nikbud Posted September 2, 2018 Author Share #31 Posted September 2, 2018 Thank you Tjalle, after seeing your work, your words are high praise indeed. Good luck with your builds! Tjalle58 1 Quote Completed Build --- Virginia 1819 - Artesania Latina Other Models --- German Armor plus others Mastermind Current Build --- Liveship Vivacia Link to comment Share on other sites More sharing options...
nikbud Posted September 10, 2018 Author Share #32 Posted September 10, 2018 Hi all, I thought I’d add to my log as I’m building a display case for the Virginia. I have been thinking about the case for most of the build. Bearing in mind that the only power tools available to me is a dremel and a drill I knew I would have to make something simple. In the end I decided to use MDF for the base and top, and clear acrylic for the front, back and sides in 3mm. I ordered the acrylic online and ordered some 2 slot display case sections from CMB. The base comprises 18mm MDF with an inner base of 6mm MDF. The top is made from an inner and outer both from 6mm MDF. I downloaded an old map of the Chesapeake and Delaware Bays, printed it out and covered both the inners sections. The inners where the glued to the outers. I had to cut a little section out of each corner on the inners to fit the CMB sections. The boat fits on the base! The acrylic sheets were glued to the 2 slot sections using contact adhesive. Here they are test fitted to the top and base. Now I know that you are thinking that MDF doesn’t really do over 3 years work on the Virginia justice, and you would be right. So I have a plan…. GrandpaPhil 1 Quote Completed Build --- Virginia 1819 - Artesania Latina Other Models --- German Armor plus others Mastermind Current Build --- Liveship Vivacia Link to comment Share on other sites More sharing options...
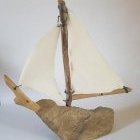
nikbud Posted September 28, 2018 Author Share #33 Posted September 28, 2018 Originally my plan was to use some walnut sheets as a veneer over the MDF, but veneer always looks like veneer and I wanted something a little different. So I decided to take the veneer idea one step further and plank the case as if it were a deck and hull. I chose Maple for the horizontal/deck surfaces and Walnut for the vertical/hull surfaces. I started with the base, I thought that the top of the case would need a bit more than just decking so I purchased a couple of AL grating kits. These were made up and edged with some spare stock. I painted the top black where the gratings would sit and marked the centreline and the perpendicular lines for the butt shift guides. Here are the gratings and the centre plank glued on. Throughout this build I used Aliphatic carpenters glue which meant that very little clamping was needed. One half planked in a 4 shift pattern. The top completely planked and scraped and sanding underway. I used a standard double edged razor blade for the scraping, which proved that I need to invest in a good cabinet scraper. I also debated whether to indicate treenails. In the end I was worried that it would look too busy and that along with my fear that I couldn’t get them neat enough convinced me that for now I wont show them. The top was finished with Danish oil and a good buffing with a protective wood balsam/wax. I made a little box to display a name/detail piece and placed that and the kit flag on the base The completed display; Her home for the moment; Well, I've finished at last. Thanks for reading this log, I hope it has been of interest and helpful to anyone thinking of building this kit, even if only to show which mistakes to avoid! Now to start my next build…… Cheers, and Happy Sanding! vossiewulf, russ, gonzz0 and 15 others 17 1 Quote Completed Build --- Virginia 1819 - Artesania Latina Other Models --- German Armor plus others Mastermind Current Build --- Liveship Vivacia Link to comment Share on other sites More sharing options...
Seventynet Posted September 28, 2018 Share #34 Posted September 28, 2018 First class build and case Paul. I hope you will continue to showcase your skills with another project! Ian nikbud and Altduck 2 Quote Builds in progress - Hayling Hoy Builds completed - Naval Cutter Cheerful - by Syren Ship Model Company - Cape Cod Catboat - by Bluejacket - Gokstad - by Dusek - Ship's Boat - by Dusek - Brazzera - by MarisStella Link to comment Share on other sites More sharing options...
nikbud Posted September 29, 2018 Author Share #35 Posted September 29, 2018 Thank you for your kind comments, Ian. And thanks for everyones likes, they are much appreciated. I fulfilled my brief to finish up with something that - mistakes notwithstanding - I can be proud of. Gone, for me, are the days of plastic kits, I have fallen in love with sails and wood! I am already well into the planning stage for my next ship, the kit has been purchased, I'm just in the process of "adjusting" the plans. I hope to start my next log in a week or two..... Thanks again everyone Cheers, Paul Seventynet 1 Quote Completed Build --- Virginia 1819 - Artesania Latina Other Models --- German Armor plus others Mastermind Current Build --- Liveship Vivacia Link to comment Share on other sites More sharing options...
nikbud Posted October 3, 2018 Author Share #36 Posted October 3, 2018 Hi Mark, good to hear from you. Thanks for your comments Yup I made the case, its not as "posh" as a solid wood one but its something different, which is what I was after. The covering is a printout of an 1892 map of the Delaware and Chesapeake Bays from the US Coastal and Geodetic Survey that I found online. I'm just in the "plan adjustment" stage of my next build. I hope to put saw to wood this week and start my log very soon. Quote Completed Build --- Virginia 1819 - Artesania Latina Other Models --- German Armor plus others Mastermind Current Build --- Liveship Vivacia Link to comment Share on other sites More sharing options...
Oliver24 Posted January 13, 2019 Share #37 Posted January 13, 2019 Wonderful ship nikbud! You should be proud of yourself! What are your opinions about Artesania Latina based on the kit? nikbud 1 Quote Link to comment Share on other sites More sharing options...
nikbud Posted January 15, 2019 Author Share #38 Posted January 15, 2019 On 1/13/2019 at 10:00 PM, Oliver24 said: Wonderful ship nikbud! You should be proud of yourself! What are your opinions about Artesania Latina based on the kit? Thanks for your comments Oliver, I really appreciate them. I think AL did pretty well with this kit. It is a basic kit of a generic "schooner type boat" so I can't comment on AL's accuracy. But the wood supplied was varied and of decent quality and you got more than enough to complete the kit. None of the wooden parts were warped. I didn't like the metal parts; carronade, bitts, boom saddles etc, I would have preferred them in brass as shown in the instructions but for the price point its understandable. The instructions were pretty good for a wooden kit, although they mostly follow other manufacturers in that they tell you to do something rather than exactly how. And then when it comes to the rigging they tell you to work it out from the pictures - again I don't think that is unusual with these type of kits! As a basic kit as an introduction to wooden ship building? yeah I'm happy with the kit, not the best but not the worst either. If AL had the ship I was looking, for in the scale I wanted, I would certainly include them in my decision. Oliver24 1 Quote Completed Build --- Virginia 1819 - Artesania Latina Other Models --- German Armor plus others Mastermind Current Build --- Liveship Vivacia Link to comment Share on other sites More sharing options...
Wiktor.L Posted January 15, 2019 Share #39 Posted January 15, 2019 WOW! WOW! Beatifull virginia! nikbud 1 Quote Regards. End: Bryg corsair occre, Black Pearl Hachette, Scottish maid artesania, BKA 1125 In build: Vasa deagostini, Dwunastu Apostołów deagostini, Hms FLY amati Novik modelik, spitfire airfix, Wait for build: hms alert shipyard, orp kujawiak wak, hms Beagle occre, thermopyle revell, few JSC models, Link to comment Share on other sites More sharing options...
nikbud Posted January 18, 2019 Author Share #40 Posted January 18, 2019 On 1/15/2019 at 7:55 PM, Wiktor.L said: WOW! WOW! Beatifull virginia! Thank you Wiktor! Wiktor.L 1 Quote Completed Build --- Virginia 1819 - Artesania Latina Other Models --- German Armor plus others Mastermind Current Build --- Liveship Vivacia Link to comment Share on other sites More sharing options...
gerty Posted January 18, 2019 Share #41 Posted January 18, 2019 Nice work ! Congrats on your beautiful model. nikbud 1 Quote Current Build: Willie L. Bennett - Model Shipways Future Interests: Friendship Sloop - BlueJacket Ship Crafters Cape Cod Catboat - BlueJacket Ship Crafters Link to comment Share on other sites More sharing options...
nikbud Posted January 18, 2019 Author Share #42 Posted January 18, 2019 4 hours ago, gerty said: Nice work ! Congrats on your beautiful model. Thanks Gerty! Quote Completed Build --- Virginia 1819 - Artesania Latina Other Models --- German Armor plus others Mastermind Current Build --- Liveship Vivacia Link to comment Share on other sites More sharing options...
Jag Posted September 17, 2019 Share #43 Posted September 17, 2019 wow! amazing build nikbud! I'm really impressed. nikbud 1 Quote Link to comment Share on other sites More sharing options...
nikbud Posted September 20, 2019 Author Share #44 Posted September 20, 2019 On 9/17/2019 at 3:52 AM, Jag said: wow! amazing build nikbud! I'm really impressed. Thank you Jag! Quote Completed Build --- Virginia 1819 - Artesania Latina Other Models --- German Armor plus others Mastermind Current Build --- Liveship Vivacia Link to comment Share on other sites More sharing options...
Alexisgm97 Posted March 27, 2020 Share #45 Posted March 27, 2020 Hello!! This one really amazing build of the Virginia Schooner!!! I am currently building the same model and I would also like to make the same stand as you. I guess that the majority of the strips (those at the corners and crossing the boat) are the ones supplied with the kit, 2x5mm. So I would like to know what the measure of those holding the keel of the boat is please. If I am mistaken or it is easier for you, just tell me a bunch of measures and I am sure I will work out which one is which. Thanks! Quote My models: Artesania Latina's H.M.S Bounty's Jolly Boat Constructo's Carmen Artesania Latina's San Francisco Cross-Section Working on: Constructo's La Flore (first "big" ship I make) Link to comment Share on other sites More sharing options...
nikbud Posted March 29, 2020 Author Share #46 Posted March 29, 2020 Hi alexis, sorry I missed your question, I'm not on here as often as I should be..... I'm not sure about the measurements of the strips for the stand, but I will open up the case in the morning and take some measurements for you. Alexisgm97 1 Quote Completed Build --- Virginia 1819 - Artesania Latina Other Models --- German Armor plus others Mastermind Current Build --- Liveship Vivacia Link to comment Share on other sites More sharing options...
Alexisgm97 Posted March 30, 2020 Share #47 Posted March 30, 2020 18 hours ago, nikbud said: Hi alexis, sorry I missed your question, I'm not on here as often as I should be..... I'm not sure about the measurements of the strips for the stand, but I will open up the case in the morning and take some measurements for you. Hi! Don't worry I'm not in a hurry. Thank you very much!! I'll wait! Thanks again! Quote My models: Artesania Latina's H.M.S Bounty's Jolly Boat Constructo's Carmen Artesania Latina's San Francisco Cross-Section Working on: Constructo's La Flore (first "big" ship I make) Link to comment Share on other sites More sharing options...
nikbud Posted March 30, 2020 Author Share #48 Posted March 30, 2020 Hi Alexis I have just measured the strips and you are right; the thin strips are 2mm x 5mm from the kit. the square strips are 5mm x 5mm, although they all have been very well sanded to get them very smooth so the measurements are more like 1.5 x 4.5 and 4.5x4.5. so the strips either side of the keel are 5x5 with a 3x3 small strip between them at either end. If i remember rightly i had to do a little sanding in the inside edge of the two long strips - after they had been glued together - to make the keel fit snugly. I hope this made sense??? Cheers n be safe, Paul Alexisgm97 1 Quote Completed Build --- Virginia 1819 - Artesania Latina Other Models --- German Armor plus others Mastermind Current Build --- Liveship Vivacia Link to comment Share on other sites More sharing options...
Alexisgm97 Posted March 30, 2020 Share #49 Posted March 30, 2020 5 hours ago, nikbud said: Hi Alexis I have just measured the strips and you are right; the thin strips are 2mm x 5mm from the kit. the square strips are 5mm x 5mm, although they all have been very well sanded to get them very smooth so the measurements are more like 1.5 x 4.5 and 4.5x4.5. so the strips either side of the keel are 5x5 with a 3x3 small strip between them at either end. If i remember rightly i had to do a little sanding in the inside edge of the two long strips - after they had been glued together - to make the keel fit snugly. I hope this made sense??? Cheers n be safe, Paul Hi! Thank you very much! It really makes sense! It can be easily seen that you sanded all the corners and the strips look really rounded which also gives them a really good look and thus, it changes the measurements a bit. So now I have the correct ones to make an order This explanation along with the photos makes a really good tutorial to make my own stand just like yours. I really appreciate your fast response and the time you took opening the case and everything! Thanks and take care. Quote My models: Artesania Latina's H.M.S Bounty's Jolly Boat Constructo's Carmen Artesania Latina's San Francisco Cross-Section Working on: Constructo's La Flore (first "big" ship I make) Link to comment Share on other sites More sharing options...
Biggles109e Posted August 28, 2020 Share #50 Posted August 28, 2020 Hi Nikbud. I found your blog purely by accident today, and though it was a serendipitous moment I was enthralled by your narrative. Although inspired and awed at the same time as a long time aviation modeller, I'm just about to order this kit and follow in your naval bootsteps...heaven help me! Wish me luck... Quote Link to comment Share on other sites More sharing options...
ggret41 Posted May 30, 2022 Share #51 Posted May 30, 2022 nikbud, this would have to be the best, most detailed, perfectionist build I have seen to date, it deserves far more than congratulations, but words fail me. I am new to modelling, but have just completed a build of an 80cm Black Pearl, I confess not up to your standard, but an enjoyable build. I a Virginia schooner, then have been researching build blogs, I now have a role model, thanks Paual. Gerry Queensland Australia Quote Link to comment Share on other sites More sharing options...

Recommended Posts
Join the conversation
You can post now and register later. If you have an account, sign in now to post with your account.