j21896 Posted February 15, 2013 Share #1 Posted February 15, 2013 Hi Folks, My name is Robert and I am building the Caldercraft kit of HMS Mars a/k/a HMS Orestes. It’s my first wooden ship model, and I’ve been working at it on and off since 2007. I decided at the outset that I wanted to leave her with an all natural wood finish -- no paint or stain. That would necessitate some scratch built replacements, as the kit includes “finish” parts made of plywood such as the gun carriages, capping rail and head components, that would not look right unpainted. Also, certain items like waterways were not included in the kit plans or parts, and I really think they belong, so it will be up to me to build them. Cheers, Robert Archi 1 Quote Current Build: HMS Mars Link to comment Share on other sites More sharing options...
j21896 Posted February 15, 2013 Author Share #2 Posted February 15, 2013 1st Planking Archi 1 Quote Current Build: HMS Mars Link to comment Share on other sites More sharing options...
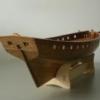
j21896 Posted February 15, 2013 Author Share #3 Posted February 15, 2013 (edited) 2nd Planking Came out okay, except the run-of-the-planks at the bow is completely wrong. About three quarters of the way in, the "light came on" and I realized what I should have been doing! However, I decided to press on. (That decision still haunts me, as the bow planking really bugs me, but it's way too late to turn back now, almost 5 years later!) Next time I will definitely plank the wales first. Also, I just recently found a fantastic tutorial on planking that Chuck has posted in the MSW Database (find it under Articles and Downloads on the MSW Home Page) It is an excellent guide on how it should be done! Edited February 23, 2013 by j21896 aviaamator and Archi 2 Quote Current Build: HMS Mars Link to comment Share on other sites More sharing options...
j21896 Posted February 15, 2013 Author Share #4 Posted February 15, 2013 (edited) Scratch-built Head Since the kit parts were plywood, I decided to make my own bow cheeks and bow rails. I took some more “artistic liberties” and added a couple of hawse hole bolsters, as well as wash cants. Edited February 15, 2013 by j21896 klimi, Mirabell61, Archi and 1 other 4 Quote Current Build: HMS Mars Link to comment Share on other sites More sharing options...
j21896 Posted February 15, 2013 Author Share #5 Posted February 15, 2013 Finished Hull Archi, klimi and Mirabell61 3 Quote Current Build: HMS Mars Link to comment Share on other sites More sharing options...
j21896 Posted February 15, 2013 Author Share #6 Posted February 15, 2013 (edited) Planking of Bulwarks Departures from the Kit Plans: 1. Lined all gunports and sweep ports 2. Installed Spirketting with scarph joints 3. Fashioned and installed Waterway with scarph joints 4. Installed treenails 5. Used cherry for the bulwark planking as well as all of the above Unfortunately I had only just discovered Jeff at HobbyMill, so once again there are variations in the coloring of the wood used for the regular planking, spirketing and waterway. Cherry darkens with age, so we’ll see how it looks as time goes by. This first photo shows a "backing strip" below the spirketting, to which the waterways will be glued. Edited February 20, 2013 by j21896 klimi and Archi 2 Quote Current Build: HMS Mars Link to comment Share on other sites More sharing options...
j21896 Posted February 15, 2013 Author Share #7 Posted February 15, 2013 Deck Furniture I got plans from the NMM and now have three versions of Mars/Orestes! As fit-out in 1782, as re-fitted by the British in 1790, and as “re-fitted” by Caldercraft for the kit.While the NMM plans aren’t as detailed as some I’ve seen on MSW for other ships, there is enough detail to determine significant differences between 1781 and 1792. As well as, enough to determine that neither of those matches up with the kit plans!At first I was pretty confused by all the differing information and was having quite a time trying to figure it all out. But then I realized I could just take the easy way out, and simply continue building "my own version” of her.In any event, by combining elements from all three layouts in the different plans, I drew up yet another deck plan, and have begun building coamings and ledges for the deck furniture. The following pictures show them in various stages of construction. (I revised the deck layout several more times after these, until I finally locked it down!) Cheers,Robert Archi and natant 2 Quote Current Build: HMS Mars Link to comment Share on other sites More sharing options...
j21896 Posted February 15, 2013 Author Share #8 Posted February 15, 2013 (edited) Deck Planking It seemed like it took me forever, but I finally got to the planking of the deck! For whatever reason -- perhaps because I’m not using any paints or stains -- I did not envision this model with the classic light colored deck. So, after much deliberation I decided to plank the deck with Swiss pear. Had I known about Hobby Mill and the availability of Swiss pear at the outset, I probably would have done the entire model in this beautiful wood! It has been great to work with and the way it holds edges made the cutting of hooked scarphs really fun. Robert Edited February 23, 2013 by j21896 Archi, hamilton, Ferit and 1 other 4 Quote Current Build: HMS Mars Link to comment Share on other sites More sharing options...
j21896 Posted February 15, 2013 Author Share #9 Posted February 15, 2013 Deck Treenailing and Finishing Finally back in the shipyard after over a year, I’ve actually started some new work. However, I thought I'd post some pictures of how I left Mars, way back when. I had said that photos of the finished deck would follow “soon” – meaning of course, some 14 months later! I used a satin, gel coat wipe-on poly (from General Finishes) and knocked back the sheen with a Scotch Brite pad. Caulking was simulated with a no-bleed fabric marker, and treenails are Swiss Pear. Robert Quote Current Build: HMS Mars Link to comment Share on other sites More sharing options...
j21896 Posted February 15, 2013 Author Share #10 Posted February 15, 2013 (edited) GratingsSince I’m not using paint or stain on this build, I wanted to replace the kit-provided white gratings with a darker wood. I did these a year ago – before I decided to order a table saw – so I purchased pre-made cherry (or so I thought) grating strips from Model Expo. Between their 1/32” (2 scale inches) and 3/64” (3 scale inches) offerings, I preferred the look of and went with the slightly larger than practice 3 inch strips.Another lesson learned: Oil the grating strips to bring out the color BEFORE assembling and gluing into the coamings! I didn’t, and it turns out that not all of the strips were cherry – or at least they’re not colored as such. Oh well, just more aggravating color variations that I’m going to live with – though these in particular really do ... uh, grate on me Again, I took liberties in straying from the kit's deck layout, and designed my own with ideas from the NMM plans. Robert I added a couple of platforms -- one for the capstan, and one for the pumps. Another platform with a hole for the galley flue. Edited February 23, 2013 by j21896 Archi 1 Quote Current Build: HMS Mars Link to comment Share on other sites More sharing options...
j21896 Posted February 15, 2013 Author Share #11 Posted February 15, 2013 (edited) Companionway To get myself back into building after a year-long layoff, I decided to tackle a “model within the model”. Early on I decided that I would like to add a companionway deck house, so that’s what I chose to tackle a couple of weeks ago. The design was pretty much ad-libbed, as I didn’t have any good reference photos. Hopefully it’s at least close to proper for the period – I think the Caldercraft HMS Snake kit includes a similar type structure with a sliding top hatch. I think it kind of looks like it belongs. In any event, it will have to do for my version of Mars. Sitting atop the coaming, the highest point of the roof at the hatch is about 3’ 9” off the deck. The doors are each 3 feet tall by 16 inches wide, for a total opening width of 32 inches. The hinges are blackened brass. Cheers, Robert PS. It is very easy to create and add to a build log on the new and improved MSW site! A big thanks to all the admins for all the work you do! Glad to have MSW back on-line! Edited February 23, 2013 by j21896 Archi, garyshipwright and tomas1970 3 Quote Current Build: HMS Mars Link to comment Share on other sites More sharing options...
j21896 Posted February 15, 2013 Author Share #12 Posted February 15, 2013 (edited) Galley Flue Another thing I chose to add -- this one picked up from the NMM plans -- is the galley flue. To add this, I had my first foray into the world of silver soldering! The plans show a taper in the flue from 15 inches at the base to 10 inches at the top. I created a wooden “plug”, to which I ca glued the brass fore and aft sides of the flue. I applied silver solder paste to the edges, clamped the brass sides in place with a little overlap, and applied a bit more solder paste to the outside of the joints. A quick pass of the torch was all that was needed! I then trimmed the edges, filed, and immersed in acetone to dissolve the ca and remove the slightly charred wooden plug. The flue was blackened using Birchwood Casey brass black. Robert Edited February 23, 2013 by j21896 Archi, Pygothian and garyshipwright 3 Quote Current Build: HMS Mars Link to comment Share on other sites More sharing options...
Wintergreen Posted February 15, 2013 Share #13 Posted February 15, 2013 Robert, glad you are back! If you keep this speed you will be done in no-time Orestes looks great in that soft light. Cheers!Håkan Quote Happy modelling! Håkan __________________________________________ Current build: Atlantica by Wintergreen Previous builds Kågen by Wintergreen Regina by Wintergreen Sea of Galilee boat, first century, sort of... Billing Boats Wasa Gallery: Kågen (Cog, kaeg) by Wintergreen - 1:30, Billing Boats Regina - 1:30, Billing Boats Dana, Link to comment Share on other sites More sharing options...
j21896 Posted February 15, 2013 Author Share #14 Posted February 15, 2013 Hey Hakan -- I just happened to be over at your re-built build log!! Wintergreen 1 Quote Current Build: HMS Mars Link to comment Share on other sites More sharing options...
cog Posted February 15, 2013 Share #15 Posted February 15, 2013 Robert, You'll be finished by tomorrow if you keep up this speed!!! She's still looking very lovely, even if she's a man-o-war ... Quote Carl "Desperate affairs require desperate measures." Lord Nelson Search and you might find a log ... Link to comment Share on other sites More sharing options...
j21896 Posted February 15, 2013 Author Share #16 Posted February 15, 2013 Thanks Carl. My re-post speed is right up there, thanks to the features in the new MSW site! However, my build speed has an unfortunate history of falling off to zero for long periods of time. But I'm working on it! Robert Quote Current Build: HMS Mars Link to comment Share on other sites More sharing options...
aliluke Posted February 16, 2013 Share #17 Posted February 16, 2013 Great that you have re-posted Robert. It is absolutely beautiful work. Long live MSW!!! Cheers Alistair Quote Cheers Alistair Current Build - HMS Fly by aliluke - Victory Models - 1/64 https://modelshipworld.com/topic/34180-hms-fly-by-aliluke-victory-models-164/ Previous Build - Armed Virginia Sloop by Model Shipways Previous Build - Dutch Whaler by Sergal (hull only, no log) Link to comment Share on other sites More sharing options...
Timmo Posted February 16, 2013 Share #18 Posted February 16, 2013 Nice build indeed. I've always liked the lines of Mars and you've done so much more with what the kit offers. Can't wait to see more Quote Current build Enterprise class 28-gun frigate 1774 - scratchbuild 1:36 RC Completed builds Cruizer class brig - scratchbuild 1:36 RC HM Bomb Vessel Granado - Caldercraft HM Cutter Sherbourne - Caldercraft Link to comment Share on other sites More sharing options...
j21896 Posted February 16, 2013 Author Share #19 Posted February 16, 2013 Thanks Alistair. I'll be looking for your re-posted log! And thanks Timmo. Her lines really sealed the deal when I was choosing a ship to model. Cheers, Robert Quote Current Build: HMS Mars Link to comment Share on other sites More sharing options...
augie Posted February 16, 2013 Share #20 Posted February 16, 2013 Wow! At least this re-set has had one benefit......finding your log. Very nice work. I like your decision to keep her in an all natural finish. I really like that. Early on I decided to follow Chuck's lead and go with the painted version of Syren. But sometimes I think she looks like a '57 Buick . There's much to be said for both techniques. I'll be following! Quote Augie Current Build: US Frigate Confederacy - MS 1:64 Previous Builds : US Brig Syren (MS) - 2013 (see Completed Ship Gallery) Greek Tug Ulises (OcCre) - 2009 (see Completed Ship Gallery) Victory Cross Section (Corel) - 1988 Essex (MS) 1/8"- 1976 Cutty Sark (Revell 1:96) - 1956 Link to comment Share on other sites More sharing options...
j21896 Posted February 16, 2013 Author Share #21 Posted February 16, 2013 Thanks Augie! Funny, but when I look at painted and coppered models like yours, I kind of wish I had gone that route. Both approaches certainly have their merits -- I guess I pretty much just love all kinds of ship models Look forward to seeing you through to your quickly approaching completion of Syren! Robert Quote Current Build: HMS Mars Link to comment Share on other sites More sharing options...
augie Posted February 16, 2013 Share #22 Posted February 16, 2013 Funny, I was just catching up this morning hoping not to miss anybody and I wound up right back on here! I REALLY like her. Oh.....Syren is about 4 months out. I forgot to repost my motto: "I may not be any good, but I AM slow'". Cheers. Quote Augie Current Build: US Frigate Confederacy - MS 1:64 Previous Builds : US Brig Syren (MS) - 2013 (see Completed Ship Gallery) Greek Tug Ulises (OcCre) - 2009 (see Completed Ship Gallery) Victory Cross Section (Corel) - 1988 Essex (MS) 1/8"- 1976 Cutty Sark (Revell 1:96) - 1956 Link to comment Share on other sites More sharing options...
j21896 Posted February 16, 2013 Author Share #23 Posted February 16, 2013 If that's your motto Augie, then mine would definitely be: "(see Augie's motto)" Wintergreen 1 Quote Current Build: HMS Mars Link to comment Share on other sites More sharing options...
rdsaplala Posted February 17, 2013 Share #24 Posted February 17, 2013 Hi Robert, I'm pleased to see your Mars/HMS Orestes build log back on line again, beautiful and clean work as always my friend, all those upgrades have really turned her into a museum piece Quote Best regards,AldoCurrently Building: HMS Pegasus (Victory Models)-Mothballed to give priority to Triton HMS Triton (first attempt at scratchbuilding) Past build:HM Brig Badger (Caldercraft), HM Brig Cruizer, HM Schooner Ballahoo Link to comment Share on other sites More sharing options...
patrickmil Posted February 17, 2013 Share #25 Posted February 17, 2013 Robert, the HMS Mars has never looked better. Your choice in replacement lumber has really paid off on an excellent looking build. I'll be following along to the end with this log. Quote Thanks, Patrick YouTube Channel for fun: Patrick's Scale Studio Finished: Model Shipways US Brig Niagara Current: I Love Kit USS Curtis Wilbur DDG-54 "Tomorrow is the most important thing in life. Comes into us at midnight very clean. It's perfect when it arrives and it puts itself in our hands. It hopes we've learned something from yesterday" - John Wayne Link to comment Share on other sites More sharing options...
rlb Posted February 18, 2013 Share #26 Posted February 18, 2013 Robert, Your Mars looks great. I'm envious of your scarf joints! Keep up the good work. Ron Quote Building: US Brig Oneida (1809) HMS Euryalus (1803) Completed: John Alden Sloop Link to comment Share on other sites More sharing options...
Elia Posted February 19, 2013 Share #27 Posted February 19, 2013 Robert, Your Mars build is superb! Did you fabricated and install those treenails, or did you use the a tool to imprint them on the planking? They look fantastic. I'm embarrassed to say I had missed your build on MSW 1.0. I will definitely check in on it now. Outstanding. Cheers, Elia Quote Elia Rose Valley, PA Arethusa: 1907 Gloucester Knockabout Link to comment Share on other sites More sharing options...
j21896 Posted February 20, 2013 Author Share #28 Posted February 20, 2013 Wow, thanks for the encouragement Elia! I'm a big fan of your work -- ever since I first saw your Oneida on the old Dry Dock Models forum! All treenails throughout were made with my trusty Jim Byrnes draw plate and the holes were drilled with my Dremel. I know there were 6,500 in the hull, but I stopped counting when I moved inside to the bulwarks and deck, so I'm not sure what my total is now. I hope you'll be posting pictures of your Oneida in the Gallery of completed ships here. And hopefully you can recreate your Goddess build log too. Cheers, Robert augie and BobSki 2 Quote Current Build: HMS Mars Link to comment Share on other sites More sharing options...
Beef Wellington Posted February 20, 2013 Share #29 Posted February 20, 2013 Hi Robert, I too had missed your build before, shes looking very nice indeed, simply beautiful! If it weren't too much trouble, could you share the technique you used to build the waterways and tackle the scarf joints and which tools. Not sure I would know where to even start! Quote Cheers, Jason "Which it will be ready when it is ready!" In the shipyard: HMS Jason (c.1794: Artois Class 38 gun frigate) Queen Anne Royal Barge (c.1700) Finished: HMS Snake (c.1797: Cruizer Class, ship rigged sloop) Link to comment Share on other sites More sharing options...
augie Posted February 20, 2013 Share #30 Posted February 20, 2013 Wow, thanks for the encouragement Elia! I'm a big fan of your work -- ever since I first saw your Oneida on the old Dry Dock Models forum! All treenails throughout were made with my trusty Jim Byrnes draw plate and the holes were drilled with my Dremel. I know there were 6,500 in the hull, but I stopped counting when I moved inside to the bulwarks and deck, so I'm not sure what my total is now. I hope you'll be posting pictures of your Oneida in the Gallery of completed ships here. And hopefully you can recreate your Goddess build log too. Cheers, Robert Holy cow! You're the best! That's a lotta treenails. Quote Augie Current Build: US Frigate Confederacy - MS 1:64 Previous Builds : US Brig Syren (MS) - 2013 (see Completed Ship Gallery) Greek Tug Ulises (OcCre) - 2009 (see Completed Ship Gallery) Victory Cross Section (Corel) - 1988 Essex (MS) 1/8"- 1976 Cutty Sark (Revell 1:96) - 1956 Link to comment Share on other sites More sharing options...

Recommended Posts
Join the conversation
You can post now and register later. If you have an account, sign in now to post with your account.