Blue Ensign Posted March 20, 2013 Share #61 Posted March 20, 2013 Hi B.E., Thanks very much! My name's actually Robert -- but hopefully you still meant your encouragement for me Cheers, Robert Sorry Robert, a senior moment, I knew who I meant.... I think Yes it surely was you. B.E. Quote Current Build: HMS Indefatigable-1794-by-blue-ensign-vanguard-models-164-scale Medway-longboat-1742-by-blue-ensign-½”-scale Completed builds: HMS Sphinx 1775 by Blue Ensign. 1:64 scale - Vanguard Models Queen-Anne-Royal-Barge-circa-1700-by-Blue-Ensign Fifie fishing boat Lady Eleanor Muirneag-1903-–-a-scottish-zulu-fishing-boat-164-scale-based-on-the-vanguard-models-zulu-kit/ HM Cutter Alert 1777 HM Cutter Cheerful 1806 18th-century-English-longboat-by-Blue-Ensign-ms-148-scale/ finished 18thc English Pinnace by Blue Ensign-Model-Shipways-1:24 scale/ finished HMS-Pegasus-by-Blue-Ensign-finished-Victory-Models-1:64-scale/ Heller Seventy-four 1:150 scale - modified Le Superbe/Le Glorieux kit after Boudriot, waterline setting with sails. The schooner Pickle, Jotika pob kit 1:64 scale, my interpretation. Link to comment Share on other sites More sharing options...
runner63 Posted March 21, 2013 Share #62 Posted March 21, 2013 Great looking work sir, love the great photography. runner63 Quote Link to comment Share on other sites More sharing options...
j21896 Posted March 29, 2013 Author Share #63 Posted March 29, 2013 (edited) Catheads Before deciding on their placement, I had to make the catheads. I used Goodwin as my reference for dimensions, size and position of sheaves and sheave slots, end caps, etc. Since I don’t have a good machine for turning brass, I made the sheaves and pin from wood. I traced the outline of the kit-provided walnut catheads onto 3/16” thick cherry sheet and cut them out using the scroll saw, leaving them a little long at the head and tail. I drew the sheave slots in pencil, and also marked lines for cutting the excess length at the heads. I drilled a starter hole so that I could thread a scroll saw blade through to cut the slots. A little masking tape at the ends to hopefully remind me to stop my cuts… Once the sheave slots were cut with the scroll saw, I “flossed” them with narrow strips of sand paper to open them to width. I made the sheaves out of Swiss pear in the same manner I used to make the drumhead for the capstan, but on a much smaller scale, using the Dremel and a #76 bit. Some pear treenail stock I had prepared was used for the pin. End caps were finished with the “patina” design using a 1/8” chisel blade. Unfortunately I didn’t take pictures of the whole process -- and those I did take, are a bit blurry -- but these show a bit of it toward completion. Not yet cut to length at the head end, but the sheaves are installed and the “pin” of treenail stock is threaded through all. A couple of “extra” sheaves remain unused. I experimented with making the caps using cherry, but eventually used Swiss pear for a little contrast. The “fiddly bits” of these fittings… The catheads cut to length at the head end, caps installed, all sanded and ready to go. (Of course the obligatory “extras” snuck into the shots) The tails of these cats have been left a bit long in case I decide to run them over the rail vs. under it. Yes, that decision still beckons me But I can stall no longer, the time has come! Edited March 29, 2013 by j21896 garyshipwright, Blue Ensign and Gahm 3 Quote Current Build: HMS Mars Link to comment Share on other sites More sharing options...
Wintergreen Posted March 29, 2013 Share #64 Posted March 29, 2013 Looks good Robert! Very precise work (as usual). About making holes in the hull, check out Ron's build of the Oneida from TheLumberyard...he redid the upper part of the whales "in place". As they say "viewer discretion is advised"... Quote Happy modelling! Håkan __________________________________________ Current build: Atlantica by Wintergreen Previous builds Kågen by Wintergreen Regina by Wintergreen Sea of Galilee boat, first century, sort of... Billing Boats Wasa Gallery: Kågen (Cog, kaeg) by Wintergreen - 1:30, Billing Boats Regina - 1:30, Billing Boats Dana, Link to comment Share on other sites More sharing options...
patrickmil Posted March 29, 2013 Share #65 Posted March 29, 2013 Robert, your catheads look excellent. There are so many different pieces that I wish I had ordered pear or cherry for. There is such a difference that a good solid carving wood can make in a parts final appearance. Your work has been outstanding with this build. Quote Thanks, Patrick YouTube Channel for fun: Patrick's Scale Studio Finished: Model Shipways US Brig Niagara Current: I Love Kit USS Curtis Wilbur DDG-54 "Tomorrow is the most important thing in life. Comes into us at midnight very clean. It's perfect when it arrives and it puts itself in our hands. It hopes we've learned something from yesterday" - John Wayne Link to comment Share on other sites More sharing options...
j21896 Posted March 29, 2013 Author Share #66 Posted March 29, 2013 Thanks Hakan! And you're right, I have actually been using Ron's build log as a source of instruction (and inspiration) for a number of aspects of the build. Oh, and speaking of build logs, please send me the link to view progress on your Euryalus Hey Patrick, I hear you on the wood replacement! I couldn't believe the difference in working with cherry and pear compared to walnut and lime! I think pear is the best, as cherry is a bit too grainy for my liking, but I'm living with it. Ah yes, if I only knew then, what I know now. But I guess that's what first builds are all about -- second builds! Cheers, Robert Quote Current Build: HMS Mars Link to comment Share on other sites More sharing options...
augie Posted March 29, 2013 Share #67 Posted March 29, 2013 Truly excellent work Robert. And I have to agree with your final comment. Quote Augie Current Build: US Frigate Confederacy - MS 1:64 Previous Builds : US Brig Syren (MS) - 2013 (see Completed Ship Gallery) Greek Tug Ulises (OcCre) - 2009 (see Completed Ship Gallery) Victory Cross Section (Corel) - 1988 Essex (MS) 1/8"- 1976 Cutty Sark (Revell 1:96) - 1956 Link to comment Share on other sites More sharing options...
rdsaplala Posted March 29, 2013 Share #68 Posted March 29, 2013 Hi Robert, Splendid work my friend, those scarph joints on the rails are very precise and that cathead is a real gem with all those detailed sheaves and end-caps, thanks for sharing your technique on opening up the sheave slots using a scroll saw then flossing with sandpaper, hope you won't mind me borrowing your technique A small question if I may: when "flossing" open the slots, could you share your technique on how you prevented the sandpaper from rounding out the side edges of the opening? Every time I try opening a slot with a sandpaper strip, I always tend to ruin/round out the side edges so I'm really keen on discovering your method of keeping them sharp Quote Best regards,AldoCurrently Building: HMS Pegasus (Victory Models)-Mothballed to give priority to Triton HMS Triton (first attempt at scratchbuilding) Past build:HM Brig Badger (Caldercraft), HM Brig Cruizer, HM Schooner Ballahoo Link to comment Share on other sites More sharing options...
j21896 Posted March 29, 2013 Author Share #69 Posted March 29, 2013 (edited) Aldo! I think I can speak for many at MSW, when I say, we've missed you! I'm guessing that pesky old job is still demanding all your time. I hope your "Peggy" can steal you away a bit in the not too distant future. For "flossing", I cut narrow strips from a sandpaper band (the kind used with a micro sanding wand) as it has a bit more stiffness than plain sandpaper. I really didn't have to open the slots that much, as they are just a bit wider than the sandpaper band itself, and I used the scroll saw to get them to that point. So, with the cats clamped in a vice, I flossed more lengthwise along the slot from end to end vs. just pulling back and forth through the slot. The cherry holds an edge pretty well, and leaving a final sanding of all four sides of the cats until the end helped some too. Cheers, Robert Edited March 29, 2013 by j21896 Quote Current Build: HMS Mars Link to comment Share on other sites More sharing options...
Wintergreen Posted March 29, 2013 Share #70 Posted March 29, 2013 Thanks Hakan! And you're right, I have actually been using Ron's build log as a source of instruction (and inspiration) for a number of aspects of the build. Oh, and speaking of build logs, please send me the link to view progress on your Euryalus Touché! But it says "Upcoming" right? j21896 1 Quote Happy modelling! Håkan __________________________________________ Current build: Atlantica by Wintergreen Previous builds Kågen by Wintergreen Regina by Wintergreen Sea of Galilee boat, first century, sort of... Billing Boats Wasa Gallery: Kågen (Cog, kaeg) by Wintergreen - 1:30, Billing Boats Regina - 1:30, Billing Boats Dana, Link to comment Share on other sites More sharing options...
rafine Posted March 29, 2013 Share #71 Posted March 29, 2013 I love those catheads, Robert. Beautiful work. Bob Quote Current builds on MSW: HMS Winchelsea 1:48: Medway Longboat 1:24 Prior builds on MSW: Schooner Halifax: Lumberyard 1/48 semi-scratch; Cutter Cheerful 1:48; Granado: Caldercraft 1:64; Frigate Essex: Kitbashed Model Shipways kit; Triton Cross Section 1:48; Kingfisher from Lauckstreet kit; Syren: Model shipways kit ;Kitbashed Fair American: Model Shipways;Prince de Neufchatel: Model shipways 1:64 Civil War Picket Boat Link to comment Share on other sites More sharing options...
Elia Posted March 29, 2013 Share #72 Posted March 29, 2013 Robert, Those catheads look very sharp. Could you elaborate on using the scroll saw to cut the sheave slots? They look fantastic, as do the sheaves. I agree also regarding swiss pear - I really like working with it. It can take a really clean, crisp edge, much like boxwood. Cheers, Elia Quote Elia Rose Valley, PA Arethusa: 1907 Gloucester Knockabout Link to comment Share on other sites More sharing options...
j21896 Posted March 29, 2013 Author Share #73 Posted March 29, 2013 Thanks very much Elia! Here are the gory details: Sheave Slots (width about .028” = 1.8 scale inches) As shown, I drilled starter holes through the cats at the ends of the slots, using a #70 drill bit (.028”) and the Dremel drill press. I threaded a scroll saw blade (Saw Bird #2/0 = .027” wide, front to back, by .008” thick) through the hole, then attached it to the scroll saw. I sawed the length of the slot, backed up, and using the blade like a sander, sawed it again to open it up by about twice the thickness of the blade (.016”). Then I’d just disconnect the top end of the blade, move the cat over to the next slot, reattach, and repeat for all the slots. The sandpaper band from which I cut narrow flossing strips is about .015” thick. Also, there is a stiff backing to the section of the sandpaper where it is joined to form the band. That section is .022” thick and pretty stiff – good to use once the slot is wide enough. The sheaves (about .014” diameter x .02” thick) were drawn on pear sheet with a compass and cut out roughly to shape with an Exacto blade. After drilling through their centers, they were glued to a #76 drill bit and also glued to each other, using ca. Chucked in the Dremel for use as a lathe, I sanded them to size, then dipped them in acetone to dissolve the ca and parted them with an acetone-drenched Exacto blade. Maybe more info then you really wanted, but … Cheers, Robert Quote Current Build: HMS Mars Link to comment Share on other sites More sharing options...
rdsaplala Posted March 31, 2013 Share #74 Posted March 31, 2013 Thanks very much for that detailed explanation Robert, I appreciate it augie 1 Quote Best regards,AldoCurrently Building: HMS Pegasus (Victory Models)-Mothballed to give priority to Triton HMS Triton (first attempt at scratchbuilding) Past build:HM Brig Badger (Caldercraft), HM Brig Cruizer, HM Schooner Ballahoo Link to comment Share on other sites More sharing options...
j21896 Posted April 4, 2013 Author Share #75 Posted April 4, 2013 Catheads – continued Decision made: Catheads will run under the capping rail. Time to do some cutting To aid in aligning the slots in the bulwarks, the center line and cathead orientation angles were drawn on a piece of paper, and taped to the deck. As suggested by the folks here, after drilling a few starter holes with a small bit, I used files to cut in the slots to the bulwark tops. Using a chisel, I continued the “excavation” work in the spirketting, waterway and the edge of the margin plank. A quick test fit ... Then, repeat excavation on the port side. Next up will be installation of the catheads and the capping rail. Cheers, Robert garyshipwright 1 Quote Current Build: HMS Mars Link to comment Share on other sites More sharing options...
patrickmil Posted April 4, 2013 Share #76 Posted April 4, 2013 Robert, do you remember the painter Bob Ross? We always used to say "It's time for your bravery test". I think that would apply to cutting into the bulwarks like you've done. That being said, you have done a fine job of it and the catheads will look fantastic once they are mounted. Quote Thanks, Patrick YouTube Channel for fun: Patrick's Scale Studio Finished: Model Shipways US Brig Niagara Current: I Love Kit USS Curtis Wilbur DDG-54 "Tomorrow is the most important thing in life. Comes into us at midnight very clean. It's perfect when it arrives and it puts itself in our hands. It hopes we've learned something from yesterday" - John Wayne Link to comment Share on other sites More sharing options...
rafine Posted April 4, 2013 Share #77 Posted April 4, 2013 I agree that it's always scary to cut into your finished work, but you've passed your "bravery test" with flying colors. Nicely done. Bob Quote Current builds on MSW: HMS Winchelsea 1:48: Medway Longboat 1:24 Prior builds on MSW: Schooner Halifax: Lumberyard 1/48 semi-scratch; Cutter Cheerful 1:48; Granado: Caldercraft 1:64; Frigate Essex: Kitbashed Model Shipways kit; Triton Cross Section 1:48; Kingfisher from Lauckstreet kit; Syren: Model shipways kit ;Kitbashed Fair American: Model Shipways;Prince de Neufchatel: Model shipways 1:64 Civil War Picket Boat Link to comment Share on other sites More sharing options...
ccoyle Posted April 4, 2013 Share #78 Posted April 4, 2013 Robert, your model looks absolutely splendid! It makes a very strong argument in favor of something I wish kit manufacturers would do, namely offer packages that consist of only the hull former set. Your upgrades are a dramatic improvement on the basic kit, and as you said earlier in this thread, had you known about the existence of pre-milled wood, you would have used that for the entire hull. Seems like a simple enough proposition, doesn't it? Cheers! Quote Chris Coyle Greer, South Carolina When you have to shoot, shoot. Don't talk. - Tuco Current builds: Brigantine Phoenix, Hawker Hurricane Link to comment Share on other sites More sharing options...
augie Posted April 4, 2013 Share #79 Posted April 4, 2013 How about hull formers, any applicable PE sheets and any cast or resin bits? Quote Augie Current Build: US Frigate Confederacy - MS 1:64 Previous Builds : US Brig Syren (MS) - 2013 (see Completed Ship Gallery) Greek Tug Ulises (OcCre) - 2009 (see Completed Ship Gallery) Victory Cross Section (Corel) - 1988 Essex (MS) 1/8"- 1976 Cutty Sark (Revell 1:96) - 1956 Link to comment Share on other sites More sharing options...
Blue Ensign Posted April 4, 2013 Share #80 Posted April 4, 2013 That's a fine pair of catheads Robert, far exceed my own humble efforts on Pegasus. Well done. B.E. Quote Current Build: HMS Indefatigable-1794-by-blue-ensign-vanguard-models-164-scale Medway-longboat-1742-by-blue-ensign-½”-scale Completed builds: HMS Sphinx 1775 by Blue Ensign. 1:64 scale - Vanguard Models Queen-Anne-Royal-Barge-circa-1700-by-Blue-Ensign Fifie fishing boat Lady Eleanor Muirneag-1903-–-a-scottish-zulu-fishing-boat-164-scale-based-on-the-vanguard-models-zulu-kit/ HM Cutter Alert 1777 HM Cutter Cheerful 1806 18th-century-English-longboat-by-Blue-Ensign-ms-148-scale/ finished 18thc English Pinnace by Blue Ensign-Model-Shipways-1:24 scale/ finished HMS-Pegasus-by-Blue-Ensign-finished-Victory-Models-1:64-scale/ Heller Seventy-four 1:150 scale - modified Le Superbe/Le Glorieux kit after Boudriot, waterline setting with sails. The schooner Pickle, Jotika pob kit 1:64 scale, my interpretation. Link to comment Share on other sites More sharing options...
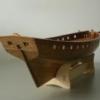
j21896 Posted April 5, 2013 Author Share #81 Posted April 5, 2013 Catheads & Capping Rail – continued Before installing the capping rail, a little more “excavation” This time to the capping rail – and not so bad. Using a drill, chisel and files, made openings for timberheads and knightheads. Then, just a test fit to check positions and angles, etc. I think -- I THINK -- I’m finally ready to install the cats and the rail permanently. To be continued … Quote Current Build: HMS Mars Link to comment Share on other sites More sharing options...
patrickmil Posted April 5, 2013 Share #82 Posted April 5, 2013 Robert, that is VERY NICE looking. I like the pictures you have up so far. They show the outstanding job you've done on the sheaves. Once you get things installed permanently, we need a picture at waterline level to show off the ends of the catheads. Great work so far! Quote Thanks, Patrick YouTube Channel for fun: Patrick's Scale Studio Finished: Model Shipways US Brig Niagara Current: I Love Kit USS Curtis Wilbur DDG-54 "Tomorrow is the most important thing in life. Comes into us at midnight very clean. It's perfect when it arrives and it puts itself in our hands. It hopes we've learned something from yesterday" - John Wayne Link to comment Share on other sites More sharing options...
Wintergreen Posted April 5, 2013 Share #83 Posted April 5, 2013 Robert, how about cropping the image to get rid of the lesser wanted objects? I do that a lot...often makes for a more interesting image also And I do agree on the looks of the rail and cats - excellent! Quote Happy modelling! Håkan __________________________________________ Current build: Atlantica by Wintergreen Previous builds Kågen by Wintergreen Regina by Wintergreen Sea of Galilee boat, first century, sort of... Billing Boats Wasa Gallery: Kågen (Cog, kaeg) by Wintergreen - 1:30, Billing Boats Regina - 1:30, Billing Boats Dana, Link to comment Share on other sites More sharing options...
john46 Posted April 5, 2013 Share #84 Posted April 5, 2013 Hi Robert, just looked at your build log. What a marvelous built. Will follow your log with interest. Regards, John Quote <span style='font-family: courier new'>In progress: <a class='bbc_url' href='http://modelshipworld.com/index.php?/topic/177-king-of-the-mississippi-artesania-latina-scale-180/'>King of the Mississippi</a></span><br /> <br /> <span style='font-family: courier new'>Completed : <a class='bbc_url' href='http://modelshipworld.com/index.php?/topic/176-mare-nostrum-4331-artesania-latina-scale-135/'>Mare Nostrum 4331</a></span><br /> <span style='font-family: courier new'><a class='bbc_url' href='http://modelshipworld.com/index.php?/gallery/album/51-16th-century-galeass-imai-scale-1160/'>16th century Galeass</a></span><br /> <span style='font-family: courier new'><a class='bbc_url' href='http://members.upc.nl/carla.en.john/Modelbouw/Rocket.htm'>George Stephenson Rocket Locomotive</a></span><br /> <br /> <span style='font-family: courier new'>Next build : sl Louise</span> Link to comment Share on other sites More sharing options...
petervisser Posted April 6, 2013 Share #85 Posted April 6, 2013 Hi Robert, I just caught up on your build log of the Mars and really enjoyed it. Your techniques are very well carried out and your model looks beautiful. Thanks for sharing your work. It's an inspiration to me to try some of your methods. Happy building! Peter Quote Build Log: Billing - Cutty Sark In The Gallery: HMS Unicorn, HMAV Bounty, L'Etoile, Marie Jeanne, Lilla Dan, Zeeschouw "Irene" A Toast: To a wind that blows, A ship that goes, And the lass that loved a sailor! Link to comment Share on other sites More sharing options...
augie Posted April 6, 2013 Share #86 Posted April 6, 2013 Thank you John! And thanks Hakan. I'll try cropping. Or maybe, to hide her faults, I'll just shoot her through gauze, the way aging actresses used to demand to be filmed. Cheers, Robert 'I'm ready for my close up, Mr. DeMille'. Yes these darned new 25 megapixel cameras don't forgive much! But from what I've seen, you're worrying WAY too much. Your lady looks fantastic! It was the late Donald McNarry, whom I admire greatly, who stated in his book 'Ship Models in Miniature' that it is most humbling to see a photo of your work enlarged during a full screen presentation showing all the defects (not a direct quote). This from a man who worked primarily at a scale of 16 or 32 feet / inch !!!!! You have the proper attitude........the next one will show improvement. Quote Augie Current Build: US Frigate Confederacy - MS 1:64 Previous Builds : US Brig Syren (MS) - 2013 (see Completed Ship Gallery) Greek Tug Ulises (OcCre) - 2009 (see Completed Ship Gallery) Victory Cross Section (Corel) - 1988 Essex (MS) 1/8"- 1976 Cutty Sark (Revell 1:96) - 1956 Link to comment Share on other sites More sharing options...
j21896 Posted April 6, 2013 Author Share #87 Posted April 6, 2013 Thanks Augie! I've looked and looked for a setting on my camera that matches my eyesight: tired-old-worn-out-pixels. Maybe in the next generation of digitals. By the way, I got to see the "extreme miniature" work of Donald McNarry descendant Philip Reed in a gallery, up close and personal, a few years back, and it just boggles the mind! Those guys are just in a whole different league. Robert augie 1 Quote Current Build: HMS Mars Link to comment Share on other sites More sharing options...
augie Posted April 6, 2013 Share #88 Posted April 6, 2013 Different galaxy Robert. But somehow, by doing what we do we have true appreciation for what they do. Clumsy sentence but you get the idea. Quote Augie Current Build: US Frigate Confederacy - MS 1:64 Previous Builds : US Brig Syren (MS) - 2013 (see Completed Ship Gallery) Greek Tug Ulises (OcCre) - 2009 (see Completed Ship Gallery) Victory Cross Section (Corel) - 1988 Essex (MS) 1/8"- 1976 Cutty Sark (Revell 1:96) - 1956 Link to comment Share on other sites More sharing options...
mtaylor Posted April 7, 2013 Share #89 Posted April 7, 2013 Robert, You're doing a fantastic job on this ship. We are our own worse critics. Quote Mark "The shipwright is slow, but the wood is patient." - me Current Build: Past Builds: La Belle Poule 1765 - French Frigate from ANCRE plans - ON HOLD Triton Cross-Section NRG Hallf Hull Planking Kit HMS Sphinx 1775 - Vanguard Models - 1:64 Non-Ship Model: On hold, maybe forever: CH-53 Sikorsky - 1:48 - Revell - Completed Licorne - 1755 from Hahn Plans (Scratch) Version 2.0 (Abandoned) Link to comment Share on other sites More sharing options...
mtaylor Posted April 11, 2013 Share #90 Posted April 11, 2013 Thanks Mark. By the way -- and this is not just because I'm a very slow shipwright -- your signature maxim is superb! Cheers, Robert Thanks. It's actually there to slow me down. Quote Mark "The shipwright is slow, but the wood is patient." - me Current Build: Past Builds: La Belle Poule 1765 - French Frigate from ANCRE plans - ON HOLD Triton Cross-Section NRG Hallf Hull Planking Kit HMS Sphinx 1775 - Vanguard Models - 1:64 Non-Ship Model: On hold, maybe forever: CH-53 Sikorsky - 1:48 - Revell - Completed Licorne - 1755 from Hahn Plans (Scratch) Version 2.0 (Abandoned) Link to comment Share on other sites More sharing options...

Recommended Posts
Join the conversation
You can post now and register later. If you have an account, sign in now to post with your account.