Bedford Posted January 17, 2019 Share #331 Posted January 17, 2019 It's looking very nicely jury rigged, well done and good luck! cog and mtaylor 2 Quote Ships built :- Schooner for Port Jackson Thermoplylae Bluenose II Full size Tammie Norrie dinghy 1:8 scale Miss Caroline, model of the full size boat I built Under construction :- Royal Caroline, this one is special as it is in memory of my 13 year old daughter, Caroline who passed away in 2005 Miane three masted schooner R/C, scratch build (on hold) Charles W Morgan (on hold) Scratch designed and built R/C Mahogany and Walnut speedboat (on hold) In the que :- S.T. Waratah, maybe! Link to comment Share on other sites More sharing options...
cog Posted January 17, 2019 Share #332 Posted January 17, 2019 That's the way Mark. Looks like you've got a lot of down draft in your shop ... mtaylor 1 Quote Carl "Desperate affairs require desperate measures." Lord Nelson Search and you might find a log ... Link to comment Share on other sites More sharing options...
druxey Posted January 17, 2019 Share #333 Posted January 17, 2019 Interesting technique, Mark. Is this your own invention? mtaylor, samson and Jack12477 3 Quote Be sure to sign up for an epic Nelson/Trafalgar project if you would like to see it made into a TV series http://trafalgar.tv Link to comment Share on other sites More sharing options...
Mark Pearse Posted January 17, 2019 Author Share #334 Posted January 17, 2019 thanks everyone; Druxey, yes it is, but perhaps stab in the dark is better - I might market a technical book "sailmaking by the assisted gravity technique". KeithAug, cog, mtaylor and 1 other 4 Quote completed 1:12 28' Ranger type yacht, scratch build - COMPLETED 1:12 20' 1930 open sailing boat, half model, scratch built - COMPLETED 1:12 24' Ranger type yacht, scratch build Link to comment Share on other sites More sharing options...
KeithAug Posted January 18, 2019 Share #335 Posted January 18, 2019 Mark - Looking good-----steady as she goes. Try splicing the mainbrace - I always find it makes things look even better. mtaylor, Omega1234 and Mark Pearse 3 Quote Keith Current Build:- Cangarda (Steam Yacht) - Scale 1:24 Previous Builds:- Schooner Germania (Nova) - Scale 1:36 https://modelshipworld.com/topic/19848-schooner-germania-nova-by-keithaug-scale-136-1908-2011/ Schooner Altair by KeithAug - Scale 1:32 - 1931 http://modelshipworld.com/index.php/topic/12515-schooner-altair-by-keithaug-scale-132-1931/?p=378702 J Class Endeavour by KeithAug - Amati - Scale 1:35 - 1989 after restoration. http://modelshipworld.com/index.php/topic/10752-j-class-endeavour-by-keithaug-amati-scale-135-1989-after-restoration/?p=325029 Other Topics Nautical Adventures http://modelshipworld.com/index.php/topic/13727-nautical-adventures/?p=422846 Link to comment Share on other sites More sharing options...
samson Posted January 19, 2019 Share #336 Posted January 19, 2019 Hi Mark It's a pleasure to see your project and I'm very impressed with your brass work, it's awesome. Omega1234 and mtaylor 2 Quote Link to comment Share on other sites More sharing options...
cog Posted January 20, 2019 Share #337 Posted January 20, 2019 did you use the epoxy yet? I just wondered what would happen if you added the sand on top. Does epoxy stick to clinging film/citchen wrap, if not you could put that between the epoxy and the sand ... just a thought ... mtaylor 1 Quote Carl "Desperate affairs require desperate measures." Lord Nelson Search and you might find a log ... Link to comment Share on other sites More sharing options...
Mark Pearse Posted January 22, 2019 Author Share #338 Posted January 22, 2019 (edited) thanks for the assistance & suggestions. Keith, you'll be horrified that I had to use the www to find out what splicing the mainbrace means. Not always helpful, but a timely glass can help with thinking sometimes. I saturated the fabric with Everdure epoxy & laid on top some fibreglass tape that I had, then added more epoxy. Initially I was disappointed with the results, but in separating what worked from what hasn't I think I can get it to work. These things didn't go to plan: Everdure is too thin for this job, a more standard thickness epoxy would work better; the fabric is rippled on the underside (the face side of the form), I think because the cotton blend fabric stretched & the glass fabric doesn't. The Everdure has soaked right through the fabrics & didn't get held in the fibreglass, so the layer of fibreglass didn't't really bond too the fabric below. What I'm thinking is to use Dynel fabric for the lower layer & a sheet of fibreglass on top, then some thicker runny epoxy, applied with a brush. Possibly I'll do a small test to see if I need to put a sheet of plastic film below the Dynel. The good side is: the sail shape is very nice, this view is as if looking up at the sail & the twist at about the throat height looks good to my eye. You can see how the fibreglass hasn't bonded. thanks Edited January 22, 2019 by Mark Pearse GrandpaPhil, Omega1234, samson and 6 others 9 Quote completed 1:12 28' Ranger type yacht, scratch build - COMPLETED 1:12 20' 1930 open sailing boat, half model, scratch built - COMPLETED 1:12 24' Ranger type yacht, scratch build Link to comment Share on other sites More sharing options...
Roger Pellett Posted January 22, 2019 Share #339 Posted January 22, 2019 Why not just apply resin to the cotton sail cloth and skip the fiberglass? Roger cog, Omega1234, mtaylor and 1 other 4 Quote Link to comment Share on other sites More sharing options...
Mark Pearse Posted January 22, 2019 Author Share #340 Posted January 22, 2019 Hi Roger initially I did do that, but it was still very flexible. If the cloth was to be the actual sail that might be fine, but the plan is to build up a Silkspan sail over a curved form. It looks that the Silkspan part won't be as difficult as making the form. I think the reason it wasn't stiffer is that polyester/cotton mix of the fabric has poor tensile rigidity - my guess is that resin & fibreglass is rigid because the components are fairly rigid in compression & tension. The Dynel is a quite an open weave, so a test will see how well it holds the thicker epoxy. As part of the test I'll probably do part of it with a piece of fibreglass cloth on top & see both how rigid that is & how well the two together hold the resin. michael mott, mtaylor, Omega1234 and 1 other 4 Quote completed 1:12 28' Ranger type yacht, scratch build - COMPLETED 1:12 20' 1930 open sailing boat, half model, scratch built - COMPLETED 1:12 24' Ranger type yacht, scratch build Link to comment Share on other sites More sharing options...
cog Posted January 23, 2019 Share #341 Posted January 23, 2019 I thought as Roger, but it is indeed a lot of work just to make a mould. You might just as well have made it from plaster(!) I think the weave of the fiberglass is better suited to retain the fluid mtaylor and Omega1234 2 Quote Carl "Desperate affairs require desperate measures." Lord Nelson Search and you might find a log ... Link to comment Share on other sites More sharing options...
Mark Pearse Posted February 2, 2019 Author Share #342 Posted February 2, 2019 The dynel & fibreglass went well. At the time it appeared to be going very badly, the dynel needs a lot more edge support than the poly/cotton does. At the time it appeared that only the parts bounded by the timber sticks were going to work out, but I used pieces of string & lots of clothes pegs to pull the loose edge (the sail's leech in this case). The brown is beach sand, & it appears that the Dynel kept sagging a bit after I'd done it, the bagginess is just a little too much, so I'll adjust in the way the jib is shaped. Good news is that I reckon I can use this form for the jib as well. The photos don't fully show the shape, it's more even that it appears. I'm now doing a test of Silkspan as a sail - the Tom Lauria videos on youtube were extremely helpful. I emailed Tom via his website & he was kind enough to answer & give guidance. The videos show a 1:48 sail, using a single thickness of Silkspan. I am testing doing a triple thickness: the outside face of the outside sheets being painted, seams drawn in pencil, reinforcing patches & battens etc. Then lay them up on the form using diluted PVA as a bonding & stiffening agent. It will also tell me if the minor irregularities that are still visible on the form will matter or not. thanks mtaylor, Omega1234, paulsutcliffe and 6 others 9 Quote completed 1:12 28' Ranger type yacht, scratch build - COMPLETED 1:12 20' 1930 open sailing boat, half model, scratch built - COMPLETED 1:12 24' Ranger type yacht, scratch build Link to comment Share on other sites More sharing options...
KeithAug Posted February 2, 2019 Share #343 Posted February 2, 2019 Mark - a fine bit of experimenting, I am following with interest. paulsutcliffe, mtaylor, Omega1234 and 1 other 4 Quote Keith Current Build:- Cangarda (Steam Yacht) - Scale 1:24 Previous Builds:- Schooner Germania (Nova) - Scale 1:36 https://modelshipworld.com/topic/19848-schooner-germania-nova-by-keithaug-scale-136-1908-2011/ Schooner Altair by KeithAug - Scale 1:32 - 1931 http://modelshipworld.com/index.php/topic/12515-schooner-altair-by-keithaug-scale-132-1931/?p=378702 J Class Endeavour by KeithAug - Amati - Scale 1:35 - 1989 after restoration. http://modelshipworld.com/index.php/topic/10752-j-class-endeavour-by-keithaug-amati-scale-135-1989-after-restoration/?p=325029 Other Topics Nautical Adventures http://modelshipworld.com/index.php/topic/13727-nautical-adventures/?p=422846 Link to comment Share on other sites More sharing options...
Mark Pearse Posted February 6, 2019 Author Share #344 Posted February 6, 2019 The curved form is great but I should have experimented with the Silkspan first. It really doesn't want to form a 2-way curved shape, or at least not one as curved as this is - but it does look & feel good. The process was: I painted some small sheets using flat acrylic paint in an off white colour, & after they had dried I laminated 3 layers using standard PVA diluted with about 20% water - with a small roller to apply the glue. It's quite difficult to laminate a second or third sheet when it's all on a curved surface, the wrinkles form because the curves are too great. The wrinkles aren't bad at all, a real dacron sail is quite wrinkled if it's had some work, but it remains flexible enough to not retain the curved shape. As an experiment I also gave both sides a couple of coats of a matt spray polyurethane based clear varnish, each time laying it back on the form to dry...no good. It yellowed a bit & didn't stiffen it up. One useful conclusion is that 3 layers of Silkspan is probably too thick, but 2 layers feels good, you can see a corner where I pulled the outer layer back. The videos I watched were for 1:48 models & this is 1:12, so really that's 16x the size. Good news is the 6H pencil lines are nice, & I think that if I tone some glue with grey paint I can do sail cringles by putting a blob on the sail & drilling or punching the centre out. So, I'll likely use a double thickness of Silkspan, laid flat. If it doesn't go well or if it's just too big to have up, then I can still furl the sails - the mainsail is a little taller than a 36" Silkspan sheet. The family might have something to say about it..... KeithAug, Omega1234, mtaylor and 1 other 4 Quote completed 1:12 28' Ranger type yacht, scratch build - COMPLETED 1:12 20' 1930 open sailing boat, half model, scratch built - COMPLETED 1:12 24' Ranger type yacht, scratch build Link to comment Share on other sites More sharing options...
druxey Posted February 6, 2019 Share #345 Posted February 6, 2019 Two layer of SilkSpan mean only one glueing layer, which will be less tricky than bonding three layers of material. If you are using white glue which is water-soluble, you could subsequently dampen the flat double layer and let it dry over the form, perhaps? As for the mainsail exceeding the size of the material, could you stagger the joints along different seam lines? mtaylor, Omega1234 and Mark Pearse 3 Quote Be sure to sign up for an epic Nelson/Trafalgar project if you would like to see it made into a TV series http://trafalgar.tv Link to comment Share on other sites More sharing options...
Mark Pearse Posted February 10, 2019 Author Share #346 Posted February 10, 2019 Hi Druxey - yes, staggering the joints is what I was thinking of, just thinking with some degree of trepidation. handling wet silkspan makes me feel like a 3 year old trying to handle household plastic wrap - you just know disaster is lurking. The Silkspan obviously has some ability to do compound curves, but not as much as I thought. The work area - I prep sanded lumps etc off the ply. The overlaps were done on opposite ends & a spot of CA glue to help sheet alignment. Once two sheets of Silkspan are painted & against each other it's quite difficult to move one without making a mess of it. I mixed acrylic paint plus about 10-15% plain PVA, painted this on one side of the first sheet in strips & quickly laid the second sheet on it before it had started to dry (it's been warm here). Then painted the top of the second sheet, & after about 5 mins I could turn it over & do the same on the other side. Then hung it up to dry. The colour is whiter than the previous sample, a creamy white with just a tiny dot of black to stop it being yellow. Then the other one (jib). I'm happy with the effect: the colour, texture, weight & feel are all good. This is one of the joints, not bad. I even like the wrinkles - they look like the wrinkles in dacron. It's not what I was imagining 3 weeks ago, but I'm pleased. Next is string up the sail sea, adding reinforcing latches, cringles, sail numbers. mtaylor, vaddoc, KeithAug and 8 others 11 Quote completed 1:12 28' Ranger type yacht, scratch build - COMPLETED 1:12 20' 1930 open sailing boat, half model, scratch built - COMPLETED 1:12 24' Ranger type yacht, scratch build Link to comment Share on other sites More sharing options...
Mark Pearse Posted February 17, 2019 Author Share #347 Posted February 17, 2019 The sails are looking good, not finished but the effect of this technique suits the 1:12 scale well. The technique is fascinating, & the hot ironing of the strips details (with diluted PVA painted on) works quickly & easily. See Tom Lauria's YouTube videos on silkspan sails. The seams are done with a 6H pencil, & I've given the jib two coats each side with a matt finish clear polyurethane coat. I think it will help with durability & cleaning, & I like the feel. All in all, they really do feel like scaled dacron. Here is the jib, it's now a non-overlapping jib, a #3. The mainsail, still going. Th stiffening effect of the reinforcing patches is also very lifelike, & although I wasn't going to put battens on the jib, I did put a few because I think it's worth it to ensure it doesn't curl at the leech. The battens are short, to suit the 1960s period. You can also see that the pencil lines are a little uneven, I like this effect also, & I like the slight scuffs & marks you get from moving the sail from one spot to another while you work - they have a realistic look to me. A sail is usually quite marked, creased & with bits of dirt & stains - so I'm not trying too hard to keep it perfect. Also, the seams are usually not perfectly even in visibility, & the slight varying weight of the pencil lines seems to match this. I used pencil lines on the edges of the reinforcing patches. There's a lot of thicknesses of silkspan at this corner, & it feels 'right'. The edges of the sail have a strip guide on each side all the way around. I'll trim them to size somewhere on the strip. vaddoc, druxey, JerryTodd and 6 others 9 Quote completed 1:12 28' Ranger type yacht, scratch build - COMPLETED 1:12 20' 1930 open sailing boat, half model, scratch built - COMPLETED 1:12 24' Ranger type yacht, scratch build Link to comment Share on other sites More sharing options...
cog Posted February 17, 2019 Share #348 Posted February 17, 2019 Impressive, I'll have a look at that video. Are you certain it's a 6H not a 6B pencil? Lines look like they are made with a soft pencil mtaylor and Jack12477 2 Quote Carl "Desperate affairs require desperate measures." Lord Nelson Search and you might find a log ... Link to comment Share on other sites More sharing options...
KeithAug Posted February 17, 2019 Share #349 Posted February 17, 2019 it is looking very good Mark - i must try this approach. mtaylor 1 Quote Keith Current Build:- Cangarda (Steam Yacht) - Scale 1:24 Previous Builds:- Schooner Germania (Nova) - Scale 1:36 https://modelshipworld.com/topic/19848-schooner-germania-nova-by-keithaug-scale-136-1908-2011/ Schooner Altair by KeithAug - Scale 1:32 - 1931 http://modelshipworld.com/index.php/topic/12515-schooner-altair-by-keithaug-scale-132-1931/?p=378702 J Class Endeavour by KeithAug - Amati - Scale 1:35 - 1989 after restoration. http://modelshipworld.com/index.php/topic/10752-j-class-endeavour-by-keithaug-amati-scale-135-1989-after-restoration/?p=325029 Other Topics Nautical Adventures http://modelshipworld.com/index.php/topic/13727-nautical-adventures/?p=422846 Link to comment Share on other sites More sharing options...
druxey Posted February 17, 2019 Share #350 Posted February 17, 2019 Nice effect with the reinforcements, Mark. mtaylor 1 Quote Be sure to sign up for an epic Nelson/Trafalgar project if you would like to see it made into a TV series http://trafalgar.tv Link to comment Share on other sites More sharing options...
Mark Pearse Posted February 17, 2019 Author Share #351 Posted February 17, 2019 thanks everyone. Hi Carl, yes, it is 6H not 6B. It works well when nice & sharp, & the paint surface is slightly abrasive. cog and mtaylor 2 Quote completed 1:12 28' Ranger type yacht, scratch build - COMPLETED 1:12 20' 1930 open sailing boat, half model, scratch built - COMPLETED 1:12 24' Ranger type yacht, scratch build Link to comment Share on other sites More sharing options...
cog Posted February 17, 2019 Share #352 Posted February 17, 2019 The latter is a must as you would hardly see a line on a slick surface with that hardness. I saw the video's ... very educational. Thanks for pointing those out, Mark mtaylor 1 Quote Carl "Desperate affairs require desperate measures." Lord Nelson Search and you might find a log ... Link to comment Share on other sites More sharing options...
samson Posted February 17, 2019 Share #353 Posted February 17, 2019 nice sails mtaylor 1 Quote Link to comment Share on other sites More sharing options...
Mark Pearse Posted February 20, 2019 Author Share #354 Posted February 20, 2019 (edited) thanks all the jib is now pretty much done. The main cringles at the tack, clew & head were drilled by pre-drilling a piece of 1.5mm styrene to the final size (3mm), then using that as a guide, & the holes through the sails stayed sharp. I experimented with replicating eyelets, by adding some black oxide to PVA glue & using a toothpick to line it on a drilled hole...but it didn't work. The tinted glue is excellent but the technique is difficult to get even, so I will just leave them plain. Better to not draw unnecessary attention to them. There's possibly an error in my setout below, but I'm not sure & will accept it as is: you can't see the point at which the setout seams meet - I set out the seams to the edge of the sails, not to the edge tape seam, which is 3mm inside the sail edge. It would look better, & possibly be correct, to have allowed for the edge tape thickness in the setout. You can see here how thick the corners are, which is fairly scale-correct.Each piece of Silkspan was doubled, & there's 11 thicknesses of that. I think that the material is quite strong & won't be at risk of tearing unless there's a major accident. The whole thing had 2 coats each side of turps based matt clear polyurethane finish, hopefully t won't yellow significantly over time. I considered treating the edges with the same, or paint, or something else - but with a clean cut edge, & the mass off silkspan/acrylic paint/PVA glue is quite well bonded into a mass, it doesn't seem to need anything. Edited February 20, 2019 by Mark Pearse grammatical mtaylor, cog, Jack12477 and 2 others 5 Quote completed 1:12 28' Ranger type yacht, scratch build - COMPLETED 1:12 20' 1930 open sailing boat, half model, scratch built - COMPLETED 1:12 24' Ranger type yacht, scratch build Link to comment Share on other sites More sharing options...
KeithAug Posted February 20, 2019 Share #355 Posted February 20, 2019 Mark - I have never used silkspan and in looking it up on the web it is described as heavy tissue paper (of various weights) that does not have good puncture resistance. Yours seems to be much more robust. Is yours something different from what i see described on the web? Sails looking great. Quote Keith Current Build:- Cangarda (Steam Yacht) - Scale 1:24 Previous Builds:- Schooner Germania (Nova) - Scale 1:36 https://modelshipworld.com/topic/19848-schooner-germania-nova-by-keithaug-scale-136-1908-2011/ Schooner Altair by KeithAug - Scale 1:32 - 1931 http://modelshipworld.com/index.php/topic/12515-schooner-altair-by-keithaug-scale-132-1931/?p=378702 J Class Endeavour by KeithAug - Amati - Scale 1:35 - 1989 after restoration. http://modelshipworld.com/index.php/topic/10752-j-class-endeavour-by-keithaug-amati-scale-135-1989-after-restoration/?p=325029 Other Topics Nautical Adventures http://modelshipworld.com/index.php/topic/13727-nautical-adventures/?p=422846 Link to comment Share on other sites More sharing options...
Mark Pearse Posted February 20, 2019 Author Share #356 Posted February 20, 2019 Hi Keith, it is the same stuff, in medium weight. In his youtube videos, Tom Lauria who's using it as single thickness for a 1:48 model of a small cat boat, about 20 foot. The technique he shows really transforms the tissueyness of it, but I needed to beef it up even more. I decided to double the silkspan to then use that as a base material; I laid out one layer of silkspan on a flat surface &, using a 100mm sponge roller, rolled on acrylic house paint (matt finish) with about 20% standard PVA mixed in. I did this in strips across the sheet, about 150mm wide, & then quickly laid (& burnished) a second sheet of silkspan onto the wet part of the surface. Then painted another strip, etc. After the whole thing was beyond sticky I then painted one side with a good coat of the same paint/PVA mix, & when that was handleable I did the other side & then suspended it to dry for a day or two - (not worrying about it not being dead flat, photo somewhere above). This was the base material for me. The sail tack was one thickness of the above, with 3 reinforcing pieces each side (each cut from the same stuff), layered on top of each other, plus the edge tape (same stuff), overlapped at the corner. So it's the same technique as Tom's, but once I started fiddling it was clear that what would suit a 1:48 model of a small yacht wouldn't suit a 1:12 scale model of a medium sized yacht. I emailed Tom & he very generously gave some advice that helped a lot - as described above (the reinforcing pieces building up so much was my addition). So, the good news is that as a product & technique, it's quite adaptable. Unfortunately it doesn't suit my original idea of formed sails (at the scale & model size I'm doing, & with the amount of curvature I wanted in the sails). The ironing it really works well & fast, & I found that using the iron - without steam - at a 'wool/silk' setting, & the water/PVA was about 40/60 ratio. This part probably won't make sense if you haven't seen the videos. Hopefully this gives a good visual picture. At the risk of being repetitious, I'm amazed but how much it feels & bends like heavy dacron, even the sound. But if you were going to show the sails flaked, or rolled, or furled etc...my sails would possibly not work, probably a bit thick. Testing required. cog, druxey, michael mott and 3 others 6 Quote completed 1:12 28' Ranger type yacht, scratch build - COMPLETED 1:12 20' 1930 open sailing boat, half model, scratch built - COMPLETED 1:12 24' Ranger type yacht, scratch build Link to comment Share on other sites More sharing options...
michael mott Posted February 21, 2019 Share #357 Posted February 21, 2019 Hello Mark. Thank you for your detailed description of the way you made the sails. replicating a particular material at scale can be daunting, it looks like you pulled off the Dacron nicely. I am guessing that Canvas would be easier at 1:8 But your model of the Dacron sail might work for my cutter since it is a modern refit of an older version. Anyway nicely done! Michael. druxey, cog, KeithAug and 1 other 4 Quote Current builds Bristol Pilot Cutter 1:8; Skipjack 19 foot Launch 1:8; Herreshoff Buzzards Bay 14 1:8 Other projects Pilot Cutter 1:500 ; Maria, 1:2 Now just a memory Future model Gill Smith Catboat Pauline 1:8 Finished projects A Bassett Lowke steamship Albertic 1:100 Anything you can imagine is possible, when you put your mind to it. Link to comment Share on other sites More sharing options...
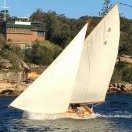
Mark Pearse Posted March 24, 2019 Author Share #358 Posted March 24, 2019 Some progress, I'm almost ready to do the final rigging of the sails. The jib is done, but without any sheet blocks or track cars to lead the sheets yet; the mainsail was test fitted, see below, & since then I've set out & drilled the luff. The luff is not laced, that's a bit old-fashioned for the 1960s, they would have likely been some simple car & track arrangement. Laced luffs are ok but can jam if it's very windy, nothing like being unable to get sails down. I've also decided against doing a loose foot on the mainsail, mainly for model making reasons. I prefer a loose foot, but it will be a greater risk for the model to have the sail loading to just the tip of the boom & the tiny block there. I think it's historically correct to do either for the time. The rig temporarily in place, the 'A' indicates the Sydney Amateur Sailing Club. The tack of the jib completed. One minor detail is that the replicated modern swage terminals - aluminium tube with the wire glued in place with CA - just aren't strong enough so I did a single squeeze on each tube with pointed (round tipped) pliers. The effect is quite good, & in fact the actual terminals do have a flat spot for putting a spanner. Jib hank: These will be the mainsail luff cars. The flat bar pieces will sit in a brass C section that's on the stern side of the mast. To be soldered, then probably glued into the track. dvm27, JerryTodd, mtaylor and 8 others 11 Quote completed 1:12 28' Ranger type yacht, scratch build - COMPLETED 1:12 20' 1930 open sailing boat, half model, scratch built - COMPLETED 1:12 24' Ranger type yacht, scratch build Link to comment Share on other sites More sharing options...
cog Posted March 24, 2019 Share #359 Posted March 24, 2019 she does look the part ... very beautiful work on the sails, Mark mtaylor 1 Quote Carl "Desperate affairs require desperate measures." Lord Nelson Search and you might find a log ... Link to comment Share on other sites More sharing options...
KeithAug Posted March 24, 2019 Share #360 Posted March 24, 2019 Looking good Mark - and nearly finished. Any thoughts on there next build? Quote Keith Current Build:- Cangarda (Steam Yacht) - Scale 1:24 Previous Builds:- Schooner Germania (Nova) - Scale 1:36 https://modelshipworld.com/topic/19848-schooner-germania-nova-by-keithaug-scale-136-1908-2011/ Schooner Altair by KeithAug - Scale 1:32 - 1931 http://modelshipworld.com/index.php/topic/12515-schooner-altair-by-keithaug-scale-132-1931/?p=378702 J Class Endeavour by KeithAug - Amati - Scale 1:35 - 1989 after restoration. http://modelshipworld.com/index.php/topic/10752-j-class-endeavour-by-keithaug-amati-scale-135-1989-after-restoration/?p=325029 Other Topics Nautical Adventures http://modelshipworld.com/index.php/topic/13727-nautical-adventures/?p=422846 Link to comment Share on other sites More sharing options...

Recommended Posts
Join the conversation
You can post now and register later. If you have an account, sign in now to post with your account.