mcpwilk Posted May 20, 2019 Share #391 Posted May 20, 2019 Quite beautiful. Mike Keith Black and mtaylor 2 Quote Link to comment Share on other sites More sharing options...
Mark Pearse Posted May 26, 2019 Author Share #392 Posted May 26, 2019 I've now finished the display stand. I've got a deadline to try & finish the last details of the model, if any of the Sydney forum members are interested there's an evening at our sailing club, talks by Bill Gale, Sean Langman & myself - & the model will be there - Wednesday 5th June. It's on the Ranger yachts generally & Cliff Gale's legacy of designs. Send me a message & I'll send more information. John, I did consider keeping the bark on the base timber, but a section of bark was missing & I was more confident of the result with it removed. Keith, yes, I was just using the timber as a stand to show off the brass on (while looking for a chisel to open the tin of paint). The timber base was finished with 2 coats of clear polyurethane rubbed on with a rag, then rubbed with 000 steel wool dipped in beeswax/gum turpentine furniture polish, then rubbed with a cloth. This shows how the brass tubes were filled with epoxy glue & drilled for the fixings - this technique was firstly to save cost (tube is 1/5th cost of a solid), & I don't have the equipment to drill out or thread the end of a solid. The brass flats were bend & shaped by hand. Unsurprisingly the keel support was a bit too flexible, so I soldered an inner flat bar. The dremel was able to give enough heat for this job. The brass was cleaned up & patinated to a dark brown, to tone it down visually, & was lined with some leather, then screwed together. The brass rods were glued into the timber & the timber will get some pads underneath, probably some unfinished cork. The holes in the timber weren't done by eye, my brother has a bench drill so I used that. Bedford, Keith Black, kurtvd19 and 16 others 19 Quote completed 1:12 28' Ranger type yacht, scratch build - COMPLETED 1:12 20' 1930 open sailing boat, half model, scratch built - COMPLETED 1:12 24' Ranger type yacht, scratch build Link to comment Share on other sites More sharing options...
druxey Posted May 27, 2019 Share #393 Posted May 27, 2019 Sweet! Well done, Mark. Keith Black, cog and Mark Pearse 3 Quote Be sure to sign up for an epic Nelson/Trafalgar project if you would like to see it made into a TV series http://trafalgar.tv Link to comment Share on other sites More sharing options...
mtaylor Posted May 27, 2019 Share #394 Posted May 27, 2019 Wow. Love the display. Keith Black, cog and Mark Pearse 3 Quote Mark "The shipwright is slow, but the wood is patient." - me Current Build: Past Builds: La Belle Poule 1765 - French Frigate from ANCRE plans - ON HOLD Triton Cross-Section NRG Hallf Hull Planking Kit HMS Sphinx 1775 - Vanguard Models - 1:64 Non-Ship Model: On hold, maybe forever: CH-53 Sikorsky - 1:48 - Revell - Completed Licorne - 1755 from Hahn Plans (Scratch) Version 2.0 (Abandoned) Link to comment Share on other sites More sharing options...
cog Posted May 27, 2019 Share #395 Posted May 27, 2019 a true eyecatcher, Mark.The stand turned out even better than I expected Mark Pearse and Keith Black 2 Quote Carl "Desperate affairs require desperate measures." Lord Nelson Search and you might find a log ... Link to comment Share on other sites More sharing options...
KeithAug Posted May 27, 2019 Share #396 Posted May 27, 2019 19 hours ago, Mark Pearse said: Unsurprisingly the keel support was a bit too flexible, so I soldered an inner flat bar Very neatly done Mark. Given your machine tool limitations you achieve remarkable results. Keith Black, Mark Pearse, cog and 1 other 4 Quote Keith Current Build:- Cangarda (Steam Yacht) - Scale 1:24 Previous Builds:- Schooner Germania (Nova) - Scale 1:36 https://modelshipworld.com/topic/19848-schooner-germania-nova-by-keithaug-scale-136-1908-2011/ Schooner Altair by KeithAug - Scale 1:32 - 1931 http://modelshipworld.com/index.php/topic/12515-schooner-altair-by-keithaug-scale-132-1931/?p=378702 J Class Endeavour by KeithAug - Amati - Scale 1:35 - 1989 after restoration. http://modelshipworld.com/index.php/topic/10752-j-class-endeavour-by-keithaug-amati-scale-135-1989-after-restoration/?p=325029 Other Topics Nautical Adventures http://modelshipworld.com/index.php/topic/13727-nautical-adventures/?p=422846 Link to comment Share on other sites More sharing options...
vaddoc Posted May 27, 2019 Share #397 Posted May 27, 2019 Very nice Mark. I presume the letters are bought, single adhesive letters? mtaylor, Keith Black and Mark Pearse 3 Quote Current projects: 21' Fisherman's Launch - plans by Howard Chapelle Completed projects: 21' Yawl Longboat - plans from the National Maritime Museum Deben 5 tonner - a Whisstock yard design 24' exploration gaff rigged ketch - a Tad Roberts design 15' knockabout sailing boat Link to comment Share on other sites More sharing options...
Jim Lad Posted May 27, 2019 Share #398 Posted May 27, 2019 She really looks the ants pants on that stand Mark. Unfortunately I won't be able to come on Wednesday week, but thanks for the open invitation. John mtaylor, Mark Pearse and Keith Black 3 Quote Link to comment Share on other sites More sharing options...
Mark Pearse Posted May 27, 2019 Author Share #399 Posted May 27, 2019 thanks everyone Hi Vaddoc, the sail numbers are self adhesive vinyl cut to order, but there aren't so many places that do 25mm size. I looked at 'Letraset' type lettering but it's more expensive & the range available is limited these days. For the adhesive stuff, you order a few extras & it might not cost any more but it gives you a couple of sets to try your hand with. The transom lettering is also adhesive vinyl, but I had to go to the USA to order them - http://smalllettering.com They were helpful & good to deal with, & likewise I was able to order extras in different fonts/italics etc & then select when they arrived & experiment with the others. Omega1234, Keith Black and mtaylor 3 Quote completed 1:12 28' Ranger type yacht, scratch build - COMPLETED 1:12 20' 1930 open sailing boat, half model, scratch built - COMPLETED 1:12 24' Ranger type yacht, scratch build Link to comment Share on other sites More sharing options...
G.L. Posted May 28, 2019 Share #400 Posted May 28, 2019 She is really a beauty, Mark. mtaylor, Mark Pearse and Keith Black 3 Quote G.L. Current projects: Oostends schipje (Ostend shrimper) - scale 1:20 Clipper d'Argenteuil - POF - scale 1/15 - SMALL Completed projects: Norwegian Whale Boat - POF - scale 1/10 - SMALL Anatomy of a boat by G.L. - scale 1/10 - POF - SMALL Day gaff sailing boat with center board - FINISHED - SMALL - scale 1/10 Cross section fishing smack - FINISHED -scale 1:20HMS Triton cross section - FINISHED - Scale 1:24 Link to comment Share on other sites More sharing options...
Mark Pearse Posted June 2, 2019 Author Share #401 Posted June 2, 2019 Most of the final details have now been done, but I haven't done a spinnaker pole, & it's an important detail so I'll probably make one. Below are photos of the rope coils etc. Initially I did a couple of coils by winding the rope around a piece of stick & then adding glue - & the result was realistic but I doubt that they would look good on a model. It became clear that the slightly messy yet realistic coils would catch the eye & stand out too much. I realised that the point of doing them neatly is that they don't stand out excessively on the model. The coils were done by drawing an ellipse on a cork base, putting a piece of clear plastic over, & putting a series of pins on the line. Glue was PVA/water about 2:1, then superglue for the lashings & ties. A sharp eye can see that the CA actually stains the thread a little. On some models that might be unacceptable, but I accepted it as part of the ropework colour variations generally. Anyway here's how they came up; halyards coiled at the mast: Running backstay: Jib sheet: Lazy jib sheet, mainsail sheet: Main sheet again: There's a few stains on the thread from the old pins; I scraped some of it off with the tip of a knife but left some on, the odd stain looks quite good. dvm27, JerryTodd, cog and 15 others 18 Quote completed 1:12 28' Ranger type yacht, scratch build - COMPLETED 1:12 20' 1930 open sailing boat, half model, scratch built - COMPLETED 1:12 24' Ranger type yacht, scratch build Link to comment Share on other sites More sharing options...
Jim Lad Posted June 3, 2019 Share #402 Posted June 3, 2019 All looking up to your usual standard, Mark! John cog, Keith Black and mtaylor 3 Quote Link to comment Share on other sites More sharing options...
KeithAug Posted June 3, 2019 Share #403 Posted June 3, 2019 All looking very smart Mark. mtaylor, Keith Black and cog 3 Quote Keith Current Build:- Cangarda (Steam Yacht) - Scale 1:24 Previous Builds:- Schooner Germania (Nova) - Scale 1:36 https://modelshipworld.com/topic/19848-schooner-germania-nova-by-keithaug-scale-136-1908-2011/ Schooner Altair by KeithAug - Scale 1:32 - 1931 http://modelshipworld.com/index.php/topic/12515-schooner-altair-by-keithaug-scale-132-1931/?p=378702 J Class Endeavour by KeithAug - Amati - Scale 1:35 - 1989 after restoration. http://modelshipworld.com/index.php/topic/10752-j-class-endeavour-by-keithaug-amati-scale-135-1989-after-restoration/?p=325029 Other Topics Nautical Adventures http://modelshipworld.com/index.php/topic/13727-nautical-adventures/?p=422846 Link to comment Share on other sites More sharing options...
Bedford Posted June 5, 2019 Share #404 Posted June 5, 2019 Thanks for the invite to the "Cliff Gale's Legacy" talk tonight, it was very informative. Cliff was a great designer. I stood and looked at the model from several different angles and the hull just looks right, no matter where you view it from. The model is larger than I thought and I'd have to call it museum quality, just beautiful and it was good to meet her builder. cog, Omega1234, mtaylor and 1 other 4 Quote Ships built :- Schooner for Port Jackson Thermoplylae Bluenose II Full size Tammie Norrie dinghy 1:8 scale Miss Caroline, model of the full size boat I built Under construction :- Royal Caroline, this one is special as it is in memory of my 13 year old daughter, Caroline who passed away in 2005 Miane three masted schooner R/C, scratch build (on hold) Charles W Morgan (on hold) Scratch designed and built R/C Mahogany and Walnut speedboat (on hold) In the que :- S.T. Waratah, maybe! Link to comment Share on other sites More sharing options...
Mark Pearse Posted June 5, 2019 Author Share #405 Posted June 5, 2019 Hi Steve thank you, it was very good to meet you. I'm glad you enjoyed the event, Cliff's boats are getting more attention & interest these days - the attention is mainly because of their surprising performance in races against boats of any vintage...which is ironic as he designed them more to do simpler things well: fishing, picnicking, camp cruising & single handed sailing. I liked your idea of the scaled Tammie Norrie model - I hope you get to that one. Keith Black, Bedford and mtaylor 3 Quote completed 1:12 28' Ranger type yacht, scratch build - COMPLETED 1:12 20' 1930 open sailing boat, half model, scratch built - COMPLETED 1:12 24' Ranger type yacht, scratch build Link to comment Share on other sites More sharing options...
Bedford Posted June 6, 2019 Share #406 Posted June 6, 2019 (edited) Imagine what a Cliff Gale designed racing boat could do! Edited June 6, 2019 by Bedford mtaylor and Mark Pearse 2 Quote Ships built :- Schooner for Port Jackson Thermoplylae Bluenose II Full size Tammie Norrie dinghy 1:8 scale Miss Caroline, model of the full size boat I built Under construction :- Royal Caroline, this one is special as it is in memory of my 13 year old daughter, Caroline who passed away in 2005 Miane three masted schooner R/C, scratch build (on hold) Charles W Morgan (on hold) Scratch designed and built R/C Mahogany and Walnut speedboat (on hold) In the que :- S.T. Waratah, maybe! Link to comment Share on other sites More sharing options...
michael mott Posted June 6, 2019 Share #407 Posted June 6, 2019 Mark, What an exquisite model! It is a pity that I live so far away, I would certainly enjoy seeing the model up close. Michael Mark Pearse, Keith Black, Bedford and 2 others 5 Quote Current builds Bristol Pilot Cutter 1:8; Skipjack 19 foot Launch 1:8; Herreshoff Buzzards Bay 14 1:8 Other projects Pilot Cutter 1:500 ; Maria, 1:2 Now just a memory Future model Gill Smith Catboat Pauline 1:8 Finished projects A Bassett Lowke steamship Albertic 1:100 Anything you can imagine is possible, when you put your mind to it. Link to comment Share on other sites More sharing options...
Mark Pearse Posted June 6, 2019 Author Share #408 Posted June 6, 2019 thank you all. Steve, the Maluka to Hobart article here will interest you: https://sasc.com.au/wp-content/uploads/SASC0217W.pdf Keith Black, mtaylor and Bedford 3 Quote completed 1:12 28' Ranger type yacht, scratch build - COMPLETED 1:12 20' 1930 open sailing boat, half model, scratch built - COMPLETED 1:12 24' Ranger type yacht, scratch build Link to comment Share on other sites More sharing options...
Bedford Posted June 7, 2019 Share #409 Posted June 7, 2019 That was a great read, thanks Mark Mark Pearse, Keith Black and mtaylor 3 Quote Ships built :- Schooner for Port Jackson Thermoplylae Bluenose II Full size Tammie Norrie dinghy 1:8 scale Miss Caroline, model of the full size boat I built Under construction :- Royal Caroline, this one is special as it is in memory of my 13 year old daughter, Caroline who passed away in 2005 Miane three masted schooner R/C, scratch build (on hold) Charles W Morgan (on hold) Scratch designed and built R/C Mahogany and Walnut speedboat (on hold) In the que :- S.T. Waratah, maybe! Link to comment Share on other sites More sharing options...
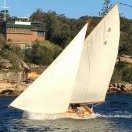
G.L. Posted June 22, 2019 Share #410 Posted June 22, 2019 Mark, I like very much the classic style of your yacht and you made a marvelous model of it. In one of your posts you showed a beautiful action picture of the 'Stella'. I am experimenting a bit with oil paint to learn to paint and used that picture as model for my first marine canvas. I hope you don't blame me for the use of your picture before asking permission. cog, Omega1234, mtaylor and 1 other 4 Quote G.L. Current projects: Oostends schipje (Ostend shrimper) - scale 1:20 Clipper d'Argenteuil - POF - scale 1/15 - SMALL Completed projects: Norwegian Whale Boat - POF - scale 1/10 - SMALL Anatomy of a boat by G.L. - scale 1/10 - POF - SMALL Day gaff sailing boat with center board - FINISHED - SMALL - scale 1/10 Cross section fishing smack - FINISHED -scale 1:20HMS Triton cross section - FINISHED - Scale 1:24 Link to comment Share on other sites More sharing options...
Mark Pearse Posted June 23, 2019 Author Share #411 Posted June 23, 2019 (edited) Hi GL that's beautiful, & it really looks like the boat. (It's a photo of our boat Cherub, which is 24' - 4' shorter than the model design, but with the same beam dimension & cockpit size). Very well done & I hope this one gives you encouragement to do some more marine paintings. I'm very glad you liked this photo enough to paint it. Mark Edited June 23, 2019 by Mark Pearse Keith Black, cog and mtaylor 3 Quote completed 1:12 28' Ranger type yacht, scratch build - COMPLETED 1:12 20' 1930 open sailing boat, half model, scratch built - COMPLETED 1:12 24' Ranger type yacht, scratch build Link to comment Share on other sites More sharing options...
G.L. Posted June 23, 2019 Share #412 Posted June 23, 2019 Thank you Mark, I will certainly try to make some more. mtaylor and Keith Black 2 Quote G.L. Current projects: Oostends schipje (Ostend shrimper) - scale 1:20 Clipper d'Argenteuil - POF - scale 1/15 - SMALL Completed projects: Norwegian Whale Boat - POF - scale 1/10 - SMALL Anatomy of a boat by G.L. - scale 1/10 - POF - SMALL Day gaff sailing boat with center board - FINISHED - SMALL - scale 1/10 Cross section fishing smack - FINISHED -scale 1:20HMS Triton cross section - FINISHED - Scale 1:24 Link to comment Share on other sites More sharing options...

Recommended Posts
Join the conversation
You can post now and register later. If you have an account, sign in now to post with your account.