claybaker
-
Posts
29 -
Joined
-
Last visited
Content Type
Profiles
Forums
Gallery
Events
Everything posted by claybaker
-

HMS ANSON 1781 by albert - 1/48 - 64 guns
claybaker replied to albert's topic in - Build logs for subjects built 1751 - 1800
Gary, Intrepid plans I see at RMG are J3635 and ZAZ1487 (J3628) Clay edit: the plan Albert posted above is ZAZ1487 -
They look fantastic! Clay
-
You're a lifesaver! I came here looking for exactly this info. It's looking like nobody in the US sells wood for the Swan, so I'm going to have to gather it up myself. Best Clay
- 1 reply
-
- 1
-

-
Isn’t that always the case? It sure is for me.
-
Now I feel bad. Got mine last week. Haven’t played with it though.

-
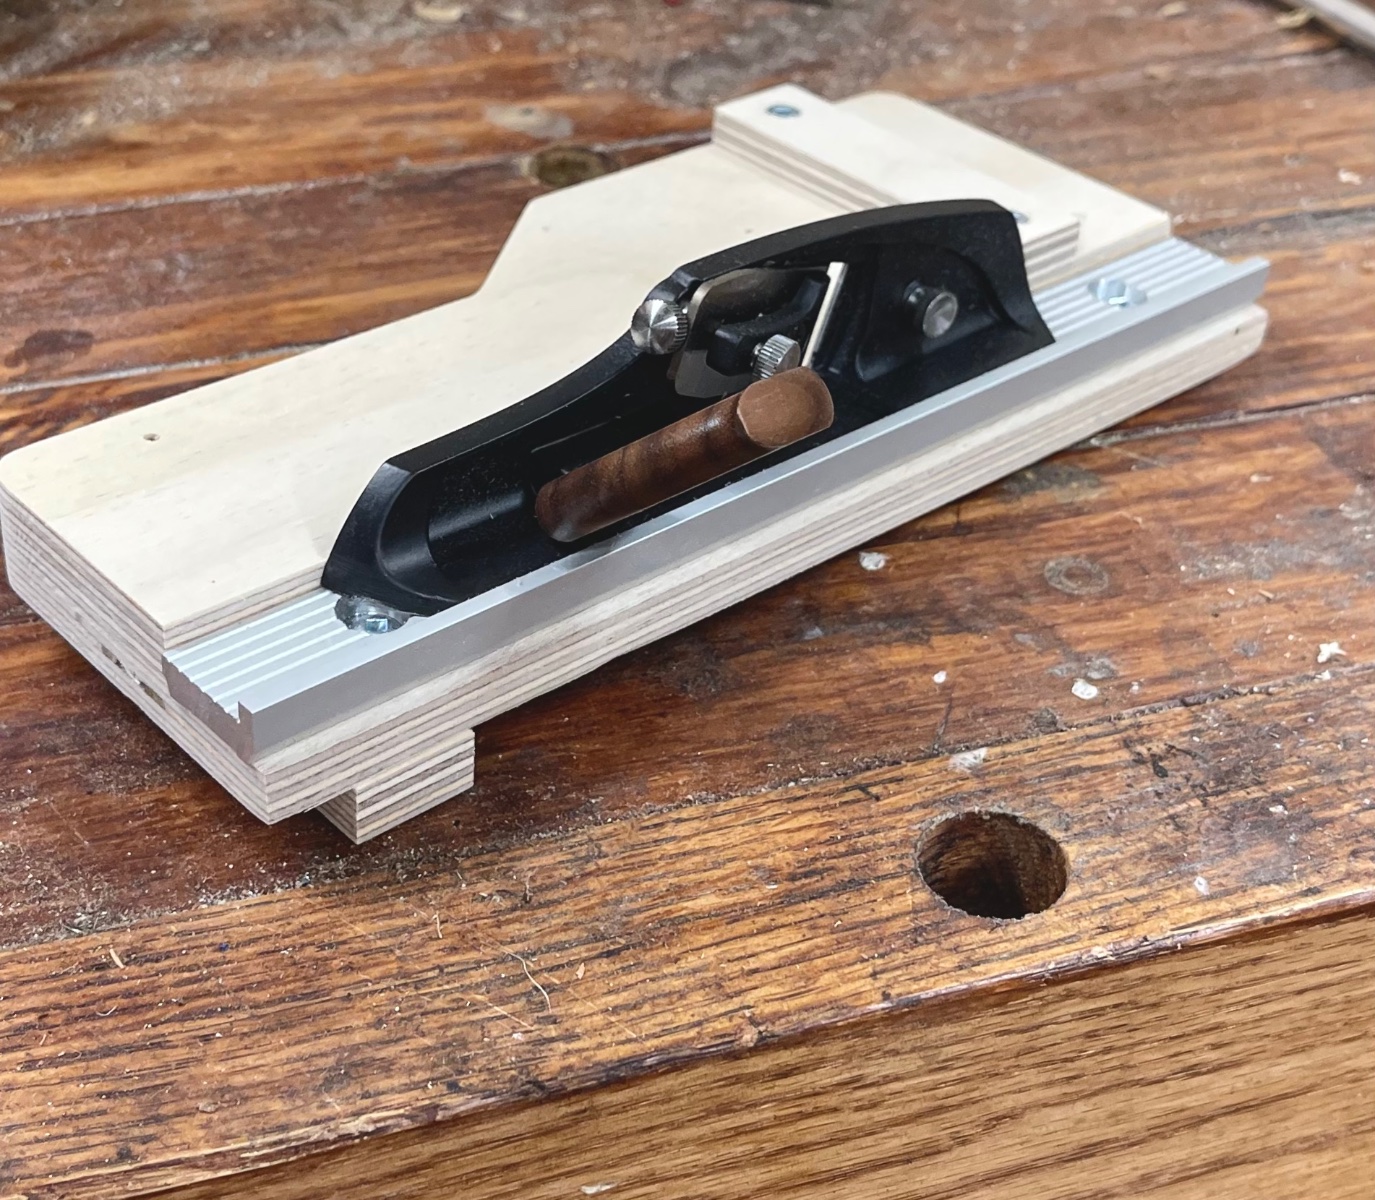
I’m very happy with my Taig which I got through Carter Tools although they also sell direct. While I got everything need it to convert to CNC, I’m thinking of getting a second already CNC configured.
-
Always interested Gary. I could (and have) spend hours looking at your pictures. Clay
-
Beautiful
-
Wow! Very nice! Bet that saves your back.
-
Hi marsalv, That’s what I was trying to say - that they were available from a number of suppliers - but your way came out much better. 🙂 The build is beautiful. I need to save these photos for reference. Clay
- 589 replies
-
- 2
-
-
- le gros ventre
- cargo
- (and 2 more)
-
FWIW, I have one of the older motorized versions (not sure which one) and I very rarely install the motor. I seem to produce a better serve when I can feel the machine with my left hand and the rope with my right. And if anything gets out of whack I can stop within a single turn - something I’d have to add a foot switch for with a motor (slow reaction time 😔)
-
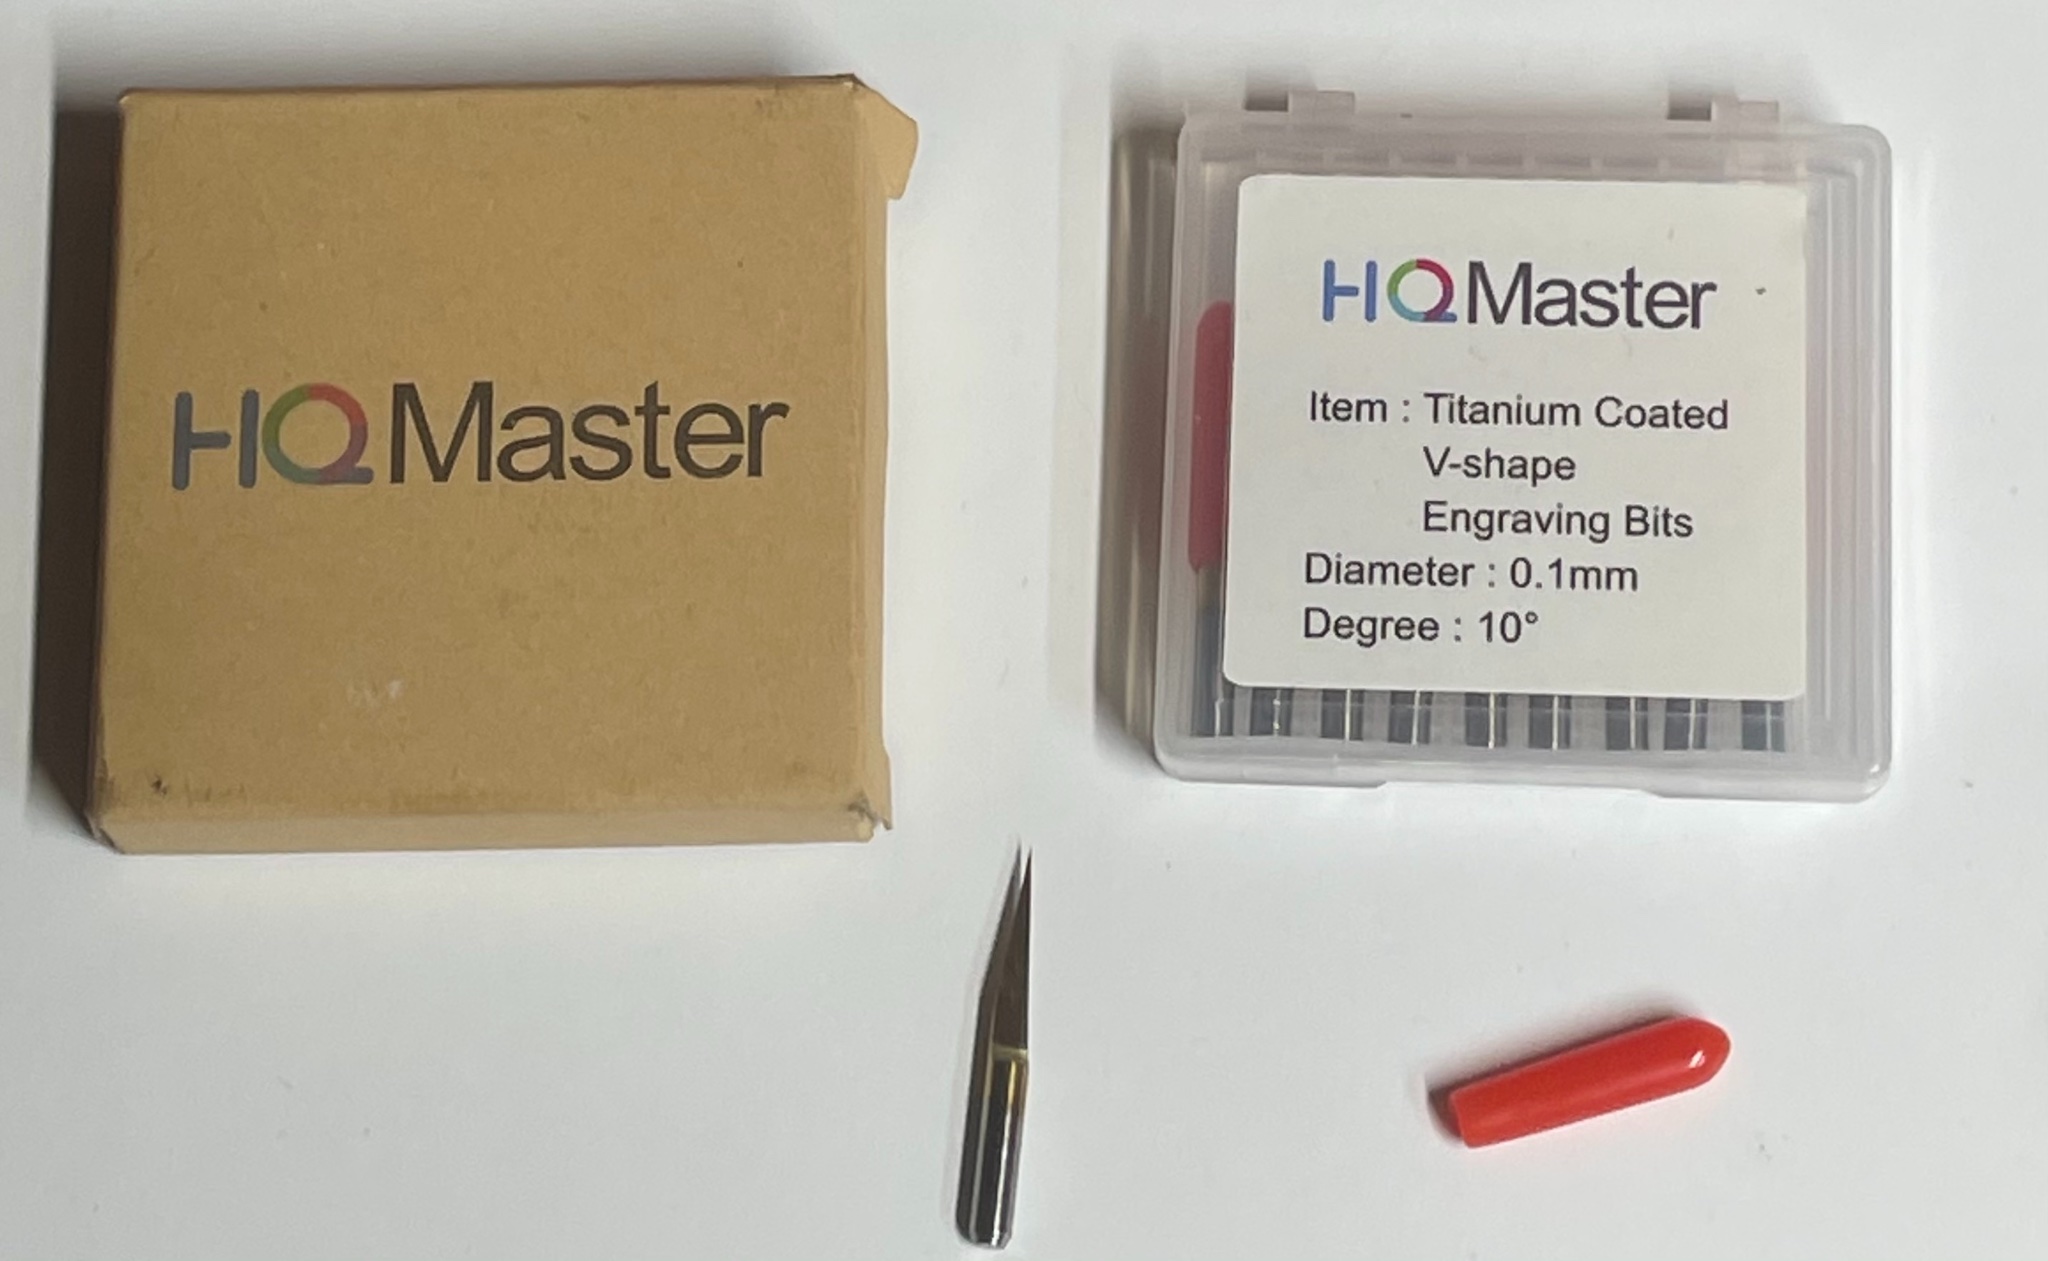
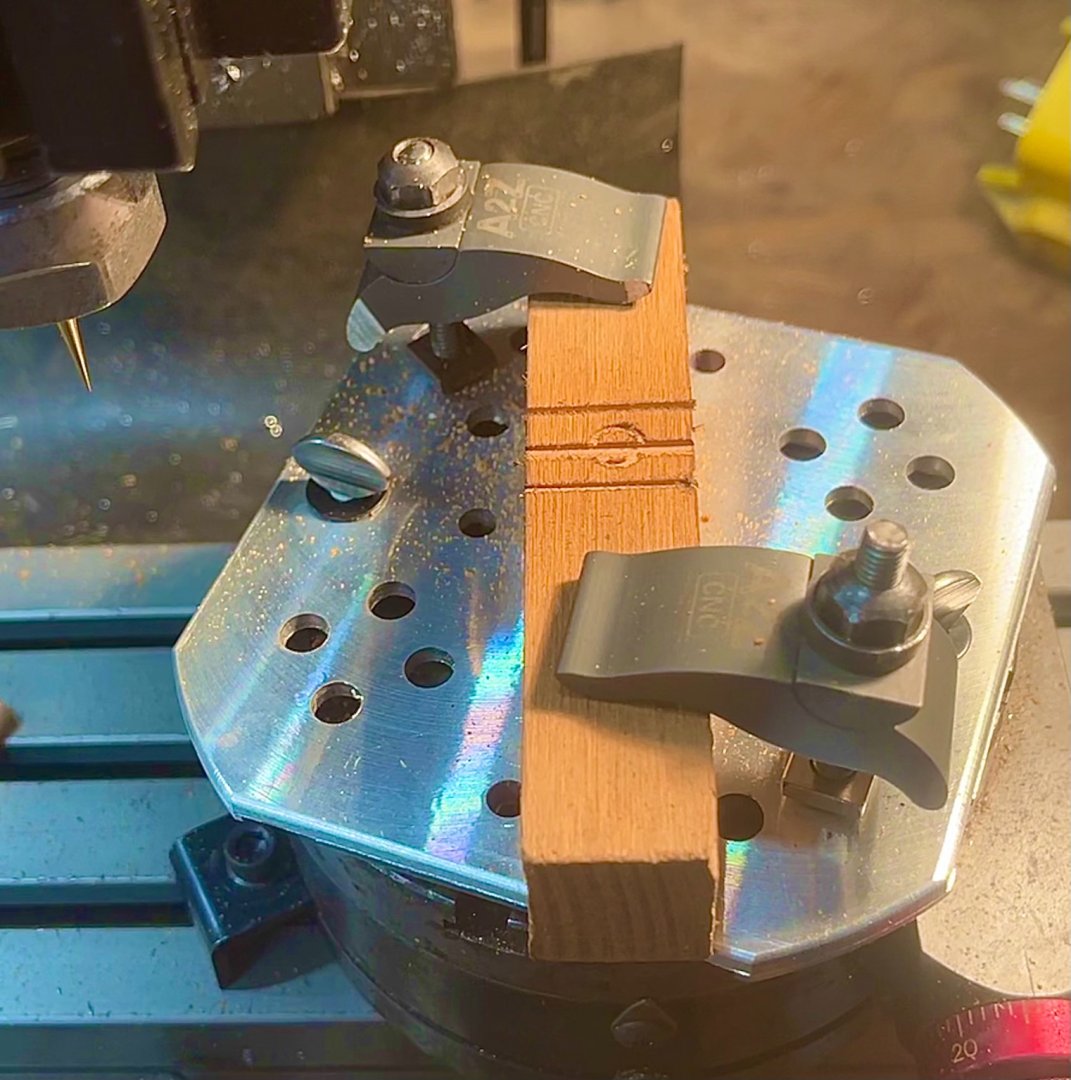
Gary, I haven’t “used” them in the “make a part with them” sense, but I did take some test cuts. My initial worry was that because they’re engraving bits the cuts would have to be really shallow because of not having any flutes to bring oup the swarf. While I didn’t push them, I was able to make 0.0125” deep cuts in cherry without any problems. My old eyes also found it a bit challenging to set 0Z, but I think close is probably fine since they come to such a fine point. The one thing I want to investigate further is the alignment of the tip with the axis of the shaft. It seemed as if the cutter was straight from end to tip which would put the tip slightly off center, but this could be a misperception and I didn’t have the patience to investigate further right then. The picture of them on Amazon seems to show the point centered, so I might be mistaken. I also wonder how long the tip will stay sharp, but only time will tell. Below is a picture of my test cuts in cherry. From the bottom 0.0125” deep, 0.025” + 0.0375”, and 0.0375” stand alone. The two in the middle appear as one because I only moved over 0.05” for the second cut.
- 589 replies
-
- 3
-
-
- le gros ventre
- cargo
- (and 2 more)
-
Marsalv, Thank you for the information on the cutters you’re using. I was able to find something here in the US at Amazon (here) I don’t think it’s the same manufacturer, but they seem to be good quality. I’m looking forward to giving them a try.

- 589 replies
-
- 4
-
-
- le gros ventre
- cargo
- (and 2 more)
-
It makes complete sense Gary. Thank you for your insight. I’m a student too, so how about we agree to call you an advanced student and me a newbie? I hadn’t noticed the pieces between the bends. Thank you for pointing them out so clearly. I have to go back and study Goodwin some more, because I obviously didn’t take it all in. I’m not sure which way I’m going to approach my Warrior, but I’ve got time to think on it, I still need to raise quite a few spars on my Constitution. Clay
-
Hi Gary, I’m waffling on my Warrior practicum decision and considering building her upright rather in Hahn fashion. As such, I’m trying to soak up all I can about framing. Thank you for including the 1781 contract in your build log. It looks like you had to key that in by hand which was incredibly selfless. Looking at the contact and Peter Goodwin’s “The Construction and Fitting...” [p 16] I think (and remembering that I have no idea what I’m talking about) that both describe the frames with chocks. Goodwin also says, “Now that these timbers were fastened by chock or scarphs, there was no need for them to be fayed and bolted to the adjacent timbers” [p 17 - Frame Construction 1750-1811] If you don’t mind, would you share your thought process in deciding to use butts and sistered frames? i explicitly want to say to everyone that this question is not trying to imply you did something incorrectly, but rather I am purely trying to learn from someone I consider an expert in the craft. Clay
-
I was so happy to find this build log. I too have her monograph sitting on my shelf. Trying to decide whether to build her or Warrior next. Clay
- 589 replies
-
- 1
-
-
- le gros ventre
- cargo
- (and 2 more)
-
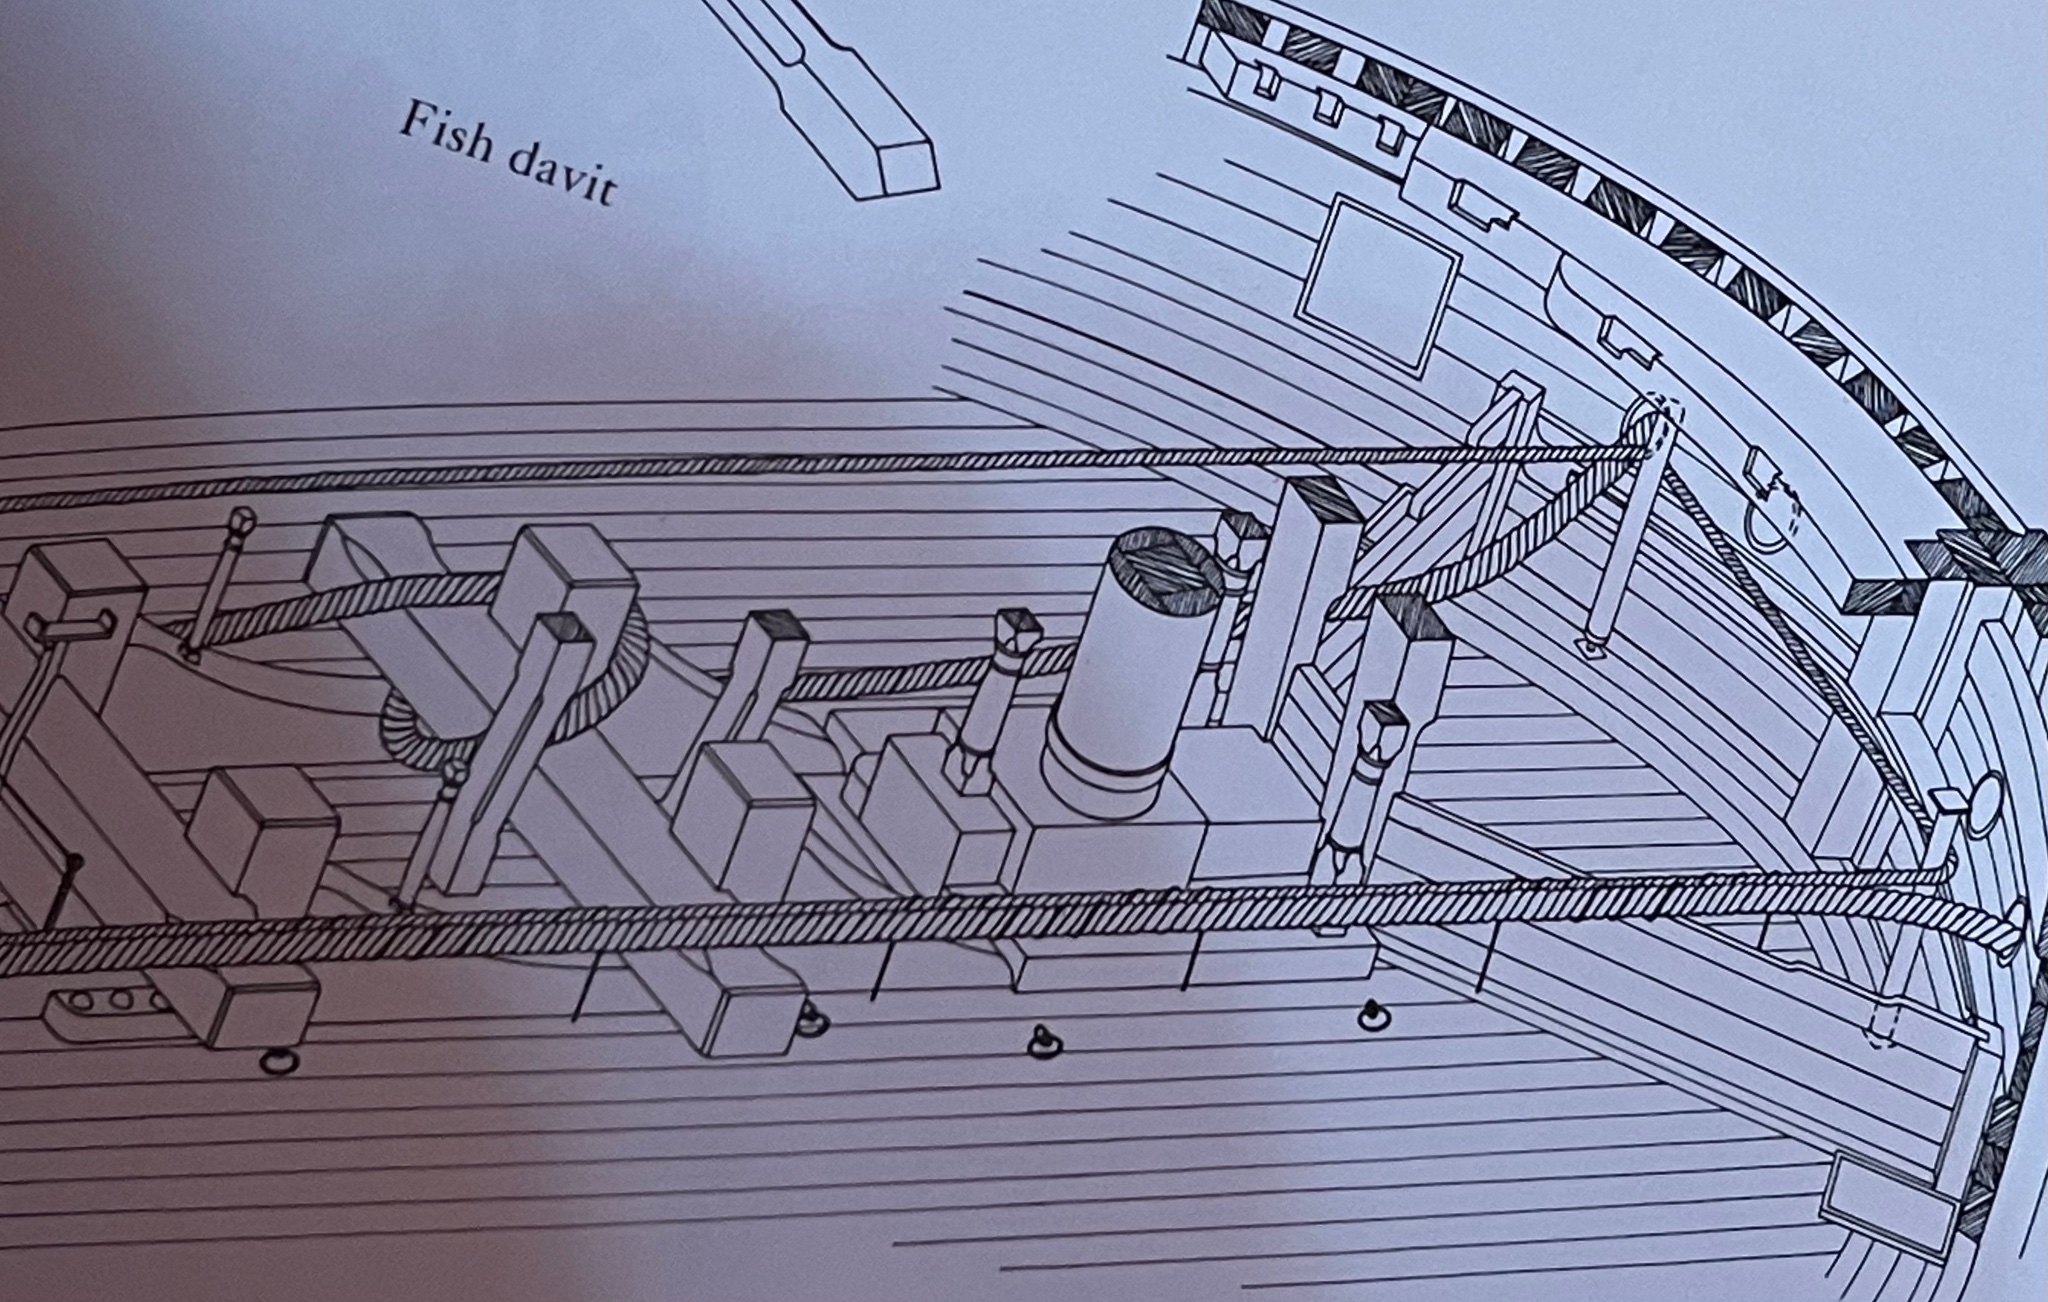
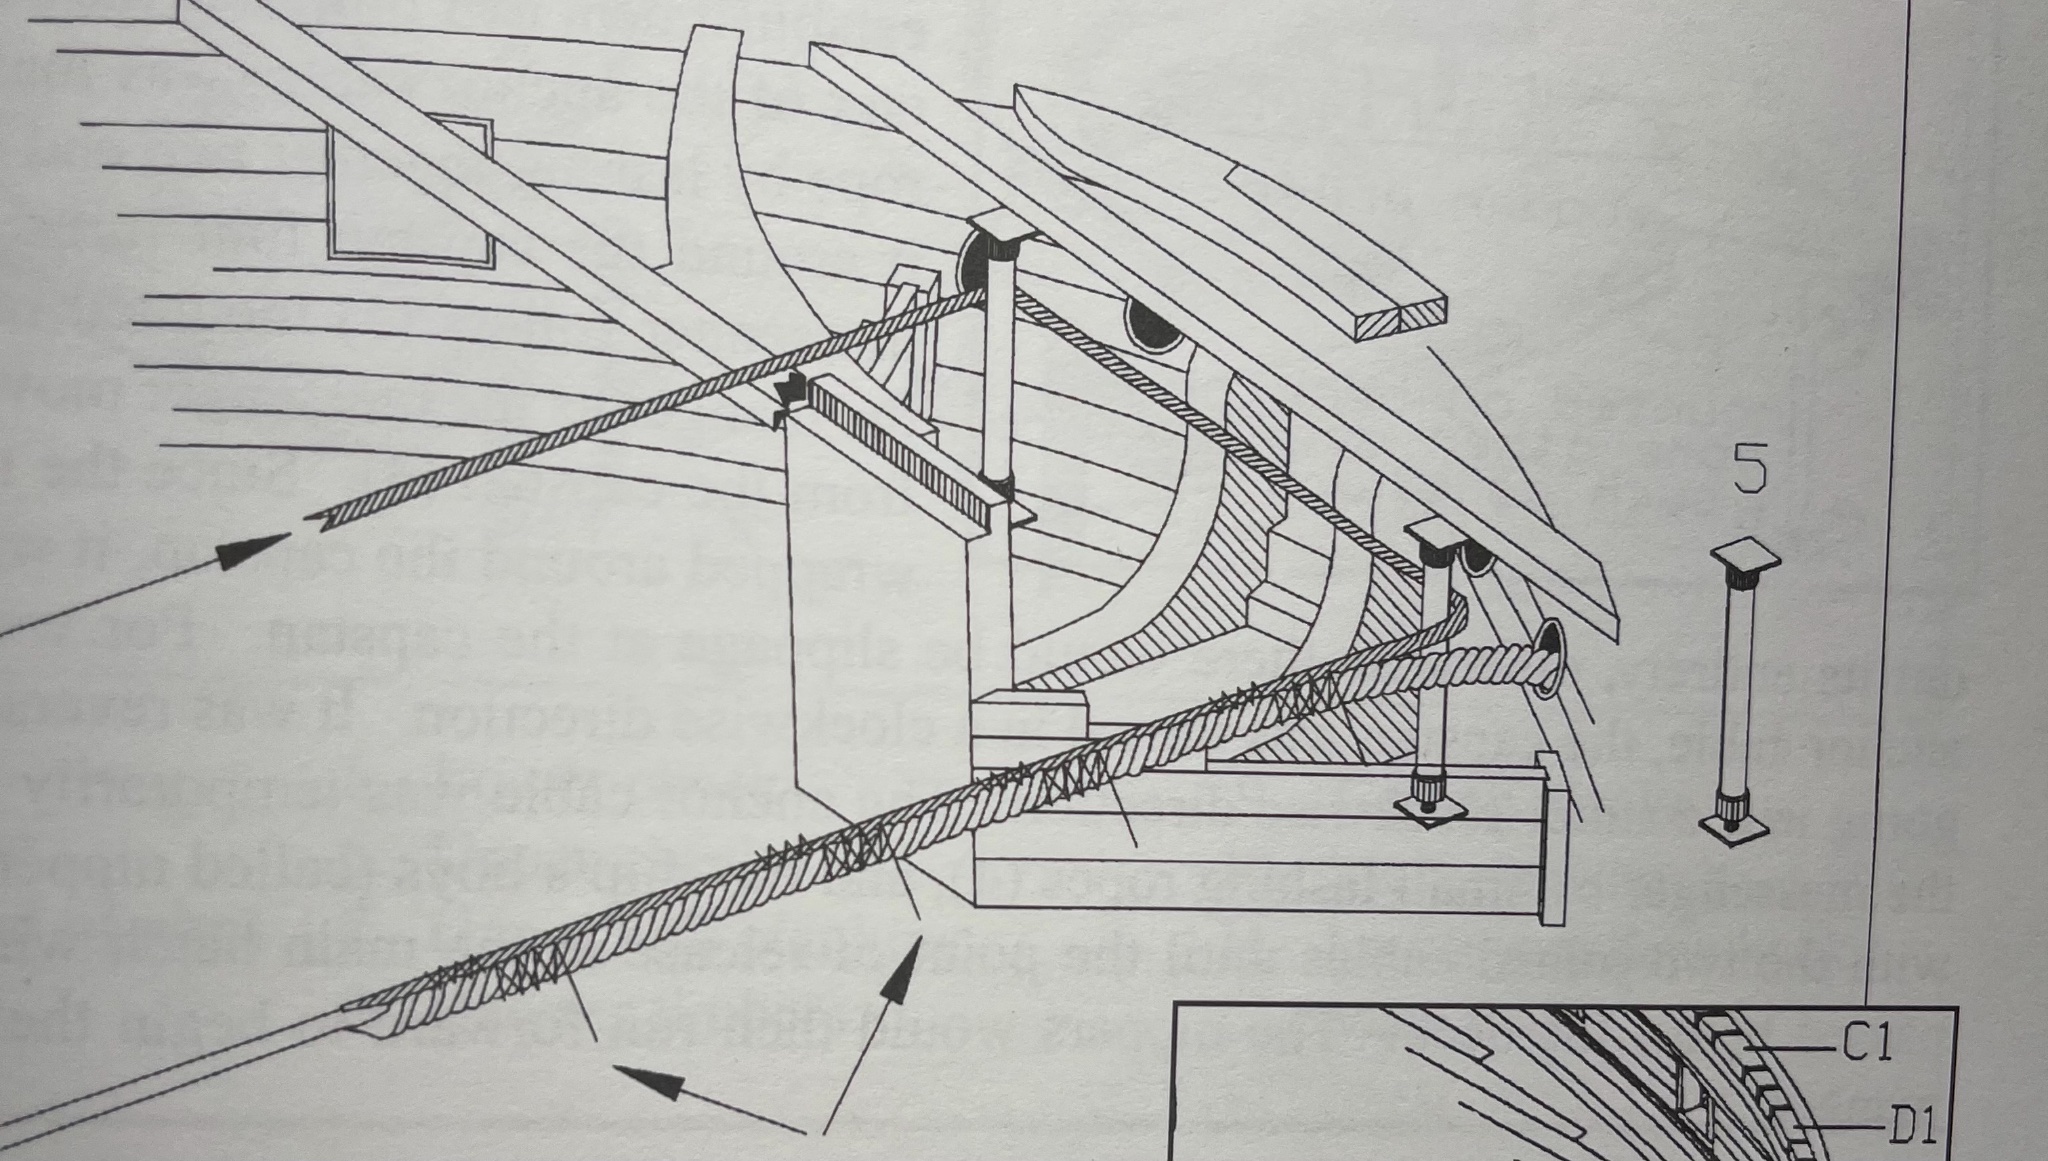
Gary, Yes I see it now on 156. I had missed it before. I think snatch blocks are a possibility as you suggest, but hopefully we’ll find something that’s definitive. Since I haven’t started a scratch build yet, my copy of Peter’s book (20+ years old) is almost pristine, except for the dust jacket. It’s my copies of Lee’s Masting and Rigging of English Ships of War 1625-1860 and Harland’s Seamanship in the Age of Sail that are starting to show their age. Clay
-
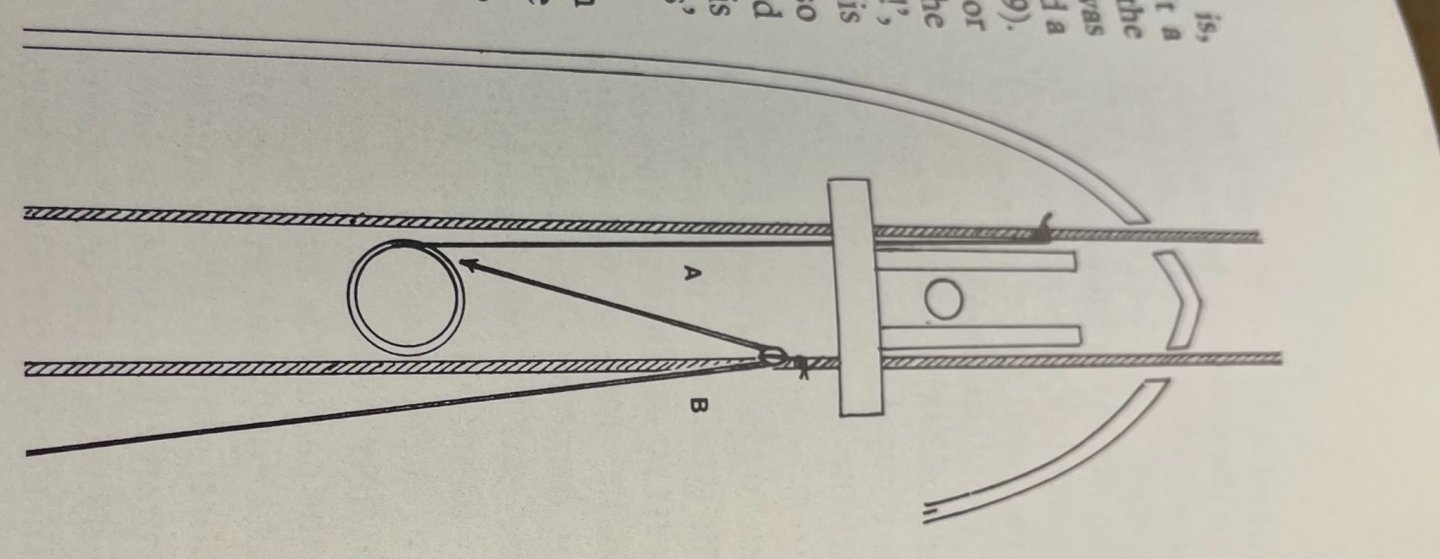
Gary, Once I came into the house from the barn 😉 I was looking at Alan McGowan’s “Victory, Her Construction, Career and Restoration” to see if there was a picture fore of the bowsprit, and I stumbled upon the picture that Romero referenced (p. 197). So at least the idea of stanchions is plausible. Clay
-
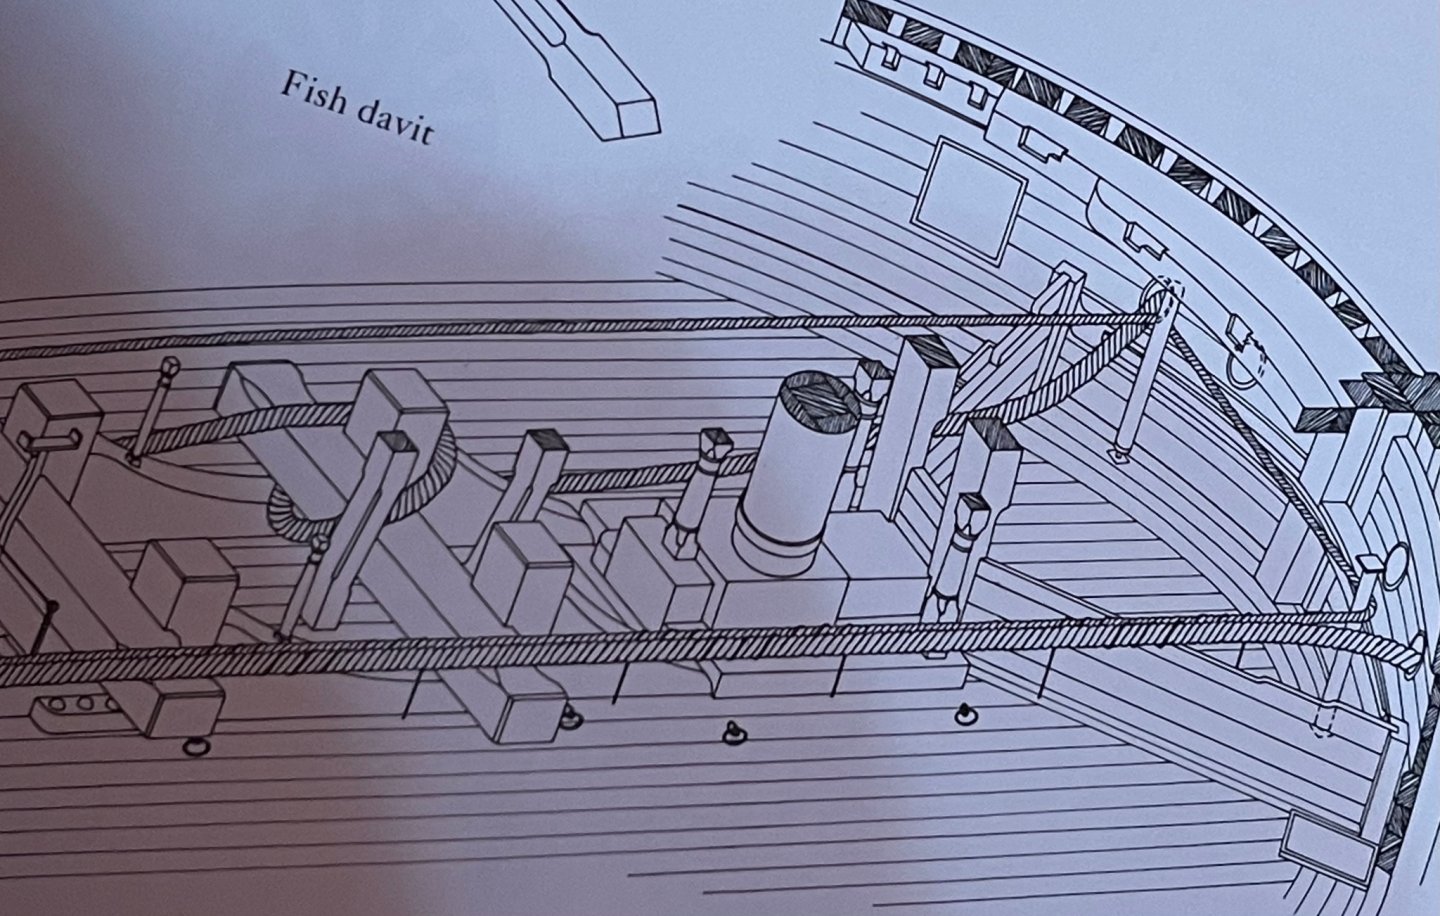
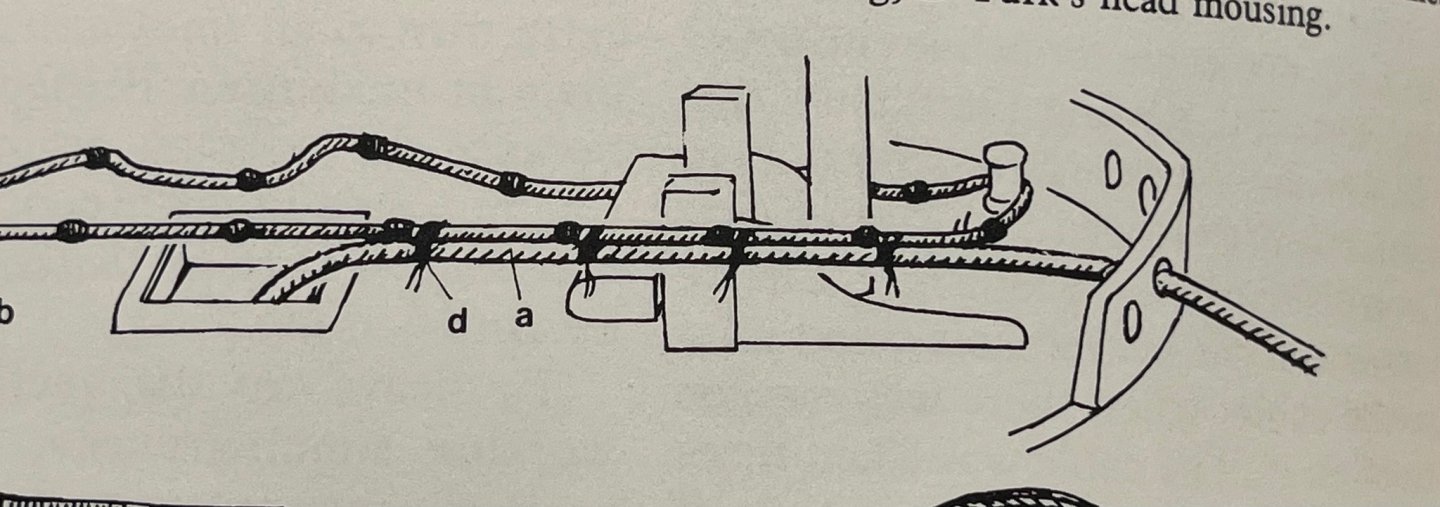
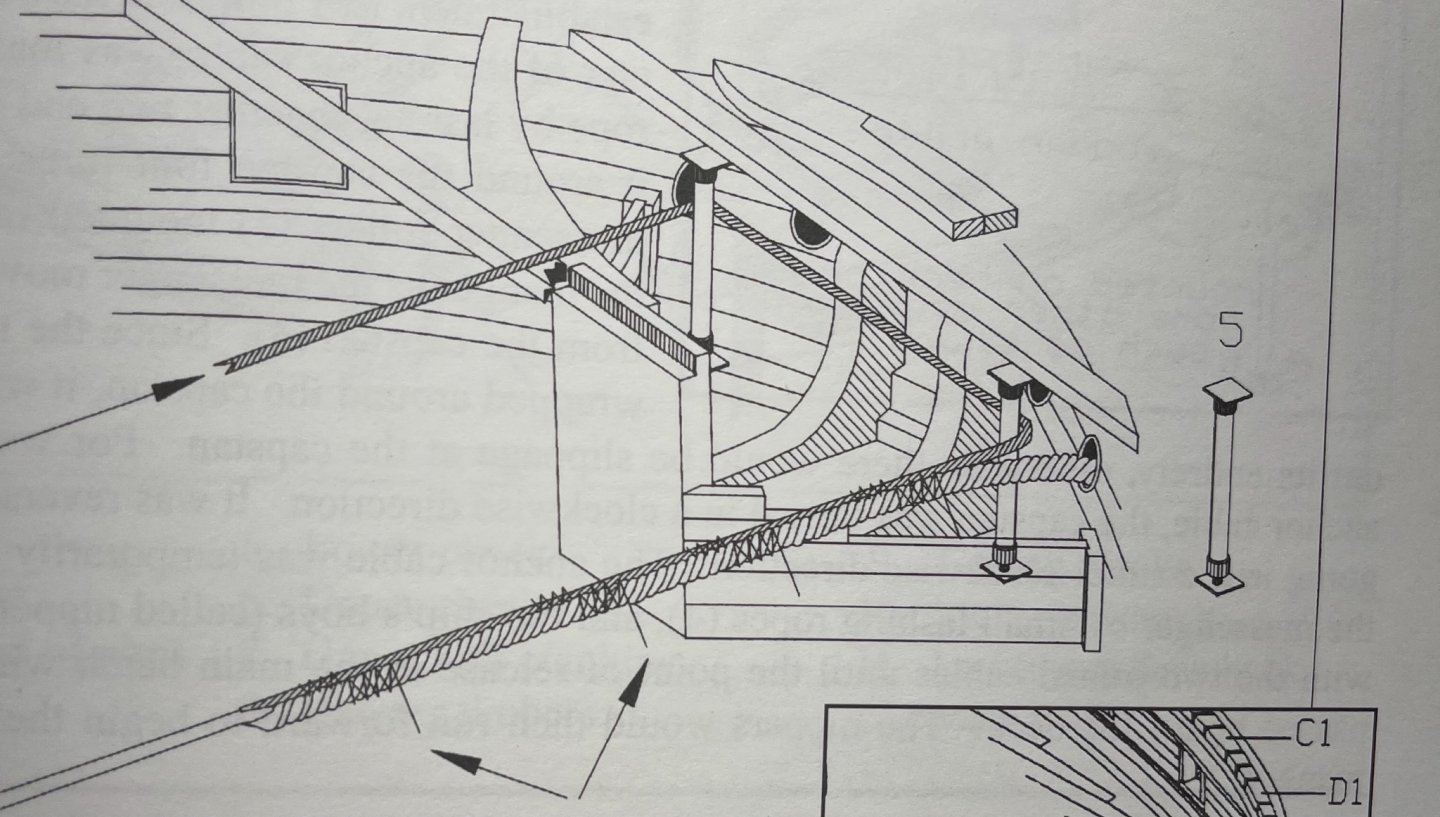
Gary, Not sure if you got an answer to this. Harland (p. 264) only shows cables coming in through the center hole (first two pics). Romero shows stanchions being added to bring cables in the outside holes and round the corner but doesn’t source his sketch (bottom pic) and Hahn doesn’t show those on his plans. Clay
-
Thanks Gary, I will need to give that some thought. The basement ceiling is pretty close to ground level so I’ve got to look at what I have room for vent-wise. Clay edit:typo
-
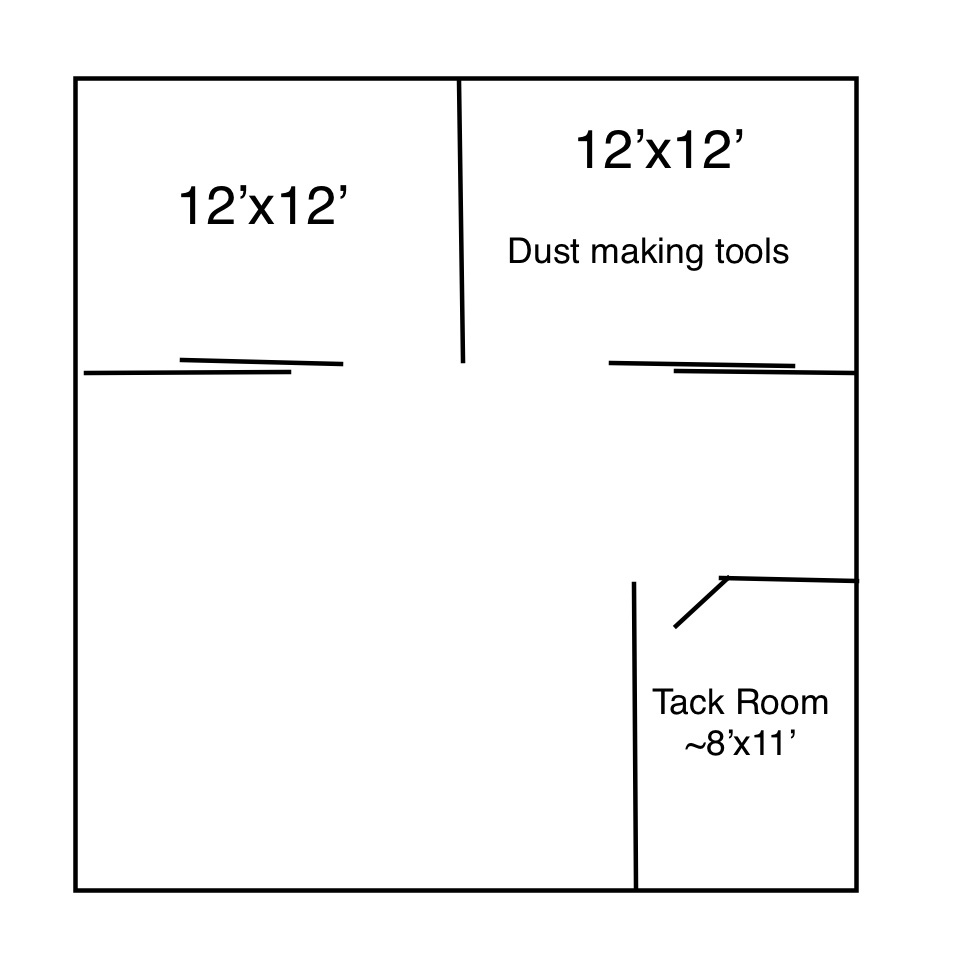
Hi Gary, First let me apologize for hijacking the thread on your beautiful build, that was not my intention. I’ve attached a crude drawing (sorry, I’m on my phone) to help you visualize what I talk about below. The barn is an Amish built horse barn. I only mention that so that you picture 6”x6” beams with a peak height of 12’. I use one of the 12’x12’ stalls for dust making work and the tack room (~8’x11’) for assembly and smaller tasks. The tack room is insulated to the outside (I guess saddles are expensive) with one inch thick wooden walls on the inside and a little forced air heater is all I need in there. The stalls however present two problems. 1) heat in the winter and 2) dust/dirt. Even though we’re in Virginia US, I was surprised there was no heat in the barn. My wife, who grew up with horses, told me horses make their own heat, so it wasn’t unusual. I’ve thought about a wood burning stove, but that would take up a lot of room, and the power is maxed - only a single 240V line run from the house split into single 20A and a 15A circuits. We do have propane heat in the house, but since the house is about 50 yards from the barn I would have to run either power (from the far side of the house) or a gas line (from the barn side of the house) down here if I want a non-wood solution. Dust - ugh. The floor of the stalls are dirt covered with horse mats. They keep the dirt somewhat at bay, but there always seems to be a settling of dust on everything. The tack room has a concrete floor covered with karate mats (for my comfort) but dust can be an issue in there too. I’m very open to any ideas you or anybody else have. We do have an unfinished basement that I thought about adding a shop to, but the biggest obstacle there is dust removal and/or the noise of dust removal. Oh, and the cats Once again sir, I apologize for hijacking your thread. Clay
-
Thanks Gary, I will take a look. Sadly, my shop is in an old barn, so while somewhat roomy, any serious work out there until the temperatures rise a bit. Clay
-
Gary, A very tidy solution. I was thinking that maybe I could build something similar for my 48” lathe as well as my Taig, although neither is permanently mounted. Do you remember where you found the “Y” shaped nozzle over the bed? Are they from the loc line aquarium fixtures? I saw those, but at $75 each I’m hesitant to get them for a “trial” system. Clay
-
Wow sir, thank you so much for the kind offer. I will try not to abuse your good will Clay