JPZ66
-
Posts
173 -
Joined
-
Last visited
Content Type
Profiles
Forums
Gallery
Events
Everything posted by JPZ66
-

casting metal parts including cannon
JPZ66 replied to rtropp's topic in Metal Work, Soldering and Metal Fittings
Walton, I am talking about a Centrifugal casting machine that spins a 9" or 12" circular mold....it is absolutely designed for production work. No, it is not for the typical "home hobbyist". It is THE way to cast pewter for production of small model parts. This not the "broken arm" type centrifuge. When I was casting small model ship parts, say, 20mm deck guns in 1/350 scale, I could easily get 100 parts per spin in a 9" mold. A spin cycle takes about 2-3 min. My spin casting machine sits right next to a melting furnace crucible pot that holds 150 lbs of pewter. I have other equipment for investment casting. Joe -
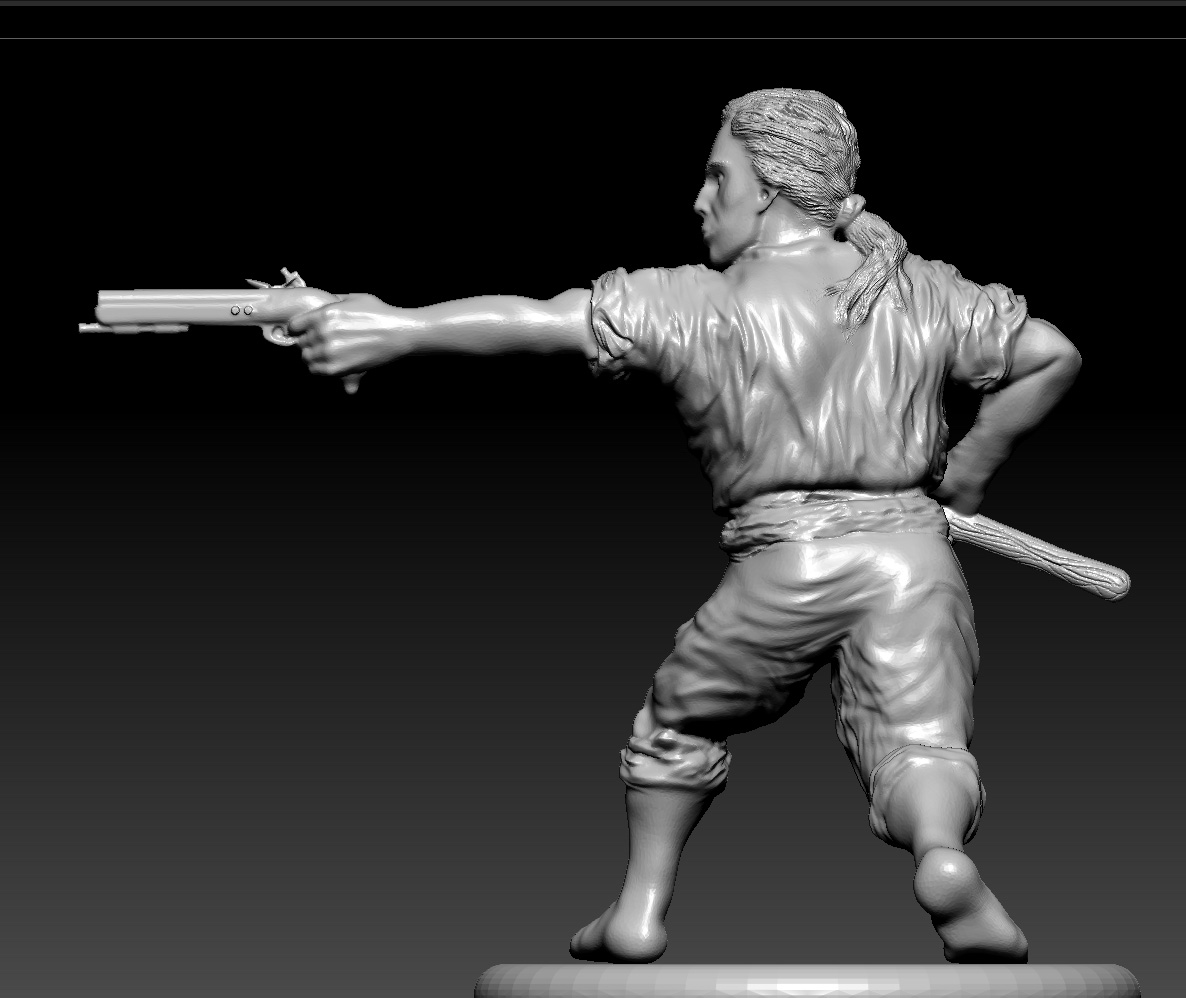
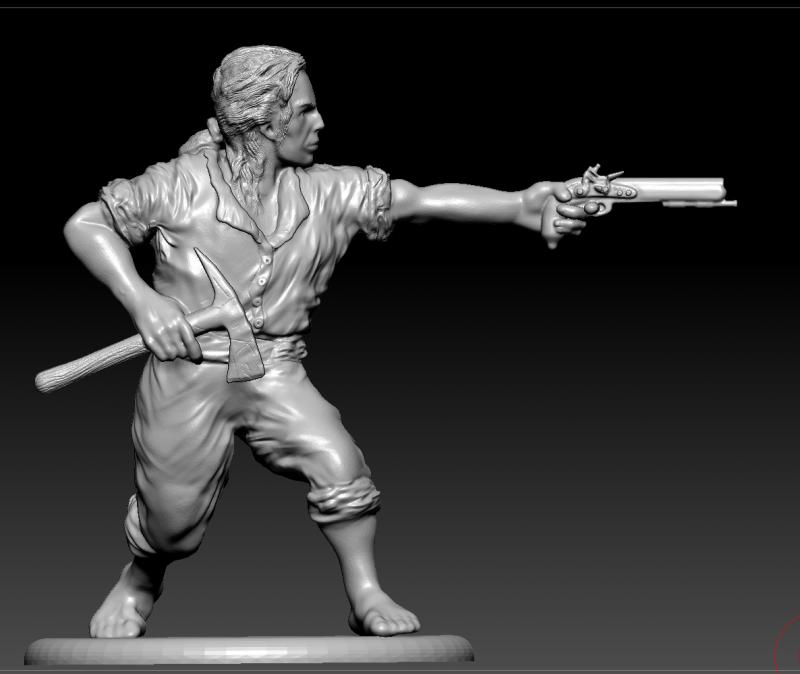
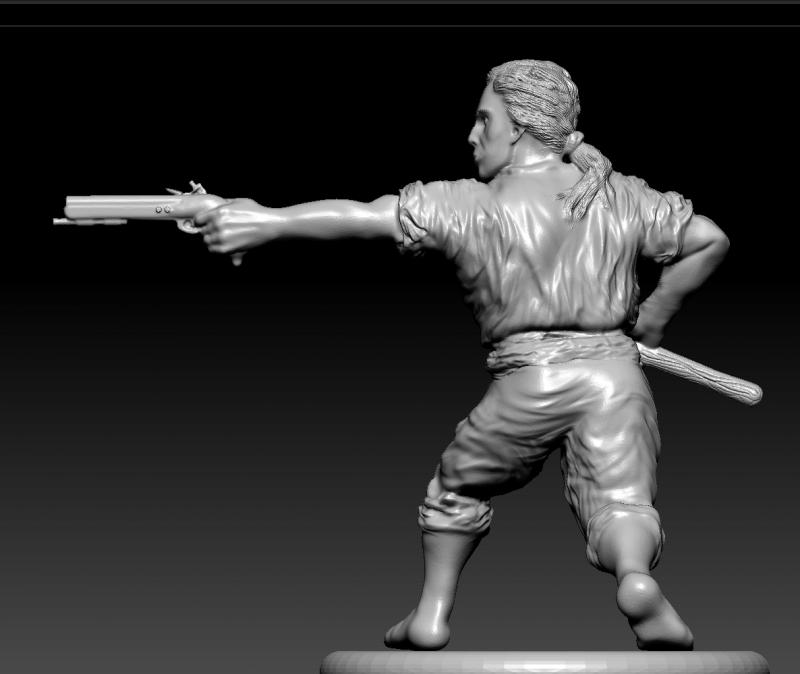
Just a quick note.....we have been making some fine tuning adjustments on the 3D printer, and the test figure is more sharply defined. Additionally, we have done output in 32mm, 35mm and 54mm. In 54mm, you can even see the wood grain in the axe handle quite nicely ! We are going to run some tests on even smaller scales soon as well. Aardvark Miniatures, LLC should be releasing some of the first figures at the beginning of 2017. -Joe
-
The next figure I'm working up is going to be a crewman in rowing pose ( actually, going to create a couple different, but similar poses / dress for this ) Expect an update in a few weeks on this one. Also, I should have the 35mm figure back in a day or so to inspect. That will work nicely for 1/50-1/48 scale. Thanks all, Joe
-
Actually, the proportions of most wargames figures are for ease of painting...notice how often you see heavy layers and oversized details on uniforms? ..they do also like to have beefy weapons to help against breakage though and to make the castings a bit easier to produce....I'm told...though I find that to be an excuse. As such, they tend to "swell" the figure to match. I call them caracatures. Sadly it is the accepted 'standard' there. My goal with these is to keep them on the more proportioned and realistic side as much as possible. ( understand that the digital sculptor I'm working with comes from the gaming side of things It is another reason why I value the feedback on the figures when I post pictures. I prefer the scale aesthetic. Thanks, Joe
-
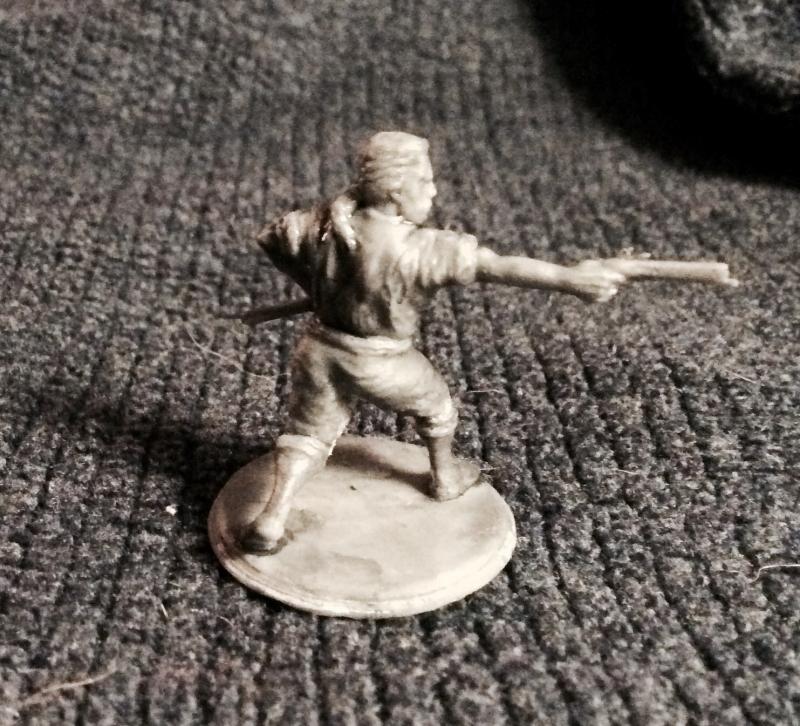
Wefalck, Yes I initially thought the same, as the nature of the pose, and my lousy photography ( paper in front of bulb to try and diffuse the light and an older cell phone camera ), do sort of make it appear that way. It does actually measure out properly. The figure is also a little 'stocky' to my eye, and now that we have a printed prototype, I will be discussing a few adjustments with the artist. Neither of us were quite sure just how well the details would hold up in this 28mm size given the printer we used to output it and we are establishing a baseline. This also illustrates why creators of figures in small scales tend to exaggerate some features - though not correct, to provide what many consider to be a visually appealing look. Sort of like plank nails being shown for effect, when in reality ( for small scales ) you would never see them. One company, in my opinion, that makes really good looking figures without this sort of distortion, is Preiser. Unfortuntately they don't make figures in this genre that I am aware of. I appreciate any and all feedback, as the goal is to create good looking figures that people will want to use to crew their ships. I will be posting more images in the coming weeks and months as we get more figures done. Thanks, Joe
-
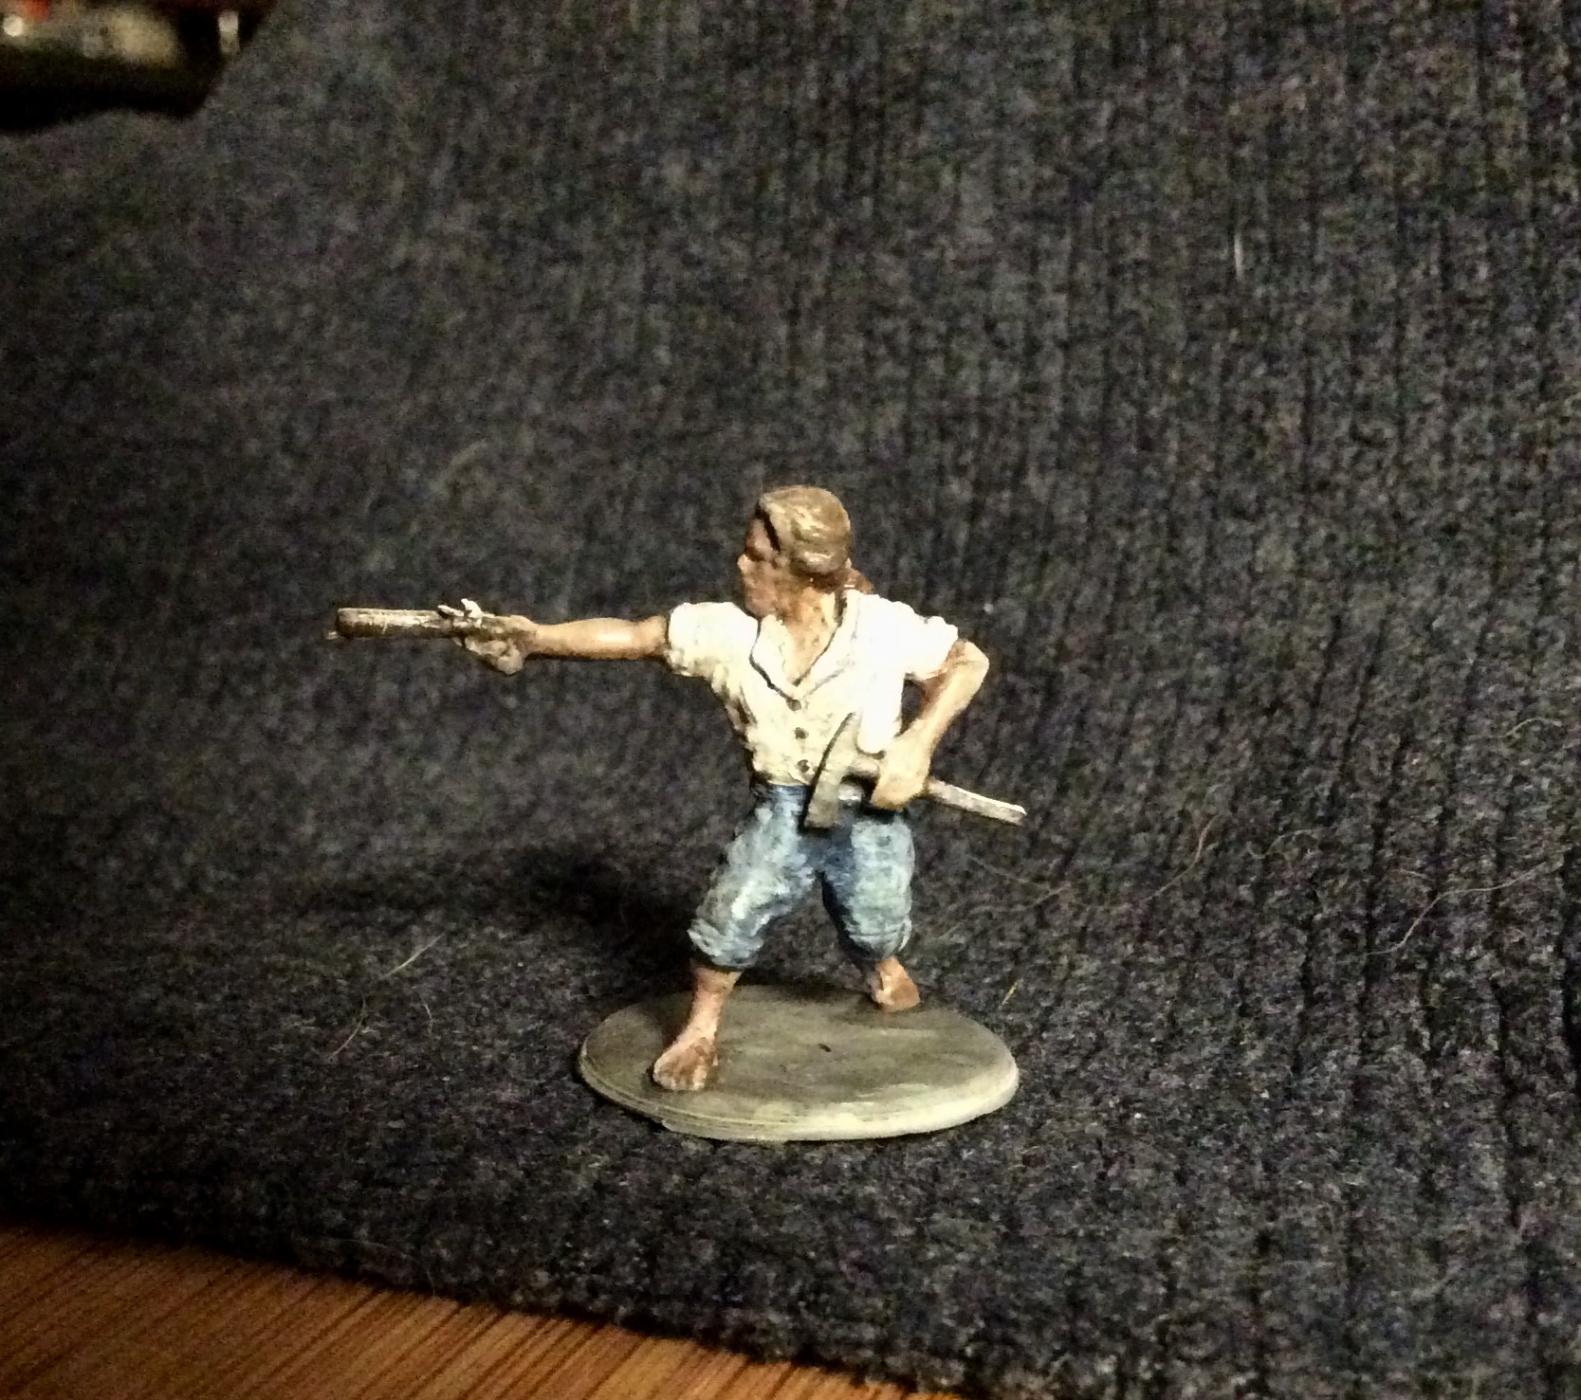
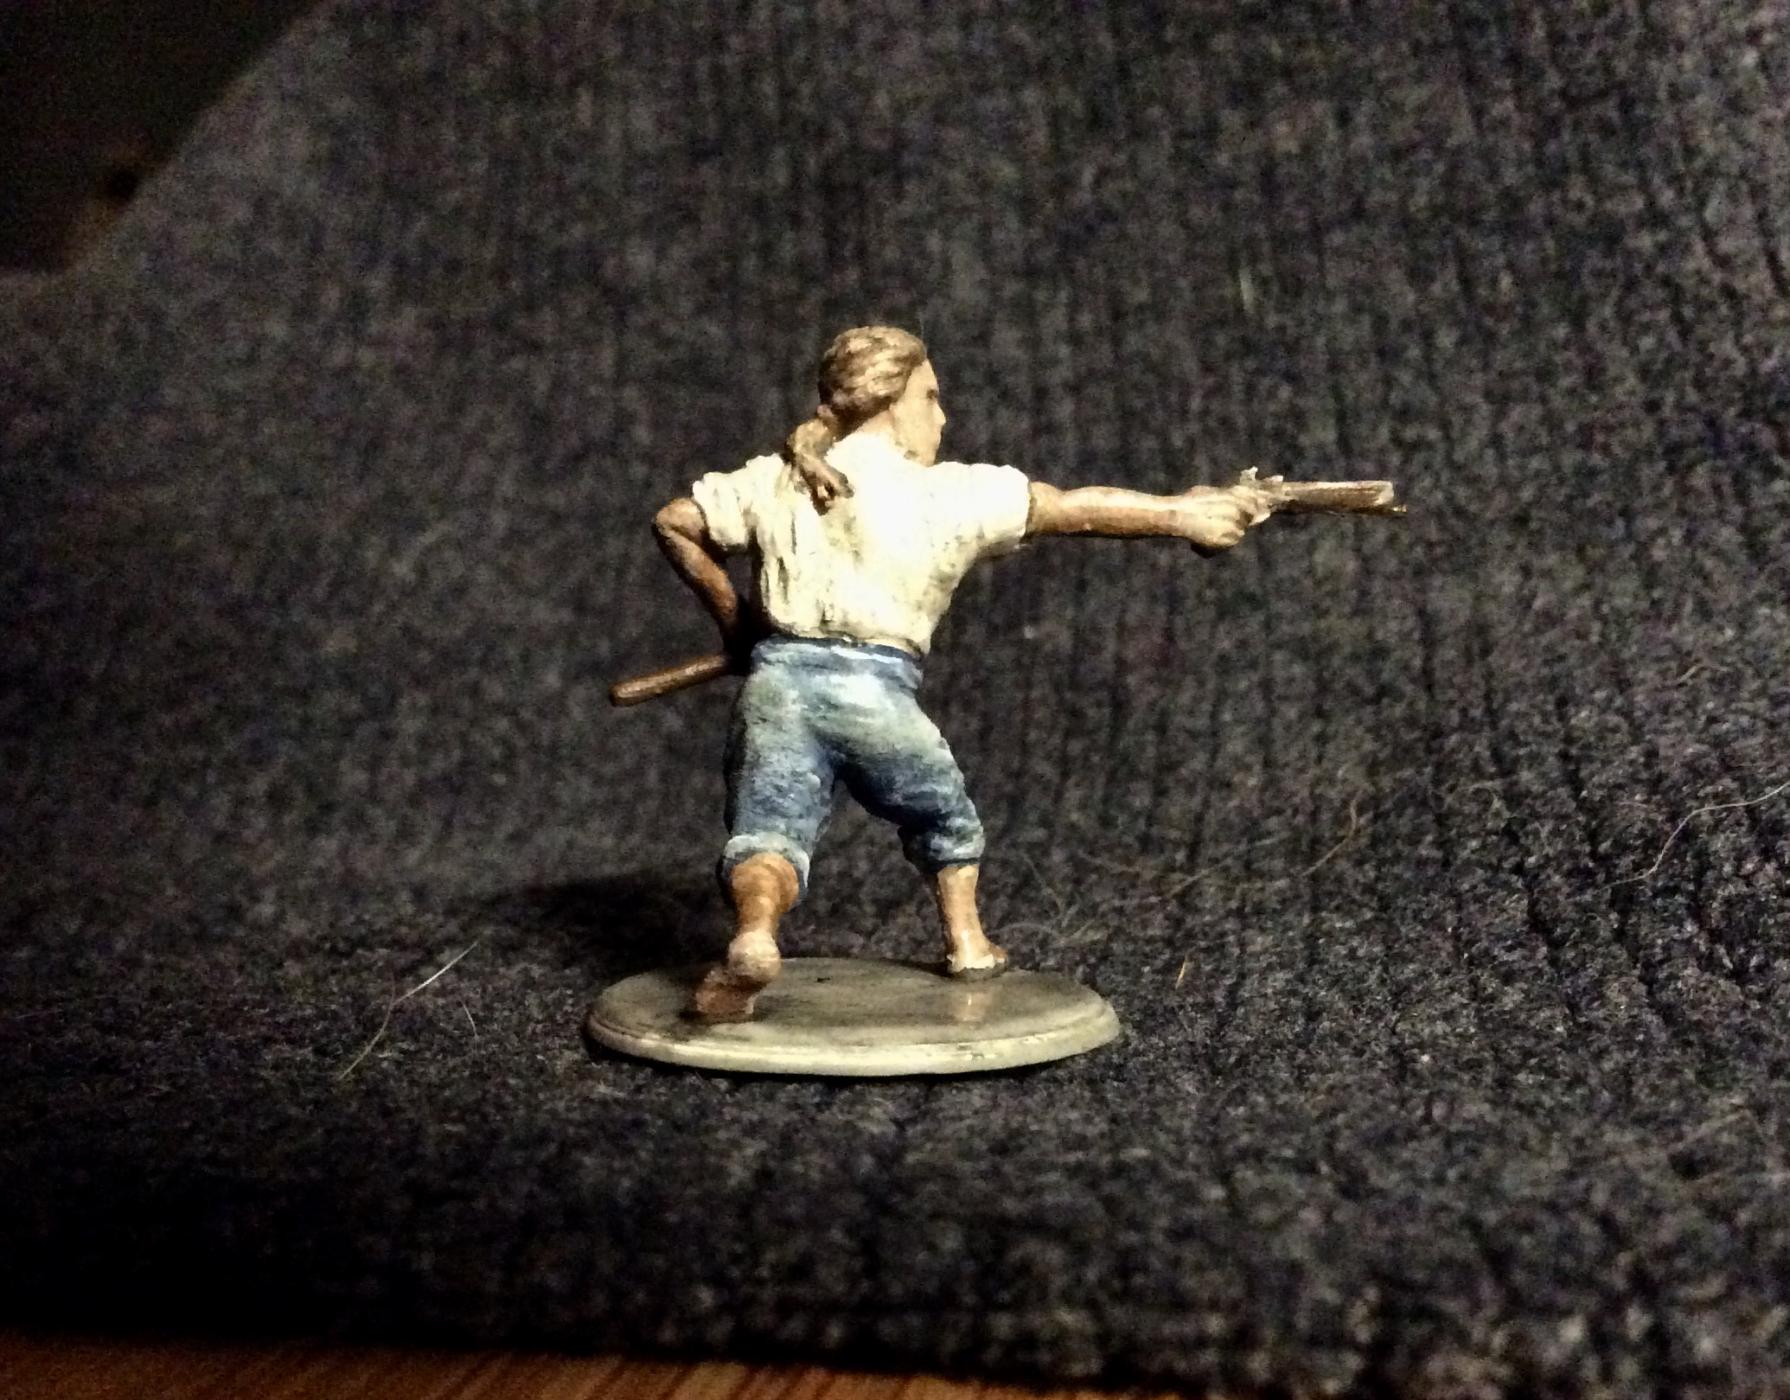
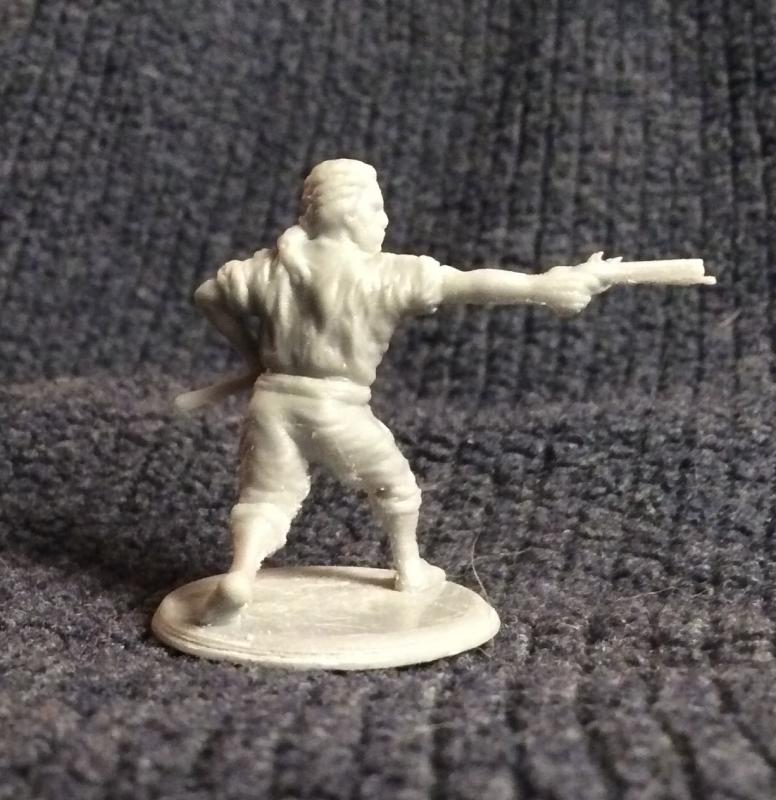
Ok...last photos of this guy...I took 15 min to splash a little color on him...


-
Same figure with a quick wash to show a bit more depth...
-
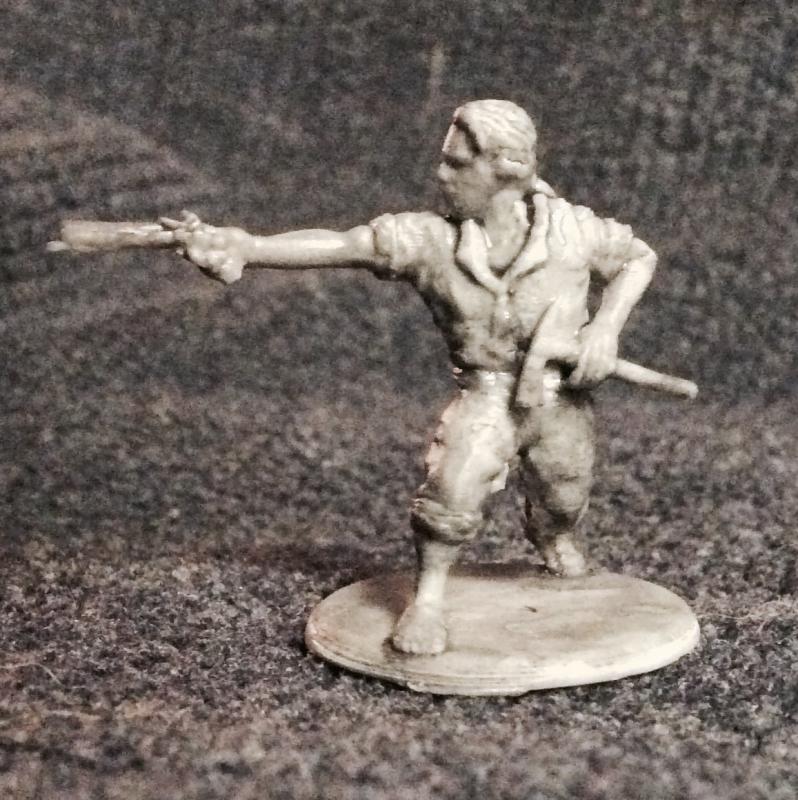
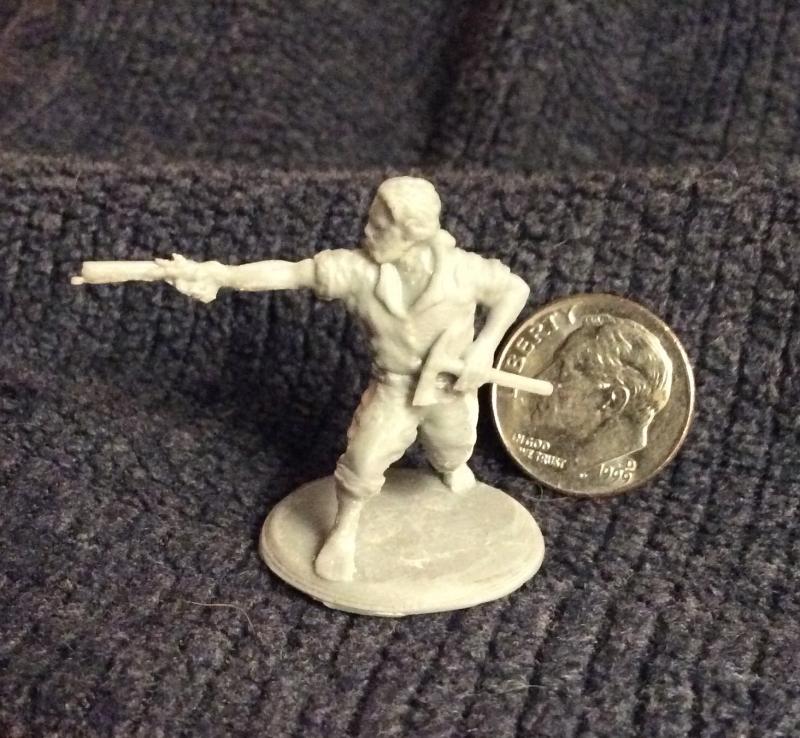
Ok, so I picked up a few prints and after a quick trimmimg of supports and no further clean up....... Here is the test 28mm figure ( 32mm and 35mm coming later this week ) The detail is quite good, rather hard to see here, and perhaps I will try an ink wash to show the recesses a bit better. -Joe
-
Wefalck, Good suggestions. I will be looking over the prototype print in just a little while. Additional model prototypes are being run in different scales. We are looking at what happens to the detail level. I'm not a fan of bases either, so there will likely be an option of with or without bases. The base came about as these figures can be used for wargaming. The other option I'm looking at, is making them available as already cast pieces, or as a downloadable file that one may print either at home or through a service. One problem with making files available through an outfit like Shapeways for example, is that the creator gives up Intellectual Property Rights as I understand it....I'm looking into that to get the facts. Some figures planned will not have a base option, as they are "in action" , i.e; sail handling on the yard, or climbing the rigging, etc. I will post some photos later today of the printed prototype. -Joe
-
Hi all, I have found a 3d sculptor to work with and am currently running some test output on an SLA / 3d printer. Currently the test figure shown here is being done in 28mm, but can be scaled up or down a bit fairly easily. The goal in this project is to create several limes of figures in a few scales ( covering 1/60 - 1/48 range ) initially and that they be in "action" poses, not simply standing around. The figures will be prototyped with 3d printing, molded, and then cast in either resin or pewter. These will be officer and crew figures of the 18th and 19th century period. - Joe
- 103 replies
-
- 13
-

-
I vote for bands as well, but maybe you can use a 'gun metal' shade instead of black ? Maybe reduce the stark contrast a bit.....not sure if that would be correct though. Joe
- 306 replies
-
- 4
-
-
- armed virginia sloop
- Patrick Henry
- (and 2 more)
-
Yes !
-
Bolt Heads on Brass Strips
JPZ66 replied to mikiek's topic in Metal Work, Soldering and Metal Fittings
You might wish to try photo-etched parts. Bolt heads and nuts come in a huge range of sizes. Some are available in nickle, stainless or brass. I quick search for scale model photo etched parts will turn up plenty for you to check out. Quite popular with car, railroad and armor modelers ! You can find them in round, square, hex and most sets include washers.... Joe
-
Frank, That is an absolutely splendid job you're doing ! The weathering depth and tones, and attention to detail present a truly realistic appearance ! -Joe
-
Tadeusz, Thank you so much for this continuing effort and wonderful posts ! All of it has been a fascinating view of ships and ship building. Very highly interesting !! -Joe
-
Possible significant maritime find in England
JPZ66 replied to BANYAN's topic in Nautical/Naval History
That would be quite a find if that's the ship and can be salvaged to any degree ! Fascinating ! Thanks for posting that link. Joe -
Bilge Pumps 1870/80
JPZ66 replied to GAW's topic in Discussion for a Ship's Deck Furniture, Guns, boats and other Fittings
Here is a link to a thesis that some may find interesting and was / is the basis for "Ships' Bilge Pumps" , Oertling, a book published by Texas A&M University press. http://nautarch.tamu.edu/Theses/pdf-files/Oertling-MA%201984.pdf - Joe -
Found this very brief video on YouTube....a quick overview of the process, but gives you the idea....
-
A bit late perhaps, but possibly useful for others.... If the photoetched parts are in layer or have little to no stress on them, using clear lacquer applied via artist brush works well as a "glue". -Joe
-
I should also like to mention, that when multiple waxes are created, they will each need to be imspected, cleaned up (of parting lines, etc) and assembled into a 'tree'...looks a lot like a Christmas tree when done, and then is ready to be made into the investment mold stage....the great part about investment molded metal castings, is that they have no parting lines...only the attachment point of gates and vents, which are easily trimmed and cleaned. It is certainly possible to create low temp metal castings at home, but there are a number of downsides. Foremost of them is that the low temp metals available typically do not have much strength and many will 'rot' over time. Some contain lead. For low temp metal castings, you can simply mold your master in a high temp resistant silicone and won't need to worry about any plaster molds or the like. If you are a DIY'er...Please follow the directions of any casting kit you buy and be very carefull with even the low temp metals...they most certainly can cause serious injury to you and your household equipment if not handled properly. When you move up a step to actual shop castings, one must consider there are a number of different formulas even for brass. Not very home casting friendly due to the required temperatures, proper crucibles and so on. I was supposed to have my shop up and running by now, but got sidetracked with a different venture......at any rate, I will be setting up my casting operation in the coming months, and will once again be able to cast large or small quantities in everything from resin to lead free pewter / brittania, brass, silver and gold ( forget about platinum ! ) Anyone desiring more information about molding, casting in resin or metal, feel free to shoot me an email with your questions. I'm happy to assist if I can. - Joe
-
Hi, There are a couple of ways to go about this process...I won't go into that except for this much .... You can create a master...from nearly any material, mold it in a type of heat resistant silicone, and make injected waxes for the investment casting process, or you can create wax masters for either 'one off' ( risky ) or to use for other forms of molding, and again making additional wax copies for the investment process. The "Investment" is a type of refractory grade material, similar in appearance to plaster, but capable of allowing very high temperature materials to be poured or cast into it. Brass, silver, gold, platinum, etc. No matter which way you tackle the front end work, once you create a 'tree' of wax masters and set up, pour and create the investment mold, the mold is then cured and baked in a high temp oven for very specific cycle of temps and time to both cure the investment AND melt out the wax masters....leaving behind the exact cavity of the master which then gets filled with your casting Metal. - The 'Flask' ( the part that is the investment mold in a metal cylinder ) will be taken from the oven or kiln, and either gravity or vacuum cast with the metal that is ready and waiting. The flask needs to be at a quite high temp when this is done. Again, a separate topic all its' own....for another thread maybe one day. Throughout the process, there is a small percentage of shrinkage produced at the different stages, and knowing both the molding materials and the final casting materials will be a part of the initial design...i.e; the original master is often created at anywhere from 1-3% oversize to account for this. For very small parts this process shrinkage may not be noticeable, but if the parts have a bit more size or mass, and are requird to fit as a part of an assembly.....well, you get the idea. The good thing about creating a silicone mold for wax injecting, is that if you decide you want more of the castings, you simply make more of them and repeat the investment process for more metal castings. BTW - there are quite a few silicone mold materials to choose from and the type of investment will depend on the desired finish, type and temp of the metal to be cast....none of these parts of the process are " one size fits all ". I hope I have not added any confusion here....hopefully it sheds a little light on the process. There are a few decent videos on the internet out there, but most that I have seen are less han satisfactory for really explaining things well. - Joe
-
All I can say is; Wow, what a masterpiece ! To see what you have done with simple, ordinary trees......Amazing, master class artistry. Bravo Gaetan, Bravo !!! - Joe
- 728 replies
-
- 3
-
-
- le fleuron
- 64 gun
- (and 1 more)
-
Just a thought on the deck build... When building a strip kayak over frames and strongback, duct tape is used to cover these so that when the cedar strips are glued and clamped tight, they can be lifted off later. Usually the outside is finished and 'glassed, then it is lifted off and the inside is 'glassed. I would think it's possible to build your deck this way. Use a layer of fiberglass on the inside, and it will be waterproof and strong. If you preplan the locations, additional sections of reinforcing plywood need only be epoxied and glassed in at specific locations. Whatever you do, the example you made looks fabulous ! -Joe
-
Is this the Europylus ? Joe
-
Lextin... BINGO , Thayer is Correct !! Joe