JPett
-
Posts
881 -
Joined
-
Last visited
Content Type
Profiles
Forums
Gallery
Events
Everything posted by JPett
-
 Ahoy Mark I will second Augie's remark. There's a bit of work in that there pic She looks great
 -
Ahoy Buck No but I drove one once at a trade show and watched a full demo. It uses gluons to fuse molecules at an atomic level . You'll love it I want one for my PE. It really is the bomb. You can solder one thing right next to the other and not melt any other solder except on the part your working on. Think tack welder meets soldering iron. It really is you.
- 515 replies
-
- 5
-

-
- artesania latina
- whaleboat
- (and 1 more)
-
Ahoy Buck If your going to go down this road and we all know you will; you might want to start saving those penny's. About 39000 of them will get you a really nice set up http://www.all-spec.com/products/10541.html?gclid=CNiYnPD_nsQCFU8Q7AodaXIApA#nowhere These things are the bomb
- 515 replies
-
- 3
-
-
- artesania latina
- whaleboat
- (and 1 more)
-
Ahoy Mike I use the Rocket Air globe http://modelshipworld.com/index.php/topic/2791-giottos-super-rocket-air/?p=76162 I find them easy to use and very effective
-
Tips and Tricks for Airbrushing
JPett replied to JPett's topic in Painting, finishing and weathering products and techniques
Ahoy Mates Here is another really good video that answers many basic questions. Lots of common sense info. He also demos an inexpensive can adapter for airbrushing large areas that might be all some hobbyist need- 39 replies
-
- 2
-
-
- Airbrushing
- Tips
- (and 1 more)
-
Tips and Tricks for Airbrushing
JPett replied to JPett's topic in Painting, finishing and weathering products and techniques
Ahoy Mates In my never-ending quest to improve my airbrushing techniques and models I have found this video It is not an airbrushing video although he does use airbrushing paints. Most noticeably Vallejo's new Metal Model Air colors which may be of interest to many here. What he achieves is impressive. The author has also turned me onto a new hobby. Airbrushing plastic utensils. They are cheap and provide an excellent surface in which to develop painting skills, new techniques or possible color combinations before applying them to your models. I am developing a collection of spoons that are weathered, have panel lines and rivets, depth to color, fades, and even look like their made from everything from leather to metal. I plan to paint a spoon, knife or fork (forks are good practice for covering multi layers objects) before I paint anything on my kits. It only takes a few minutes and confirms my mix, pressure, airbrush and warm up the operator before the main task.- 39 replies
-
- 5
-
-
- Airbrushing
- Tips
- (and 1 more)
-
Tips and Tricks for Airbrushing
JPett replied to JPett's topic in Painting, finishing and weathering products and techniques
Ahoy HSM It should be noted that when you cover your needle and backwash your airbrush you should never follow this up by spraying. It should always be the last step before you dump your cup or empty the jar so you don't contaminate your airbrush. This is a great link for anyone interested in cleaning their airbrush (Any Brand) http://www.iwata-medea.com/support/faqs/faqs-airbrush-maintenance-and-cleaning/- 39 replies
-
- 2
-
-
- Airbrushing
- Tips
- (and 1 more)
-
Is there a better #11 blade handle
JPett replied to roach101761's topic in Modeling tools and Workshop Equipment
Ahoy Phil I put a single wrap of Tamiya tape where the knurled lock down knob meets the handle. This is all it takes to prevent it from backing off, keeping the blade firmly in the jaw. -
Tips and Tricks for Airbrushing
JPett replied to JPett's topic in Painting, finishing and weathering products and techniques
Thx Spiff I will have to try your 10 pound suggestion as I am also big on lots of thinner. I am not a skim milk drinker so I tilt the paint in the cup and watch how it runs back down. For me it should immediately run back leaving only a slightly opaque film on the wall of the cup. When I mix up batches I use a glass jar and this same technique I love my Neo Perhaps you could do a post on how you do your mottled camo. -
Tips and Tricks for Airbrushing
JPett replied to JPett's topic in Painting, finishing and weathering products and techniques
Ahoy Canute I have read many comments about being very careful when using ammonia in my airbrush. I use Windex and cheap glass cleaners all the time as a quick rinse and have even found mixing some in with acrylics helps the paint to settle. I always dilute it though and never use it straight. Word is prolonged use of ammonia products can damage the chrome plating on the internal parts of your airbrush. -
Ahoy Buck You're are really starting to scare me. Any smaller and you might run afoul and split an atom. Your neighbors would not take to kindly to this.
- 515 replies
-
- 4
-
-
- artesania latina
- whaleboat
- (and 1 more)
-
Tips and Tricks for Airbrushing
JPett replied to JPett's topic in Painting, finishing and weathering products and techniques
Ahoy Twintrow If it helps the biggest problem I had when I started out was rushing. Airbrushing requires prep, patience and practice. Lots of practice, I shoot between 20 and 25 PSI, thin the crap out of everything and never rush. Learn to build up layers. The best advice I can give you is to go out and buy some cheap model kits and start painting. Once you get into the grove you will be amazed at how good some of these cheap kits can look with a good paint job. I am a PE addict and love resign kits that have a ton of it. The PE will really test your skill with the airbrush. Especially truss work where you need to paint the inside without over spaying the outside. If you use Acrylics buy that companies thinner. Guys have all kinds of home brews which do work but in the beginning it is best to eliminate everything so the focus is just on you developing the skill and finding your weaknesses. I like the Tamiya paints but only if you thin them with lacquer thinner which i know is the opposite of what I just said. I am however past the learning stage and can play. Beginners should try a line staying only with that manufacturers recommended products. Buy only a few colors, some thinner and spray away. Another big mistake is let your stuff dry. Yes you want to build up layers but once that is done put it away. Some paints take 24 hours to cure. When you start mixing and matching you can cause a chemical reaction that can take a week to cure. I don't paint everything or one color all at once. I paint a few parts, work on something else and maybe paint that , then come back to the first thing I painted in a few days. This way I never fret about getting it all done: I know that chances are that color will be back in the cup in a few days so who cares if I missed a spot or need a touch up. Plus too much air time and I start making mistakes. . Biggest mistake. Learn to clean your airbrush and do it frequently. Get a cleaning kit. I can break down and completely clean my airbrush in under five minutes. I do mine at the first sign of trouble or when ever I change paint types. I have a little jar that all the parts go for a swim in, less the body and needle. Then I take them out one at a time, clean them, line them up, and once thier all clean assemble the airbrush.- 39 replies
-
- 2
-
-
- Airbrushing
- Tips
- (and 1 more)
-
Tips and Tricks for Airbrushing
JPett replied to JPett's topic in Painting, finishing and weathering products and techniques
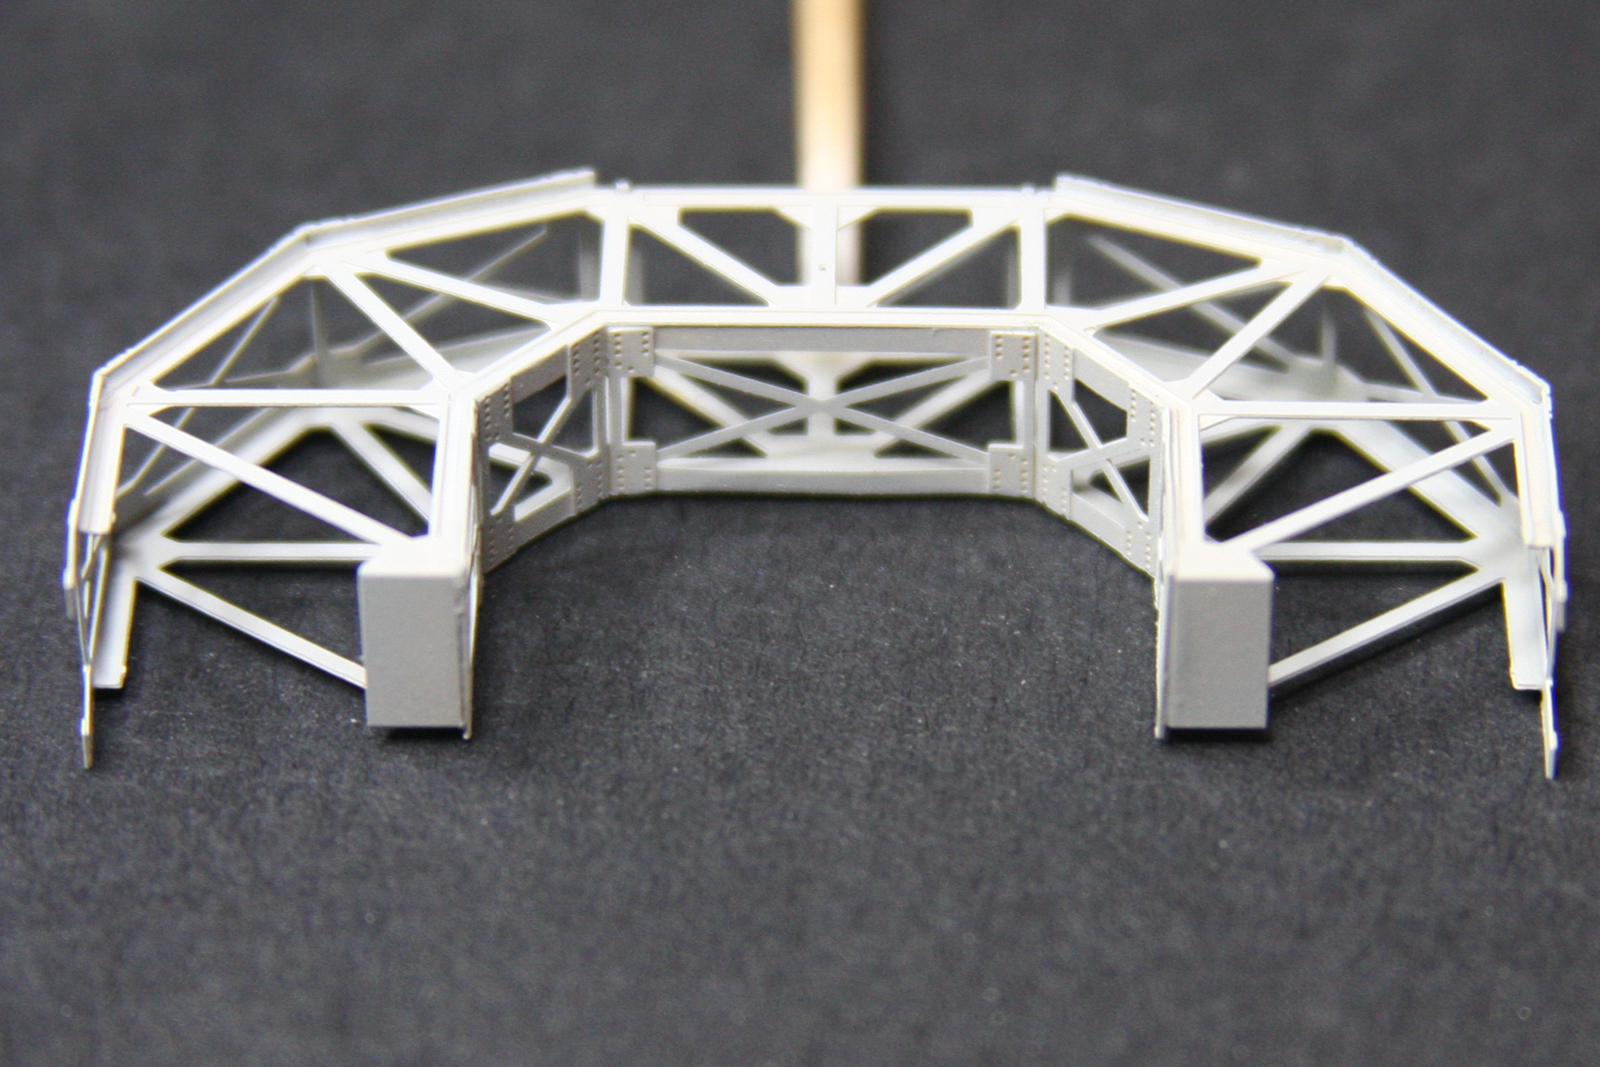
Ahoy Mates PRIMING 101 PE and Resin Any of us that have experience airbrushing resign or PE know the importance of a good primer. After much experimenting and many disasters I use exclusively Mr Hobby Resign primer and Mr Hobby Leveling thinner. Either one could be the poster child for dangerous chemicals used in the hobby industry so a proper paint booth and mask are requirements. This combination does adhere to resins very well and not come off when using low tack tape. It also does not flake or ship off when sanded like many other primers. A coat of Johnson's however will make most primers easier to sand. The Mr Hobby can be wet sanded with Tamiya 1200 or 1500 and repainted with no problems Primers can be one of the hardest paints to apply with an airbrush. Many have a separate airbrush just for primers and flats. These paints dry very fast and will clog the tip of your airbrush in seconds. This is followed by splatter and an unhappy modeler. I use a Neo Dual-Action Airbrush with 0.35 mm tip and Gravity Feed Cup for everything. First never thin primers in your airbrush cup when using gravity feed airbrushes. It is impossible to stop the paint from immediately filling the bottom of your cup regardless of how much thinner you have in it. This glob of primer will proceed to your nozzle as soon as you pull back on the stick with negative effects on your airbrushes performance regardless of how much you stir. Use a suitable container and mix yourself up a batch and then use that directly in your airbrush. If you prime everything as I do it will never go to waste. Actually first should have been wash your parts. I use an old paint brush, Ajax dish-washing soap and cold water. Never use hot or even warm unless you want to reassemble them. Then I use air to dry them. Then they sit for a few hours. Thinning primers. I thin primers as much as 60/40 (sometime more). The 60 being thinner. The thinner you can paint with primer the better your kits will look. Mine is so thin it takes between 5 to 10 coats to cover. The good news is all the coats can be done in one sitting. Apply a light coat, apply some air; a properly applied coat will dry in about 10 seconds. Apply another coat and repeat until the part or kit is covered. My first coat is so thin I can only see it by the shimmer. Buy doing it this way you will have a super thin, super tough primer coat that does not hide the smallest detail. As far as the spray pattern I only pull the lever back (Double action) about 25% and work close to my project for the small stuff. Larger areas I am further back but still only around 50% on the throttle. With this much thinner, pull back any more and you will only flood the surface and cause a run. It is important to find your happy place too and do this off your work. I spray into a paper towel and get the setting and then without changing a thing move to my project. I also never stop while the brush is aimed at the project. Spray away then stop. The distance where the paint is wet on the surface of your project, barley covering and not flooding is where you want to be. The good news is with this much thinner if you do flood or saturate an area just switch to air and disperse it. In most cases you will never see it after it dries. Good luck and happy modeling Pic is of a PE assembly for Alliance Model Workshops SMS Vulkan 1:350 scale primed as described. It is a total of 5 parts CA'ed using Jet Super thin. Edit: I removed the text regarding this primer and PE. Although it does work it is no better then the Tamiya which is also quite good
- 39 replies
-
- 5
-
-
- Airbrushing
- Tips
- (and 1 more)
-
Ahoy Mates With all the interest I see here on MSW about airbrushing I thought it would be helpful to have a thread that allows those with more experience to share what they know with those who are just starting out in. If there are enough responses I will request the thread get pinned Please free free to post what ever you like, questions, answers, practicums, links to your videos or other logs here on MSW that you think might be helpful to others
- 39 replies
-
- 4
-
-
- Airbrushing
- Tips
- (and 1 more)
-
Paint brush verses air brush
JPett replied to medic's topic in Painting, finishing and weathering products and techniques
Ahoy Mates I don't think there is a wrong way or better tool. I think it depends on what kind of finish you want on your ship. I always use my airbrush on plastic and resign kits but it has not touched any of my wooden ships yet. This does not mean it won't, but just that I have not found it necessary yet. For stains and dyeing wood, a brush or rag is the better tool; but should I decide to do a clear coat my ship with a dull urethane when I am done I will use my airbrush to do this. It will do the best job to preserve all the detail, especially on the deck. Truth be told a spray can could also do this. A brush however would not do a good job here. For PE, metal parts that are highly detailed it might come out or I might try blackening. I considered a translucent color to represent bottom paint but let all the detail show. Again something for the airbrush. I put the airbrush with the Sherline mill and Brynes saw for shipbuilding. They are each really nice to own but not really necessary for shipbuilding. Yes these tools will expand your possibilities but only after you learn to use them which can be a task in itself. The airbrush does have a slight advantage over the other two: you can't cut your finger off learning to use it. You will however spend a lot of time. -
Ahoy Russ Leave to you to debunk the high priced serving machine Please keep us up to date on its function I'm hooked
-
Ahoy Augie Nice The fit you have achieved on these pieces is just amazing. You have really stepped it up on this whole build Thx for sharing it
- 2,191 replies
-
- 2
-
-
- confederacy
- Model Shipways
- (and 1 more)
-
Ahoy Chris One of the biggest mistakes people make is not shaking the can enough. The hot water trick is good but if the paint is not properly mixed its worthless. If you can still lift either one of your arms its not shaken enough. I use an airbrush now but when I used rattle cans I would tape them to a long sawsall blade and run the tool for at least 5 minutes. Before this brainstorm I would go for long walks with my spray can. I am not sure I would recommend the walk method today. Proper shaking makes a big difference in the particle size, finish, splatter and clogging. Works for the color coat too. Heat it and you can achieve coats only an airbrush can top. Well someone whose good with an airbrush and that's another can of worms. Another mistake which I am sure you know about but I will mention it for others is how far away you spray from your work. This distance will change depending on the weather and where you paint. You want the paint to be wet when it hits the model. If its drying in the air and then landing on your kit you will get what's called "orange peel". Your paint will look like the surface of an orange. Too close too thick. This is especially important for primers and flats that dry fast. Good luck, its a beautiful kit
-
Proxxon compound table -- Opinions?
JPett replied to rtropp's topic in Modeling tools and Workshop Equipment
Ahoy Richard I have found mine to be excellent for hobby use and of high quality. It is not however a Sherline table but it will interface perfectly with your drill and not break the bank. Accuracy is very good but not as precise as a higher end compound table. The comparable Sherline table is $260 and does not include the clamps, the Proxxon comes with them. Mine was made in Japan. Not sure if that makes a difference My only complaint would be that the wheels used to move the table should be knurled. Other then that I have no complaints and use it frequently. It makes a big difference when using micro drills or making custom parts. It should also open up some basic milling opportunities which you will find very useful for shipbuilding -
Ahoy Mark It is truly an amazing project you have here. An absolute pleasure to follow. Sorry to see the crack but we all know these things happen and generally only make us better in the end. I am sure you will weather this small squall As for your Ebony I am not sure if its correct to use spile and ebony in the same sentence but I am wondering if this might be that exception to the rule. Good luck and happy sailing
-
Ahoy Buck Maybe you could sell your buckets. Start a business "Buck's Buckets" Who knows It could become the next big thing. They are amazing "Lol" Or you could just start the Wasa
- 515 replies
-
- 5
-
-
- artesania latina
- whaleboat
- (and 1 more)
-
Ahoy Sport You mean this stuff right Kneadatite Blue/Yellow Epoxy Putty Tape 36" "Green Stuff" I might buy some and borrow your idea "again" She looks great I really like the lettering
-
Ahoy Robert Good idea. When I saw that on the plans I laughed at the thought of it knocking around in the hull As for the door; I think the plan is to let the shipwright decide. My plan is to take a piece of milk carton plastic and place it in the hull. This should allow the door way to be illuminated but not let you see through the hull to the other door. I have to run some tests before I commit to this
-
What keel clamp is recommended?
JPett replied to MarkBseau's topic in Modeling tools and Workshop Equipment
Ahoy Mark Who told you not to bother with the Amati. I will admit that it is expensive but good tools generally are. I got mine on an MS 40% off sale. LOL I am cheap like that. Due to its price I only recommend it to those who have made a commitment to the hobby. In my opinion; it is the second best clamp in the industry You can build the best clamp for under 3 dollars http://modelshipworld.com/index.php/topic/8154-the-first-jig-every-kit-builder-should-consider/?p=242063 -
Ahoy Robert Looks great I see you went with the stub as per the instructions between B8 and 9 Did you reinforce it