


Landlubber Mike
-
Posts
4,217 -
Joined
-
Last visited
Content Type
Profiles
Forums
Gallery
Events
Posts posted by Landlubber Mike
-
-
Really nice job! I leave for a while, come back and you've already started and finished a model - and a beauty at that. Great work!
- mtaylor, Old Collingwood, GrandpaPhil and 2 others
-
 4
4
-
 1
1
-
Hey Craig, just catching up after being away for a while. The Ferrari came out fantastic! Really well done my friend. The yellow is really sharp and for a color that's not always easy to execute, you knocked it out of the park.
- king derelict, FriedClams, Canute and 3 others
-
6
-
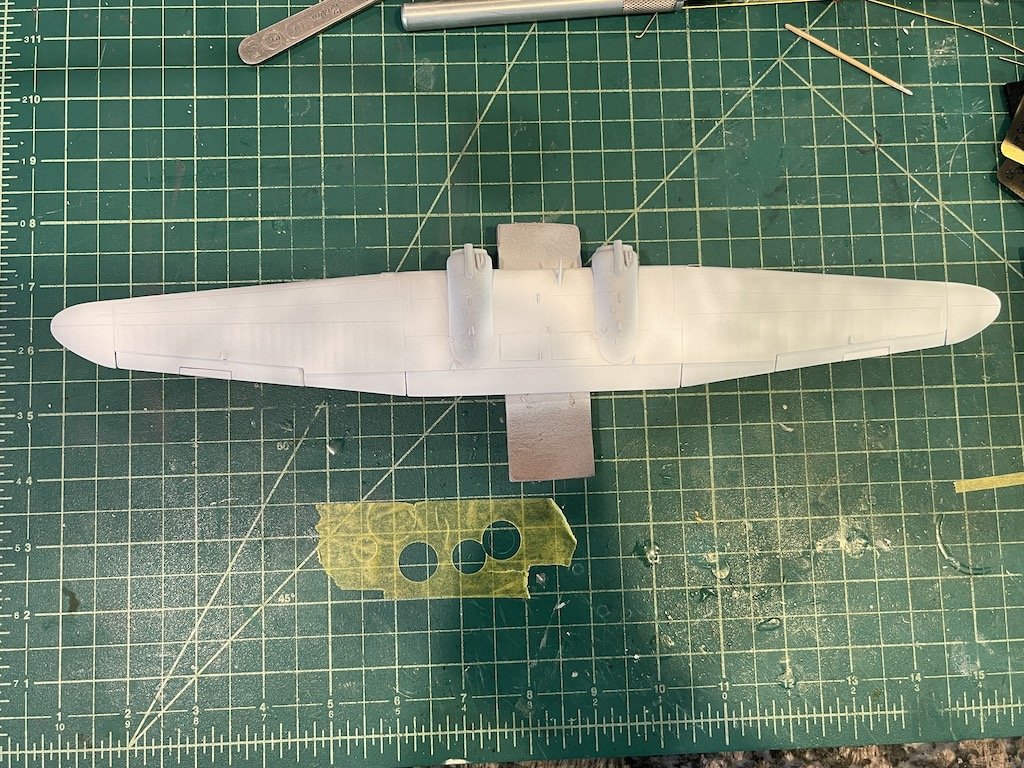
Back to the JRS-1 after a really fun family trip to the beautiful Smokey Mountains in Gatlinburg, Tennessee. I added the remaining PE grab handles to the fuselage and have a few rounds of primer on the model. I really like using Mr. Surfacer as it helps show any gaps, extra bits of glue, and other imperfections. Plus it's sandable and provides a really stable base for when colors are to be laid down, taping, etc.
One annoying thing about this kit is you have to fill two windows on the right side of the model. I used a Dspiae circle cutter to cut out two plastic discs and everything looked fine. I was worried, however, that the primer coat would show outlines of the discs, and that is what indeed happened. I managed to get one of the discs sanded/filled where it eventually disappeared, but one stubbornly refused to go away. I realized that the problem was it probably wasn't fully seated into the fuselage and kept lifting up no matter how much I sanded. So, late last night I tried pushing it in a bit to see if I could glue the the raised edge down, and the stupid disc popped into the fuselage 🤬 I freaked out and said a lot of not nice words, but 20 minutes later I had a new disc cut and glued in via superglue this go around, and after the primer coat, both discs are now gone ✌️
I still have some very minor cleanup and a few panel lines to re-scribe, but otherwise I'm happy how it's looking. I was a bit worried how the scratched landing gear would come out after being painted, but thankfully it's looking better than I expected.
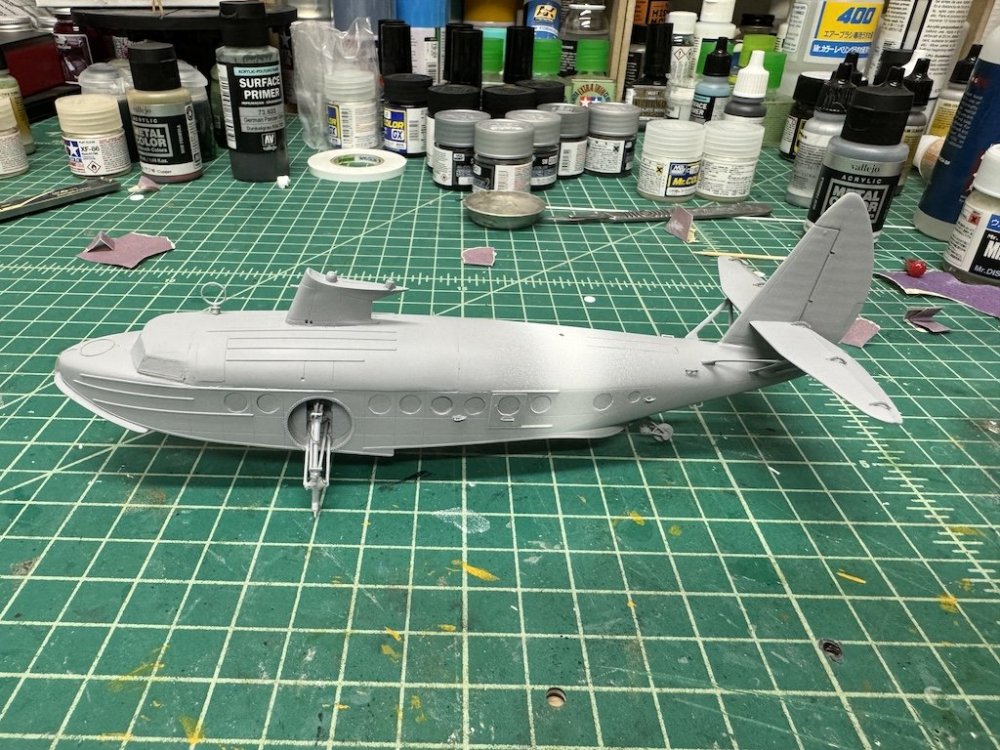
I've been agonizing a bit over the order in which to paint the fuselage - aluminum first then colors, or colors first then aluminum - but I decided to do the colors first and finish with the aluminum. I've already put an undercoat of Mr. Surfacer 1500 - white for the red band near the tail, so will try to get the red band, green tail, and black underside and top side markings done today.
Thanks for looking in!
-
Just catching up with your log after being out of town. That steel template is fantastic! Really great idea! This is looking very good, thanks for sharing your tips and techniques.
- tmj, Glen McGuire, FriedClams and 3 others
-
6
-
Thank you Gary! Really appreciate the kind words!
- Egilman, Jack12477, Old Collingwood and 5 others
-
8
-
55 minutes ago, Canute said:
Mike, take a look here: https://www.cybermodeler.com/hobby/details/sac/detail_sac_48068.shtml
Cast white metal replacements.I used a set for a damaged F-4 model.
Your scratch gear turned out great. Looks like it would work.
Thanks Ken! I did see this, and might actually have it. Definitely a good option if I don't want to scratch it. What I liked about scratching the LG was that I could drill holes into the fuselage, and run rods through and into the fuselage for added stability. Typically, you can't do this with kit parts (or the SAC metal replacements, which I believe are usually copies of the kit parts).
46 minutes ago, king derelict said:Mike, the scratch built gear looks spectacular. It definitely repays your efforts.
wing looks nice too.
alan
Thanks Alan, really appreciate it!
- Egilman, AJohnson, Old Collingwood and 5 others
-
8
-
-
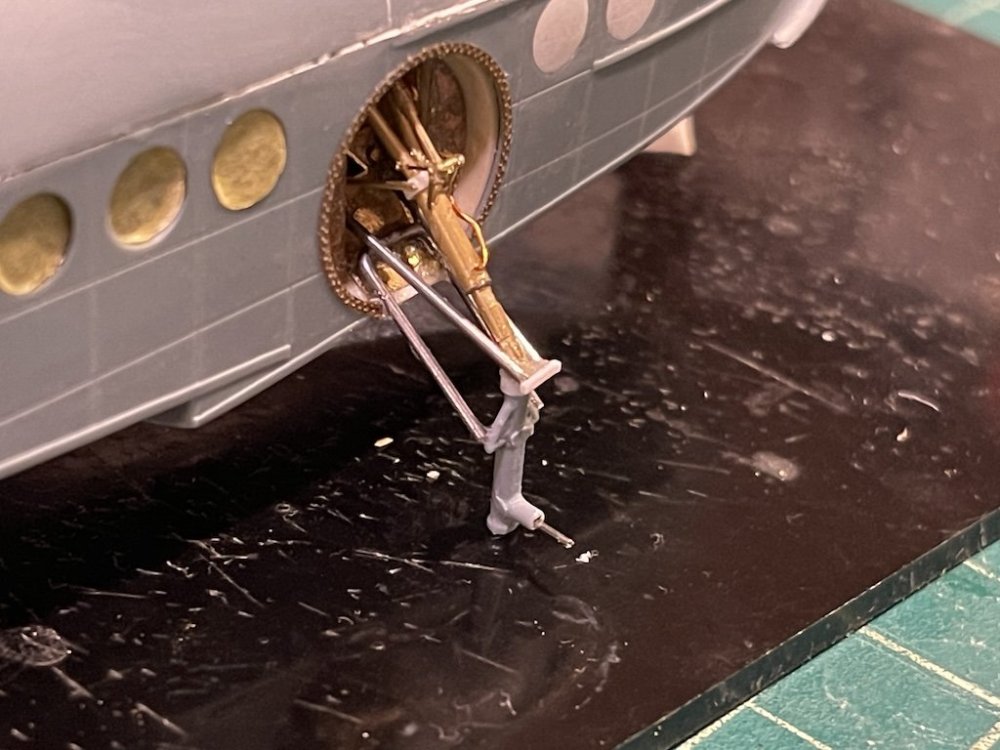
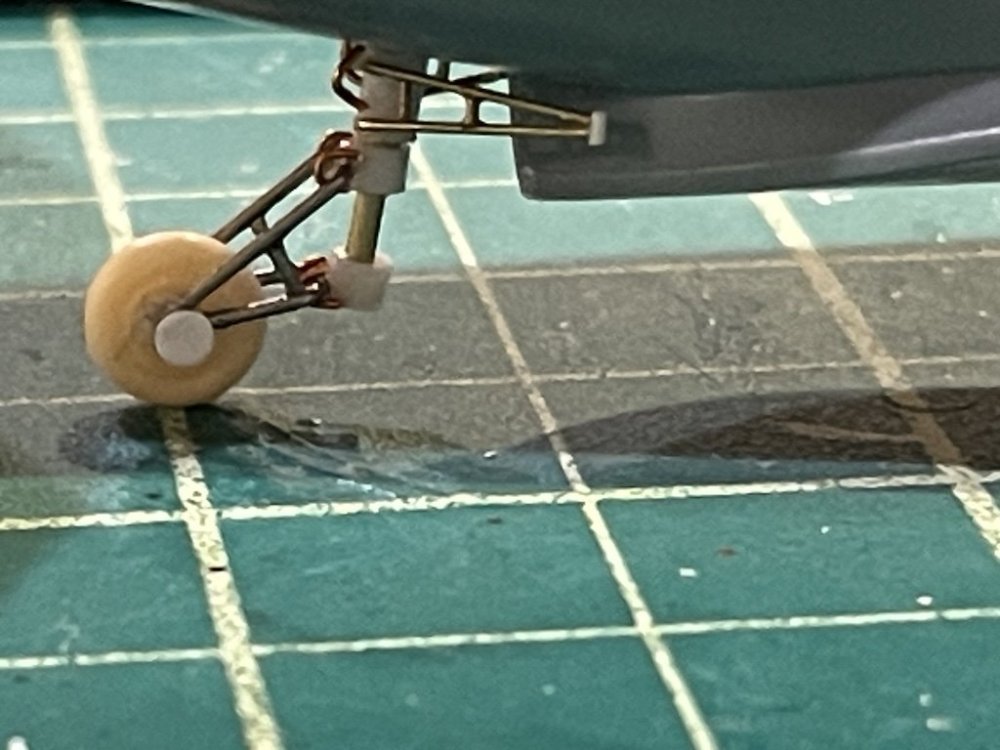
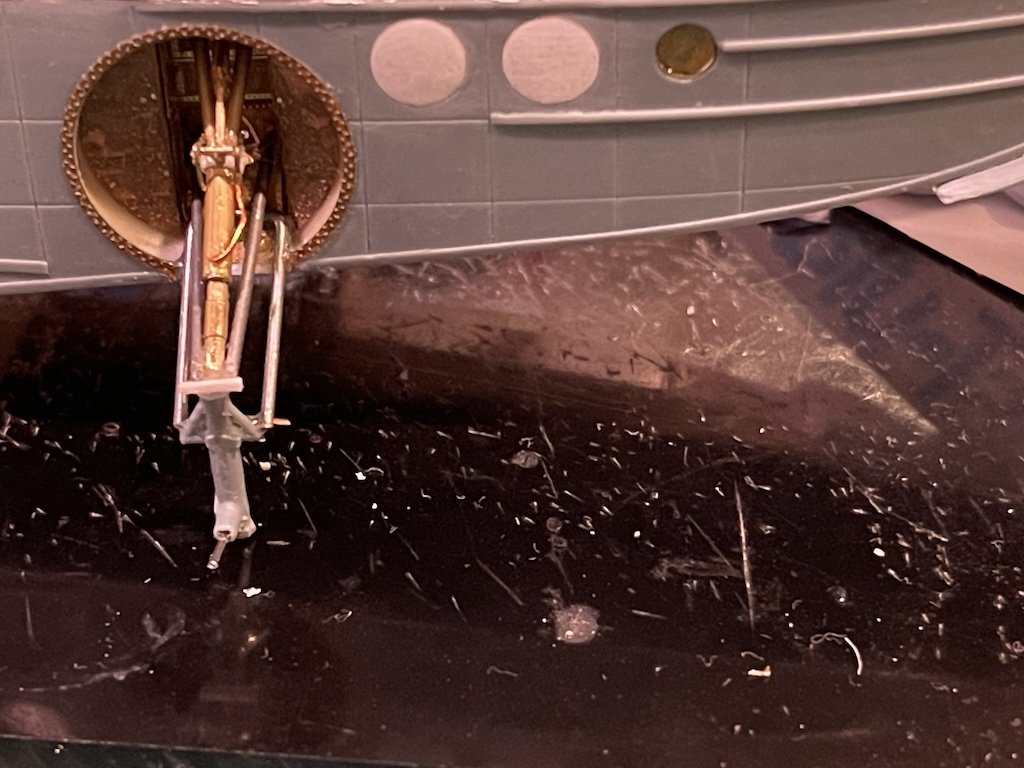
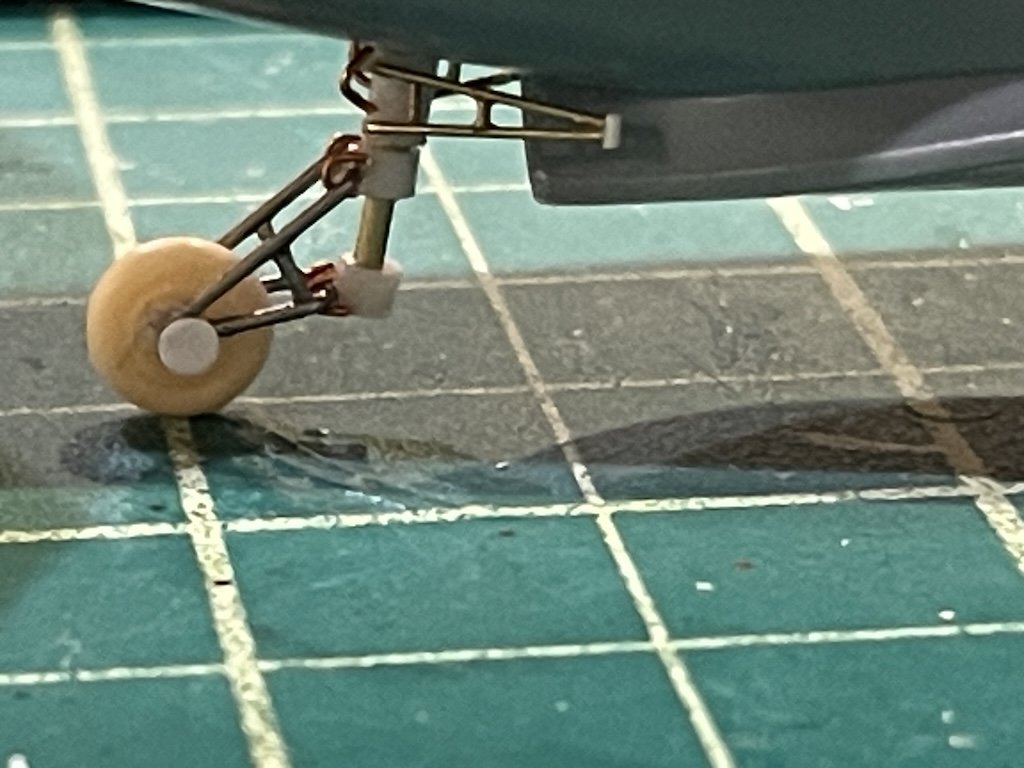
Finally got the landing gear done on the JRS-1. With the CMK resin aftermarket, I was worried that the kit landing gear, which was made up of five parts on some very thin, weak plastic, wouldn't support the model long term. Otherwise, the kit landing gear was a reasonable approximation of the real thing, but the tail wheel assembly was very overly simplified to say the least -- once I saw pictures of the real thing, I couldn't "unsee" it so decided I would scratch it along with the landing gear.
I used some kit parts, along with music wire, cut down steel pins, brass and copper wire, brass tubes from Albion (amazing tubes if you need tubes designed to fit within one another), and plastic tubing. With CA and two-part epoxy, both the landing gear and tail wheel are pretty sturdy. Not sure it was worth probably 20+ hours of work, but I'm glad I went through the process as now I'll be able to scratch build the landing gear on the 1/48 PBY-5A Catalina which is notorious for collapsing. Anyway, here are the pictures:

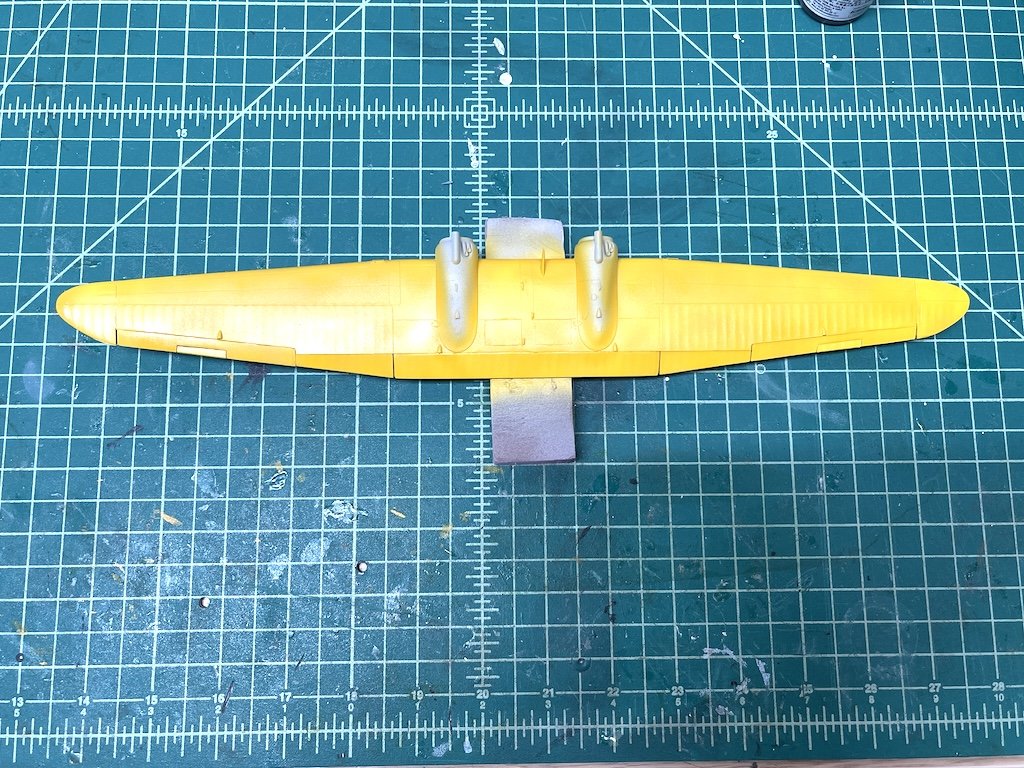
The upper part of the wing has been painted with the base yellow from decanted Tamiya Camel Yellow from the rattle can. I first primed with Mr. Surfacer grey, and then lightly sprayed with either Mr. Surfacer white primer or Tamiya white primer (I forget), to get some variation in tone. Then a light spray of the yellow and there's some decent tonal variation so it doesn't look too plastic.


Thanks for looking in!
-
Another wonderful SIB Glen, congratulations!
- FriedClams, mtaylor, Glen McGuire and 2 others
-
4
-
1
-
Wow, nicely done! Stellar work!
- Jack12477, Keith Black, Paul Le Wol and 2 others
-
4
-
1
-
Looking great Alan! Nice quick build!
- Old Collingwood, Canute, thibaultron and 1 other
-
4
-
Thanks Alan! The kit out of the box makes for a nice model, but it is based on an older Sword kit from 2003. The nice thing about the Eduard boxing is that you get some resin parts as well as a small PE fret, so if anyone is interested, that is the kit I would buy. You don't necessarily need the other PE set from Eduard or the CMK set (if you can find it), but they do add some nice details.
Really, the canopy is the toughest part to fit. Everything else goes together fairly well with a little work. The landing gear is just an odd set of parts, but are fairly accurate - I just don't see how sturdy it will be over time. The tail wheel is probably the one part that is completely wrong, but at this scale, it's probably the best they could come up with in plastic.
-
Thanks guys! Guns at this scale are usually the trickiest, given the size and lots of parts. I've gotten a little better at putting them together over the last few models. Now at this scale, you will barely be able to make out any details with the naked eye. But, they still look a little crisper to me than the kit plastic guns.
- AJohnson, Knocklouder and mikegr
-
3
-
Fantastic subject! Hopefully at 1/144 it shouldn't be too much of a space eater.
- Egilman, Old Collingwood, Canute and 1 other
-
4
-
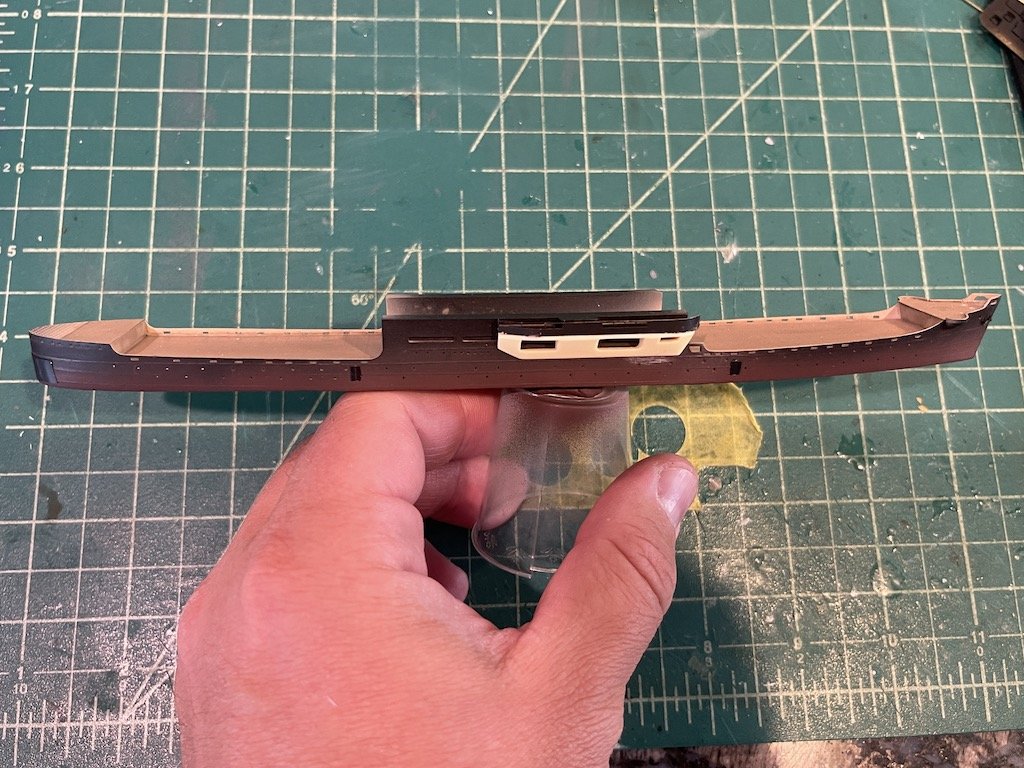
I ended up putting in a little time on this project the past couple of days. It's a nice kit, but the instructions - which are all pictures - aren't exactly a step-by-step guide. One of the problems especially has been that the kit doesn't include any information on the date of the ship (and it's corresponding configuration) or even what the colors are. Thankfully, there are kits from Aoshima of this ship in early and late configurations (this is a late configuration) with good instructions which has made things easier. Otherwise, the Five Star kit - with the resin hull and other parts as well as PE and brass items - seems to be a big improvement over the clunkier all-plastic Aoshima kit.
Here is where I am with the hull at the moment. I've added the various doors, the anchors, and the starboard area under the bridge. Interesting thing about the Akitsu Maru is that it was designed to carry planes as an escort carrier as well as vehicles for the IJA as a Type C landing craft depot ship. The planes were carried on platforms above the wooden deck you see in the picture below (and under the flight deck), while vehicles were carried in the hull that exited through doors that opened in the stern (you can see one of the four doors in the picture). The ship also could carry landing craft in the hull, where the well deck could be flooded so the landing craft could float out of the ship.
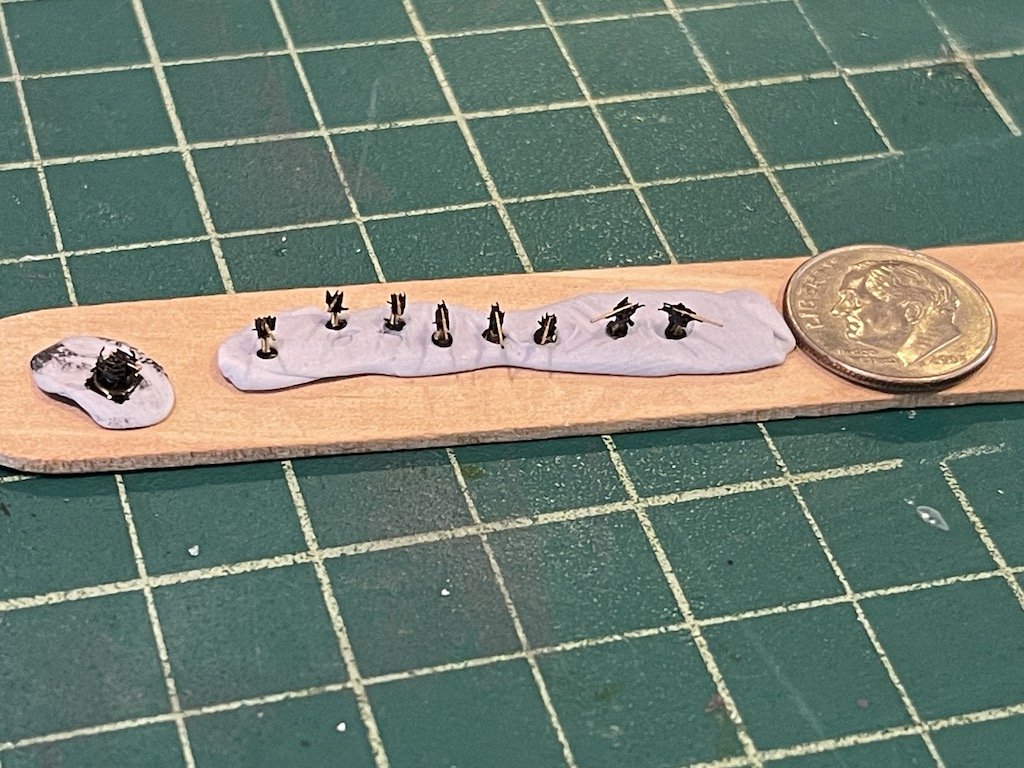
I decided to also tackle the mortar - tiny little thing made up of eight or so parts...
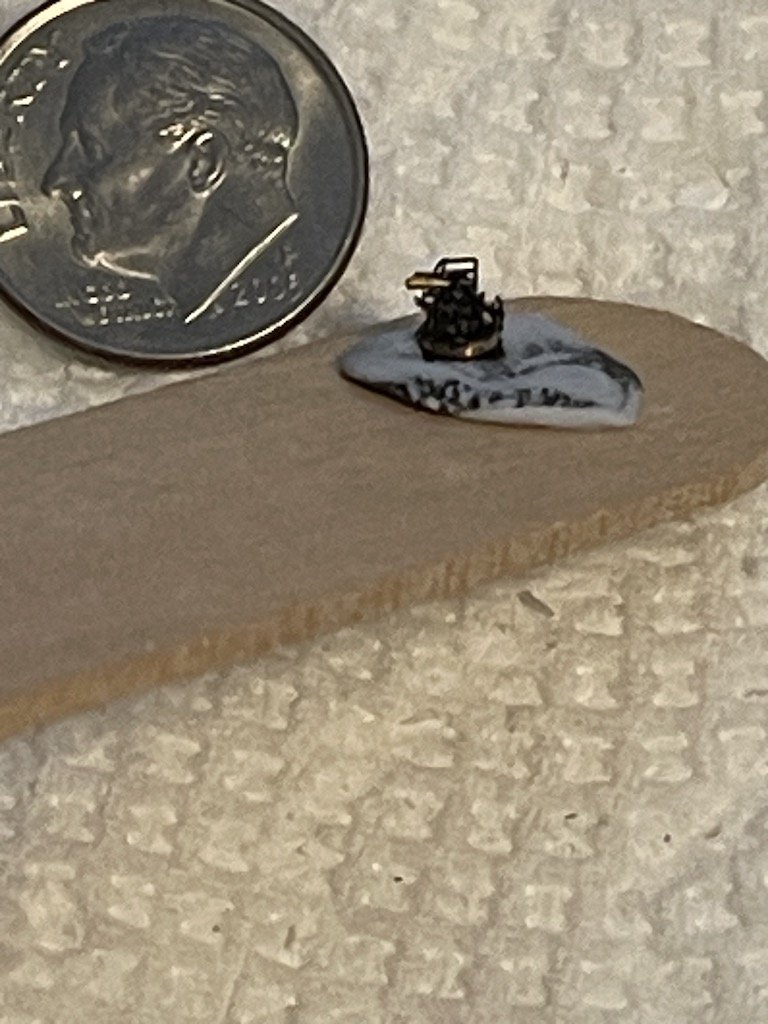
...and eight of the AA guns:
The other 1/350 and 1/700 ships were a bit easier in some respects when it came to construction and painting as you could pretty much fully assemble the ship, paint the deck, and then paint the rest of it dark gray. This is a little trickier in that you have to construct and paint in stages, as some of the interior parts (such as under the flight deck) are clearly visible but need to be painted in different colors. This ship, like many of the IJA ships, were painted in a camouflage green as to the exterior, while the interior parts were probably not painted as such. So my next step is to add the platforms under the flight deck and the stored planes, and then I can work on adding the flight deck, bridge, stern platform and other exterior items.
Thanks of looking in!
-
Between fit issues, accuracy issues I can't unsee, and issues like the landing gear (see below), I keep losing the will to want to work on the kit. But with the extension of the group build on LSM, I feel like I should get this one completed.
This kit wants to fight you the whole way, but I've managed to get the construction for the most part completed. The wing took a lot of work to add the various CMK resin parts and PE handles, etc., but it's looking ok I think. After looking at pictures, I decided to move the antennae. The kit has you add it dead center (and standing straight up) in the front between the two engines. It looks like the antennae was actually off center to the right and angled forward, so that took a bit of work.
I did get the wing primed, and I'll start adding some pre-shading before painting the upper surface yellow. I'm debating whether to use the kit decals or just try to paint the US insignia on myself. Given the amount of work needed for the top surfaces of the wing, I'm going to take the approach of painting the top of the wing before installing it onto the fuselage.

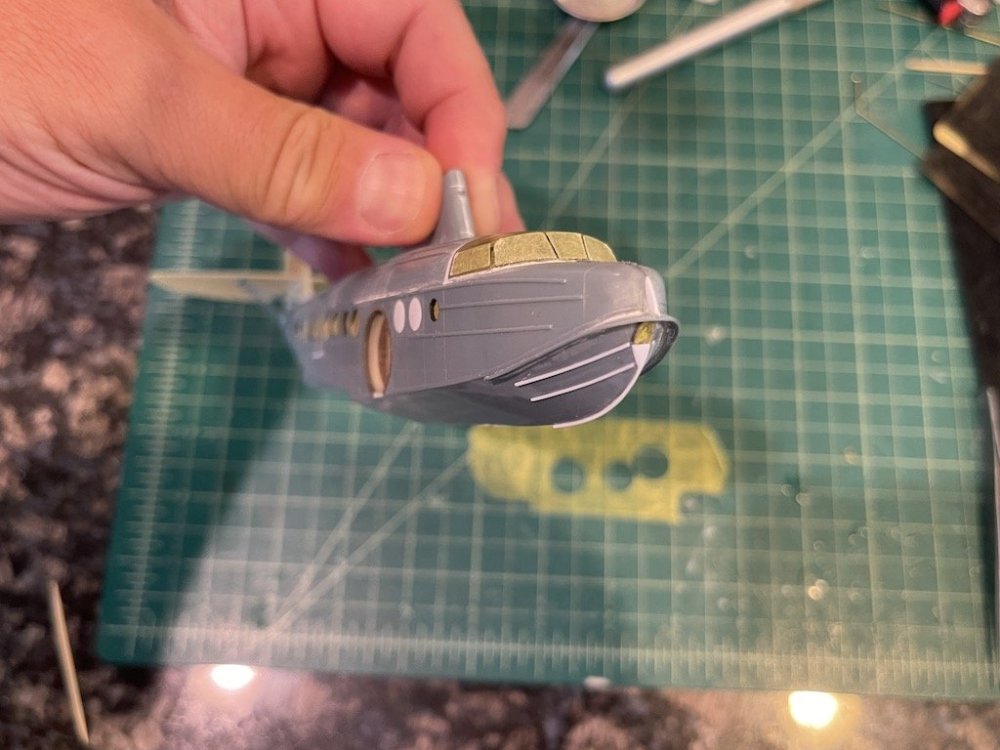
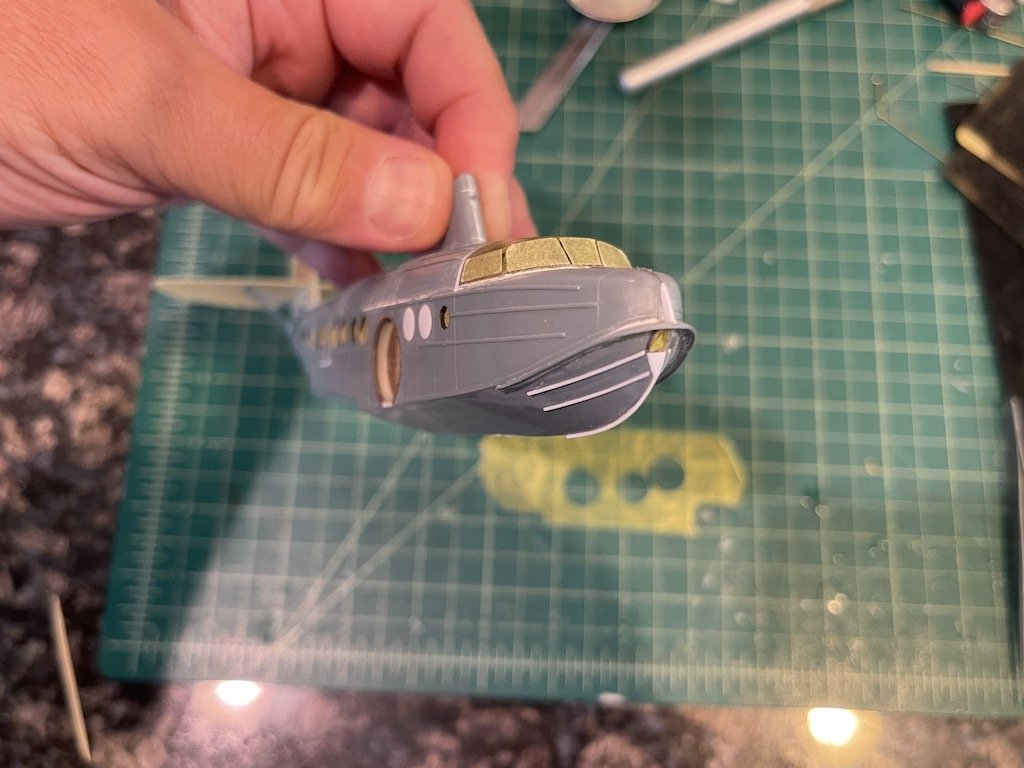
I ended up modifying the nose of the plane to better match what I think I see on pictures of the real thing. I added stringers to the lower section - these were apparently added to strengthen the front (bow?) after water landings caused damage on the earlier models. These were a bit more pronounced than the PE parts in one of the Eduard sets so I built them out of plastic rod. The kit and Eduard PE also seemed a bit off when it comes to where the stringers met at the nose - the yellow taped section seems to be a very small window. So, I replicated that section as best I could.
Next up, I am going to tackle the landing gear. The kit parts are very thin plastic, and I worry that the heavier weight of the model with the CMK resin parts is going to cause problems. Plus, the landing gear in the kit is a bit oversimplified. So, I'm planning to use metal rods where I can, epoxied into the fuselage, to help give it a bit more strength. Also, the tail wheel is completely wrong, so I'm going to try scratching that as well.
Thanks for looking in!
-
12 hours ago, Dan Poirier said:
Looks nice, but $115.99 does seem a tad expensive. It looks like there are some other configurations at various price points.
Yeah, I think I spent about 1/3 of that when I got mine a few years ago. No clue why it's so expensive now.
- Canute, mtaylor and thibaultron
-
3
-
On 7/28/2024 at 7:44 PM, kgstakes said:
You have a picture of what you use?
This is what I have - I don't recall spending this much on it, but it's very sturdy and holds pretty much everything I need for my plastic models (tools, glues, etc.). The handle makes it very easy to move around.
https://www.amazon.com/LA-LMG-WO-18-Mobile-Workstation/dp/B086VRBZR5
- Jack12477, thibaultron, mtaylor and 2 others
-
5
-
Masterful work Igor!! Amazing job!
- IgorSky and Knocklouder
-
2
-
-
-
-
I have a similar MDF tool holder for my plastic models. It allows me to work upstairs in my kitchen and hang out with my family, rather than work in my workshop. Best yet, it's portable, which allows me to move it in and out of the kitchen as needed. Seems like you are looking for a similar solution, so if you think this meets your needs, I'd consider it.
- thibaultron, Canute, catopower and 2 others
-
5
-


1967 Foose Dodge Charger by CDW - FINISHED - Revell - 1:25 Scale - Plastic
in Non-ship/categorised builds
Posted
Really sharp looking Craig, nice job! One of my favorite cars.