Emelbe
-
Posts
92 -
Joined
-
Last visited
Content Type
Profiles
Forums
Gallery
Events
Everything posted by Emelbe
-
Hi John I shouldn't worry too much about it not matching the plan, must admit I never did. You should find the pieces supplied are fine, I never modified any of the structural MDF parts and all went well. In fact I wouldn't recommend modifying any of the parts as they're pretty much integral to fitting the side panels accurately. The Gunport surrounds need fitting properly which, if I remember correctly, means removing some of the material, but that's all it will need. The door openings are very close to the formers, but again don't worry too much, once the etched brass doors/surrounds are fitted you won't see that, (unless you decide to leave them wide open and make a captains table etc.!!!!). Looking good so far, and you seem to be moving the build on nicely. One tip, when you come to fitting the lower side panels reinforce the joins, if you look at my log you should see what I mean, just a case of cutting a bit of the spare MDF to glue to the formers, gives you a bit more to pin the panels to. Hope I've been some help, must crack on and do a progress report on mine, been a bit lazy recently (think it's a bit of Seasonal Affected Disorder). Best Regards Martin
-
Hi John Thanks for your comments, will be following your build log, and if I can assist in any way don't hesitate to ask. I've not had much chance to do much work on my Revenge lately, things like holidays and normal life getting in the way, but the rigging is started and all the yards etc. are finished, I've also been making my own rope for it, which isn't a two minute job, so it doesn't look like I've done that much on the actual model, hence the reason for the lack of posts recently. To be honest I didn't do much checking of bits etc. I just dived in and, as it happened, there was pretty much everything there. The stern I just took a couple of millimeters off so when sanded back the planking would end up the same thickness as the sternpost, (can't really see it on the photo's) just mark to the level of the bulkheads and sand up to there, don't worry too much about being deadly accurate as there's plenty of sanding to be done after the first planking to bring it down to thickness. I'm sure your going to enjoy building this kit, once you get started it's fairly straightforward as it's really well engineered. Looking forward to seeing your progress, Regards Martin
-
Hi Nigel Outstanding!!!!, in fact it's so good the boss wants one (she who must be obeyed), so who am I to argue? Seriously, this is a fantastic model and is a credit to you. Hope you don't mind but I will be stealing some of your ideas when I start mine, they say imitation is the best form of flattery. Once again congratulations Cheers Martin
- 270 replies
-
- 3
-

-
- red dragon
- artesania latina
- (and 1 more)
-
Hi Denis Looking good so far. Think I managed to plank the lower deck off the model, but the gun deck definitely needs to be fitted first before planking to hide the join. If I remembered correctly the only other deck that needs planking in situ is the forecastle lower deck, tricky little devil to fit! Don't worry too much if you do break the tops of the bulkheads on the forecastle, they're pretty redundant as the side patterns go on easy and you cut them off before fitting the forecastle upper deck anyway. A quick word to the wise, check the width of the Tanganyika planks, they're supposed to be 4mm for deck and 5mm for the hull, but they're actually just over 4mm and slightly under 4mm, the wider ones in the bundle designed for planking the deck. I actually used the narrower strips for decking and the wider ones for the hull. It's no big deal just have to think about the spacing of the whales a little bit when you come to it (just have a look at my log, I did enough banging on about it!!!). So far so good mate, keep up the good work. I'll be putting up a post on mine in the next couple of weeks, haven't had as much time to work on the model the past couple of months, but she's coming on nicely now the rigging's going on. Cheers Martin
-
Hi Denis I'm not going to put sails on mine, my sewing skills aren't up to it. Will have to wait 18 months until the boss retires then that's her department as she's a dab hand with a sewing machine. Cheers Martin
-
Hi Denis Wasn't sure myself about the MDF to start with, but it wasn't a problem, in fact it's quite easy to work and didn't have any splitting problems. Gets a bit fragile at the Forecastle as you'll find out, but no great worry if they break. One tip is to add reinforcement pieces where the side patterns join. Cheers Martin
-
Hi Don, Seventynet Cheers for the link, don't think I need a 3d view as I'm twisting myself inside-out getting to the rigging. Actually I've had a look, very impressive. I know the feeling about completing the model, my mind keeps wandering to my next little ventures, have to resist. Cheers Martin
-
Hi Denis Think you're going to enjoy this one. Very impressive kit, I'm looking forward to following your build, best of luck with it. Cheers Martin
-
Avast there Capn' Methinks you have been reading my mind, I have the very plans in front of me as we speak. Thanks for the advice, when it comes to rigging any help is more than welcome. Now my turn to give you some advice, hit the 'Add to Cart' button, I don't think you'll regret it, just call it an early Xmas present!!!! Cheers Best Regards Martin
-
Hi Don Flattery gets you everywhere, thanks once again for your words of encouragement. Shouldn't be too long in posting again, just working on the yards at the moment (giving the new lathe a bit of a road test). Should be able to crack on a bit now the workroom's sorted out. Your Mayflower's looking good, I really like the different wood tones. Looks like we might be starting the rigging stage around the same time, just think, all those ratlines to look forward to....think it might be a glass of something and a decent audio book to listen to Best Regards Martin
-
Hi Nigel Thanks for the kind words, coming from a fellow Yorkshireman I'll take that as a real compliment. Cheers Martin
-
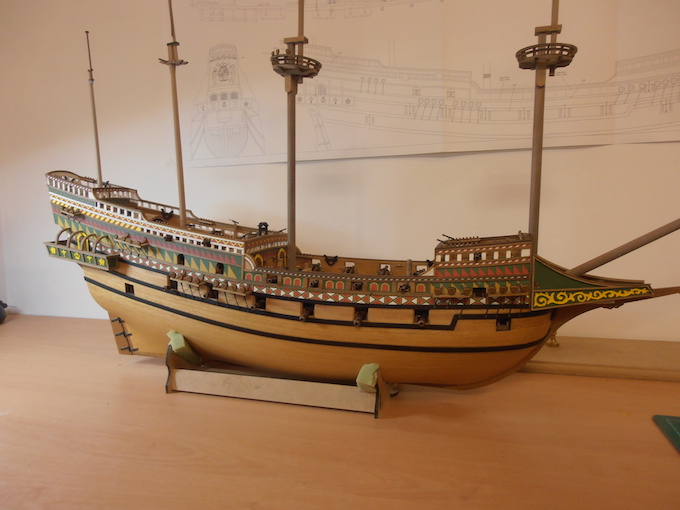
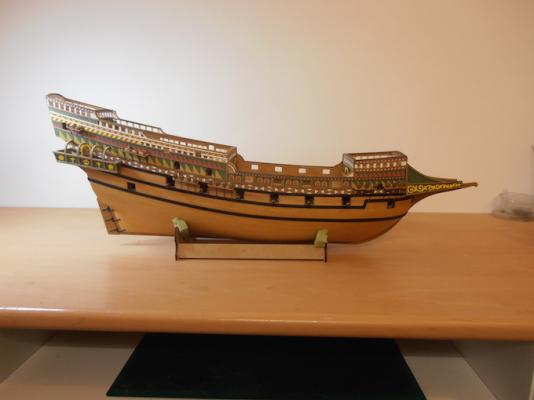
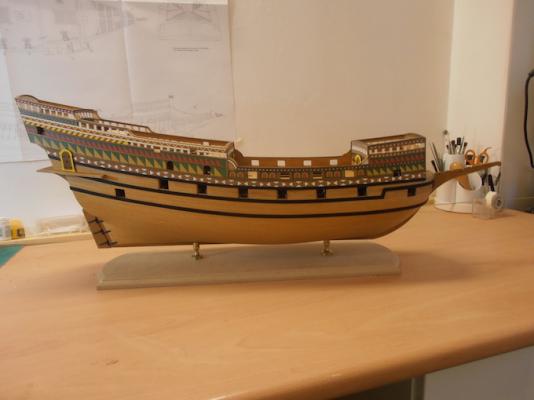
Hi All, That’s the hull completed now, until I finish rigging when I’ll fit the lower deck cannons and gunport lids (less chance of accidents). Nothing much to say about the deck fittings as they’re all pretty straightforward. Lots of drilling for the eyebolts etc. though. I’m going to be working on the masts, most of which are complete, and the yards (gives me chance to play with my new lathe). I’ll do a separate post on the them, then it’s on to the rigging, unfortunately not my strongest point. I’m going to have a go at making my own rope, a technique I haven’t yet mastered yet by a long way, but I’m getting there, the Byrnes ropewalk is a nice piece of kit, although any hints and tips to de-mystify the age old art will more than welcome. The rest of my Bynes machines arrived earlier this week and I’m highly delighted, thanks to those who recommended them, they’re well worth the extra shipping costs. So, now I’ve no excuses!!!! I’m at the stage in the build where my mind is wandering to my next project or more accurately projects. It’s normally at the ratline stage where I start a new build and the current model is pushed to the back burner a bit, but I’m going to try and resist temptation this time, I want the decks cleared before I attempt anything else. Just for info I’ve got two kits waiting in the wings, both chosen by the boss (she likes unusual or different models). The first in the Mantua ‘Bruma’, and the other the Artisania ‘Red Dragon”, both nice winter projects, got a few ideas for them, (will do build logs). My main future build is going to be my first dabble with the mysterious world of scratch building, and that’s going to be the ‘Marie Sophie’ from the Underhill plans. I’ve ordered all the wood from a company called ‘Original Marquetry’ based in Bristol, who were quite happy to cut Boxwood and Pear to my required thickness and the price wasn’t unreasonable, I’ll be able to cut to my exact size myself now with the Table Saw. I still haven’t quite figured out how to finish the base for the pedestal stands. It’s a piece of MDF routed to shape, my thoughts are just to spray it high gloss black, but I’m open to ideas. So exciting times ahead, and I have to fit in our main holiday at the end of November as well, until my next post Cheers Martin


- 133 replies
-
- 18
-
-
Hi Simon Makes perfect sense, I've just had one of those 'why didn't I think of that' moments, so simple when you think about it! That's going to come in handy for my next intended build, scratch model of Marie Sophie from the Underhill plans, got to finish 'Revenge' first though. Many thanks. Cheers Martin
- 120 replies
-
- 6
-
-
- mercury
- victory models
- (and 1 more)
-
Hi Simon Looking good mate, this one's on my wish-list so should be interesting. If you get a chance could you explain how you set up your template for the stem rabbet on the milling machine. Will be following your build with interest Cheers Martin
- 120 replies
-
- 4
-
-
- mercury
- victory models
- (and 1 more)
-
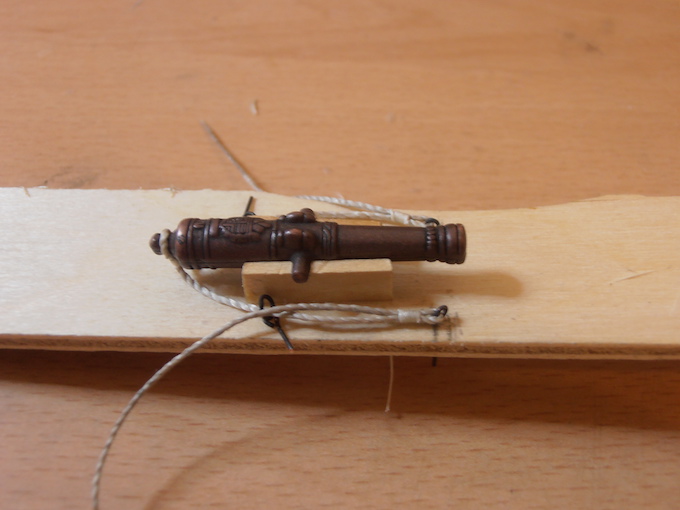
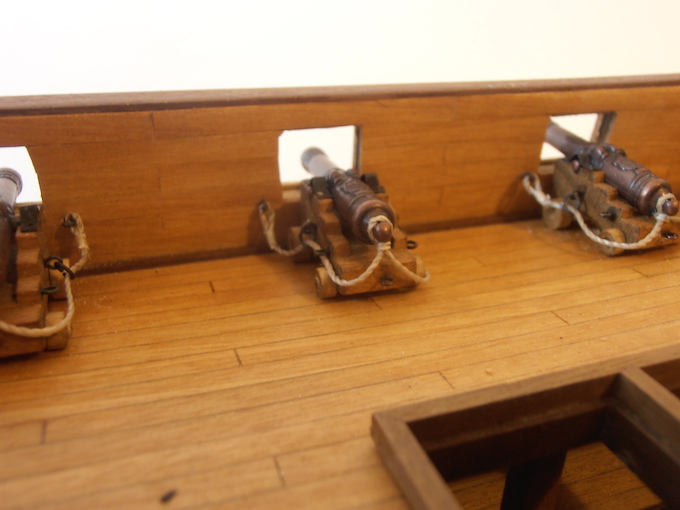
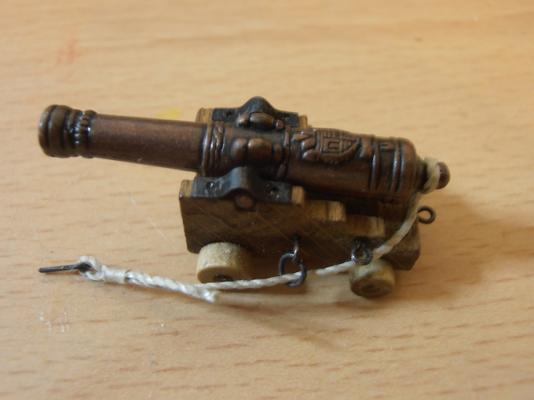
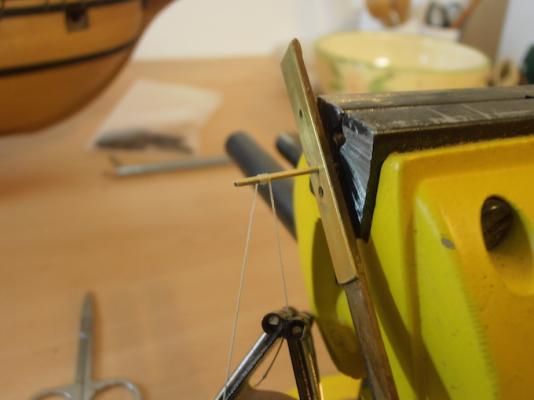
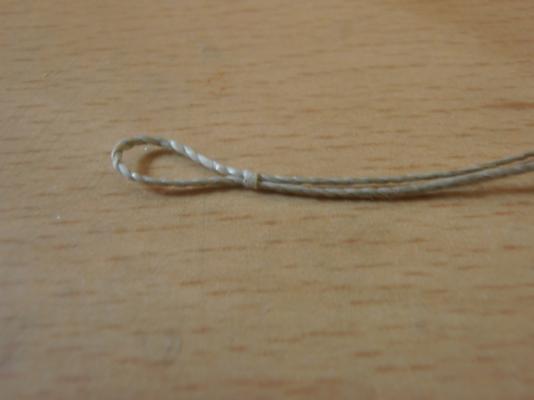
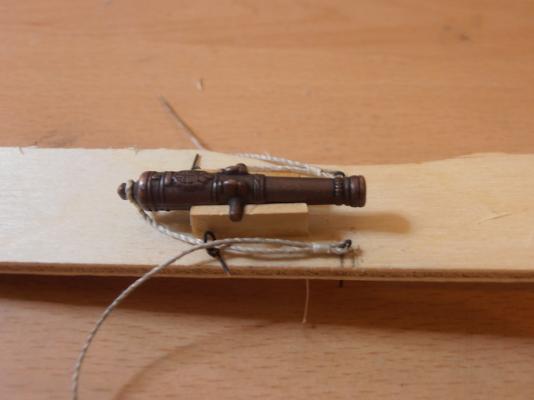
Hi All Things have been a bit slow again this week as I’m still trying to sort my workroom out, but I did manage to get the cannons completed. I was originally in two minds whether to fully rig the cannon or just rig the breeching ropes, but I finally decided to go for the latter. The carriages are one piece milled wood which look a bit chunky, but after fitting a couple of rigging eyes and the straps that hold the cannon, don’t look too bad. For the rigging I used what I think are called ‘Zip seizing’, a nice little tip from the ‘Ship Modelling for Dummy’s’ website (well worth subscribing to). If anyone is unfamiliar with them, it’s simply thread wound around a suitable diameter bar and soaked with cyano, I use the dead cheap stuff you can buy by the gallon and is usually only good for sticking fingers. Once removed you have a nice tube which you can run your thread through. A little tip, I found that if you clean the bar with fine grade wire wool and rub the tiniest amount of beeswax on before making the seizing, they come off dead easy. For the length of the breeching rope I made up a little jig. I’ve added some images to give you the idea. The carriages are dowelled to the deck with a toothpick and that’s about it. So, short but sweet, I’m hoping this time next week the hull will be all about there. Then it’s on to the masts, yards and rigging. Cheers Martin


- 133 replies
-
- 13
-
-
Hi Philo Posting a comment as promised on your Nautical Discussion thread. Your build is coming on nicely, I agree with the comments about the shrouds, I'm not sure doubling up is the right way to go, but as I have said in my log, any build is an achievement, and looking at your 'Ersatzia' you have accomplished something many do not, and that is a finished ship model, well done. Both your projects are, in truth, ambitious for first builds, but I'm sure you have learned a lot. Keep at it! Cheers Martin
- 69 replies
-
- 1
-
-
- admiral vernon
- steingraber
- (and 1 more)
-
Hi Apollo You definitely know your history!!! It is all relevant though, I haven't read all the thread about 'how much detail' yet but I'll put my two pennyworth in. If I wanted to make an 'exact replica' of a ship, then I would research it myself thoroughly and probably draw up my own plans (if none were available), it would be at least 1:48 scale or larger, and I would make every part myself. With kit builds I think any additional detailing would be to enhance supplied parts I can't particularly live with ( a lot of manufacturers put commercialism before absolute accuracy) such as the Amati Cannons as an example, or to rectify any glaring error. I personally think there are two arguments regarding absolute authenticity, one is the side of 'The devil's in the detail' and many take that approach, the other is how much time do you want to devote to one project. I've done it myself, in the days when I used to build the odd plastic model I would spend hours buying and fitting aftermarket products to enhance the cockpit of a plane etc. only to bury them when the canopy went on, never to be seen again. I would spend so long on this that the project started to wear thin and I would either rush to finish it or, on occasion, scrap it altogether. I think the whole topic is subjective, I had a major rethink to my approach when I decided to start modelling again, and now before I start building I ask myself 'why am I building this' and 'what do I want to achieve from it'. Any completed model is an achievement, no matter what the standard, and at the end of the day your own skills improve every model you build. I think I've said before, model ship building is a lifelong apprenticeship. Anyway, enough of that, I could talk for hours on the subject, got cannons to fit! Cheers Martin
-
Hi Duff Thanks for the tip about Ships of Scale, to be honest I've never looked at their site as its not a popular magazine over here, looks interesting. Looking forward to getting stuck in with the machines, its all come flooding back to me now, once learned never forgotten. Was funny the other night when I was talking to a friend of mine, he was trying to wind me up about them (and nearly succeeding). When he asked why, and what I was going to do with them I replied, 'same as you when you bought your XJS Jaguar to run around an island 9 miles by 5 miles with a 30 mph speed limit'. I'm sure I'll get more mileage out of them than he will out of his car (posing b********). Cheers Martin
-
Hi B.E. Thanks for your comment. The armament Amati have provided are two sizes of Cannon and their standard brass culverins. I'm working on the upper deck cannon at the moment and they don't look too bad on the ship as provided. I quite agree they would be no good on an 18/19th century ship but they certainly represent the 'character' of the Elizabethan period. Having looked at your build logs several times and your extraordinary work on the Pegasus, I know you have an exceptional eye for detail, but I think I have to remind myself why I wanted to build this particular model, and that is I simply liked it when I first saw the prototype. I'm a little wary of getting bogged down at the moment, now I have so many distractions with my new toys, my wish list has doubled over the past couple of days. I think my main aim is to finish the model to a standard that satisfies me, and there's still quite a way to go yet. I can always come back to bits at a later stage, as you have with Pegasus. I might be picking your brain in the very near future on some of your rigging techniques, if you don't mind, that's going to be the next big challenge for me. Cheers Martin
-
Hi Apollo Well, what can I say, apart from thanks for the kind words and history lesson, I've definitely learned something. I have to confess I have been a bit lazy when it came to researching the ships of that period, and in truth we'll probably never know exactly how these vessels looked. I do know that the firepower from the more 'portable' gun carriages gave the English the edge over the Spanish fleet through watching several documentaries on the subject, and we can safely say how the cannon looked through archaeological finds, but the rest is supposition. In a way, for modelling purposes, this is good because it allows us to put our own interpretation on things without getting too bogged down on historical accuracy. I think the attraction of this kit/ship is not the detail, but the overall beauty and aesthetics of its lines. I'm still in two minds how far to go with the cannon, do I fully rig them or do I just show the breeching lines as in the prototype?, and in honesty by the time the masts and yards are fitted and the 'spiders web' of rigging completed will it matter? I think this is part of the fun of modelling and possibly the subject of a new thread, 'how far do we go with our models and what do we want to achieve from them'. Food for thought? Cheers Martin
-
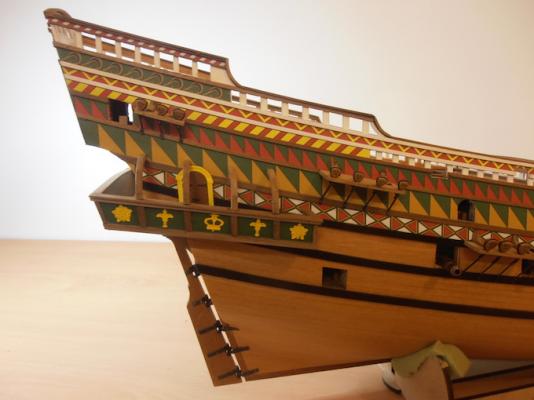
Hi Blue Ensign, I know what you mean about the generic guns. I think I can probably live with the 'bronze cannon', and possibly the carriages as that type was in it's infancy at the time of the Armada before the Royal Navy did it's MacDonalds job of standardisation. Thanks for the info regarding the crest, heraldry isn't one of my strongpoints I'm afraid. Cheers Martin
-
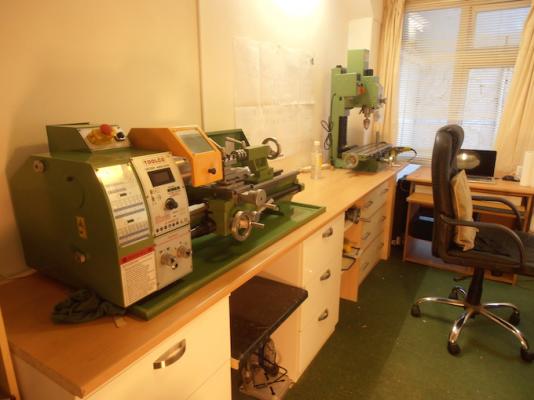
Hi Don Thanks for the kind words. The Lathe and Mill are from a company called Toolco Ltd, I think the machines are derivatives of Sieg, very nicely built and finished and also quiet. The machines actually ship with quite a few accessories as standard which is what attracted me to them, but I did get some additional ones when I ordered the machines. The ones for the milling machine were a decent milling vice, a set of end mills and a rotary table, the lathe I got a keyless drill chuck, centre drills, lathe tools, revolving centre and a self centring 4 jaw chuck which is great for working with square section. I've tried it out already and it's spot on. I'm really looking forward to working with them, there's so much you can do with these machines, and it shouldn't be too much of a learning curve as I was apprentice trained on general machine tools etc. just have to jog my memory a bit. Just waiting for a couple of bits from Byrnes and my little world will be complete, the boss will be telling me to move my bed in next!!! Cheers Martin
-
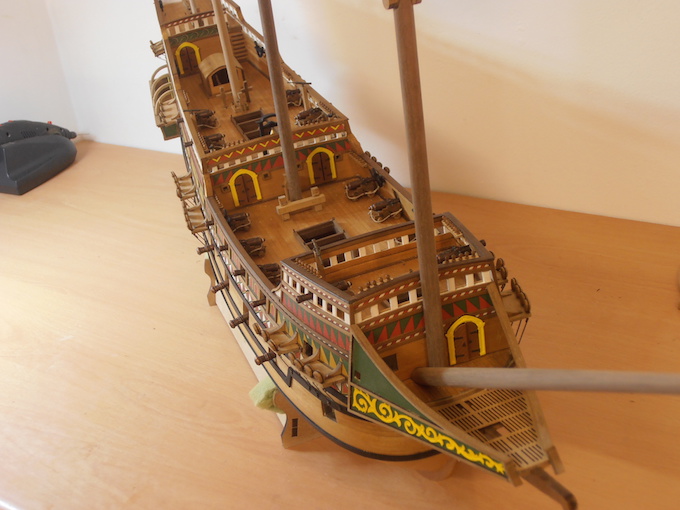
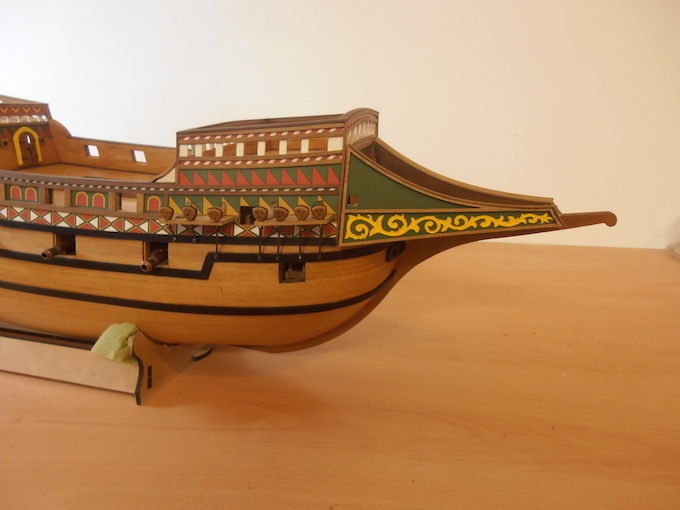
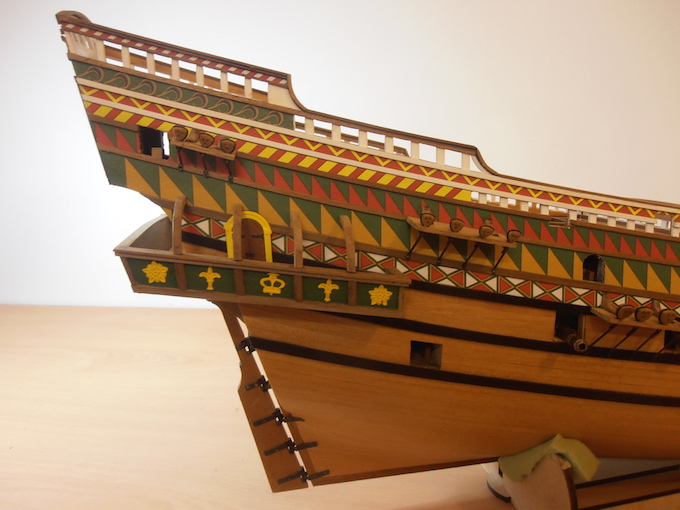
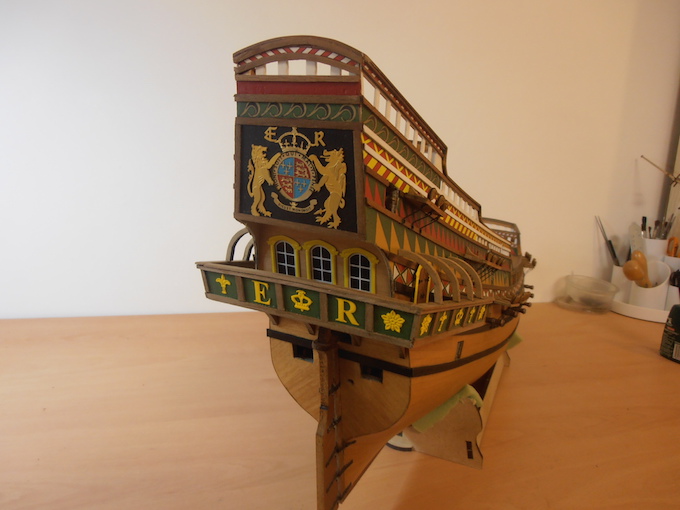
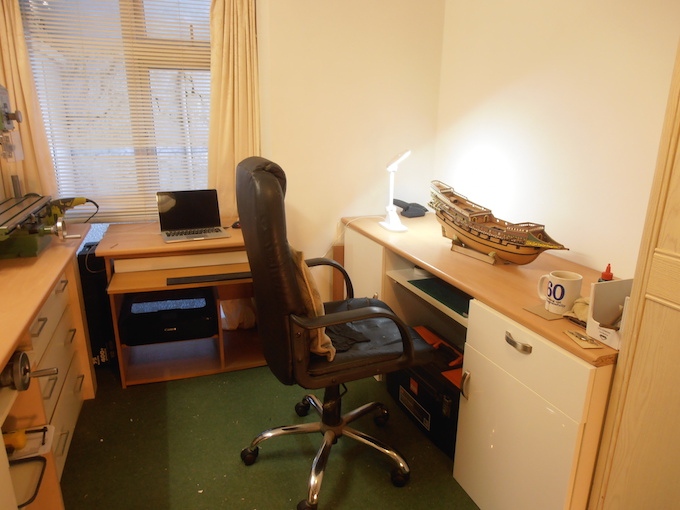
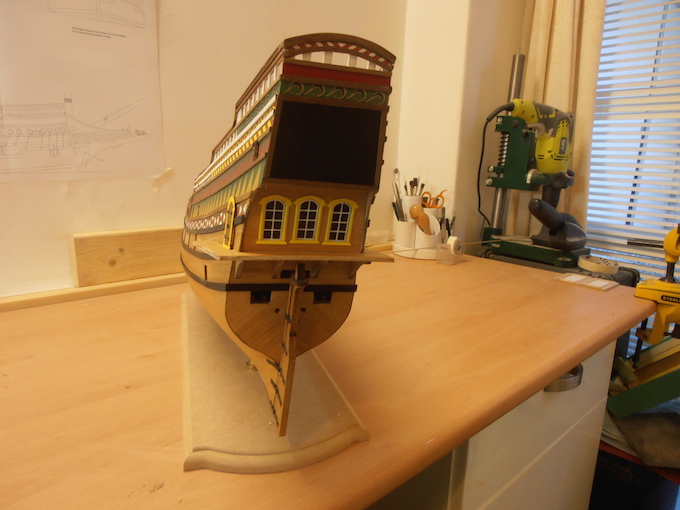
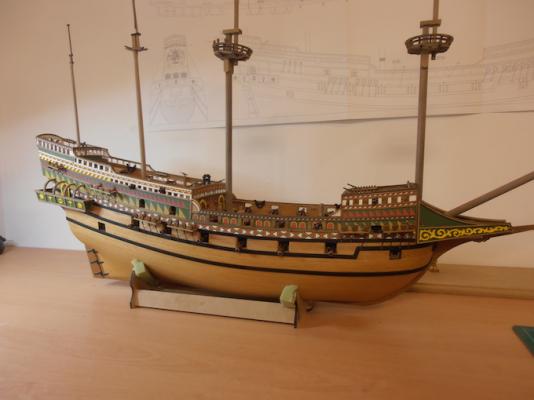
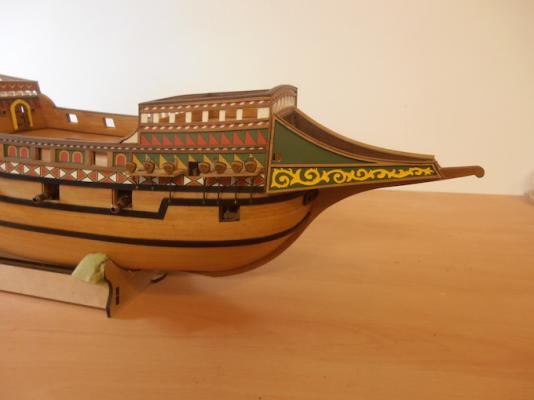
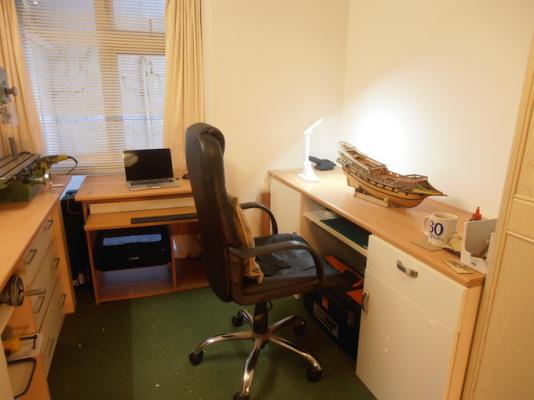
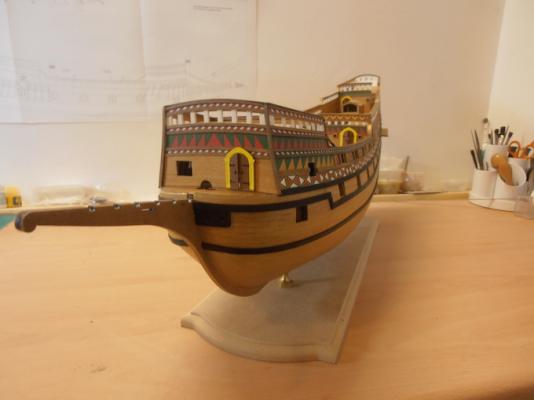
Hi All Seems like an age since I last posted, but I have been a bit tied up redesigning and fitting out my workshop (spare bedroom) ready for my new machines. I’ve been working on the stern gallery, prow section, chainplates and adding the etched brass decorations. The Stern Gallery and Prow were pretty straightforward, just a case of fitting, painting and adding the edging strips. I know I’m nit picking but the edging strip is 1 x 2 mm and there wasn’t quite enough supplied with the kit, fortunately I did have some spare which saved the day. The paint I used was the Citadel ‘Loren Forest’ which is an absolutely perfect match with the green in the decorative patterns. The prow side pieces I’ve just held in place with double sided sticky tape for the time being, I’ll fix them permanently once the bowsprit is in place and the gammoning is done, just gives me a little bit more room to work on the rigging. The etched brass decorations look pretty good once in place, although I’m not 100 per cent sure about the coat of arms at the stern, the ‘animals’ (not sure what they are) look a bit two dimensional. I’m not sure how my non-existent sculpting skills would match up to my expectations, so I decided to go with the brass one supplied, perhaps resin ones may have been better? The chainplates were then fitted, and are quite solid with the support brackets attached, I know I’m tempting fate but I didn’t think it was necessary to dowel them for extra strength. The brass bits were blackened and fitted with no great problem apart from the usual struggle to get them on to the deadeyes. All the deadeyes were secured using the etched brass straps pinned to the whales, just a case of measuring with dividers or compass and bending in the right place. I think the next job will be the cannons. I’ll probably build a little ‘mock-up’ to see how one looks as I’m still unsure about the carriages supplied. I have actually found a decent picture of the type used during that period in one of the books I bought the other week and I suppose they’re not too far off. A quick update, the lathe and milling machine has arrived and are now (after a struggle - bloody heavy, I owe a couple of friends quite a few beers) in place. Probably, for model ship building they are an overkill, as they are quite large. Having said that I’m glad I went for that size as there’s not much I won’t be able to tackle with them in the future, I’m highly delighted. I’ve uploaded a photo of my workroom, please don’t think I’m trying to show off, but it’s the first time in my life I’ve ever had anywhere half decent to work before, can’t believe my luck. Don’t know how long it will stay as clean. Cheers Martin

- 133 replies
-
- 17
-
-
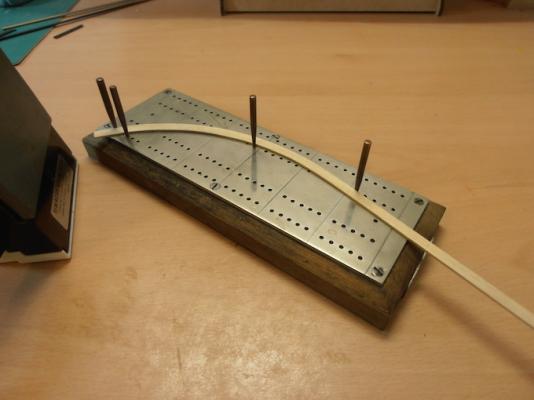
Hi Duff Cheers mate. It was funny when we were walking around the boot sale, my better half asked why I needed some hair straighteners when I'm going thin on top, and why I wanted a cribbage board when I don't play cards!!! Cheers Martin
-
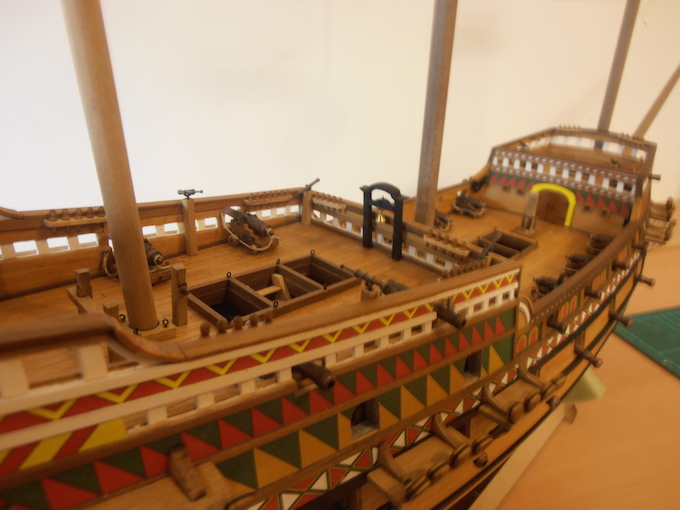
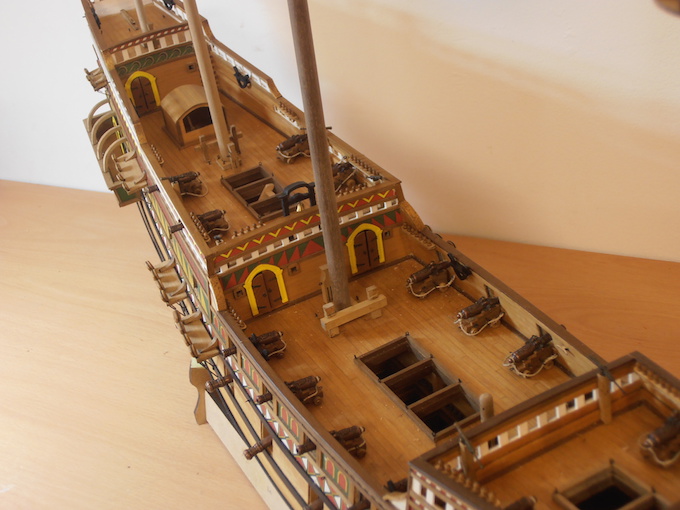
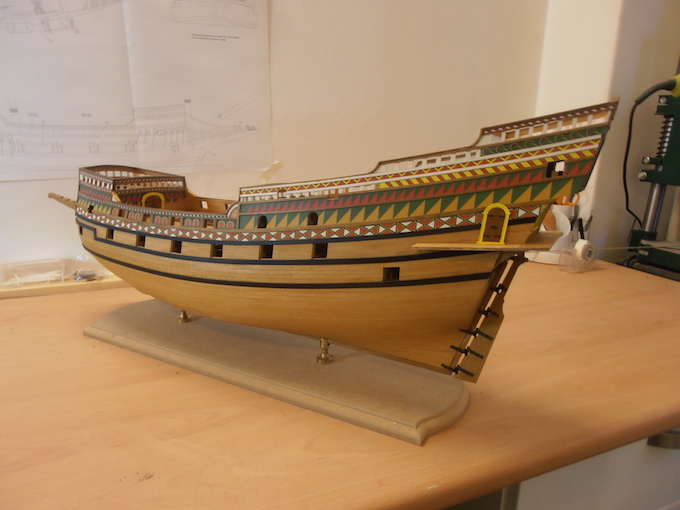
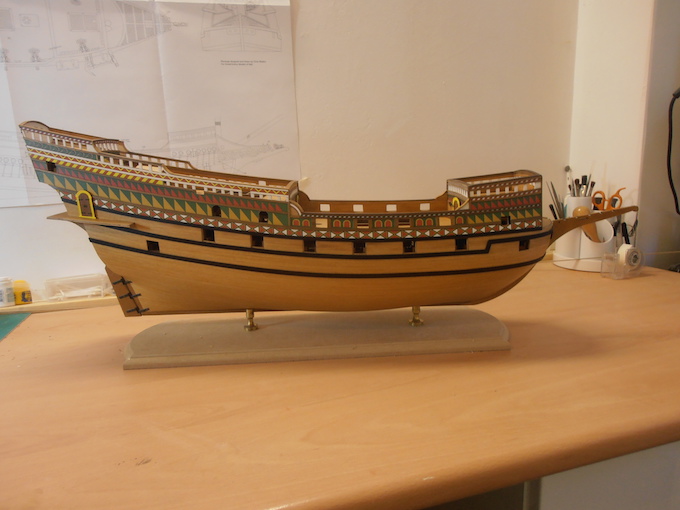
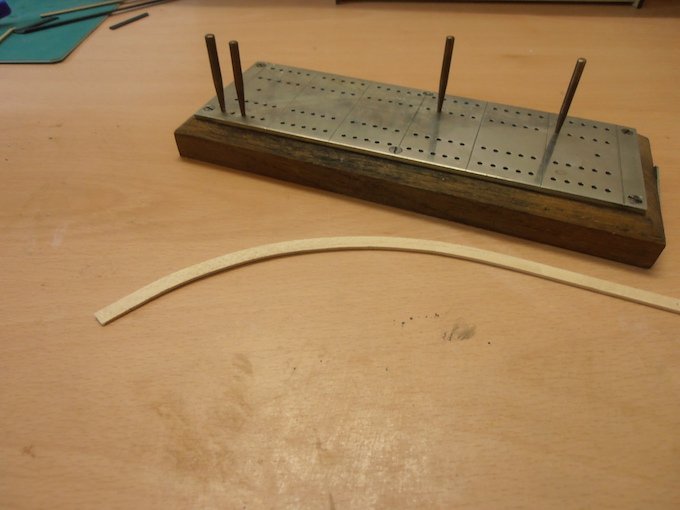
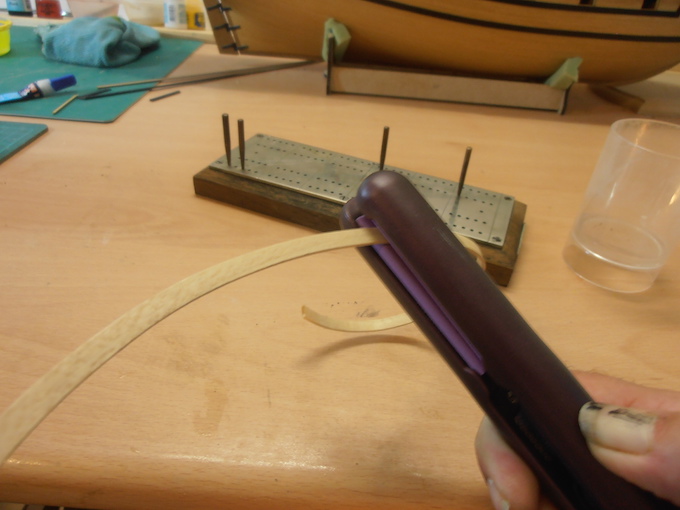
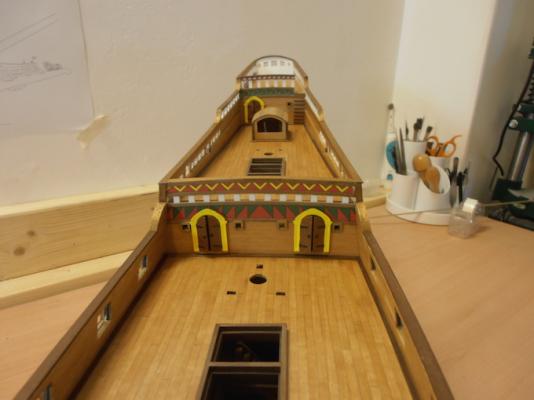
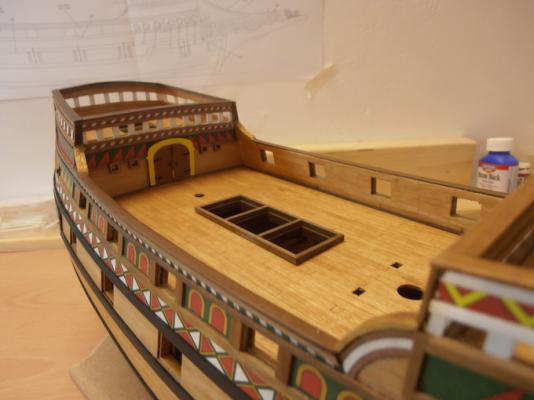
Hi All Here we are again. Don’t know why but progress has seemed slow since the last post, but at last I think I’ve now reached the interesting stage where I can start adding detail to the model. I finished planking the bulwarks apart from a little bit at the stern, mainly because I haven’t figured out how I want to do it yet, then on to the capping rails. Seemed to take an age but was worth taking my time with, the hull looks so much nicer now all the gaps and joins are covered up. I followed up with the etched brass door frames and doors, and stern window framing. I started by spraying the frames yellow with acrylic, then hand painted the doors with brown enamel, not so much by choice (I’m not the biggest fan of Humbrol) but I went to the shop to get some green for the Stern Gallery and Prow and completely forgot the brown. I think I’ve mentioned before, the paint I’ve been using is from the Citadel range, it’s the first time I’ve tried spraying it but it went on beautifully, thinned with water and the tiniest amount of washing up liquid to break the surface tension. The hinges and door handles I blackened using Birchwood Casey Brass Black. Now the job I’ve seemed to be putting off, the lower three whales. The lower most whale I spent quite some time bending so it would lay flat against the hull, and once I was happy with the fit, I sprayed them using the Citadel Chaos Black aerosol before fitting (I can’t recommend it highly enough). I also fit the hawse hole boards at the bow, bit nerve racking drilling the holes. That’s about where I am at the moment, so its on with the stern gallery and prow before I tackle the deck fittings etc. Couple of little asides, went to a car boot sale last weekend, picked up a couple of little gems, a set of travel sized ceramic hair straighteners, forget the commercial plank benders thats the way to go, just damp the wood and run it through the tongs and a perfect curve. The other was a cribbage board, I can think of a hundred and one uses for it, everything from a drying rack to a bending jig to a rigging stand, I’m sure you’ll see it pop up quite often during the build log. And finally all 22 volumes of the Seafarer book series all in mint condition. The whole lot less than £20, (just love bargains). I’ve added a couple of photos of these in action, the reason they work so well is I’m getting even heat on both sides of the wood (the cribbage board is metal faced so it retains the heat). Second little aside, I’ve ordered my machines, and yes, I have gone the Byrnes route, and yes, I’ve ordered the disc sander and thicknesser as well. Think Xmas is coming early this year.


- 133 replies
-
- 21
-