SteveM
-
Posts
74 -
Joined
-
Last visited
Content Type
Profiles
Forums
Gallery
Events
Everything posted by SteveM
-
Harbor Freight Workbench
SteveM replied to Landlubber Mike's topic in Modeling tools and Workshop Equipment
Couldn't say, but I do have a pair or two of 100lb full extension drawer slides left over from a workbench project. Stop by next time you're in the area and see if I haven't remembered to bring them in with me. -
Those kit cleats are monsters. Please let us know what your source is if you locate an alternative or your method of manufacture.
-
Thanks for sharing this unique kit, I had no idea Guillow's had made such a kit till you posted it on their forum the other day. This kit belongs in a very small grouping of bread & butter style kits made in 1975. There is kit #151 of the Boeing 747 and kit #152 of the F4J Phantom.
-
It's just wood, I'm sure you can fix it or patch it up to look correct. The rudder is made up of 3 or 4 pieces of 1/8" square stock glued together. The instruction booklet has a diagram of this if my memory serves me.
- 41 replies
-
- 1
-

-
- model shipways
- phantom
- (and 1 more)
-
The Veritas honing guide doesn't sharpen anything so it isn't necessarily responsible for the lengthy sharpening session. The Mk II guide has a knob that allows you to select between primary and secondary bevels. Once you've got that primary bevel established just sharpen on the secondary bevel for a while till it gets wide and takes longer to sharpen. When that happens got back and sharpen the primary bevel till it meets the cutting edge. I started out with the Veritas Mk II and sandpaper, but I was starting to use up a lot of sandpaper and decided to switch to oil stones and free-hand. What I do now is establish a primary bevel at about 25 degrees on a cheap 6" bench grinder with a 36 grit wheel. Use light pressure, dress the wheel as needed, and dip the chisel in water to keep it cool as needed. Once I've established this primary bevel I don't go back to the grinder for a long time. Next I move on to a medium grit India stone and hone till I feel a slight burr across the entire back of the chisel then I move on to a black Arkansas stone and hone till I've removed all of the scratches from the India stone. Then I take a few swipes on a leather strop charged with green stropping compound and end with a single swipe on the back to remove any burr that might remain. As I'm working I'll occasionally revisit the strop and when it starts to feel dull I drop back to the black Arkansas stone and proceed as described above. To test for sharpness I try to cut across the end grain of a soft wood such as pine. A truly sharp tool will cut through smoothly while a dull one will crush the end grain and tends to slip out of the cut. What I didn't mention yet is that the backs of my chisels near the cutting edge are polished to a mirror finish, you can't get sharp without that. Also, when I hone and strop I first place the face of the chisel flat on the stone or strop then lift up slightly to create a secondary bevel. This way I'm only sharpening that tiny secondary bevel near the cutting edge so it will go much faster. Over time that secondary bevel gets wider and wider and takes more time to sharpen, that's when I revisit the grinder to reestablish a primary bevel that goes all of the way down to the cutting edge. My oil stone and strop setup was about $100, but the Arkansas stone will outlast me and my only consumable is honing oil which is a minor cost as it goes a long way. The key to sharpening is to pick a system then stick with it till you learn how to use it properly.
-
Harbor Freight Workbench
SteveM replied to Landlubber Mike's topic in Modeling tools and Workshop Equipment
If you plan to work on small parts on the bench then I suggest finding a way to cover or plug the dog holes so you're less likely to loose them. -
I don't think I can add anything new except my own unique blend of what has already been said. This hobby is more challenging than others for most people so "entry level" does not mean quick or easy, just quicker and easier than other ship models. What makes a plastic model easy is that you don't have to have a clue what the final product looks like and yet you can still build it quickly, easily, and accurately; but with wood ship modeling you start with blocks of wood and remove everything that doesn't look like part of a ship. That's really challenging when you don't know what the parts should look like so you must rely on good plans or secondary sources such as books and MSW. Therefore I feel that the #1 criteria for an entry level kit is that it have excellent plans and directions. Everything else boils down to personal opinion and taste and only helps to narrow the selection of the right entry level kit for that person. For example, some people such as myself prefer models with weaponry and a rich history so a fishing boat would be a real challenge to motivation and quality control. On the other hand, a newcomer cannot say if they would find a solid hull or POB easier so either will answer for an entry level kit and they can form their own opinion from there. The MS Phantom on its own is not an entry level model by my definition because the directions are very lacking at times and often is no more than "Build the X, Y, and Z and glue them into place." What makes it a good entry model is Chuck's practicum.
-
Thank you all, I hope a few kind find the log of some use. Gulf - The templates are not an exact match for the lines shown on the plans so stick with one or the other. I went with the templates as-is, but they could be re-drawn from the hull lines on the plans. The directions are ok, there just isn't enough detail to help the first time builder. Chuck's practicum fills in the blanks so you'll find yourself using both the practicum and directions in some areas.
-
Thanks, I've added to the list above.
-
The MSD has an article that covers the more common woods and their uses. Walnut : Common Name(s): American Black Walnut. Botanical Name : Juglans nigra Colour : Fairly even dark brown. Description : A very nice wood for working with hand or power tools, although its coarse, open grain make its modelling applications limited. Bends easily when steamed or heated. Sands to an excellent finish. Cuts and carves exceptionally well, but usually can't obtain fine detail. Very stable and will not shrink or expand once in use. For its weight, Walnut is exceptionally strong. Use: Frames, keels, decorative planking and mouldings. Well suited for hull timbering and framing.
-
Chad's initial posting on 30 April 2008 regarding woods he planned to purchase appears below. I know he later ordered some wood from Hobby Mill and changed some of his choices, but this is what he started with. It's been a loooong month since I last posted. First I was derailed by a backyard project and then a sick two-year-old, but today I FINALLY ordered my wood. After all the distractions, I got down to the business of deciding the What, Where, and What Size of the cross section. I started by figuring that I was going to buy most of my lumber pre-milled, since I have yet to buy a thickness sander and I'm still learning the ropes with my table saw and scroll saw. Next on the agenda was trying to decide what types of wood I'd use. Two things I figured into the equation were 1) I haven't worked with many types of wood outside of the ones that come with kits, so I would like to try diversifying a little, and 2) money wasn't going to be a hinderance. I remember a post somewhere a long time ago that if you divide the price of the supplies over the amount of time it take to finish a project, that the cost tends to be very small- so I'd rather pay a little more for the wood I want since in the end it's probably only pennies difference. So trying to decide what I wanted to use was going to be tough since my wood knowledge is pretty shallow, so I hit up the gallery and came across Raul Guzman Jr.'s Oliver Cromwell*. I have seen this model before and absolutely love it, so I PM'ed him and he was nice enough to provide me a "who's who" of the types of wood used. I pretty much ended up using the same wood list since I liked it so much, and added a couple other types. Once I knew what types I was going to use, I set out breaking everything down into sizes and types using the plans and came up with this list**. The only part (I think) that I missed was the gun carriages, but I'm going to wait and see how things play out and see what I would like to use. I've ordered everything from the Lumberyard and qty's in parenthesis are for 12 inch+ lengths- which will give me enough to screw up with and yet probably finish. BOXWOOD (2) 3/16 x 3" x 24" frames, lodging knees, sills, beam arms (13) 1/8 x 1/8 ledges (6) 3/16 x 3/16 carlings (3) 1/4 x 1/4 gun deck beams (3) 5/16 x 1/4 lower deck beams (1) 5/32 x 2" x 24 hanging knees, lintels APPLE (1) 13/32 x 5/16 keel (1) 5/16 x 5/16 keelson (1) 13/32 x 1/16 garboard strake (20) 3/16 x 1/16 planking (3) 1/4 x 1/16 broad strake (6) 7/32 x 3/32 lower deck spirk./gundeck clamps (2) 1/16 x 5/32 skid beams INDIAN LAUREL (1) 1/4 x 1/16 gangway ladder (1) 3/16 x 1/16 FWD ladder (1) 1/16 x 3/8 sheer rail (1) 3/8 x 3/32 gangway trim (1) 5/32 x 5/32 gundeck stanchions (2) 1/8 x 5/16 false keel CHERRY (6) 1/8 x 5/16 thick stuff (4) 3/32 x 1/4 planking 1 (2) 1/16 x 1/4 planking 2 (2) 1/16 x 3/16 planking 3 (2) 5/32 x 5/32 hold pillars WALNUT (2) 1/4 x 5/32 hatches EBONY (4) 1/8 x 3/16 wales (2) 1/16 x 1/8 trim (1) 3/8 x 1/16 fenders (2) 3/16 x 3/32 steps BLOODWOOD (2) 1/4 x 3/32 gundeck spirketting (1) 3/32 x 3/16 gangway clamp (3) 1/16 x 3/16 bulwarks (1) 3/16 x 3/8 gallows (1) 1/8 x 5/32 cross piece (2) 1/4 x 1/4 bitts MAPLE (23) 1/16 x 3/16 deck planking (3) 1/16 x 1/4 waterways (10) 1/16 x 5/32 gangway ... so now I wait... * If you haven't seen Mr. Guzman's models for some reason, you can find the Oliver Cromwell in the gallery, or you can visit his site here: http://www.guzmanshipmodels.com/ **If anyone somewhere down the line would like a copy of this list, just let me know- I have it saved as a word doc.
-
Chad (chach_86) posted a list of materials that he ordered and mentioned having a Word document that he would give anyone that wanted it. I'll shoot him an e-mail pointing to this build log so he can post it for you.
-
If the wood was good 25 years ago it should be good now. Wood doesn't dry out and go bad, it maintains a moisture content in equilibrium with the environment. I suspect ship modelers refer to dry and brittle wood as a way of saying the wood needed soaked in water so it would bend or the wood they were using wasn't suitable for bending.
-
That's a lovely nameplate, I like it.
-
Thanks Marks. I hope you don't mind, but I've added your contributions to the first post with proper credit. I've also update with other important info such as if they ship internationally, minimum order sizes, military discounts, etc. I welcome any corrections or additions in this area as well.
-
This area of the forum was a great resource for information on where to buy various types of wood. Let's rebuild that information using our collective knowledge and experience. I've given credit in parenthesis to those who have contributed the name of that source. Sources of milled wood (Australia): Modellers Shipyard (Shazmira) - A limited selection of sheet and strip stock. They also have kits, tools, and other supplies. Ships internationally. Sources of milled wood (Germany): Arkowood (TRJ) - A bit on the expensive side, but good for smaller quantities. All major wood varieties, including swiss pear, box, lime. Massivholzwerkstätten Horschig (Redshirt) - Good assortment of wood, high accuracy and good price. Sources of milled wood (UK): Hobby's (AntonyUK) JoTiKa (Marsares) Cornwall Boat Models (Marsares) The Model Dockyard (Marsares) Sources of milled wood (USA): Ocooch - Good source for milled sheetwood of all species but no Boxwood, swiss pear or holly. Syren - sheets and strips of milled Boxwood, Alaskan Yellow Cedar and Swiss Pear. Itasca - Mainly a source for basswood. Their "Half Price" wood is still of good quality and excellent value. $20 minimum order size. 20% military discount. National Balsa - Another source for basswood, Maple, Cheerry. More expensive than Itasca, but they have a greater range of sizes and have lots of dowels. tallships_model_builder (themadchemist) - An eBay store with several items targeted towards model ship builders (eg. Deck planking and sheet wood). May be willing to cut custom sizes for you. http://www.northeasternscalelumber.com/shop/index.php?PHPSESSID=fbf4aea8bc5623641aa53ab405ec4c6a - Northeastern Scale Lumber I'm adding my list of US suppliers of lumber. Given the market they may or may not have the wood you want. IF they do have it, order it, don't wait as they will run out. All Righteous Woods Bod Nosen Colonial Hardwoods, Inc. CookWoods Dyes Exotic Wood, Birdseye Maple, Curly Maple & Tiger Maple Bell Forest Products Gilmer Wood Company Griffin Exotic Wood--High Quality Exotic Woods Groffslumberr hearnehardwoods.com- Inlay Banding, Ebony and Holly Wood Products Kettle Moraine Hardwoods, Inc., Hartford, WI Midwest Products National Balsa Wood Co- Balsa wood, Basswood, Mahogany, Architectural Models, Model RC Aircraft, Savox Servos Ocooch Hardwoods - Supplier of Thin Wood for Scroll Sawing, Carving Blocks, Intarsia wood, Plywood for scroll sawing, and more. Rare and Exotic Lumber in Maine - Rare Woods USA Rare Woods USA Rockler.com S.H. Goode & Sons Workshop Specialty Wood Exotic Lumber Exotic Woods - Keim Lumber The Wood Database Tropical Exotic Hardwoods Welcome to the World of Hardwoods Wood Project Source - milled wood sheets and strips and wood carving blocks woodcraft.com- Woodfinder® Marketplace Woodworkers Source for Imported, Rare, Specialty, Exotic Woo Sources of rough lumber (Australia): Trend Timbers (1492) - Local, imported and exotic timbers. Anagote Timbers (Jim Lad) - Local and imported timbers. Named after a pet goat called Anna. Australian Furniture Timbers (BANYAN) - A wide selection of timbers. Avilable in 1 meter lengths. Sources of rough lumber (UK): Workshop Heaven (AntonyUK) - Various sized chunks of exotic wood Yandles (Kevin) Sources of rough lumber (Spain) Maderas Barber (ymperivm) Sources of rough/billets lumber (USA): Gilmer Wood Company - Mainly Exotic wood and much of it highly figured. The main species of interest for ship modelers will be boxwood, ebony, and holly. $100 USD minimum order for Internet purchases, no minimum for walk-in purchases. Ships internationally. Cookwoods (mtaylor) - Exotic hardwoods. Ships internationally. Righteous Woods (davec) - Domestic, imported and exotic timbers. $100 USD minimum order for Internet purchases. Ships internationally. Tallgrass Custom Wood Productsfff382 (Thairinker) - Domestic hardwoods. Located in Kansas, does not appear to offer shipping. Woodworkers Source (Sephirem) - Domestic and imported. Lumber is organized based on geographic region that it comes from. Rare Woods USA (ChrisLBren) - Ships to Continental USA only for online orders, but is free for orders >$100 with conditions. Sources of rough lumber (global): A local hardwood store - Usually a great place to buy domestic wood and some exotics. I have seen ebony and purpleheart at Woodcraft. A local hardwood flooring store (muzzleloader) - Mahogany, maple, cherry and other hard woods. Inquire about sales of remnants at bargain prices. A note on Gilmer: This is a local business for me so I am fortunate that I can visit. If you've purchased milled Castello Boxwood for your model then it probably came from here. They told me that they don't have a source for this wood anymore, but in addition to the large stack of wood towering over me they also had a bunch more in another warehouse. The Castello Boxwood starts out as rough 8/4 (2" thick) boards around 6" wide and 7' long. When the stock on their website gets low they pull down a board, clean it up in a planer, spray with shellac to bring out the color, then seal the ends with wax. They told me if I was to buy a board off the top of the stack it would be $30 a board foot (1"x12"x12") but that if I wanted to dig through the stack they'd up the price to $35 per board foot. Indeed, the chunks on their website were about $35 a board foot when I last ran the numbers. Ebony is tricky stuff as it all looks the same in pictures so ask them to select a board with straight grain, if you tell them it is for a ship model they will understand what you need. When I was there last they showed me how to hold the ebony to the light to check the grain for straightness. Also don't be too concerned if the description of Castello Boxwood on the website is "figured" as that is what they listed my piece of wood as and it was actually fairly straight. Not all wood can be sold to customers outside of the USA because of laws to protect endangered species.
- 81 replies
-
- 17
-
-
Thanks. I figured it would be a good idea to get a Phantom build log back up right away as it is popular with a lot of beginners. I was a beginner when I built this (still am) and found other's build logs to be very helpful.
-
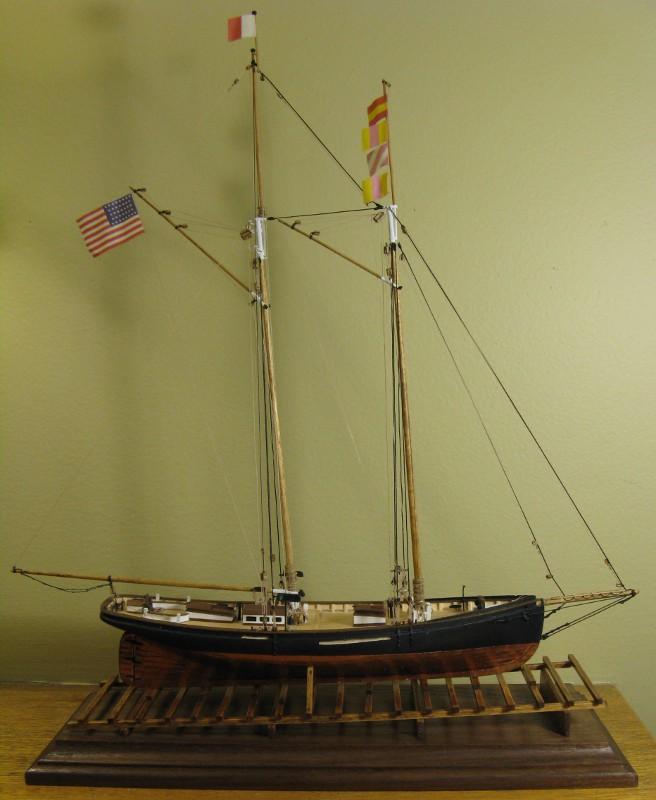
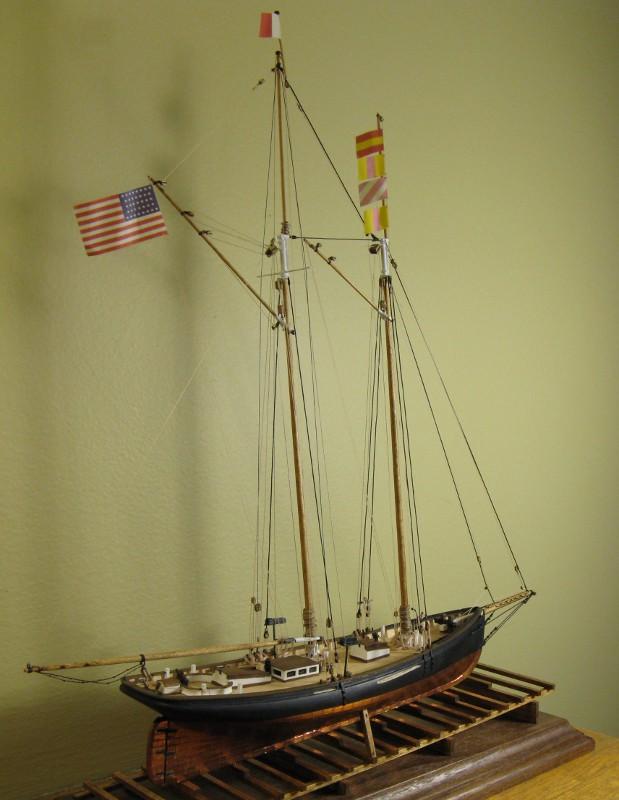
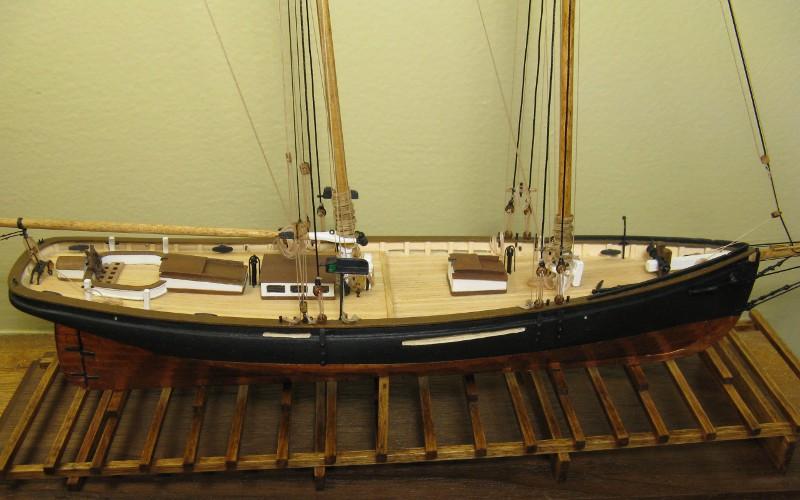
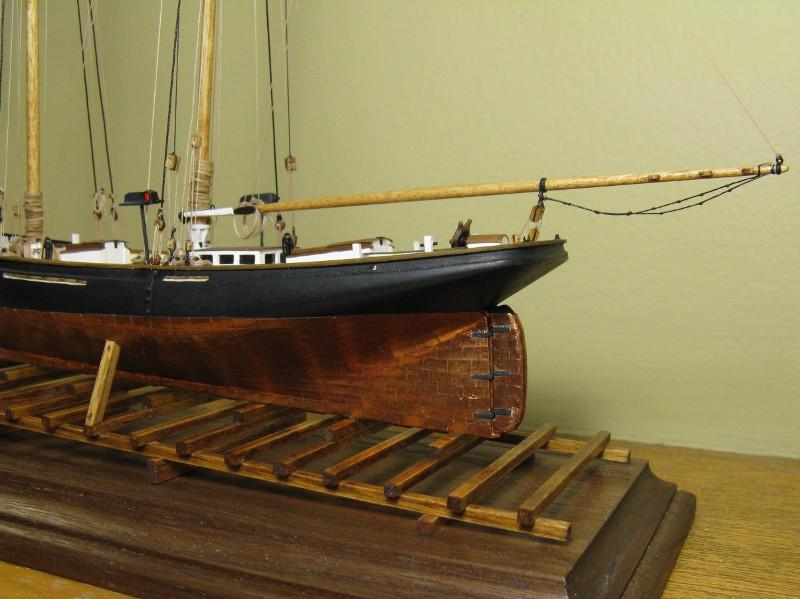
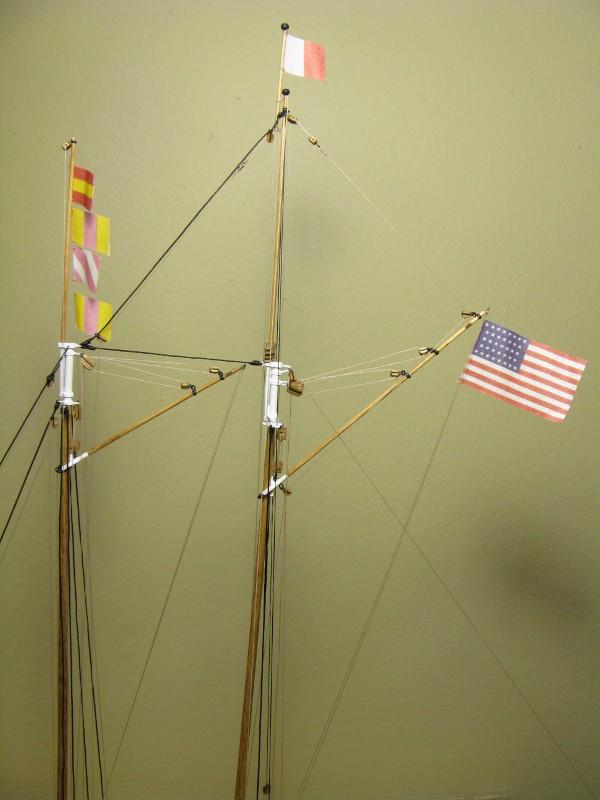
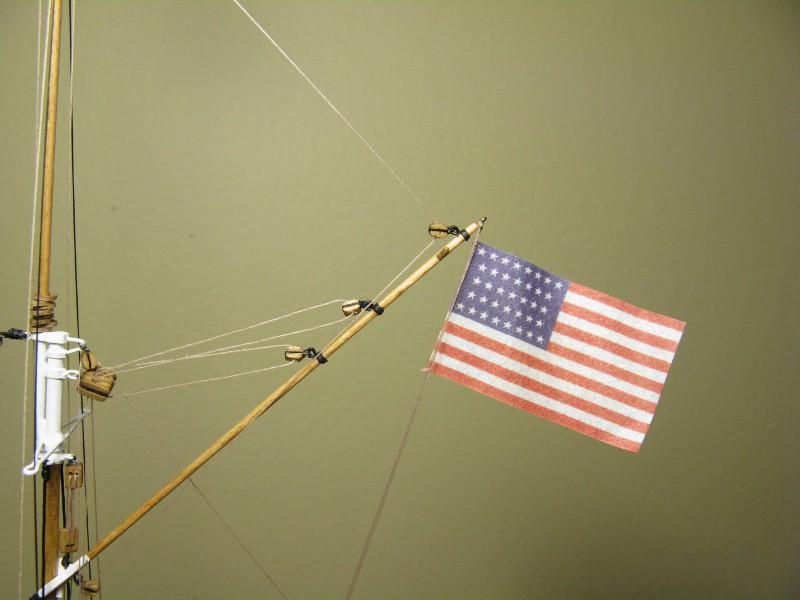
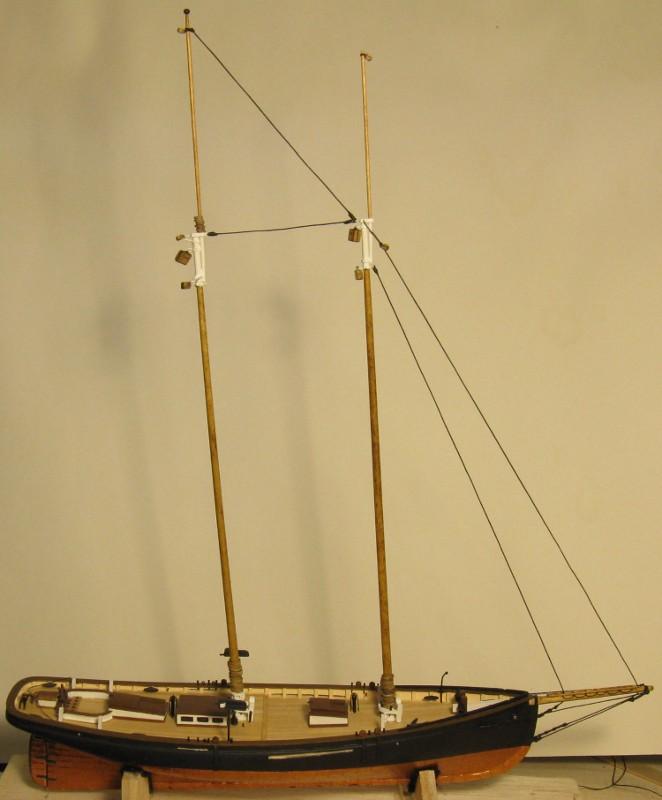
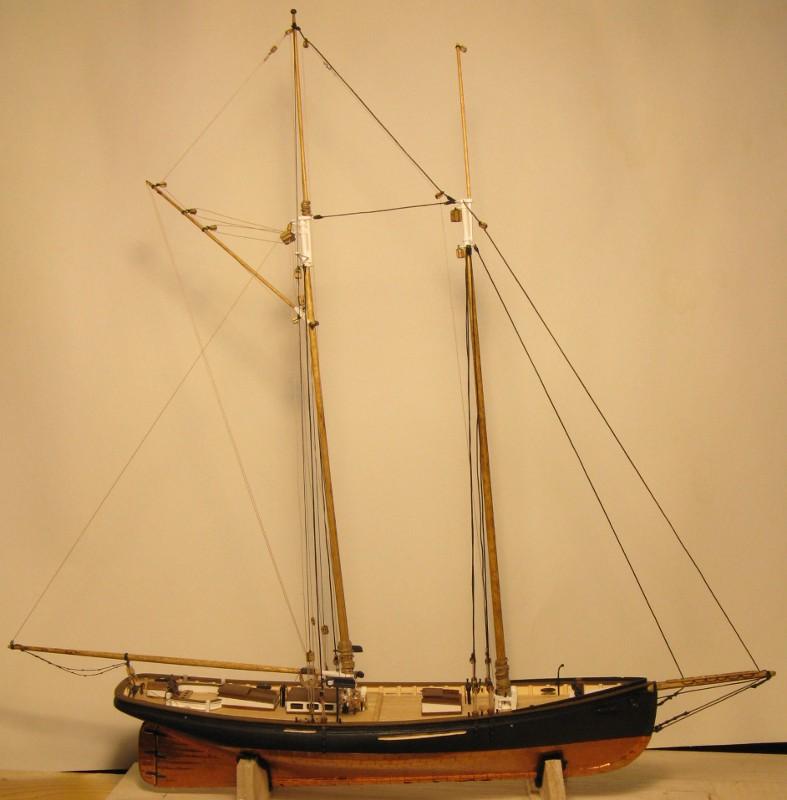
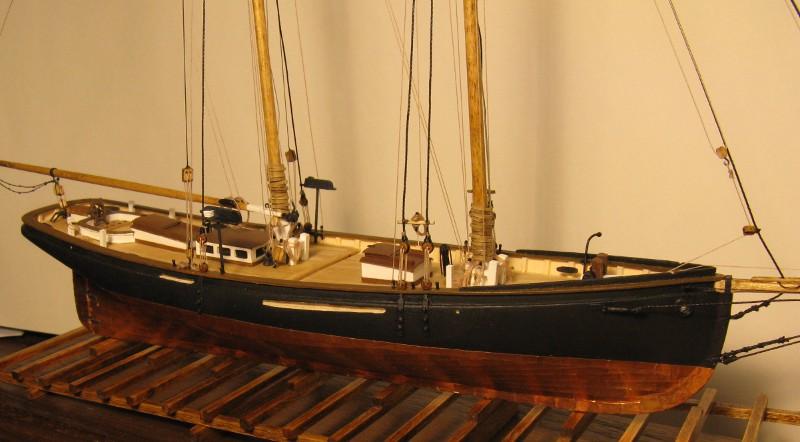
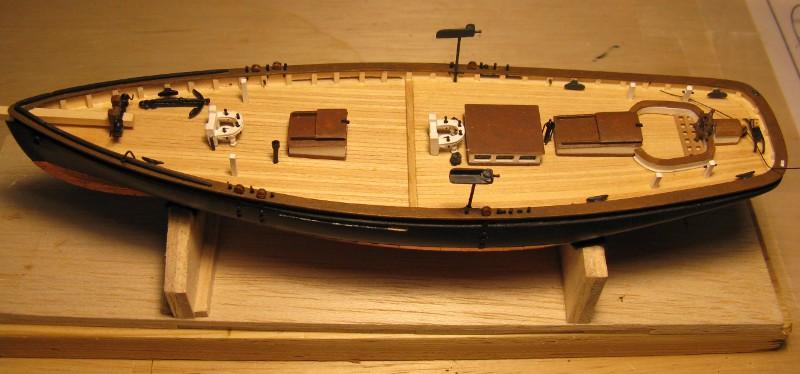
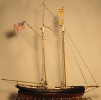
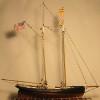
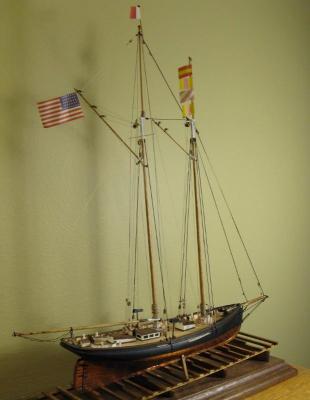
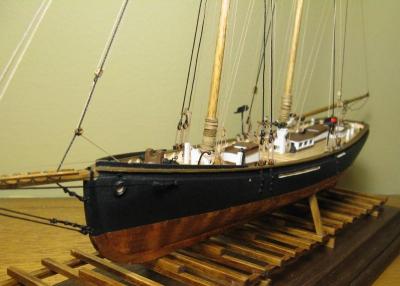
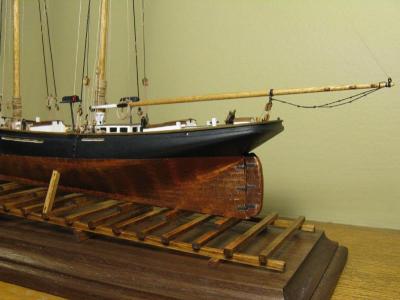
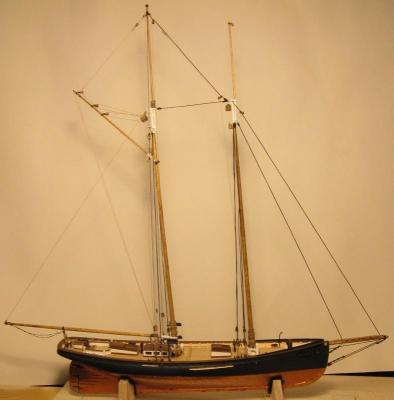
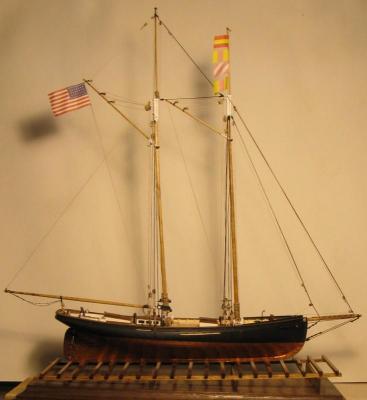
These are photos of the completed model (12 January 2012). Feel free to ask me to explain anything that wasn't covered and I will do my best to help you.


- 41 replies
-
- 1
-
-
- model shipways
- phantom
- (and 1 more)
-
That's the last of the text I was able to find for my build log, just pictures and brief comments from now on. Stays Shrouds and stays Main boom installed Main gaff Some rigging pictures


-
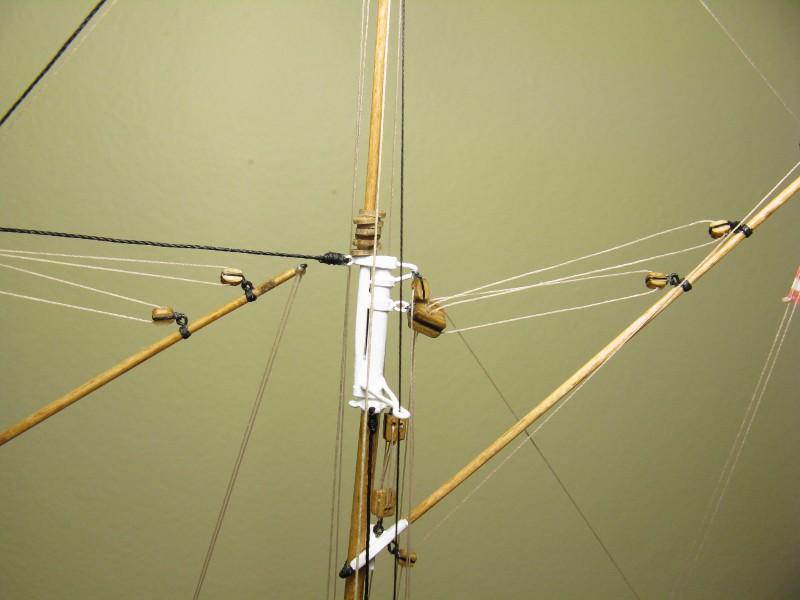
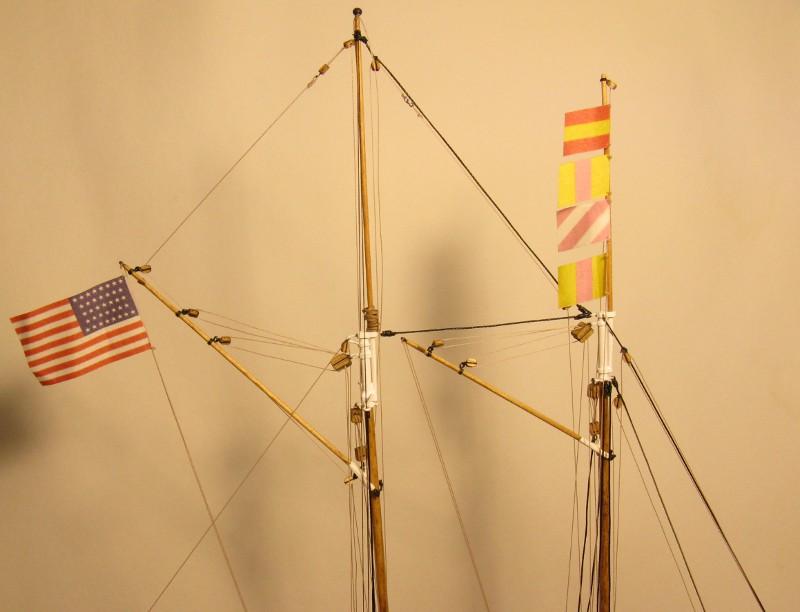
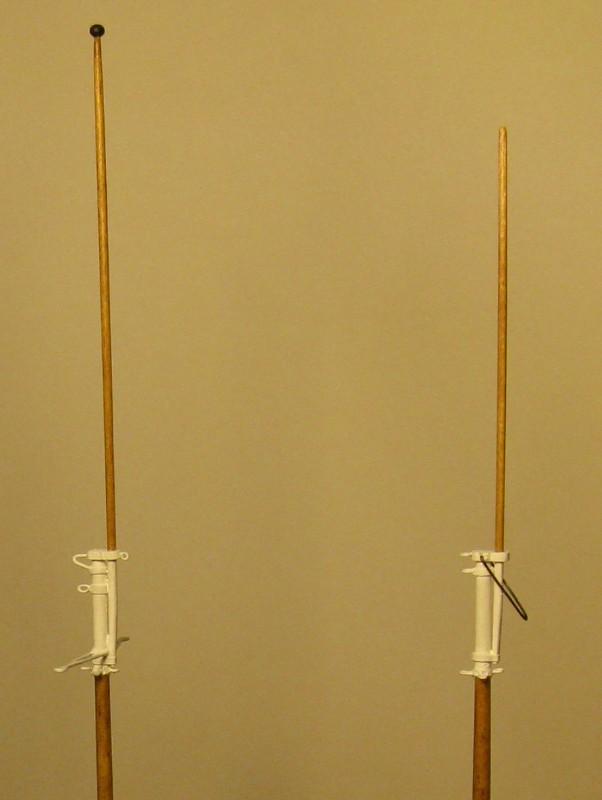
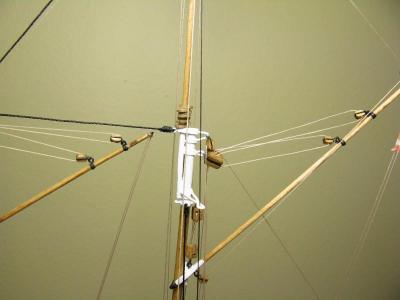
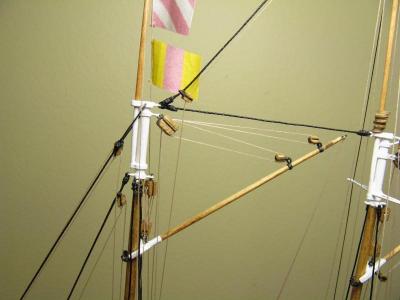
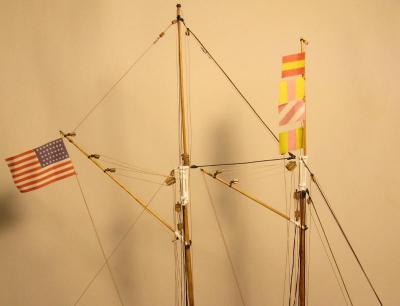
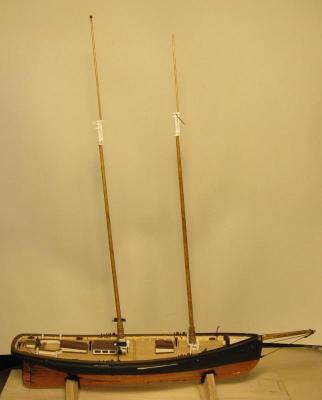
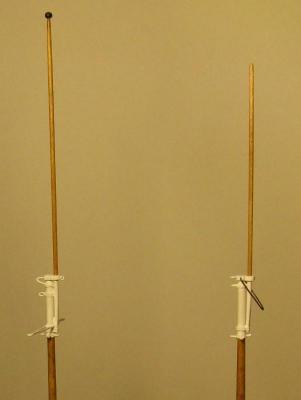
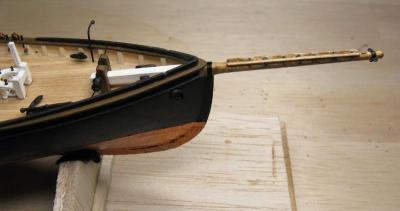
Fri Dec 23, 2011: I've been hard at work making the masts. Well, not really because I could only do so much each evening before having to let the stain or wipe-on poly dry before I could move on. The dowels were chucked in my electric drill and sanded to shape followed by a little final hand sanding here and there. Everything you see here is pretty much straight out of the practicum. The wooden ball truck on top the main mast is actually a 5/64" (2mm) parral from a bag I bought at the LHS for doing the main boom. Main top mast and signal pole. Dry fitting the masts.
-
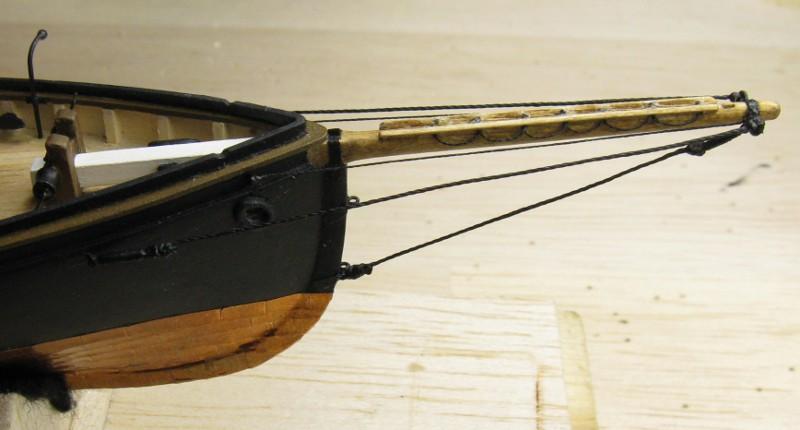
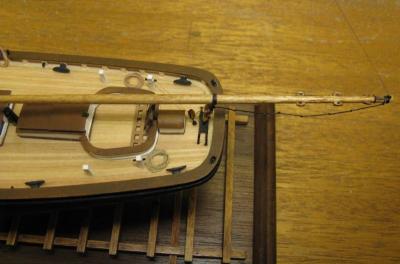
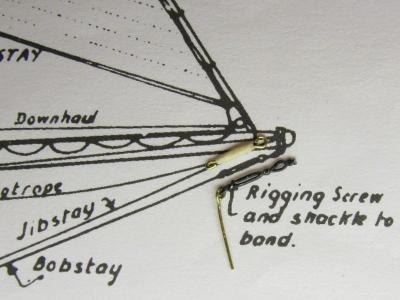
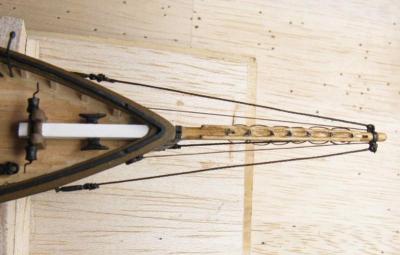
Mon Dec 12, 2011: At first I made a stretching screw as shown in the directions, but it turned out too long for my liking. In the end I made all of mine solid and of wood strip material from the kit. If you are close enough to see that the stretching screws are solid then you need to get your nose off the glass anyways. I finally got my first taste of rigging today. It was slow going because I dug through all of my books for references to standing rigging and the best way to tie a line that goes between two fixed points such as an eye bolt and stretching screw that isn't actually operational. In the end mine are not quite as tight as I would like, my knots not as well made as I would like, and my foot rope too tight. But I think it'll do just fine for my first rigging attempt and I expect to get much better with experience. I welcome any rigging and knot suggestions that might help with these sorts of lines. Stretching screw comparison. Bowsprit standing rigging. Bird's eye view of the bowsprit.

-
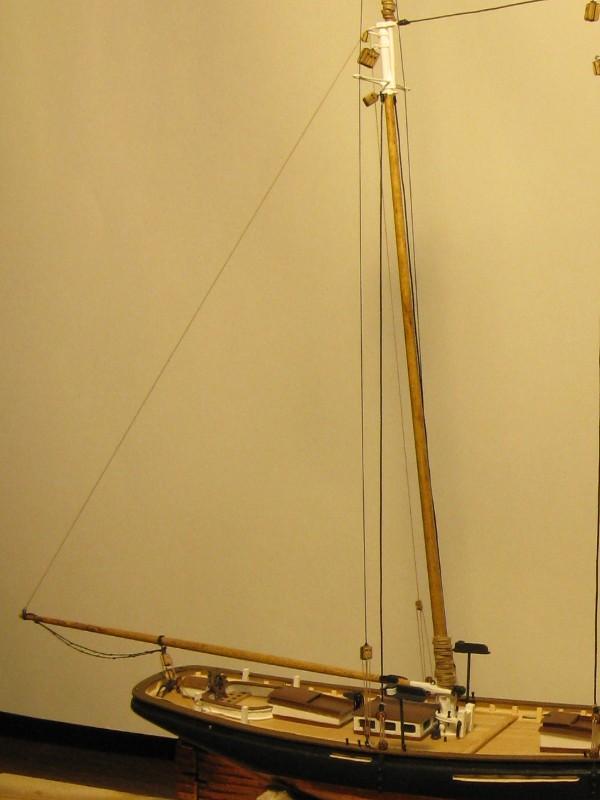
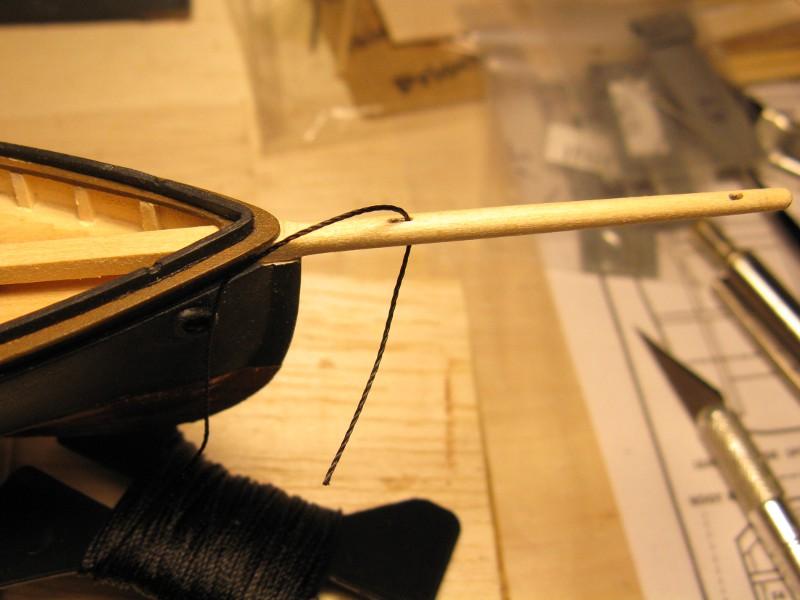
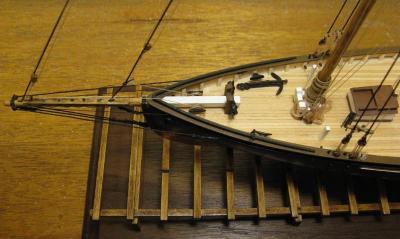
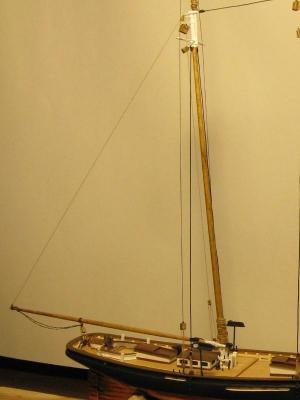
Sat Dec 10, 2011: I've managed to get the bowsprit finished and installed. Of course I missed that part where Chuck says it is easier to attach the stretching screw to the bowsprit before you install the bowsprit so I'll have to be careful when it comes time to attach the stretching screw. I've also noticed that the windlass and bitts is a bit too far to starboard so if you sight down the length of the boat you can see the tip of the bowsprit is slightly to port, but not enough to warrant ripping it out and fixing it. At first I attempted to make the gaskets from wire as Chuck suggested, but I didn't like how it was turning out so I figured it was as good a time as any to see what it they would look like when made of the nylon line. I waxed the line, but it still doesn't hang quite right as you would expect and I had a heck of a time getting the glue to stick to it. I have one book that twice says not to use CA on rigging line, but never says what you should use, so I assumed Weldbond would be fine and so far it is doing ok. Checking the fit of the rigging line in the bowsprit sheaves. Bowsprit installed Bowsprit has a slight angle and the cleats are not perfectly opposite of each other, but few will ever notice.


-
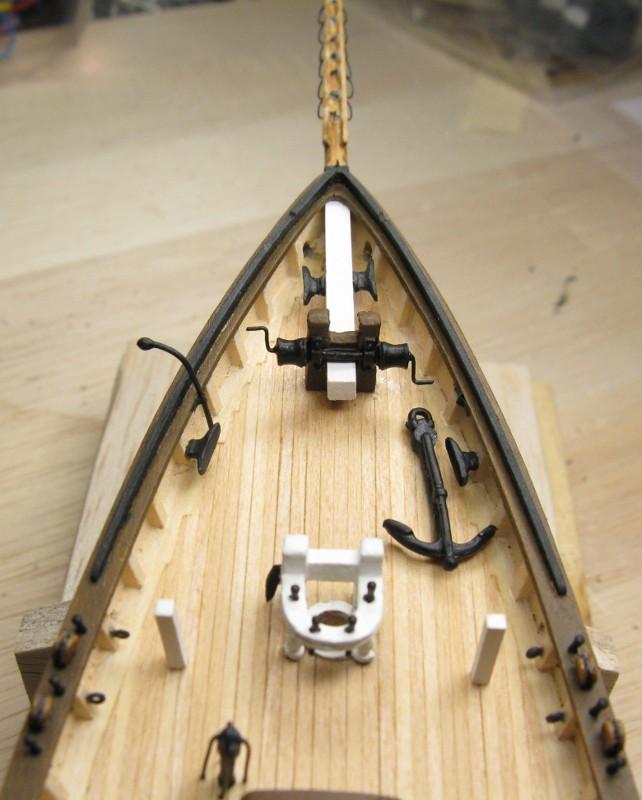
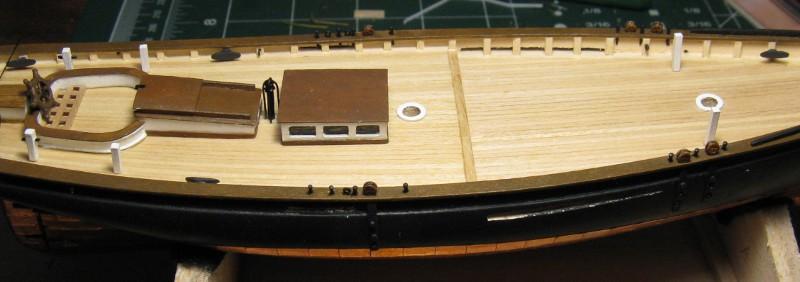
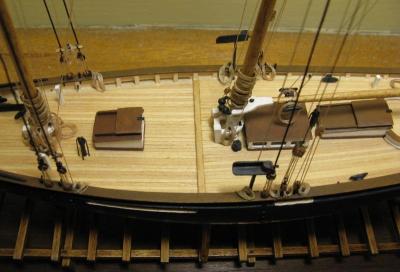
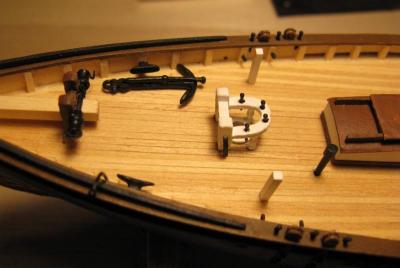
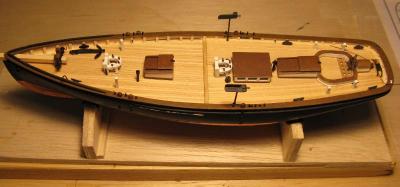
Thu Dec 01, 2011: It has been quite some time since my last update, thanks in no small part to a great deal of time spent in the garage trying to turn it into a usable workspace. I've just passed the final electrical inspection so the pressure is off and I was able to spare some time for the Phantom. I've also been hesitant to post a picture when not everything in the photo was complete, but I decided if I waited till all of the bits I was currently working on were complete then I'd never stop to take pictures of my progress. Most of the deck fittings are complete or will be completed soon. I'm looking forward to making the bowsprit. Lots of new forward deck fittings are glued into place. Not a whole lot more I can do tonight till the glue and paint have time to dry. I like to show a photo of the whole model from time to time to get a good perspective of the progress made so far.
-
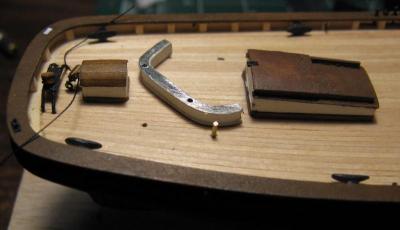
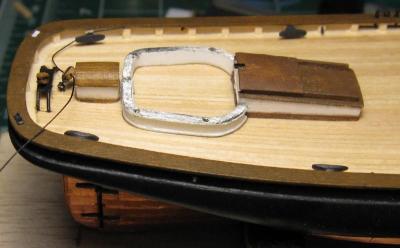
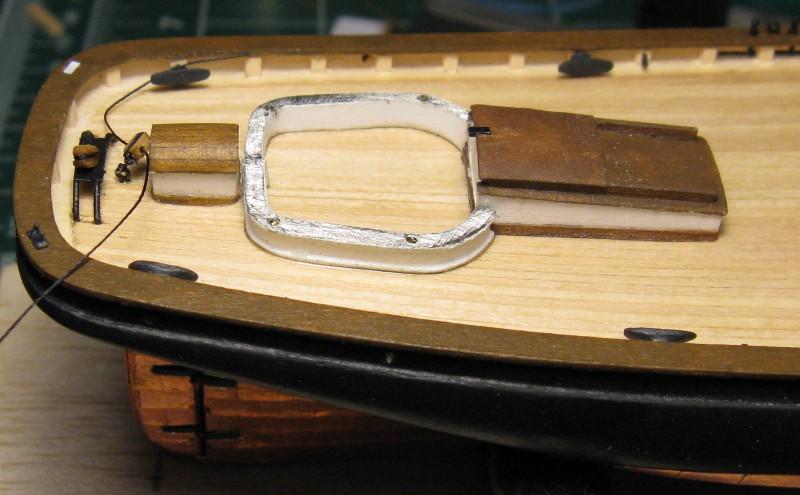
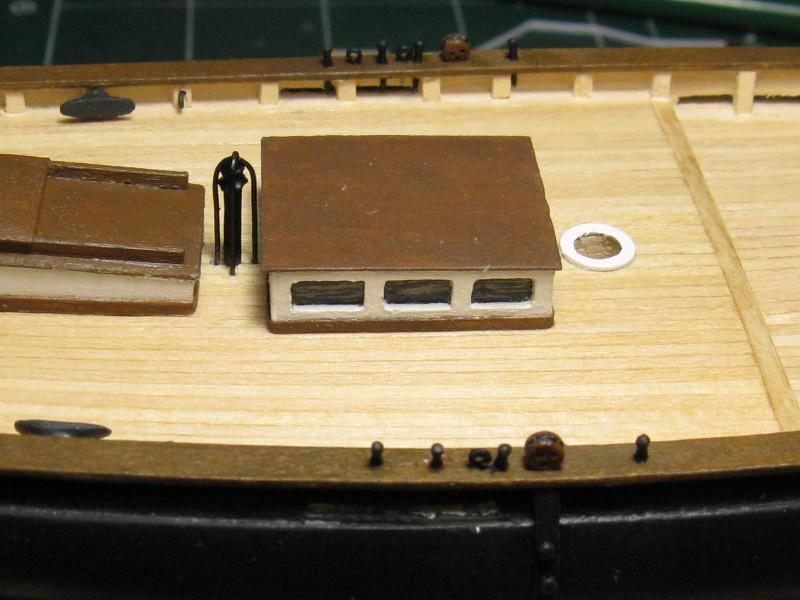
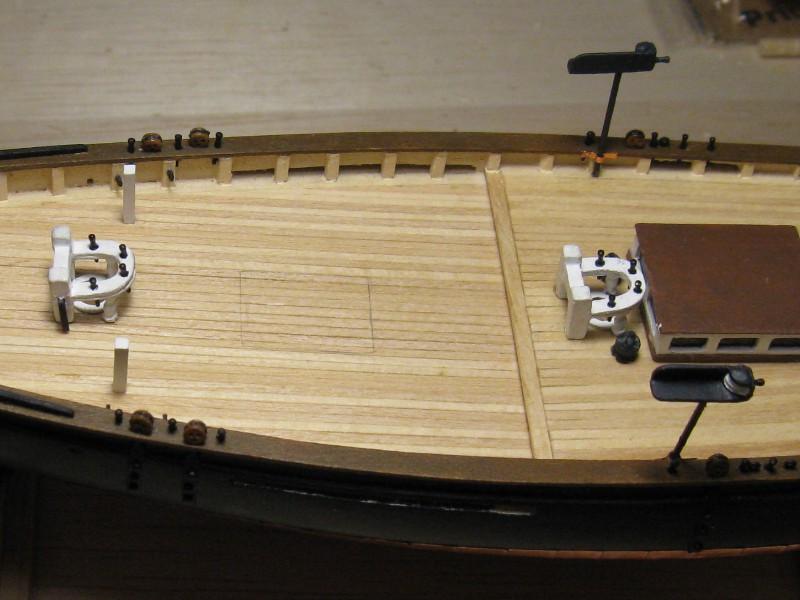
Note that the cockpit area should be recessed, but I didn't read far enough ahead in the practicum to see that till later in the build. Cockpit coaming Wheelhouse and companionway Cockpit and stove pipe Skylight Mast coat and bollards Fife rails and pumps