jdbradford
-
Posts
213 -
Joined
-
Last visited
Content Type
Profiles
Forums
Gallery
Events
Everything posted by jdbradford
-
Pete, is your site still active? I was looking for more information on the HMS Victory.
Thanks,
Jeff
-
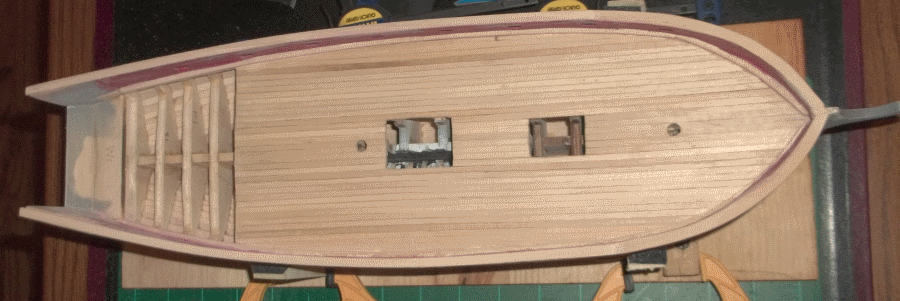
 My next step is the fancy rail and cap. I have been looking at many of the previously built models of the Fair American and for each one, it seems that the cap rail is done a bit differently on them. Also, the finish used on this part is also as different as the number of them being built. I am not sure how I want to proceed with this section. Any ideas? Jeff
 -
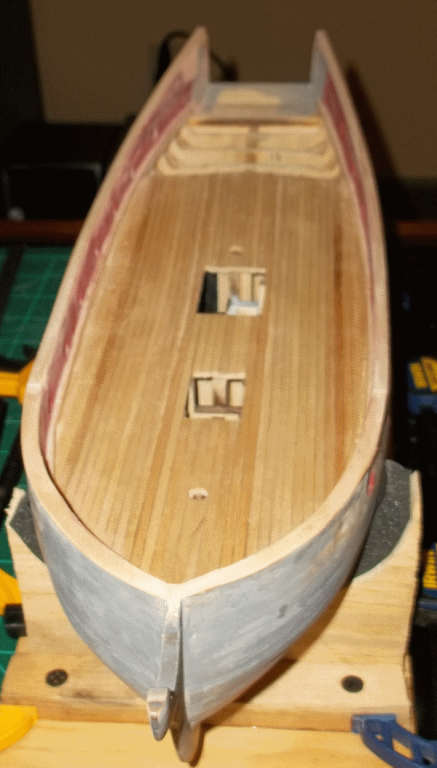
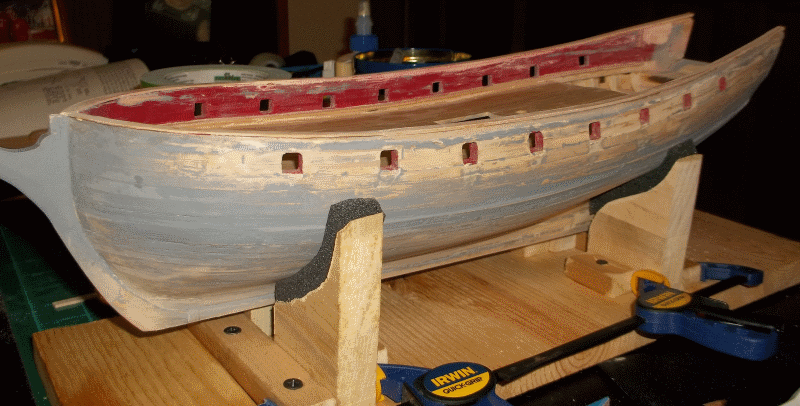
Here are 3 shots after installing the cap rail and my new cradle for building the ship. The plans showed the cap rail to be 1/16 x 3/16 which seemed very thin at first. But this is what I used on the bow part using a small sheet of 1/16 I had. From about frame 4 aft I used some 3/32 strip I had and then filled and finished by sanding some off to make the transition a bit less noticeable.
-
Greetings, from Seattle Washington
jdbradford replied to Estoy_Listo's topic in New member Introductions
Welcome -
Possibly interesting find by an utter newbie
jdbradford replied to Dylanmserra's topic in New member Introductions
Welcome aboard. The lines of the ship remind me a bit of the Revenge. Jeff -
Hello from the Colonies ... Ontario, Canada
jdbradford replied to albergman's topic in New member Introductions
Welcome aboard Frank. That looks like a wonderful model you have. Looking forward to seeing more. Jeff -
Welcome to the group. That is a lovely model in your picture. But, I think I enjoy the one's of your home area even more. It looks peaceful and tranquil. Jeff
-
Welcome Edd. This is a great site for resources and support. It looks like you have a wonderful model that needs some TLC. You will get help from the folks here. I hope it is alright to post another resource on here. Pete Coleman has a forum for Victory builds. http://pete-coleman.com/forum/ Jeff
- 8 replies
-
- 4
-

-
- montreal
- hmsvictory
- (and 2 more)
-
Yipee, my original login still works. I will post some current pictures of my build a little later today. Jeff
-
Is this the Chris Watton designed Revenge? I have that one waiting in the shipyard. Jeff
-
In regards to the aft framing and transom, I will need to check mine before I get that far. It may allow me to adjust the width of the transom as you mentioned. Of course, mine was one of the last kits, so it may not be necessary at all. Your model is coming along wonderfully Dave. Jeff
- 306 replies
-
- 1
-
-
- armed virginia sloop
- Patrick Henry
- (and 2 more)
-
how to work with teeny blocks???
jdbradford replied to achuck49's topic in Masting, rigging and sails
Where did you end up getting this from? Jeff nvm, I see where you posted that you got it. thanks -
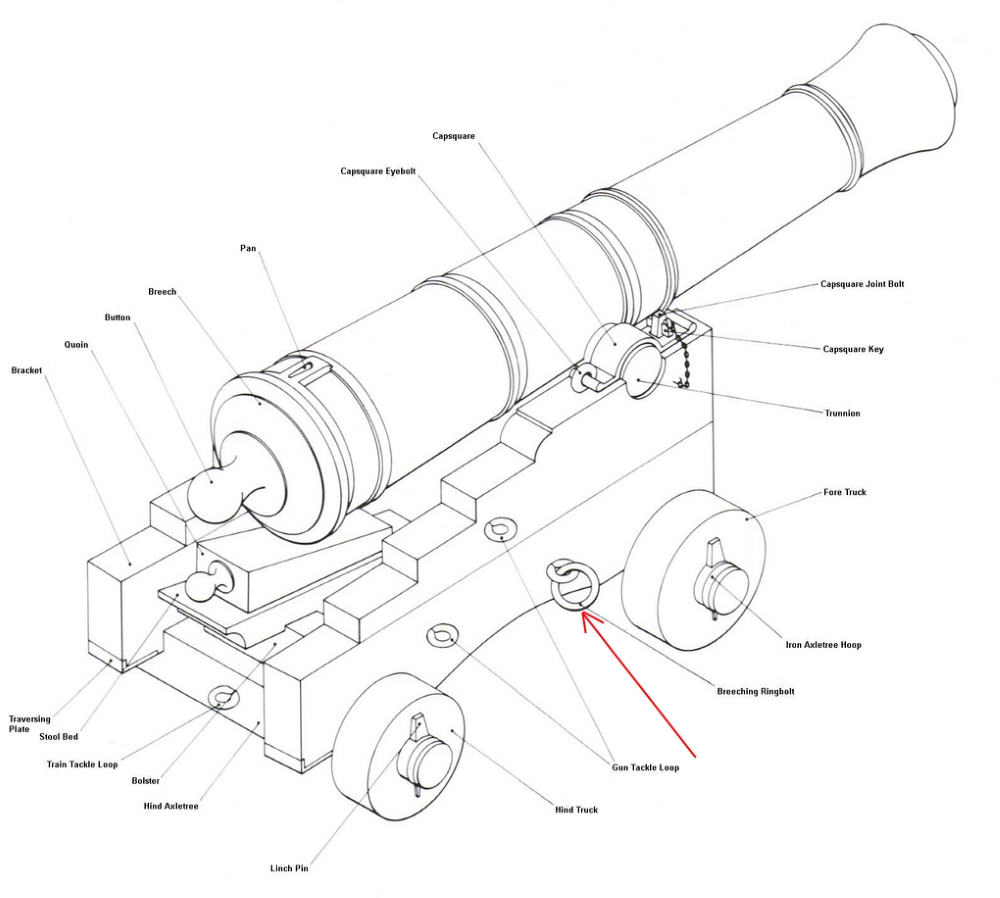
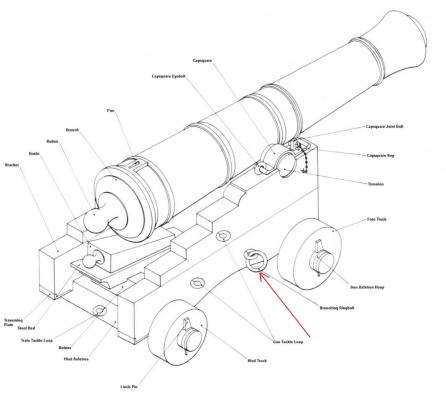
Hey Jerry, How goes your build. I have been working on the cannon and carriage parts. Trying to make the eyelets and rings for the carriage rigging look realistic. I saw a build for the AVS where the carriages are about the same. The rings seemed to big for the scale, but I am trying to find a way to make them the right size and black too. Jeff
-
Ship Drafting
jdbradford replied to mholmberg's topic in CAD and 3D Modelling/Drafting Plans with Software
I would like to learn how to convert ship plans to model plans. I have read a number of topics here and on other sites, but am not grasping the information. Do they make "Dummies creating model plans from ship plans"? LOL Jeff -
If the hole does not go all the way through the bulkhead, how does the water drain? Jeff
-
Hey Dave, I have not looked in on your build in a while, but it looks great. Hope all is well with you and yours. Jeff
- 306 replies
-
- 2
-
-
- armed virginia sloop
- Patrick Henry
- (and 2 more)
-
I had the same issue with mine. I ended up gluing the trucks directly to the carriages for those that broke off. I also ordered some of Chuck Passaro's carriages to test for size. I may order replacement carriages and such for my next model. Now I am rigging the cannon on my Fair American. They did not supply the blocks or other hardware to rig them. I do think these teeny eyelets are for the cannon carriage rigging, but they have been an absolute pain trying to get black. My next issue is the breaching ringbolts. I have not seen an easy way to manufacture these. I have done no metal fabrication like this. Thanks, Jeff
-
I too use Minwax wipe-on Poly with great results. I would love to see a pictorial of your wood finishing Jaager. Jeff
-
I will test out trying to brush some on tonight. Jeff
-
I scrubbed the brass eyelet with a wire brush, soaked it in vinegar for about 15 minutes, rinsed it in clear water, allowed it to dry and then let it soak in Jax black for about 20 minutes. When I pulled my hemostats out of the liquid, the jaws of the hemostat look great in black. I did not clean them or soak them. The brass eyelet is as brass looking as it ever was. I am ready to give up on this product. Jeff
-
Well, I have tried multiple ways now. I took the eyelets from the kit, roughed them up, primed and then painted black. A real pain in the butt. First, I punched small holes is a block of Styrofoam, and painted them with a brush. They end up spinning around, falling out and the holes get too big. I then drilled about 60 very small holes in a small piece of wood and dropped them in. It worked okay for the larger eyelets, but when I got to the smaller ones, they went down too far in the wood. My next try was using my hemostats to hold the end opposite of the eye and to dip them in the primer first, poke out the excess primer from the eye and then to blow on them to dry them some before setting them down to do the next one. After finishing about 100 of these, I switched over to dipping them in flat black acrylic and going through the same steps to let them dry. These turned out pretty well. I ordered a bottle of the Jax Black and have now tried to brush it on and then tried to let one soak for about 5-10 minutes or so. Neither one worked as the black coating rubbed right off when I picked up the eyebolt. Not sure this will work for me. Jeff
-
Thank you for the reply Chuck. I will get some hooks ordered and then locate some blackened wire to make eye bolts. Jeff
-
Mark, What is Dafi? Jeff
-
Thank you Ken and Brian. The blackening techniques do not look to hard, so I may try them. I will need lots of patience to create the eye bolts and hooks, so wish my Admiral all the best. LOL Jeff
-
Has anyone found a source for blackened or iron-looking eye bolts for rigging cannon? I am not sure I want to purchase the materials used to blacken items. I have tried to paint the brass-looking ones that came with my kit. The larger eye bolts seem to have turned out okay, but the really small ones are a pain. I would love to find another color, other than the shiney brass ones. Thanks, Jeff