John Kendziorski
-
Posts
30 -
Joined
-
Last visited
Content Type
Profiles
Forums
Gallery
Events
Everything posted by John Kendziorski
-
Thanks, Gents. I don't know about the big leagues, but I'll take up the challenge of each kit with joy.
-
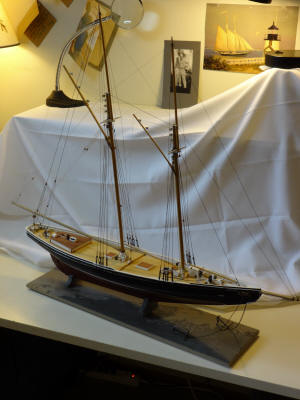
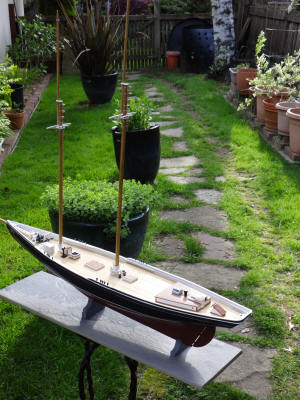
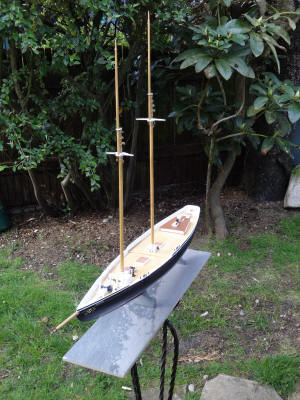
Final Bluenose post from me. I've taken it as far as I'm willing to. Might have to revise my motto because more things broke as I tried to repair others. She sits above my work station, and I have to say I'm amazed that she turned out as handsome as she did. Next, Constructo's Louise. John
- 18 replies
-
- 3
-

-
- bluenose
- model shipways
- (and 1 more)
-
Made a fair-looking waterline using 6mm Tamiya masking tape. Had to freehand the sweep under the stern—a little shaky there. Transfer letters didn’t work, so I printed hull/stern name plates on photo stock; couldn’t get a good color match because I’d chosen to paint the hull midnight blue. Prefab pintles/gudgeons and deadeyes/plates worked well enough, but had to thin the pintles/gudgeons to fit between rudder and sternpost. Mast/boom/gaff dowels were arc-ed; tried to use the convex sides as is while flattening the concave. Used aluminum paint to represent the various metal bands. Masking helped, but opted to freehand most of them—again, a little shaky. Booms and gaffs will get similar treatment. Base is a piece of tile. I rather like it for color and its seascape look. Still, she’s a good-looking model, and I’ve been contentedly entertained for the four months it’s taken to get this far. Having a philosophical nature, I find similarities to the process of aging--accepting, even chuckling at, little setbacks along the way. John
- 18 replies
-
- 2
-
-
- bluenose
- model shipways
- (and 1 more)
-
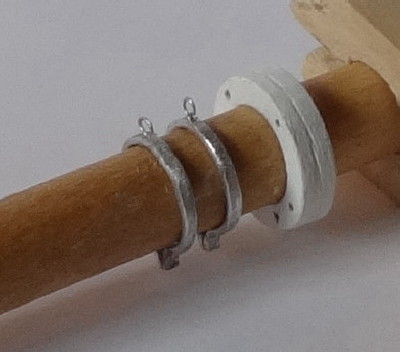
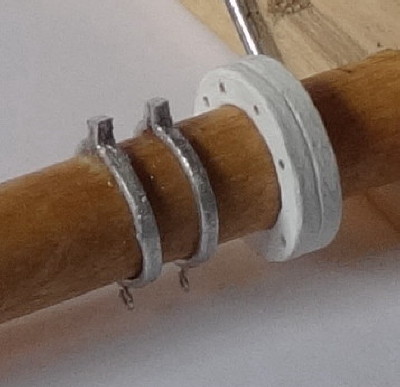
I used aluminum wire for the gooseneck. Malleable, fairly easy to bore. A thin steel brad will lock in the boom.
- 18 replies
-
- 2
-
-
- bluenose
- model shipways
- (and 1 more)
-
Thanks, Don. This is my first intermediate level build, and I wouldn't mind going at it again; it's been that satisfying. Hence, this first effort is practice, practice for the next Bluenose. John
-
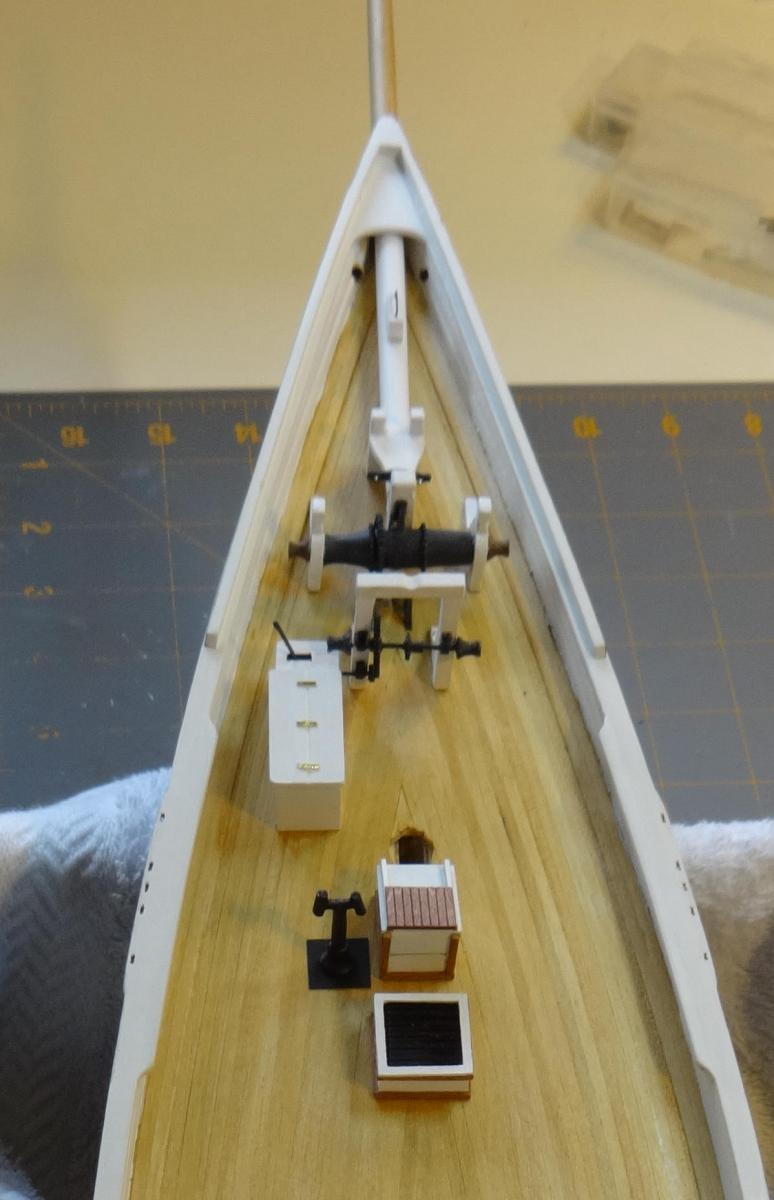
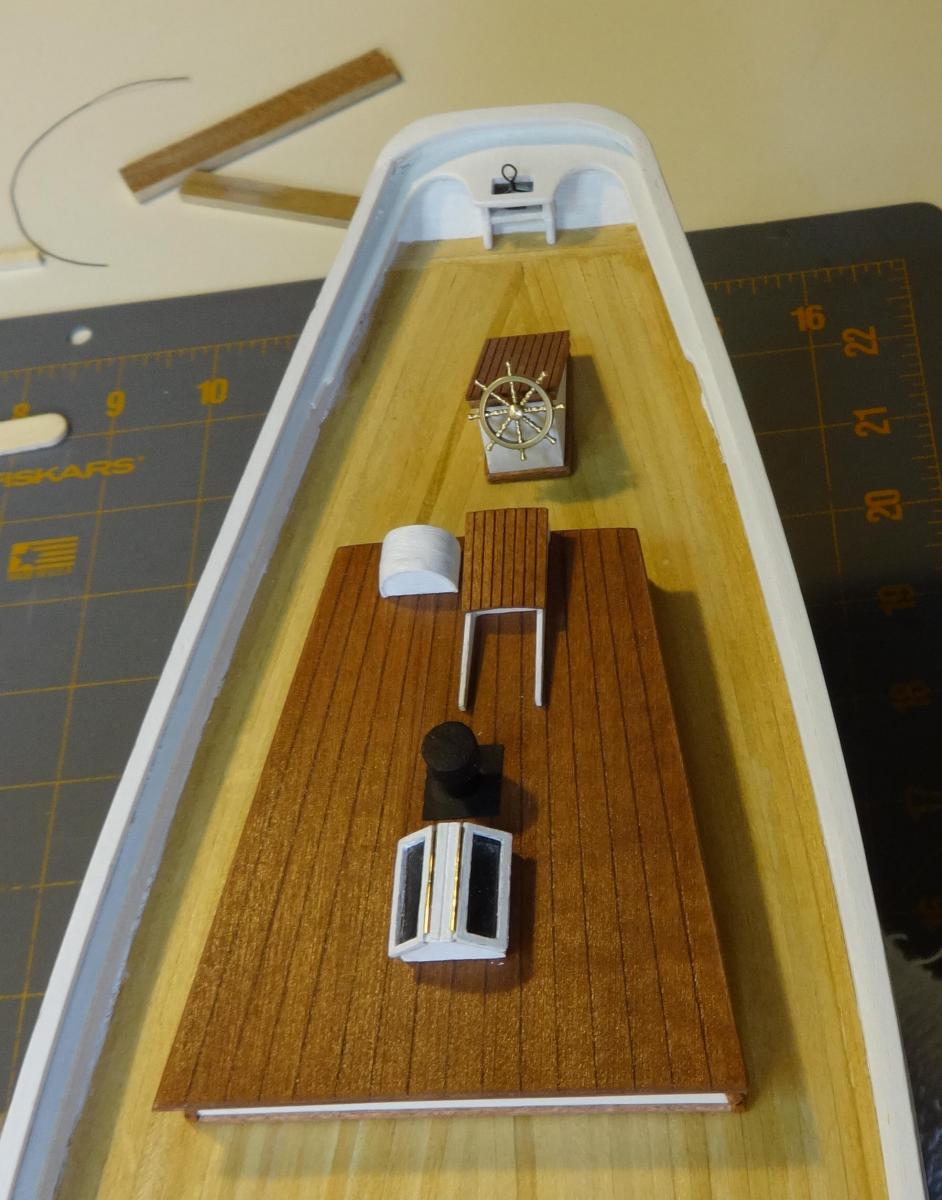
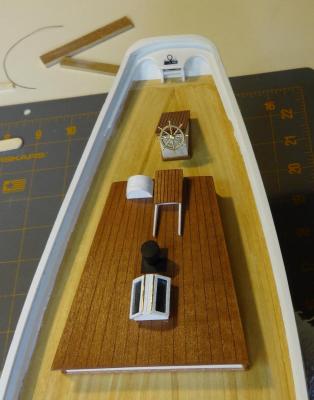
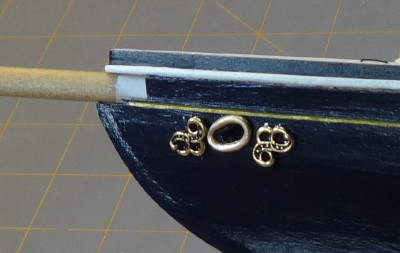
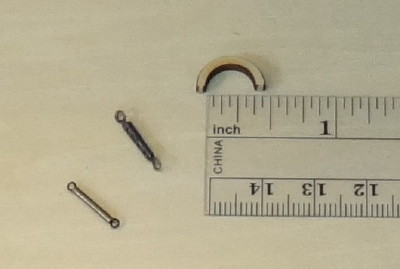
This has been quite a challenge, but I’ve enjoyed every success, failure, broken assembly, all of it, except the quality of the kit. I really wanted to build a good looking model, but I realized early on that for me this would be a practice model, a mere reasonable facsimile of the Bluenose, so I’m just going with the flow, doing what I can, fudging some, and ignoring whatever is beyond my skill level. Most of the deck furniture is in place and work on the masts begun. I’ll use black paper and mini eyebolts made from 26 gauge black-coated copper wire. (I’ve no experience at soldering, and I don’t want to deal with the strong chemicals to blacken brass.) Purchased some parts: brass helm from Harbor Models; pintles/gudgeons and strapped deadeyes from BlueJacket; brass transfer lettering from Letraset. The scroll work around the hawse pipes comes out of my wife’s findings trays, as will the mockup turnbuckles. A medium point gold-ink ball pen did the thin line. About the kit: It is a disappointment because of the poor quality of the MS castings and the heavy charring of the laser cuts, most of which were at an angle rather than being perpendicular to the face. The rings for the mast coats, boom rest, and pin saddle measure 3/8”+ID while the masts are only 5/16”OD. I wondered if this kit was meant for the accomplished modeler with a well-furnished shop. Did I just get an “as-is” bargain (it wasn’t at bargain cost), or are most MS kits this way? I’m asking a question; that’s all. Two versions of turnbuckles. They'll be half this length on the model. The ME paint kit for the Bluenose was even more disappointing, and I don’t recommend it. Inconsistent viscosity from jar to jar, difficult to brush without leaving marks, tacky even after several days of drying. I found far better paints at the fabric store and for far less cost. Better coverage, a true flat finish, less drying time, and no tack. Laker (John)

- 18 replies
-
- 3
-
-
- bluenose
- model shipways
- (and 1 more)
-
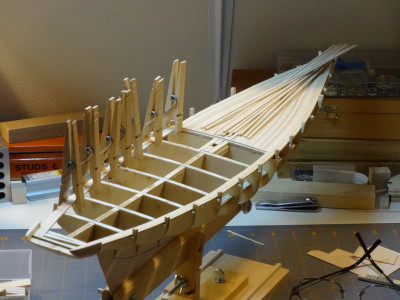
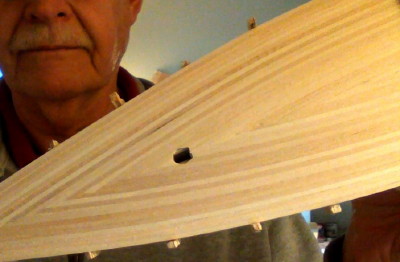
I broke more stanchions before completing the deck, so I opted to remove them all. After installing the outer waterways plank, I referred to the drawings to begin engineering the replacements. And here I discovered that the drawings and the laser-cut bulkheads are not symmetrical; one half is not the mirror image of the other. I suggest any future builder check these things carefully. So here's how she looks without stanchions. Opted to build up the areas of the stanchions with solid wood, starting with 1/8"2 which I bent into shape, or nearly so. Will have to guess at the outward sweep towards the prow and the inward sweep toward the stern. Will build up as needed to meet the main rail. Scuppers won't appear inboards, but they can appear outboard. All in all, this seems a satisfactory solution to those fragile stanchions.
- 18 replies
-
- 1
-
-
- bluenose
- model shipways
- (and 1 more)
-
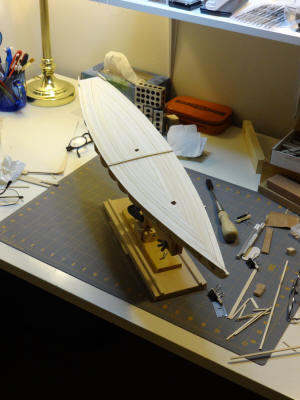
Moving along with the deck planks. You know, planking can be good contemplative work. Opted to simply follow the arc of the waterways, forming a herringbone effect over the keel. Not authentic, but handsome in its way. Trimmed just right, the planks snap into place and hold themselves without clamping. At most, a little finger pressure until the tack of the glue takes over. Before installing the outermost waterway, I'll use the plan drawing to design replacements for the broken stanchions, which now number seven, all from the same sheet. Hmm. Final result:
- 18 replies
-
- 2
-
-
- bluenose
- model shipways
- (and 1 more)
-
Persistence pays. I crafted those filler blocks and made good tenons on the masts. Now trying to figure out the thickness of the filler blocks between the quarter frame and either the fake stanchion or the stanchion at bh O. The two drawings related to this area are confusing. If the filler is 1/8" thick, what's the need for a fake stanchion between bhd O and the quarter frame? Can anyone clarify this for me? Meanwhile, worked on the bhd stanchions. Three broke clean off and two others showed signs of near breakage, all during what I consider normal handling and work procedures. Hmm. Waterways are next. Intend to install the first course inside the bhds then fill between stanchions before going on to the second inside course. The quarter deck will be something else. John
-
Bulkheads in place. Two of them got slightly out of square for some reason. I'll deal with this later after some head scratching. Glad I waited to fair the bhs until after installation. Bad luck with the filler blocks aft of bh "O", including running a blade into my thumb. Uff da!
-
Found a small [2 3/4"] suction vise with rubber jaws for $15 at Home Depot. Sure beats trying to hold these pieces between my arthritic digits. Makes for short work removing the char on the bulkheads. Decided to bevel them after installation [with due care at the stanchions]. Feel I'll do a better job with battens in place showing how the planks will want to lie. Waiting for that 1/8" chisel to arrive so I can work on the rabbeting. Golly, that keel will be just 1/16" thick, presuming I don't over cut! Think I'll make a jig to support it until a plank can be glued in. John
-
Keel joined. Transferred bearding and rabbet lines to the port side by burnishing the vellum photocopies. Starboard side scored through the vellum. Then both sides scored with straightedge and ships curve. Now struggling to chisel as needed. Feeling frustratingly incompetent, but will soldier on. Meanwhile, the bulkheads are coming around. Stanchions, after thinning, seem too fragile to continue without a spot of cyano to weld the wood fibers. The drawings are not as precise as I was used to in my profession, but I enjoy the challenge of learning how to interpret them correctly.
-
Kit arrived 12/31/14. Photocopied keel drawings onto drafting vellum, and began study of differences between those and the laser cuts. Some cuts are not perpendicular to the faces of the keel. Will sand those square and shim if necessary. An inch or two of the fore-section bends a bit to the right. Any suggestions for straightening that? Sheet of large bulkheads is warped. Blocks between them should correct most of that. Meanwhile, carefully removing the char will keep me suitably entertained. Hmm, just noticed that all three sections of the keel are 0.5-1.5mm short of the drawing. Maybe I can add material to flesh that out. John
- 18 replies
-
- 3
-
-
- bluenose
- model shipways
- (and 1 more)
-
Thanks. I'm going with Syren. John
-
In another post you mentioned blocks and deadeyes from Syren. Did you opt to get them, or are you satisfied with those that came with the kit? Myself, I'm sort of a basher, but I like to make improvements that please me and don't cost too much. Blocks and deadeyes from Syren seem to be a reasonable cost. What are your thoughts about that? John
-
Hey Gary, My Bluenose is scheduled to arrive tomorrow. The resources you posted above are helping me to brace myself for the challenge. John
-
Seattle Shipwrights!?
John Kendziorski replied to Justin P.'s topic in Modeling tools and Workshop Equipment
You've waited a long time for a reply, shipmate. Wish I had a recommendation. I think all "true" hobby shops have closed around here. -
Greetings, Phil, The Swift is a sweet vessel. By now you may have found some of the well-documented build logs of the Swift. If not, I suggest you take a look at those so that you don't feel you have to reinvent the wheel. Brian advice is spot on; get those bulkheads right, or treacherous waters lie ahead. My own psychology is to get things as right as I think I can, then put the model aside for the evening. In the morning I see things needing improvement. Good luck, John
- 12 replies
-
- 1
-
-
- swift
- artesania latina
- (and 1 more)
-
fair a frame
John Kendziorski replied to gulfmedic1's topic in Modeling tools and Workshop Equipment
After a day fumbling with parts and instructions, I tossed the small pieces, saving the few pieces of better wood for something. Yup, should have researched this more thoroughly. Anyway, I fashioned my own system for squaring the frames to the false keel; 1.375 blocks cut from 1.5x1.5 poplar, and a couple of bar clamps. John -
Thanks, grsjax. I'll look for that. Again, I'm concerned about transferring products onto the better, more visible woods. Meanwhile, a friend gave me a pack of vinyl gloves he uses for painting. Stronger than examining or surgical gloves,with enough tactile feedback while I do the more course work of sanding. Best, John
-
Thanks Toni, I wondered about that. I'll try mineral oil or a lotion before donning the gloves. Another option may be to turn the gloves inside out; I didn't feel any powder on the outside. True, these gloves are not very strong, but most of the tears have been inside the palm. I've noted some loss of tactile feedback, too, but not so much that it disappoints me. John
-
Hey, Zach, wait up. My kit (Virginia, from the hobbylinc folks) arrives tomorrow. It'll be fun to swap notes. In fact, I'm enjoying the site so much, I may not get much work done on the ship! Best Regards, John
-
Thanks for all the replies, gents. I saw the medical officer, who suggested frequent applications of lotion and giving surgical gloves a try. I found that traces of lotion got onto the work. My dad had this problem, too.
-
After working on a few easy ship kits, my fingertips began to split from handling the wood. I don't want to give up this hobby, so I've ordered some surgical gloves, but I wonder how much tactile feedback I'll lose.