


slow2cool
-
Posts
114 -
Joined
-
Last visited
Content Type
Profiles
Forums
Gallery
Events
Everything posted by slow2cool
-
Hi Jd I had the same problem. In the first link it will show how I make coils. The way I make them does help them to lay right. https://modelshipworld.com/index.php?/topic/13186-making-rope-coils-with-help-from-many/&tab=comments#comment-402670 The next link will show how I hold coil in place while the glue dries Before I place the coil on the pin and pin rail I will put some water down glue on the rope that bends around the pin. If need be I will also put some on the coil. This will soften the rope and make it so it will flex easier. Then I use the next link https://modelshipworld.com/index.php?/topic/12313-just-the-right-amount-of-holding-force/&tab=comments#comment-372390 Hope this helps Joe
-
Good to see you back, and all is well. I was thinking something bad may have happened. Planking looks great. Joe
-
John You are not alone. I have the same thinking as you. When things don't work out I keep thinking it me, and I must be doing something wrong. Like not enough heat, to much heat, didn't let it soak long enough, etc, etc. I like you have come to the point that it must be the wood, and different wood acts different. What you have come up with is not only out of the box, but very smart. I would have never thought of using tile to help with the bending. My hat is off to you for keeping with it, and doing what you have done. Joe
-
scarf joints
slow2cool replied to dennistestagrossa's topic in Building, Framing, Planking and plating a ships hull and deck
Dennis If you want the best videos I have ever seen, go to utube and look up "daves" or "dave stevens" videos. The build he does is the Caustic "daves" is on modelshipworld If you can't find him or the videos, send me PM and I will look for the links His videos are outstanding, everthing is very clear and spot on. Joe -
John You are doing some really great work. Looks like all your effort is paying off. At the rate you are going your planking job is 1st rate. Joe
-
John I have been there done that. I have spent weeks trying this, doing that. Then my admiral will say I don't knnow why you build those things. Any other time she is very helpful. For a long time I thought is was just me that had the results that you have gone through. I thought I was doing something wrong. Thanks for posting, and all the info Joe
-
John First let me say thanks for taking the time to make such a detailed post, the wording and the pics are spot on. I can see just what you are talking about, and you have made it so clear of how the 2 options are going to lay. I am not a expert in planking different types of hauls, with that said I would have to go with Mark. The second option does look like it will work out better. The first looks like it is almost bent the wrong way. The only other thing I can think of why it may be going in that direction is it looks like you didn't put in of take account for the garboard strake. I am not even sure if your haul should have one. Maybe Mark can shed some light on this, and how that would effect to laying out of the planks. All I can say is I know I have not done it right, and to do it right takes a lot of planning. Once to do it right, I think it will be a breeze after that. Like Chuck said you should have it all marked out so you can see it even before you cut the first piece of wood. The next time I do a haul like you have I think I will either mark it all out and then maybe even use card stock for test planks. Joe
-
Well Sun I see the windmills of your mind are turning, as I guess like mine and others have. I know for me I start reading, and thinking, and pondering, and the next thing I know I come to the conclusion that we can only make things just only so real. It's all a matter of scale, if you are building 1:24 or bigger then you can be very real, crank up those windmills. Things become complex when you are building in 1:80 or smaller. Then the other thing is, like others have said, is money. I am working on the Robert E Lee in 1:150 scale. On one hand something like build scale stairs is almost impossible, on the other hand, painting this model with those little bottles of paint would cost about $85.00. This is a great hobby, you will learn a lot, may even go broke, and never be the same agian. Now that can be a good thing, or a bad thing. But the time will come when you start wondering about yourself. When you get to this point you have reached the pucker factor. This is the point of no return Let me know when you are there, because here I am. Joe
-
Hi John My first planking on the type of bow you have, came out just like what you did. I didn't have any wide planking to spile, and didn't know about edge bending. I didn't bother lining off the haul or do any tapering for the reason I just said, so mine came out like yours. When I have done other types of hauls I have lined them off and taper the planks, so I did know the process, just didn't know about edge bending. I have done your jig method, which I find helps keep the wood from splitting. I am trying Chuck's method, I have had some wood that bends fine, and other that just splits. Not sure if it's me, the wood, or what. Looks like you are doing well at this stage. If you have any other info about planking please post. Info about planking is like money, you can never have too much. Joe
-
Mark and Chuck Thanks for posting. I never saw this before. I can't wait for my next build to try this out. Will this work on all types of wood??? Joe
-
I have not been doing this for a long time but, I would say that Brian is spot on. I can't think of any thing else. If you can spile, spile. If you can't look for softer wood. I have to say, it takes a lot of determanation to sand away the work you have done. Joe
-
WOW Steve this is your first ship, looks outstanding to me, can't wait to see her with yards and sails Joe
-
Hi Steve Welcome to MSW I just finished my first ship with sails. You can look in my albums if you like. This is the place to be if you need info. Looking forward to your pics, I am following this thread. If you see something you like, or want to know how someone did something, you can always send a PM to that person. I think all of us here like to tell of our how to this or that. Joe
-
I have been following your build from the start. WOW what a joy to see what you come up with time after time. What wood did you use for the core of the top cone shape part ??? Joe
-
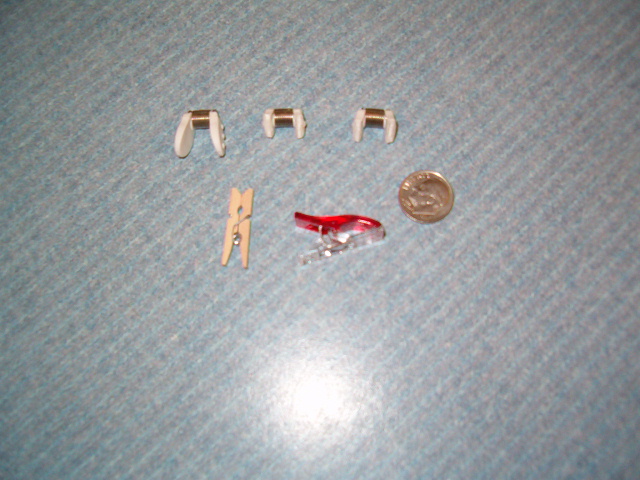
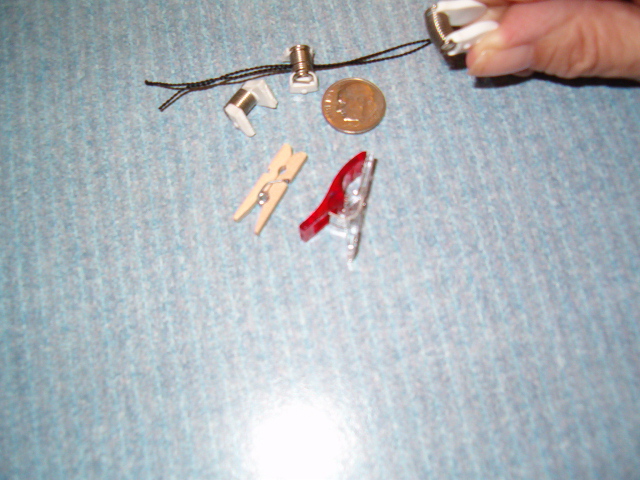
Bruce Here are the pics of the clamps I was talking about The little cloths pins I found at Walmart, the little red clamp are hem holding clamps from Joanns Like I said you could use just about any springs, you would just have to open the springs with neddle nose. You can see my wife's hand opening up the spring. Joe

-
Hi Bruce I know what you are talking about, I had the same trouble with rigging lines I don't know what they are called, I found them at either Joann Fabrics of a craft store that I shop at. They are tiny springs with two plastic ends, you close the ends and it makes the spring form a "u" shape. The curve top part of the spring opens and you slip the lines in the open spring, then let go and the spring goes back to being straight, holding the lines. I would think that you could just use springs with out the plastic, you just need to make the coils of the spring open on one side. Also the spring has to be coiled tight. If you need me to take a pic let me know. Joe
-
Nils I also wanted to know about the laundry pegs. Looks like great clamps Thanks for posting. Joe
- 2,625 replies
-
- 4
-

-
- kaiser wilhelm der grosse
- passenger steamer
- (and 1 more)
-
Thanks for all the info Ed. I didn't know about the CA and cotton. Joe
- 3,596 replies
-
- 3
-
-
- young america
- clipper
- (and 1 more)
-
Ed I see in your post talking about the ca being washed off with acetone. I have used acetone to clean my fingers, but never thought about using it on the model. What is your method??? How do you keep the acetone from unglueing the parts you have glued??? I don't know how you guys keep coming up with stuff I would never have dreamed of. Thanks Joe
- 3,596 replies
-
- 3
-
-
- young america
- clipper
- (and 1 more)
-
Painting a Waterline
slow2cool replied to mikiek's topic in Painting, finishing and weathering products and techniques
I would paint the hull white, the whole hull Then I would mark the water line. Then tape and cover the white paint, then paint black. Joe -
WOW Not bad at all I would even say really great job Joe
- 60 replies
-
- 4
-
-
- king of the mississippi
- artesania latina
- (and 1 more)
-
maturin52 is right the planking needed to be open in the front so the piece in the pic could slide between the 2 sides of the planking you might be able to sand the point of the bow flat and might have to cut a new piece to fit the contor of the bow or replank this is one of those OH NO moments can't wait to see what you come up with, wish I could be of more help Joe
- 60 replies
-
- 3
-
-
- king of the mississippi
- artesania latina
- (and 1 more)
-
Planking questions
slow2cool replied to tarmes's topic in Building, Framing, Planking and plating a ships hull and deck
Hi Tarmes I have done the kit you are talking about. This type of hull will not need to be spil. The planks will lay very nice. Not sure what this type of bow is called. I know the buff bow ( I think that's what it is called ) needs to be spiled, or you end up planks that don't run all the way to the bow. This is how one of my ships came out. Only because I didn't order wider planks. One of these days I will try to spil. I have spent days reading how to. This is place to find what you need to know. Happy Building Joe -
Looks Great I can see the windmills of your mind are running at full tilt Joe
- 60 replies
-
- 2
-
-
- king of the mississippi
- artesania latina
- (and 1 more)