


Rick01
-
Posts
637 -
Joined
-
Last visited
Content Type
Profiles
Forums
Gallery
Events
Everything posted by Rick01
-
For a master class in building this model check out this build https://modelshipworld.com/topic/15099-lady-nelson-by-vossiewulf-amativictory-models-164/ for some reason he never completed it but what there is, is well worth reading. Rick
- 3 replies
-
- 1
-

-
- Lady Nelson
- Amati
- (and 2 more)
-
I seem to have been blocked from this thread Australia - If the crocs and spiders don't get you, the possums will . . . either that or the whole string has disappeared. Can admin please see what has happened here. Rick
-
I'd like to say I made them of wood, but with no where enough skill for items that small I did twisted wire around a suitable bit of dowel, then ran a dremel cutting disk up the wire to provide a series of loops. A bit of solder and a paint job finished it. As the ship isn't viewed with a magnifying glass I'm quite happy with the result. Bowsprit guys and anchor were another item that needed a lot of adjustment until I had a clear run for all ropes. Rick
- 241 replies
-
- 1
-

-
- mermaid
- modellers shipyard
- (and 1 more)
-
I shifted mine to the rear of the channels - it just didn't make sense otherwise. As it is there is practically no port/starboard movement on the lower spar! As to the rings, if you used PVA glue you could get a bit drastic and soak the lower fitments on the mast, remove, fit rings then replace. I've just done that with the waterways on a model I'm working on as I just wasn't happy with the original fit and knew it was going to bug me if it wasn't fixed. Rick
- 241 replies
-
- 1
-
-
- mermaid
- modellers shipyard
- (and 1 more)
-
Something I almost didn't do on my original model - mast rings. Bit of a problem for you if you've already mounted the mast! Have you considered this, the correct number is clearly shown on King's sketch of the ship. Rick
-
Almost all my ironwork is done using a flat black cartridge paper with PVA glue used to secure it. Pretty well impossible to tell the difference unless you use a magnifying glass on it. Rick
- 241 replies
-
- 1
-
-
- mermaid
- modellers shipyard
- (and 1 more)
-
It's probably worth re-visiting King's sketch of the Mermaid as it does give a rough idea of how he saw the basic rigging as well. Rick
-
I've just looked back at my copy of the instructions. I made a few notes at the time and basically I threw my hands up in despair and then turned to Petersson's book as it was fairly obvious that the rigging plans had been taken from this book. I took it slowly, mounting and rigging each mast/spar fully before going to the next (working up the mast obviously). Good luck! Rick
-
Pretty much - I lashed a block to the head of the mast at the rear. Ran the halliard from the block, through a free running block with a hook lashed on it back through the topmast block, then down to a spare belaying pin port side. The hook was secured in one of the eye bolts on the deck. Similar to the halliard as shown on p27 of Petersson. Hope my explanation is fairly clear. He also has a problem with the anchor cables on p21 - he's never going to get both anchors lowered at the same time! Note that the guy who put the Mermaid together has also followed Petersson on that point. Rick
- 241 replies
-
- 1
-
-
- mermaid
- modellers shipyard
- (and 1 more)
-
Don't forget that you still need a hoist for the spar/sail so a block at the head of the topmast is needed. I also ran the rigging through the block and down to eyebolts by the main hold. That may not be the correct anchor point but at the time it was the best idea I had. If you come up with some other way of handling it I'm happy to re-rig mine! Rick
- 241 replies
-
- 1
-
-
- mermaid
- modellers shipyard
- (and 1 more)
-
I re-jigged my model around the time we were all discussing the stern and its shape. I added a pair of bitt heads, but you need to be careful as it's easy for the anchor to foul the bowsprit braces. Page 1 post 27 has an illustration of her under sail with the anchor lashed up but it's not clear what to, so for my money it's a bitt head. You may also want to give yourself a refresher on those first few pages as there are a couple of points on the mast and its rigging that will need to be watched for. I'm afraid mine is now well encased in glass and I can't get a good photo easily, but if you think one will help I'll see what I can do. Rick
-
If my memory serves me correctly, the bowsprit/bulwarks problem is due to the bad instructions. The supplied bulwarks have a front and back, with the back being slightly higher than the front. This however is not noted on the instructions, so, like me you've probably fitted the bulwarks on back-to-front! You will also find another problem in that the three holes on the stem will be fouled by the bowsprit unless you really play with the whole setup at that point. I seem to remember that I had to adjust both the cut-out that the bowsprit sat in and the support that it rests on. Which-ever way you go the forestay holes will be a problem by the look of the clearance you have on the stem (I had a row with the maker of the kit over this). Rick
- 241 replies
-
- 1
-
-
- mermaid
- modellers shipyard
- (and 1 more)
-
With the rigging, run the rope through the pin rails from below and then just push the belaying pin through the hole securing the rigging. This way once you've completed all running rigging any tension adjustments can be made. Once happy all you need to do is make up separate coils to look like excess rigging hooked over the top of the belaying pins (hopefully you can understand this 😉 ). Rick
- 241 replies
-
- 2
-
-
- mermaid
- modellers shipyard
- (and 1 more)
-
Well we survived the last couple of years pretty well, and as you'll see from my signature I've a couple more kits under my belt (plus a couple that I didn't illustrate here). This is still probably my favourite build and from time to time I'm tempted to get it again as I feel I could do a much better job this time round. I'm keeping on following your build but I've only got around another 25 years before I start pushing up daisies, so I'm expecting you to do the right thing and finish within that time span. 😉 Rick
- 241 replies
-
- 2
-
-
- mermaid
- modellers shipyard
- (and 1 more)
-
Good to see you back on this project, remember King doesn't seem to show a bell anywhere and also (as I recall) no sign of bilge pumps. I was advised when I built this that some small cutters had dismountable pumps. Rick
- 241 replies
-
- 1
-
-
- mermaid
- modellers shipyard
- (and 1 more)
-
I always feel that the option of a clear Perspex side should be available, just to display the intricate work that goes on inside the model. Check this out https://www.arcair.com/Fea1/201-300/Fea206a-Wellington-Hill/00.shtm Rick
-
Thanks for the link Andy - I already know at least one of the stories "Winston Parker". I'm deeply involved with a FB page about Stalag VIIIB Lamsdorf where he was held and am helping set up a web page covering all allied POW's held in Europe during WWII. Rick
-
On top of the discomfort all you can see from the seat is a part of the instrument panel! I stood slightly back from that position in the Walk Through frame just to get an idea of what my father had experienced - all I can say is "Not Nice". Rick
-
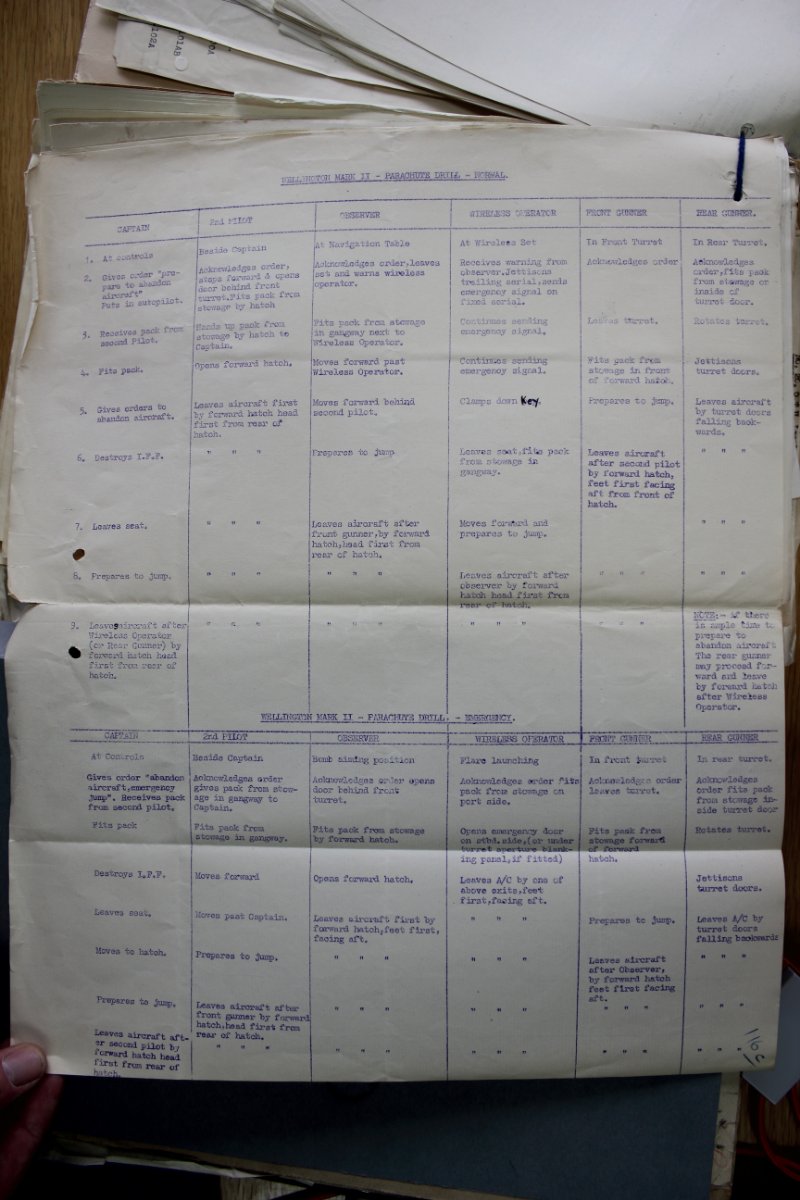
I don't know if you've been supplied with parachute packs, but if so, here's the positions and order of bailout from a Mk II (unchanged I guess from the Mk I. . All very well - unless your bomb aimer manages to pull his ripcord whilst still in the nose! Wireless operator and front gunner bundled him up and threw him out. He ended up with a strained groin,treated by a local Dr and passed back to England by the underground. The rest of the crew spent the rest of the war as POW's. Rick

-
It's a "walk through" display at Brooklands Museum alongside R-Robert. Basically just a fuselage using assorted items collected over the years, but it really does make you appreciate what the crew went through every time they flew. Rick
-
This is the bit in real life. 🙂 Note the cut-out in the seat for the control column (useful when pulling back hard to get an enemy fighter off your tail ). Rick
.thumb.JPG.9c5bc6c6f76945745c5414593a28d527.JPG)
- 174 replies
-
- 11
-
-
No argument - the one on the right. I've seen R-Roger in the UK and the colour was very close to the right one (as was the earth colour you have shown). Rick
-
Thanks Andy - I have seen it but my skills are just not good enough to do it justice I'm afraid. These are two of the exits when told to bail out. This one is a kick out panel on the side of the aircraft (just below the roundel position). It would have been a bitch to get throufh when wearing full flying gear plus parachute. ... and this was also kick out after lifting the duck boards, although not all the Mk I/II series had the blank for a belly gun position. This shot does give a fair representation of the colour of the framing. Rick
.thumb.JPG.4d397c31f25d7afbfb60851e513e1030.JPG)
.thumb.JPG.20f69f145f54ebde3acc37385eefa36f.JPG)
-
I can also add a direct interest in the build. My father was 2nd pilot in a Mk II , shot down over le Havre on his second time out and spent the rest of the war in Stalag VIIIB. Rick

.JPG.23e9ec020cb659b2d3abdf5a5712745c.JPG)
.JPG.c61fab6a27ca1c7df49398a371d0bbc5.JPG)
.JPG.0359fb382ec67214948eeb3a122347ce.JPG)