SARGOFAGUS
-
Posts
12 -
Joined
-
Last visited
Recent Profile Visitors
590 profile views


-
 GrandpaPhil reacted to a post in a topic:
HMS Warspite by Sargofagus - RESTORATION
GrandpaPhil reacted to a post in a topic:
HMS Warspite by Sargofagus - RESTORATION
-
GrandpaPhil reacted to a post in a topic:
HMS Warspite by Sargofagus - RESTORATION
-
GrandpaPhil reacted to a post in a topic:
HMS Warspite by Sargofagus - RESTORATION
-
GrandpaPhil reacted to a post in a topic:
HMS Warspite by Sargofagus - RESTORATION
-
GrandpaPhil reacted to a post in a topic:
HMS Warspite by Sargofagus - RESTORATION
-
GrandpaPhil reacted to a post in a topic:
HMS Warspite by Sargofagus - RESTORATION
-
Canute reacted to a post in a topic:
HMS Warspite by Old Collingwood - FINISHED - Academy - 1/350 scale - PLASTIC
-
mtaylor reacted to a post in a topic:
HMS Warspite by Old Collingwood - FINISHED - Academy - 1/350 scale - PLASTIC
-
Robin Lous reacted to a post in a topic:
HMS Warspite by Old Collingwood - FINISHED - Academy - 1/350 scale - PLASTIC
-
Old Collingwood reacted to a post in a topic:
HMS Warspite by Old Collingwood - FINISHED - Academy - 1/350 scale - PLASTIC
-
 Hi, just a little bit of information re the 'extra' armour, I am sure that it is the plate where they catapulted the spotter plane for, most big battle ships had them, hope this helps you, all the best Glenn
 -
Thank you to all who have replied and sent me the great comments, I'm really 'flattered', thanks again All the best Glenn
- 33 replies
-
- 2
-
-
- warspite
- battleships
- (and 1 more)
-
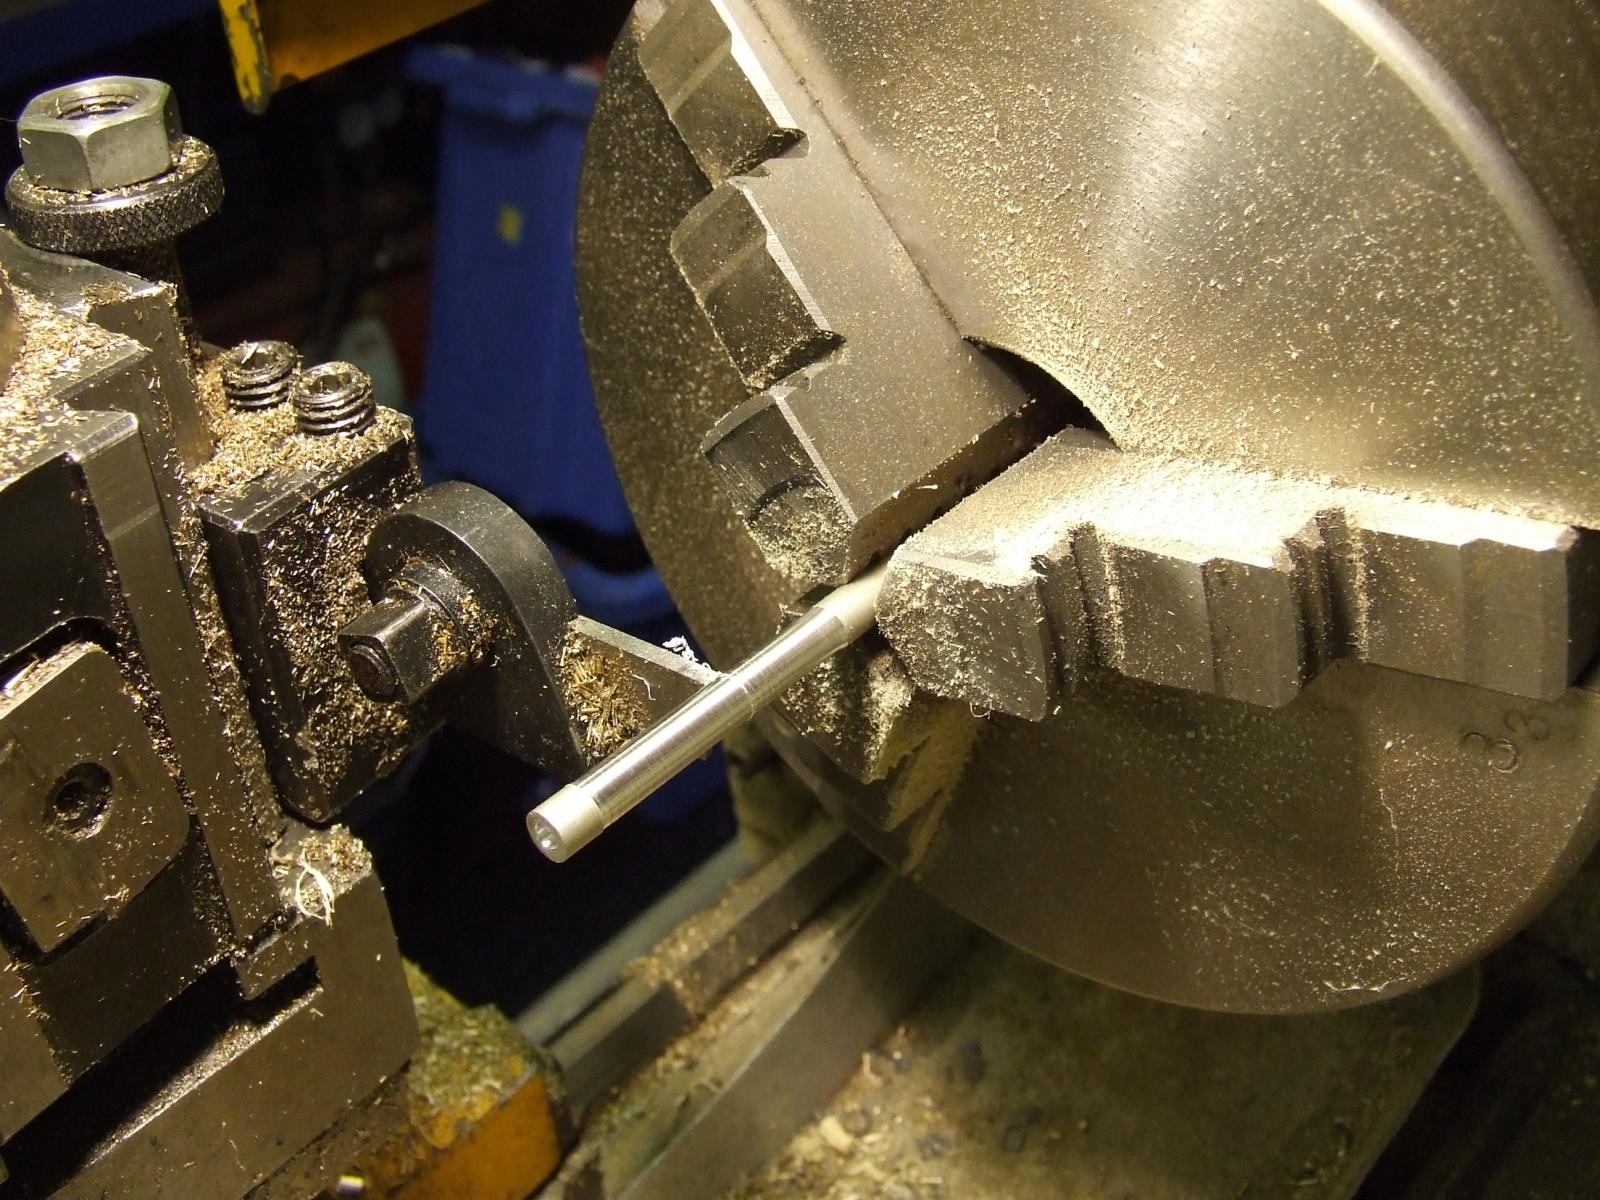
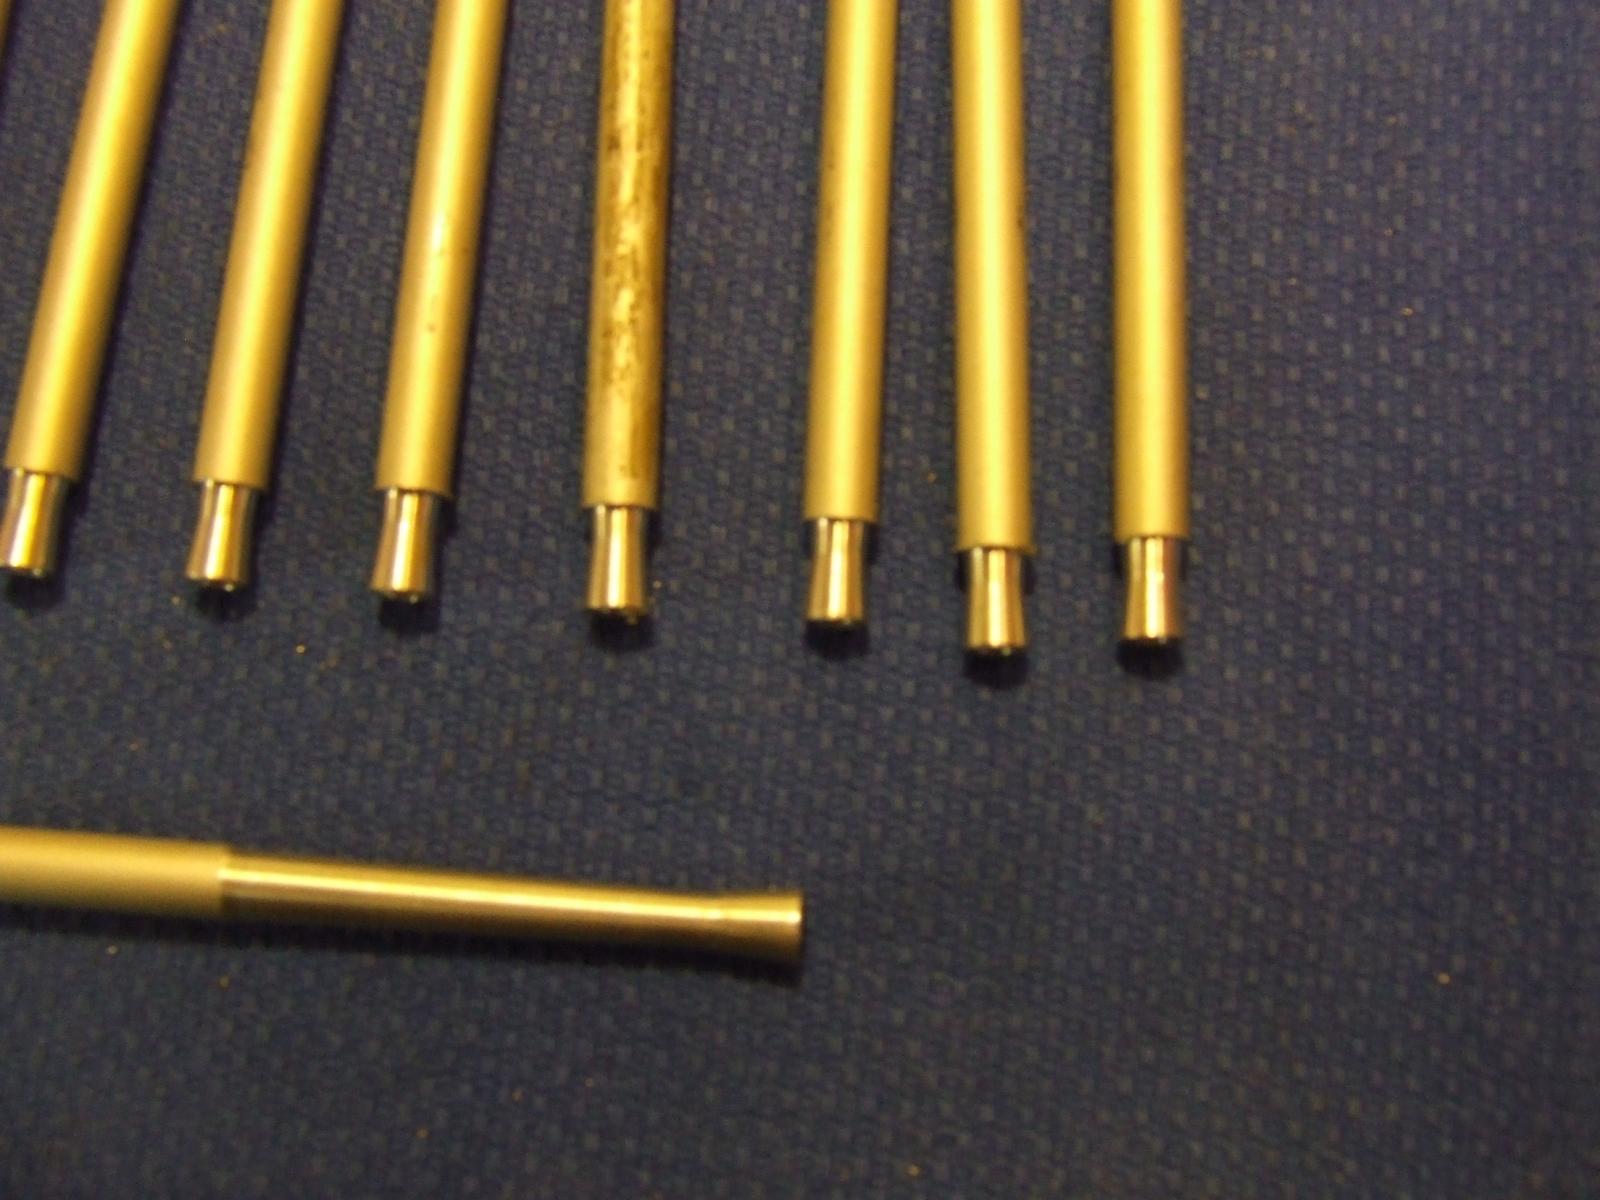
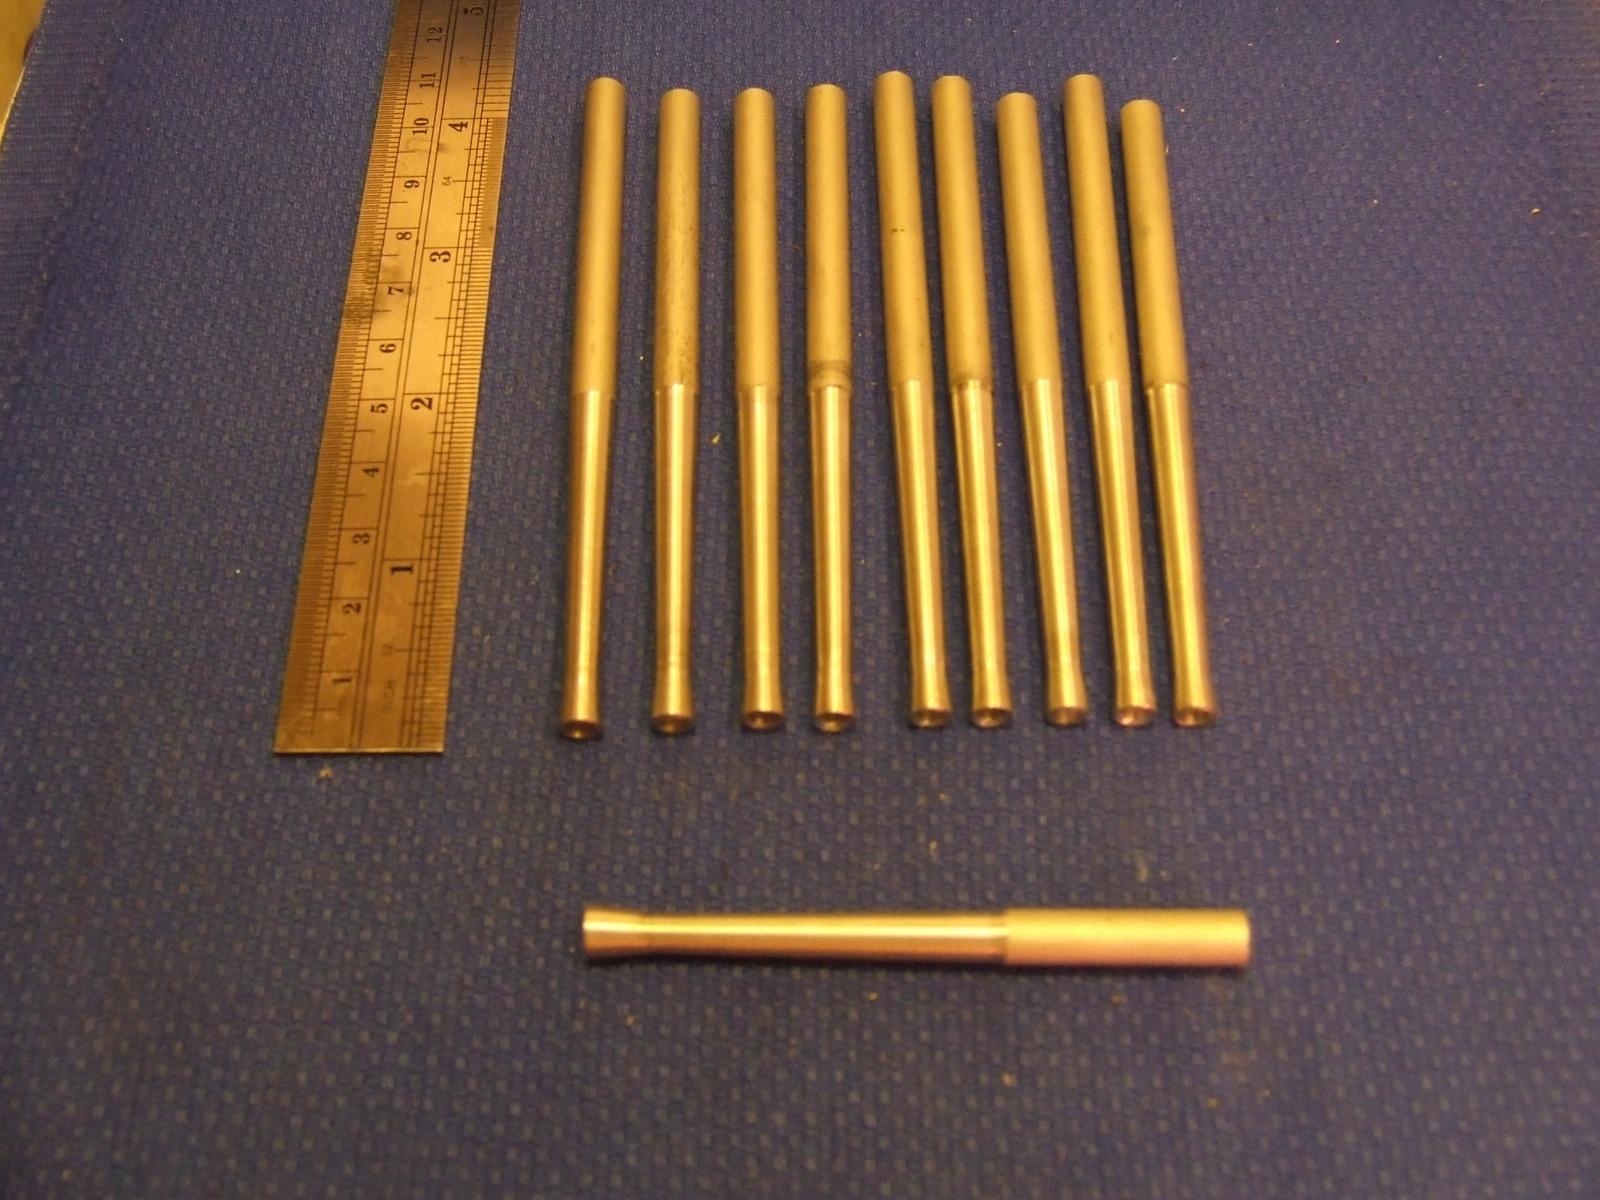
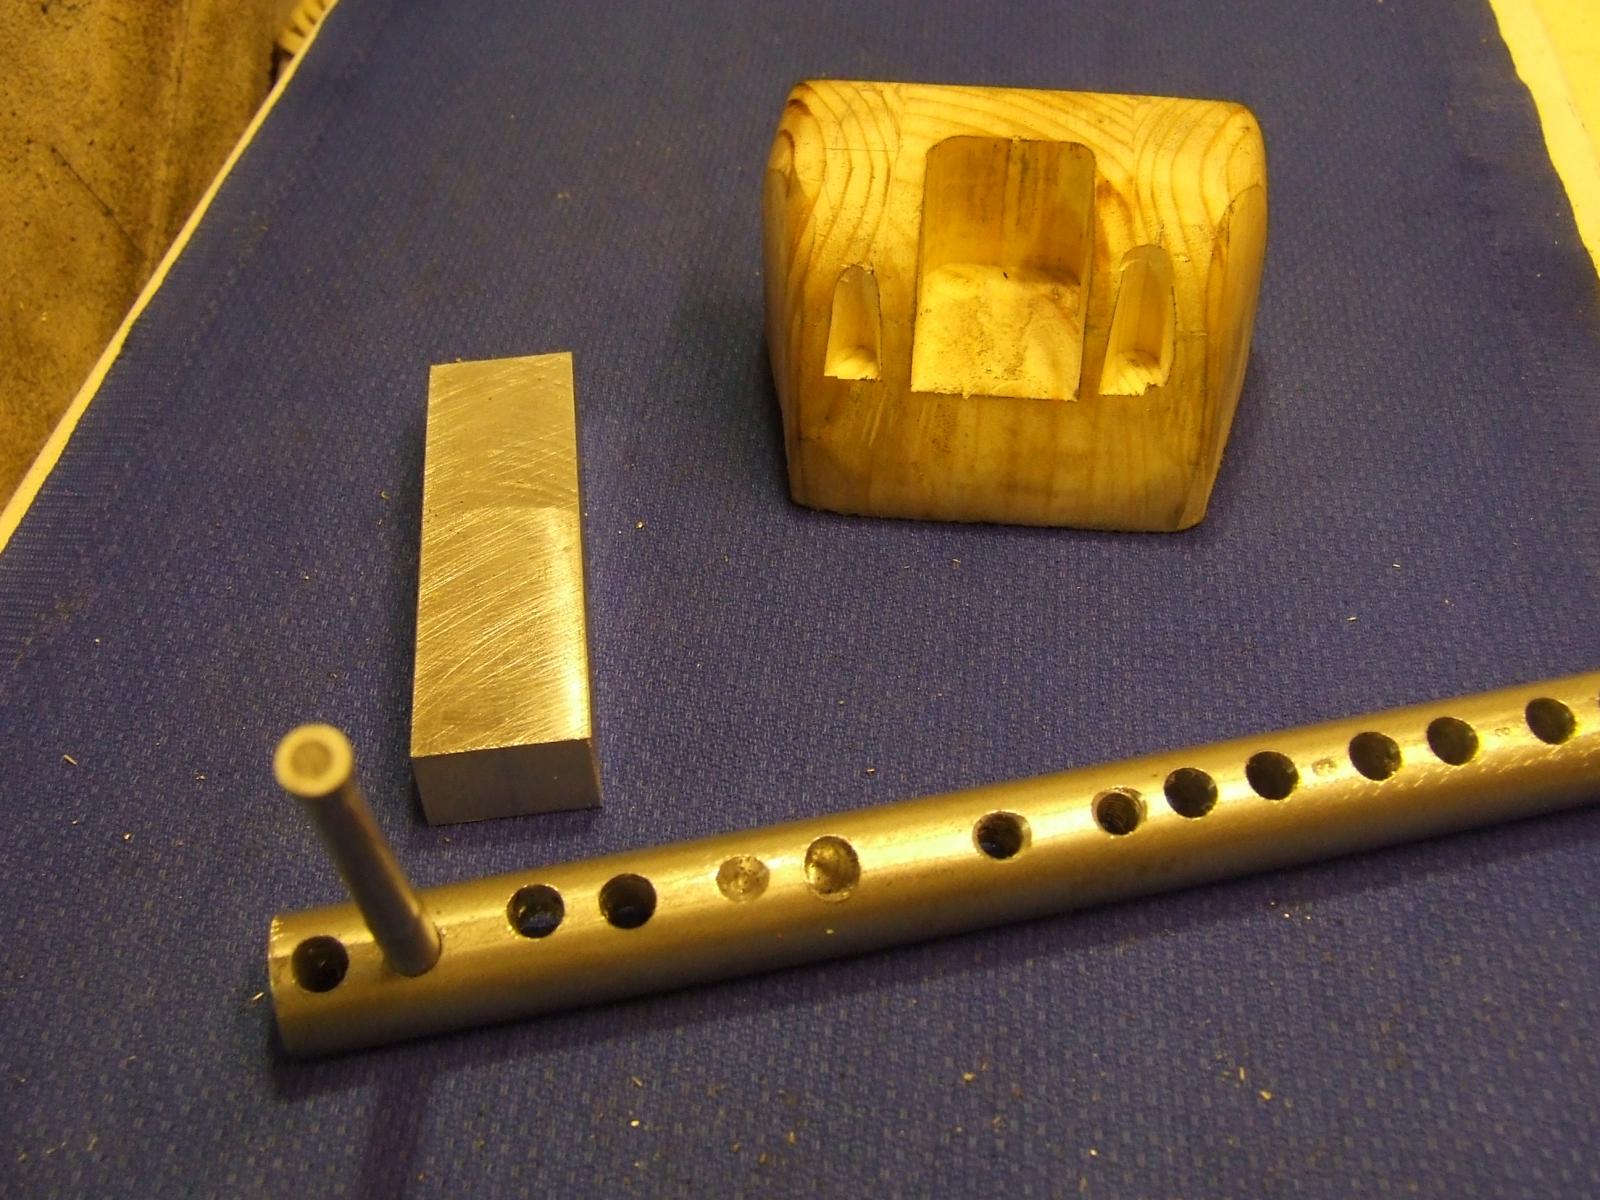
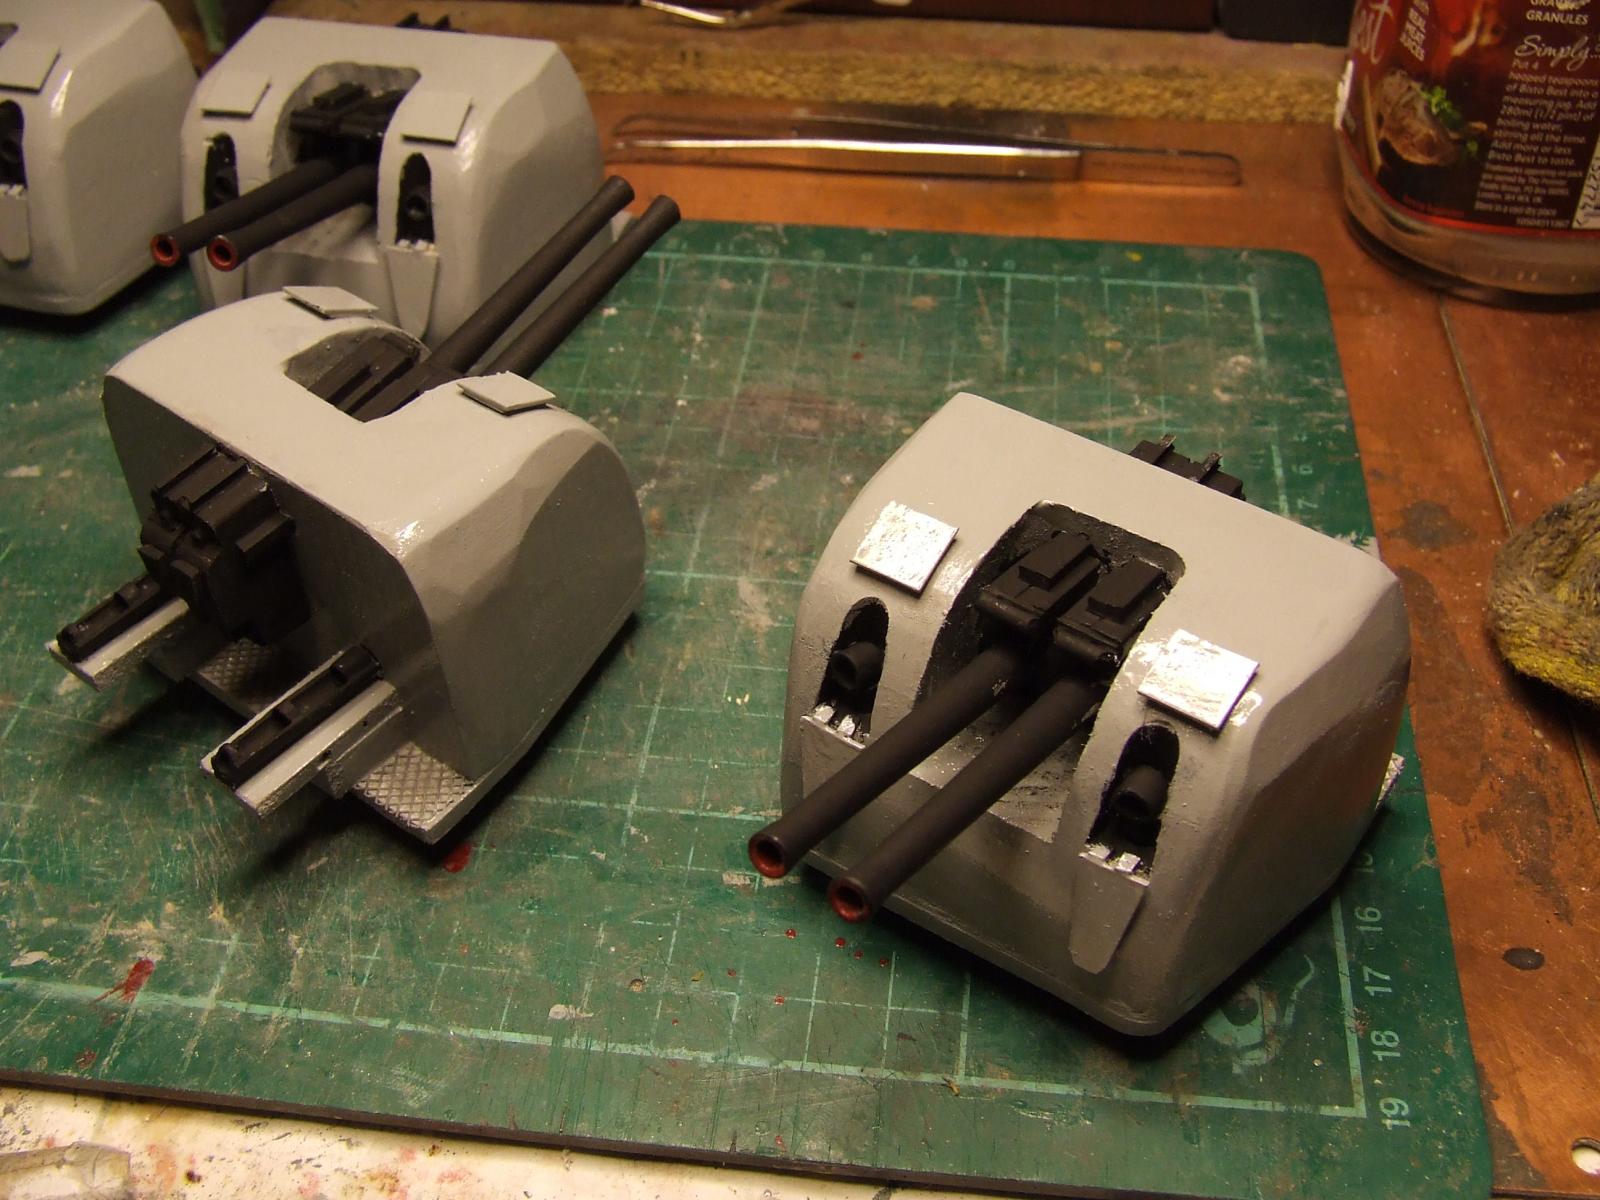
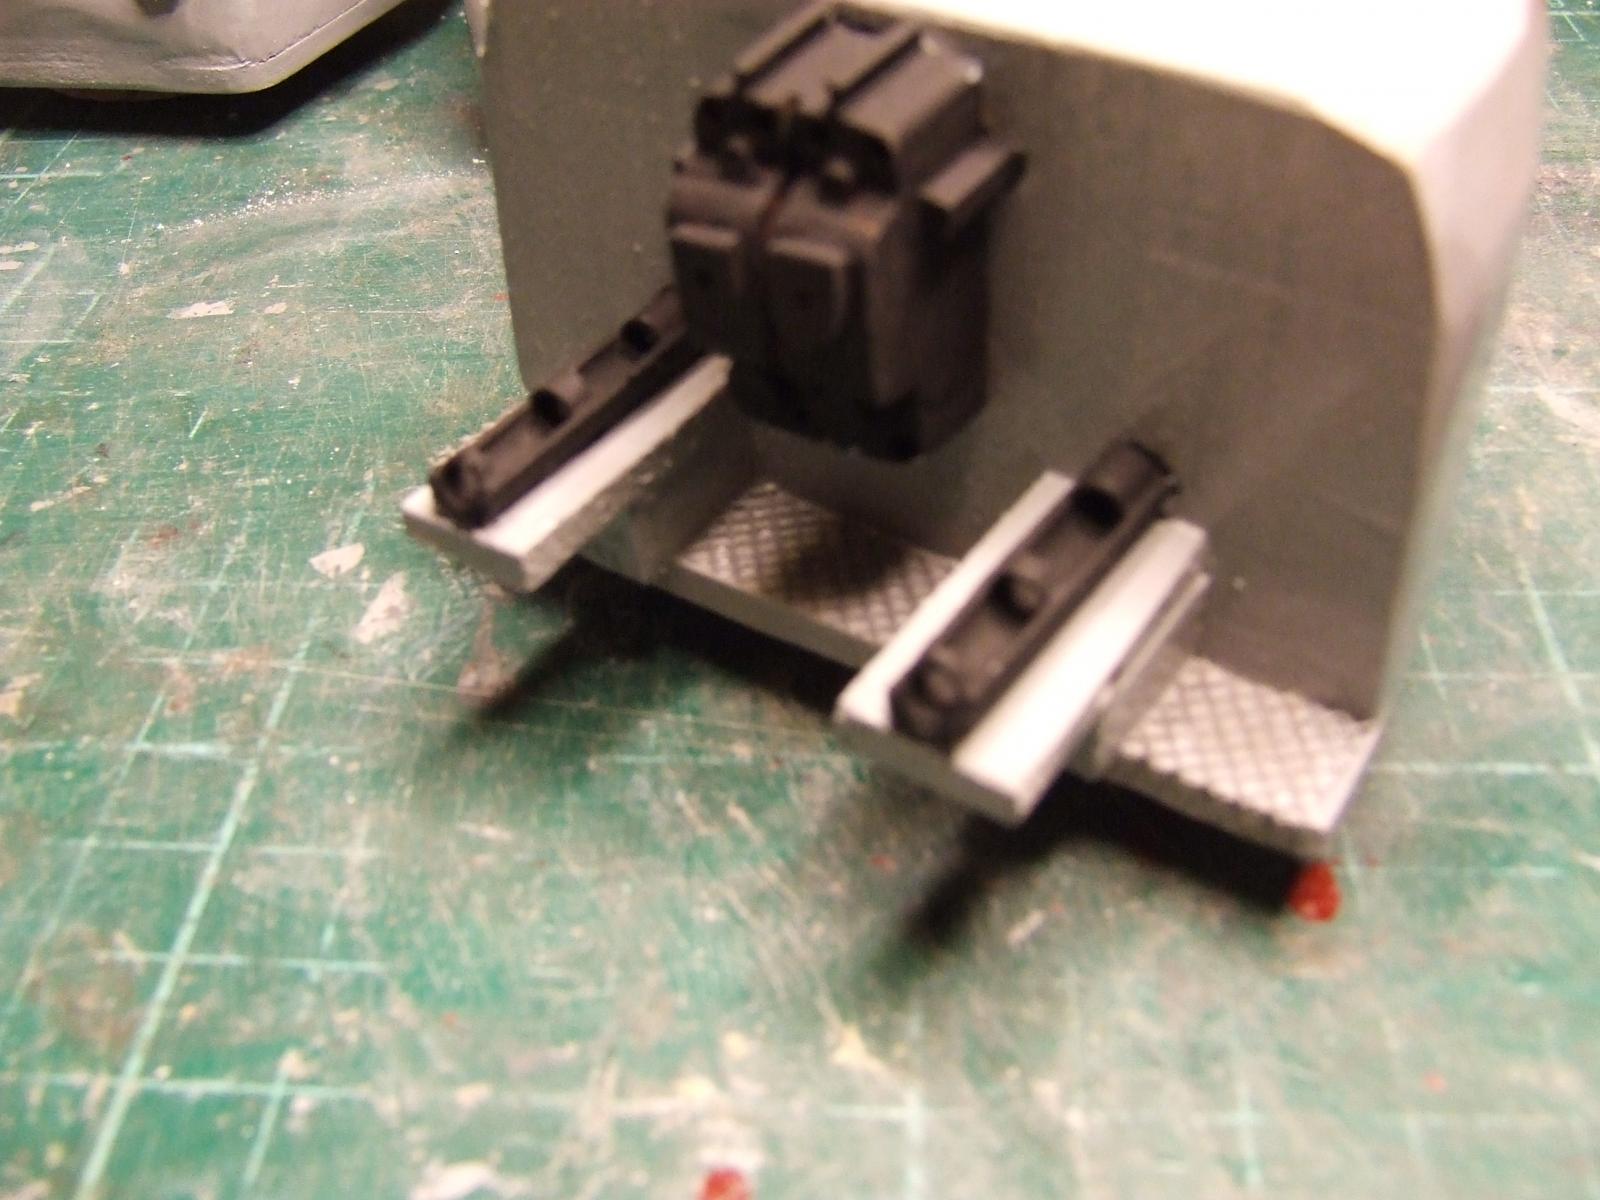
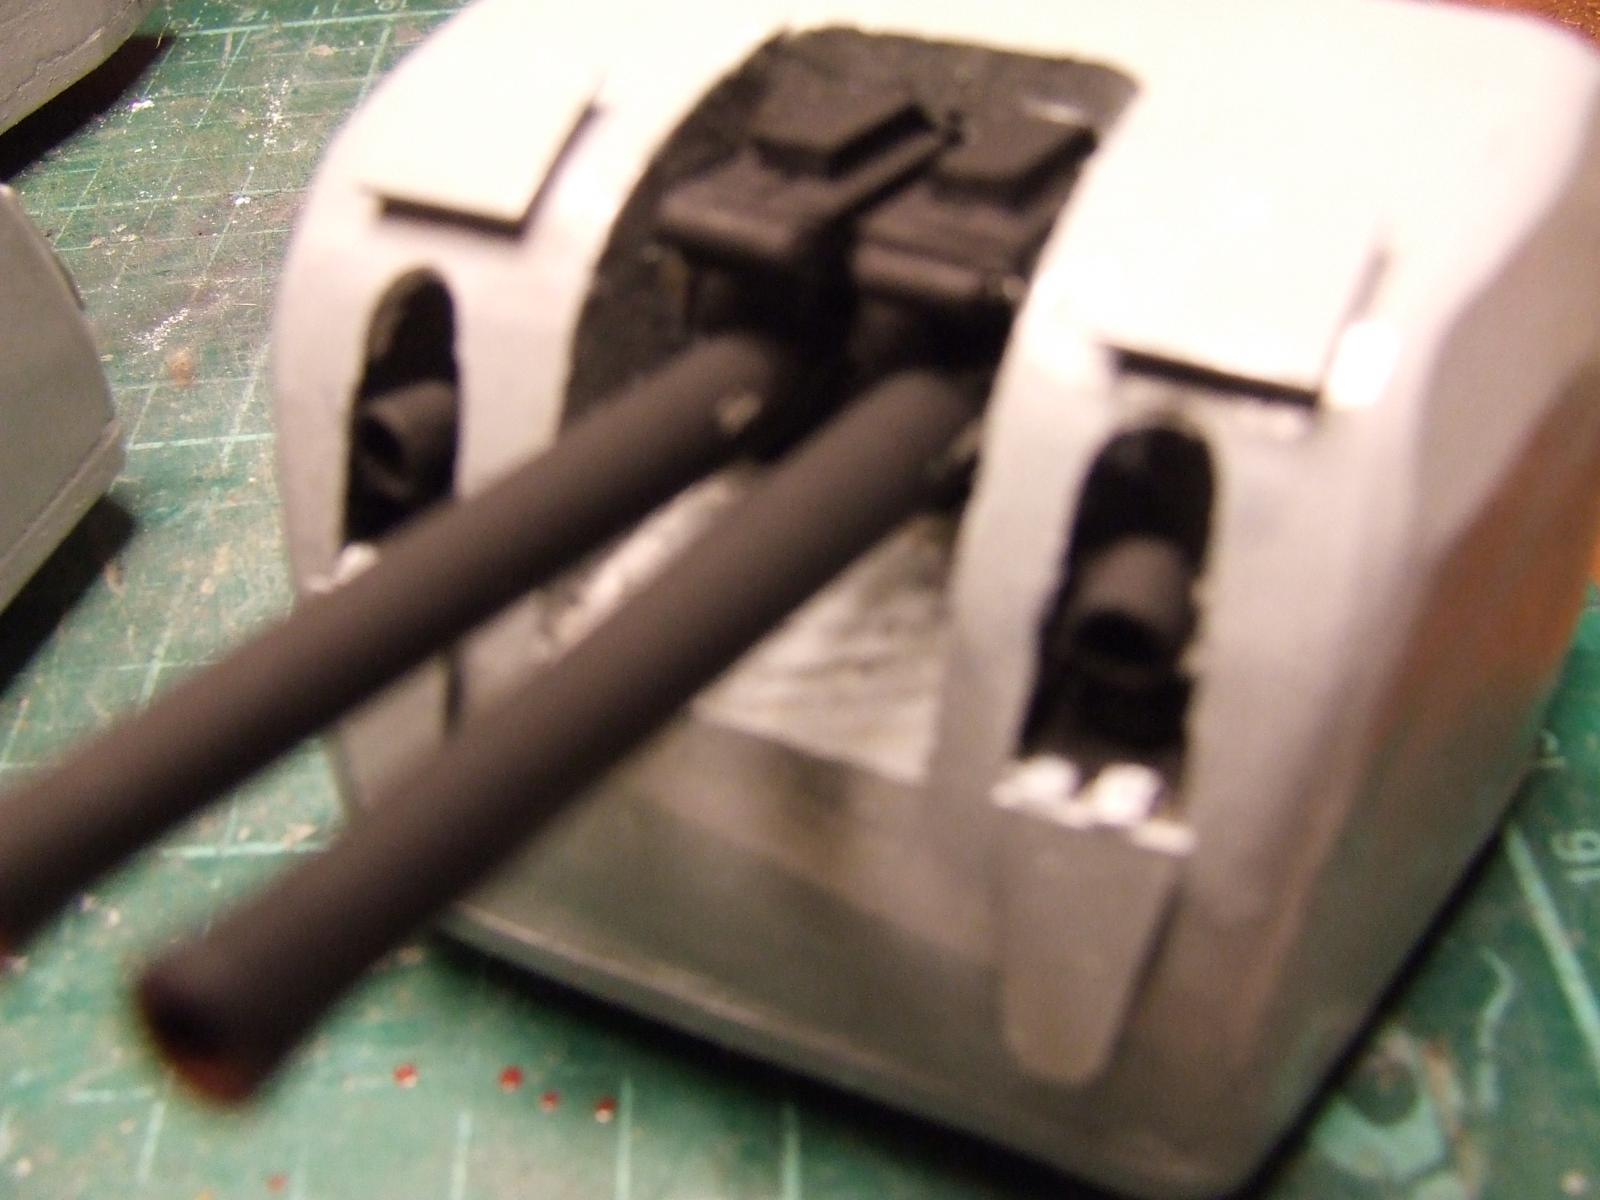
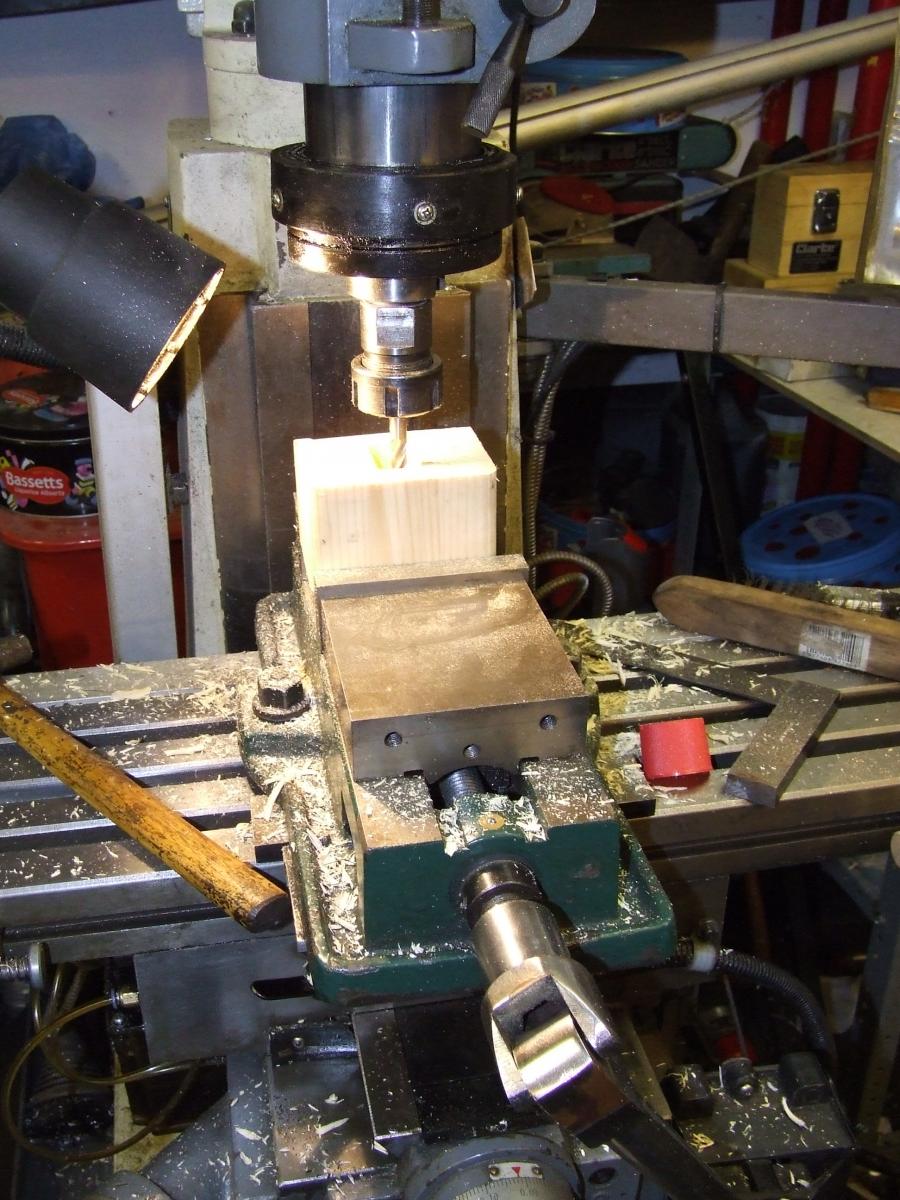
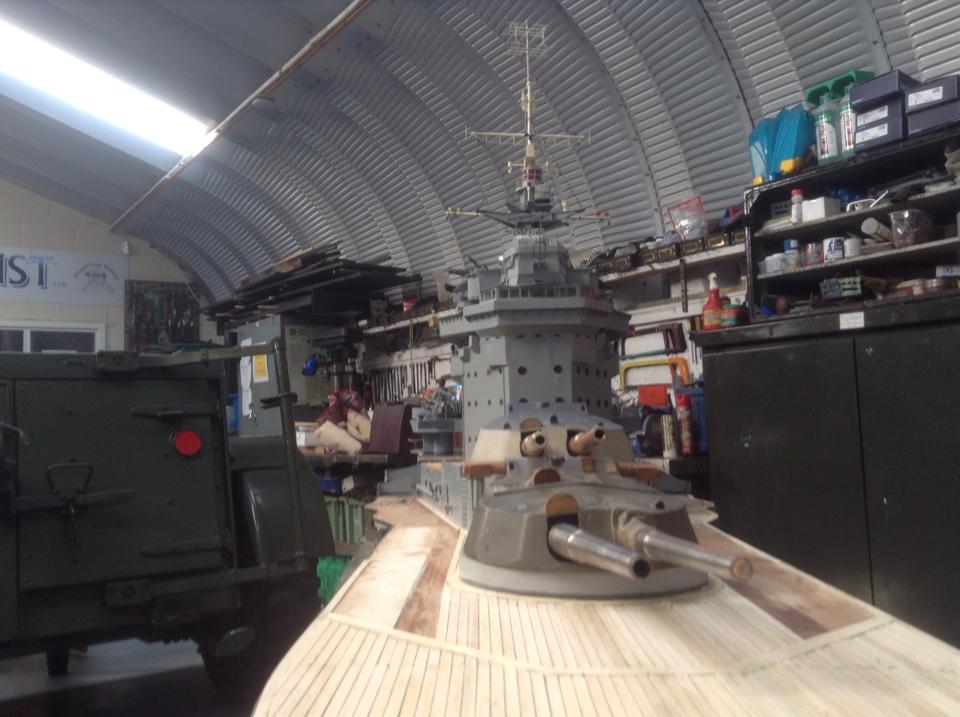
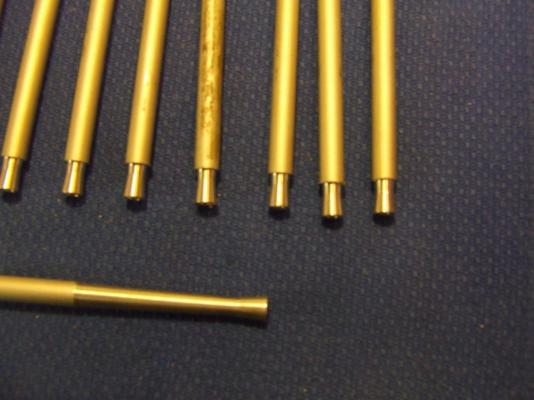
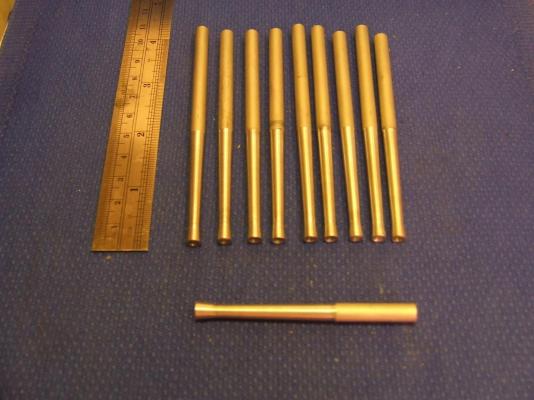
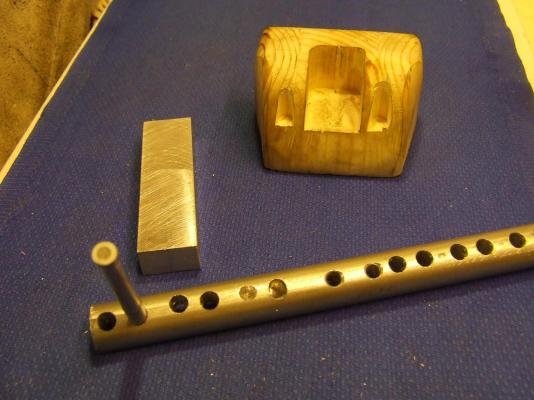
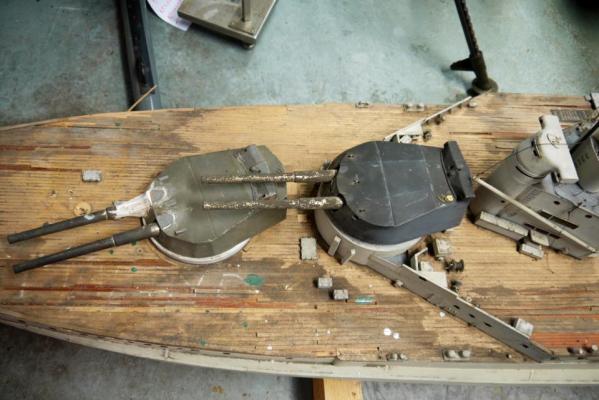
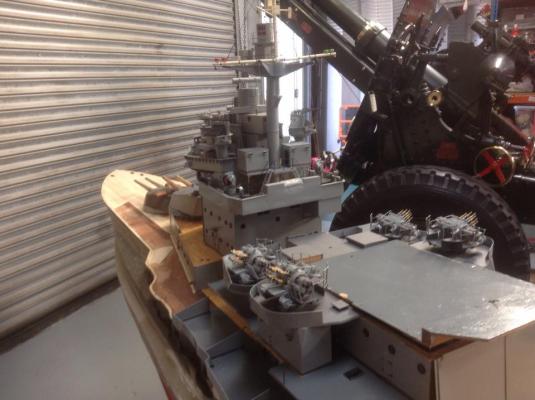
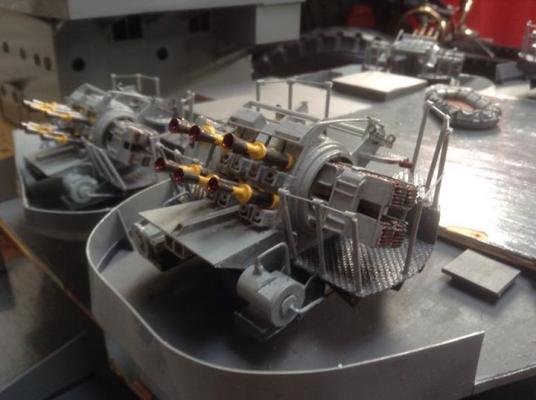
Hi All, I have almost finished the 4 x 6 inch twin mk 12 guns, and here is the rest of the photos, I have still to finish painting them, but the construction is now complete, I will post the photos and then I will explain them, hope you like them, I had to work out the scale but I found a photo on 'images' which had all the dimensions in inches, so used this to work out the scale, (this was quite easy as all I had to do was divide the inches by 48, and there was my size), I know some of you out there will already know this and think I am 'teaching Granny to suck eggs' but it may help some of the new members who don't know how to work scales out, so sorry to the 'experienced' modelers out there. 1, Turning the barrels, to scale, barrel drilled to 1/8th inch (multiplied by 48 equals 6 inches), also I turned the barrel taper to the correct dimensions, which was a diameter of 0.218", just to give you an idea, I will post all the sizes if any one wants me too, please let me know, 2. The first part of the barrel turning, (the end 'flute') 3. The completed tapered barrel, ready to be cut to length, (note I always make one or more extra parts, in case I 'mess' up on one) 4. The 'breach' parts, or the barrel supports, all been made on the milling machine on one piece of Aluminium bar, then cut to length to fit into the 'body' 5. I have lost the text 4 times tonight I put a lot on so I'm sorry but here is the photos of the guns and the searchlifgt for Shipyard Sid, hope you will be happy with this, thank you for the interest you have all shown in this project, and all the best6 Glenn


- 33 replies
-
- 8
-
-
- warspite
- battleships
- (and 1 more)
-
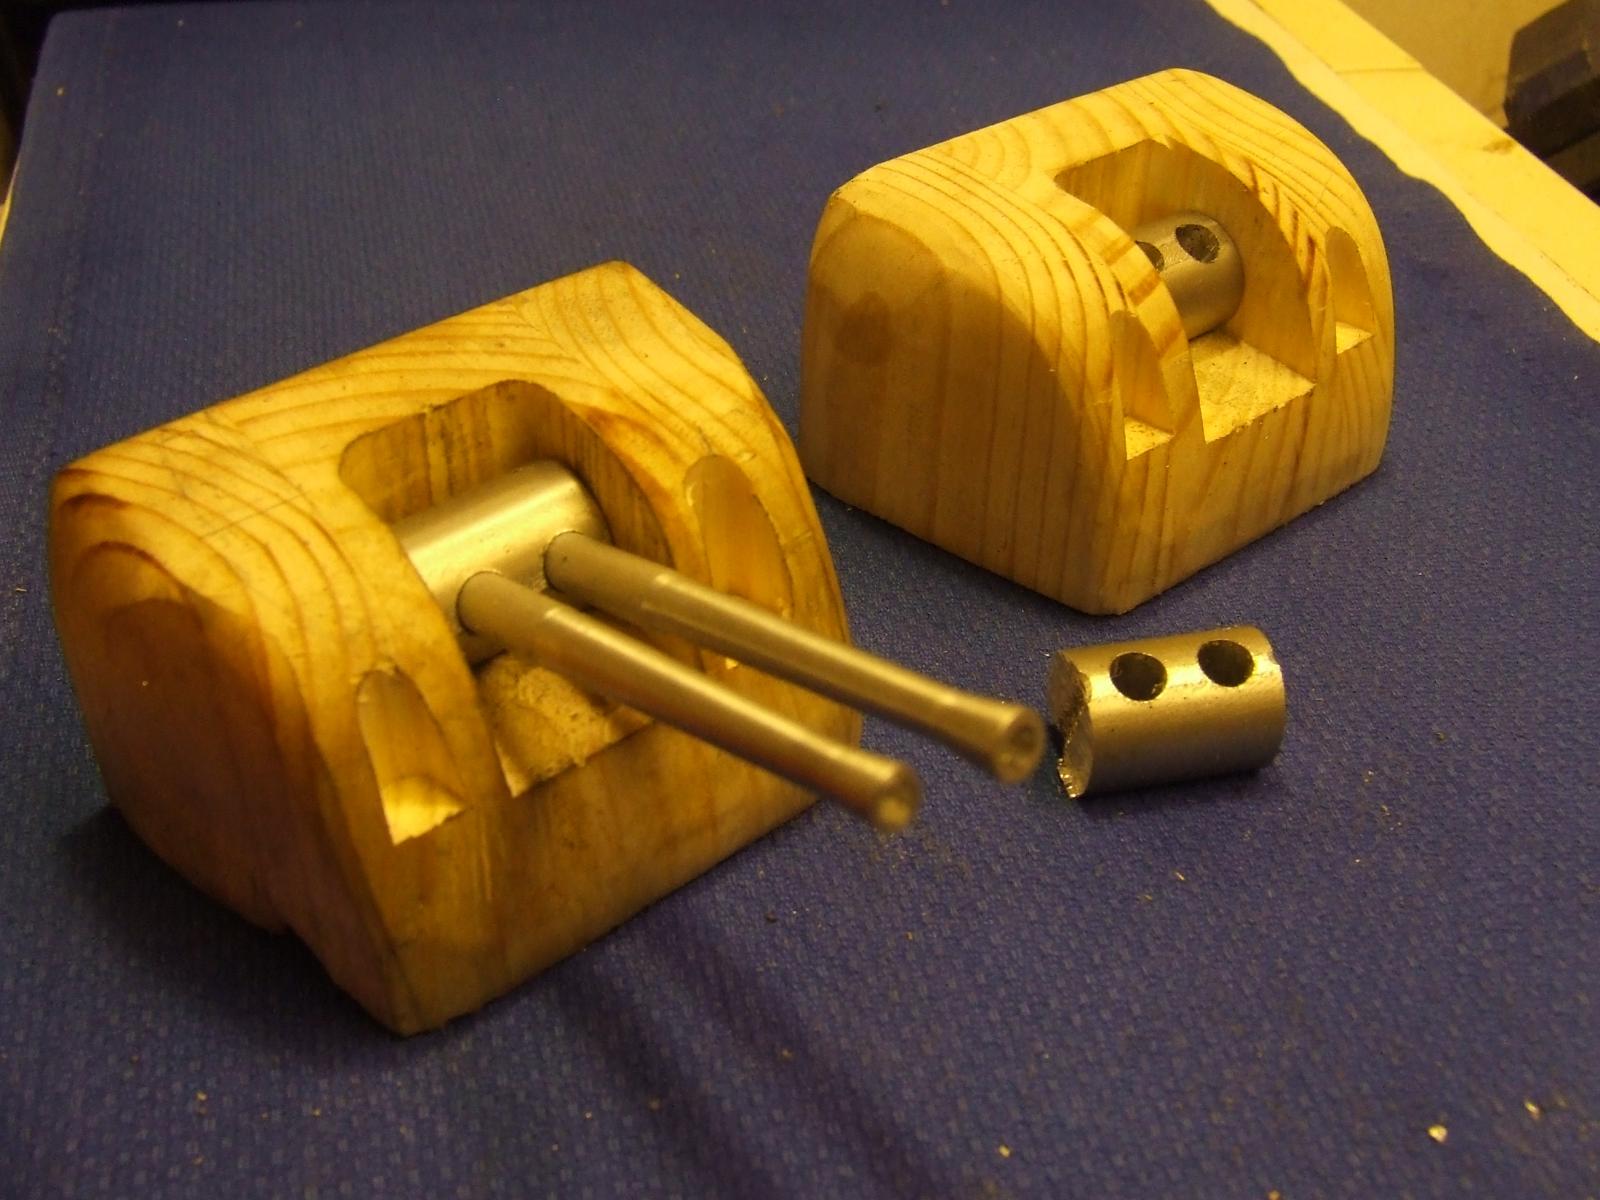
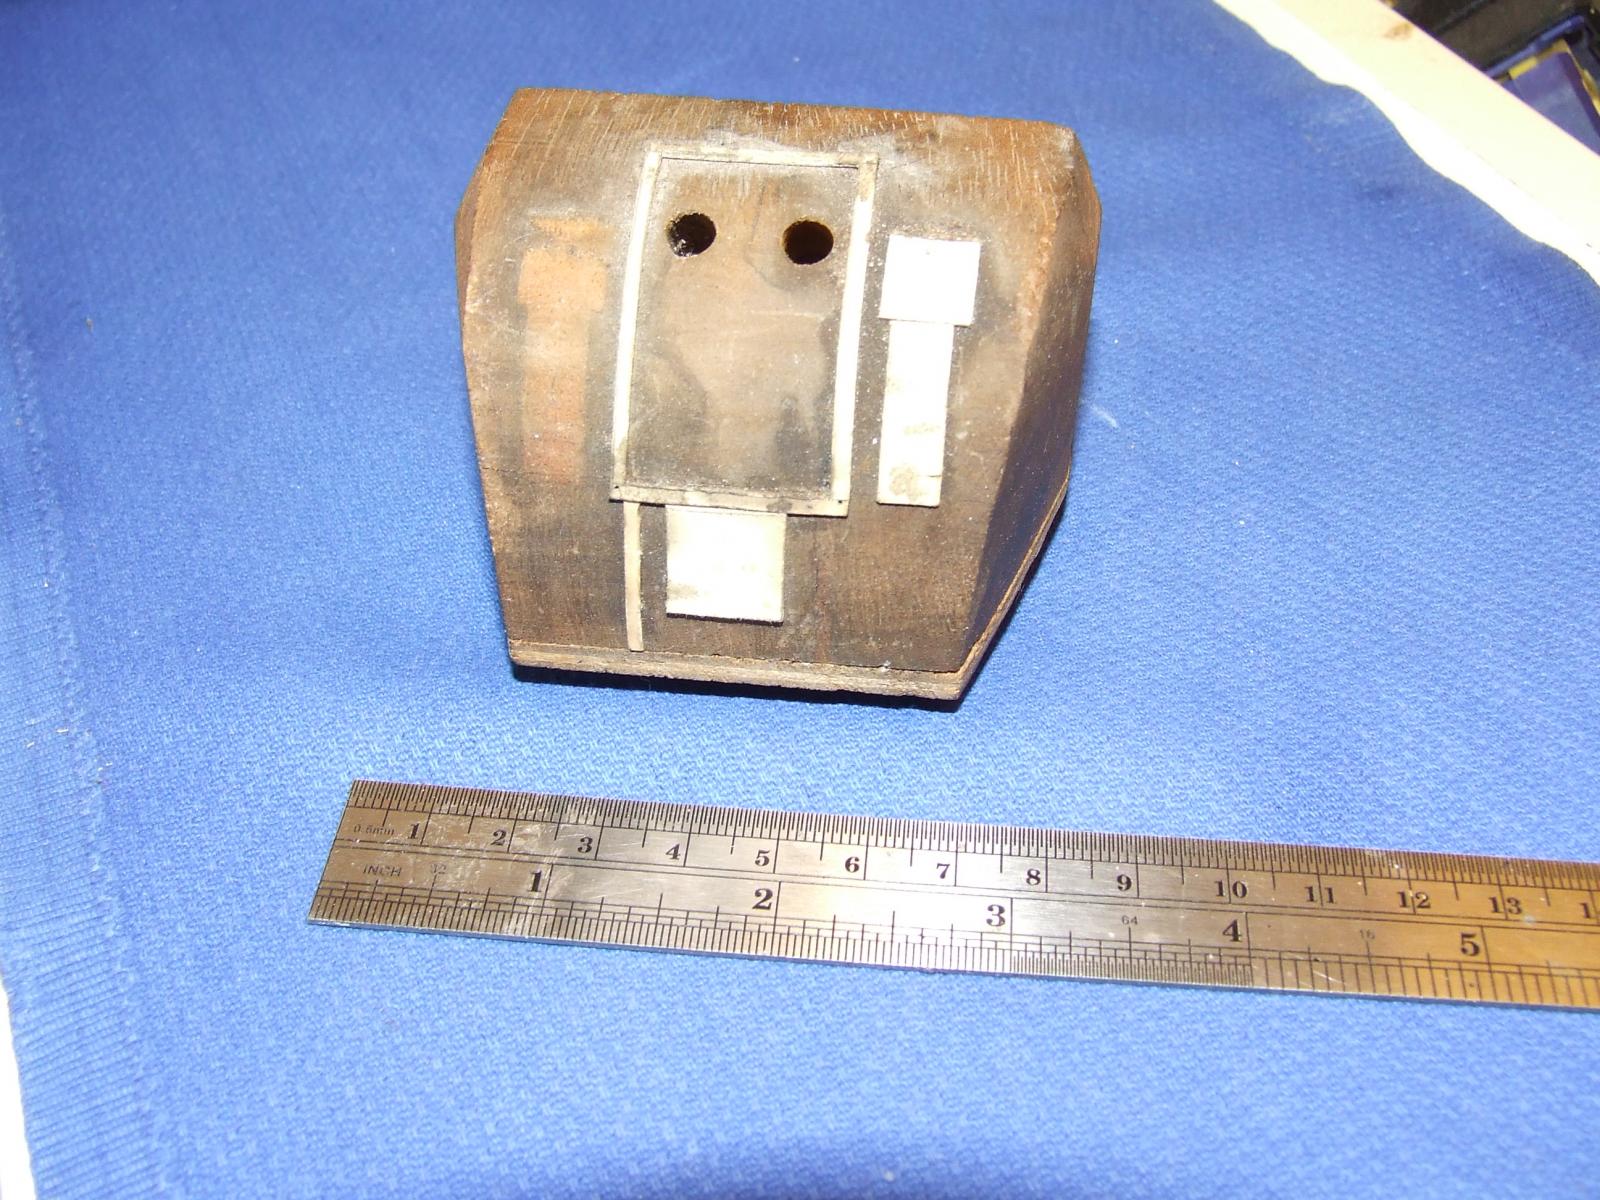
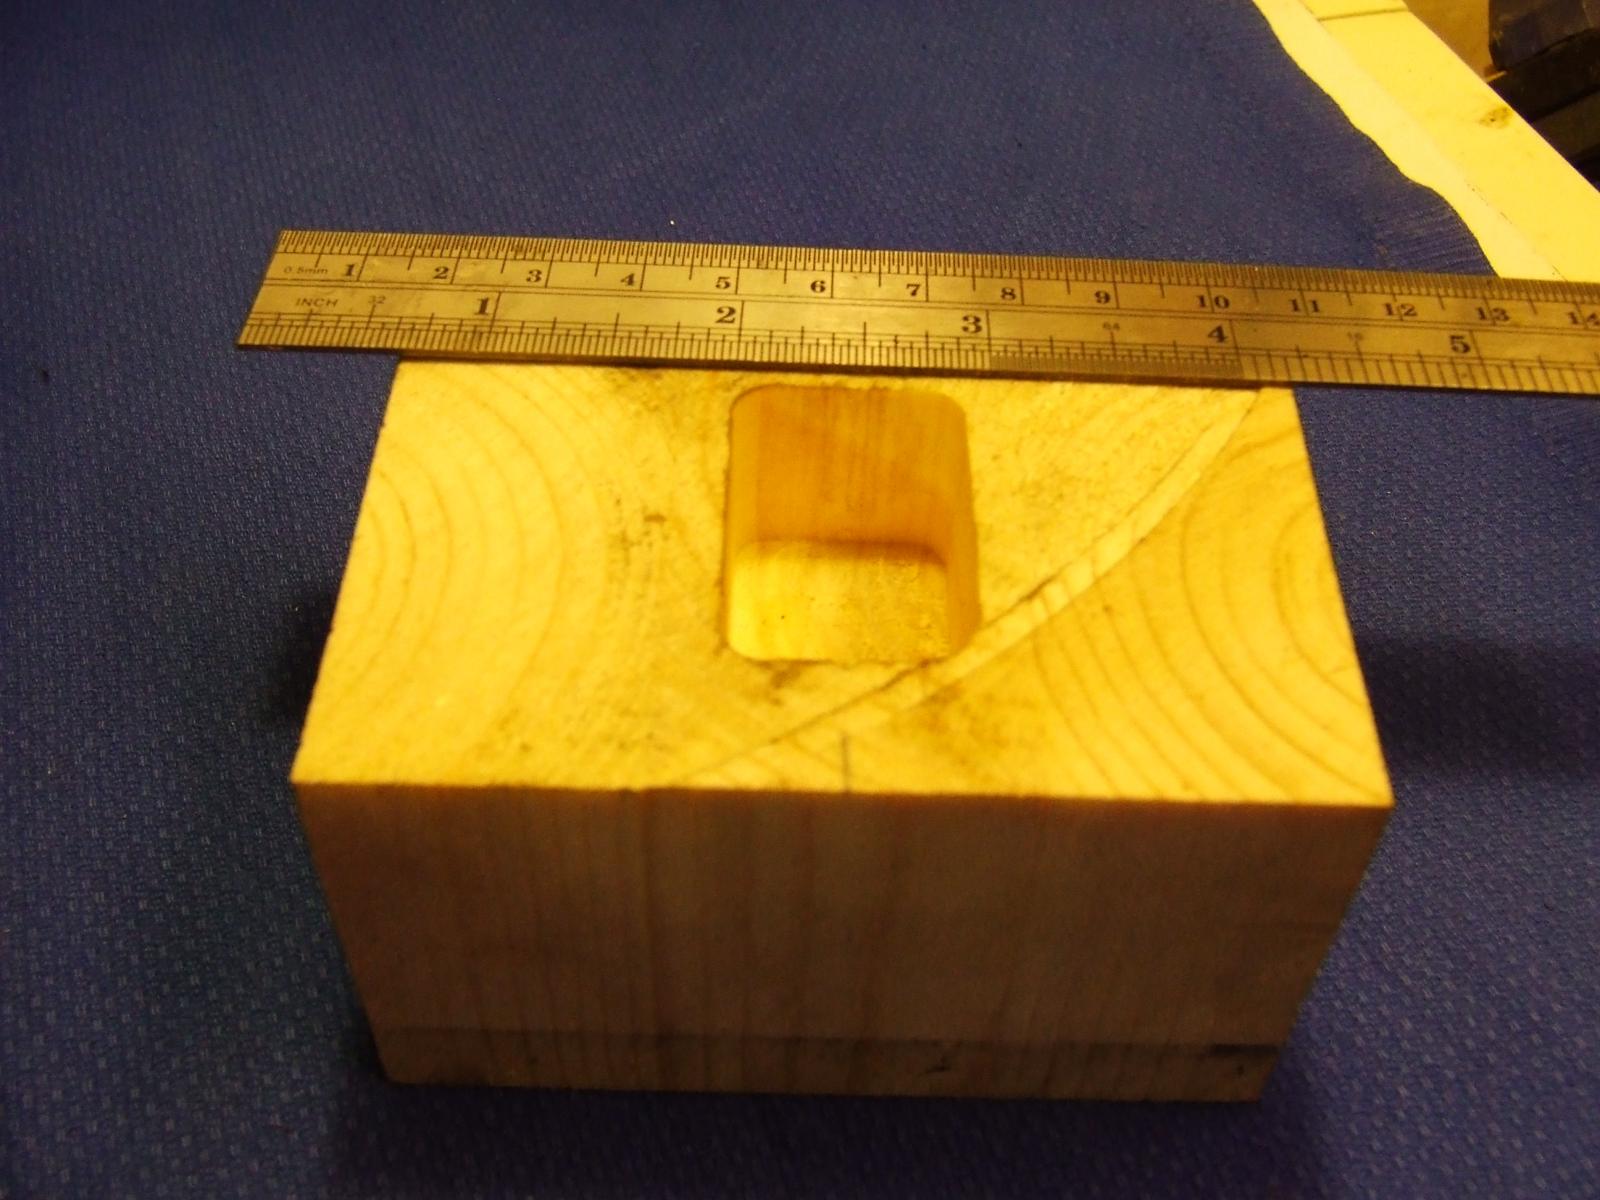
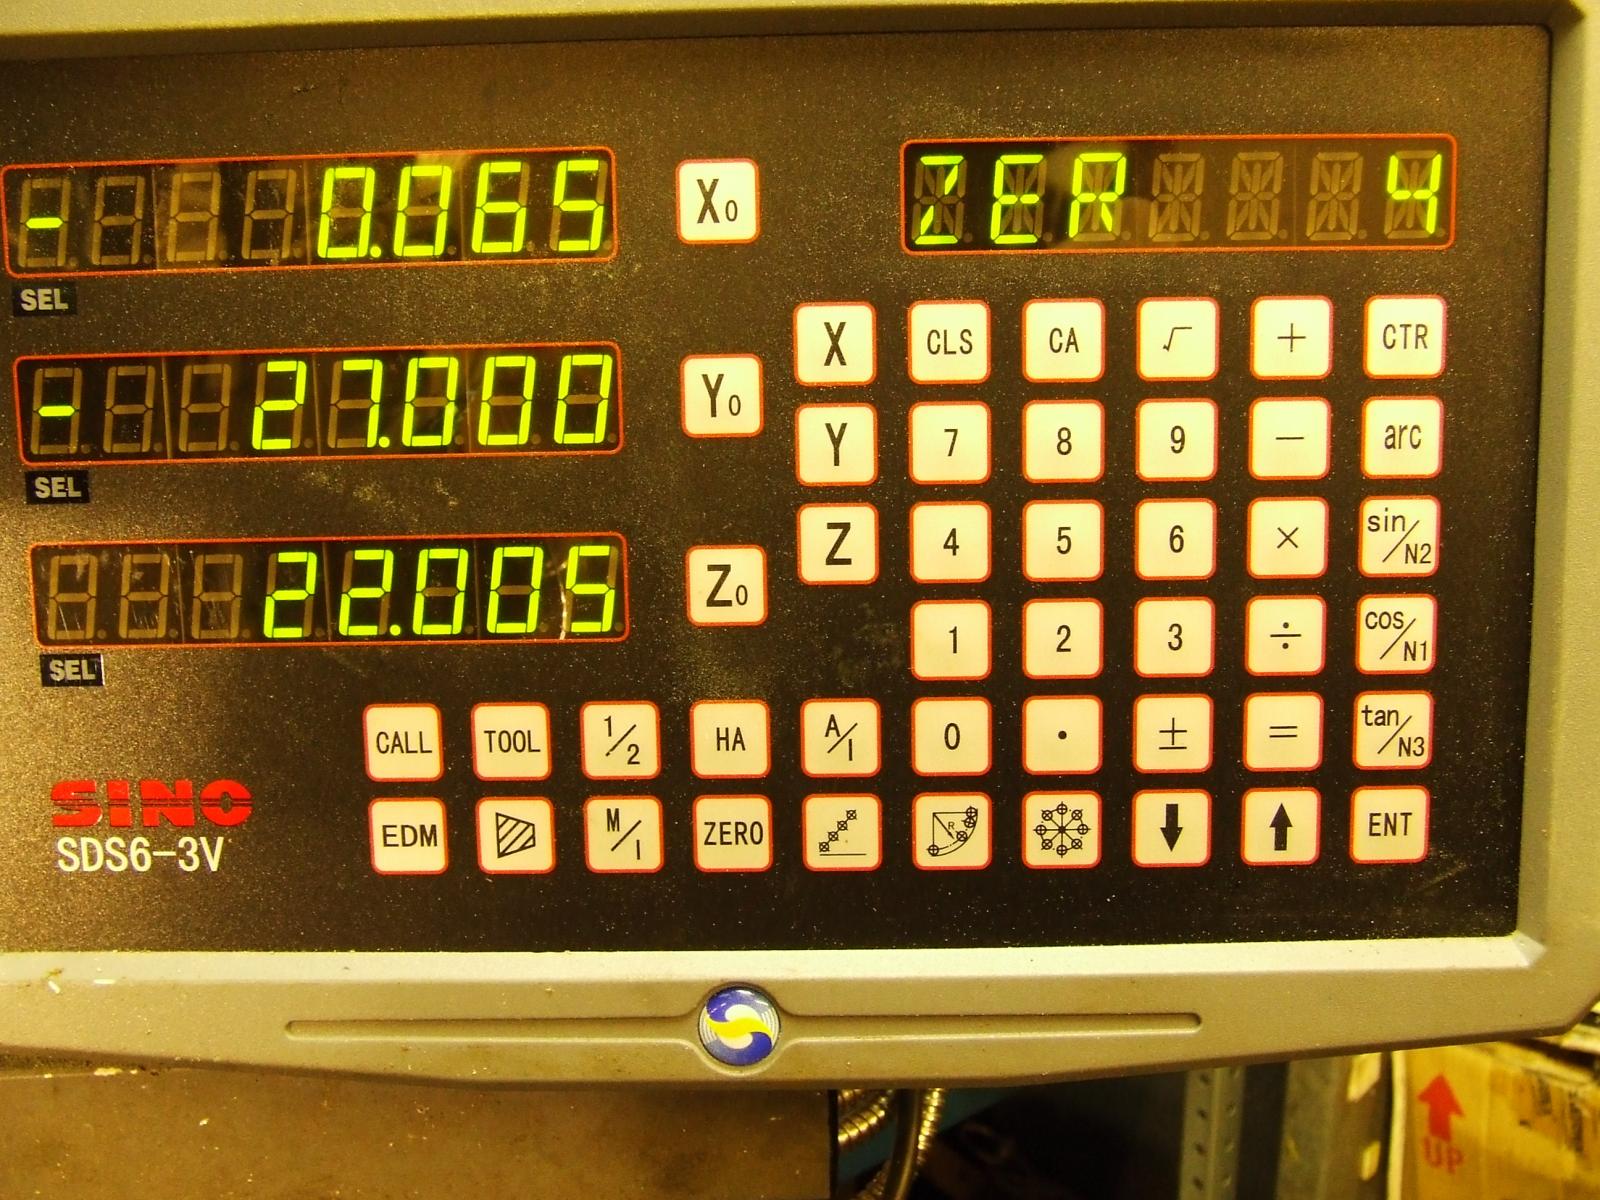
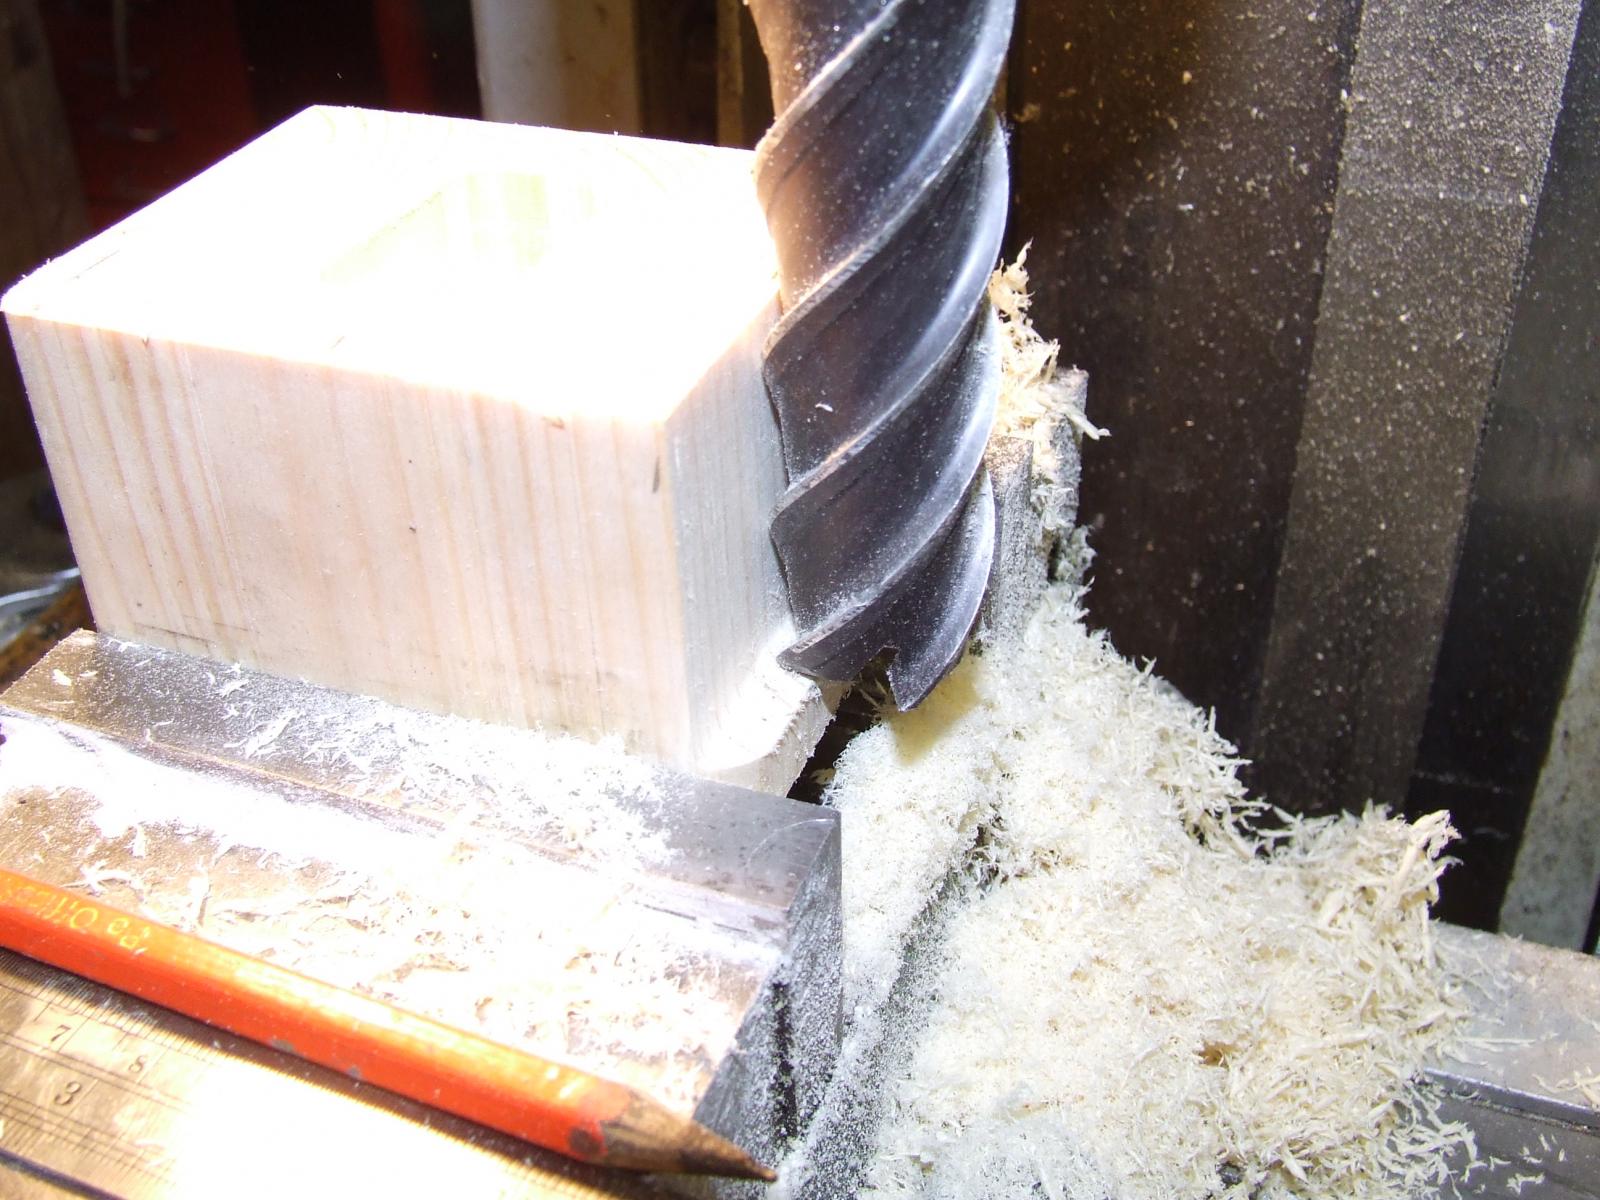
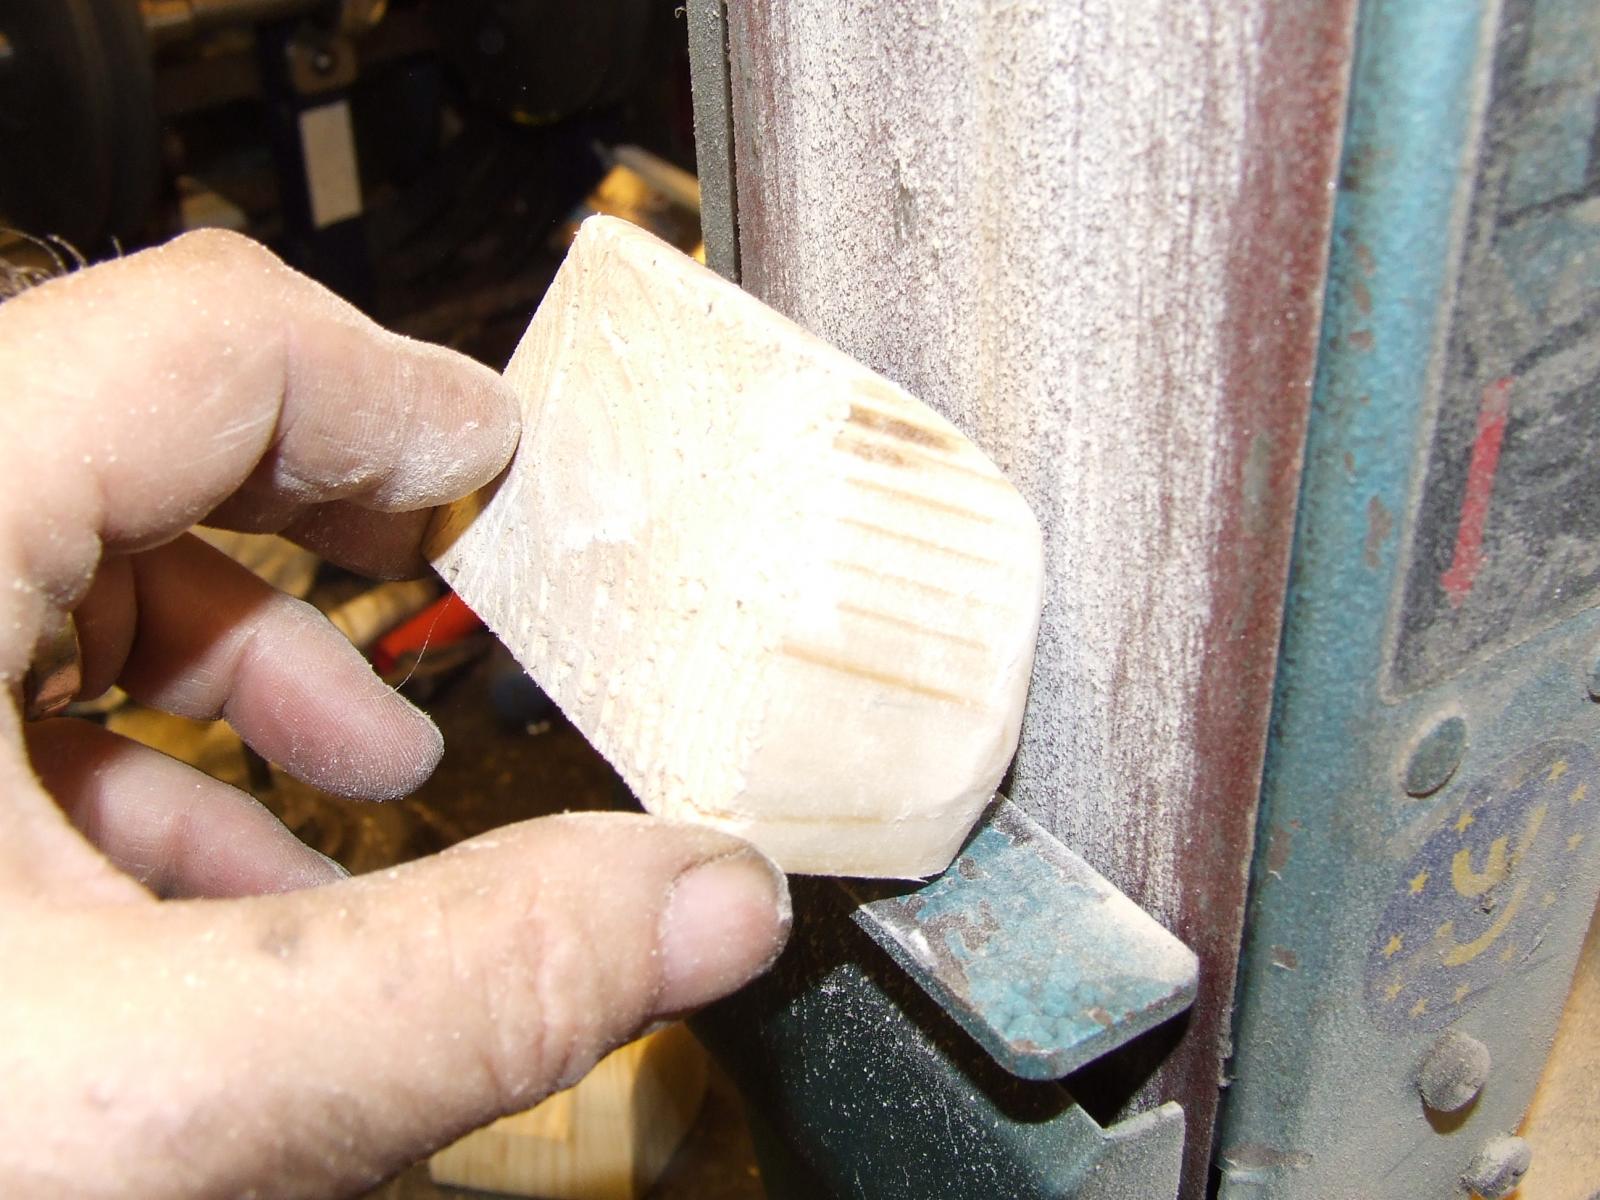
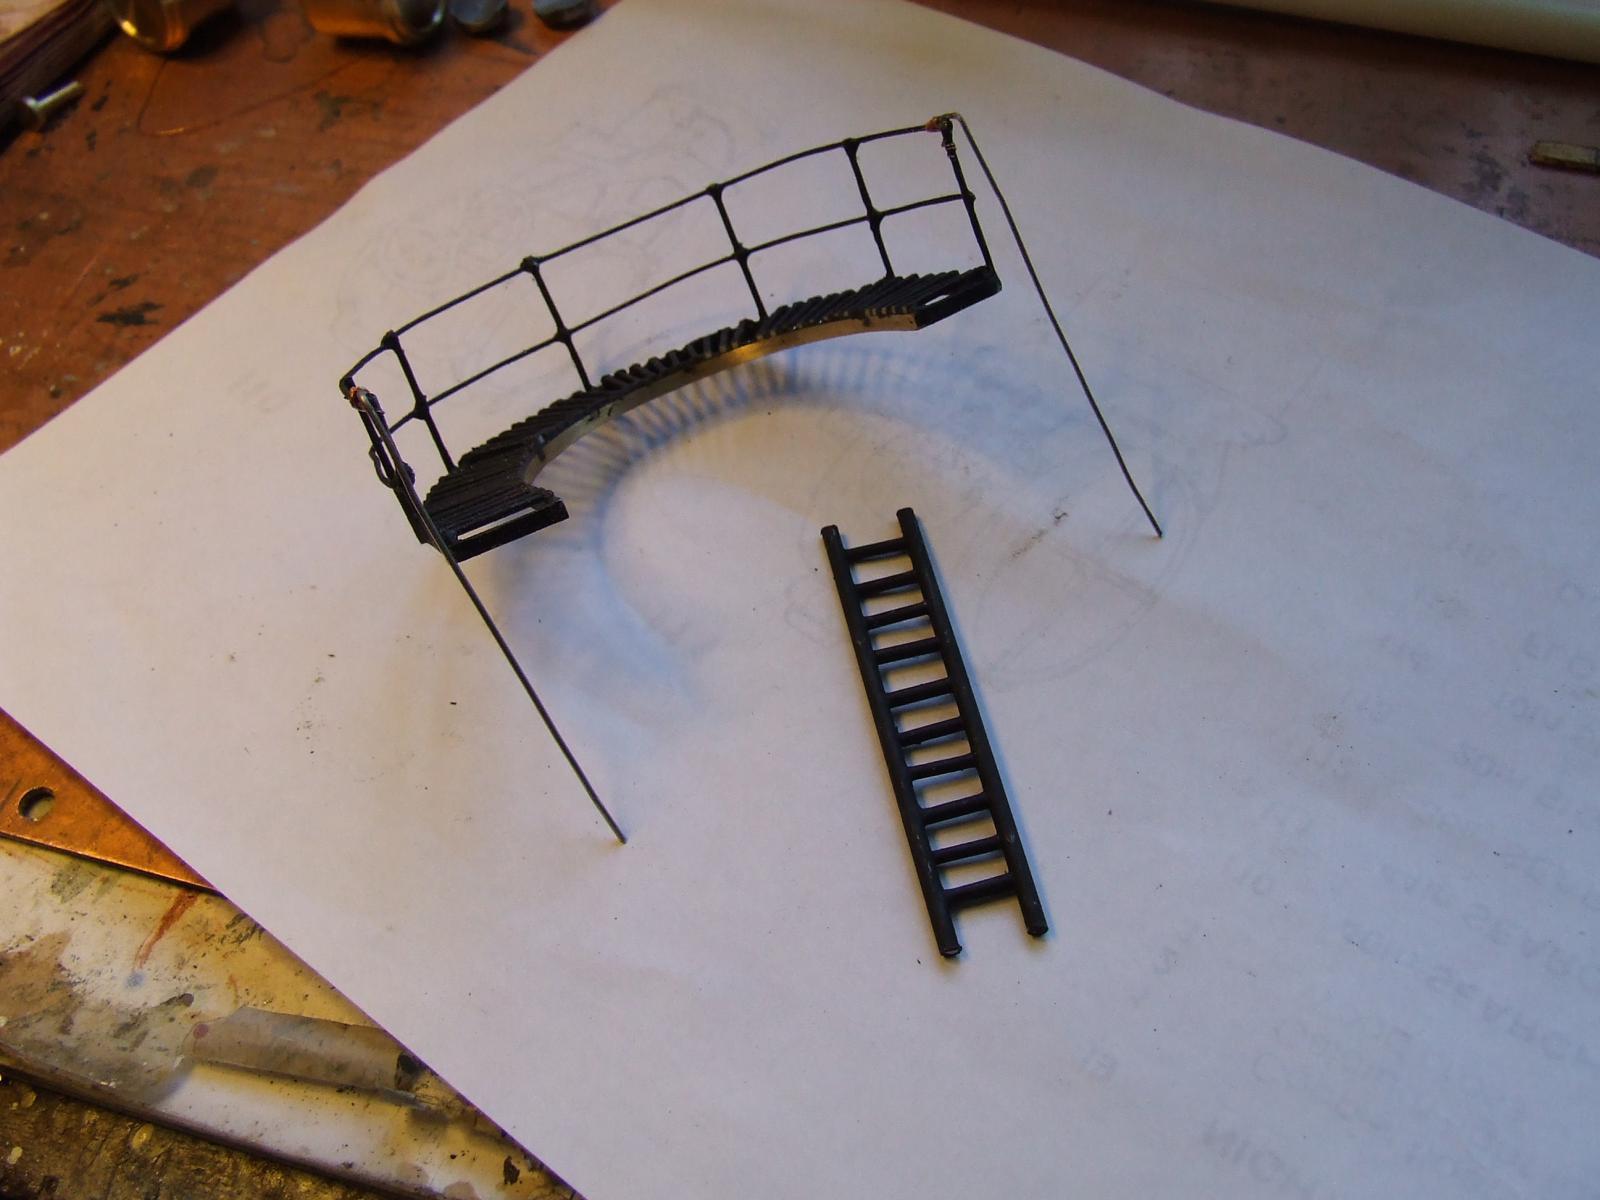
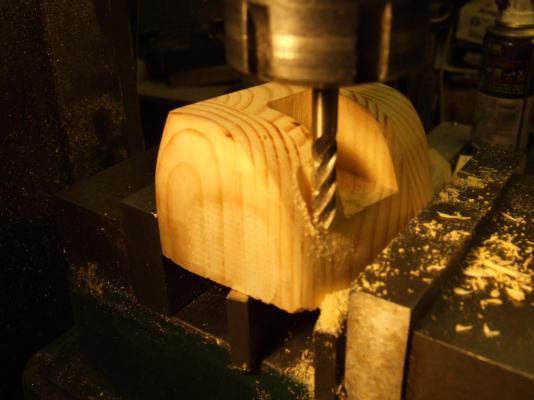
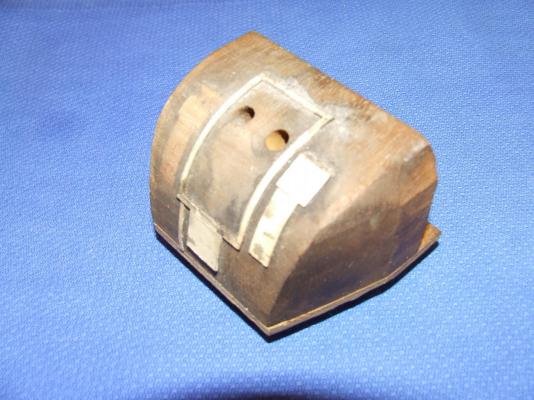
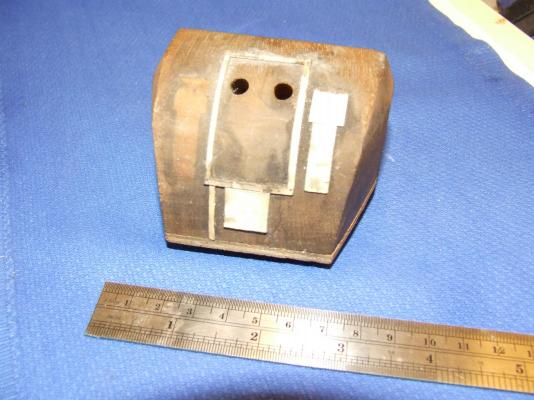
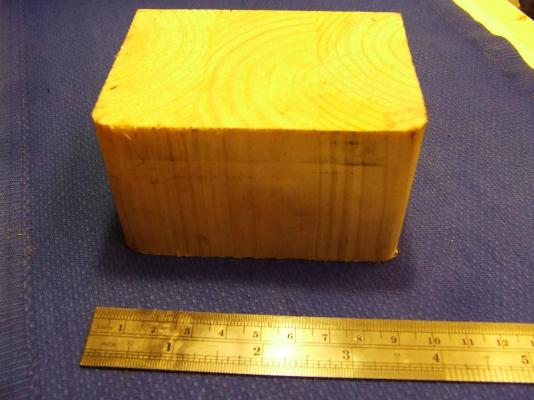
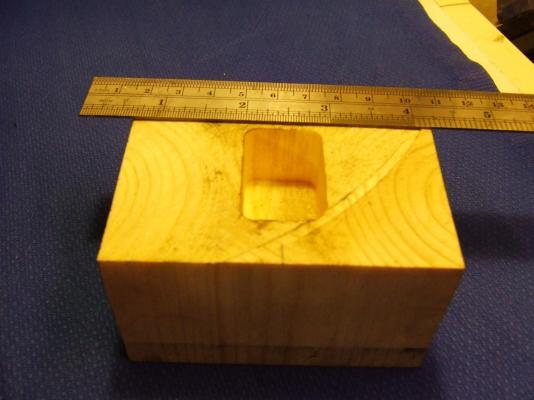
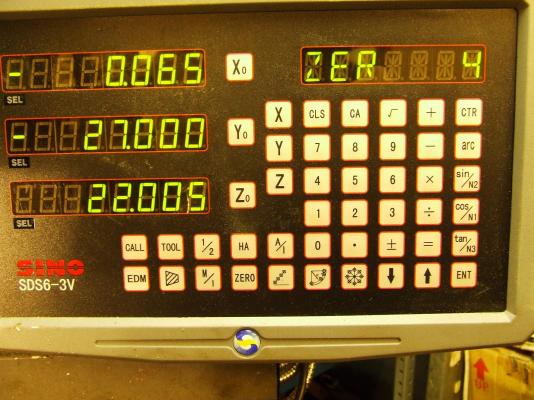
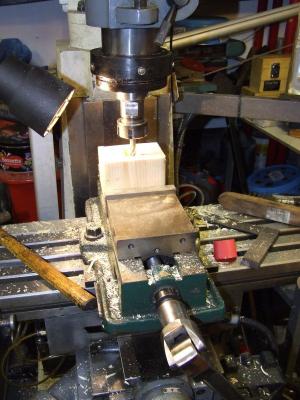
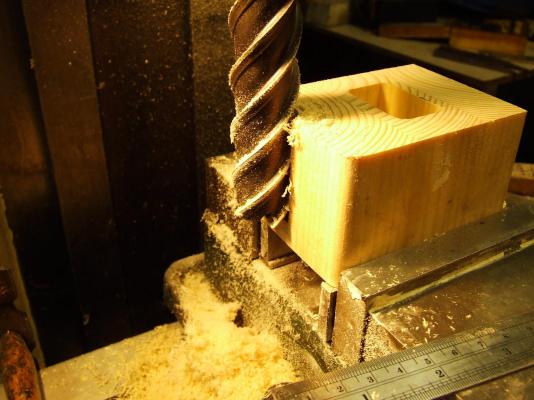
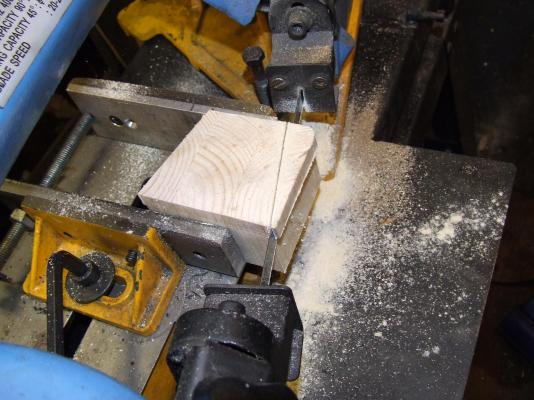
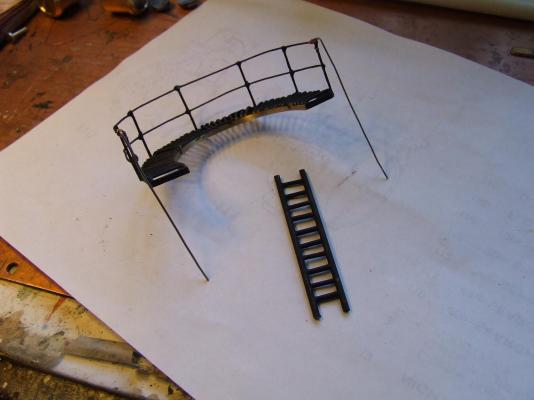
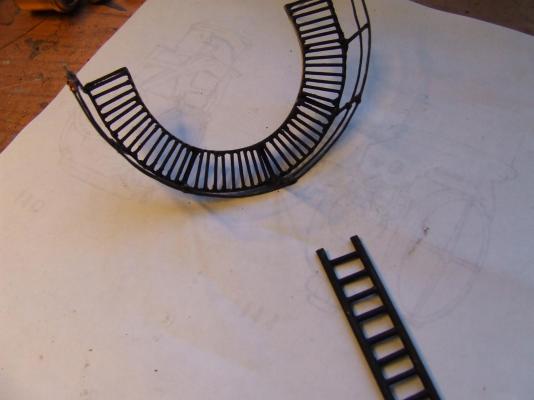
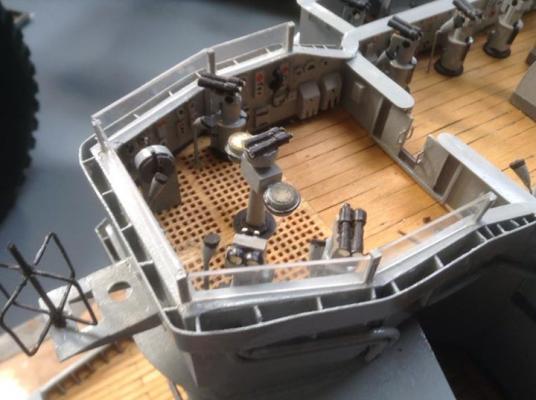
Hi Bill and All, Re the team, ll there is only 3 of us one of which only is interested in the planking side of the project, I made all of those bridge parts, the telephones are made from car body filler, the binoculars are made from dowel and turned on the lathe then glued together, the stands are made from dowel, 'washers' and plasticard, and I worked the scale out using the little man you may see in some of the photos, (he is from the model railway at a scale of 0 gauge which works out at about 1/48th scale), just thought you might like to know how I did it, also I'm working on the 4 twin 6 inch guns at present, and today I made the body shell from a solid piece of 4x4 inch wood, I have uploaded a set of photos showing the stages it took to complete them, having said that they have a lot more work to do to finish them, ie., I will have to turn the barrels and fit the breach and other bits etc., which I will post after I have done them, all the best Glenn Still don't know how to add 'captions' so here is a list of the photos, 1,2, and 3, The original which came with the ship, (which I'm taking the measurements from) 4, The start block 4" x 4" 5, The gun barrel 'slot' milled out 6, The milling process, 7, The 'computer screen' from which I work out the measurements, note it is not a CNC machine, just has a computer readout, 8, Showing the milling process 9, as above 10, Cutting the sides to the angle 11, More of above 12, Using the metal band saw to shape the sides 13, Finish sanding of the 'Glasis' plate (if I have spelled it incorrectly, sorry, the spell checker couldn't find it either) Oooh dear, it looks like the photos have decided to be silly and 'jumped' about and got themselves in the wrong spots, but I'm sure you can work it out as to where they should be, lol, all the best Glenn PS It took me about 8 hours to complete this part, so far,


- 33 replies
-
- 5
-
-
- warspite
- battleships
- (and 1 more)
-
Hi All, I've just tried it and it seems to be working, so all the Warspite photos are now on this site, hope you like them, thanks to you all, especially to Reklein, for telling me where to do this, all the best Glenn
- 33 replies
-
- 2
-
-
- warspite
- battleships
- (and 1 more)
-
Hi again All, I have added the following 'links' I think to photobucket, and the photos in the album I have uploaded, hope I have done it right, if not will someone please tell me how to do it, thanks to you all, all the best Glenn <iframe width="480" height="360" src="http://s1369.photobucket.com/user/Sargofagus/embed/slideshow/"></iframe> <div style="width:480px;text-align:right;"><embed width="480" height="360" src="http://pic2.pbsrc.com/flash/rss_slideshow.swf" flashvars="rssFeed=http%3A%2F%2Ffeed1369.photobucket.com%2Falbums%2Fag214%2FSargofagus%2Ffeed.rss" type="application/x-shockwave-flash" wmode="transparent" /><a href="javascript:void(0);" target="_blank">
- 33 replies
-
- 1
-
-
- warspite
- battleships
- (and 1 more)
-
Thanks Reklein, I have uploaded all the Warspite photos that we have taken to 'Photobucket' and I think I have done it right , I would appreciate you looking for them and letting me know if I have completed this correctly, have 'clicked' on public, but don't know how to let everyone know hw to access it, I have called the album 'Model ship world' and used my online name of sargofagus, I have pass worded it, but I'm keeping that 'close to my chest', lol All the best, and lease let me know, thank you Glenn
-
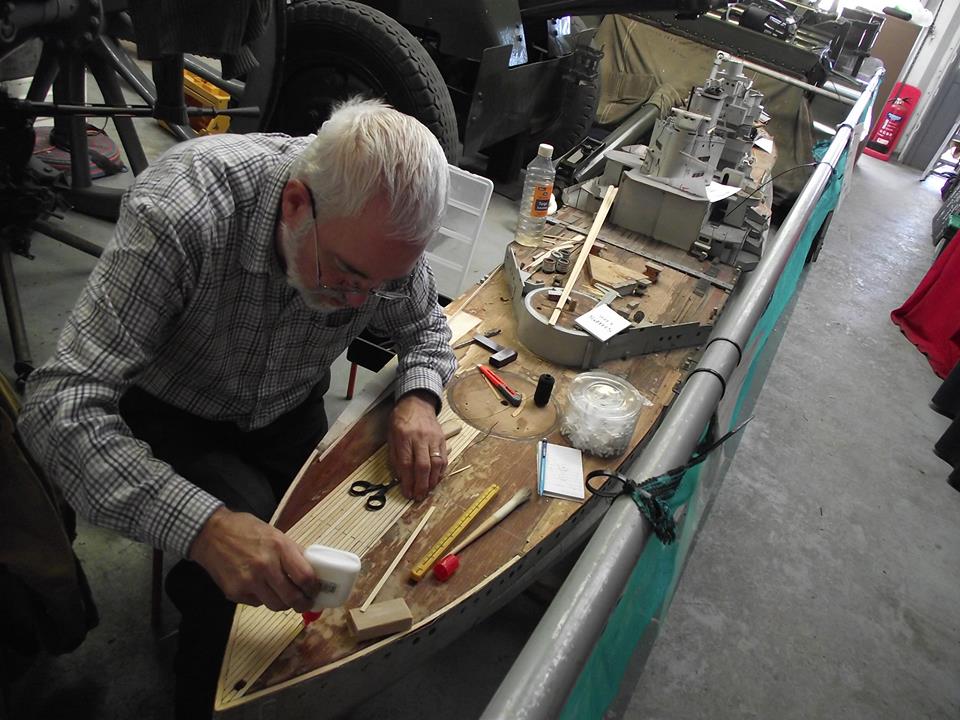
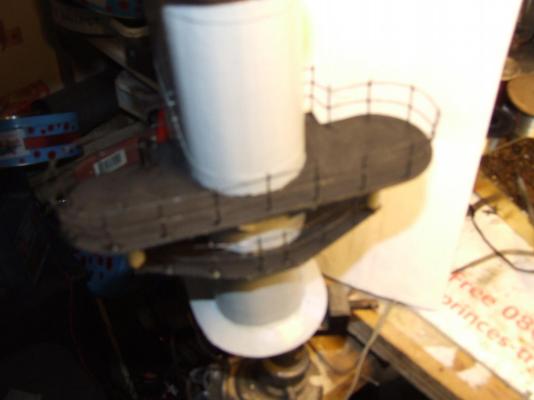
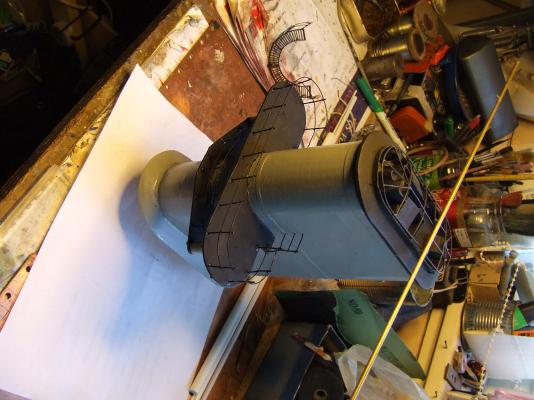
Hi All, Thank you for the nice comments and the interest you have shown in this project, I must tell you all that there are three of us working on the ship, Allan (who just wants to be involved with the planking) and is doing a really good job, Ken (who is the project coordinator and works with me on the restoration side of the project), and I am the 'engineer' on the team, we are all 'retired', I do most of the work at home (where my workshop is) and I tend to put in some 35 hours+, (I'm on my own so have plenty of time to dedicate to the ship), although I do have a 20 foot by 10 foot shed with a model 00 gauge railway which I'm building alongside this project. In answer to 'Redshirts' question, I don't know, (as I am ex Army, not Navy) but I'll ask John (the man at the Battery who will know) and get back to you, also 'Shipyard Sid' asked for a close up photo of the searchlight, this I will take when I next go to the Battery, (possibly next Monday), and post it for you. I do have a lot of photos that we have taken when the ship was taken out of the box at first, and if there is a way that I can make them available for people to access I will put them on, but I don't want to 'flood' this site with loads of these photos, so please if there is someone out there who can suggest a way I can do this without 'flooding' the site, please tell me and I will put them there for all to see. Thats all for now, and all I am going to be doing over the next few days will be repainting the 'door dogs etc.,) Grey instead of the Black that they are now, one of the 'mundane' jobs to do, thanks for looking, and all the best Glenn
- 33 replies
-
- 1
-
-
- warspite
- battleships
- (and 1 more)
-
Just remembered had some more pics in the camera, of the parts as I made them and before I put them together, cheers and I promise this is the last time tonight lol . Glenn


- 33 replies
-
- 9
-
-
- warspite
- battleships
- (and 1 more)
-
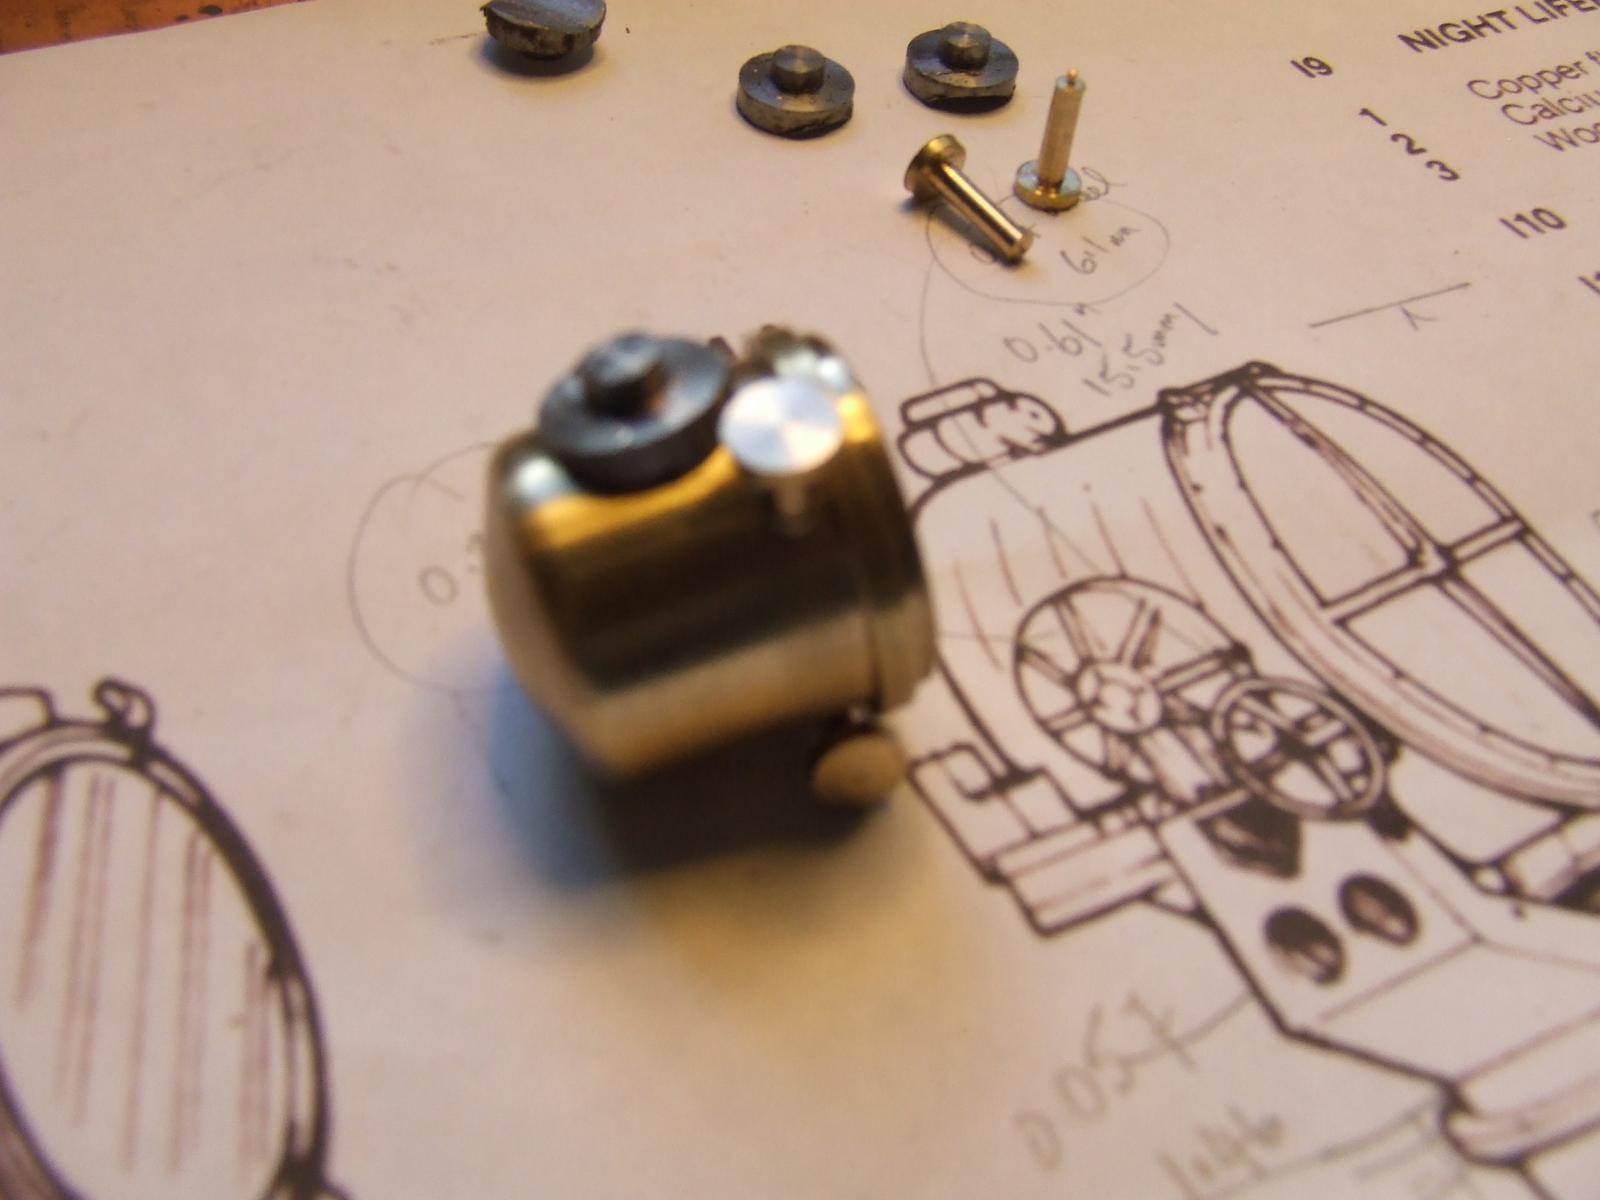
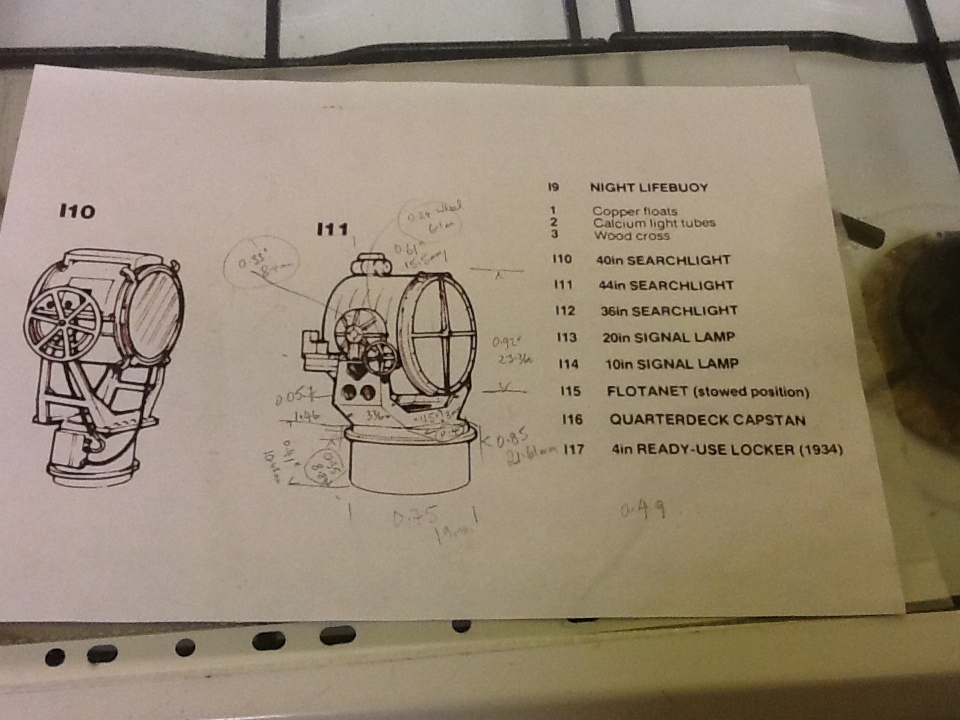
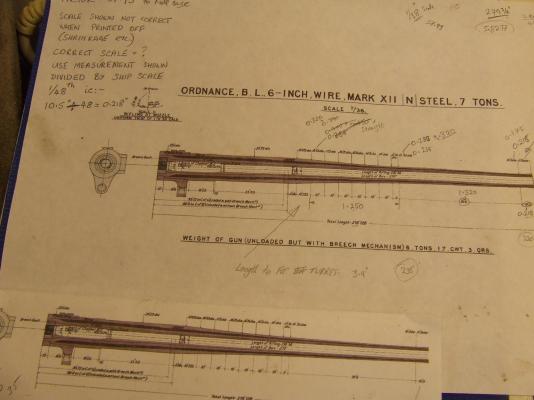
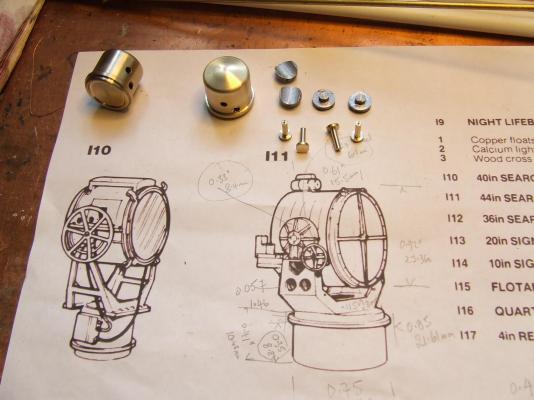
Thanks to a very good friend I have a photo of the 'plans' I worked from for the searchlights, thanks David (shipyard sid), note the 'scribbling' is how I worked out the scale, (see text) for the complicated details lol Glenn

- 33 replies
-
- 5
-
-
- warspite
- battleships
- (and 1 more)
-
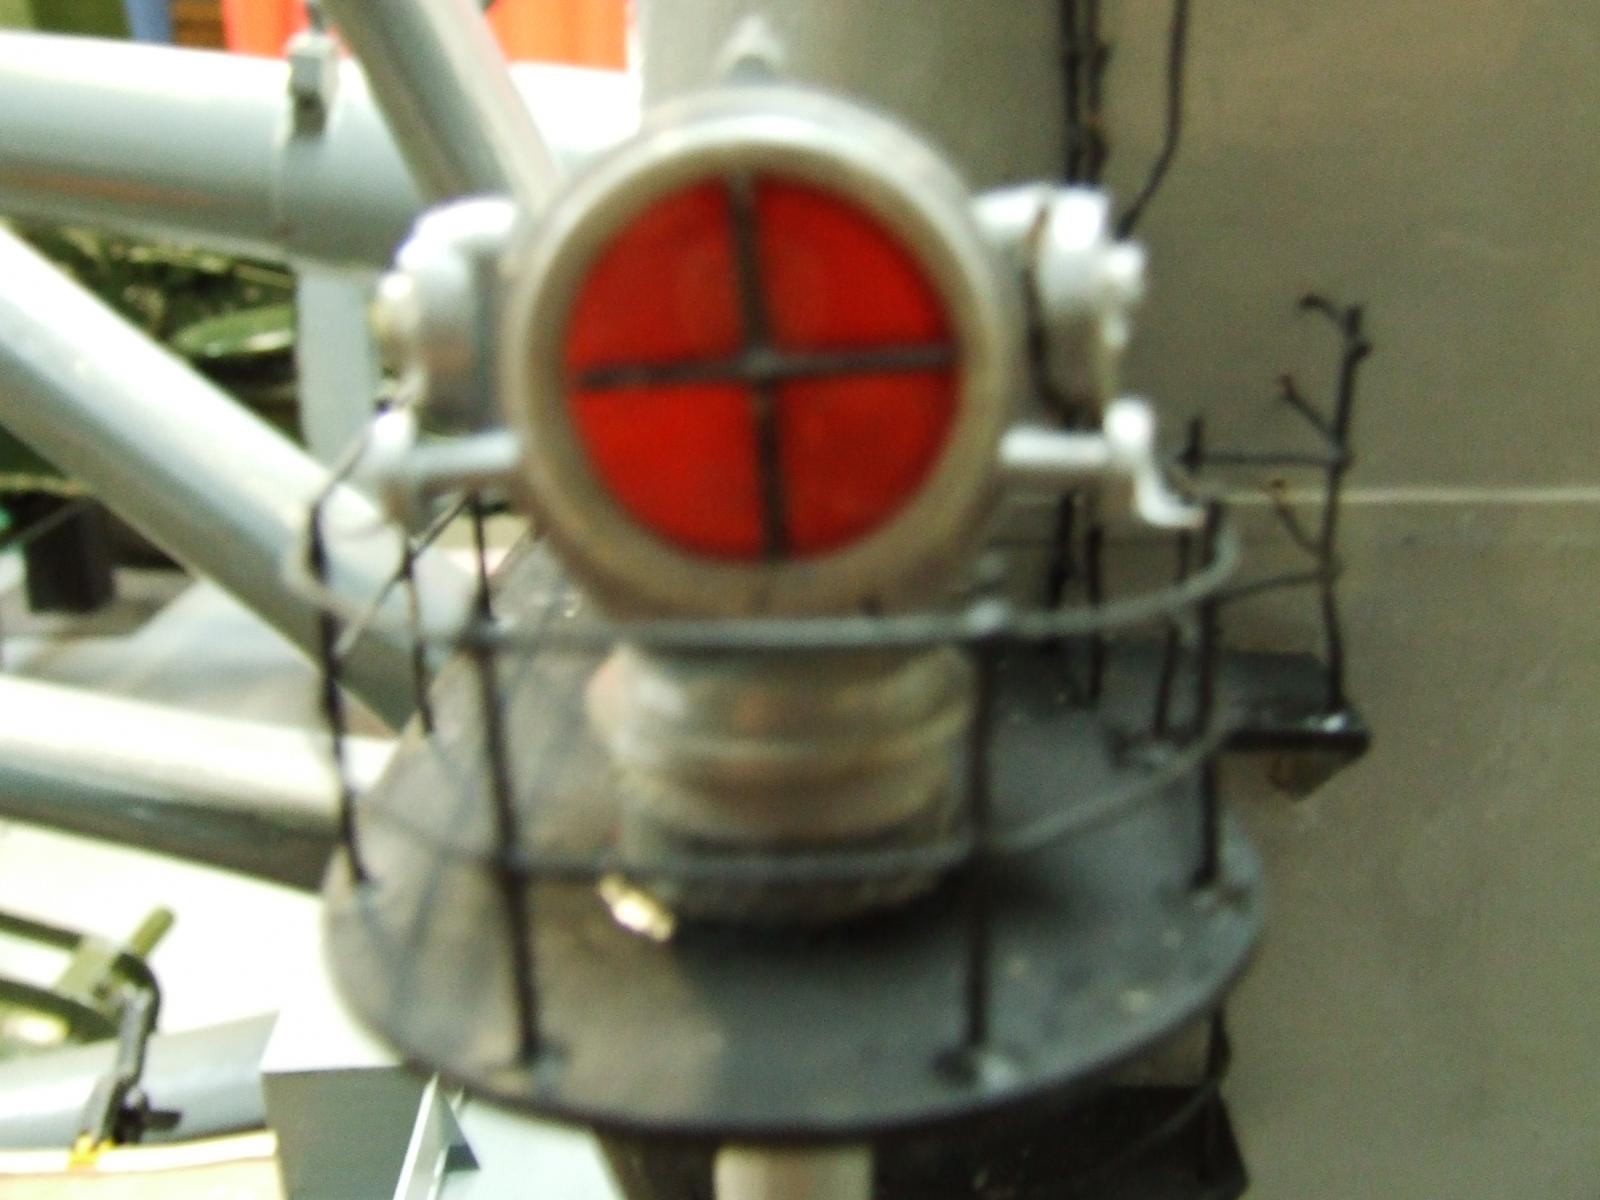
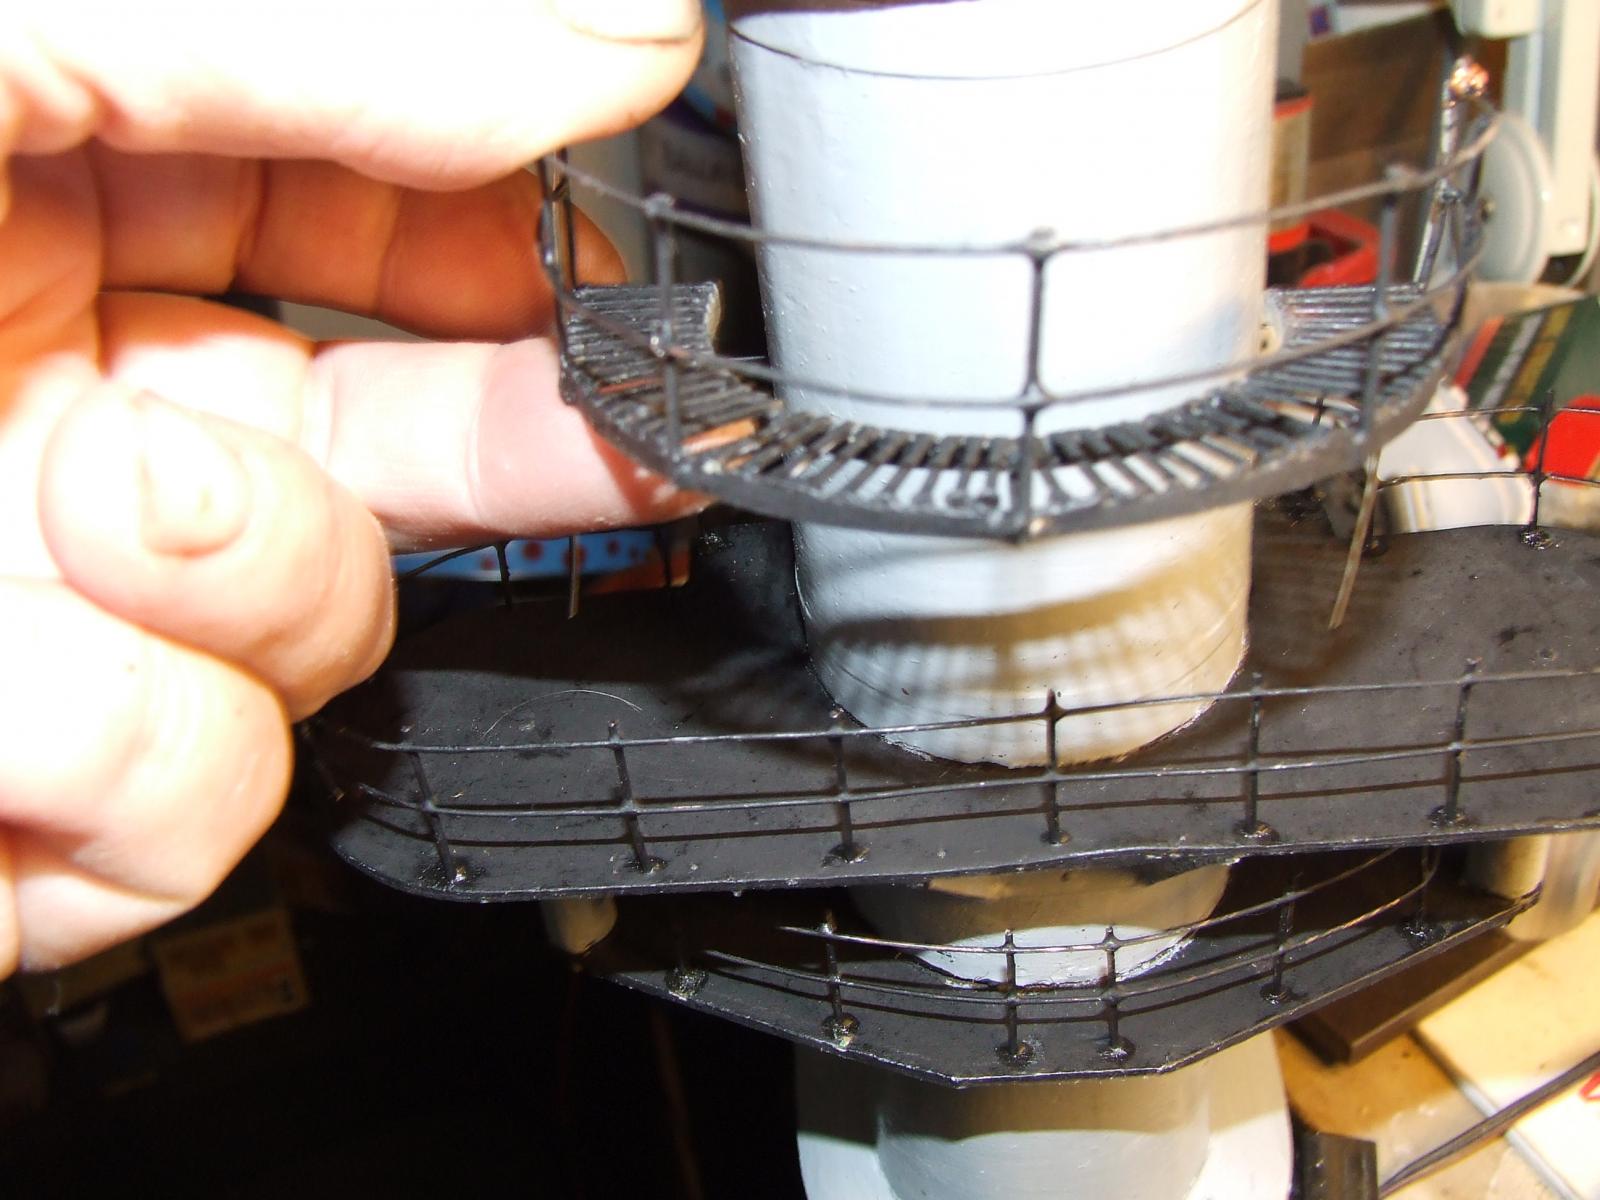
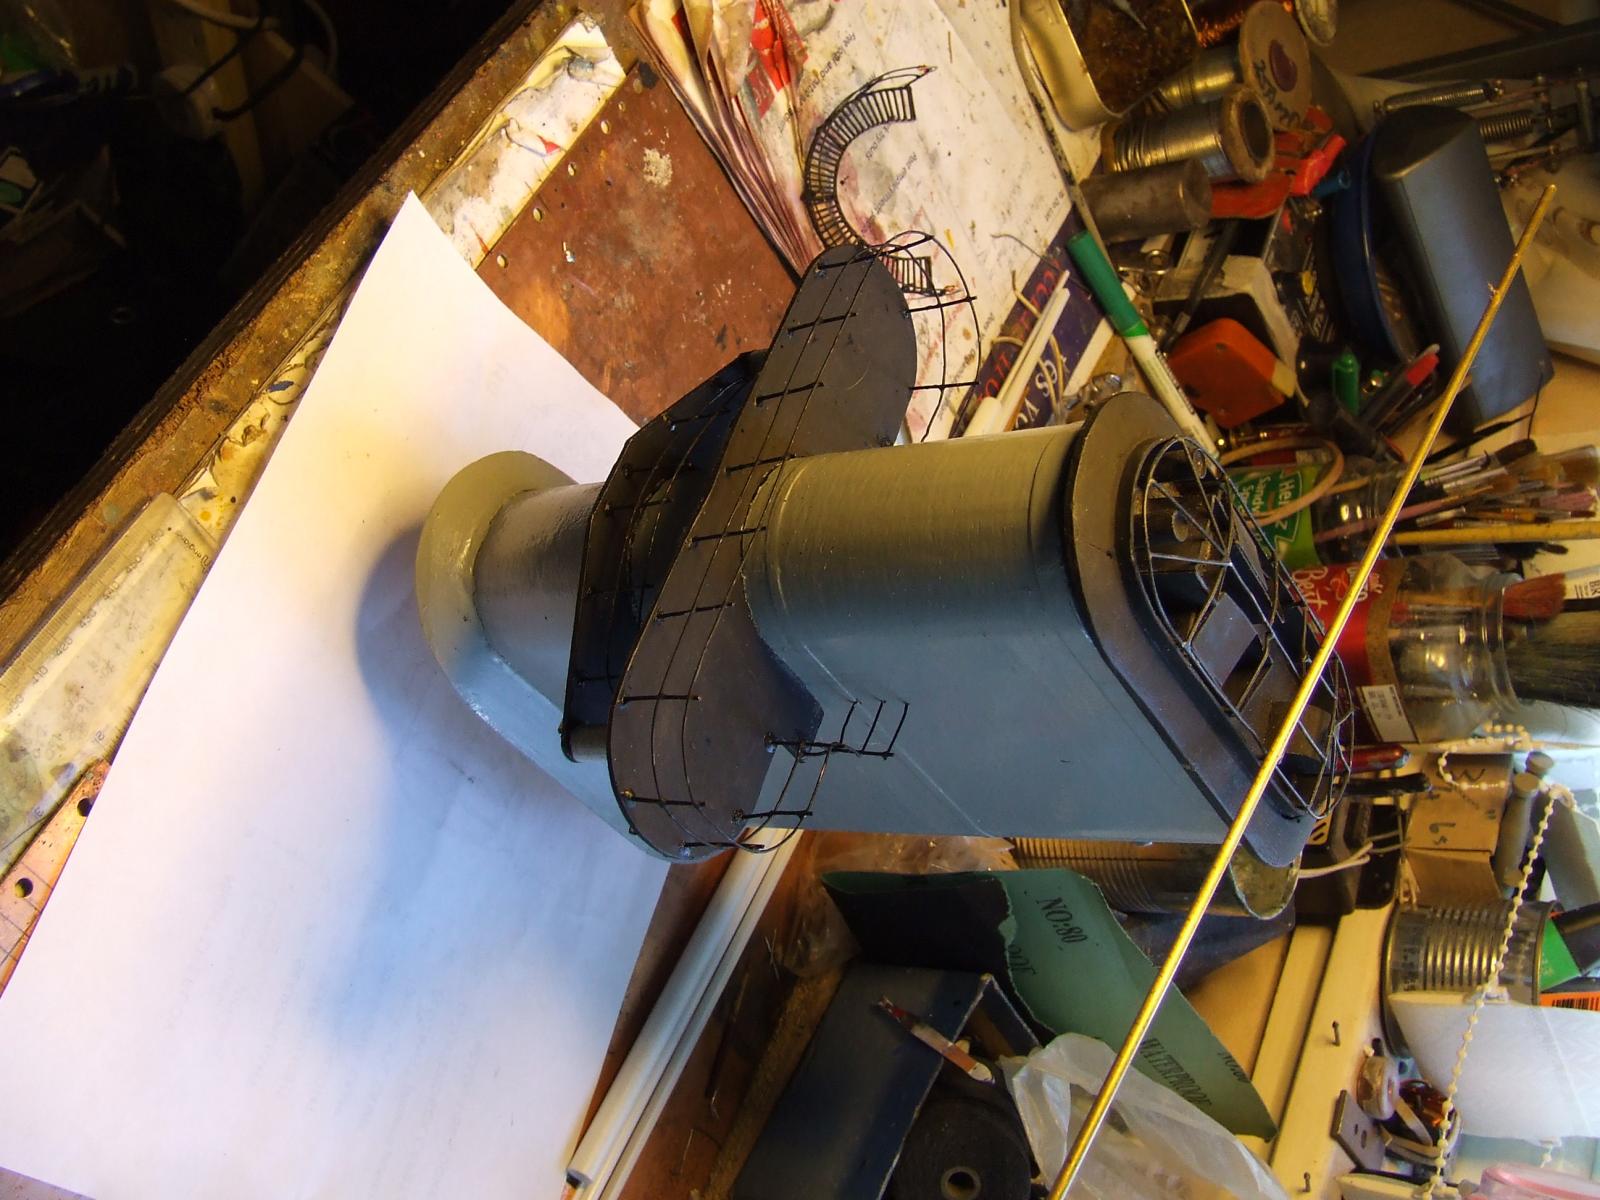
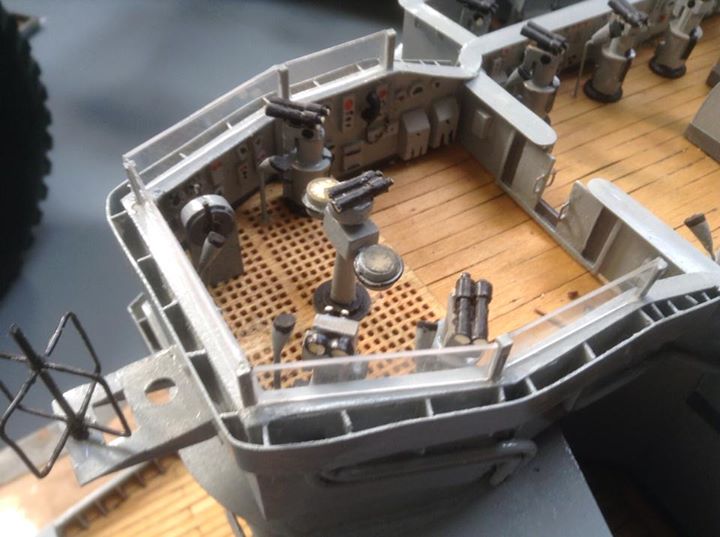
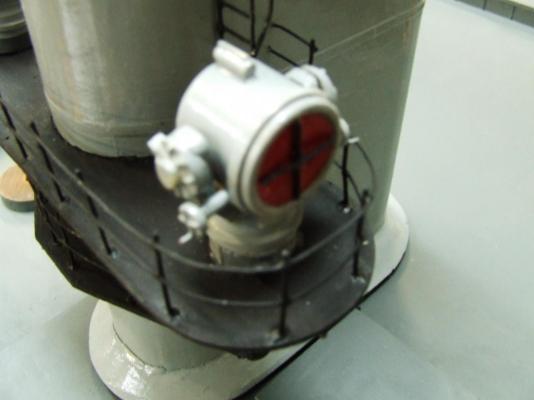
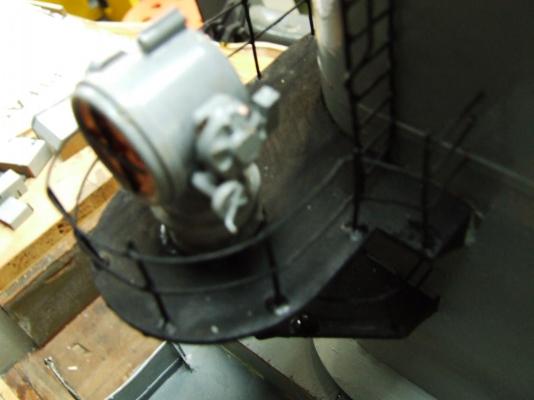
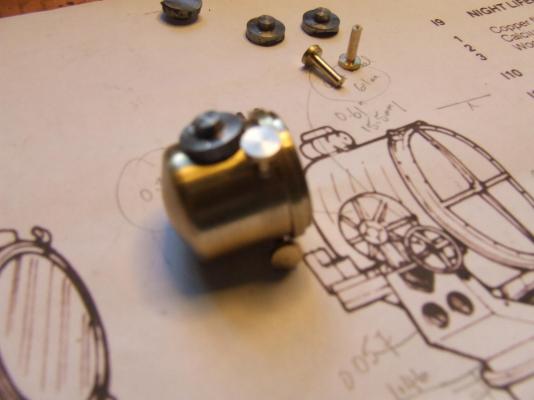
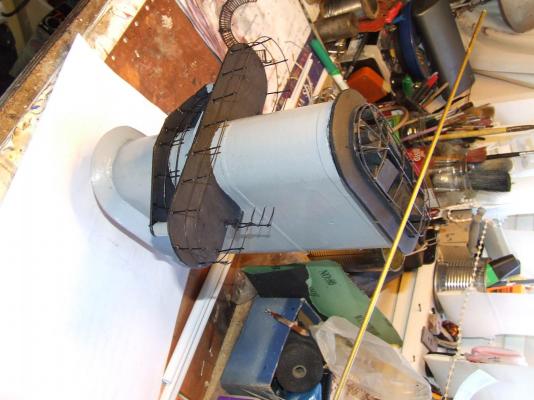
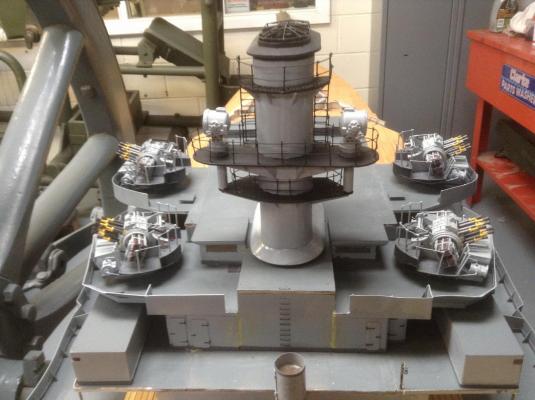
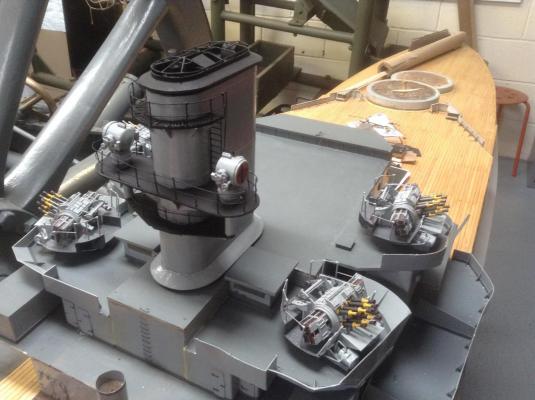
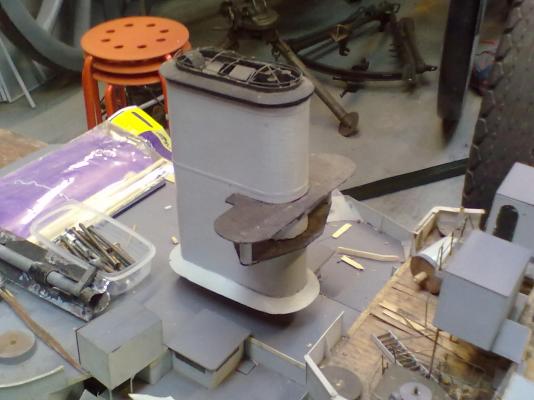
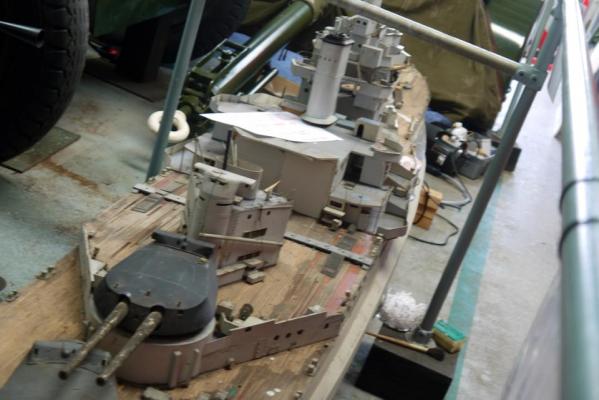
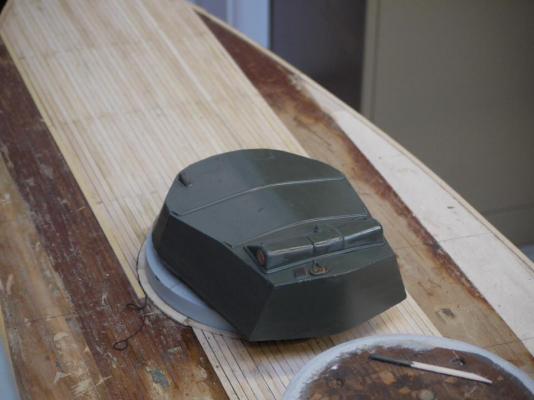
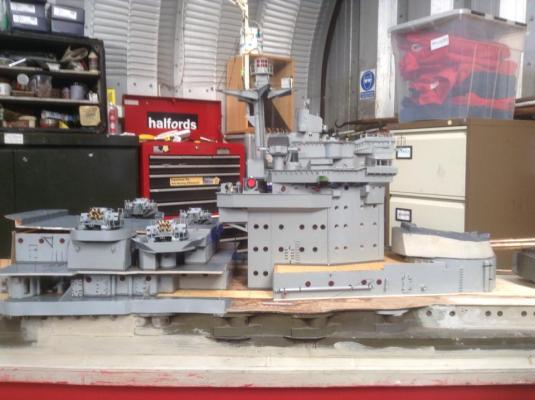
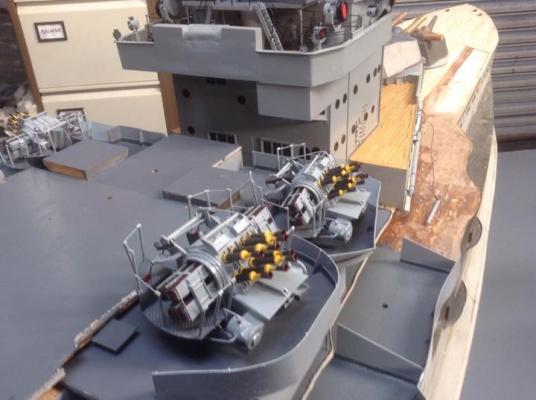
Hi All I have been working on the funnel and the 2 pdr pom poms and we have fitted them today, here are two of the photos, the pom poms are made up from 'plasticard, dowel, and bits & pieces lying around the workshops', as well as some wire, it has taken me about 4 weeks to complete the pom poms and another week to finish the funnel, (of which the shell was already made and I had to complete the railings, and the walkways) the railings are just wire soldered together in situ , the searchlights I made in Brass, by turning the main piece, then the stand, the side bits were also turned on the Lathe then 'milled' out at the back to get the shape needed to fit the stand, the 'winding' handles were also turned and the along with the side fitting I soldered small bits of wire onto it, the stand was made in 1/8th ply and then I used 'super glue' to fasten the whole piece together, the wooden parts were cut to 27.5 degrees so as to form the correct shape for the light to fit into, the whole thing was from a photo I sourced, so I had to work out the 'factor' for working out the scale (1/48th) and then I had to use a digital caliper to measure the photo parts, then multiply the result by the factor of 0.49 to get the final sizes, (sounds complicated, but was really easy in practice) i.e., for instance if the photo measures 0.920" (still work in old 'money' lol) then multiply this by the factor (0.49) gives a result to work to of 0.450", which I would use as a final diameter for the finished part, then when all the parts were completed I 'glued' then together, hope I haven't 'bored' you all with 'too' much 'tecnobabble' please tell me if I am giving too much information, thanks for the interest, Glenn PS the first two pictures are the new work, the rest are as the model came to us, hope you enjoy this thanks again Glenn


- 33 replies
-
- 7
-
-
- warspite
- battleships
- (and 1 more)
-
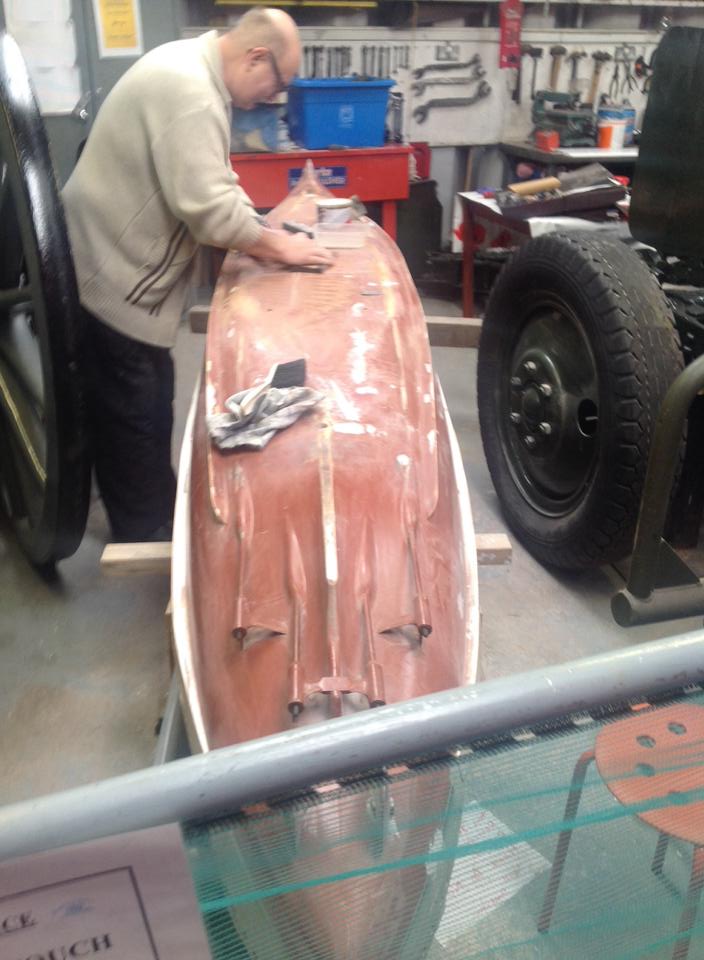
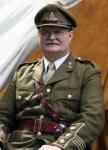
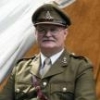
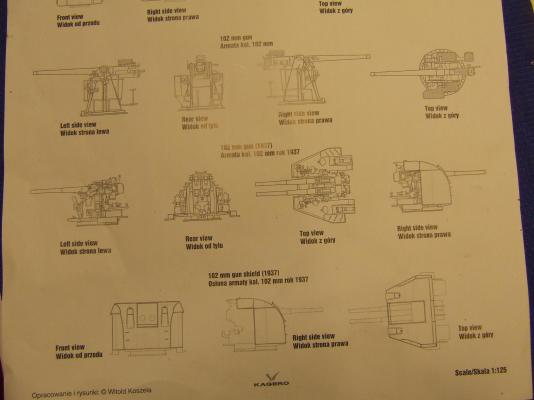
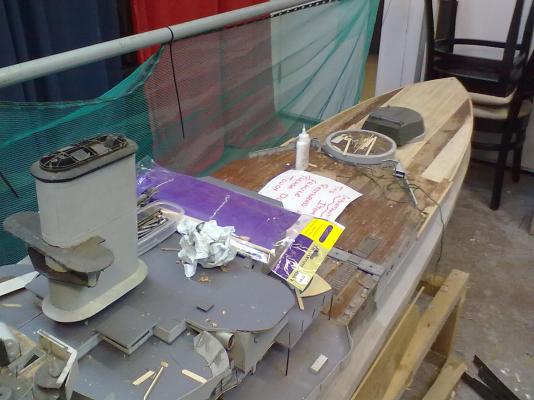
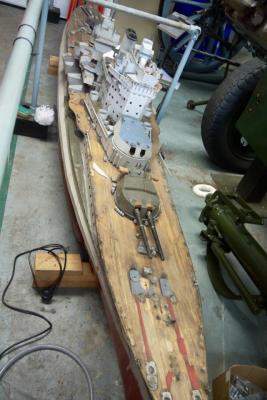
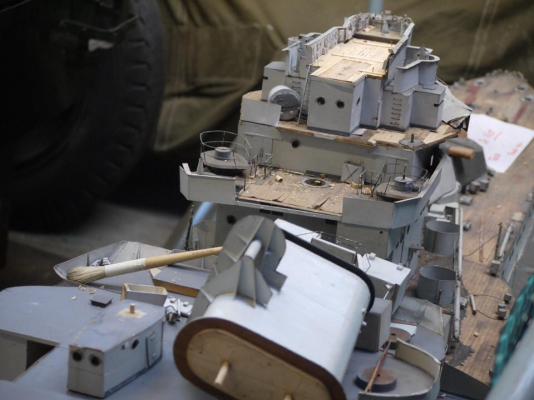
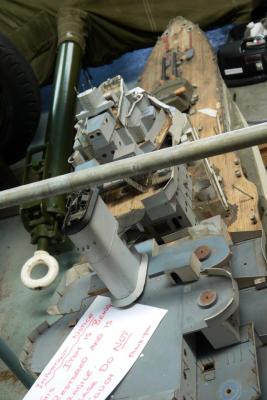
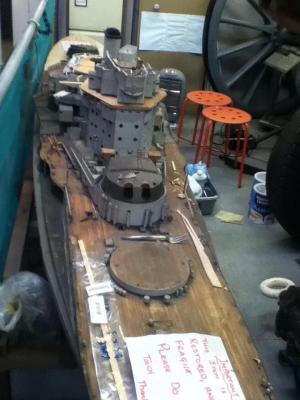
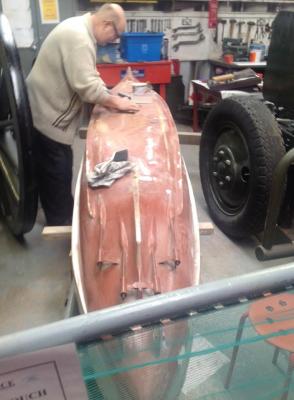
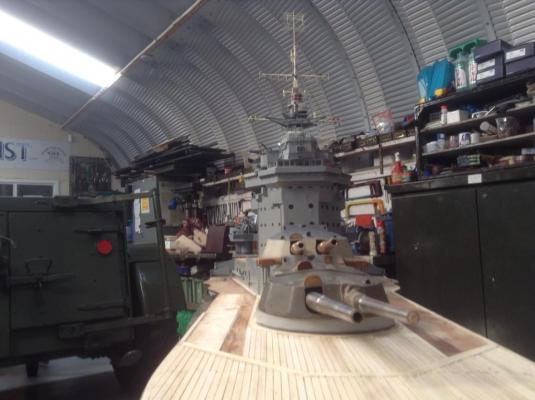
Hi to all out there, Just to let you all know a little of my history, I'm a widower (having lost my wife to cancer 4 years ago), am 66 years young and disabled, served in military uniform for over 36 years and am now retired, hence the start of this hobby, I used to be one of the directors at the Heugh Battery Museum, until I resigned to look after my wife in her last days, so I am now a volunteer there, and the Heugh Battery is where the first person in England to be killed duringf World War One, and we have been restoring it from a run down car park and 'vagrant' area since the year 2000, we are now open to the public, and have lots of artifacts (that you would expect from both World Wars) 'plug for the Museum', see us on www.heughbatterymuseum.com. One of the artifacts we have acquired is the model of the HMS Warspite (Queen Elizabeth Class Battleship), she was built in 1912, launched in 1915, the over the years went through a lot of refits. The model we got from the Imperial War Museum was in a terrible state when we received it, (lots of parts missing and broken) it turns out that she was originally (the model) built by some shipyard apprentices to a very good state, but when some of the refits took place, the model was also updated, only not always by the same apprentices and this shows. We received the model in a massive wooden box (where she had been stored during the Second World War, (for safe keeping), evidently this box had not been opened since about 1940/42, so a decision was taken to restore her to her refit of 1942, so the hunt was now on to find both plans and help to put her right again, we received her in July 2013, we then asked around the volunteers as to who would like to take on this mammoth project, after a lot of 'head scratching etc'., it was decided that three of us would do it, Glenn (myself) who would do the most of the metal work (as I have a full workshop including a Lathe and Milling machine along with other machines) and the repair and replacement of some of the parts (which we have to source), along with painting and all the other 'mundane' work, Ken who took on the job of project leader, and works very closely with me, and Allan, who only wanted to do the ' deck planking' and a really good job he is doing of it, including putting cotton between the planks to give the nice black line between them. I am going to copy all this onto another page when I post some of the photos that we have taken, (as I'm not sure that I'm doing this right. So folks, that's all for now, if anyone wants more information, please don't hesitate to contact me and I'll try my best to answer you, thank you for reading all this, I hope I have't 'bored' you all to tears, Sargofagus Thought I'd add some photos of the progress, we have taken loads of the parts we have been able to strip down, but there is lots of 'bits' that we are going to have to source, the plans we are using is a book produced in Poland and is in Polish (also in English) and this has helped us immensely, we have to work out the scale as the full size, then reduce it to 1/48th scale, (but it is working), if anyone out there has any 'better' plans that you would let us have this would be fantastic, we are restoring it to around the 1942 period. Thanks again for your interest, Sargofagus OOps forgot to add the photos, (you can tell I'm new to this) lol I'm the one on photos 11, and 12, Allan is the other person on the photos, Thanks


- 33 replies
-
- 20
-
-
- warspite
- battleships
- (and 1 more)