xavjar
-
Posts
42 -
Joined
-
Last visited
-
 PeteB reacted to a post in a topic:
HMS Kingfisher 1770 by Remco - 1/48 - English 14 Gun Sloop - POF
PeteB reacted to a post in a topic:
HMS Kingfisher 1770 by Remco - 1/48 - English 14 Gun Sloop - POF
-
xavjar reacted to a post in a topic:
ARGHH!!....Making A Mouse For Stays
-
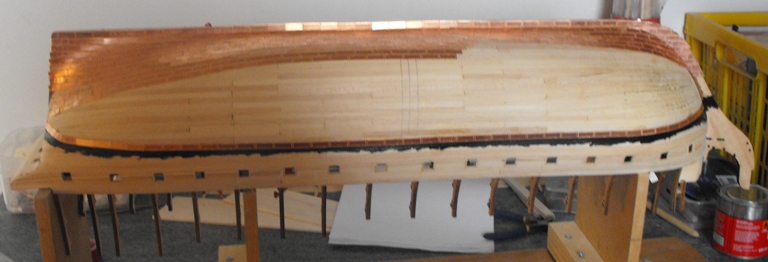
Hi, Unfortunately I have lost all of the in progress photos since my last up date so I'll just offer a brief text version Ok so I finished planking the lower hull and installed the keel and stem, I had obviously sanded to much of the false keel because when I came to install the stern post there was a significant gap between the strikes and the top edge of the post - but a little bit of filler sorted that out and a lesson was learnt for the future!!!! I laid the next couple of rows on the upper hull and then marked, lined and cut out the gun ports. On the starboard side I also cut out four viewing windows so the deck interior can be viewed at a later date. I then installed the lower gunwale, I relied heavily on the various measurements that were generously given to me by fellow builders that have completed the same build to be able to position this wale as it's not really supposed to be installed until after the galley is in place. I know that no two builds are the same but it should be pretty close (well hopefully anyway!!) The water line was marked on and using a tip that I picked up that long ago I can't remember where from, I glued some 0.5 x 0.5 styrene strip along the waterline to act as a boarder and a guide for the tiles, which was then painted black. I then painted a boarder of copper paint around the joint between the hull and the keel and then the process of copper plating began. I quickly ran out of tiles and it was whilst I was waiting for some more to arrive that the fire happened and I haven't done anything to her since. So that's the build pretty well up to date then, here's a picture of how she looks at the moment,

-
Hi, First of all thank you Anja for your well wishes (39 and getting old!!!) Well what a year it's been for me and my family, back in April the house next door had a fire which spread into ours and well you can guess the rest, it's taken us since then to get back on our feet as the saying goes but finally all of the building work has now been completed and we can now put the whole episode behind us......... Anyway I hope you have all been keeping well and I hope to get back to picking up my builds soon All the best
-
nealefoulds reacted to a post in a topic:
HMS Victory by xavjar - DeAgostini (AL)
-
nealefoulds reacted to a post in a topic:
HMS Victory by nealefoulds - DeAgostini - Scale 1:84 - Trafalgar Colors - First wooden ship build
-
Question on false seizing / zip seizing
xavjar replied to slagoon's topic in Masting, rigging and sails
Hi, I had the same issue whilst building my HM Pickle I tried different types of CA and lubricants and as you say the seizing just shredded when I tried to remove it from the rod. In the end I found that the best glue to use was clear fabric glue, run a small amount down the thread before wrapping it around the rod - wipe of the excess and leave to dry. It comes of the rod easily and is sets nice and strong. Hope this is of some use to you Cheers Phil, -
Hi, Your planking looks great mate, really nice work. Cheers Phil,
- 62 replies
-
- 1
-
-
- victory
- deagostini
- (and 1 more)
-
Hi, Thank you for your kind words David, I quite pleased with how things are going at the moment, early days I know but I’m determined to do a decent job!!!! Cheers, Phil
-
xavjar reacted to a post in a topic:
HMS Victory by xavjar - DeAgostini (AL)
-
What is your favorite hand tool(s)??
xavjar replied to Modeler12's topic in Modeling tools and Workshop Equipment
I took your advise and had a go at this...... it worked great, I now have a razzor sharpe chisels - thank you Cheers Phil, -
xavjar reacted to a post in a topic:
What is your favorite hand tool(s)??
-
xavjar reacted to a post in a topic:
Le Soleil Royal by jack.aubrey - FINISHED - De Agostini - Scale 1:70
-
Hi, I'm afraid I don't speak Italian but the pictures in your other log (via the link) certainly tell the story of an interesting and well built vessel. I'll look forward to the translated version on here. Cheers Phil,
-
Hi, Great advise on the water line marker.....er thingy..... thanks for sharing your design, I'm following your log with great interest but the down side to me doing this is that I now know that I have 2500+ copper tiles to install!!!!! never mind, Enjoy your build mate, Phil,
-
xavjar reacted to a post in a topic:
HMS Victory by Shipyard sid - FINISHED - Caldercraft
-
xavjar reacted to a post in a topic:
HMS Victory by Shipyard sid - FINISHED - Caldercraft
-
Thank you for your comments Neal, It's good to be able to "bounce" ideas of another builder who's doing the same build as me. Enjoy your build mate, take care Phil,
-
xavjar reacted to a post in a topic:
HMS Victory by xavjar - DeAgostini (AL)
-
nealefoulds reacted to a post in a topic:
HMS Victory by nealefoulds - DeAgostini - Scale 1:84 - Trafalgar Colors - First wooden ship build
-
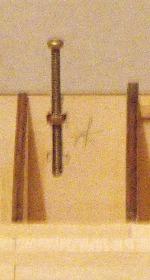
At this point I had a change of heart, I was going to display the finished build on a cradle but instead I've opted for the "free standing" look. So whilst I was still able to do so I installed the bolts onto the false keel, which I'll use later to fasten the build onto it's base, Well thats all for now, I'll up date again in a little while. Thanks for dropping in, enjoy your builds, Cheers Phil,

-
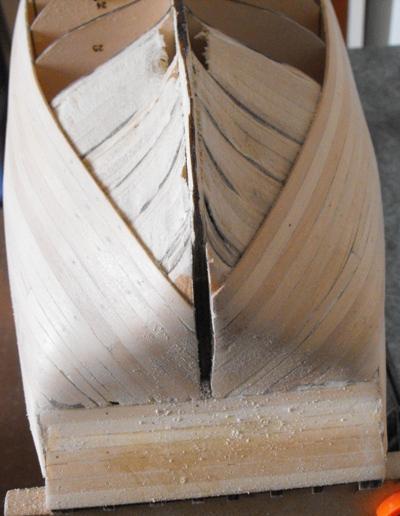
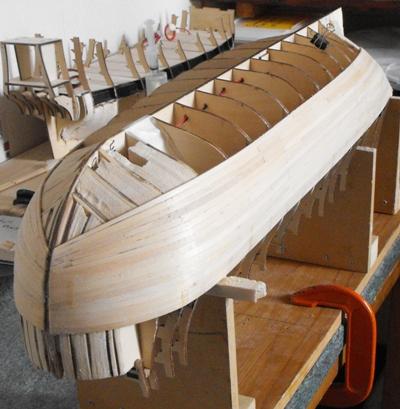
Hi everyone, Just a quick up date, I continued with the planking of the lower hull until I reached about the half way stage (issue 36), I found the stern area a bit hard going at first but "got the hang of it" after a while. It will still need a light sanding down to get rid of the pencil marks but I'll do that later on here's a couple of pics.....

-
That style of planking would look very nice on a natural hull...... thanks for the links, I really must have a propper look around this site one day!!!!! Cheers Phil,
- 62 replies
-
- 1
-
-
- victory
- deagostini
- (and 1 more)
-
xavjar reacted to a post in a topic:
HMS Victory by nealefoulds - DeAgostini - Scale 1:84 - Trafalgar Colors - First wooden ship build
-
nealefoulds reacted to a post in a topic:
HMS Victory by nealefoulds - DeAgostini - Scale 1:84 - Trafalgar Colors - First wooden ship build
-
Hi, Hi perhaps I can shed a bit of light on this subject? In the early weeks of the MS forum there was a lot of talk regarding rib 15 some people experienced this rib to lean out to much however not every one experienced this as some people had no problems with it. I believe that is why Tony’s (Tomick) build doesn’t contain any details regarding this. If you look at the later pages (21 +) of the Build Discussions on HMS Victory topic you’ll find various different ways in which builders tackled this problem. The method I followed is post #7 just click on the link below and scroll down to it http://forum.model-space.co.uk/default.aspx?g=posts&t=1310 I hope this helps you out a bit Cheers Phil,
-
Hi, You're certainly cracking on with the planking pal, It's looking great, You'll have to let me know how the mouse sander works out for you in regards to sanding down the hull I was looking at getting one of those my self for the same task, I'm sanding by hand as I go at the moment and I've got the blisters to prove it!!!!!! Enjoy your build mate, Phil,
- 62 replies
-
- 1
-
-
- victory
- deagostini
- (and 1 more)
-
Hi, I'm sorry I missed that program it sounds as though it was a good watch, I'll have to keep an eye out for it you never know it might get repeated. Enjoy your build mate, I'll look forward to your next update, Cheers Phil,.