Stavrogin
-
Posts
30 -
Joined
-
Last visited
Content Type
Profiles
Forums
Gallery
Events
Everything posted by Stavrogin
-
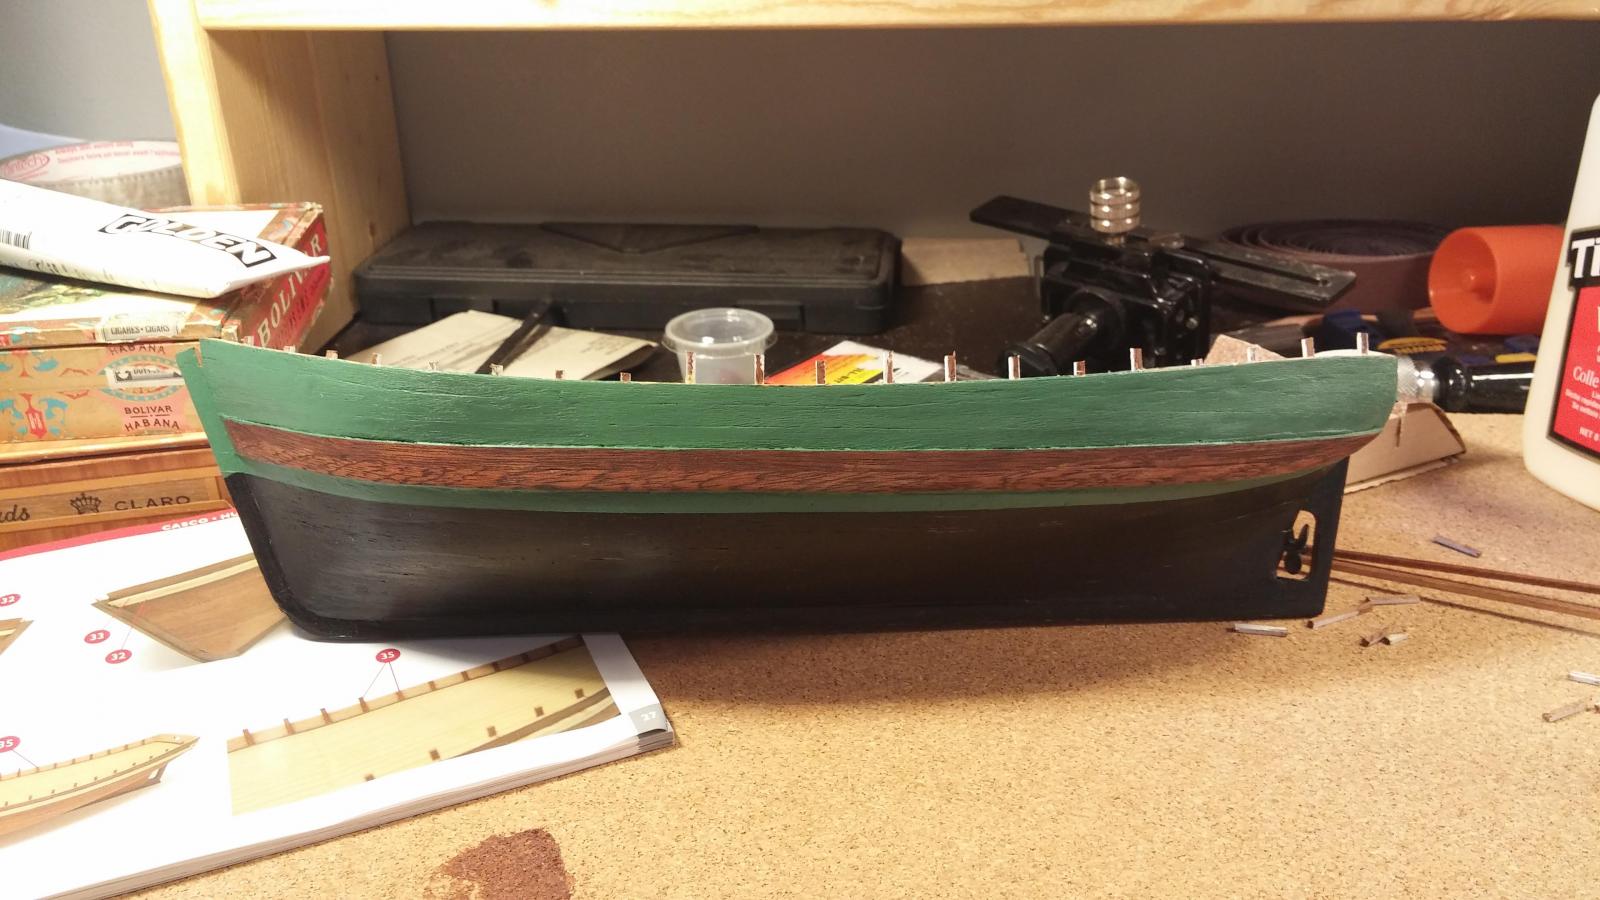
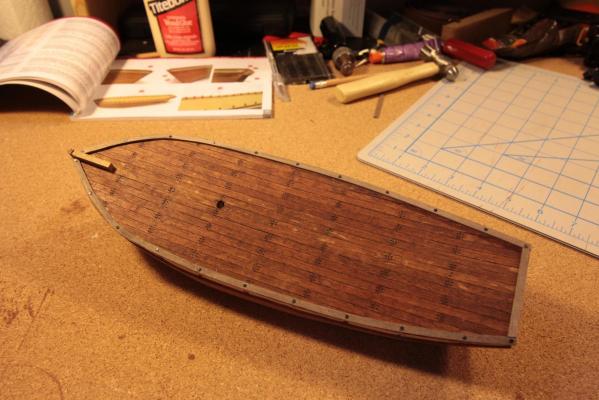
 Hi again MSW, Been busy but want to log my progress again. I've begun painting the hull and most recently glued some timbers inside the bulwarks. They're still rough but will be sanded flush next. The green colour on the hull came out slightly more "minty" than i would have liked but the result isn't bad and I expect it will look good with the red I plan to add. Trying to research how to get my water lines correct for the next section and any pointers are appreciated. Took some quick photos:
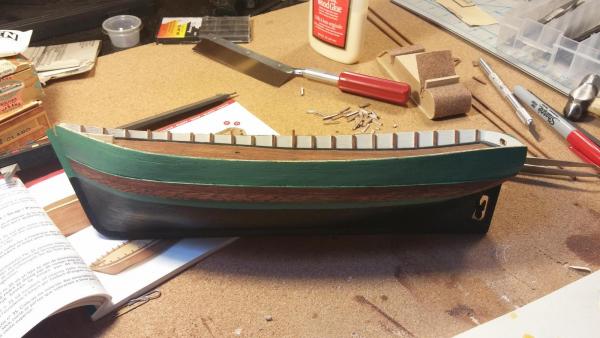

- 35 replies
-
- 1
-

-
- Constructo
- Gjoa
- (and 1 more)
-
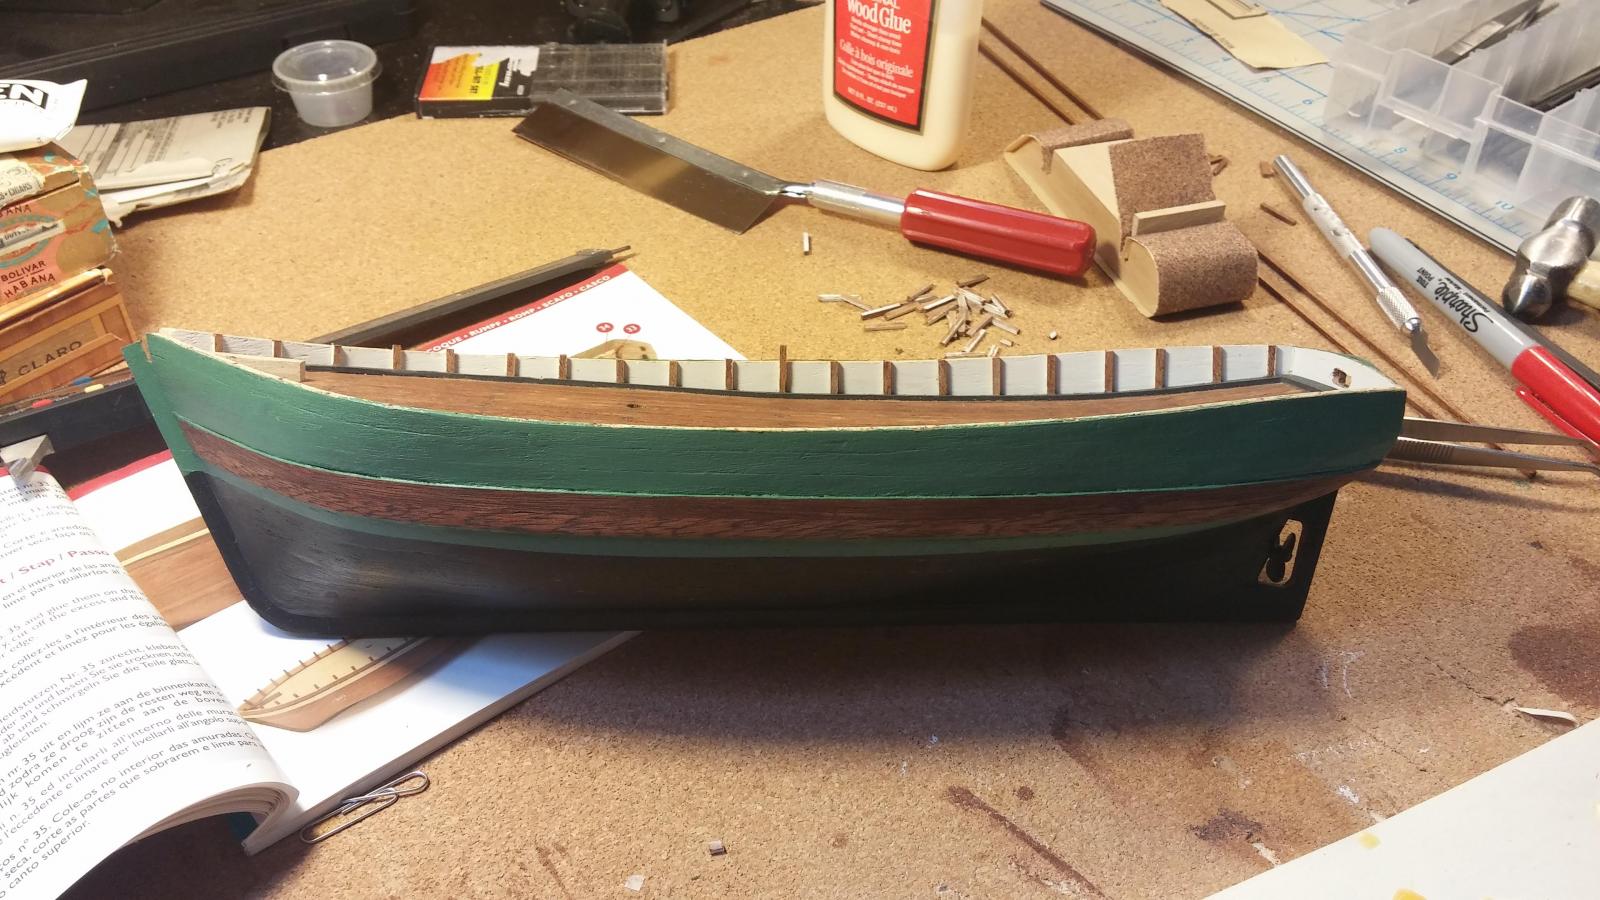
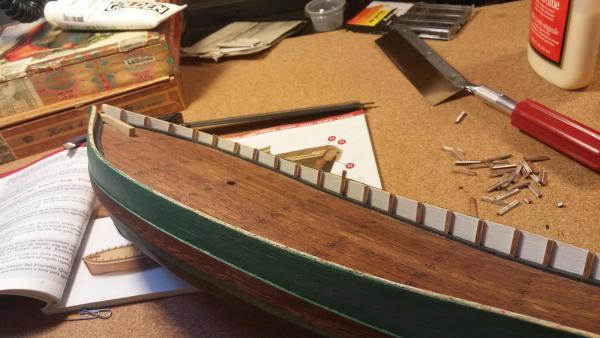
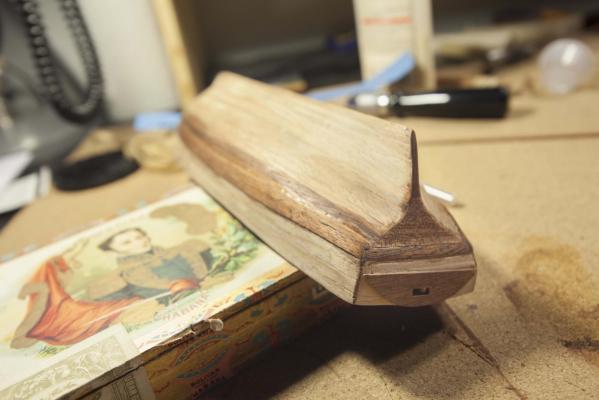
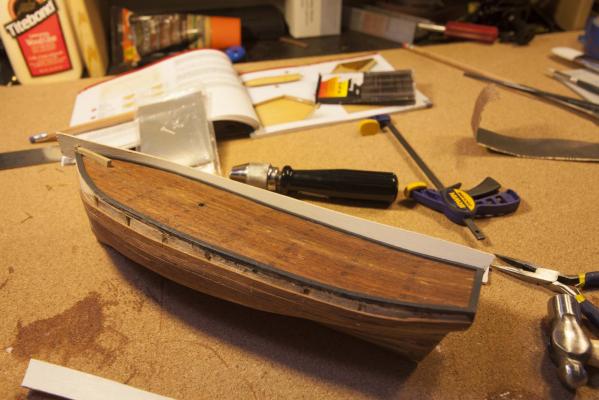
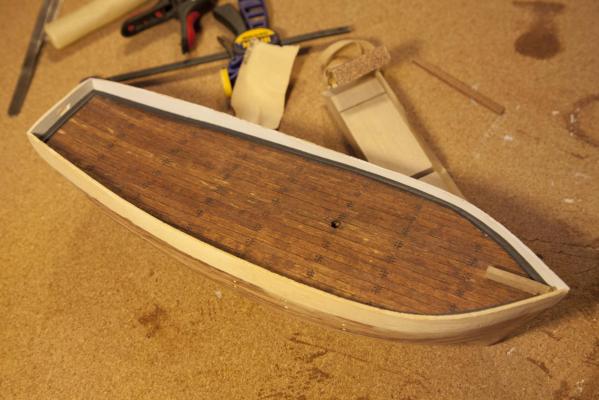
It has been a while, but I am still building (albeit more slowly now). Not the prettiest/finest work (nor photography), but I expect that the hull will look fine after painting. Most recently I've planked the bulwarks with some dull veneers that were included in my kit, laid and stained two more planks on top of each side that will be exposed when the rest of the hull is painted, and tacked on a little crescent for the transom. A lot of this is off Constructo's intended path so I will be customizing a few pieces next before attaching the keel. edit: below is not the most pleasing angle for my slanted transom piece, but unfortunately that was the result of my sanding the backside flush. It will all be green above the stained plank, and overall I'm really not too displeased with the area. It looks much better right side up! Here are some updated shots: Thanks for reading.

-
Hi Darrell, very cool to see that we are building the same ship. It has been a great first experience for me so far, and as a beginner I think you will be pleased with the level of complexity. Lots of challenges, but nothing infuriating. Disclaimer: I've strayed from Constructo's plans a fair bit, and I'm also a beginner, so my build log is far from gospel. Some early advice: I would really take your time preparing for the planking. I'm opting to paint my model so my mistakes will be hidden, but if you want to show off your woodworking there are a few things to consider. First, Constructo's booklet will have you nailing your planks to hold them in place while they are glued down, but I found the nails too hard to remove afterward. I found elastic bands and a clever combinations of clamps did the trick, but I'm really not sure what best practice would have been (or is). Secondly, really plan out your planking. Nigel (above) shared a great video with me earlier, and here it is: http://modelshipworld.com/index.php/topic/8131-hm-cutter-cheerful-1806-148-scale-by-chuck/page-22 Good luck with your build and I look forward to following along,
-
That was really great Nigel, thanks. Makes me want to start a new build and go for gold! (but I won't because I'm loving this little rough boat)
- 35 replies
-
- 1
-
-
- Constructo
- Gjoa
- (and 1 more)
-
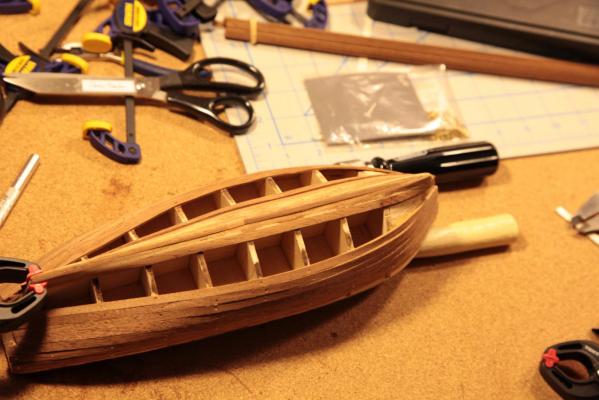
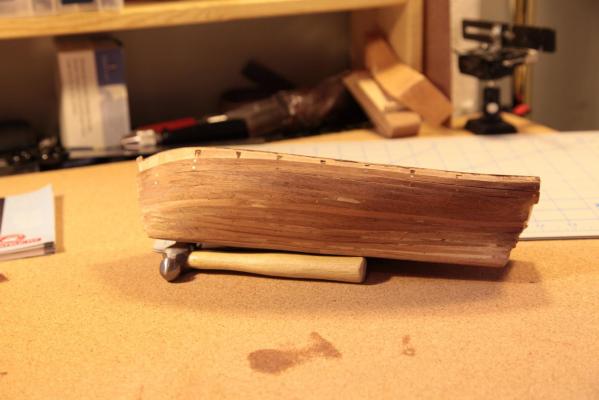
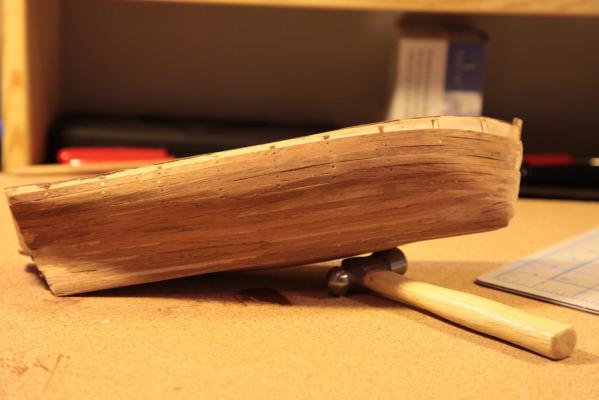
Hi MSW, it has been a busy while for me, but I'm still at it. Progress: Got the bulwarks up with the painting done (stringers and bulwarks; by hand). I've sanded down the first planking and overall I'm fairly pleased with the results although there are lots of imperfections. Namely, the bulwarks get a tad low toward the bow, the transom is a bit ajar, and the hull has been faired mostly by eye (it's decent but not great). pictures below. Question: I'm having a very hard time clamping things (planks/bulwarks) at the bow. I have a variety of clamps but nothing seems to do the trick. I've made some rough brackets but even those only do a mediocre job. Where possible I've found rubber bands to be my best but I cant help wonder what others do. Any advice? I've scoured some build logs but it doesn't seem to be such an issue for most. Appreciate it. Next: Second planking. Yikes.

- 35 replies
-
- 1
-
-
- Constructo
- Gjoa
- (and 1 more)
-
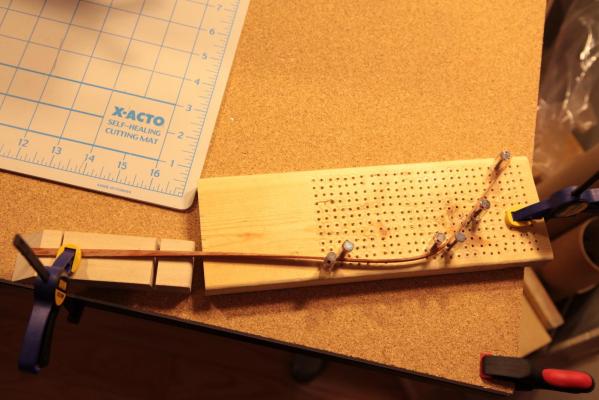
Put the stringers on. I just soaked the pieces/used a jig to get this bend (the wood was manzonia this time), and it wasn't easy. Luckily things worked out even though I had to use nails to hold it down (with some bar clamps). Photo below, but I'm actually slightly further ahead at this point. I've filed the nail heads down and will be painting over the stringers next. Just doing some research into painting.
- 35 replies
-
- 2
-
-
- Constructo
- Gjoa
- (and 1 more)
-
Looks amazing Nigel! I fatigued myself with my first planking and overlooked a lot of crucial calculations. A good lesson, and nothing the second planking can't hide luckily. Look forward to more progress here.
- 270 replies
-
- 1
-
-
- red dragon
- artesania latina
- (and 1 more)
-
Just finished my first planking. Didn't go very smoothly, but I am going to press ahead having learned from my mistakes. I am confident that if I spend the time forming the hull I will get good results with the second planking (veneers). A couple of notes on my process/where I went wrong: I glued the most straightforward planks (the top) prematurely, and created a 4 plank band with no tapering. Also, see my previous post about using the nails to pin while gluing as per Constructo's instructions. Beginners beware: this is not sound advice if you have access to the proper clamps. I then laid temporary battens and did some basic calculations for the next bands. However, I overlooked the garboard being double the width of a normal plank so after I laid the first band (3 planks here, probably should have kept it consistent) I was left with an awkward space. At this point I just broke some rules and shaped a few correction planks to fill the gaps. Then I lathered with some wood filler and gave it a rough sand to make it more presentable. Some general notes: I think I tired myself out with my process all while not having spent the time up front to plan. I soaked every plank and either pinned it right away or if the bend was significant (or if I soaked 2 at once) I'd put one in the jig. I had a hard time getting the mukali to bend perfectly at times, so unfortunately there was some space between some of my filler blocks and the planks. I also discovered my clamping had snapped some small bits at the bow, but being lazy I just used wood filler and I'm expecting it to sand down fine. I will research some tips for clamping these tough spots because I found it really tough. Last: I added a bit of height (1.5 mm) to my false keel because constructo's instructions seem to have wanted me to plank to a sharper point than the false keel itself (note: I did freehand a bearding line). I expect to sand this down to near nothing, but I will need some new tricks for this fairing while I shape the hull. Hope none of this is too taboo. Thanks for reading. Any help/advice is appreciated. Pics below.
- 35 replies
-
- 3
-
-
- Constructo
- Gjoa
- (and 1 more)
-
Looking great Nigel. My first planking is taking me forever: garboard next then 3 final planks on each side. I will use your share of the wood filler because it doesn't look like you will need it!
- 270 replies
-
- 1
-
-
- red dragon
- artesania latina
- (and 1 more)
-
Planking update: So far smooth sailing. I set up a simple jig and just went for the first 4 on each side without tapering. I did some simple bevels while I faired the hull, but overall very simple stuff and I think the results are decent. Going to plan out the remaining planks and do some minor hull shaping. One gripe: I foolishly followed Constructo's instructions into a bit of a tight spot. Constructo provides a very basic tool set with their kits so in lieu of clamping their instructions recommend using nails to tac the planks in place while the glue dries and then remove them. Of course, the nails are near impossible to remove once the glue has dried. I (mostly) have the proper clamps/techniques now but the top 2 rows were nailed. My solution has been to file them down flush with the planks, and so far it seems tenable. Most of the extensive sanding will happen below that line, but I'll also need to match the bulwarks up top. Last note: I will be doing the second planking with veneer strips.
- 35 replies
-
- 1
-
-
- Constructo
- Gjoa
- (and 1 more)
-
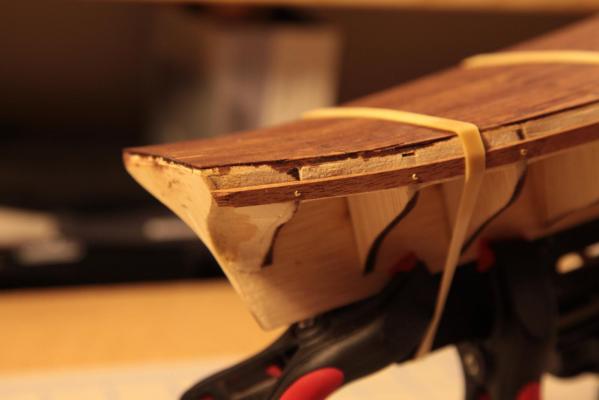
Thanks Nigel. That will be my plan of attack for the stain. Luckily 90% of the really rough patches will be hidden once the model is finished. Part 7: I'm starting to fair the hull now. I soaked my first plank, and I was planning on using this as a test batten for the whole side, but the wood (sapele) wasn't very compliant. It actually snapped right at the transom when I tried to pin down a slight twist. I think it's salvageable for the spot it's in with a little help from the wood filler, so I haven't moved it. Going forward I'm planning to pin a plank, make sure it is lying correctly on the bulkheads, then move along/dry pin the next plank. This is essentially the fairing process at this point, correct? Once I'm 4 planks (20mm down) I plan to treat the remainder of the hull in bands and calculate what tapering is required (as per this guide: http://modelshipworldforum.com/resources/Framing_and_Planking/plankingprojectbeginners.pdf).Want to make sure I'm not missing any huge concepts here. pics: Note (to self?): The instructions call for the space left above the fitted plank to be saved for the bulwarks.
- 35 replies
-
- 5
-
-
- Constructo
- Gjoa
- (and 1 more)
-
Part 6: Help! I picked out a stain for my deck, which I was quite happy with but it hasn't taken to some of the planks very well. It's blotchy and where it didn't take there are just light spots that look like scratches. I suppose my fine sanding wasn't fine enough, and perhaps I shouldn't have overlooked a pre-stain treatment. Looking back: the troublesome plank was my first, and was laid on top of some ugly nail heads (haha). Maybe I was just sloppy with my glue, but to my eye I had sanded it all off. All that being said I'm not totally displeased with the rest of the stain. I think the colour is quite nice and it makes the details pop. Further, a lot of the worst plank will be covered when I get to the fixings up there & beyond. Absolutely a live and learn situation. What could I have done better? Is there anything I can do to improve the result at this point? Note: I haven't varnished yet. Thanks all, pics below,
- 35 replies
-
- 3
-
-
- Constructo
- Gjoa
- (and 1 more)
-
Haha, pressure is on Guru. Just kidding. I know from another log that this kit gets right into the planking. Look forward to it (and I'll stop bogging down your log now),
-
Nice start Guru. Like the build stand, and look forward to seeing the deck/hull take shape. Looks tough. Please share your plank bending techniques!
-
Hi John, Nigel, thanks for the photos. I have been looking for all that I can get. Here is a nice comprehensive album I've found: http://www.pbase.com/maritimmodellklubb/gjoa_dekk&page=1 I do plan to paint my hull the way it appears in John's photos, but I'm a bit apprehensive about it at this point. Will need to really slow down and do more research. Tips are appreciated. For the deck I'm thinking I'd like to darken it slightly and add a tiny bit of red, but there is some darker detail in the bulwark supports that I don't want to clash with. Just doing a quick photo search and it may not be such a problem: http://img4.hostingpics.net/pics/391900DSC06658.jpg Last: I learned recently that MS made a Gjoa kit back in the 50s (?), and found some really great hi res photos of their plans and a build log on flickr. They also have some great photos courtesy the Smithsonian of when the Gjoa was idling in San Francisco. I imagine they are taken from William Baker's restoration plans. Here is the link: https://www.flickr.com/photos/31561521@N04/8207809894/in/photostream/
- 35 replies
-
- 1
-
-
- Constructo
- Gjoa
- (and 1 more)
-
Look forward to following this one Felipe. All the best,
-
I'm actually planning on just taking the heads off of some .5 mm nails and (hopefully) getting the ends flat and flush with the deck. I wasn't planning to do this in my prep so I really have no idea what is or isn't done here. Essentially my build probably won't be a very good case study if you're wanting to do treenails proper, haha. More of an experiment. I have been playing around with some stains, and re the rest of the nails: I actually didn't punch them. I haven't got any sort of nail set and my clamp probably couldn't withstand a proper strike so what I did was just carefully file the rounded heads down as best I could and plank over that. It all worked out. Thanks again for your help with this, and I look forward to some photos of your build,
-
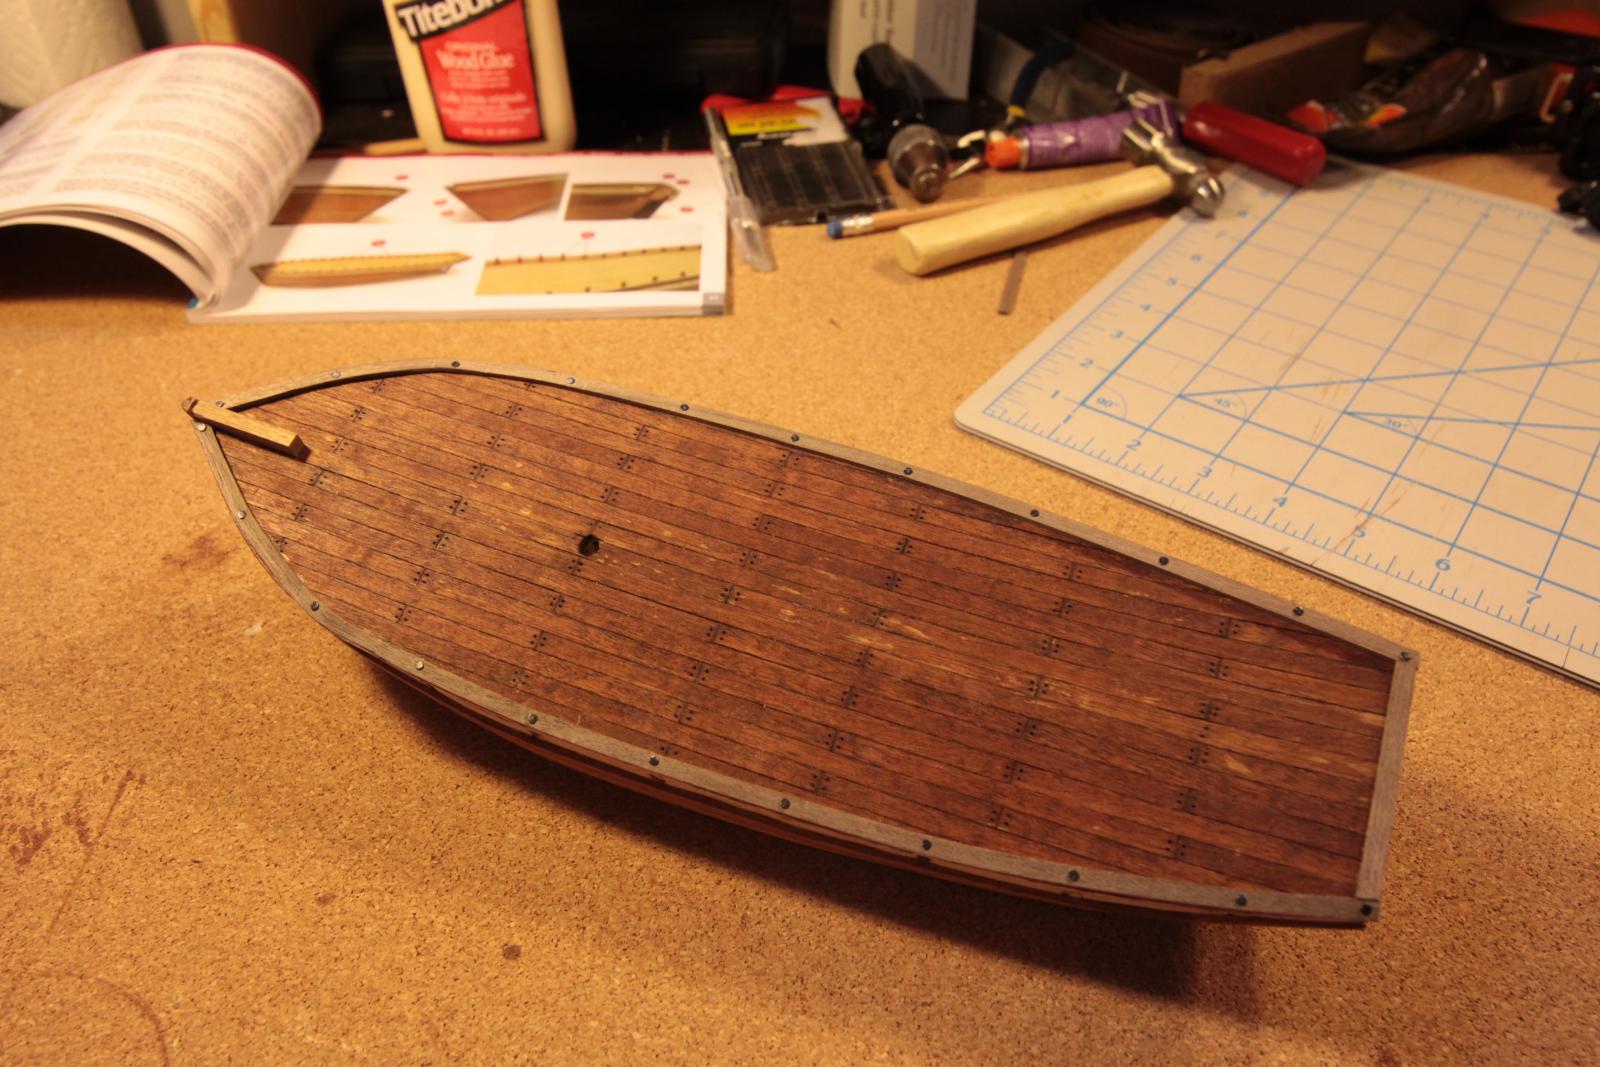
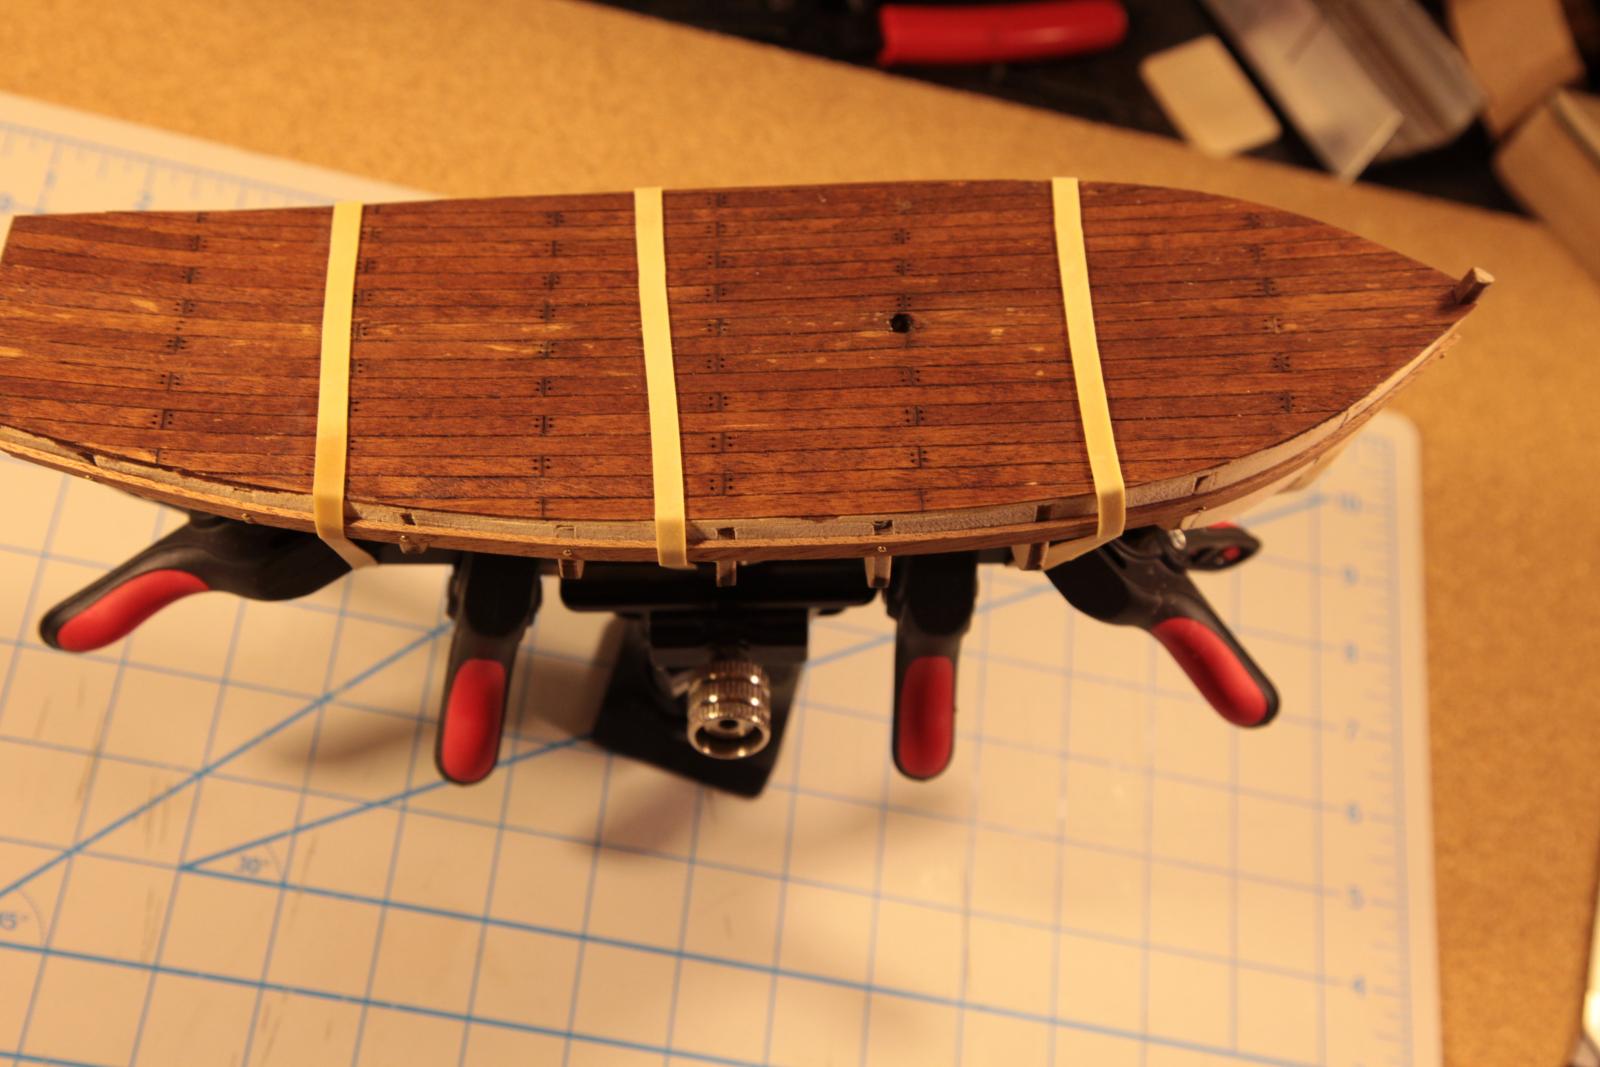
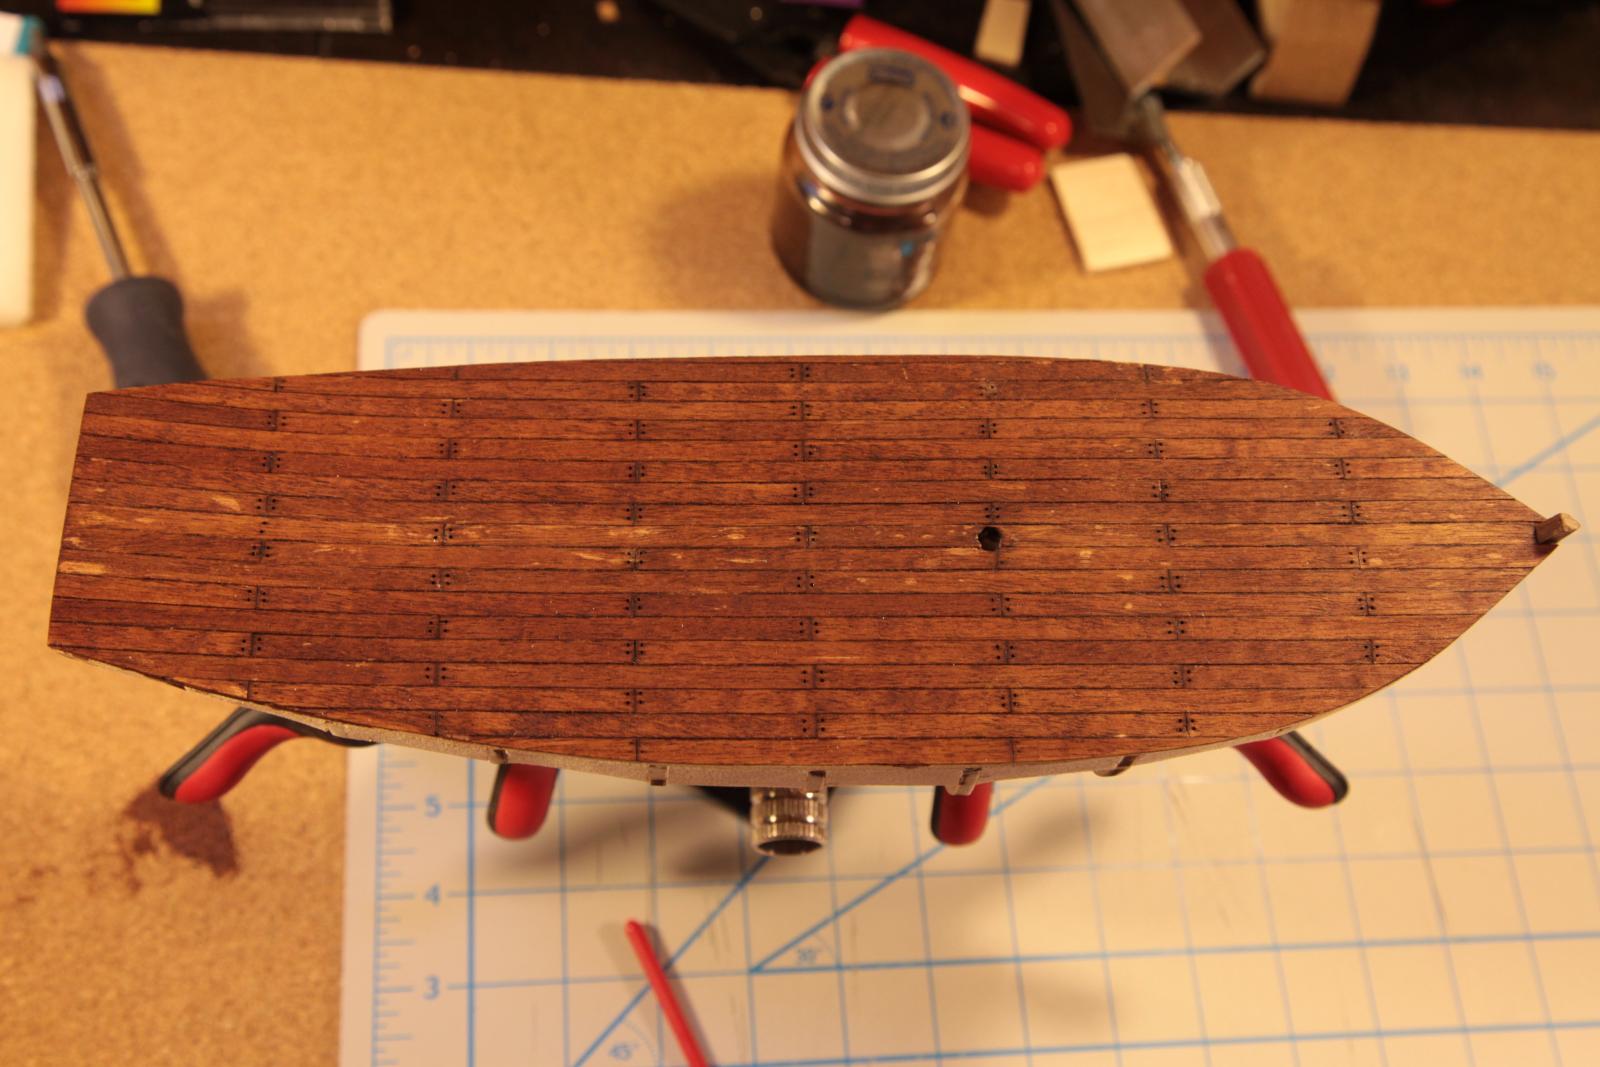
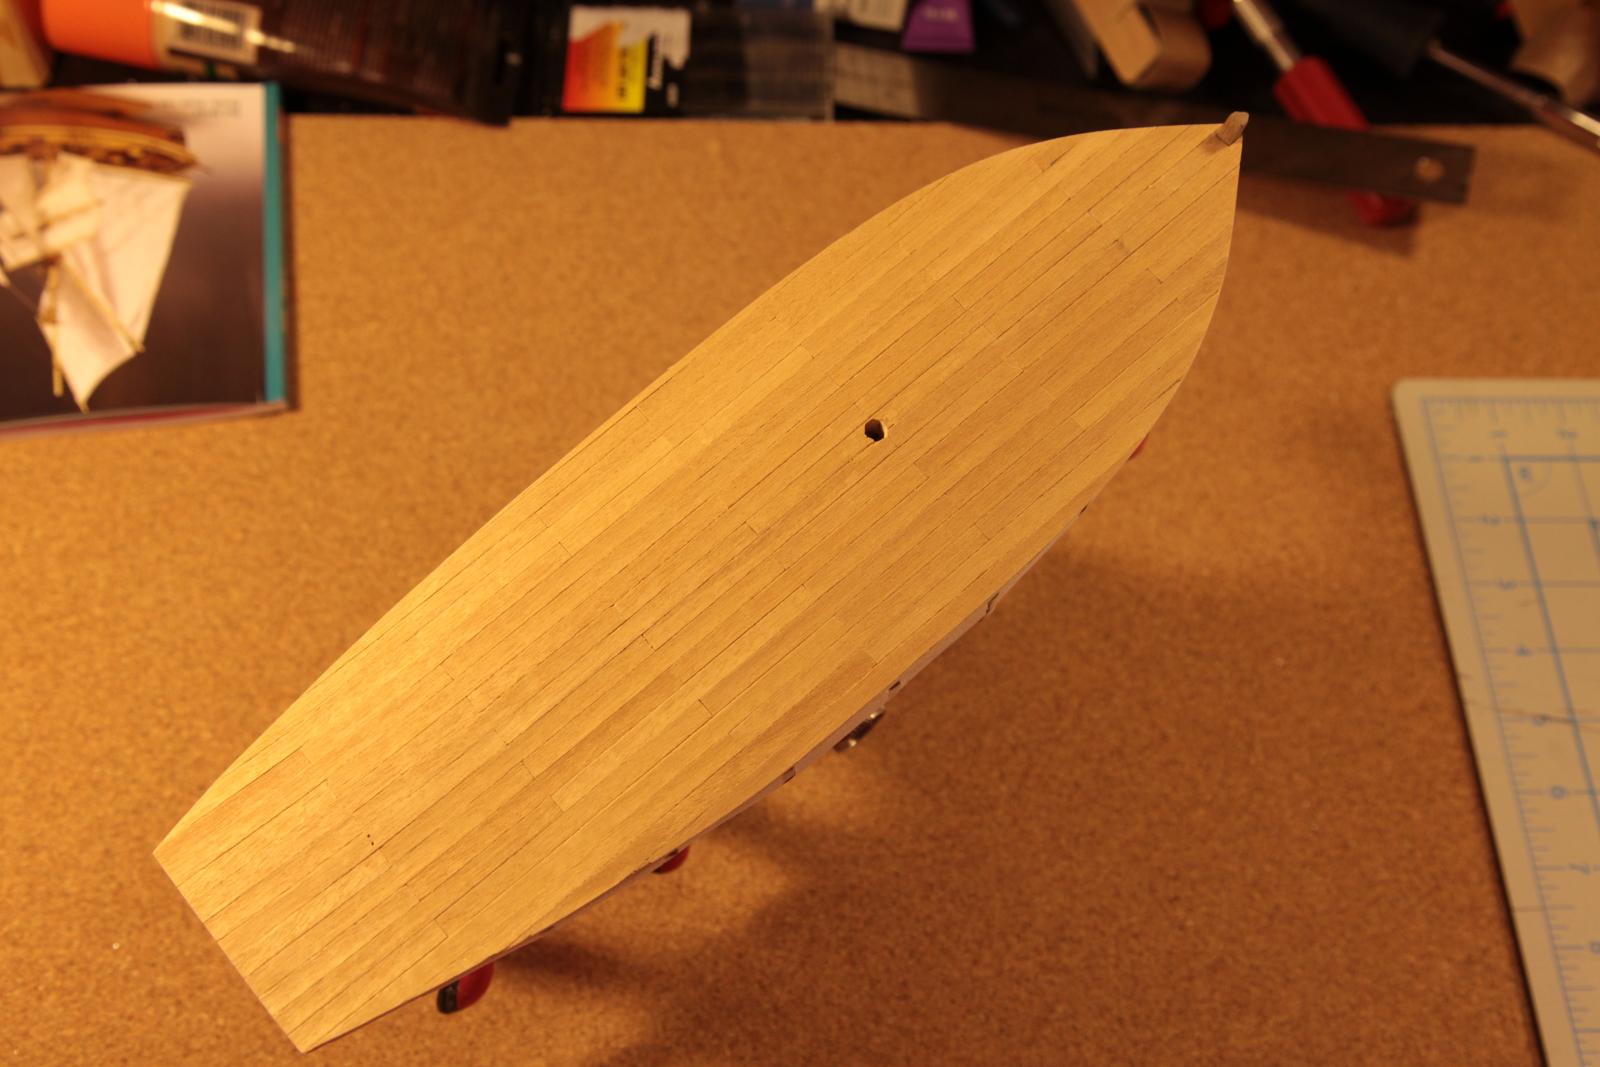
Planked my first deck. I'm feeling good about it, but I'm sure there is a lot of room for improvement. Feedback is welcome. Sanding it down will be next.

- 35 replies
-
- 4
-
-
- Constructo
- Gjoa
- (and 1 more)
-
Yes, treenail was the word I was looking for. I plan to dab each in a bit of adhesive and then sit it in the balsa. That should work, right? And yes, I was a bit overeager with by deck planking last night. I cut some down to size then couldn't resist gluing some on. What is the best way to countersink such small nails? Last, thanks for the sanding tip. Wasn't sure whether that was kosher on the deck or not. I plan to stain but I am a bit worried about glue up there as well. Thanks again Nigel. cheers,
-
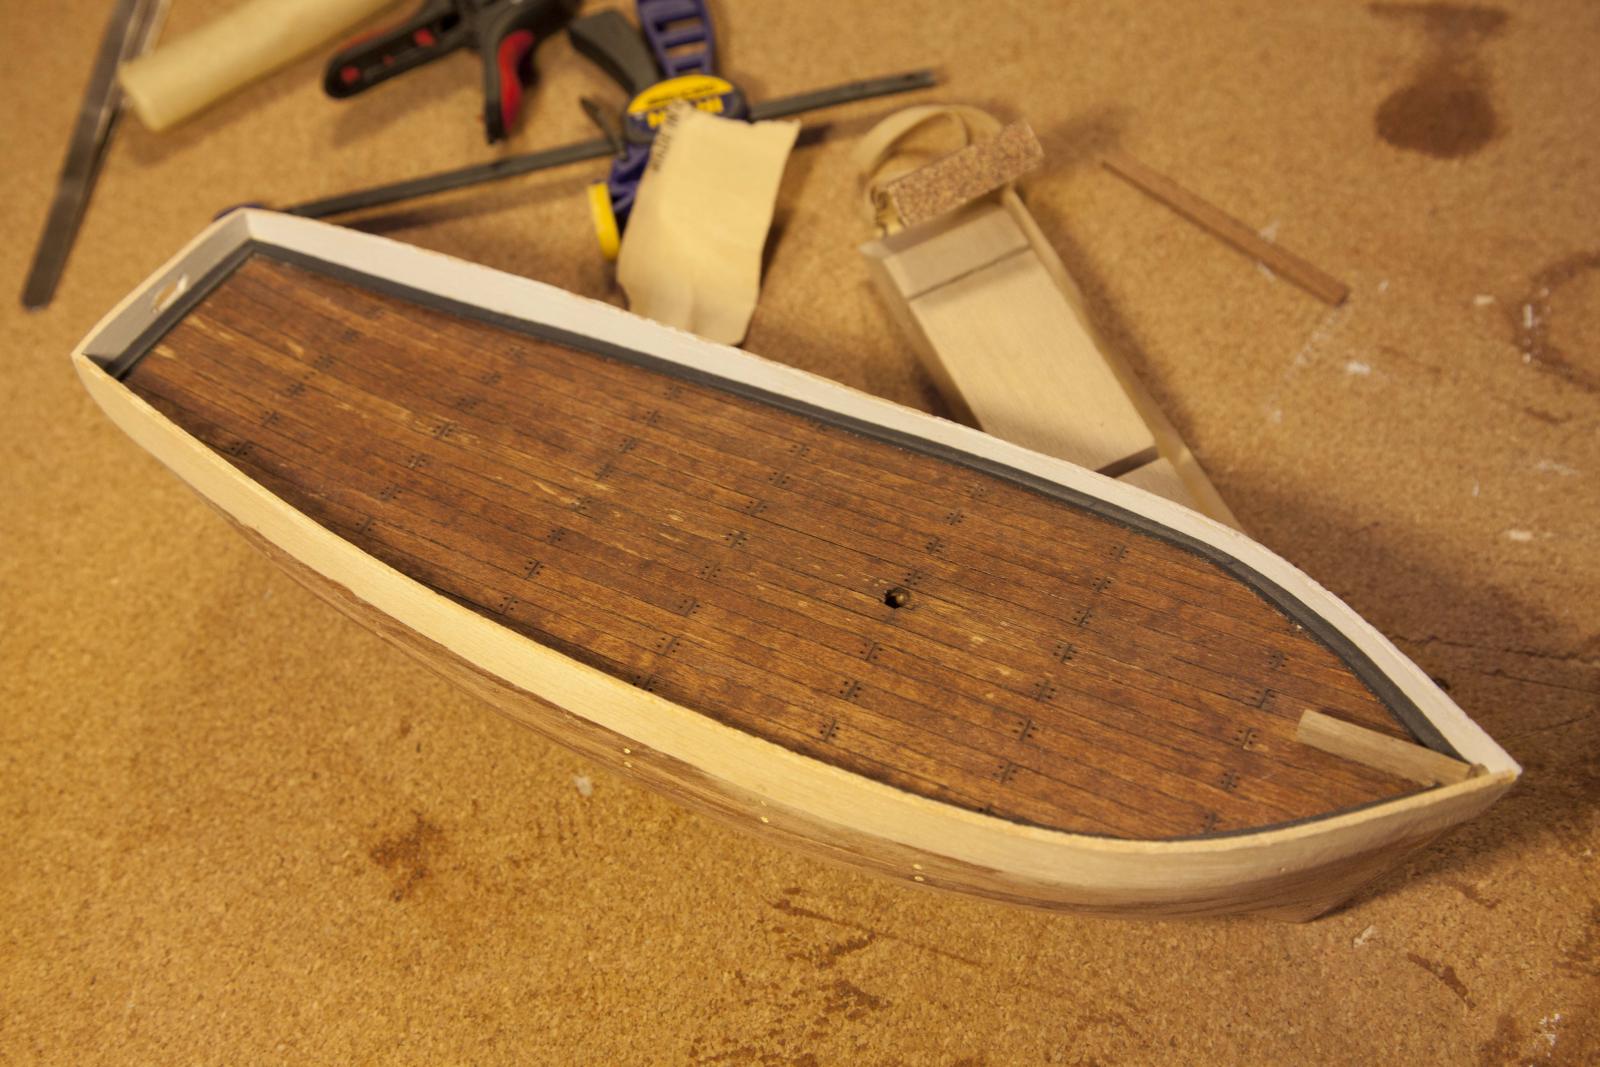
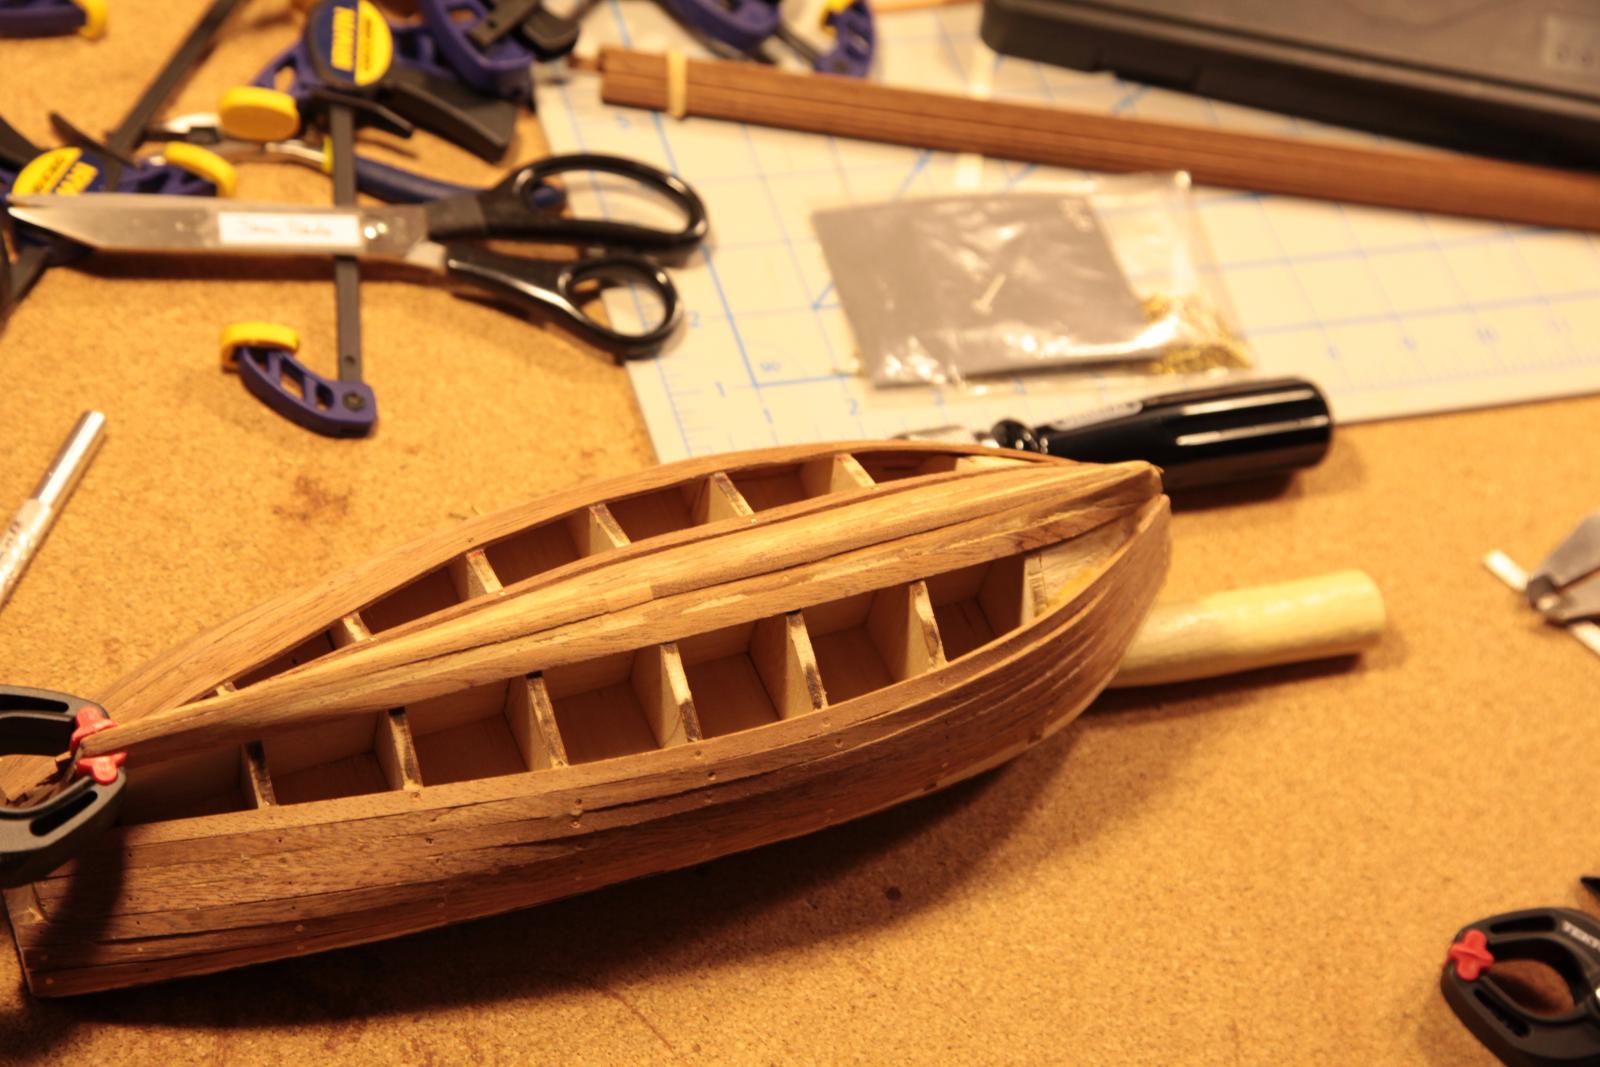
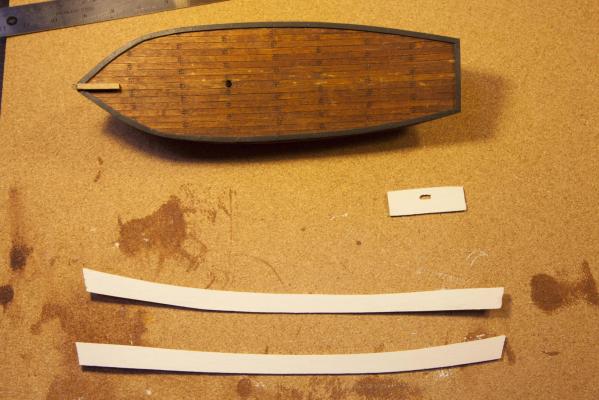
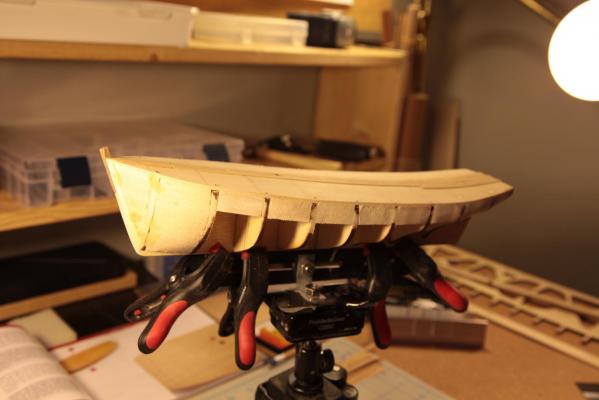
Part 4: I've started planking the deck, and it's proving to be a bit tough. I didn't remove the tacks from the deck so my middle planks are pretty wonky. What is best practice for smoothing these things? And again: the 1cm balsa in between my bulkheads is there primarily to sink some decorative nails into/bolster the bulwark gluing. I suppose it will keep the form too. Anyone want to chime in as to whether this was worth while? Here are the pics - please don't mind the rough patch around the mast support :
- 35 replies
-
- 2
-
-
- Constructo
- Gjoa
- (and 1 more)
-
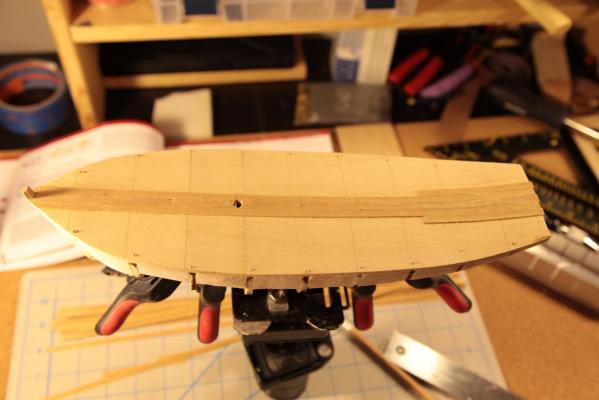
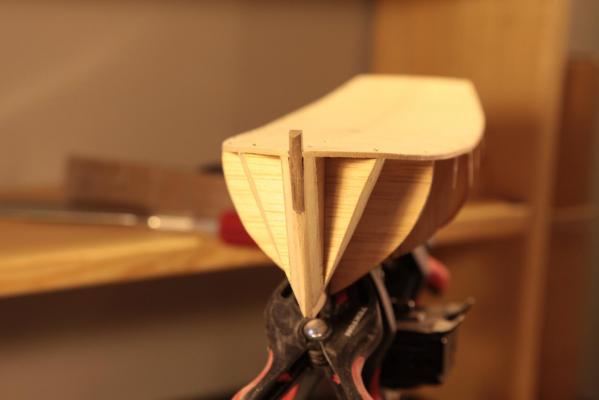
Progress: bow filler blocks are sanded. That was a lot of sanding, but I don't think I'm done with the balsa yet. I've decided to do things the hard way and cut my deck planks down. I'm also planning to cut the heads off of some .5 mm black nails and use these on the planks (just for the look). Sounds tedious, and it will be, but I'm looking forward to it. I will be using 10mm of balsa in each frame just so that the nails will have something to sit in, and also to get some solid surface area for the bulwarks. Simon
- 35 replies
-
- 3
-
-
- Constructo
- Gjoa
- (and 1 more)
-
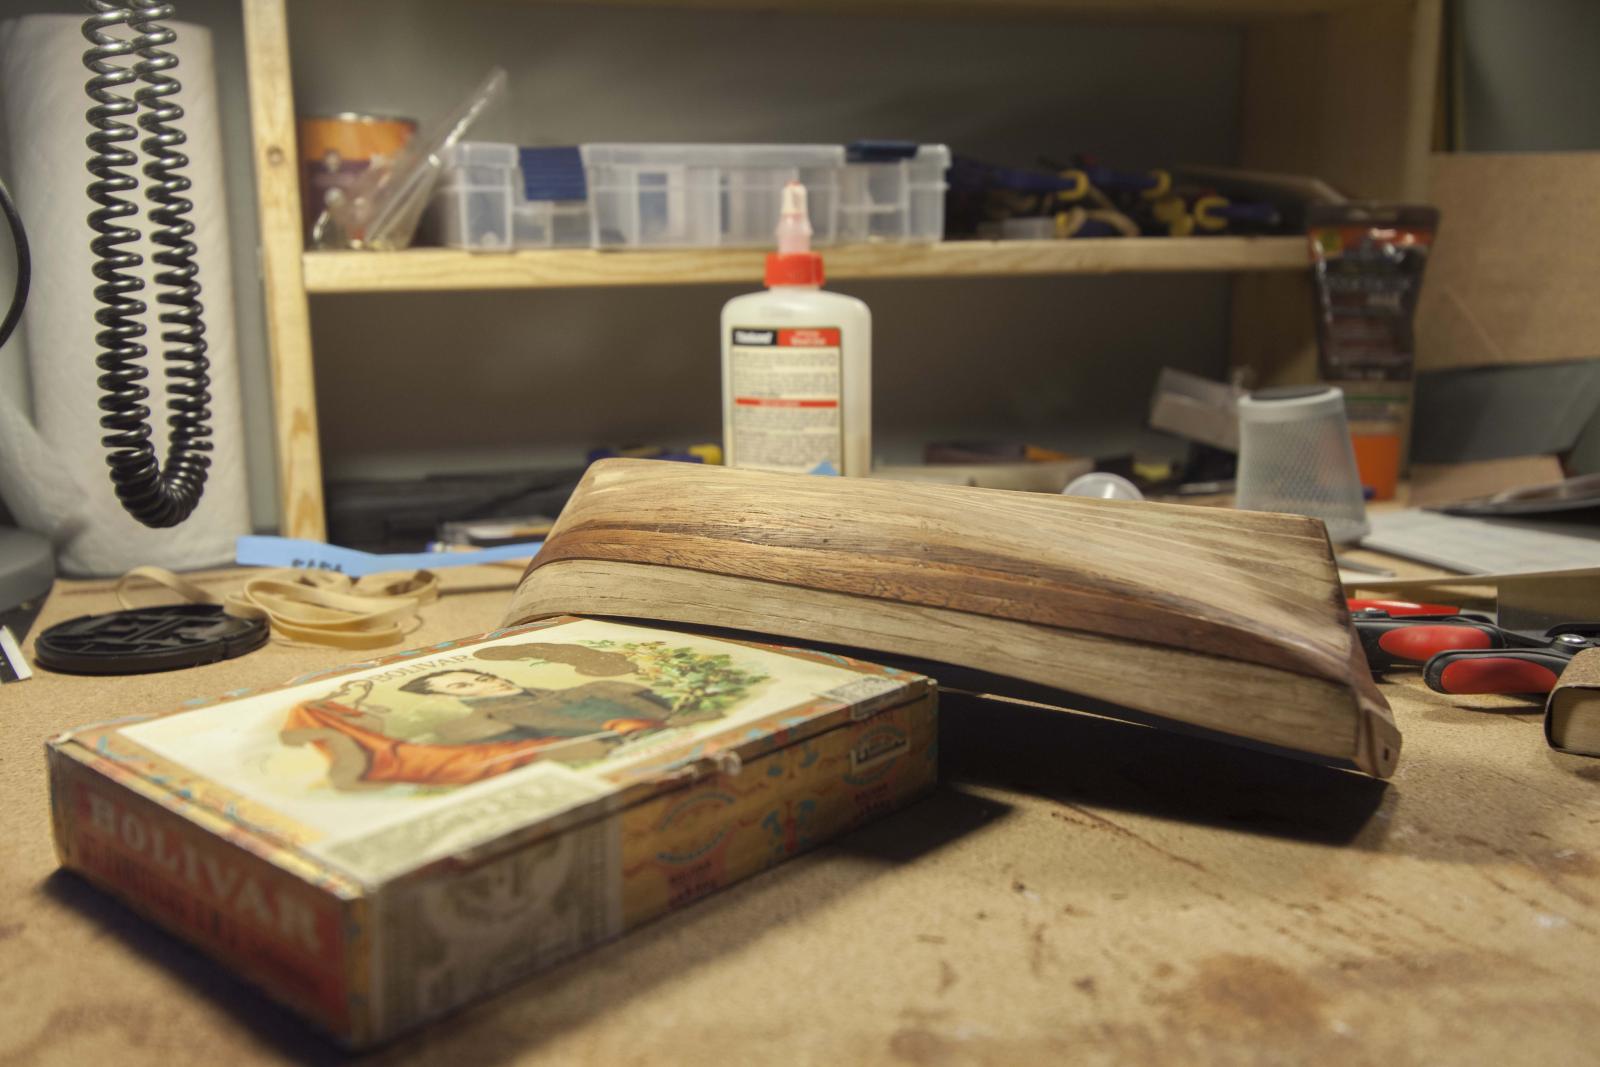
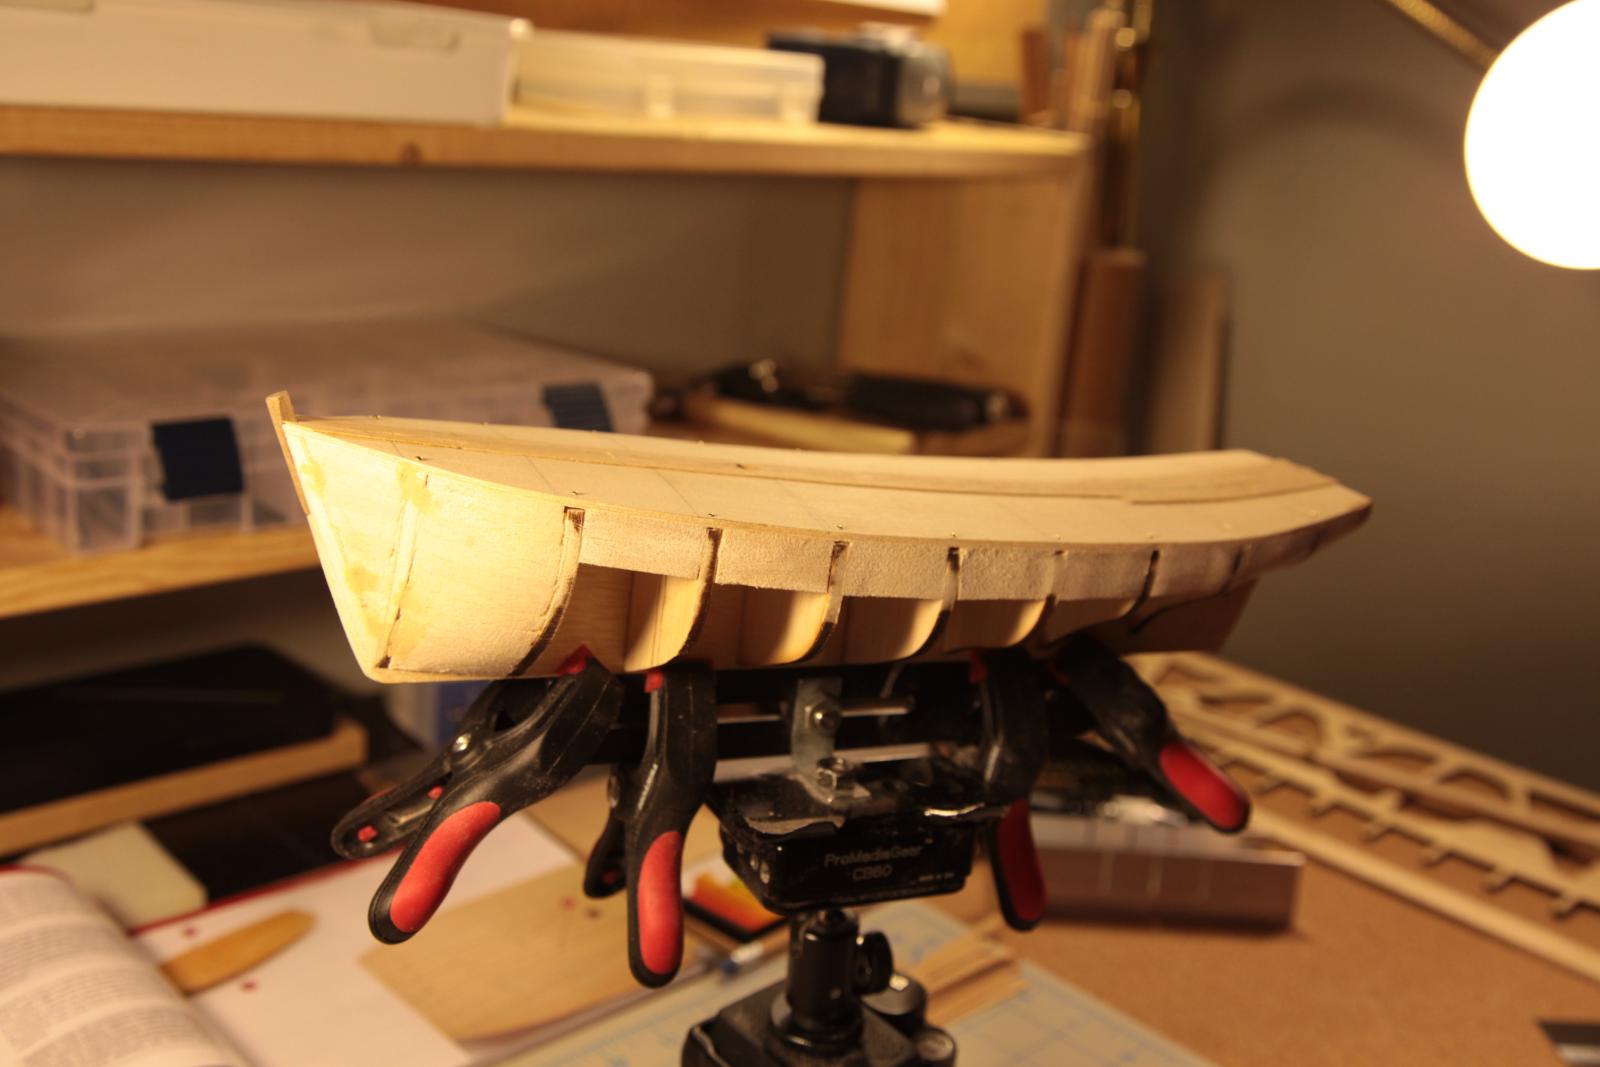
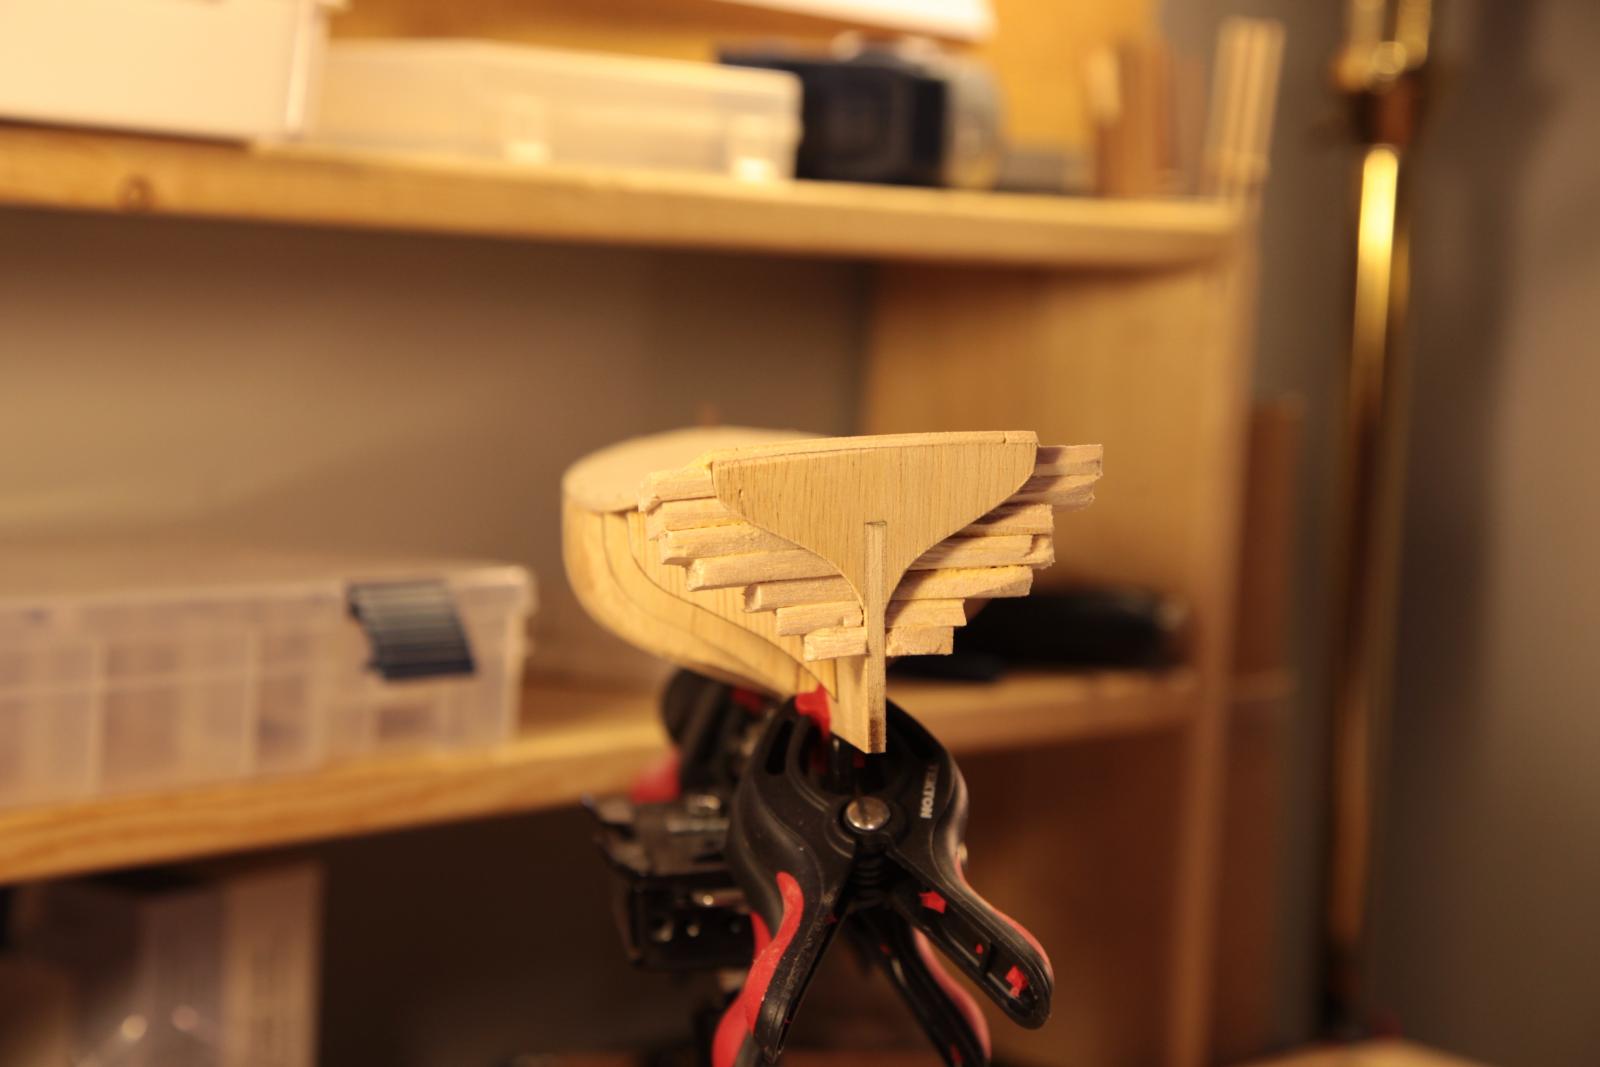
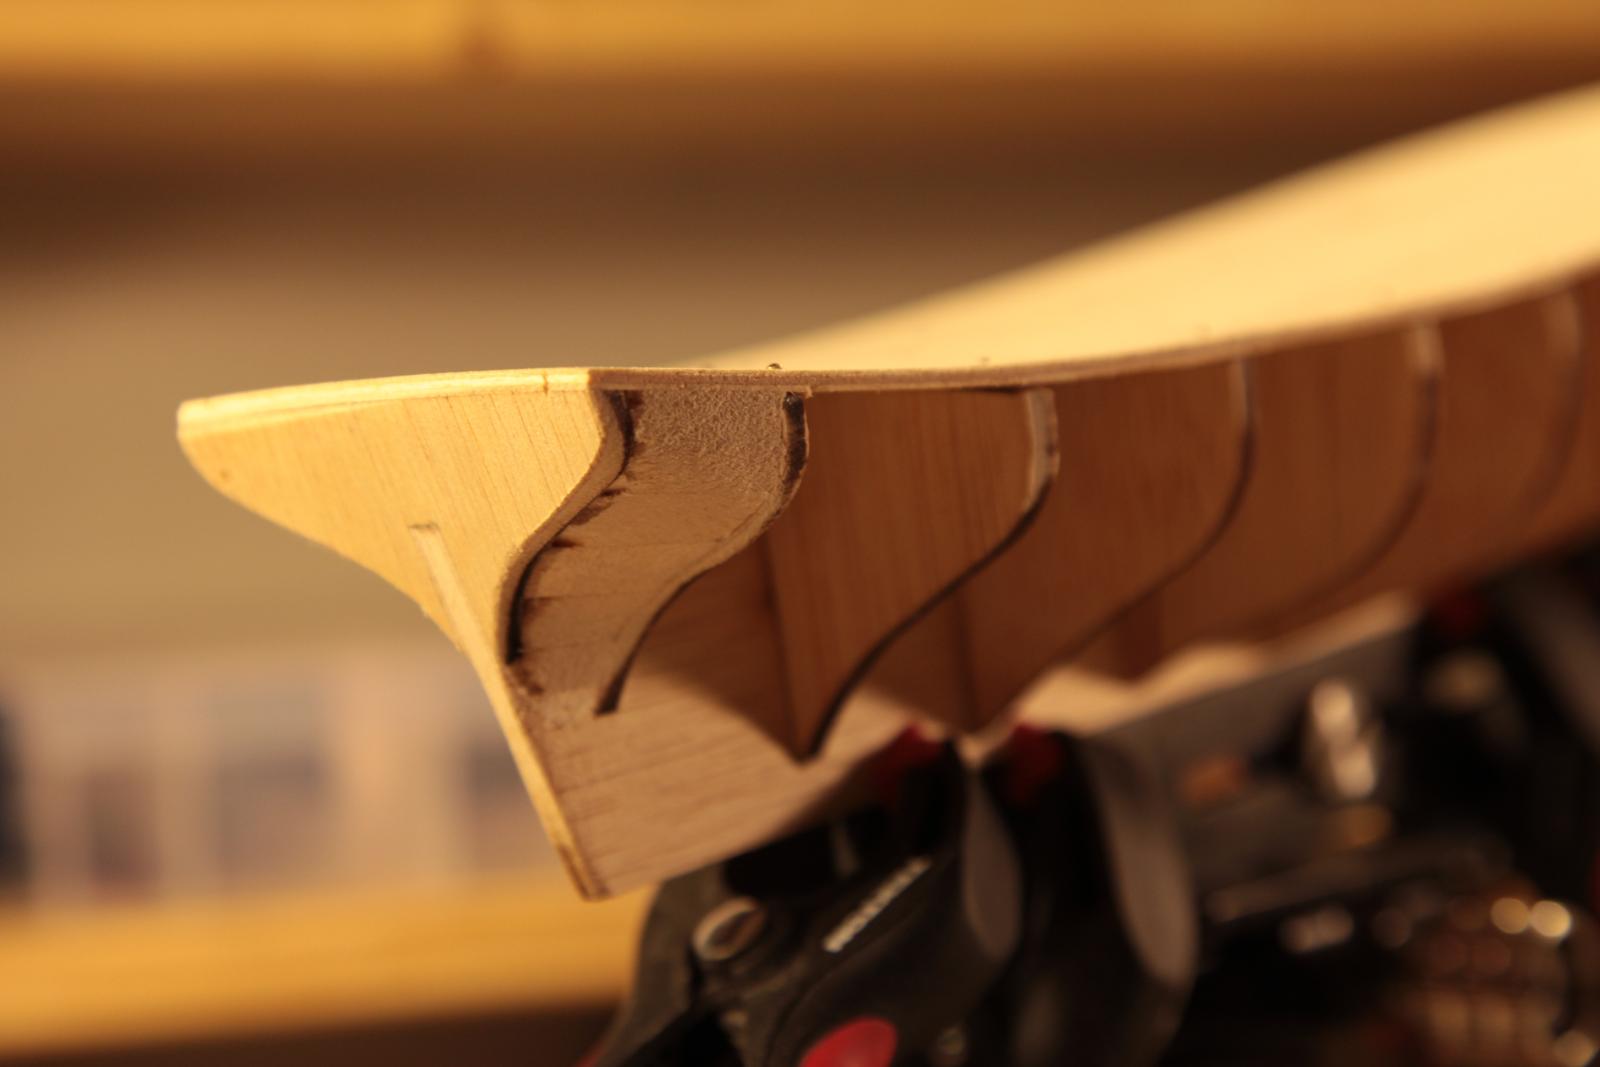
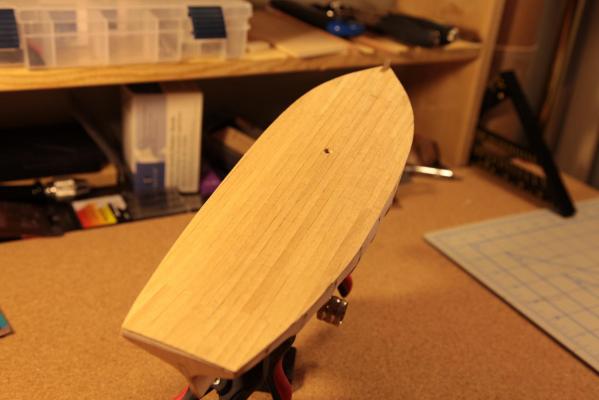
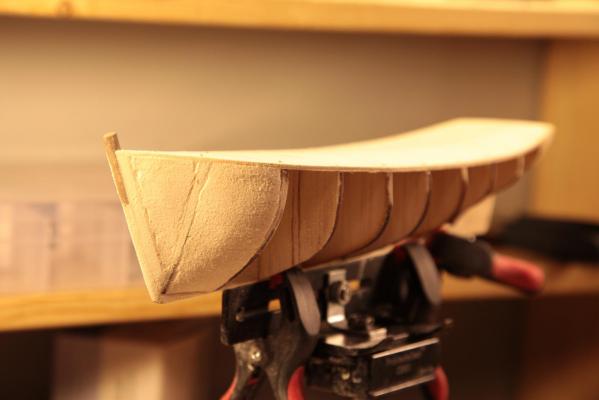
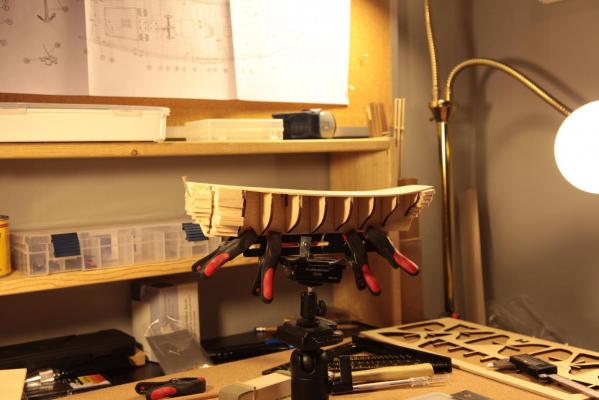
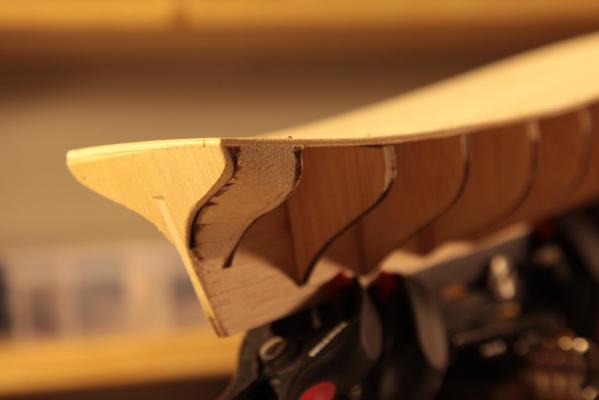
Part 3 Got some preliminary sanding done on the bow and stern pieces. I've also decided to give myself some extra mileage on my first planking (ever) by adding in some balsa filler blocks. I may have overdone it with the pieces I cut, and I definitely made a lot more sanding for myself, but I'm hoping that it pays off. Pictures below. Status: stern filler blocks are roughly sanded. Waiting for tomorrow to do the bow. Still thoroughly enjoying the process. Cheers, Simon

- 35 replies
-
- 3
-
-
- Constructo
- Gjoa
- (and 1 more)
-
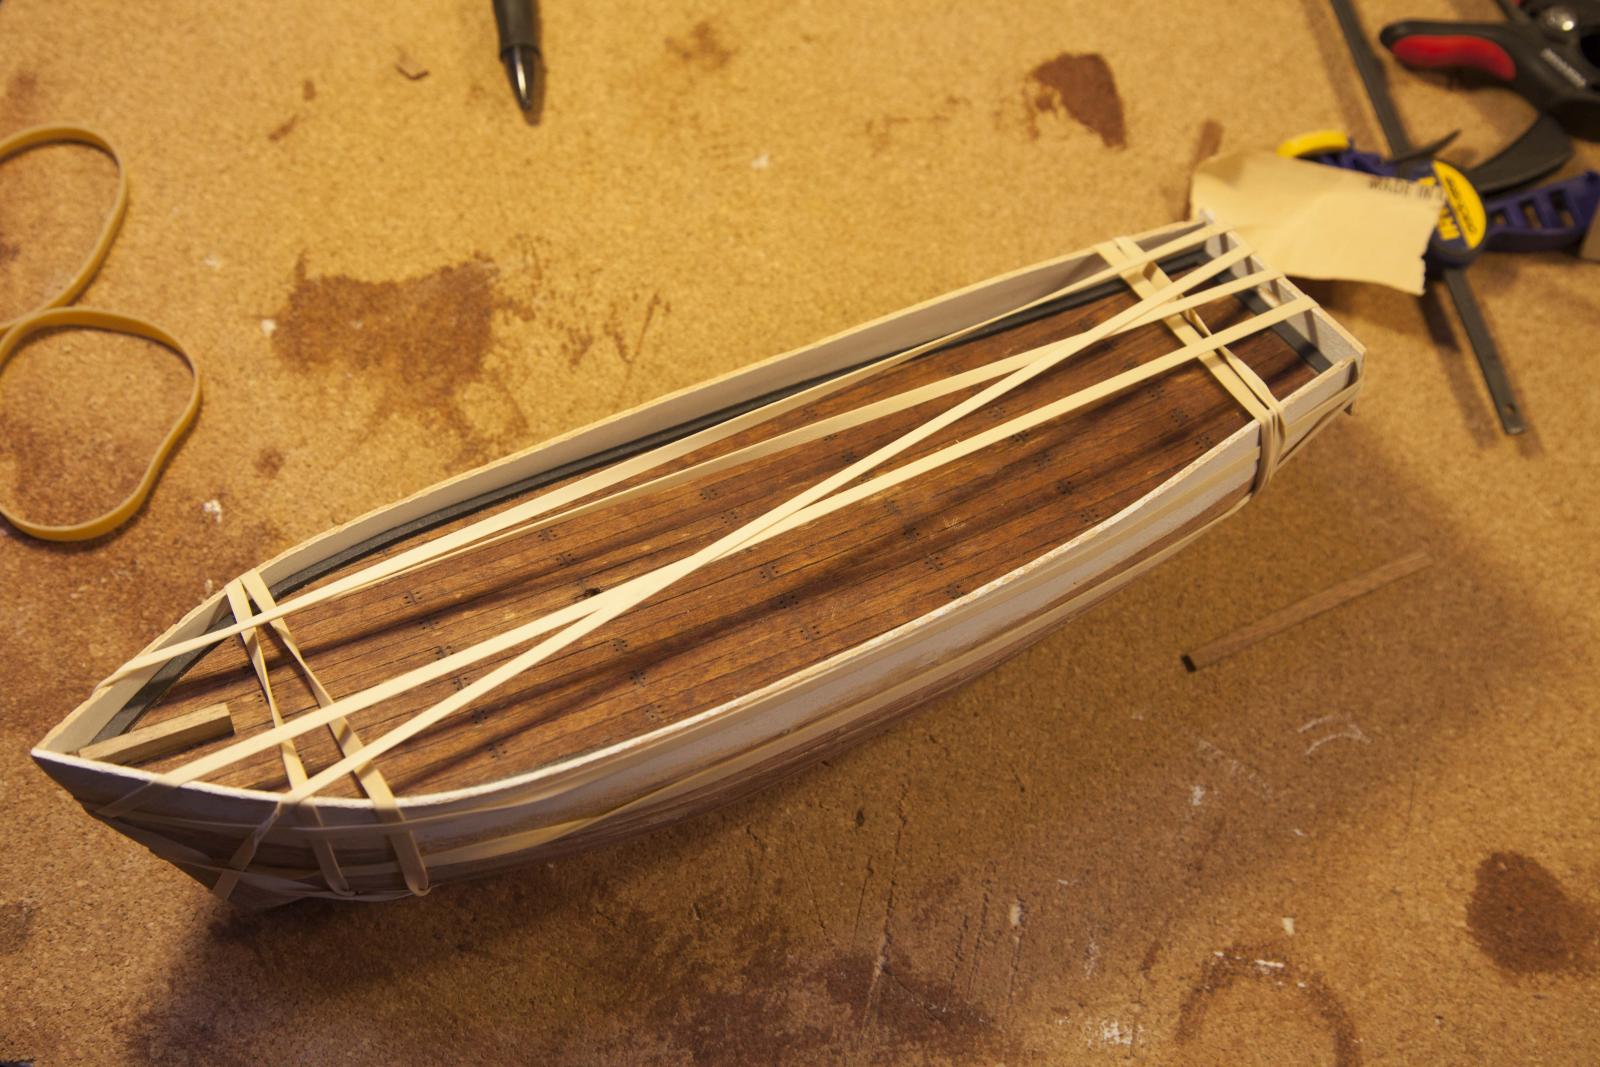
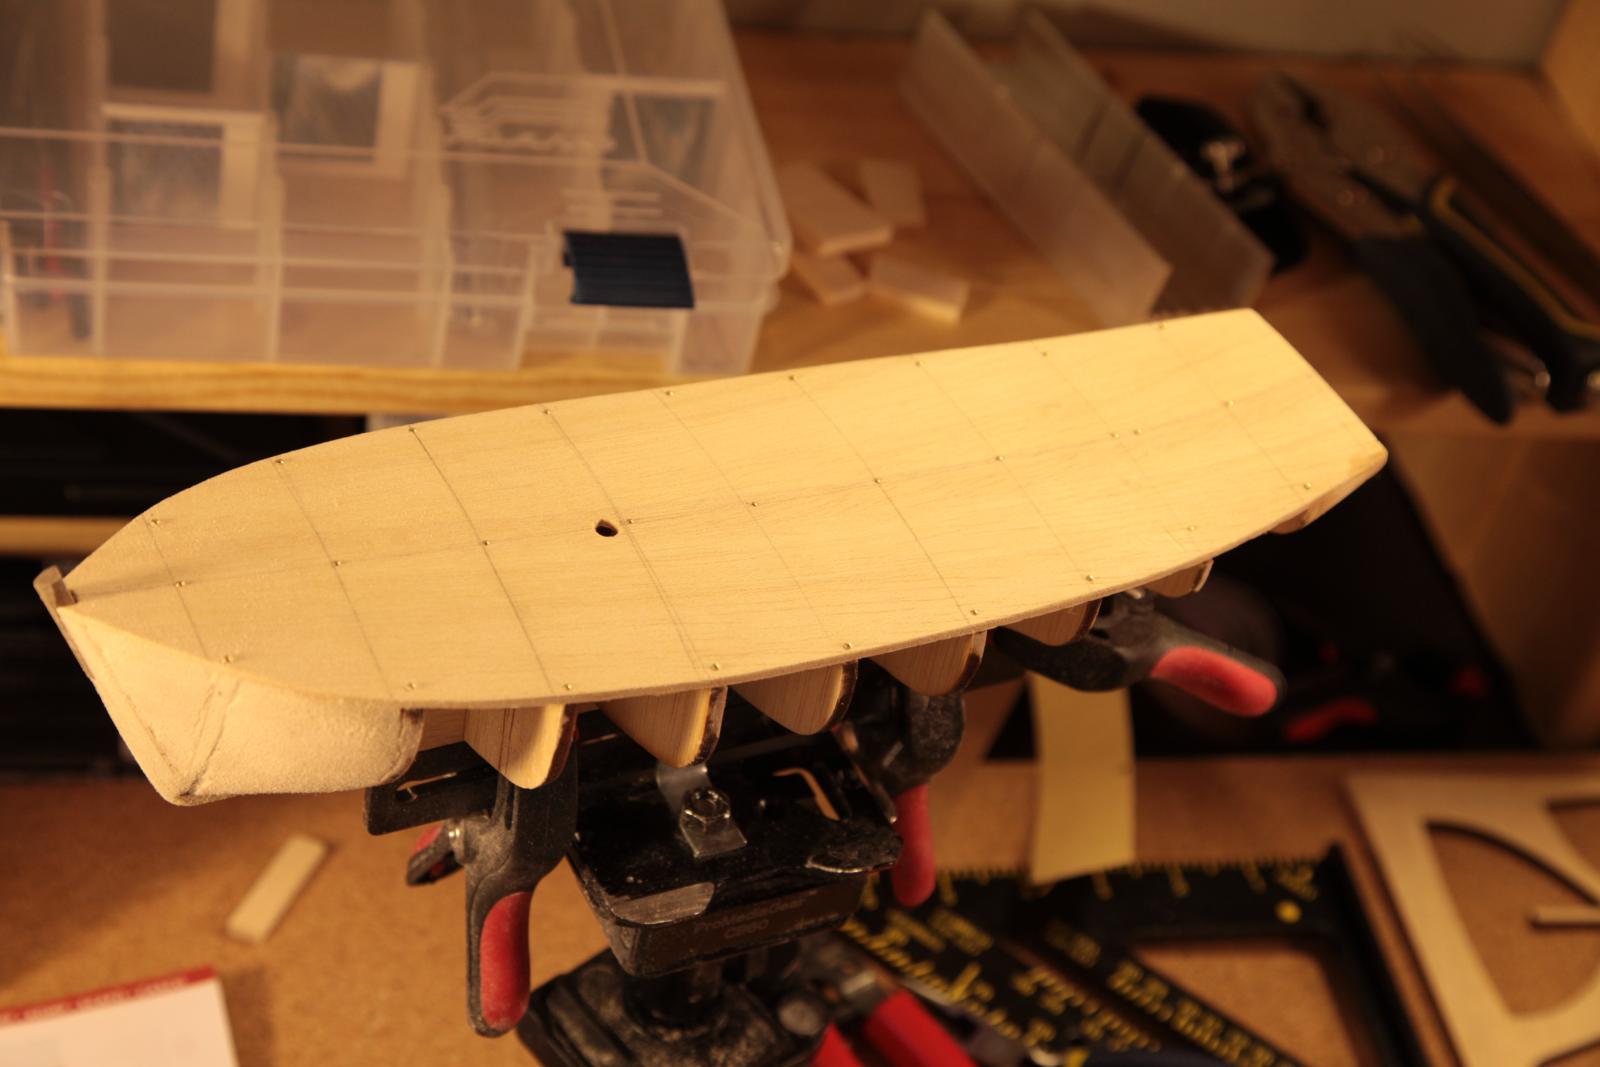
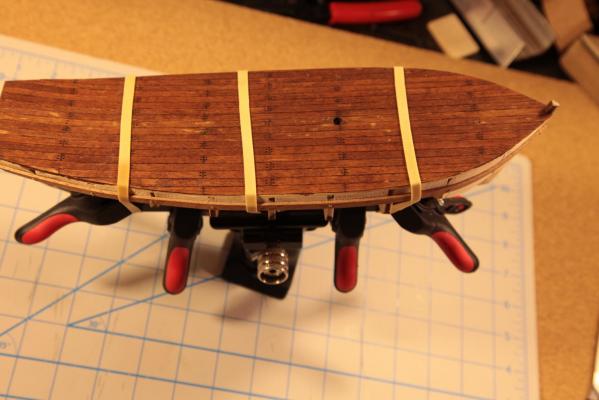
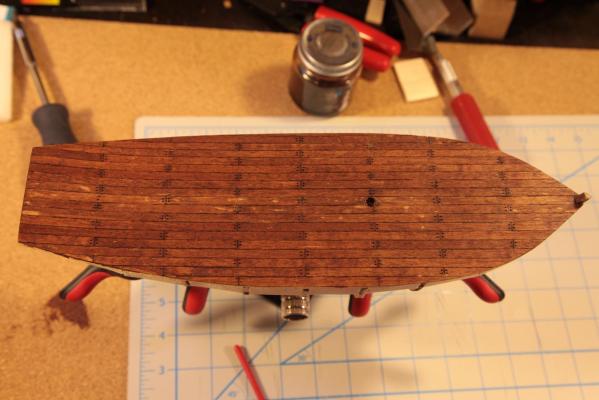
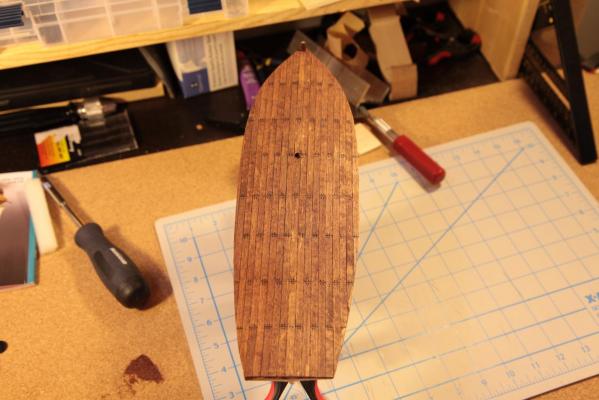
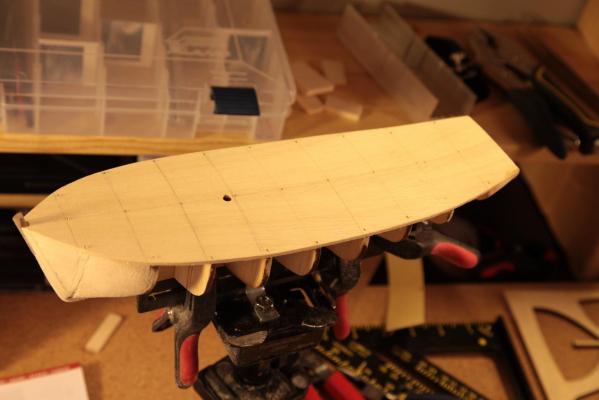
Part 2. Gluing the deck. Not the easiest, but not so bad. There's quite a drastic curve on top so I had to work with an iron and watch the moisture. Gluing it down looked something like this (not pretty but it seems to have done the job): And this was the result after tacking it down: Thoughts: It's not perfect, but I'm happy. Off to sand again, Simon

- 35 replies
-
- 4
-
-
- Constructo
- Gjoa
- (and 1 more)
-
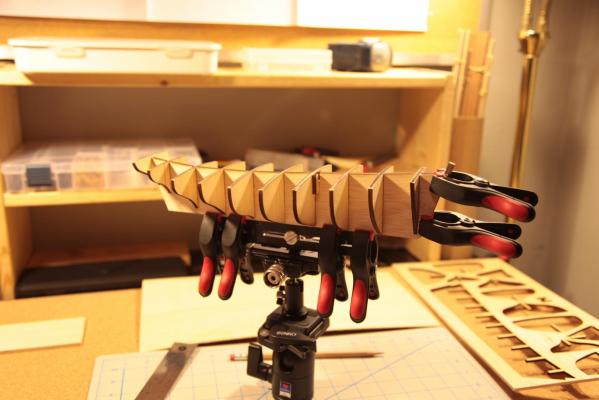
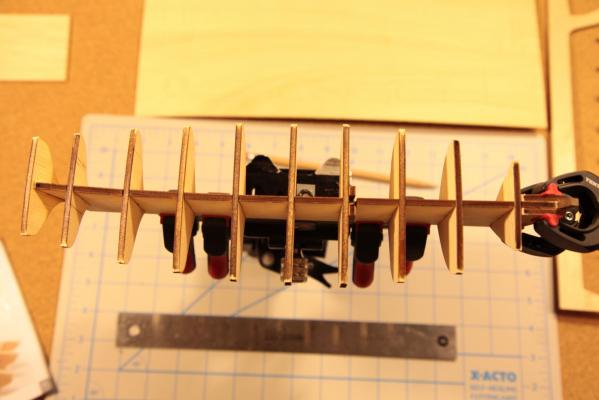
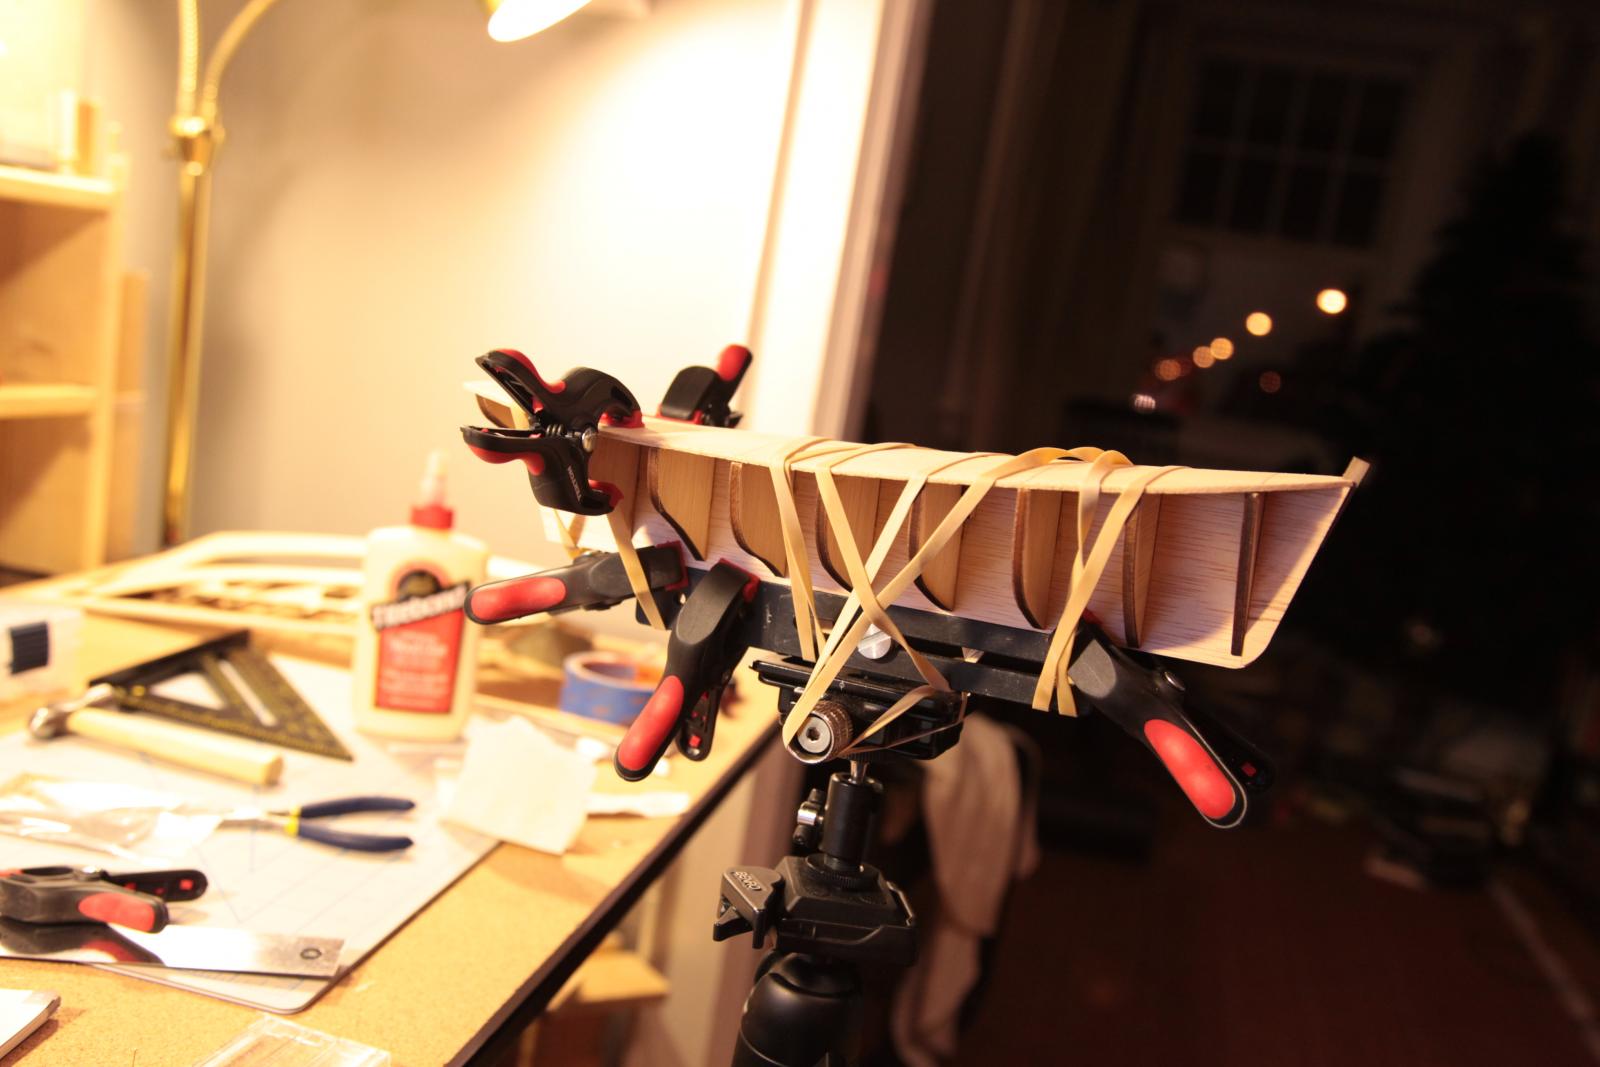
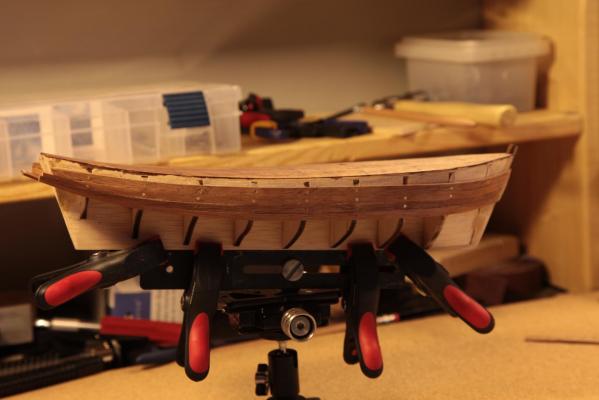
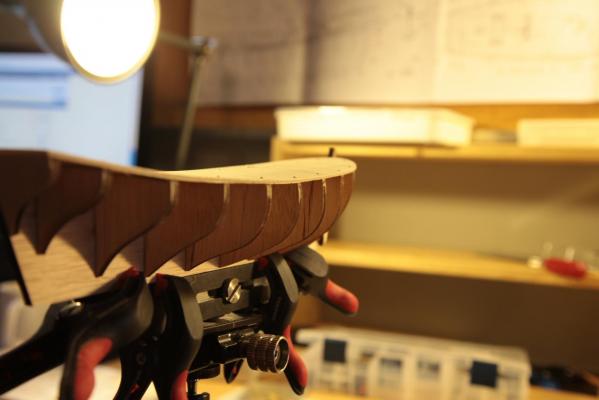
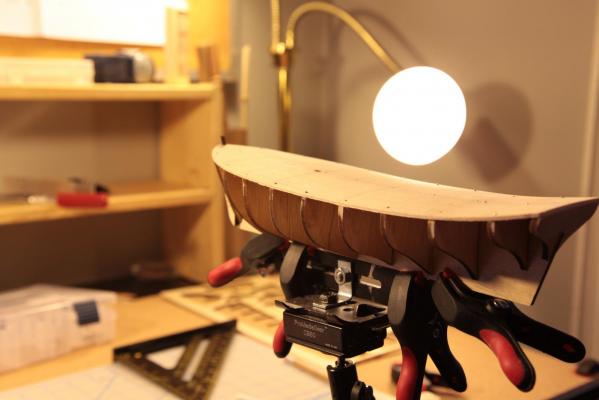
Hi guys, I actually tackled this problem today. Thank you all for the input. Here's how I ended up doing it: I rigged up a keel clamp using a couple of tripod ball heads, a 90 deg. angle, a 4 mm thick piece of aluminum used for offsetting camera flashes, and a few small clamps. 4mm is the thickness of the false keel so it worked out nicely. And here are the results: I am totally pleased, this being my first build and all. Cheers, Simon