


UpstateNY
-
Posts
466 -
Joined
-
Last visited
2 Followers

Recent Profile Visitors


-
 Obormotov reacted to a post in a topic:
USF Confederacy by UpstateNY - Model Shipways - Scale 1:64
Obormotov reacted to a post in a topic:
USF Confederacy by UpstateNY - Model Shipways - Scale 1:64
-
 Obormotov reacted to a post in a topic:
USF Confederacy by UpstateNY - Model Shipways - Scale 1:64
Obormotov reacted to a post in a topic:
USF Confederacy by UpstateNY - Model Shipways - Scale 1:64
-
Obormotov reacted to a post in a topic:
USF Confederacy by UpstateNY - Model Shipways - Scale 1:64
-
Obormotov reacted to a post in a topic:
USF Confederacy by UpstateNY - Model Shipways - Scale 1:64
-
Obormotov reacted to a post in a topic:
USF Confederacy by UpstateNY - Model Shipways - Scale 1:64
-
Obormotov reacted to a post in a topic:
USF Confederacy by UpstateNY - Model Shipways - Scale 1:64
-
Obormotov reacted to a post in a topic:
USF Confederacy by UpstateNY - Model Shipways - Scale 1:64
-
Obormotov reacted to a post in a topic:
USF Confederacy by UpstateNY - Model Shipways - Scale 1:64
-
Obormotov reacted to a post in a topic:
USF Confederacy by UpstateNY - Model Shipways - Scale 1:64
-
Obormotov reacted to a post in a topic:
USF Confederacy by UpstateNY - Model Shipways - Scale 1:64
-
Allow me to introduce our model ship group to you. We are located in and around Rochester NY. We are a small group that was founded in late 2015. We have members in Buffalo, Rochester, Syracuse, Florida, and even one in Lisbon Portugal. We meet monthly and through the Zoom application we have been able to include our more distant members. You can learn more about us by visiting our web site modelshipwrightguildwny.org.
We have located you through the “Community” drop down function on the Model Ship World forum and are reaching out to you to explore your possible interest and participation in a lively and talented group of modelers from all walks of life.
Generally, sessions are structured with introductions of visitors, followed by a brief business segment and then we almost always have a central presentation topic or two ending with a show and tell of group models. The sessions usually last two hours.
So you are invited to visit us (via Zoom) this Fall and see what we are all about. You might find us interesting enough to join us on a more consistent basis. Please PM me back and I will put you on distribution for our Fall schedule when released.
We will not badger you beyond this outreach if you are not interested.
Hoping to hear from you.
Thistle17 on MSW (Joe)
-
 Hi Stephen, Thanks for the kind words and I hope you enjoy building your Red Dragon. I had to check my own log to answer your question given it has been so long now, but I used Chuck's heat technique to preform the strips to shape. I illustrated this in posts 44 and 45, but I've copied Chuck's link below as well from my post given he shows this much better than I do. It took a while to get the shape correctly formed against the hull, but in the end if I recall correctly, I only needed very light pressure using some elastic bands and a couple of clothes pegs to hold the wood in place while the wood glue cured. I used Chuck's technique in multiple places and it really helped to avoid needing a lot of pressure. http://modelshipworld.com/index.php/topic/8131-hm-cutter-cheerful-1806-148-scale-by-chuck/page-22 I hope this helps and best of luck with your Dragon! Cheers, Nigel.
 -
UpstateNY reacted to a post in a topic:
Granado by rafine - FINISHED - Caldercraft - 1:64
-
UpstateNY reacted to a post in a topic:
Granado by rafine - FINISHED - Caldercraft - 1:64
-
UpstateNY reacted to a post in a topic:
IJN Yamato by RGL - FINISHED - Tamiya - 1/350 - PLASTIC
-
UpstateNY reacted to a post in a topic:
IJN Yamato by RGL - FINISHED - Tamiya - 1/350 - PLASTIC
-
My thanks to you as well Moonbug....Augie was most welcoming when I first joined MSW so it great to see his Confed finished so beautifully. I am also sure, as Dave just said, that he is smiling down from on high somewhere. Rest in peace Augie. Cheers, Nigel.
- 2,191 replies
-
- 8
-
-
- confederacy
- Model Shipways
- (and 1 more)
-
UpstateNY reacted to a post in a topic:
USF Confederacy by Augie & Moonbug - FINISHED - Model Shipways - 1:64
-
UpstateNY reacted to a post in a topic:
USF Confederacy by Augie & Moonbug - FINISHED - Model Shipways - 1:64
-
UpstateNY reacted to a post in a topic:
USF Confederacy by Augie & Moonbug - FINISHED - Model Shipways - 1:64
-
UpstateNY reacted to a post in a topic:
USF Confederacy by Augie & Moonbug - FINISHED - Model Shipways - 1:64
-
UpstateNY reacted to a post in a topic:
USF Confederacy by Augie & Moonbug - FINISHED - Model Shipways - 1:64
-
UpstateNY reacted to a post in a topic:
USF Confederacy by Augie & Moonbug - FINISHED - Model Shipways - 1:64
-
Hi Carl, Lovely work...these PE kits are just amazing and I hope the eyes are holding up! One question is how do you get a good paint finish on without covering up all the etched details? Is there a primer/paint combo you use that lets you get good coverage with very few thinned coats, even with an airbrush? Cheers, Nigel.
-
Like is for support Jesse...hang in there and looking forward to your update. Cheers, Nigel.
- 1,306 replies
-
- 9
-
-
- syren
- model shipways
- (and 1 more)
-
Hi Greg, Some amazingly patient and detailed work here...very much enjoying following along. Cheers, Nigel.
-
Thanks Carl... I think it is time I invested in a similar magnifier...looks like it will work with the bifocal magnifiers I already have to wear so I don't bump into things.... Cheers, Nigel.
-
Hi Carl, Wow...the turrets and 25mm gun look amazing, but I finally caught up with just how small these PE kit parts are! Are you using a magnifier or a microscope to put these together? Cheers, Nigel.
-
Hi Jack, Thank you for sharing the details on how you thin gesso...very thoughtful. Hi Nick... Thanks for stopping by...will try to not fall off the build wagon again! Beakhead planking has now been removed...a new razor blade inserted between the planking and the bulkhead popped the planks off cleanly with no other damage thankfully. Replanking is now in progress....2nd time hopefully will be the charm! Finally, thanks for all the "likes"...much appreciated! Cheers, Nigel.
-
Thanks for stopping by and for the thinning tip Jack....I will certainly try a test first. Cheers, Nigel.
-
Just beautiful...hope I can get mine even half as good! Cheers, Nigel.
-
Hi Carl, Yep...easy until it doesn't work out as I just found out.. I also just went down to the workshop and gave the beakhead a good dose of looking at...yep...redo time! No point in spending the next 5 years or so building this model and being aggravated about the way the bow looks. I also just went over the planking section in the instructions and found a reference to using a #75 drill for the treenails so clearly I overdid the hole size! Need to find a way to template the design better as well so some tests are definitely in order. Hi Dave, Thanks for the welcome back, for the kind words and for suggesting bamboo...I will add that into the toothpick vs filler tests. I can use this work to set up for all the hull work to come to get the treenail technique sorted now. I was looking for a reason to get the Byrnes draw plate so every cloud has a silver lining! . Cheers, Nigel.
-
Hi Carl, Thanks..a bit worried the end grain of the toothpicks may also stain up too dark, but yep it is certainly worth a try. Of course if it works, then I'll need to do the entire hull that way down the road to match which was one reason I figured I'd try the filler method first! Cheers, Nigel.
-
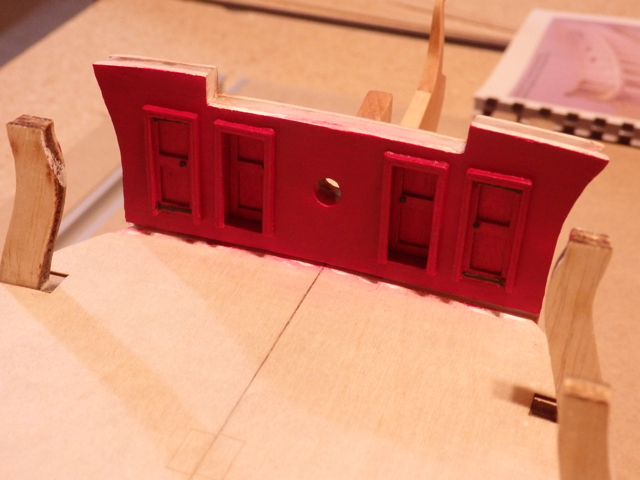
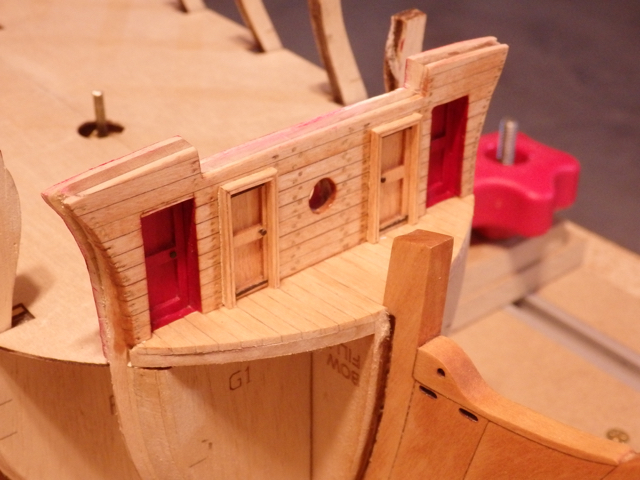
Hi All, Slowly getting back on the wagon after a long break for work and family, but with the New Year starting, it seemed like the right time to try and make a fresh start. Amazing how fast time goes by... So, picking up where I left off on the beakhead, the first step was to paint the interior and the doors crimson. I found it hard to get an even paint finish even using multiple thin coats. I am wondering if I got some glue deep into the planks as the finish was really uneven. Unfortunately, I can’t recall which build now (my apologies!), but I remembered someone using gesso. By applying a thin gesso coat, followed by a very light sanding, I finally got a more even finish using many thin coats as Chuck recommends. Exterior deck planking followed and then I tried to treenail the front bulkhead I used a 0.65 drill per the instructions and Elmers natural filler to fill the holes. Unfortunately, after sanding them smooth and then re-staining, the treenails look too obvious and also rather uneven. I am going to think about it for a couple of days and start to run the battens for the gunport sills, but I may have a redo coming! A few pictures below...doors and frames are just press fitted. Good to be back modeling again! Cheers, Nigel.

-
Hi Carl, First day of your new build and I am already late to the party it seems...wiill start the second row! Looks like she will be a fun build and those photo etched parts look great on the turret! Cheers, Nigel.
