

Ageofsail
-
Posts
24 -
Joined
-
Last visited
1 Follower

Recent Profile Visitors
556 profile views


-
 Razorbill reacted to a post in a topic:
New member from Scotland (Falkirk)
Razorbill reacted to a post in a topic:
New member from Scotland (Falkirk)
-
Keith Black reacted to a post in a topic:
New member from Scotland (Falkirk)
-
mtaylor reacted to a post in a topic:
New member from Scotland (Falkirk)
-

New member from Scotland (Falkirk)
Ageofsail replied to Razorbill's topic in New member Introductions
Hello and welcome aboard! My thought is, which era is your passion? The age of sail? Early steamers? Passenger ships? Iron warships (of which the variety is almost endless)? What do you want to see on your mantle? And how big is the area for display? If you're new to the art, start simple and smaller, but larger in scale, it will not be as discouraging as building a ship the requires untold hours of tedious rigging. You will see results quicker which will inspire you. All the best! Dan -
Hi Marcus, just saw this post, it make me wonder, when you're presenting the ship in port, as I am, sails furled in the yards, how do you represent the anchors? It would seem the bow anchors, given the shallow water would necessarily be deployed to be dropped if required. However, if she was at sea, this quote makes sense. Thoughts anyone?
-
Canute reacted to a post in a topic:
Nantucket Light Ship by Fright - FINISHED - Lindberg - 1:95 scale - PLASTIC
-
Old Collingwood reacted to a post in a topic:
Nantucket Light Ship by Fright - FINISHED - Lindberg - 1:95 scale - PLASTIC
-
popeye the sailor reacted to a post in a topic:
Nantucket Light Ship by Fright - FINISHED - Lindberg - 1:95 scale - PLASTIC
-
Hi Robert, was lurking around here doing some research for my U.S.S. Constitution build and stumbled across your work, I remember a discussion we had some time ago on Finescalemodeler about you jumping into the deep end of the model ship building pool. If this build is any indication of your skill set, I say go for the Black Pearl, nice work!
-
Ageofsail changed their profile photo
-
GrandpaPhil reacted to a post in a topic:
Constitution by Ageofsail - Revell - PLASTIC - Homage to Old Ironsides
-
GrandpaPhil reacted to a post in a topic:
Constitution by Ageofsail - Revell - PLASTIC - Homage to Old Ironsides
-
While all this was going on, I was still trying to figure out how the heads were going to come together, especially since the brass grating from Blue Jacket was no way to fitting, not without major mods to both the head timbers, the head well and the grating, something I somply did not want to deal with. My solution was to simply modify the grating from the Revell kit by cutting off the stupid "heads" and trimming to fit and accomodate the brass heads from BJ mounted on styrene troughs. Seeing as I intend to use the Boomkins, I will have to figure that mounting situation out later. Not much of an update so sorry for that, this whole lifetime free flights from Delta Airlines retiree thingy is really soaking up a lot of time, hopefully more to come soon
- 21 replies
-
- 1
-
-
- constitution
- revell
- (and 1 more)
-
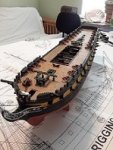
Hi guys, been a while since my last post. I thought retirement was supposed to free up all kinds of time for other pursuits! Oh well. So making small amounts of progress on Constitution, for example, after my disastrous breakage of my Dolphin Strikers AND snapping the bowsprit in 2, I lost tons of time repairing the damage and while waiting for various glues and Milliput fillers to dry, I decided to address the gaping hole in the Spar Deck where the bowsprit makes its way down to the gun deck. no way I was going to use that ugly box ladder Revell provided. because I didn't use all the brass gratings that came with the photo-etched sheets from Blue Jacket, I figured a cut and shaped piece, surrounded by coming would suffice, easy peazy! I began with filling from the underside with black styrene Next was to build the grate/coming assembly Installation was very straightforward came out pretty good I think, waaaay better than the Revell solution to this hole
-
GrandpaPhil reacted to a post in a topic:
Constitution by Ageofsail - Revell - PLASTIC - Homage to Old Ironsides
-
lambsbk reacted to a post in a topic:
Constitution by Ageofsail - Revell - PLASTIC - Homage to Old Ironsides
-
Having followed Evan (Force9) with great interest, I decided his approach to the Charlie Noble and capstan, as the kit provided ones are woefully inadequate. The Charlie Noble was a a breeze in terms of construction, getting it look aged and a little worse for wear involved a heavy, almost sticky flat black, tieing off the guy wires at this scale was a pain, a single malt night for sure!
- 21 replies
-
- 1
-
-
- constitution
- revell
- (and 1 more)
-
So I decided to take a little break from detailing the spar deck and face the inevitable, the yards, spars studding sail booms, jibs, and spankers. As I have stated, I re-enforced the lower yards and lower masts with dowel inserts so I plan on using them, the rest, for the most part not so much, simply too wimpy. I will be using Blue Jackets superb template and turning pretty much everything from above the upper masts including the yards and studding sail booms, and adding the skys'l yard Revell omits from its kit using cherry doweling, Thanks Professor Tilley for the advise. This will take a while but it will be a nice break from the work on the ship itself especially since it is still too cold here to spray the weathering solution on the copper hull, which must be done before I start rigging the jibs. I took all the Revell pieces, labeled them and marked them according to the BJ plans, the ones I know will be subject to breakage will replaced with cherrywood pieces I've already turned the jibs and spritsail yard as you can see the scale is quite different from between the 2
- 21 replies
-
- 1
-
-
- constitution
- revell
- (and 1 more)
-
I have to admit Evan has been a huge influence, it is further evident in the ship's bell, I merely copied what he built. There seems to be no super clear consensus regarding its location in 1812, but methinks close proximity to the helm and binnacles makes the most sense, especially for my purposes as I am rigging my ship with the boats placed according to the Revell plans which makes positioning the bell aft of the Charlie Noble impossible, plus there is ample room to mount it on the coming of the hatch just forward of the helm and binnacles
-
I really liked the way Evan's capstan he built for the spar deck turned out however I did think the base was a little too small diameter-wise even though it does match the Hull model. I decided to have a base equal in size to the drum cap, with a taper toward the whelps. I used Evan's method for creating the drum heads however I used pine for the whelps and cherry for the center spindle, and finished them with a diluted leather. I also put a cross-wise sheet of styrene down and scribed planking in to represent a re-enforced base to handle the stresses the decking here was no doubt subjected to, for the bars, at this scale I simply snipped some of my spare boat oars down and likewise applied the diluted leather, my wont is to represent a ship months at sea and therefore a little more weathered, repainted, weathered again. I hope I am achieving this. Professor Tilley was correct, cherrywood is the only way to go! Stark contrast between the kit piece, the Blue Jacket piece (anyone need one?) and the wood/styrene one that will go on the ship I filed the whelps down once the were in place, just seemed easier, next was diluted leather with an eye to weathering, same for the rods, and mount to the re-enforced deck
-
The time finally arrived to replace the temporary 2x4 base I had been using due to the fact that soon the jib and flying jib will be installed and it would be too difficult to replace the base with those pieces in place. Blue Jacket's base is ridiculously long and since woodworking is one of my great passions, I decided to make my own base out of white oak that will only stretch the length of the hull. 2 light coats of Dark Walnut stain and 2 coats of satin finish urethane and I think it will work. BTW, the dining room table it is sitting on is also my creation [:D] The Blue Jacket pedestals needed to be trimmed down to fit, fortunately my Revell kit had the bosses to mount it to a pedestal molded in so it wasn't too challenging Final assemby looks pretty good, will have to remove the base one more time however, in order to spray the copper down with a weathering solution, as well as weather the rest of the hull
- 21 replies
-
- 1
-
-
- constitution
- revell
- (and 1 more)
-
Still attempting to catch up on this blog, prior to my bowsprit disaster, I had spent some time modifying the existing boats as they will be the ones I use, including some ribbing and keel board Added tiller assembly and some other details
-
Hello all, it's been 2 years since my last post, but I have been nibbling away at my Constitution nevertheless. Suffered 2 bad breaks on the bloody dolphin striker, the second one so bad it actually broke the bowsprit as well. If it weren't for Dave, aka lmbsk sending me a spare he had, I would have been in dutch big time, thanks Dave! I wound up having to cut the damage bowsprit off just past the boards and using a cherrywood dowel as an internal splint, splice the replacement piece on, after adding more material to the end in order to pin the martingale in for added strength. Next I bent a piece of steel wire to match the dolphin striker, hollowed out a bed for it, and layed a piece of .020 styrene over the repair, note the piece of doweling extending past the bowsprit to ensure a good attachment point for the matringale. Next was to trim down the sandwiched piece and prepare for paint Next was brass re-enforcement of the lower dolphin strikers, out of scale now but breakage is now not a serious issue This was way more work than it should have been. But in the end, there is nothing worse than breaking these delicate parts hanging out there for the whole world to bump against and reduce you to tears at the thought of having to repair!
- 21 replies
-
- 1
-
-
- constitution
- revell
- (and 1 more)
-
Thanks Dave, I will try to fix this when I have a moment Dan
-
This post is from 2015 and 2016 on another forum, I've made some progress since then I will be posting soon, including a catastrophic development with stepping the bowsprit in place which will require fairly major surgery to repair, a repair I would be seriously distressed over had it not been for Dave, aka lambsbk, bailing me out with spare parts, work to begin on that repair soon I hope, as I am at a standstill until it is fixed. As I had previously mentioned spring summer and early fall are mountain biking and Moab rock crawling season, so work on Connie has been on hiatus. However, prior to her being put up for the season I had completed some work by the end of April beginning of May I failed to post pics of, so here they are. These were test fits of the Carronades and finally rigging of them as well as fitting the belaying pins. I did seriously consider the rigging Arnie added but lacked the time to make such a huge effort. I did sieze the cordage and like how they came out, more authentic in detail. Anyway here's what I accomplished late last spring, hoping to start up on her sometime this winter but I broke my rock crawler pretty bad and so will be spending time building my class 5 Blazer as well, looking forward to picking Evan's and Arnie's brain on the rigging to come. Prefitting the Carronades: Rigged and belaying pins installed: With rope coils: Repaired fore fife rail with brass pins: I thought long and hard about what to do regarding the rather flimsy channels, ultimately going with a combination of Evan's and Randy's suggestion. I used the original channels but reinforced the underside with .80 sheet styrene, and further reinforcement where it attaches to the hull. Evan had suggested notching rather that drilling holes for the deadeyes and the logic of it dictated I follow said suggestion Test fit:
- 21 replies
-
- 1
-
-
- constitution
- revell
- (and 1 more)
-
When this kit arrived, the box was more beat up than advertised and there was some damage which, based on following Froce9's build, really inspired me to think "outside the box" on this kit. The fore fife rail assembly was virtually shattered, to the point where only 4 of the stanchions were salvageable and so I rebuilt the whole thing including adding a pinrail on the fore crossrail and replacing the broken pinrails. I've already lamented the poor condition the decks were in, just happy I was able to make them somewhat serviceable. The main fiferail had broken feet and so I flush mounted it to the deck, and the monkey rail was in 3 pieces so I built a new one I also had at least 4 other broken pinrails so I decided to replace all of them, as well as adding 2 more. They are a work in progress but I did build them out of .80 Evergreen and planed down the belaying pin surfaces, this will allow me to use 1/4" belaying pins from Blue Jacket as well as have a substantial surface area at the attach point to the bulwarks and MUCH bigger tabs to go into the holes I drilled in the .40 reinforced and thickened bulwarks. As you can see, I still have a fair amount of touch up and clean up work to do and I will post pictures of my take on adding strength to the pinrails later but I suppose my main point is, without discovering forums such as this I never would have considered even this rudimentary amount of modification, the fact that now I am even planning on using non OOB deadeyes, shroud/ratlines and turned wood mastops and yards is giving my wife a headache . On a side note, I am curious what Force9 thinks about leaving the eyebolts un-blackened? Personally I like the look. As you can see I ordered the next size up, slightly out of scale but much easier to work with. I also bought the smaller size and will use some with rings attached as well
- 21 replies
-
- 6
-
-
- constitution
- revell
- (and 1 more)