AH1973
-
Posts
9 -
Joined
-
Last visited
Recent Profile Visitors
224 profile views

-
 garywatt reacted to a post in a topic:
HM Cutter Sherbourne by AH1973 - Caldercraft - first wooden ship build
garywatt reacted to a post in a topic:
HM Cutter Sherbourne by AH1973 - Caldercraft - first wooden ship build
-
garywatt reacted to a post in a topic:
HM Cutter Sherbourne by AH1973 - Caldercraft - first wooden ship build
-
Foultide reacted to a post in a topic:
HM Cutter Sherbourne by AH1973 - Caldercraft - first wooden ship build
-
Stockholm tar reacted to a post in a topic:
HM Cutter Sherbourne by AH1973 - Caldercraft - first wooden ship build
-
 You´re right: there is a bit of a bend at that penultimate bulkhead. But I assumed it´s supposed to be that way - after all, the parts have been CNC cut, haven´t they Anyway, the bend is not so severe as to disturb the look of the hull, IMO. No problem with split planks though thanks to watering them and pre-drilling the holes. But I did plan to place the pins next to the planks instead of through them ... yet another example of planning so much, that I forget to actually do it that way when the time comes. On the other hand, when putting the pins through the planks instead of next to them, you don´t have to drive the pins all the way into the bulkheads but just enough so that the plank is fixed. I guess I´ll experiment a little and go with what works. Andreas
- 23 replies
-
- 2
-
-
- sherbourne
- caldercraft
- (and 1 more)
-
AON reacted to a post in a topic:
HM Cutter Sherbourne by AH1973 - Caldercraft - first wooden ship build
-
Waister reacted to a post in a topic:
HM Cutter Sherbourne by AH1973 - Caldercraft - first wooden ship build
-
Waister reacted to a post in a topic:
HM Cutter Sherbourne by AH1973 - Caldercraft - first wooden ship build
-
AntonyUK reacted to a post in a topic:
HM Cutter Sherbourne by AH1973 - Caldercraft - first wooden ship build
-
Stockholm tar reacted to a post in a topic:
HM Cutter Sherbourne by AH1973 - Caldercraft - first wooden ship build
-
ccoyle reacted to a post in a topic:
HM Cutter Sherbourne by AH1973 - Caldercraft - first wooden ship build
-
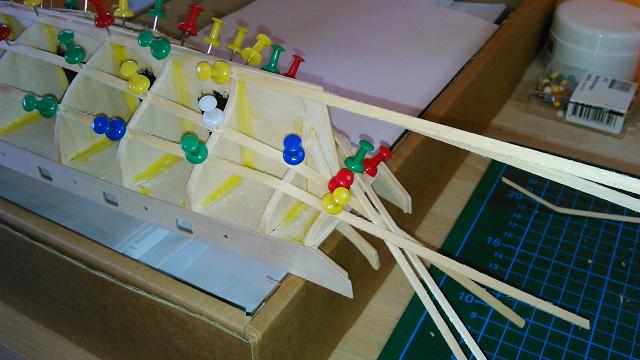
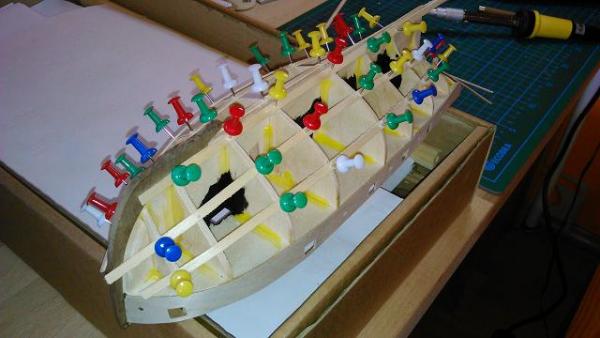
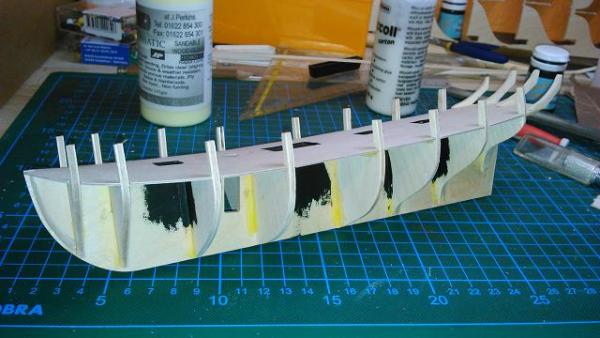
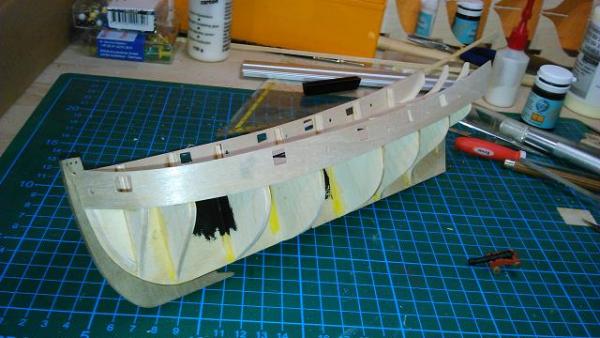
THIS sounds VERY familiar :D I seem to be doing a LOT more thinking and planning than actually building the model. @ Kester end Tony: I´m not quite sure yet what to do with the guns as I have also realized that they are not really historically accurate. On the other hand I find the look of the assembled gun not that bad, so I may just leave them as they are - mostly. But I´ll worry about that when I´ve finished the hull. In a flurry of activity I´ve fixed the temporary battens today: What a weird look of the model now - but at least there´s now some color for a change Andreas

- 23 replies
-
- 6
-
-
- sherbourne
- caldercraft
- (and 1 more)
-
AH1973 reacted to a post in a topic:
HM Cutter Sherbourne by AH1973 - Caldercraft - first wooden ship build
-
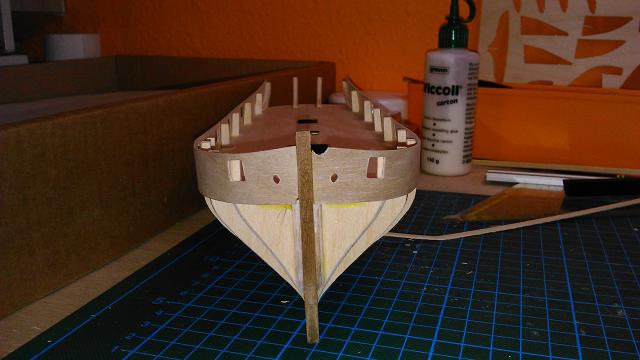
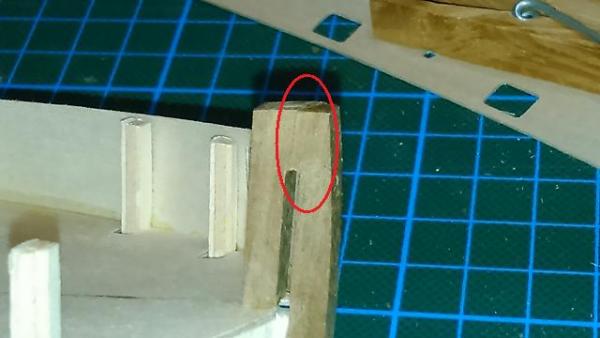
In case anyone was wondering: I´m still there. However I´m off to a sloooooow start - working with wood on a model kit is completely new for me (and quite different from the plastic and paper I´m used to). So there have been some minor, but discouraging set-backs and problems. But I´ve made some small progress that I want to share. The framework after assembly and faring: I followed Kester´s advice and assembled one of the guns prior to attaching the bulwarks to make sure they would later fit through the ports. Was it just me, or does the quoin simply not fit between the carriage and the gun itself? Also I wasn´t sure about the brass wire you´re supposed to use according to the instructions - it worked fine without it. Any insight on that? I decided to glue the stem onto the frame prior to planking, despite your warnings it may get scratched later on during sanding. I just thought, I couldnt allign the bulwarks properly without the stem in place for reference. I managed to break off part of it and had to glue it back in place (see picture) and I forgot to drill the three holes which I had to catch up on after I had glued it on. After fighting with the bulwarks for quite some time I finally managed to glue them in place - though its overall shape is somewhat less then a smoothly flowing curve ;-) So, that´s where I´m at right now. I need to muster some courage before starting with the planking. Cheers, Andreas PS: I hope the pictures are large enough.


- 23 replies
-
- 6
-
-
- sherbourne
- caldercraft
- (and 1 more)
-
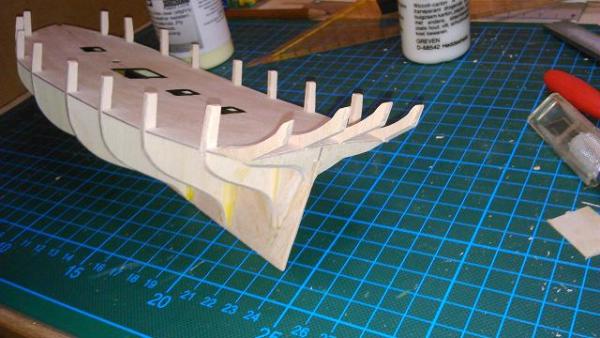
Thanks for the "warning" regardind the gunports, so I won´t fall into that particular trap. And I decided to go with the stand supplied with the kit. Tony has also pointed out the Anatomy of the Ship Volume on the Cutter Alert, which seems to be a good idea - since I´m collecting this series anyway. I´ve spent most of midday today sanding and dry-fitting the frames and the false deck. I´ve taken your advice on cutting into the tabs that will later hold the bulwarks. I cut them from the front and the back, rather than from the sides though. Since the plywood is made up of three layers, and I now cut through the two outer layers only the center layer remains which should be quite easy to snap off later - at least in theory Andreas
- 23 replies
-
- 1
-
-
- sherbourne
- caldercraft
- (and 1 more)
-
AH1973 reacted to a post in a topic:
HM Cutter Sherbourne by AH1973 - Caldercraft - first wooden ship build
-
Tony, Kester thank you so much for your advice and time - I obviously have chosen the right forum There really is much more to take into account than I would have thought so I´m very glad you are so willing to offer your assistance and experience. To me it is not so very important that the model is 100% historically accurate, and not on my very first model anyway. For now I´m content to buliding the kit "as is", which already is enough of a challenge for me at the moment. But nevertheless I´m very grateful for your advice an that regard as well, so feel free to keep it coming. Frankly I hadn´t spent much thought on how to display the finished model, but it seems I´ll have to. A word on instructions: When you say, the Sherbourne´s are pretty basic, are there other kits (or other manufacturers) which include more thorough instructions? Thanks again and have a great Sunday, Andreas
- 23 replies
-
- 1
-
-
- sherbourne
- caldercraft
- (and 1 more)
-
AH1973 reacted to a post in a topic:
HM Cutter Sherbourne by AH1973 - Caldercraft - first wooden ship build
-
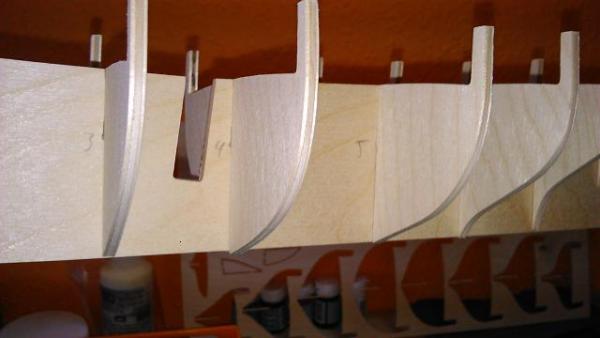
So I´ve finally actually started the build, freed the false keel and the frames from its sheet and dry-fitted them together. The way I understand it, the "real" keel comes on later, after the first layer of planking is done, right? So that means, that the garboard plank of the first layer should be flush with the false keel - otherwise you can´t fit the real keel. As you can see in the picture below, some frames extend all the way to the edge of the false keel, or even beyond it (the tops of the frames are flush with the top of the false keel part). Before I start filing and sanding away I just wanted to check: Do I have to take material off the frames, until they are "low" enough to allow for the first layer of planking to be flush with the false keel and then be able fix the real keel? Or did I get it all wrong?
-
Well noted Tony, thank you for your input.
-
I thought along those lines already as well. I guess I´ll go without the bearding line. Thanks. Thanks Tony, it does make sense. Does filling the spaces between frames make planking as such easier as well? Is it usually done, or just at the bow and stern? Or is that up to anyone´s preference? Generous and friendly forum members will be a welcome change - I´ve been active in another forum (though not modelling related) and the overall atmosphere there was far from homely Andreas
-
Hello everyone, after introducing myself to this forum yesterday I received several very kind replies and was encouraged to start a build log. So here goes ... (This is my first time not only of building a wooden model ship but also of writing a build log - so please bear with me ) So far I have checked the contents of the box and glanced over the supplied plans. Previously I had already looked at the "simple hull planking techniques for beginners" guide here at the forum, so I knew the first task should be to mark the bearding line and cut out the rabbet recess - and I hit the first problem. According to the guide, the exact position of the bearding line is supposed to be marked in the plans, but I couldn´t find it. Did I not look right or is it missing from the plans? And if so, how can I mark this line on the keel, when it´s not given in the plans? And then another thing: after stating how important the exact work on bearding line and rabbet recess were for the finished model, the guide subsequently states that it isn´t really necessary after all and that it makes little difference to the finished model anyway! As a novice to this kind of model building I´m already confused before I even started with the build. A little help and enlightenment would be highly appreciated Andreas
- 23 replies
-
- 1
-
-
- sherbourne
- caldercraft
- (and 1 more)