


Roger Pellett
-
Posts
4,442 -
Joined
-
Last visited
Content Type
Profiles
Forums
Gallery
Events
Posts posted by Roger Pellett
-
-
Really nice work Melissa! The deck structures can be tricky on these small craft as they often slope. This means that a conventional three view (orthographic) drawing provides a distorted view of the shapes. While there are manual drafting techniques and of course CAD that can provide a "true view," modeling in cardboard will work too and of course then you wind up with patterns.
Roger
- Canute, mtaylor and Melissa T.
-
 3
3
-
I don"t know what an English Wheel roller is. Possibly a Three Roll Bender in American Idiom? MicroMark used to sell a light duty of one of these for about $100. I have one and it works well.
Roger
-
There are two types of commonly used small drills; High Speed Steel (HSS) and Carbide. You don"t tell us which kind you are trying to use. Carbide drills are extremely fragile and are intended to be used in some sort of mechanical drilling device. Any side force will cause them to shatter. HSS drills are old fashioned but forgiving. Good quality ones will drill any of materials that we encounter.
Roger
- Scottish Guy, mtaylor, Keith Black and 1 other
-
4
-
I have been an amateur woodworker for over 60 years. I have built farm building, gunstocks, several boats and about a dozen scratch built models with their glass cases. I love buying and cutting into a fresh piece of lumber. On the other hand it is sad to see novice model builders attempting to assemble kits from inappropriate wood species promoted as "deluxe materials; the above "Boxwood Deal" being a prime example. Model Expo should be embarrassed enough to just refund the buyer's money. Pay to send it back? Nuts!
Some thoughts about buying wood:
Basswood- Provided in kits, often considered substandard. I wonder if basswood is actually what"s supplied as there are basswood look alikes that are softer and perhaps cheaper. Cottonwood, and "popular." There are two types of poplar. That found in the Southern Midwest is a great model building wood. It is cut from the "Tulip Poplar" tree. These get to be very large producing a wood great for carving hulls. The other poplar is cut fom the Aspen tree, a fast growing tree that often takes over clear cut areas. Trees usually do not become large. Wood is quite soft, almost white, and when cut from small trees grain structure can be poor. Here in Minnesota this type of poplar, locally called "popple" grows like aq weed. A plank of real basswood in my lumber pile actually looks like a nice modeling wood.
Lumberyard Pine- IMHO, real Pine, not Spruce or Fir is an excellent modeling wood. As Jaager posts above it can commonly be found in American lumberyards. I do not buy 2"x4"S or for that matter any of the 2" construction sizes as these can be cut from small immature trees yielding undesirable core grain structure. I prefer 1" lumber as wide as possible. This yields nice straight outer grain pieces.
Bargin Bin- Lumberyards will sumetimes receive damaged high grade pieces of lumber. Lumber is sold in lengths of 2" increments. So, they can sometimes salvage a damaged board by sawing off a 2ft damaged end end and selling the shortened piece as prime grade. The 2ft damaged end is sold in the bargin bin. A 1"x10" piece of pine 2ft long can provide a lot of ship modeling wood at a very reasonable cost. The wider sizes, 1x10 and 1x12 will often crack at the ends. The crack is easily removed by the table saw providing a pair of clear, straight grained pieces of pine, ideal for our needs.
Roger
-
What a great project!
I too grew up reading Paddle to the Sea. I loved the book. 35 years ago I was fortunate to be given the opportunity to move from the Ohio Valley to accept a new job in the Great Lakes region and I accepted it in a heartbeat. I can just barely see a tiny sliver of Lake Superior from a window on the second story of my house. I also made sure that my children grew up with the book too.
Did you know that there is a Paddle to the Sea movie too? Here in Duluth the Army Corps of Engineers runs a nice museum dealing with Lake Superior. During the summer tourist season they show movies about the lakes in a conference room. Visiting with my two kids and my granddaughters the announcement came over the speaker that there had been a special request from a family visiting to show Paddle to the Sea. My daughter had made the request. The movie while beautifully filmed cannot reproduce the 1940's picture of the industrial lakes that Holling does with his book.
Roger
- Marcus.K. and thibaultron
-
2
-
Old computer woes have made an appearance here on MSW. While I can read content on each of our two IPADS, I cannot post. I can only respond with the "like button;" no WOW. I also cannot sign either IPAD out.
Roger
- FriedClams, KeithAug, mtaylor and 1 other
-
 4
4
-
During my working career, I saw a number of these Jarmac saws in use at model ships operated by large engineering firms (Bechtel, Fluor, etc.) to build models of industrial installations. The saws were used to cut plastic scale pipe and structural shapes to length. Ripping would not have been required. In the case of piping, the fittings all had sockets cast into the ends. The cut length was slipped into the socket and glued so the length of the assembly could be adjusted slightly before gluing. End play of the blade was therefore not a problem.
Roger
-
Paul, Have you looked at the build log for Ed Tosti’s Young America. If not, I recommend it. If you’re not familiar with it is a meticulous build of a Clipper of the same era. See how he handled this.
Roger
- mtaylor, paul ron and Keith Black
-
3
-
As Welfack points out these lights like much else aboard ship required maintenance. They also had to be refilled with fuel (whale oil and later kerosene), and the wicks had to be trimmed. Ships were therefore equipped with Lamp Rooms, an enclosed space where lamps could be worked on and stored out of the weather when not in use.
Roger
-
-
Basswood strips are often stocked by craft stores like Michaels, Hobby Lobby, etc. Basswood lumber is carried by some Big Box Home Improvement stores.
Roger
- Canute, mtaylor, Keith Black and 1 other
-
4
-
Unless you live on the East Coast or highly populated areas of the West Coast everything that Ian posted about totally Electric vehicles also applies to the USA. I don’t foresee that these cars will ever be practical for the long distance driving and weather that we encounter in the Northern Midwest.
Roger
- FriedClams, TBlack, KeithAug and 4 others
-
7
-
-
Bob, I don’t have one, so can’t comment on its performance but the late Jim Byrnes used to offer a draw plate specifically for wood. Hopefully his company will get back on its feet
Roger
- mtaylor, Keith Black and Dan DSilva
-
3
-
This is supposed to be an activity that’s enjoyable so if planking is a problem, choose a project that doesn’t involve it. If you are limited to kits check out solid hulls. Bluejacket offers some, as does A.J. Fisher. A well made solid hull model is no less authentic than a planked POB one. The important thing is correctly reproducing the hull shape. OR. Find a POB model that is easy to plank. How about a Skipjack? There is at least one Skipjack kit on the market and their relatively small size allows modeling at a scale that allows detailing.
Roger
- mtaylor, hollowneck and Canute
-
3
-
Square brass and copper wire is used by the jewelry people. It is available in different sizes on Amazon. 1/32” is the smallest that I have found.
Roger
- mtaylor, Canute, Keith Black and 3 others
-
6
-
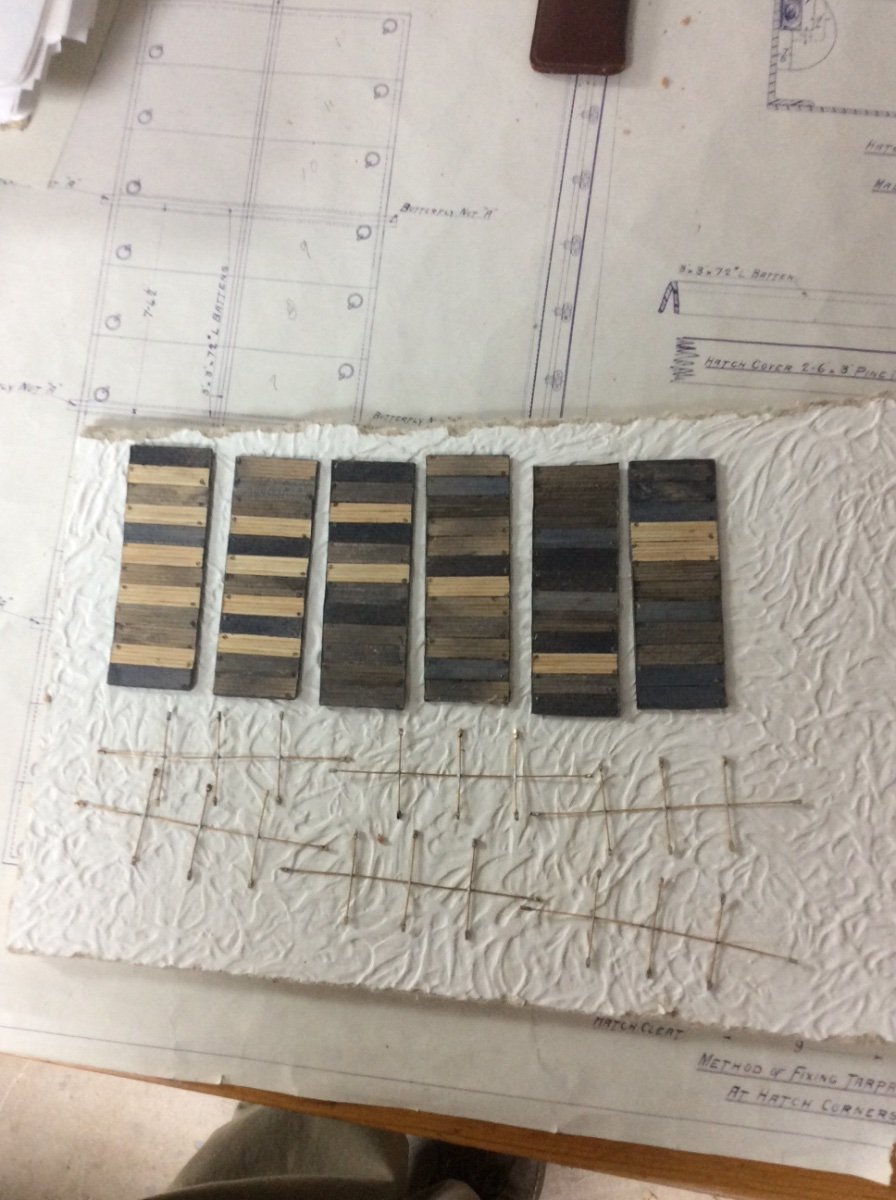
A very strong El Niño has given us a record winter; much above average temperatures and almost no snow. As a result, the SOO locks intend to open several days earlier than planned. Noteworthy this past month was the recent announcement of the discovery of the SS Arlington sunk in 600ft of water off Lake Superior’s Kweanee Penninsula. Arlington, sunk in 1940 shares several similarities with Benjamin Noble. Both were close to the same size and were designed for the pulp wood trade. Both were built by the same yard (five years apart). Arlington was loaded down with a late season grain cargo. Heavy seas washed off hatch bars, tarpaulins, and la least one hatch failed entirely flooding her hold.
Work since my last post involved assembling the hatch covers on a backing piece of 1/64” plywood and fabrication of the hatch bars. Wooden hatches float, so hatch bars were fastened atop to restrain them. These were pieces of 3” steel angle bolted at the ends to padeyes attached to the deck. For the model I used 1/32” square brass wire. At each tip, I soldered a short piece of I/16” brass tubing. A #75 hole through the top of the tube will accept the simulated hold down bolt. A fussy detail requiring a frustrating amount of time.
Roger


- realworkingsailor, Canute, mbp521 and 13 others
-
16
-
Underhill appears to be doing it the hard way! Of course he was writing many years ago and new tools and materials have become available since.
Unless oyou are planning to put your chain under considerable tension, high temperature silver solder is not necessary. Lead free solders are now available in a wide range of diameters. I have recently been using .010” diameter solder with good results. Like Underhill, I like the liquid fluxes applied with a small brush. They do a good job of drawing solder into the joint. Finally, I prefer a fine tipped electric soldering iron to a torch. With the very small sizes involved here an electric soldering iron will fuse the joint instaneously.
Roger
-
Andy, really nice work.
In the years before Covid, my wife and I went on three Sisley Garden Tours to different areas of rural England; a wonderful experience. We heard from more than one gardener maintaining these magnificent gardens that there is an Asiatic blight killing the Boxwood Trees. It would seem that someone could scavage some nice Boxwood before it’s too late.
Roger
- FriedClams, FlyingFish, Keith Black and 1 other
-
4
-
Definitely not splitting hairs, apples and oranges! Allan refers to sailing warships of the 17th and 18th Centuries. These vessels had large permanent lanterns affixed to the transom; one to three depending on the status of the ship. Samual Pepys bragged that one on the Royal Sovereign was large enough that he kissed a woman while standing inside of it! The main purpose of these lanterns was to allow formation station keeping at night.
Much later in the Nineteenth Century, maritime nations developed “Rules of the Road” in an attempt to eliminate collisions at sea. These would not work at night if the vessel’s could not see each other. This lead to the legal requirement for vessels to carry navigation lights, specifically red (port) and green (starboard). These would have been attached to the lower mast shrouds on sailing ships. Exactly when did this happen? I don’t know.
Roger
- Keith Black, allanyed, mtaylor and 1 other
-
4
-
Of course, Constitution has had a very long life during which she has been rebuilt and repaired several times. For a considerable part of this time she sailed as an active unit of the US Navy so until recent times, her refits did not necessarily involve ensuring historical accuracy. Even today, she is a hodgepodge of different periods.
Constitution underwent a major repair in the 1920’s. There are photos of her during this repair in drydock with all exterior planking removed. Apparently, during this repair a series of as built drawings were prepared. In the 1990’s these drawings, on a DVD disc, were offered to the public. I believe that the drawing that you have posted is one from the 1920’s. To be useful to the level that you want you would have to be able to determine when different structural elements were added during which historic period.
Roger
- Keith Black, mtaylor and Marcus.K.
-
3
-
Great project, John! Looking forward to following your progress.
It is interesting the way that the highly successful paddle steamer design migrated from the Mississippi River Basin to the West Coast. American readers may remember the famous Delta Queen that cruised on the Ohio and Mississippi Rivers into the 1990’s (?). Living in an Ohio River Town we could hear her steam calliope from our house each time she visited. Although billed as an “Old South” river boat, she was built for and initially traveled on the US West Coast, in particular, the Sacramento River. Her design resembles your Klondike rather than any than any Mississippi River Basin Steamer. I believe that she is laid up somewhere in Tennessee.
Roger
- bridgman, Canute, FriedClams and 2 others
-
5
-
Paul, From a Naval Architect’s perspective, you are exactly right. Determining the waterline at which a vessel will float requires knowing two things:
1. The weight of water displaced with the vessel assumed to be floating at several waterlines shown on the lines drawing. The results of this calculation can be plotted as a curve displacement vs waterline height.
2. The weight of the ship in different load conditions.
With this information, the draft of the vessel can be picked off for any load condition. In 1800 there were several methods for calculating displacement from the shape of the hull. These ranged from numerical approximations calculated manually, but based on techniques similar to the computer algorithms used today to actually measuring the quantity of water displayed by immersing a model in a tub of water.
The big unknown for ships built in the wooden ship era was the weight of the ship itself. Shipbuilding management systems were simply not capable of accurately predicting how much of the timber allocated for a particular ship would actually wind up in the finished vessel. Iron and steel construction would eventually change this.
The answer to all of this would come when the vessel was launched, and the draft of the floating vessel known. With this they could pick off the weight in the as launched condition from the curve. Adding the weight to be added to complete the ship, the armament, stores, etc. they could get a realistic estimate of the draft of the vessel in various loaded conditions.
My suggestion: Coppered vessels- Follow whatever drawings you are using. Vessels not coppered- White or back stuff up to the bottom of the Wales. The stuff was cheap.
Roger
-
Interesting project! Not specifically related to Florida waters but they supposedly said these old steamboats “could float on a heavy dew.”
Roger
- mtaylor, Harvey Golden and Canute
-
3

Blairstown by mcb - 1:160 - PLASTIC - Steam Derrick Lighter NY Harbor
in - Build logs for subjects built 1901 - Present Day
Posted
Unlike steam railroad locomotives, marine engineering practice required use of condensing engines for two reasons. First, high pressure boilers did not tolerate salt water. Scaling from salt deposits impeded heat transfer causing failure of the boiler tubes. Second, the development of the triple expansion engine, increasing thermal efficiency, required steam in the low pressure to be exhausted well below atmospheric pressure.
New York City harbor craft, however appear to be an exception to this rule. In his excellent book, Tug Boats of New York City, (Photo caption page 85) author George Matteson writes:
"The white vapor emanating from the tug is exhaust steam, which indicates that it is equipped with a noncondensing engine....... Most small harbor tugs were equipped with noncondensing engines to save expense and because clean fresh water was always available from city hydrants."
Railroad locomotives are subject to height restrictions from tunnels, bridges, etc. These harbor craft were not. the easiest way to increase boiler draft was to increase the height of the smoke stack with steam vented separately. As with railroad locomotives, as steam technology matured, marine engineers worked to utilize every last BTU from fuel bought and paid for. For sophisticated steam ship designs this lead to all sorts of waste heat recovery devices often located in the smoke stacks. These harbor craft traveling very short distances did not require these complicated steam plants.