tdmongillo
-
Posts
11 -
Joined
-
Last visited


-
 CaptainSteve reacted to a post in a topic:
USS Constitution by tdmongillo - BlueJacket Shipcrafters - 1:96
CaptainSteve reacted to a post in a topic:
USS Constitution by tdmongillo - BlueJacket Shipcrafters - 1:96
-
Thanks for all the interest in my build. I'm sorry to report that I have been unable to spend any time on this kit since my last post. I'm specializing in orthodontics and it has been a very busy program. I graduate in December, though, and hope to continue once again after the new year. Until then I need to spend my time on a thesis and find a job.
-
WackoWolf reacted to a post in a topic:
USS Constitution by tdmongillo - BlueJacket Shipcrafters - 1:96
-
CaptainSteve reacted to a post in a topic:
USS Constitution by tdmongillo - BlueJacket Shipcrafters - 1:96
-
CaptainSteve reacted to a post in a topic:
USS Constitution by tdmongillo - BlueJacket Shipcrafters - 1:96
-
coxswain reacted to a post in a topic:
USS Constitution by tdmongillo - BlueJacket Shipcrafters - 1:96
-
coxswain reacted to a post in a topic:
USS Constitution by tdmongillo - BlueJacket Shipcrafters - 1:96
-
coxswain reacted to a post in a topic:
USS Constitution by tdmongillo - BlueJacket Shipcrafters - 1:96
-
coxswain reacted to a post in a topic:
USS Constitution by tdmongillo - BlueJacket Shipcrafters - 1:96
-
Landlubber Mike reacted to a post in a topic:
USS Constitution by tdmongillo - BlueJacket Shipcrafters - 1:96
-
Aussie048 reacted to a post in a topic:
USS Constitution by tdmongillo - BlueJacket Shipcrafters - 1:96
-
Sweet! Thanks so much for the advice.
-
Hi, I'm new to ship modelling and I'm wondering if anyone has advice on how to ensure masts are aligned. I have a solid wood hull and I'm at the stage where I need to drill holes into the hull, and I'm concerned that drilling the holes with the slightest misalignment will be compounded at the top end of the mast. The way I see it there are a couple of ways to do this: 1. Drill the holes perfectly to size and angulation. 2. Drill holes larger than necessary and use shims to align later. What methods have you used? Your advice is greatly appreciated.
-
Question about mast angle/length on phantom build
tdmongillo replied to kdnash's topic in Masting, rigging and sails
I'm at a stage where I could drill the holes in my solid wood hull and I don't want to do it incorrectly. Would you please describe by photo or in writing what you mean by, "make a tool to help drill them at the correct angle." Thanks, -
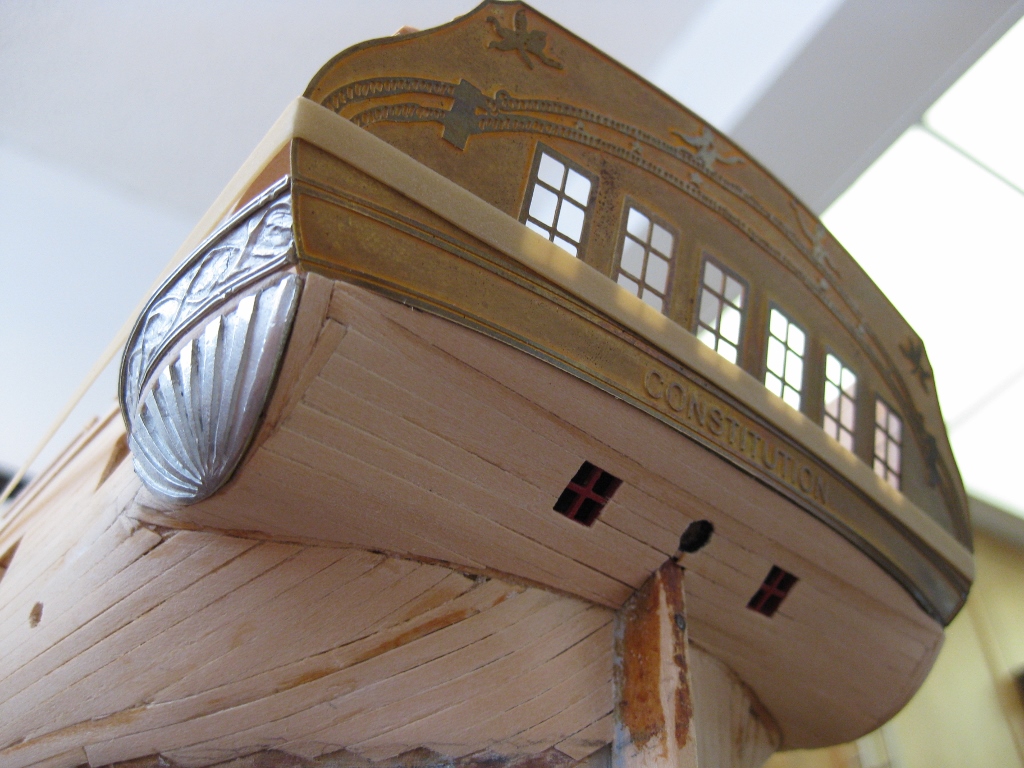
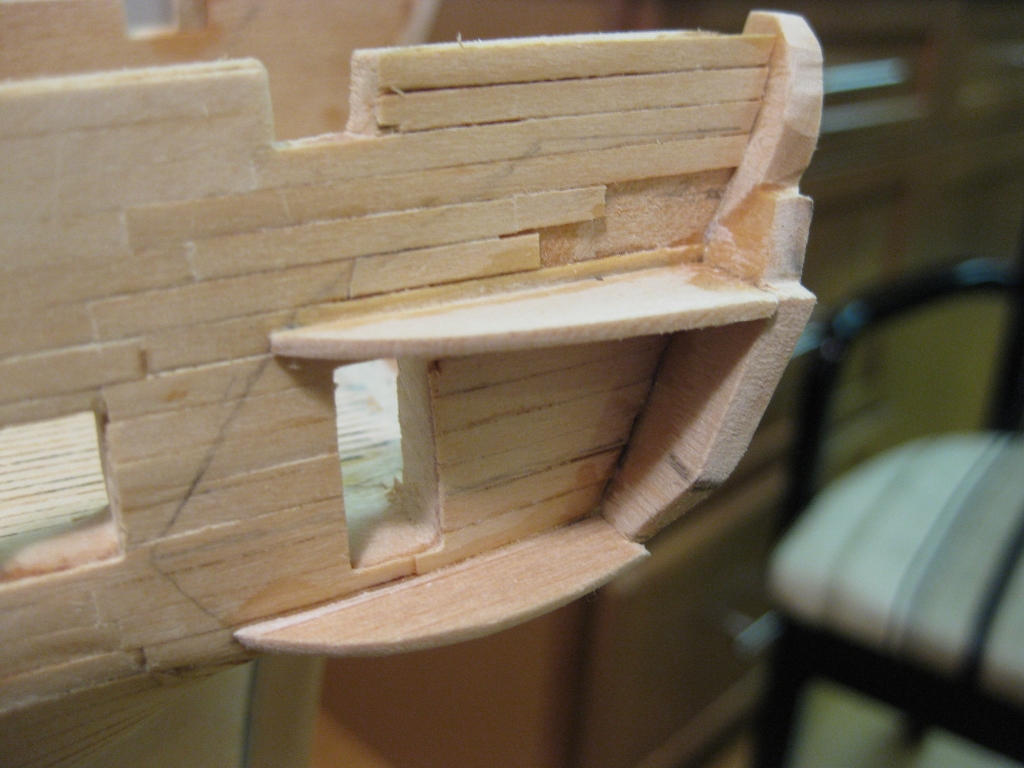
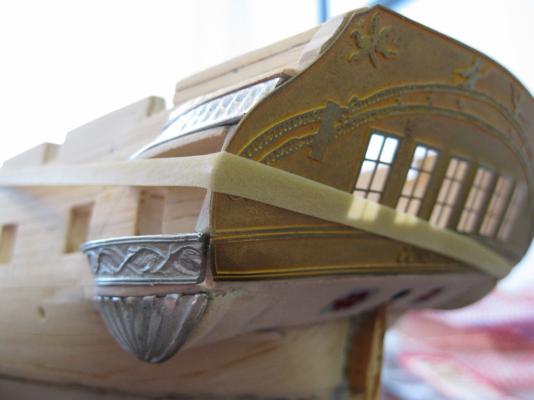
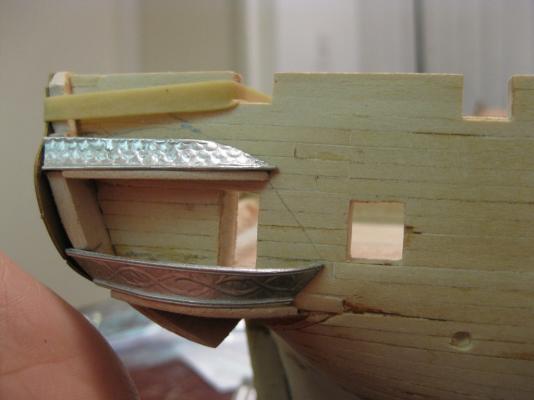
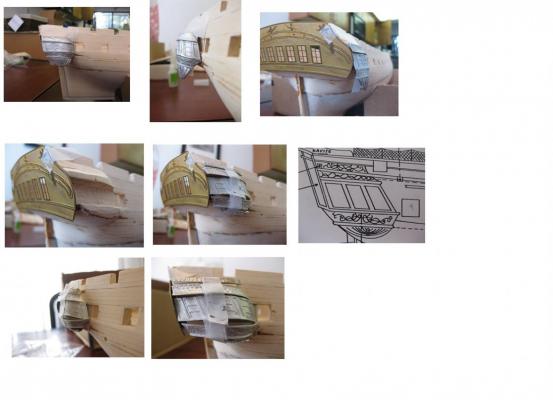
Whew! Made some major progress. I really wouldn't recommend fabricating the galleries like this--there has to be an easier way. Nevertheless, it's mostly done. Now I will just need to create window frames for the galleries, paint the details, and glue them on. The window frames will be very difficult to make by hand. We'll see how it goes. Outlining framework for each of the metal pieces to be used in the galleries With lower stern windows prior to planking. Try-on of metal pieces Metal pieces, framework, and stern planking

-
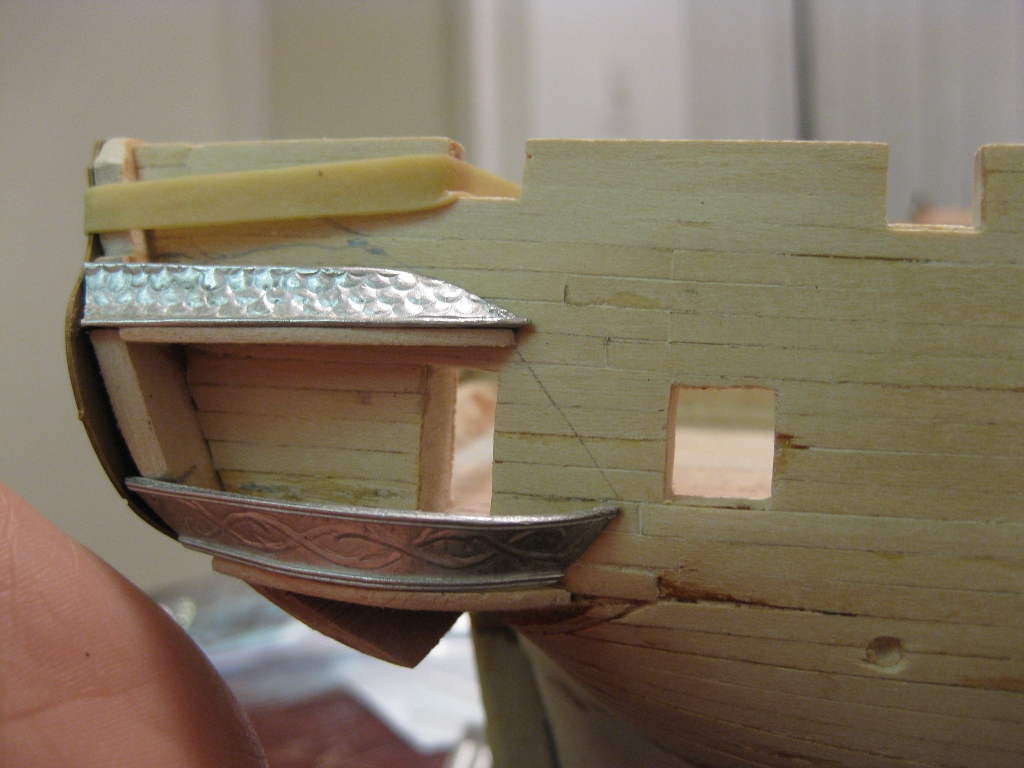
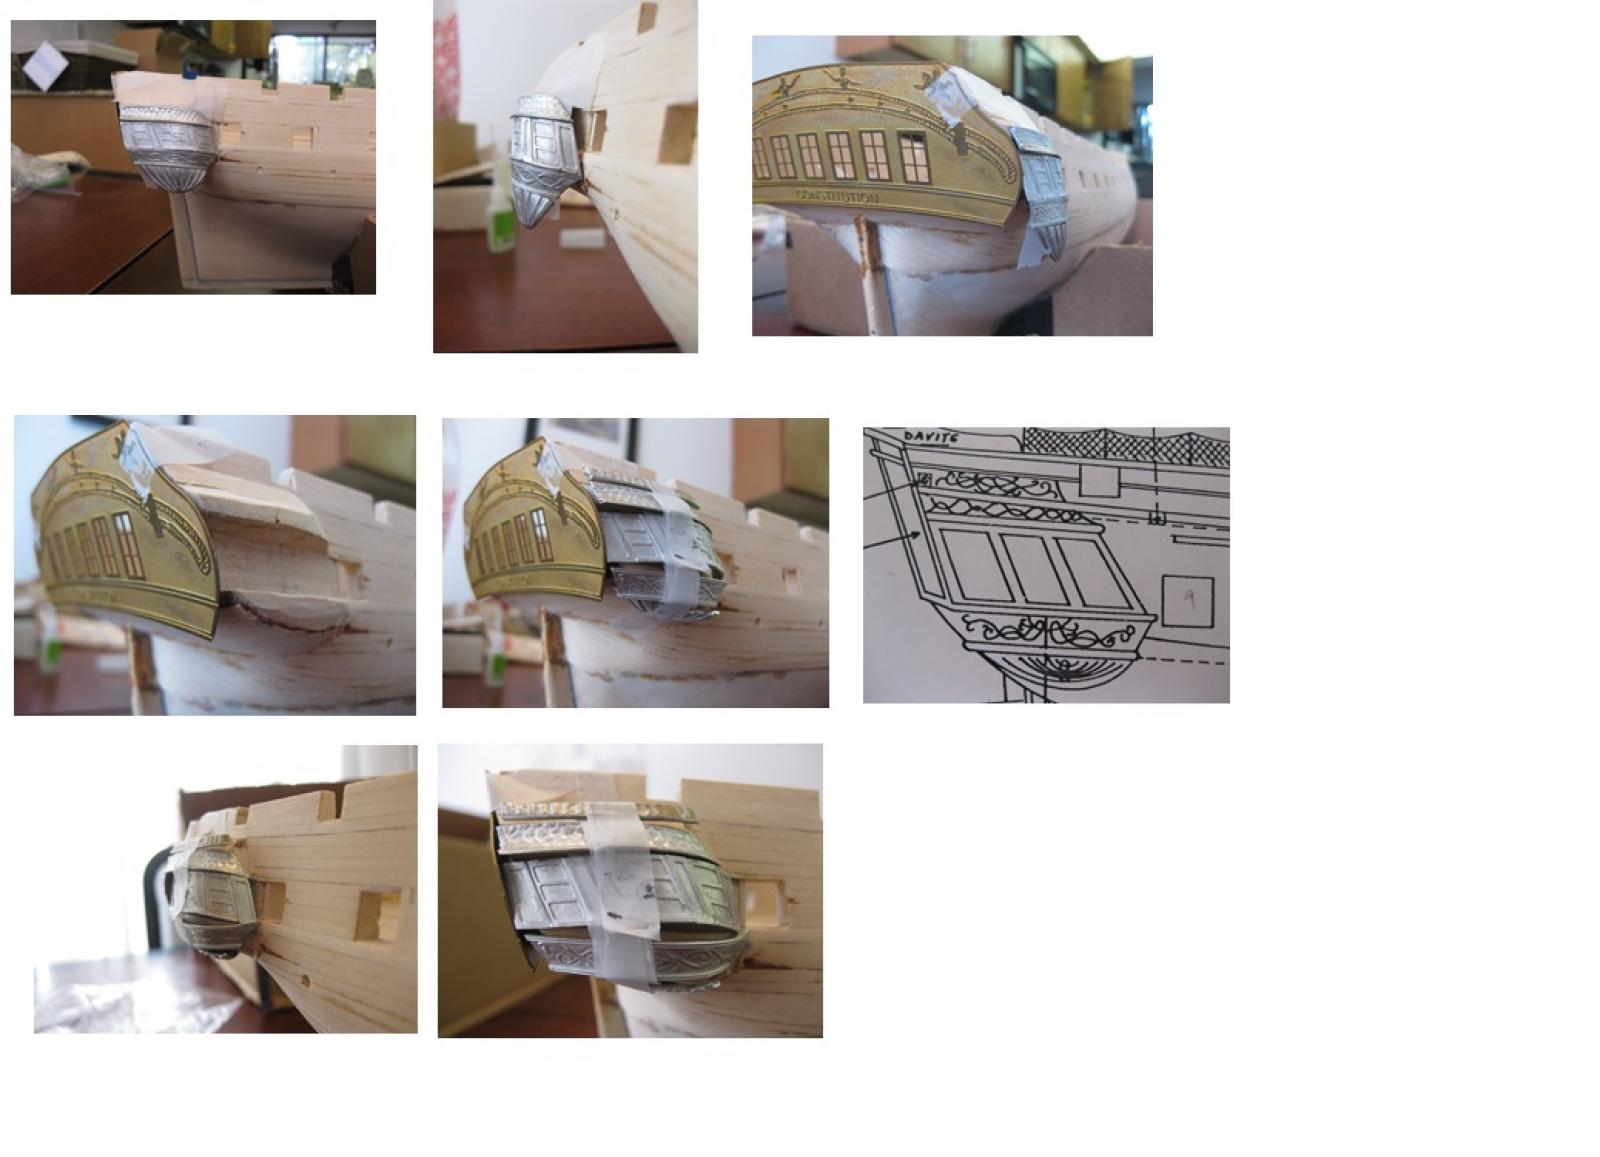
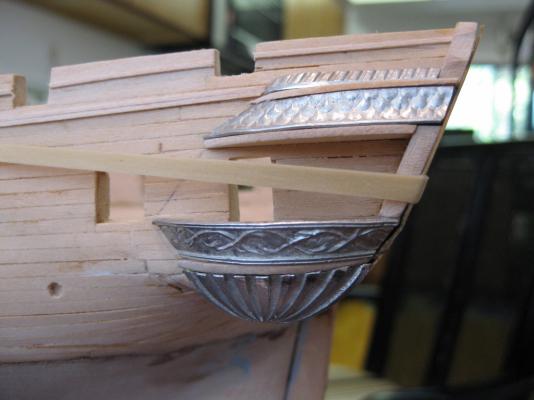
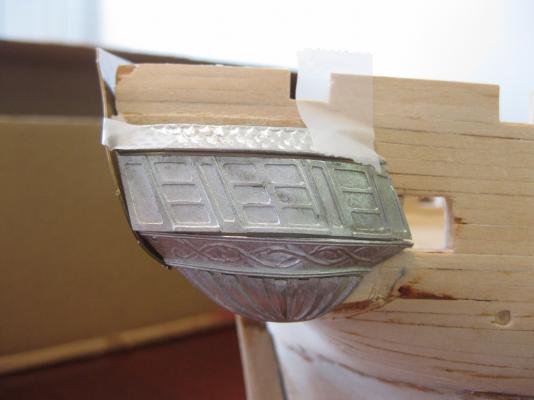
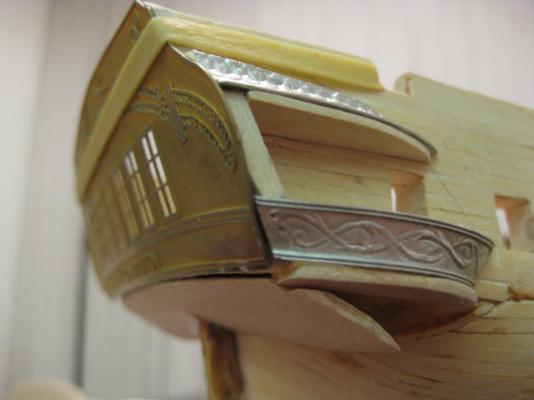
Thank you for the suggestions! After lopping off the machine carved wooden galleries so that I could better try on the metal transom and galleries supplied in the kit I've decided to keep those parts--with the exception of the window frames (the window frames are too squatty). With a bit of research I found a great article from the US Navy called, "USS Constitution Stern & Quarter Gallery Decorations." In the article is a great side elevation of the galleries. I used Paint and re-sized the diagram to scale, printed it out, and used it as a template. Turns out, the transom just needed to be moved aft about 1/8 inch, and voila! Problem solved. (Hopefully this doesn't ruin future construction.) I'm going to fabricate my own window frames for the galleries to be taller and accurate to the diagram the US Navy supplied. Here's the progress so far... Carved galleries removed Try-on of supplied parts show that the gallery extends into the gun port Addition of 1/8 inch using transom template Using scaled diagram from US Navy document as template Fabrication of galleries With supplied parts


-
tdmongillo reacted to a post in a topic:
USS Constitution by tdmongillo - BlueJacket Shipcrafters - 1:96
-
Thanks for the comments. I have yet to install the spar deck. I need to complete the gun deck first. I don't want to start detailing the gun deck until I get the outside shape right--and this includes the transom and galleries. Also, I think I'd like to paint the outside black prior to detailing the gun deck. No, my kit's instructions are not detailed enough to make galleries from scratch. All that are included in the plans of the galleries is the little photo that I uploaded in my last photo post--and those plans are inaccurate. I don't want to purchase an entire set of new plans. Maybe I could contact BlueJacket. Any other ideas?
-
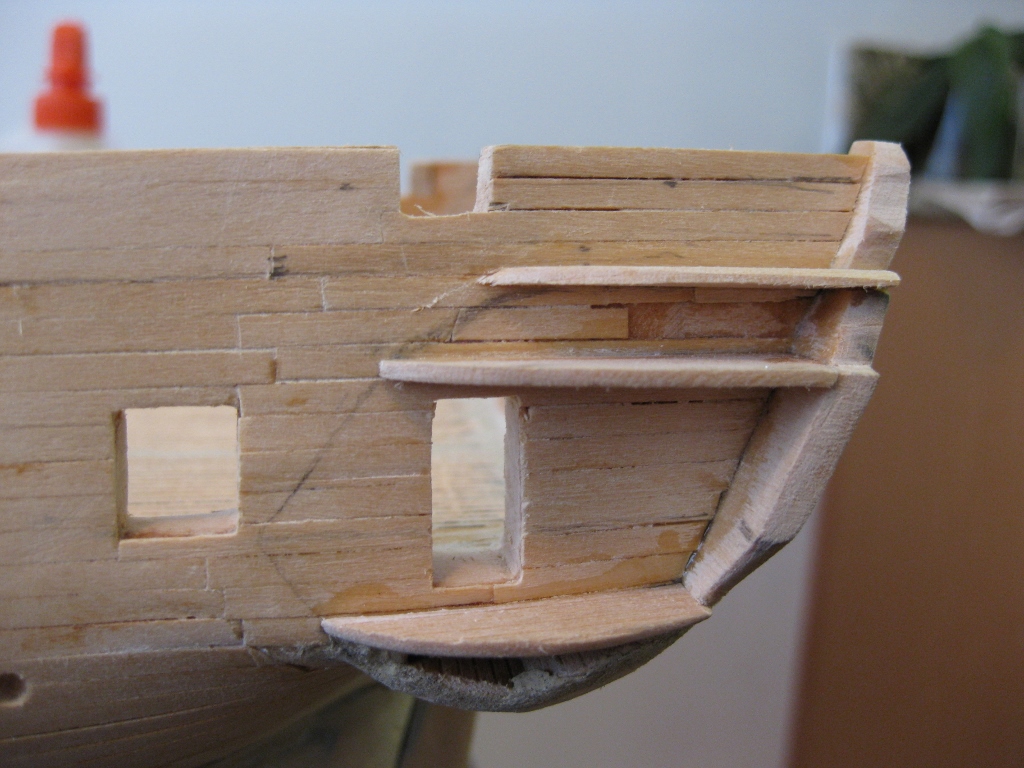
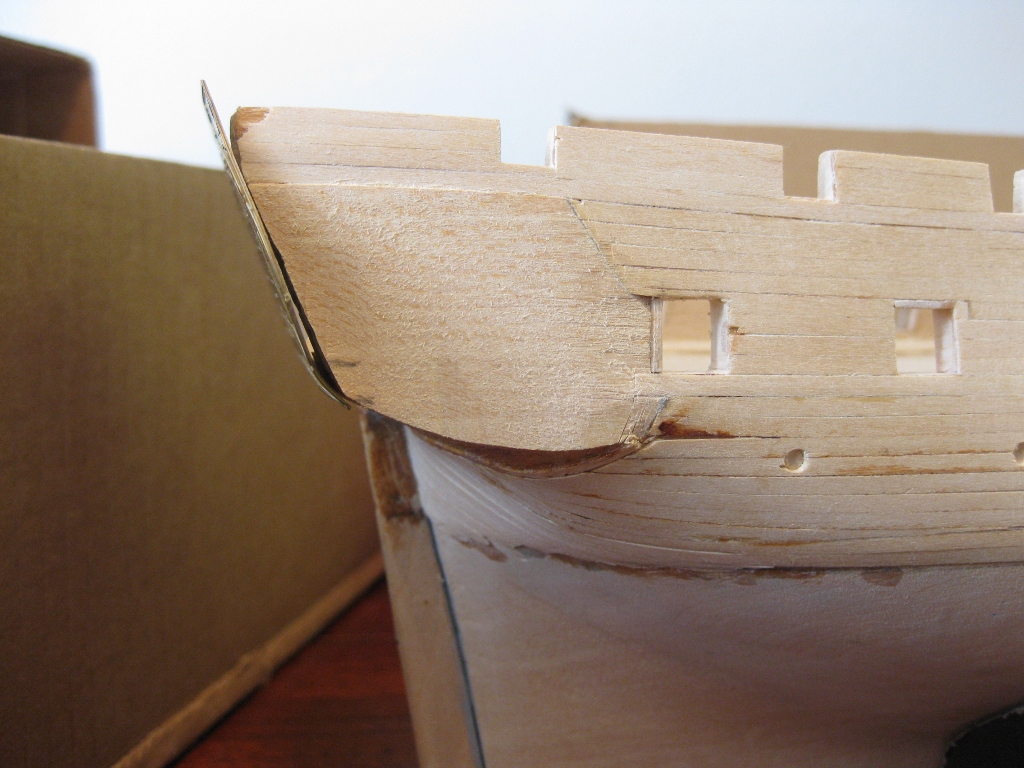
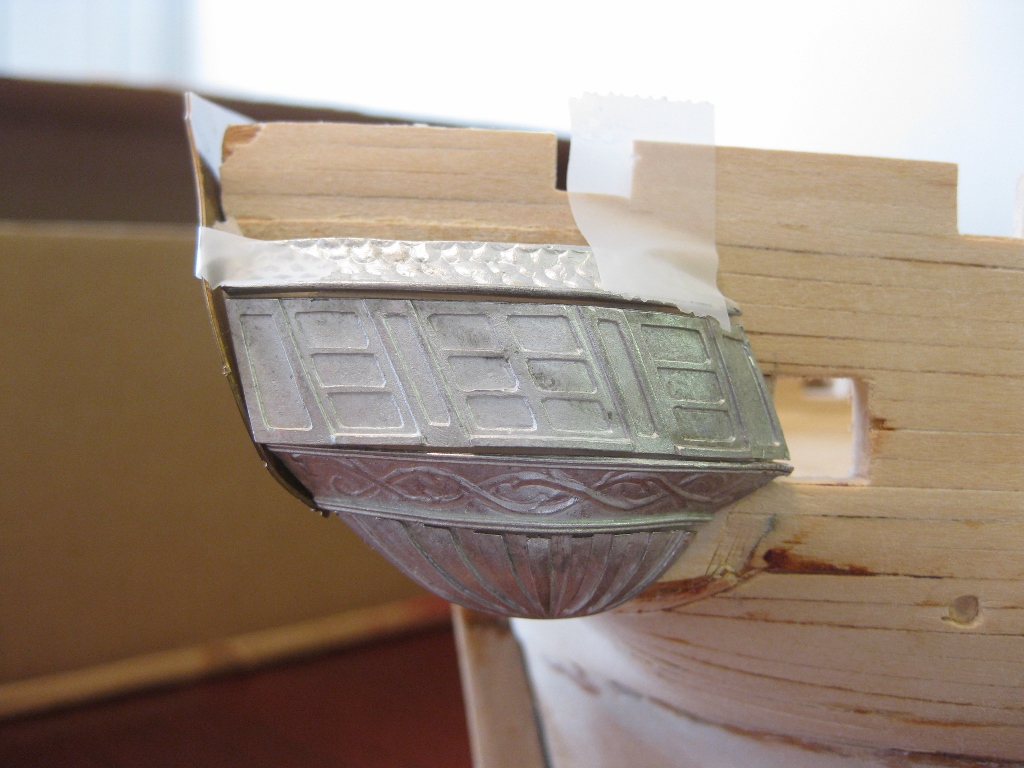
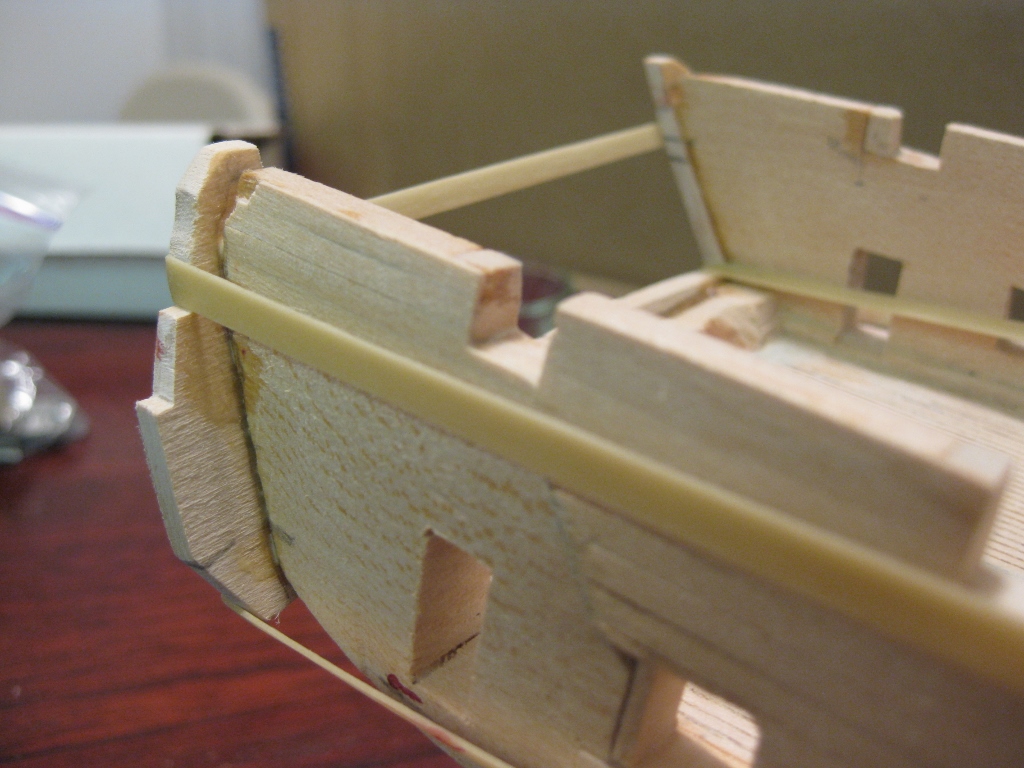
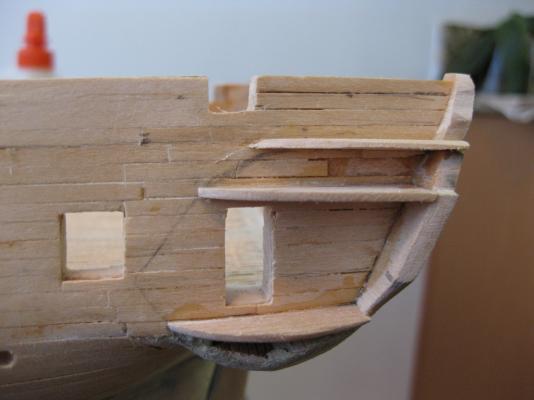
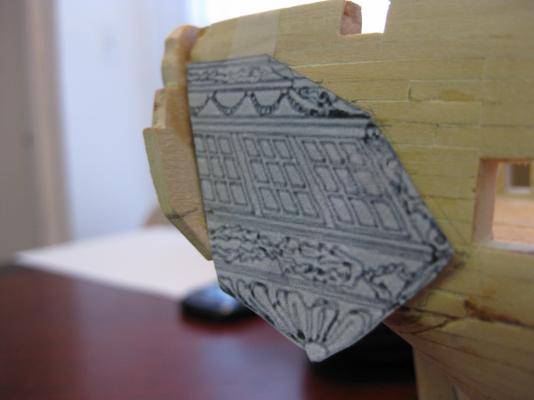
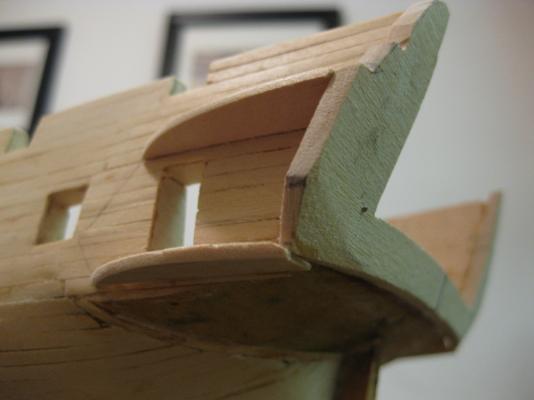
I did a trial fit of the cast britannia quarter galleries and brass transom. Houston, we have a problem. I've heard that every kit has its problems, but this is pretty egregious. The parts look good in 2D, but when you turn it to the side there are gaping spaces. The lower corners of the transom also hang out in the breeze. I think I need to lop off the machined galleries already on the hull AND abandon the britannia parts. Please, advice and comments welcome!
-
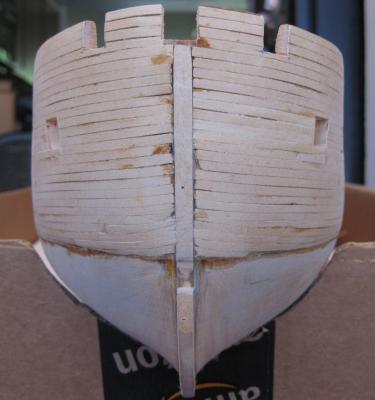
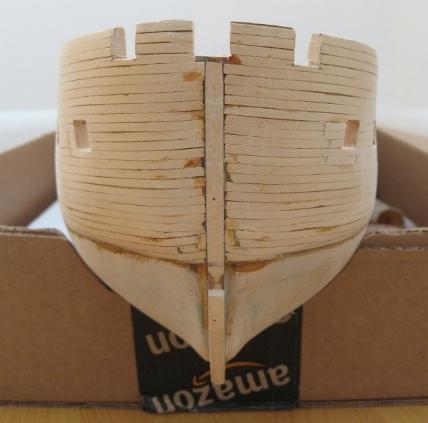
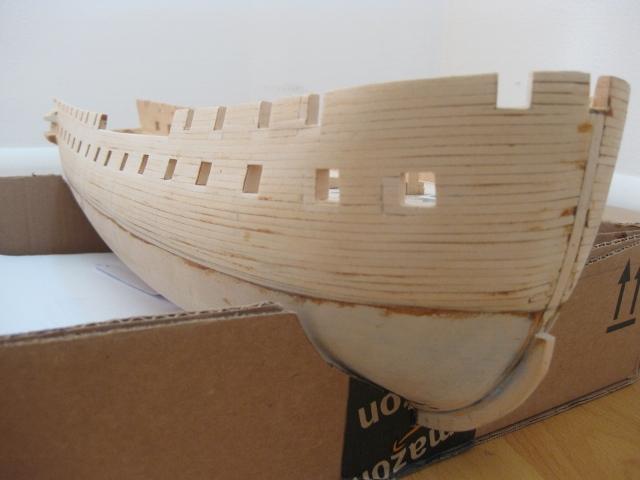
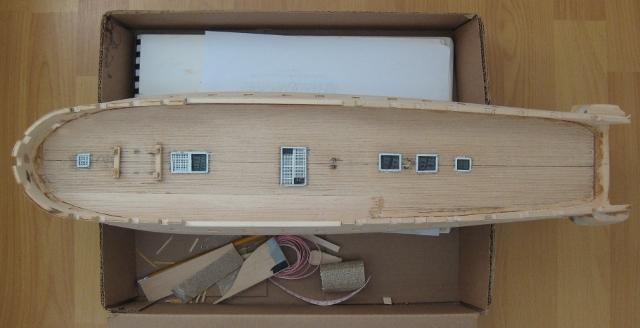
Finished re-planking around re-positioned gun/spar deck ports. I didn't like the patchwork look. Problem is I don't know what to do next. I'd like to place birth deck ports, hawse pipes, and get the galleys and transom set, but I'm wondering when I should apply the black paint. Compare this to the first photo I posted. Notice less plank patchwork around the port side gun deck window in the new photo. Also, reworked the wood around the keel.
-
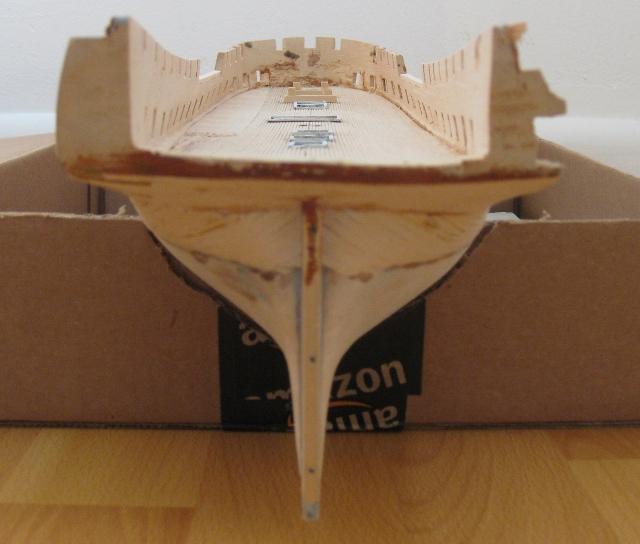
I've been looking forward to posting photos, but now that I look at them I am quite embarrassed. 90% of what you see was completed when I was in middle school. My time is now being spent trying to fix many issues: re-positioning the center and water lines, re-positioning the gundeck and spardeck ports, re-planking the hull where ports were re-positioned, thinning the bulwarks, leveling the gundeck floor, etc. The work is tedious and I feel like every two steps forward I take another step back.
-
From what I understand the USS Constitution is the most difficult model BlueJacket has to offer. As a novice model ship builder it appears that I am in for a real challenge! This model was given to me as a gift from my father when I was 11 or 12. I think he was tired of hearing that plastic model airplanes weren't difficult enough and wanted to give me a real challenge. He succeeded. I remember opening the manual and thinking, "Where's step one?" I didn't get very far on the model as it was lost in storage after a move. I have always longed to continue working on my Connie. Over 15 years have passed and now the kit is back in my possession! Your help, advice, and patience through this forum would be greatly appreciated as I undertake this challenge. Best, Anthony Mongillo, A novice.