Ship Shape
-
Posts
54 -
Joined
-
Last visited
Content Type
Profiles
Forums
Gallery
Events
Everything posted by Ship Shape
-
Due to another card build taking place here, I pulled all this back out and am finishing the glue up of the frame. Hope to have a few photos up by the weekend with some advancement in the build. Rick
-
I have been building in card for some years and have a vast collection of kits. Shipyard and HMV are my fav's not counting GMP. I have also ordered numerous times from GMP and have never had a issue one with them. Sometimes it seems like 2 wks and you have and then again it might take 4 weeks, You just have to be patient when ordering. I try to make mine pretty large when ordering to keep the shipping down per month. I like the paint that comes w/Shipyard kits, it is a water base gauche paint. This translates into a medium that one can layer to get many variations of the color and effects. However, it is not a easy paint to use and takes a bit of practice to get down. Looks to me, you have mastered it well. One of the down sides is this is a water base paint and water and card are not friendly. Here is a tip I learned from modelers from Poland, clear base then paint. I use good ole model airplane dope for this. Another way is Future Floor Polish. Once all is dry and ready, you will find you are not plagued with raised or swelled card. Hope this has helped. I also seal all my paint w/sealer from Hobby Lobby. The stuff that protects your paint job from UV that artistes' use to protect the paintings from sunlight. Look forward to more of your build. You fired me up to get out a project I started some time ago..........Santa Maria, Shipyard, all laser cut kit.
-
Impressive, very. I built this many years ago and it never occurred to gild all the gold areas. Looks great and look forward to more. Rick
-
I believe period construction for these wood deck vessels mandated that the deck would later be scraped resulting in cleaner lines. But I might be wrong. Like how your turned out. The Lego trick is a cool idea many here have copied.
-
I am really enjoying your build. I am a huge Vic fan and I am also drawn too Billing Boats kits. At present am trying to fix a very bad warped keel to Billing Boats Santa Maria. Will be watching. Rick
-
I am watching with baited breath. Looking forward to more of your build. I am again working on the hull of the Royal Sun. Rick
-
I have looked @ this kit many times and I must admit, you are for sure bringing all you can out of it. Looking forward to more. Rick
-
I agree, it did help to see her finished after what the beast cost. I did @ a latter date aquire another Victory but this time a Corel Kit. A retirement project down the road. But in the mean time, I shall enjoy yours. Cheers Rick A Scott Cousin in the US
-
Enjoying your log, I was building this same kit several years ago and had got to the point of planking when a fall from the build desk caused concederable damage and I just put it away. I would later sell and I believe the fella went on with damage and all and pretty much finished her. Looking forward to more of your mojo. The deck work is most excellent. Rick
-
Looking forward to your build of this most wonderful vessel. I am also interested in how you approach and build a Billing Boats Kit. I have a kit from 1984 of the Santa Maria w/o fittings kit, but that is no big deal, I can make and use after market items for what I do not have. Will watch w/interest. Rick
-
I have one of these tucked away for when I retire, but you sure have done a great job on a working boat of the Chesapeake. I really like what you did w/dredges, these can and are not that easy to make, but you made it look easy. Great job. Rick
-
Admiral Sjors.........love it Yes, I have returned to building those confounded ships again.......oh wait, thats the theme of this here Forum. Anyway, sold our house, down sized to a apartment until we retire to the coast of NC.......7 more years it looks like. So space is @ a premium, and boy have you built a monster, but it sure is pretty, but not as much as Anja.......... hello Anja. Anyway, I do have a little build log going right now........a Shipyard Santa Maria, a 1/72 scale all laser cut card kit. So look me up and if you have any advice to give your poor lowly seaman, by all means do so my friend. Rick
- 1,873 replies
-
- 1
-

-
- occre
- san ildefonso
- (and 1 more)
-
Brought back when I was trying my hand @ my 1st Victory, mine never made it to the finish, but yours sure did and what a finish my friend. I will say it looks to me the finest HMS Victory I have seen built period..........job well done Admiral. My hat off to you sir. Rick
-
Look @ you, and a Admiral too..........I had to start over, lost all my stuff? Great to see you still build ole buddy, and yes, I had some popcorn while I read thru your thread. Rick
- 1,873 replies
-
- 1
-
-
- occre
- san ildefonso
- (and 1 more)
-
My Bad, I thought this was where you covered card modeling. If possible, can you move this thread to where it needs to be. Thanks Rick
-
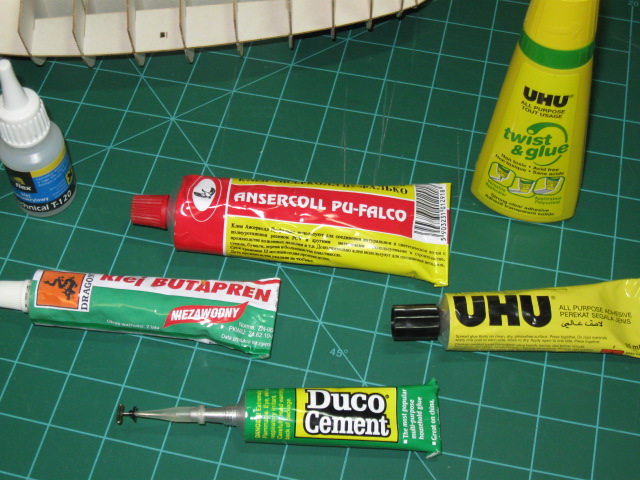
Just so you know, I use different glues for assembly........ea. one has its purpose. The glue in the green tube Klej Butapren is some of the best glue I have ever used. This glue and another tube came in the 1st laser kit I bought. The Santa Maria did not have this in it when I purchased this kit. The Ansercoll Pu-Falco is very much like the Duco as is the UHU. The Blue Bottle Uni-Flex is a card use CA and I love this stuff. Now does one need all this to build card, no, but after many years of building card models, I have acquired these and learned how to use for the different types of assembly/dry times.

-
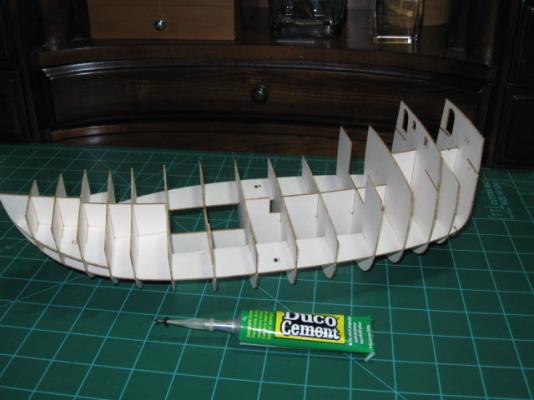
Sanded, adjusted and Duco Cement............frame is assembled. Next is to fair the ribs/hull........I will use a sponge sanding block for this little chore. Using a wood block w/sandpaper might remove/too aggressive for the laser cut card. I did not do this on my last laser cut..... Le Coureur. This resulted in a few uneven spots that was not noticeable, but I knew they were there! Next up after fairing will be the sub-deck material being added. I will use the printed decks as comes in the kit. On my last build, I replaced w/wood and though it turned out nice, it was not too scale and the printed deck in this kit has the pegs rep'd on the deck, a detail one is hard pressed to emulate.
-
Intro to Card Models Pt. I: What Is a Card Model?
Ship Shape replied to ccoyle's topic in Card and Paper Models
Paper models out date all other forms of modeling. History shows that original models were made from fibrous material very much like paper or better yet paper machie. Paper modeling has been around way before any other medium was used, so you see, paper models are the Grand Daddys of all the other forms of modeling..................... Rick -
Shipyard H.M.S. Alert, 1777, 1:96-scale Paper Model kit
Ship Shape replied to catopower's topic in Card and Paper Models
I will follow your progress............... -
Ok, so lets see that puppy.........the more the merrier! Never enough card models going/build threads. Rick
-
Great job on this kit and the extras you purchased will go along way to bring to life this little vessel. I also see you have discovered you are able to paint, this can really make a card model look as if it was crafted from wood. I have seen modern vessels painted and they looked like a plastic kit when done. Card models are one of the mediums you are able to take to different levels by the amount of time and effort you are willing to put into it. Thanks for the site for purchasing shipyard kits, already found my next project. I am currently building the Shipyard 1/72 Santa Maria, this is a complete laser cut box kit, though not cheap, as for carding, this is a great kit. I do not however recommend this kit to anyone but those with several builds under their belts. But from what I am seeing of your build, you seem to have the skills needed to assemble one of these. This is the 2nd such kit I have built, of this type kit, completely laser cut box kit. Shipyard makes some of the best card models around, the HMS Victory, I would love to see that one done as a complete laser cut kit! Look forward to more of your build. Rick
-
Where are the Big Bismarck models Logs?
Ship Shape replied to yvesvidal's topic in Plastic model kits
I see alot of people talking, but where are the builds? I just bought the Revell 1/350 Bismarck w/a ton of goodies. I opted for this scale over the 1/200th because of limited space and cost. So in the near future, no talk, will build for all to see.............. And to give you a idea, I spent well over $300.00 on kit and all the little bits to bring it to life........... Rick -
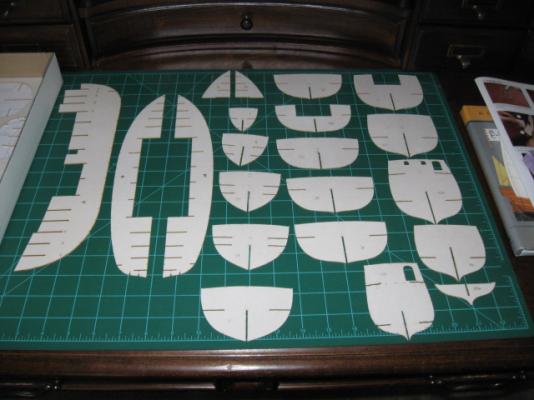
Well here is what I have done, I completely took the dry assembly apart of the frame and sanded all parts to remove nibs and high spots. Will now take ea. piece and if needed, adjust to get a perfect fit following the tick marks as supplied on the ribs and keel.
-
Howdy all, has been a few months and I have been busy and not much model time. I am starting back to work on the Santa Maria. Right now I am double checking that all the ribs are ready to glue to the keel. Though it is laser cut, you still have to remove the little nibs left from the cut process that holds the part to the sheet. One area I have ran aground is @ the stern. Instructions get abit vague here as to the correct orientation of part IVX. But careful study of the instruction booklet w/photos helps figure this little detail out. For those building, if you follow the process of all the numerals showing in the same location f/all the ribs this is correct except for the above listed part. This one must be turned around and the doors align. After that is figured out you take it all apart and after cleaning the nibs, you are ready to reassemble and glue. Here is a tip I learned from another card modeler. When putting a frame together made of card, we want to apply a bead of glue on rib and insert into slot of keel. Then we go back and lay a bead of glue down the four corners of the slot. Now yes, this is a solid way to glue, but remember, we are working w/card or paper. Glues is a moist medium applied to card and as it dries, it can and does warp/twist. That is why when you assemble a card frame and it is dead straight/level and after drying out for a week, you begin to notice little twist working their way down the keel. Now alot of this has to do with the type glue, and how much. So I sand, prep ea. rib, slide onto keel, keep it @ 90 degrees and then just spot glue down the joint. I do this on all sides. I like Duco Cement for this operation as it dries fast with little shirkage. After all the ribs are in place, sand and fare the whole assembly to prep for covering. Just one of those things one learns over time when working w/card. PS: this holds true of wood as well.
-
Outstanding craftsmanship and attention to detail. I am very impressed by your types of material you are subbing in this build. I am @ this time building a HMV USS Ticonderoga, though mine is pretty much stock as comes in book. Much to be learned from watching your build and I look forward to more. Rick