genericDave
-
Posts
209 -
Joined
-
Last visited
Content Type
Profiles
Forums
Gallery
Events
Everything posted by genericDave
-
 Thanks Dave! It all kind of clicked after reading J's description of where the lines would be tied off, seeing your photo with the location of the holes, and realizing that these metal castings are supposed to have a hole drilled in them. I'm going to take a stab at cleaning up the castings. If they don't work out, I'll probably just drill the hole and shape the opening on the outside of the bulwarks.
- 242 replies
-
- 1
-

-
- bluenose
- model shipways
- (and 1 more)
-
J, For those planks, after I cut in the notch to fit around planks 1 & 2, I tapered that inside edge (that will sit against plank 1 or 2) from the notch back towards the other end, about 6 inches. Then I tapered the outside edge on the short part past the notch, just enough to get the tip narrowed down to my liking. I didn't want to taper the entire plank, then cut the notch, because I was afraid that I'd end up with too little material around the notch.
- 242 replies
-
- 2
-
-
- bluenose
- model shipways
- (and 1 more)
-
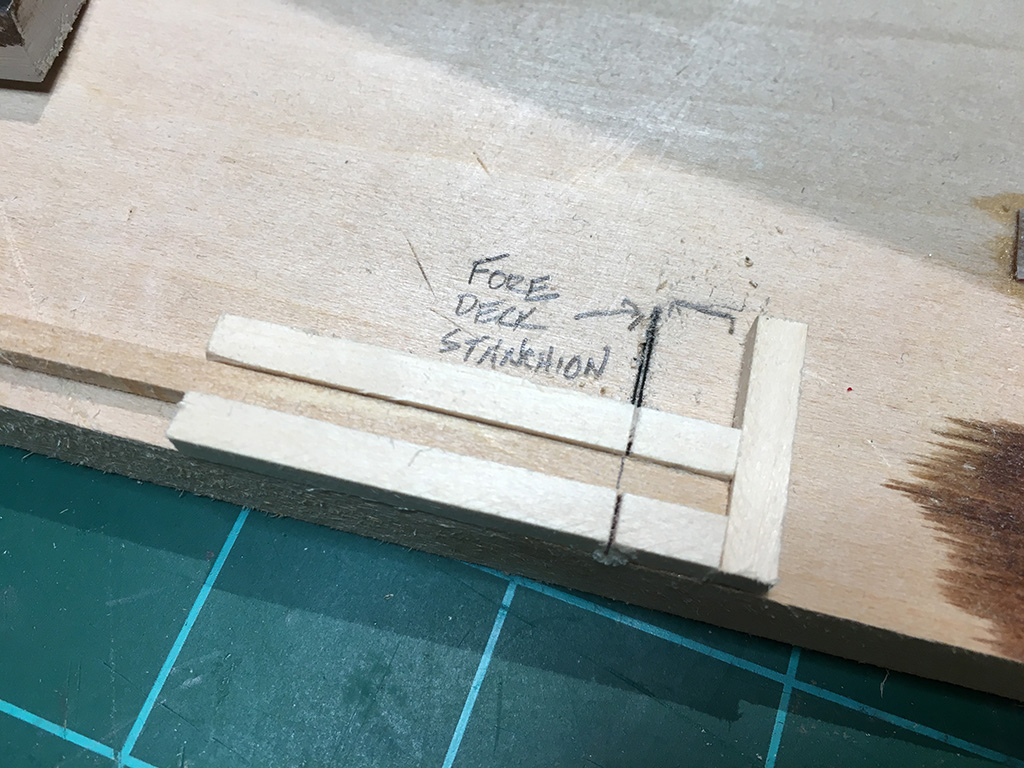
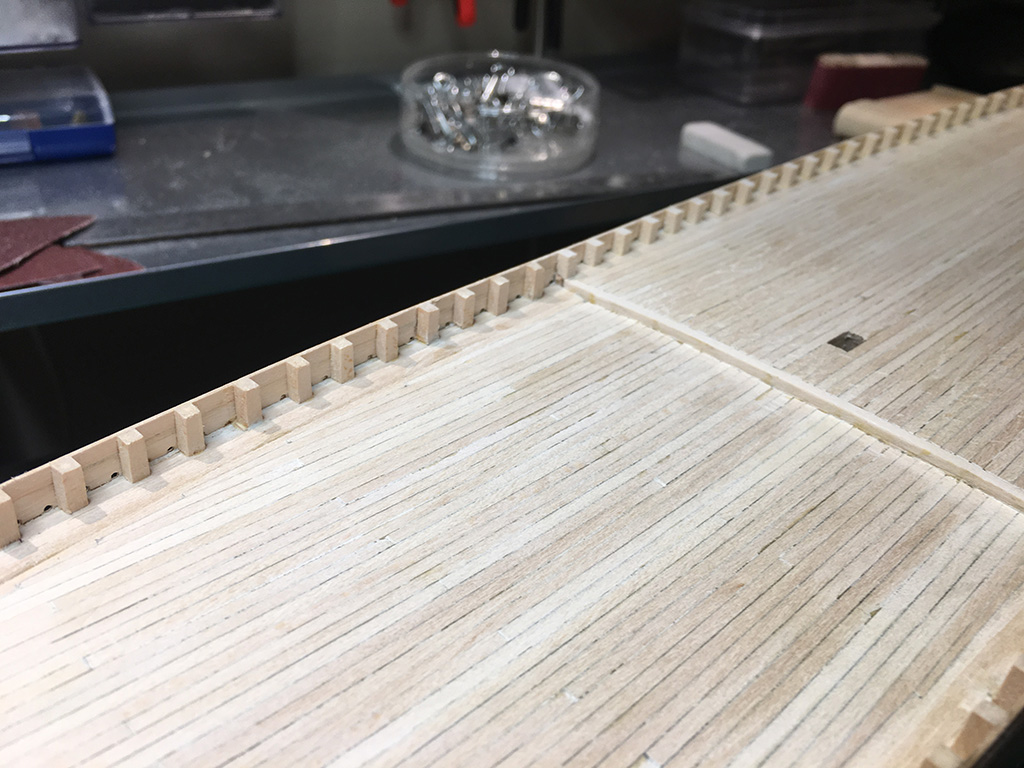
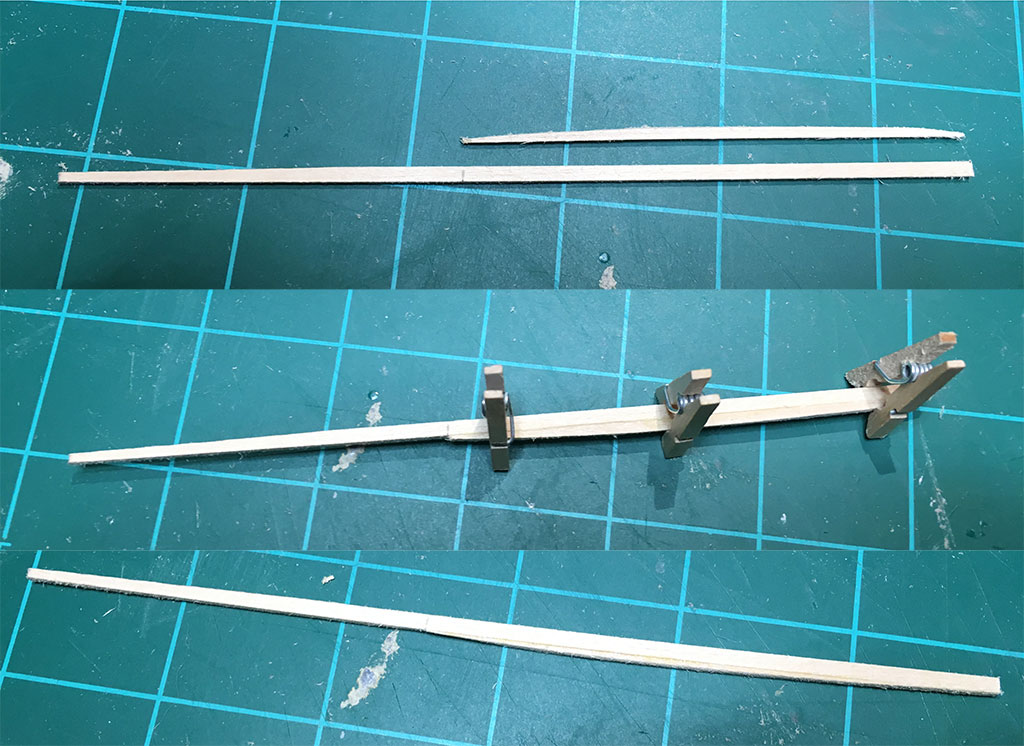
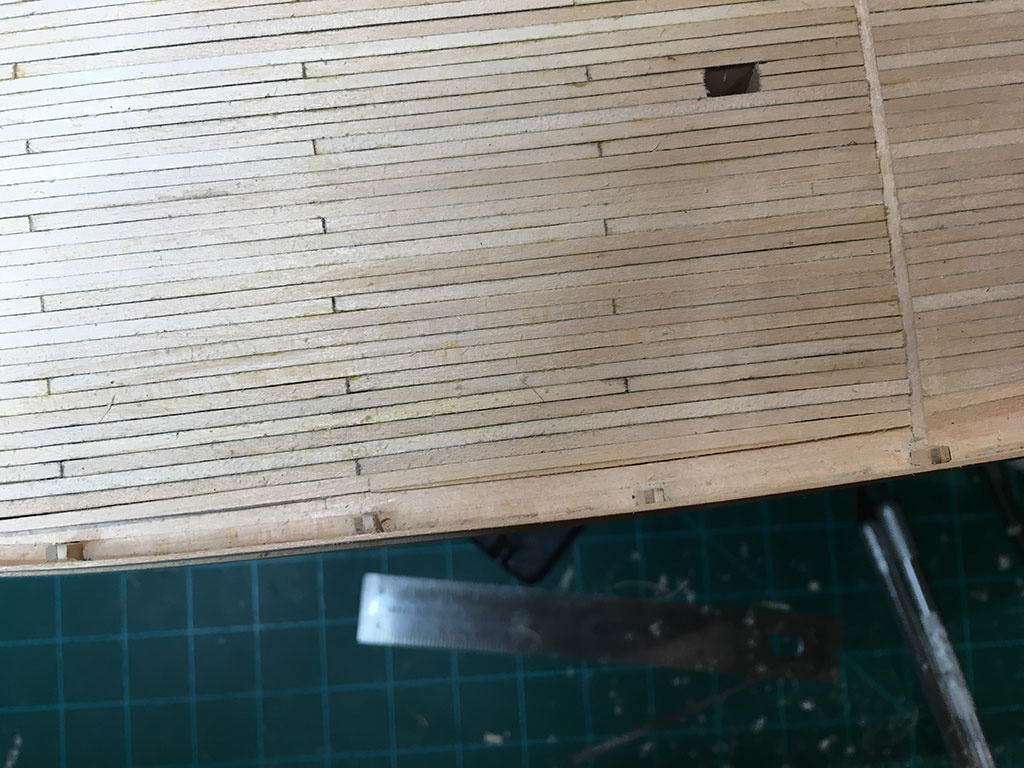
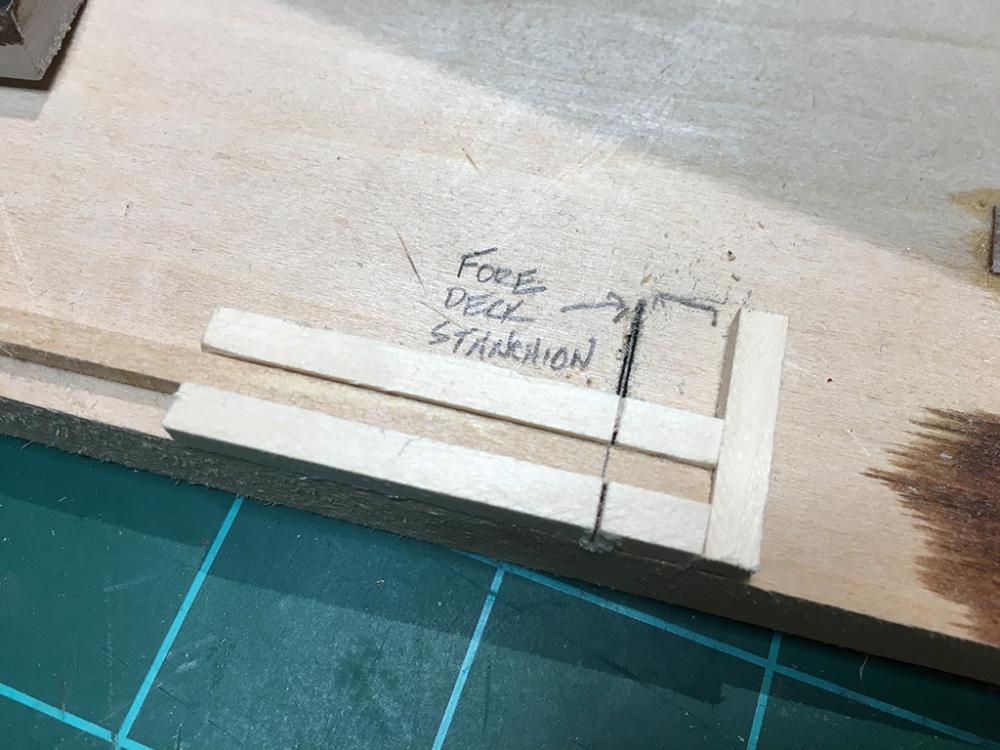
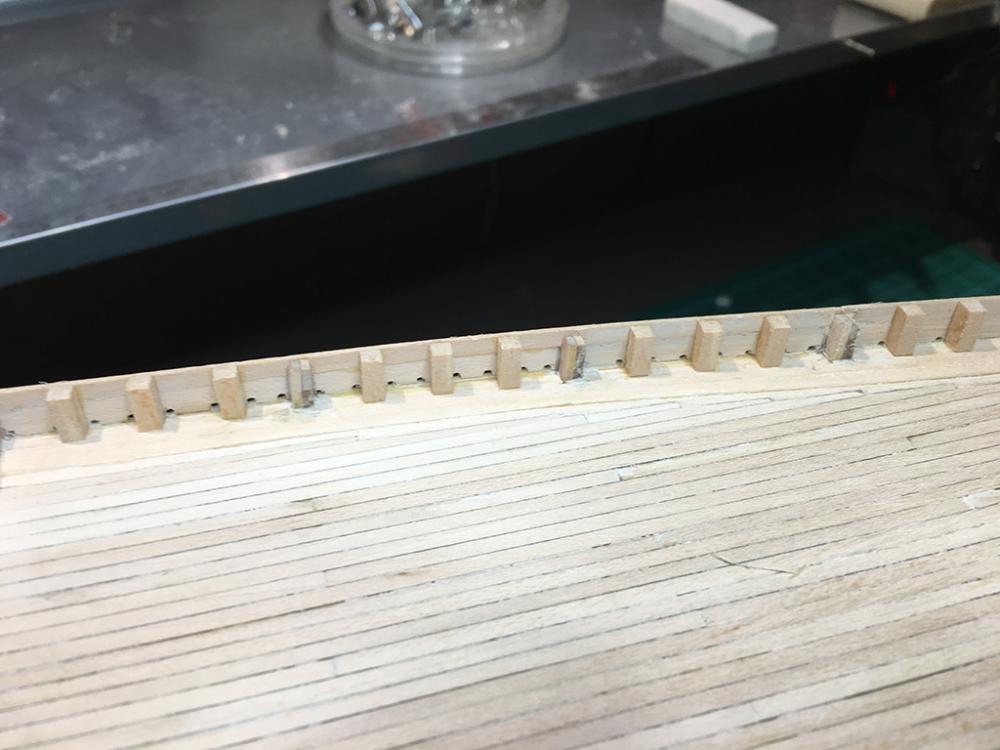
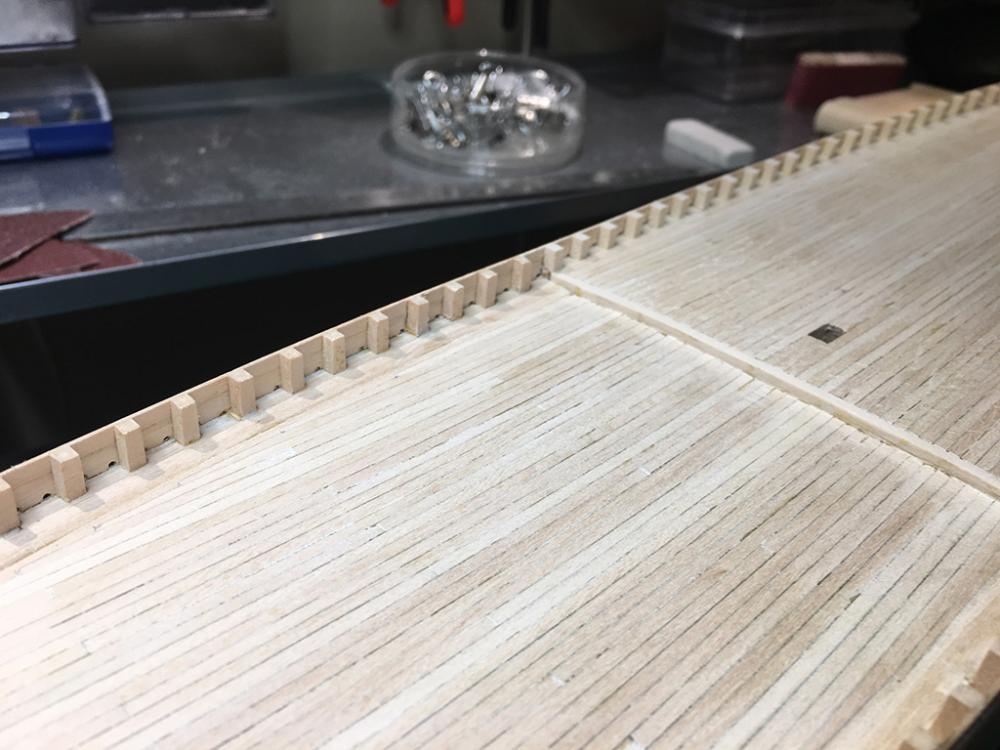
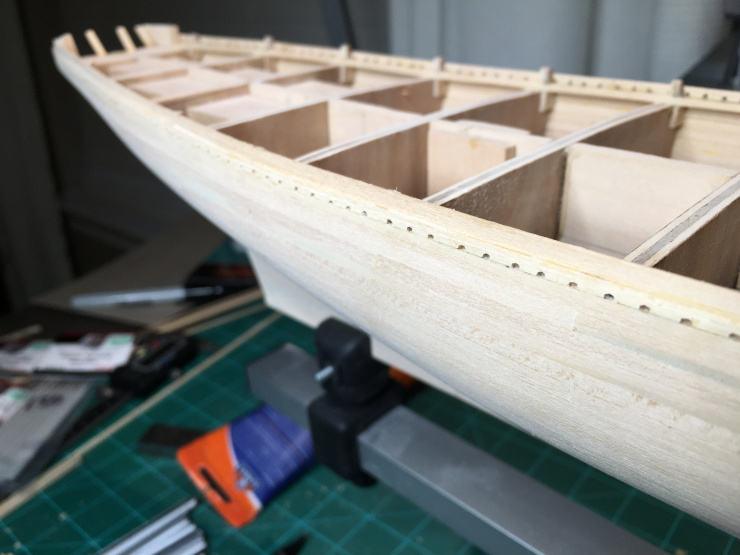
Bulwark Stanchions While I've been trying to figure out mooring chocks, I've also been working on the bulwark stanchions. Looks like my bulwark planking had a nice uniform height, so I was able to cut all the stanchions for the fore deck based off one measurement. I built a jig to hold the wood strip and help me get consistent cuts. I cut the stanchions for the fore deck, and went to work gluing them in. Since I had cut scruppers while planking, I had already done all the work to determine stanchion placement, so this went really fast. It was just a matter of gluing each one in. After getting some in place, I realized that the trimmed bulkhead extensions just weren't good enough to pass for stanchions. No amount of wood filler or shims were going to make these look right. The bulkhead extensions really stand out. So, I went to work cutting those out. I bent a razor saw blade to help get a cut flush with the deck, then did sanding/filing as necessary to smooth things out. (I think you can buy specially shaped blades for this, but I was doing the stanchions on a Sunday and all my local hobby shops were closed.) On the quarter deck, I modified my jig to cut the shorter stanchions, removed the bulkhead extensions, and glued in the new stanchions. I'm really happy with how it turned out. They look pretty uniform and clean. The whole process of installing stanchions took a full day, about 8 hours of work. Now on to the hawse pipes, mounting holes in the keel and mooring chocks. Then I think it will be time to primer the hull and see how all that planking turned out.

- 242 replies
-
- 3
-
-
- bluenose
- model shipways
- (and 1 more)
-
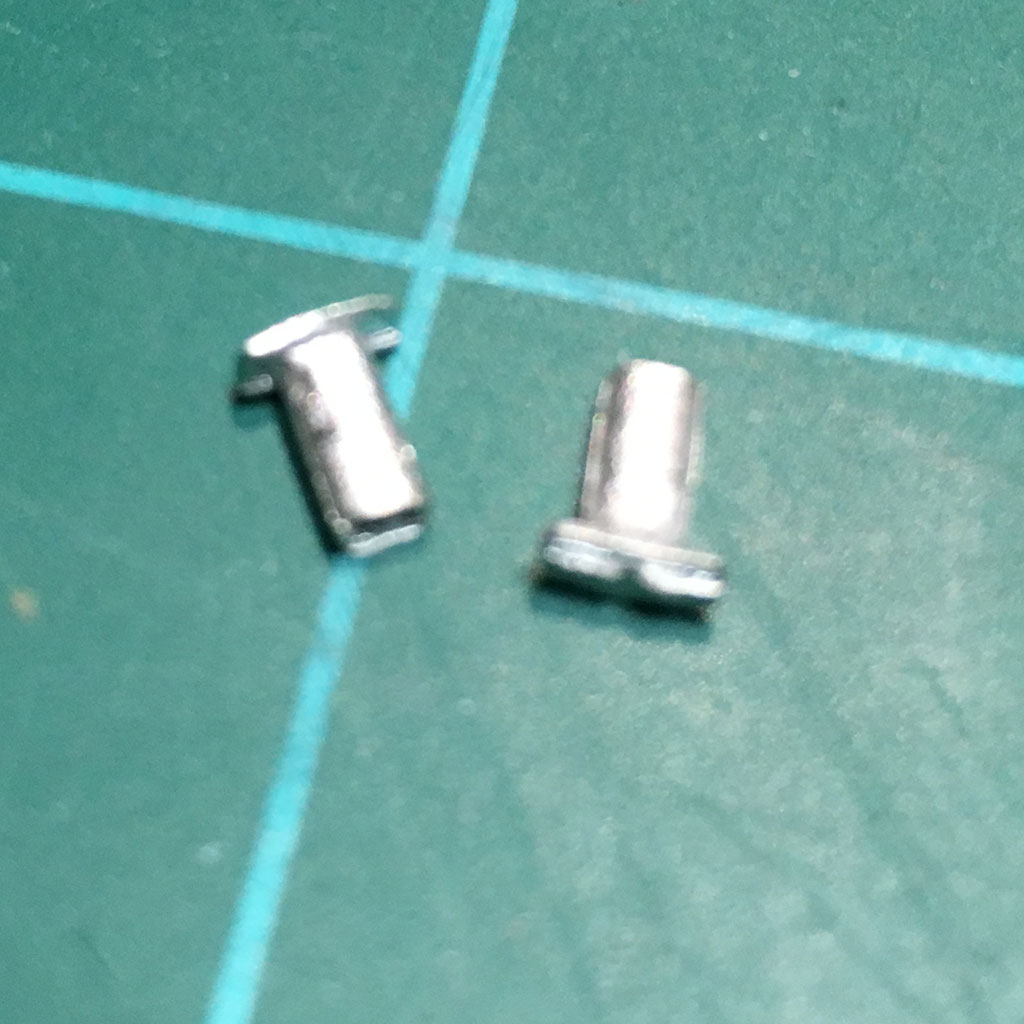
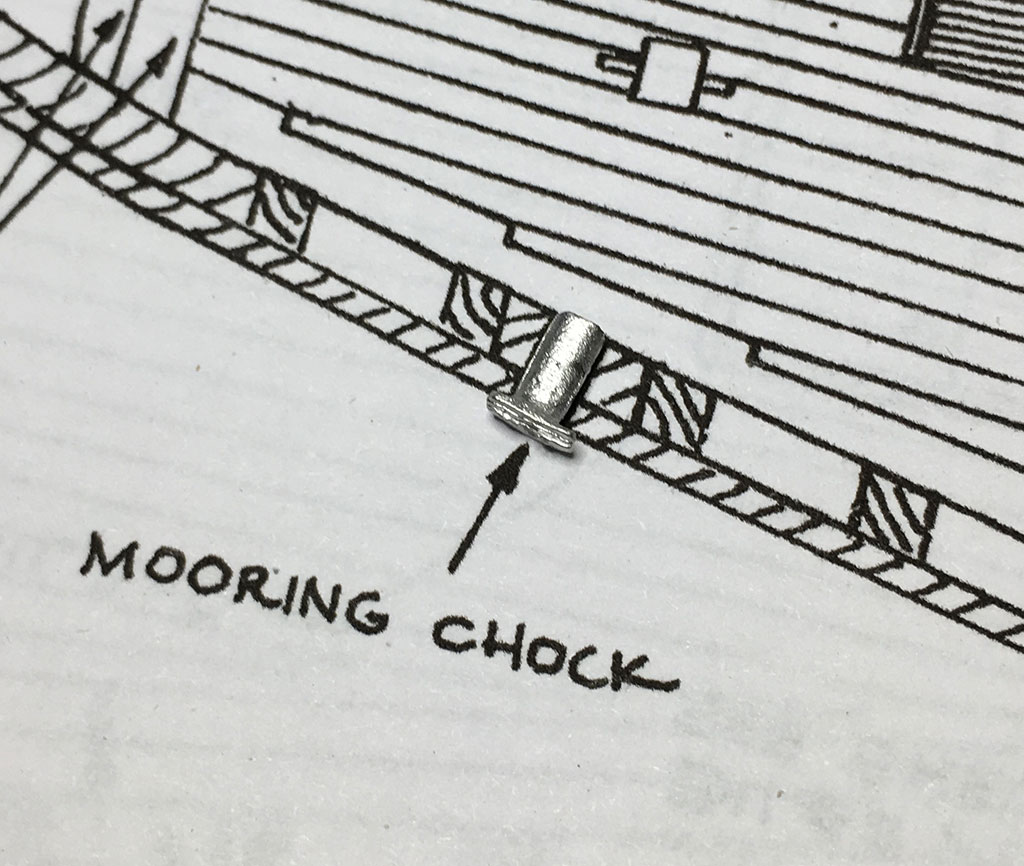
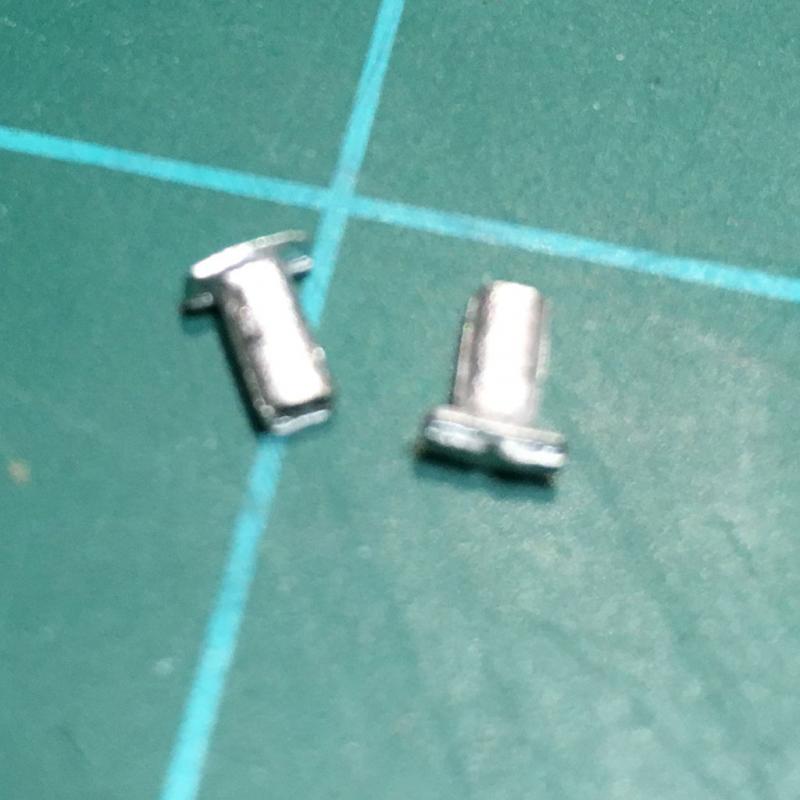
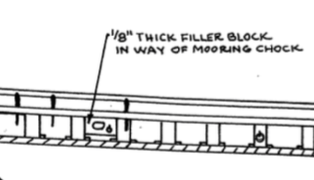
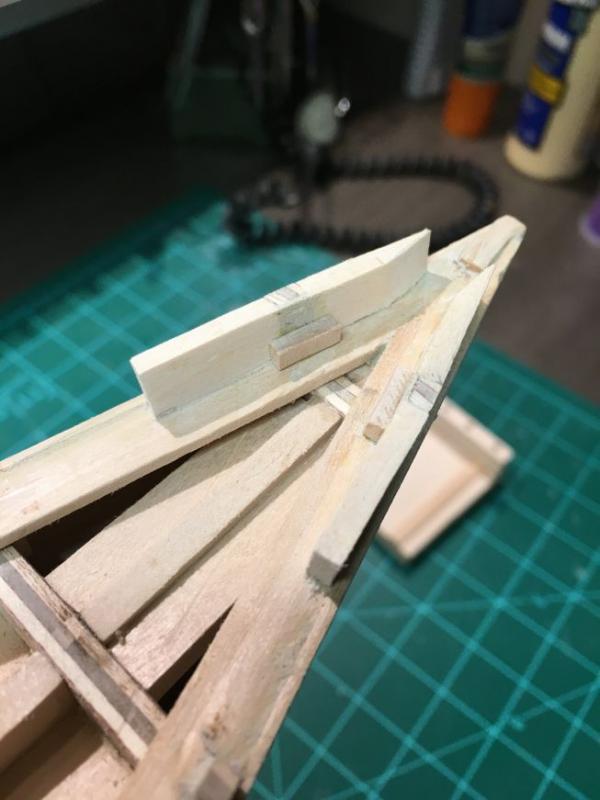
Ok, after getting home and doing a quick re-inventory of the metal kit parts, these have got to be the pieces listed on the parts list as 'mooring chocks'. Everything else seems to be accounted for. Horribly blurry photo - sorry... It sounds like this would have been a spot where the mooring lines would have been passed through the bulwarks to be tied off on the quarter bitts. Looking closer at these pieces, it looks they they are supposed to have a hole running through them, but the quality of the casting caused that to be filled in. I'm thinking that if these were drilled out, they would fit into the slots indicated on the plans and form 'tubes' that would prevent the mooring lines from chafing on the wooden bulwarks. The rectangular end 'cap' on these seems to be about the same size as the drawing on the plans, and the length of the 'tube' seems to be about the right size to pass through the bulwarks, assuming that I fill it in with a 1/8" filler block as indicated on plans. So, my plan right now is to add the 1/8" filler block as indicated by the plans - above the scruppers and below the waist - then drill a hole that matches these pieces. I'll drill out the center of these to create 'tubes' and insert them into the holes. Edit: A photo showing how I imagine this metal piece fitting in...

- 242 replies
-
- 2
-
-
- bluenose
- model shipways
- (and 1 more)
-
J - Thanks for looking that up! I've got some books on the way that hopefully will give me some more details. Dave B - Thanks for the photo! - this is the first one I've seen where I can clearly see that hole running through the bulwark. I've managed to find a few more photos of the original Bluenose ship that clearly show that hole, so I know it's there (and it appears to be located right where the MS plans indicate). What has been confusing me is that I've got the four cast-metal 'open chucks' from the kit (two will be mounted on the rail near the bow, two will be mounted on the rail at the stern). But my parts list also called out two cast metal 'mooring chucks'. Digging through my pile of parts, I've got two pieces labeled that way, and I've some trouble seeing how those would be put to use in that spot. It is possible they are not correctly labeled (identifying the parts in a Model Shipways kit is sometimes a combination of trial-and-error and a process of elimination). I need to go back through everything that came in 'quantity 2' and make sure I've got things labeled right. I might have swapped some parts around when I was doing the initial inventory. If I'm not able to get them correctly identified, I'll post a photo and I'm sure someone will correct me Fortunately I've got some time to get this sorted out. I just finished the stanchions, and I've got a good week or two before I'll get around to putting the main rail on. As long as I figure out what I'm doing before the rail goes on, I think I'll be fine.
- 242 replies
-
- 1
-
-
- bluenose
- model shipways
- (and 1 more)
-
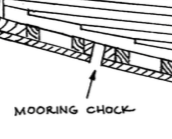
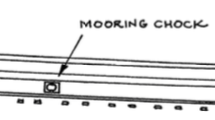
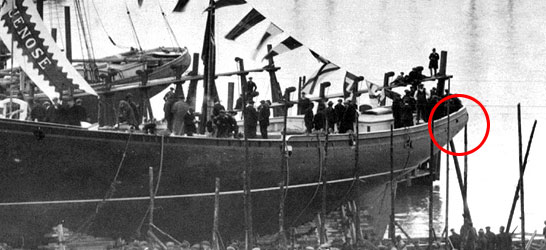
Question for you Bluenose experts out there... The plans call for mooring chocks to be installed near the stern. They are mentioned only briefly in the instructions ("check the plans for their locations"), and not mentioned at all in the practicum. I don't recall seeing them mentioned on any build logs that I've seen. Cast metal pieces are provided in the kit for these, so it is definitely something I'd like to add. From the plans, it looks like a space is cut out in the bulwarks, and a filler block is used to add some backing to mount the chock. It looks like this ends up as a small recessed spot where the kit's metal mooring chock is attached. Photos of the original Bluenose are scarce, but I think this one does show a small opening right about where these mooring chocks should be. On the Bluenose II, I've seen photos of lines attached to that spot, but it isn't clear if the chock is recessed or surface mounted (and that detail could have changed between the Bluenose and Bluenose II). It would seem like a small piece of the upper bulwark should be removed in that spot, a filler block should be added between the stanchions (but not full height, so it doesn't block the scruppers), and the mooring chock should be mounted into that block facing outward, but not extending beyond the outside of the hull. Since I haven't noticed this detail on any build logs, I wanted to see if my interpretation of this detail seems correct before I start cutting out a spot for this. Thoughts?
- 242 replies
-
- 4
-
-
- bluenose
- model shipways
- (and 1 more)
-
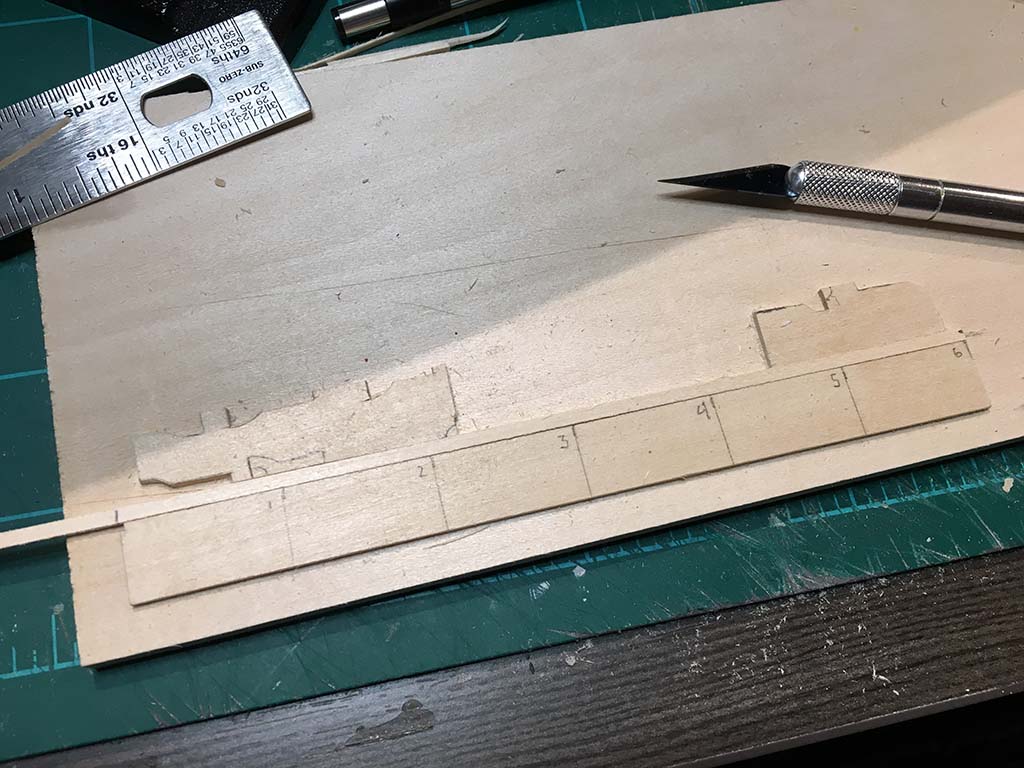
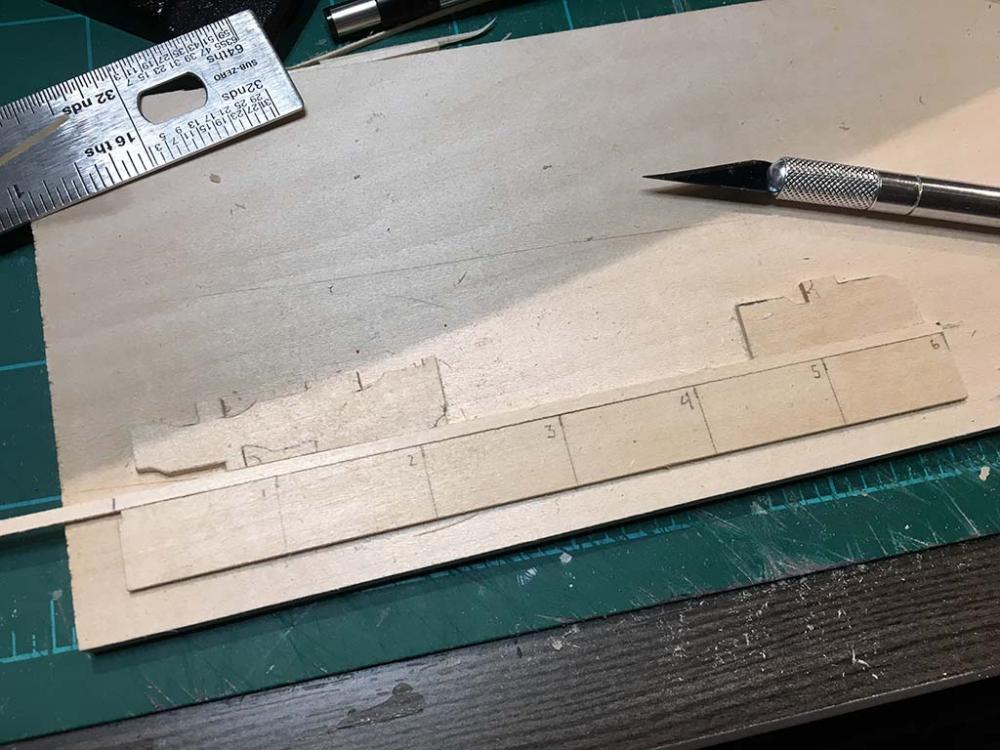
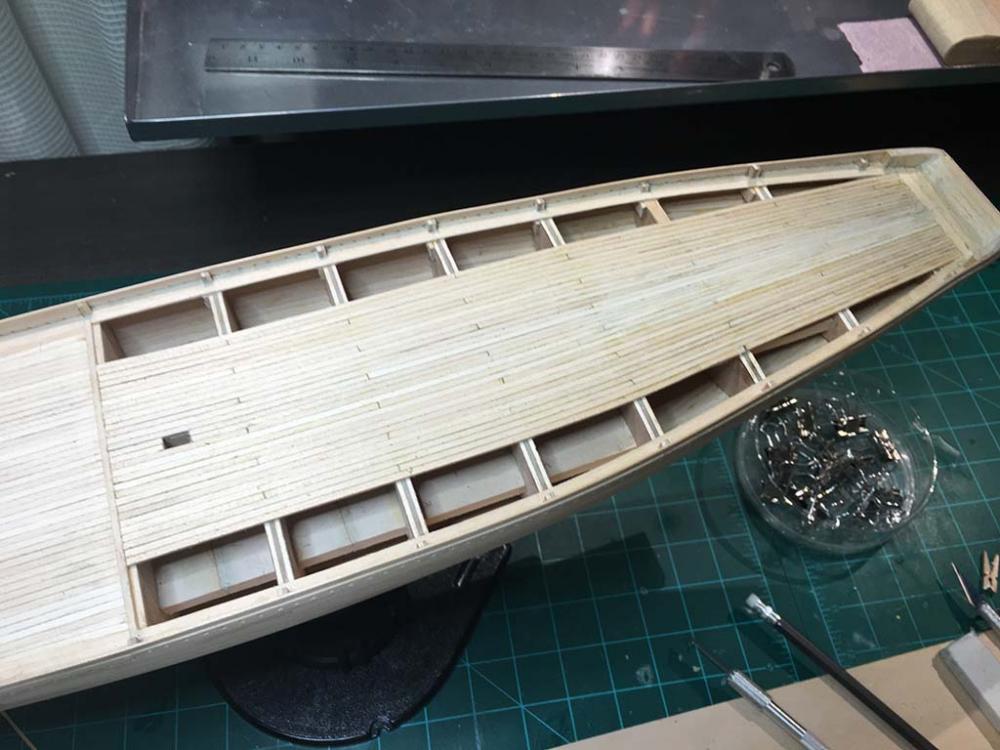
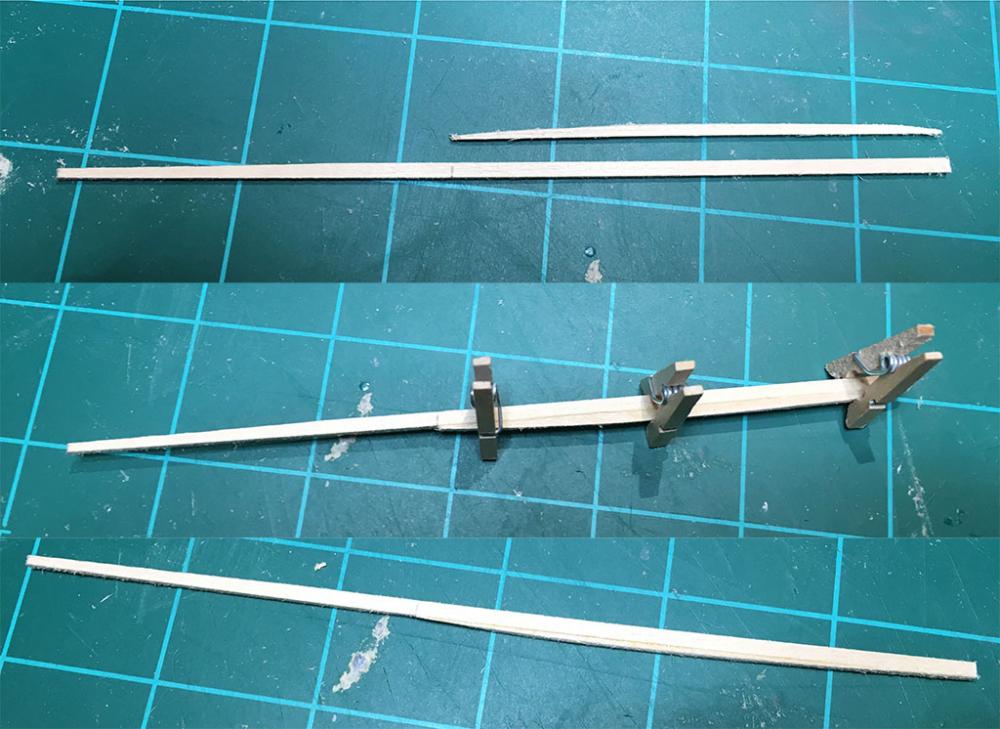
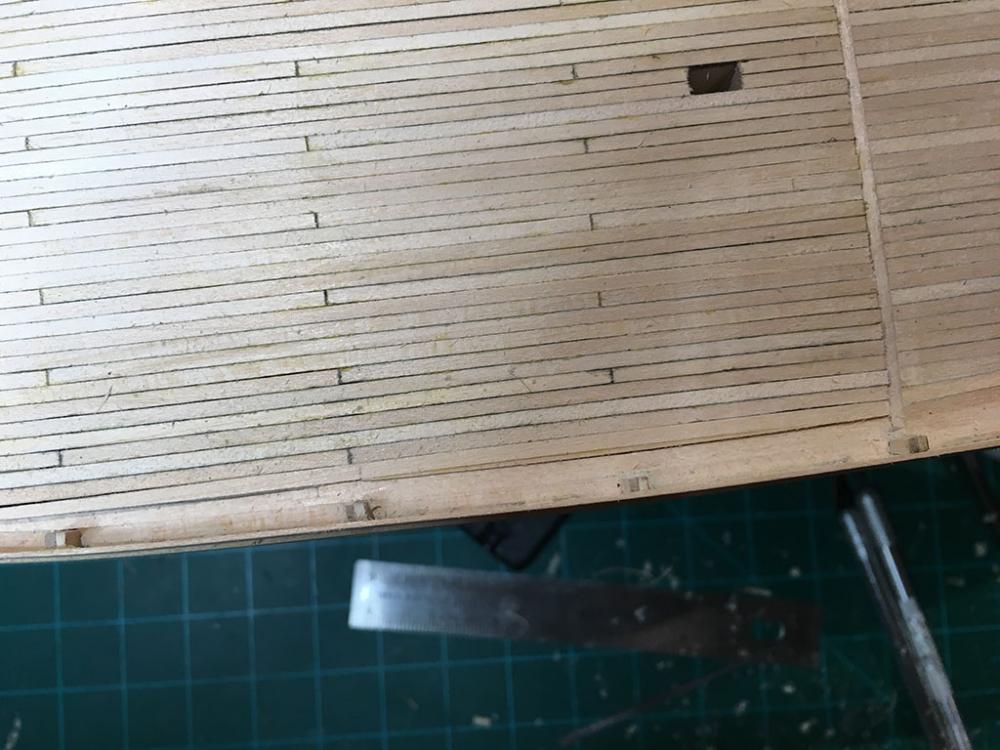
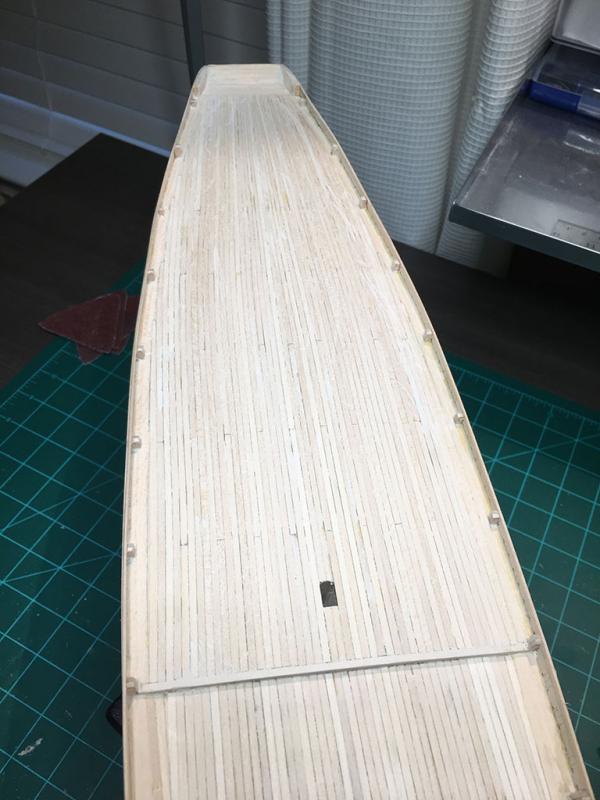
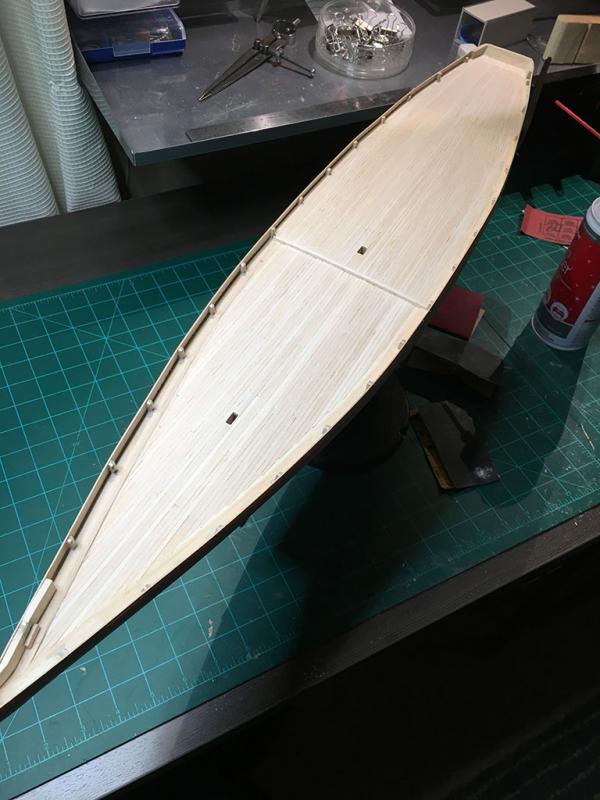
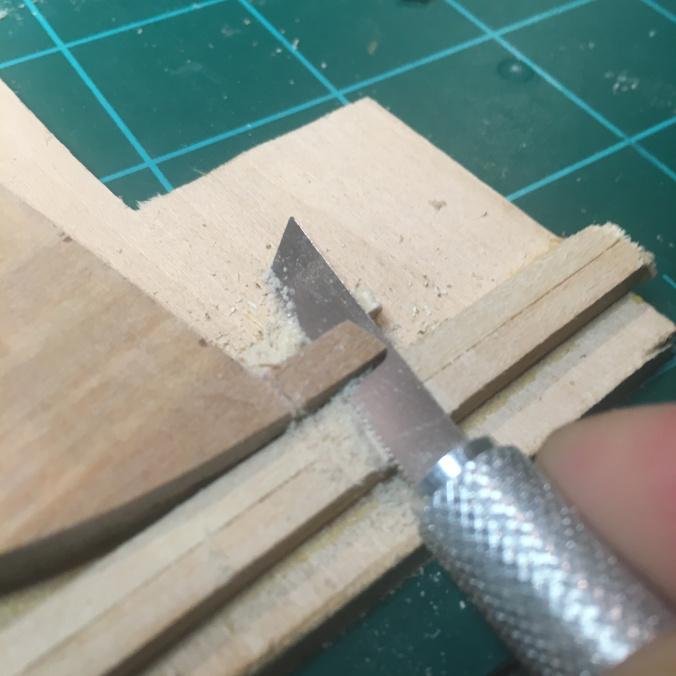
Deck Planking (Quarter Deck) The quarter deck is planked! I found the quarter deck to be a bit more challenging than the fore deck. Both decks have nibbing, but the quarter deck requires that you taper most of the planks. I wanted to maintain the 'every 5' plank layout I used on the fore deck, but tapering complicates a bit. In my build, the first 26 planks (13 each side of center) need to be tapered. The practicum has a great tutorial on this, suggesting that you start the taper 6 inches from the stern. Of course, this works best if you're using full-length strips, rather than scaled planks. So, I decided to start will full strips, do the tapering, then cut the full strip into planks as needed. This worked pretty well. The ends at the stern varied in width a bit, so as I got close to the sides I had to start being really careful about the size I was tapering down to so that I ended up with the same number of planks on both sides. Proportional dividers came in handy there. The first few planks were a little 'special' and had to be carefully positioned and cut to create the right joints. To help with cutting the taper (since I'd have to do that 26 times), I made a little jig to hold the plank and help mark the 6" spot for the taper to start. (The odd shapes on the upper side of the jig aren't important - the piece of scrap wood I used to cut those had been used to cut out various pieces from my last build. I was only interested in getting something glued down that would hold the plank in place.) After a good bit of work, all the tapered planks were in place. I had the same number of planks on each side (although they tapered to different widths). So, it was time to move on to the nibbed planks. This was just like the fore deck, so it was very straight forward. I found this part to be much easier than the tapered planks. There are also fewer nibbed planks than tapered planks, so it went pretty fast. Right at the end, I found that I had a small gap. It wasn't wide enough for a plank, but it was too wide to use filler. I saw this before I glued in that last plank, so I had some options. I decided to add some material to the plank to make it wider, then sand it down to fill the gap. After some sanding and filing, I got a pretty good fit. And then, I was done with the quarter deck! I gave it a little sanding, and I'm pretty happy with the results. It isn't perfect, but I don't think its too bad for first build with planked deck. I will give it a good final sanding before I stain and seal the deck, which I'll probably do when I paint the hull, waterways and bulwarks. But first I've got to deal with stanchions, hawse pipe holes, and the transom fashion piece...

- 242 replies
-
- 5
-
-
- bluenose
- model shipways
- (and 1 more)
-
Hey Everybody! I take a few days off from looking at my own build log (while I've been following Jerry's), and I find a bunch of new comments! Dave B - I spent hours reading through Bob Herman's build log before I ever started. Lots of great stuff in there! These forums have definitely been a big help on this build and my previous one (I think I discovered MSW as I was trying to decide if I should dive into ship modeling last year). I probably spend/lose about 5 hour a week just reading through old material on these forums. The thread on 'What have you received today' has turned me on to a number of great tools! Neptune - Thanks! My day job is producing software for professional photographers, so I'm glad to hear the photos look good (compared to the photography I see daily at work, my photos are a little lacking ). Recently I've started trying to explain a little less, since most of the 'ah ha' moments I have about ship modeling in general would be a little obvious for the experienced builders here, but I try to include any insights about this particular kit since I bet many people read through all the related build logs here when the start a build (as I did). Jerry - I think the decision about a second layer of planking will come down to whether or not you plan to paint the hull. I think the actual Bluenose was single planked (so that might be more 'historically accurate'). If you intend to paint, a single layer of planking combined with some wood filler and sanding should give you a nice smooth surface. If you want to leave the planking natural and unpainted (and I've seen at least one Bluenose build that did), a second layer of planking is probably called for. Lawrence - Thanks! I've tried to pick ships that let me add/learn a few new techniques with each build. My first ship (Phantom) was a solid hull, and I was focused on learning basic ship modeling and rigging. I chose the Bluenose so I could get my feet wet with hull and deck planking. I've started thinking about the next build...might be time for something with square rigs and gun ports, but we'll see (I don't have to make that decision just yet...) Ok! Am I caught up on responding? Let me see if I can get a build update posted...
- 242 replies
-
- 1
-
-
- bluenose
- model shipways
- (and 1 more)
-
Great job avoiding disaster with that tail section! I think you're making the right choice to just remove the bulkhead extensions entirely. I did the trimming, but now that I've got my bulwarks planked, almost all those extensions are the wrong height. I might have 1 or 2 that even reach the top of the bulwark. If I could do it over, I would have just cut them off. Looking forward to your next update!
-
Thanks Jerry! The general recommendation I've heard is that if you intend to get the most from the practicum, follow it exclusively and ignore the instructions. ...however, as I started to get a little further into the build, I found that I ended up going my own way, not really following the practicum or the instructions precisely. There are a few things that the practicum skips or does really differently (great beam, scruppers, framing the transom), and I really wanted to tackle those in a way closer to the instructions. I'm still referring to the practicum a LOT (I'm planking the quarter deck right now, and the practicum's information on tapering the planks has really helped), but I've ended up with my own 'order of operations' that does things a little differently.
- 242 replies
-
- 2
-
-
- bluenose
- model shipways
- (and 1 more)
-
Jerry, I just went back and looked at some of your previous builds....I'm in awe
-
Hey Jerry! Great to see another MS Bluenose build started! Looking good so far! I'm about two months into mine. Looks like you have the 'plywood' version of the bulkheads instead of basswood - so did I. Those are a pain to cut, and they can 'crumble' a little bit in the extensions above the deck (the ones that end up becoming stanchions later on). Fairing the bulkheads is also 'fun' with this material. But I've heard that this wood is a little strong than basswood for the bulkheads. Looking forward to following your build!
-
Well, just 6 or 8 planks into the quarter deck and I'm realizing that tapering planks is kicking my behind. My scrap pile of mis-cut strips is starting to pile up. Just placed an order for another 20 strips of deck planking.
- 242 replies
-
- 1
-
-
- bluenose
- model shipways
- (and 1 more)
-
Disc sander proxxon
genericDave replied to michael101's topic in Modeling tools and Workshop Equipment
Hi Michael! I just received the same Proxxon TG125 last week, but I have yet to fire it up. I ordered mine through Amazon (needed it quickly for a project that ended up falling through...oh well, finally got a sander), and got some additional sanding disks at the same time. I found a pack of some random brand of 5" discs with adhesive backing - https://www.amazon.com/gp/product/B00JX4LJT0/ref=oh_aui_detailpage_o01_s00?ie=UTF8&psc=1 These are pretty cheap ($12 for 50 discs in assorted grits), but I haven't been able to test the quality yet. -
Thanks Dave! I have been pretty concerned about the tapered planks on the quarter deck and getting those right on the first try. It is the main reason the ship has sat idle on the bench for the last week while I've been researching and reviewing every build log I could find. It looks like I'll need about 576 inches of plank for the quarter deck (48 strakes x ~12" each). I've got 34 strips of 2' plank stock left, which should give me about 816" of planking (34 x 24"). I *think* I've got some squish room to accommodate some mistakes. I do plank to keep up with the shorter plank length on the quarter deck, which reduces waste a bit since I can use smaller pieces that would otherwise be scrap. But since I need to taper these, my plan is to taper a full length strip, then cut it down to the individual plank sizes. Hopefully this will aid in getting the tapering consistent along each run. Of course, if I screw up a tapering job, I lose an lot of material. And if I screw up a cut on a shorter piece, matching the tapering will be time consuming. My biggest concern is that I get into a 'groove' and start going too fast - tends to be my biggest problem on these things. I might put a post-it note above the ship that says 'slow down'! We'll see...if I fail miserably, it just means I have to order some more wood and wait a week or two!
- 242 replies
-
- 1
-
-
- bluenose
- model shipways
- (and 1 more)
-
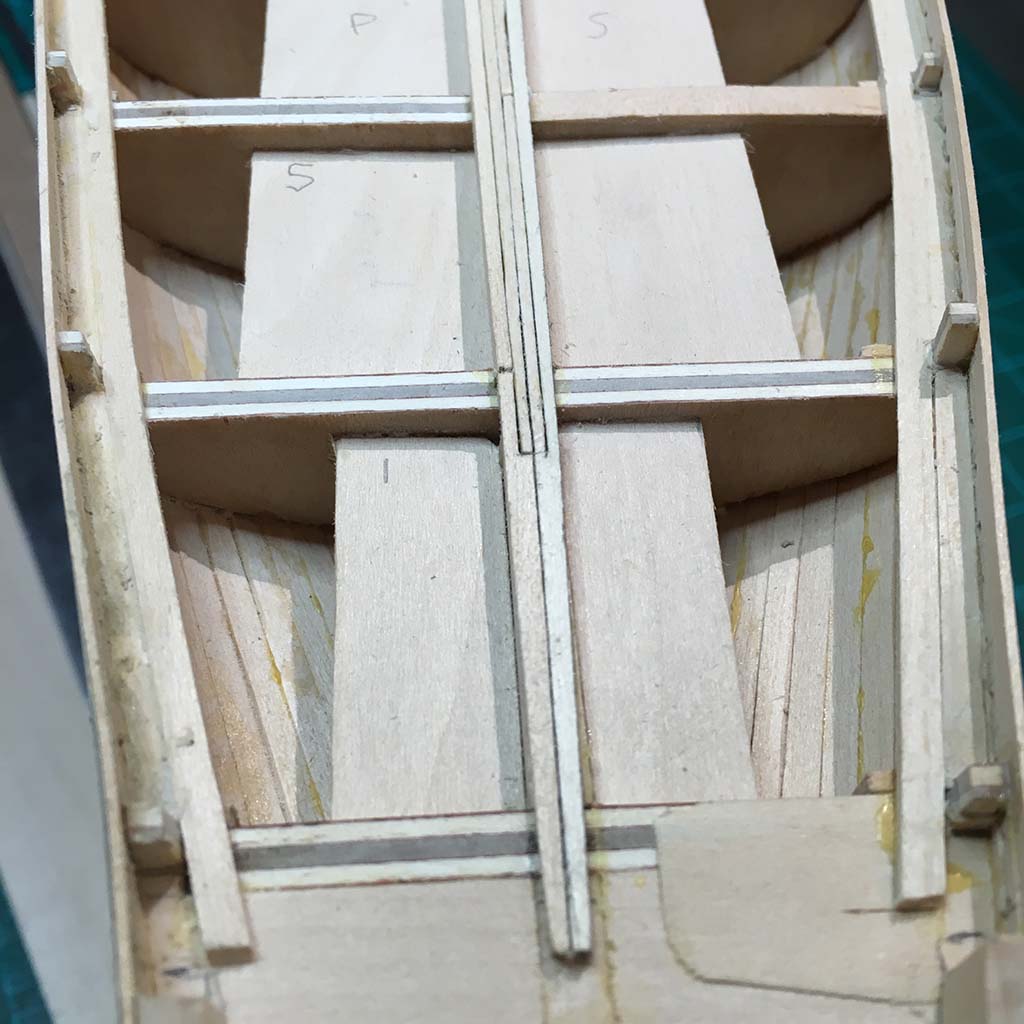
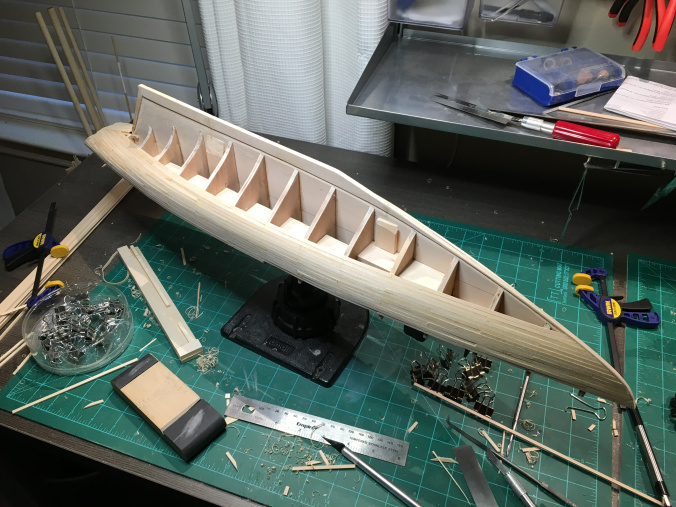
Over the last few weeks I've worked on a few different things now that hull planking is finished. I ended up going through the instructions and the entire practicum and listing out each step, then doing a pass on the plans to make sure I knew where each piece fit into the construction. The instructions and practicum do many things differently, and in different orders, and I wanted to understand all the differences. I ended up making my own plan of attack for the rest of the build. Transom Framing I started by framing out the transom at the stern. The practicum takes a simpler approach, but I opted to frame it out per the instructions. It wasn't hard or time consuming (aside from carving the transom tumble pieces), but I did end up getting glue everywhere. At least this will all get planked over. Knightheads and Hawse Timbers Next I built out the knightheads and hawse timbers. Bulwark Planking and Scruppers The next project was to finish up the planking by adding all the planks above the deck. Before I did this, I spent some time cleaning up the bulkhead extensions above the deck that will form the stanchions. I measured each one and sanded as necessary to get it squared up and to the right size. Since my hull planking started at the deck line even with the waterway, I can add scruppers by cutting them into the bottom of the first plank above the deck. I used a taller plank on the fore deck, and a narrower plank on the quarter deck so the tops of each scrupper plank line up. The scrupper locations were measured and marked on the planks, then filed out using a needle file and a small jig to control the depth. After these planks were installed, the thinner plank above the waist was added to complete the planking. Transom Planking Next up was planking the transom, both inside and outside. (This photo is an 'in-progress' photo, the final trimmed and sanded transom looked much cleaner.) With all that done, it was time to start planking the fore deck. Deck Planking (Fore Deck) I've seen some Bluenose builds that use full-length planks (each plank runs the length of the deck). That's what the practicum seems to suggest. Some rough math suggests those planks would be over 60' long. I decided that I wanted to use shorter planks and experiment with planning a good layout for joints. This is the first time I've planked a deck, so I want to get a little experience. I read through the planking tutorial on the NRG site, and ended up spending an entire Saturday playing with different variations of 'every 5', ' every 4' and 'every 3' joint layouts. The Bluenose has two wide planks at fixed locations near the bow where the windlass sits. I found that most deck planking layouts caused a joint to line up even with the joint required by one of these wide planks. I ended up going with an 'every 5' layout. This results in planks that are up to 45' feet long (which I think is way too long), but I felt it had the cleanest look of all the variations I tried and it avoided putting a plank joint right next to one of the wide planks. This was also my first time nibbing. That went pretty quick once I got the hang of it, although I did end up tossing a few planks and re-cutting them for a better fit. The deck needs a little more sanding, and I'm going to hold off on any finishing (stain, poly, etc.) until I get the quarter deck done. I'm fairly happy with the progress. It's not perfect, but it is turning out better than my first ship!


- 242 replies
-
- 6
-
-
- bluenose
- model shipways
- (and 1 more)
-
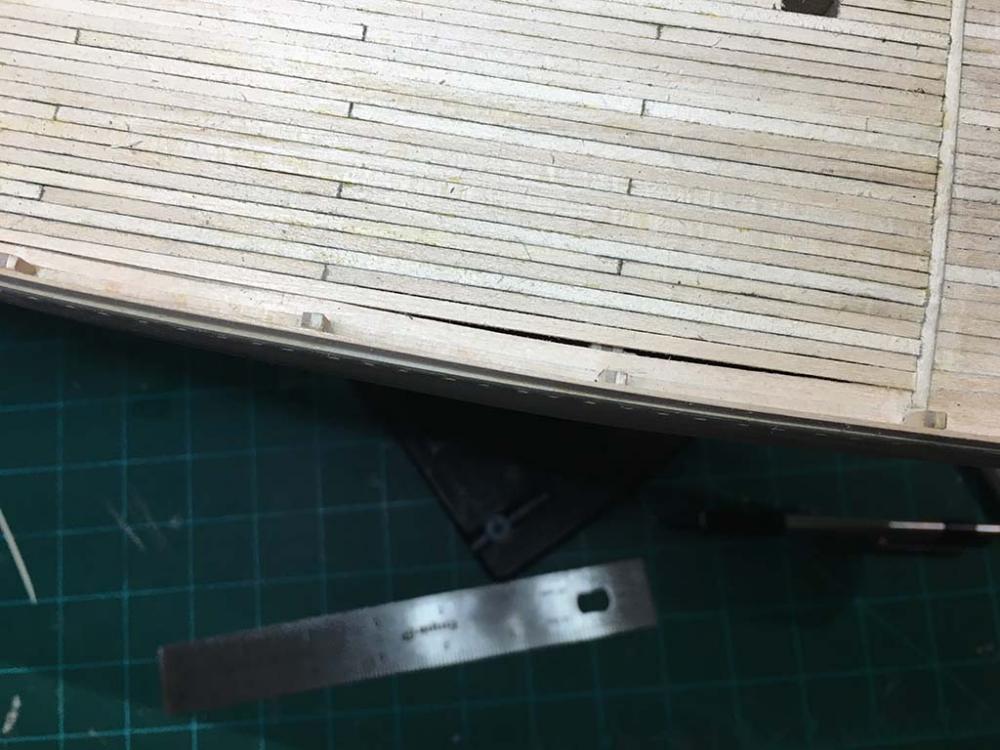
Hi Jim! I struggled a little bit with the waterway as well. The fore deck was pretty easy, since there are three strake to the waterway. I installed the two inner strakes first, then cut small sections to go between the bulkheads. Since the inner strakes were in place, they helped hold the smaller pieces to the right shape between the bulwarks. The quarter deck was another story. There is only one waterway strake there, between the bulkheads. I tried installing just that, but it ended up looking more like a bunch of straight sections than a curved waterway. I ended up installing the nibbing plank on the quarter deck to use as a guide for installing the waterway sections between the bulwarks. I have a more detailed build log over on my blog (rather than bore everyone here with my long ramblings, I started sticking them on a blog as I go, then I come back here to summarize when I hit big milestones)...https://suburbanshipmodeler.com/2016/04/23/the-waterway/ Hope that helps!
- 242 replies
-
- 1
-
-
- bluenose
- model shipways
- (and 1 more)
-
Thanks Elijah! Of course my photos were taken from angles that hide the problem spots I have no doubt that you're going do a much better job on your build given the patience and attention to detail you've been applying!
- 242 replies
-
- 1
-
-
- bluenose
- model shipways
- (and 1 more)
-
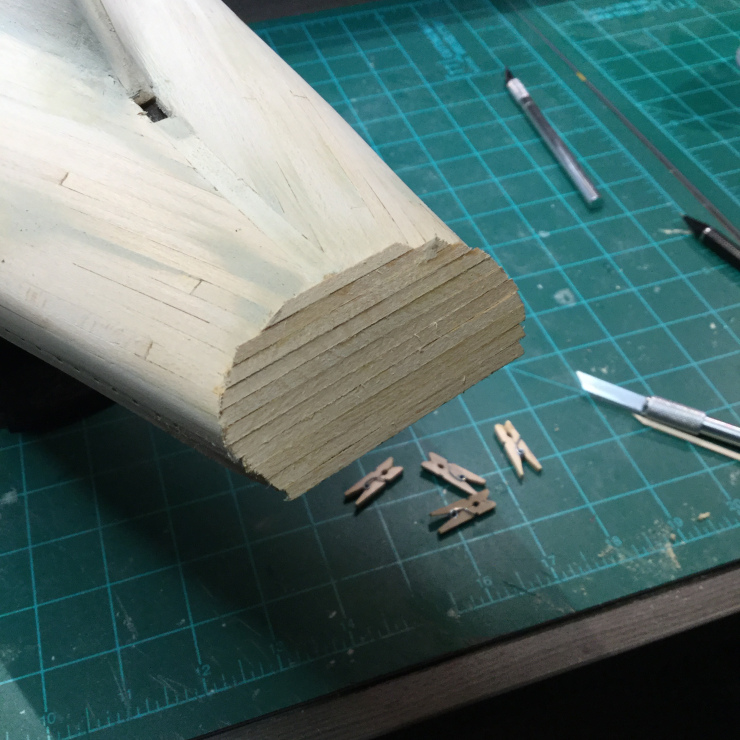
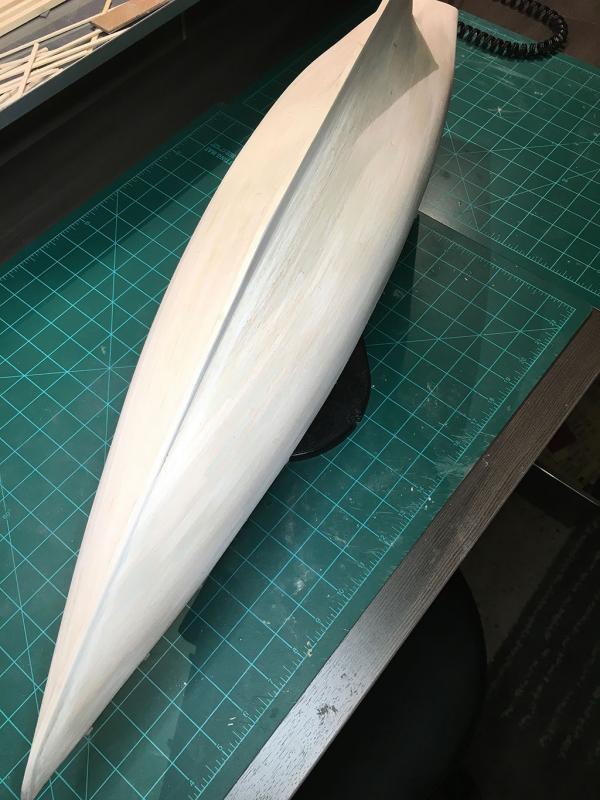
Thanks! I'm definitely a newbie at hull planking, and that practicum chapter helped to ease my fear of planking quite a bit. I'm glad I only applied filler to one side at first. With the amount the practicum used, it took about 3 to 4 hours of sanding over several days (starting with 60 grit paper) to get things smoothed out. After learning my lesson, I used less on the other side, and was able to sand it down in about 20 minutes. I then did a second pass, adding filler to just a few remaining trouble spots, then finished the hull off with passes of 150, 220, 400 and 800 grit. Pretty happy with how it turned out! I'm sure there will be a few touch ups required, but I'm going to wait until I start priming and painting the hull to deal with those (as I add coats of primer and sand, any remaining defects will be obvious). I took a similar approach when finishing out the hull on my solid hull build and it worked great. Trying to decide what to start in on next - I think I'm going to get the mast slots covered, then start on transom framing and knight heads + hawse timbers. I'd like to get those done before I add the remaining planks for bulwarks. (And I want to be done with all the hull planking before I dive into the deck planking).
- 242 replies
-
- 4
-
-
- bluenose
- model shipways
- (and 1 more)
-
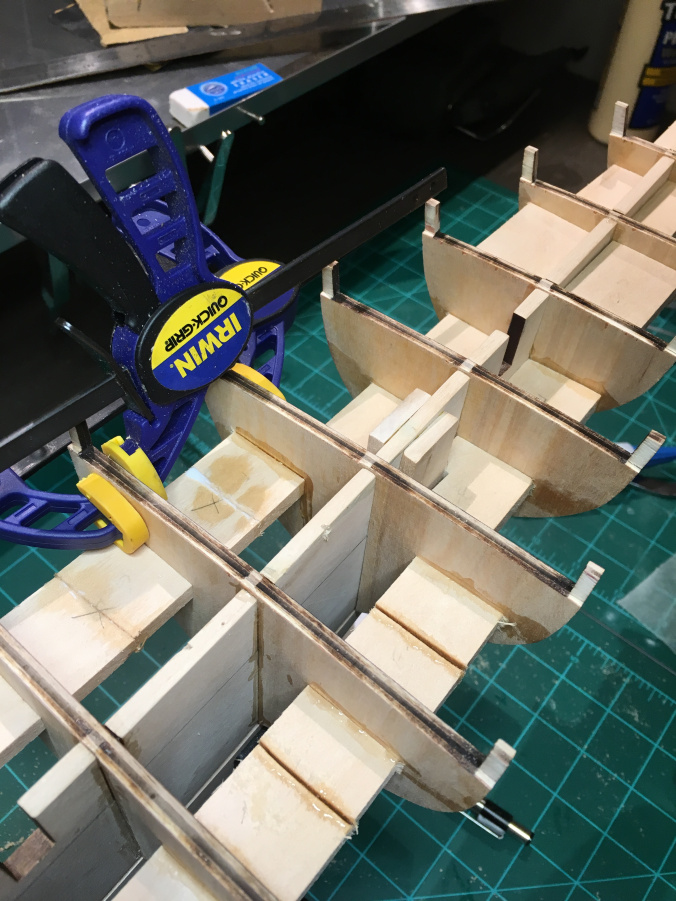
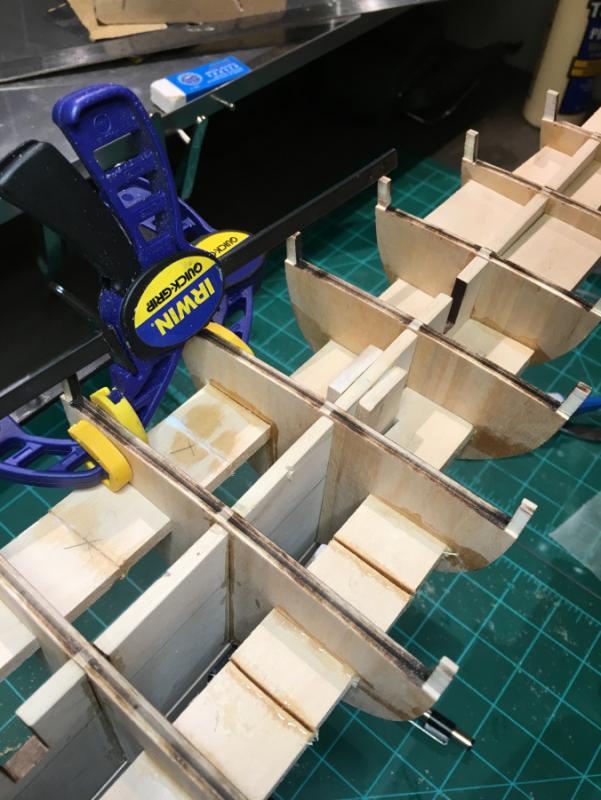
It's been a little over a month, and I've made some progress. Bulkhead Extensions I trimmed the bulkhead extensions back to make them fit the size of the stanchions. This went fairly quickly as I built a little jig to aid in cutting the extensions at the right depth. The sternpost got installed pretty easily. Bulkheads Next up was gluing in the bulkheads. This too went pretty easily with the aid of a variety of clamps, machinists squares, and angle braces to hold everything while the glue set. I decided to go ahead and add support struts between the bulkheads. Being my first POB build, I didn't trust myself to be delicate while fairing, so I wanted the extra support. I had some 1" x 1/4" wood lying around, so I used that. I measured the exact space between each bulkhead and cut individual pieces to fit each spot. This took a couple days. I made a bit of a mess with the glue, but all this will be hidden by hull and deck planking so I'm going to spend time cleaning it up. When I finished, I realized that my process (do one side first, then the other) had caused a problem. I had introduced a bend into the keel because the first side I did was a little too snug, and the second side was cut later (so it locked in the bend). If I had done both sides at once for each bulkhead, i could have avoided this. Since all the supports were firmly glued in, I fixed the problem by cutting the supports between 2 bulkheads on each side. Since cutting removes a bit of wood (due to the thickness of the blade), this gave me some squish room to relieve the pressure causing the bend. I got the keel back in alignment, and re-glued the struts one side. The other side (which now has struts with a gap in the middle) will just be filled in with wood putty so I don't have to keep looking at a reminder of my mistake. It looked messy, but the keel is straight and the struts are solid. Next up I faired the bulkheads. I thought it went fine, but I later realized I didn't do a very good job. Great Beam and Waterways The practicum I'm loosely following suggests installing the outermost waterway to use as a guide for positioning the first plank. This makes sense, but the practicum skips over installing the 'great beam' - it never installs it at all. The deck planking (and waterways) would need to be on top of the 'ledge' created when you install the great beam. So I deviated a little and installed the great beam, followed by the waterways. I went ahead and installed all three waterway planks on the fore deck. The quarter deck only has one waterway strip - between the stanchions - and I wasn't sure I'd get a smooth curve with all those little pieces. So I went ahead and installed what will become the nibbling strake, then put in the actual waterway, matched to the curve of the nibbling strake. Finally I moved on to planking. Planking the Hull One of the reasons I chose the Bluenose was that the plank layout is fairly simple and doesn't require some of the complex techniques required by other ships. Also, the hull will be painted - so I can fix any mistakes with filler. I started at the deck and worked my way about halfway down. Then I put in the garboard strake and worked my way up from the keel. I did both sides at the same time (install a strake on one side, then the matching strake on the other side) so that I could keep both sides uniform. I also decided to use individually cut planks, per the instructions, rather than using full-length strips as the practicum suggests. I did this only so I could get some practice with cutting and installing individual planks and maintaining a consistent pattern with the joints. I'm satisfied with how it turned out, but I discovered my fairing was pretty poor. There were some planks that didn't butt up nicely because the bevel on the bulkhead wasn't straight enough. I had some trouble with the curves near the stern around the top of the sternpost. Good thing this hull will be painted. Filler to the rescue. With both sides planked, I went through a few sanding rounds then generously applied wood filler as recommended in the practicum. The practicum (and some build logs I've seen around the internet) show a LOT of filler being applied, then sanded away. So, I did that. Fortunately I only did one side of the hull (I wanted to see how it went before I did the other side). I don't need anywhere near that much filler. I ended up removing 95% of the filler. It took days and I went through a TON of sandpaper. On the other side, I'll use considerably less wood filler, which should make sanding it back down go a lot faster. I've now got one side of the hull filled and sanded. There are some touch-ups needed, but I'll come back and do those after I fill and sand the other side. Next step is to fill and sand the other side and do another pass to clean up any remaining issues with the planking.


- 242 replies
-
- 11
-
-
- bluenose
- model shipways
- (and 1 more)
-
Looking fantastic! As you work on the inner bulwarks and deck shaping, be sure to double-check the depth of the deck against the plans (and take the deck planking into account). I didn't do that on mine, and the quarter deck wasn't deep enough - threw everything off later in the build. But with the detail and attention you're giving this, I doubt you'll have any problem!
- 701 replies
-
- 6
-
-
- phantom
- model shipways
- (and 1 more)
-
Hey Dave! I do plan on drilling some mounting holes before too long. I waited too long on my last build, and a fun time flipping the ship over to drill the holes in the keel after rigging was completed! I saw a ton of mentions about planning ahead in the Bluenose build logs over on Bob Hunt's forum. I'm definitely doing a better job of that now with my second ship. It is made even more important because Bob's practicum and the kit's instructions take very different approaches - and I prefer some parts from the practicum and some parts from the instructions. I finally ended up making a document that lists out the order of all the steps in each so I could understand the differences and better follow how steps are interdependent. In some cases, I ended up going my own way - not following either. That makes it a little more fun I've made a lot of progress that I haven't posted here (I'll get around to it eventually). I'm currently about 60% done with hull planking. Maybe after I get the hull finished (and sanded, so it doesn't look quite so scary) I'll try to get an update posted.
- 242 replies
-
- 2
-
-
- bluenose
- model shipways
- (and 1 more)
-
Looking forward to seeing how she progresses! I've just started the MS Bluenose build (from the kit). Some day (many years from now) I might be brave/experienced enough to try a scratch build.
-
Thanks Elijah! Have to admit, after spending so much time on the Phantom, it is a little weird to be working on a completely different ship!
- 242 replies
-
- 1
-
-
- bluenose
- model shipways
- (and 1 more)