


Ian_Grant
-
Posts
1,637 -
Joined
-
Last visited
Content Type
Profiles
Forums
Gallery
Events
Posts posted by Ian_Grant
-
-
-
You can search for viking 3D files in many places. If you're very lucky you might fine something for free. I just had a quick look, but as in my search for Romans for my ship many of the Viking figures are for war-gaming and have those really stocky unrealistic builds.
I did manage to find a very good Roman Legionnaire for about $20, and he even came rigged.
Good luck!
- mtaylor and Scottish Guy
-
 2
2
-
11 hours ago, Glen McGuire said:
Whoa! That is amazing work, Ian, especially considering you were in high school!

Thanks. I was always all about building stuff. Still am. ☺️
- Glen McGuire, mtaylor, Canute and 4 others
-
7
-
Yours is truly outstanding, beautiful work! Twenty out of ten!
- Glen McGuire, mtaylor and Keith Black
-
3
-
26 minutes ago, shipmodel said:
Hi Ian -
Really nice work on the ship. I am truly envious of your expertise with 3-D printing. It is a technology that I have not mastered and am reduced to buying pre-made parts from Shapeways and then modifying them as needed. Very well done, sir.
As for painting, perhaps you could paint the fingers black first, then overpaint with silver, which you can access easily from both sides. You should be able to get clean separation lines either freehand or with some fairly simple masks.
Dan
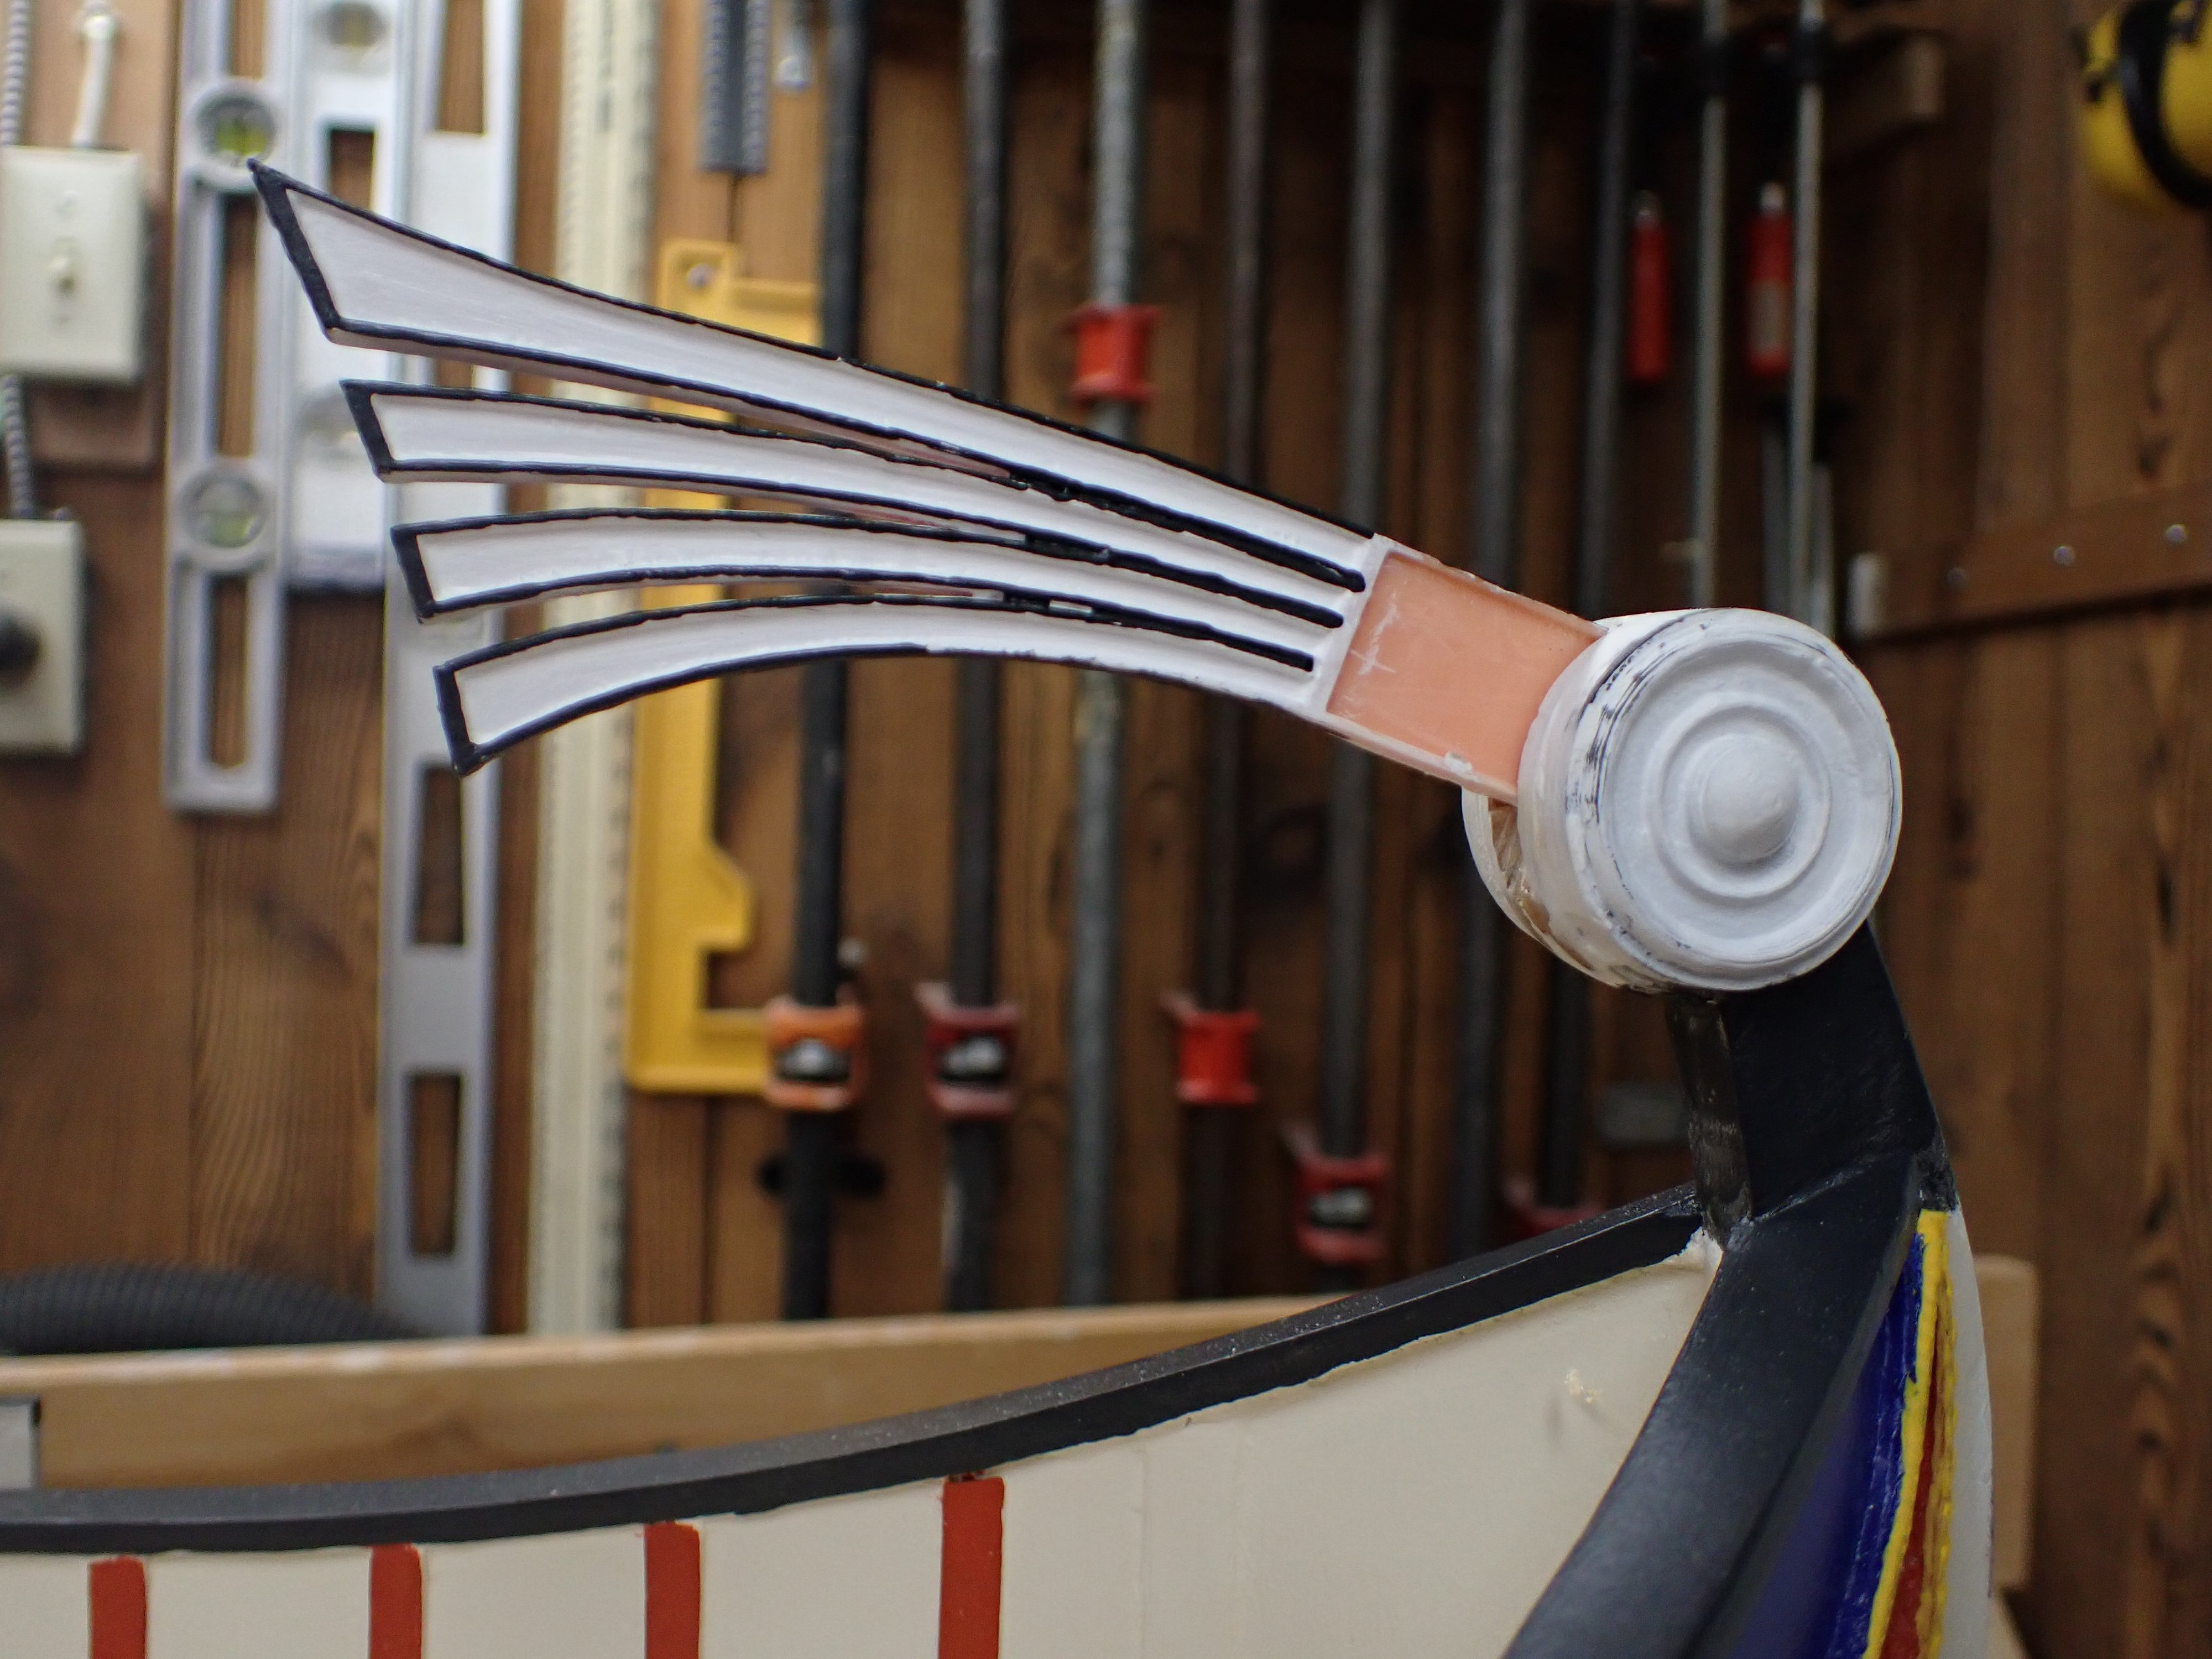
Thanks Dan! I'm exceptionally lucky to have the library's 3D machines (and the laser cutters!) freely available to me within a 1/2 hour walk. Apparently they are soon to upgrade to newer and better models 😊. Have you tried TinkerCAD? It's much simpler to learn than other CAD tools although obviously more limited too. For rectangular things like ladders and gratings it is super easy to draw what you want. The fantail fingers are about as complicated as I'd like to get in TinkerCAD.
Yes, you are right about the order of painting. I have now painted the black between the fingers which I should have done first. Now touching up the white then will redo the black edge trim.
I looked up your "albums" here on MSW. Wow! They're beautiful models. I especially like the "Maine" and the Viking knarr.
Thanks for commenting,
Ian
- shipmodel, Glen McGuire, Keith Black and 1 other
-
4
-
On 4/13/2024 at 9:18 AM, Glen McGuire said:
I certainly did, Ian. That was one of my original thoughts. But when I got her put together, I really liked how those topmast square sails looked on top of the typical schooner sails, so I didn't want to diminish their appearance further than the shredding.
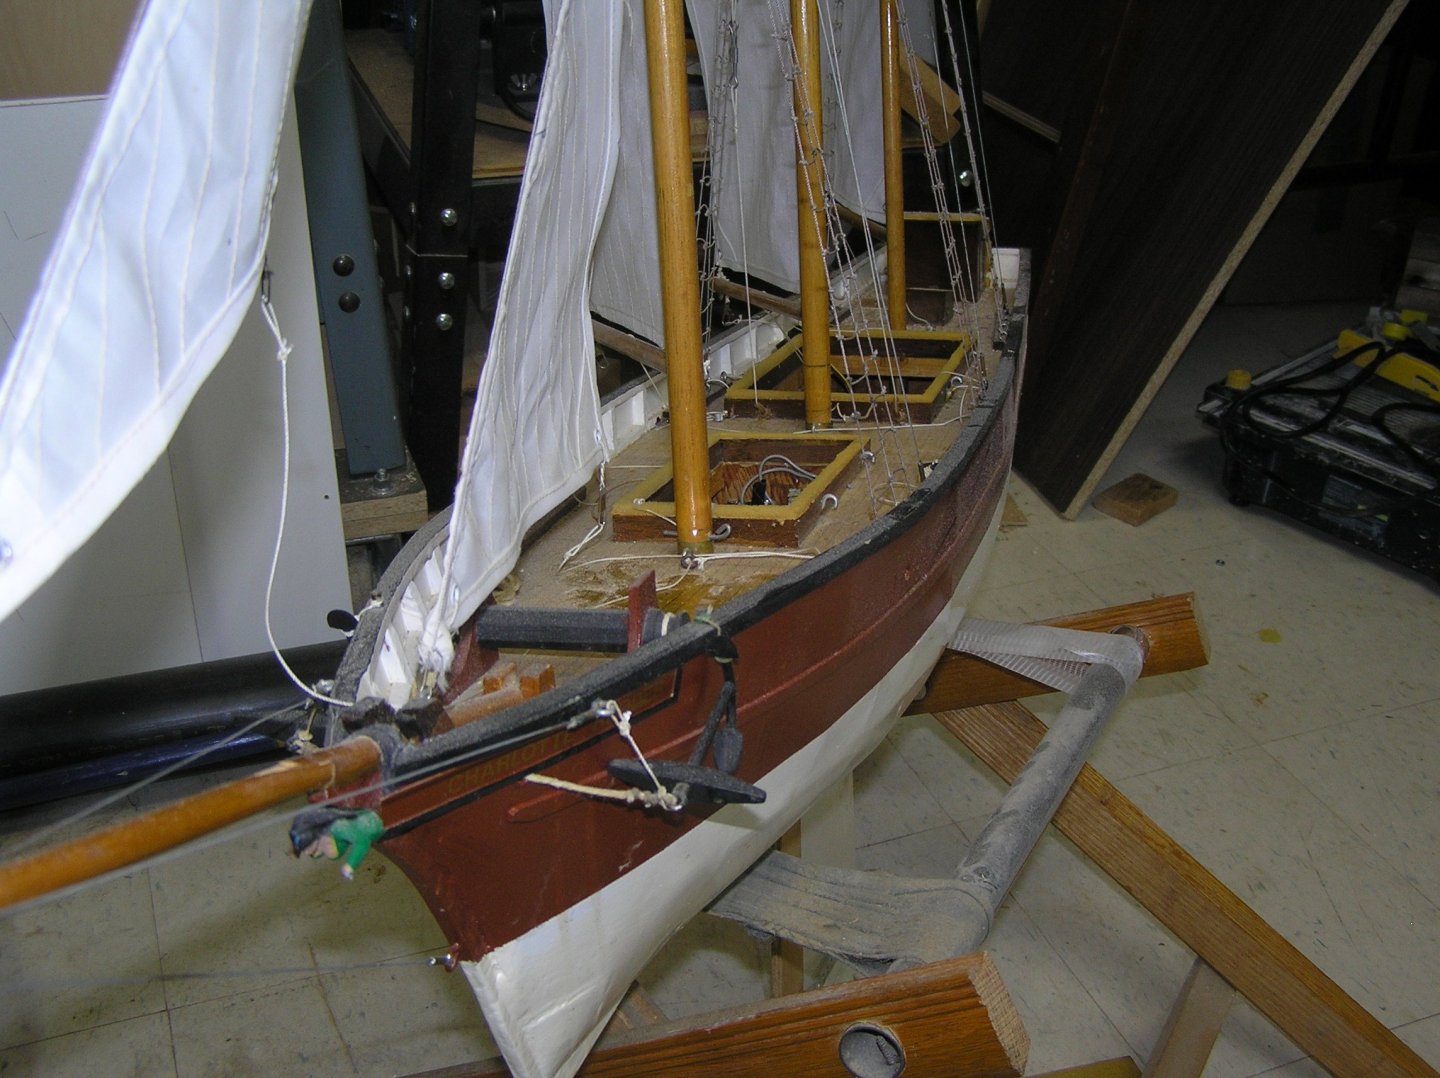
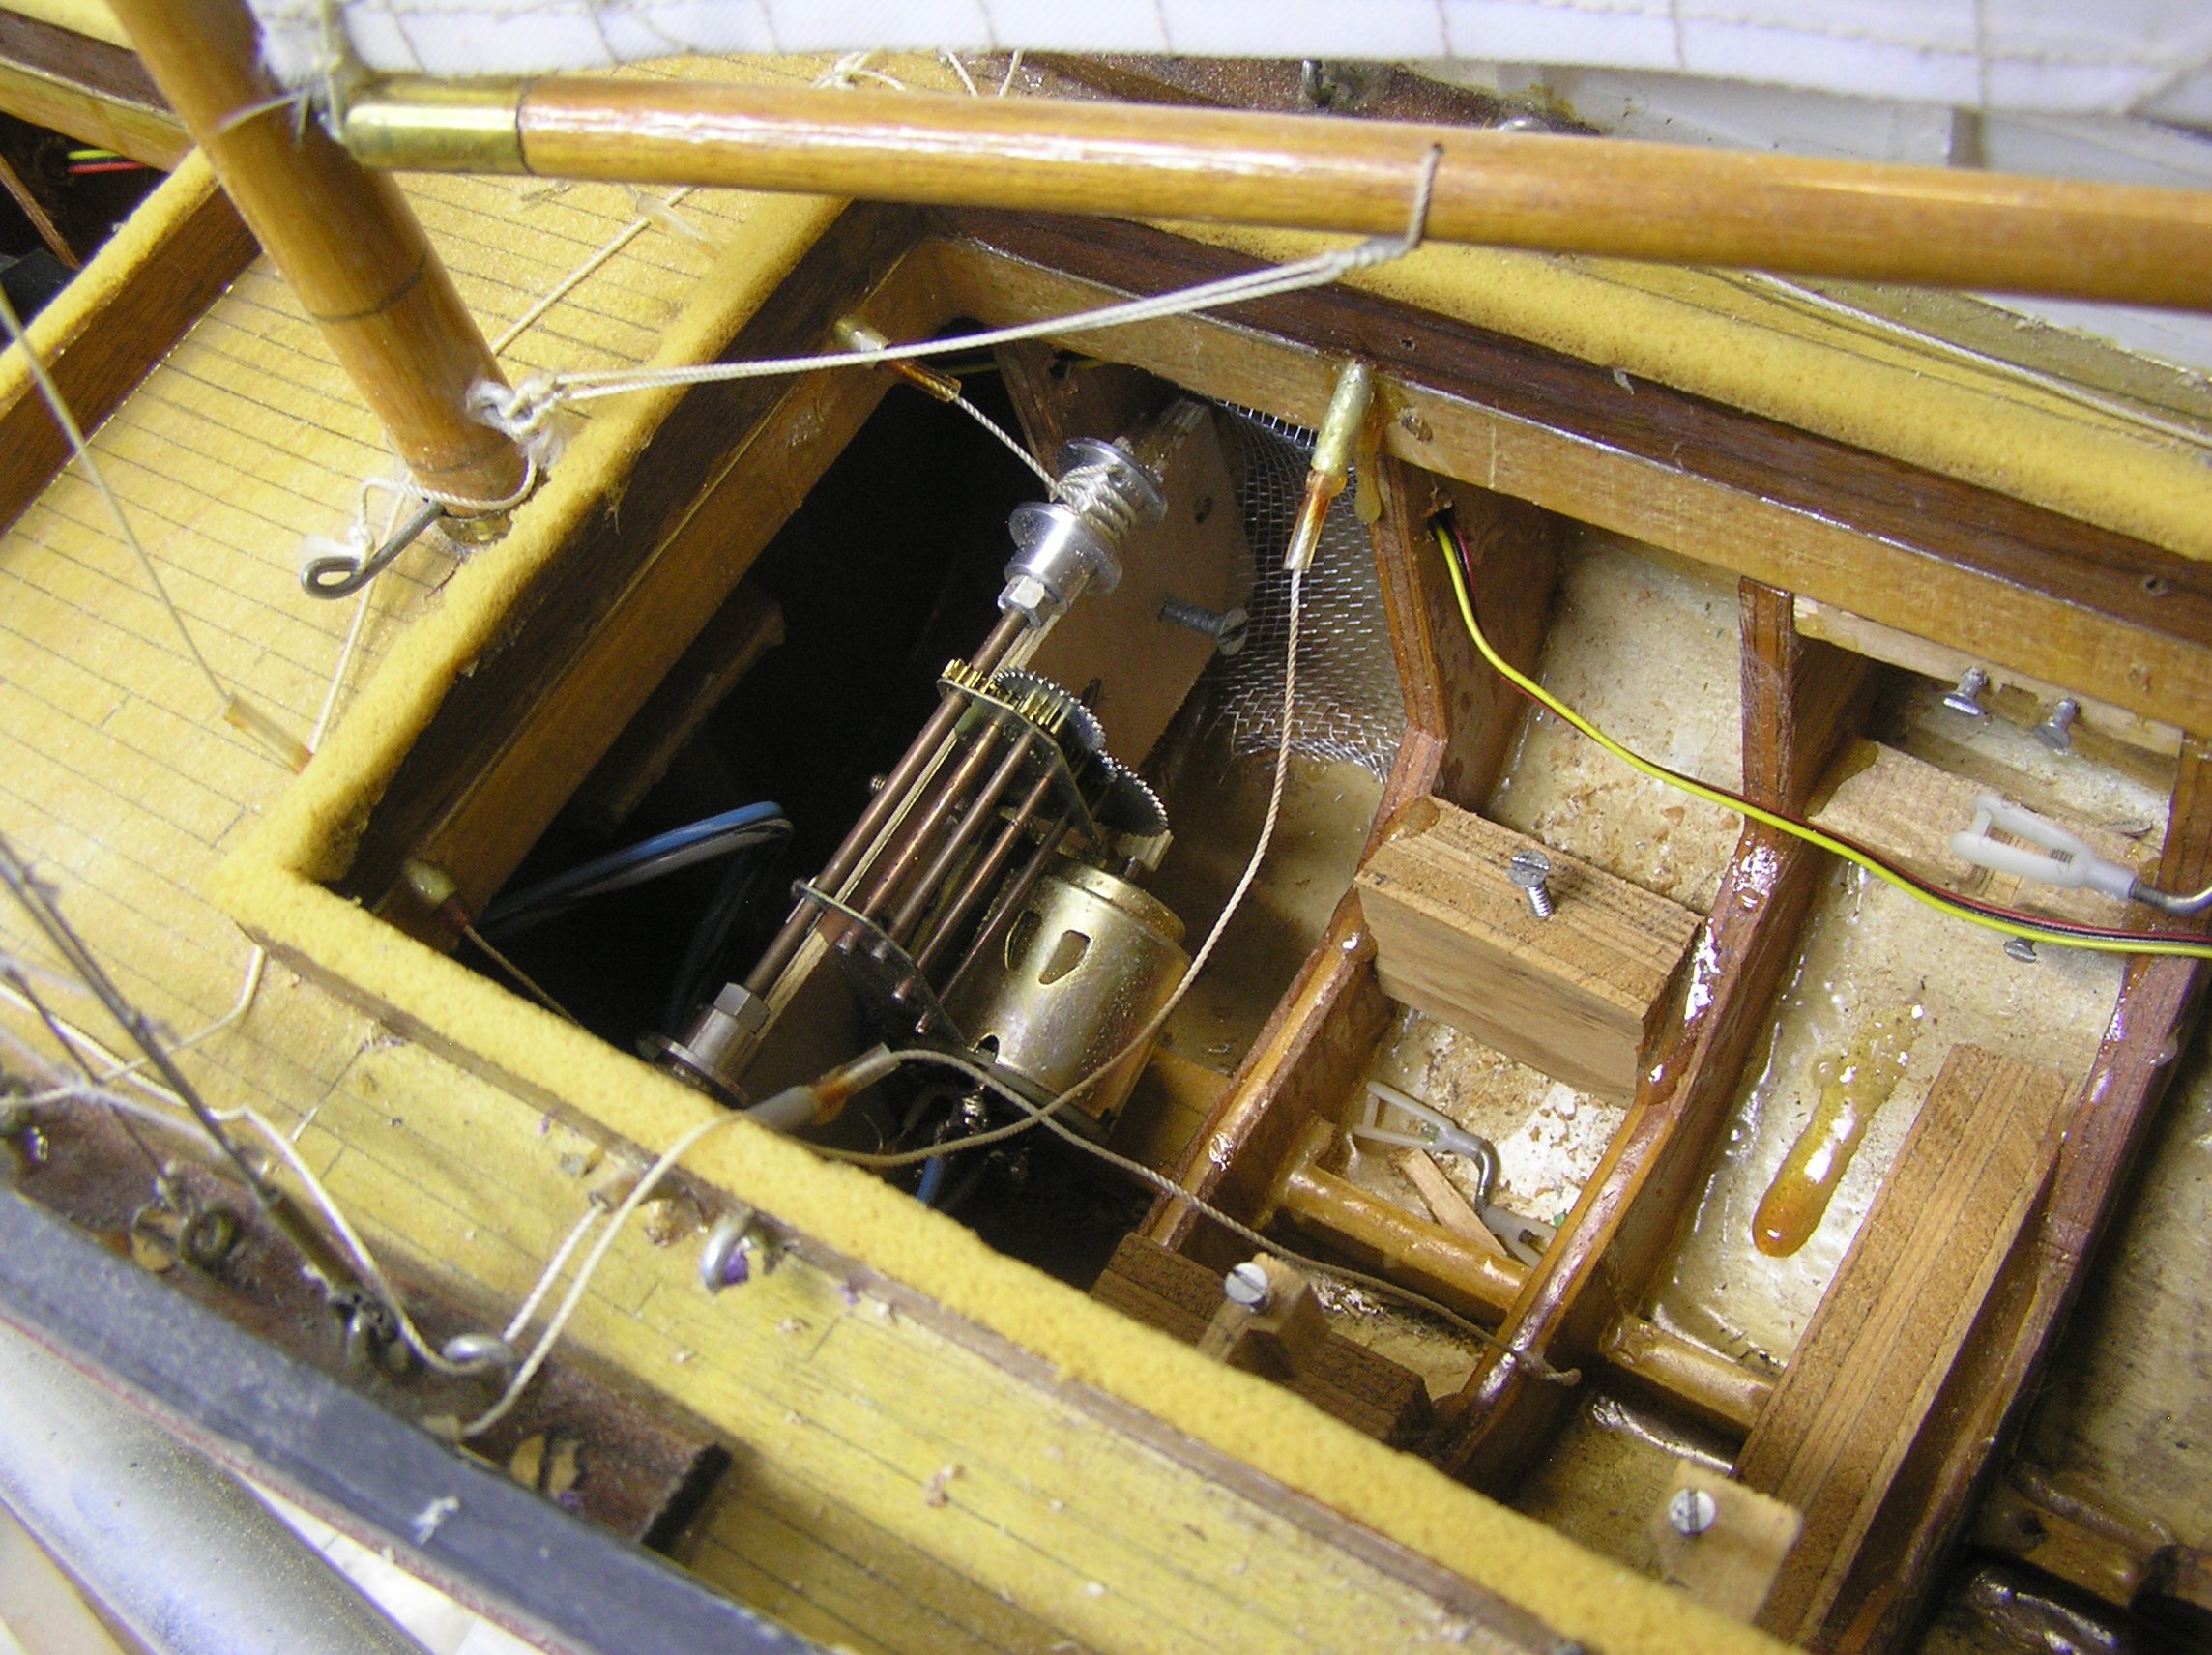
Yes, topsail schooners are very pretty. When I was making RC boats in high school in the 70's I scratch built one. The fore and aft sails were controlled by my big winch from my large Class M boat; the topsails by a motor drive ripped from a plastic model tank. I added a "bentinck boom" to the foot of the lower topsail because I didn't then know what else to do. My mom sewed the sails for me. On the boat's maiden I had trouble tacking her; decided I had placed the fin keel too far aft. You can see the addition strapped on with meccano for a test, however I then went to university and this ship has gathered dust for decades. I doubt the tank drive would still work. I thought of rejuvenating her with modern gear but as is my habit I built her solid as hell with full bulkheads and there isn't much room to work in her. Maybe someday. And just look at those big ugly bolts sticking out of the lead-filled ballast tube! 🙄
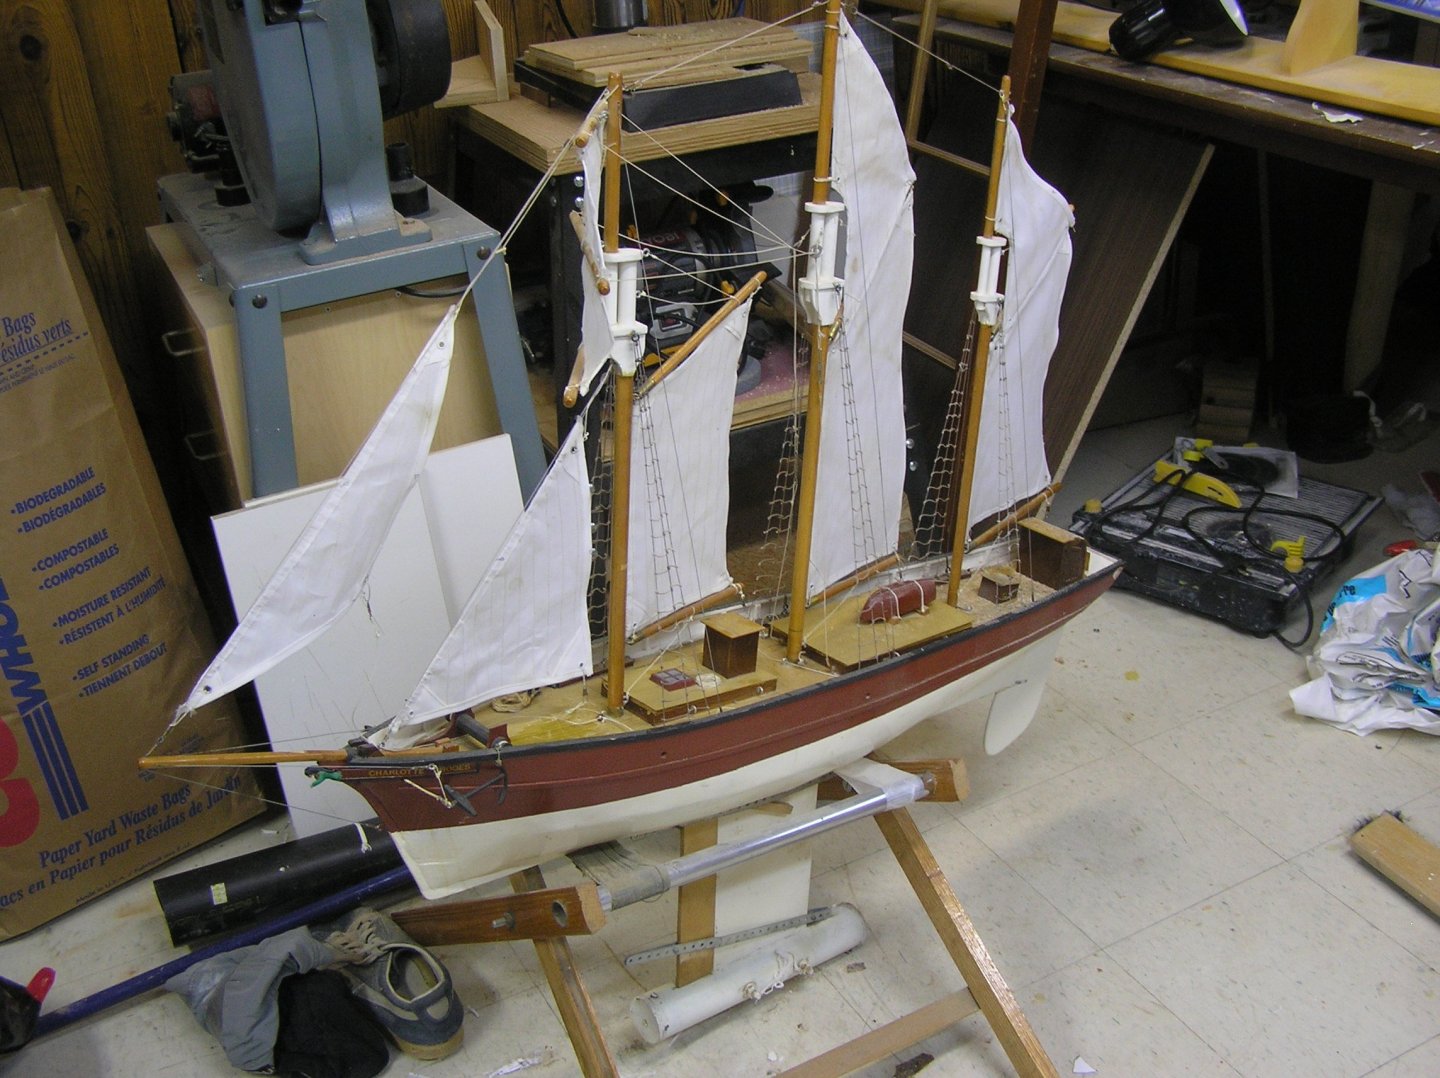
The tank drive. The remainder metal screen was my idea of some form of RF shielding for the small motor's emissions. Guess I had interference issues with the old AM RC set. Wonder what I "grounded" it to? 😏

"Reaching woman" figurehead made from a Zulu drummer from the British-Zulu war. I named her "Charlotte Rhodes" after the old "Onedin LIne" PBS series which I loved. I have two DVD's of "Onedin" episodes; wish they'd make a complete set available.
-
3 hours ago, Kevin-the-lubber said:
I've had a look at the file, nothing wrong with what you've done there. Though as often seemed to be the case with my own TinkerCad objects, the software says the components are not manifold (there are holes/gaps in the mesh, but the slicer is probably fixing these on the fly).
A multi-part will print fine in resin but I think you'd struggle with the library printer. The frames would be about 0.5mm thick but if the finger cross section was like the sketch i.e. create a mortice and tenon, there would be enough heft in the frame for it to not be that delicate. It's ages since I used TinkerCad and I can't remember how much scope there is for dimension-driven design.
Yes, the library printer could barely print it at all. Mortice and tenon is a good idea but I think a more complex CAD program would be needed. I have two days before we go away - I am trying to improve on the paint job. So far it looks promising.
- mtaylor, Glen McGuire and Keith Black
-
3
-
Beautiful model. The crew really brings it to life! Nicely done. I'll have some figures to do soon; I have some learning to do first.
-
10 hours ago, Kevin-the-lubber said:
Tuppence from me: yes, print the fingers separately and, while you’re at it, think about splitting the fingers into two parts, the outer frame and inner insert. It’s not much work, design-wise, and you’ll get lovely sharp paint lines.
Kevin, sounds like a good idea but the "frame" would be awfully delicate. Unfortunately when drawing it in TinkerCAD I gave no thought to possibly splitting it so it's a real dog's breakfast of elongated tube sections and "holes", and a patchwork of filler pieces. I'm reluctant to revisit it but may have to if I can't get a decent paint job on it.
If you're interested here's the CAD file, at the risk of exposing my clumsy drafting:
- Glen McGuire, mtaylor, Mirabell61 and 1 other
-
4
-
Another great model, Glen! Did you consider maybe having the fore topmast broken and hanging askew, to add to the abandoned appearance?
- mtaylor, Keith Black, Scottish Guy and 2 others
-
5
-
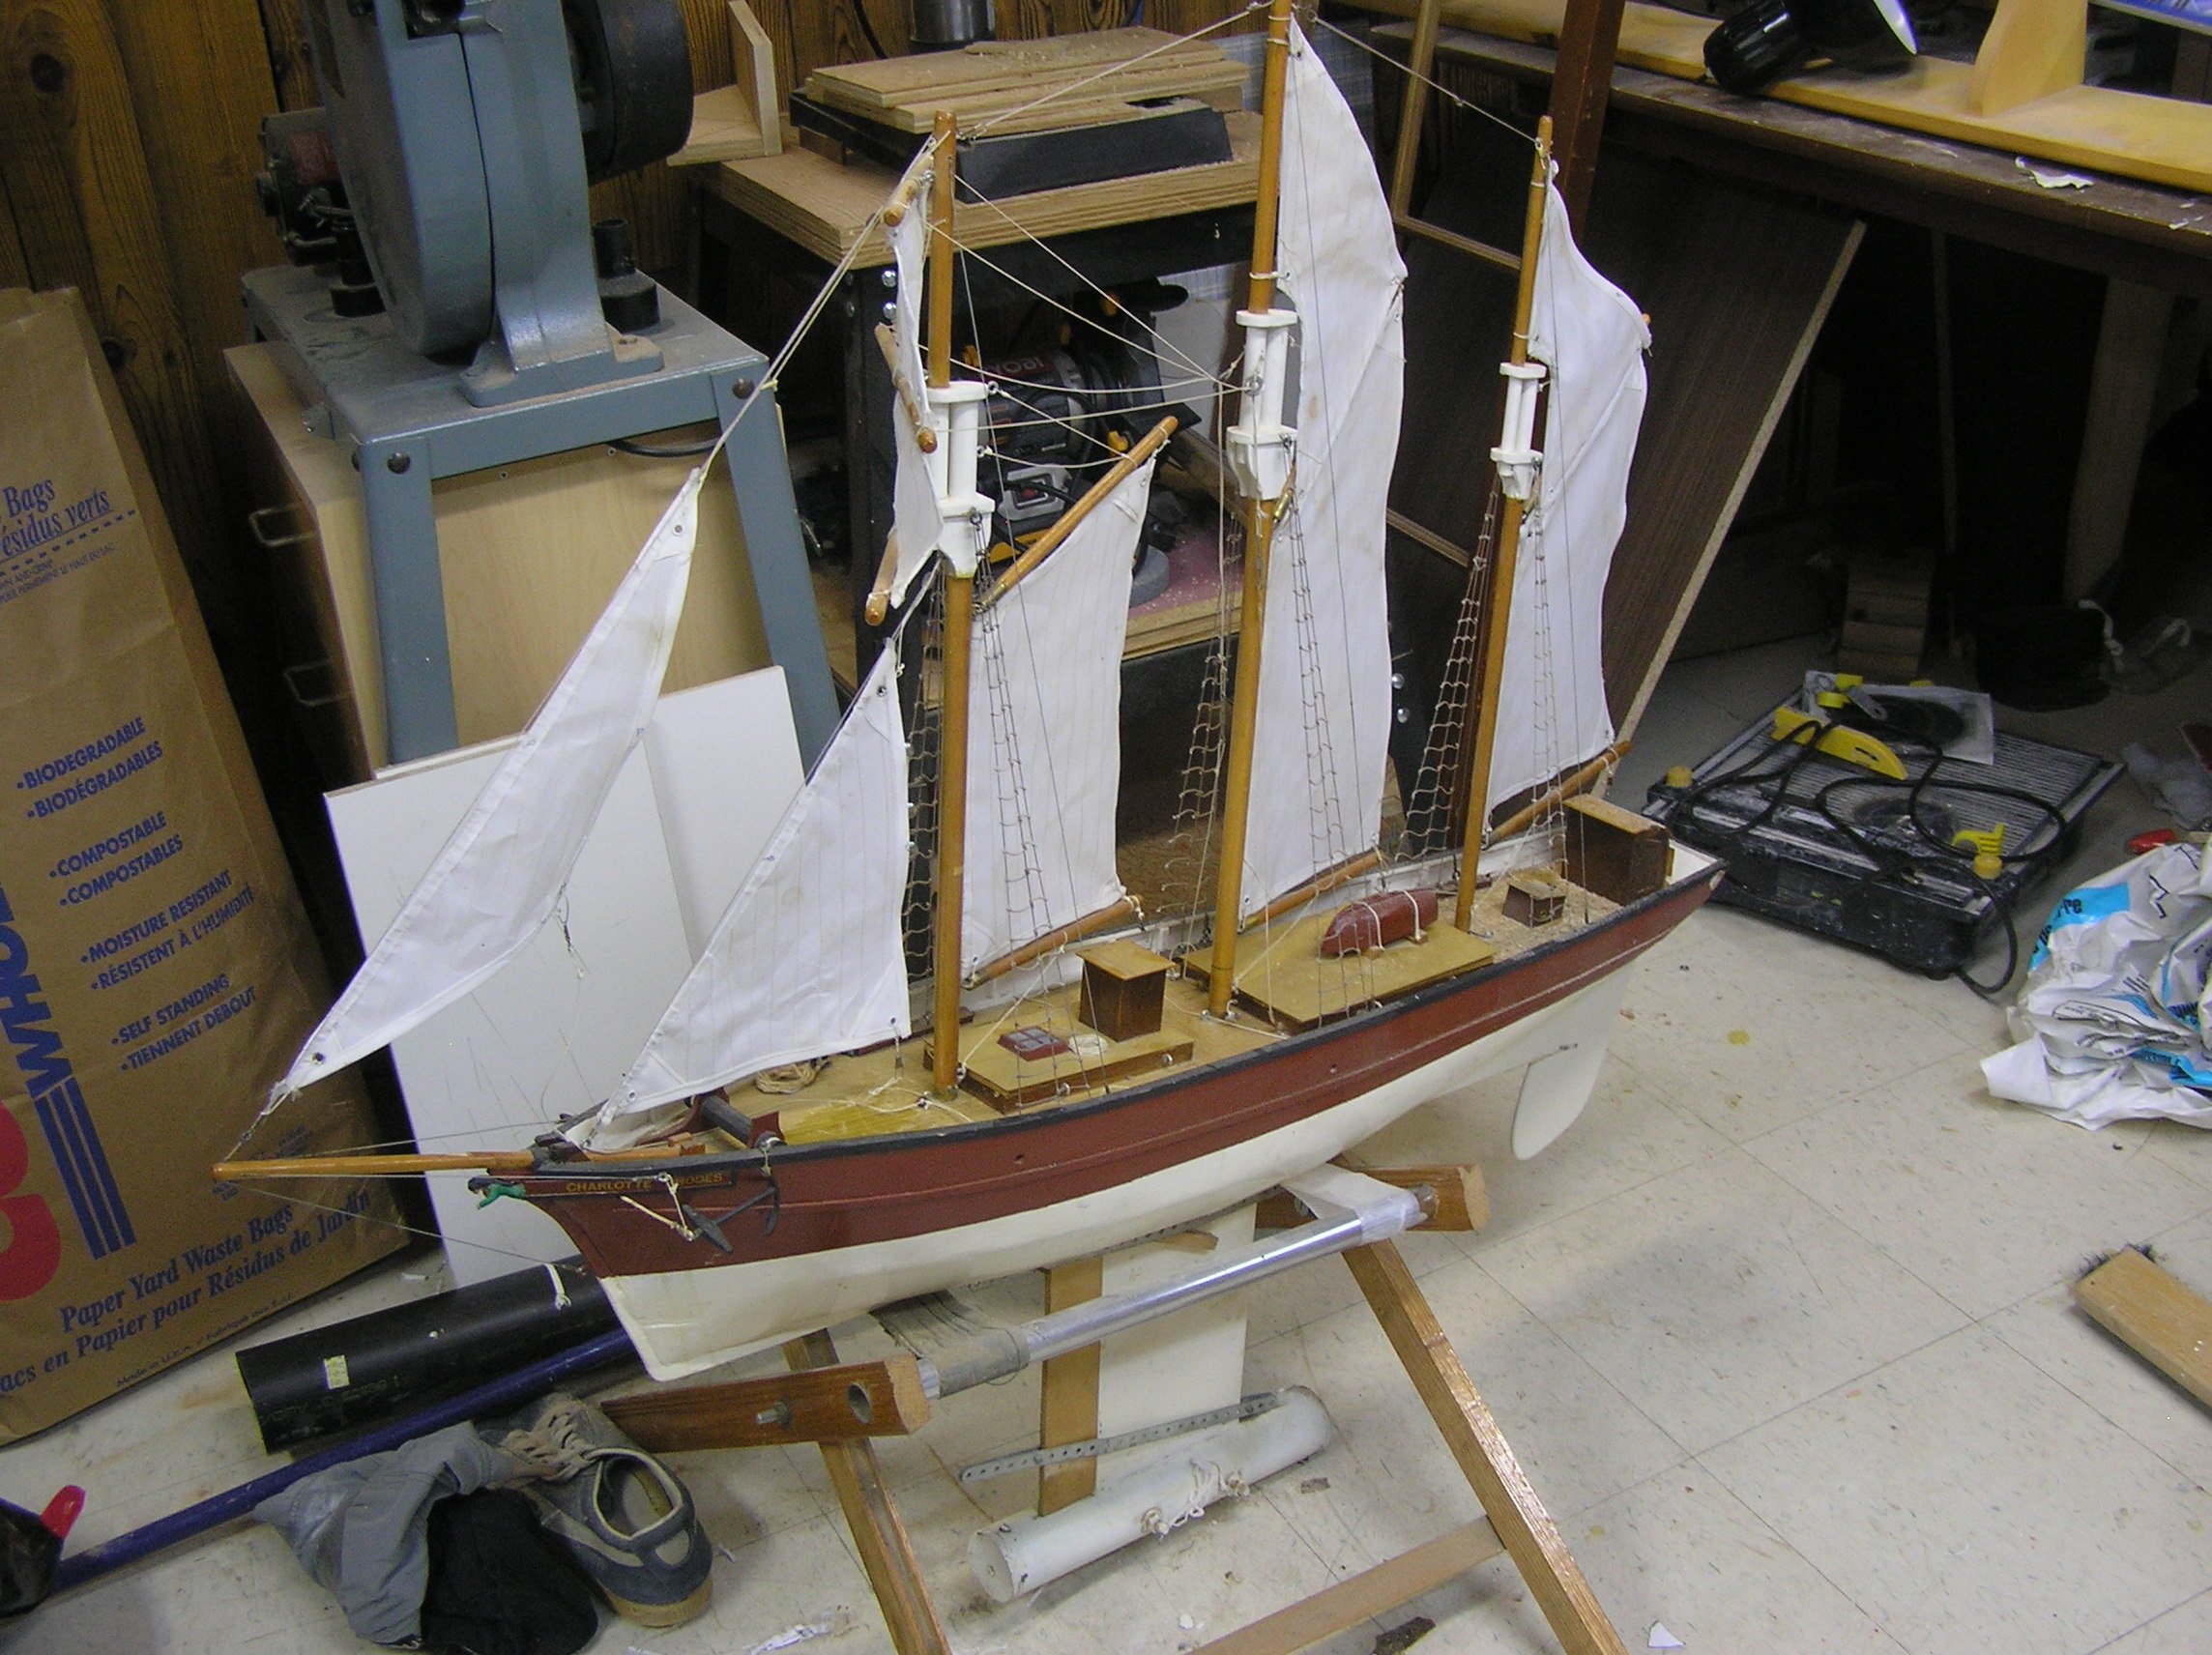
Plodding along on deck fittings. Here is the latest overall view:
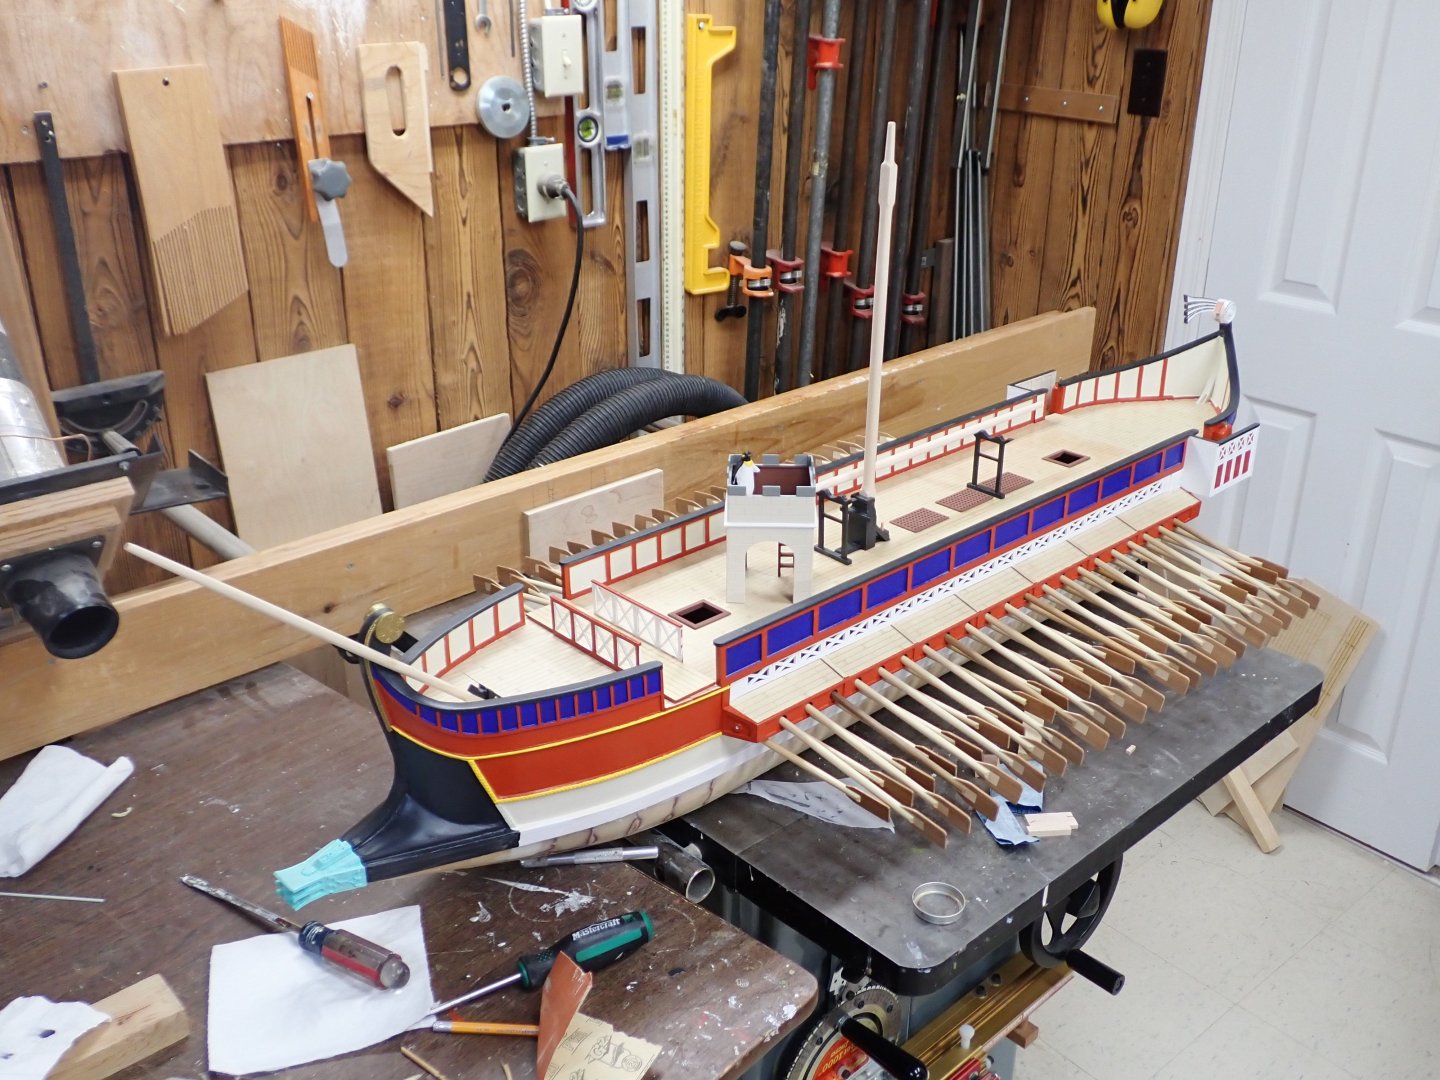
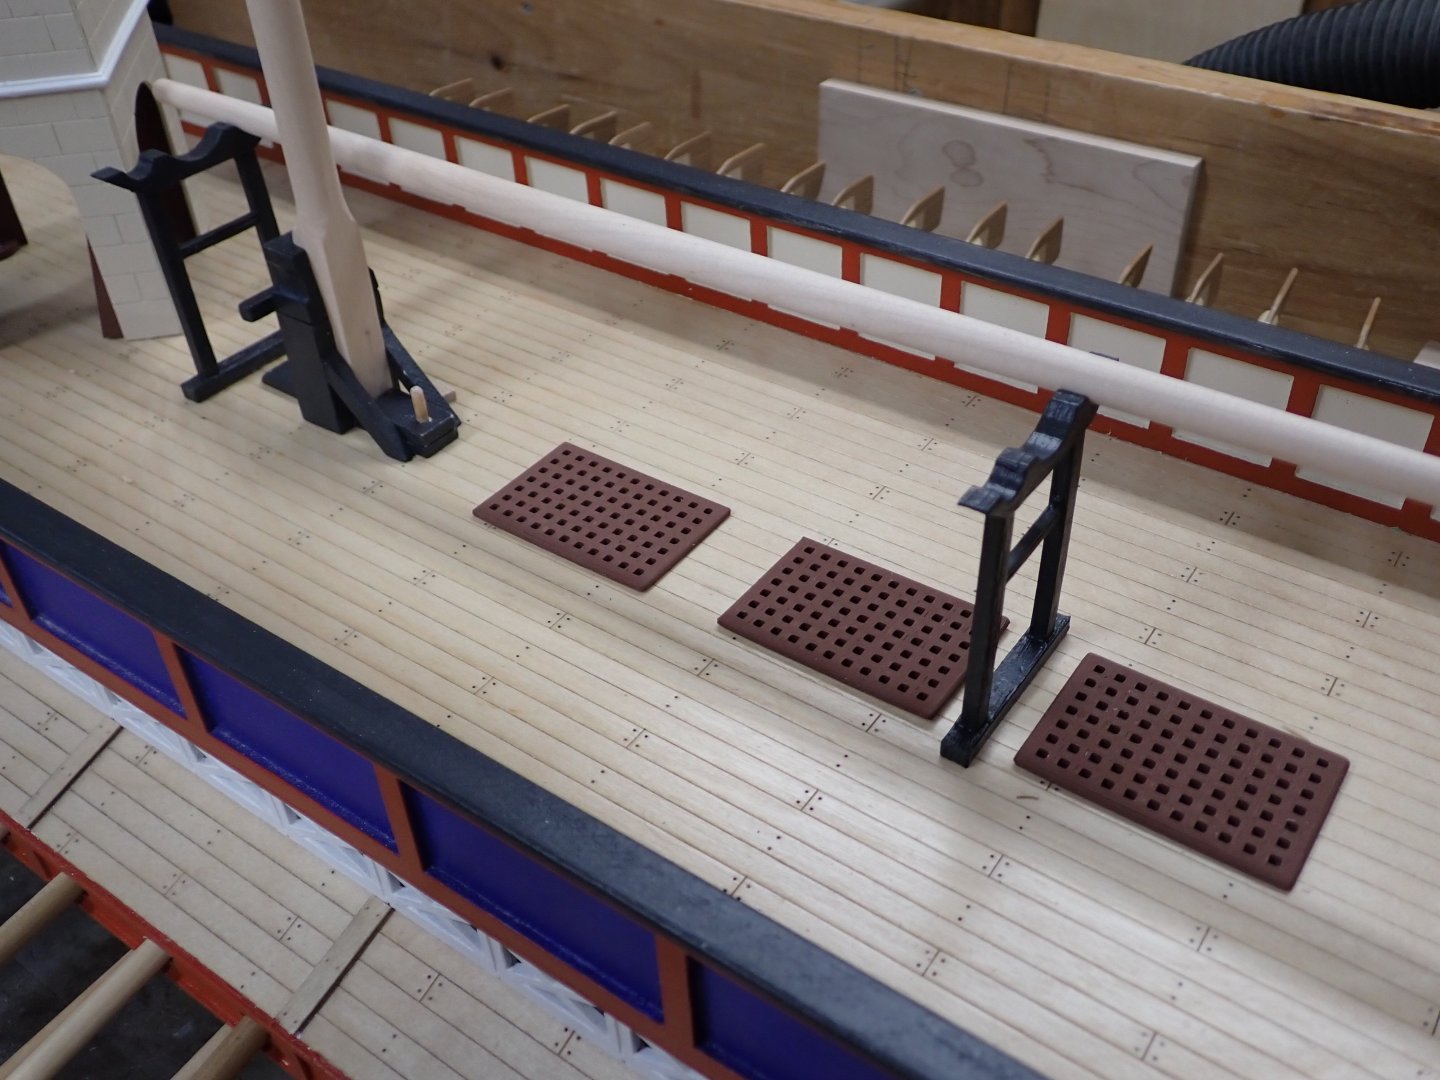
3D printed vent gratings and spar cradles. The mainyard lies on the cradles.
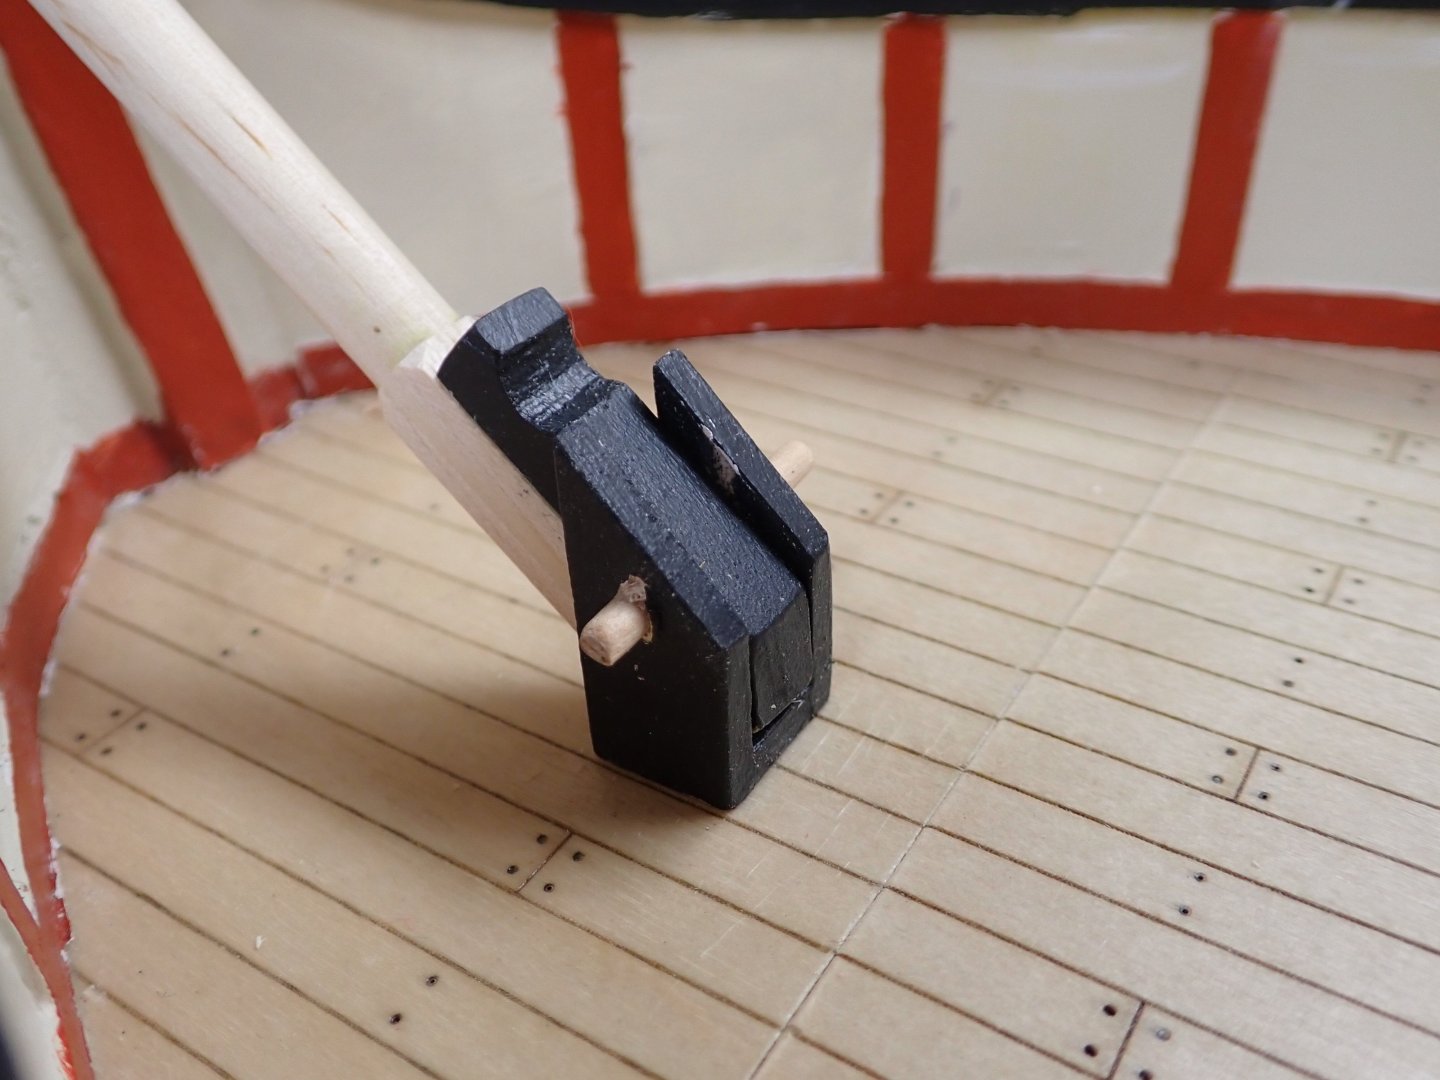
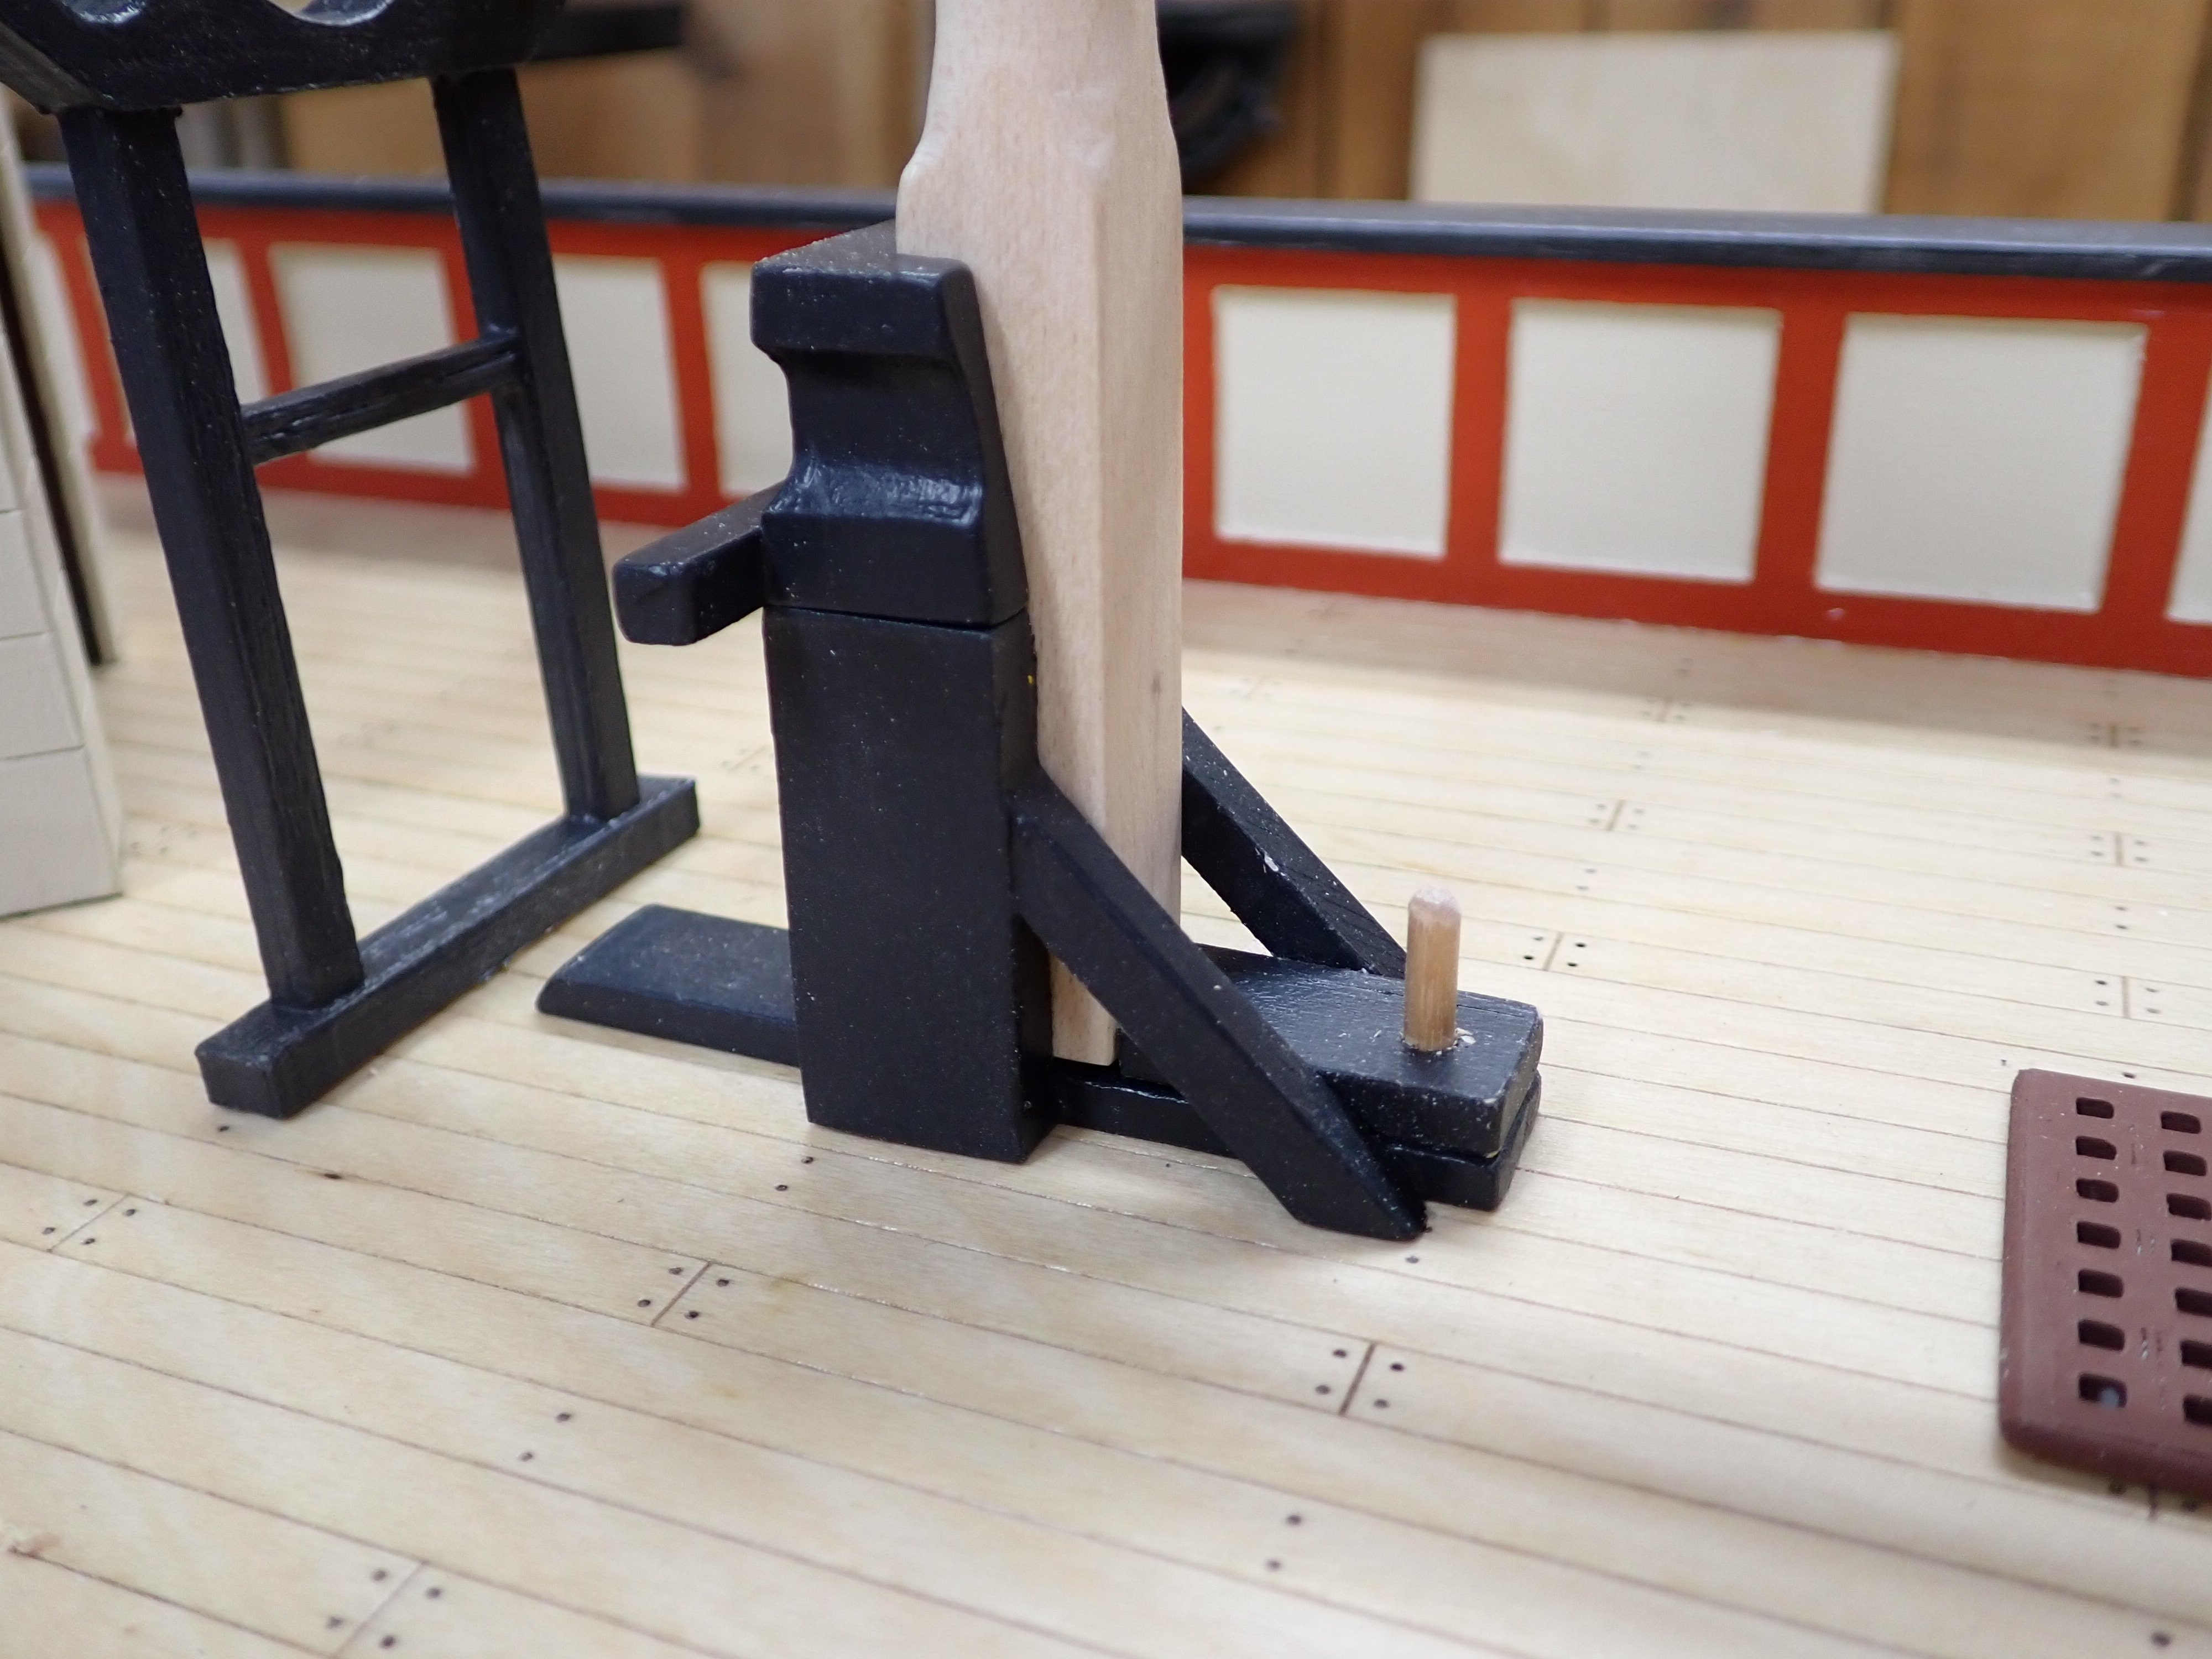
The main mast "tabernacle". The separable upper black part will be glued to the mast, and lashed to it in the concave portion. The white pin at the bottom is to allow me to lift off the little block behind the mast, thus allowing me to slide the foot of the mast aft so I can collapse it. All the rigging will collapse with it, and it will all attach to the main removable deck section except the fore and backstays which will need to be unhooked at the stem/stern.

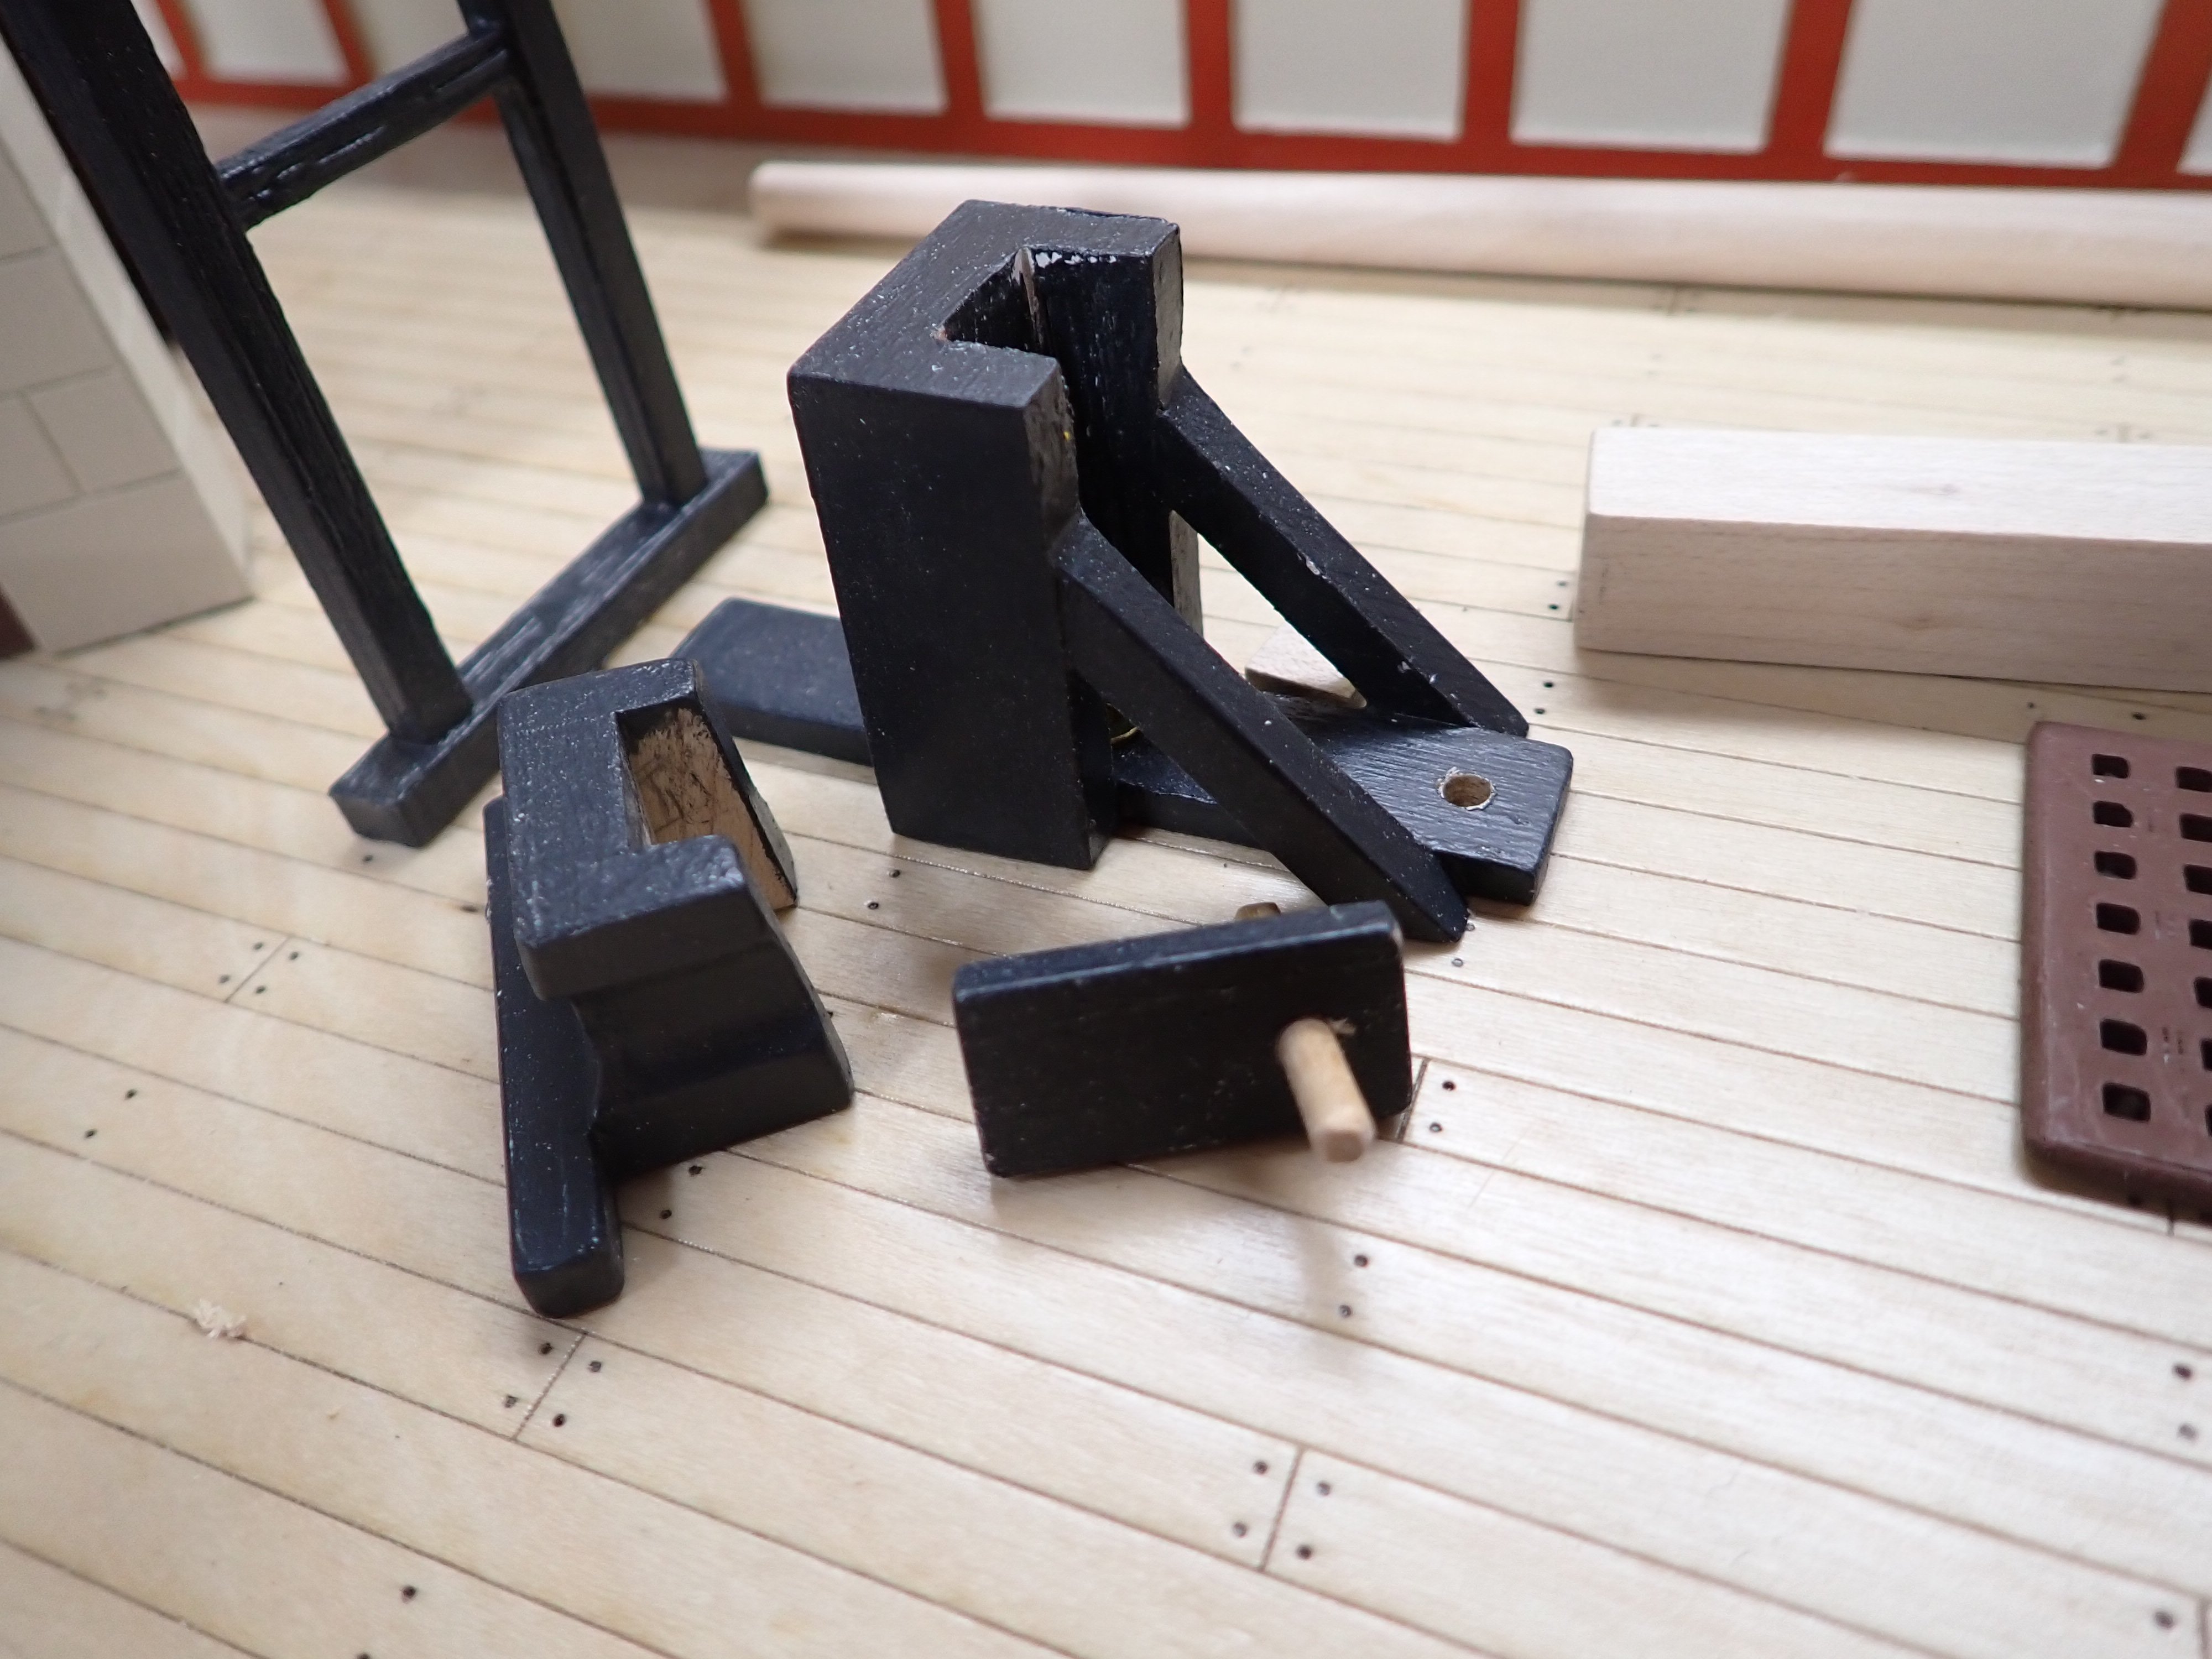
Tabernacle taken apart. The white pin will be painted black. Mast will be stained then varnished as will the yard.
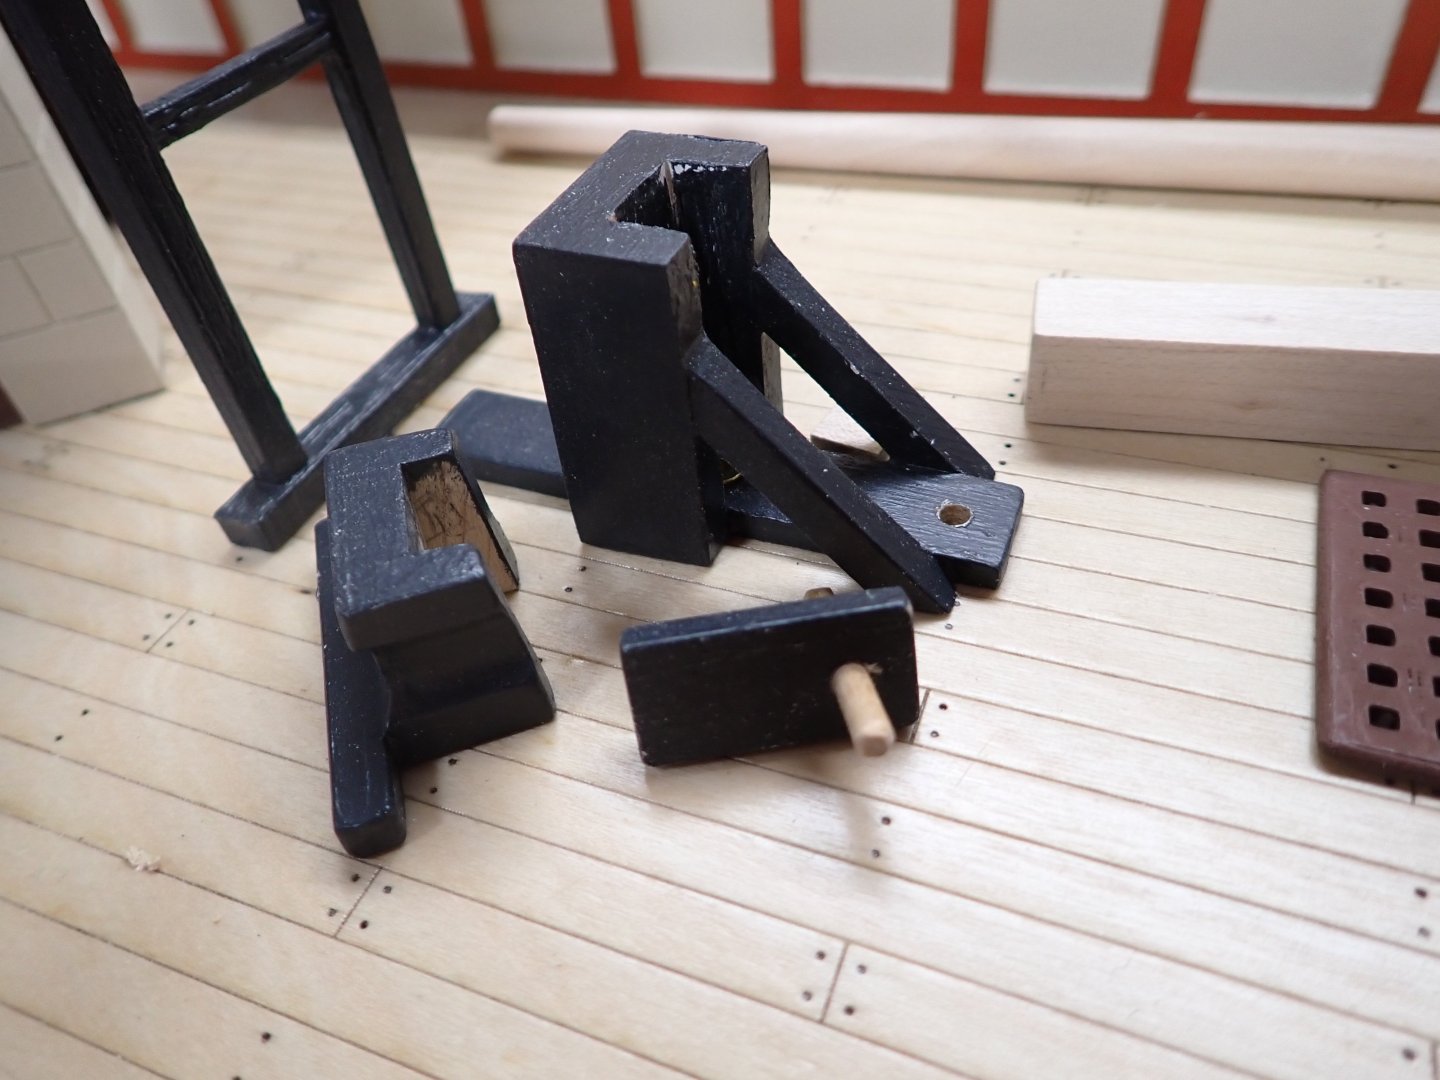
Fitting on foredeck for the "artemon" (what we'd call a bowsprit). Again, the part which will be lashed to the artemon is glued to it. Removing the white pin releases it so the artemon can be pulled in and down. Will need to make sure the bracket holding it at the stempost has some wiggle room to allow for this.
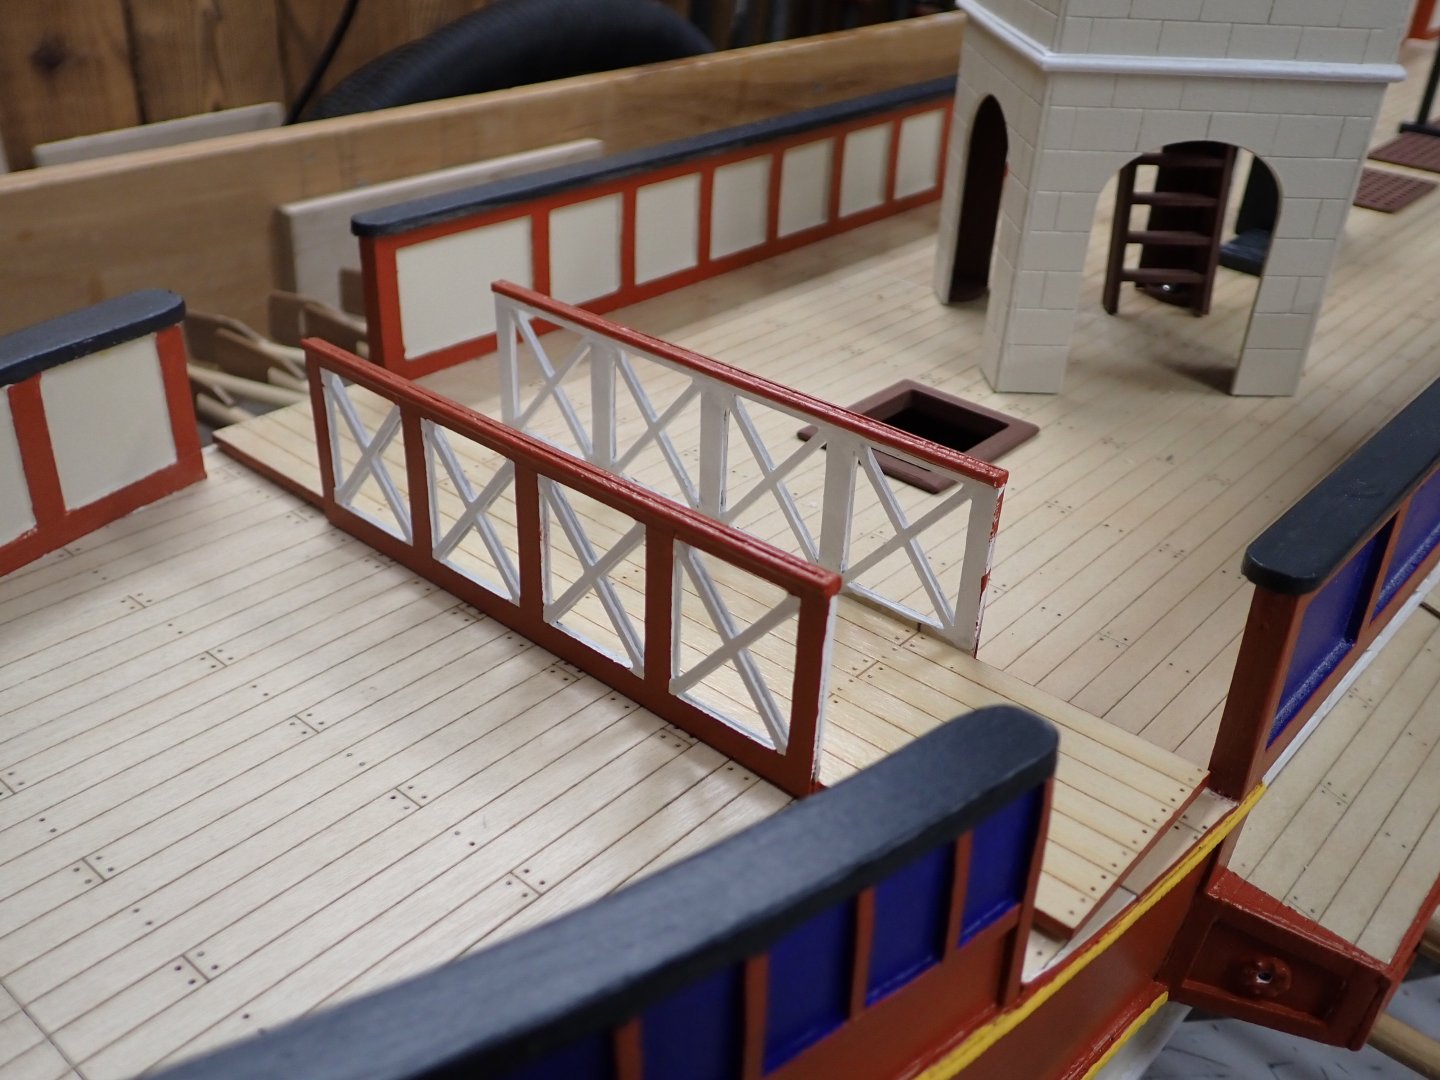
Boarding bridge is now painted. I see some white touch-up is needed. I have no info as to how it was manhandled over the side through the gaps in the bulwark or held in place there; will need to devise some reasonable scheme using cleats etc. Bridge will be glued to fore hatch and be its "handle". I copied this design from Flavio Terenzi's model but it seems to me that the lower portion of the sides should be solid to protect the marines' legs as they formed shield walls to cross over in the face of enemy archery; shields would have reached from heads to about knees. Might modify it.
Printed fantail decoration, badly painted. I need to figure out how to get black paint in between the converging fingers without gumming them up. I should have printed it in four pieces, one per finger, then painted, then glued together. Hindsight is 20/20.

Artillery: here is a printed ballista in resin, courtesy my brother. Beautiful detail but sadly too small (I had spec'd the length but it was hard to picture) so he has printed four more copies in larger scale for me. Not received yet.

Still to come are captain's stern shelter, anchors, rigging, some sort of material for gathered sails, stern flag standard. And crew.
We're going away on a little trip again.
Thanks for following.....
-
1 hour ago, woodrat said:
Ian. I dont know this block. Where did you come across it? I dont know of any archaeology to back its use in greek or roman craft? Happy to learn more.
Dick
It's from the Zvezda plastic kit #8515 "Roman Trireme". I only have two or three books on galleys through history and can't find any such details as to their rigging in them. It looks cool and suitably "ancient" but really I'd rather not have to fiddle with little wood sticks when rigging my galley.
Sorry Steven, for digressing from your fine build!
- mtaylor and Glen McGuire
-
2
-
Sure, here is one:
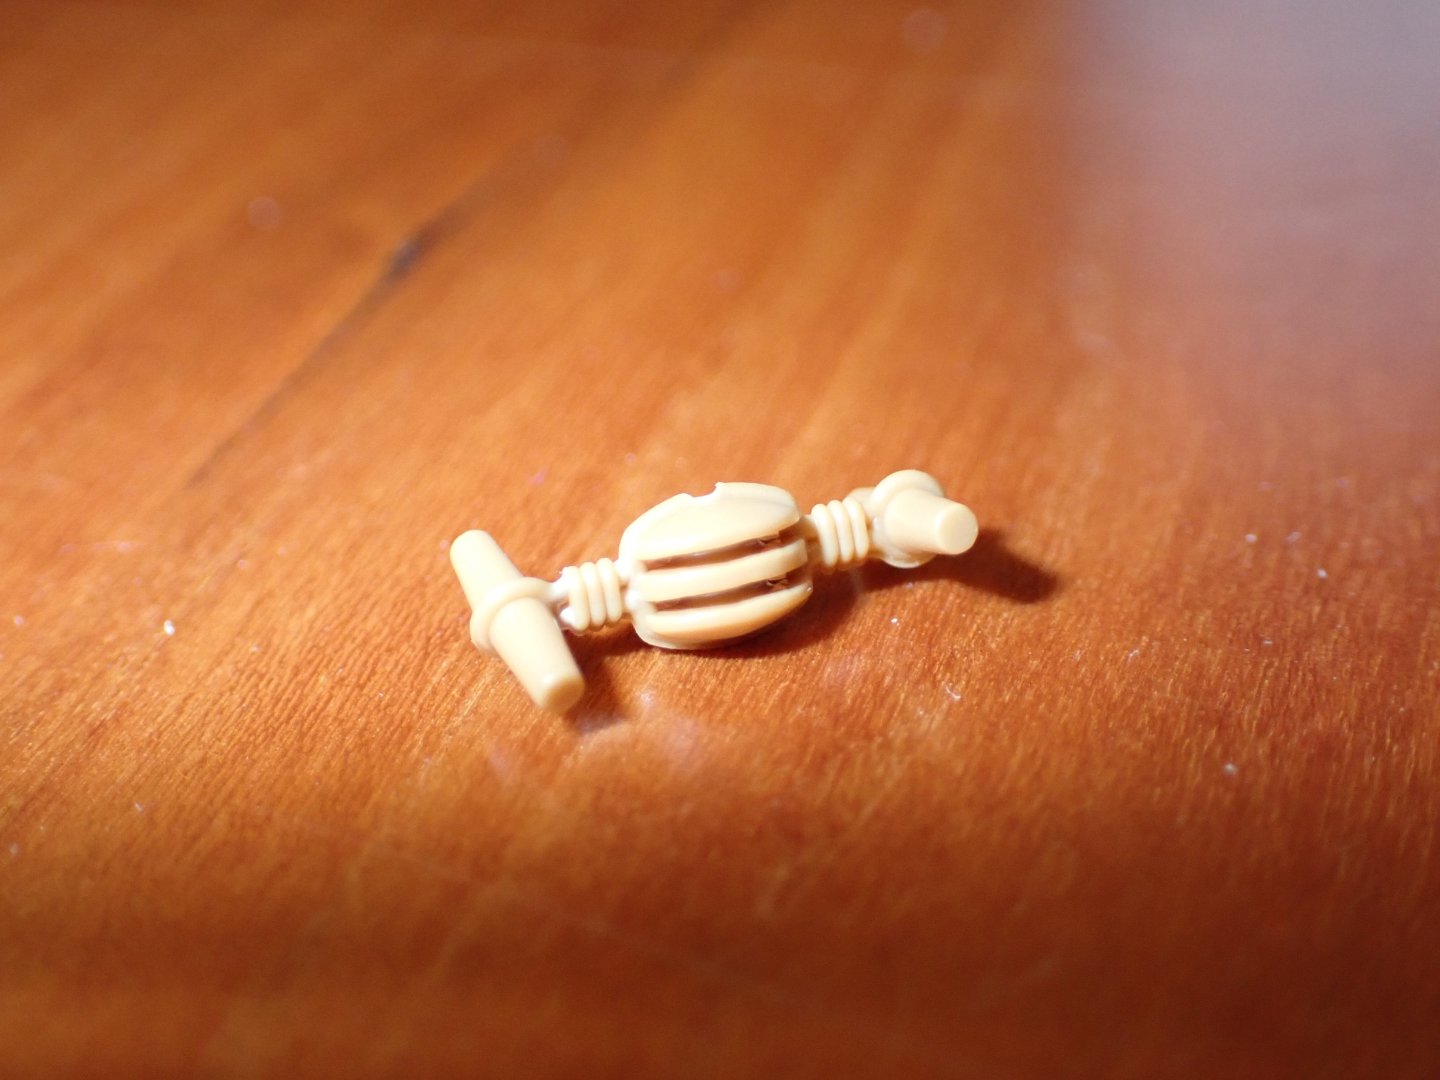
Now that I've photographed it in microscope mode I see that the block is indeed stropped, with toggles like on a duffel coat seized on. The attaching ropes also seize to these toggles. Pretty exquisite molding at this scale. The block itself is about 4mm.
This double-ended design is the upper block for the shroud tightening; one end is the shroud and the other is the lanyard which reeves through another double block (with toggle at one end only) lashed to the rail with the running end on a cleat mounted on a rail post.
- druxey, Glen McGuire, mtaylor and 1 other
-
4
-
-
Dick or Steven - do either of you know whether those blocks with the "T" on their end for stropping would be used in Roman times or did they have the now conventional stropping system? My plastic Zvezda galley came with the "T" versions and I'm wondering whether to make some for my big galley.
Thanks,
Ian
- mtaylor and Glen McGuire
-
2
-
Bonne Chance avec les planches secondaire, mon ami!
She sure was a chunky little ship.
-
1 hour ago, Glen McGuire said:
That is captivating. Thanks for sharing, Ian.
Glen, if you aren't familiar it's from "The Rime of the Ancient Mariner" (1798) by Coleridge. A bit of a difficult read these days, maybe then too.
- Canute, mtaylor, Keith Black and 1 other
-
4
-
Looking at your model's tattered sails and battered hull reminded me of a ghostly ship in a certain poem:
......
......
     The western wave was all a-flame
     The day was well nigh done!
     Almost upon the western wave
     Rested the broad bright Sun;
     When that strange shape drove suddenly
     Betwixt us and the Sun.

     And straight the Sun was flecked with bars,
     (Heaven's Mother send us grace!)
     As if through a dungeon-grate he peered,
     With broad and burning face.

     Alas! (thought I, and my heart beat loud)
     How fast she nears and nears!
     Are those her sails that glance in the Sun,
     Like restless gossameres!

     Are those her ribs through which the Sun
     Did peer, as through a grate?
     And is that Woman all her crew?
     Is that a DEATH? and are there two?
     Is DEATH that woman's mate?
........
........
-
What worked for me is to slip the seized loop over the masthead, and as Druxey says loop the lower end around the deadeye where you want it to be. Then I clamp the two parts of the shroud together with a mini smooth-jaw alligator clip. This holds all together while I apply a seizing against the deadeye; the small seizing thread easily slips in between the deadeye and alli clip. Then remove the clip, apply a small bit of glue to the seizing and add the others.
https://canada.newark.com/mueller-electric/bu-34/alligator-clip/dp/28F496
- Keith Black and mtaylor
-
2
-
-
Clicking on "WOW" doesn't do this justice........will this model have absent deck planks to show off that magnificent inlaid floor?
- FriedClams, mtaylor, Keith Black and 1 other
-
4
-
-
-
Nice build! Not too many places to "hide" the RC gear especially the rudder servo. I recall seeing another African Queen long ago in which the builder had several crates aboard like in the film (were they marked "explosives", I think?). Perhaps you could cover the rudder servo using these? Do you have access under the fore deck for the Rcvr, "steam control" servo, and battery? This same builder also found 1/12 scale (standard doll house scale apparently) figures; the Hepburn was a perfect appearance and pose. Can you tell us where you found your Bogart and Hepburn?
This is a build I would consider for the future - interesting and out of the mainstream.
Look forward to seeing it on the water.


11th century viking crew and freight in 1:25
in Discussion for a Ship's Deck Furniture, Guns, boats and other Fittings
Posted · Edited by Ian_Grant
"very odd" LOL yes I looked for some Roman archers for my ship. Didn't find any but I could have had archers in the form of skeletons, orcs, elves, scantily clad bounteous women, crocodiles, etc.
I did see some pretty nice vikings but for tens of dollars for the file. Are you aware that if you buy a file of a "fully rigged" figure you can use the "Pose" function in Blender to manipulate their posture and their clothes etc will just go with the flow and adapt? You can then use the one file you bought to print as many figures you need in whatever poses you want. Even vary their heights a little. You can pose body joints in the arms and legs, head position, usually the fingers, and on some models even jaws, eyes, and eyebrows.
If you find a viking you like but which has that stocky build, and the file is free, try importing the file into "3d builder"which is a free microsoft app probably factory installed on your computer. I don't know how to do much in this app, but it does accept bigger files than TinkercAD will open and it is pretty simple to "scale" the figure on any of the x, y, or z axes; or all at once. I used it to scale things for my brother to 3D resin print.
I haven't tried the following in 3d builder but I thought of it after my Roman search: if you "shrink" the figure along the x and y axes it will get slimmer. Once it looks reasonable proportioned you can scale it up or down an all axes simultaneously to maintain the new proportions to get the 1/25 scale height you want. It might work!