JRB9019
-
Posts
242 -
Joined
-
Last visited


-
 AJohnson reacted to a post in a topic:
HM Schooner Pickle by JRB9019 - Caldercraft - Scale 1:64
AJohnson reacted to a post in a topic:
HM Schooner Pickle by JRB9019 - Caldercraft - Scale 1:64
-
AJohnson reacted to a post in a topic:
HM Schooner Pickle by JRB9019 - Caldercraft - Scale 1:64
-
SonnyFL reacted to a post in a topic:
The super-beginners guide to stropping and whipping blocks.
-
EricWilliamMarshall reacted to a post in a topic:
The super-beginners guide to stropping and whipping blocks.
-
GrandpaPhil reacted to a post in a topic:
HM Schooner Pickle by JRB9019 - Caldercraft - Scale 1:64
-
GrandpaPhil reacted to a post in a topic:
HM Schooner Pickle by JRB9019 - Caldercraft - Scale 1:64
-
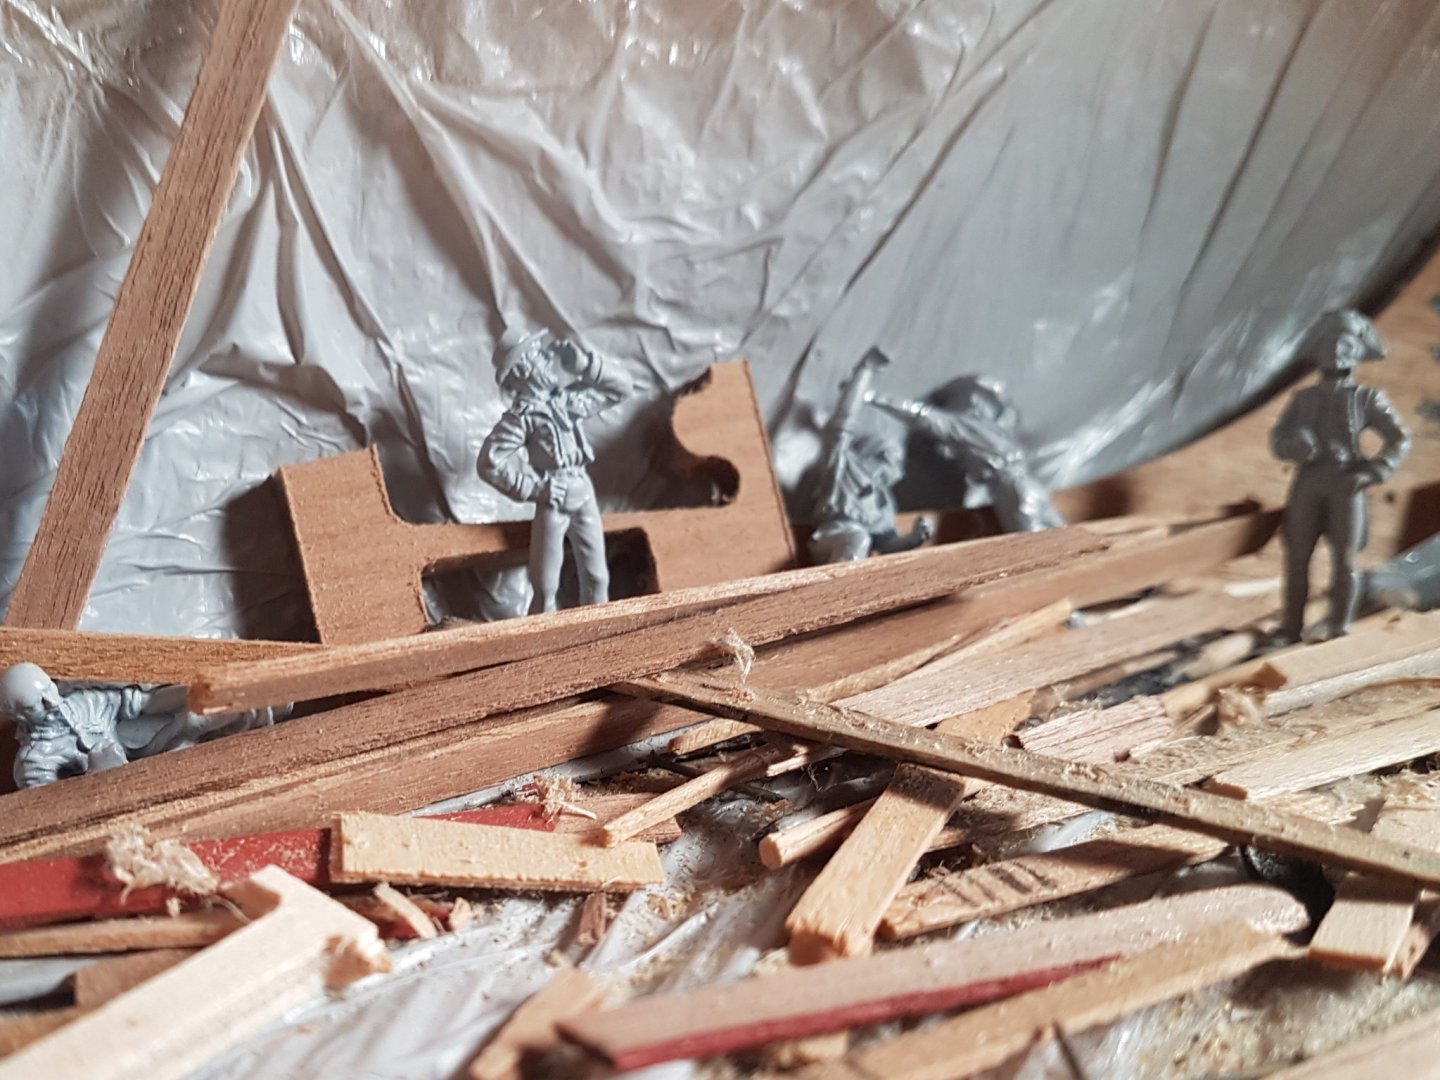
At last with a little help from the Flyer Swiss Seamans Recruitment Agency, I was able to organise a Captain and crew to help get the Pickle build completed. Sadly, their previous voyage had been an Antarctic expedition and they all arrived at the dockside looking a lot worse for wear and as can be seen, still suffering from a lot of frostbite. The crew appeared to be happy to be back on dry land and, as was their wont, immediately took to heavy drinking and fighting amongst them selves. The new crew then broke into the wood stores and made a right mess> The lookout kept watch and yelled out a warning but too late, the Captain found them all and he was not amused. The crew were sentenced to hard labour to clear up the the mess they had made and to make themselves presentable for inspection . . . .
-
JRB9019 reacted to a post in a topic:
HM Schooner Pickle by JRB9019 - Caldercraft - Scale 1:64
-
flyer reacted to a post in a topic:
HM Schooner Pickle by JRB9019 - Caldercraft - Scale 1:64
-
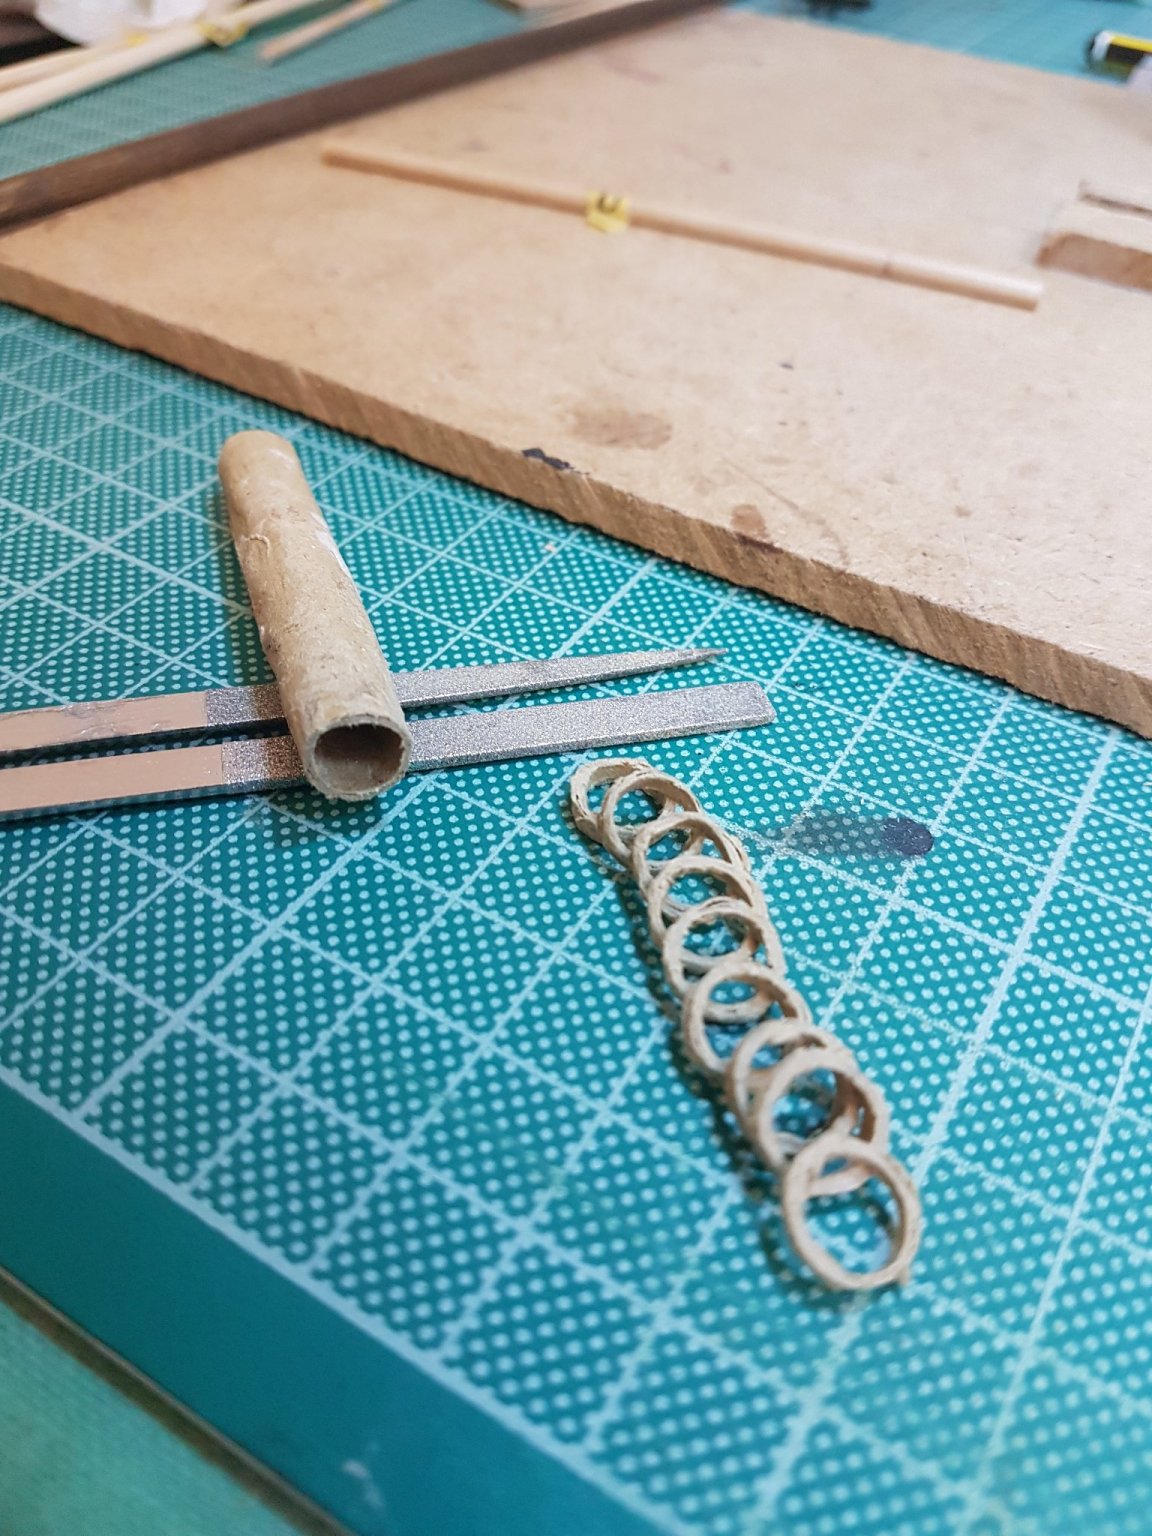
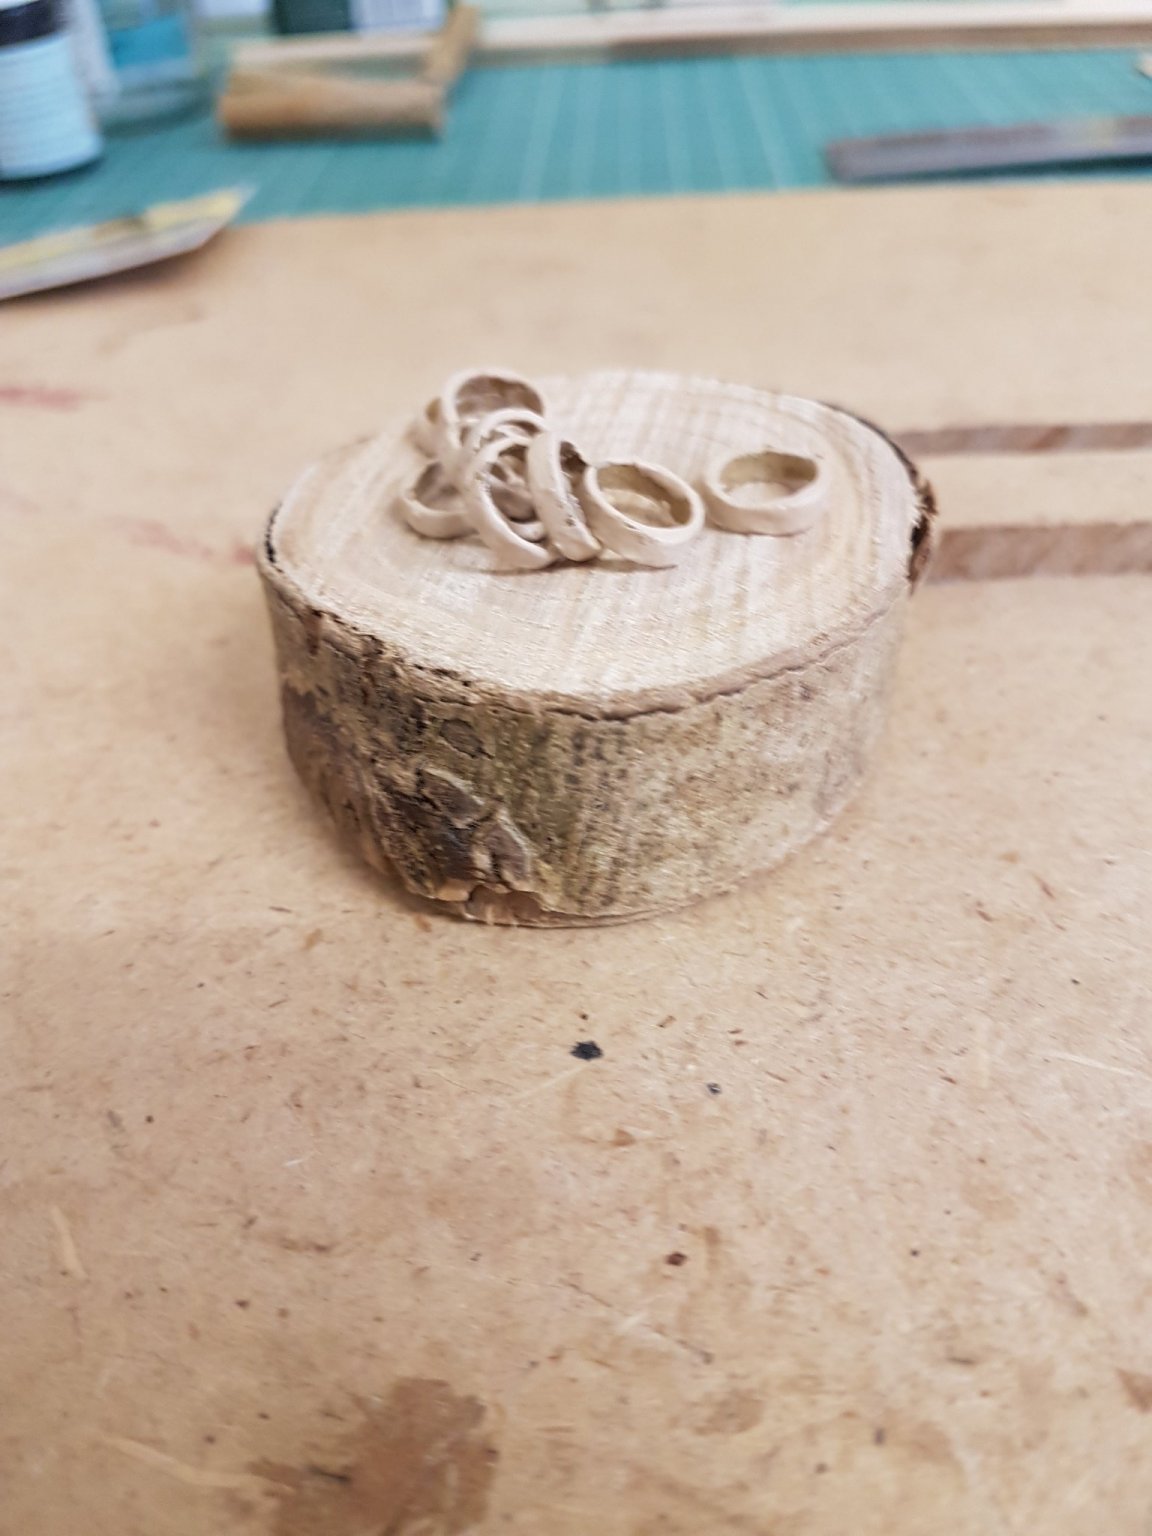
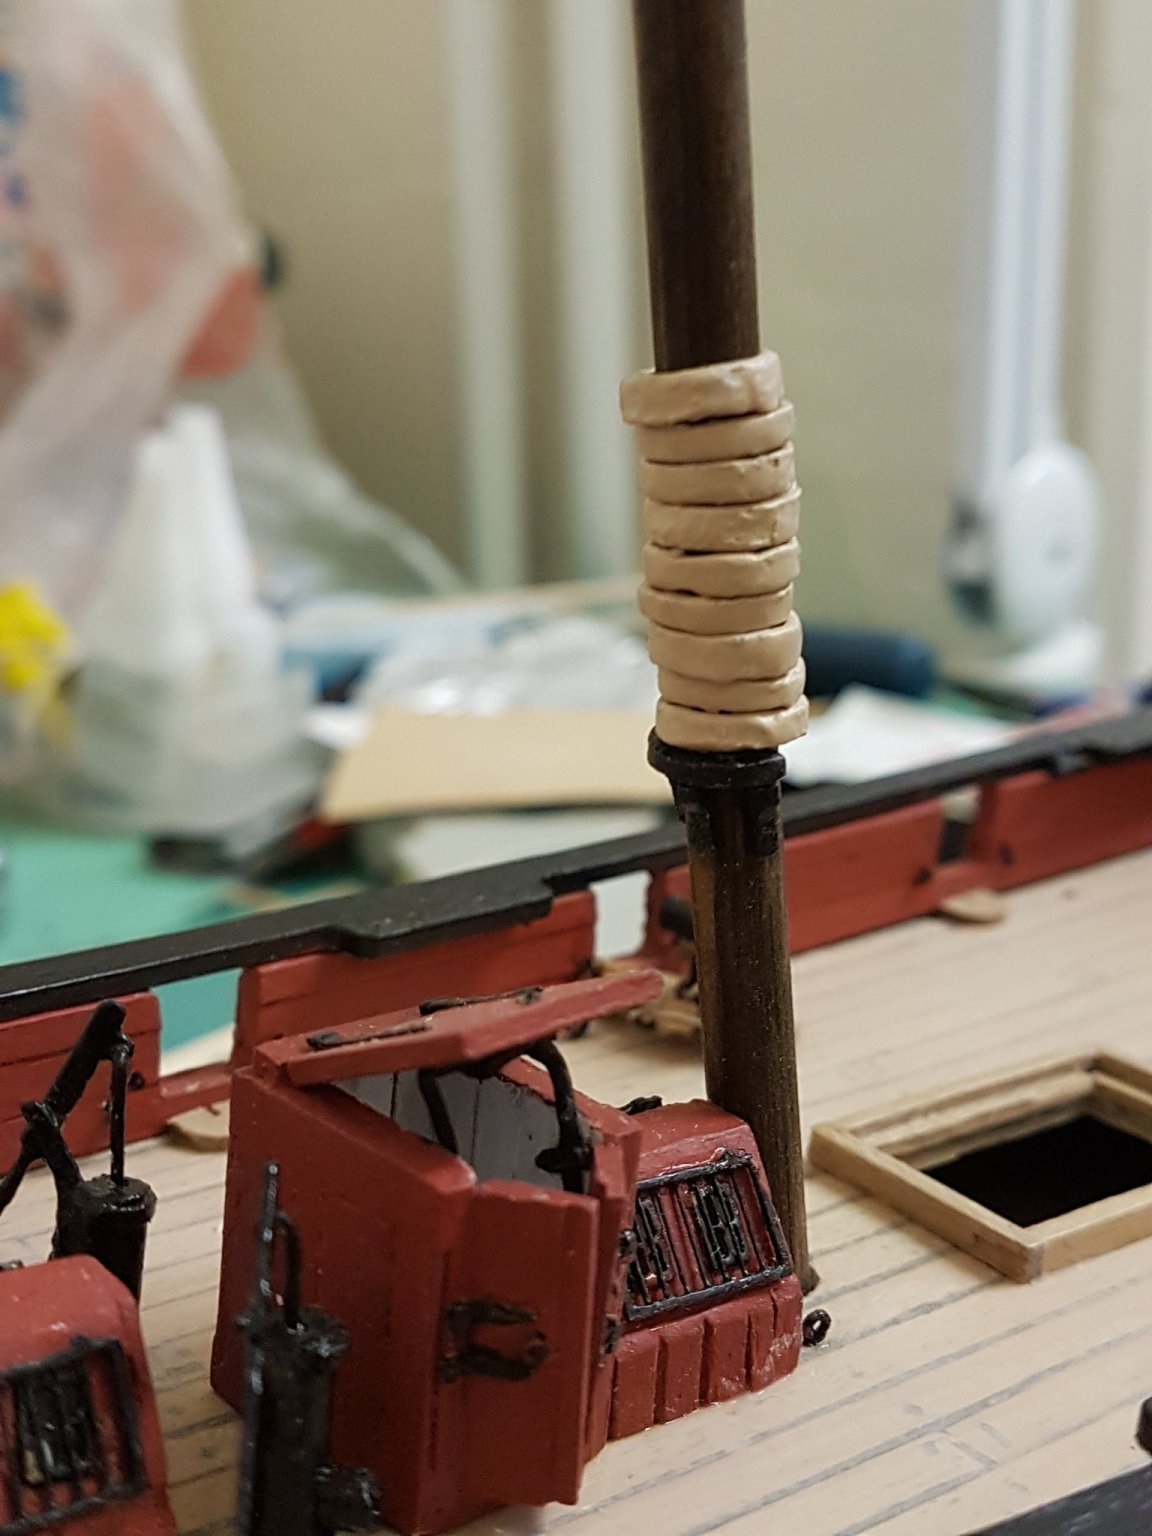
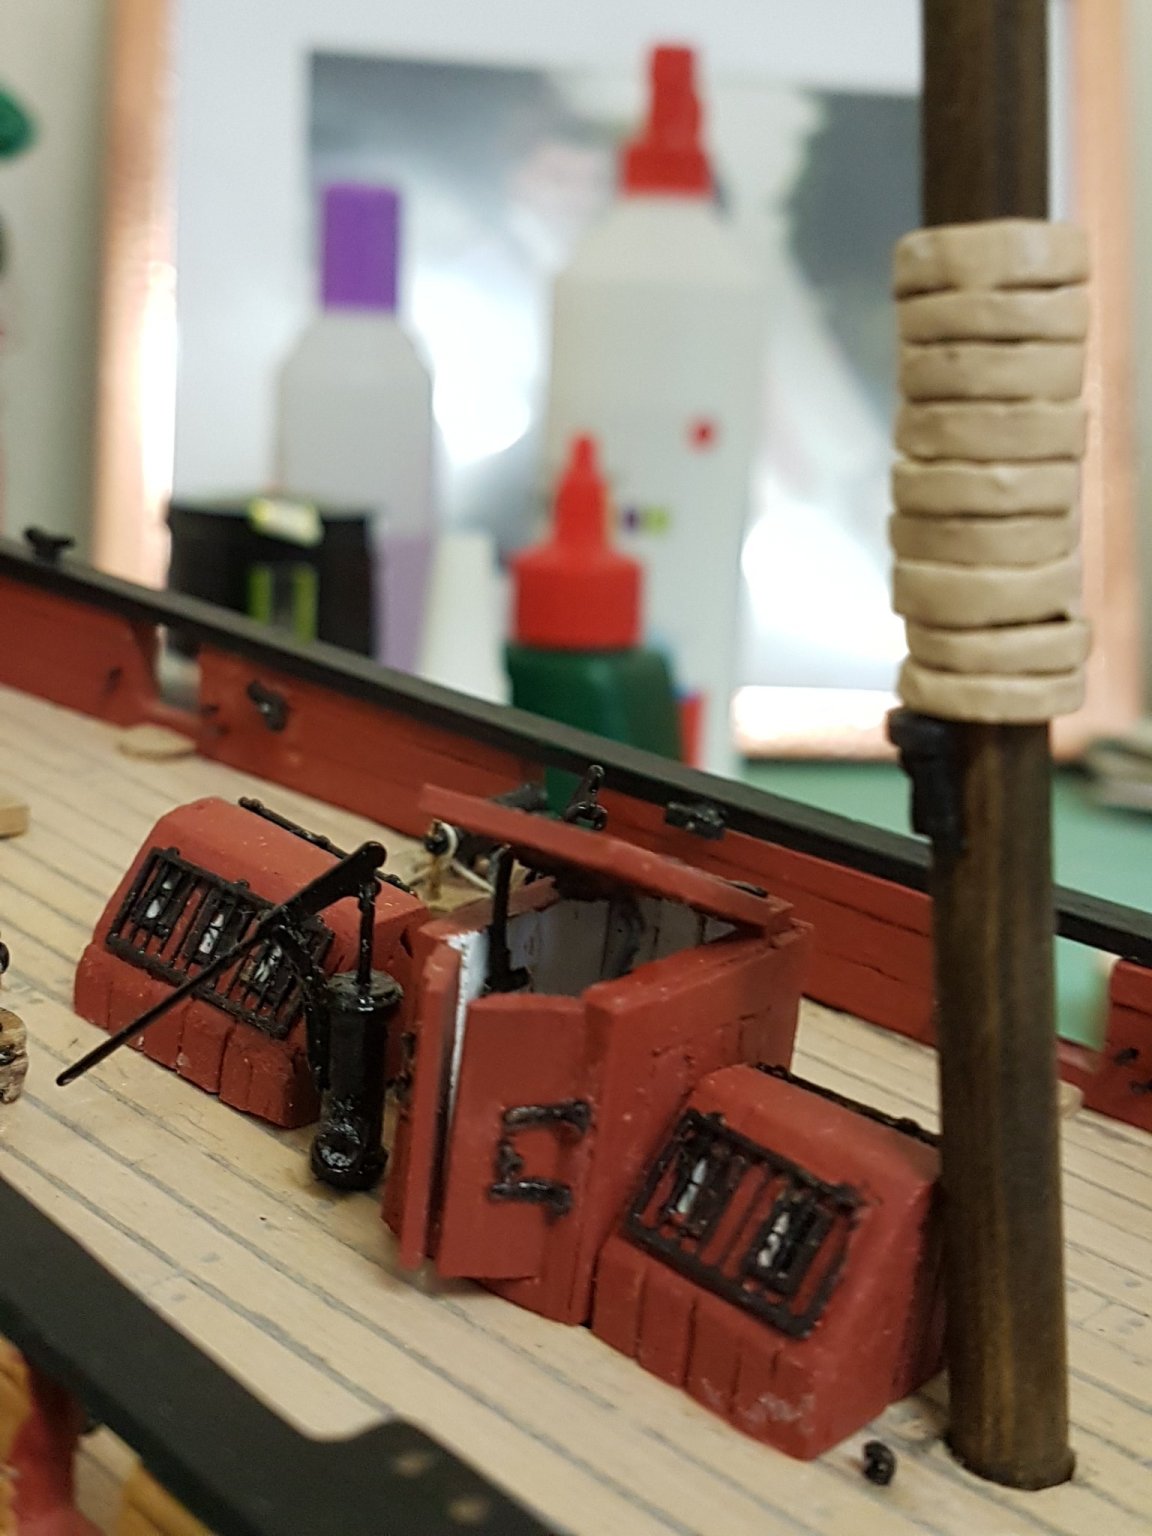
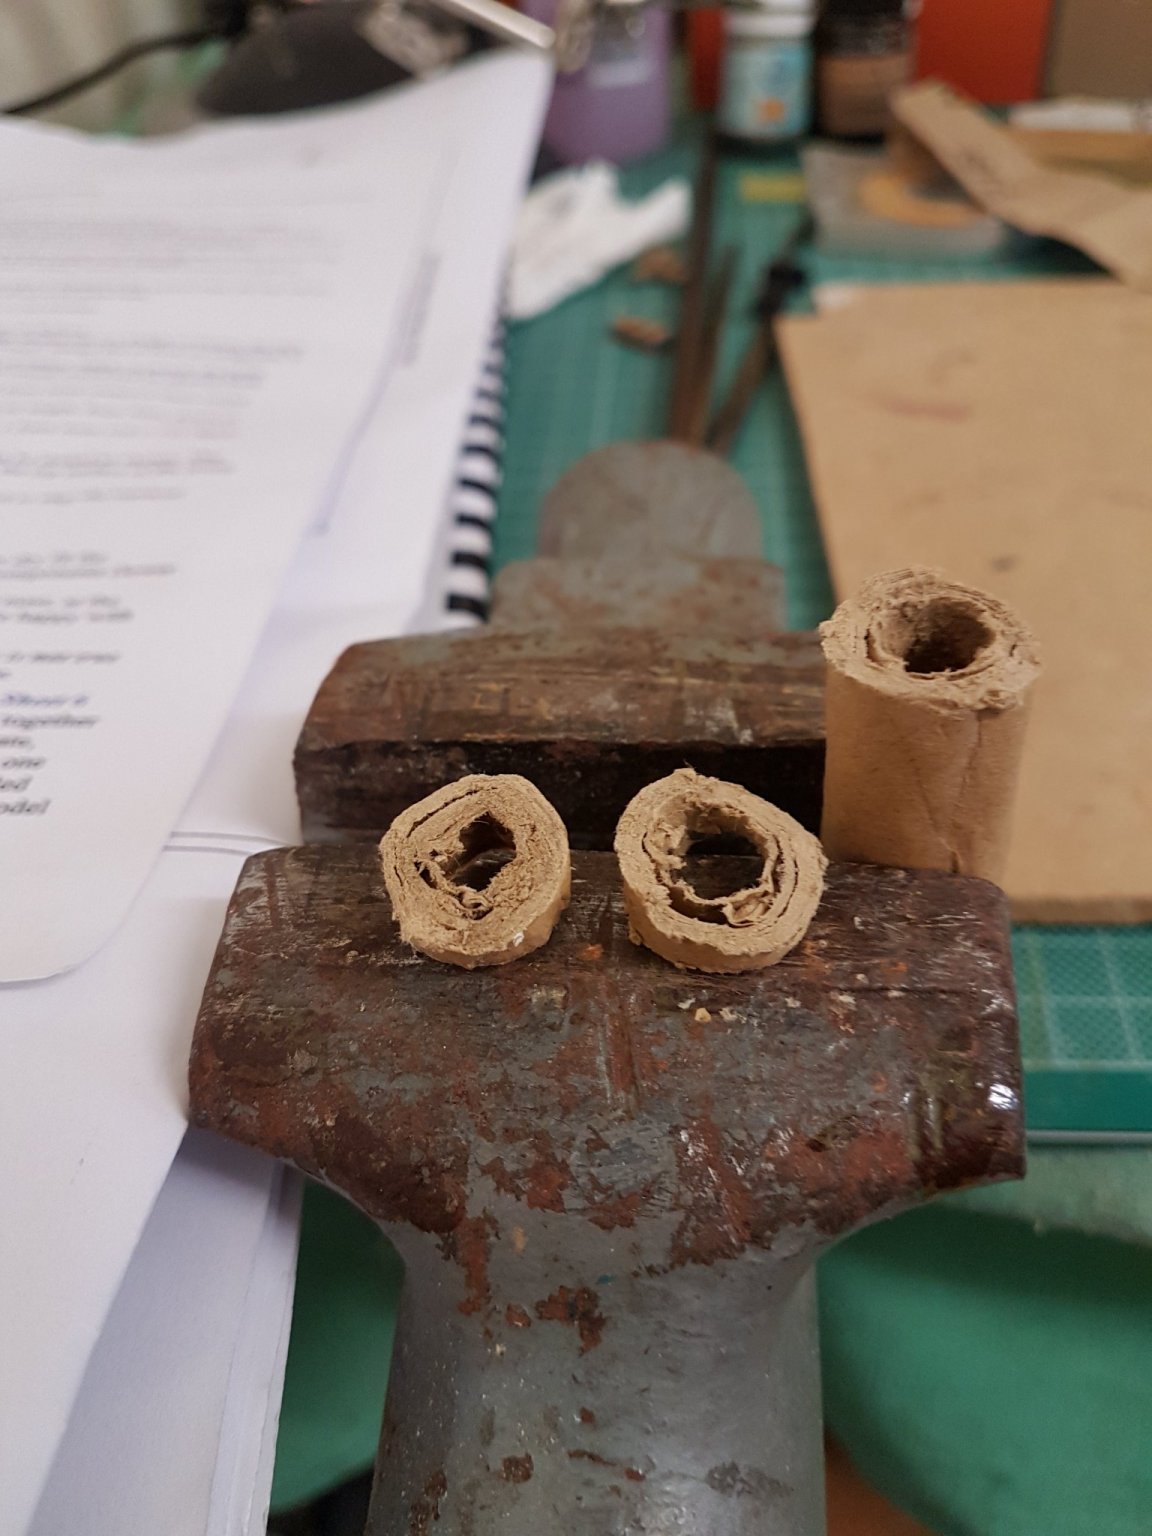
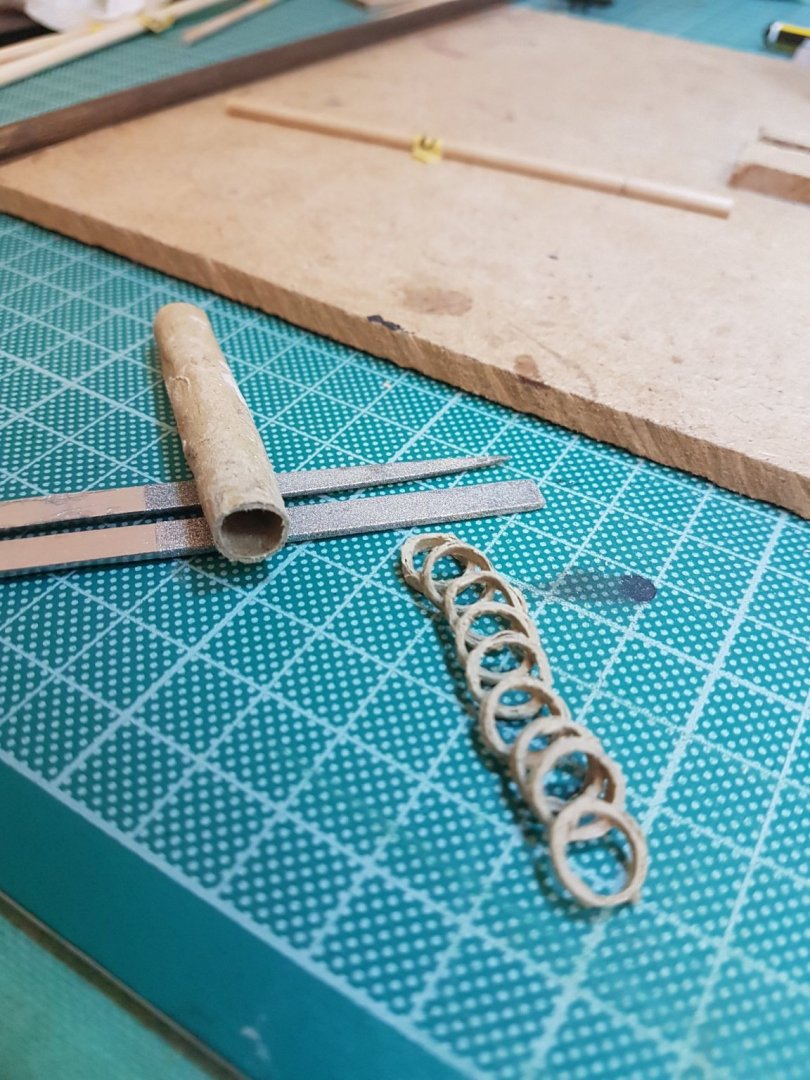
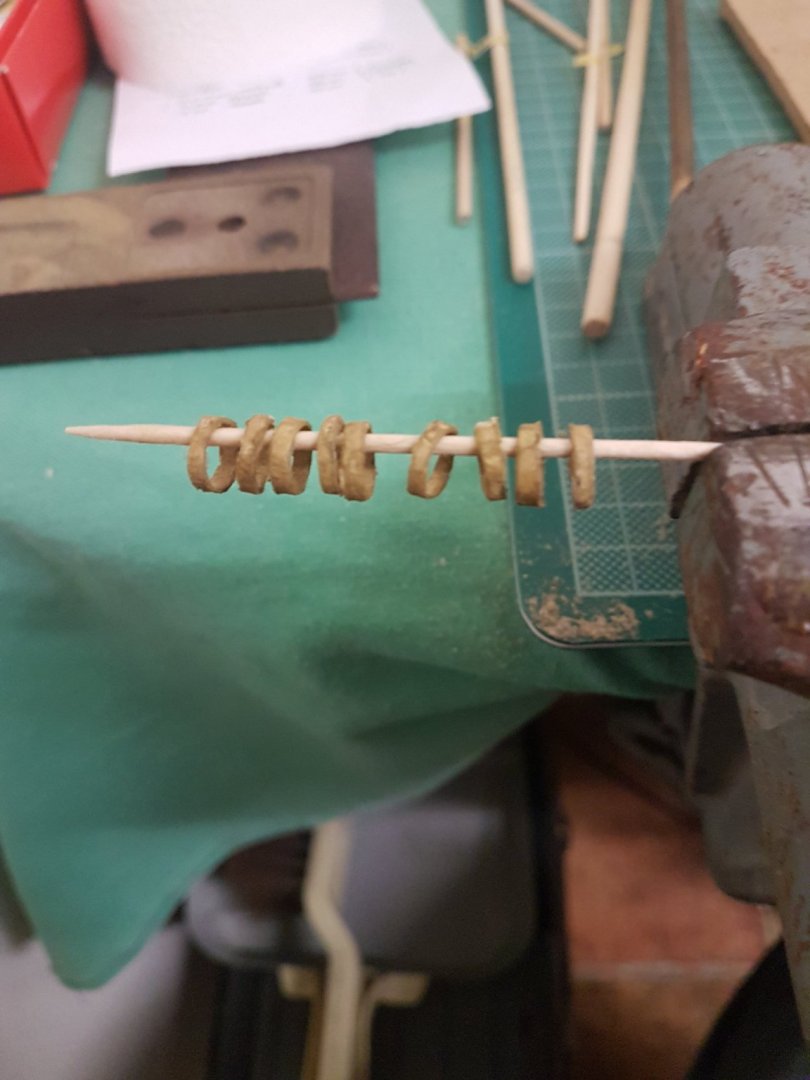
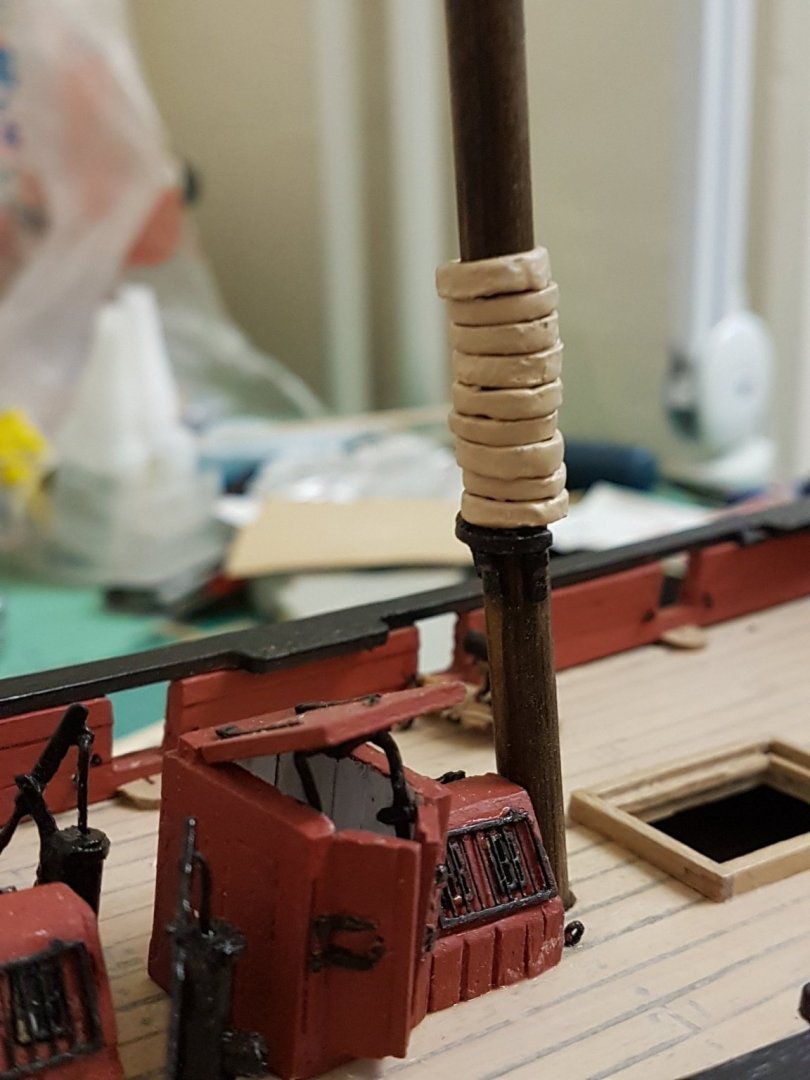
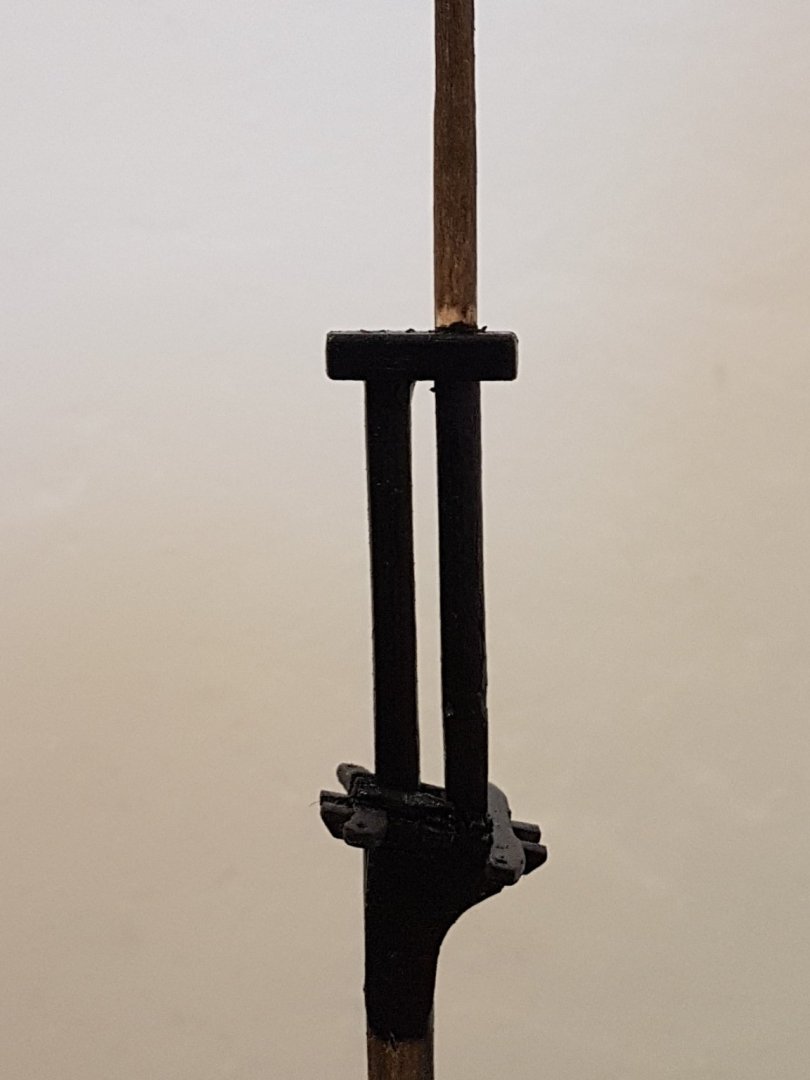
Back to completing the main mast. As I mentioned back in March in post 51, I had made several attempts to create the hoops for the main driver sail and was really not happy with the results. After a further unsuccessful attempt, still using diluted wood glue for the job (I mean after all, paper was wood once so it should be OK!!) I found some PVA Paper glue and tried it with that. That worked . . . . . except that I couldn't get them off my dowel and had to resort to cutting them off which did rather spoil things!! OK, so one last attempt. This time I would some kitchen foil around my dowel followed by a few turns of cling-film. Finally, I think I'd cracked it and not only was I able to remove my roll from the dowel but after drying for 24 hours I carefully used my fine saw to create 9 hoops!!! Persistence finally paid off and they are much, much better than my original attempts for sure. After some careful sanding and bevelling of the outer edges, I gave the rings a further good coat of my PVA glue and sent them to the drying room overnight. . . . . I was originally going to paint the hoops black, but research from my books and Flyer's comments showed that the the hoops would have been made of Ash. After consulting with the Shipyard Owner (she knows about these things!) it was suggested that a mix of white, dark walnut and a touch of ochre would give the required finish. Sure enough the lady was correct of course, so two coats of the colour was added followed the next day by a good coat of mat varnish. I happened to have some small Ash pieces lying around so used one to compare the colour and am pretty pleased with the result . . . . Done! So the next step was to fit the Driver Boom Saddle and supports. Back to my 4*4 mm Walnut for some delicate cutting and sawing and while I was at it read ahead and noticed that I would need at least another 10 or so of these so I produced them all at the same time, stuck them onto upturned masking tape which made the subsequent painting a lot easier. So, my shift was just about to finish so just before I packed up for the night I carefully glued the Driver Boom Saddle and left the fitting of the supports until the next day . . . . . . which I thought about as I woke up and suddenly remembered with a true Homer Simson 'Duuhhhh' moment that I had forgotten to fit the hoops first!!! First task was to remove the Driver Boom Saddle then. Not an easy task but after carefully soaking the edges with acetone (Nail varnish remover!!) a couple of times and carefully using plyers, the saddle eventually detached. Phew! I cleaned the area up, and reattached the saddle AFTER threading the hoops first!!. Fiddly messing around to fit the 3 supports and the Main mast was done and ready for fitting in due time . . . . . on to the fore-mast...


-
thibaultron reacted to a post in a topic:
The super-beginners guide to stropping and whipping blocks.
-
thibaultron reacted to a post in a topic:
The super-beginners guide to stropping and whipping blocks.
-
clogger reacted to a post in a topic:
The super-beginners guide to stropping and whipping blocks.
-
The super-beginners guide to stropping and whipping blocks.
JRB9019 replied to JRB9019's topic in Masting, rigging and sails
Glad you like it - hope it works for you if you try my method. If you find anything missing / confusing please let me know -
JRB9019 reacted to a post in a topic:
The super-beginners guide to stropping and whipping blocks.
-
The super-beginners guide to stropping and whipping blocks.
JRB9019 replied to JRB9019's topic in Masting, rigging and sails
Many thanks Ron. that's a really useful step that I hadn't thought about! -
JRB9019 reacted to a post in a topic:
The super-beginners guide to stropping and whipping blocks.
-
In the middle of building my first wooden plank-on-plank model (H.M. Pickle) all was going well until I came across the wonderful instructions “two copper eyelets can now be fitted to the main mast with their respective blocks”. Great I thought, and how am I supposed to do that? So after a lot of (not very good) research, I thought I had worked out what to do and so proceeded to ‘attach’ my first block. Result? Terrible. Further research followed and in the end I worked out how to do this and as suggested by a couple of people have now created this 'Super-beginners guide to stropping and whipping blocks'. I was going to call it 'The Dummy's Guide but I'd get into all sorts of trouble by doing that so I'll have to stick with my snappy title. So the guide is attached and I hope it's of use to some of you. Best Regards The super guide.docx
- 7 replies
-
- 12
-
-

-
JRB9019 reacted to a post in a topic:
HM Schooner Pickle by JRB9019 - Caldercraft - Scale 1:64
-
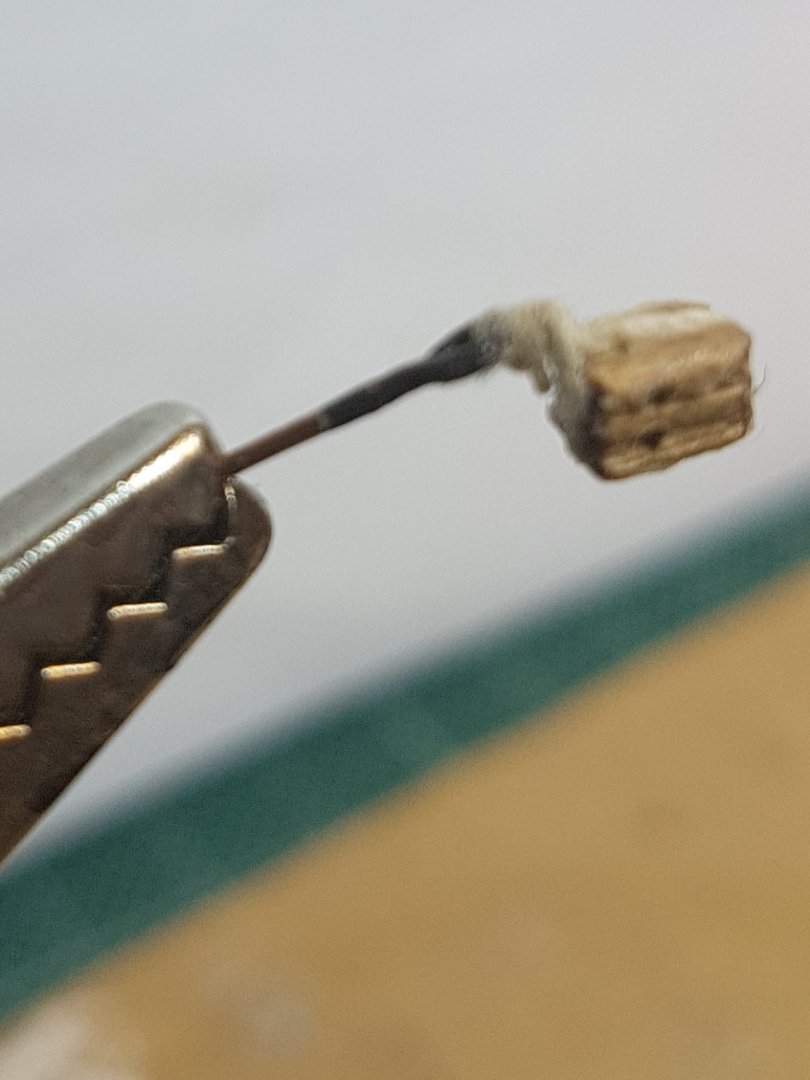
I spend a few days attempting to master the black art of Block Stropping and whipping. In the end, and referring to various comments and videos I succeeded in completing my first Block. I used one small vice to hold one set of tweezers holding a block and my 'jewellers stand and crocodile clips to hold the eye. I used dabs of white wood-glue to attach the Stropping rope to the block and then 3/4 small strips of masking tape to hold the ropes in thier right place. I then attached my whipping twine with another piece of masking tape, then made a loop in the other end and taped that down out of the way too. Now 'all' that I had to do was whip the stropping together with 7-8 turns, finishing by threading the strop end through the loop. Finally, I undid the opposite end of the whipping twine and pulled gently until the loop had tightened, holding everything in place. A final trim of all the twines and I was done. Not perfect, but now I finally understand the technique I'm sure my work will improve by the time I've completed the last block. Thank goodness this has all taken place in the workshops and not onboard!!! I have made a detailed set of photographs of the full process if anyone is interested, but in the meantime, here's a photo to finish.

-
JRB9019 reacted to a post in a topic:
Seating a mast
-
Many thanks for all your responses. I certainly like the idea of a pin/nail in the foot of the mast. It does seem to be the best solution. End of term report "The pupil must pay more attention to the details of his work. He shows promise but there is a long way to go".!!!
-
Thanks for your reply. I like your suggestion about checking the mast before decking and planking which is what I thought I had done! As mentioned, the mainmast slots in perfectly. I can feel it being held on all sides but for some reason the foremast just doesn't want to sit as it should - and I'm not about to cut a hole in the deck to find out what is wrong!!! I have a couple of ideas to see if I can pack the hole below but it won't be easy!
-
Hi all, I'm getting to the exciting part of building my first model H.M. Pickle After a little fine sanding on deck, I was able to seat the main mast and it sits firm and true. However, I've just made a start on the foremast and although it sits at the correct angle (bow to stern) and is deep enough according to the plans, it is not sitting in anything and is easy to move around, especially port to starboard. I know that the rigging will tighten the mast up and stabilise it, but has anyone any other advise? I've seen other modellers making chocks for their masts but don't really want to start that if I can help it..... Thanks
-
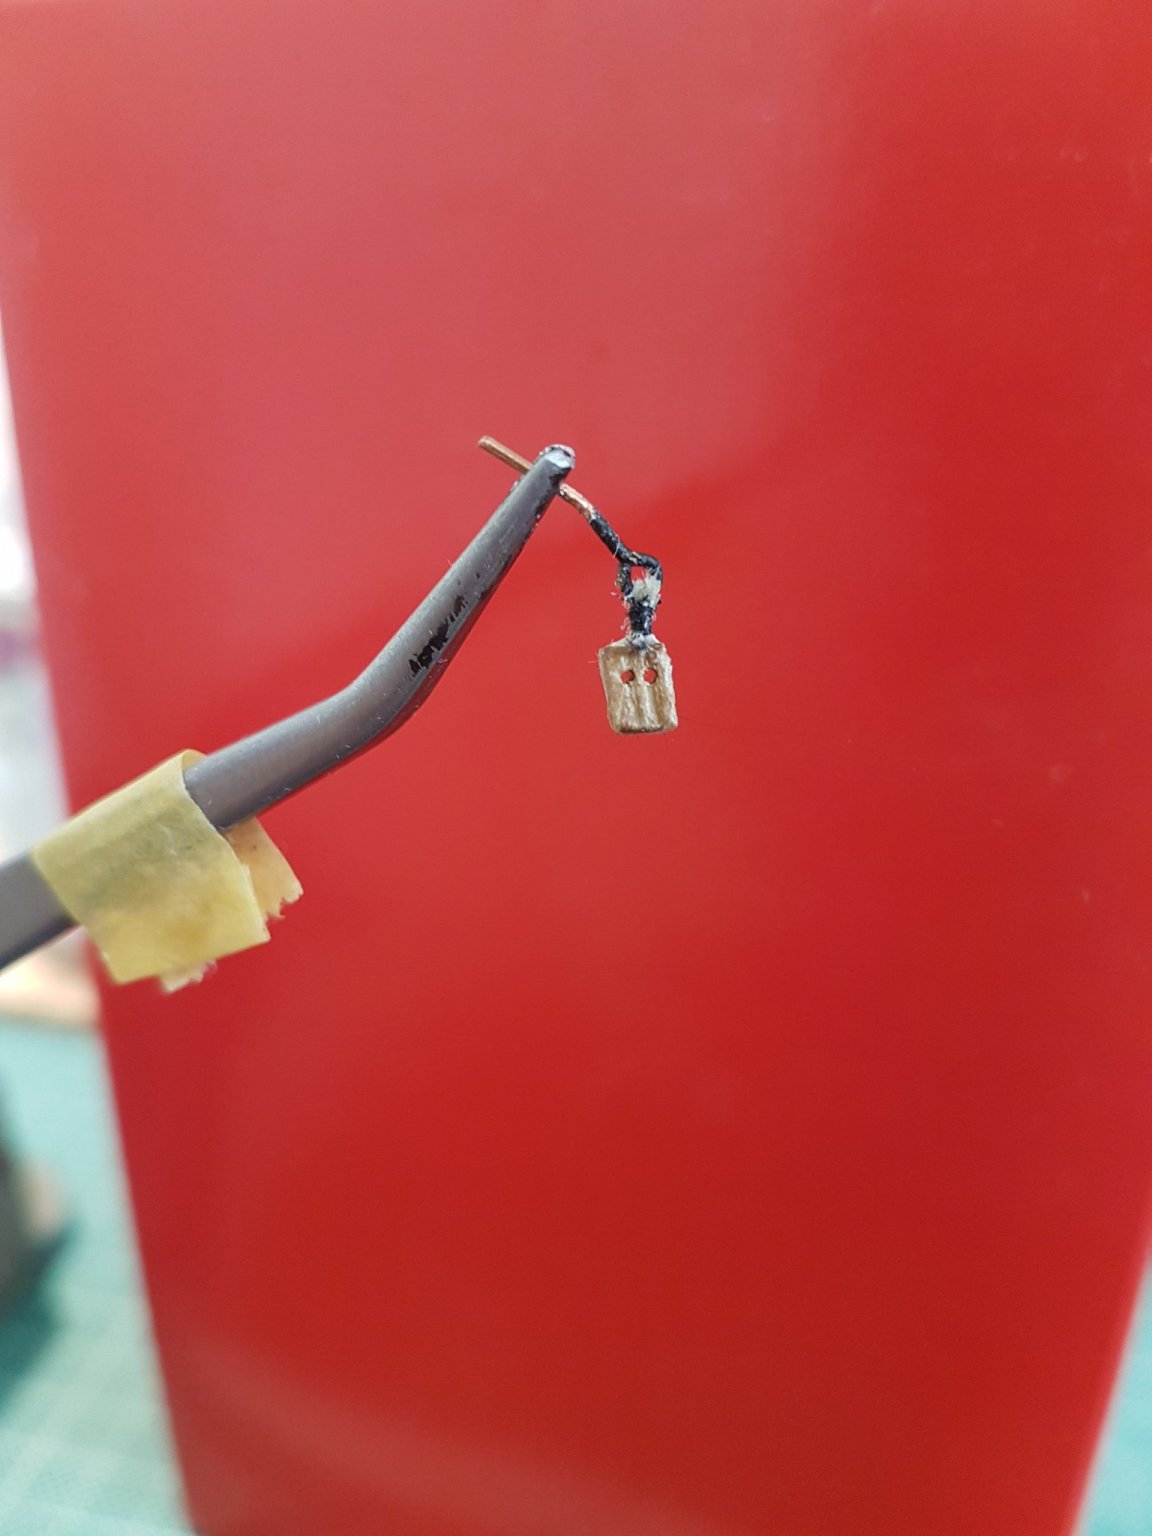
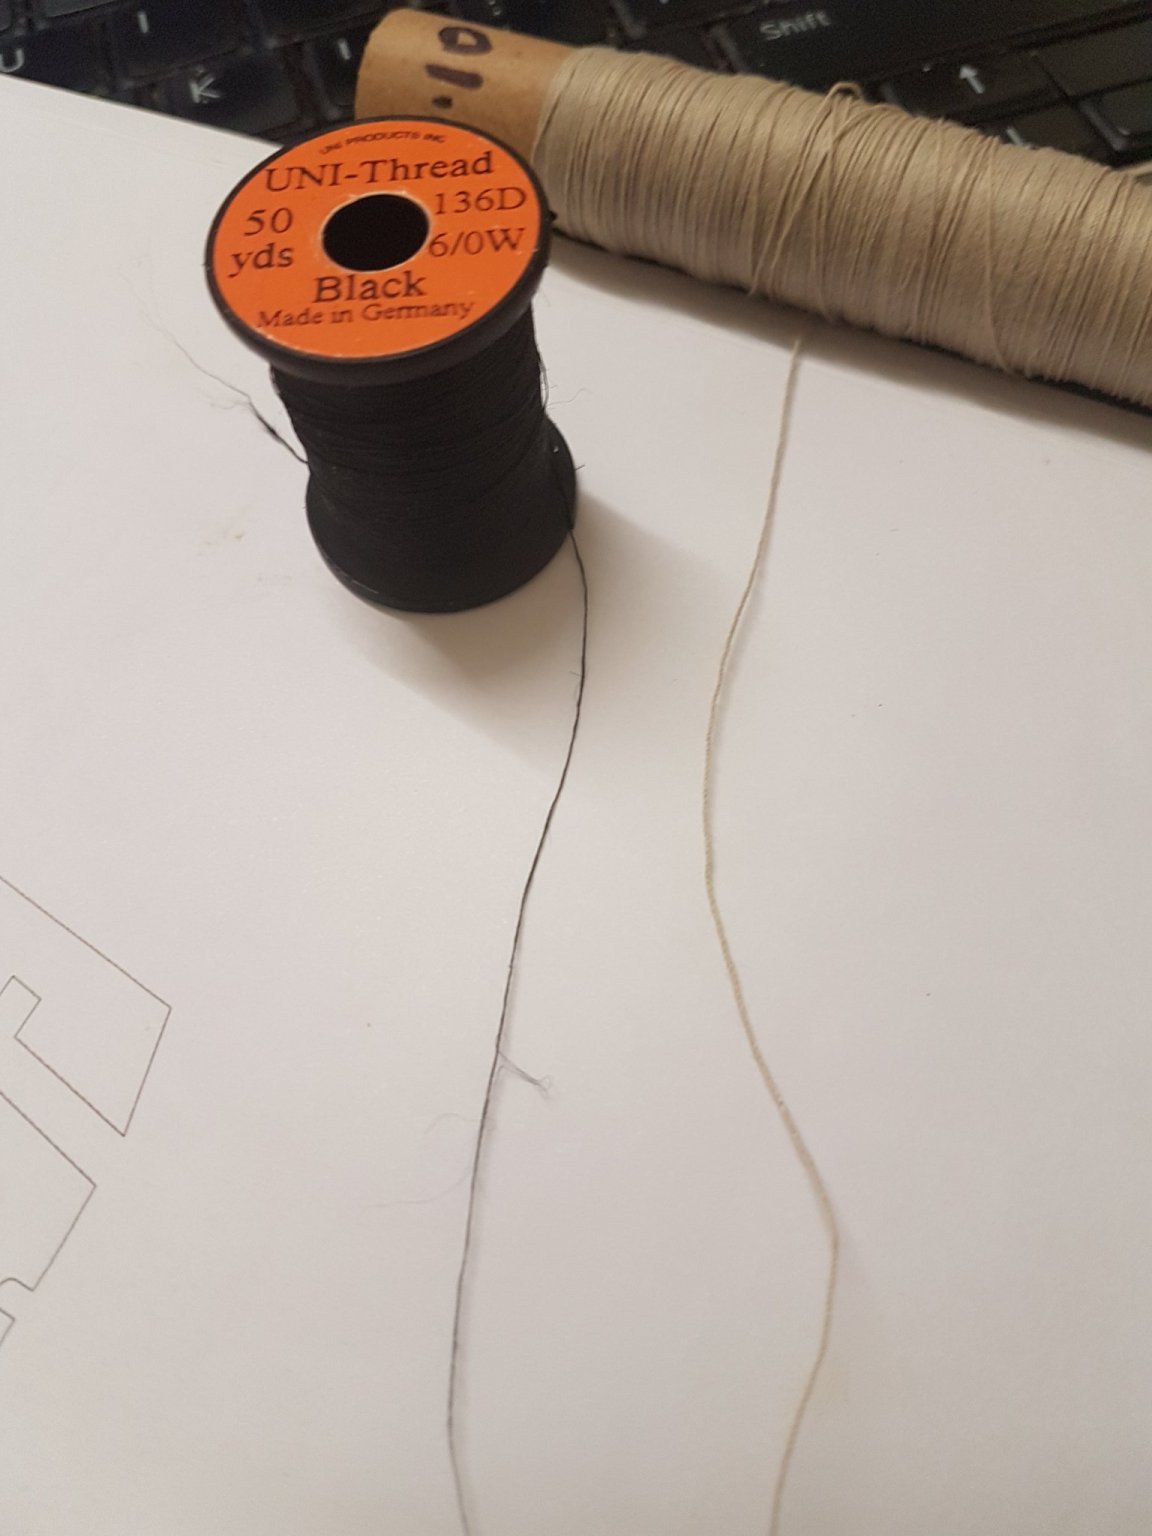
Fitting Blocks and Eyelets So after finishing the mast build, the next instructions told me to "fit two eyelets . . . . together with their respective blocks". Great, wonderful. But how was I supposed to do that? No idea! I was a little cross at this point. So far the fantastic very detailed build instructions had been a real help in my new hobby. Sure, I had some steep learning curves, but that was to be expected but as a long as I read the instructions carefully, the method was there. . . . . and suddenly I was left with 'fit the blocks' Thanks for nothing! OK, so I spend a day or two scouring the various books that I had and then went online and finally found what I thought were the answer. I finished my first attempt and I was really not happy with the result. . . . No, not acceptable. Back to research and finally found a couple of really useful videos. After studying these, the penny dropped as I had finally found someone who seized blocks and tackle with whipping twine as would happen in real life. Great. Further investigation led me to to news that these modellers were using twine that was meant for tying flies (for fly-fishing!). A few clicks later, I found a great UK supplier and within 24 hours I was the proud owner of 50 metres of black 6/0 thread shown here next to the original 0.10 mm kit thread. I requested and was granted release from my duties to attend nautical school for a while to learn how to do some proper rigging and attaching blocks, hooks and spars etc. Hopefully I pass the final exam!!/


-
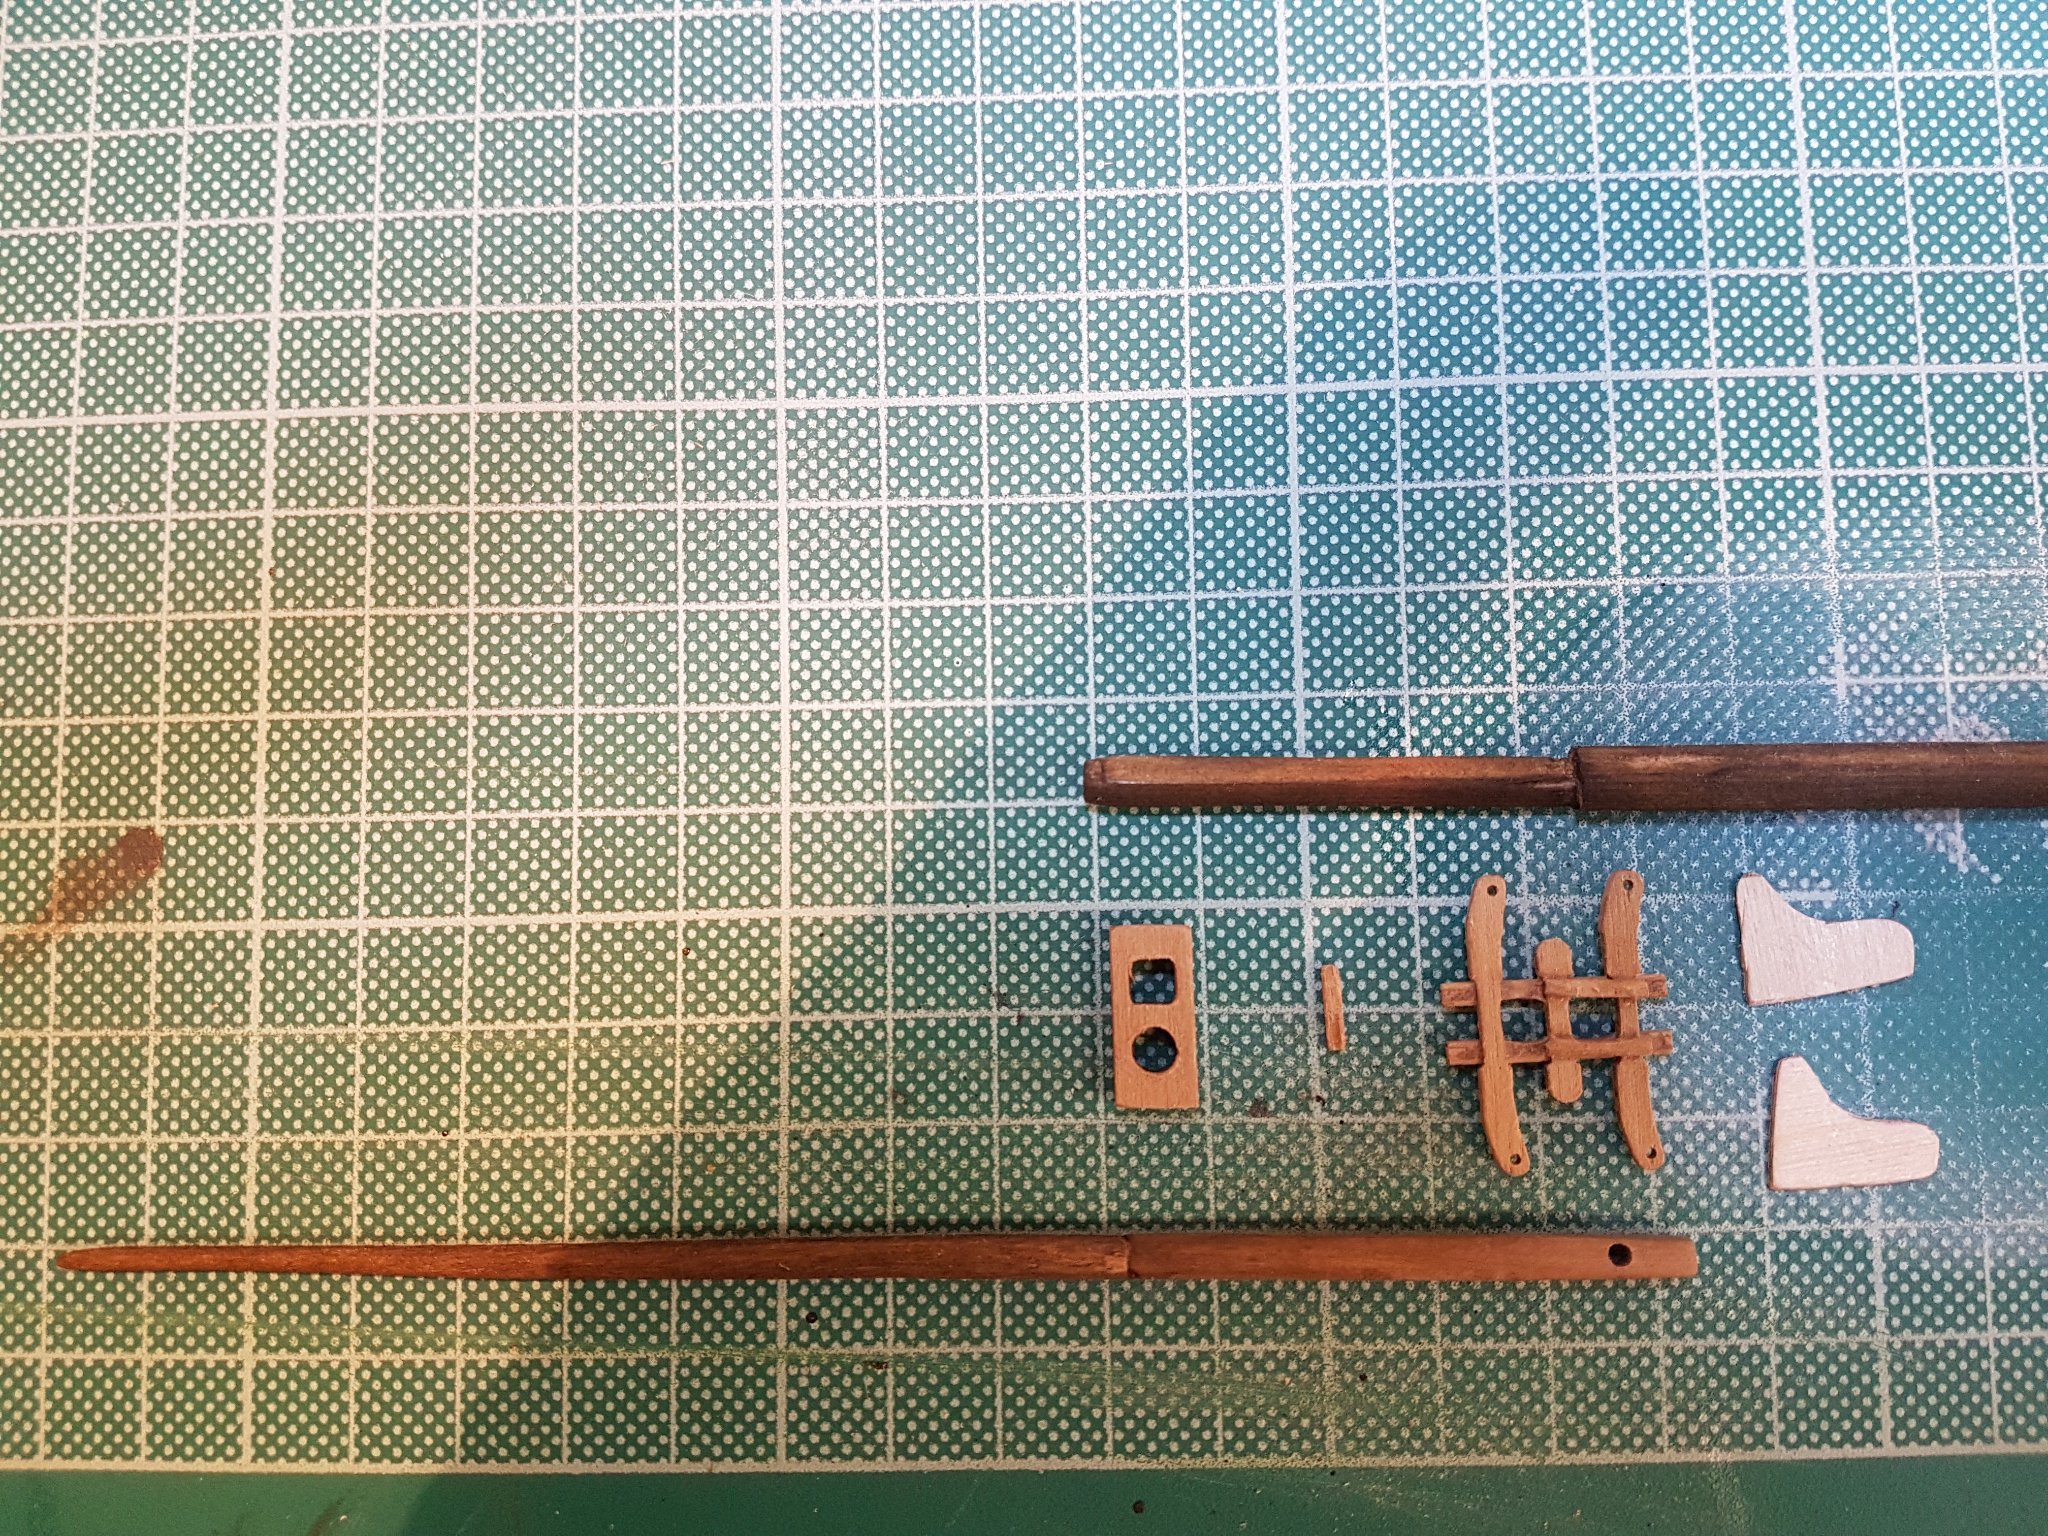
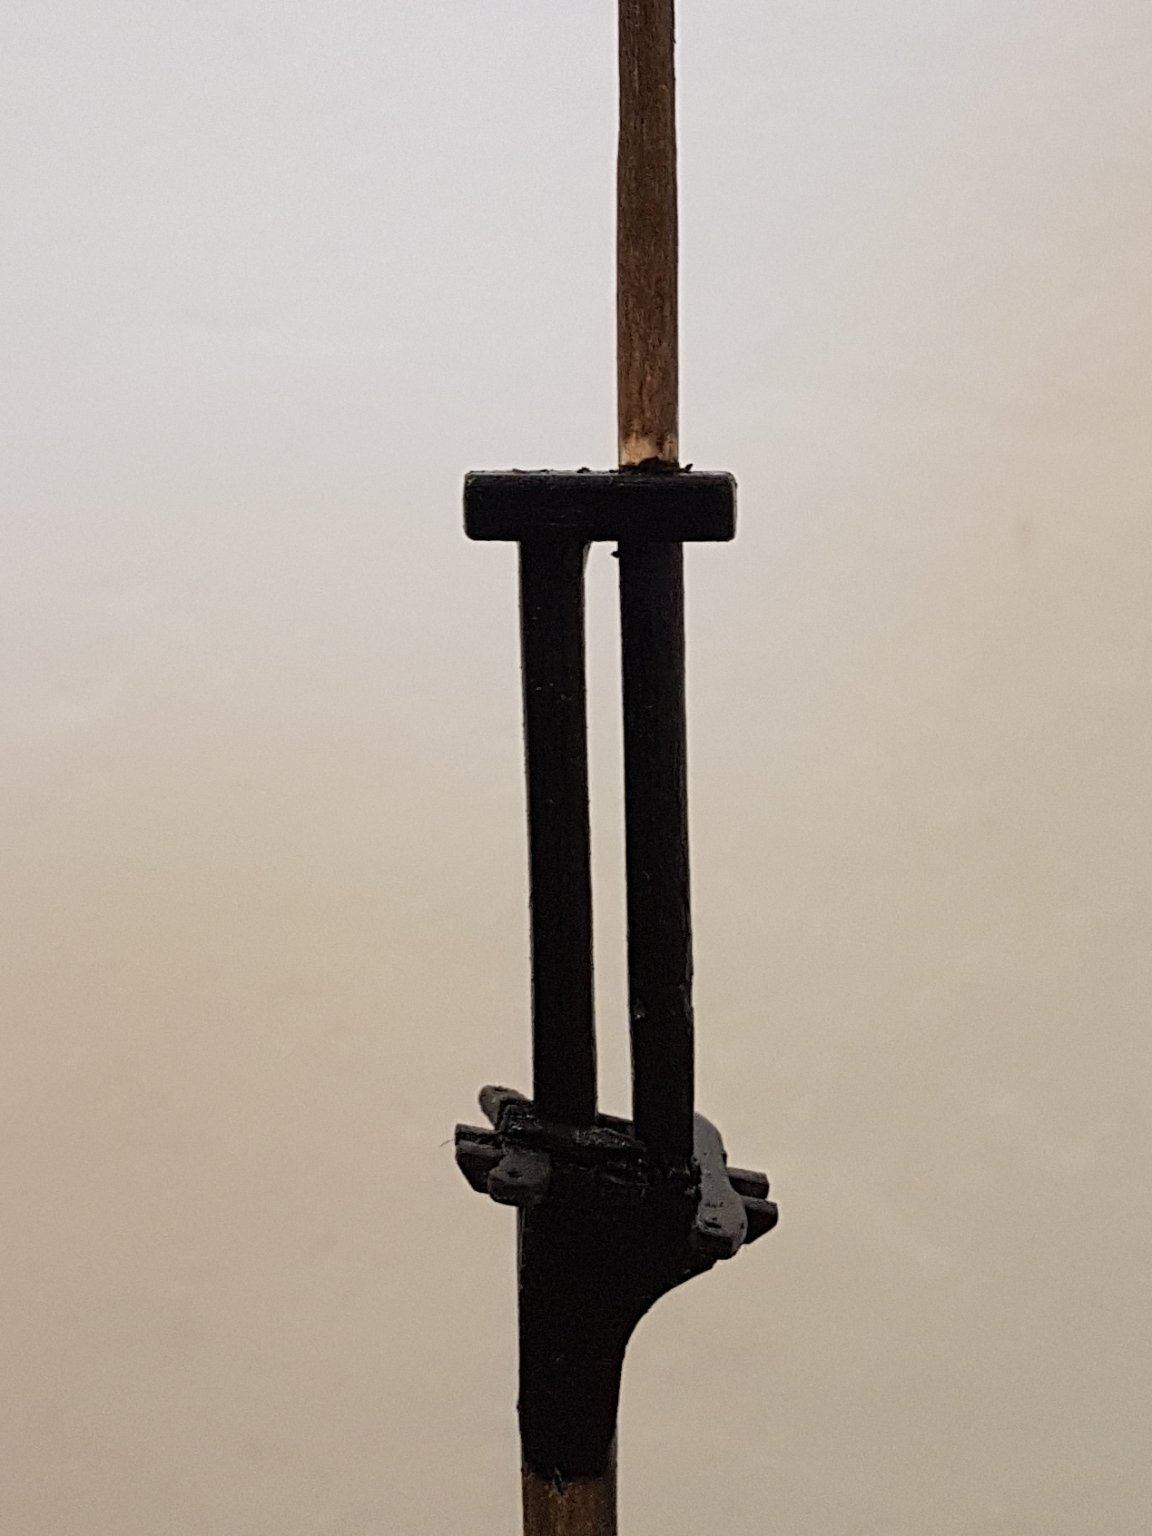
Completing the Main Mast Back at the shipyard, as per the instructions, I shaped the lower main topmast, then tapered the top section and after drilling the two sections were pinned together, this time everything looked straight! Next I had fun and games learning what a 'Fid' was, then I made one and after drilling the appropriate hole dry fitted it. Then it was on to making the Main lower top trestletrees that wasn't as easy as I thought it was going to be. I needed a lot of test fitting and fine filing before everything fitted but we got there in the end. Once again referring to Flyer and Blue Ensign's builds I also decided to create cheeks to support the lower top trestletrees. I made four whilst I was at it as I will obviously use cheeks on both masts. Finally a few final dry runs and everything was ready for the final main mast assembly. As can be seen, I stained the masts but this time, I used a cloth instead of a brush which has left a better, lighter finish. I also sanded flat a section either side of the main mast which will let the cheeks sit better. After the final careful assembly, I then painted the relevant mast sections in black and being pleased with the result let the workers off early for a well earned cup of tea!!

-
JRB9019 reacted to a post in a topic:
1:64 1800-ish Ship's Crew / boatyard members
-
Vielen Dank Joachim, Ich werde ein besuch unternehmen!!! Bis Bald John P.S. (For non--German speakers, I simply said (well, I hope so!!) many thanks and I will go for a visit!!
-
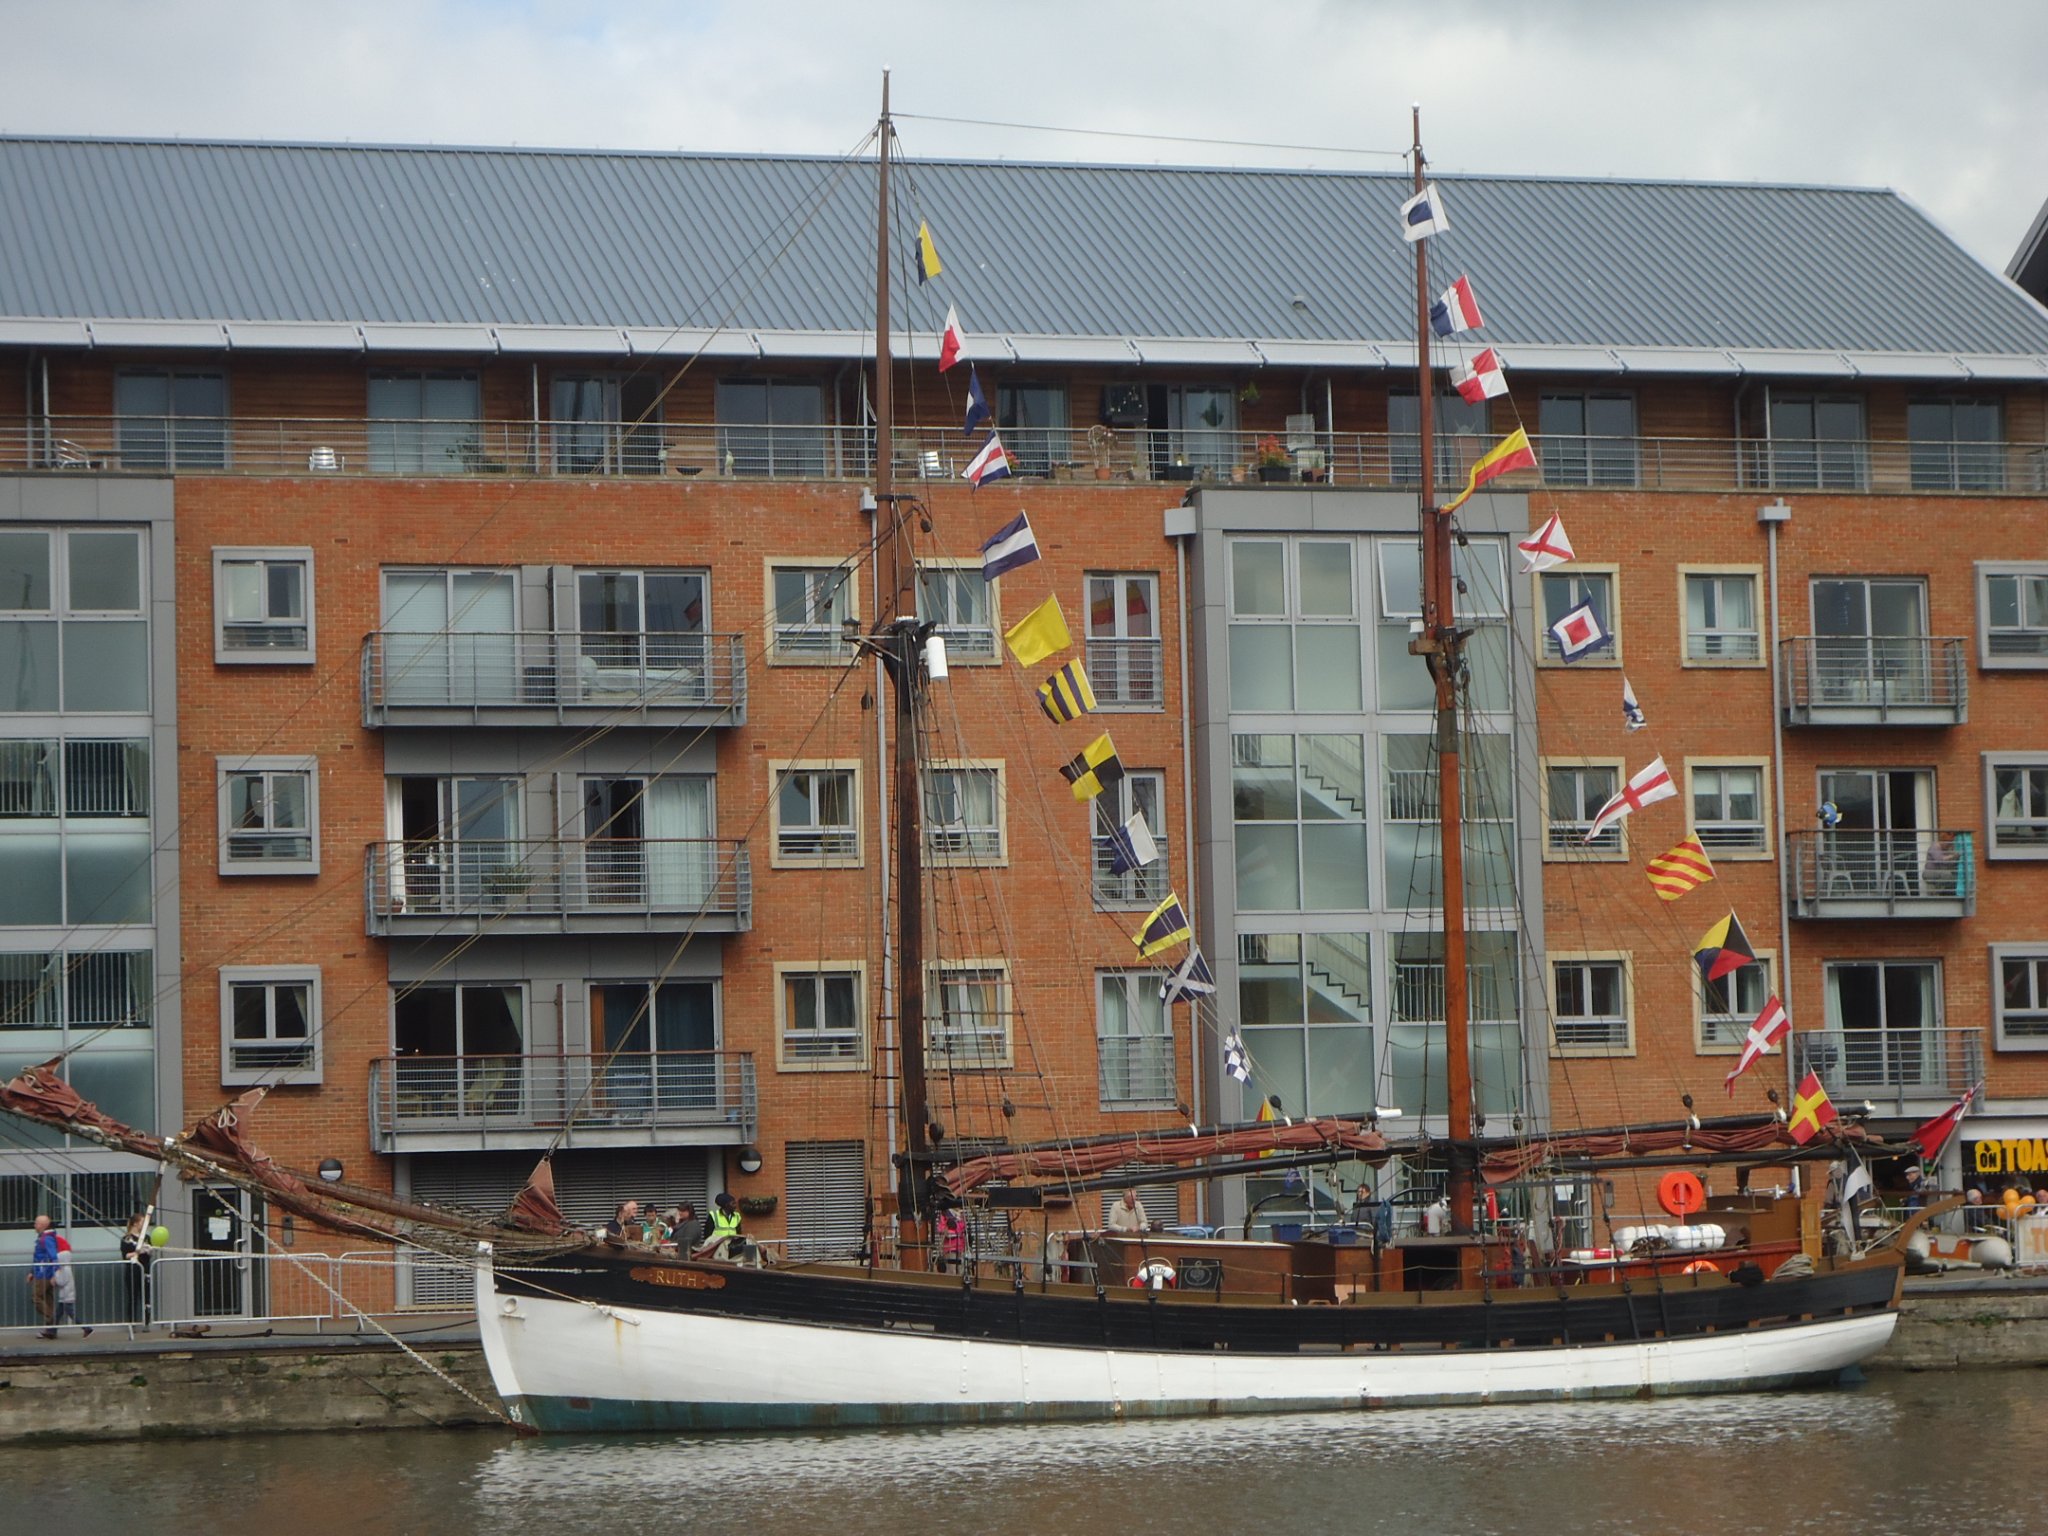
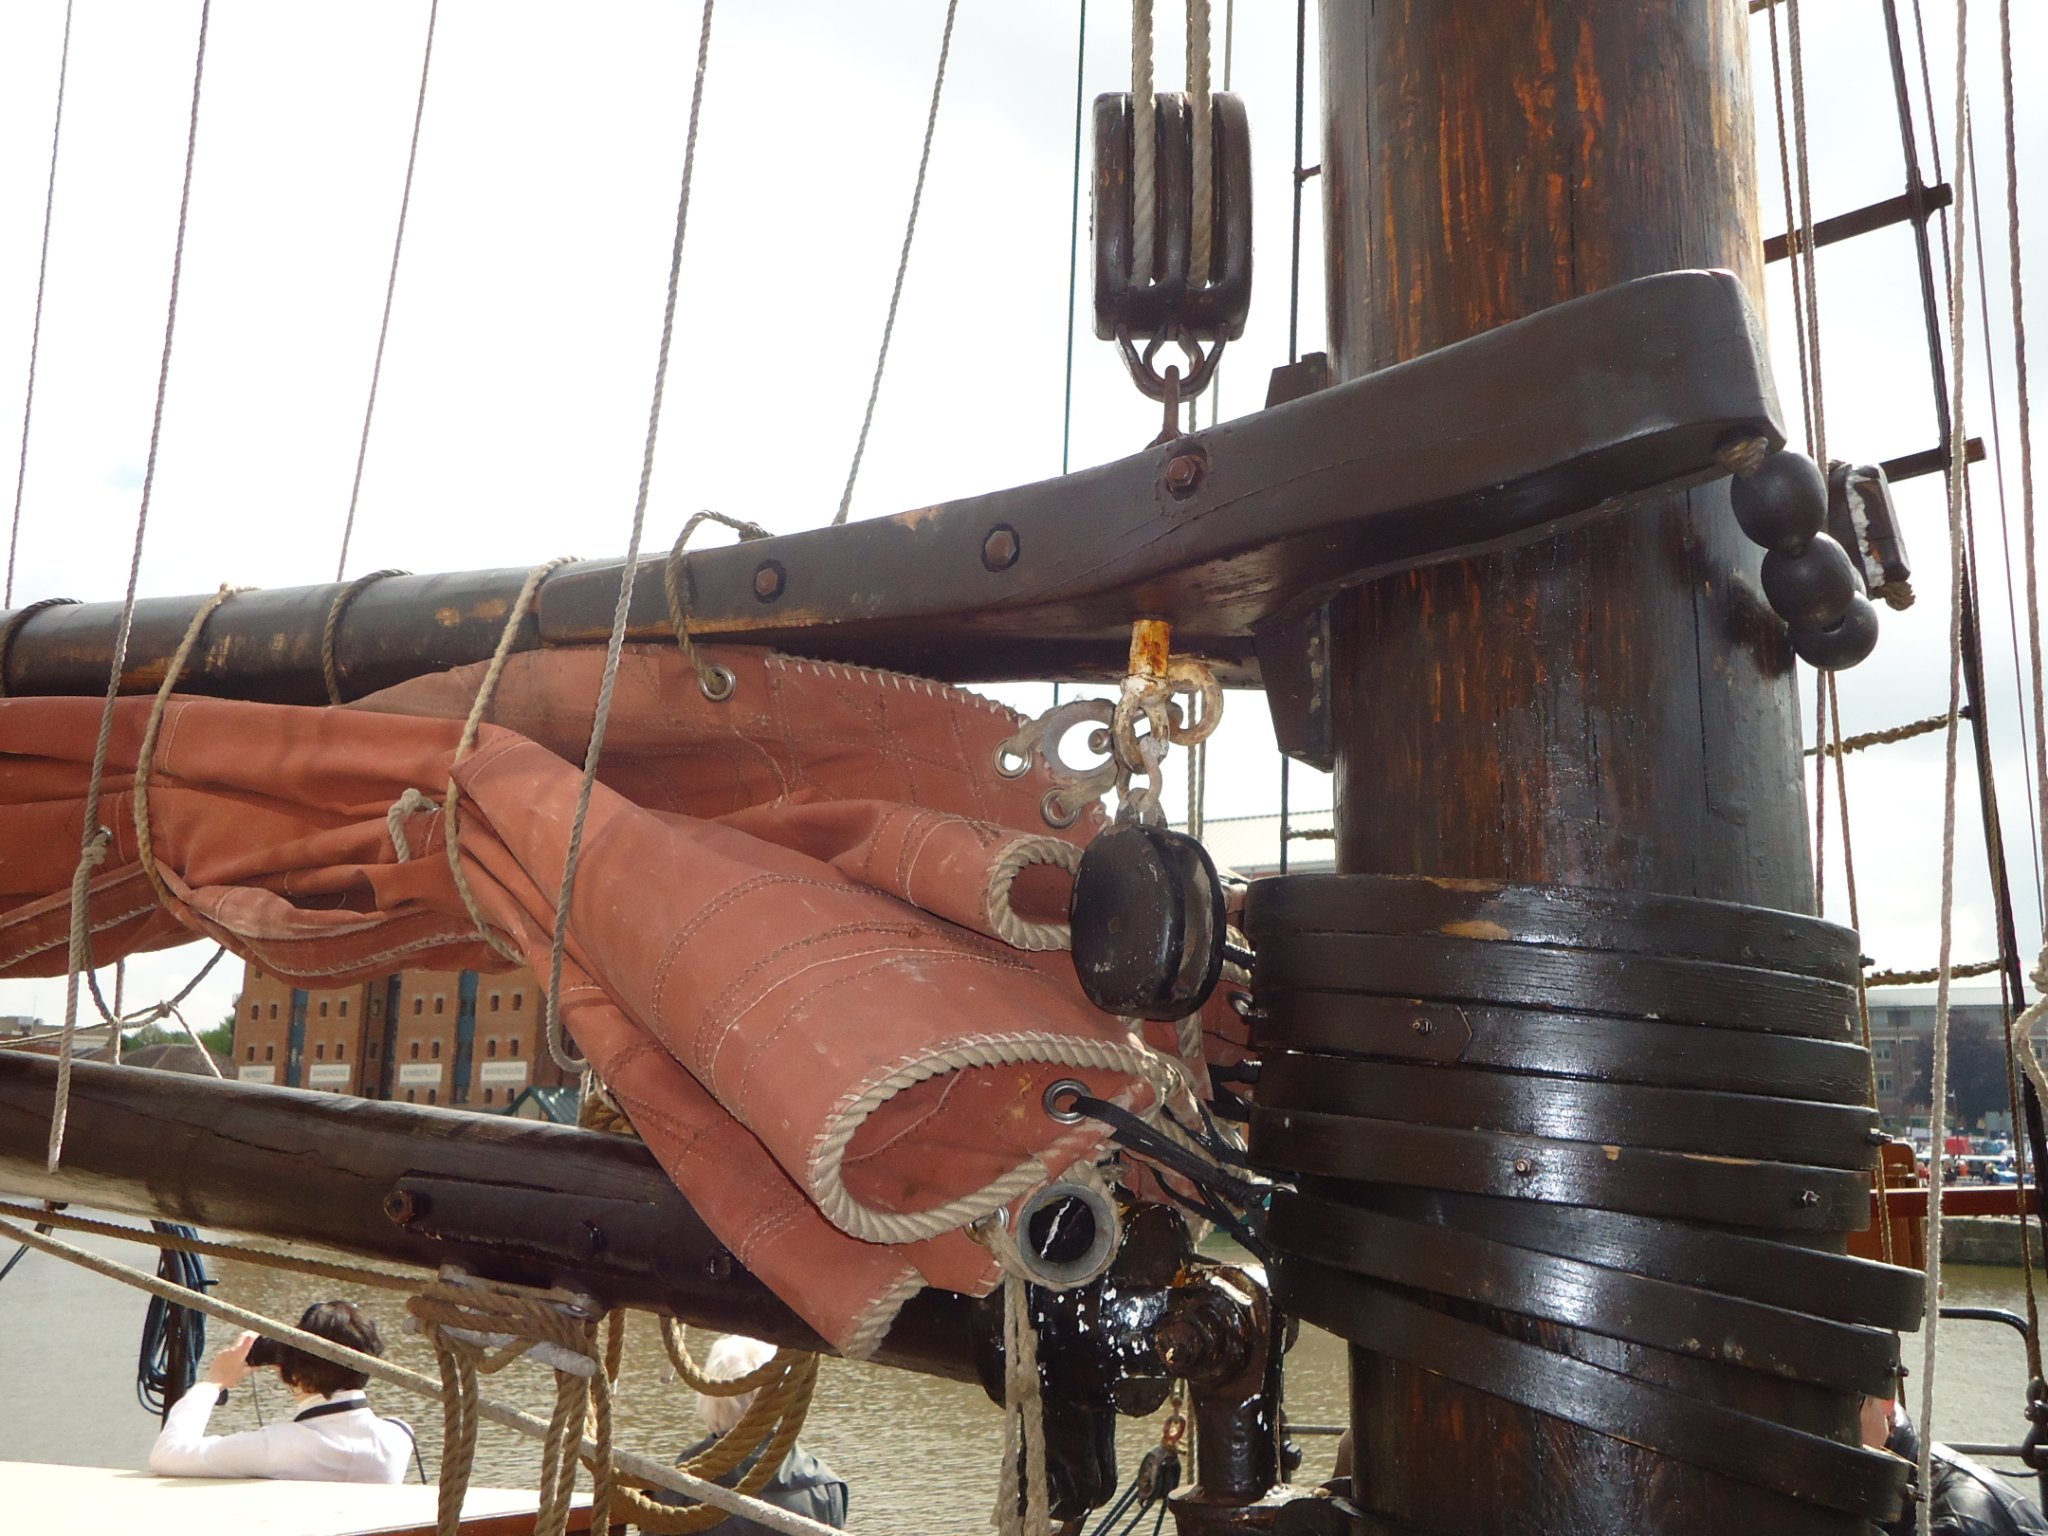
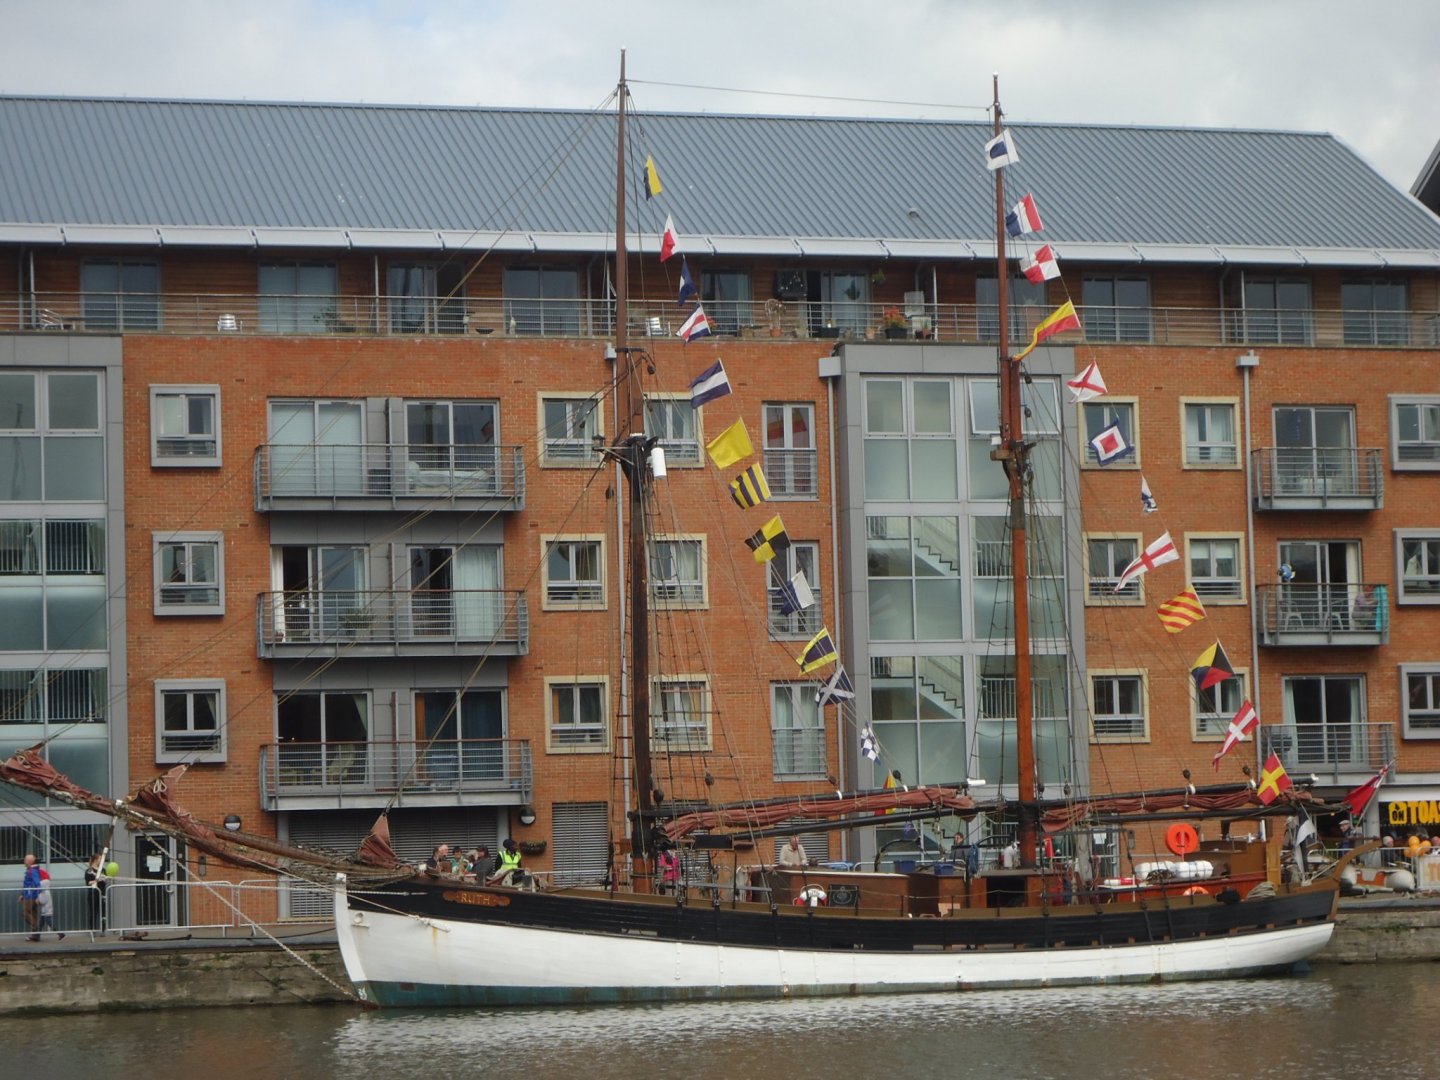
Thinking that I am still interested in attempting to make sails for Pickle, in the next step, I wanted attempt to craft some Sail Hoops for the Main Driver. I had seen them on my real-life reference ship Ruth that I was lucky enough to find in a local Ships festival in Gloucester England. Here's a shot of Ruth and a close-up of the sail hoops I had been inspired by Flyer and Blue Ensign and how they had created the hoops for their models, so putting the main mast aside for now, I decided to set my apprentices to work to craft the hoops, following the instructions that I gave them as learned from the two master craftsmen. Below are the results. I shouldn't be too harsh. They are apprentices after all but after this attempt, they have been tasked with cleaning the shipyard from top to bottom!!! Back to the main Topmast then. . . . .


-
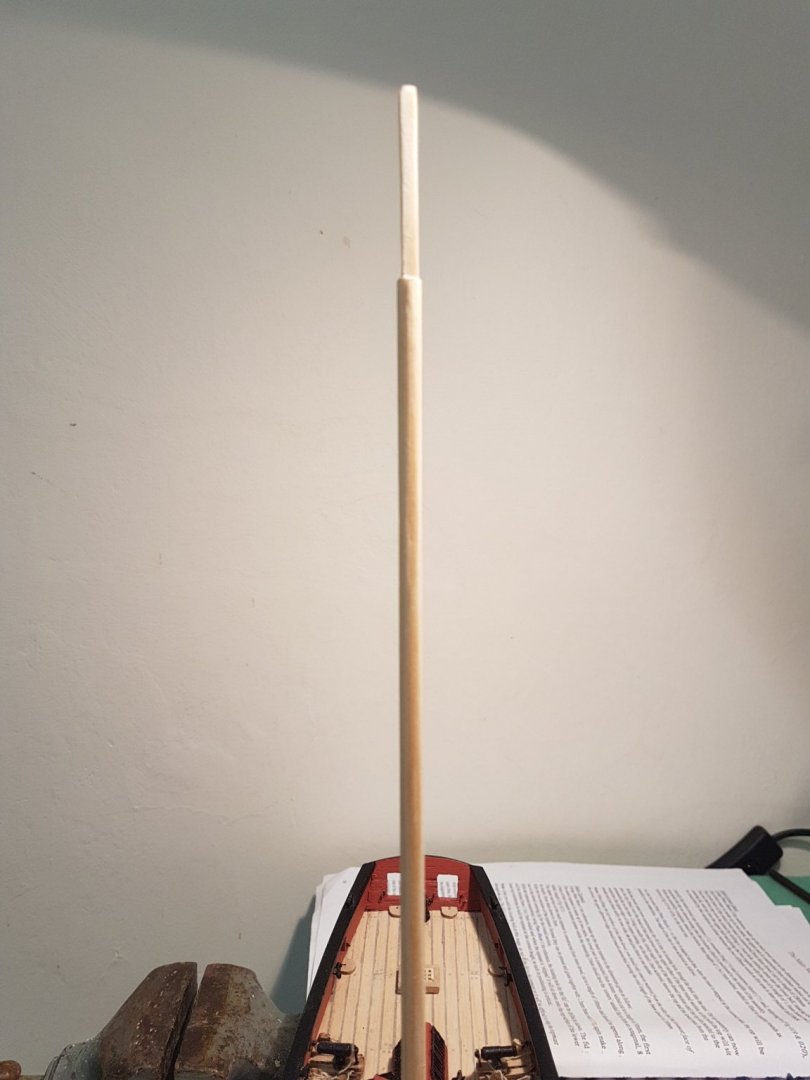
Having reviewed my attempt at my mainmast I decided that it wasn't good enough. The method of connecting the two mast sections might be good enough for the excellent modellers at Jotika models or the Mr Longridge of "The Anatomy of Nelson's Ships" and Victory scratch-build models but, as suggested by Jason (Beef Wellington) and the method used by others, I decided to purchase some new dowel and start again!! Down to my local DIY shop and I rummaged through their 6mm dowelling before eventually finding a piece that was decent enough and wasn't bent by 20-30%!! Back at the shipyard, I cut the mainmast to size (including the top section!! and started off cutting the square 4mm section with my baby plane and lots of sandpaper, but eventually I finished and after checking with my micrometre signed the work off.
-
Hi all, Having seen examples of the use of model figures on ship builds, I've realised they seem to be the best way for gauging realistic distances and set-up, for example in boom foot-ropes or ratline spacing etc. etc. I've searched the web and found a couple of examples (e.g. Cornwall Boats or Mantua) but I never seem to find the right figures. Has anyone got a good source for such things (UK preferably)?? Thanks!