J Harreld
-
Posts
57 -
Joined
-
Last visited
Content Type
Profiles
Forums
Gallery
Events
Everything posted by J Harreld
-

Hello again...this is Bleecker...I am back...intro # 2
J Harreld replied to Bleecker's topic in New member Introductions
Was nice to meet you at Salt Point the other day! I was going to recommend this site to help with what you're looking for, but I see you're already here. If the knowledge exists, there's a good chance you'll find it here. Great group of folks who very patiently tolerated my display of very non-traditional Lego builds! Cheers, John -
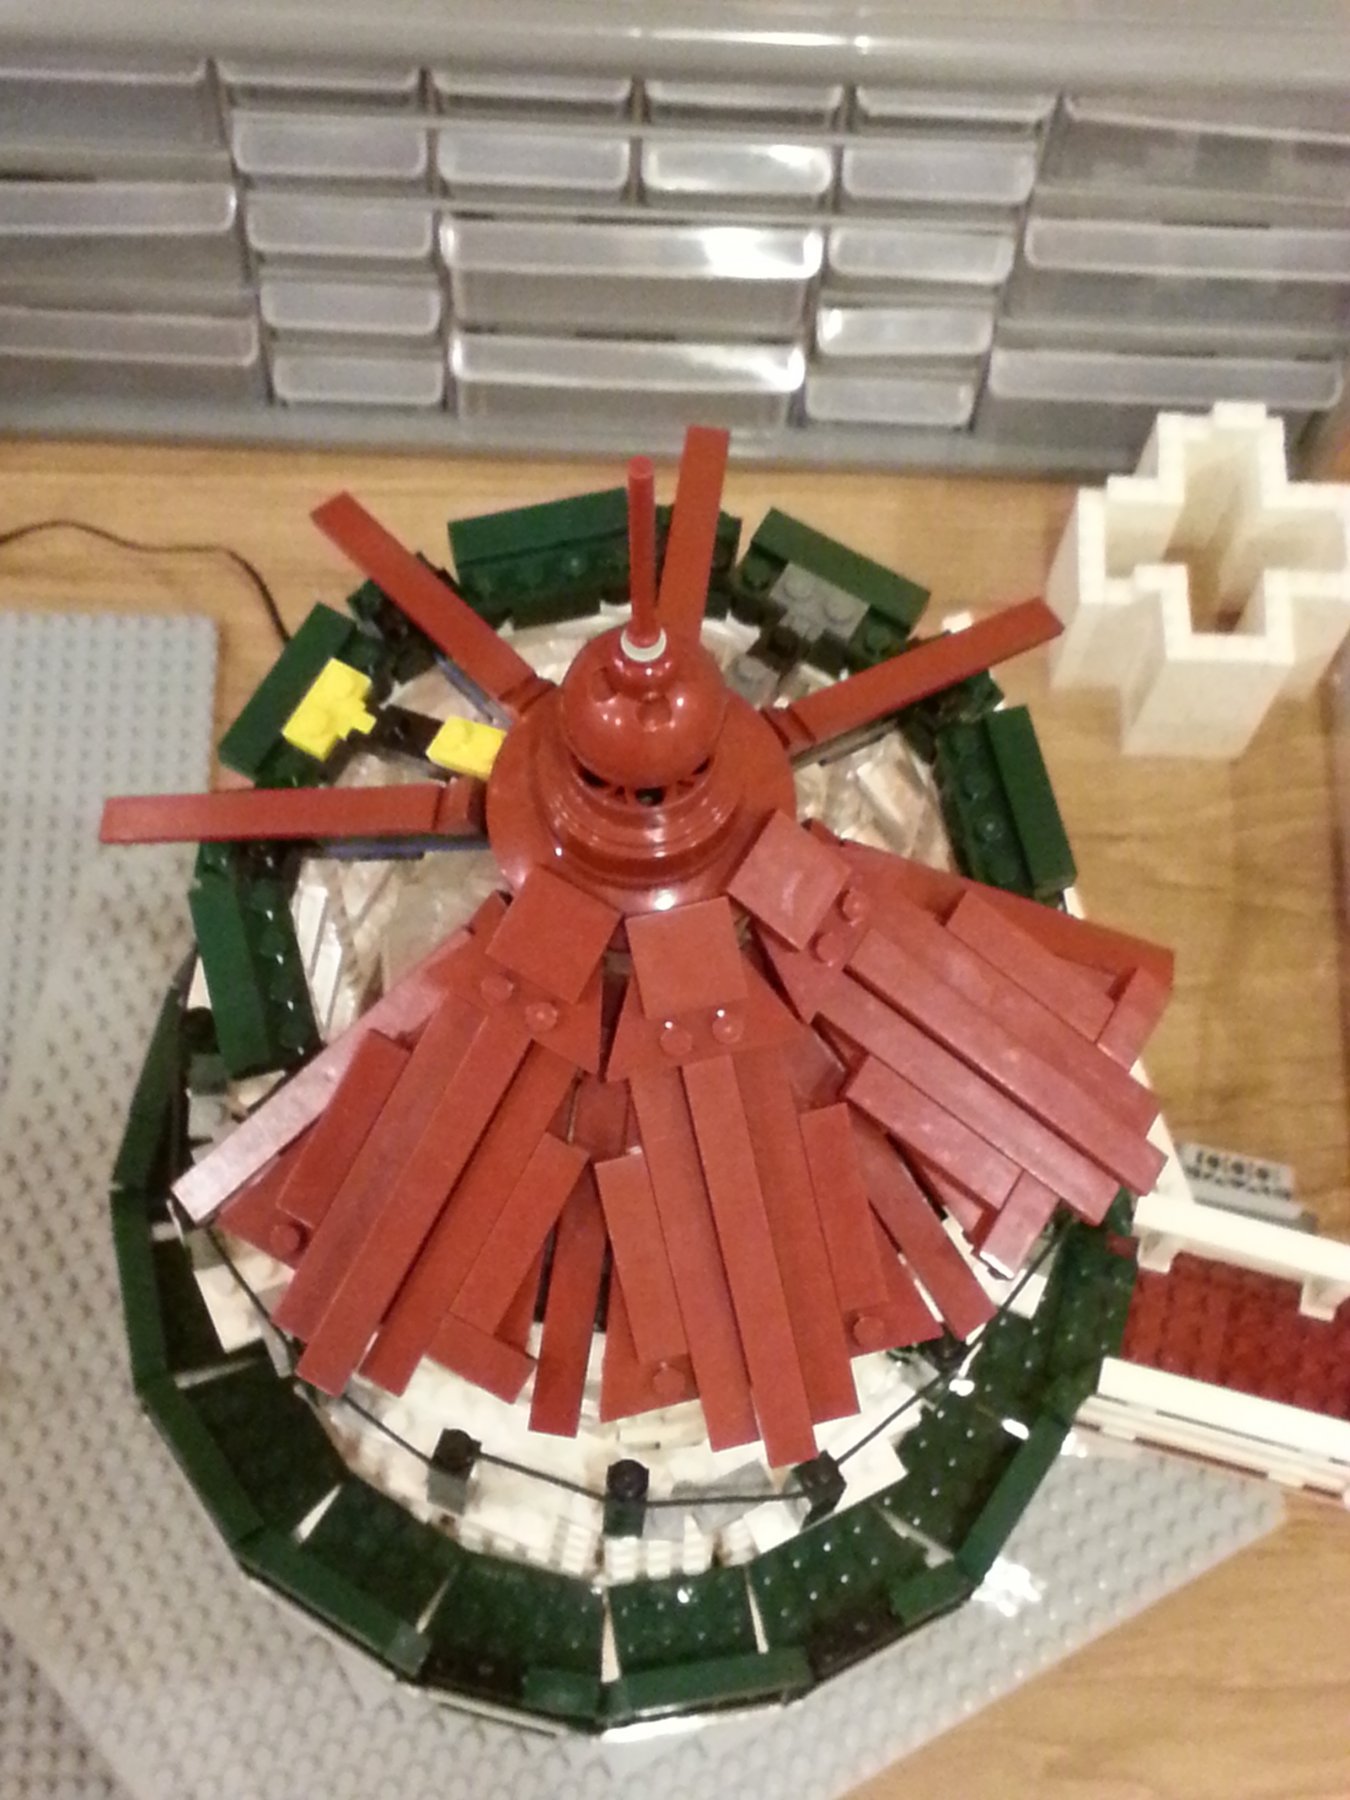
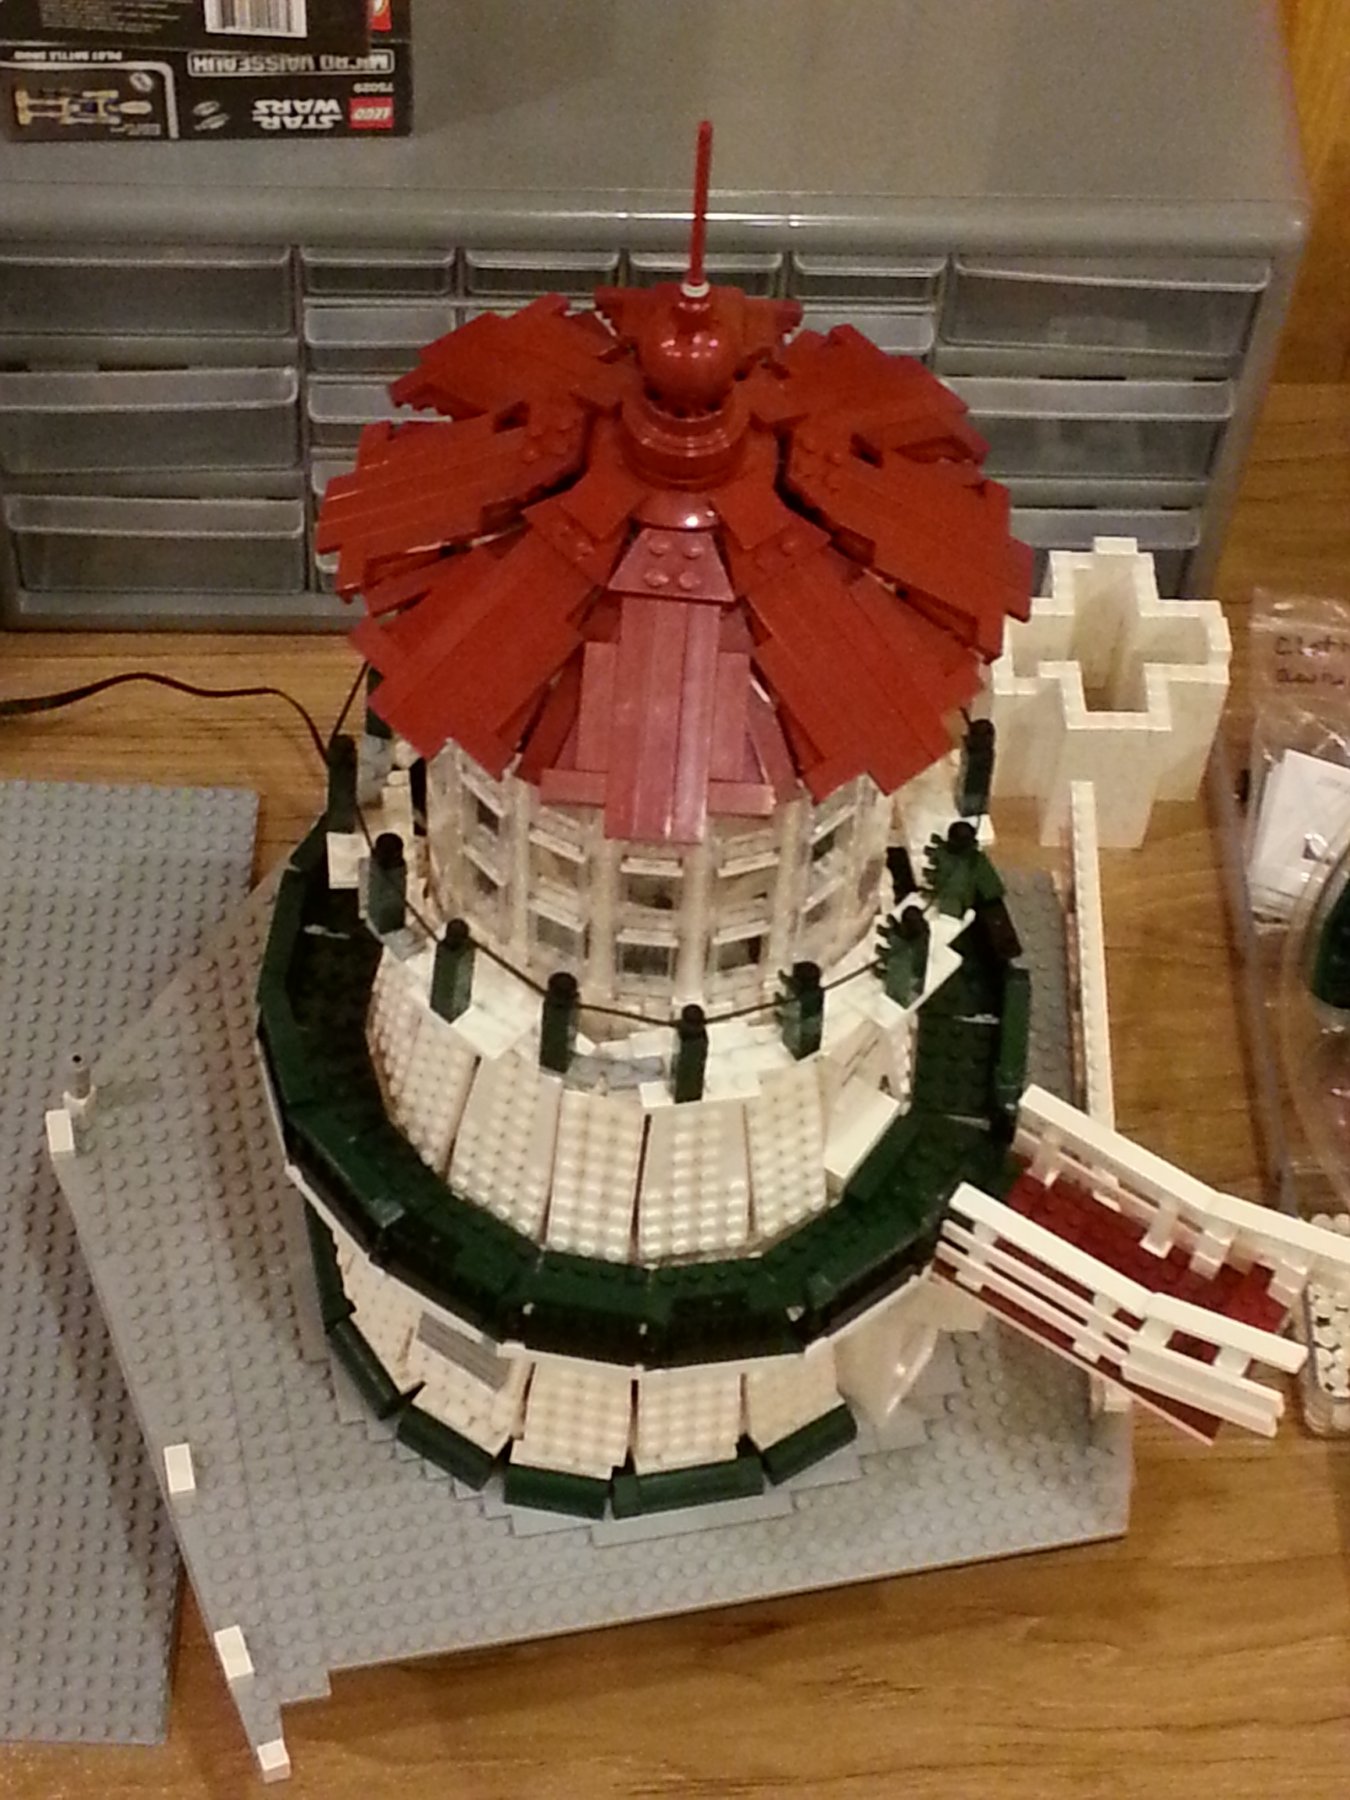
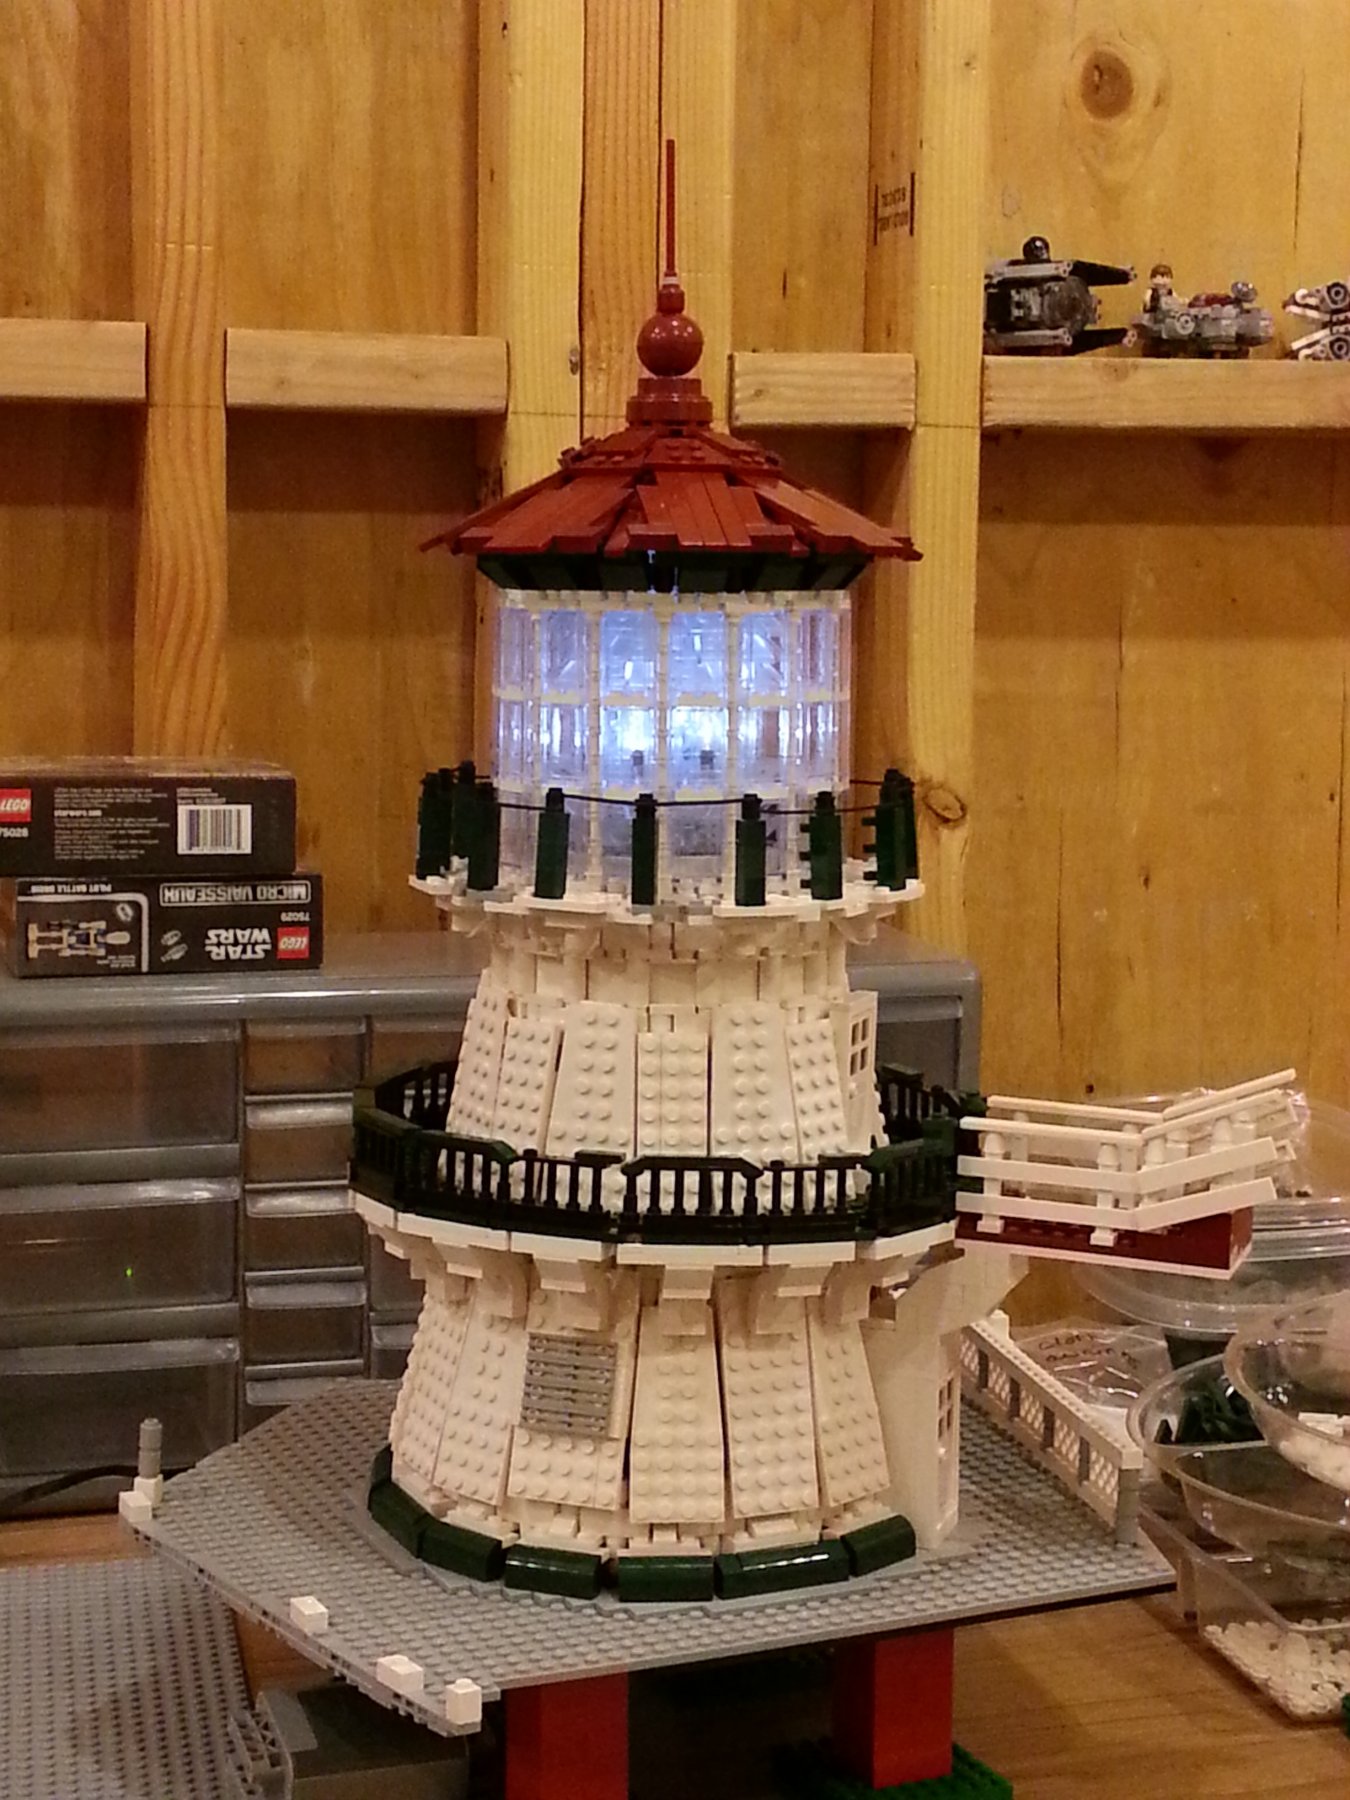
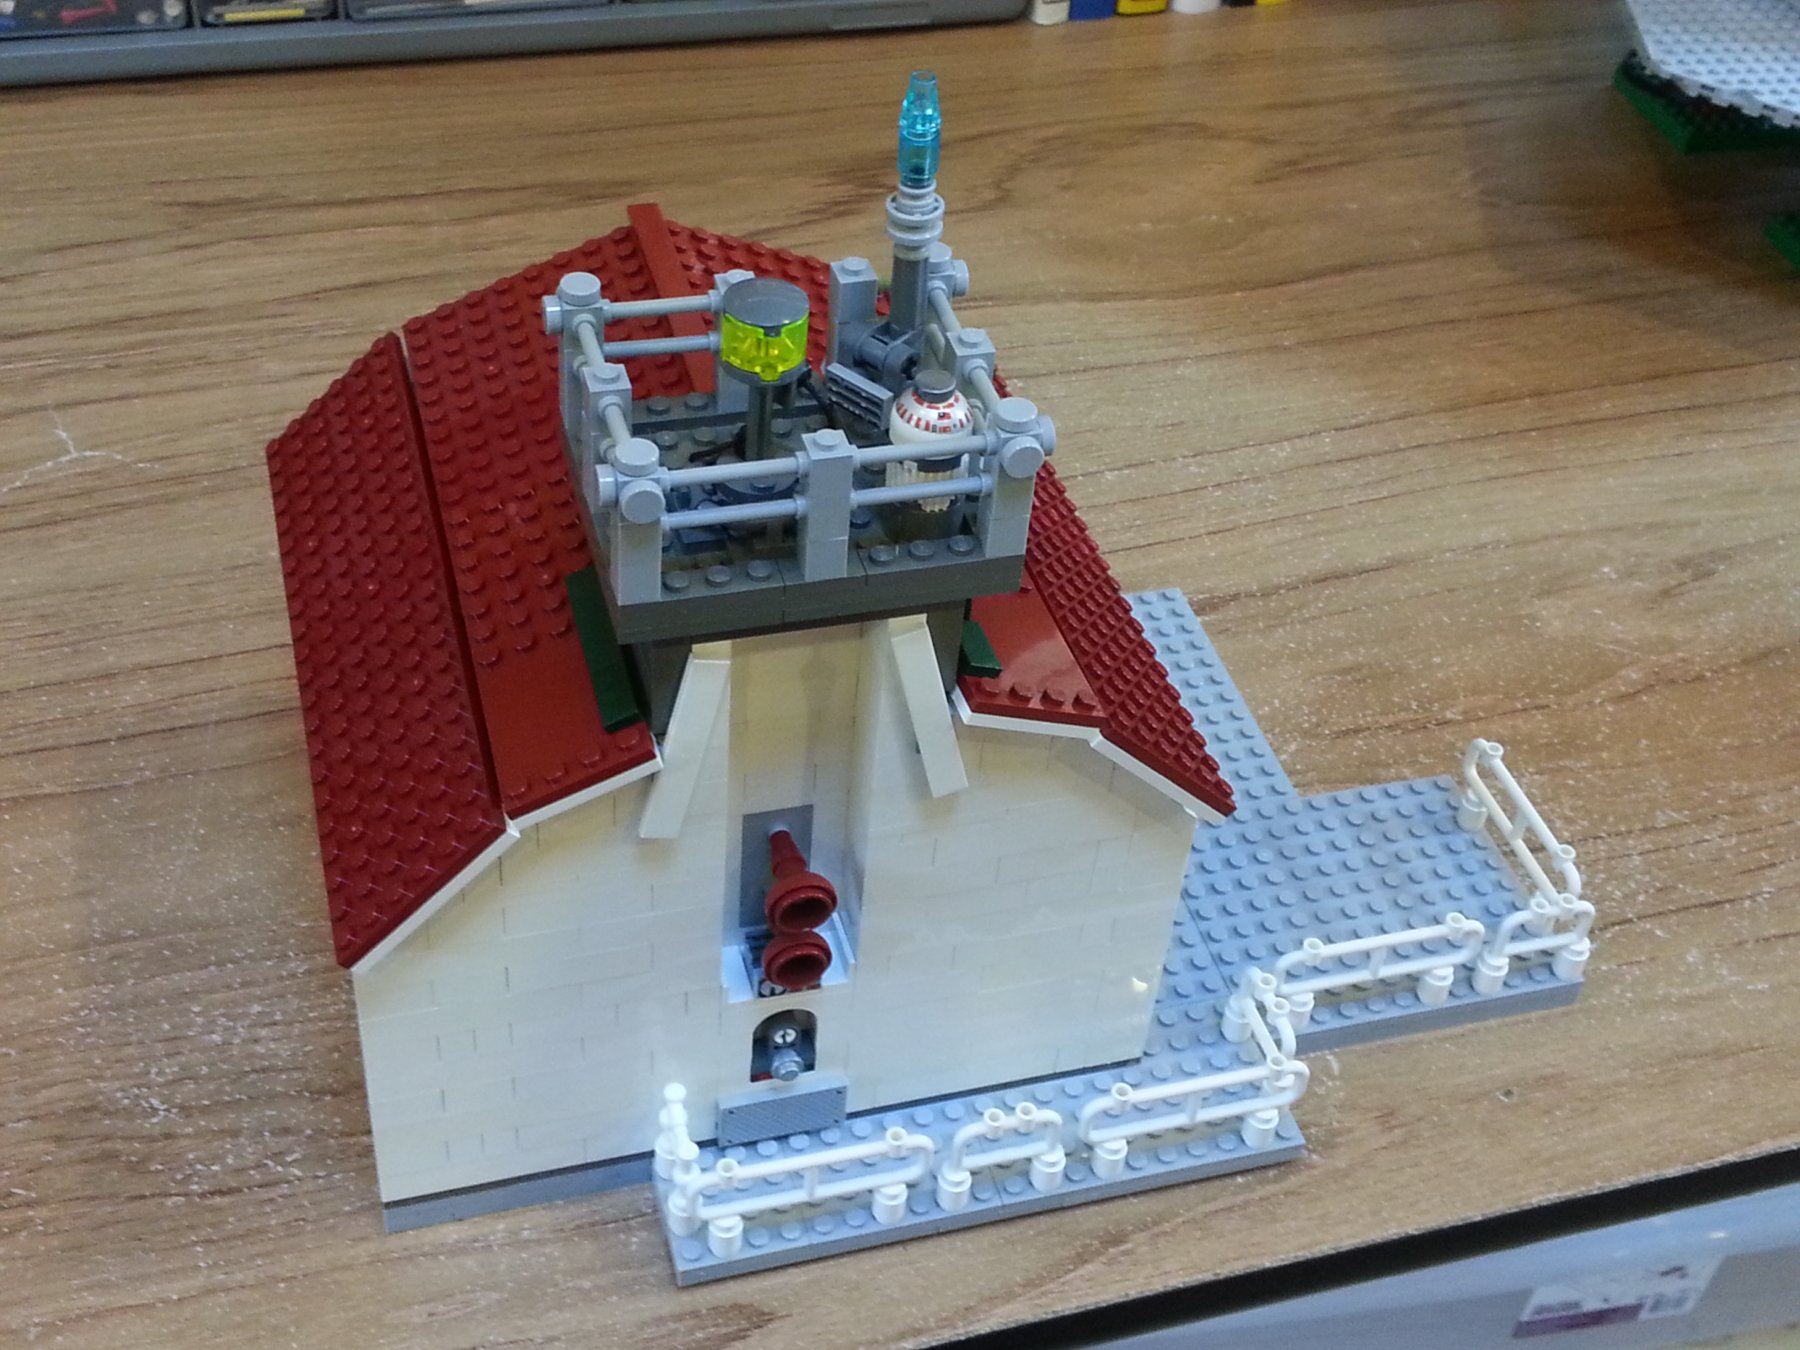
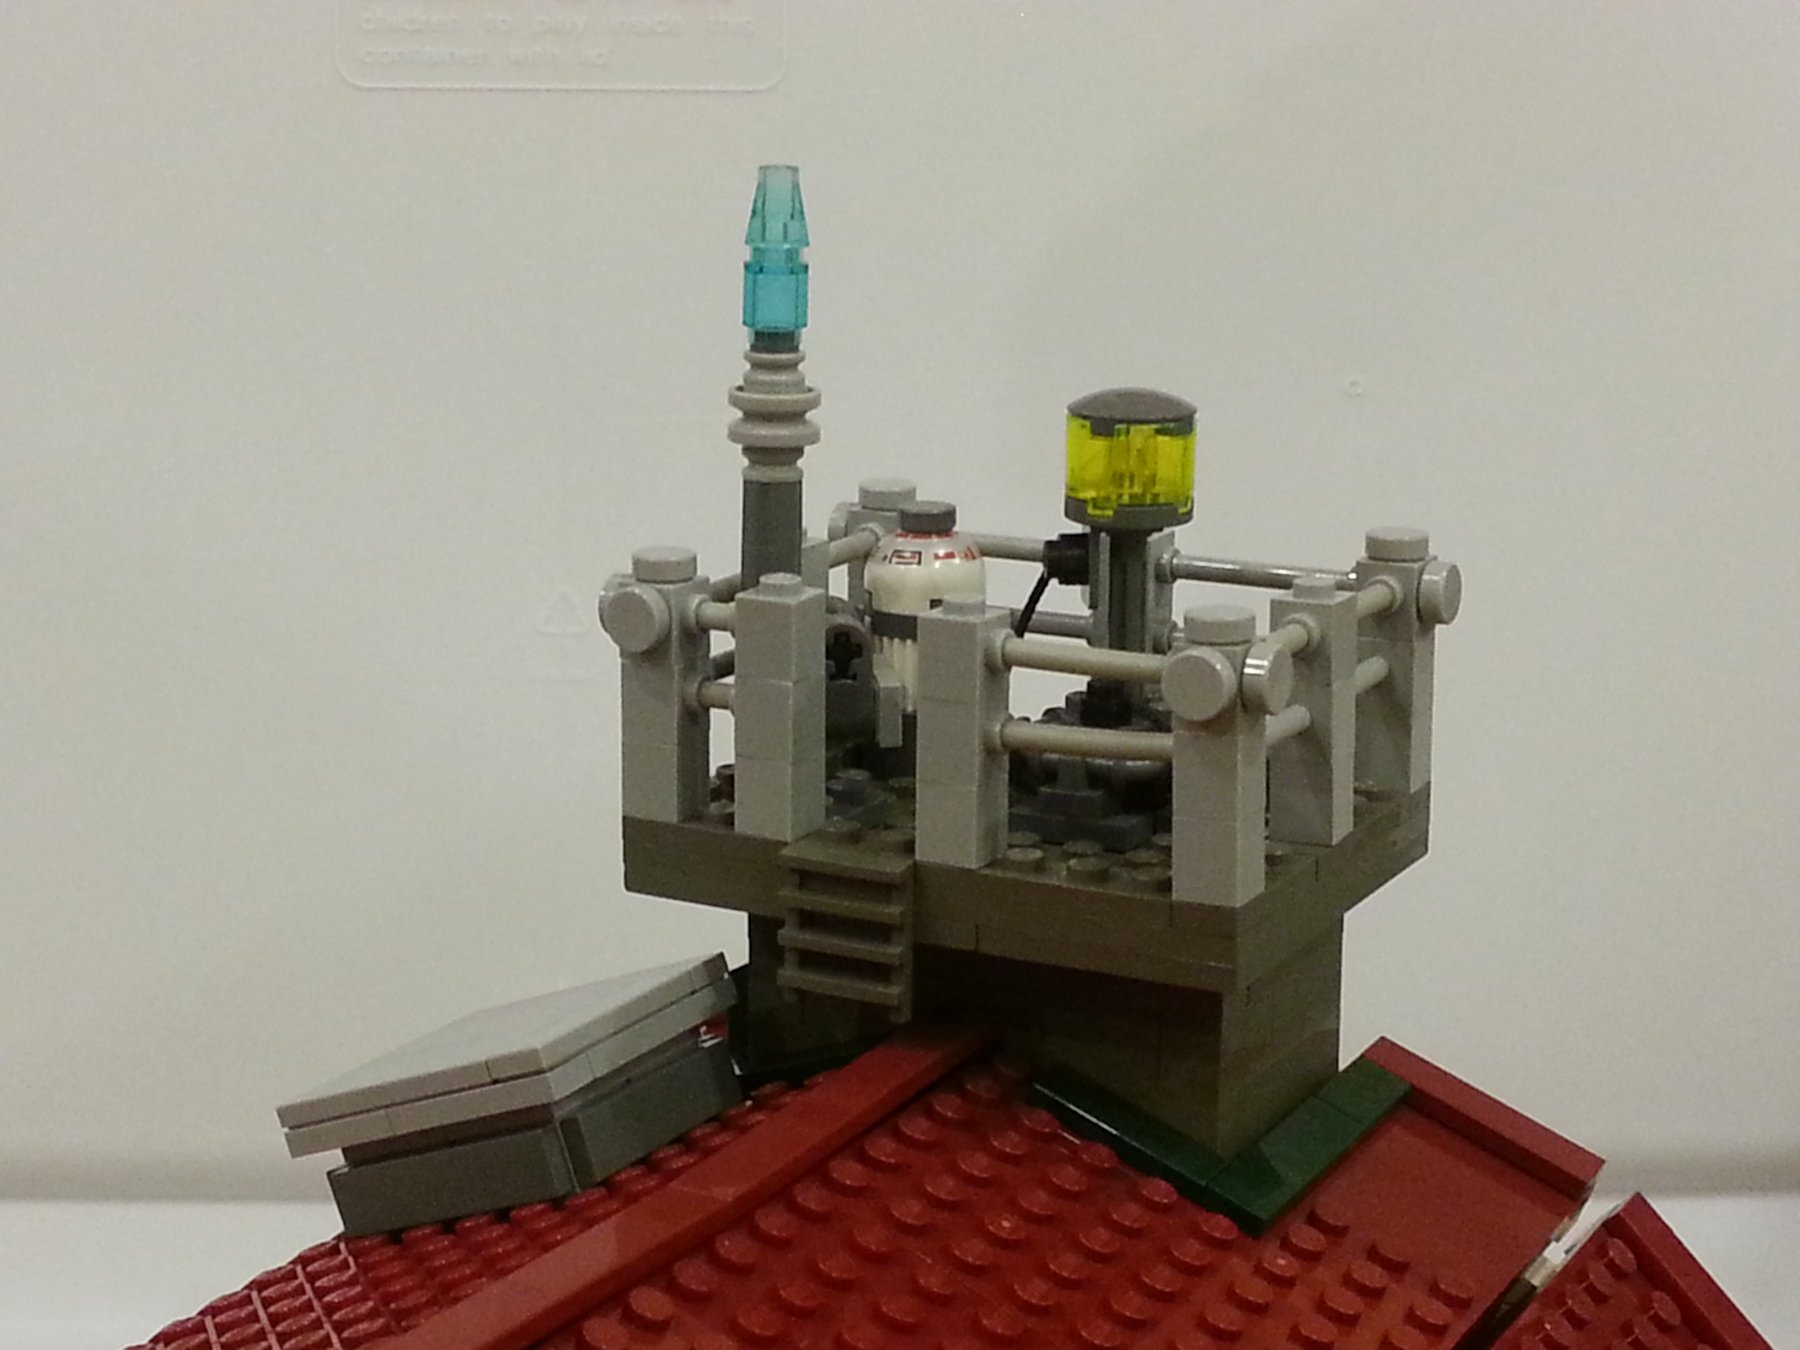
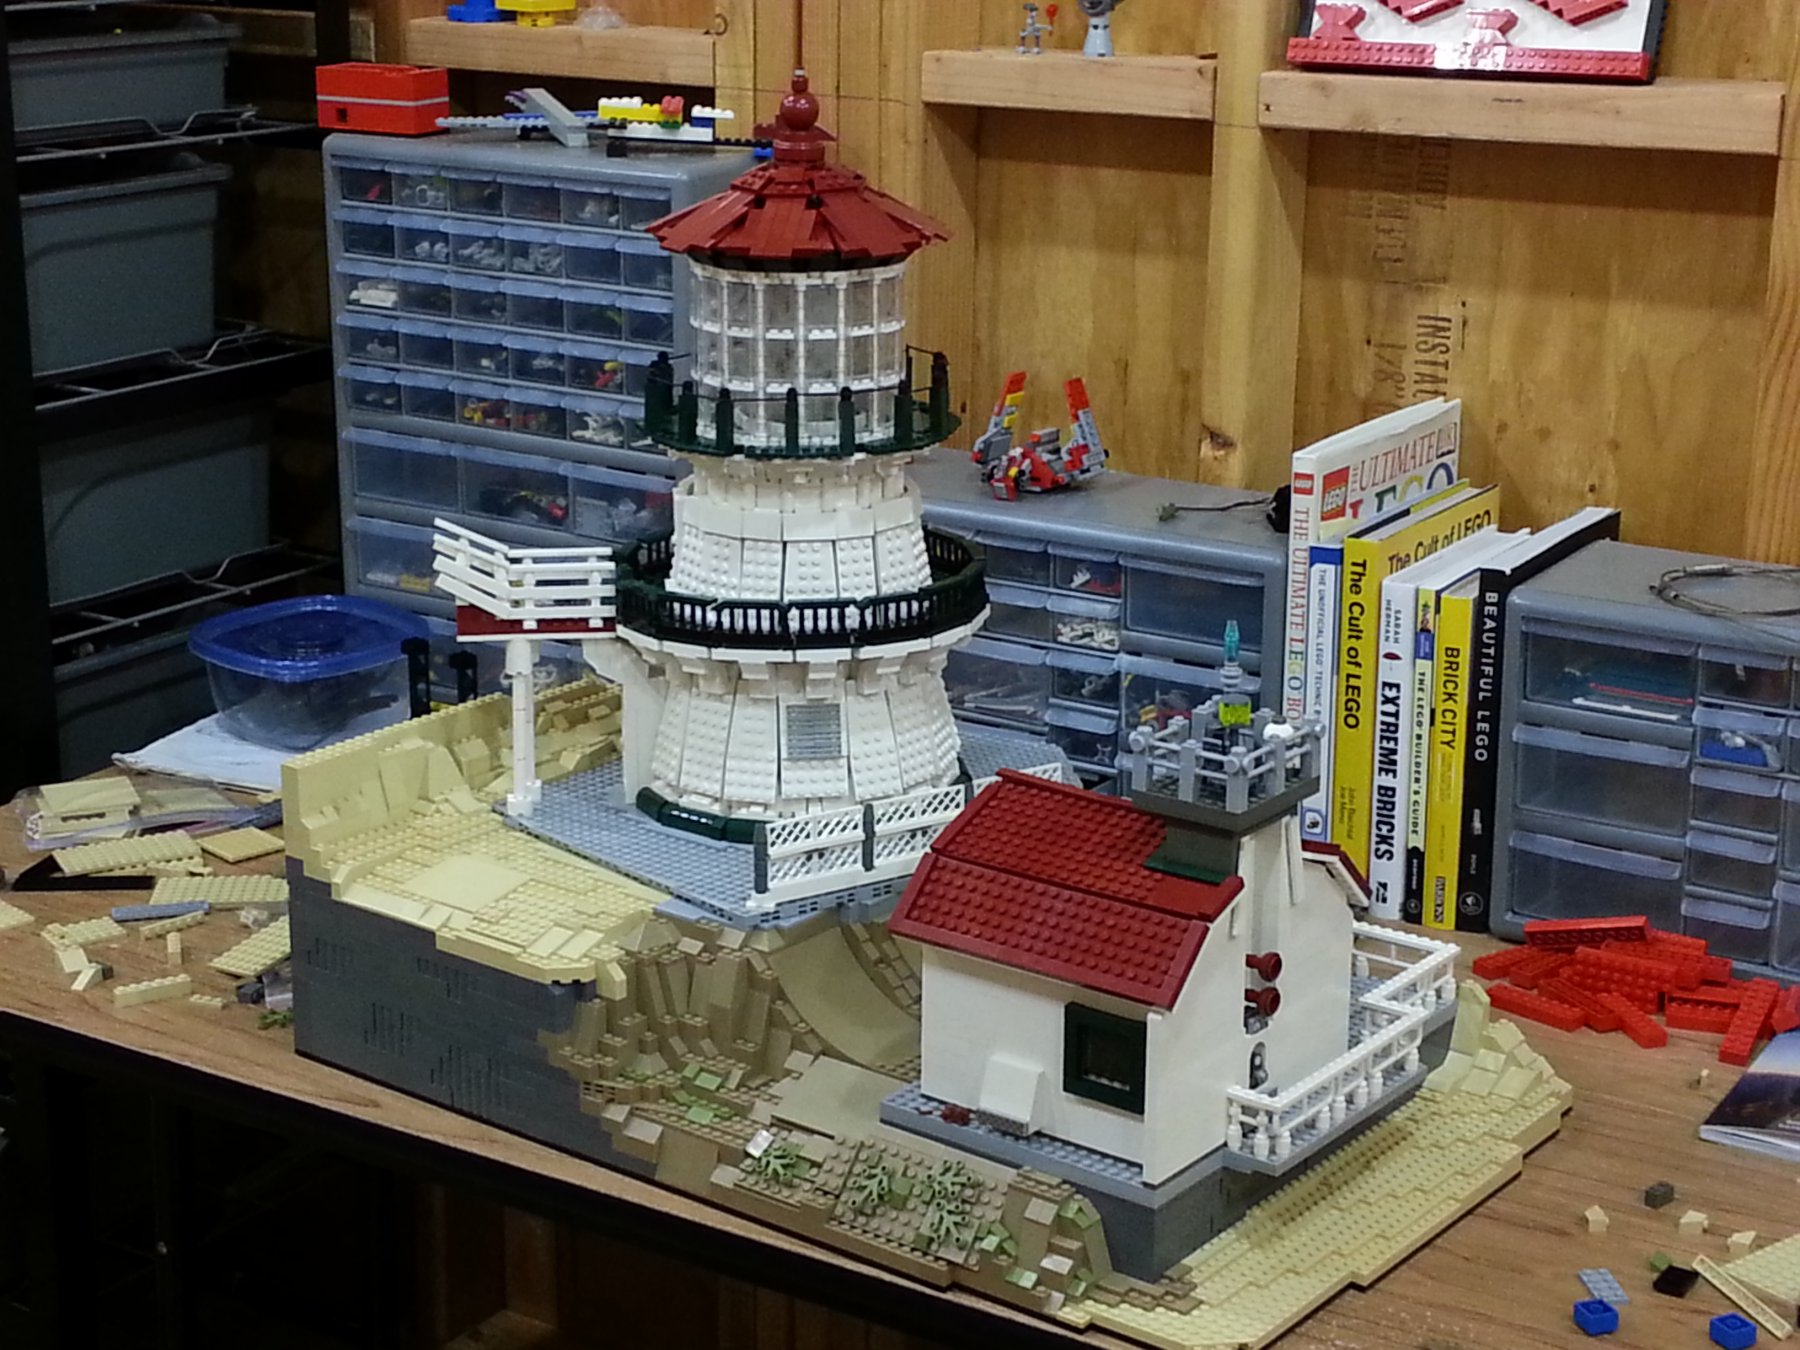
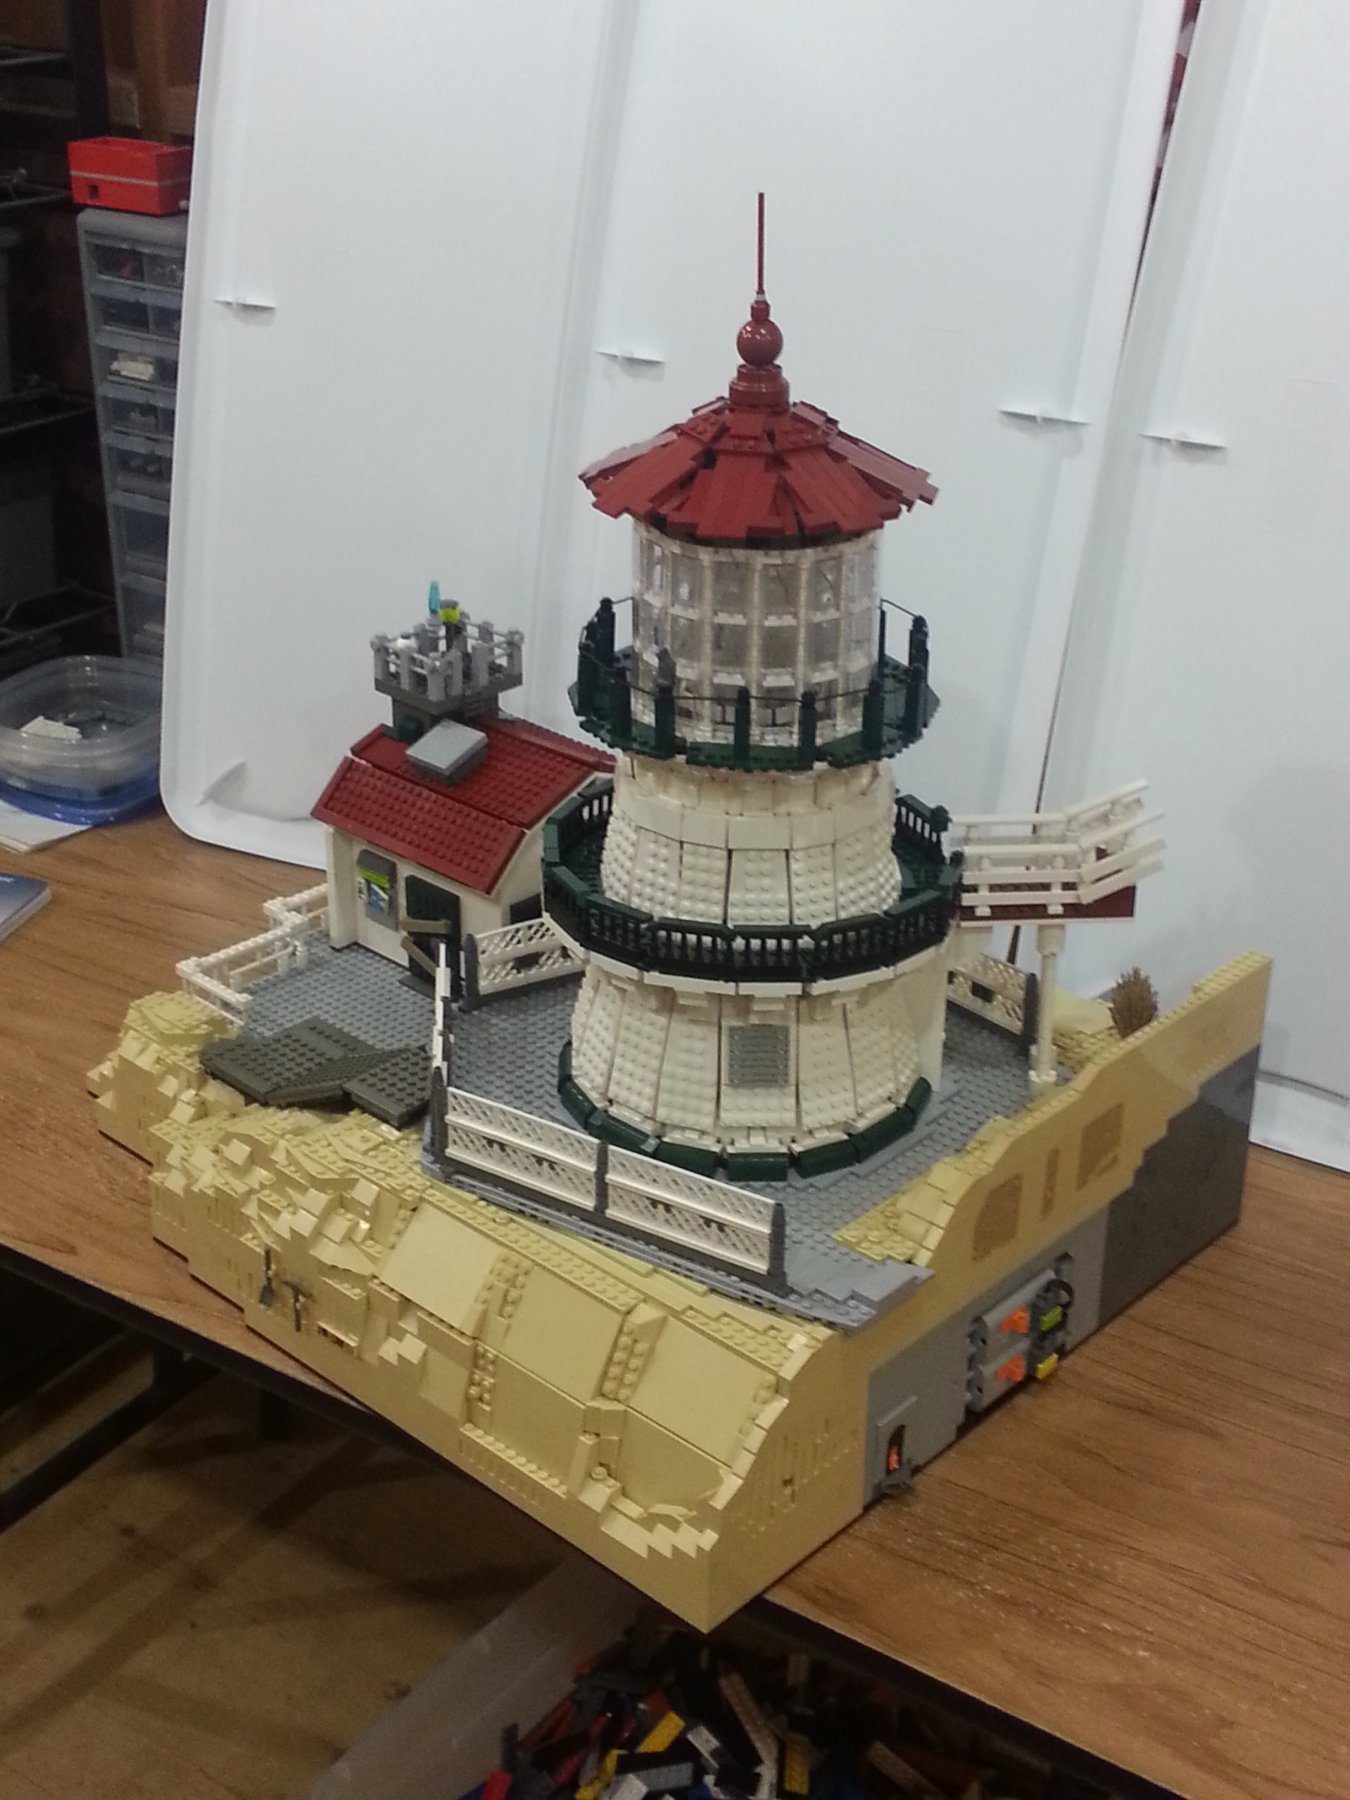
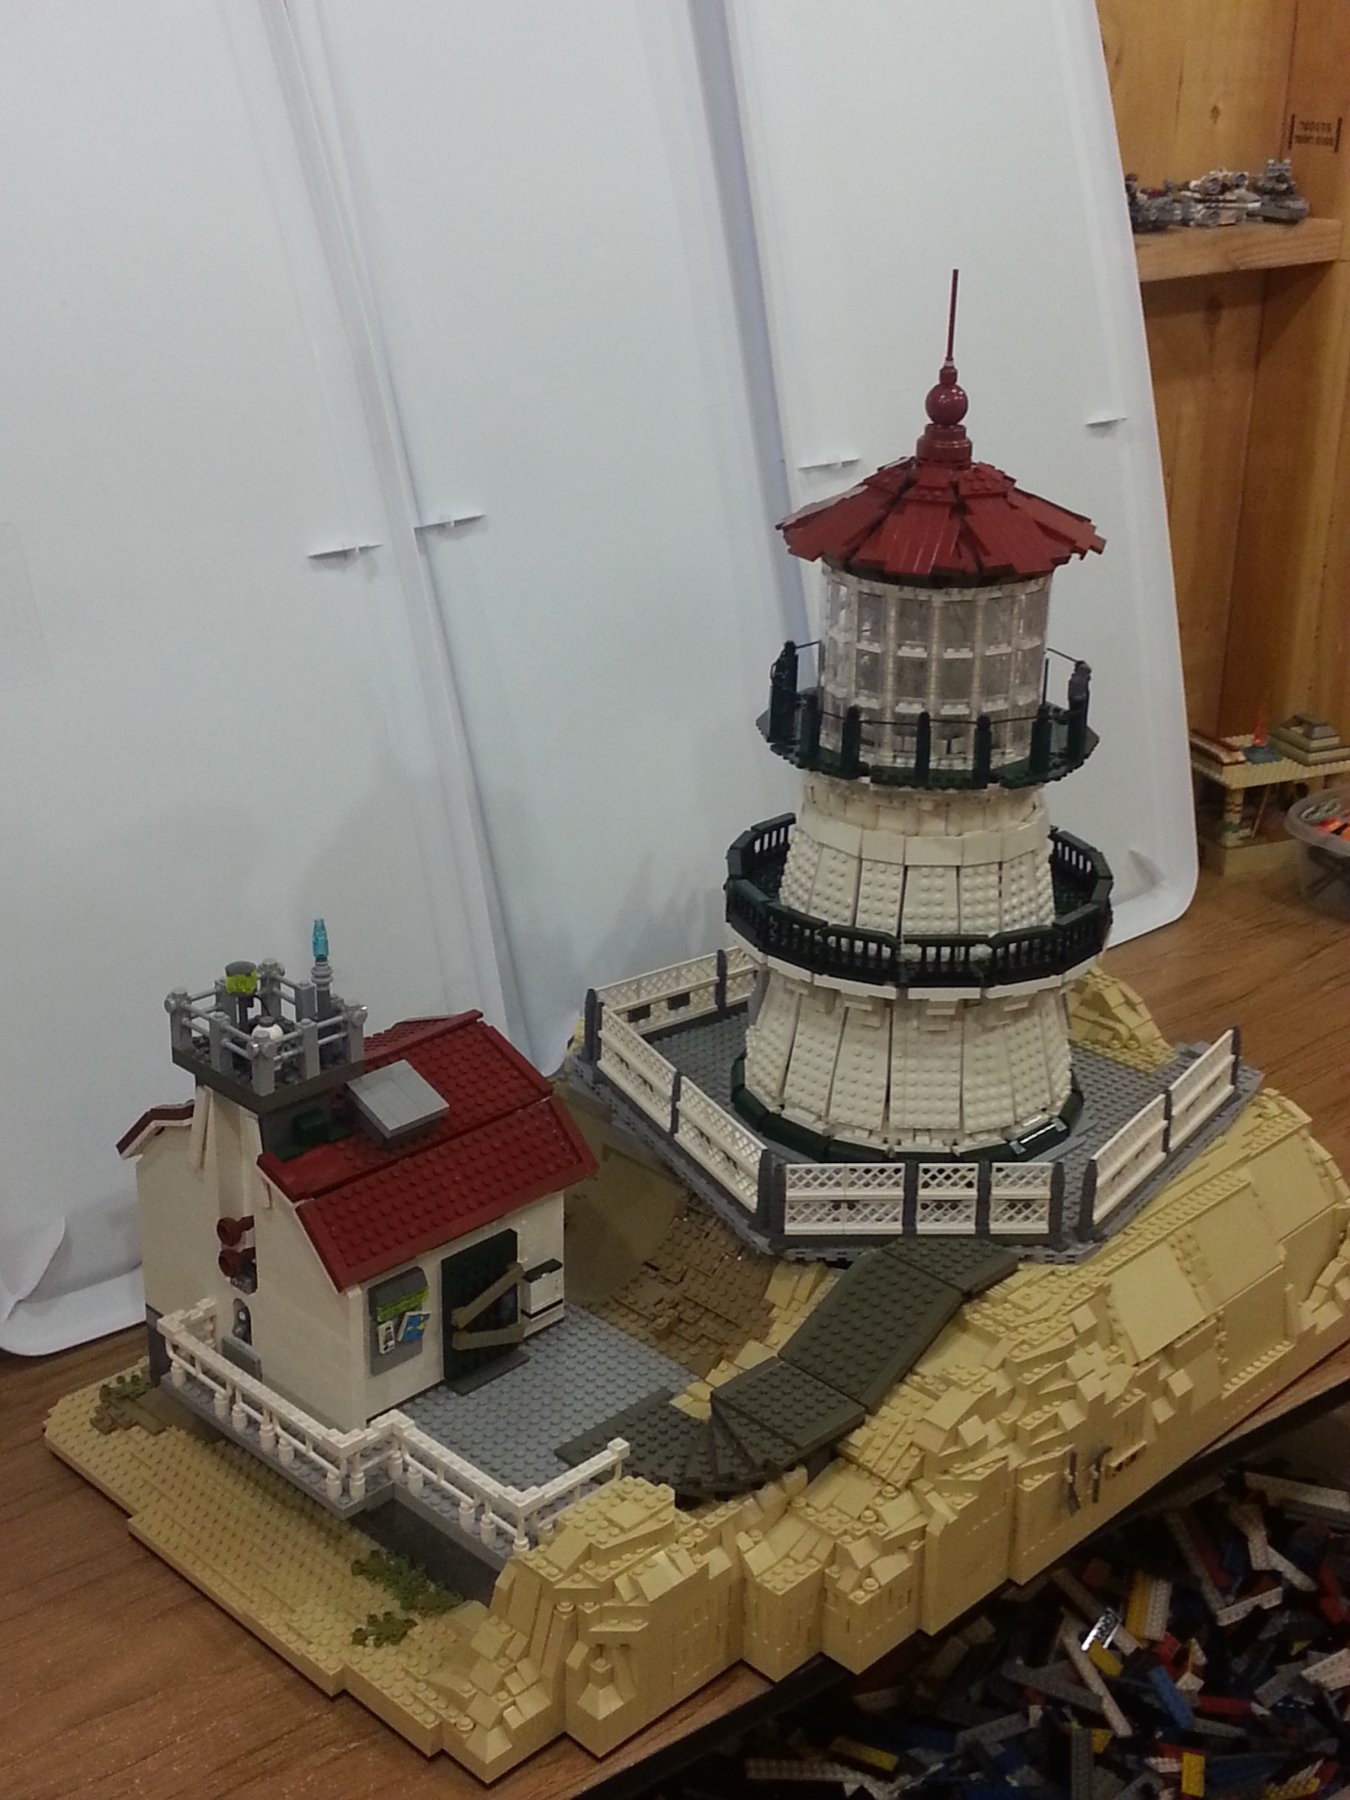
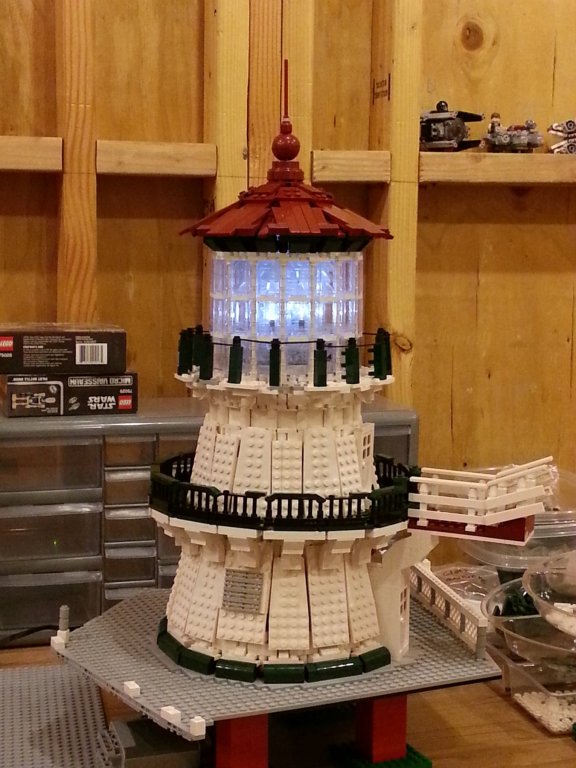
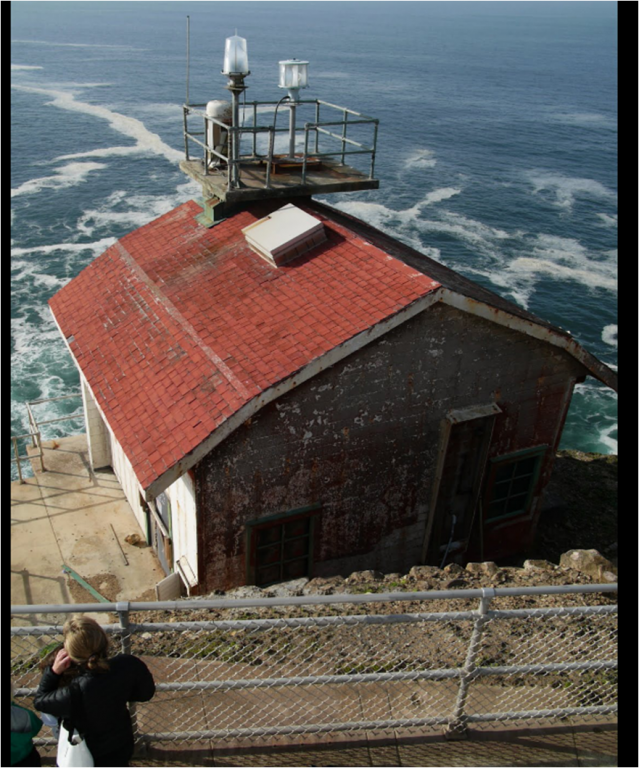
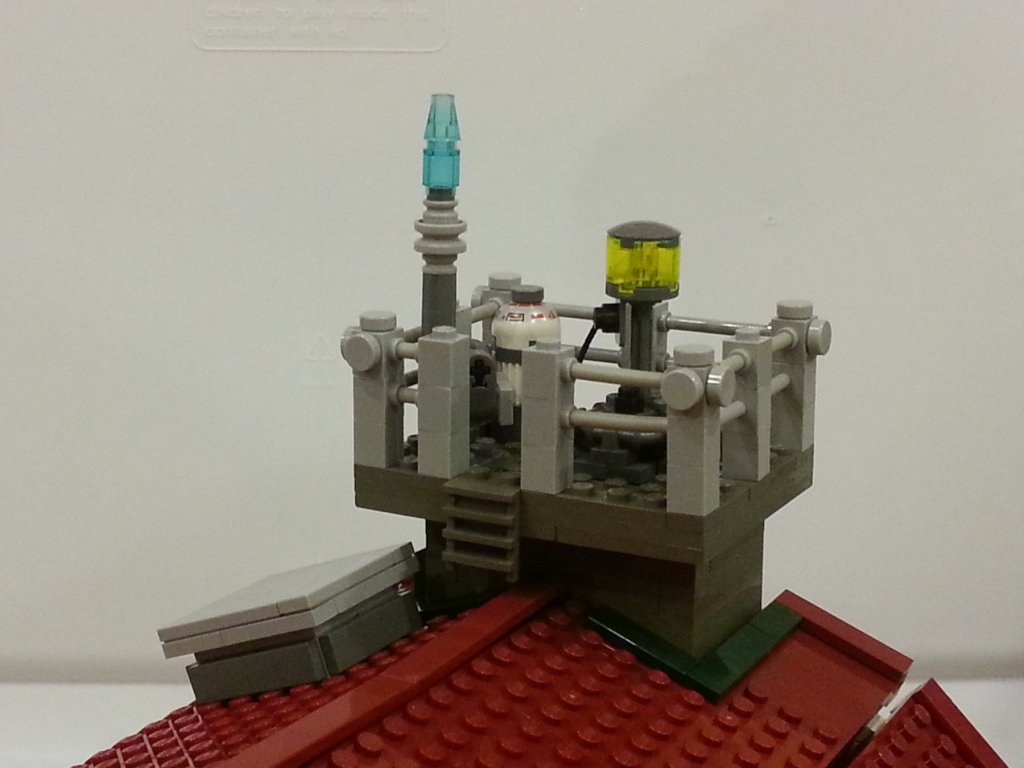
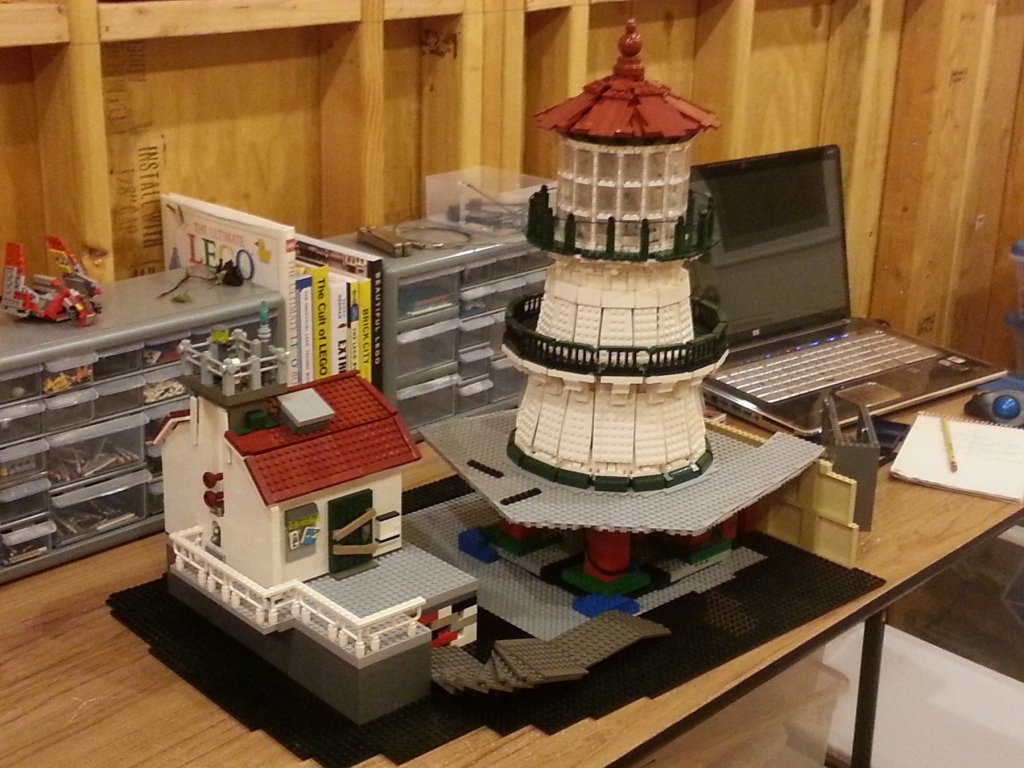
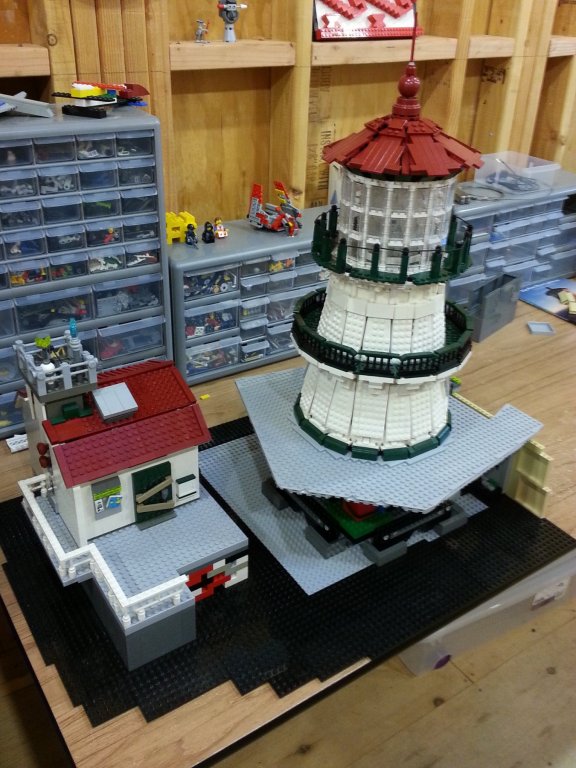
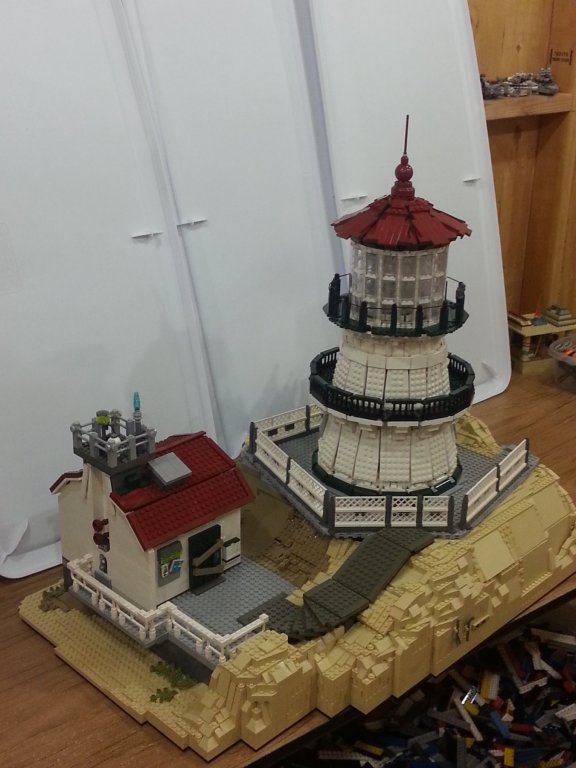
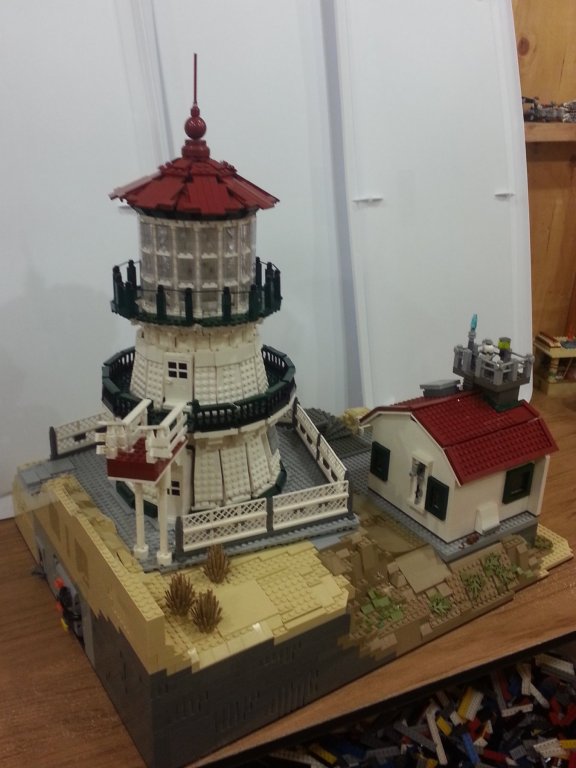
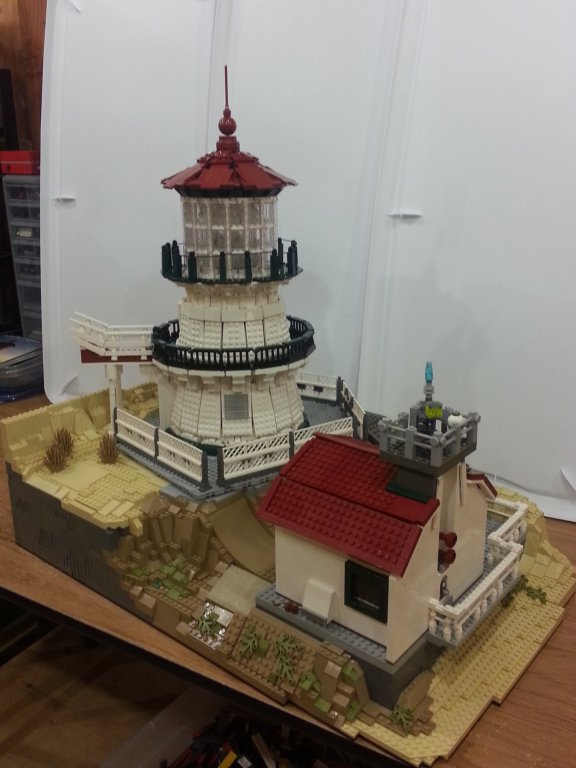
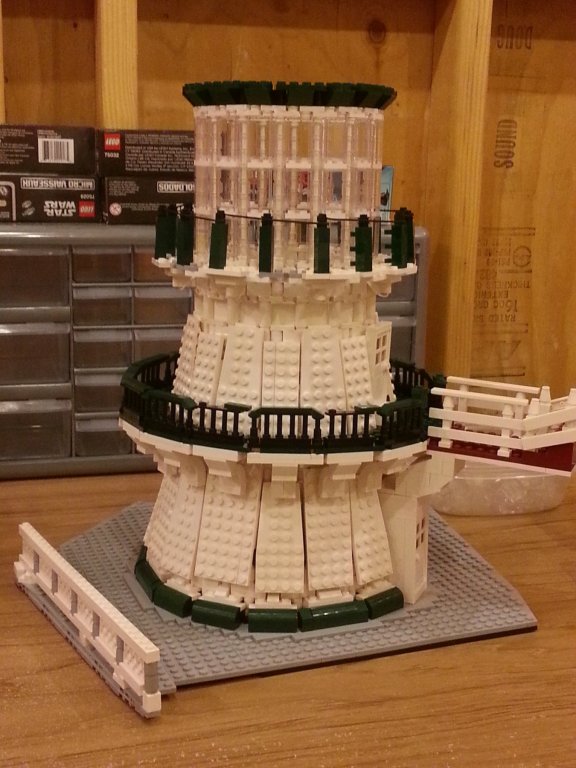
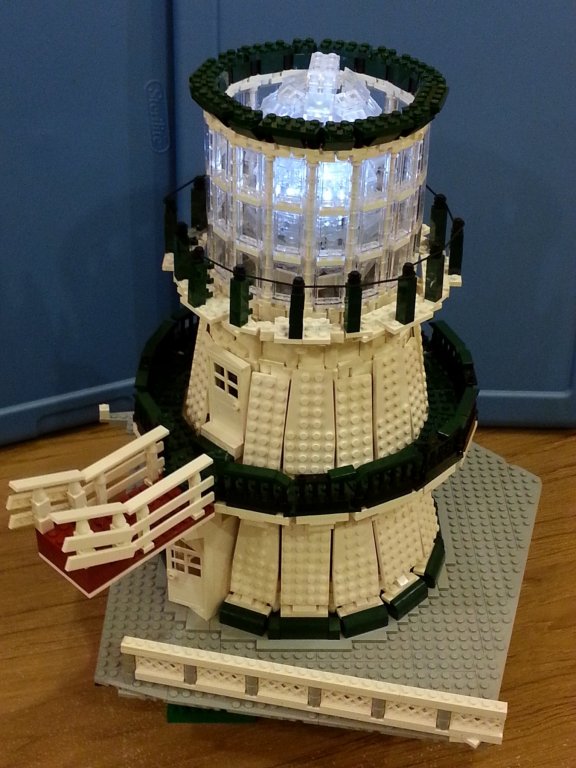
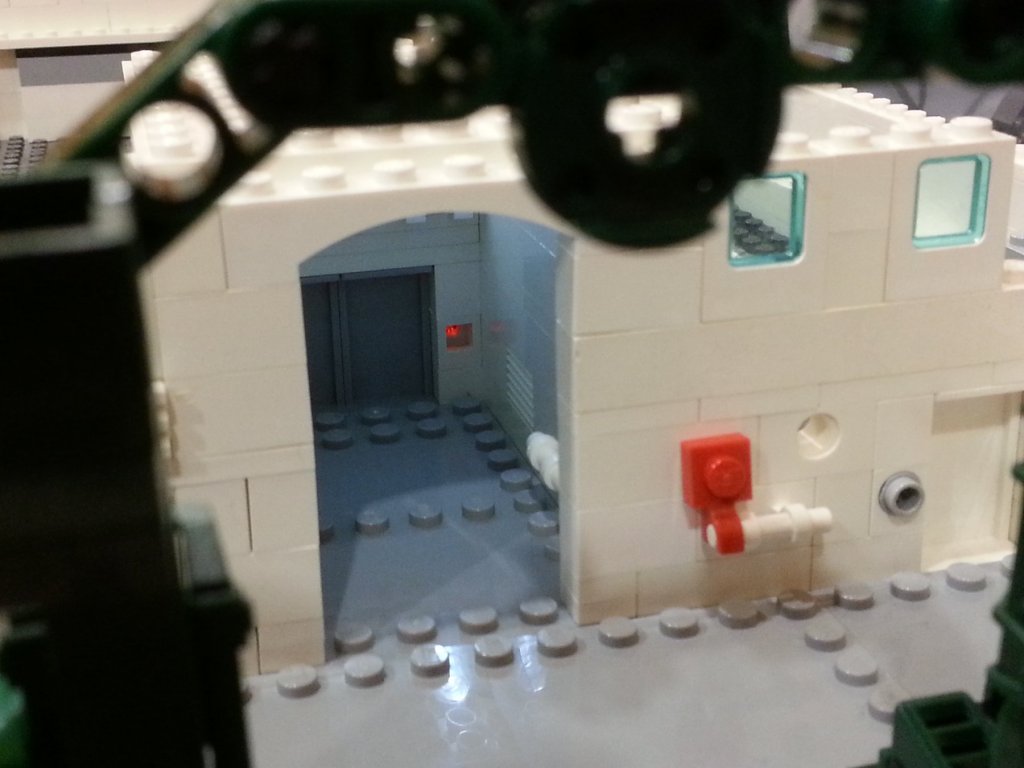
Okay, I'm back to finish up this build log... if I can remember how to post pics in the right places. So on last posting here, I guess I was about finished with the lighthouse tower, so I just need to put the roof on and build the surrounding area including the little equipment building on the seaward side... The octagonal sloped roof in dark red was not easy, and I wasn't completely thrilled with how it came out, but it got the job done and was not bad from a distance... Okay, the lighthouse part is done. Here is the actual equipment building I wanted to replicate... And here is my take on it... Here is the modern navigation equipment that is actually used to replace the actual lighthouse (yes, that's a Star Wars droid head up there - artistic license!)... Now on to getting the relative height and position worked out for the lighthouse and building... Finally, I got the cliff built up around it and got the battery pack ready to plug in to the lighthouse motor and lights... Plug everything in, set the buildings in place and it's done! Thanks for checking it out! Sorry it took me a few months to get back here and finish it. Cheers!


-
No worries! Actually I'll make it up to everyone when I do a real contemporary Lego build log. My latest inspiration is a large scale transverse cross-section of a large sailing ship. The source of the inspiration is from this group, specifically the HMS Victory Cross Section by Antony - FINISHED - Scale 1:36. I really think that or something similar needs treatment in Lego! That's the feeling that normally gets me going.
-
Mark, Ha, I wish I was that fast! Not sure if you're joking, but I tried to explain in the intro that this, like the lighthouse, was a build that I did previously and fortunately had some pictures taken throughout. It was basically from February to July of 2015. So I'm not a fast builder but instead a very slow poster. For my next big build I plan on taking pictures with the intention to share as I go. These old pictures were all just meant for my own memory of how it went together. Cheers, John
-
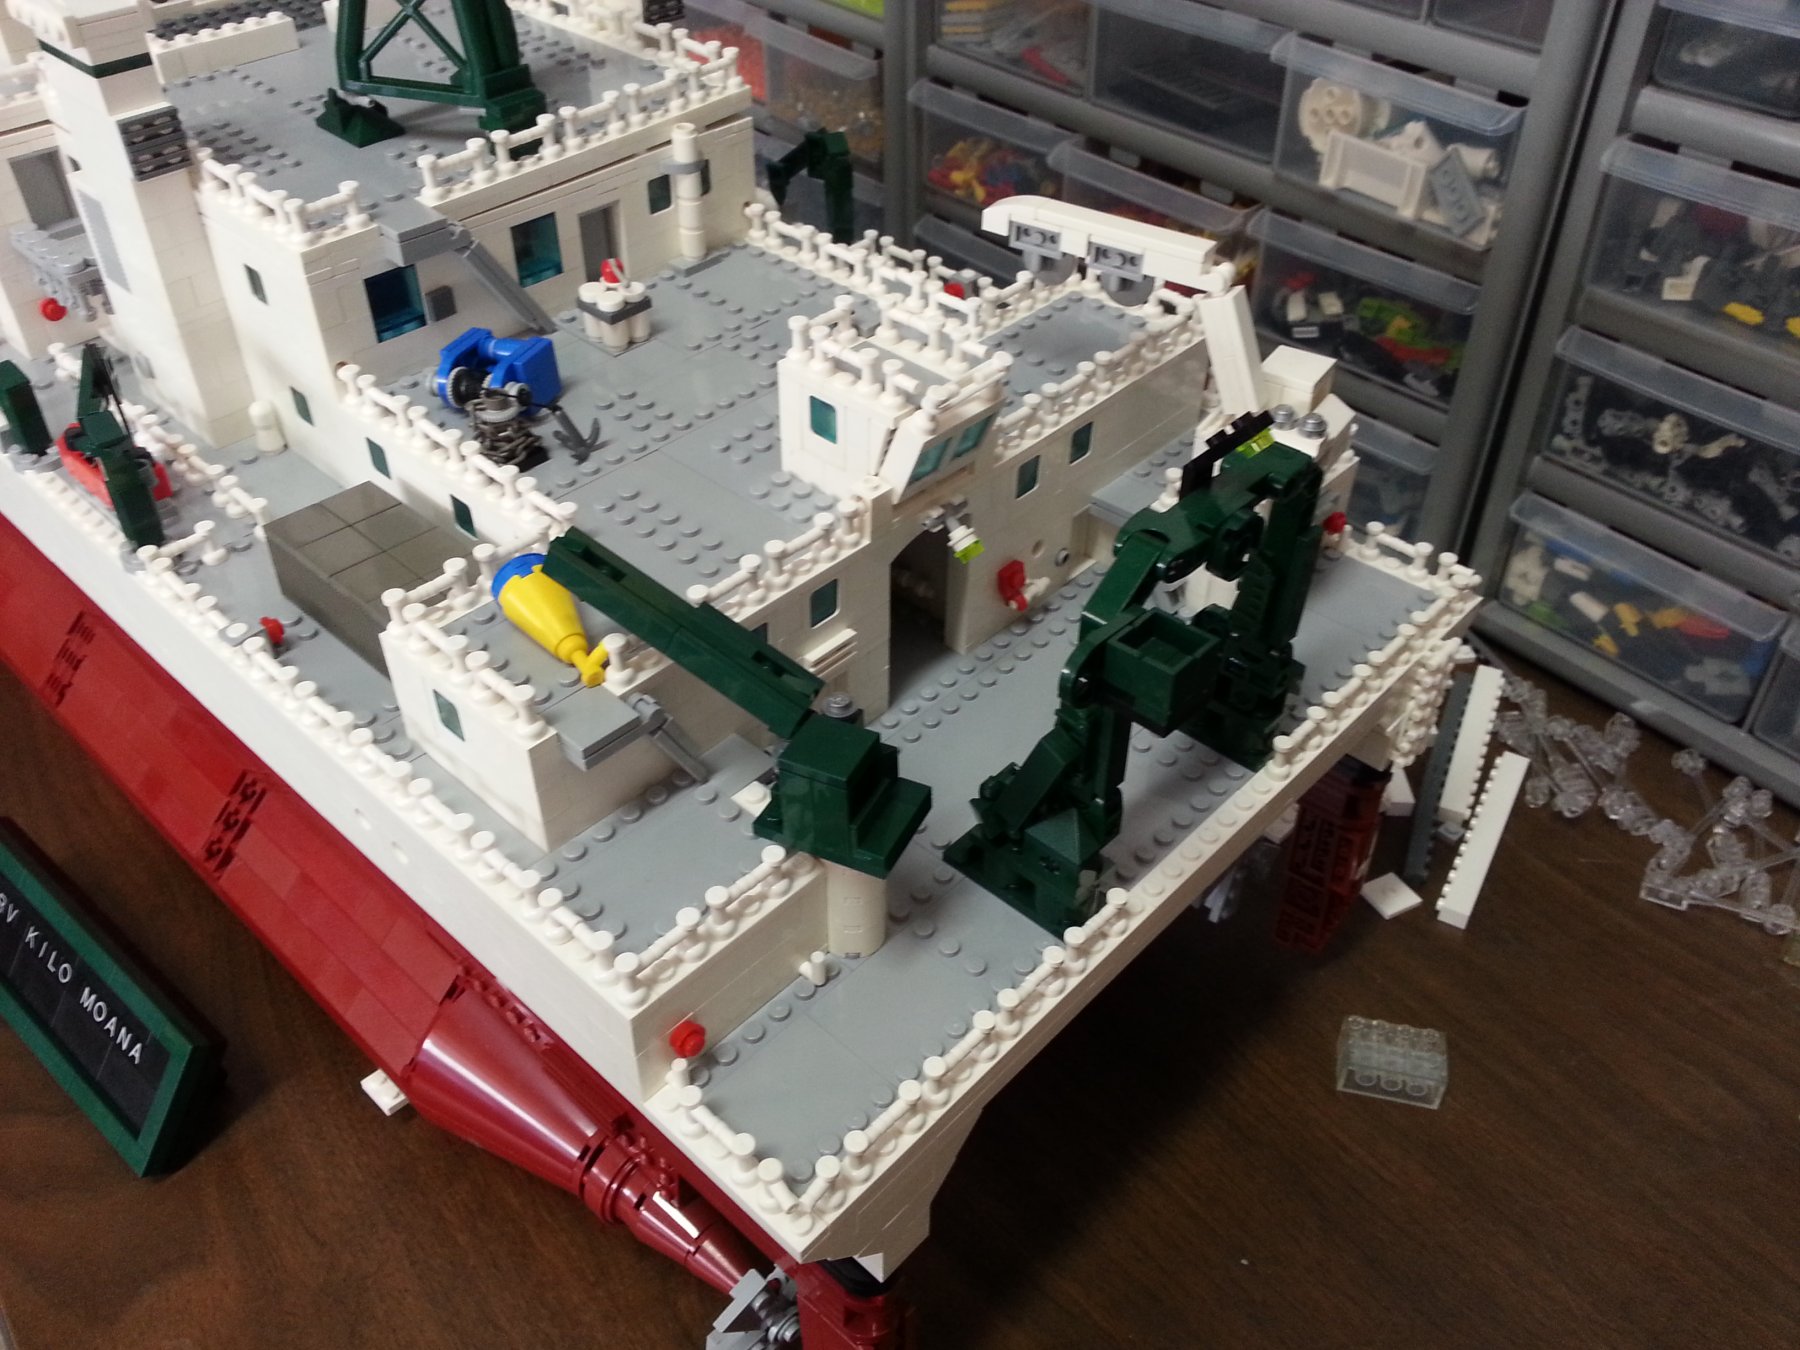
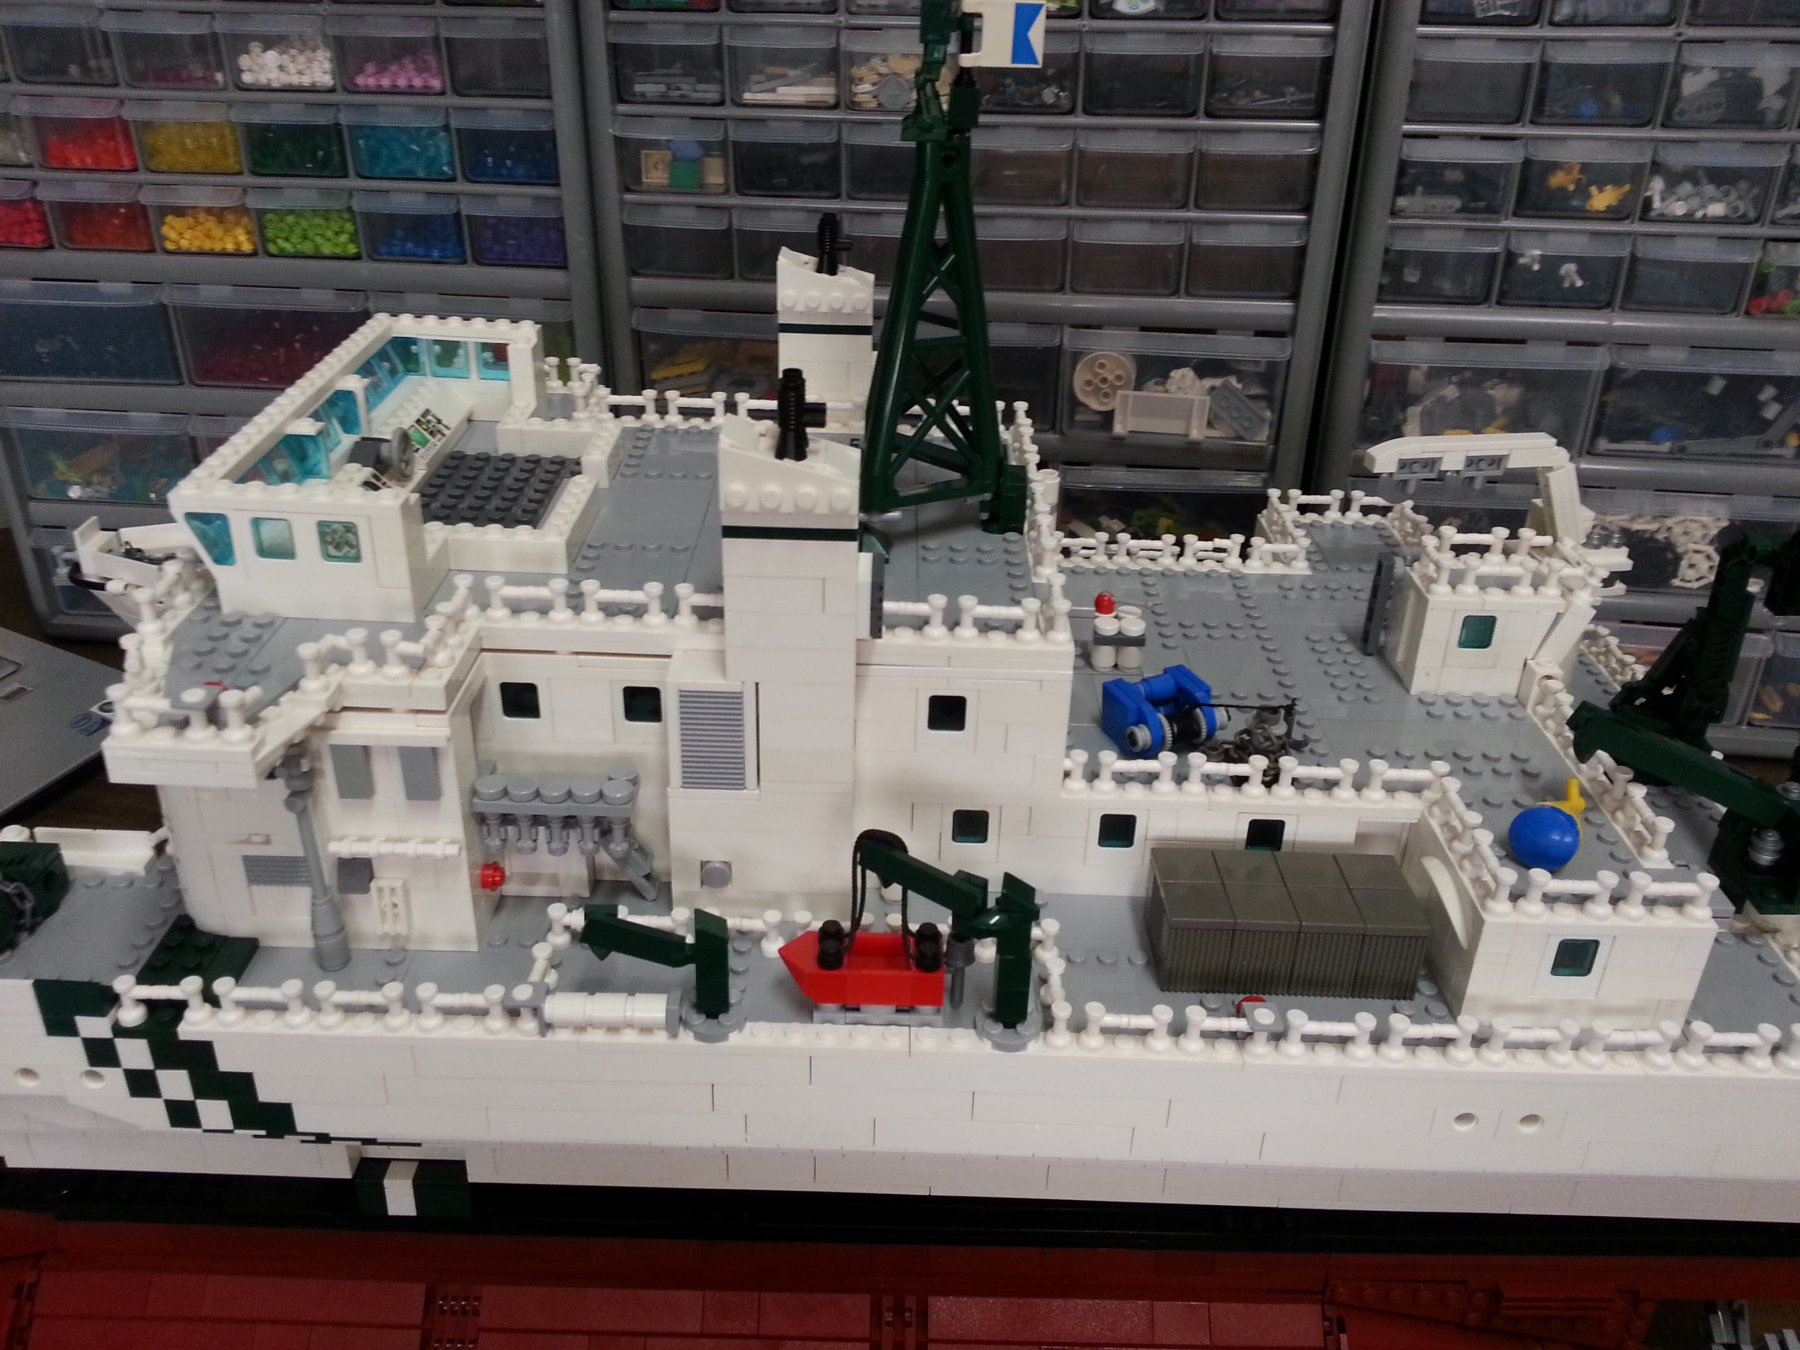
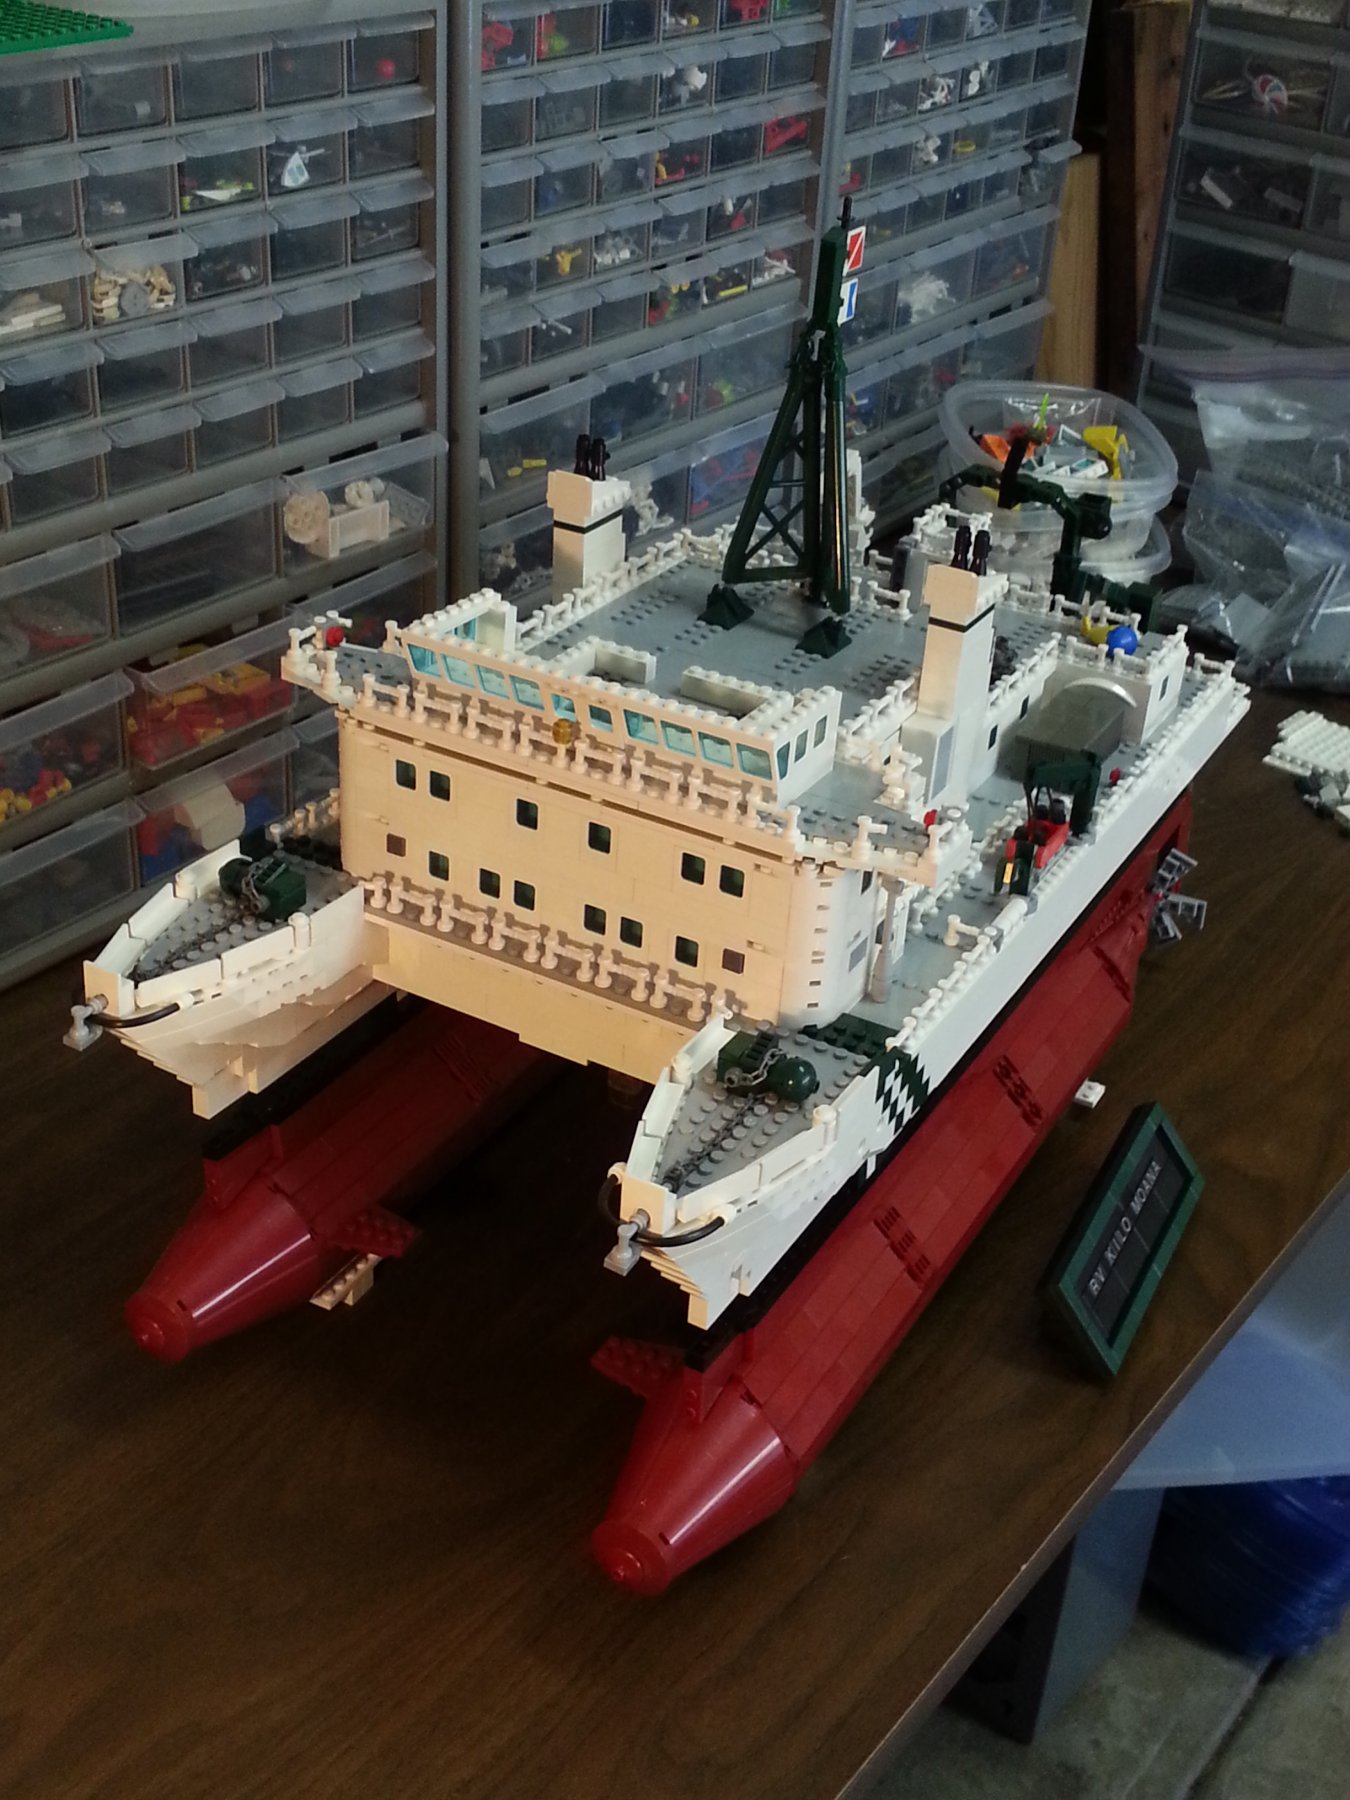
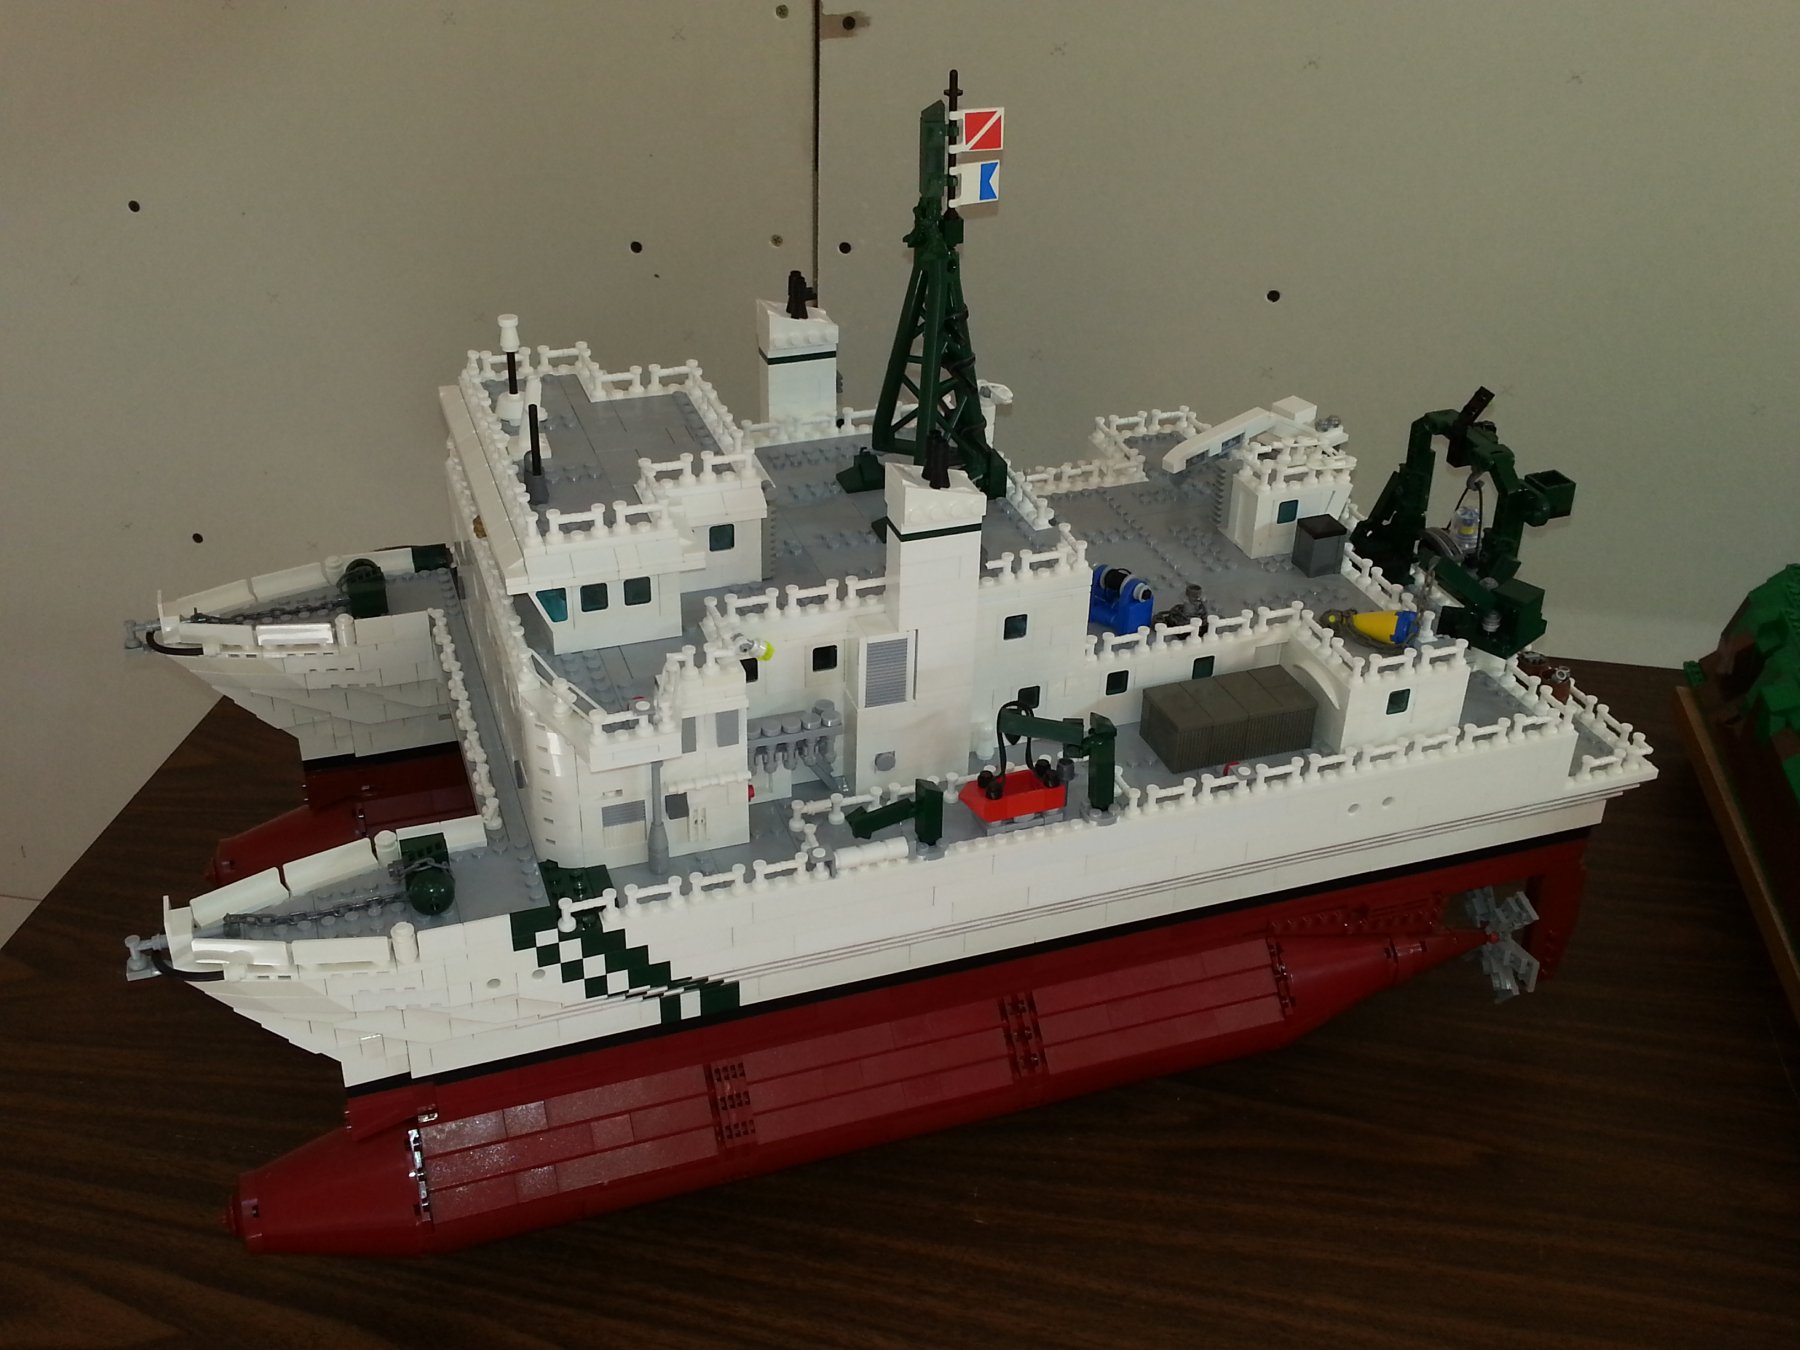
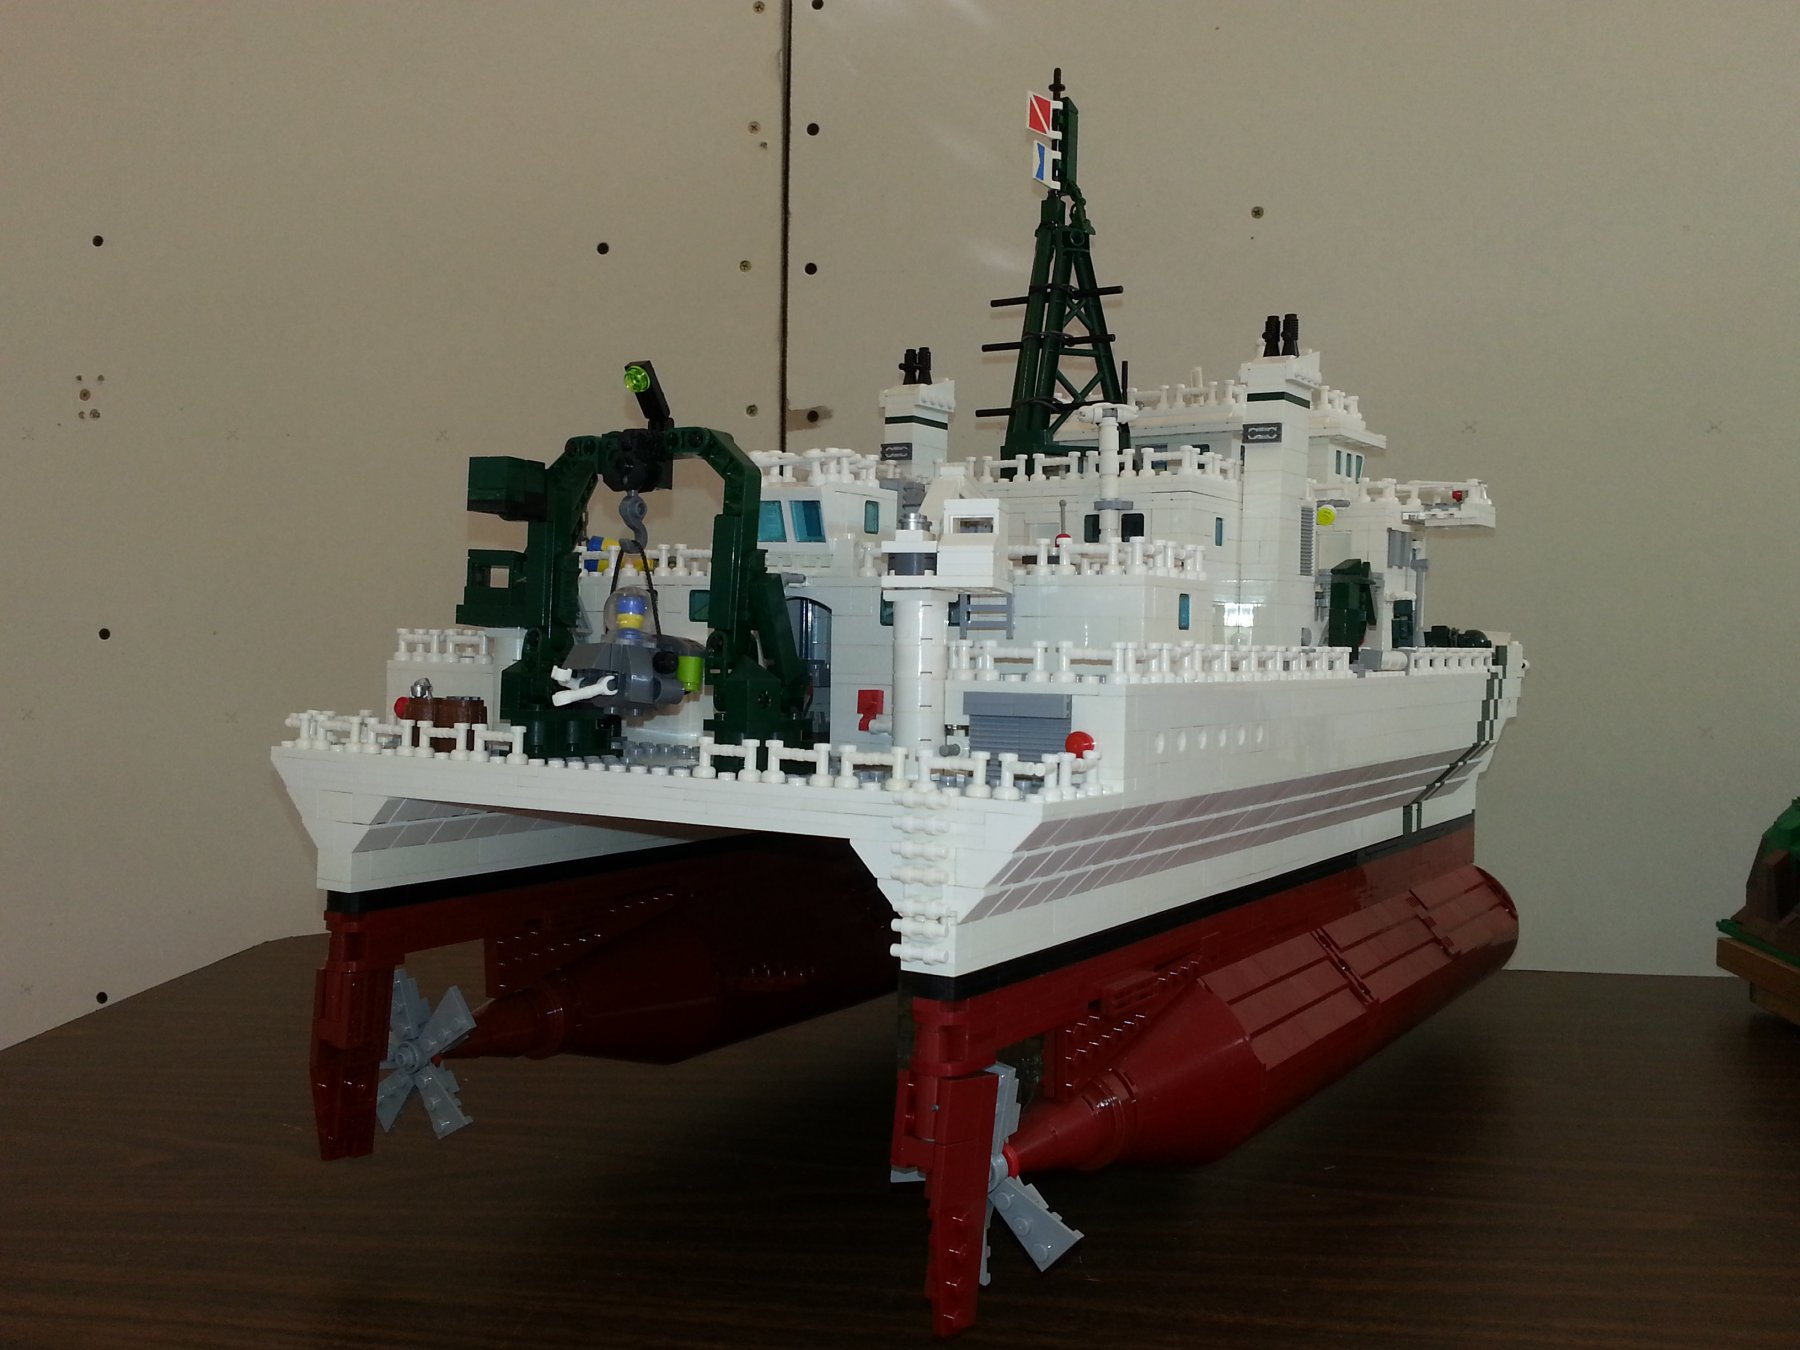
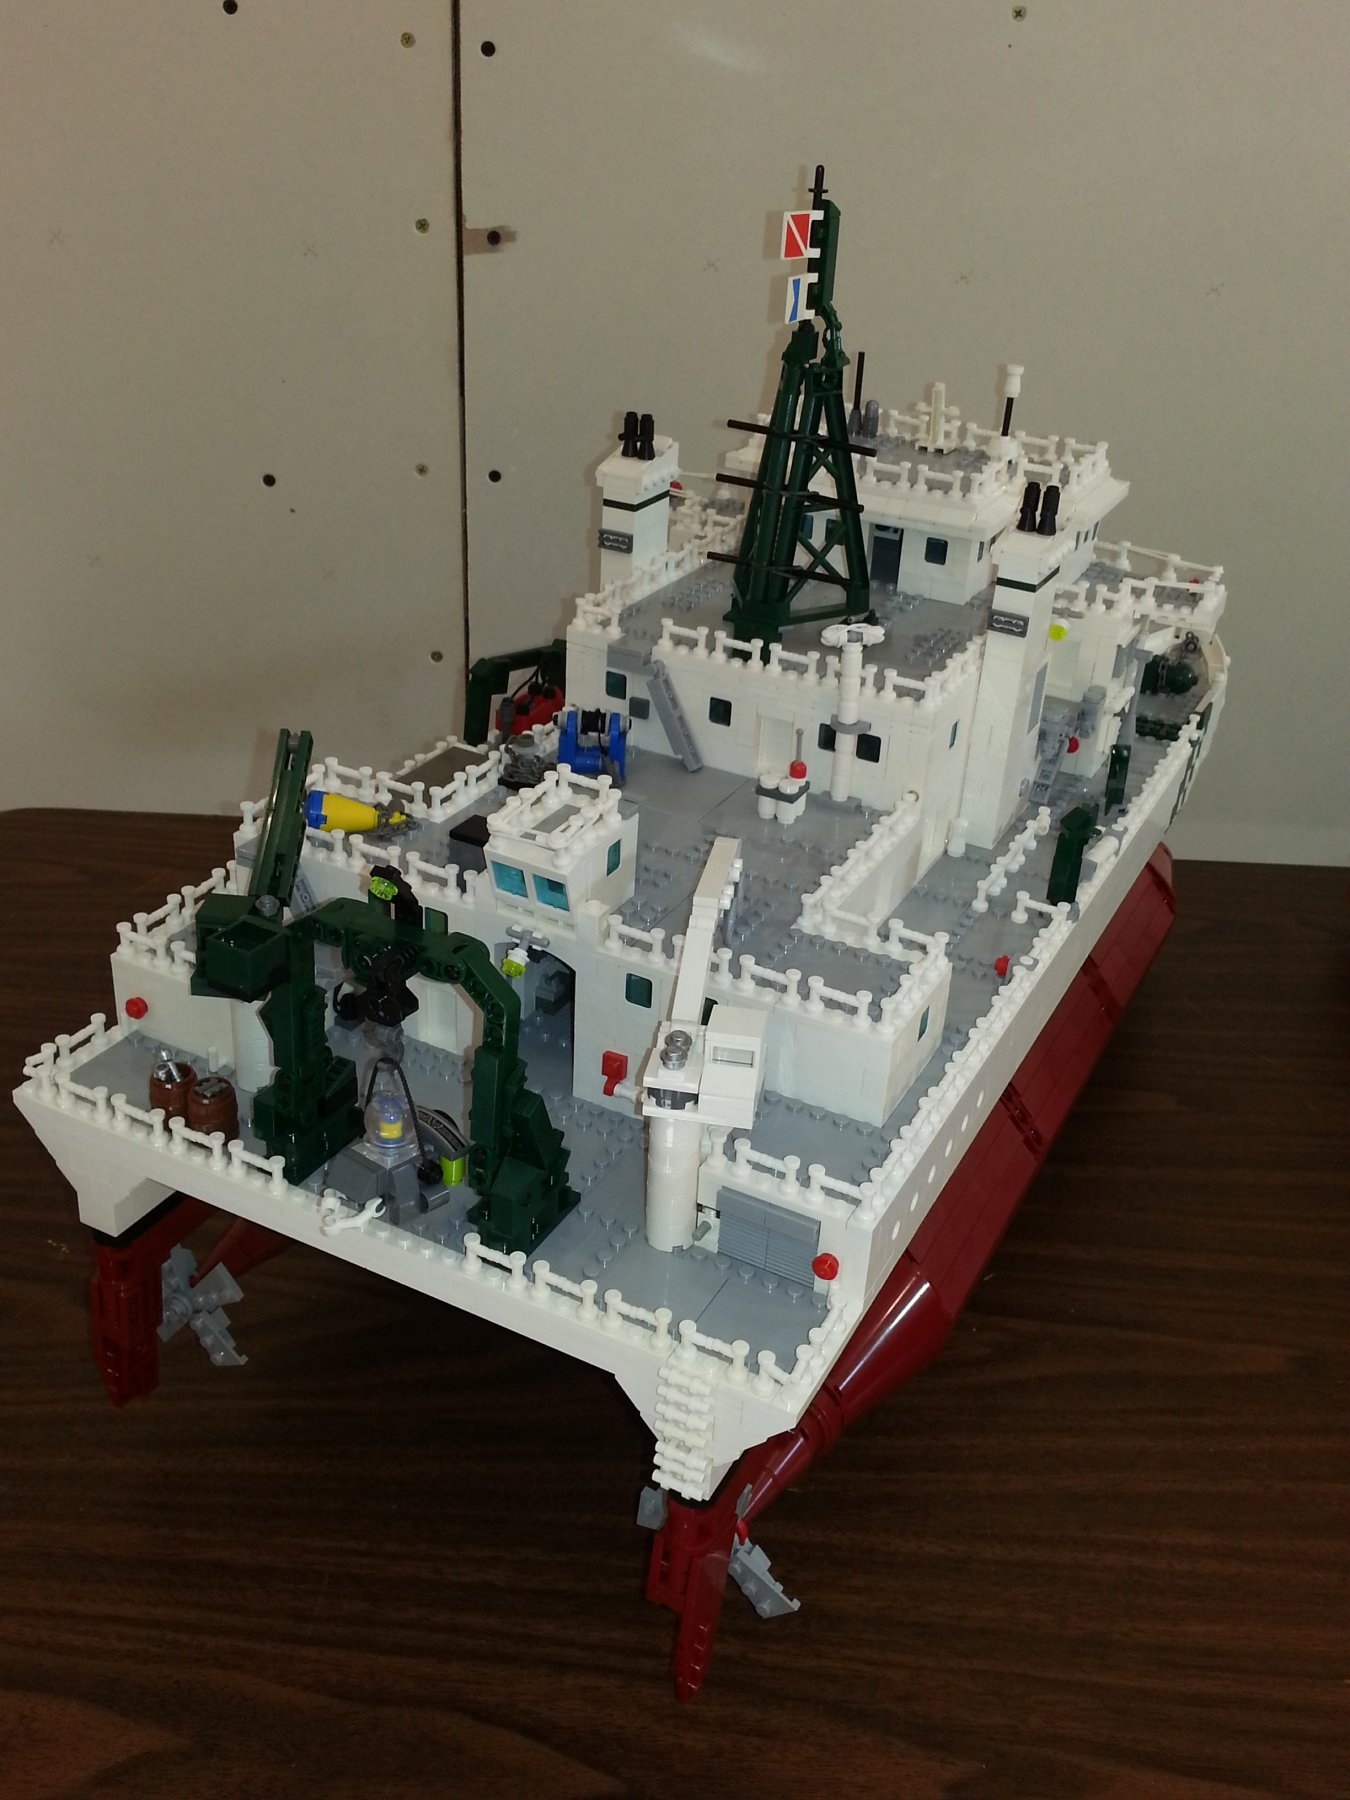
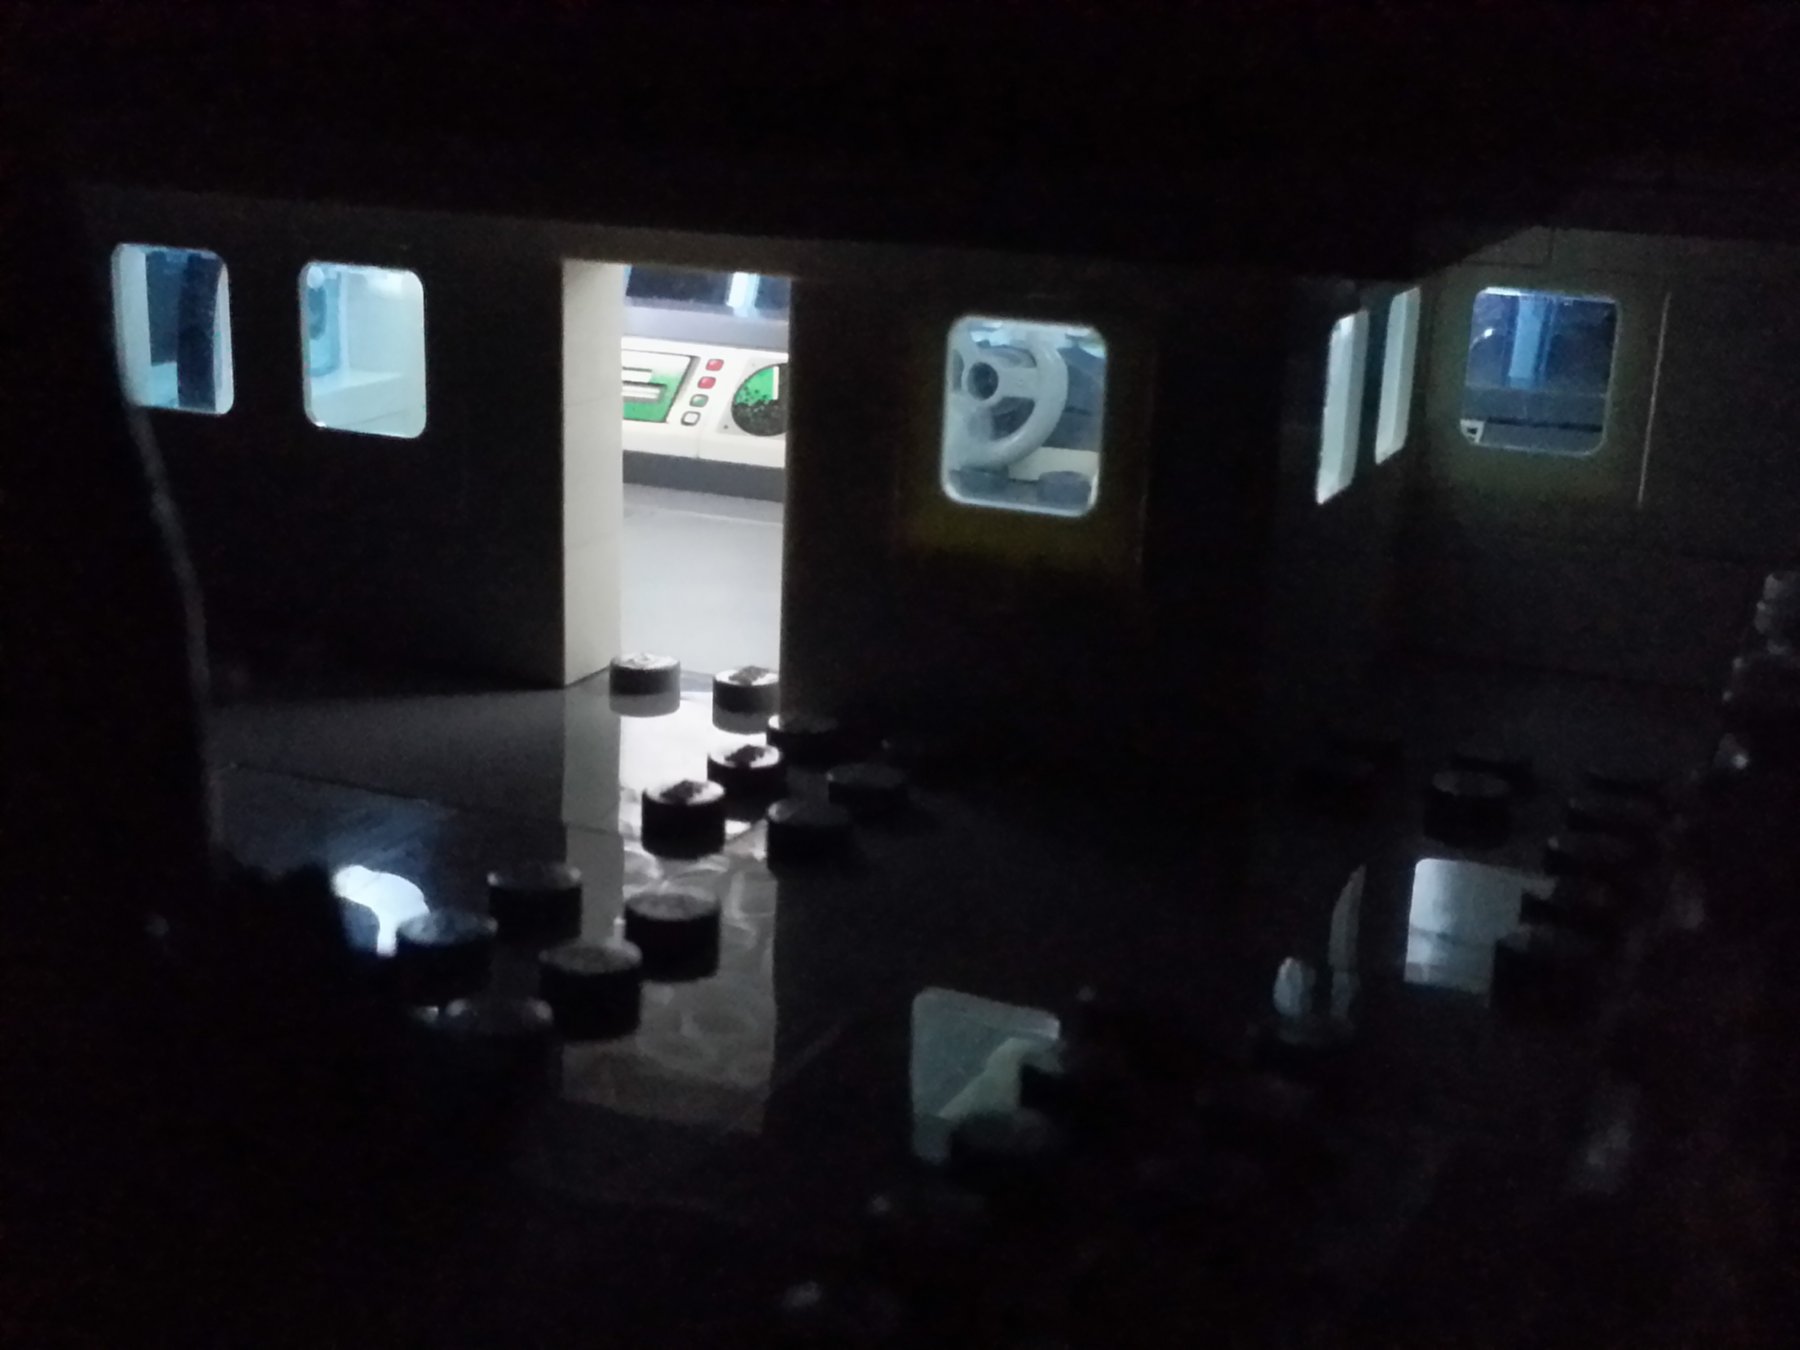
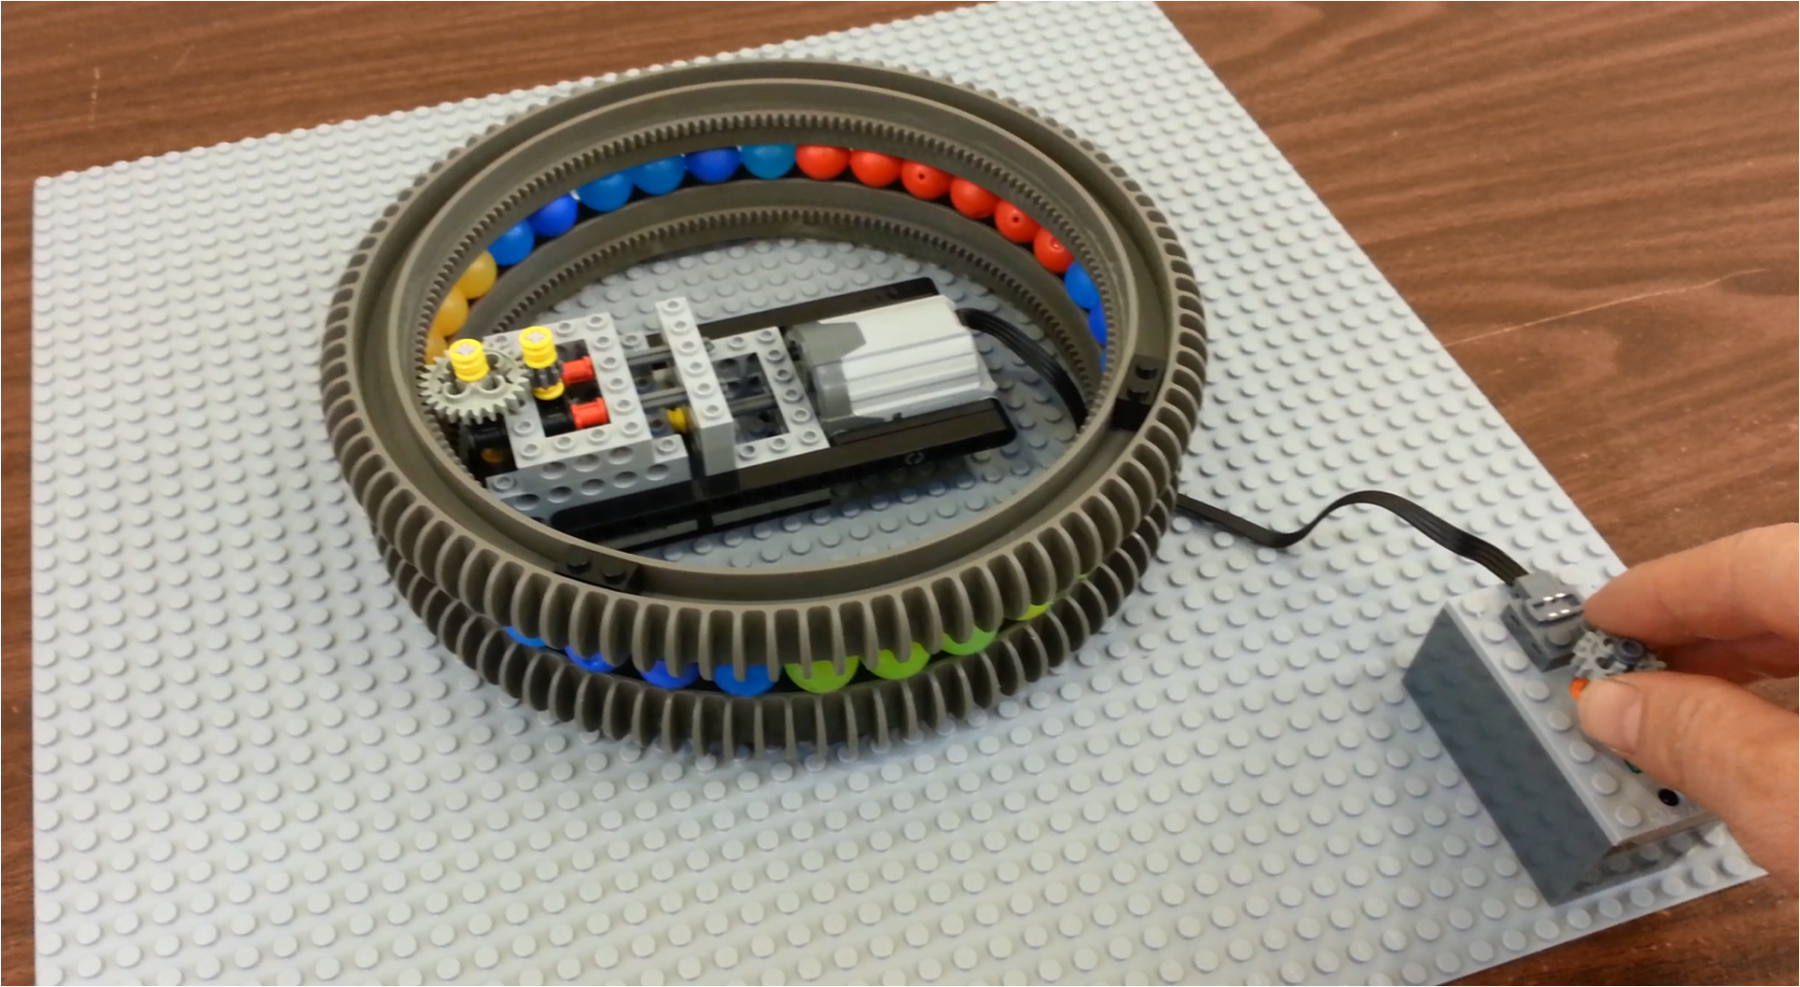
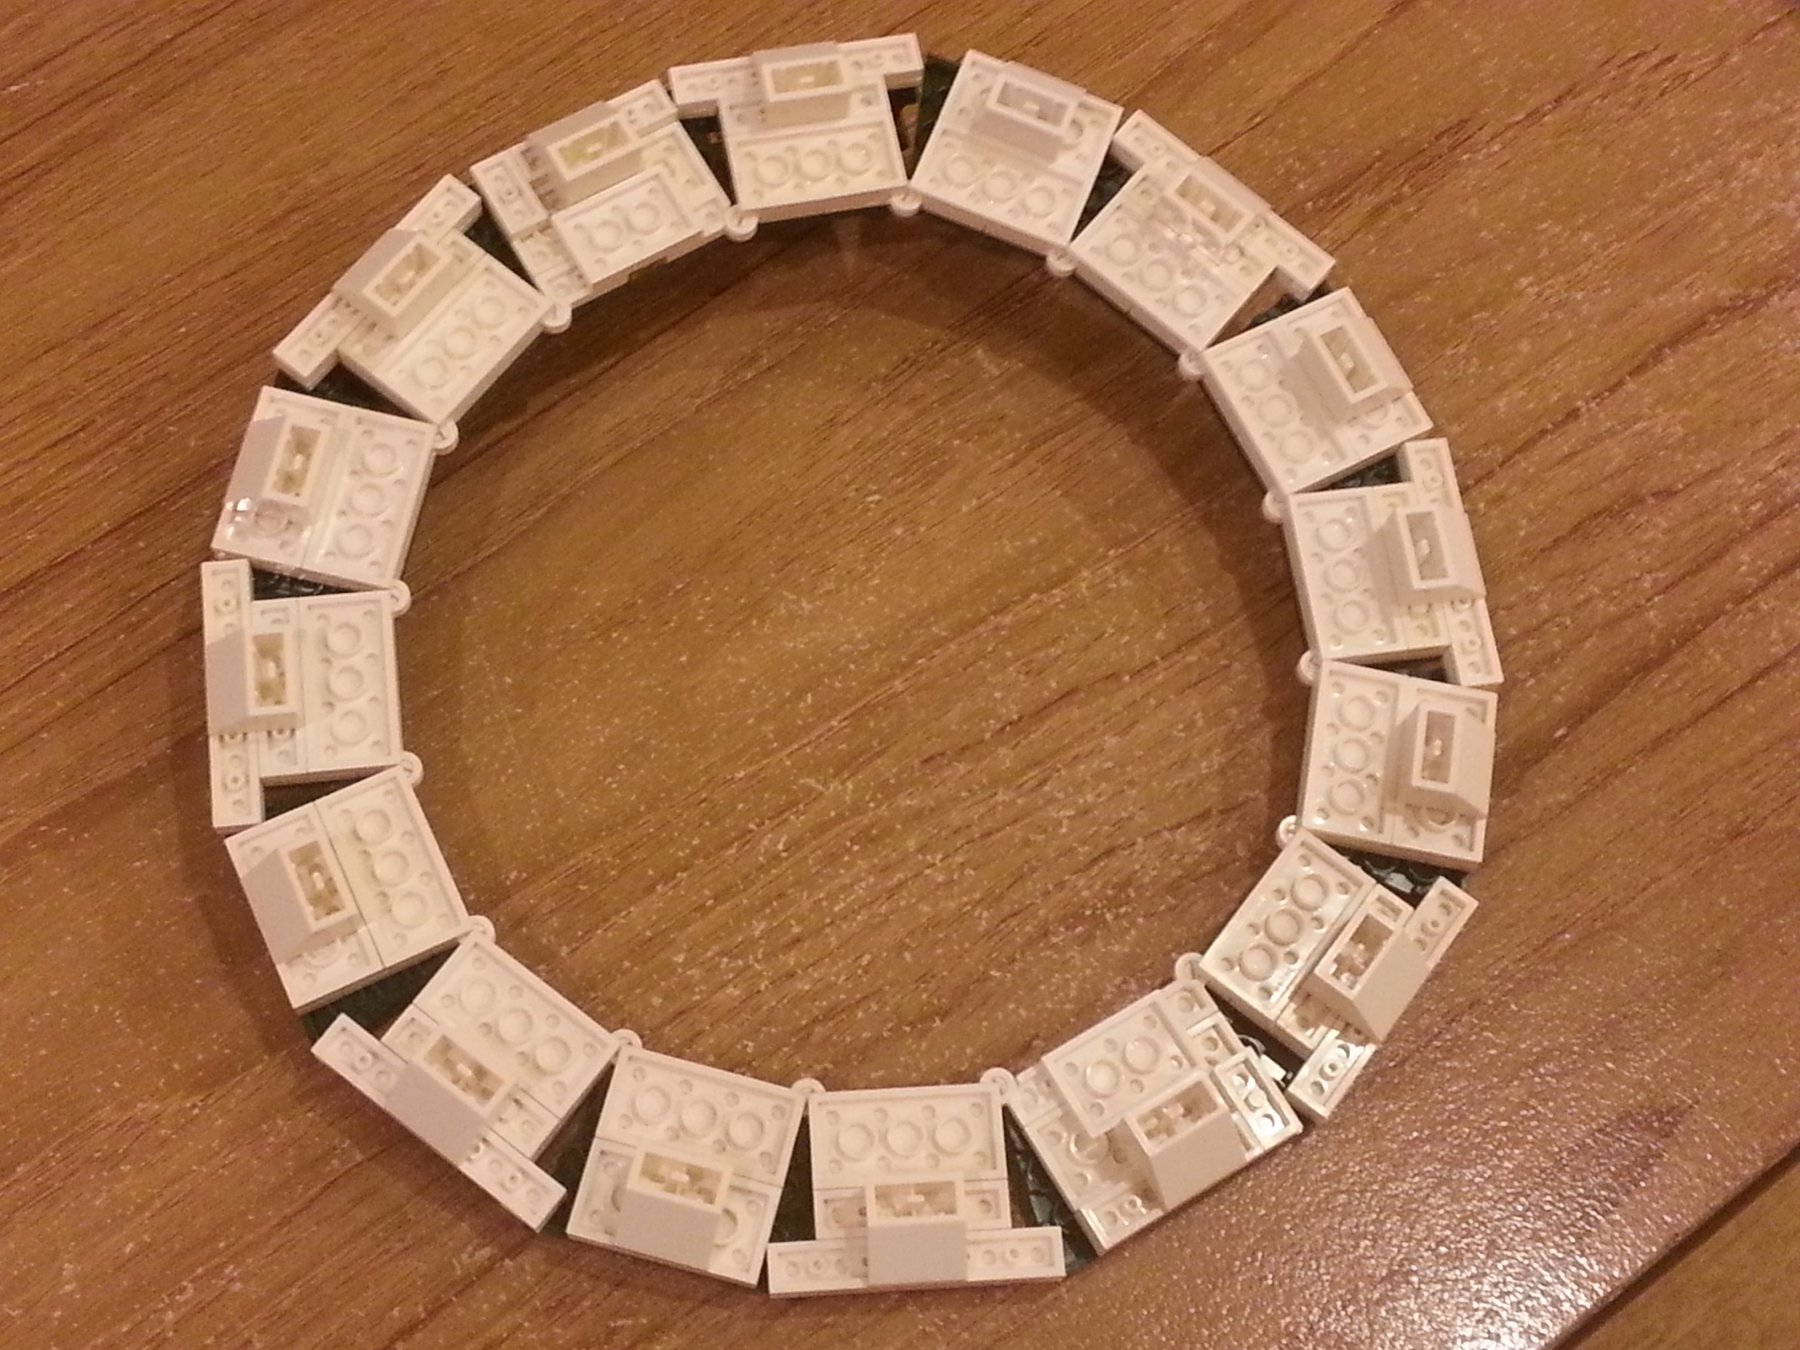
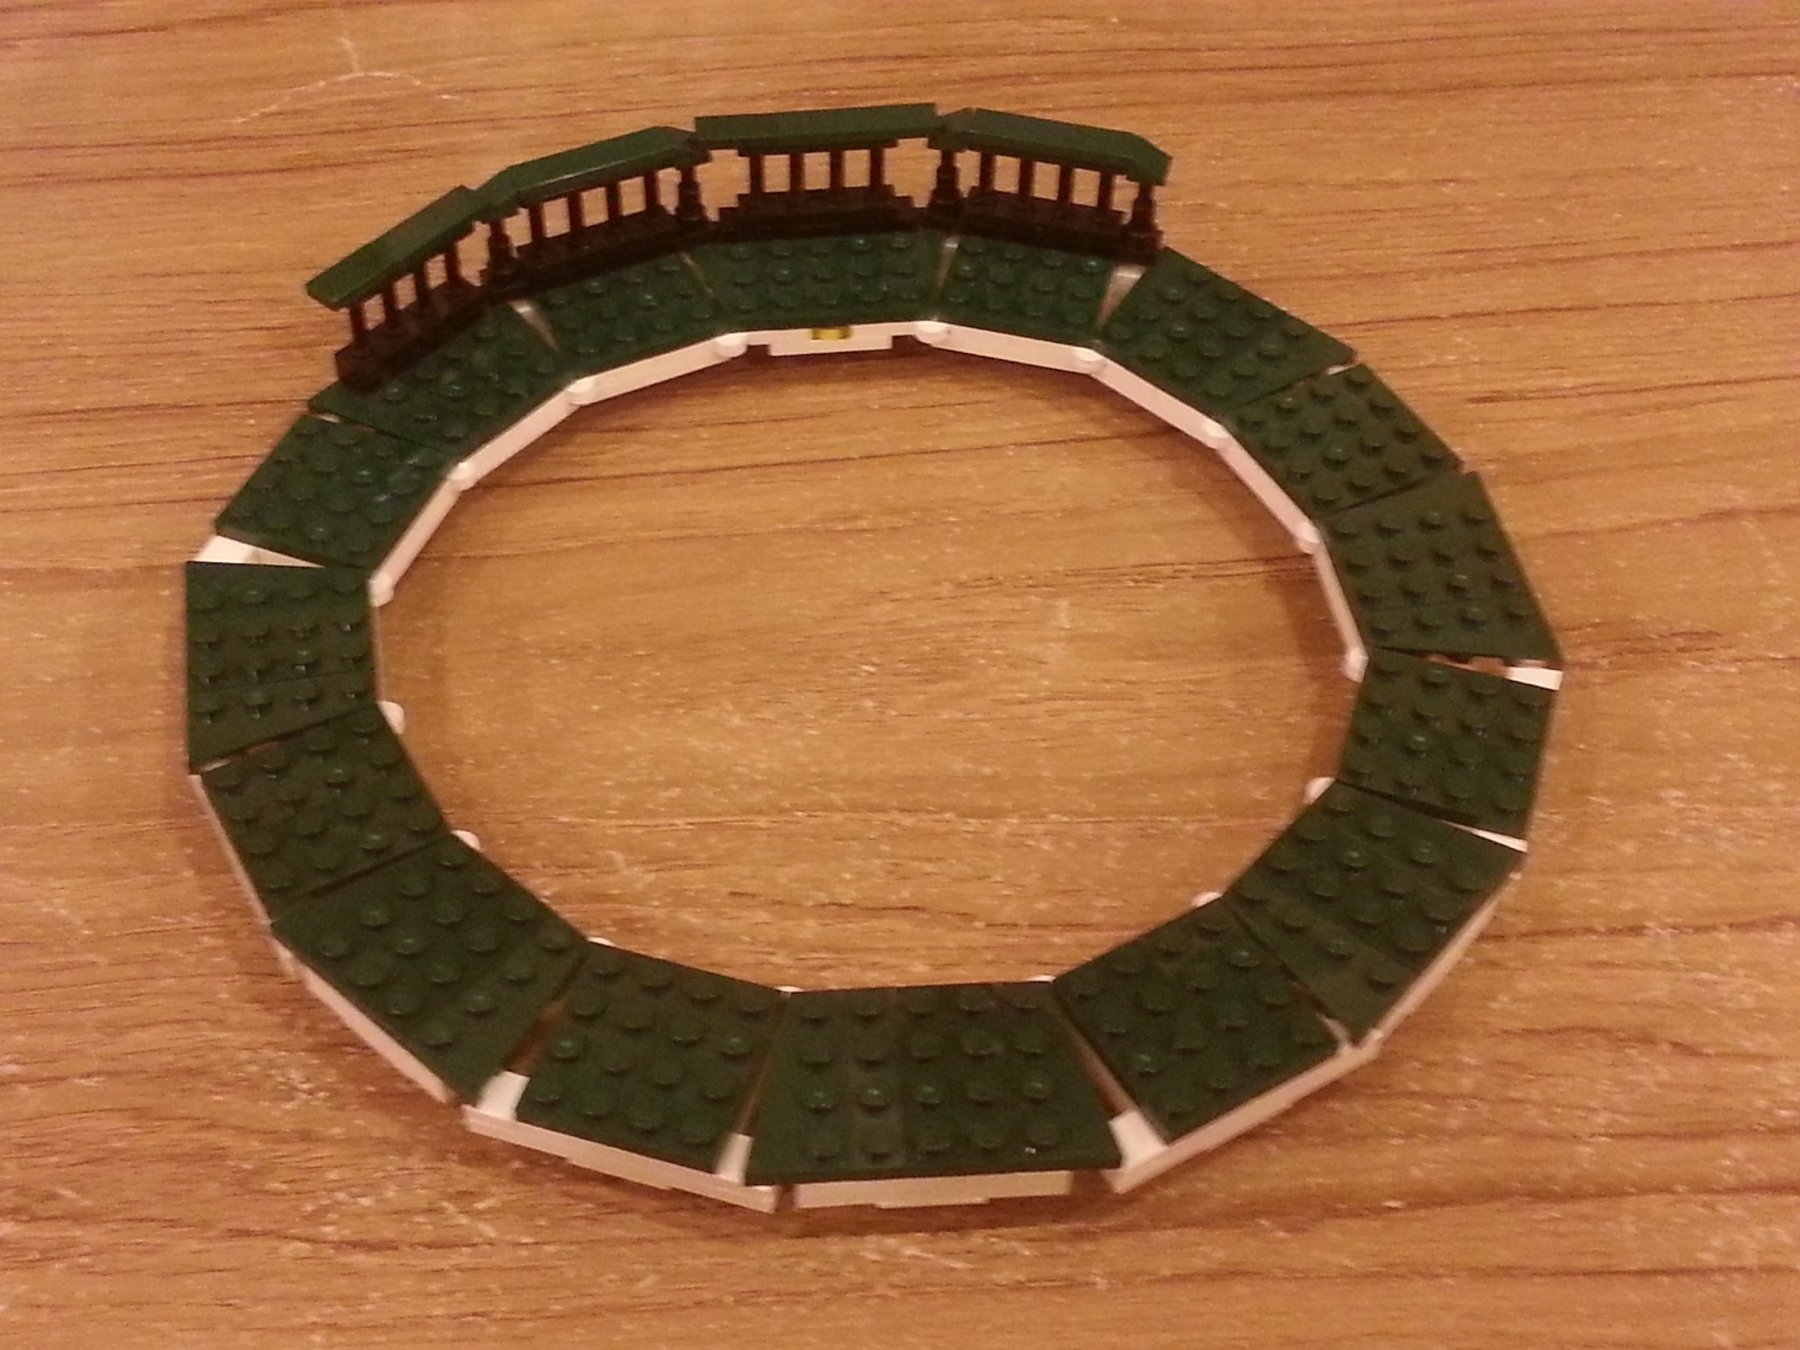
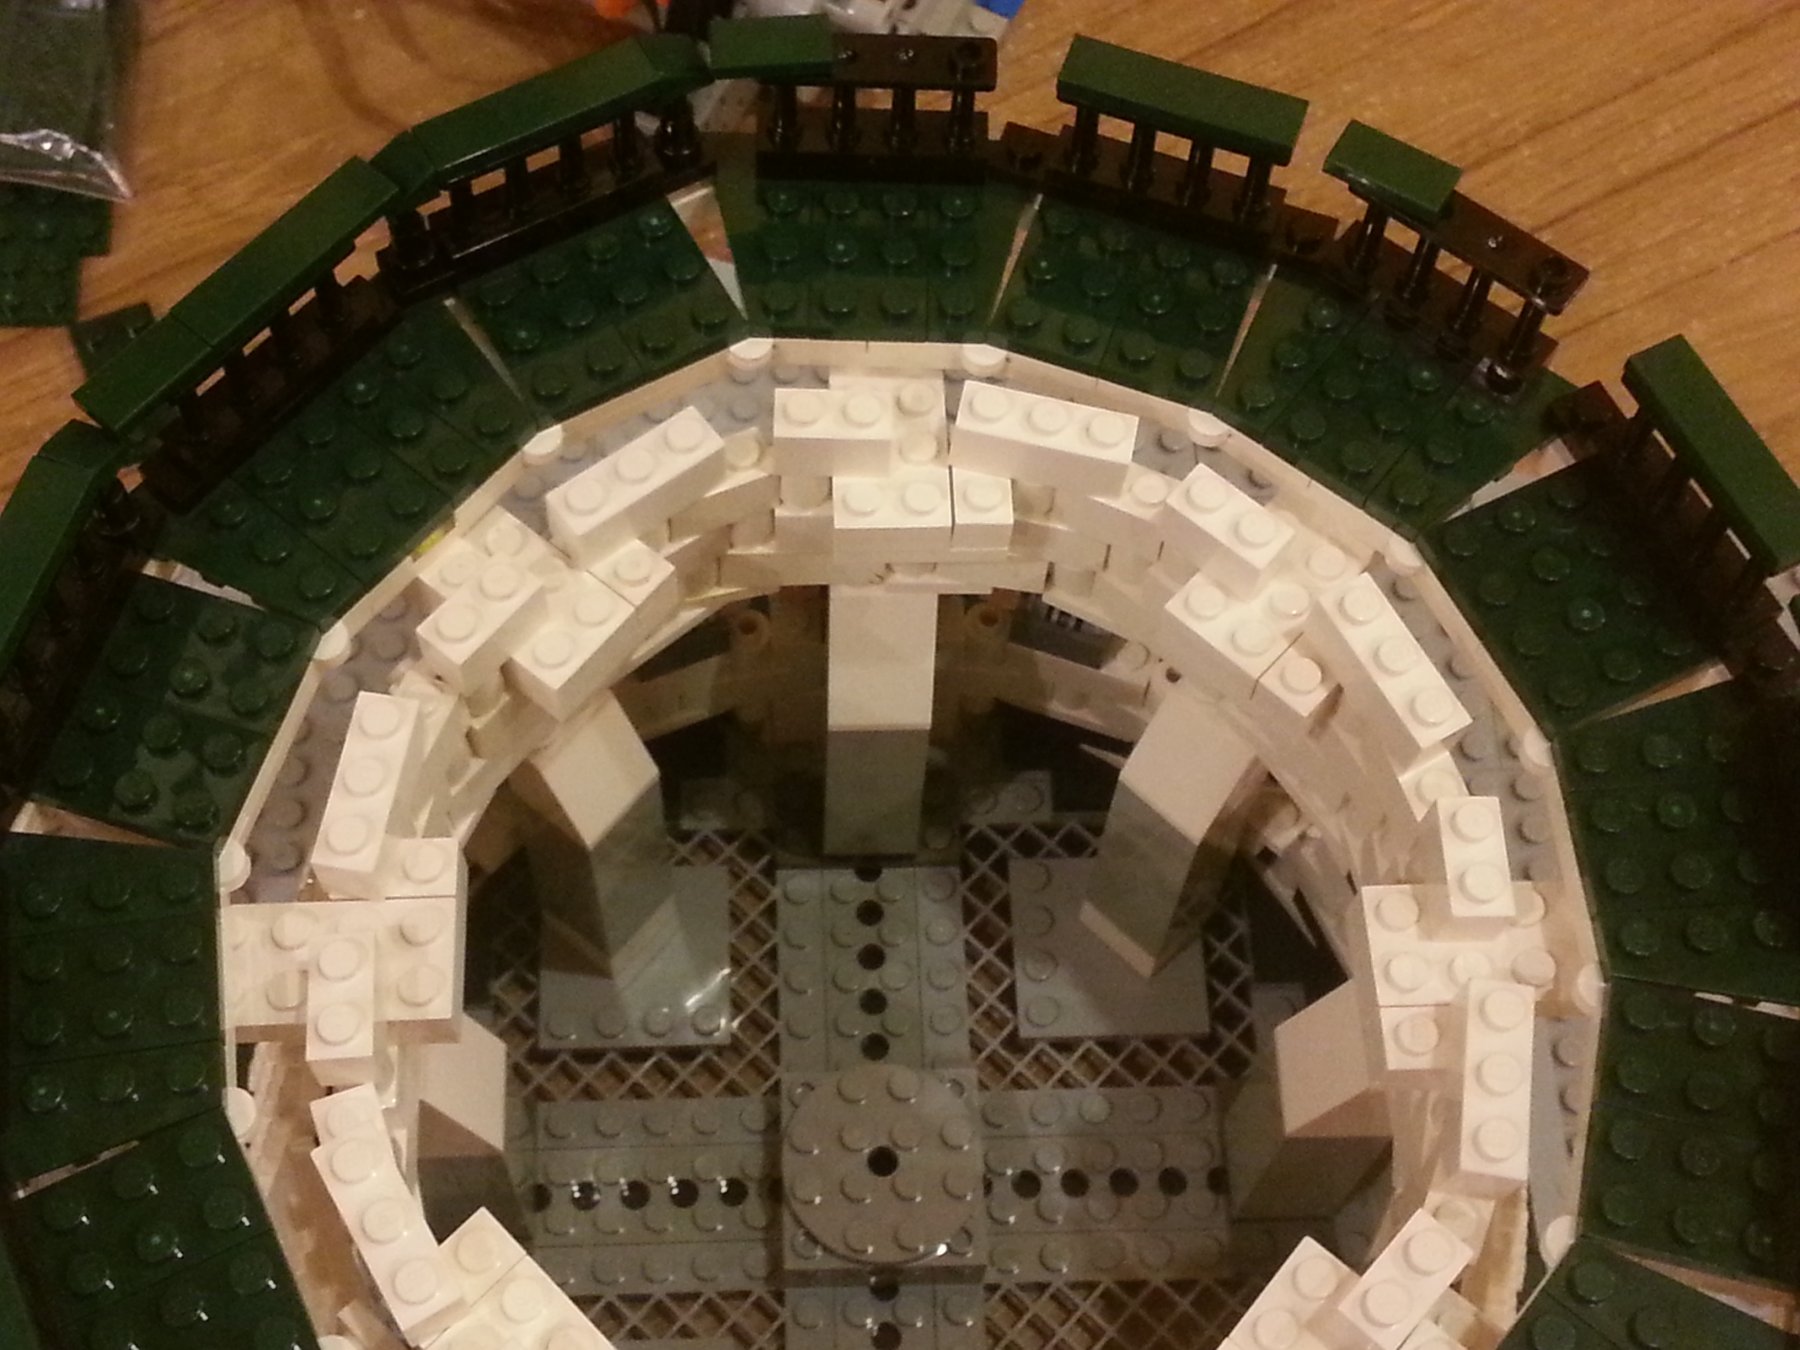
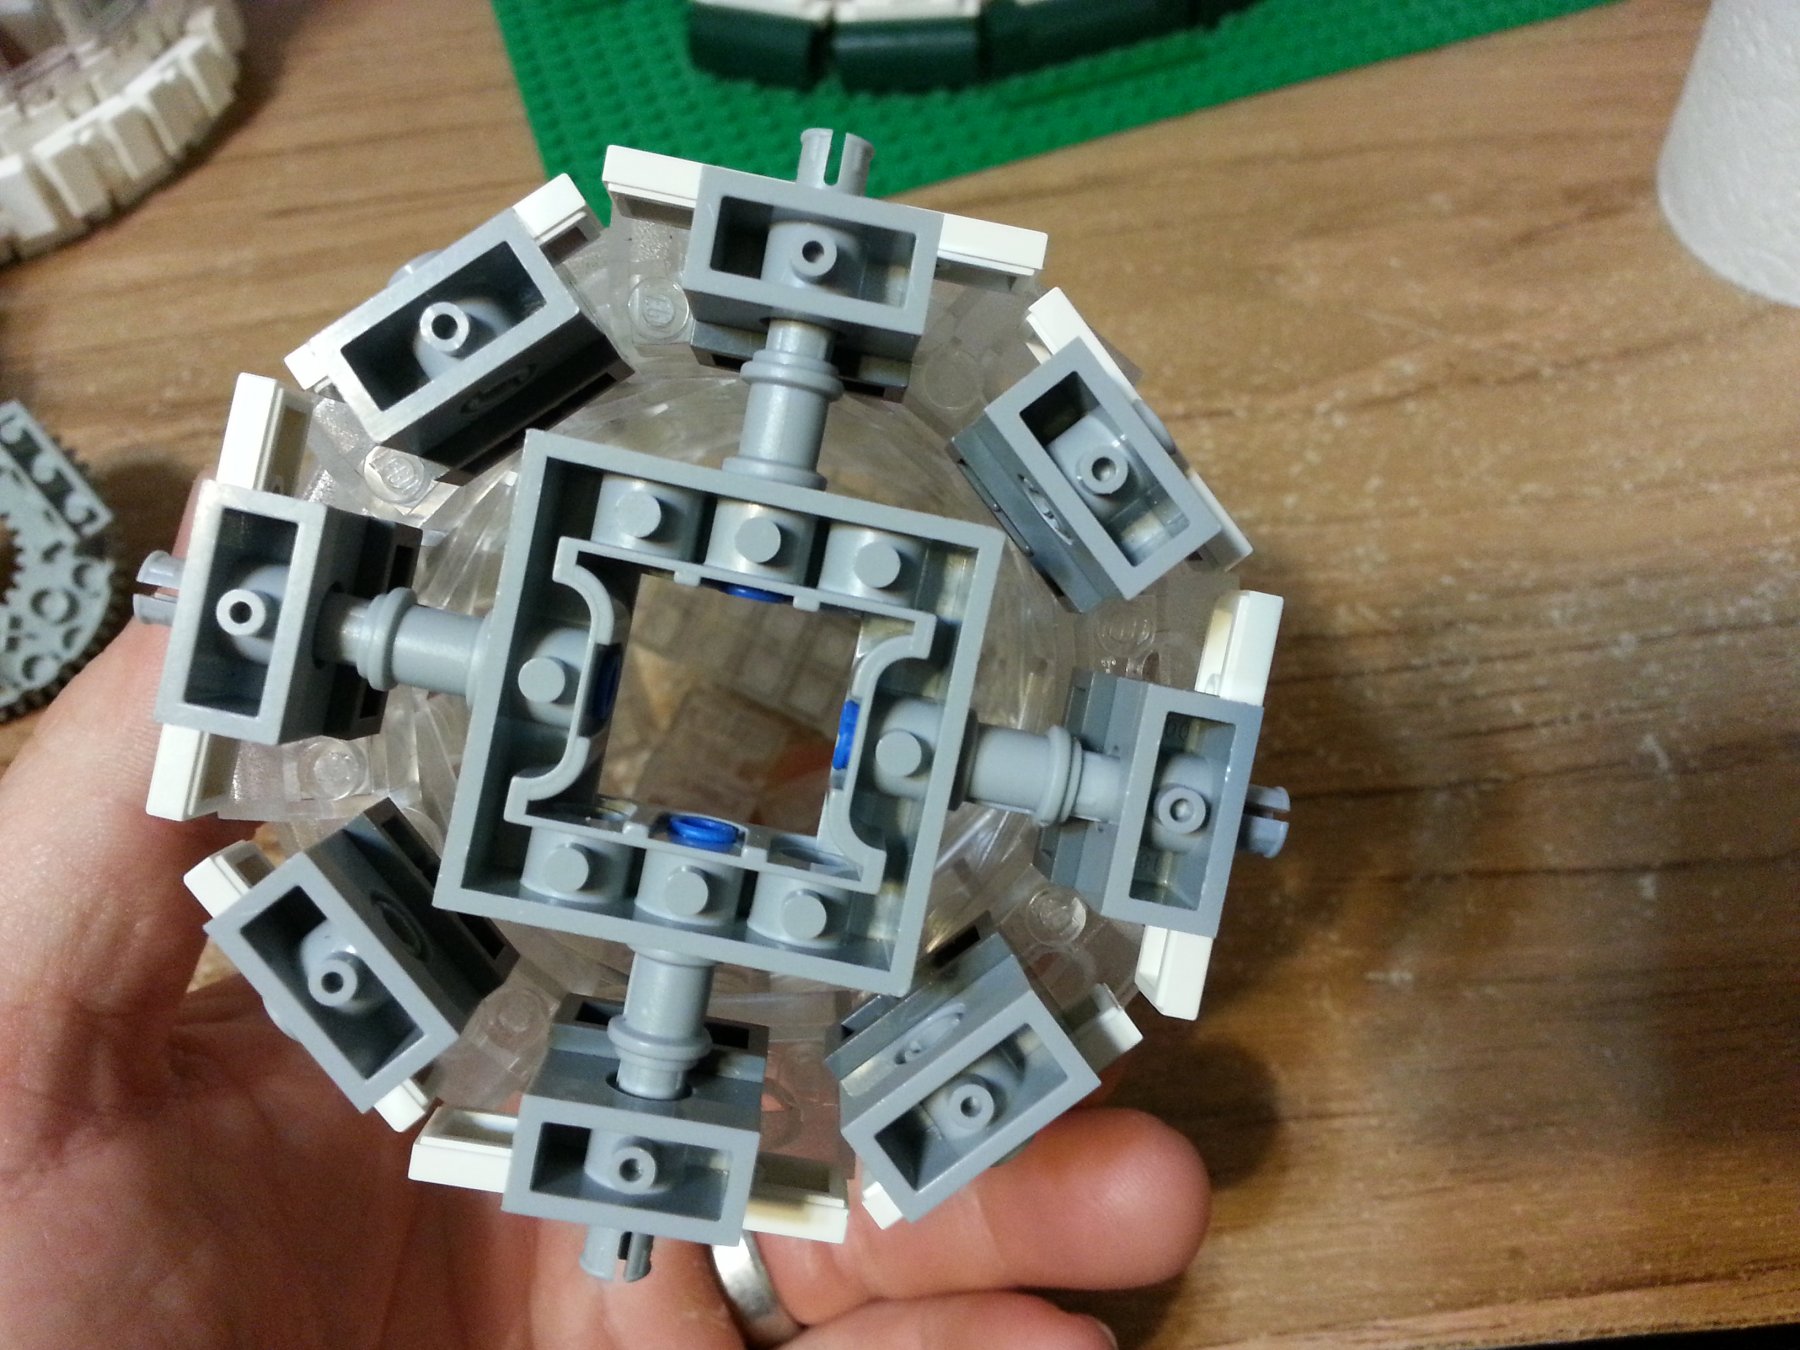
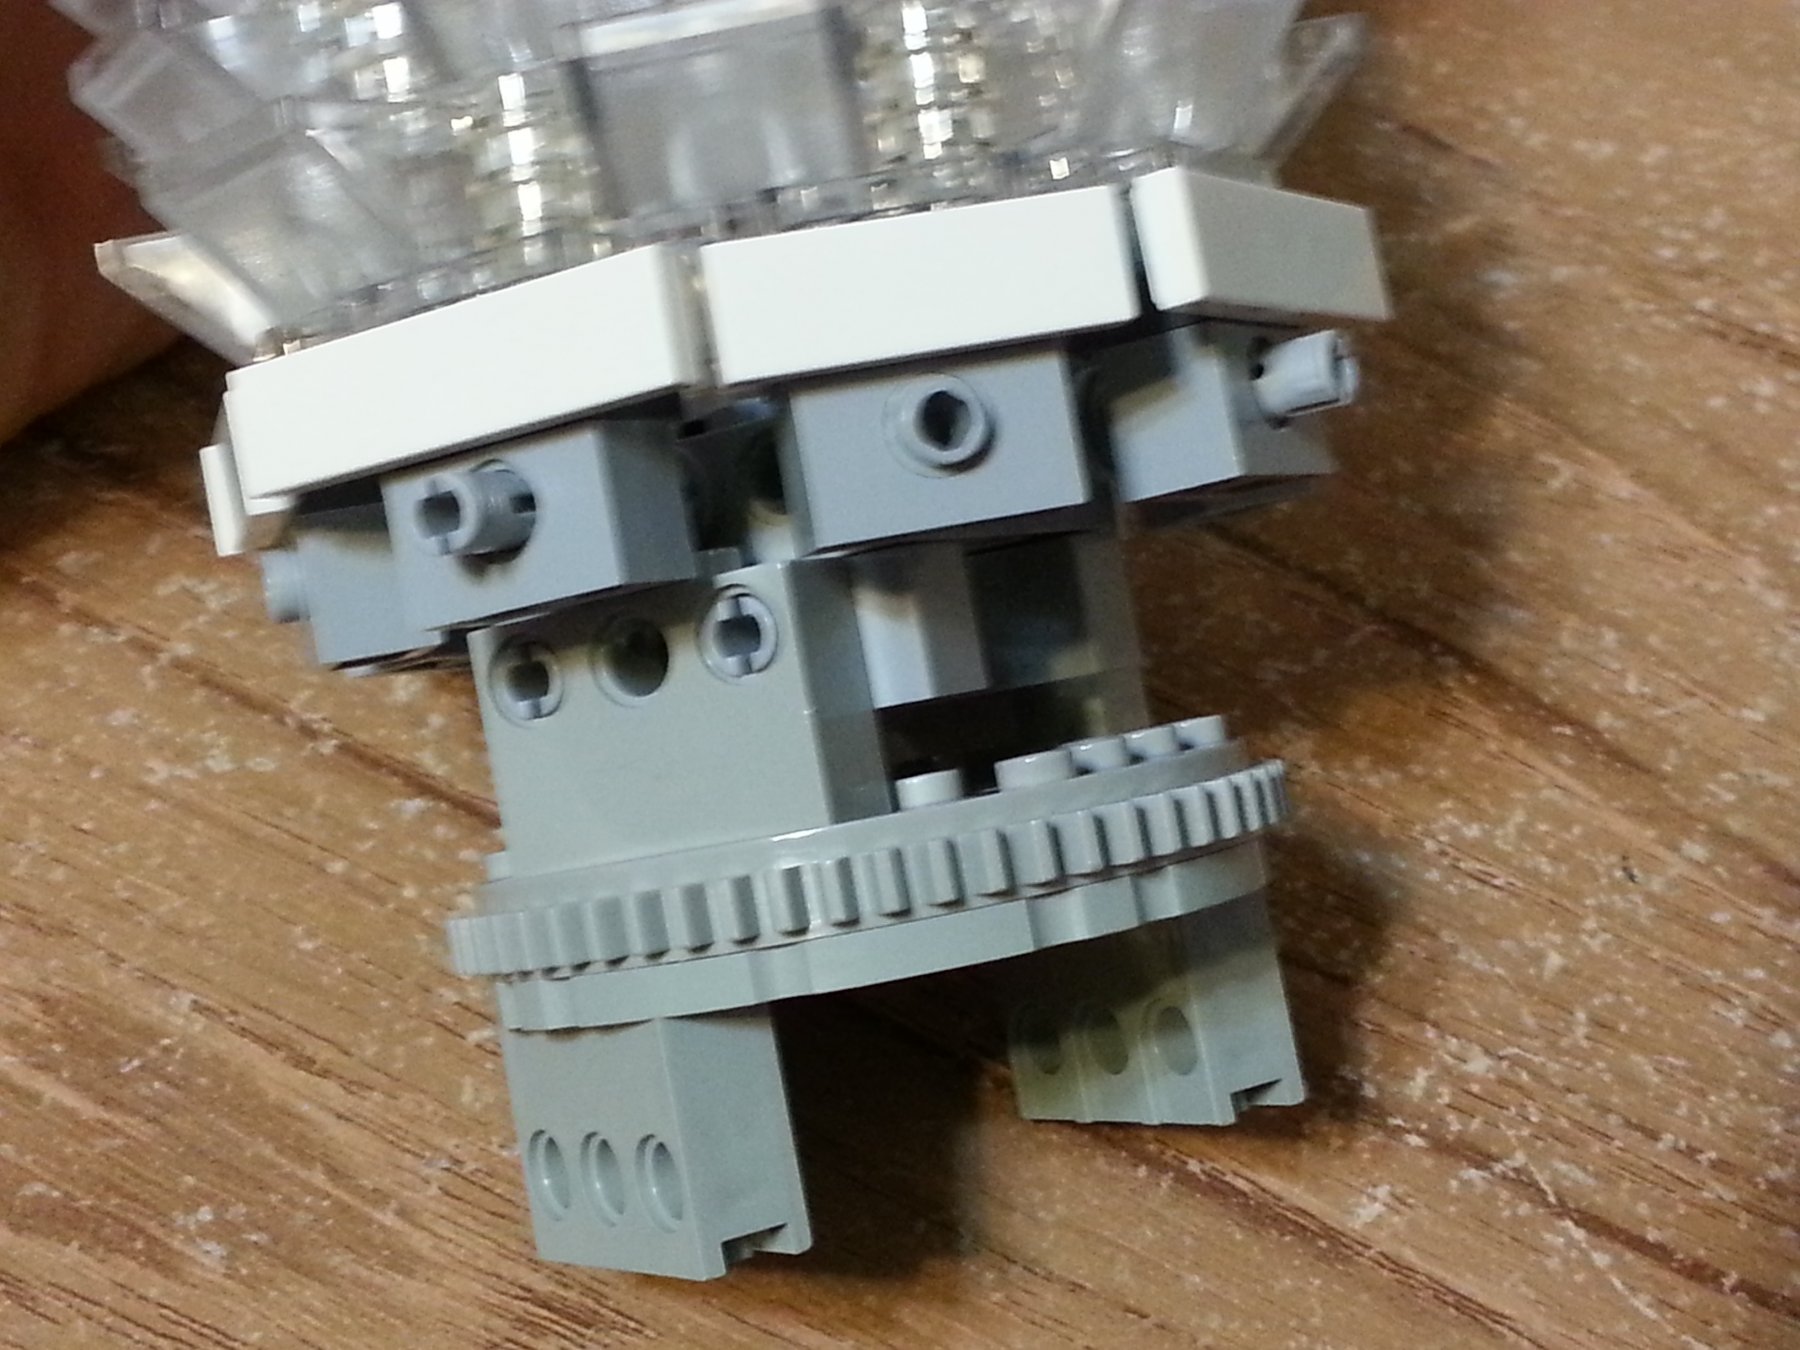
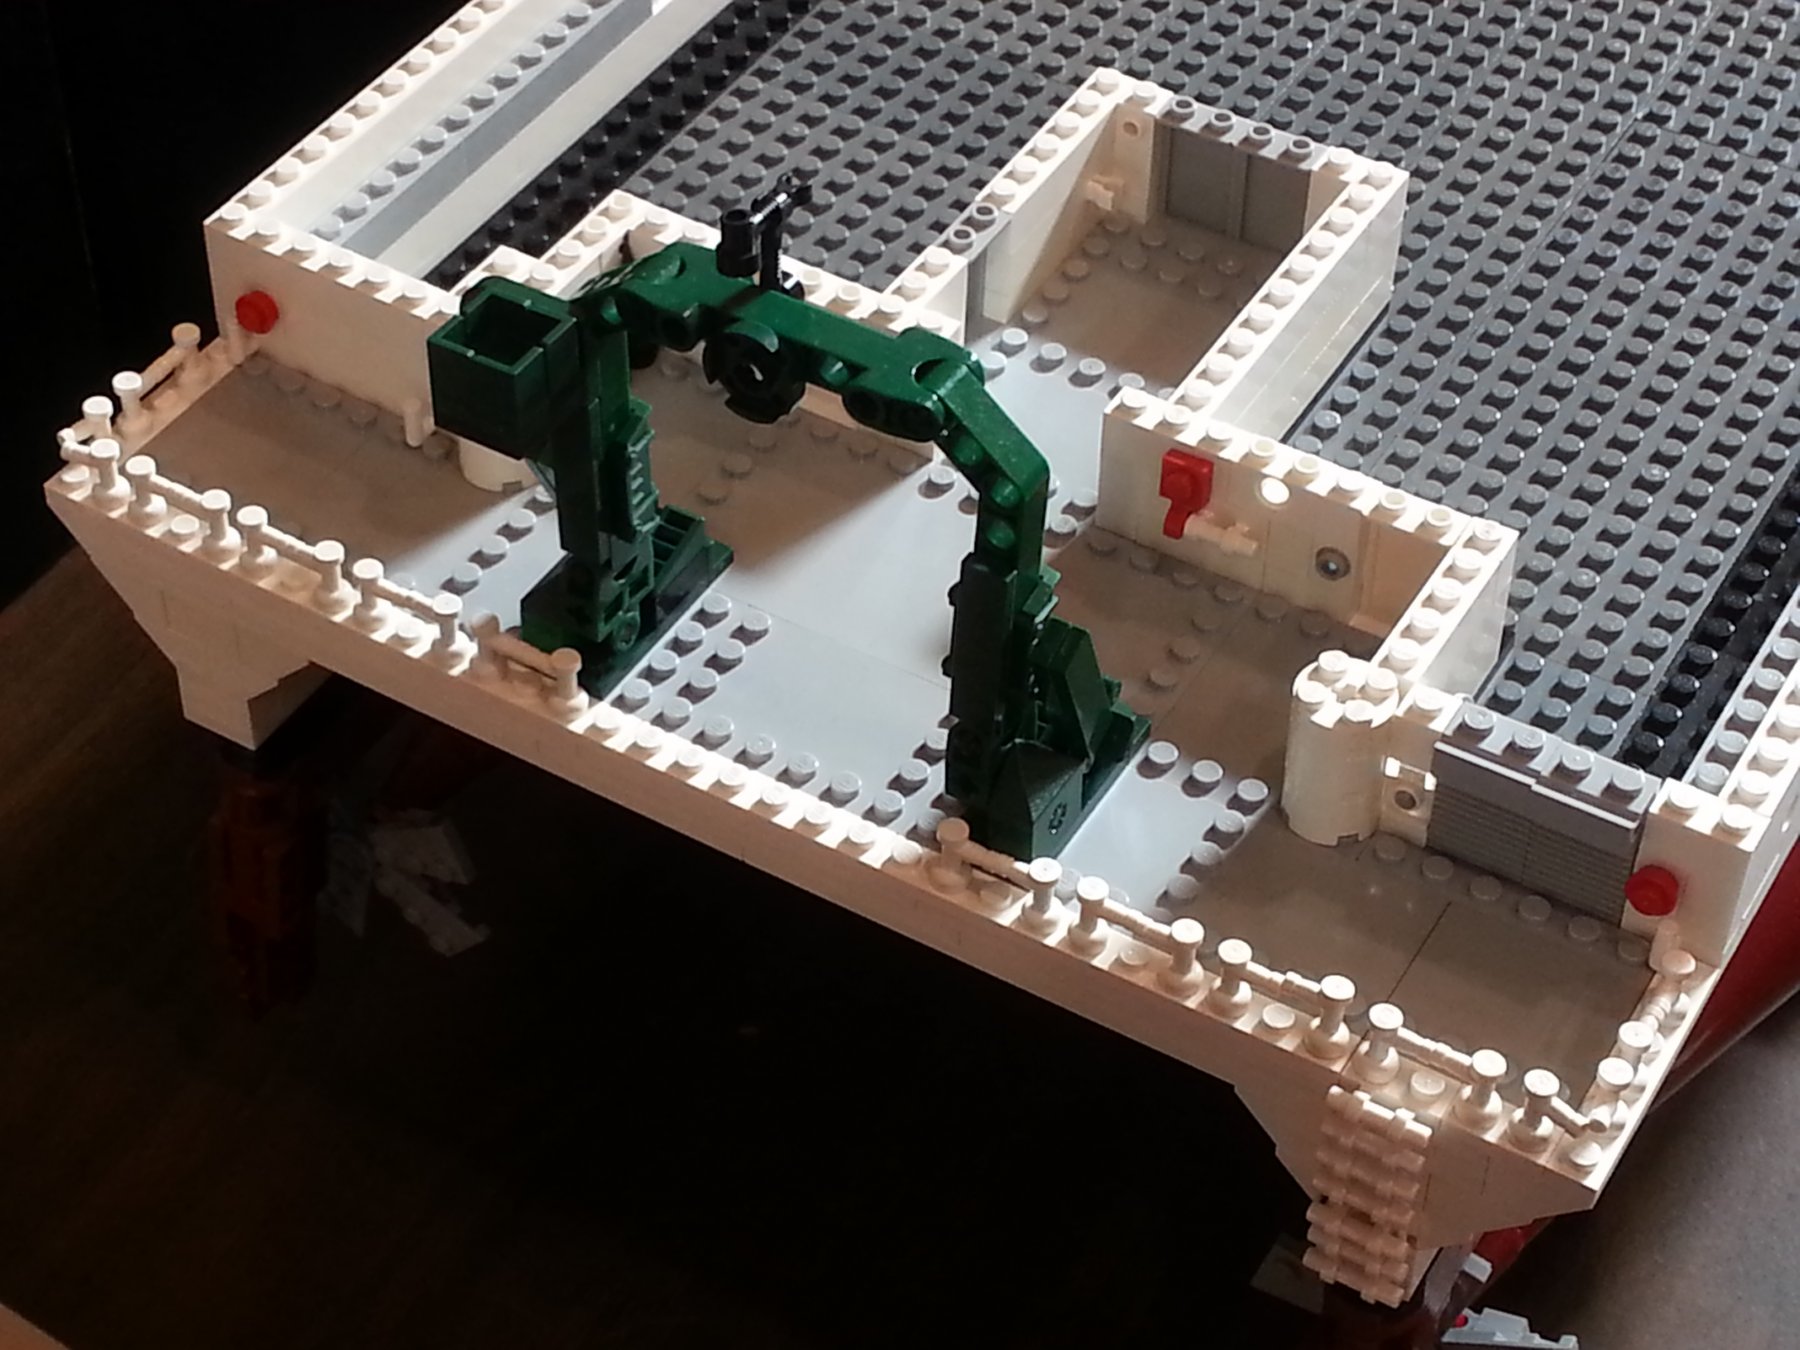
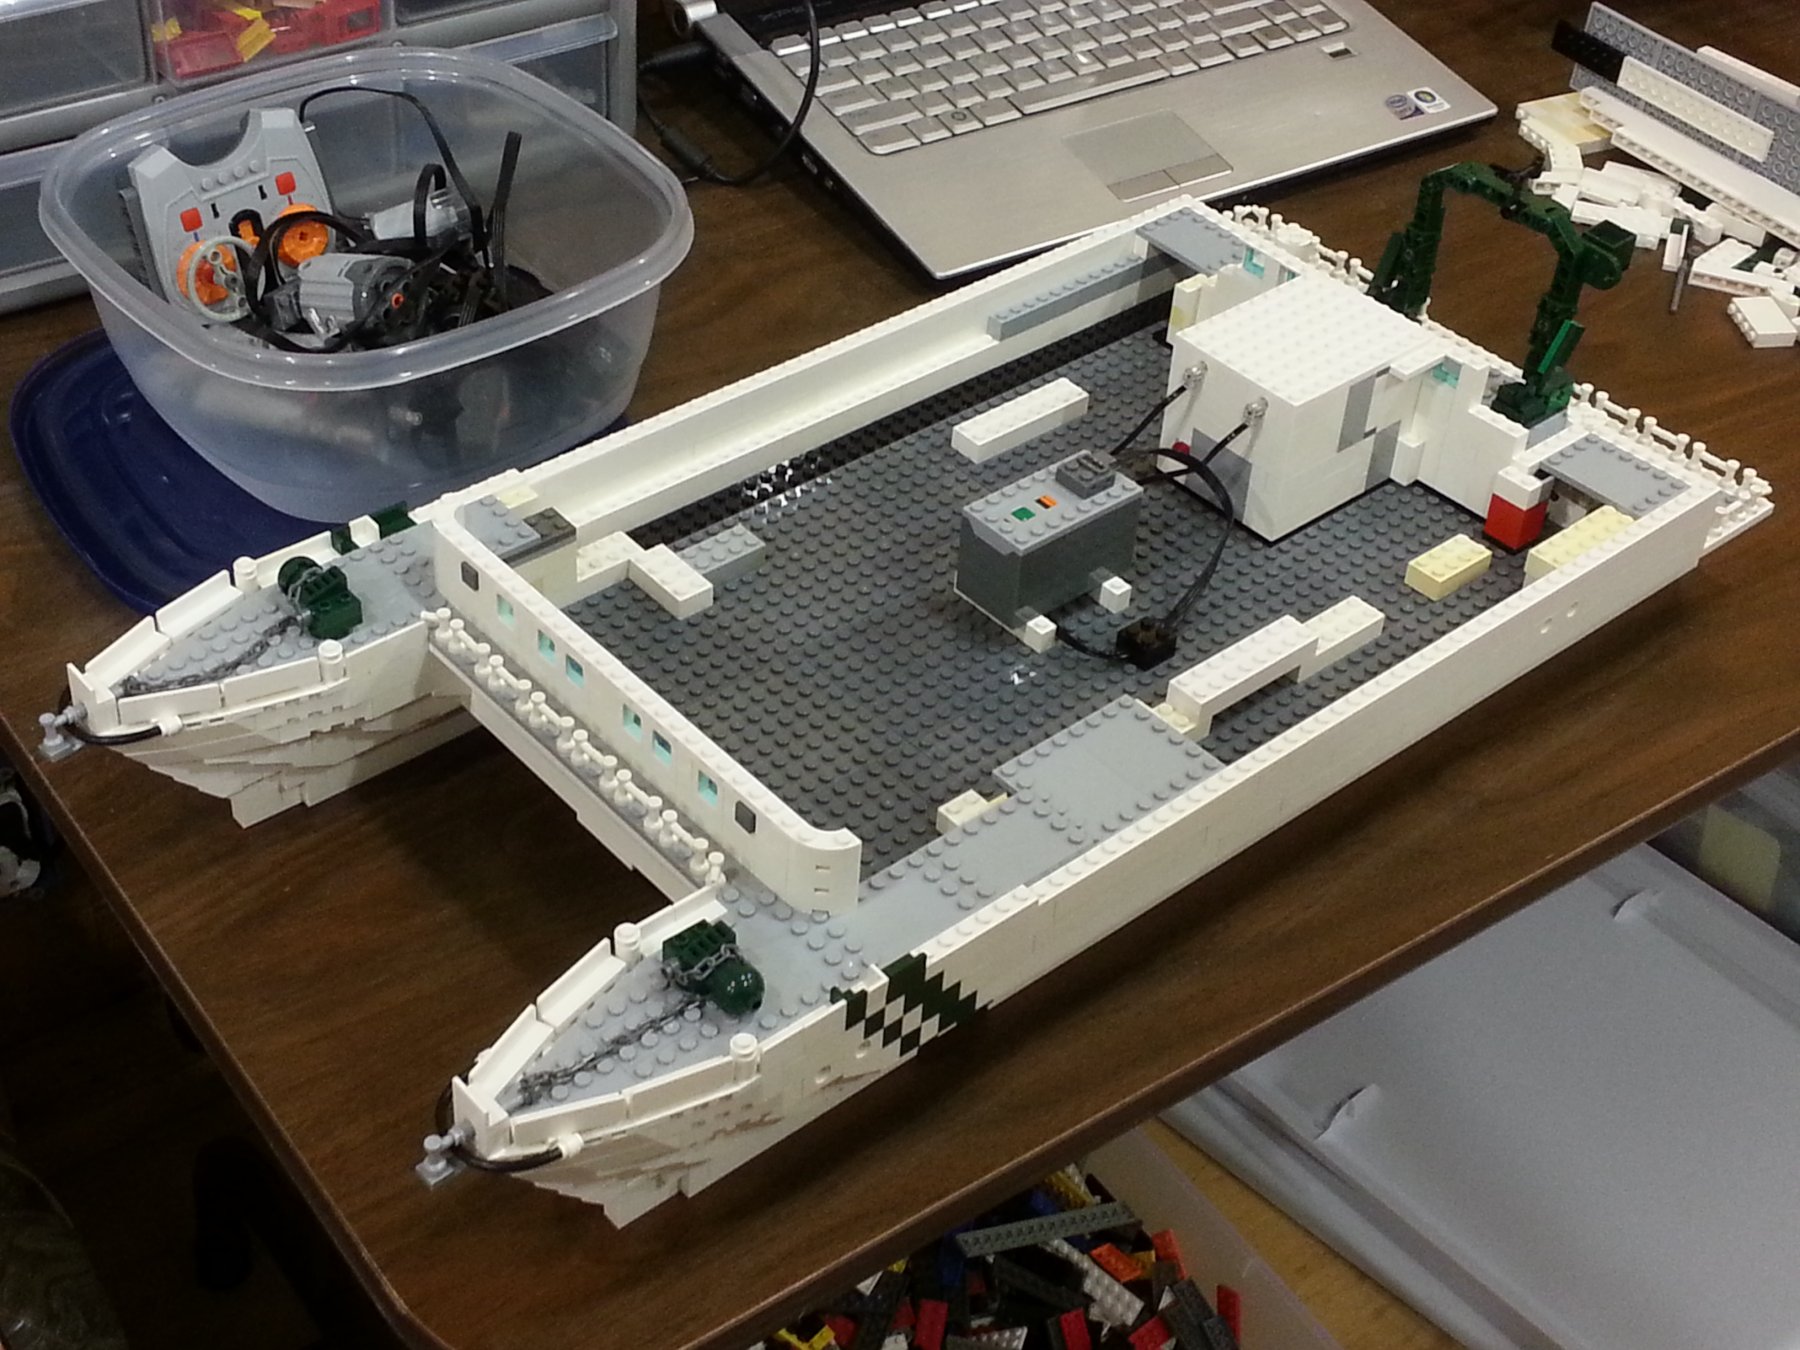
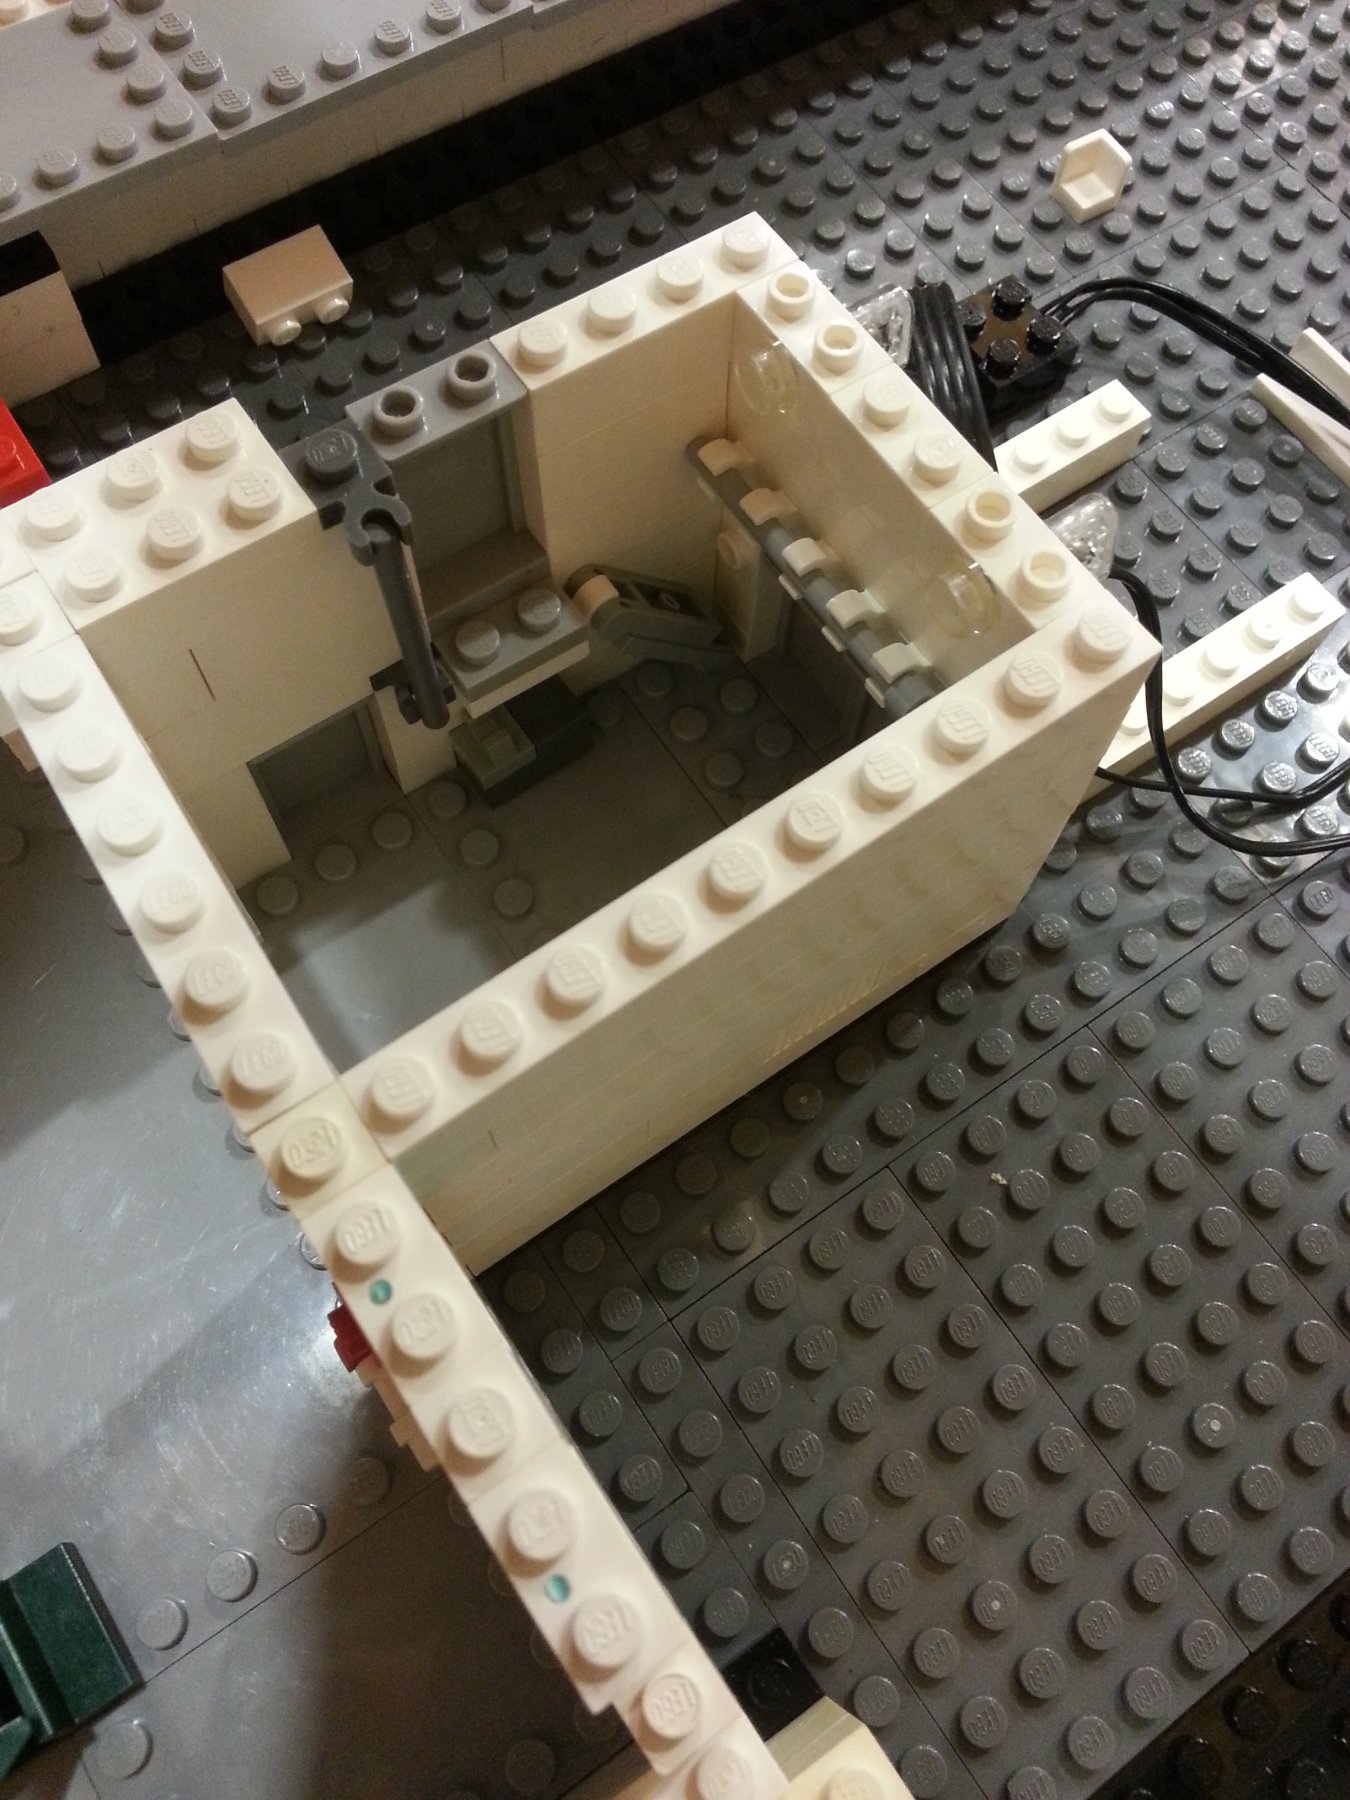
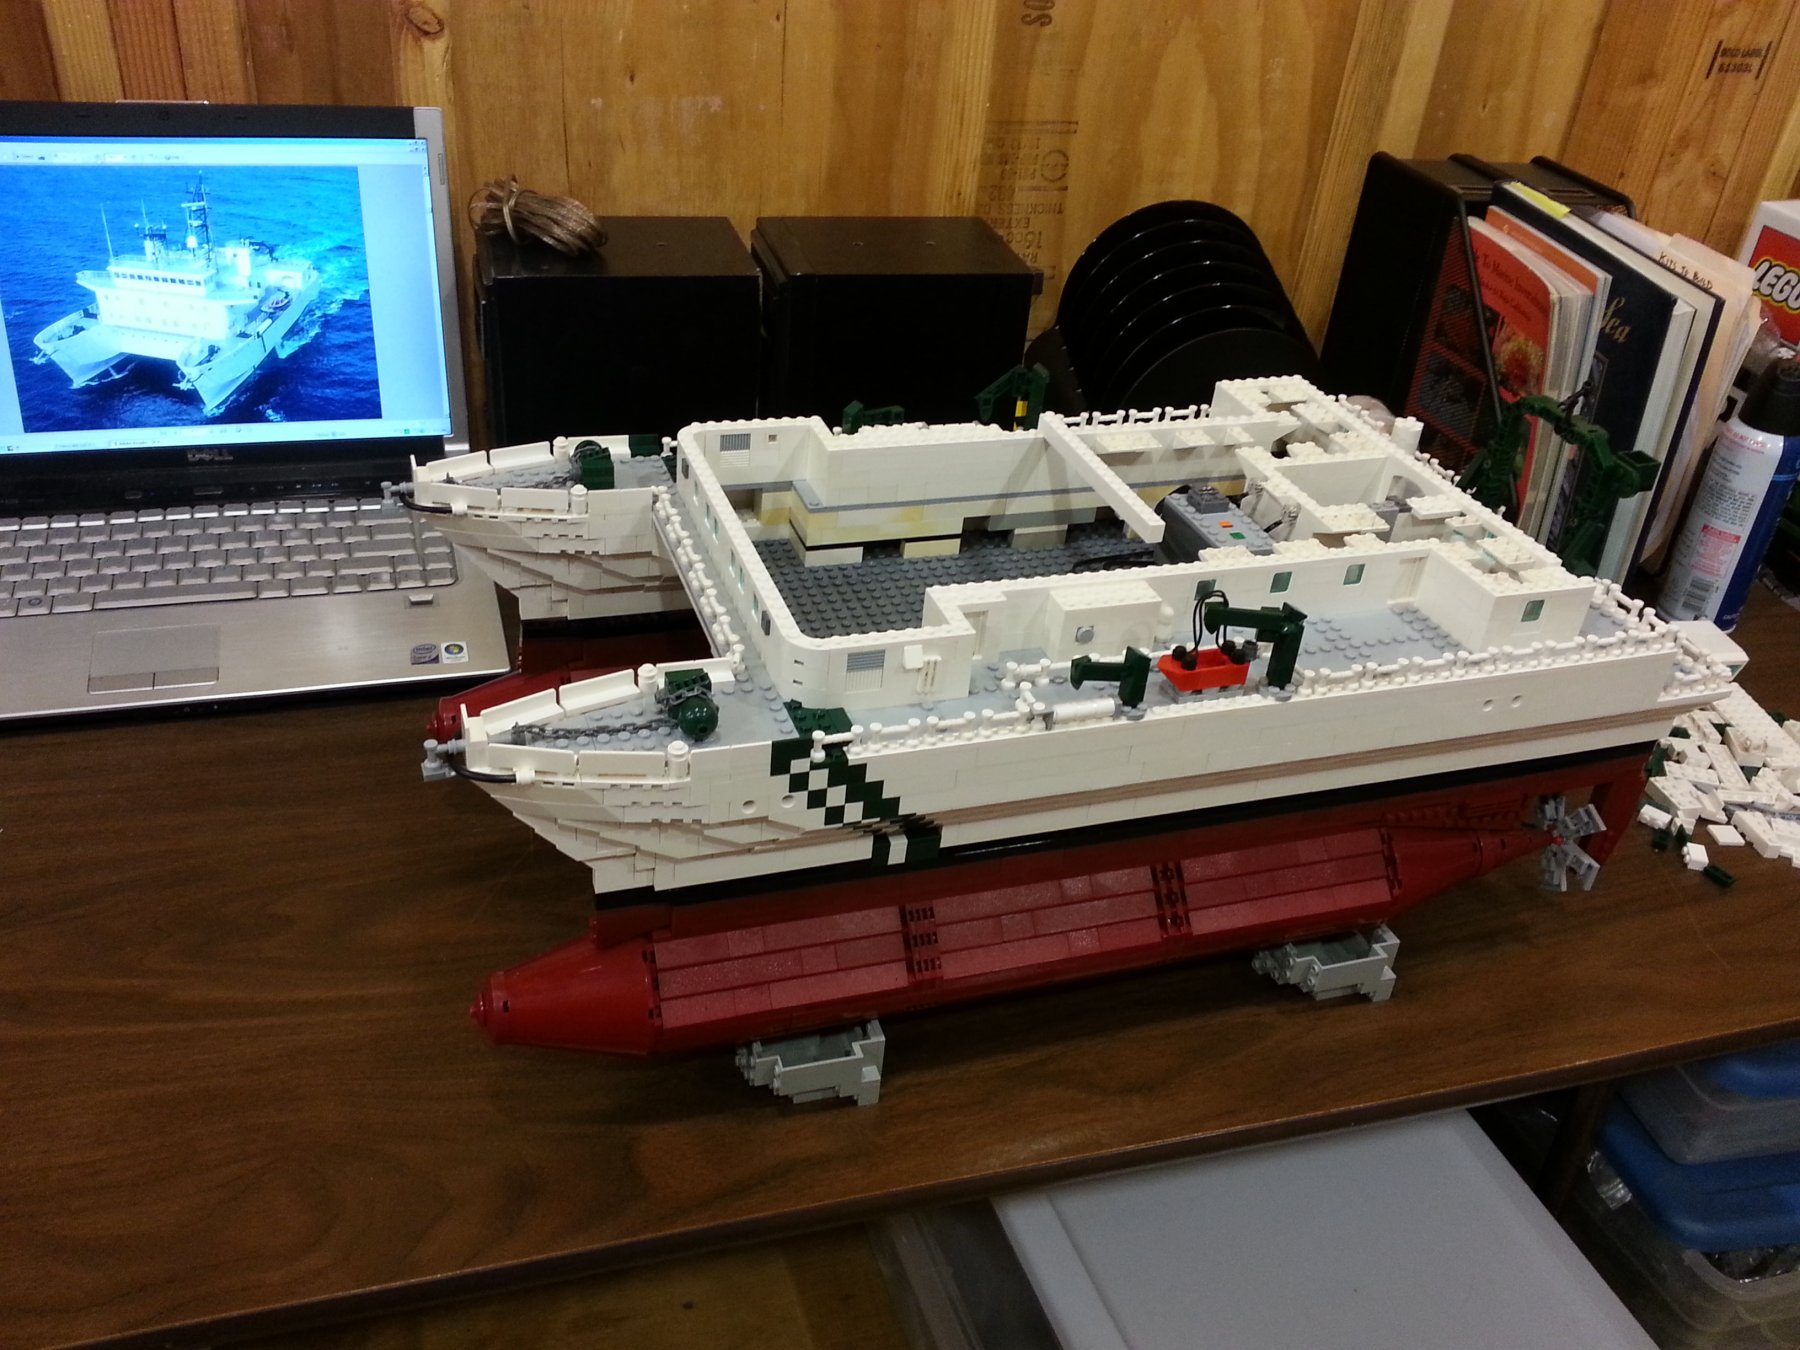
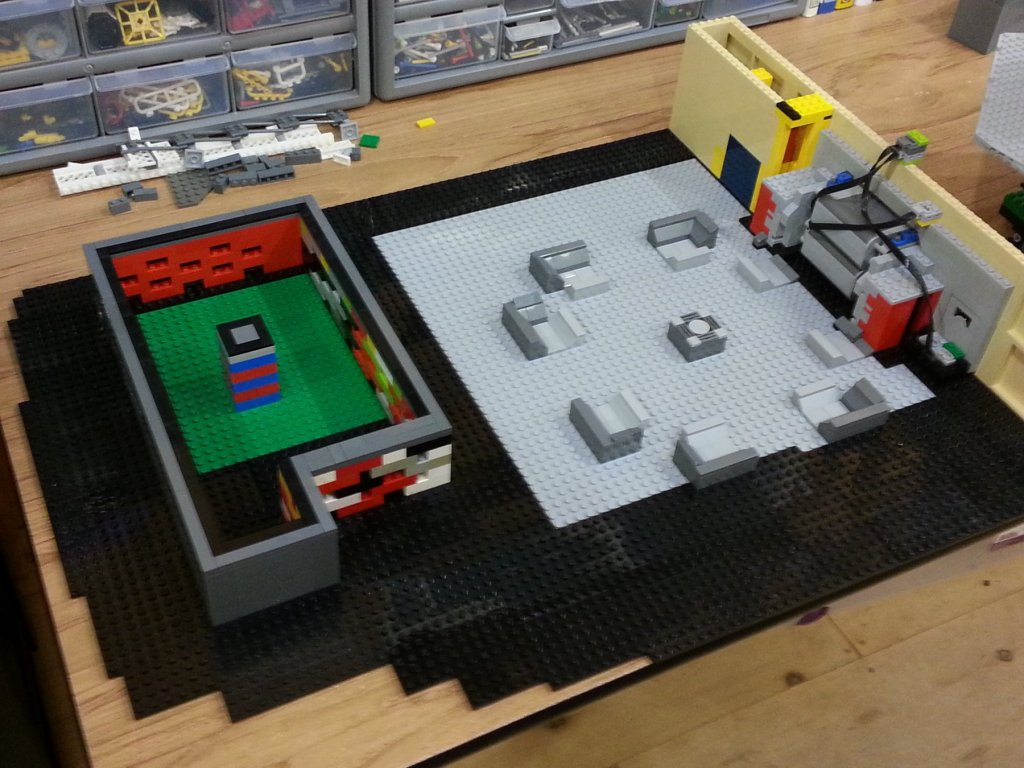
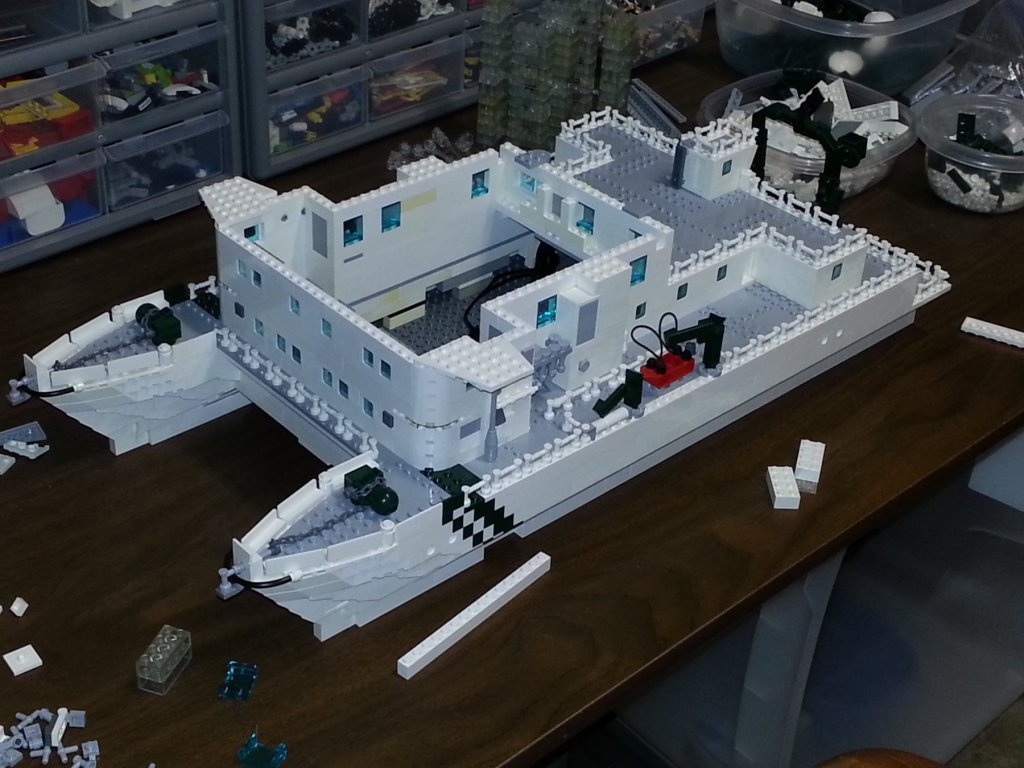
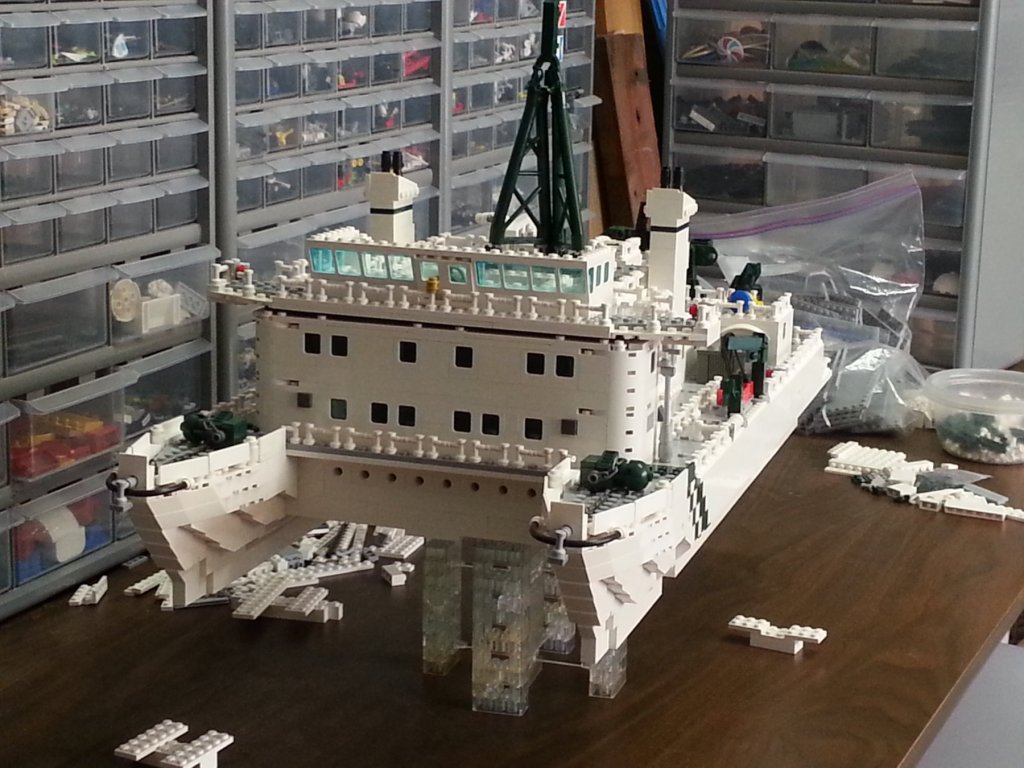
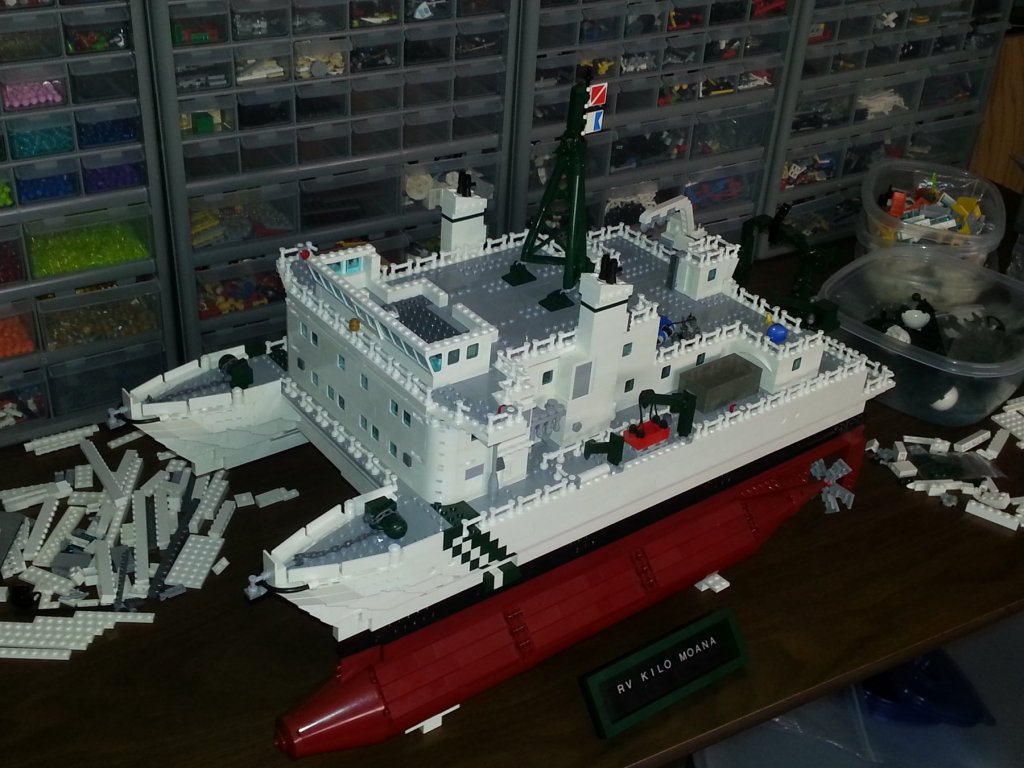
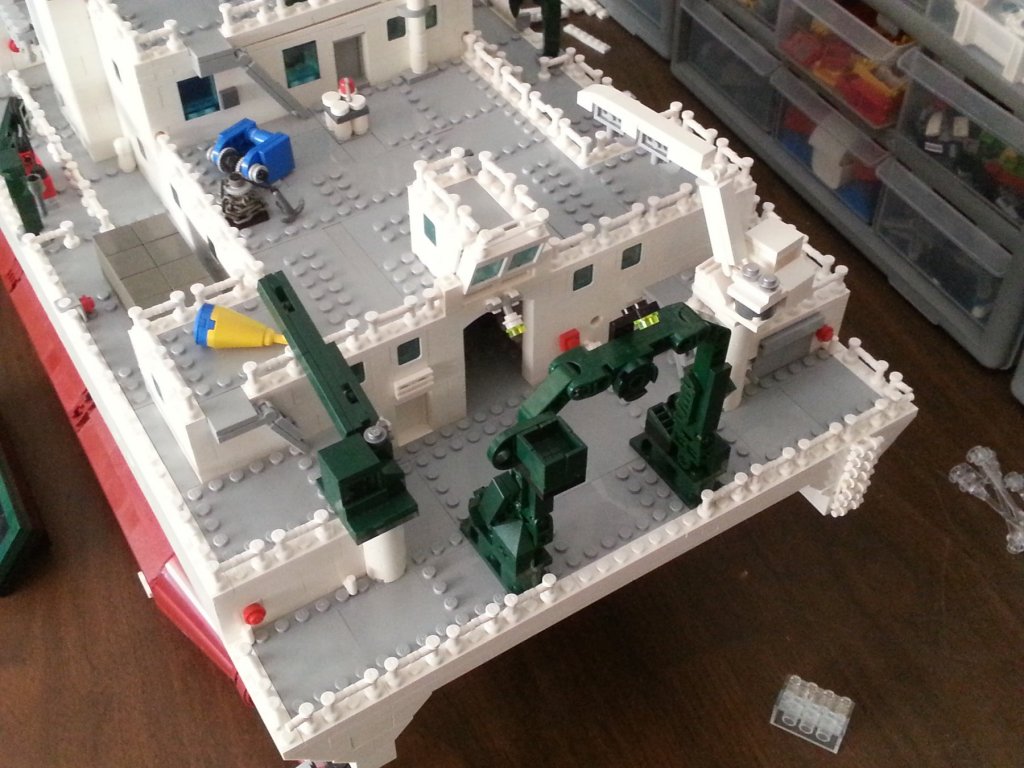
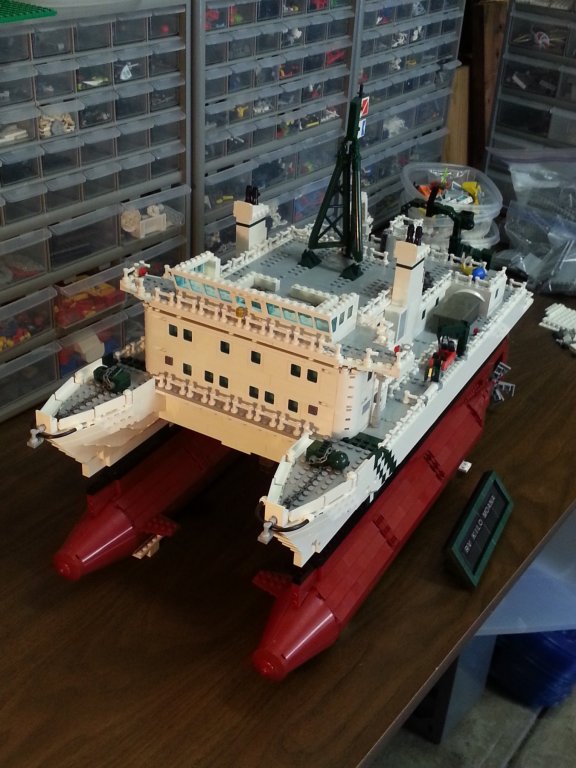
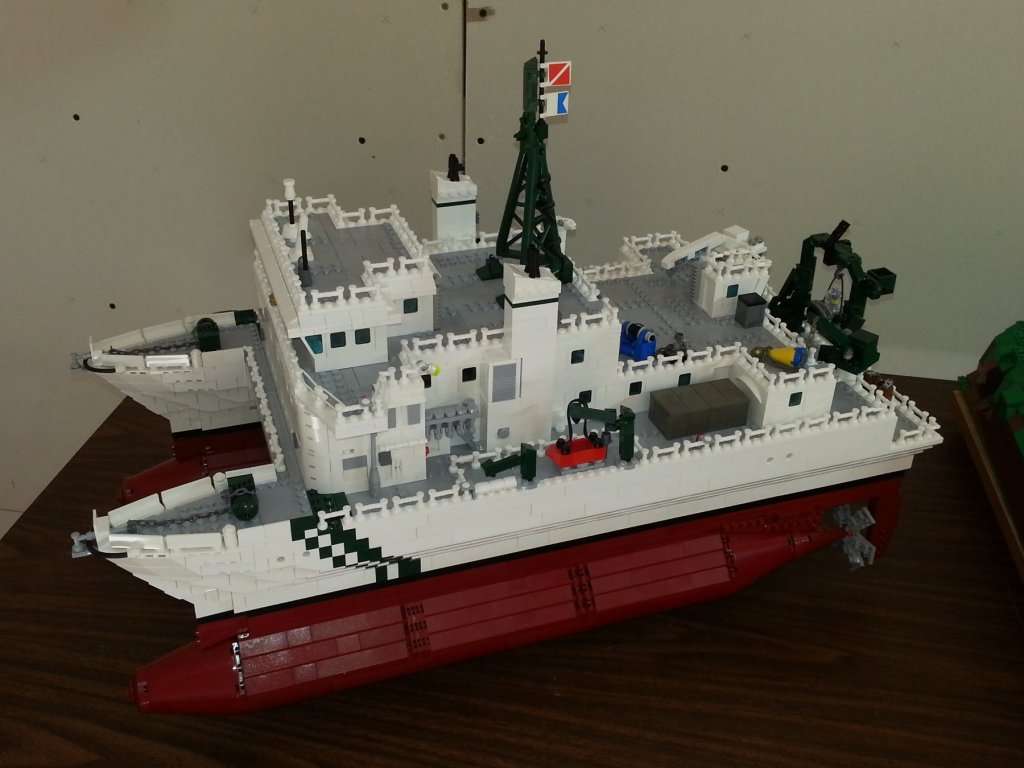
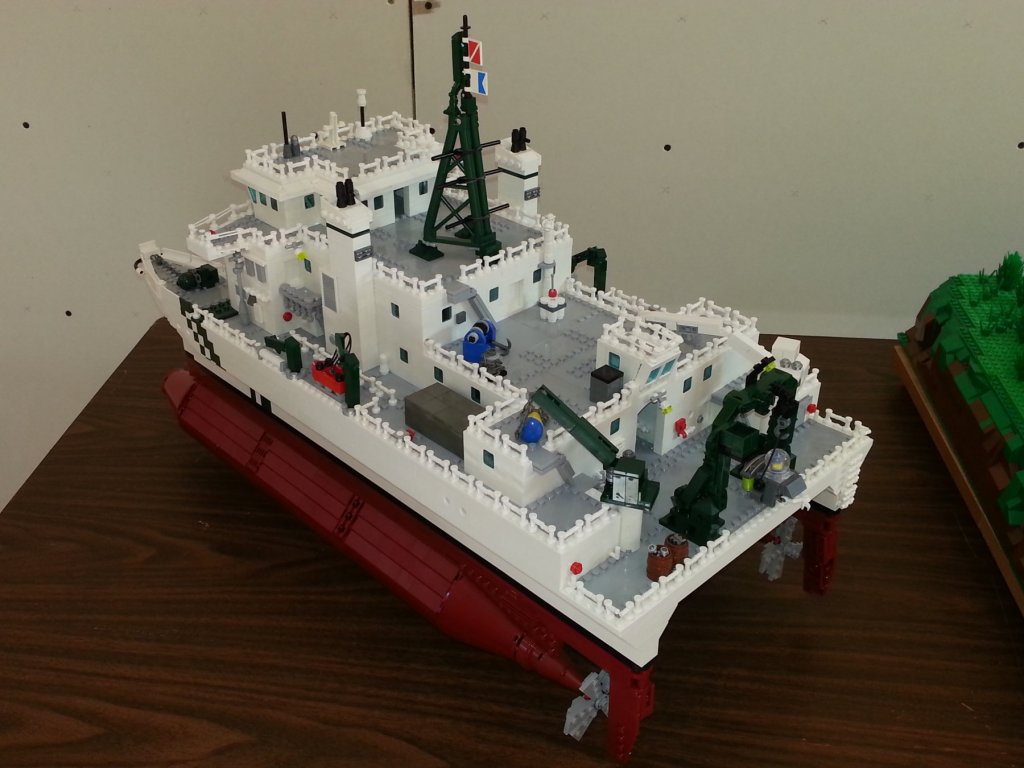
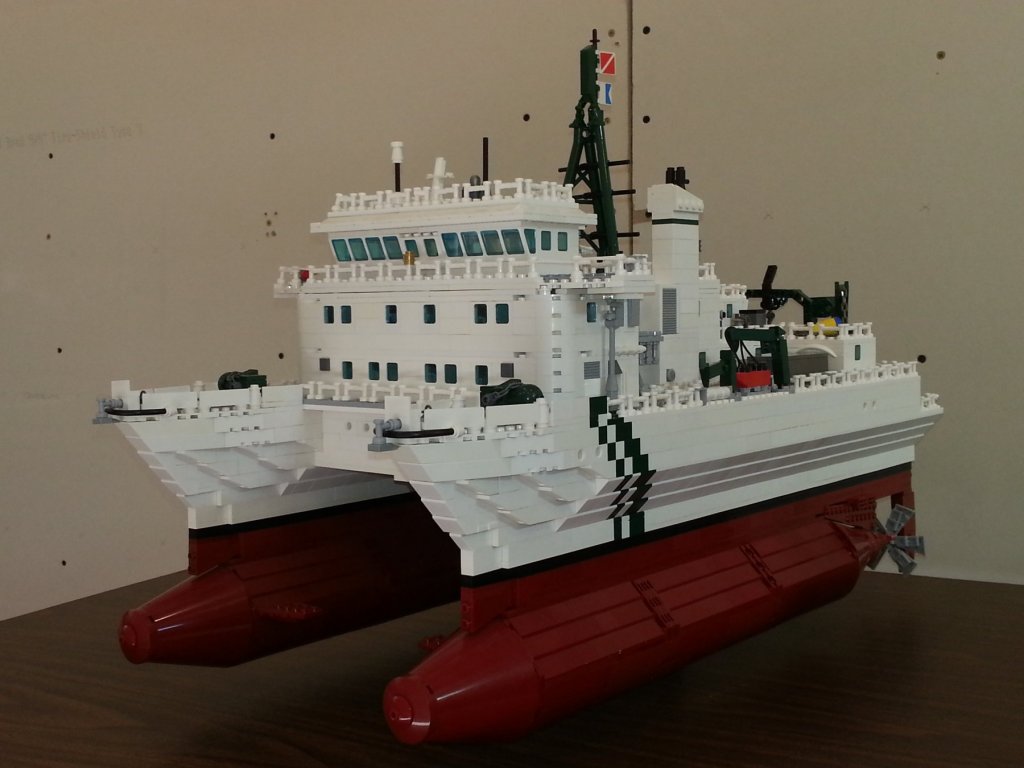
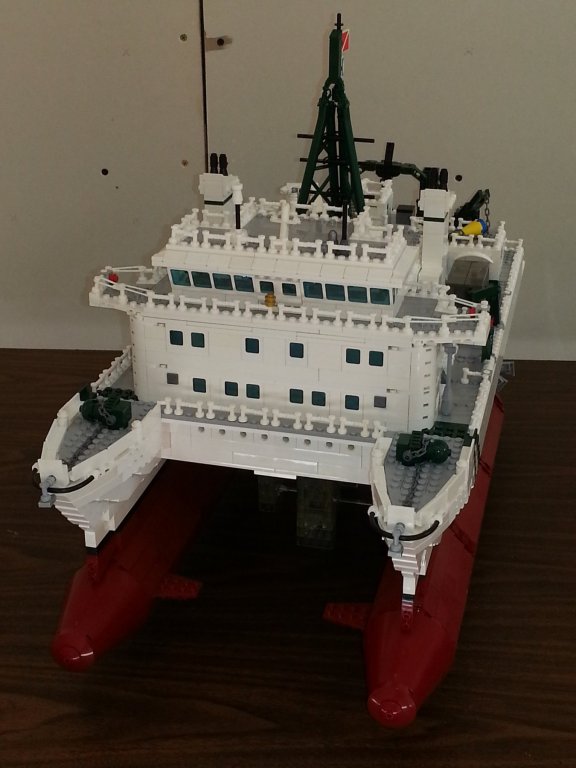
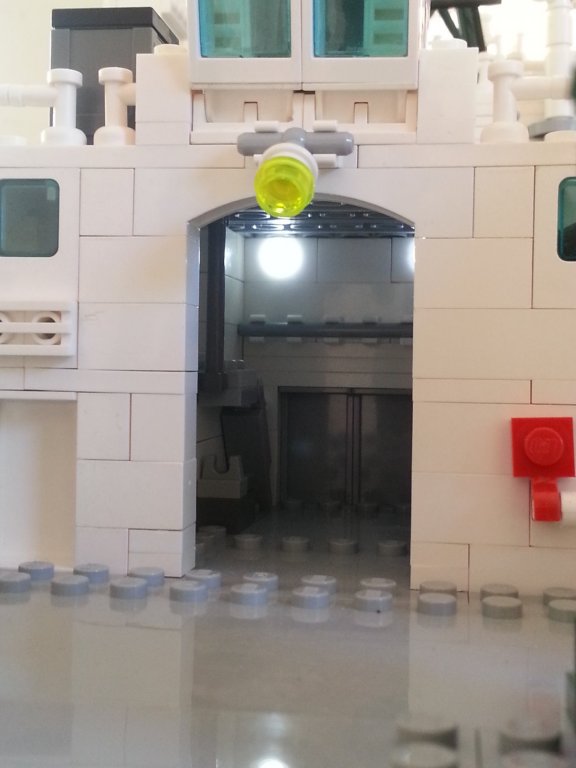
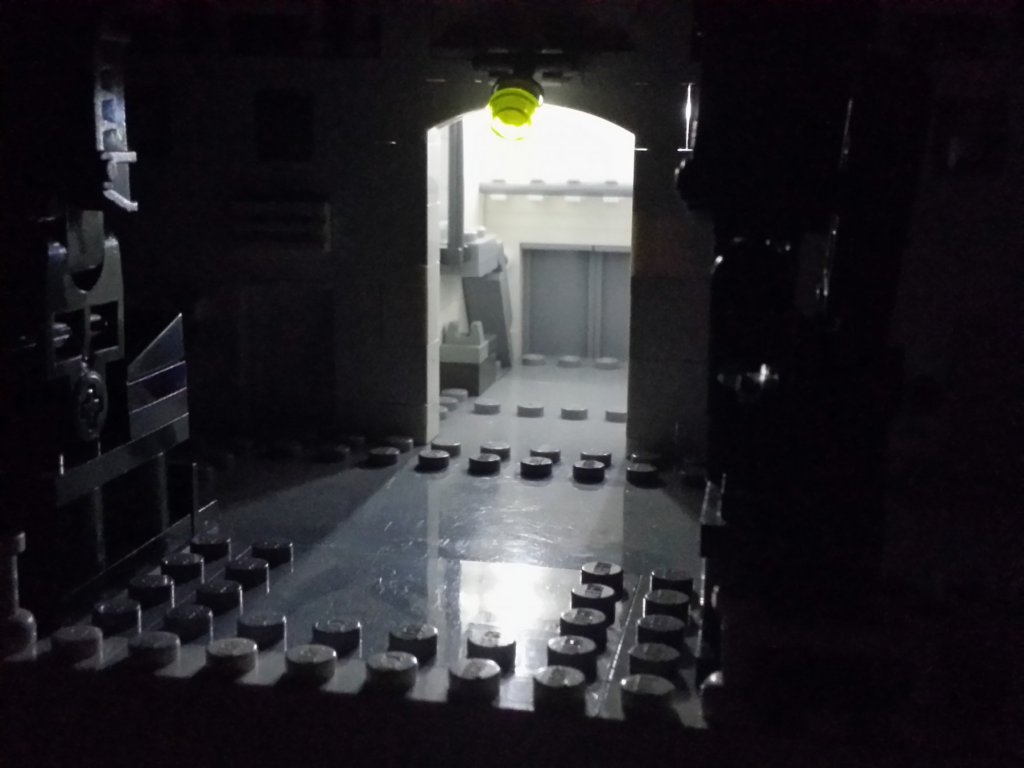
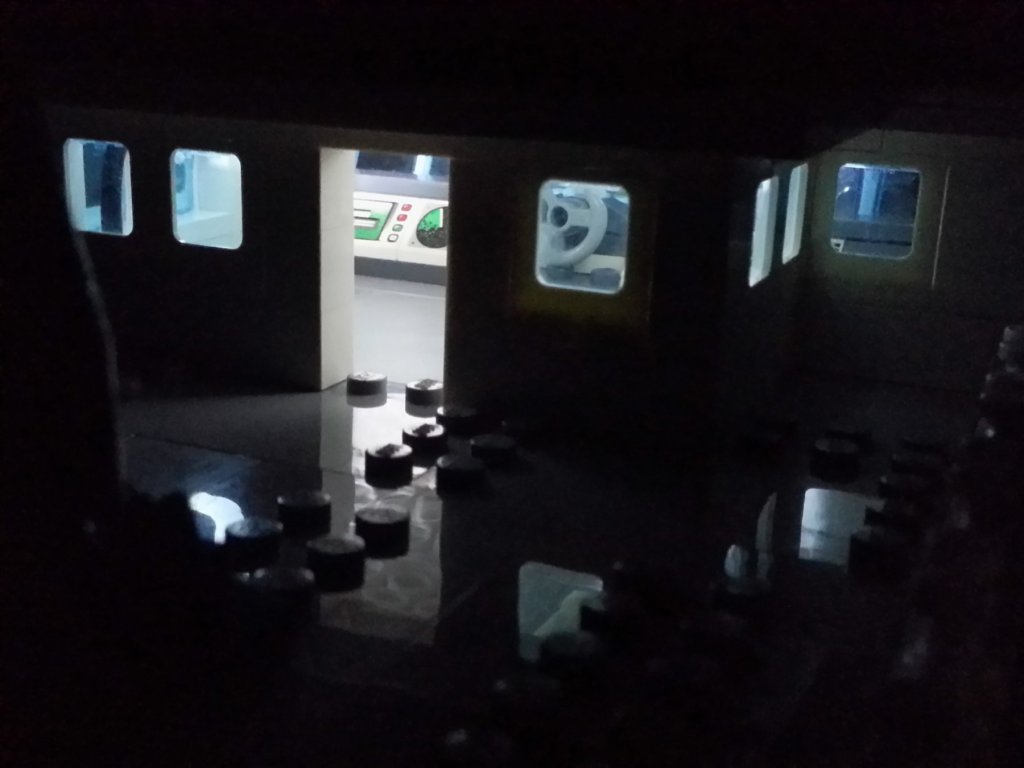
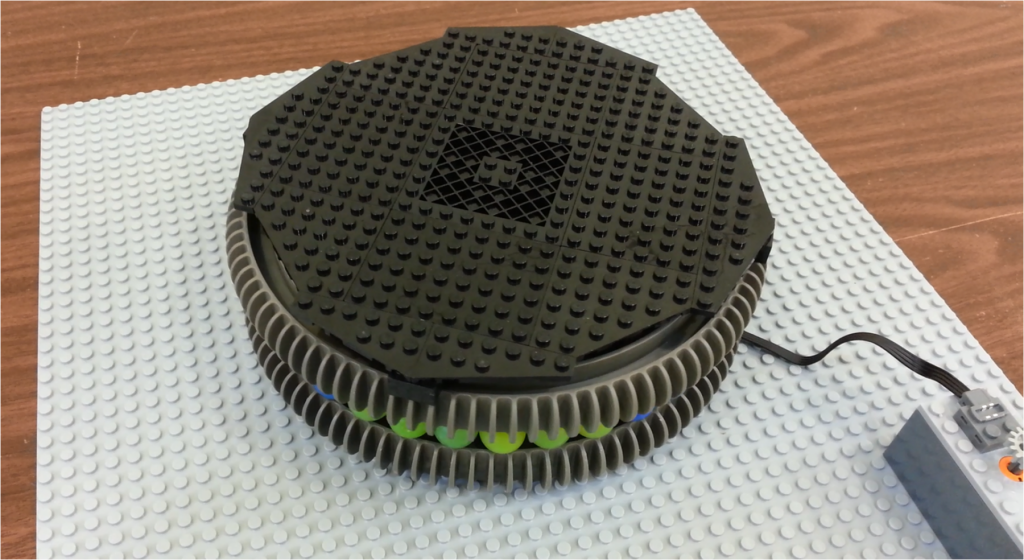
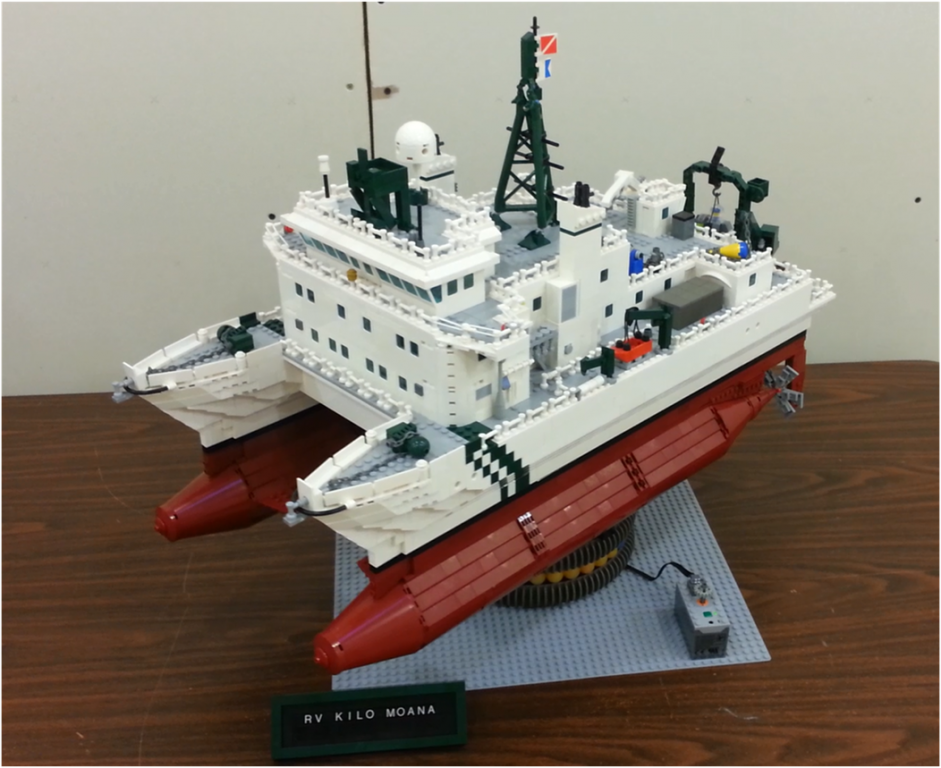
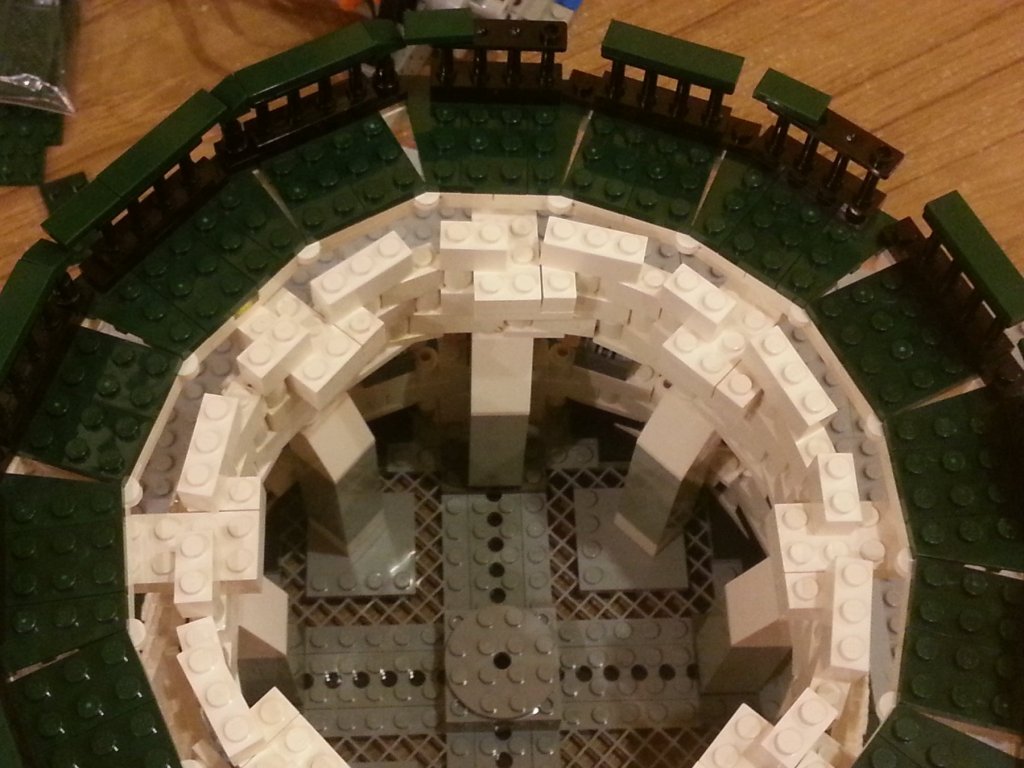
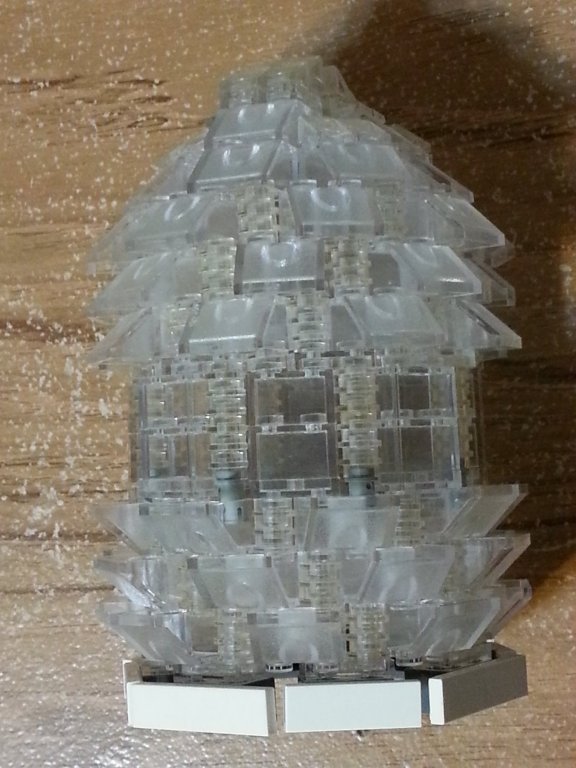
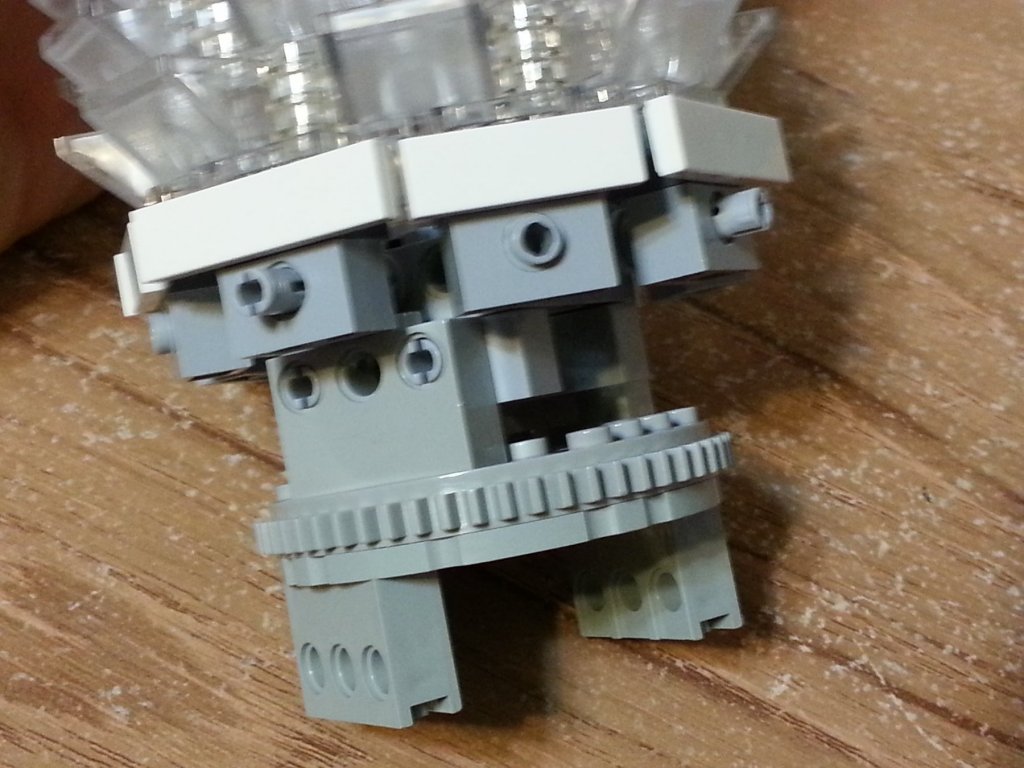
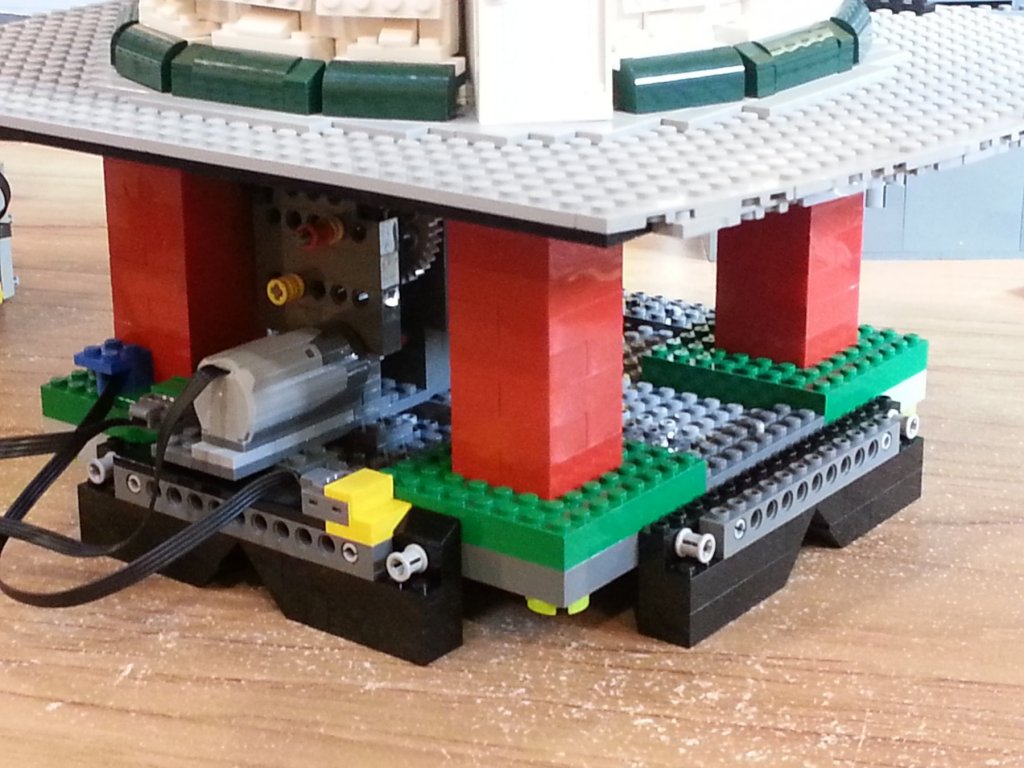
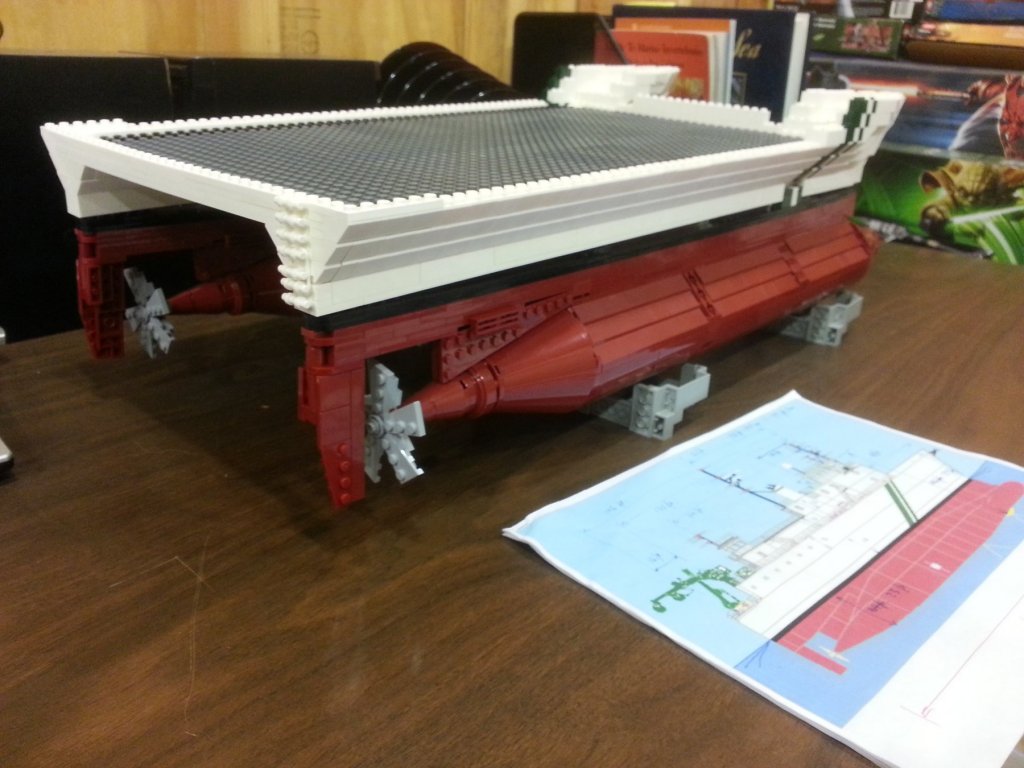
And now the conclusion... Finished the third deck and some of the lab space, getting closer to the bridge. Electrical is tucked away inside and activated by a hidden button in the middle of deck #3. Finished with the top deck and almost have the bride closed up. Just need to run the lights. And set approximately back on the "pontoons" of the lower hull... After completing the model and fixing the upper hull to the lower hull, mixed in with some reference photos. You'll notice perhaps that the dark green instrumentation tower above the bridge is not yet correct in these photos, but gets fixed in the last picture of this post... And now, the lights! First the bottom deck equipment bay... And the bridge... Finally, I wanted to display this at an exhibition where it would only be seen from maybe 120 degree angle from the front. Of course I didn't want folks to miss the details at the aft end, so I needed to build a 100% Lego turntable to automatically and slowly rotate the model while I was off looking at other exhibitor models (or digging through piles of Lego from vendors). Here is what I came up with, using giant gears exclusively from a Lego Star Wars hailfire droid kit and a bunch of "ball bearings" from another sort of Lego shooter ammunition...


- 15 replies
-
- 11
-

-

-
Aston Martin DB5 by James H - FINISHED - Lego - 007
J Harreld replied to James H's topic in Non-ship/categorised builds
James, thanks for helping me spread the word about what can be done modeling in Lego! I'll be curious to see if more members give it a shot and post their creations here in Shore Leave. I think many would be interested to learn and appreciate a totally different nature of limitations and challenges. When I finish telling the lighthouse and RV stories, I may see if I have adequate photos to tell my Chichén Itzá build story. Cheers, John -
Oh, my lord, this is exquisite! Those tiny benches in the motor launches, etc., etc.. Amazing work!
-
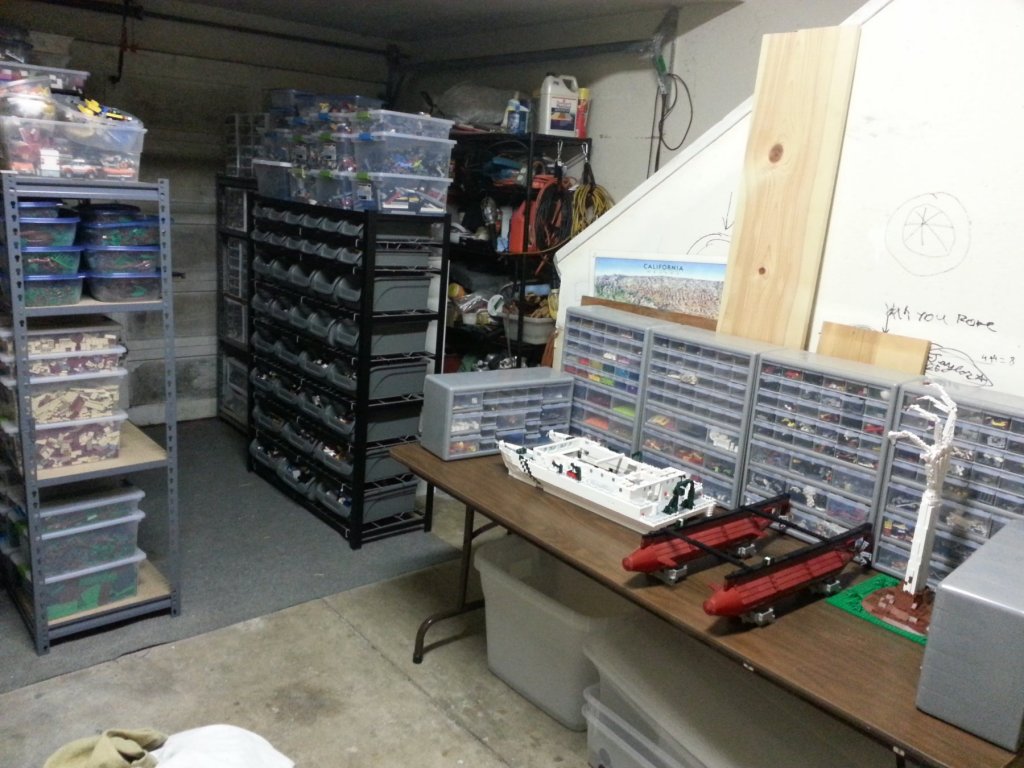
Sjors, So far I've kept all the large models I've done, but storage/display space is absolutely at capacity. So I'll need to start making some difficult decisions soon. I had 11 models of various things at my friend's secondary market Lego store for a few years, but he's pairing down to retire, so I had to take them all back this summer. It would be emotionally much easier to sell or donate than actually taking them apart, but I'l need to figure that out.
-
Mark, I can't tell you how much the compliment means after regularly seeing the truly unbelievable work here on this site. It really inspires me to step up my Lego game! ~ John
-
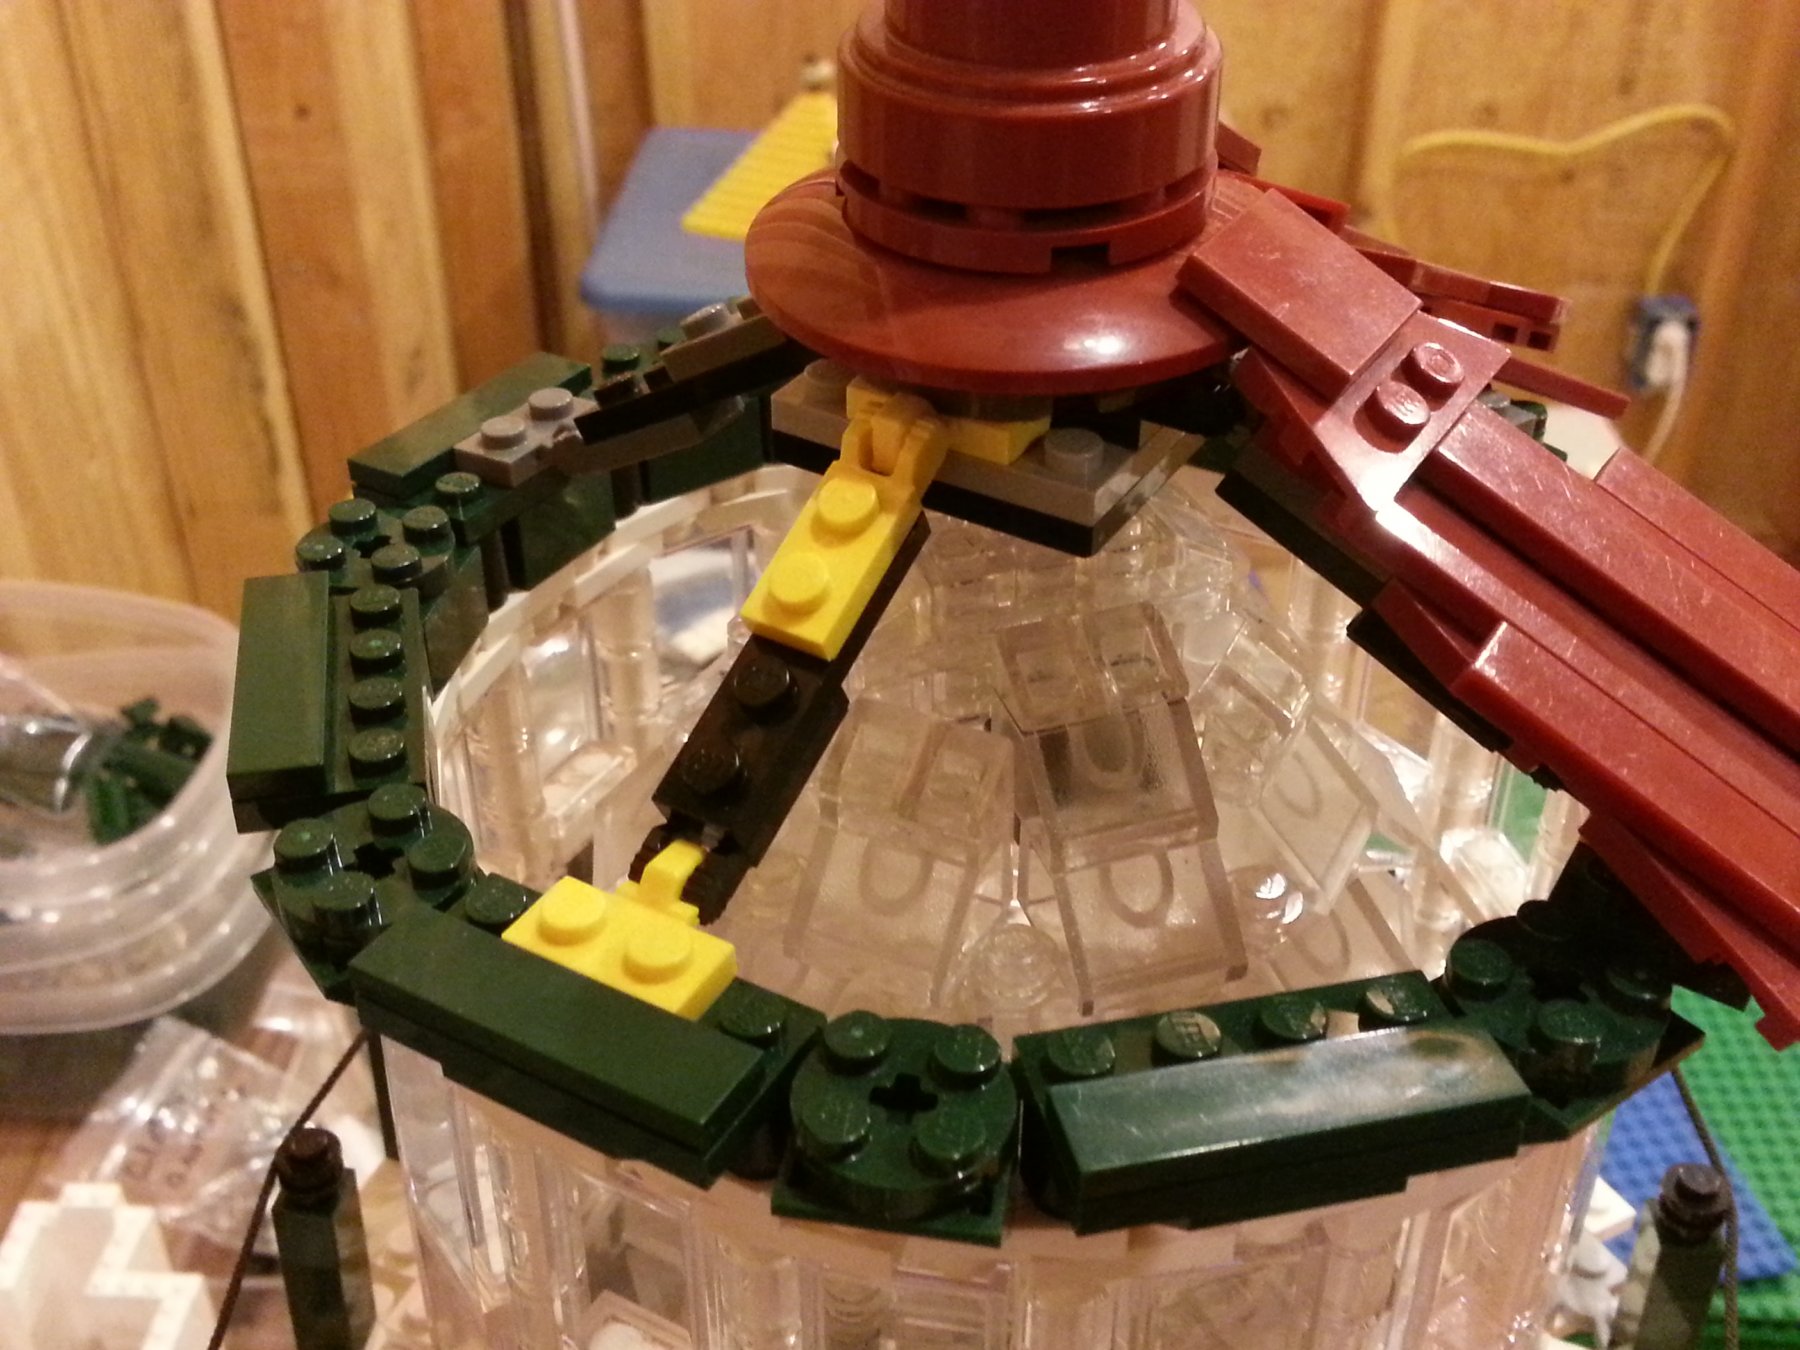
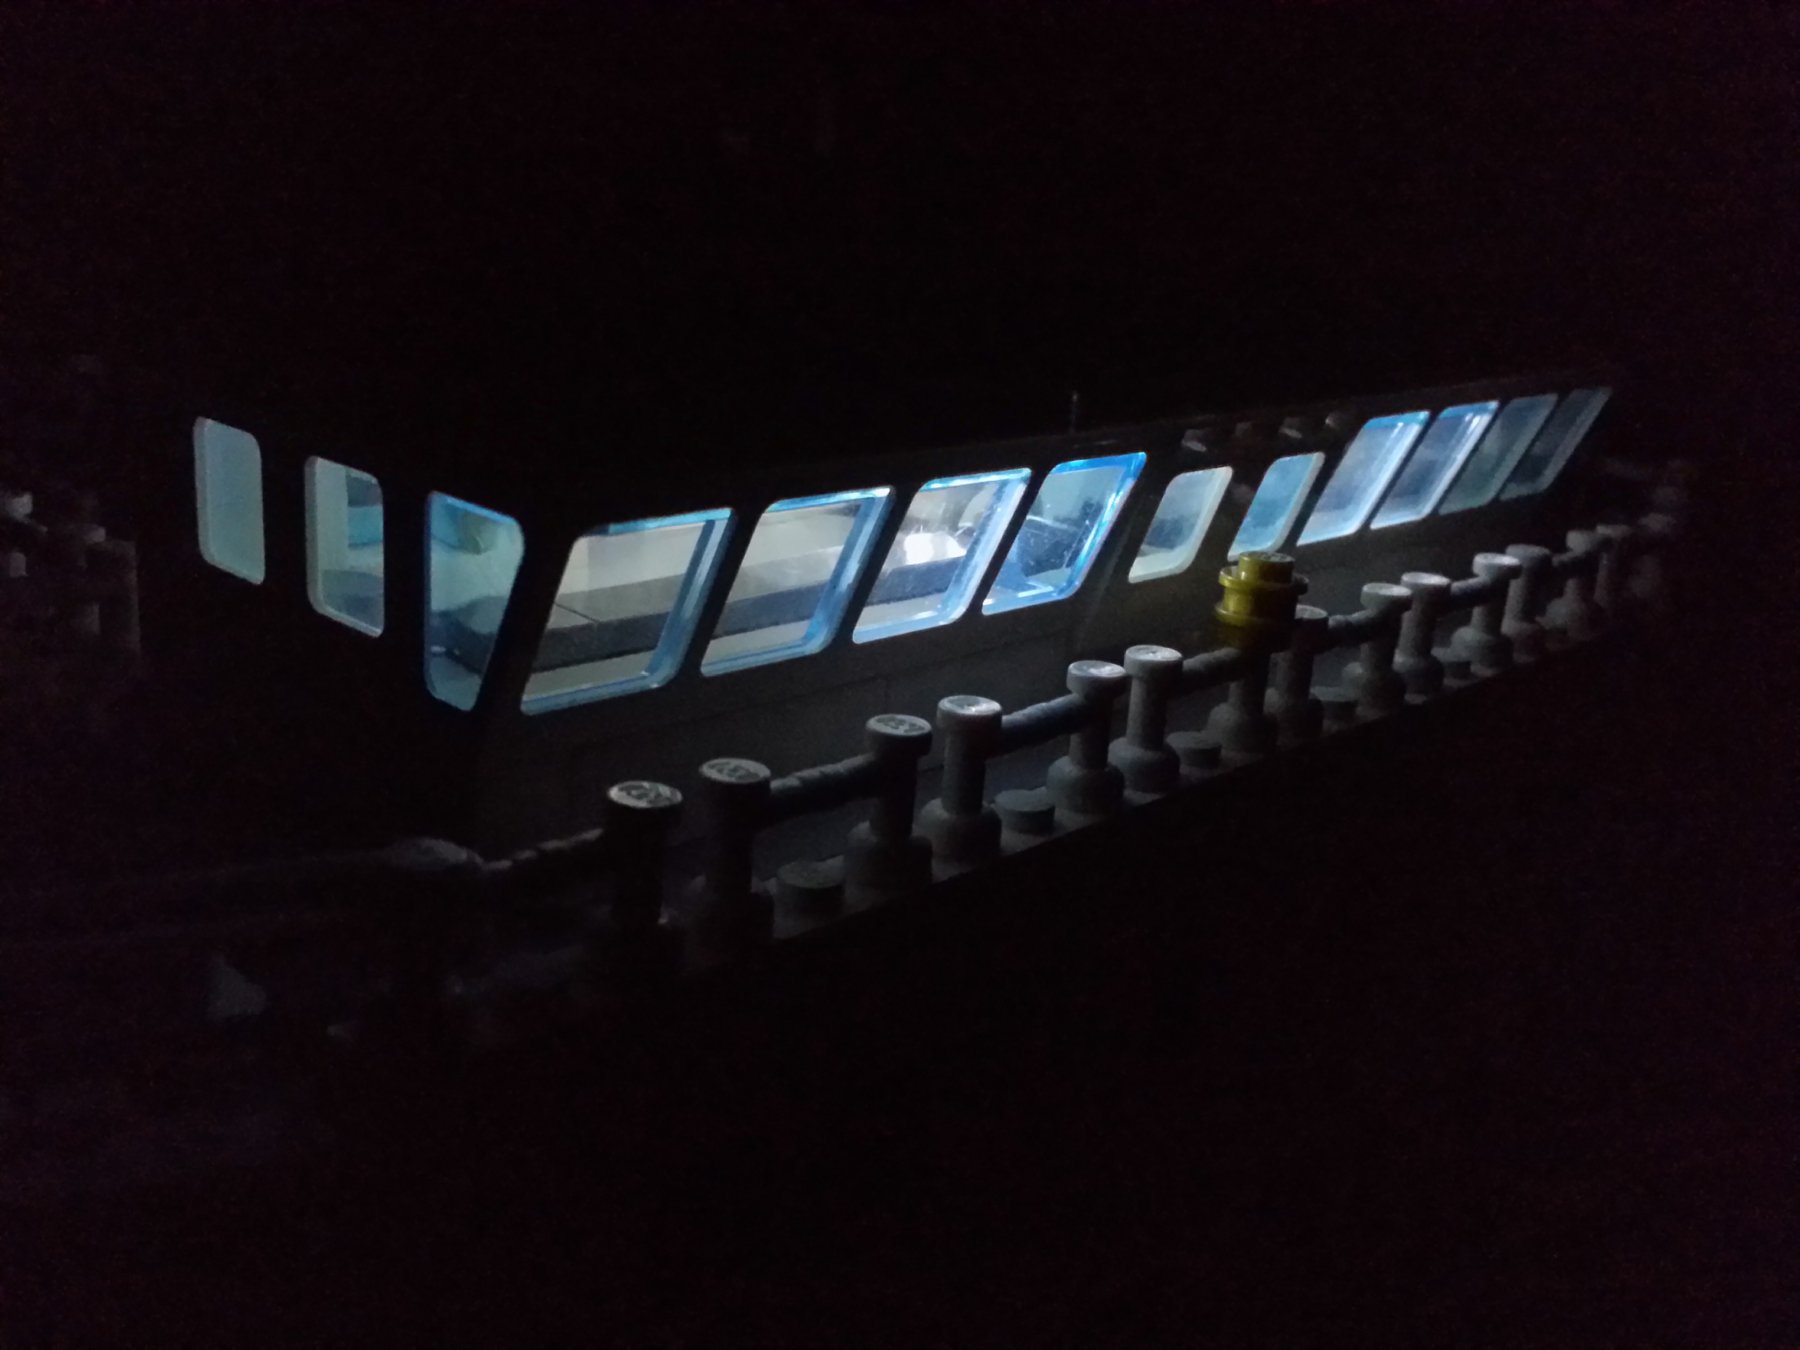
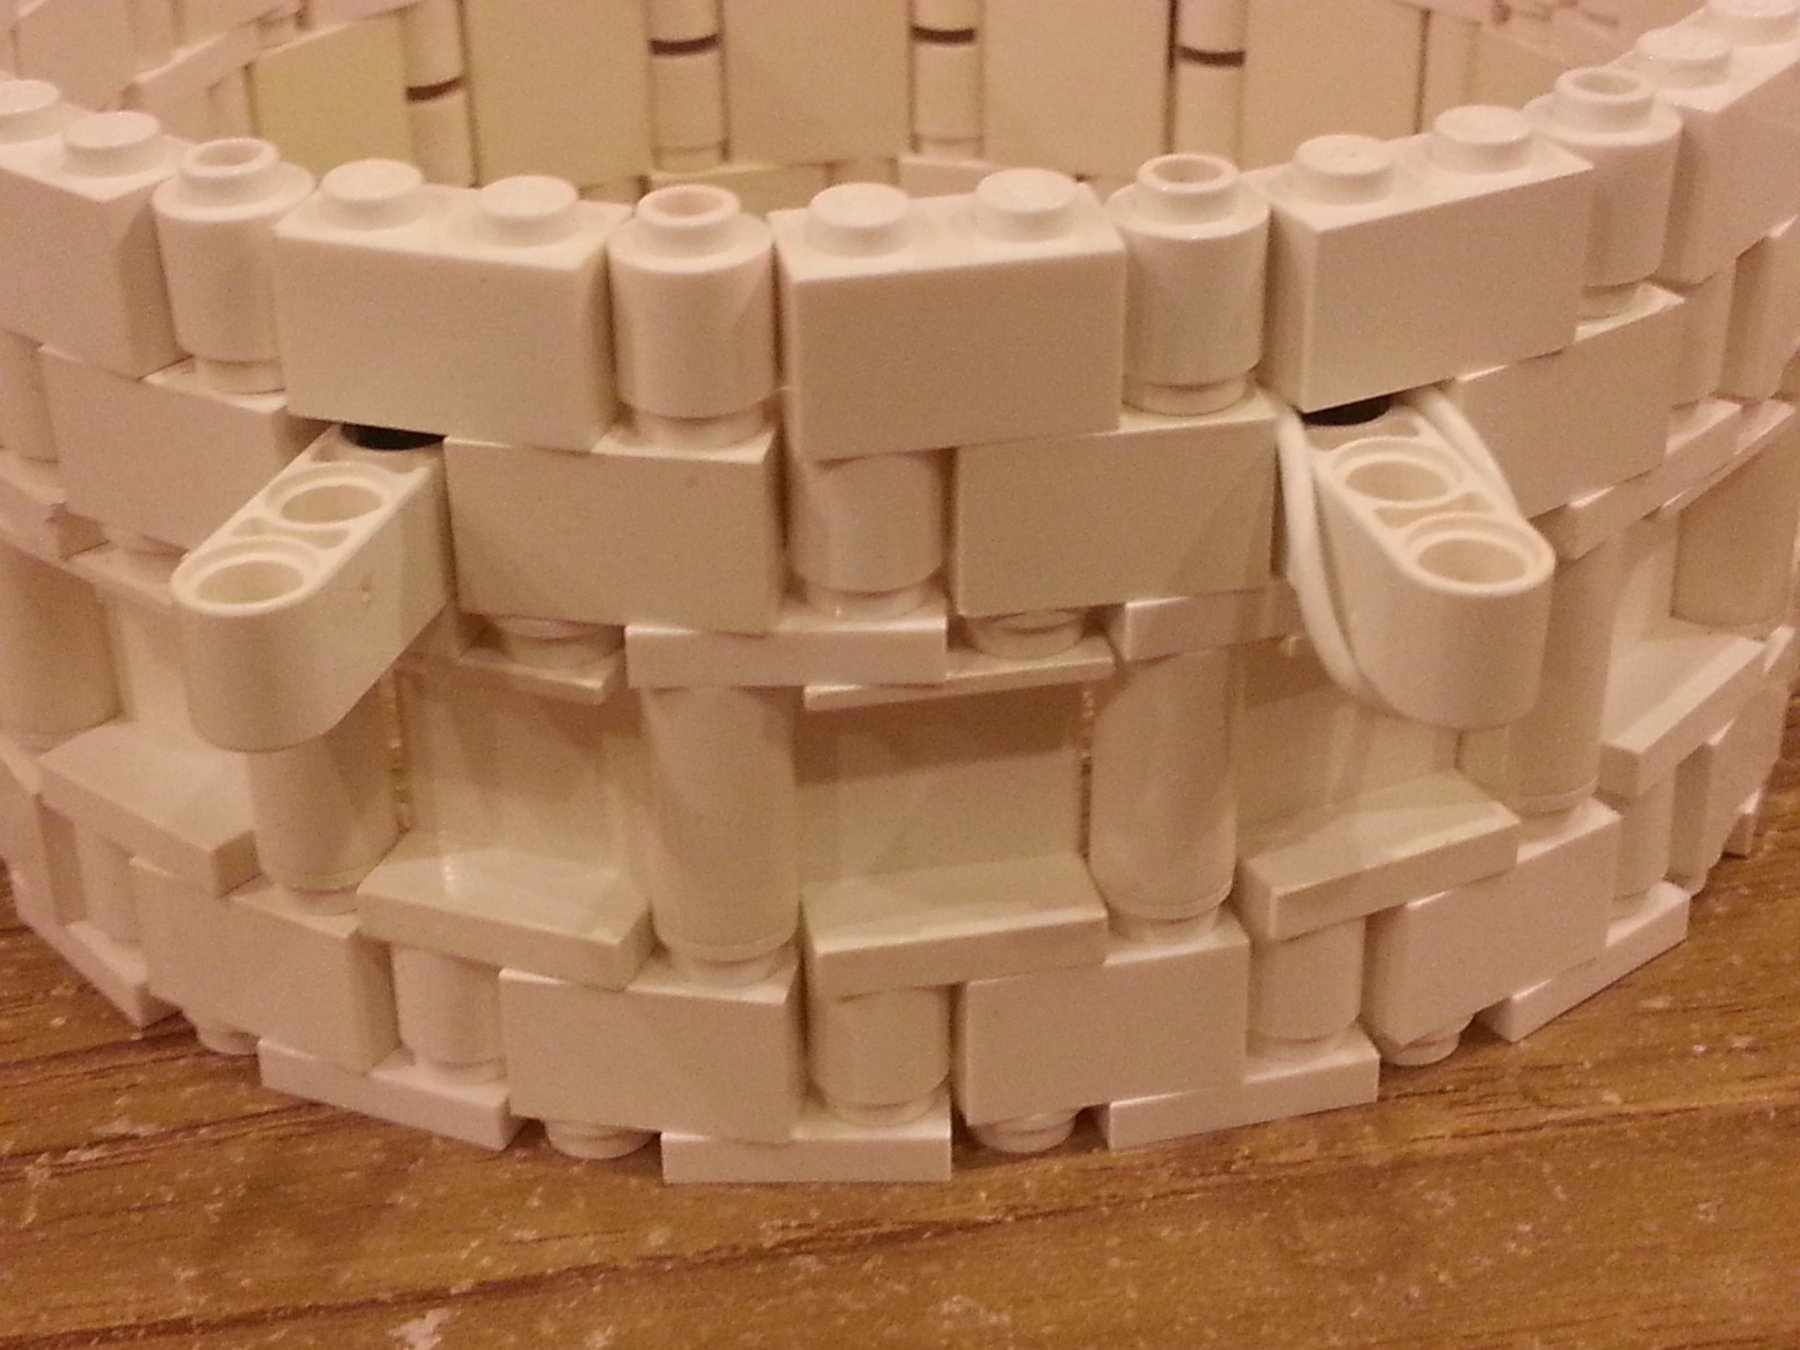
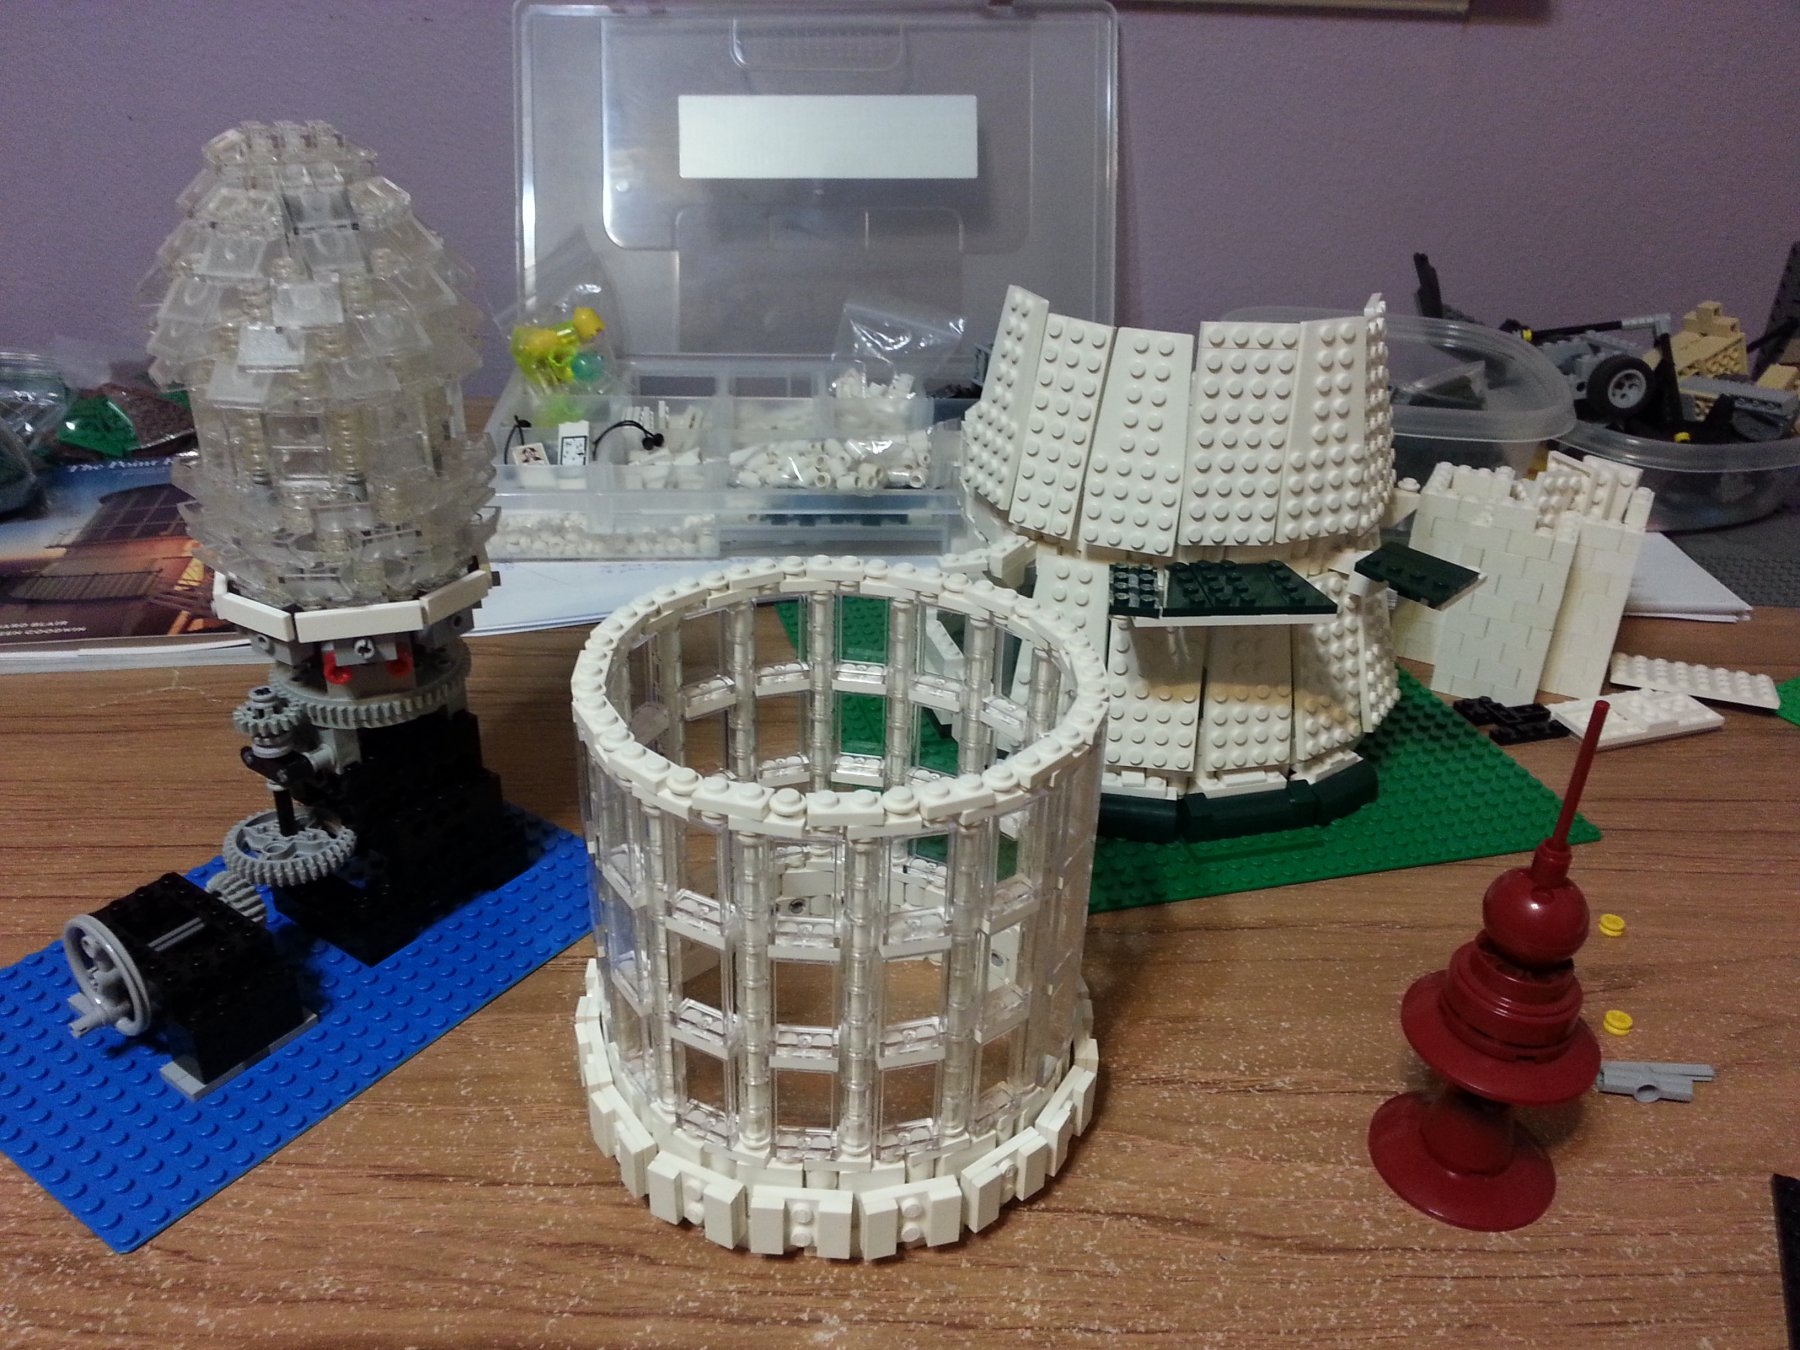
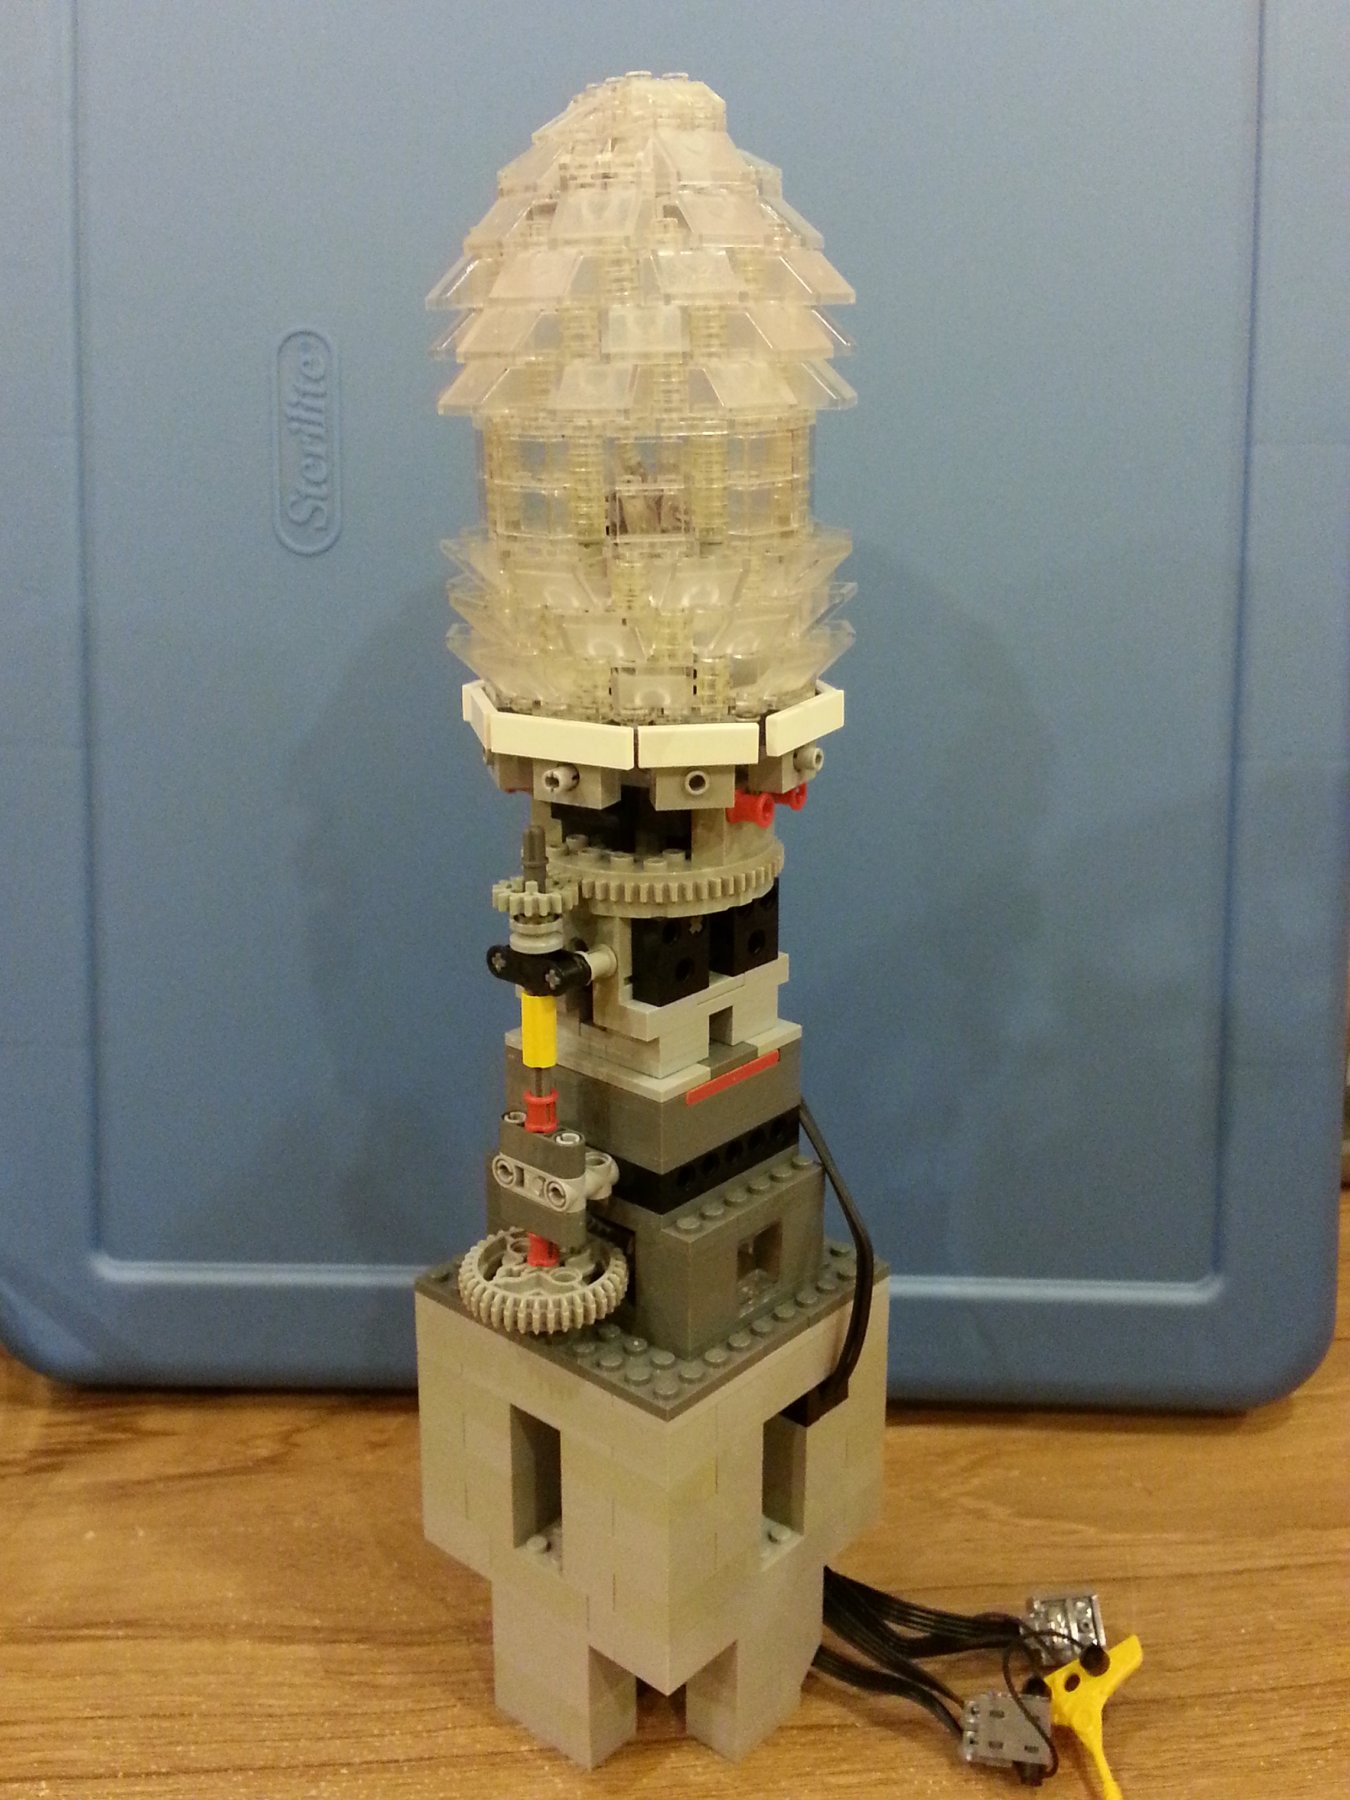
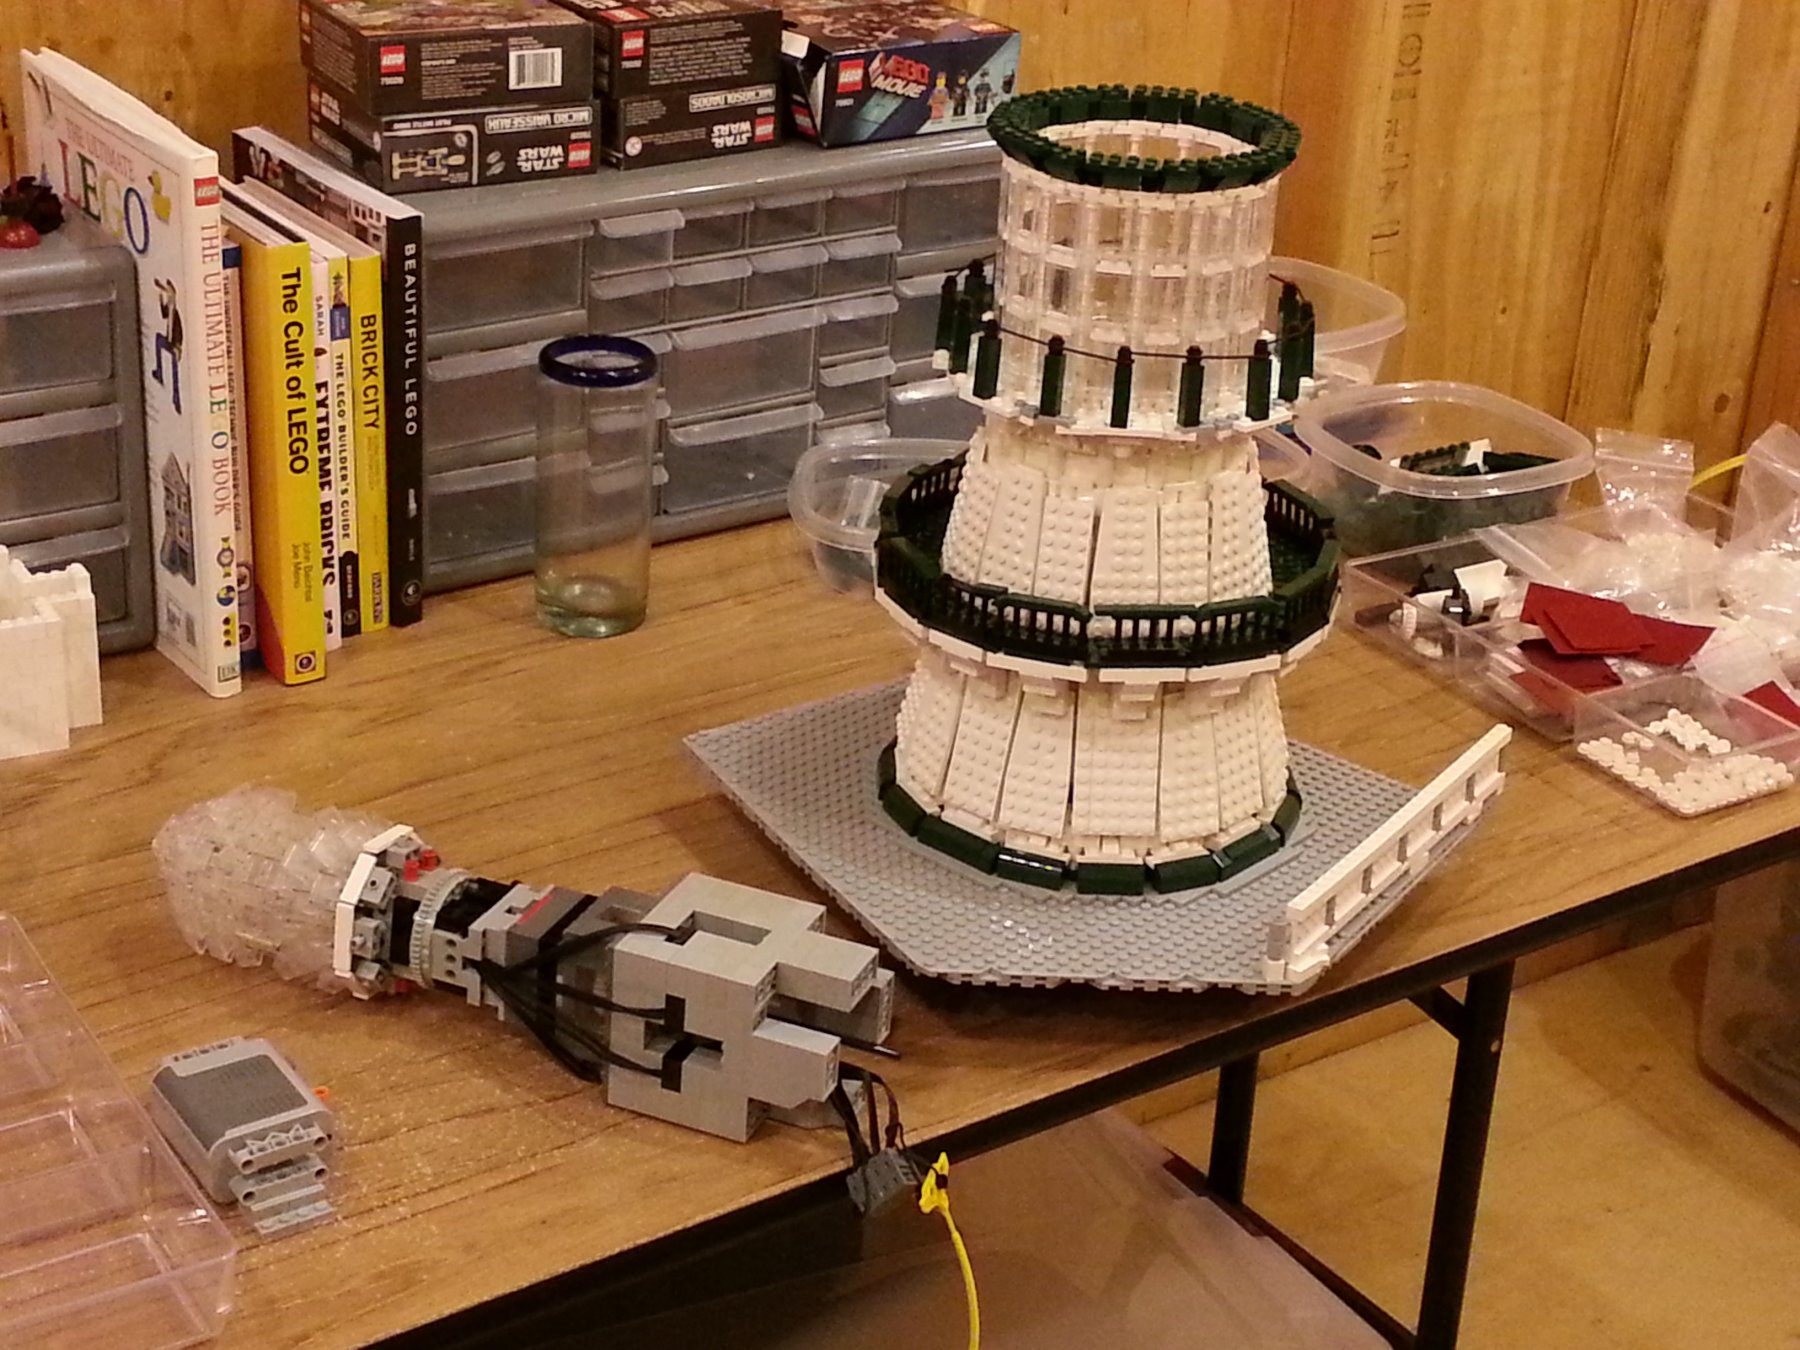
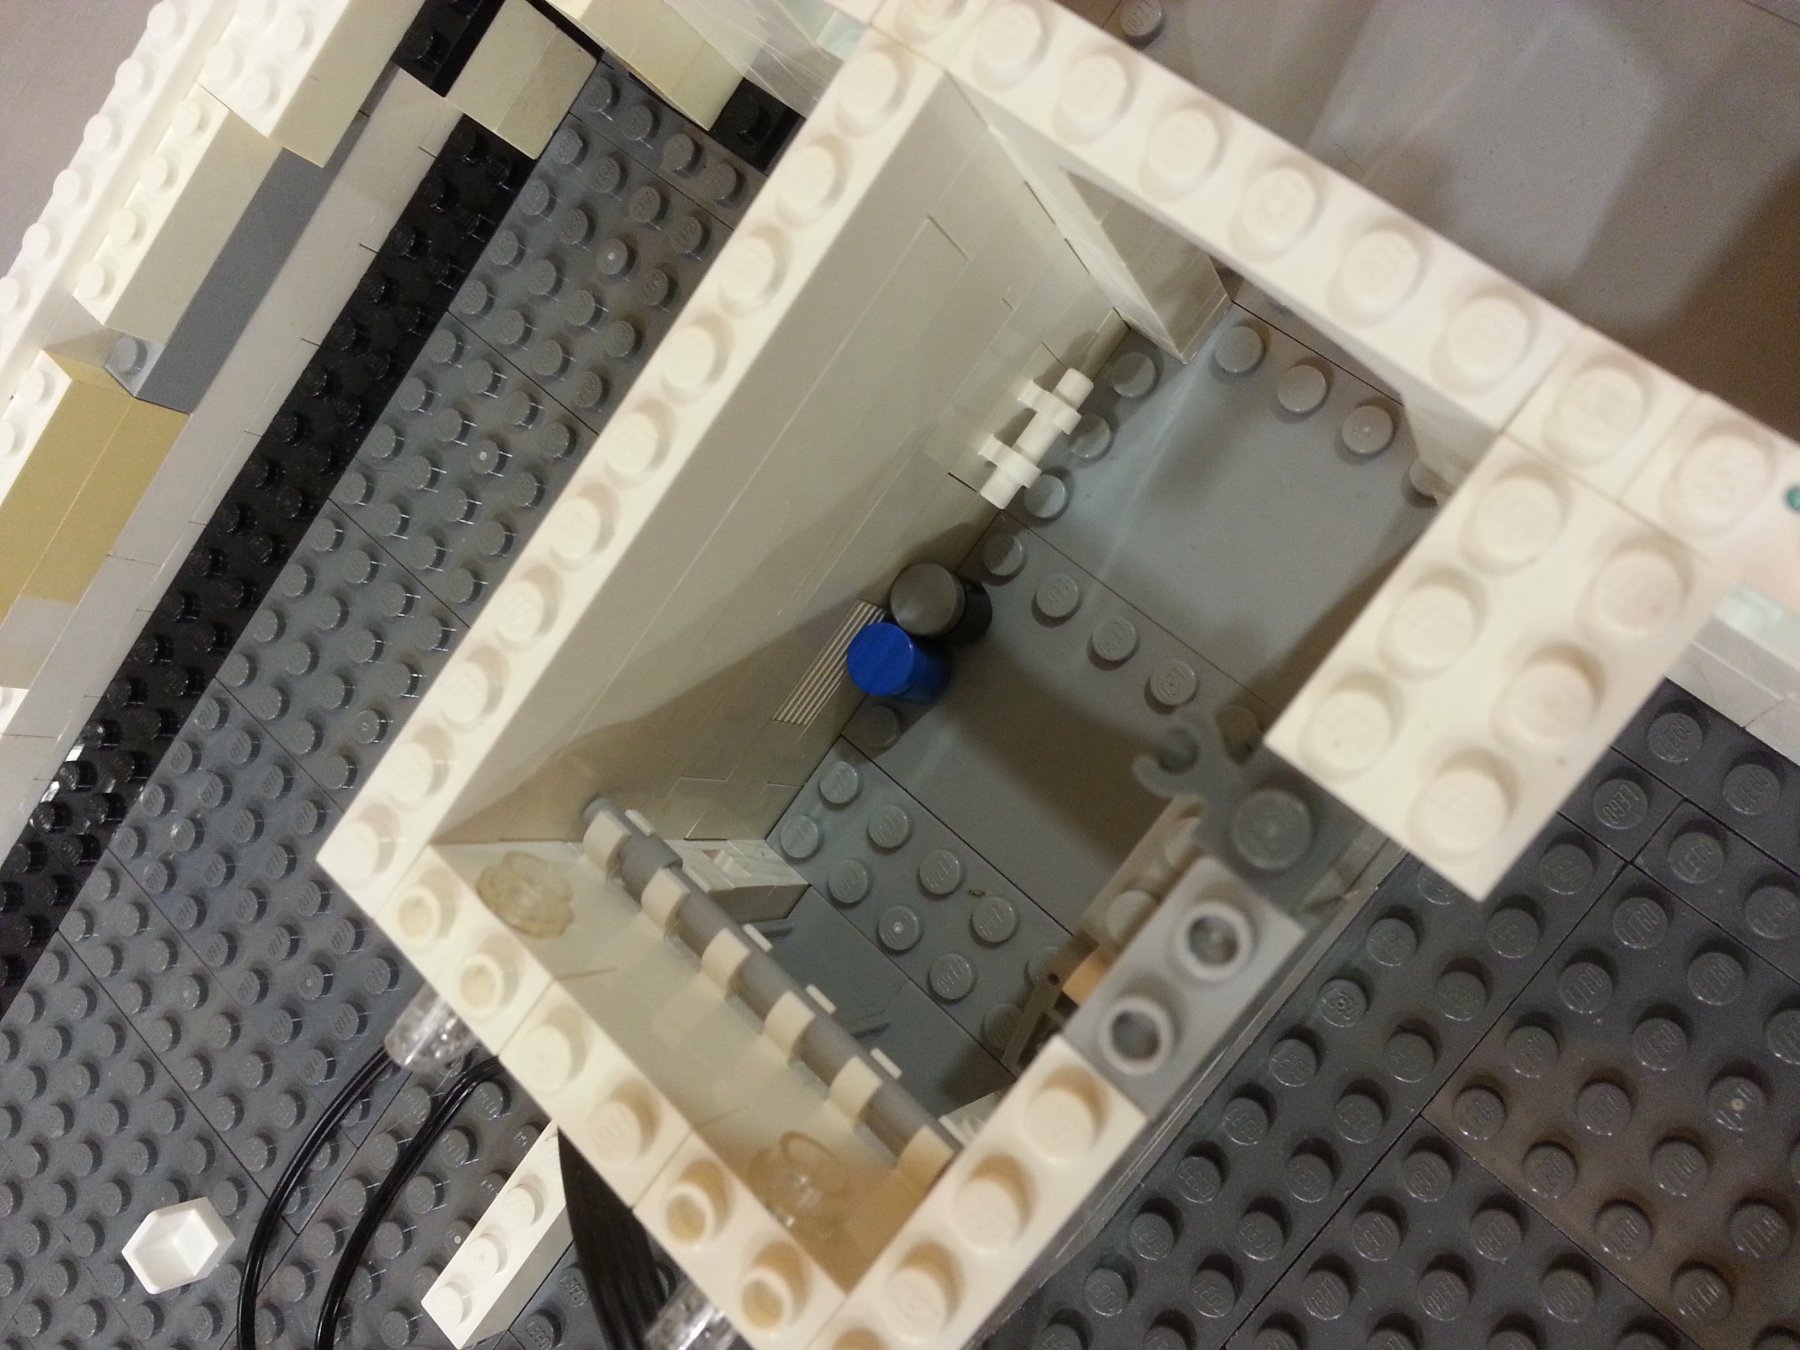
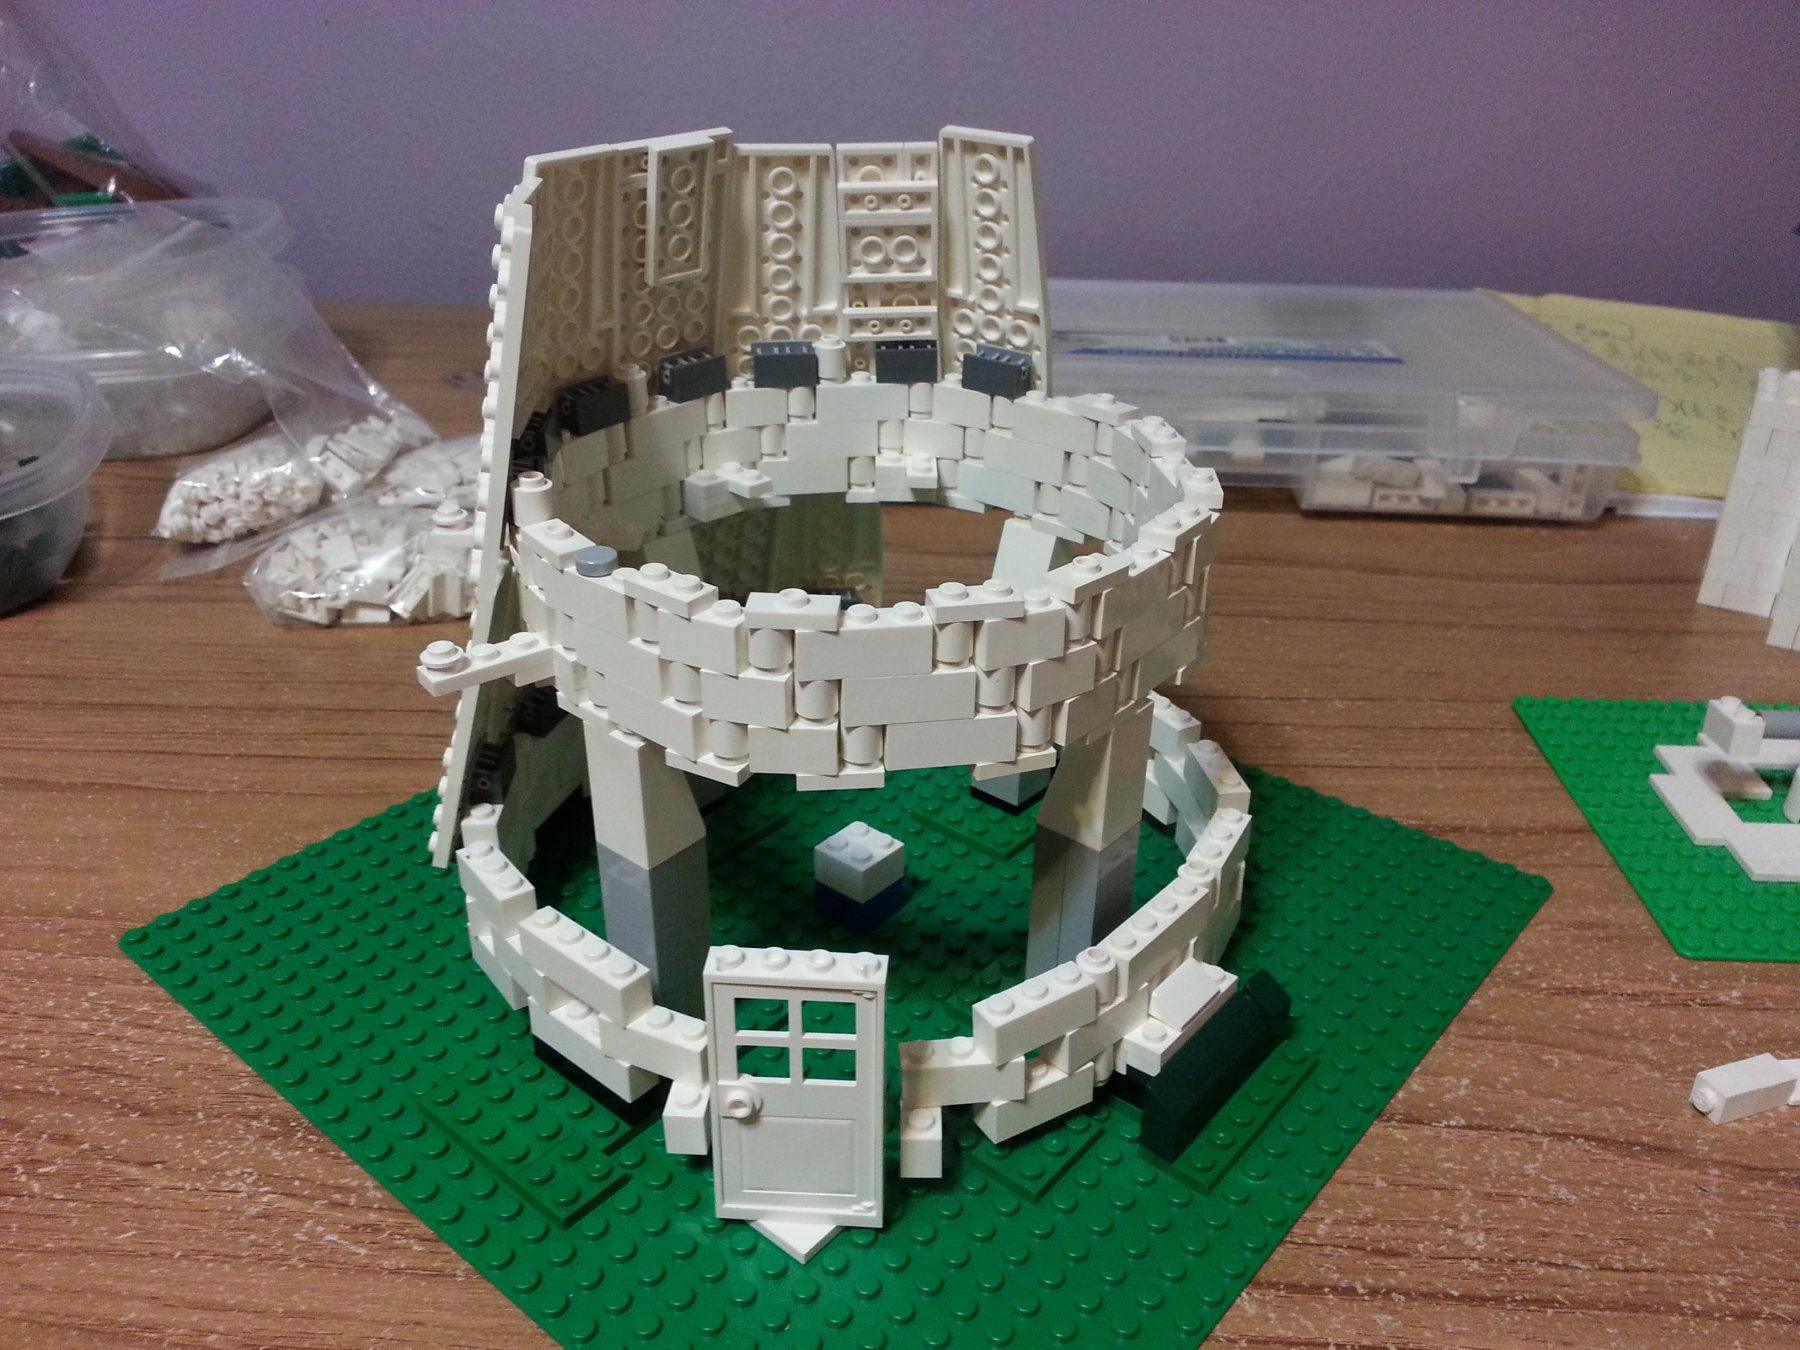
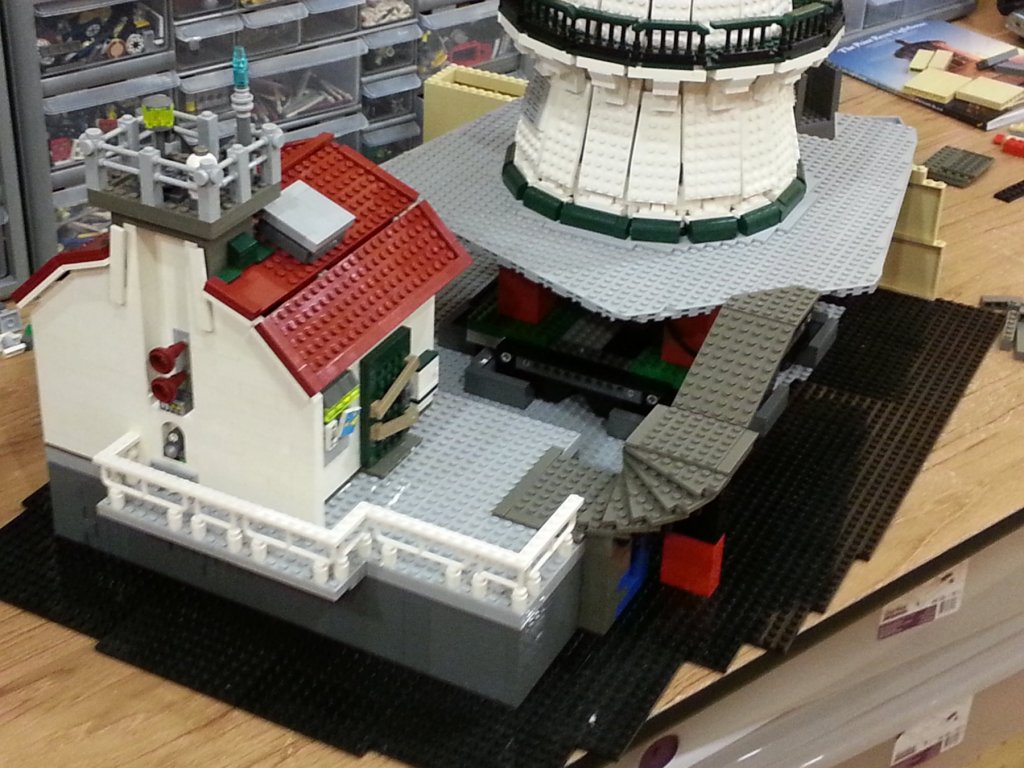
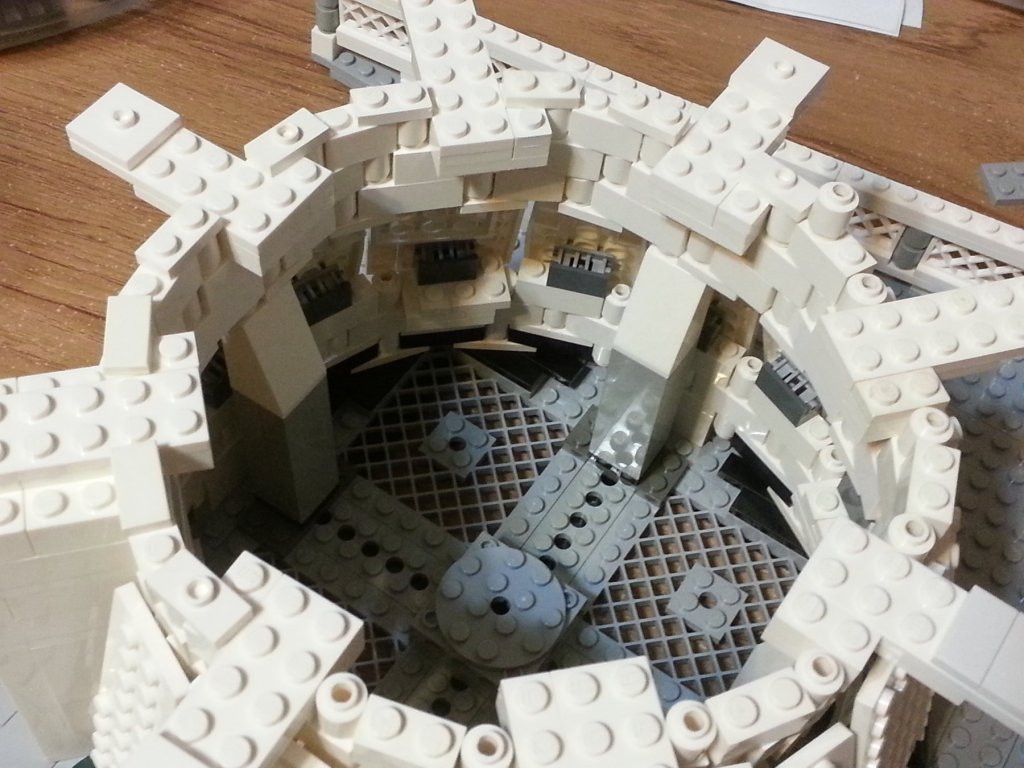
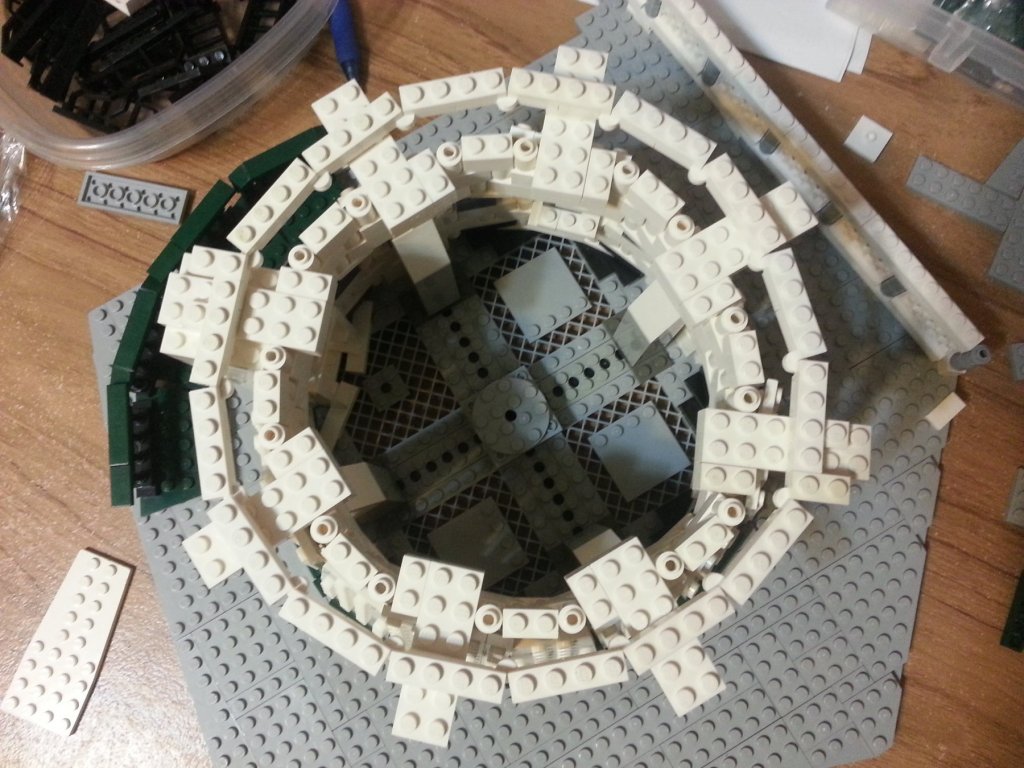
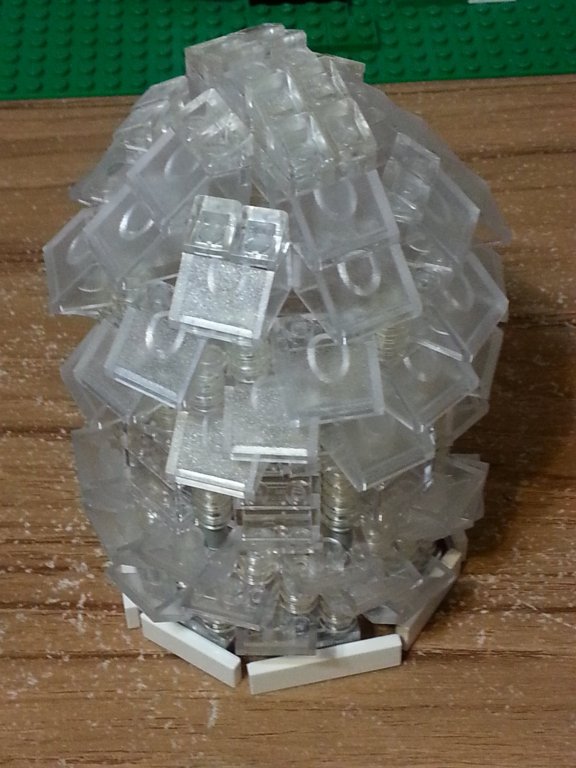
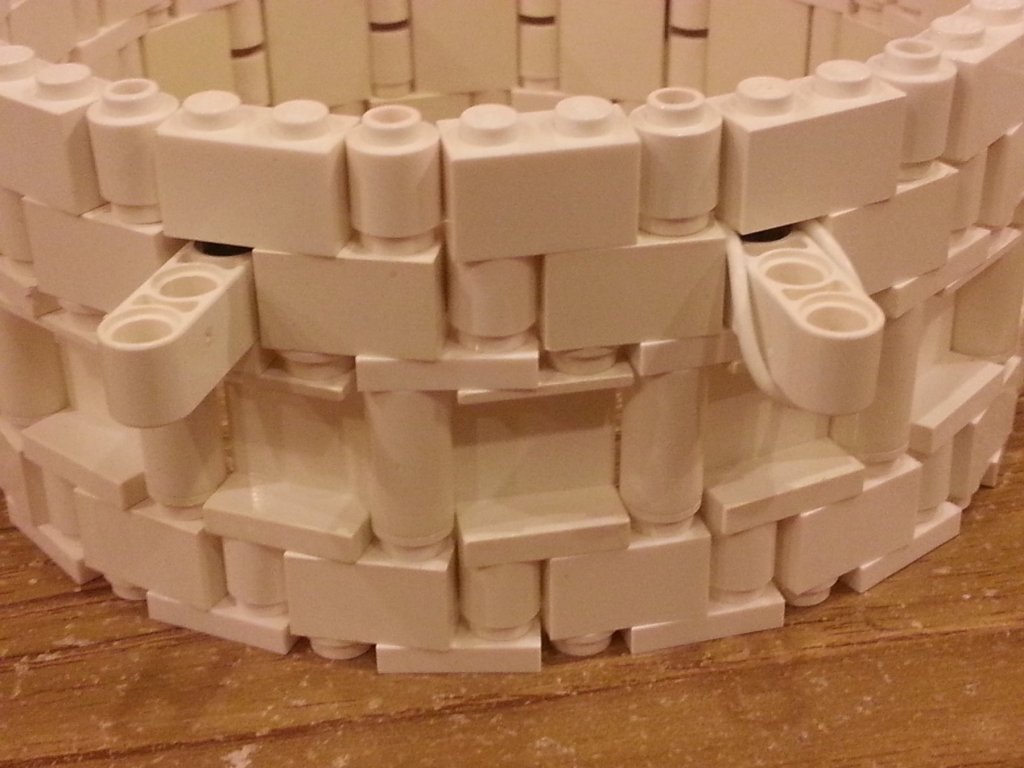
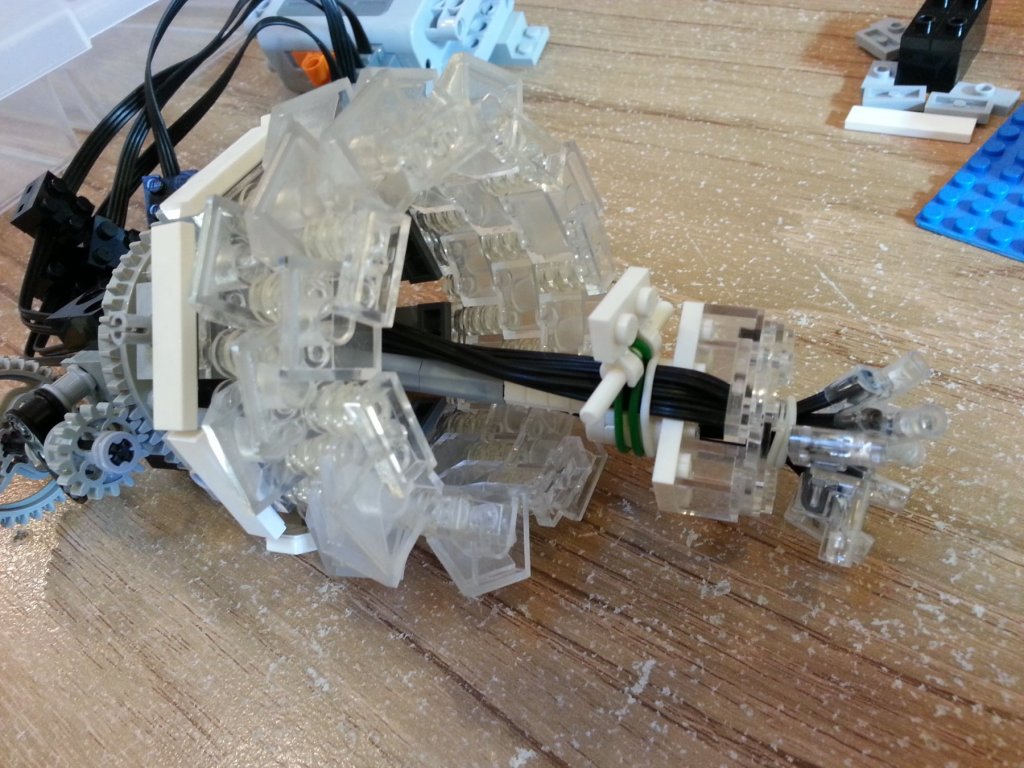
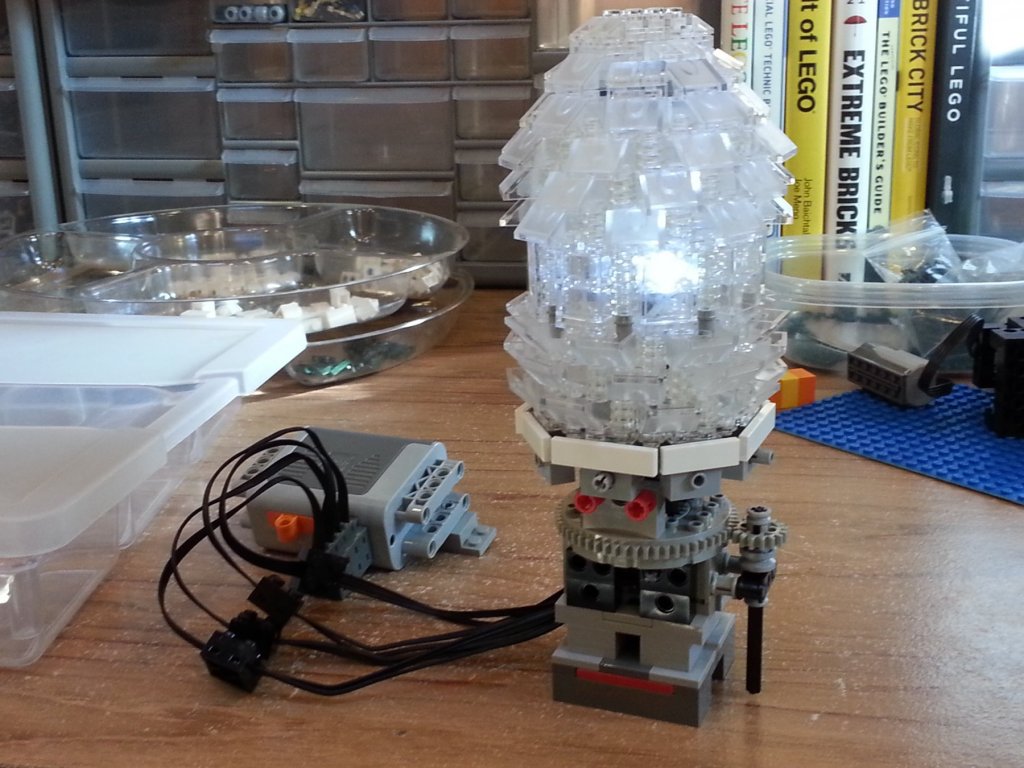
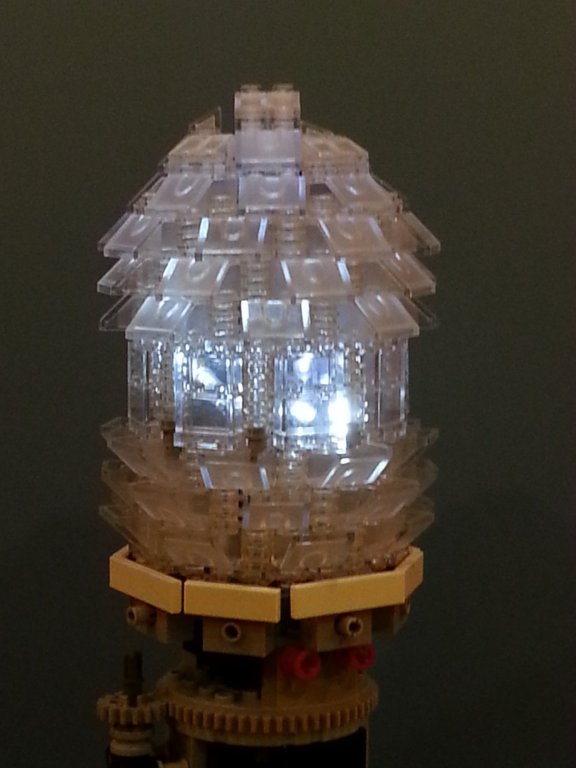
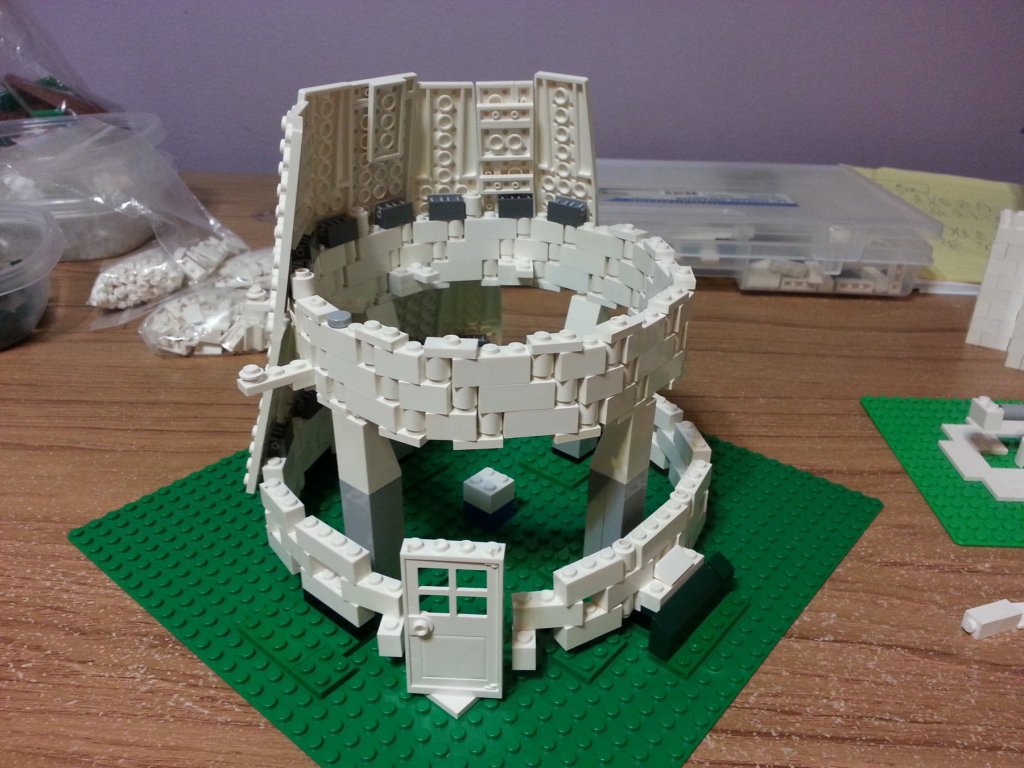
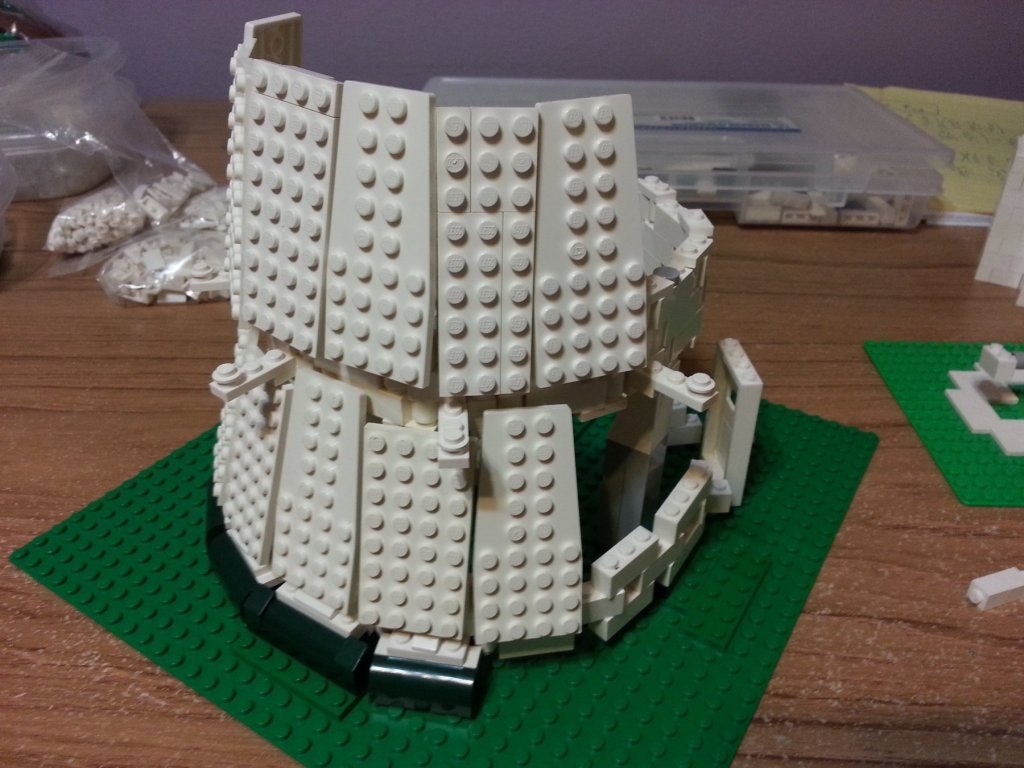
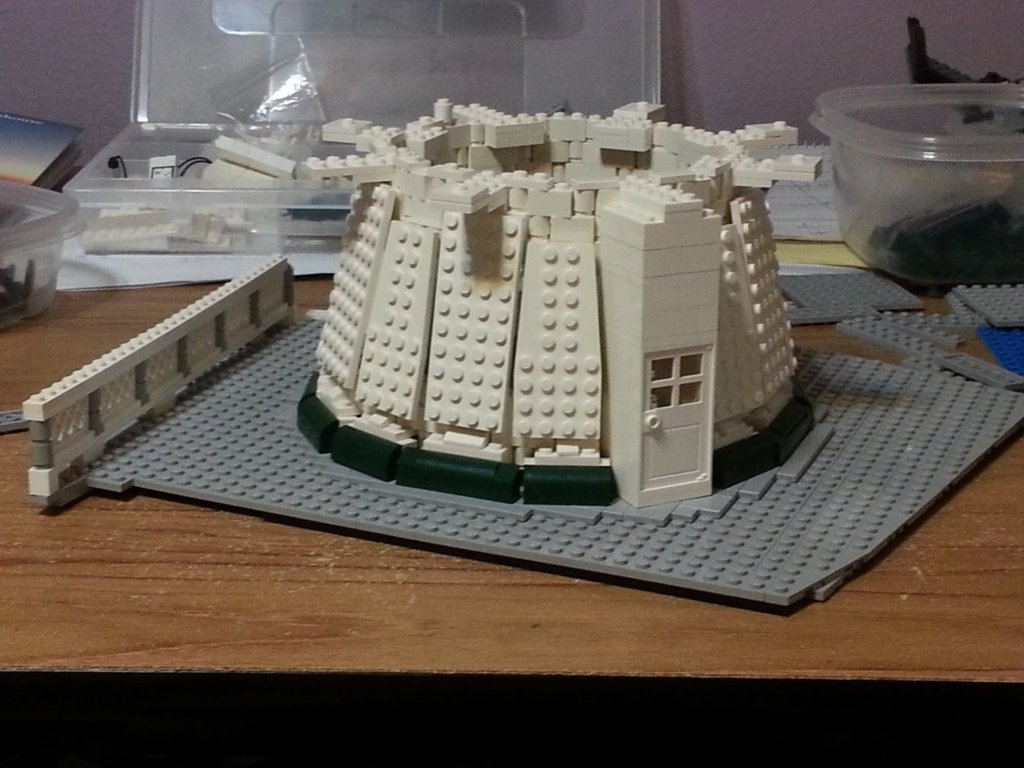
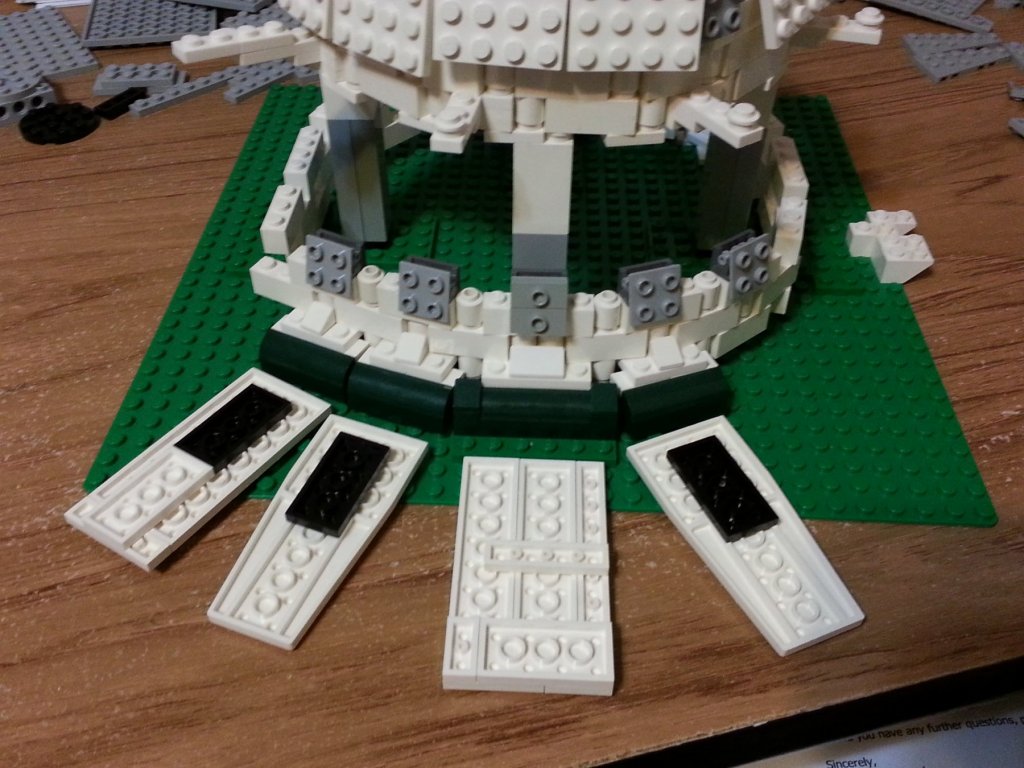
Next step was to get the 1st walkway around the base; starting with the supports, then the walkway and railing... Another important iconic feature is the Fresnel lens. This was also very tricky to treat well at this scale in Lego, so I ended up relying on the impression of a Fresnel lens rather than something that looked exactly correct. So I used transparent slopes on top and inverted transparent slopes at the bottom, then connected them in the middle with Lego technic pins. I also had to make it hollow and roomy enough for the Lego lights and leave a hole for the wires. Finally, it needed to be able to be mounted to something that I could use to rotate it with a motor. Mostly satisfied with that, I continued to make the lighthouse main body taller. First the second walkway, then the window housing to contain the Fresnel lens... Also, the ground level door and the upper level walkway to the adjacent cliff were put in here. Bundling up a sufficient number of lights and getting the wires out of the Fresnel lens... One challenge was that I needed to rotate the lens without twisting up the light wires on the drive axis. So finally I offset the rotation drive axis to the side long enough to let the wires escape before bringing it back to the center of rotation. Now ready to put the light tower into the 16 sided pyramidal tower... With a bit of planning, it dropped right in! Motor (and gearbox to further gear down minimum motor speed) to drive the Fresnel lens rotation is under the pentagonal base. Final chapter to be continued...


-
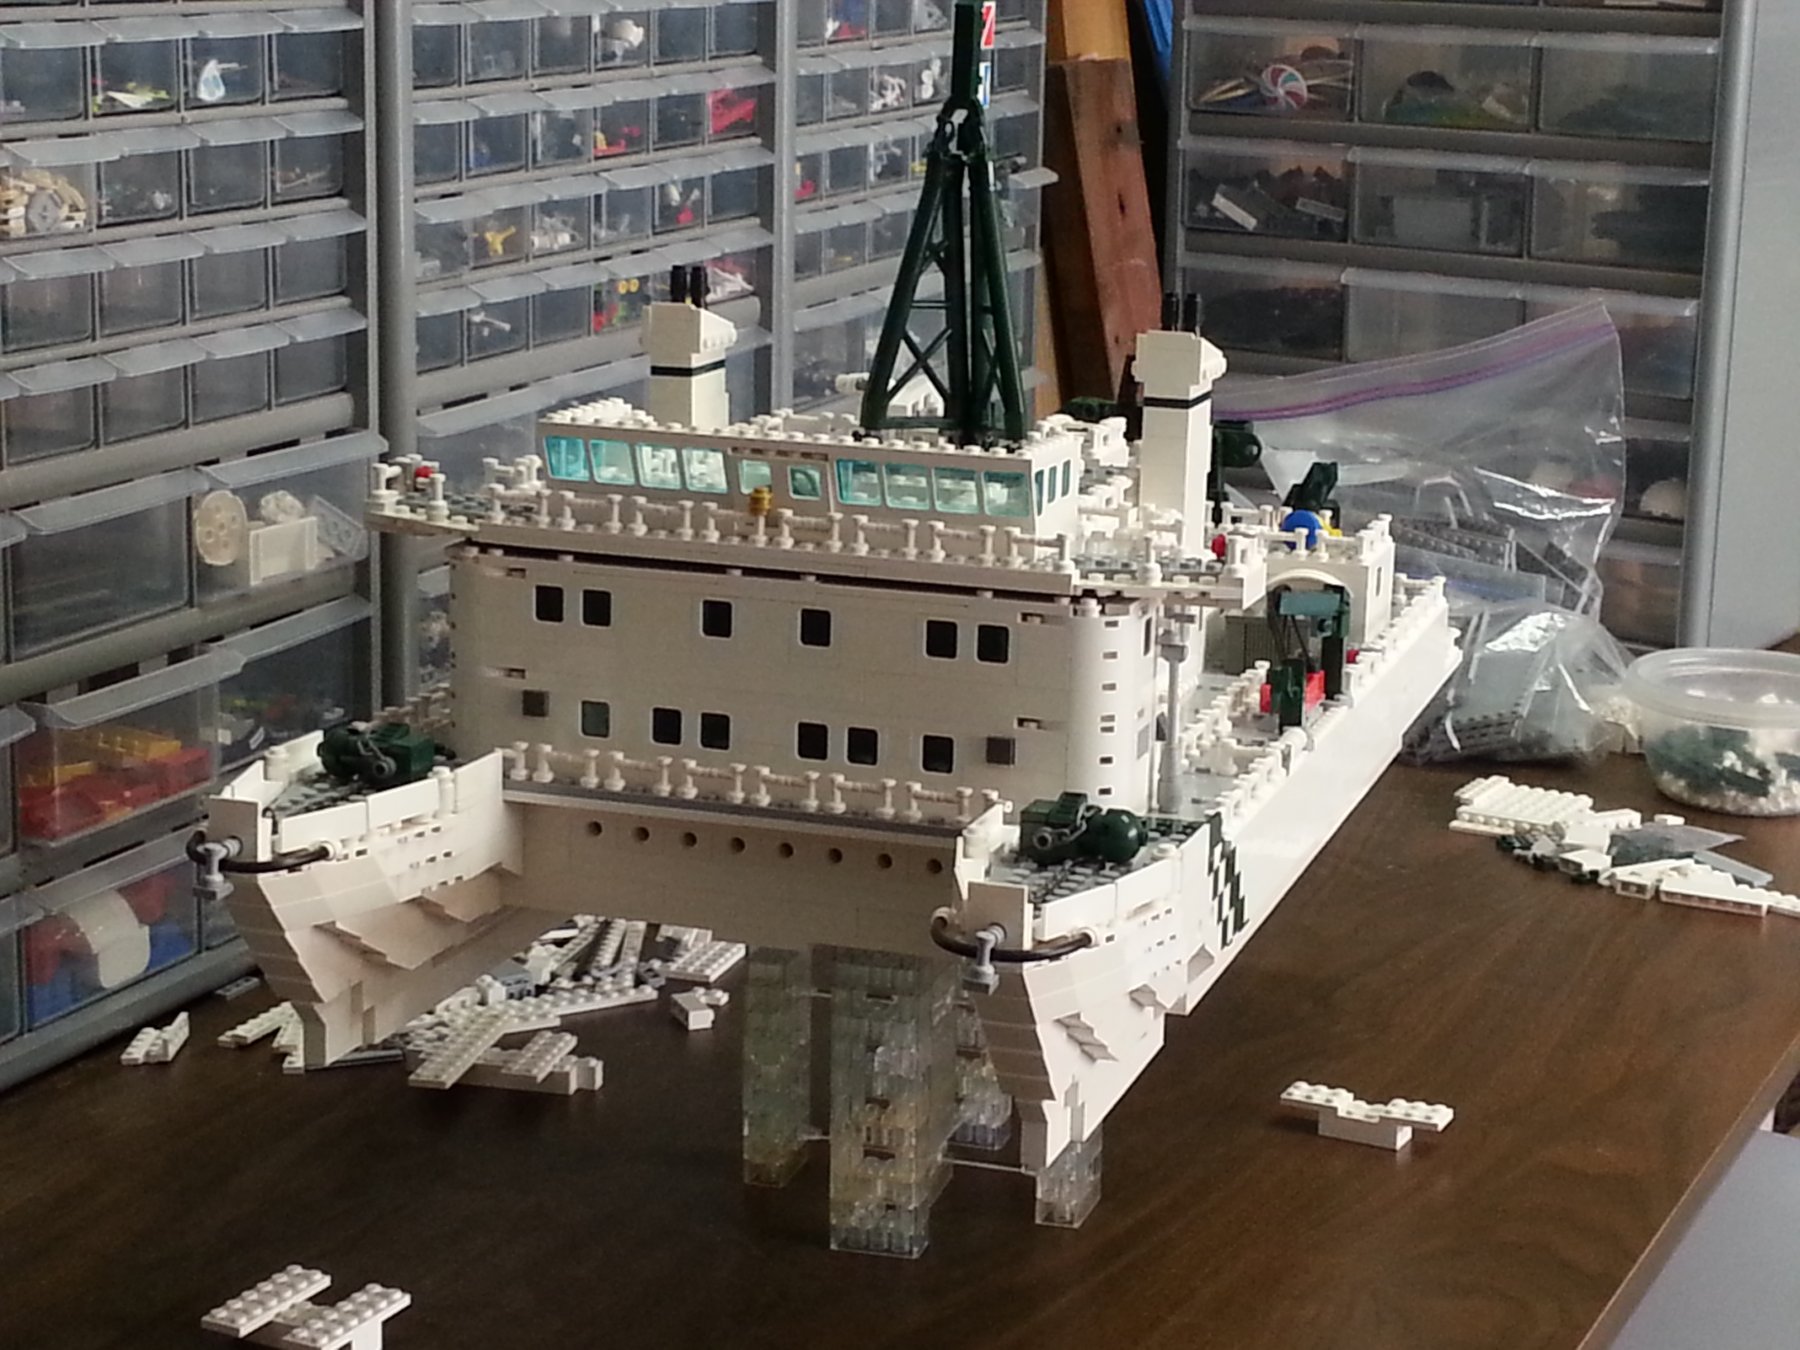
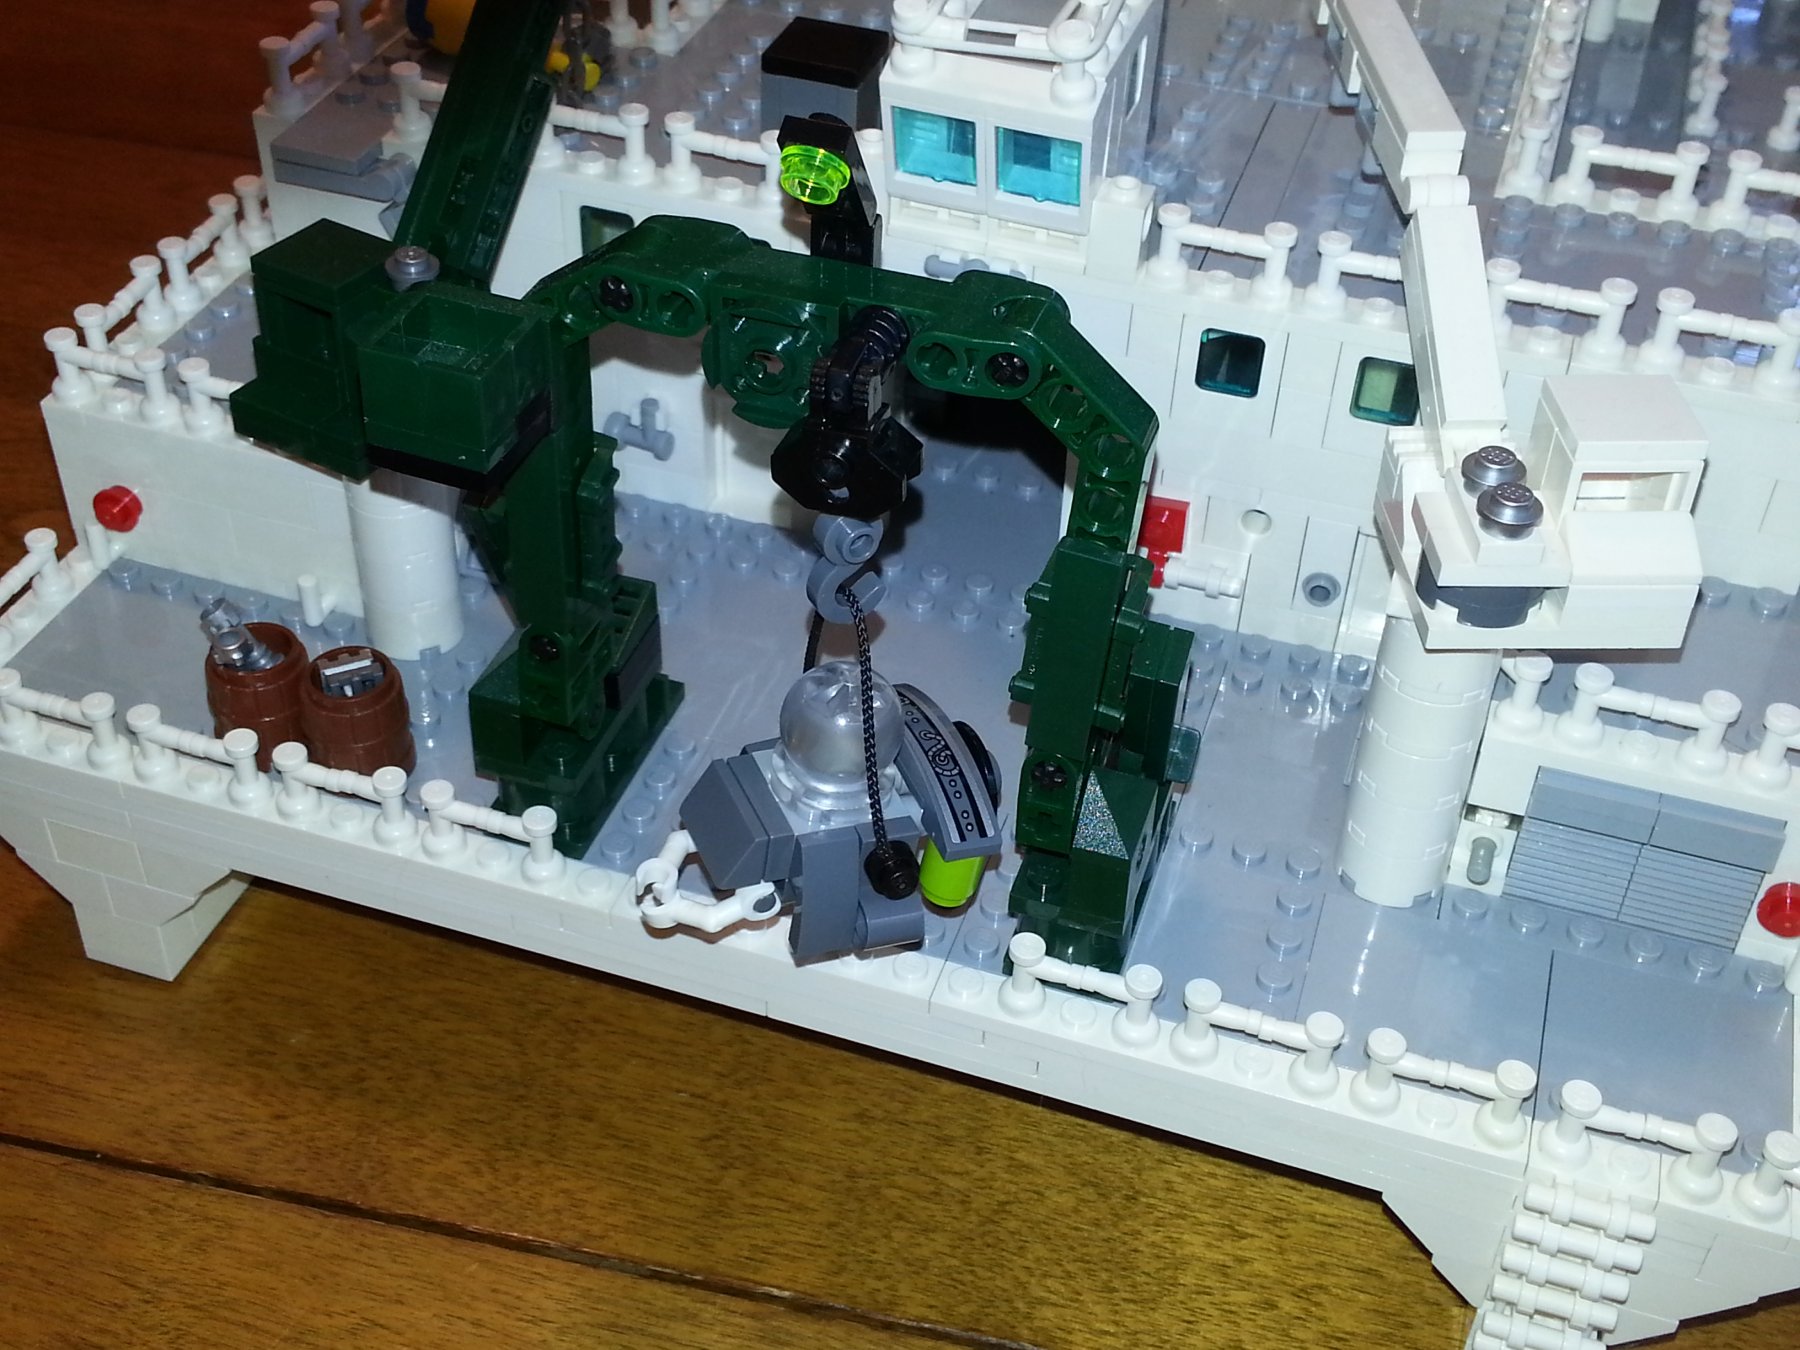
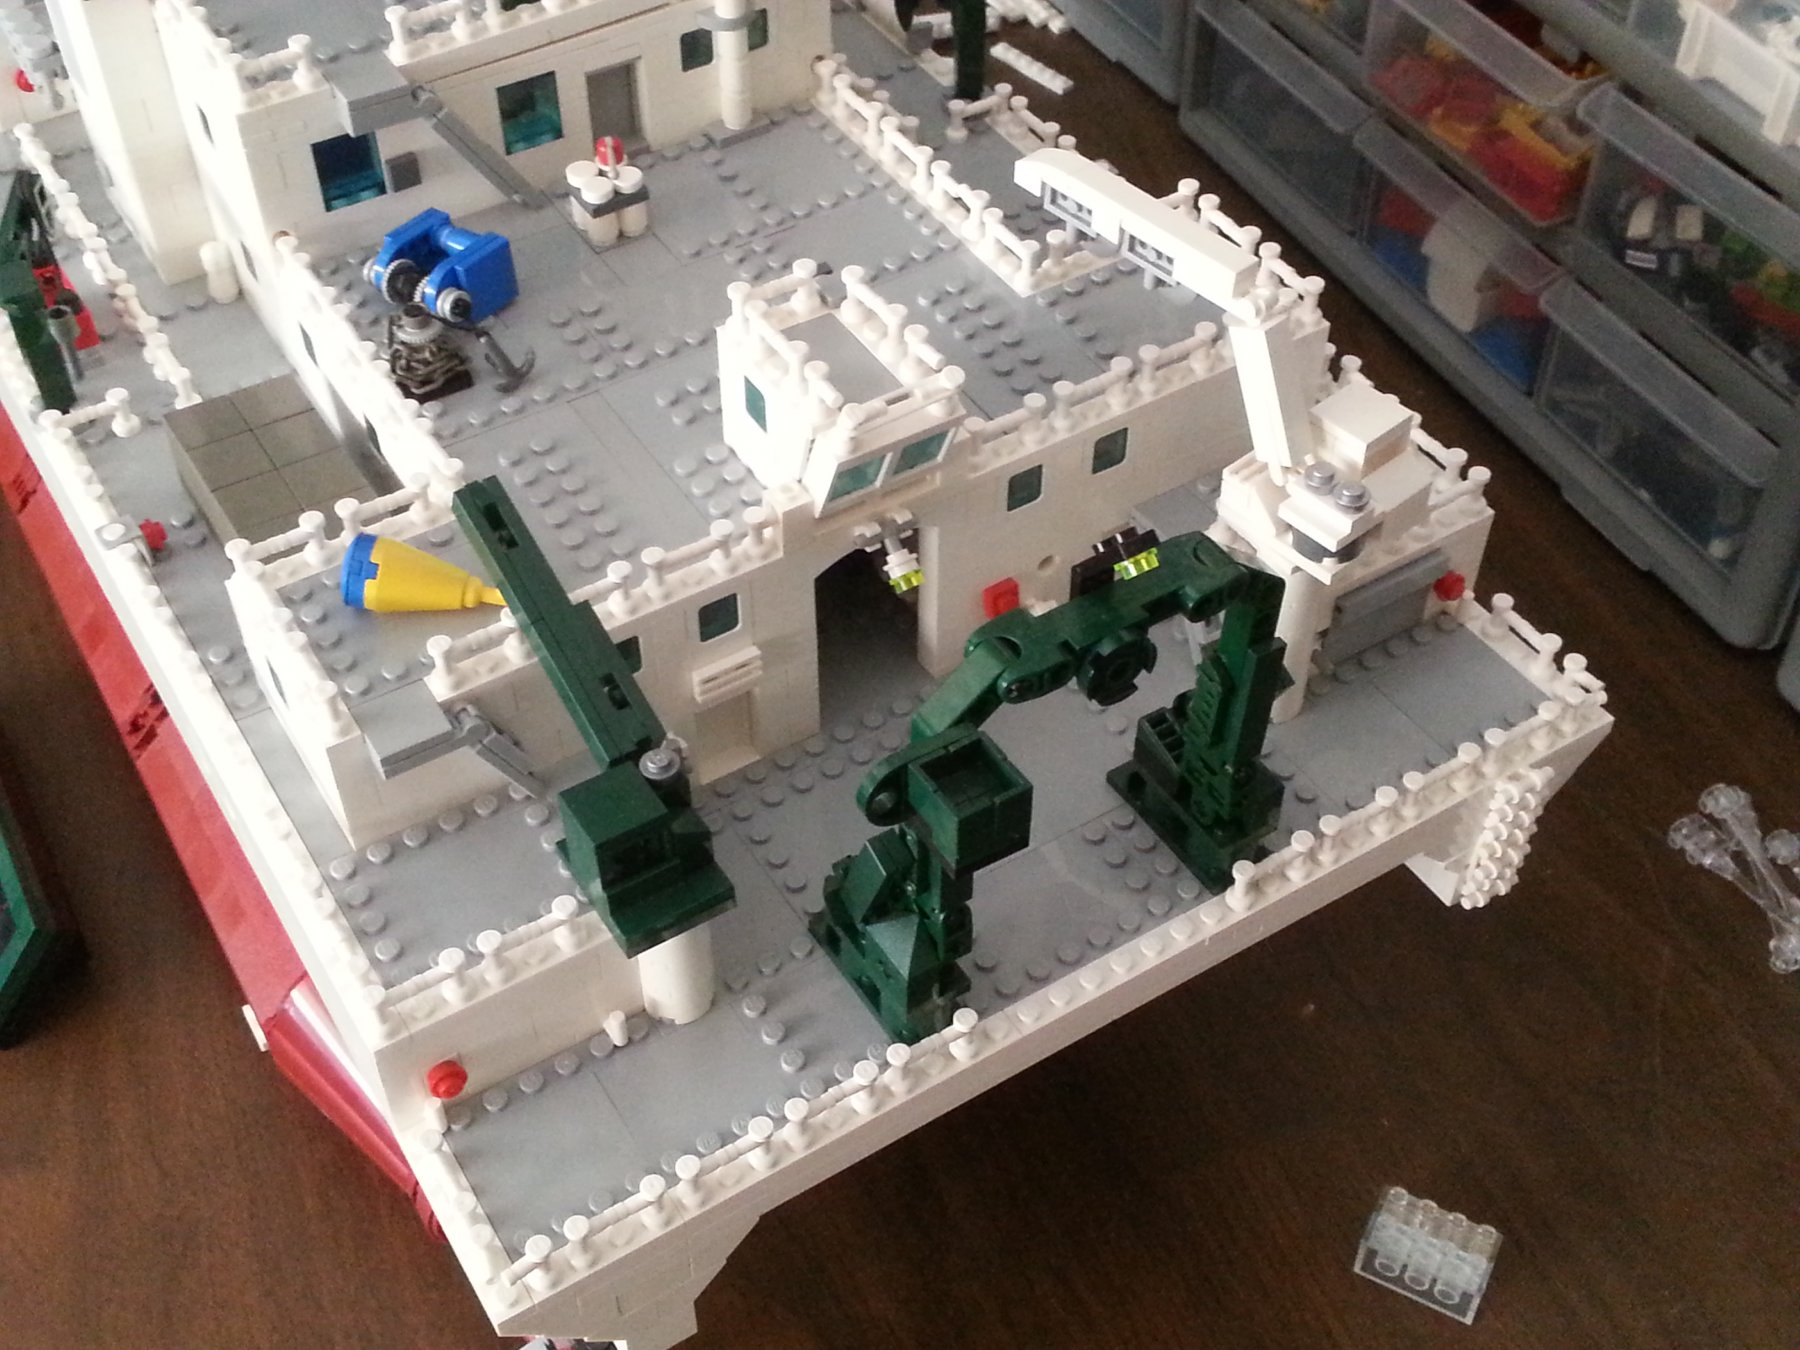
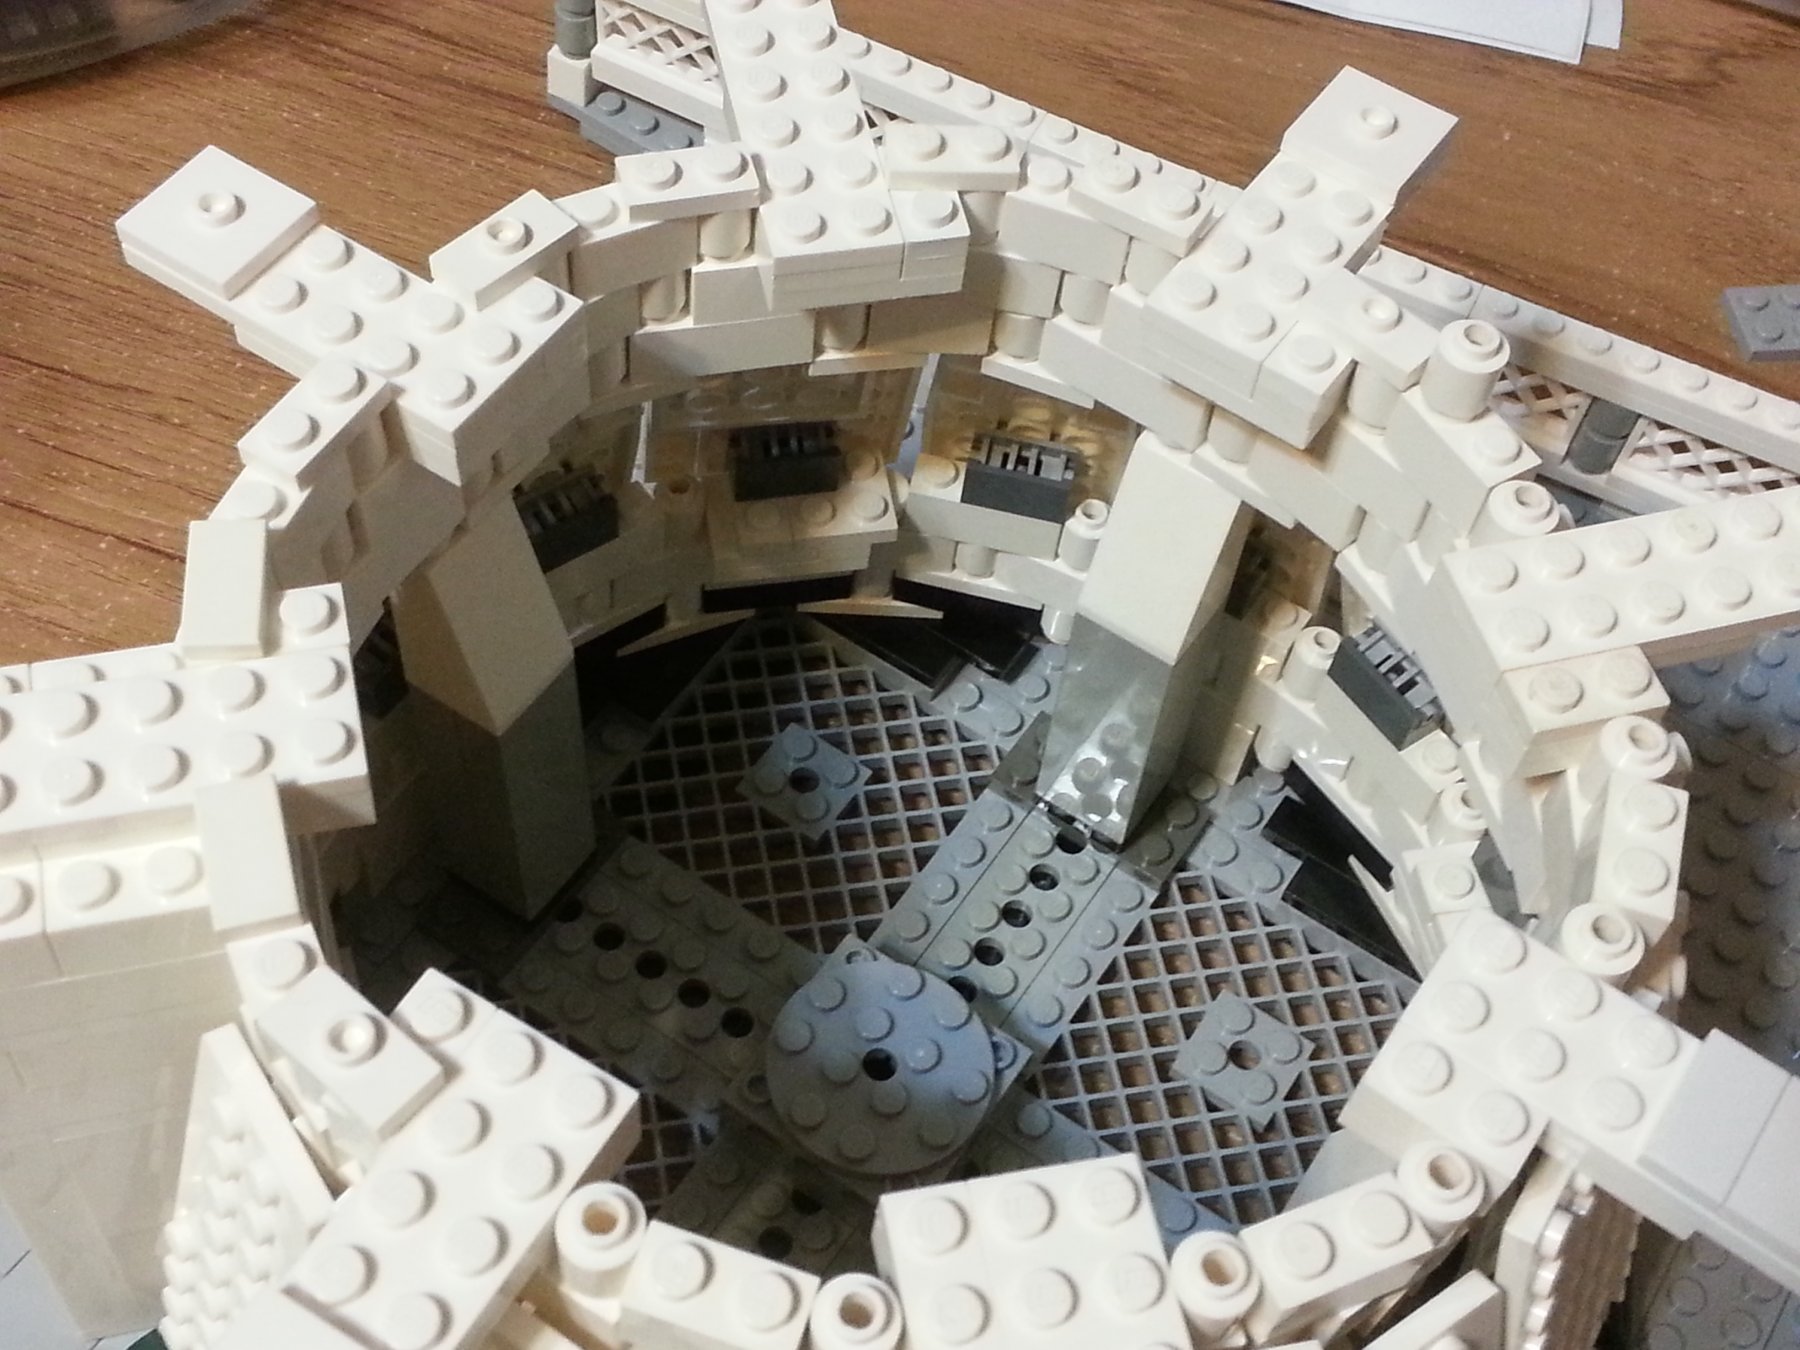
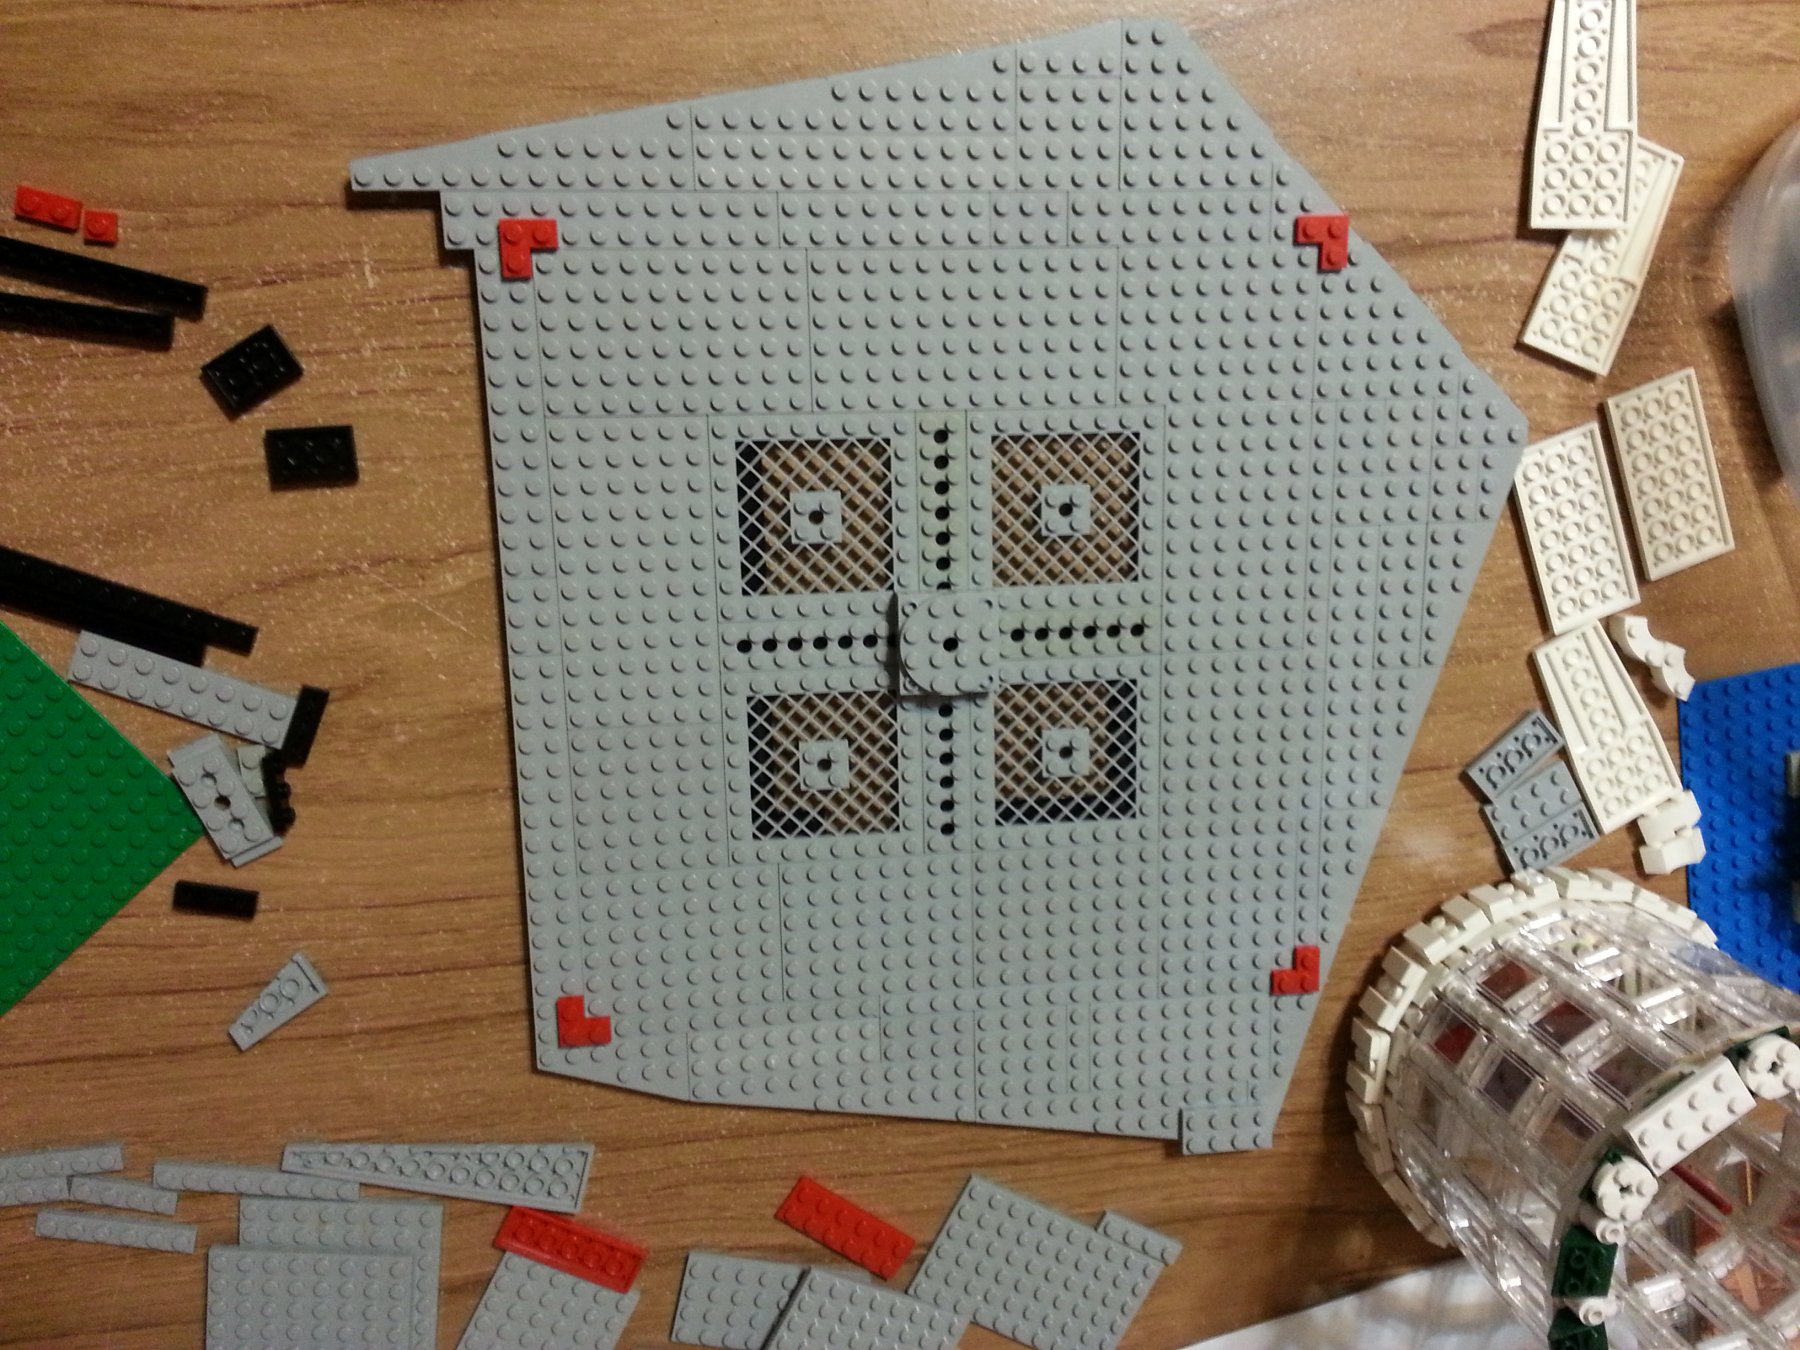
Okay, so continuing, I fixed lower hull to the upper hull and started trying to figure out how to build all the decks... I struggles a long time how to make the diagonal green painted lines the way I wanted them, and have the fit neatly against the white background. I could have gotten the straight green lines to work in either of the diagonal directions, but couldn't figure a way to get both at the same time. The few solutions I came up with just ended up looking worse than the stepped diagonal that I finally accepted. The lifting A-frame and the beginning of the equipment bay on the back deck... There are very limited part selection in the dark green color, so I have to be a bit creative with how I made the form of the A-frame. Battery box in place to light up the inside of the equipment bay... Wires will also lead to lights in the bridge. Looking down into equipment bay... Finished the next deck and continuing with the walls... At this point I needed to finish the interior of my Lego studio that we'd just built as an out-building, so I have to move my entire Lego part collection and build space temporarily into the garage! It wasn't ideal, but I kept going. To be continued...


-
Peter, you could be right about the yellowish tint to the propellers. It's not easy to tell but here is the reference picture I used. Trouble with using yellow would be that it's such a bright primary color that it might be too yellow. I'll see how it looks. I think I have all the parts needed.

-
Do it, Peter! Take 5 minutes to rake through the ol' parts and see how powerful the nostalgia is. 😉 I neglected Lego from 17 - 40 years old , so took a bit to get reacquainted, but worth it.
-
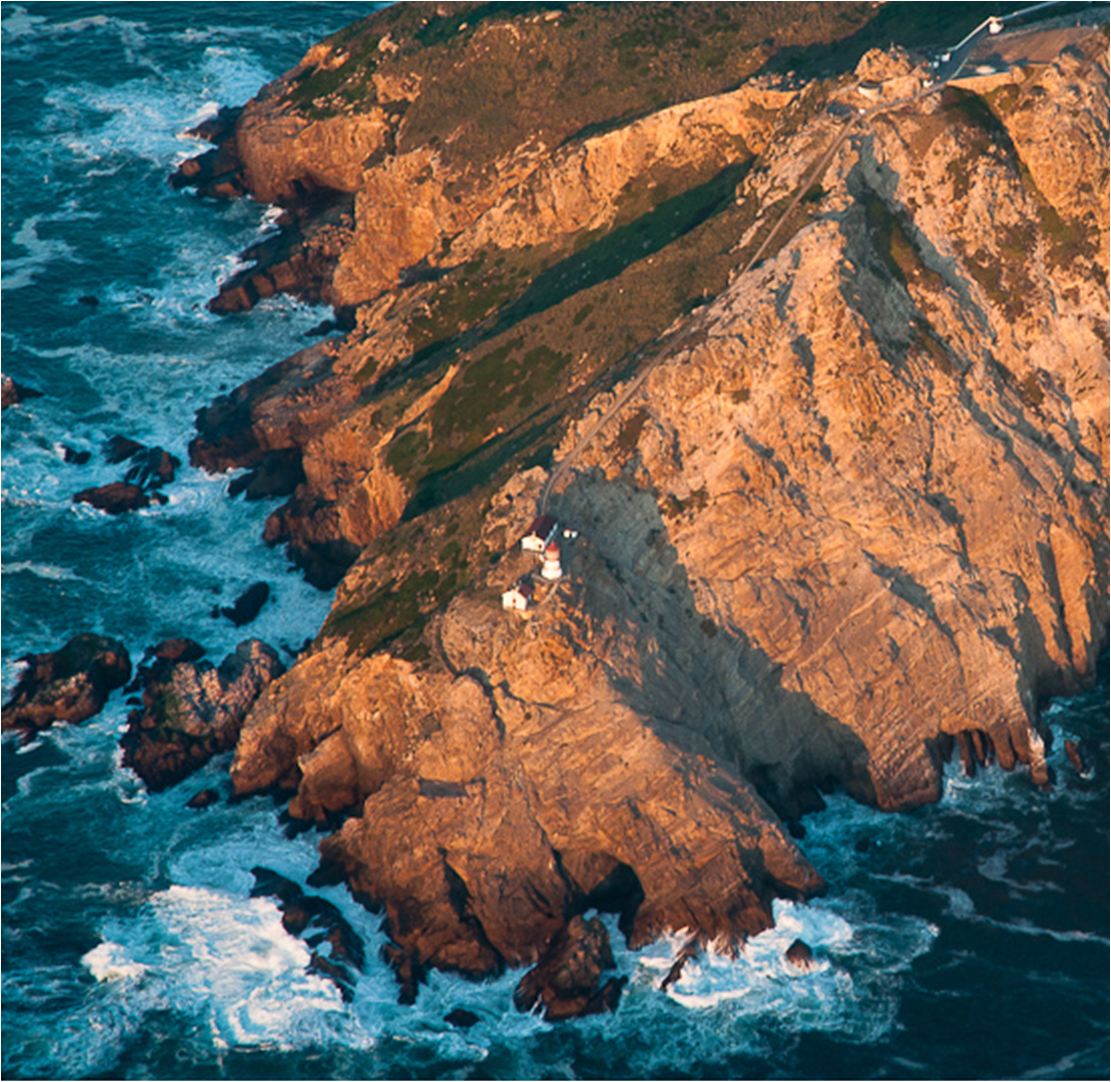
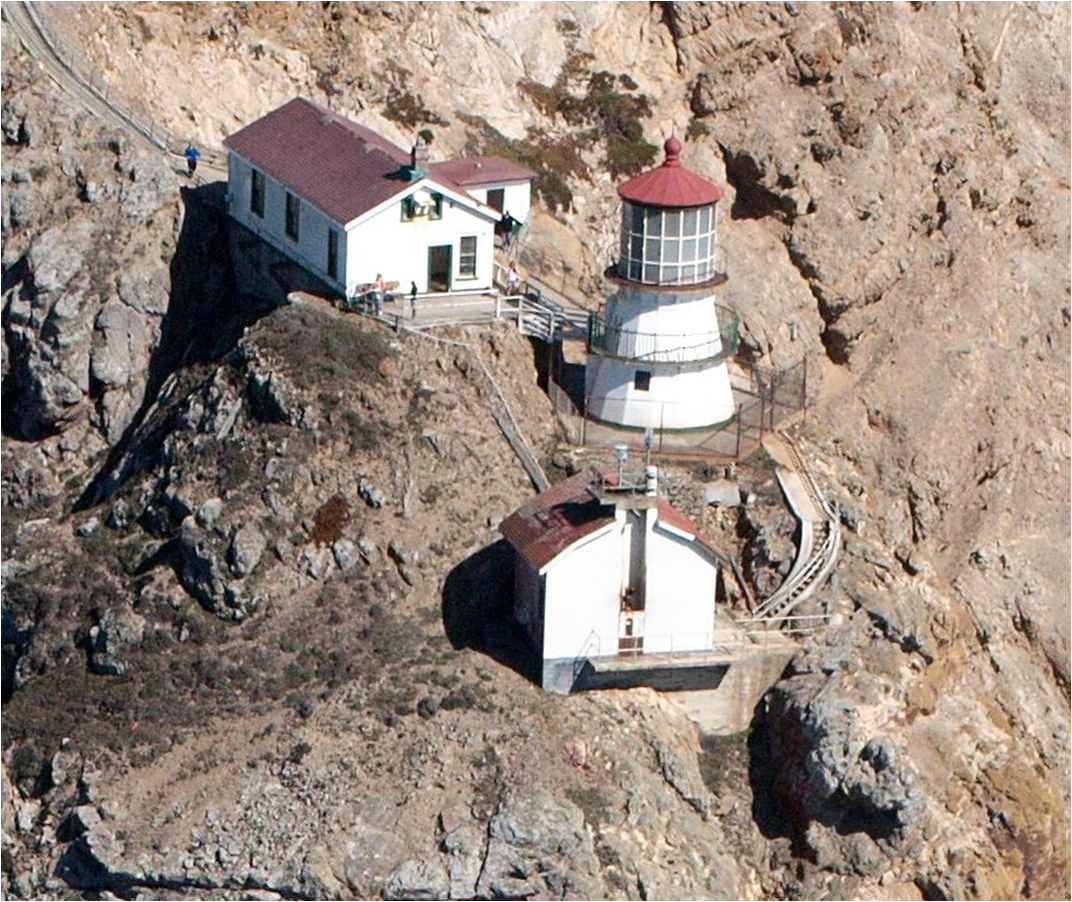
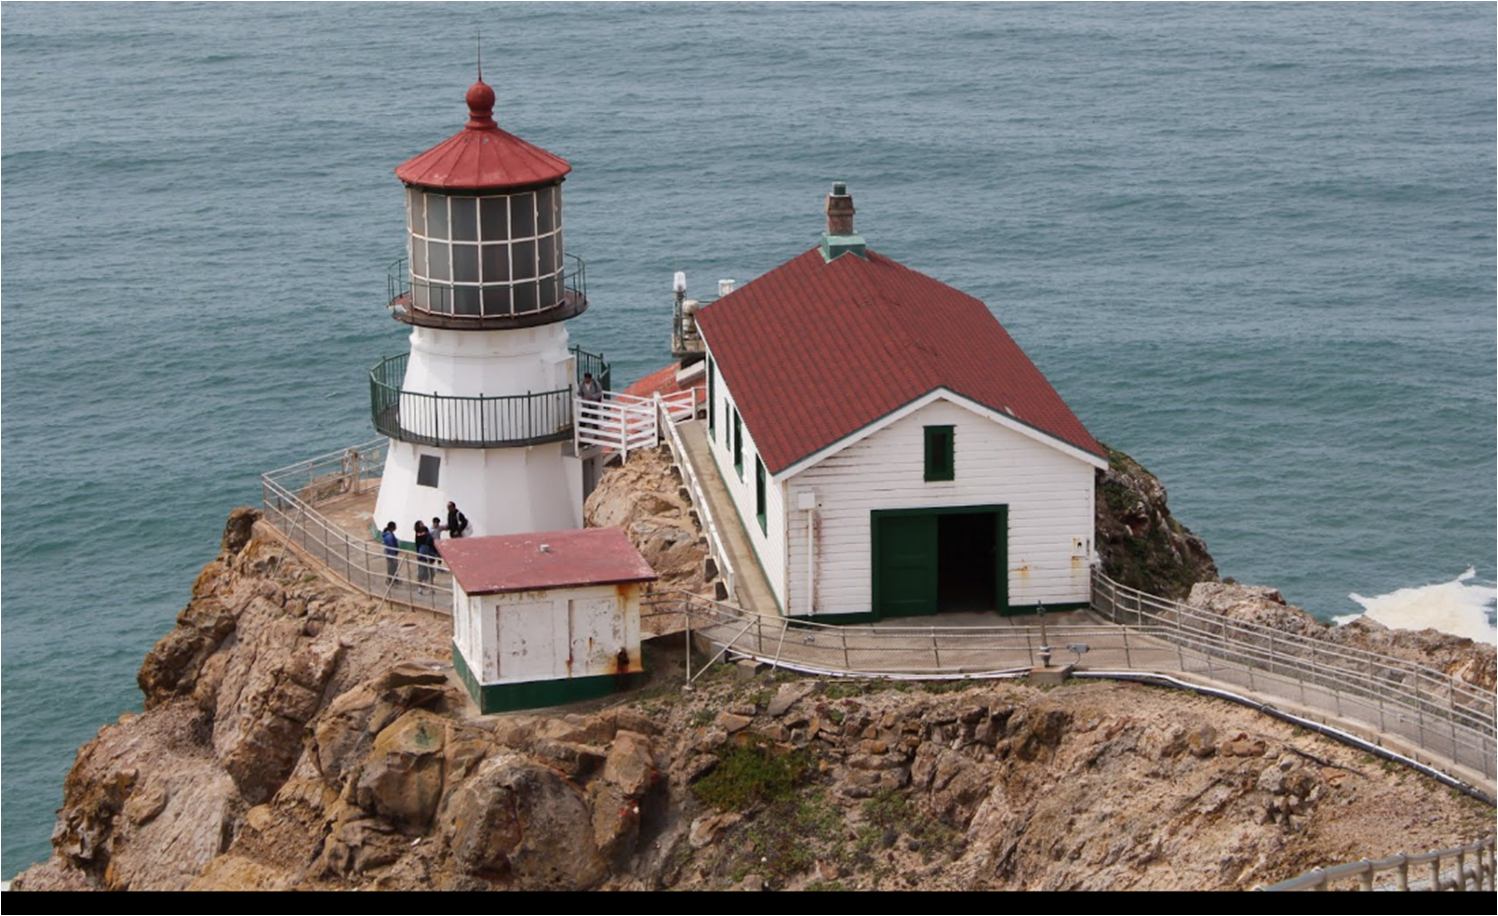
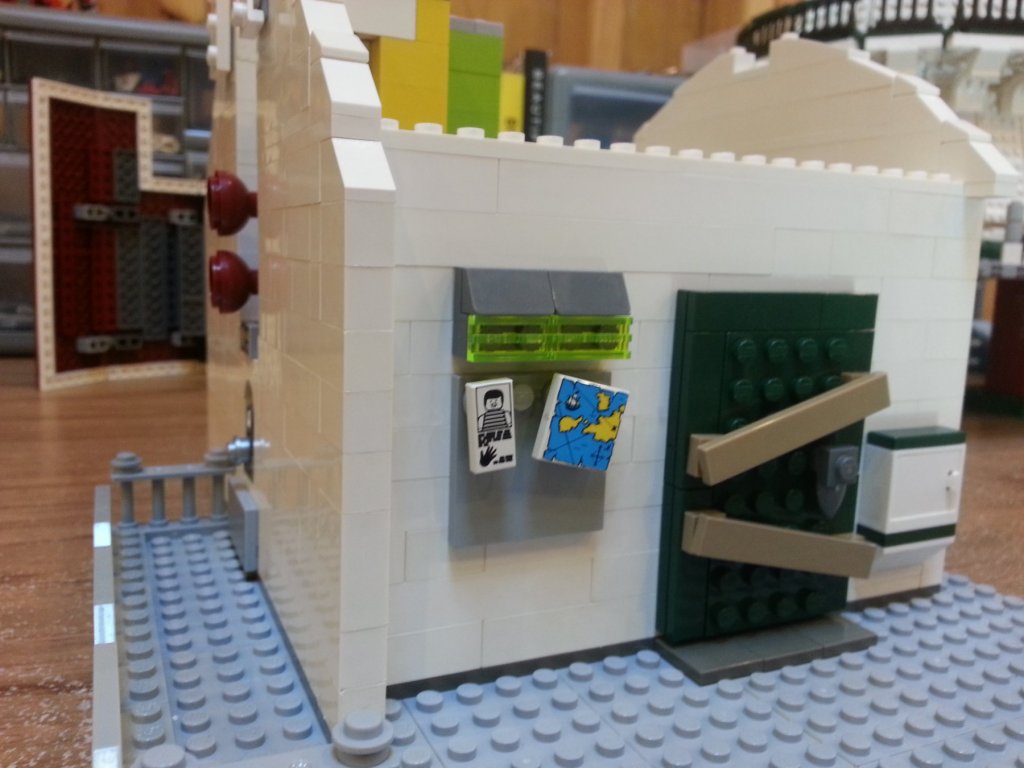
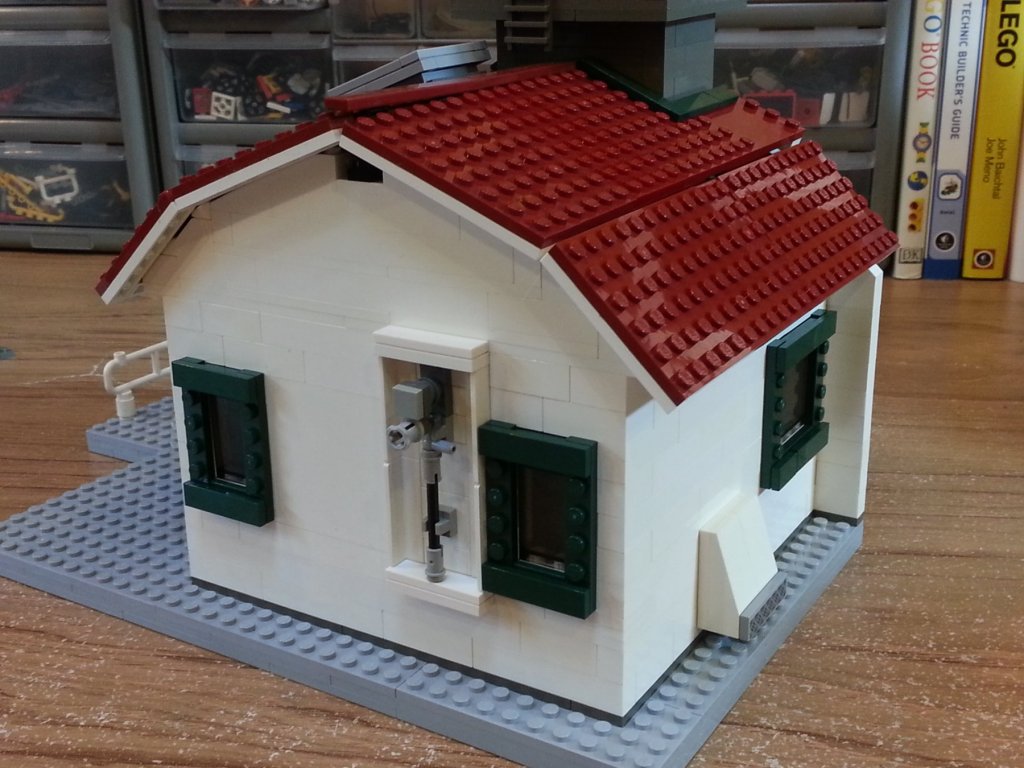
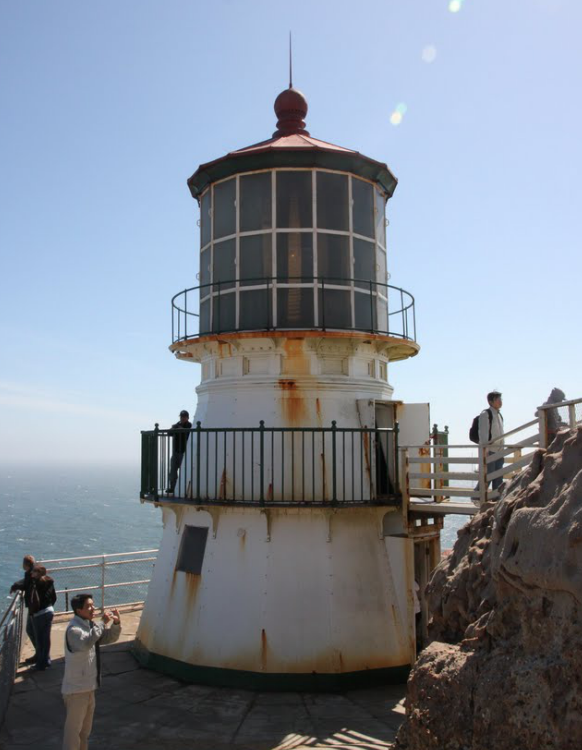
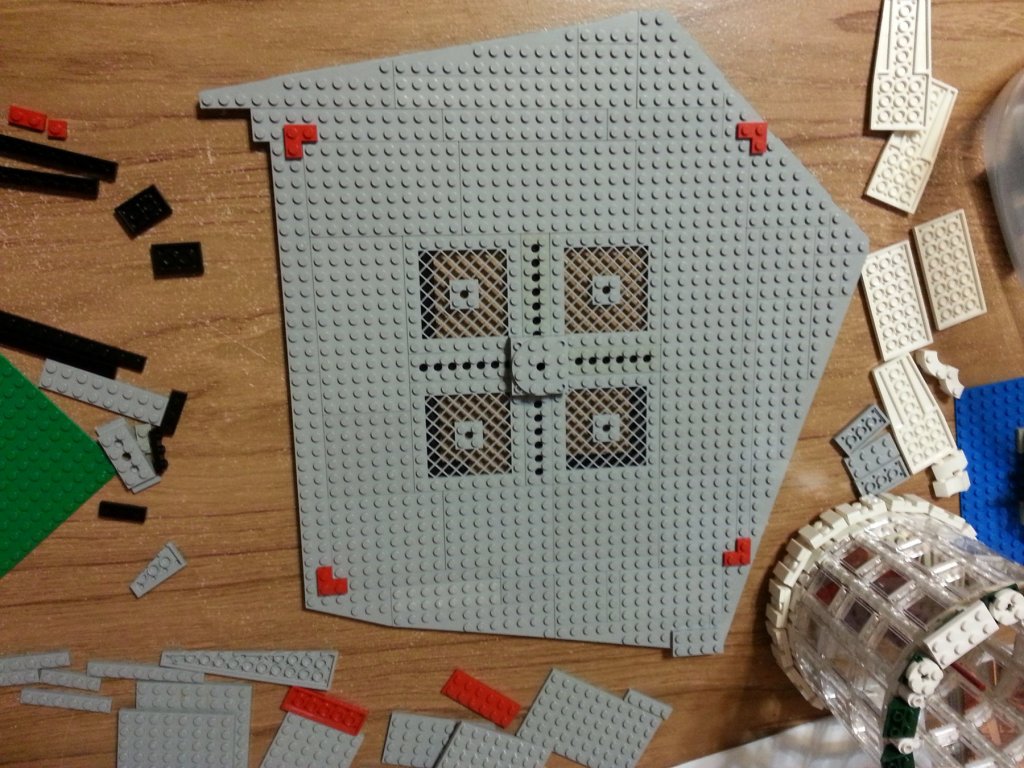
Here I'm going to post some of the process I went through to build my Lego model of the Point Reyes Lighthouse, out here just north of the Golden Gate Bridge. My wife and I went out to see it when my parents were visiting, and it just struck me as so interesting a structure that I knew I had to give it a shot. The base of the lighthouse is essentially a 16 sided pyramid, so that just screams out to be done in Lego, right? </sarcasm> But seriously, the difficulty of it is what makes it seem worth all the time that invariably goes into a big model. I know everyone here understands this well! I'm going to copy/paste a few things here up front from my Kilo Moana post, just to get them on record. Then we can begin. Any images herein that do not present actual Lego bricks are most likely not mine and scavenged from the internet in various places, and so I apologize in advance for the lack of attributions. I will include some of these images for reference. If anyone wants a source, I'll be happy to go back and locate it with an image search. Also, for the next big model I build (thinking of a large scale cross-section of a war galley as I've seen some post in this forum, but in Lego), I will take more photos with the build log in mind. I think I have enough to briefly tell the stories, but the majority of my pictures were taken to just remember what I did in various trick spots so I could remember how I solved tricky connection problems or fix something if it broke later. So on to the build... As you all do, my first step was to gather as much data and images as I could for the lighthouse and surrounding area and buildings, to get a basic idea if/how I could make it and what scale I should use. Initially I wanted to do it all of course, but had to limit my scope to the lighthouse itself and equipment/navigation building just below it on the cliff side. Otherwise, the size would be impractically large or the scale would need to be so small that I couldn't treat all the details that I love to work with so much. Unlike the more traditional model making components I see on this site, Lego parts only get so small. Beyond that, the best that can be done is to try creating an impression of details as from the limited texture and color choices available within the Lego system. The Lighthouse with 16 sided pyramidal base, built in 1870 ... And the lower equipment building... The roof also contains the modern navigation equipment and beacons actually used since the station was automated in 1975. So after determining the scope of the model, I needed to figure out the scale. Sometimes the scale is determined my the size of a Lego minifigure "person" if you want to include them in your model or display. The challenges here can be described and debated for pages, as they are in fact on many Lego-related forums and websites. Essentially, the minifigures are not human proportioned, so if you scale something by their height, they will be too thick to fit in anything you build. Conversely if you build to their width or volume, then they will be too short to fit with your model. In any case, many times your scale must be determined by the size of a specific Lego element that is essential to capturing a necessary characteristic feature of your model. This was the case for me here. I wanted the windows to the enclosure that contains the Fresnel lens to be the right size, since those window parts are limited and their appearance seemed to me to be essential for the overall look of the model. This in balance with a few other part-driven practical details absolutely set my scale to be about 1:27. Conveniently, this is basically in the range of the generally accepted "minifigure scales" that people use (around 1:25 to 1:42). So in some of these pictures you might see a Lego park ranger, as the Lighthouse is part of the NPS Point Reyes National Seashore. Once I got that sorted out and gathered a few parts for building, the first step was to prototype how to get the 16 sided pyramidal effect I wanted and still attach the raised walkways around it. Here is what I started with... And some 2x1 "jumpers" (a piece to move the connecting studs 1/2 space) to center the panels as well as possible... You can see a few critical features from these pictures. The slope of the pyramidal sides is of course applied with the two-tone grey hinges. The requisite triangular shape of the sides was necessarily a compromise. The sides were not all exactly equal and left some gaps, but these are the compromises you struggle with, optimize, and finally need to accept when working within the Lego system. Also, one common way to get round structures as in the cylinder supporting the pyramidal sides is to alternate the typical square bricks with either gaps or round bricks. Otherwise, bending Lego brick walls can be done due to small but finite gap tolerances between the bricks, but only at much larger size scales. Once I felt that I had these techniques worked out, I needed the proper base to really start building it in earnest. As you can see in some of the photos (and from satellite images), he lighthouse is built on an almost pentagonal slab. This is also not ideal for Lego geometry, but part of the fun and I made it work... The holes are to accommodate the eventual drive shaft to rotate the Fresnel lens. To be continued... 😉


-
Thanks, James! Speaking of really massive, I'd like to next do something like AntonyUK's HMS Victory Cross Section by Antony but in Lego. Maybe not his full 1:36, but maybe half or nearly that. So much thanks to his model for my inspiration! ~ John
-
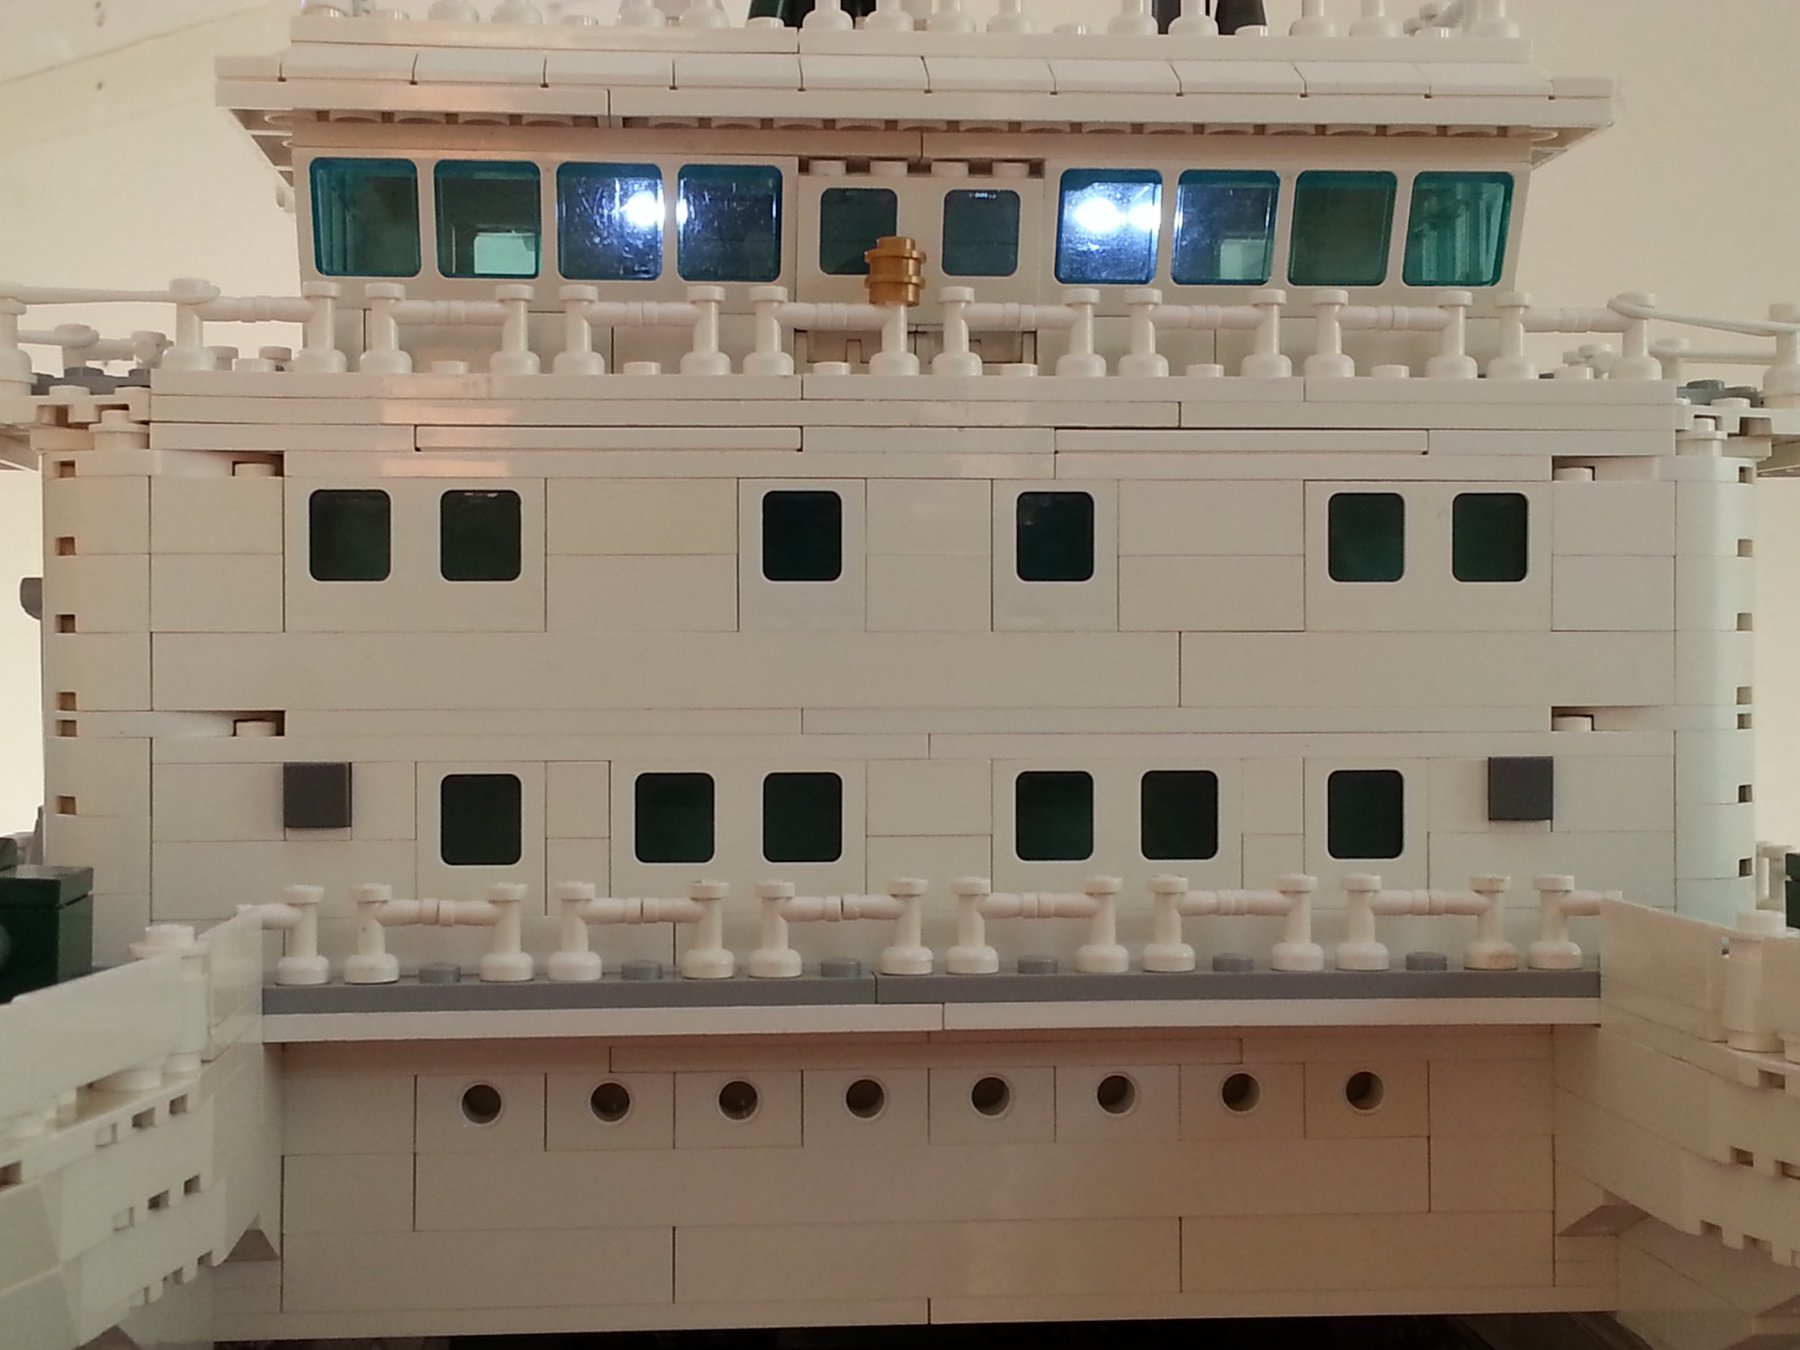
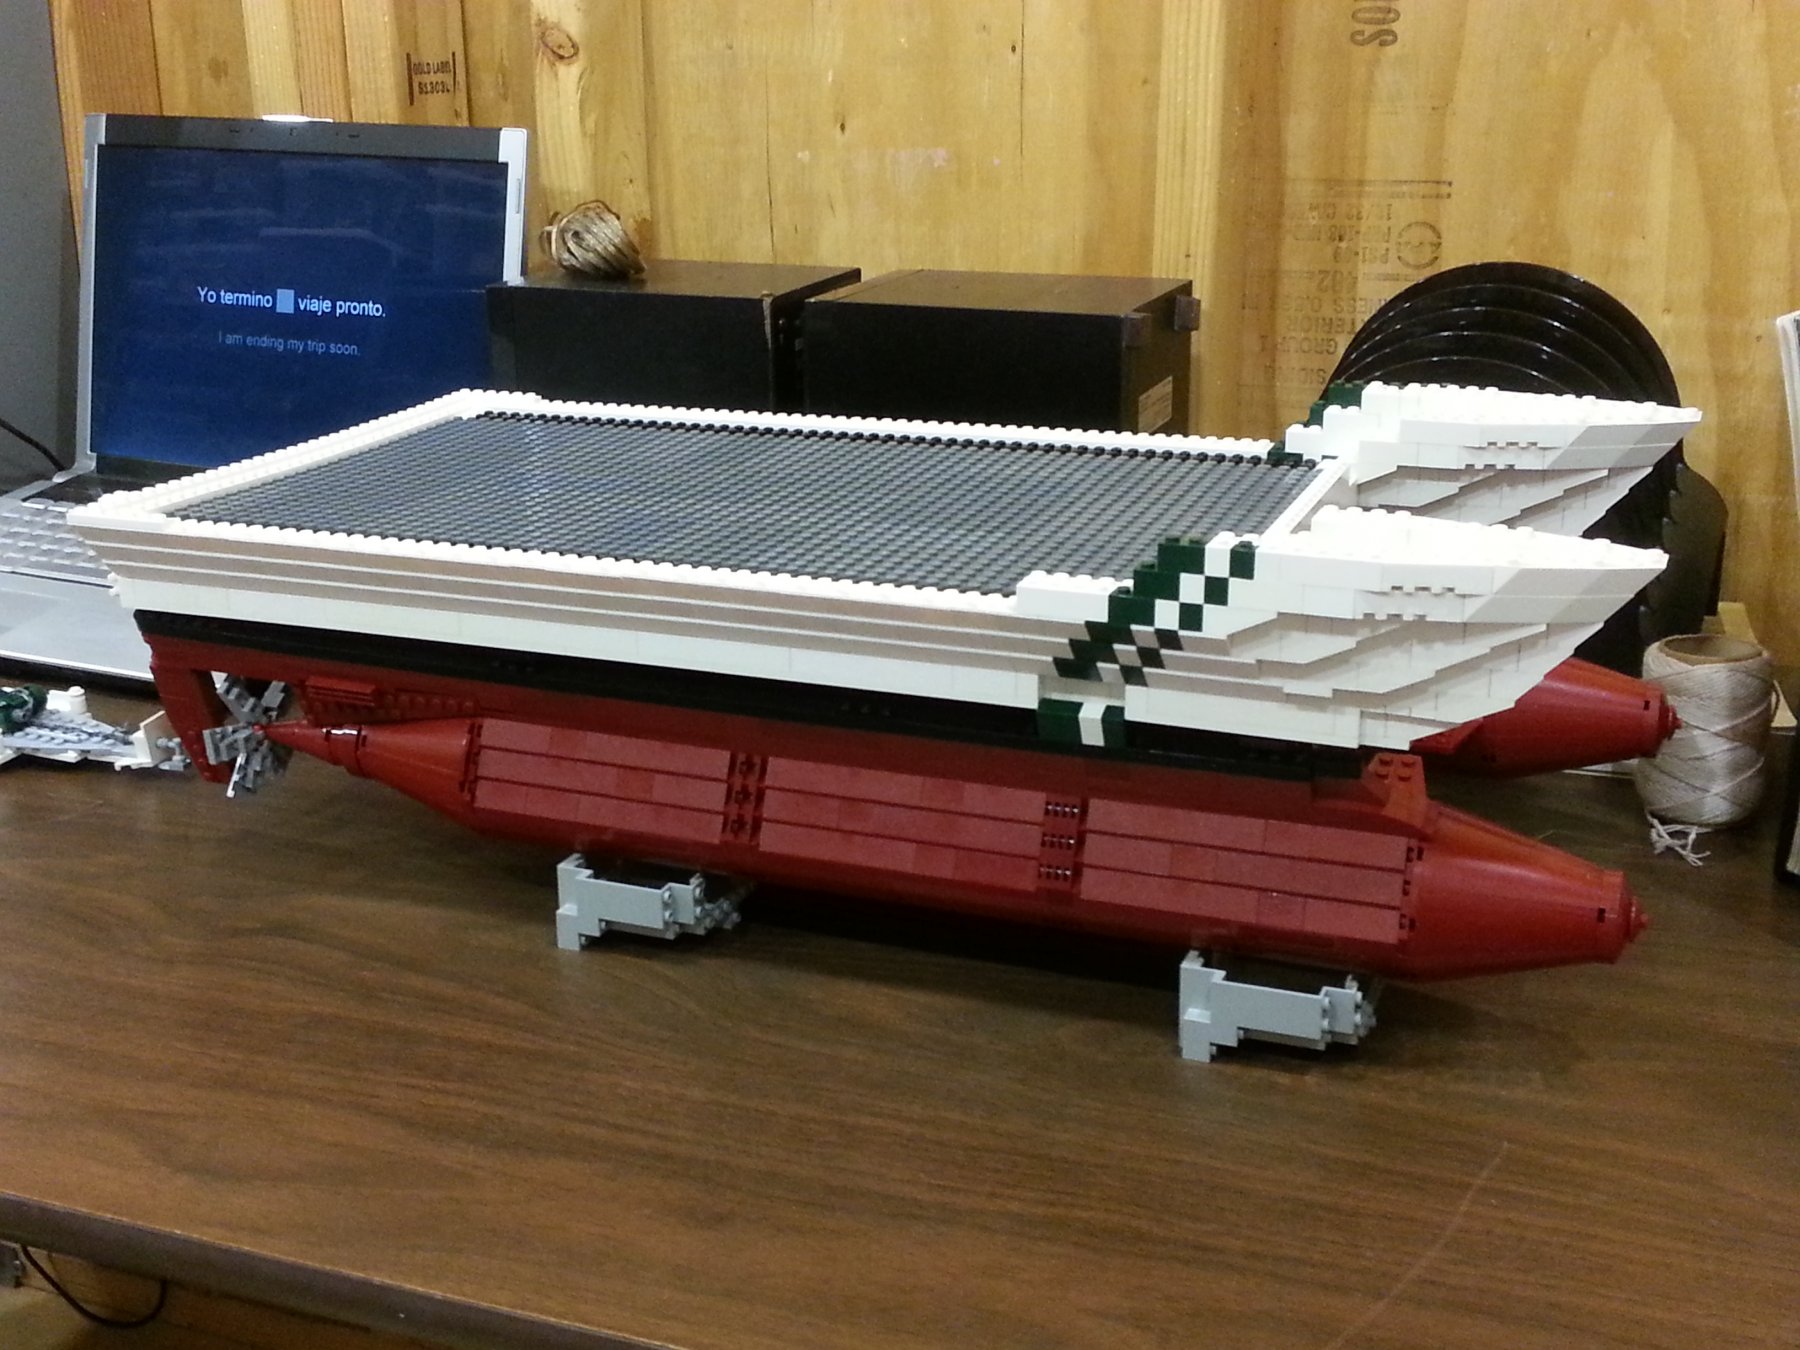
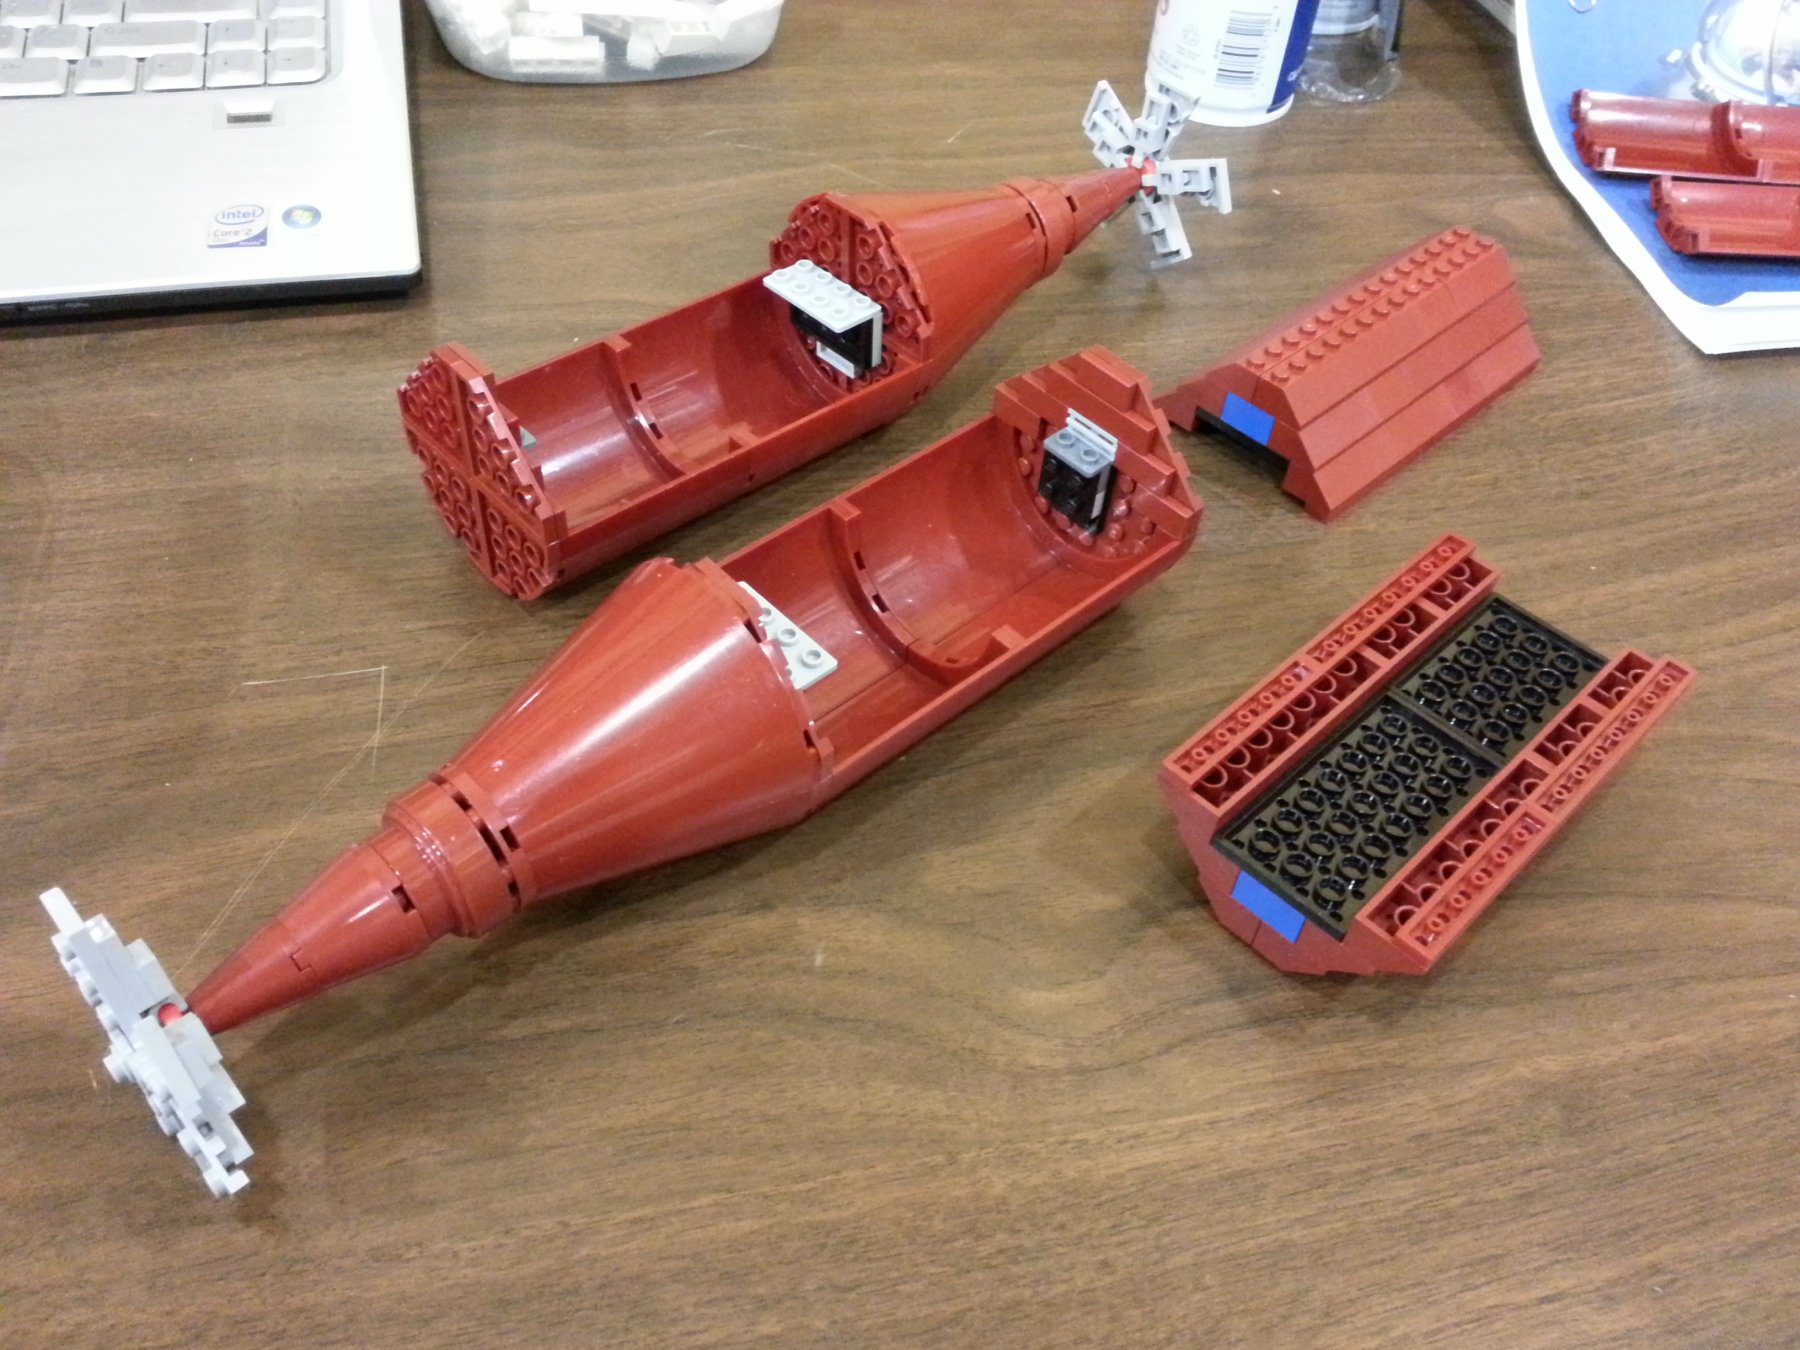
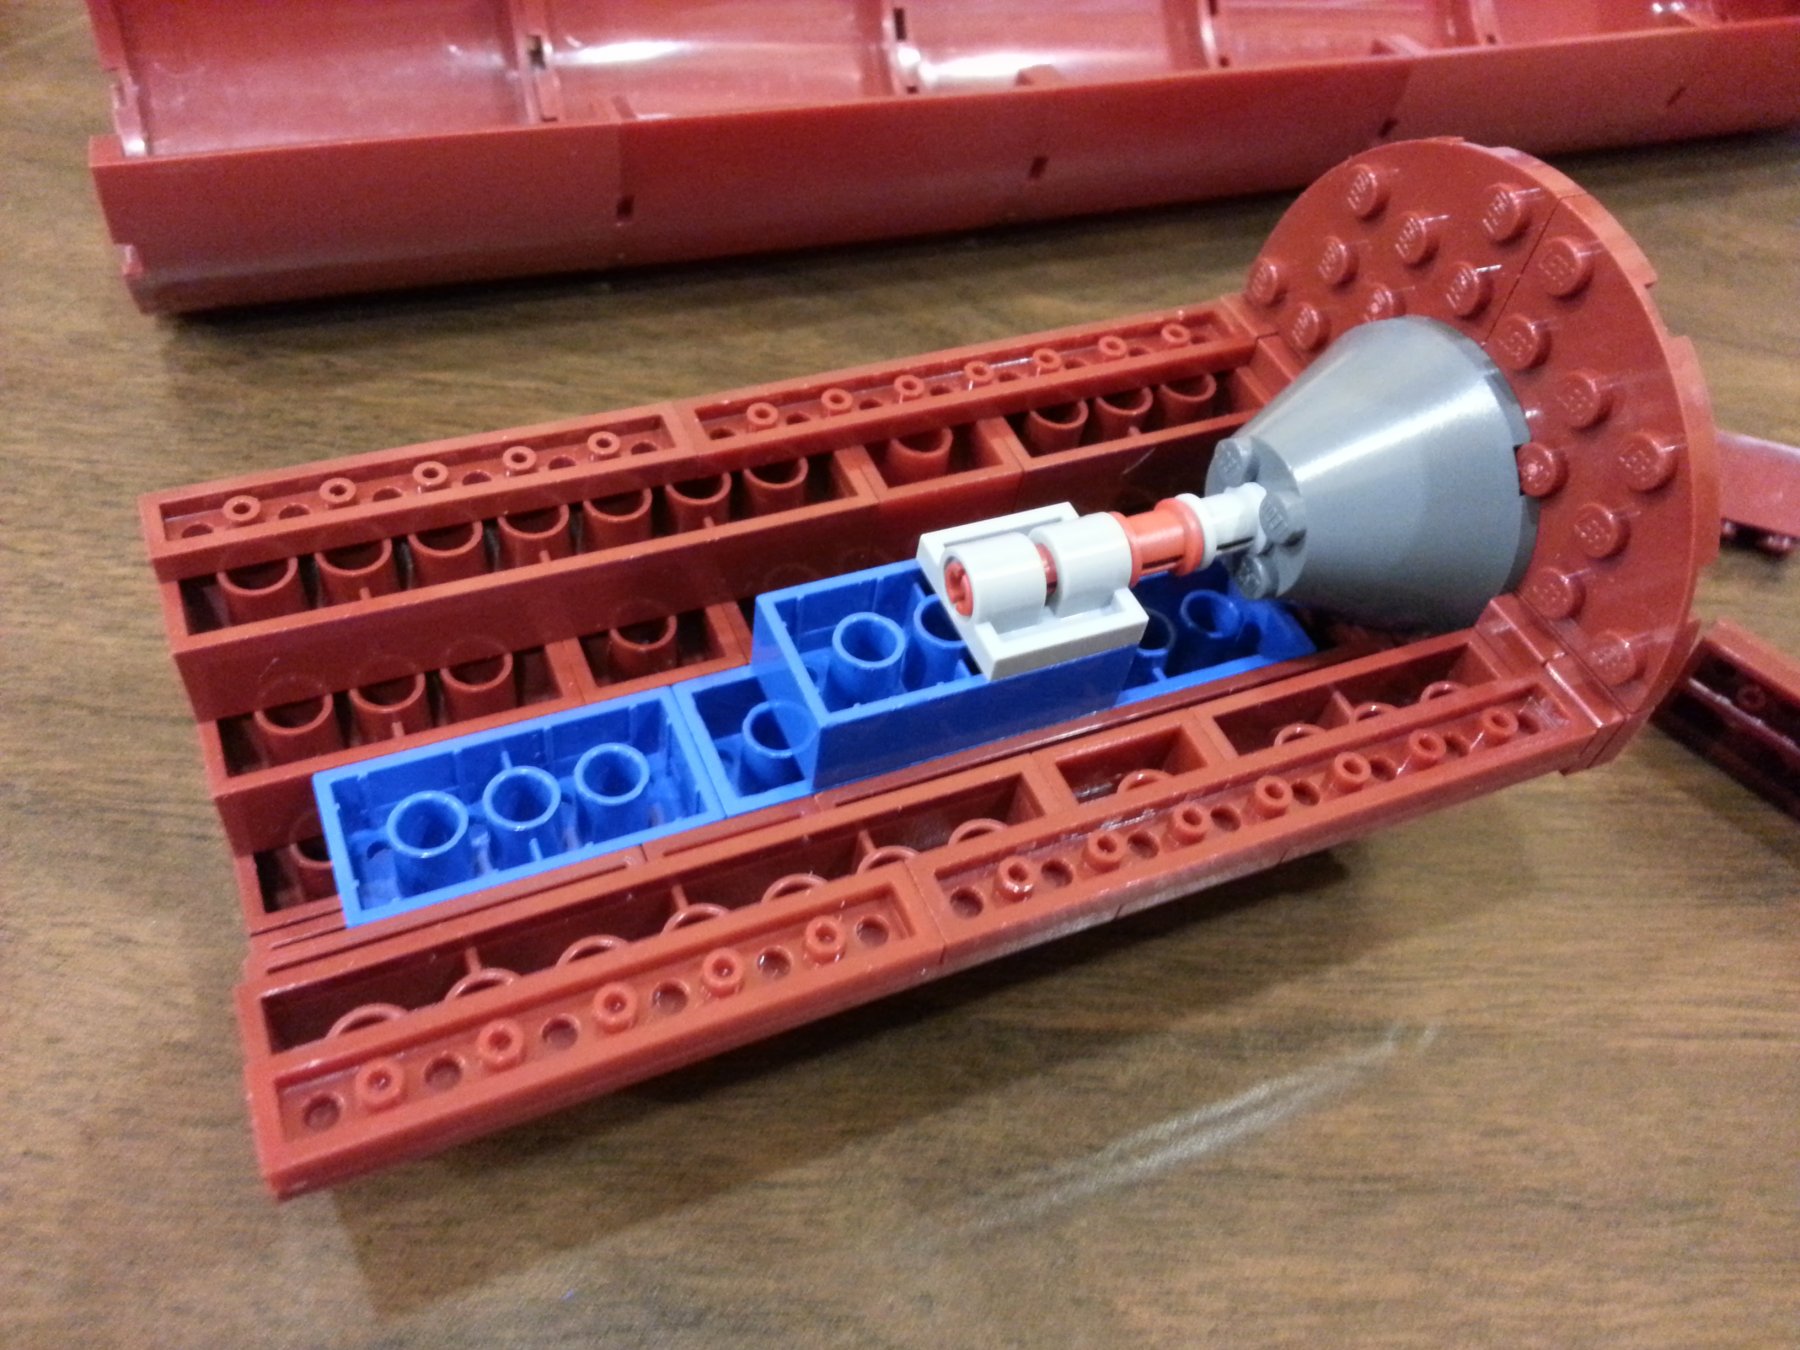
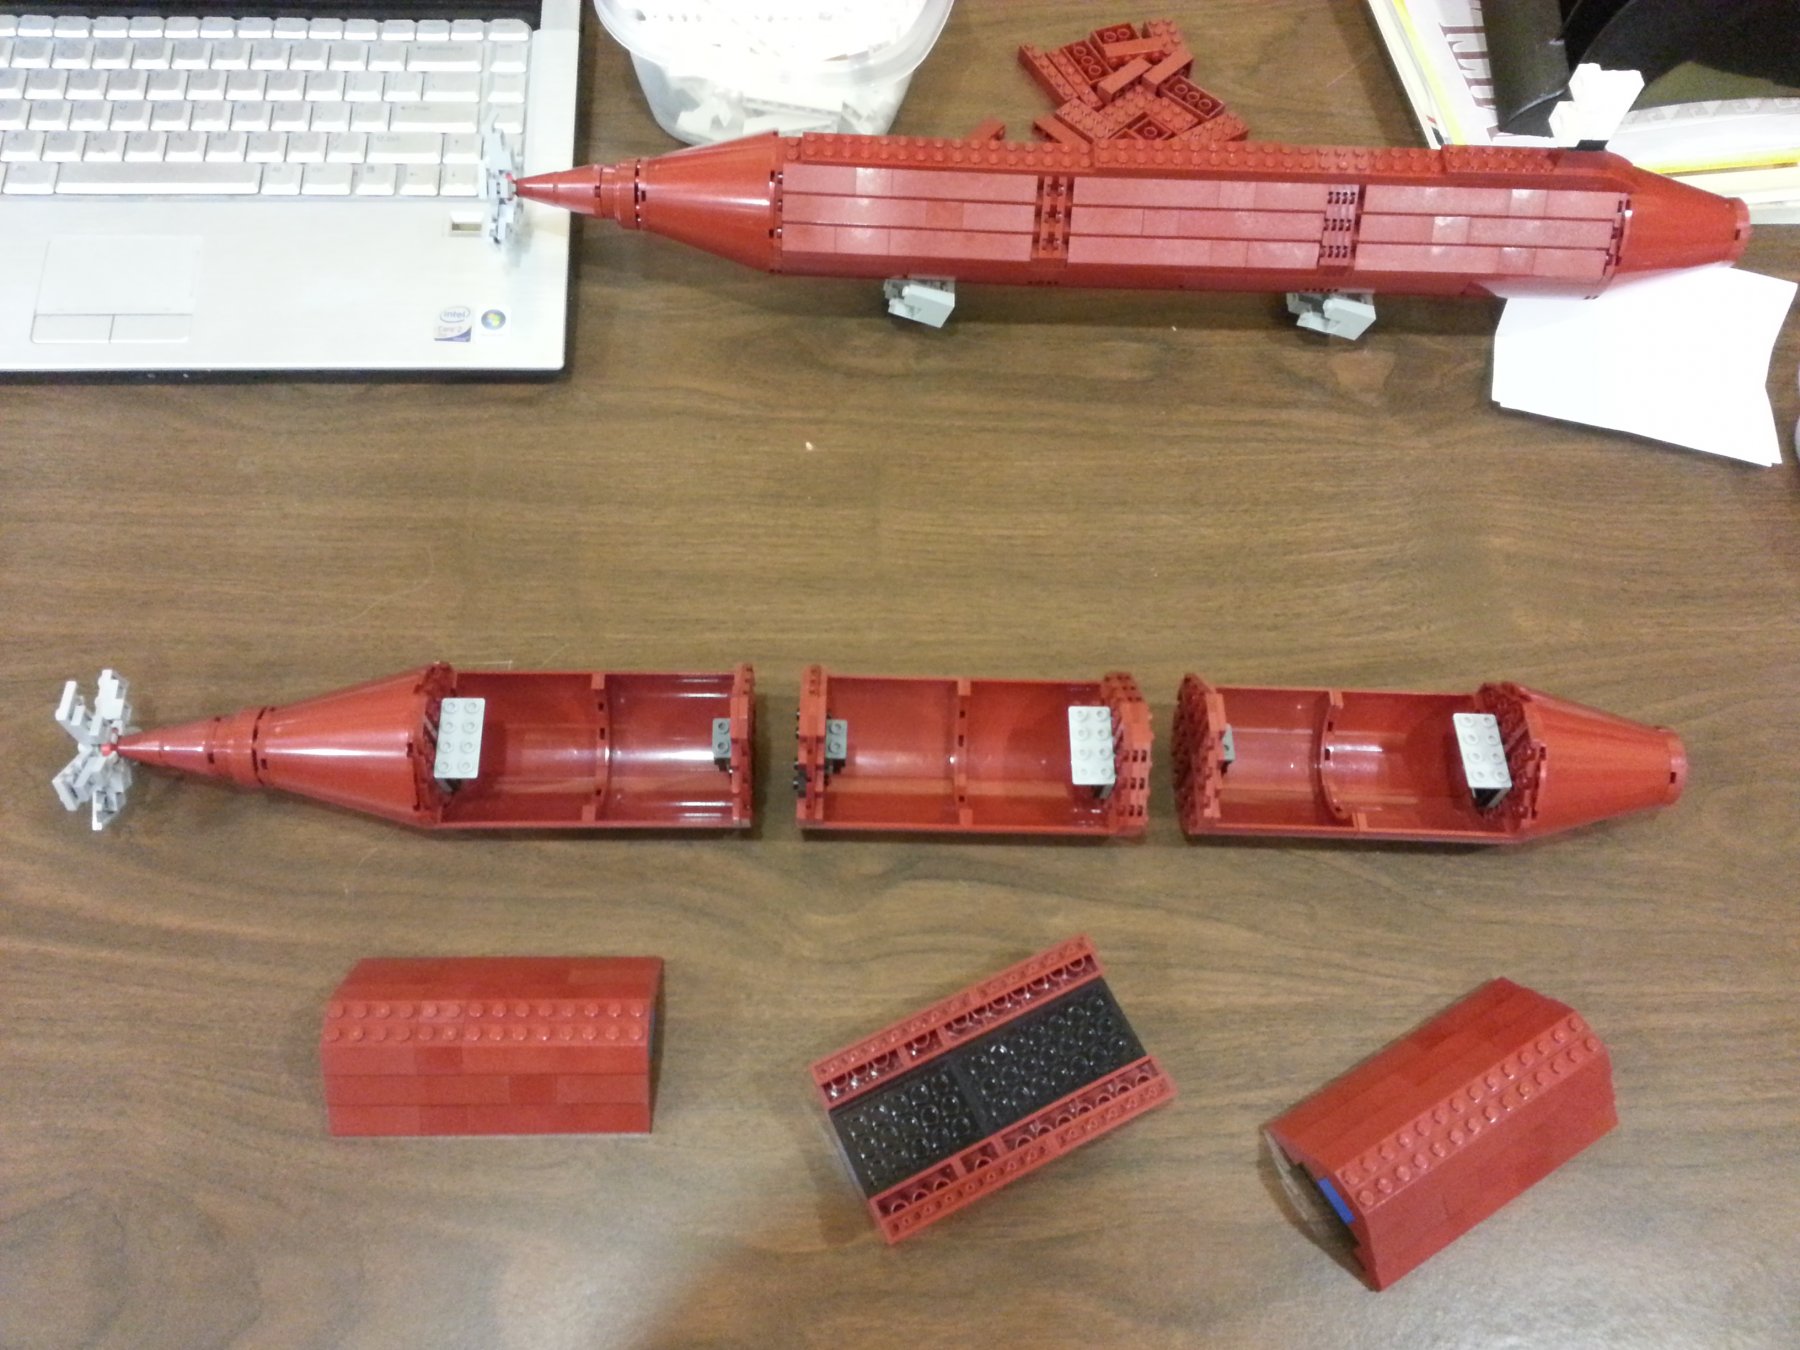
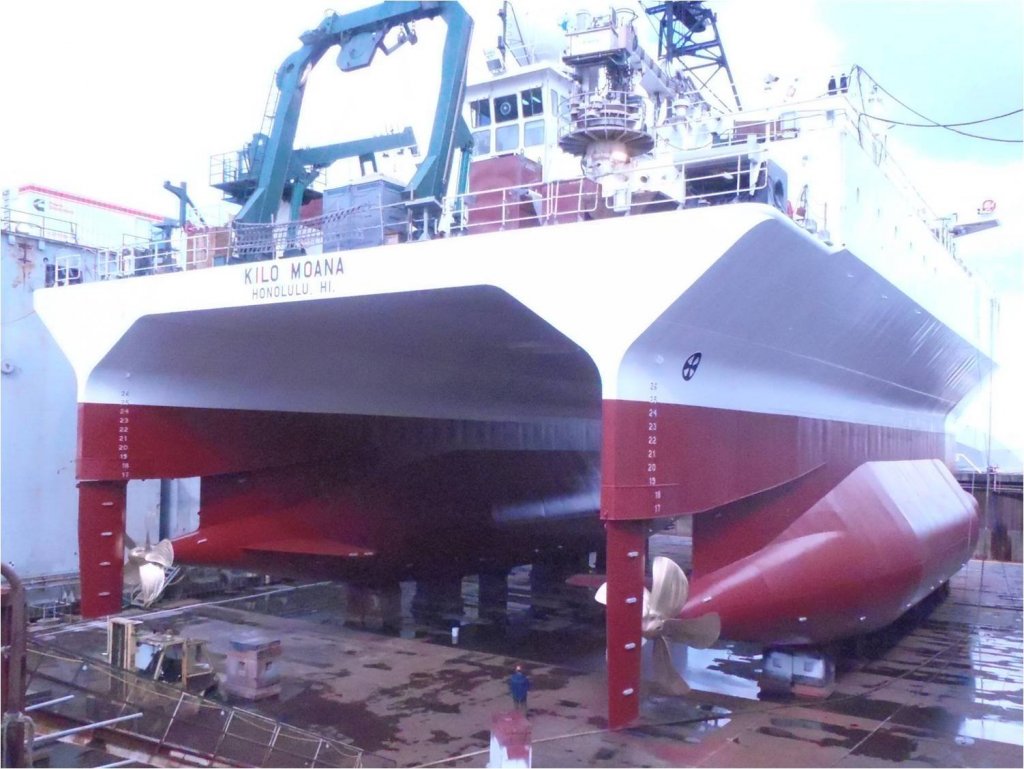
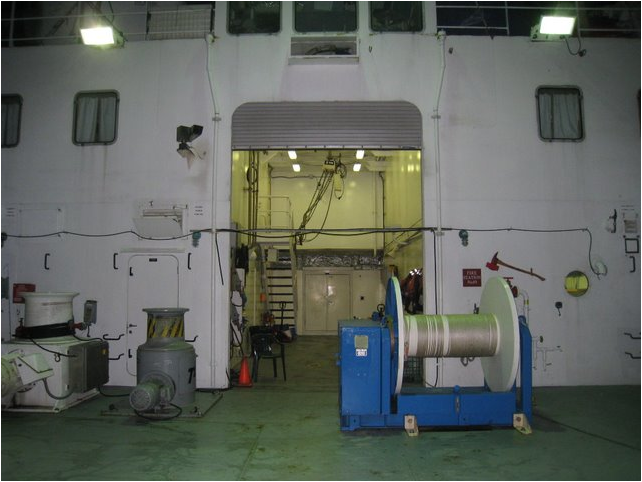
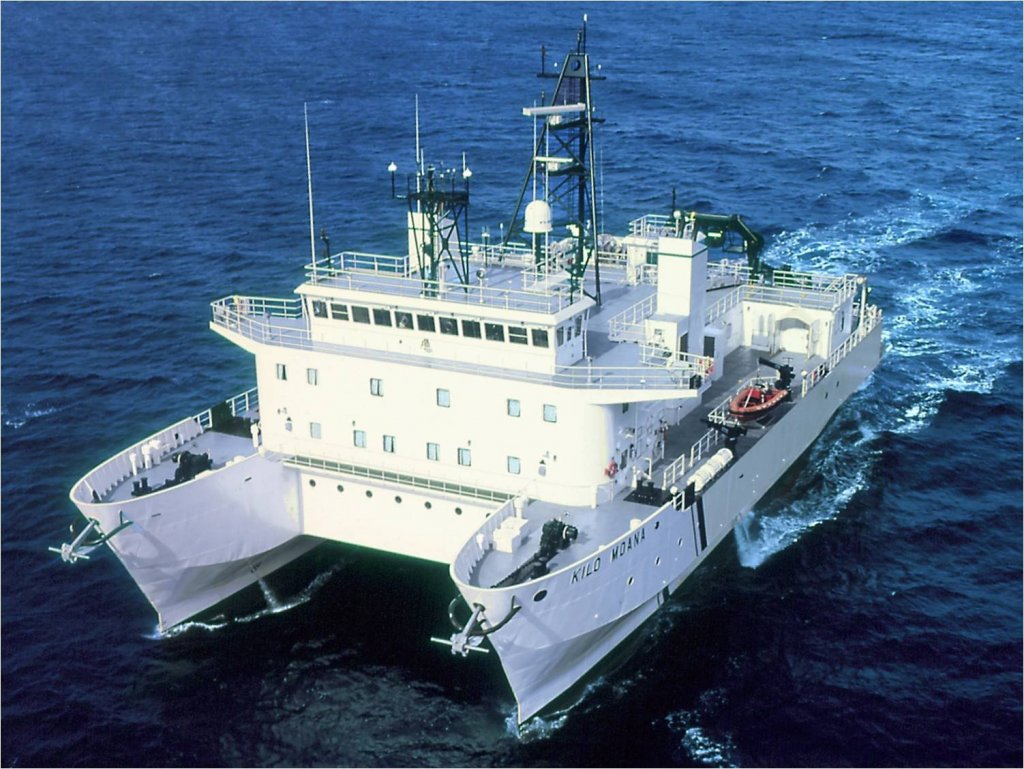
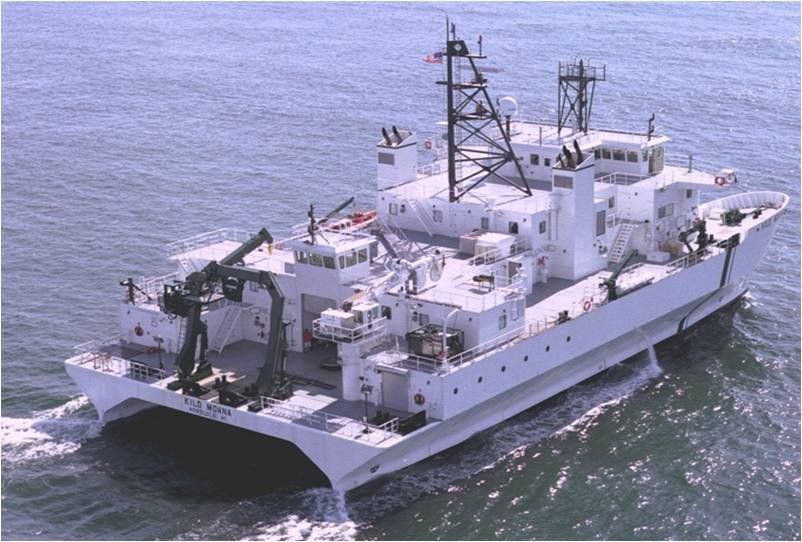
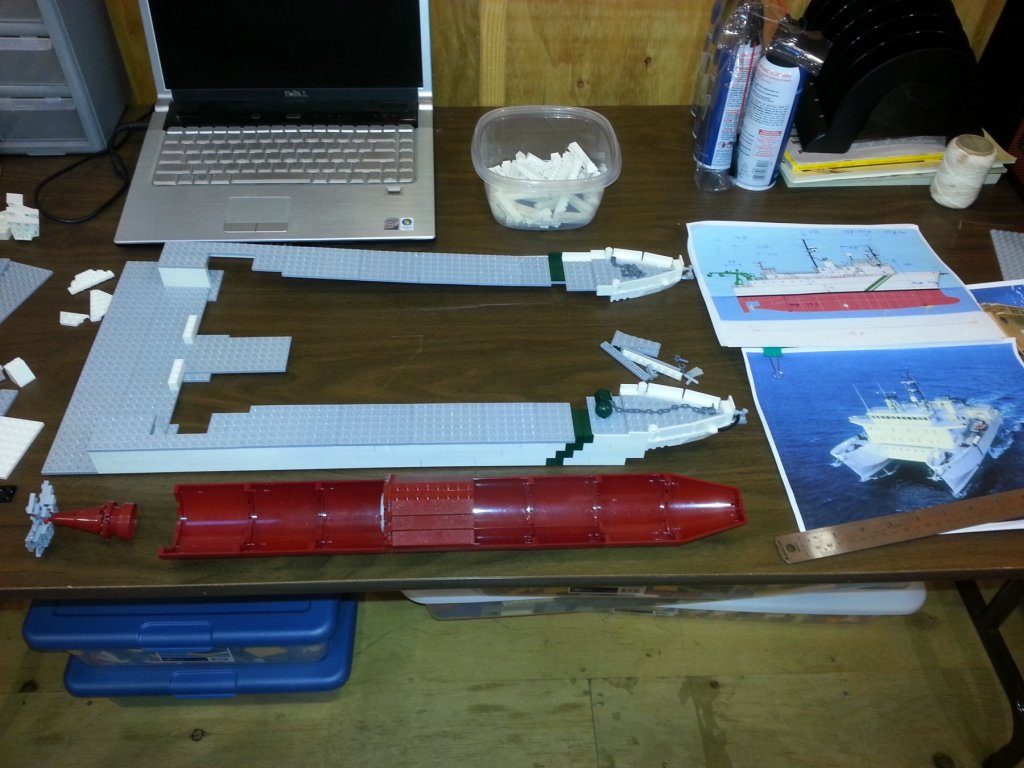
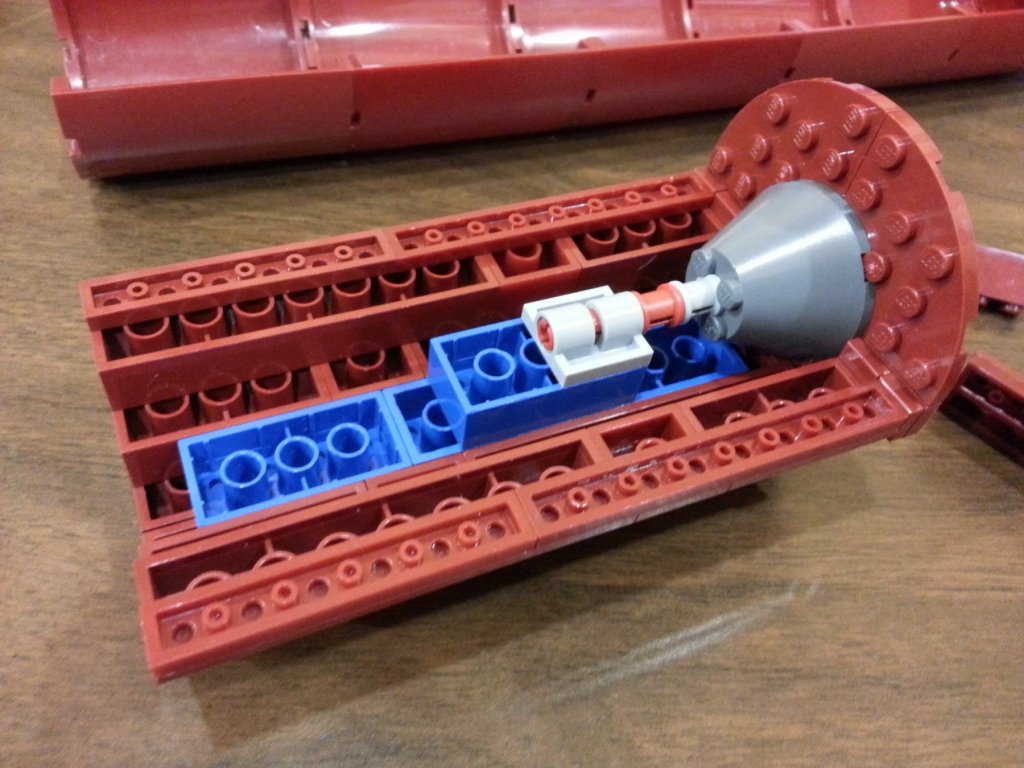
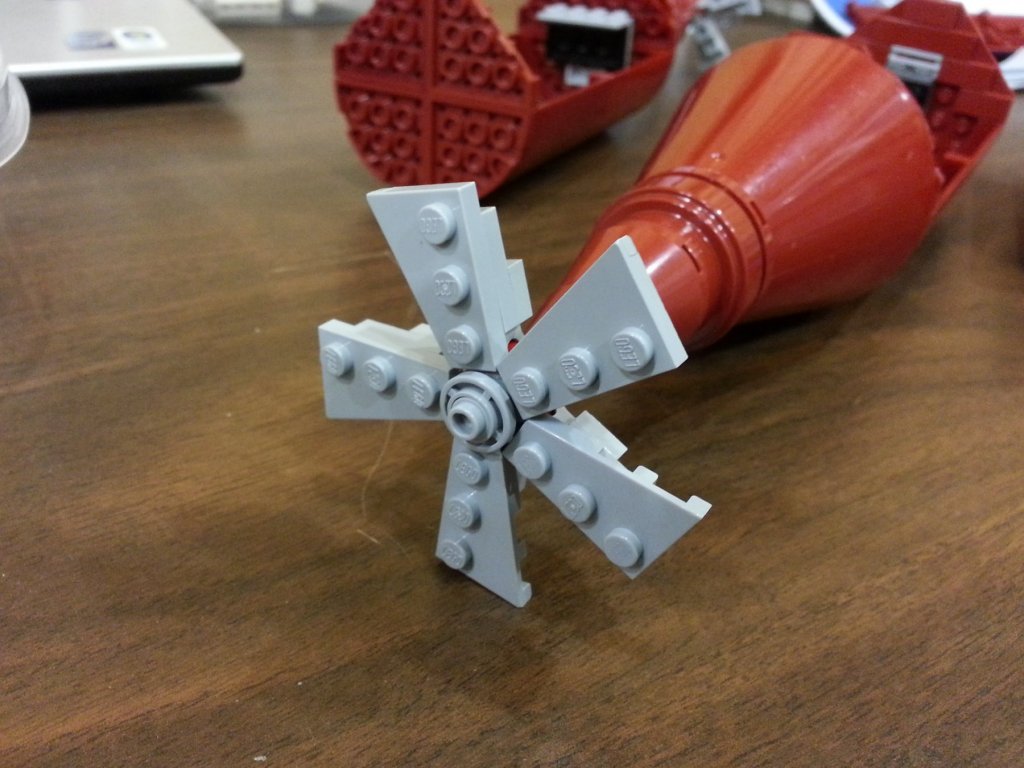
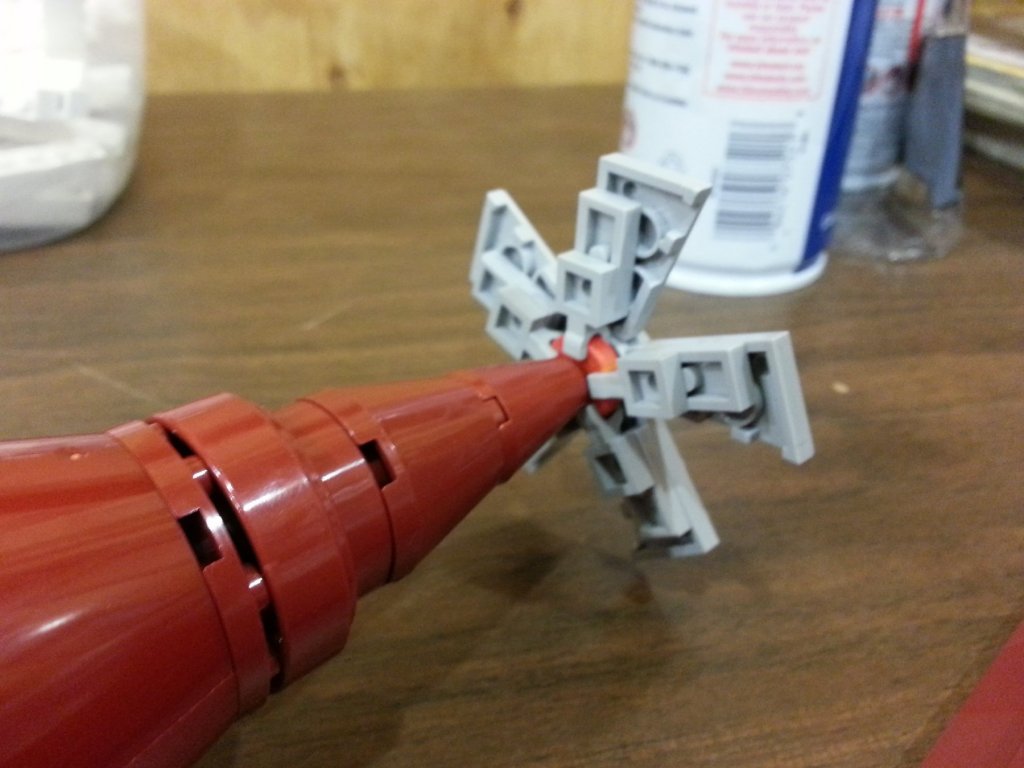
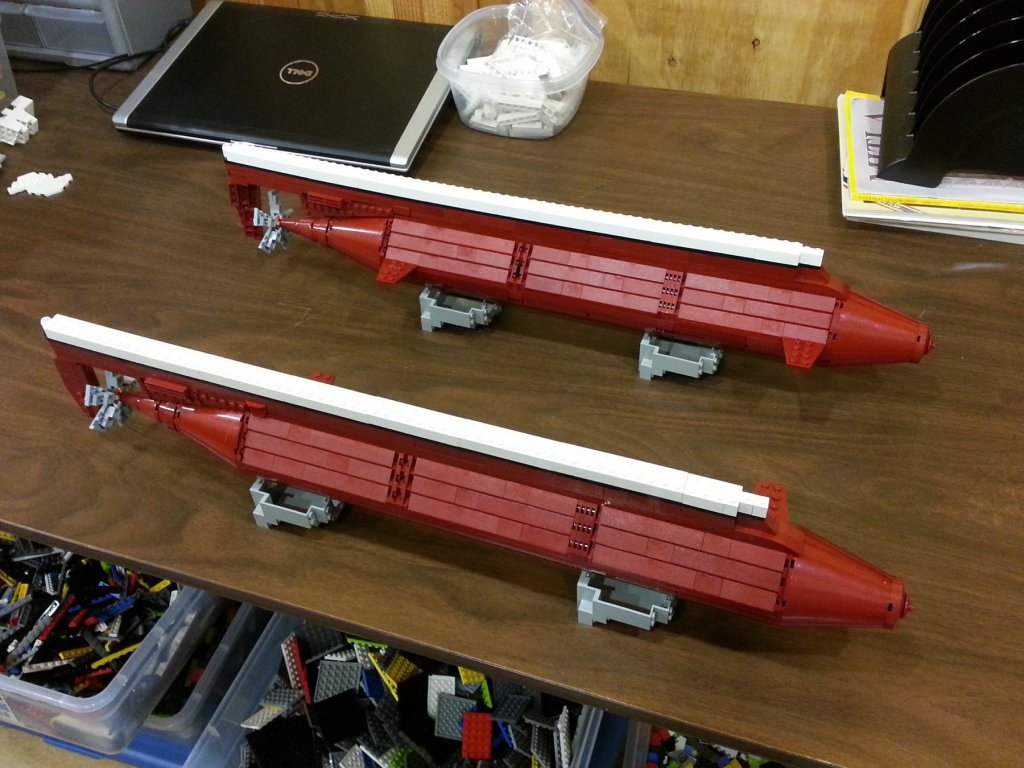
While not exactly a "build log" since it's already built, I'm going to illustrate here the process of building my custom (scratch) Lego model of the RV Kilo Moana. The Kilo Moana is a small waterplane area twin hull (SWATH) oceanographic research ship owned by the US Navy, operated by the University of Hawaii, and launched in 2001. It is 186’ long and 88’ abeam. Max speed is 15 knots and max range is 10,000 nmi. I've determined the scale here to be approximately 1:94, but as I'll get into later in my Point Reyes Lighthouse "build log", the determination of scale is a bit slippery working with Lego since the fixed geometry of the medium can be much more limiting than cuttable or formable media. By the way, any images herein that do not present actual Lego bricks are most likely not mine and scavenged from the internet in various places, and so I apologize in advance for the lack of attributions. I will include some of these images for reference. If anyone wants a source, I'll be happy to go back and locate it with an image search. Also, for the next big model I build (thinking of a large scale cross-section of a war galley as I've seen some post in this forum, but in Lego), I will take more photos with the build log in mind. I think I have enough to briefly tell the stories, but the majority of my pictures were taken to just remember what I did in various trick spots so I could remember how I solved tricky connection problems or fix something if it broke later. So enough preamble; here we go! As you all do, my first step was to gather as much data and images as I could for the ship, to get a basic idea if/how I could make it and what scale I should use. So this was my first step in the build, establishing the size of the decks and starting to figure out how I would make the "pontoon" like double hull components. You'll see many Lego ship builders only build down to the water line so that they sit nicely on a table. While this does also make the hull a lot easier to get through, it was not an option for me since the double hull is such a beautiful feature of this ship. These dark red shells of the hull components don't just click together like traditional Lego bricks, so some internal trickiness is needed to hold everything securely in place and get the connecting studs aligned to connect to the rest of the ship at the waterline. While I do have an entire bin chock full of Lego sea and air propellers, turbines, etc, none of these pre-formed elements had the right size and shape and number of blades, so I had to create my own This would be described as "brick-built" instead of a molded piece. Everything I use is Lego, including the little orange hub to the propeller which is a little disc ammunition that Lego use to use in disc-shooter guns from some of their older sets. I discovered eventually that they were the perfect thickness to be held reasonably well by the little clips (that are the same as a lego minifigure "person's" hands. So now I've got the double hull "pontoons' figured out and ready to to continue on with the above waterline hull and decks... To be continued... 🙂


-
Another researcher like myself, welcome! You'll probably find that after browsing through some of the amazing and beautiful works this community produces, you'll soon find yourself wanting to be a model ship builder as well, if you aren't already. Cheers, John
-
As a complete newbie, I think it will be a long time before I can even get my head around how beautiful is this work! Cheers, John
- 1,035 replies
-
- 9
-
-
- royal katherine
- ship of the line
- (and 1 more)
-
I'm totally new to this community and this type of model building, so just now seeing this. Absolutely beautiful work and result! As I look through here, I am so amazed at what can be done. ~ John
- 209 replies
-
- 2
-
-
- finished
- cross section
- (and 1 more)
-
Well, I have yet to build my first in wood, so I'll definitely be starting with a kit! I'd like to find a late 19th Century west-coast steam schooner, but I understand that kits of these either don't exist or would be very difficult to find. I'll keep looking, and working in Lego in the mean time. :-) Cheers, John
- 50 replies
-
- 1
-
-
- mamoli
- constitution
- (and 2 more)
-
Jacek, I really love this cross-section style for building and displaying. I think I'll try something like this in Lego also! I'd like to do a transverse cross-section of a large sailing warship, and also maybe a full longitudinal section of a steamer showing the engine, boilers, and drive shaft. Inspiration and food for thought! Cheers, John
- 50 replies
-
- 1
-
-
- mamoli
- constitution
- (and 2 more)
-
I'm absolutely in love with that little steam engine!!!
- 208 replies
-
- 1
-
-
- john cudahy
- steam schooner
- (and 1 more)
-
I have yet to acquire and start my own first ship model, but from what I understand you're ahead of the curve just getting to the nearly completed point that you have. Good luck wrapping it up! Cheers, John