
.jpg.f14fd0b82ddc4970171089371a368a63.jpg)
Seamanpeter
-
Posts
68 -
Joined
-
Last visited
Content Type
Profiles
Forums
Gallery
Events
Posts posted by Seamanpeter
-
-
Dear Jo, sorry to read you went for X-ray too.
Hope for you it is not something serious as could be anything from infection to kidney stones that are walking around as that also feels like pain in your back.
Anyway, wish you a quick recovery and take care about yourself there,
Peter xxxxxxxxxxx
-
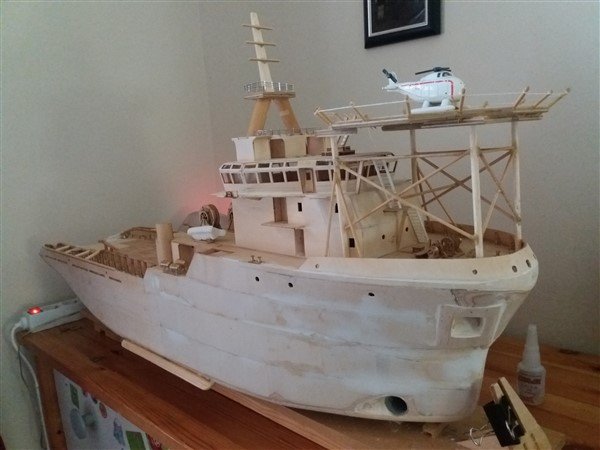
George, hi there.
Looking into your built (and also mine) I start making in the superstructure port side near the lower entrance door the Emergency Generator parts such as ventilator openings, doors, exhaust etc.
Looking at yours I cannot find that detail so I presume you did not come to it?
Also the kim keel, are you not making that? I can tell you seeing other same builds that don't have it mounted she is quickly rolling on her side when little bit of waves are coming and I know in practises those are a must special on ships this kind that should not roll that much having sometimes crew on deck not to take to much water on aft deck.
Anyway, I will drop a pic here so you know what I'm talking about.
Hope your paint is all ok, this side of the globe I postponed all paint works till next year.
Take care there now,
Peter

-
Thanks Danny and appreciate your help in here.
Good job we are not all animals but sometimes specially if you don't know your way around here like me, mistakes can easily be made.
Anyway thanks for your help.
Have a last question, how to be member of this Society and having a number too?
If that has to do with paying a contribution fine with me but have no idea where to go.
Waiting yours and have a great day
Peter
-
Dan, if my built has moved in your index pls advice where I can find it.
thanks
Peter
-
Dan, sorry to come with a question but if I'm looking into the index of RC buildings / boats I can see 2 x Fairmount Alpine from George and another who most likely is deleted by the system as cannot find him anymore if you click on it.
Now I'm building this Fairmount Alpine since March this year but can't find my built in your list!
Do I have to go somewhere else to find it or is it not updated your list?
Also I made previous a mistake to open another page here what was wrong my side but to delete it I cannot.
Maybe you could have a look into that as I have 1 since start and moved all relevant info from the second page to the first one but cannot delete it.
/profile/32387-seamanpeter/?status=1004&type=status
Sorry for the inconvenience given but we are all humans and as I'm not a computer expert the mistake was made by me.
Hopefully I can find my built in your list next time I pass there too.
Thanks on the forehand
Peter den Breejen.
-
dear Jo, yes moved all here as it is more convenient anyway to have all in 1 page so to speak.
Looking t your new project the old Danish fishing boat looks great to me and must say for an (even) tiny el motor connected to the prop there is no space unless you want to change the stern. Theoretical it can be done but is an not easy job.
Anyway, looking forward your progress in this one and wish you the patient to make it!
Good luck with your new project and will follow your works
Peter xxxxxxxxxxxxxx
-
Right, found out what is missing here as was in the other blog I made.
So to come to the point now waiting for the weather to be more nice guess this will not happen before next year.
Therefore waiting for the orders I made and what I can do from inside the house I will make it.
Not going that fast either as have to find time between other arrangements having here such as school (UNI) and work.
Will do my best but if not regularly don't be afraid I'm doing nothing and stopped but just did not have time for it.
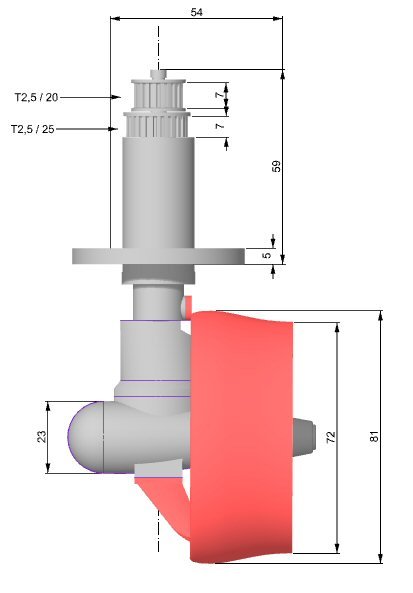
I did make some enquiries with ref to the Schottels and got some measurements I can work with.
Waiting for the measurement of the towing pins unit as that has to be fitted in between the Schottels on the deck.
Anyway, made platforms for the towing winch when it arrives so that will be the first step to do and see if my calculations where correct to place it where I want it to be.
Have a great time you all,
will revert,
Peter
 measurements for the Schottels on both sides stern.
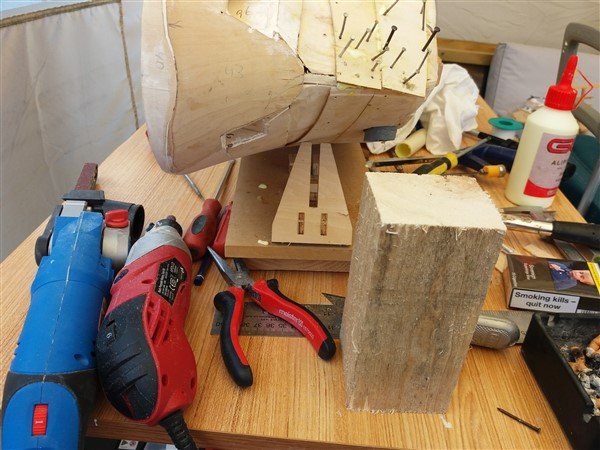
 made the bow out of massive wood
 just for more protection on a "weak" bow
 Bow trust did protection massive wood
 glue parts bow
 massive wood I used
 raw bow, needs finalising
 most raw works done
 closed up bow trust and bow itself
 secured bow trust
 closed all forward part
 made anchor pocket protection and first filler by hand
 same this side, closed up and filler first time
 coming there, looks good already
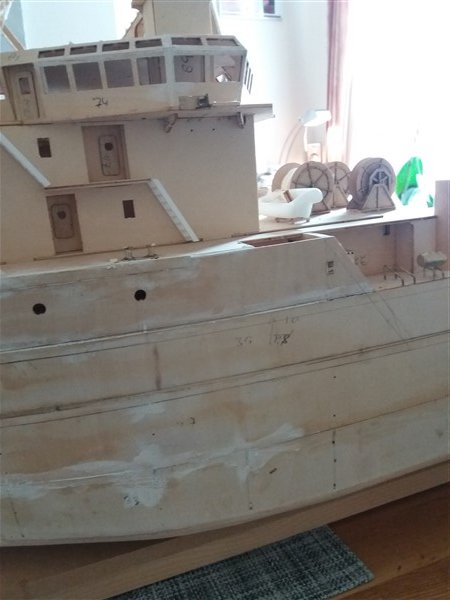 now the "labour" works like sanding and filling
 also here, sanding and filling until final before painting
 view status before sanding
 other side view before sanding
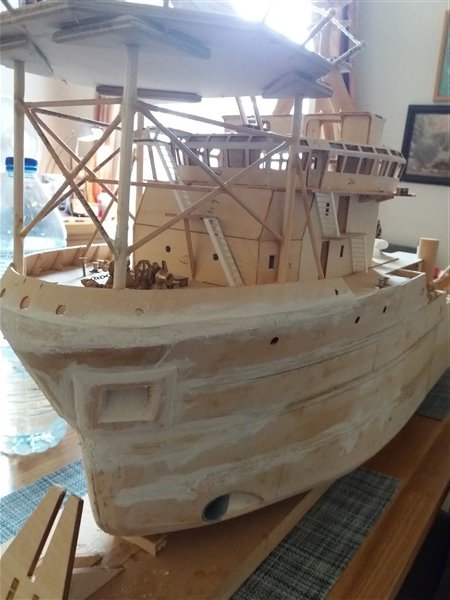
 like the shape of the bow, looks great to me
 did also some to the stern but needs more
 clearly to see the works to be done to the stern
 will start modify mast and sanding bridge
 pretty much works to be done as I can see it
 looks good after sanding
 nice shape
 still need more sanding and filler bow
 even not in center line looks good!
 bow trust in place waiting to connect
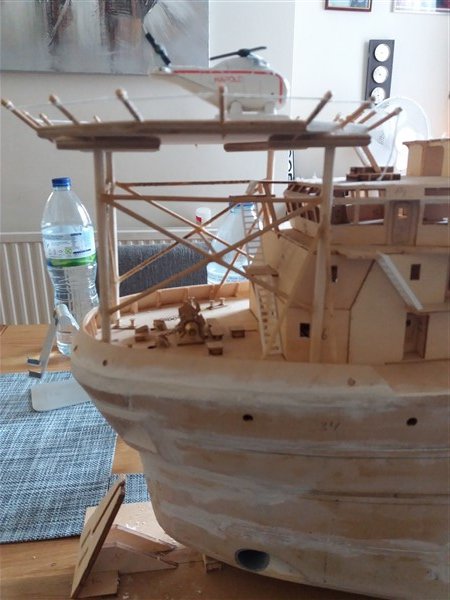
 altering up-take to helideck
 changed the uptake to helideck
 new platform to helideck / monkey island
 altered mast and looks much better
 yep, I like it
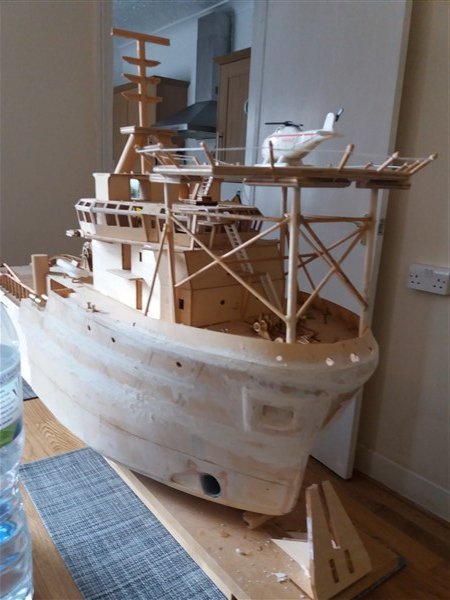
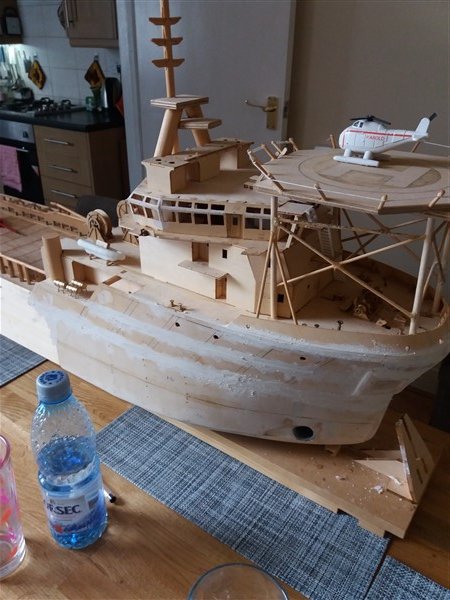
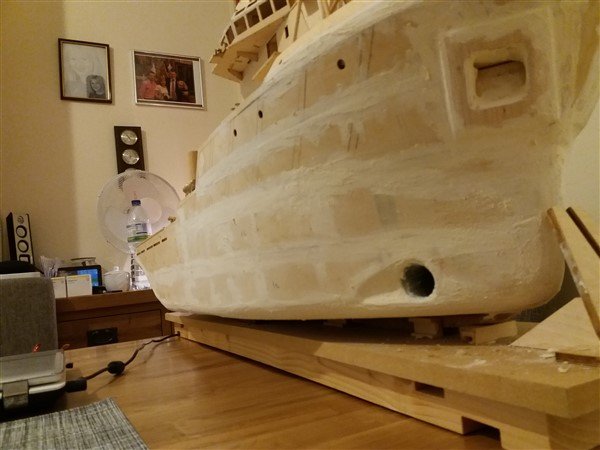
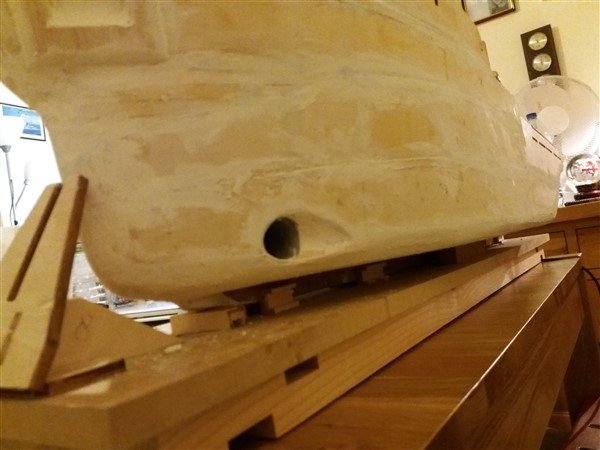
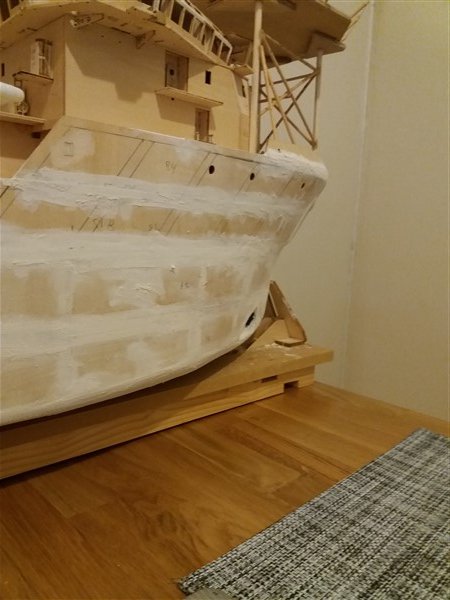
 status presently with kim keel
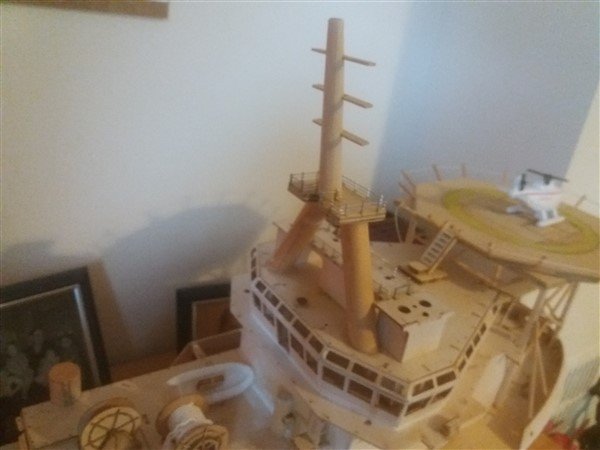 hand made mast and looks good
 yeah foremast also done
 afterwards the "lower" top nav. light

Here missing the kim keel what will be done shortly.
-
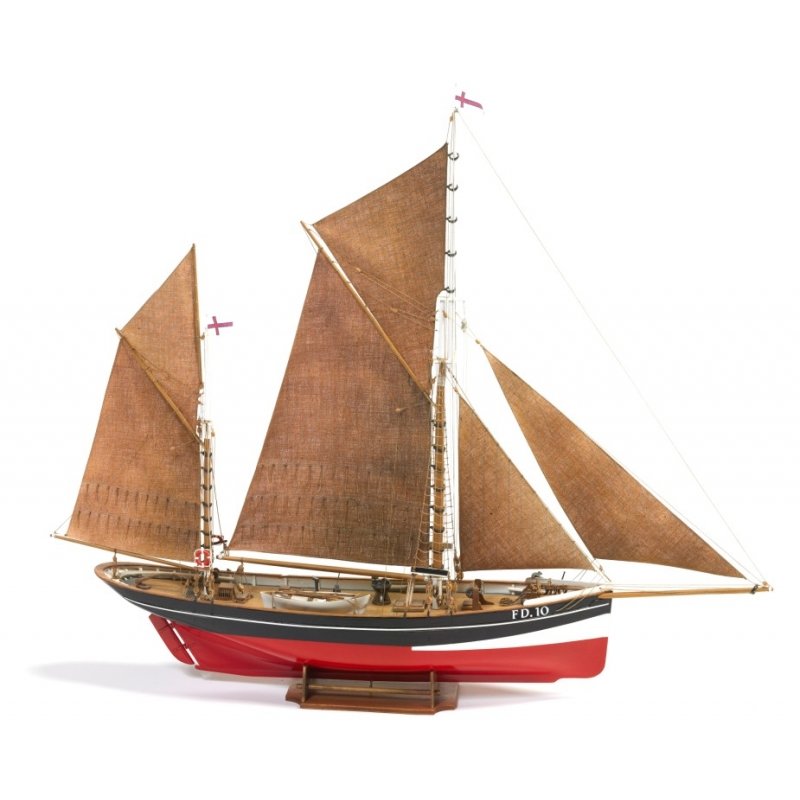
No idea for the name but can see you did a proper job! Respect my lady and I mean it!
I cannot tell you the names for them as actually never sailed on a SAIL boat and those matters never interested me to know this name.
Could be that somebody here will tell you, sorry about that.
Peter xxxxxxxxxxxxxx
-
George, in my previous built the last one I made many, many years ago was the Smit Rotterdam with the first wooden hull (others where plastic) and that time we could not buy the automatic bilge pumps as I mention to you in my mail.
As I did observe water was coming inside the prop shafts due to NOT having the so called black pot (grease pot) on those shafts I built inside just a water pump (did not have the proper ones as now available) with a suction laying/glued to the bottom of this compartment as in the frames there are NO MOUSE HOLES as we call them for the water to pass to the lowest point. But it worked that time and according my son it still works.
I left all my ships to them when I divorced their mum and they still have them.
At that time I promised myself that this will never happen again so that is why I got away with all the prop shafts and rudders this time and having Schottels it will never happen. Although as you say when touching under water sharp objects it still can be a possibility to have a leak I want to built this pump. Just to be on the safe side with suction from the lowest part what is in between frames bottom. I made mouse holes but cannot be seen anymore as covered by the wood on top the frames. Nevertheless as I did not made the "MATT" with epoxy as you have I will only use Winsor & Newton Artists Acrylic Clear Gesso Primer and afterwards Acrylic paint for wood ship in the colours I want.
That makes the outside watertight enough and gives also the flexibility to the wood and it is a nice product to work with.
For the bridge interieur with ref to the "coffee shop" I will send you later an idea how to make it.
On the bridge in those tugs mostly you have "sofa's" just under the windows as chairs have to make tight to the floor and are not that good to use on the bridge.
Even in the cabins they always have a sofa and a chair that is connected to the floor as those ships in reality making moves and you can then image what will happen!
Let's see how it will work out with both having ideas and looking forward to the end product.
best regards
Peter
-
To all, for the latest developments pls go to: https://modelshipworld.com/profile/32387-seamanpeter/?status=1004&type=status.
As it looks like my other page for this built is partly closed as after the works done to the server some mails cannot be found anymore.
Tomorrow or in the weekend will sort this out and bring all here so have it in one space / blog what ever you call it.
Best regards,
Peter.
-
Great job George, must take my head off for you with all the troubles you did have.
Hope the water pump inlet will not give you future problems otherwise you have to built in a "bilge alarm" that connect to your pump take out the water.
https://www.jonesboatchandlery.co.uk/bilge-pumps/
Here you can find several bilge pumps that switch automatically on when water comes into the built.
Depends on how much money you want to invest for it as several prices in this range.
The only disadvantage here is that those pumps CANNOT RUN DRY and therefore it is a must to have a "automatic "switch" in between like the one I will show you. https://www.jonesboatchandlery.co.uk/johnson-automatic-bilge-pump-switch in combination with https://www.jonesboatchandlery.co.uk/johnson-bilge-pump.
I will put those 2 inside as don't want to sunk my built, to costly. To see if it works you can the "overboard" line make in a position you can see it above the water line.
Your bridge looks great to be honest, lots of work done there with all the "painting " of the resp. consoles!
Missing the "coffee shop" what exist on every AHT / Tug on the bridge and is easy to make with your skills having.
Will you glue the top (monkey island) to the bridge structure or leave it as it is so you can take it off afterwards to repair lights e.a.?
Try to run the both trust in the bath so you are absolute sure that they both work without any further trouble, it can save you a lot of hassle later.
But George, you did come further then I am as still waiting for the parts to arrive.
Looking forward to see yours running and ready to sail,
forget about the ladders as even with green / white it is a good contrast!
best regards
Peter
-
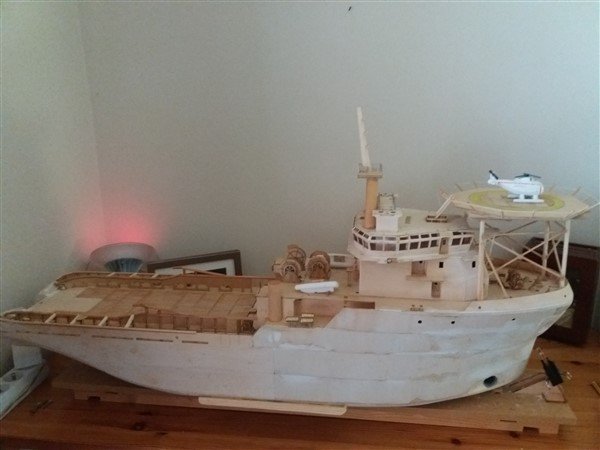
Having worked on several company sister vessels they had a colour scheme from that company and TSI when coming on board was looking after it.
But George, here also white stairs all the way up the superstructure, some have next to the superstructure orange so also here "who cares"?
Now they will be painted next dd in the colours of BosKalis so all will be changed and I can tell you that B&K will take care that the colour scheme is as it suppose to be knowing them!
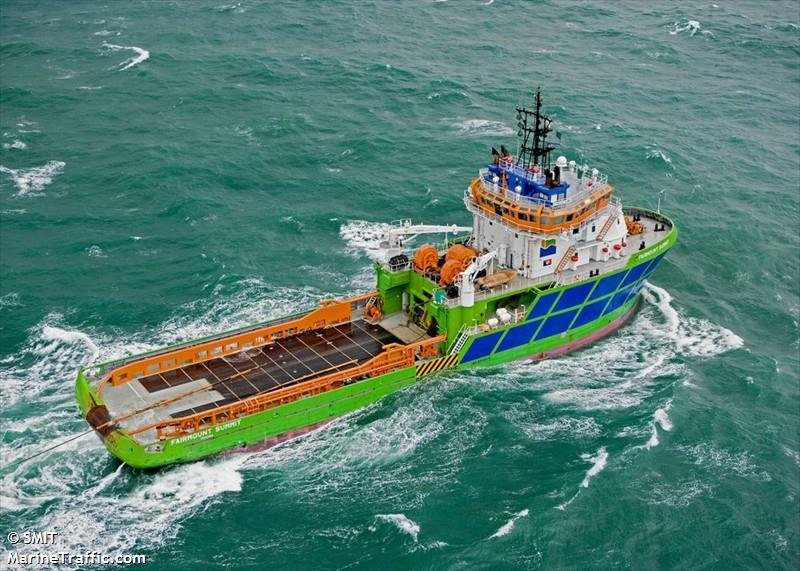
That's why I send you those 4 pics of the ex fleet of Fairmount so you can make up your mind (or mix it up).
As you say multi colour!
Let's hope the water tight test will be ok so that job is done!
best regards
Peter
-
Wow, looks good George.
The bow trust you could have filled up the whole surroundings from the old channels having the new channels (grey plastic) in place.
Just to make sure that all is watertight as for sure you never take out again those channels.
But a water test in the bath will do before you launch your built into the lake.
The ladders on the Fairmount tugs are Orange or White, haven't seen them green on the side not even the ones below the accommodation.
But as I said before it is your built and you make it the way you want.
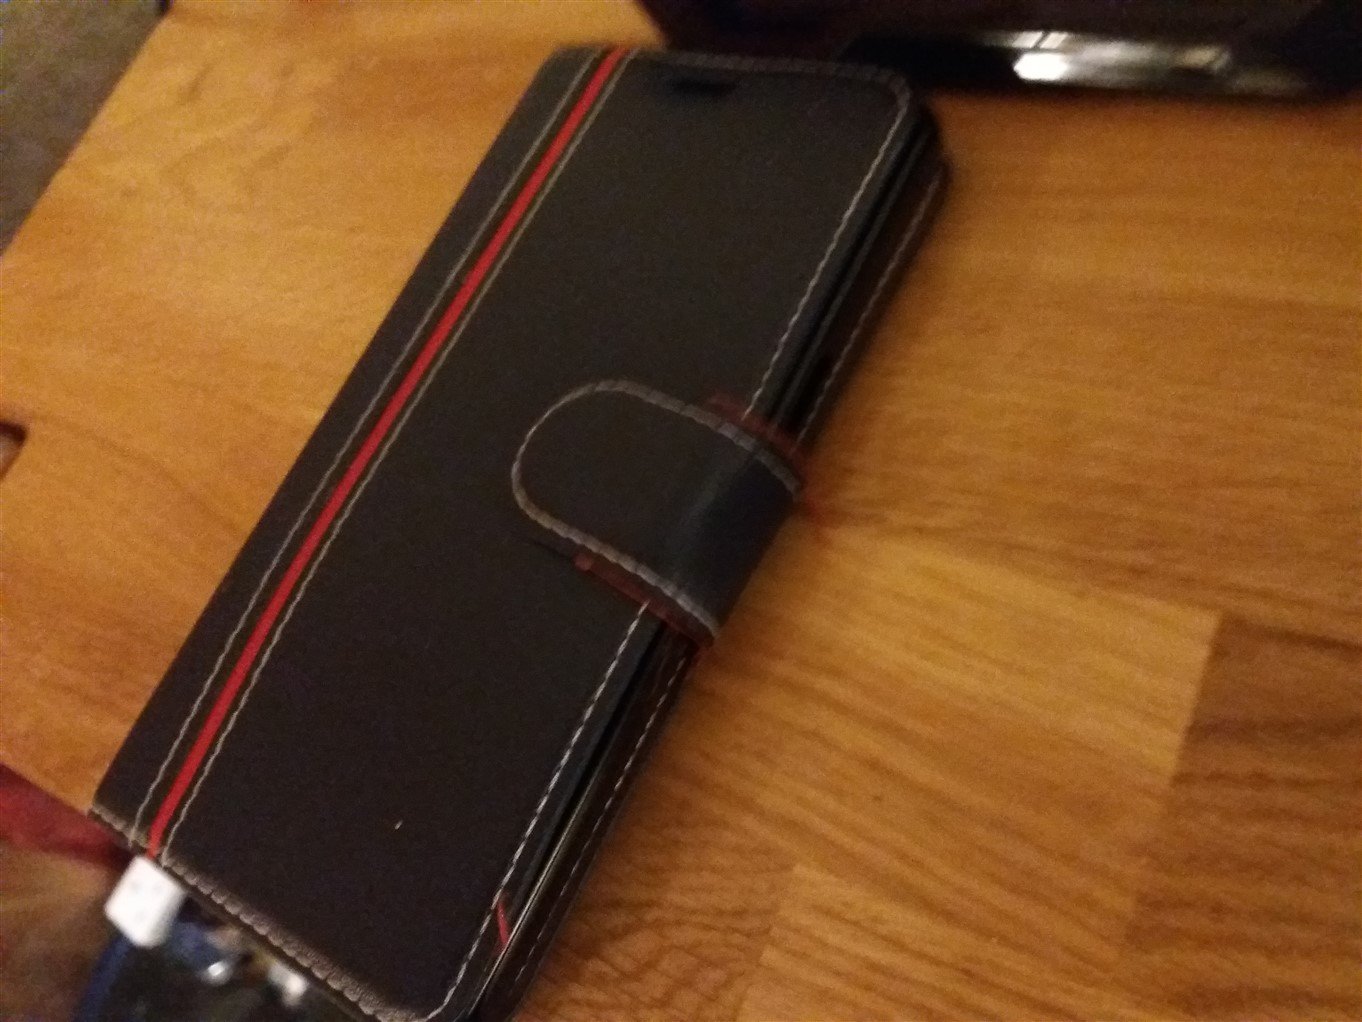
My mobile also is still working and use the left part to keep my credit cards and driving licence in.

.jpg.746a49cd8416bee6ae655eed15af0a7c.jpg)

-
Looking through your blog again found an interesting detail.
Not only we are building the same tug but apparently we also have the same protector for our mobile phone.
I was just smiling in myself if that was true.
Talk to you later
Peter
-
George, thx for the quick respond.
Well as I already mentioned, the railings for ferry boats and passenger ships are higher that is true but on working vessels this 11 mm high is about the size.
And yes the top one is thicker then the below ones and that is for a reason.
First for your hands, second the sailors on board are sometimes using it too for hanging the ladder, btsmplank /chair for painting outside (hull) and other useful stuff. The other reason is how stupid it may sound for SAFETY to give enough strength in the event a person fall against it.
So coming back to your question about the distance between the ladder steps.
If you take a ladder step (the white plastic ones you have for the uptake to upper decks) in between the steps from it will be the min. distance so if you want to make it look good you measure the distance from the deck till the top where as the ladder should go ( in the drawing 5 supports) as there is NOT a specific rule for that step distance. But for a pilot ladder YES as showed here below.
What I do know it the average distance in between the "steps" what should be ca 32 cm.
Nothing about start distance so to speak from the deck but I assume if that is the same as in-between then you should be ok.
Same for the top / end of the ladder. So if you can work out the total distance just divided in equal parts (in real ca 30 cm) then you doing a good job.
I just put in here some examples of pilot ladders and Australian ladders (those are ONLY in Australia on bulkers).
Ok, enough now, already late down under so talk to you soon.
best regards
Peter
-
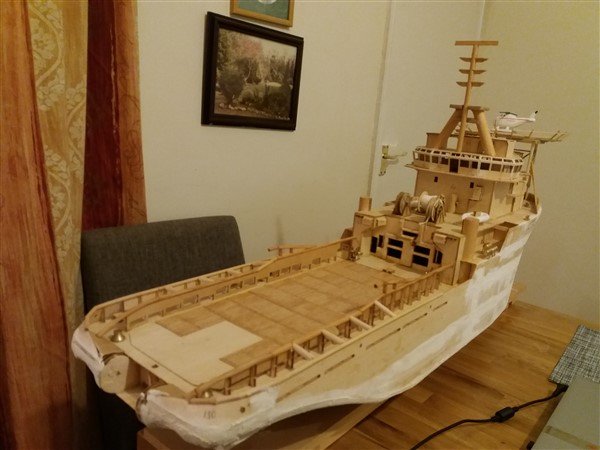
George, great job done to the stern trust!
Also the railings is a hell of a job and that's why I changed that to fixed ones.
What you say about :
Quote: Also the height of these is only 12mm, which in the scale of the model, 1:75, gives the height of 900mm, or 90cm, which for a ship safety feature preventing falling overboard seems to me, to be just a bit low. Also the three holes on there stanchions were all 0.8mm bore, which is again too big for two reasons. Firstly, the rail wire supplied is only 0.5mm, and second, the 0.8mm diameter gives in scale a diameter of 60mm, which is good for the topmost "grabbing" rail, but is too bulky for the two lower rails, here the 0.5mm wire just looks better.
Unquote.
Is not completely true as this is the height in real terms speaking you will find on board those vessels.
At the other hand, you should then say: crew members should not be more then 1. 70 M high (like in submarines) but with my 1.80 M hogh on both I had no problem. To tell you something you learn on board is the fact that having 2 hands, always 1 for the boss and the other for yourself walking over the deck so therefore the reason you say must be your personal opinion, I worked on those more then 35 years and NEVER fall overboard!.
I did order the pre-made ones from Cornwall as below.
 Railing - Pre-made railing, four rail - Height 11mm, Distance Between Rails 14mm, Length 250mm Price: £8.18 (Including VAT)
I tried to make them myself but after 1 go I stopped and just pay a bit more for it but then again, just bend them and glue inside the holes.
Anyway, this is your built and you make it the way you want.
As I read you can also make yourself 3D why not use that facility?
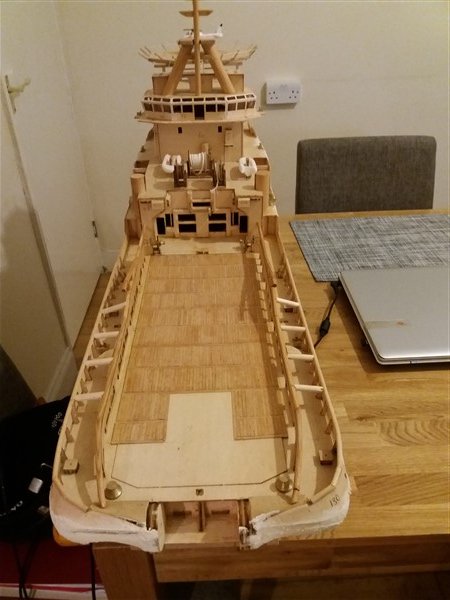
I start with bridge furniture direct against the windows as in real they have all there filled up with draws and cabinets so to speak.
On the backside bridge even a little coffee shop with sink and water.
Also what I could not find on stb side funnel (in the bridge itself) situated a toilet!
The rest I ordered but afraid still have to make the stairs opening below inside to the accommodation.
The windows will be blue (plastic) "glass" and gives a nice effect when the lights are on in the dark!
What I don't see the fact where the lower top light (navigation) is as the built in real is more then 70 Mtr long and therefore should have a lower navigation top licht (high one in aft / main mast).
Most of the AHT and normal tugs have the lower light (if not having a fore mast) on the fore ward top Monkey Island to scope with regulations although it is NOT a must have.
For the railing on the stairs I will use the same pre-made railing, just cut it where needed and glue it to the stairs.
But again, George you make the built as you want it and I will make mine in my fashion, the end product is the same, it still is floating on the water and can sail!
To come all the way down under will NEVER happen as to long way to sail!
Take care now with the bow trust to built in and the rest of the railings,
best regards
Peter
-
Lucky you George and can now understand the meaning of it (if it goes, use some butter to slide in)
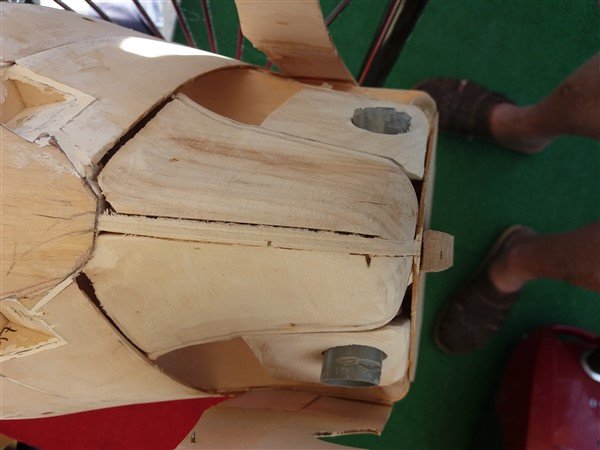
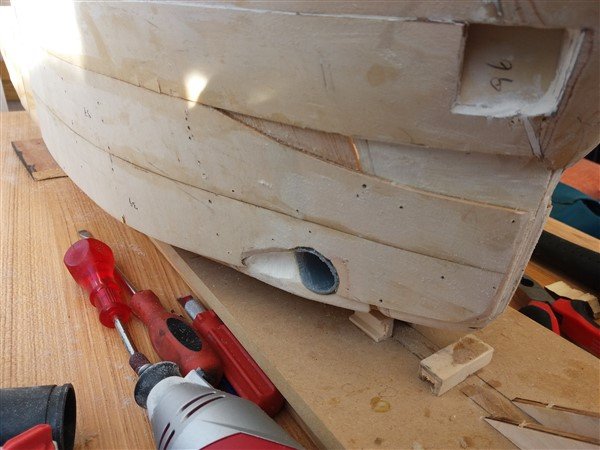
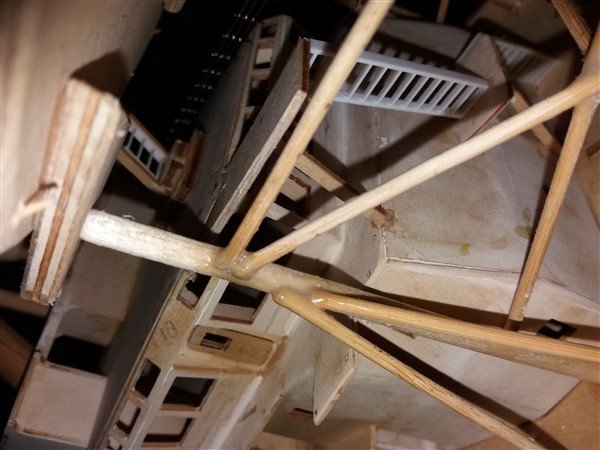
Sure if you can have the "new" channels direct connected to the trust both side, the gab you talking about can be filled up with epoxy, made it secure and watertight in the same time.
Those channels don't need to be replaced as you can just remove the el motor with the 4 screws (don't forget the seal).
Afterwards the plastic channels on the outer side can be easily made in shape of the water flow you already have.
Well lot of work and hopefully this is just a 1 time go!
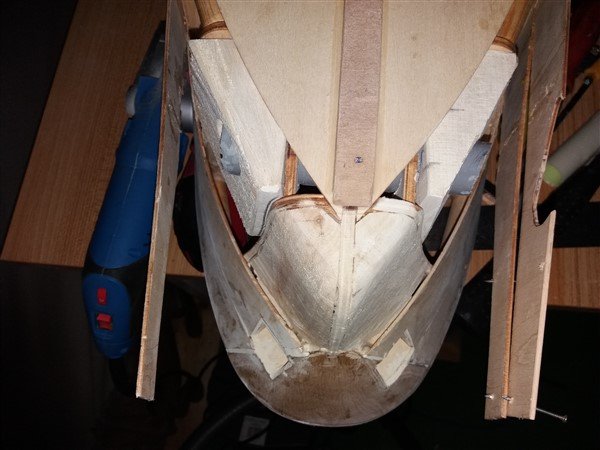
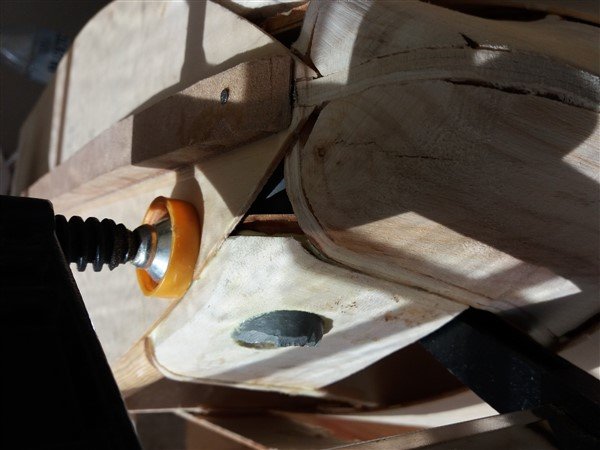
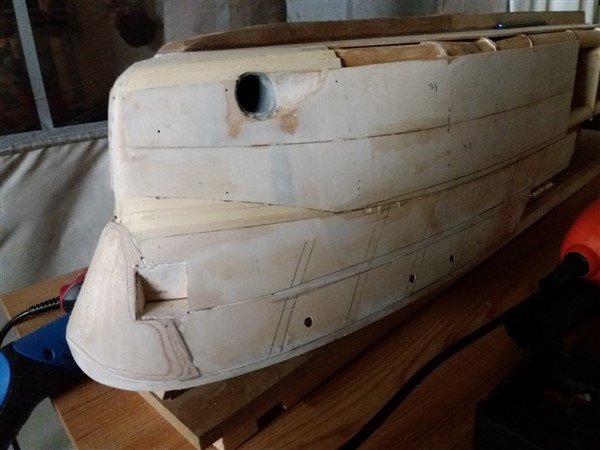
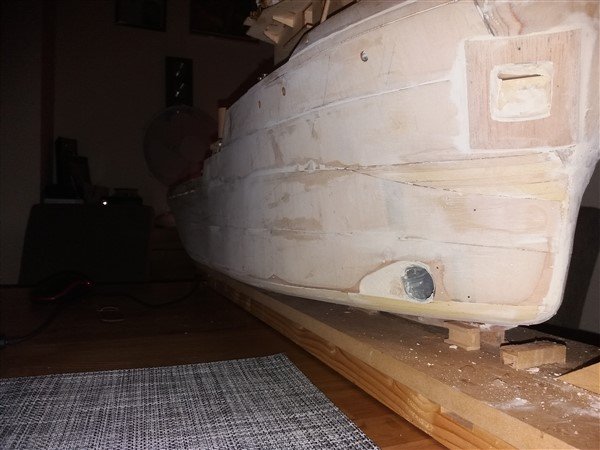
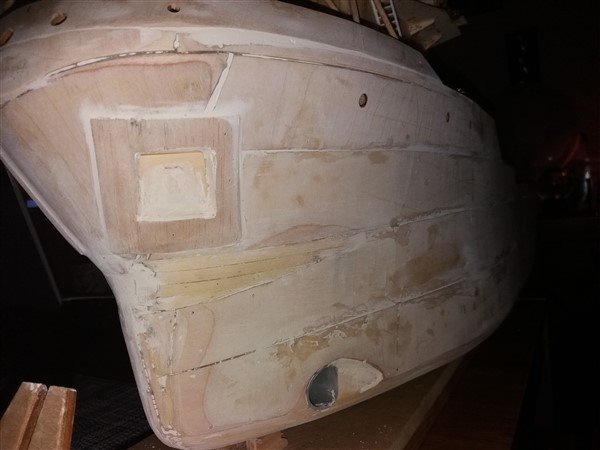
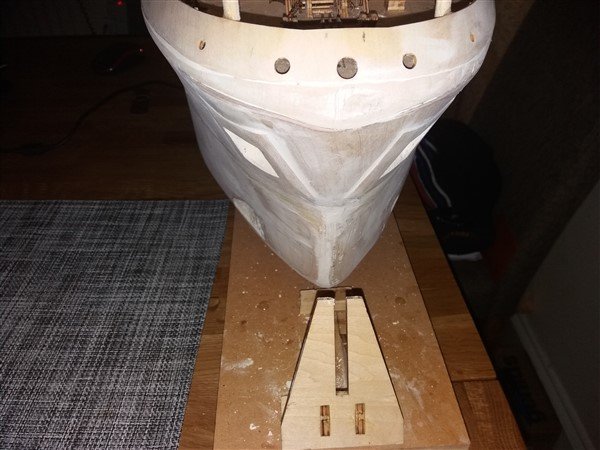
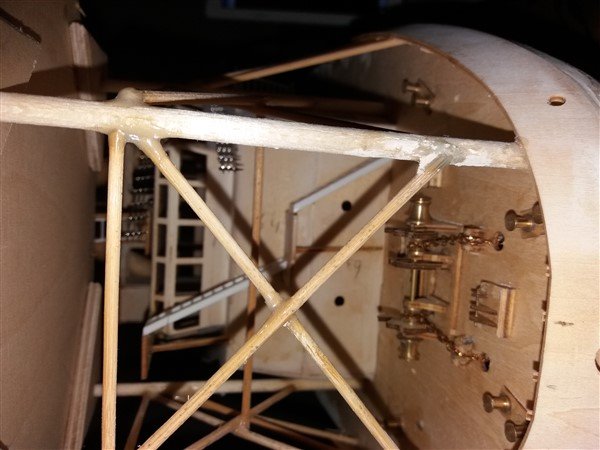
Reason I made it "bullet proof" is not just the force but until now I have seen and hear around that the bow trust gives problems by damage during transport or sailing in unknown waters touching stones etc so therefore I did this "massive" surroundings with the bow trust.
best regards
Peter
-
George, lot's of work.
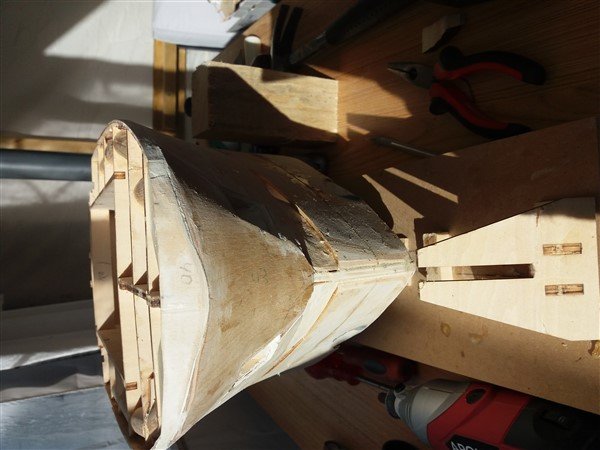
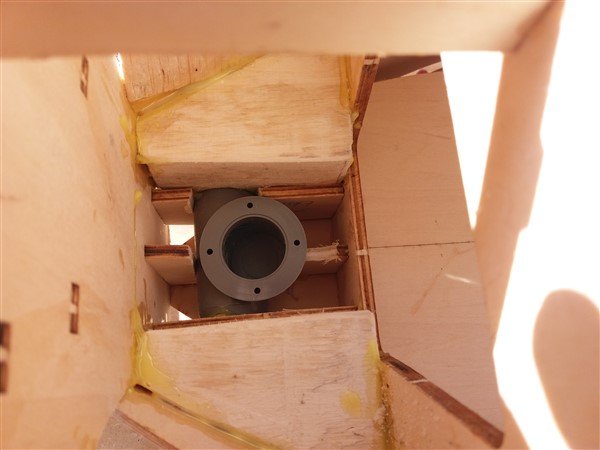
Now I'm wondering how you will fix the bow trust with the both side channels as the "old" channels from previous are still in there.
You could have done that by cutting the both timer /wood protection so you have an open connection to lift them out?
The channels connected to the mid part of the trust are tapered / conics so will that not be used as you did not remove the old ones?
Want to see how you are managing this without taking the securing position of the channels direct next to the actual bow trust.
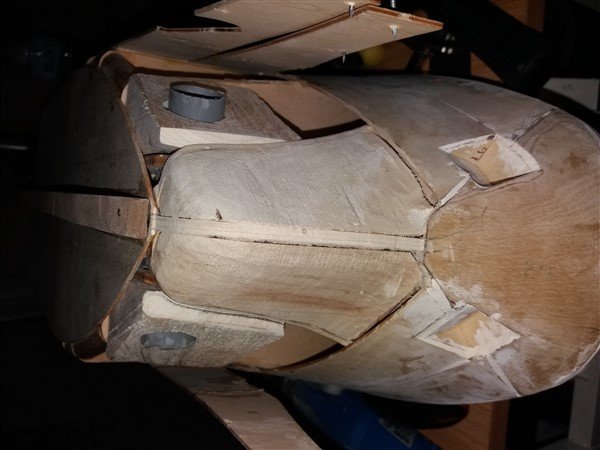
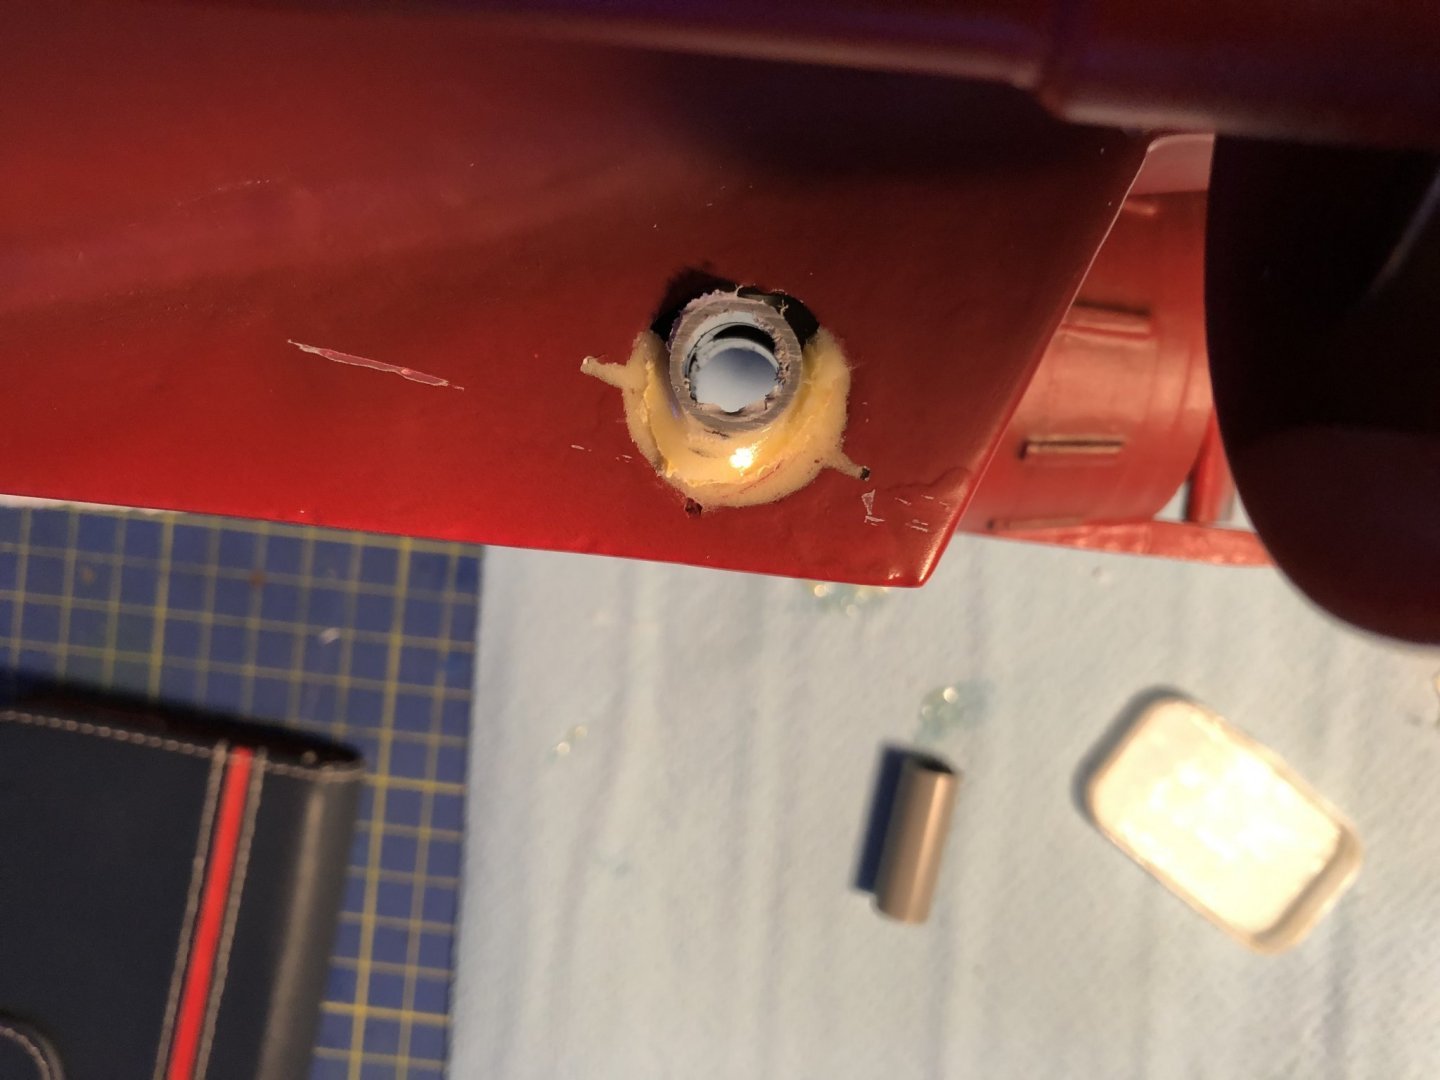
On my photo as attached here you see that I left the stb side top above the channel out and ps is still untouched there. I had a reason to take the stb part out otherwise I could not have it in place. Beside I had to make both holes for the channel bigger as they did not fit in there.

I had then afterwards both sides with massive wood as previous pics shows glues and secured in the bow. Means to take them out would be a hell of a job. At the other hand, change out the el motor is a piece of cake.
Anyway, you may have your style how to do that.
Is it 24 mm? That is about the biggest one you can get for this model.
Good luck with both trust to have it done and working again (without to many scratches)
best regards
Peter
-
Wow, looks colourful too George! Nearly need sun glasses to see it.
FYG, these days they all have 2 x ESDIC on the front panels so on stb side of the console better paint another one (if you find the space).
Unless you keep it with 1 Esdic but then you are committed to have all PAPER sea-charts on board.
Those are the rules these days.
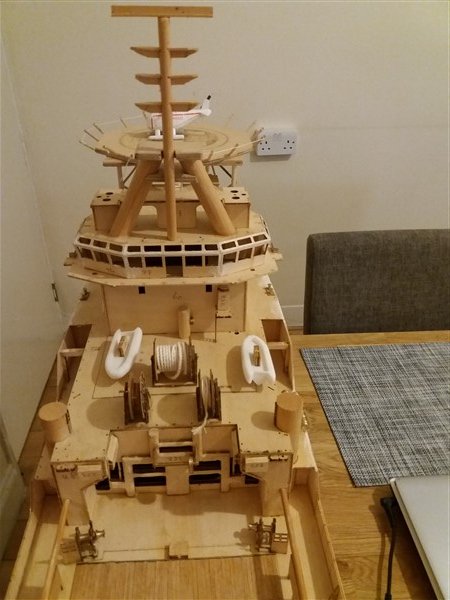
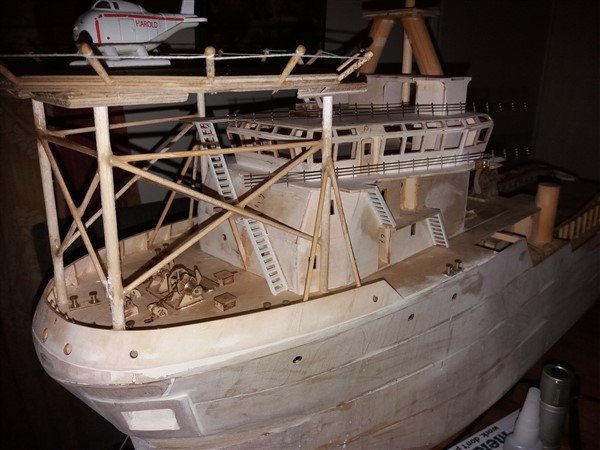
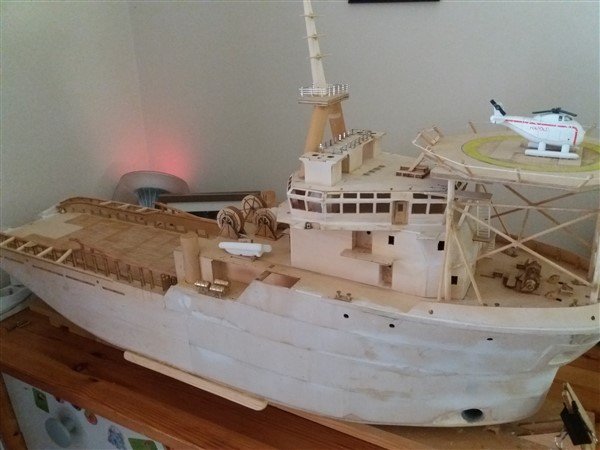
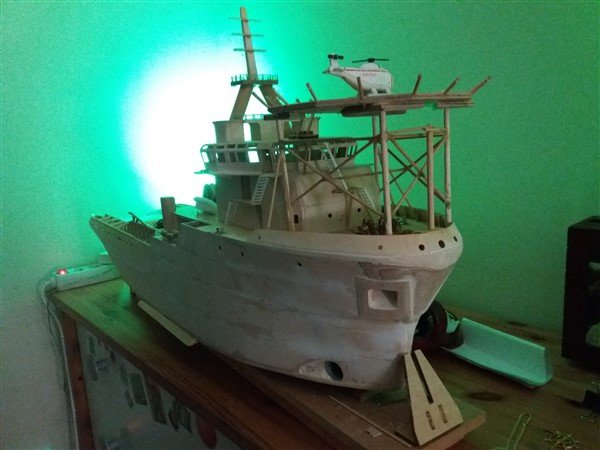
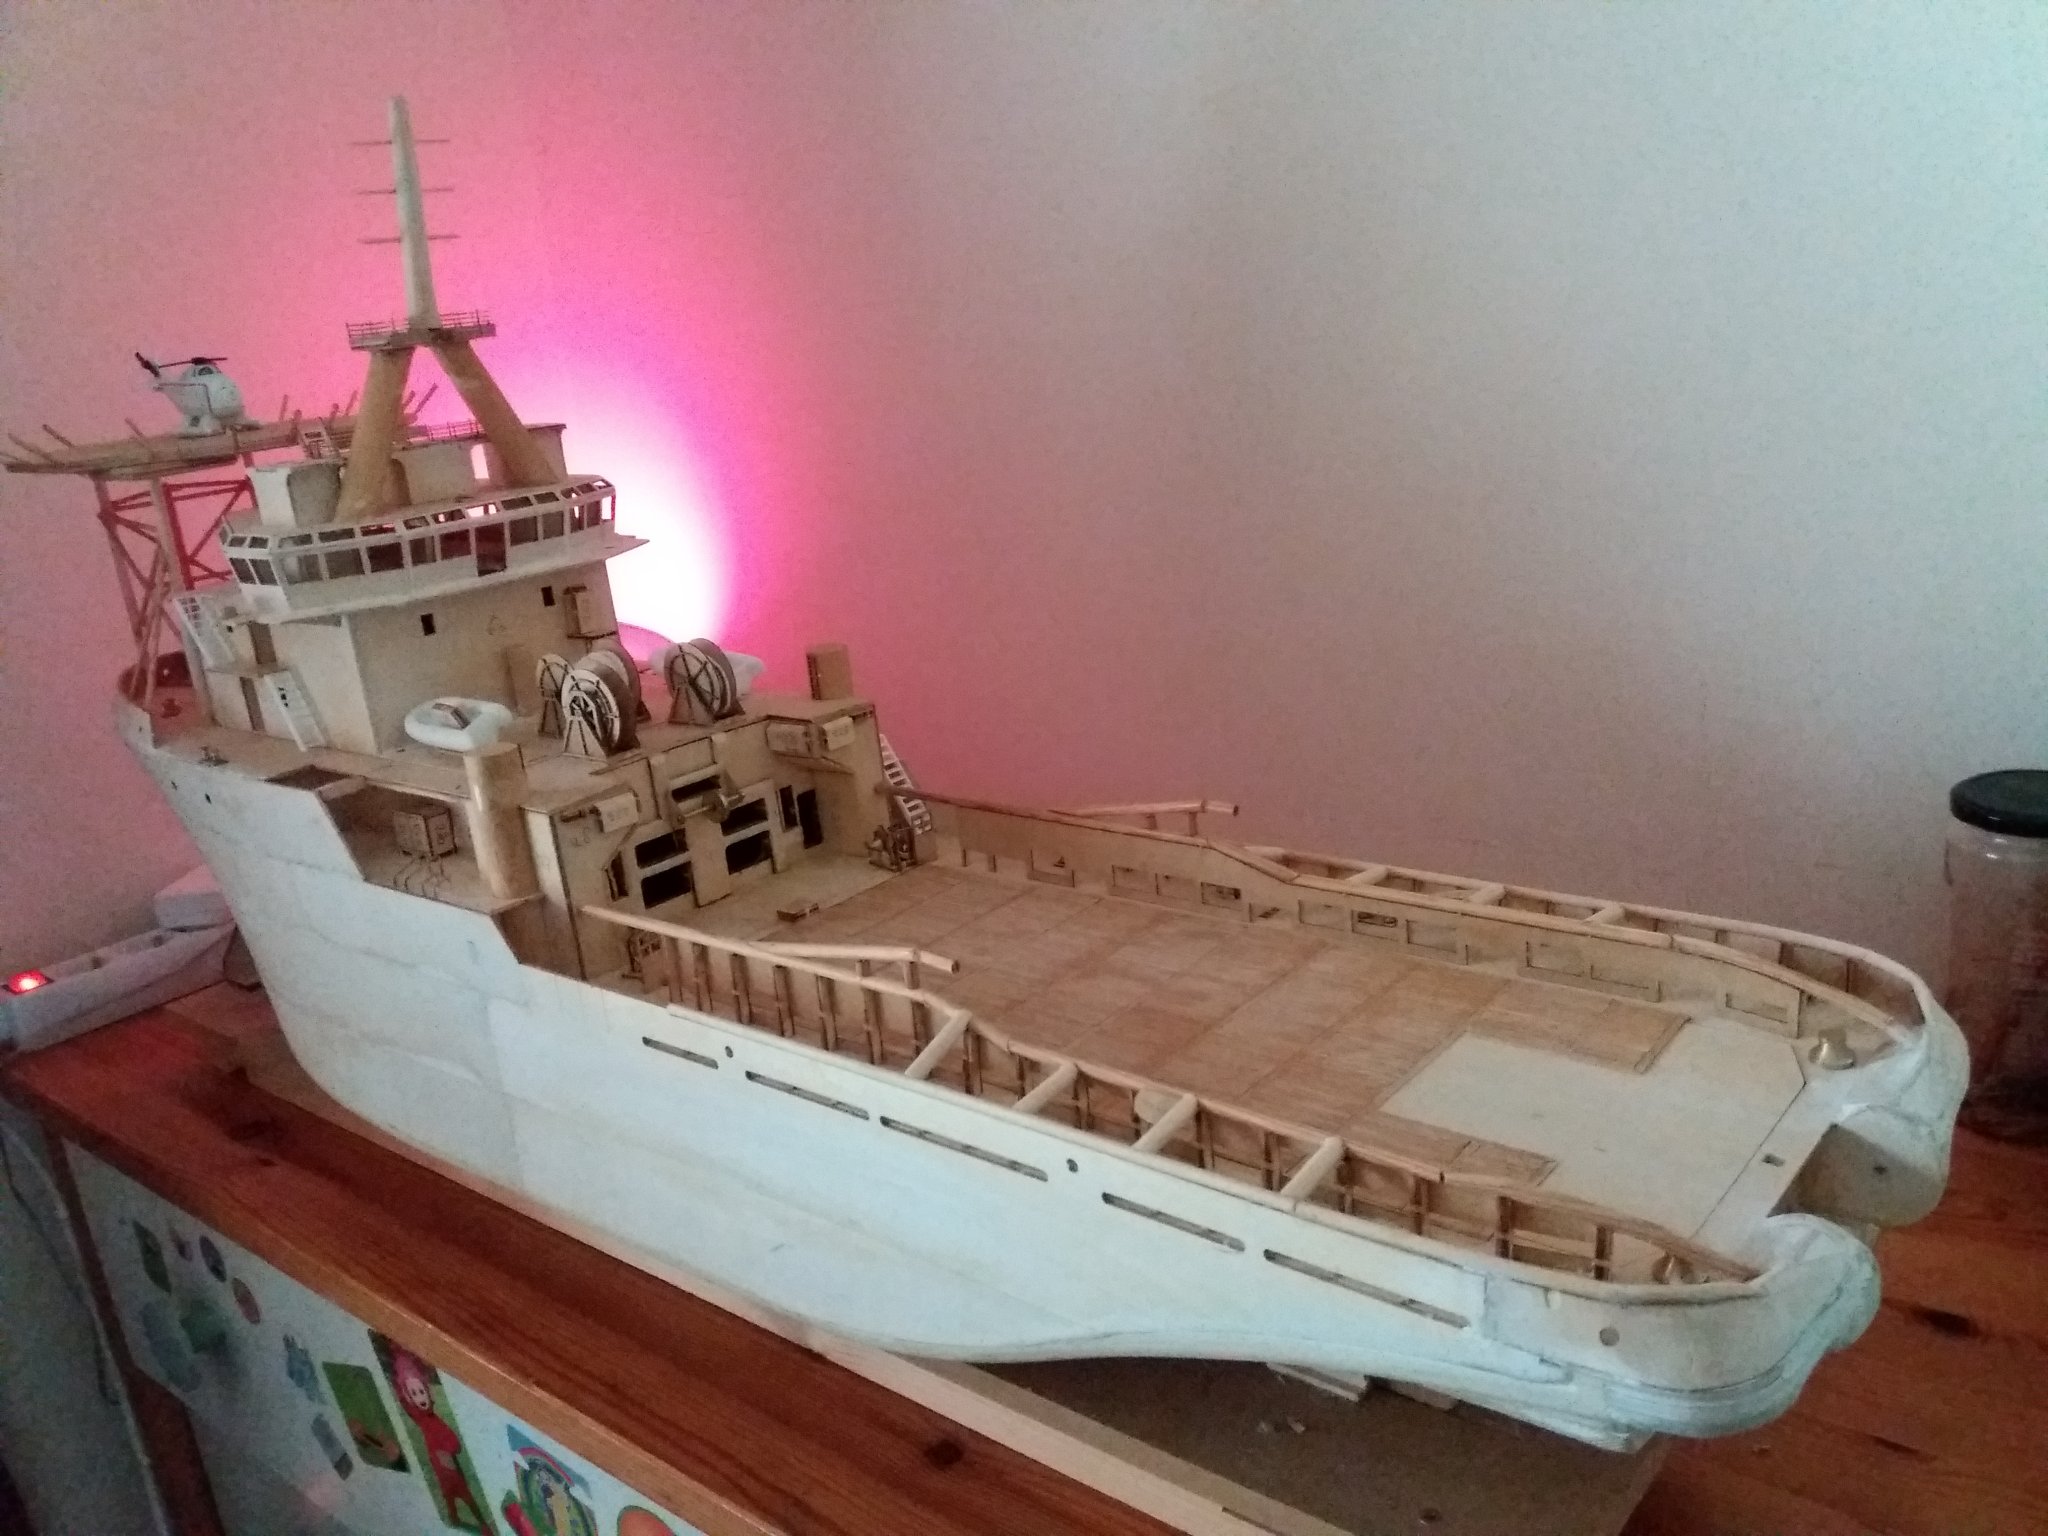
Yeah I already made a plan what I had in my head on paper where what comes / colour / cables / etc. and that is just the lighting, foremast, helideck, Monkey Island, Aft mast, bridge, accommodation, deck lights aft, and more inside the towing winch area.
Just made some measurements and yes it will fit all as I already explained to you in my previous mail.
Got not much left but under the main deck have to made a platform where as the towing winch will be situated.
Then above there (already inside the lower accommodation) another platform for the electronic devises such as receiver, different volt supply box and some other stuff.
the rest (what are the heavy parts) comes all down on the "bottom" such as batteries etc, el motors under the aft deck.
Smoke machine most likely in the front part bottom deck as well the water pump.
The anchor winch I will not make as the vessel has to sail and NOT on anchor.
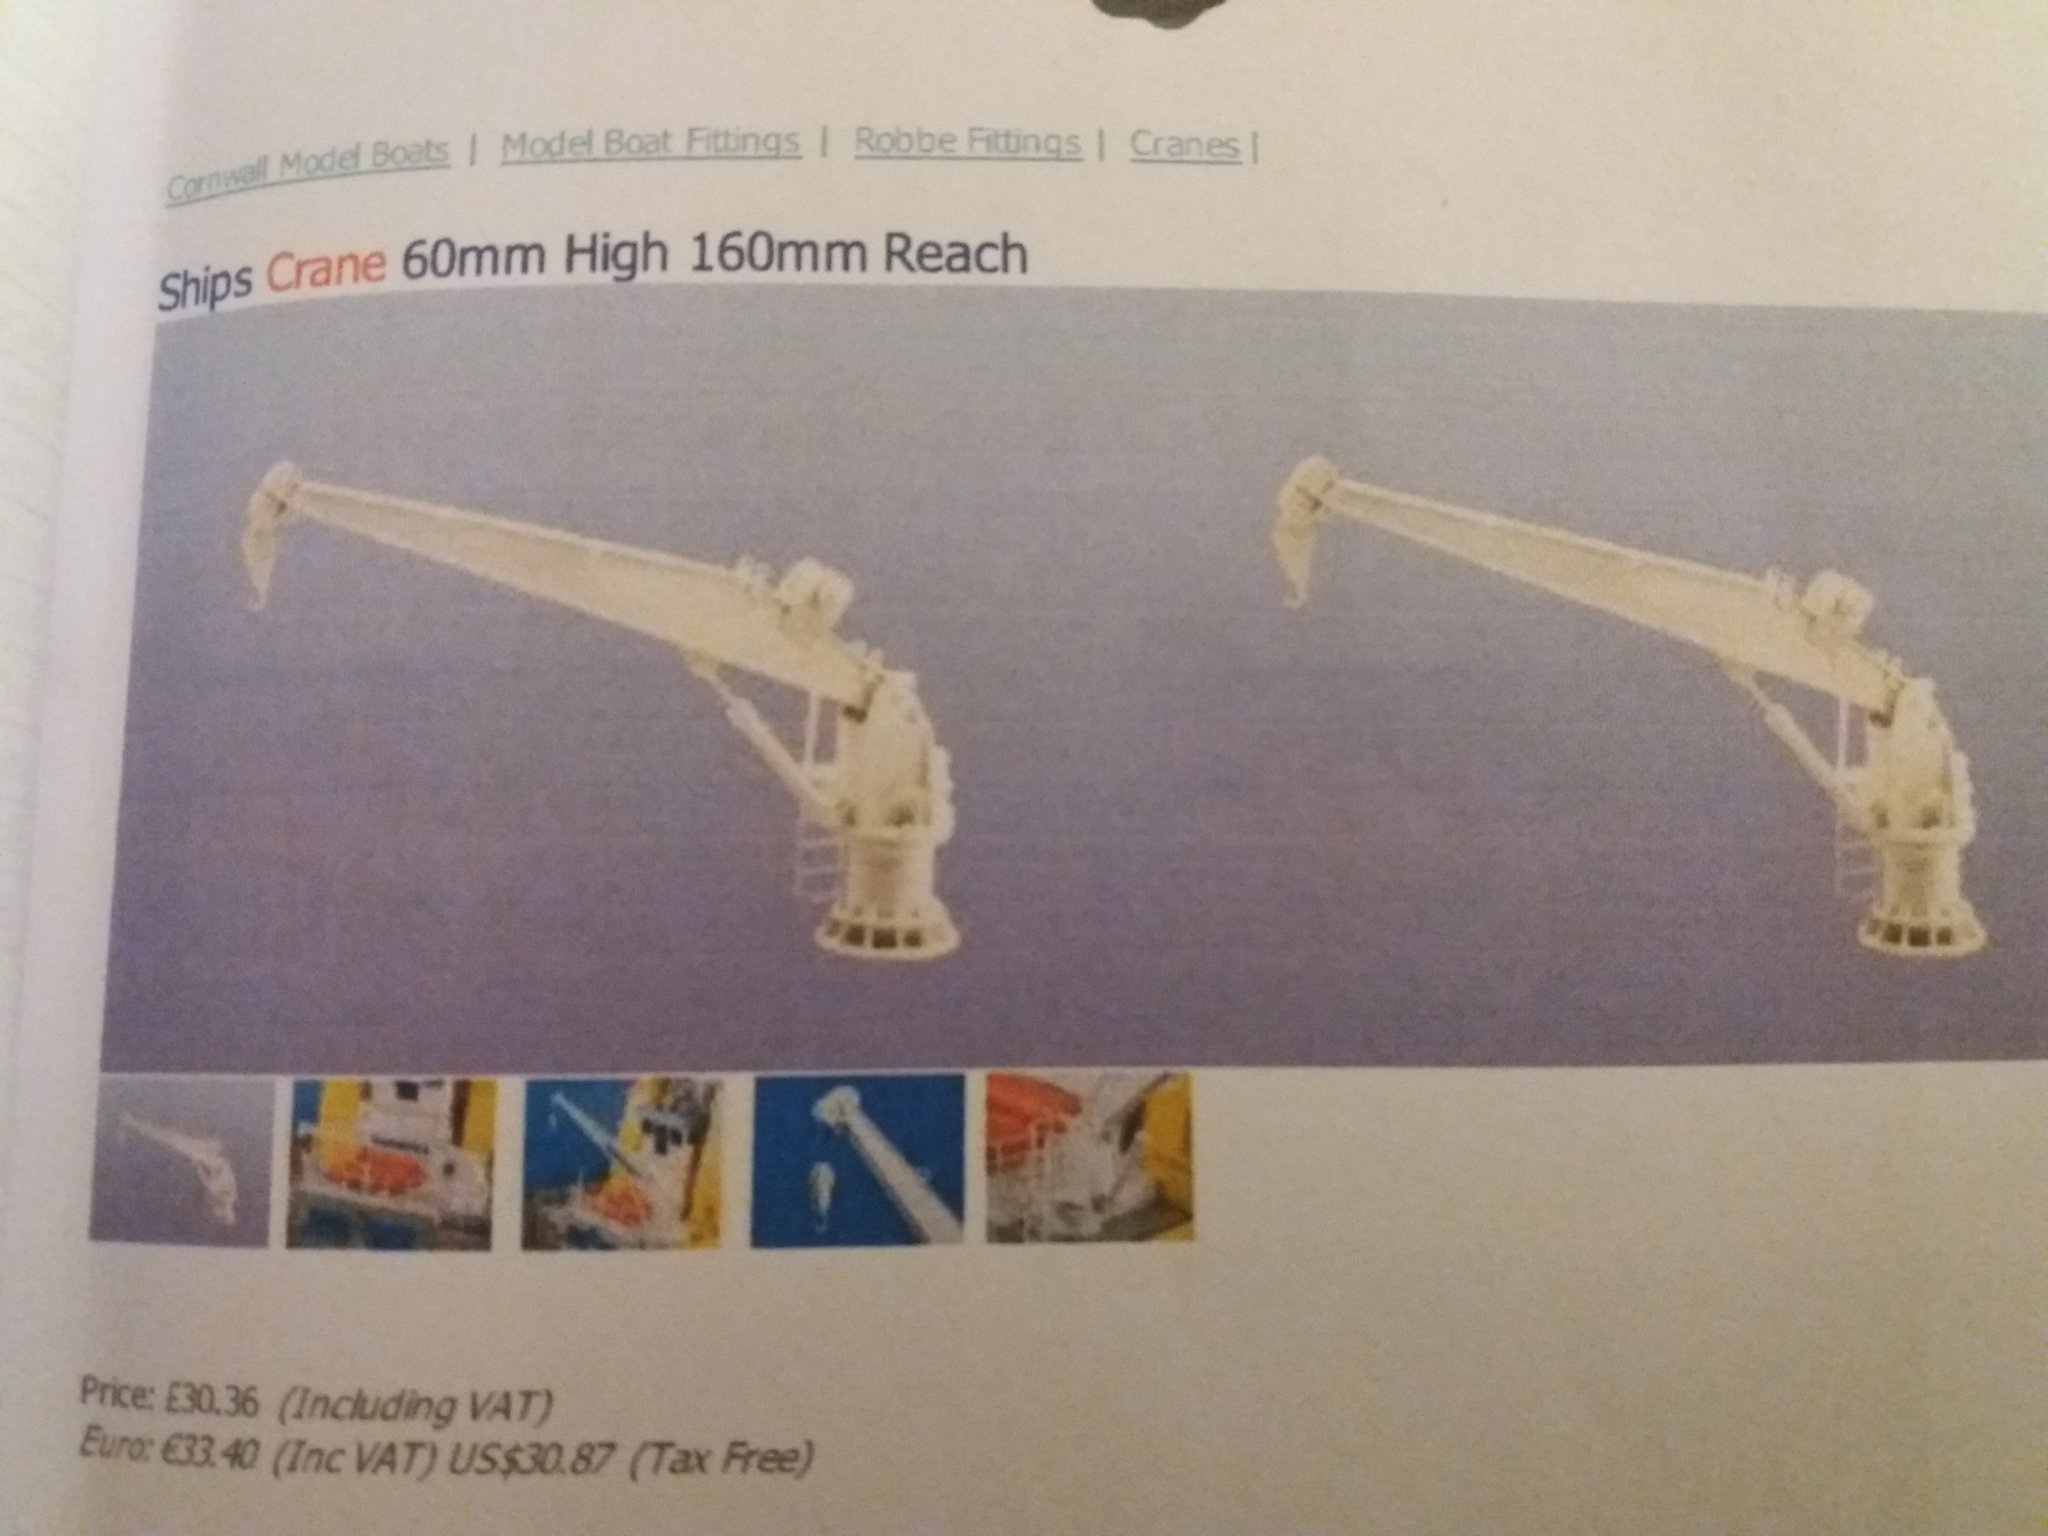
2 x deck cranes will be mounted later as on order presently.
Will on the aft deck making a "buckle" crane as pic showed you for the ROW later to handle.
That is the plan but give me some months to make it all as this takes time.
Looking forwards to see yours finalising and if this is a 24 mm bow trust I have the same.
as always, greetings
Peter
-
Looks great George, the leds doing fine too.
The difficult as you say is to have them all proper lined up and connected.
I will use a converter separate for the lighting as want the helideck also "illuminated" what will be a challange to have it done but got some ideas in my head to achieve that.
As for now I do the same nearly as you means just doing the inside, make it ready for the lighting, making floors for the towing winch and the rest of the electronic units such as receiver etc.
To be honest with you I don't have the "normal" propulsion and rudders so get away with that lot.
At the other hand want to make the towing pins and then 4 x vertical mounted the el motors for the Schottels.
The towing pins have built in el motors but I'm afraid I have to modify the stern inside to have that unit accommodated where I want it.
Anyway, for the "cold" winter days enough to do but first wait till parts are here.
Take care there down under,
regards,
Peter
-
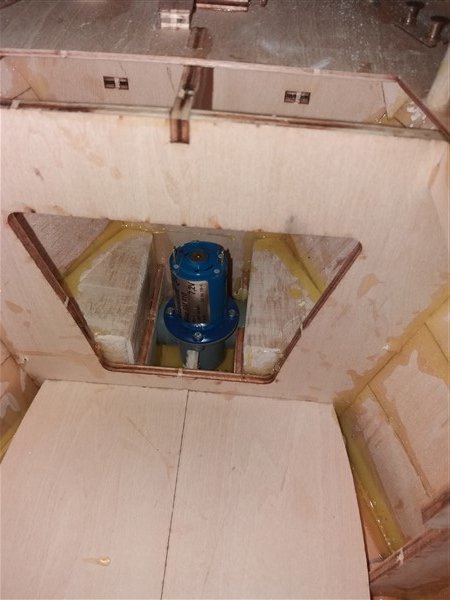
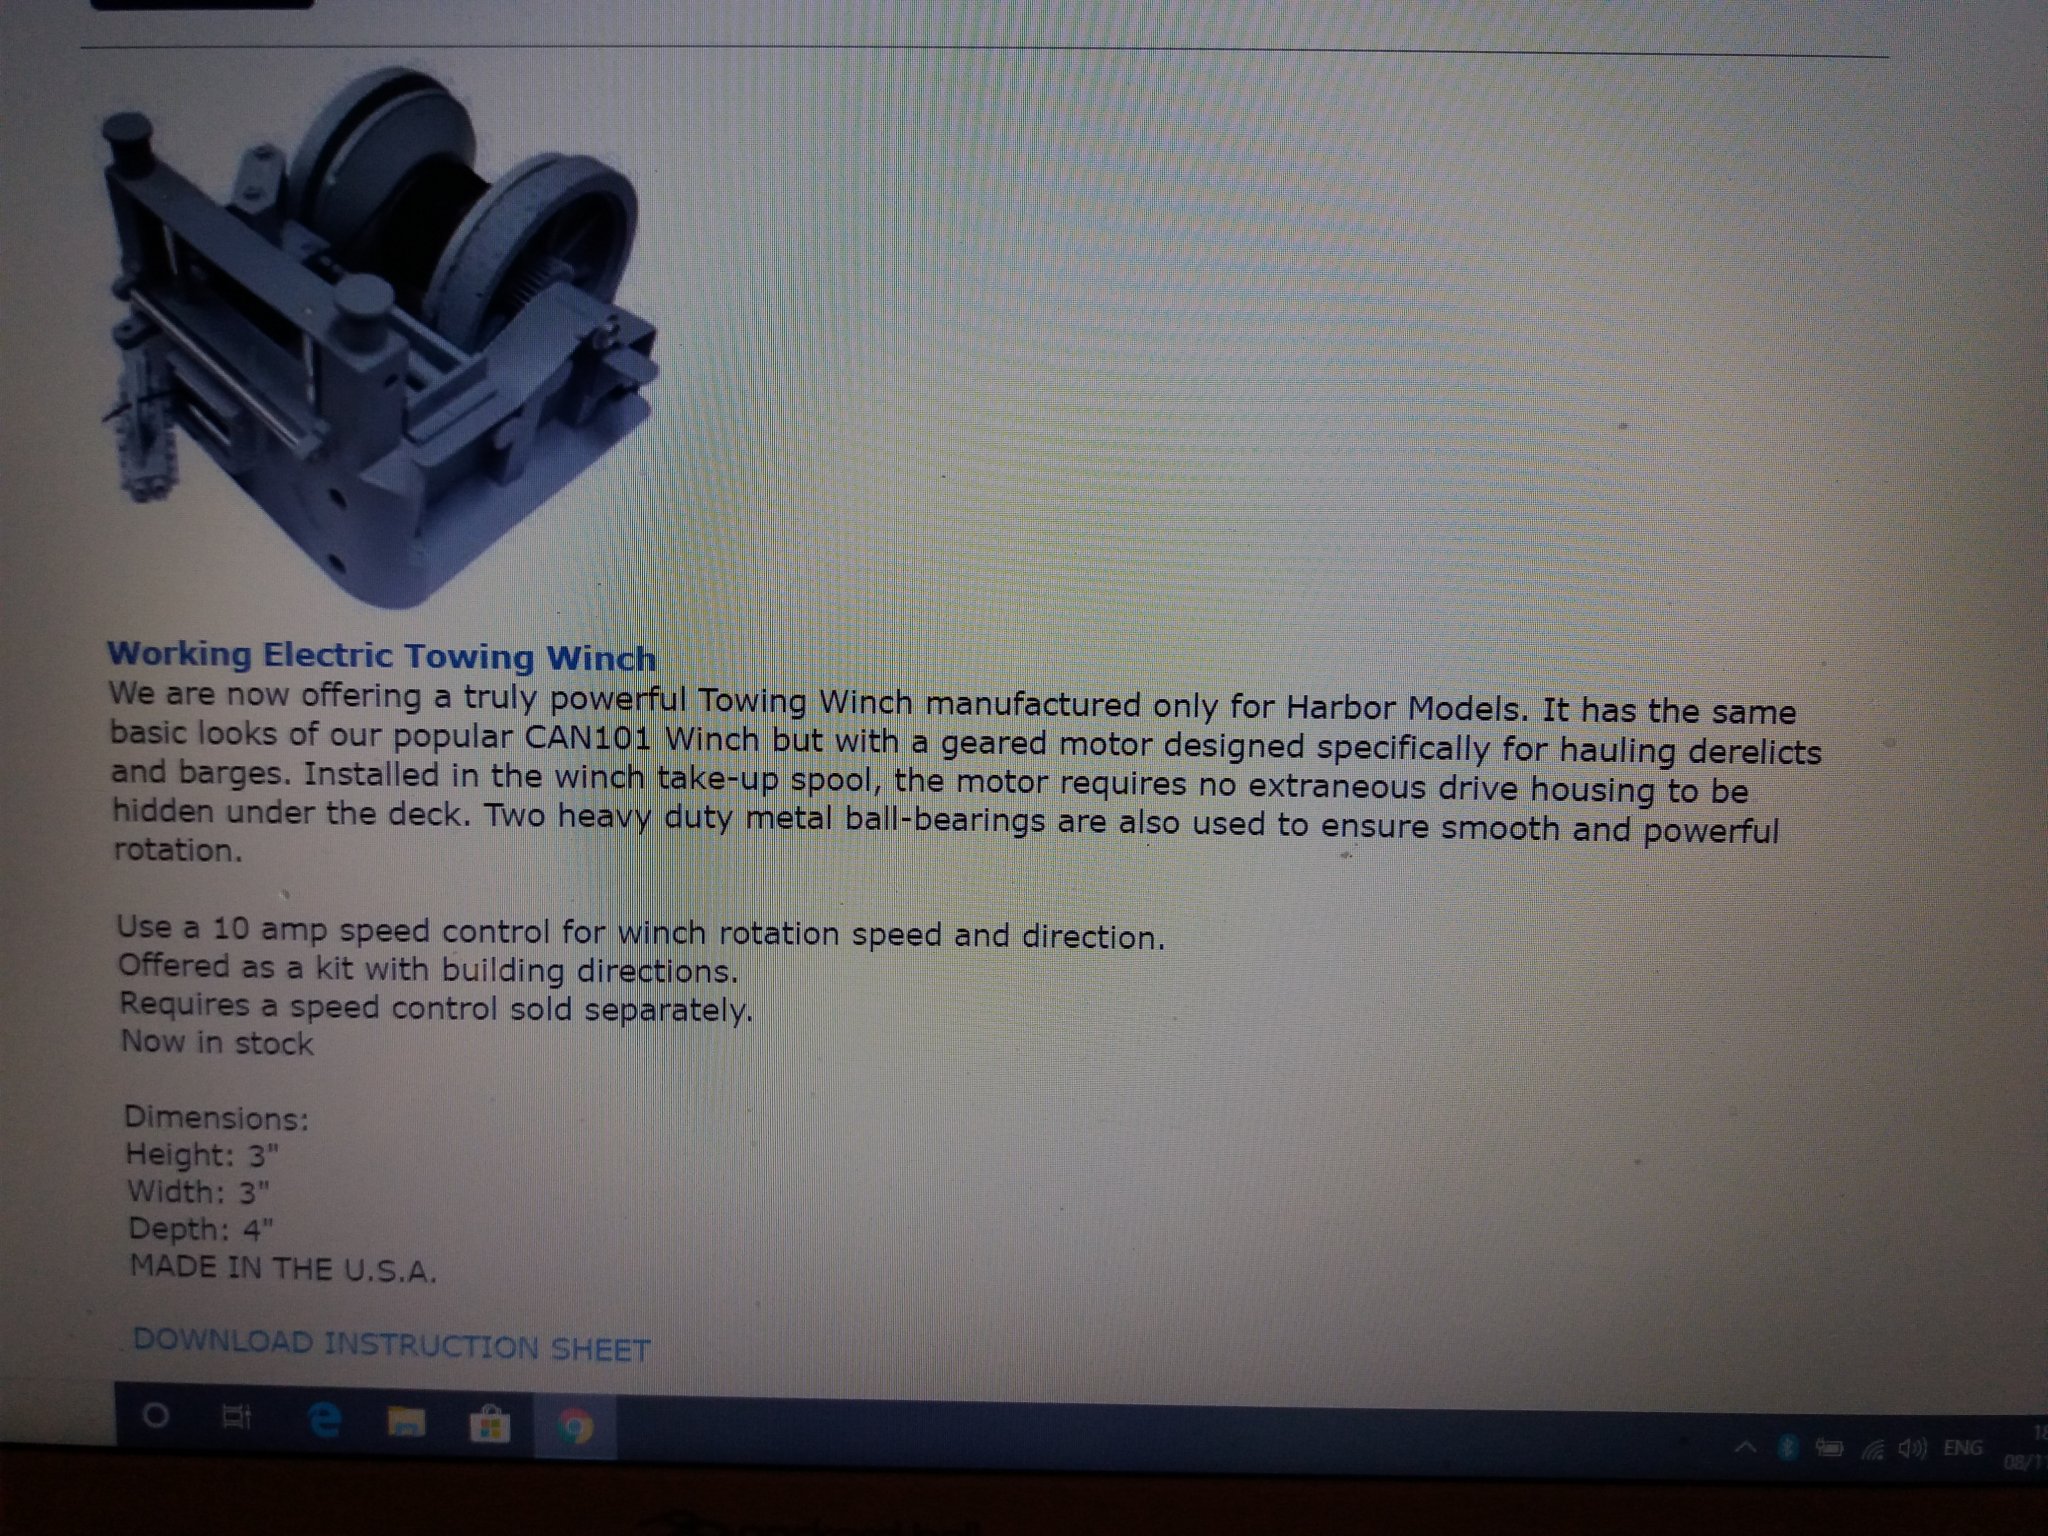
George, the towing winch I ordered is not that big anyhow and the el motor is BUILT INSIDE the drum what saves you a lot of space.
Ok it comes from USA but hopefully it is here before X-mas this year.
I know there is not much space left inside the built, therefore I want to have the recievers, volt convertors inside the accomodation and the rest below such as batteries and el motors all under decks.
I want to have long belts so the 2 el motors (vertical positioned) for each Schottel propulsion mounted as far possible in each side in way off I positioned the number 3 ps / stb side on my pic from bottom.
Means in between the 2 Schottels should be place enough for the towing pins.
As you say, you will see the pics when I received the parts and built them in.
So far so good, this weekend trying to finish the helideck to have all corners made smooth, no sharp edges and the safety net in place.
For the rest have to wait until better weather.
Chears George, enjoy the weekend,
Peter
https://www.harbormodels.com/craneswinches.html

towing winch on order and will be placed direct behind the midships towing arrangement place.
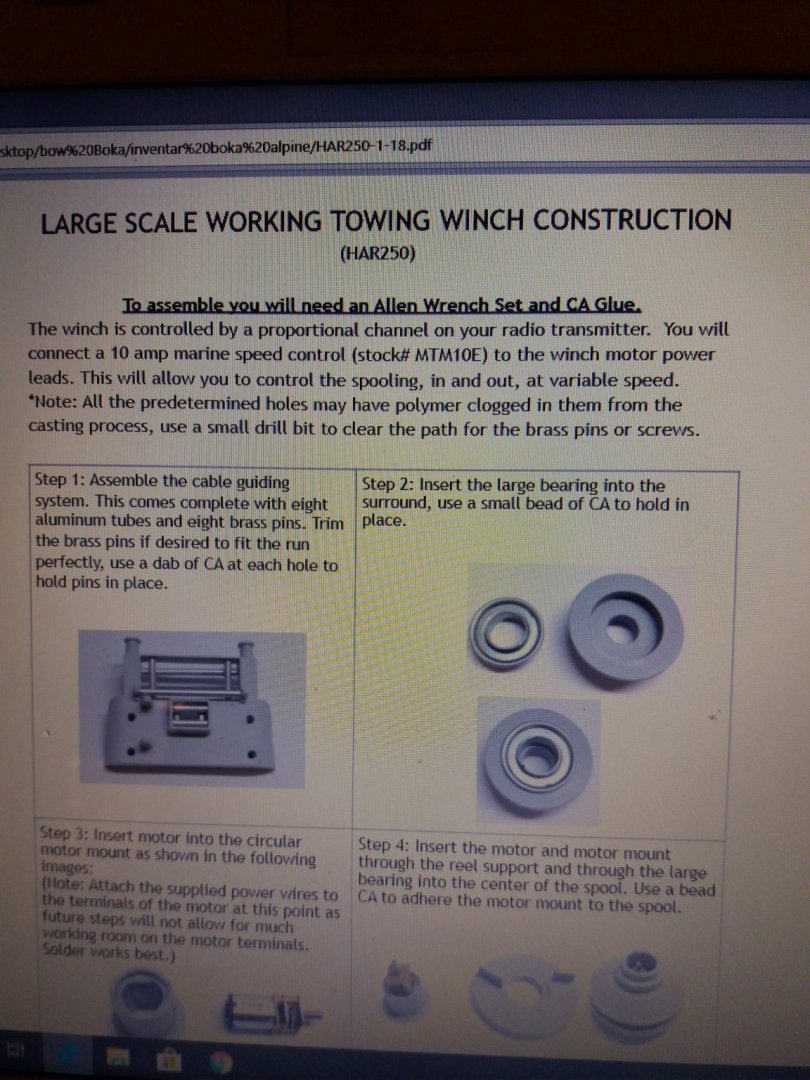
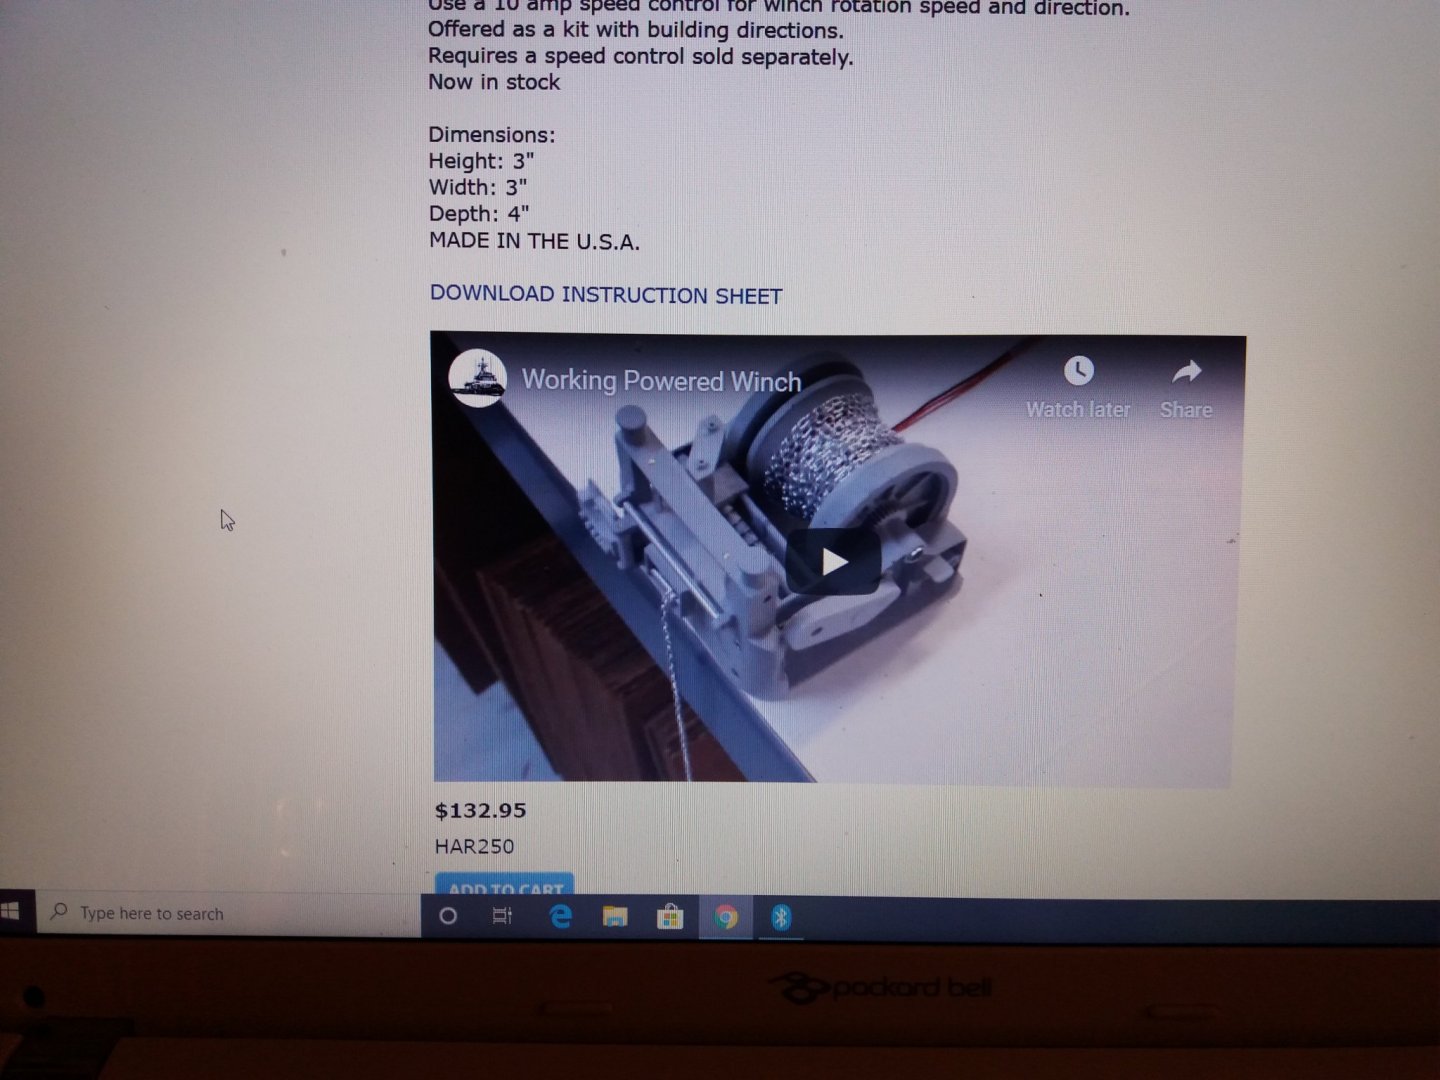
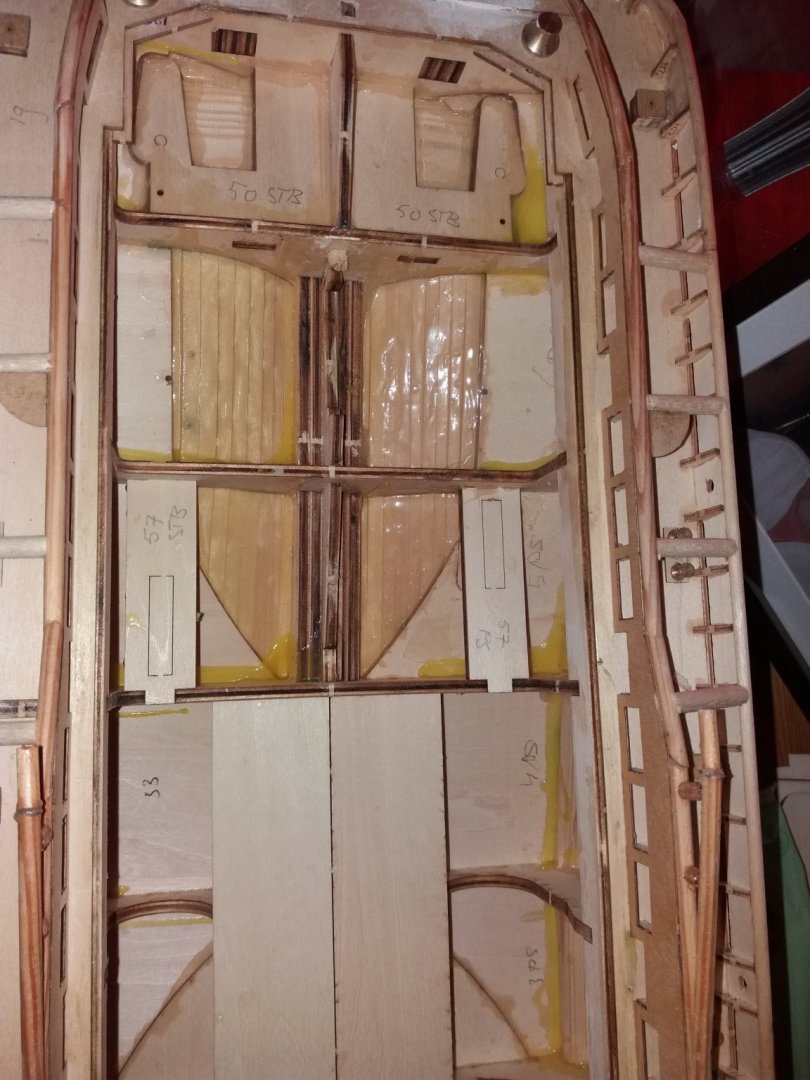
Where you see S3 and 4 ps is the spot where the 2 el motors (vertical) for the Schottel propulsion are coming, on top of the frame with no 57 stb and 57 ps the spot for the small 360 degrees turning el motors of the Schottels.
-
Right, thanks for this info George, I know this firm in Germany and you right, they are a bit at the top level if you look at their prices.
Never the less, they do have nice stuff what can be used for a resonable price too.
For the weight of the built most likely because I built additional wood in her and checked until now on the scale is ca 11 kg but without all equipment such as Schottels, batteries and other stuff.
I gues together with all I will come to ca 15-16 kg but as seen other builts same size they are still to my knowledge a bit high on the water so I'm not really afraid about it.
You did a great job on the bridge inside and the lighting is going great too. Not sure if I go for the same lay out as we all have our ideas and not the same but never the less it looks good.
I will make an adjustable floor inside the accommodation under the bridge to make the stairs in there and also the lightning.
Have to take care not to consume all space as want also the towing winch inside her under the accommodation on a floor as present it is not there.
Here I did order some parts as the pics will show you and are all scale 1:75, I did not posted all I ordered in the pics as that is to much, you will see them afterwards.
The only disadvantage is delivery time can be up till 6 weeks or longer for some parts.
But as you can see I go away from the original layout as according general plan but this is me, having sailed on those ships I always want to make it perfect although that is something you never get but this time building it I can.
Ok George, thanks again for showing your status and we talk again when we find something what is usefull for both.
Greetings from Luton UK
Peter

Those are the cranes in scale 1:75 what will come on the tug stb and ps.
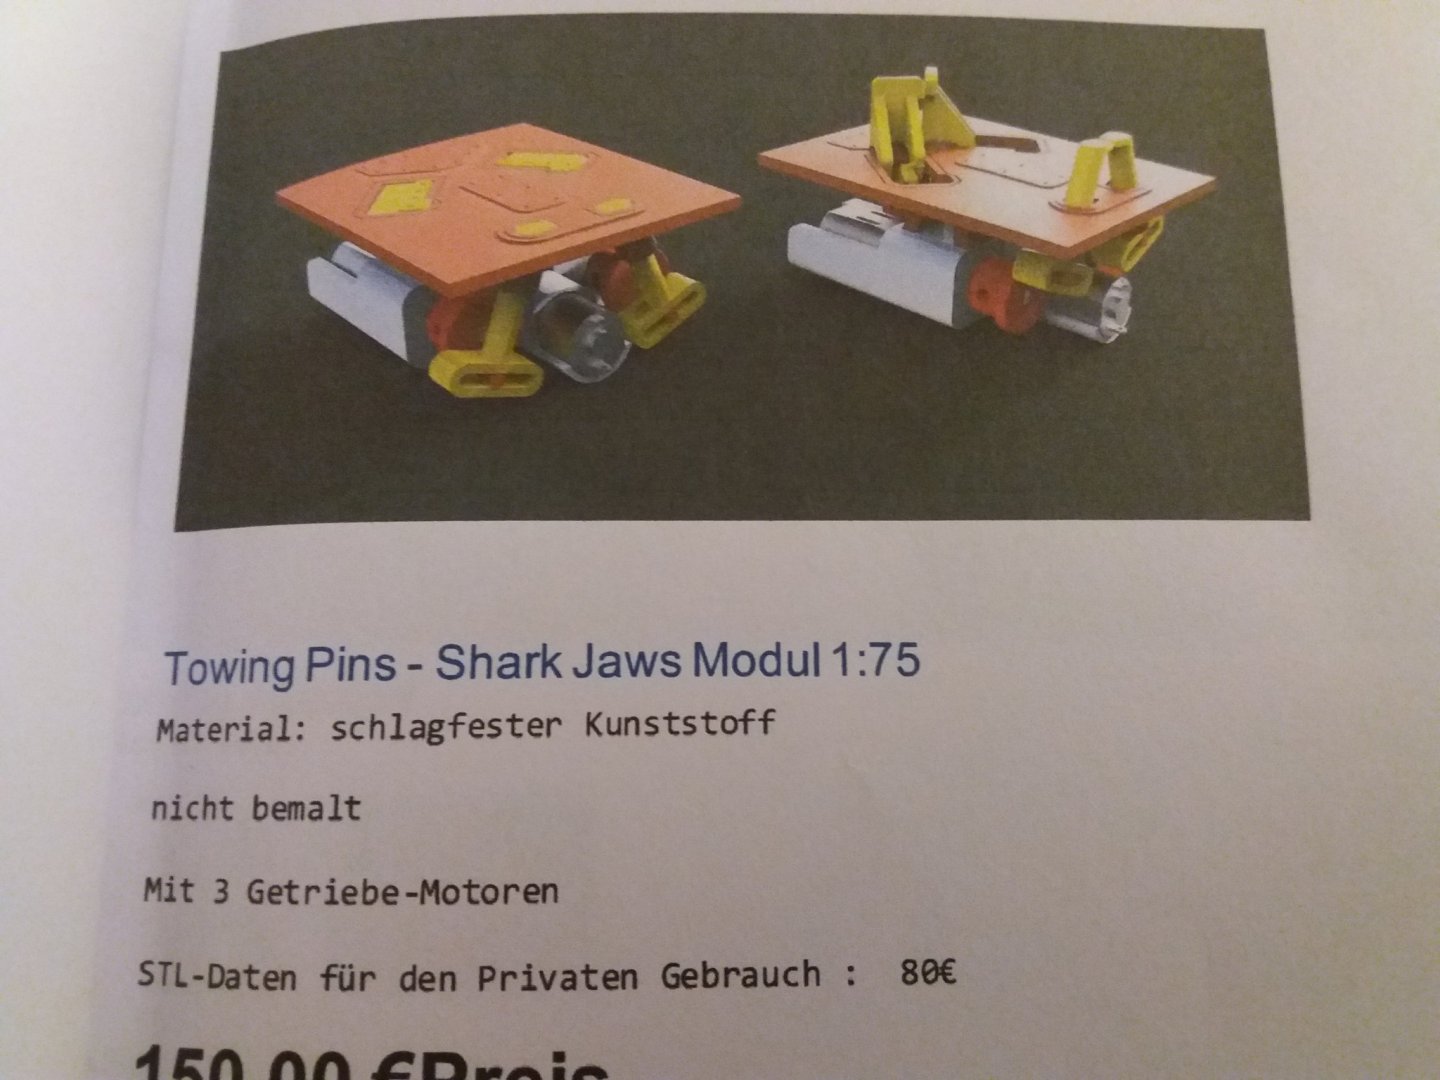
Towing pins what should be accommodated in between the 2 Schottels aft. (Hopefully enough space)
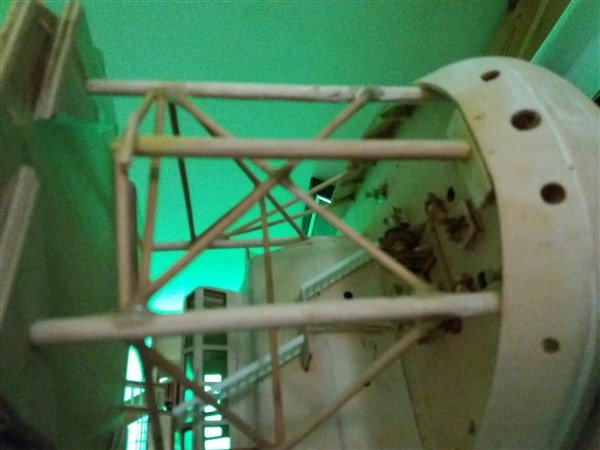
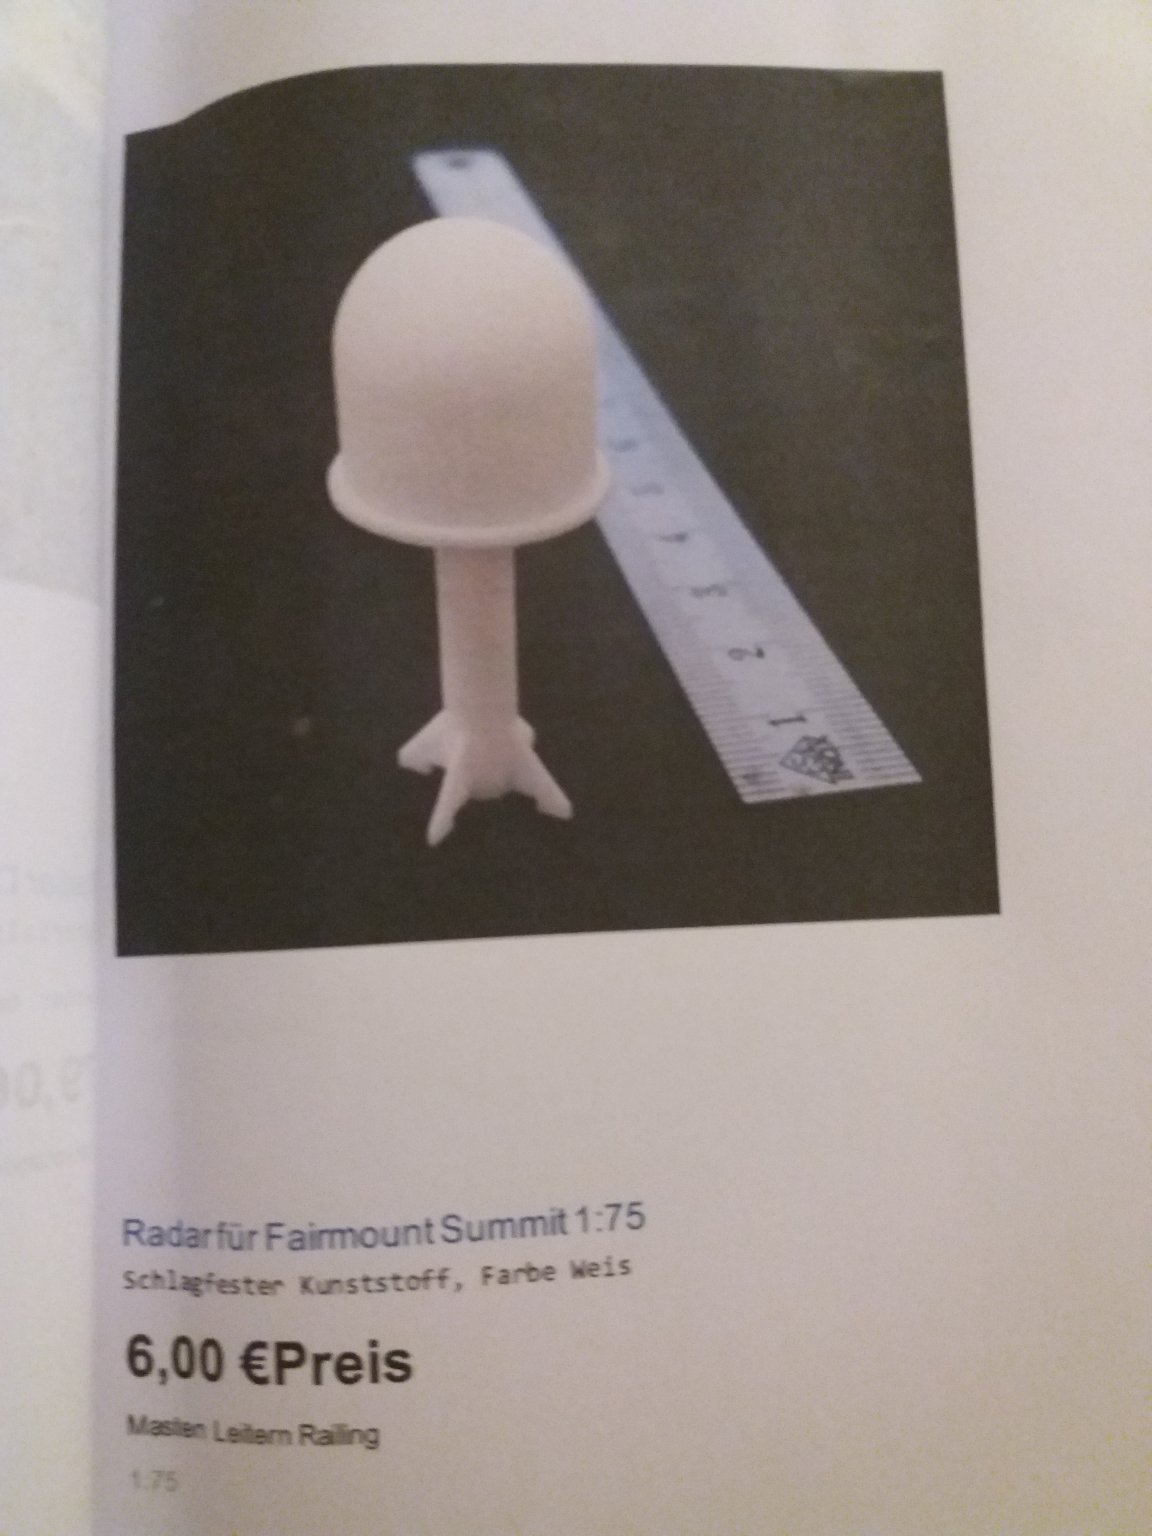
Radar / comm mast what will be situated between funnels and helideck on the monkey island
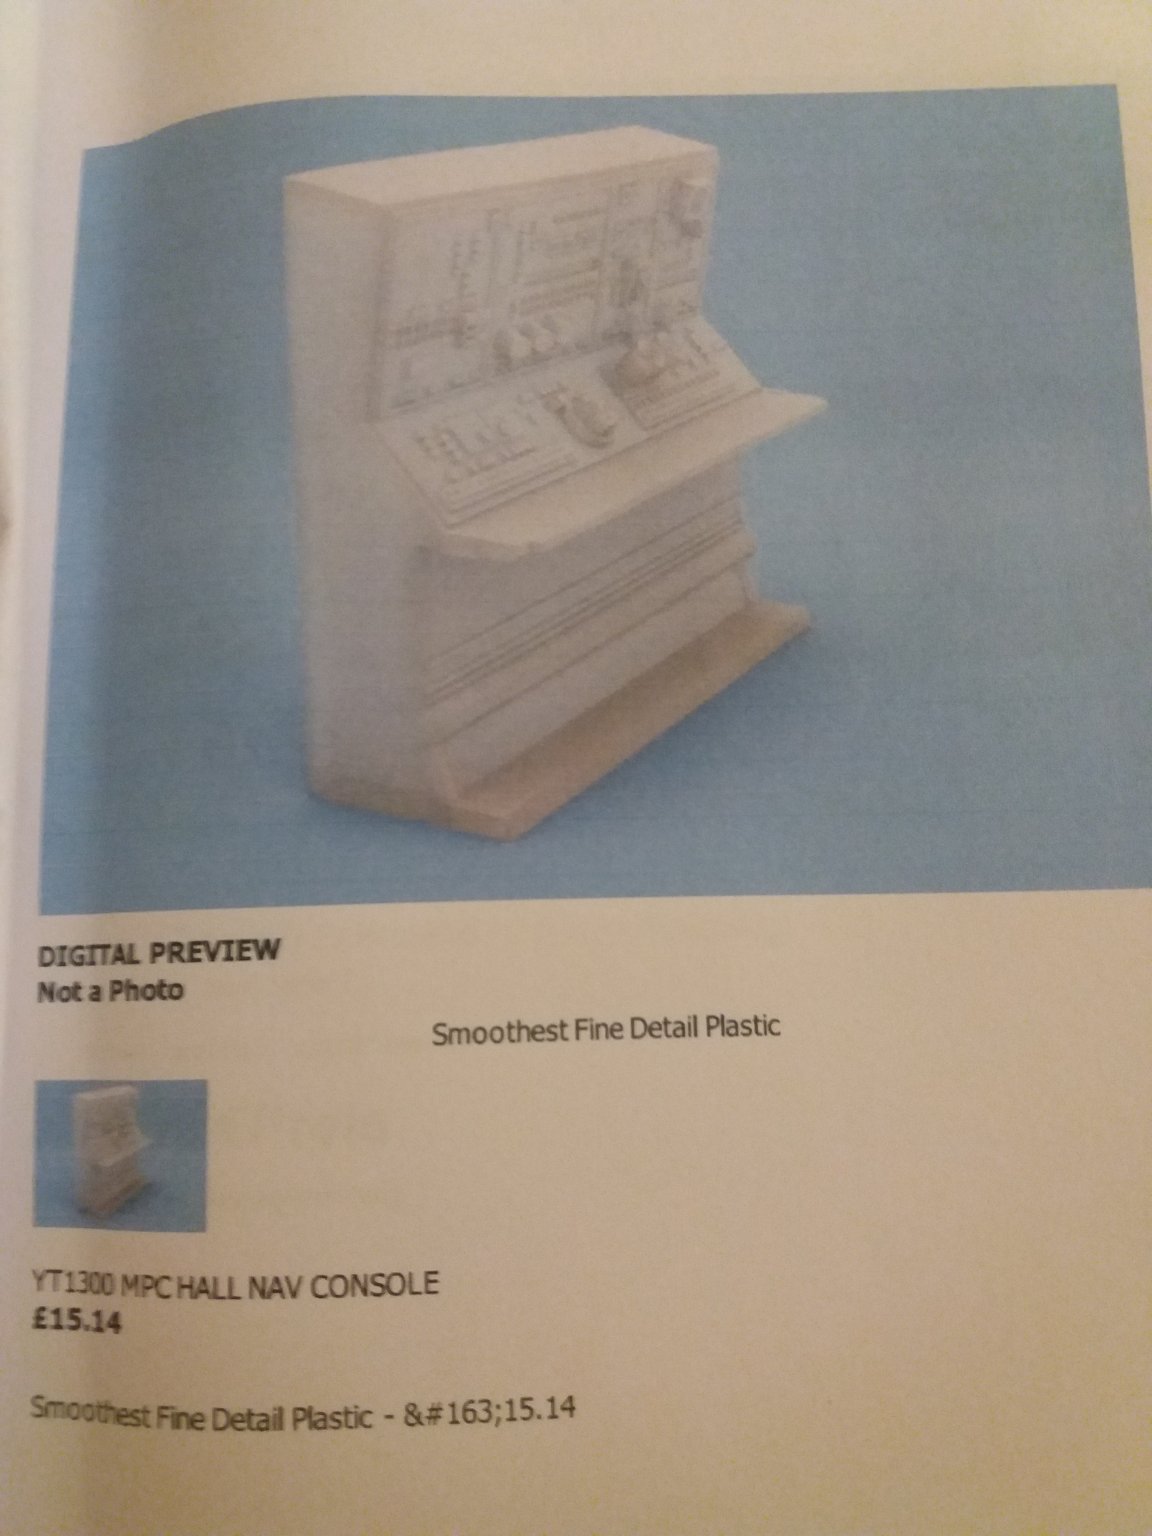
radio / nav console inside the bridge
radar on the aft mast, need to make a small platform there.

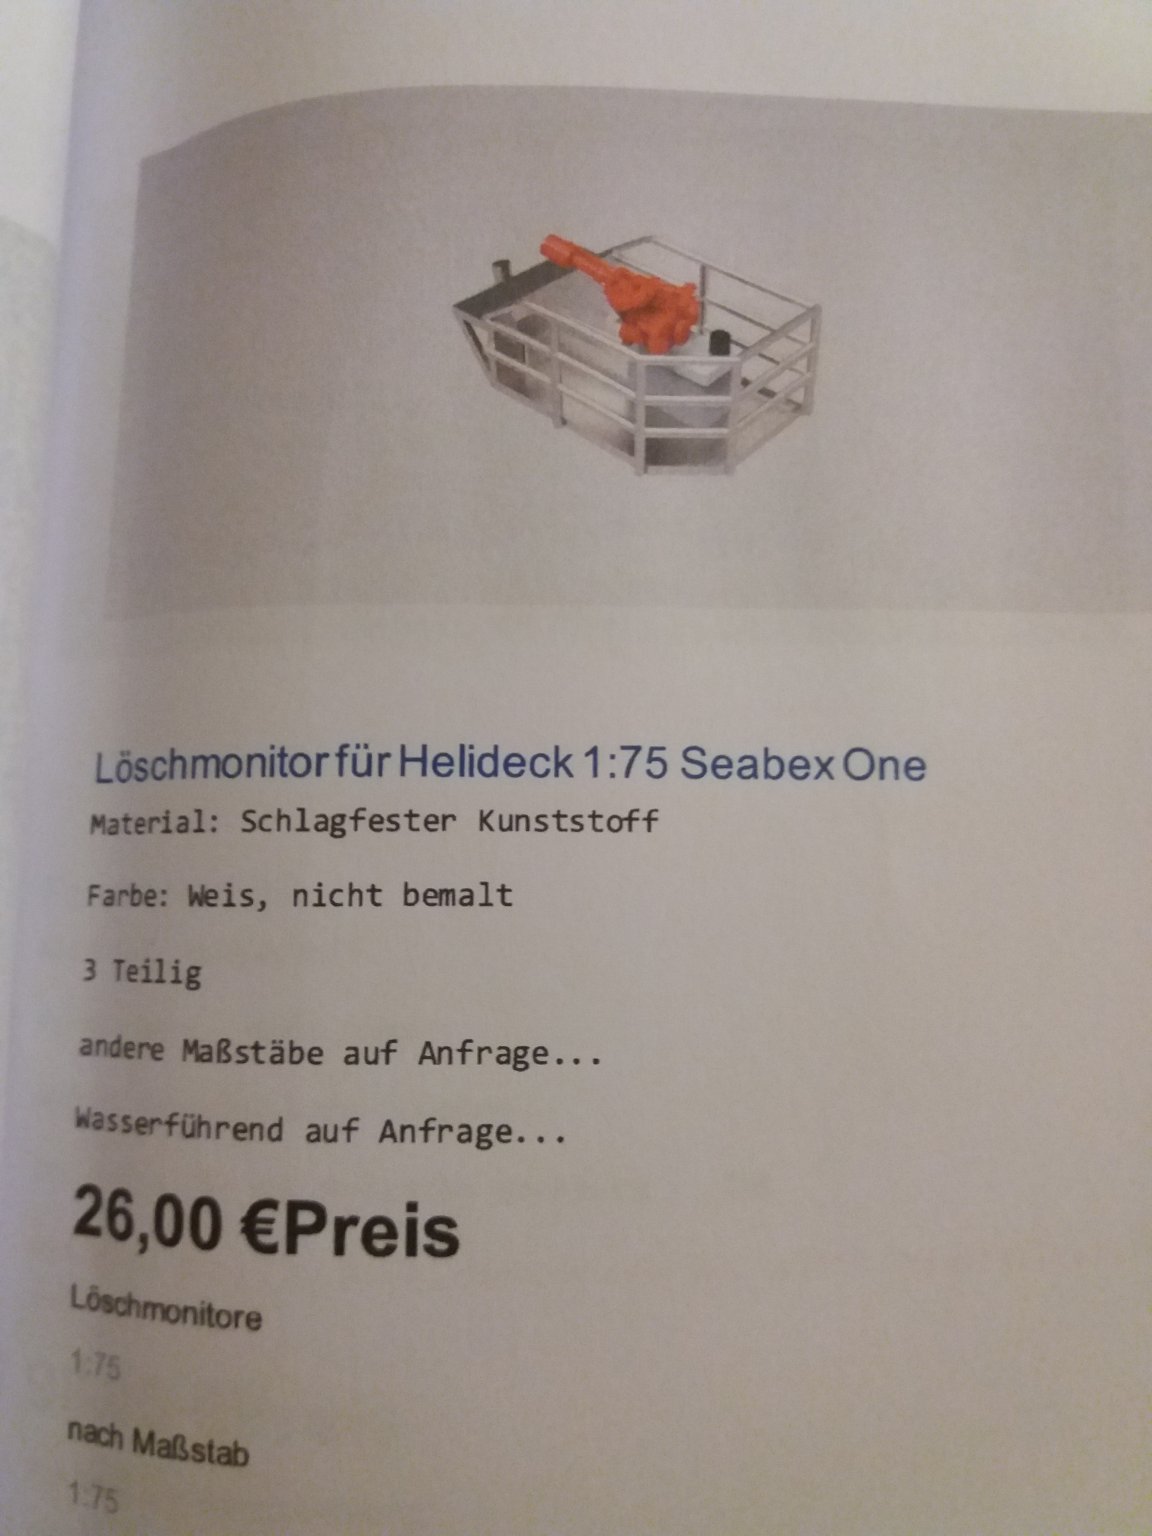
fire equipment to be mounted on a platform situated aft side helideck
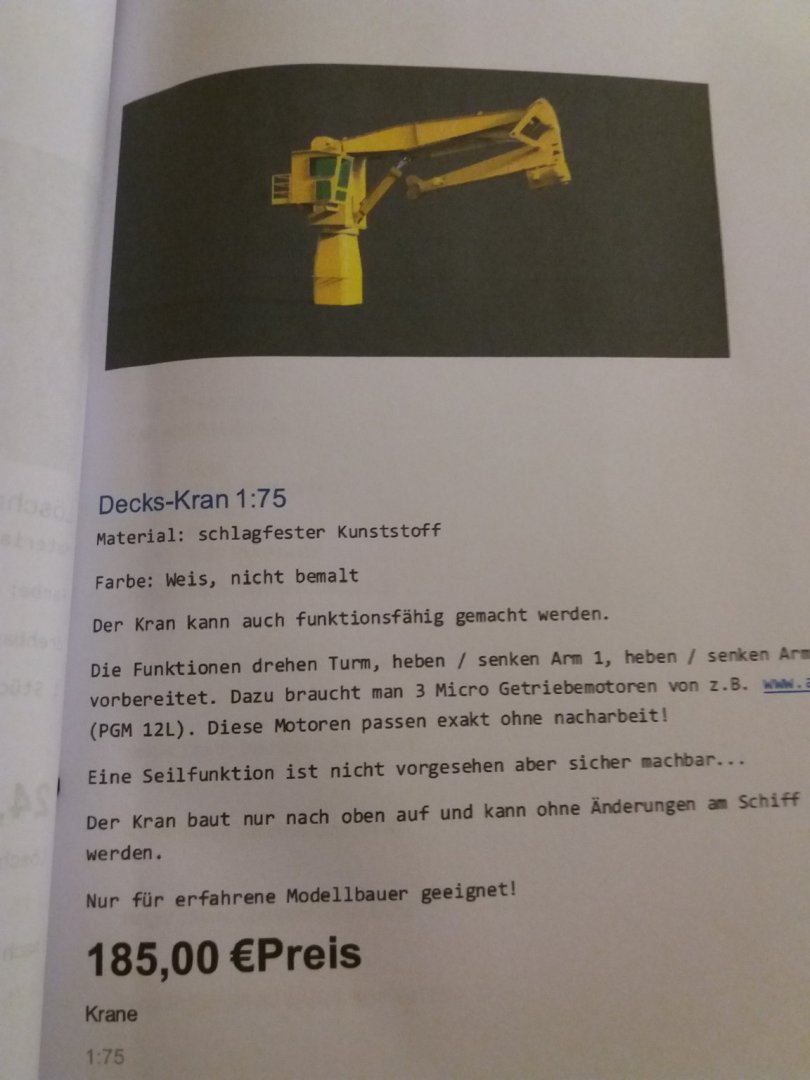
buckle / deck crane on ps deck iwo ps tucker winch and outer hull, place to be situated when part arrived
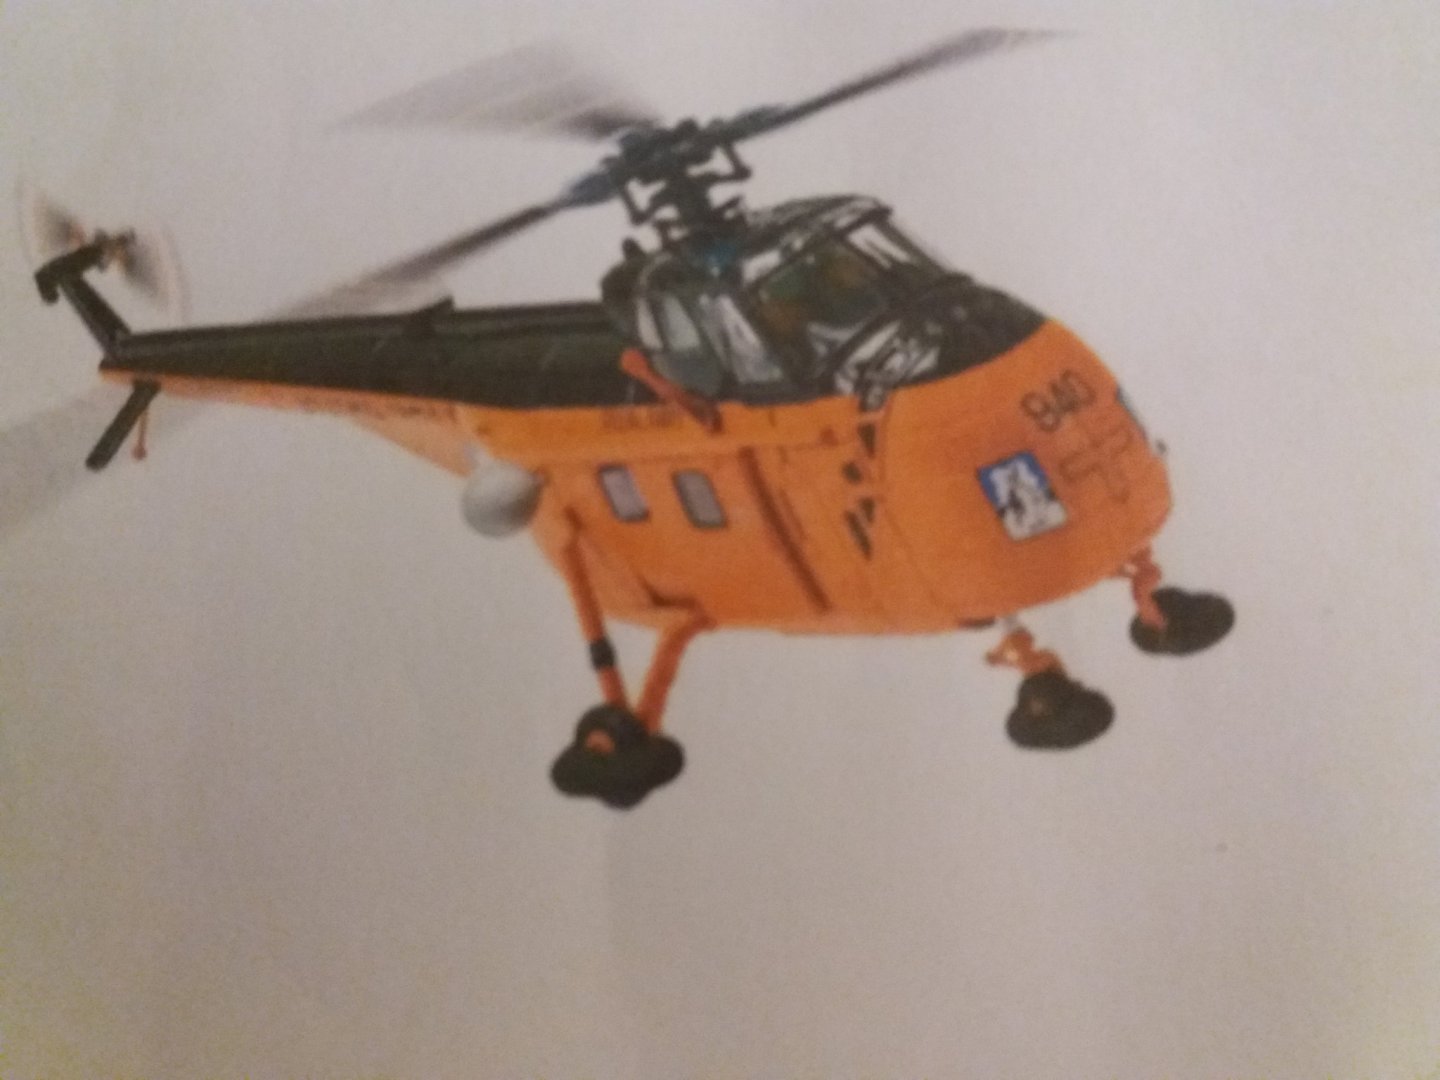
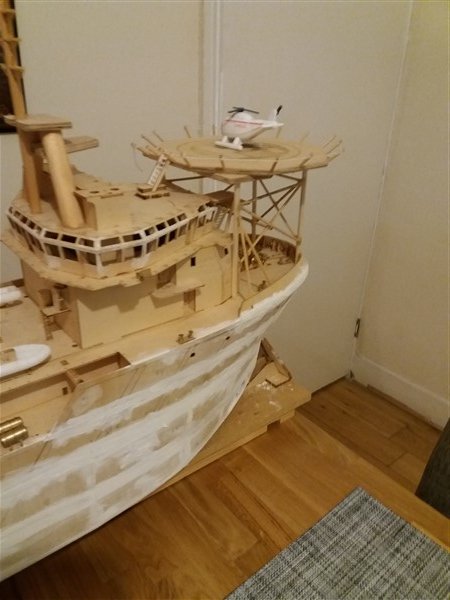
helicopter what will be having his own remote and can fly on / off the helideck.

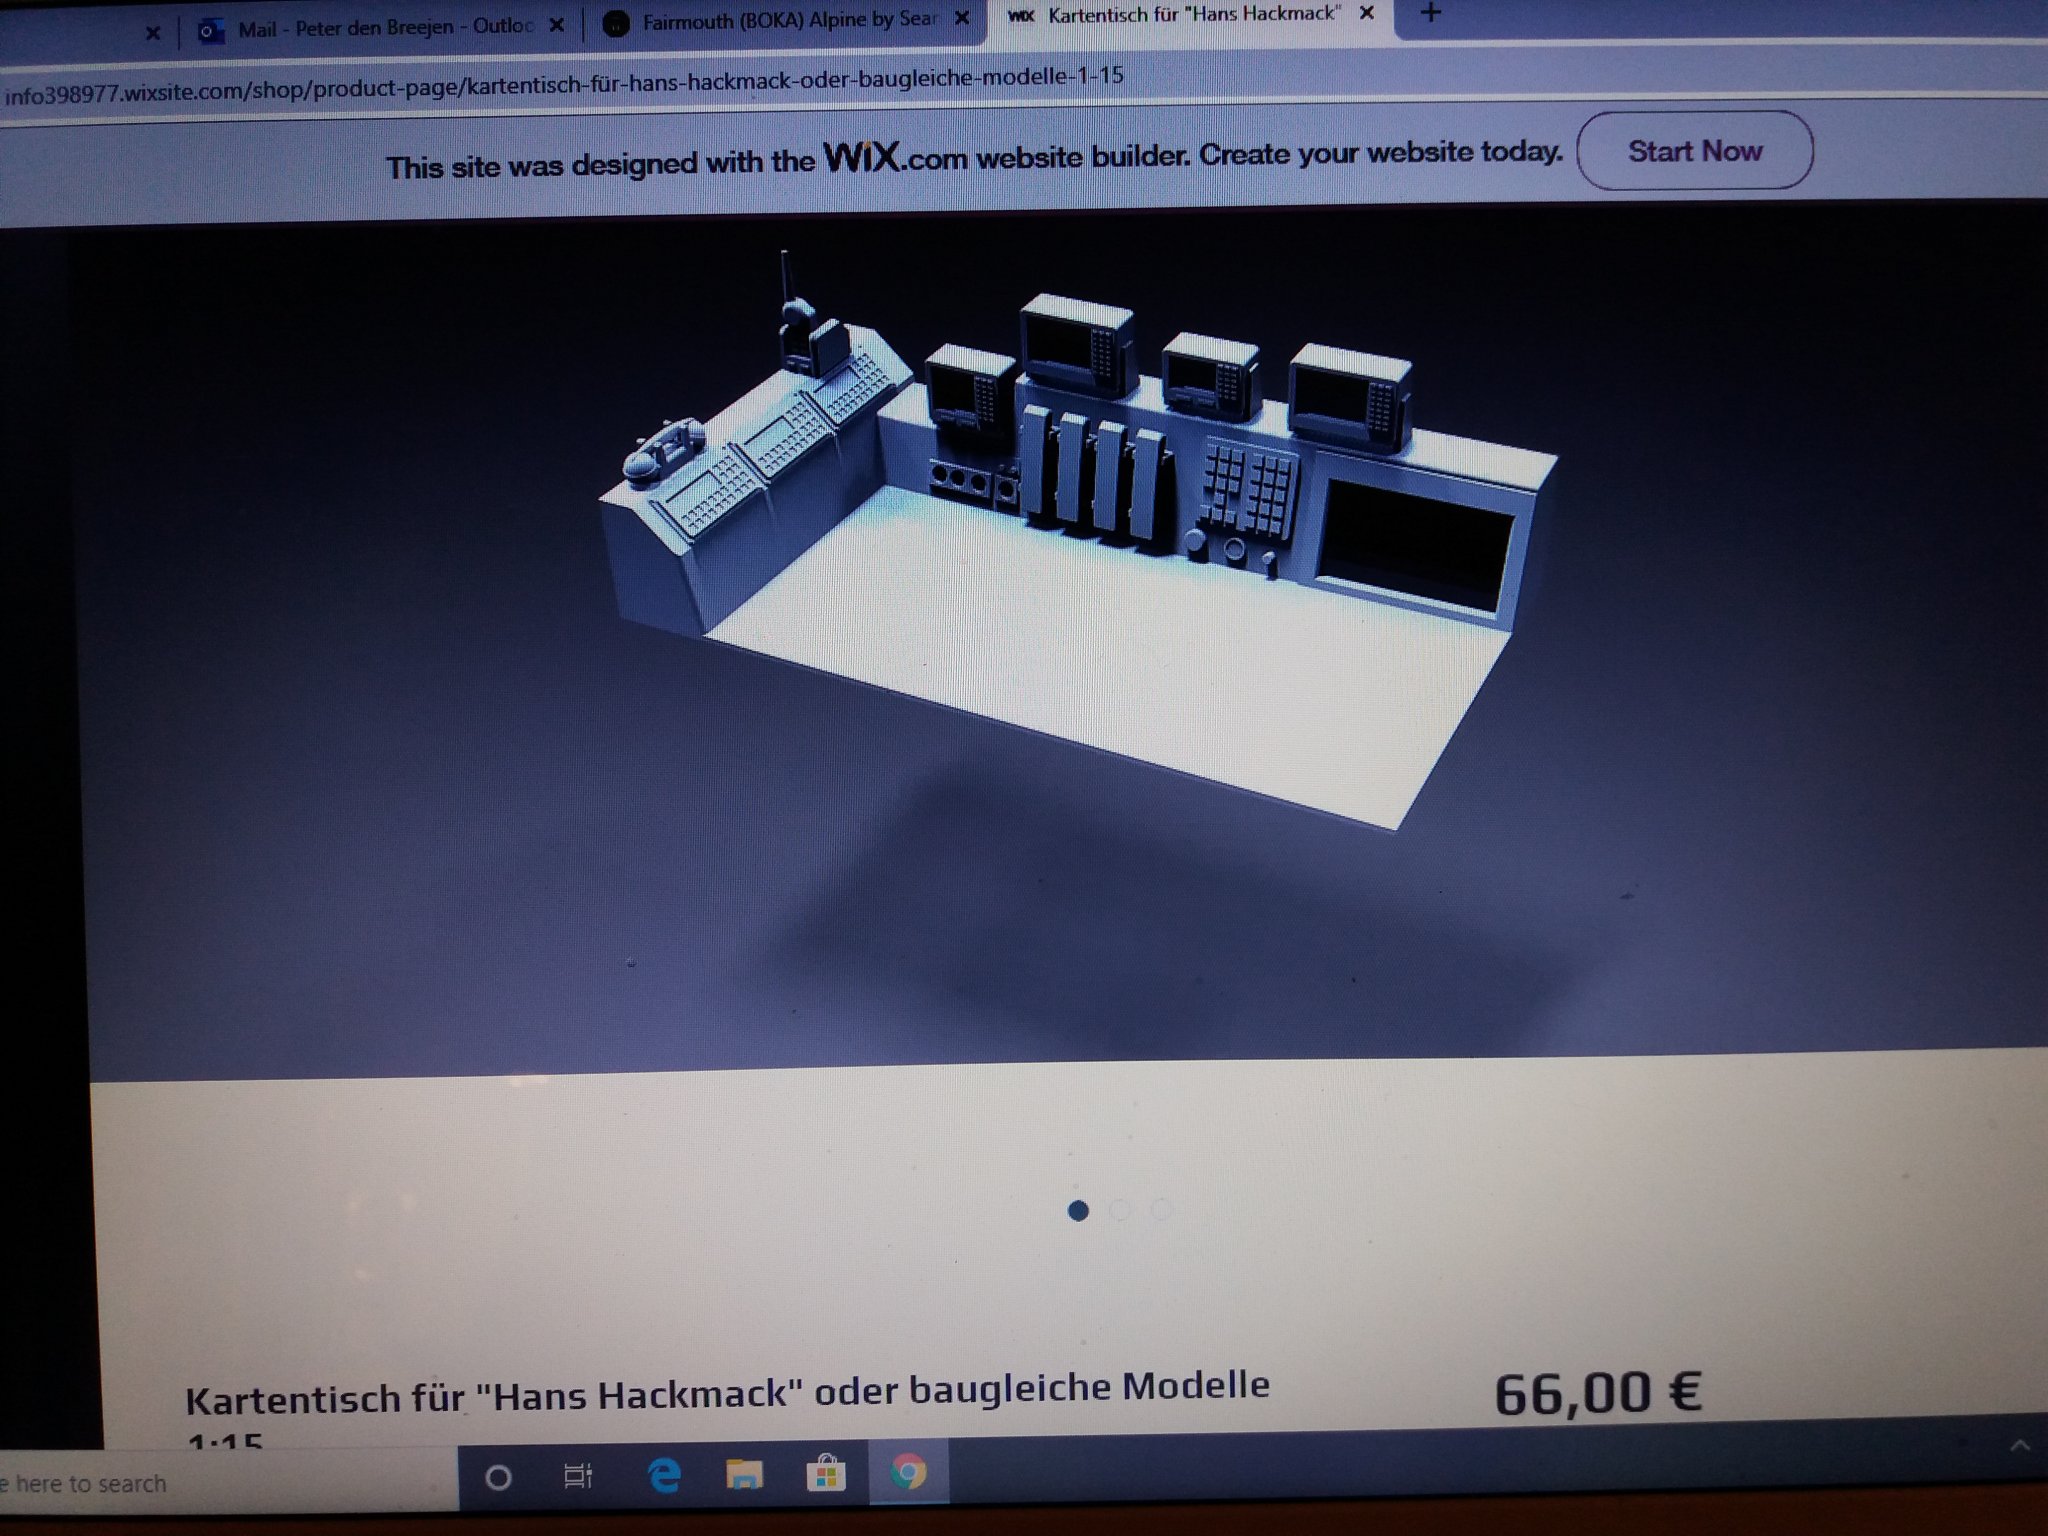
Radio Console on the bridge in scale 1:75, comes opposite the chart table near stairs
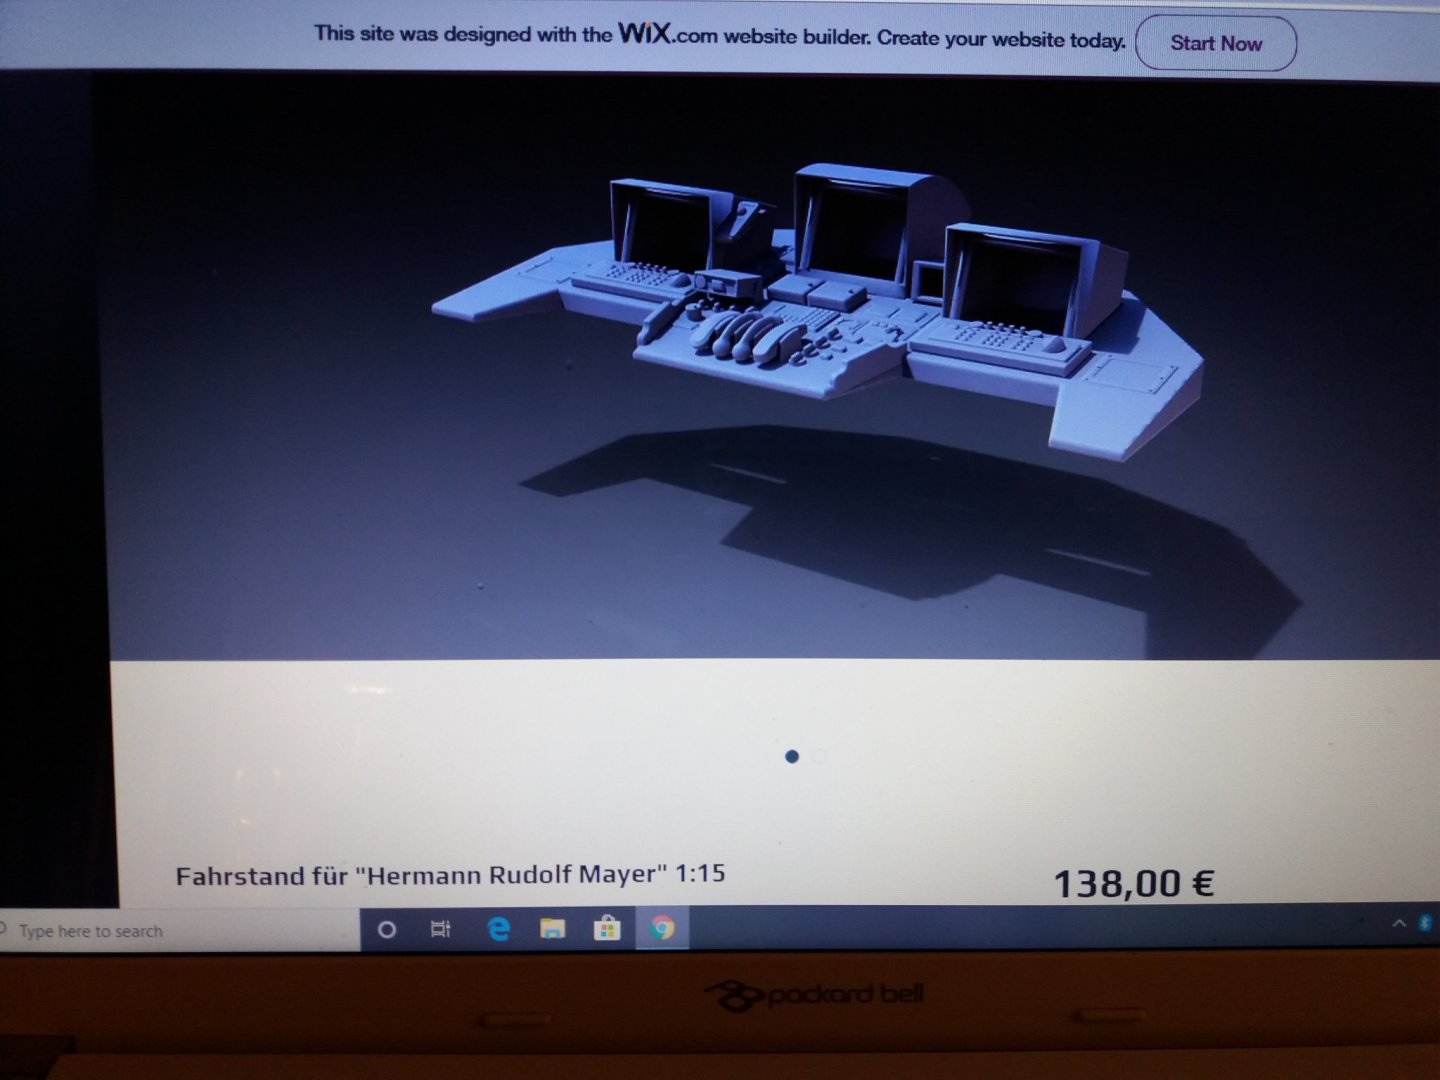
Bridge console for navigation with 3 screens for radar, ecdis and other equipment

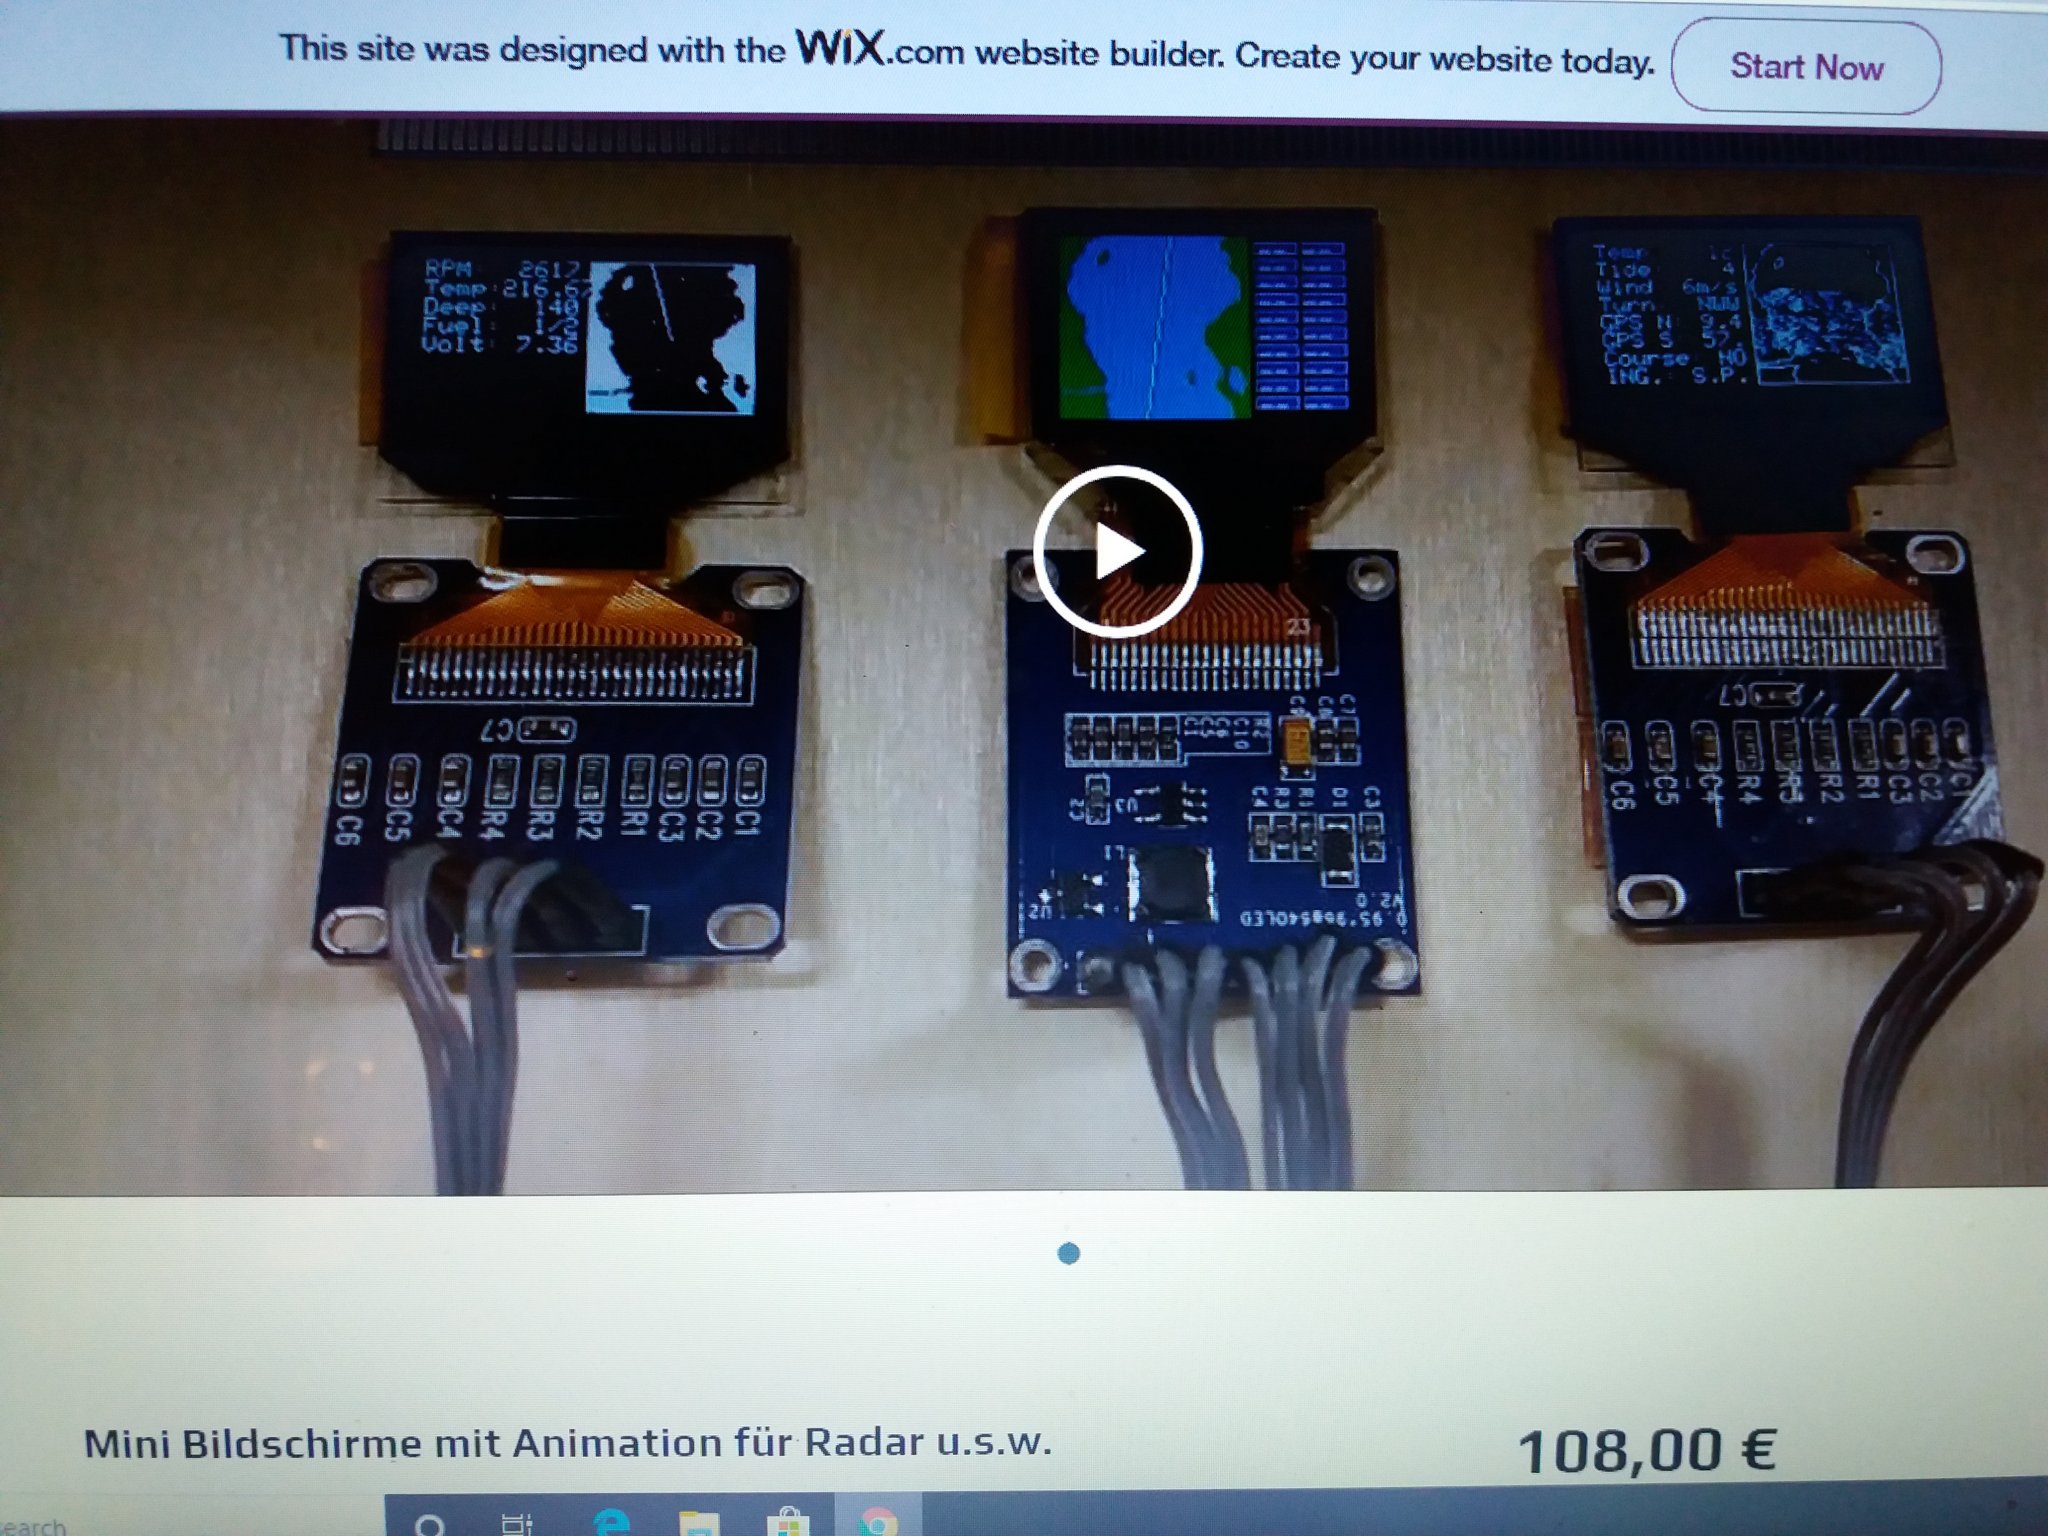
mini screens for bridge console working conditions all for scale 1:75
-
George, not bad at all, sorry you have to change the trust front and back.
Must say that if have to do in mine I will have more problems then yours as mine is secured in massive wood parts.
Thanks for the advice given in your answer to me and will sort that out on both sides.
The general arrangements can be downloaded from the web site of the owner Bos & Kalis.
I will give you the website here. https://boskalis.com/about-us/fleet-and-equipment/offshore-vessels/oceangoing-and-anchor-handling-tugs.html
There you see all the tugs from them and it helps when building them although the ship's name like Fairmount Alpine you will not find.
Look for the new name what is BOKA Alpine.
Still waiting here for the weather so did not do much to it and my spares did not arrive.
Keep up the spirit and follow you built too.
greetings
Peter
-
Well, all them that did came into Australia somewhere there roots are going back to UK or Ireland or another country in Europe.
Trus you keep having those words that are not mentioned in any dictionary saying them and if the other person you'r talking to comes from somewhere else yeah they will look funny at you thinking (maybe) what the hell is he/she talking about!
This way we all learn from each other as if going to the USA where as they suppose to speak English forget it as most words are "translated" to Yank language!
Believe me as the first time I came to the UK as a teenager (learned at school the "Step by step again") and saw a guy/man in London I shake his hand and polite saying:"How do you do?" The only thing he was doing looking at me from top till bottom and out of his mouth came: What the f..ck you want?
That was my first encounter with the english language. I learned quick as later on worked with multi culture people you start up at the end speaking 9 language!
Must say still learning as "dialect" is another challenge!
Jo you did (and doing) a great job to your built and NO my material did not arrive yet but still slowly working on it to make the foremast having later a navigation light in it.
Also thinking about the fact I want towing pins but afraid not having enough space under decks to have this installed. Thinking to raise the aft deck in a fashion NOT to block any towing wire afterwards but will put it first on paper, wait until the part is here (take 6 weeks to make it) so yes still working on it.
Waiting for you to show the finished little lady.
Peter xxxxxxxxxx


Fairmount Alpine by George-JK - Billing Boats - 1:75 - RADIO
in - Kit build logs for subjects built from 1901 - Present Day
Posted
yeah George, seeing your electronic parts there is indeed not much space left.
I did some measurements and on the back of the built in mine and must say if you divided the front part (under the superstructure) in 2 decks you have above the batteries space for other equipment such as speed controllers / voltage regulators and others.
Waterpomp for FIFI will come below the "deck" you have the el motor stb side for the propulsion.
Otherside / opposite side on ps I will make there the foundation for the "buckler crane connected to the bottom to have it secured and then penetration through the deck but all on the side so NOT using the aft deck space.
In the front as where you have the batteries but as far to the front possible or even split them as I will have space not having the traditional propulsion as my electro motors are vertical placed and can be as far to the back possible.
Sofar I did this calculation with all components I will need and will look later with ref to the "balans" of the ship (forw. or backwards) and most likely need ballast in the vessel.
You say that until now you are on a weight of ca 6-7 kg and I'm afraid that will not be enough to have the ship "stable" in the water, guess ca 10 kg as you calculated previously is more realistic.
But that only can be noticed when it is in the water.
Anyway, weather is here not good so all works to that postponed till next year and doing now other small things in between work and school and also family life.
Anyway, wish you luck to have it all done and until that time,
Have a great time
best regards,
Peter