

.jpg.1f80adf1a9b14a937cfcf2ca6af0f0d4.jpg)
WalrusGuy
-
Posts
1,007 -
Joined
-
Last visited
Content Type
Profiles
Forums
Gallery
Events
Posts posted by WalrusGuy
-
-
-
On 5/17/2022 at 1:19 PM, abelson said:
Excellent build and photography. A project well done, one that will become an heirloom.👍
On 5/17/2022 at 1:43 PM, DARIVS ARCHITECTVS said:Such a clean and beautiful ship! The photos you took are indistinguishable from a real ship! Huge congrats!
Thank you for the compliments! It's really appreciated 🙂
-
Congratulations! Your model looks so beautiful, especially in the case. Very nice job 👍
-
Congrats on a beautiful build. Museum quality!! 🙂
- Edwardkenway, Justin P., BobG and 1 other
-
 4
4
-
-
Some of the best planking I've seen 🙂
- FrankWouts and Dave_E
-
2
-
-
-
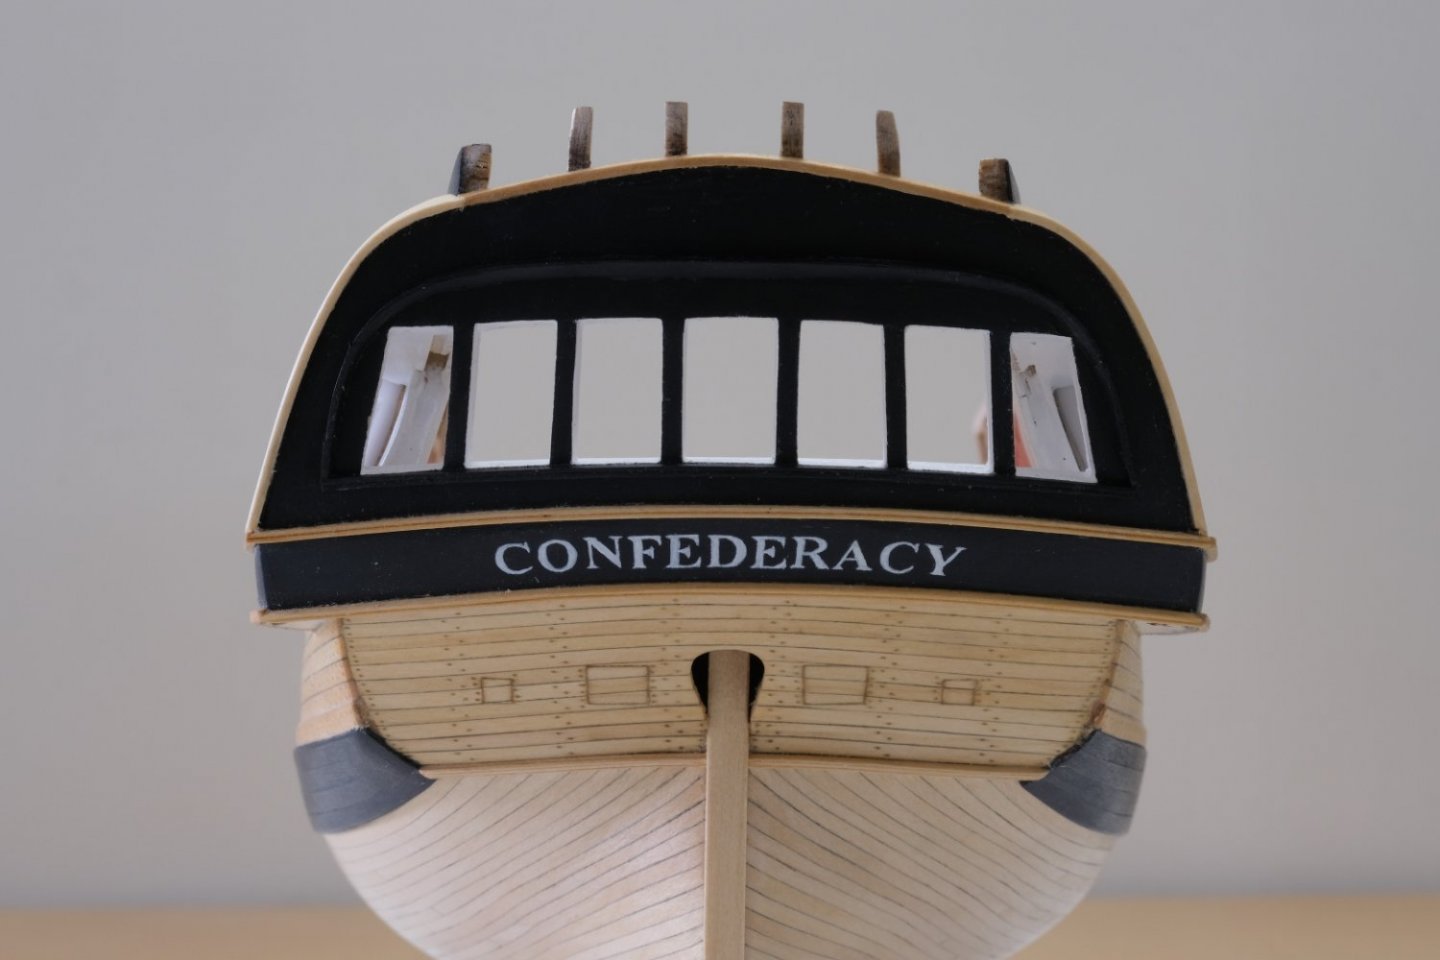
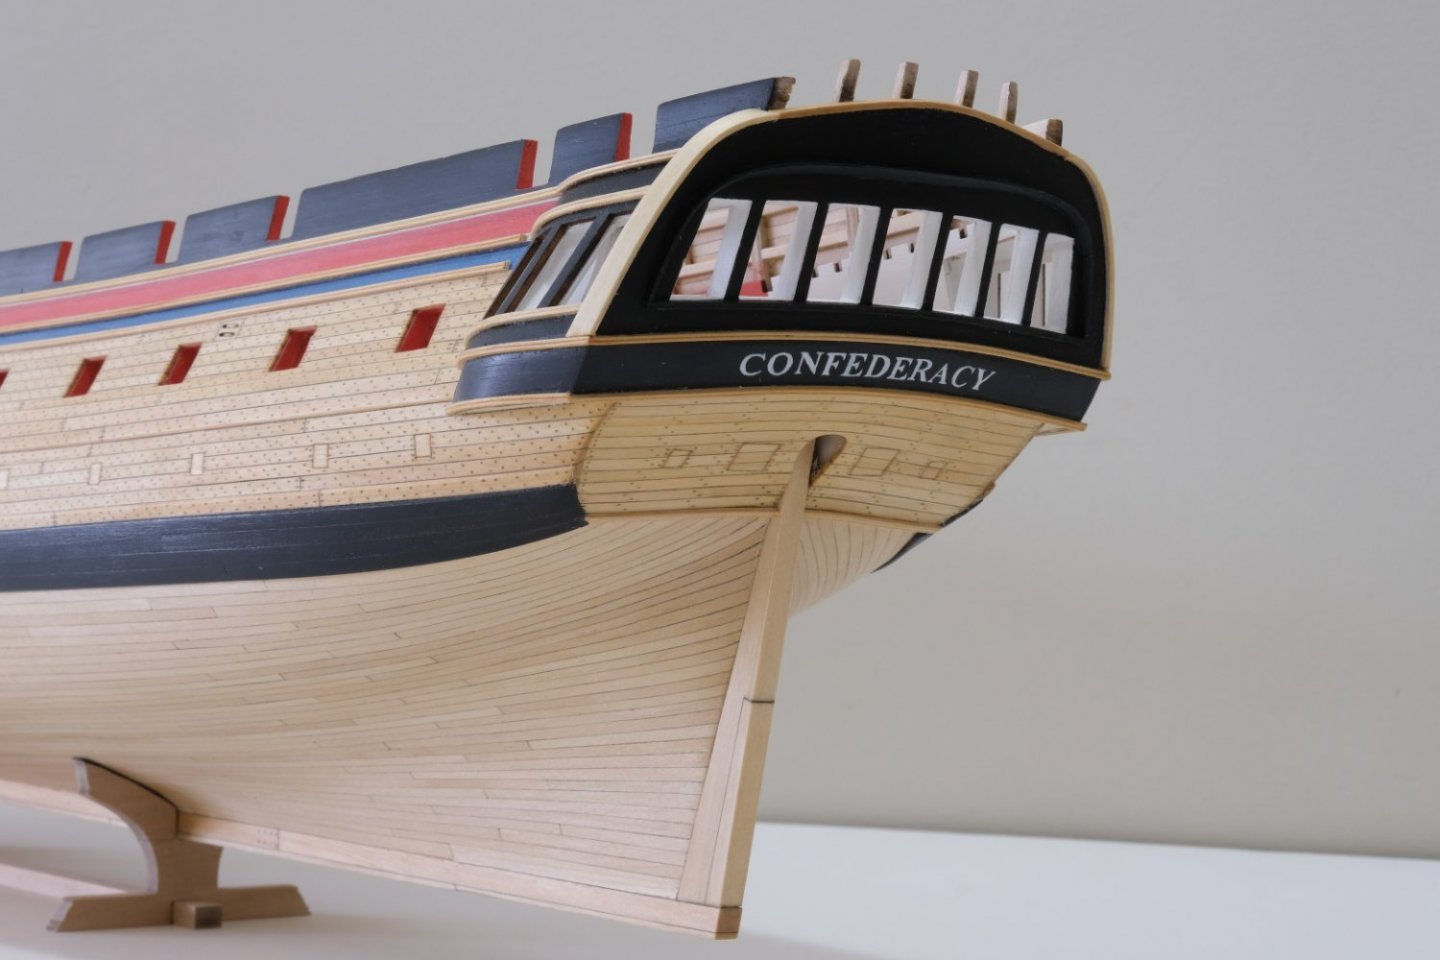
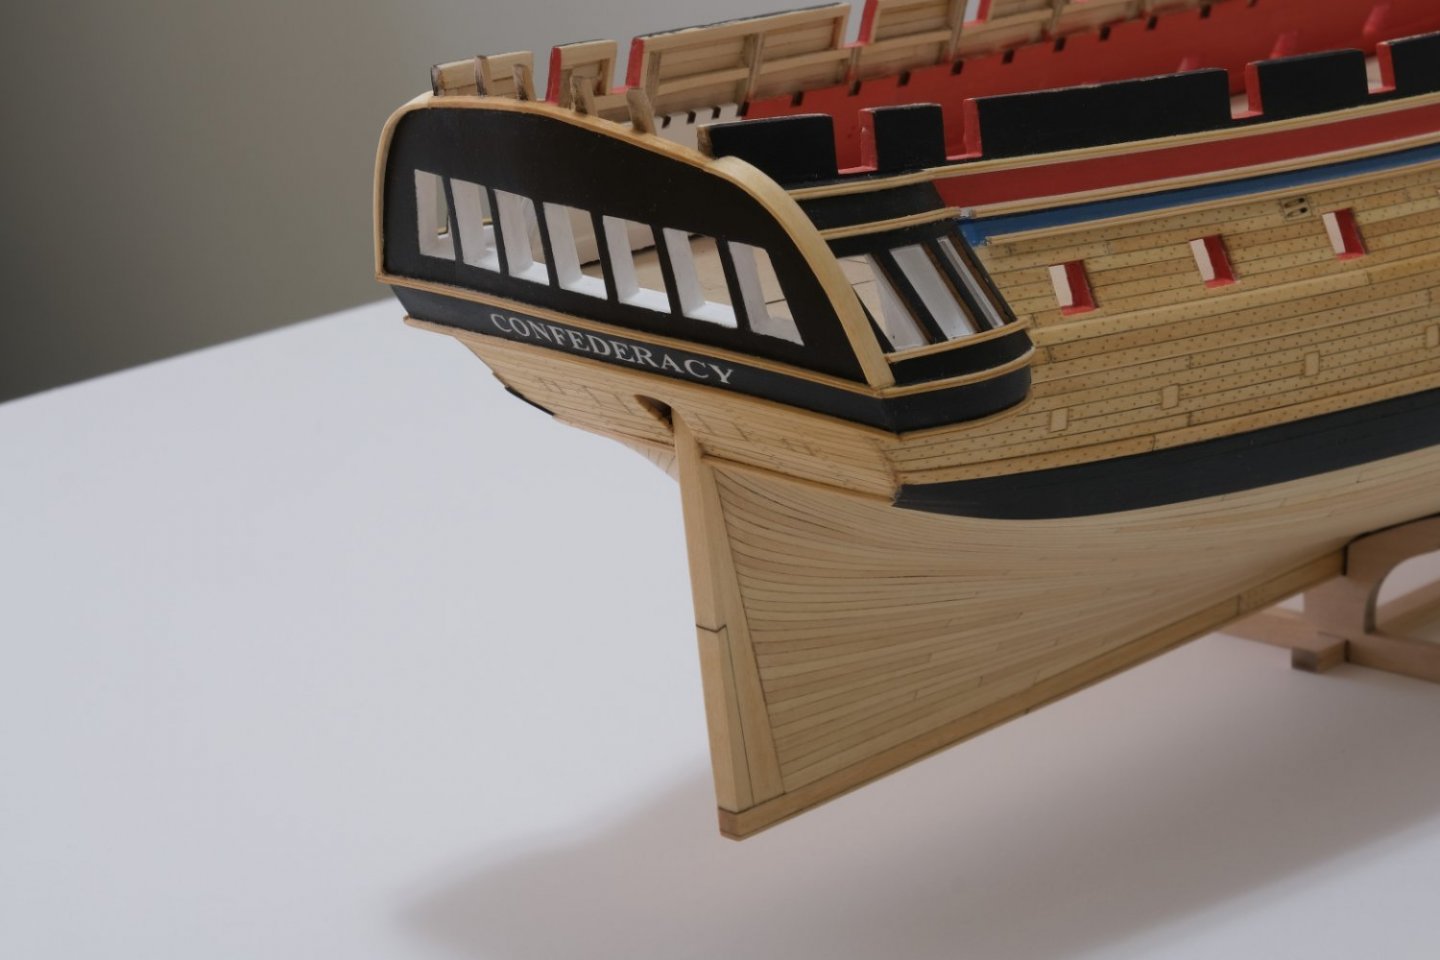
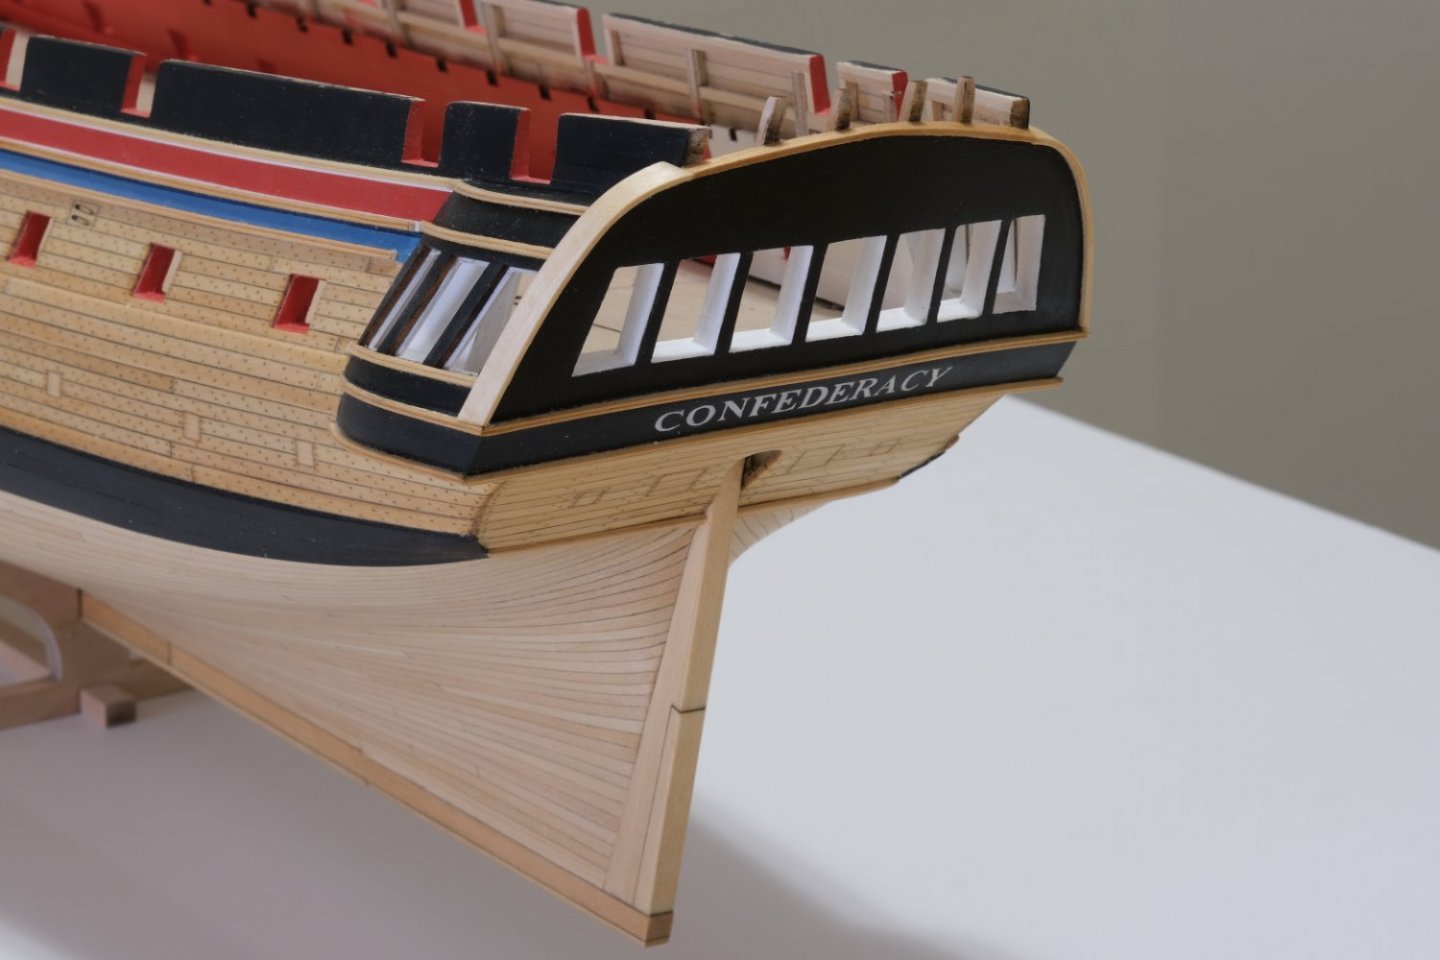
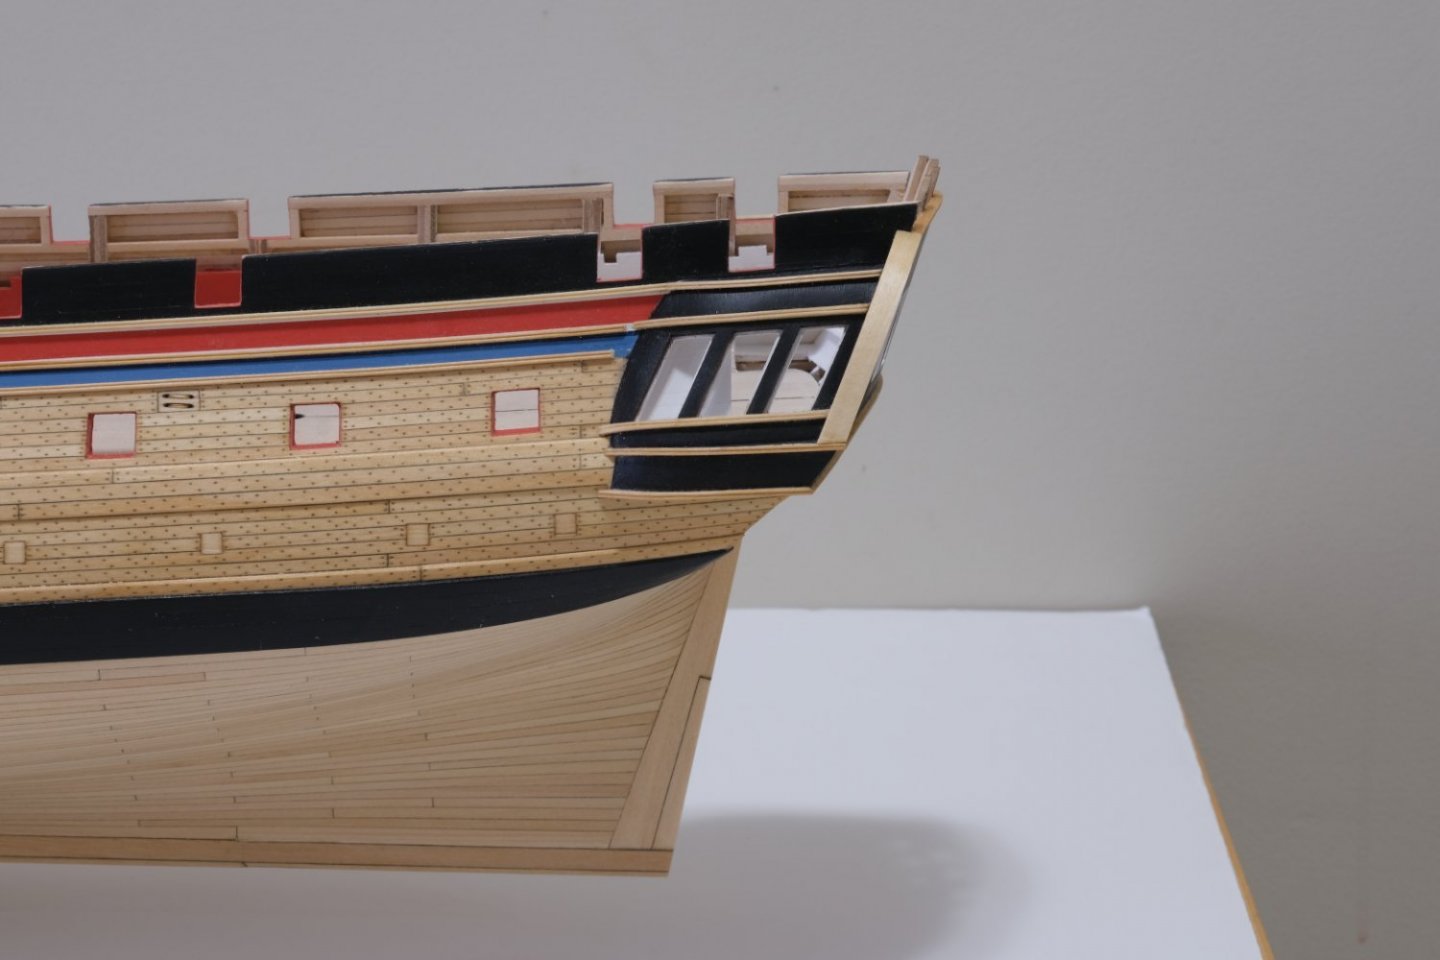
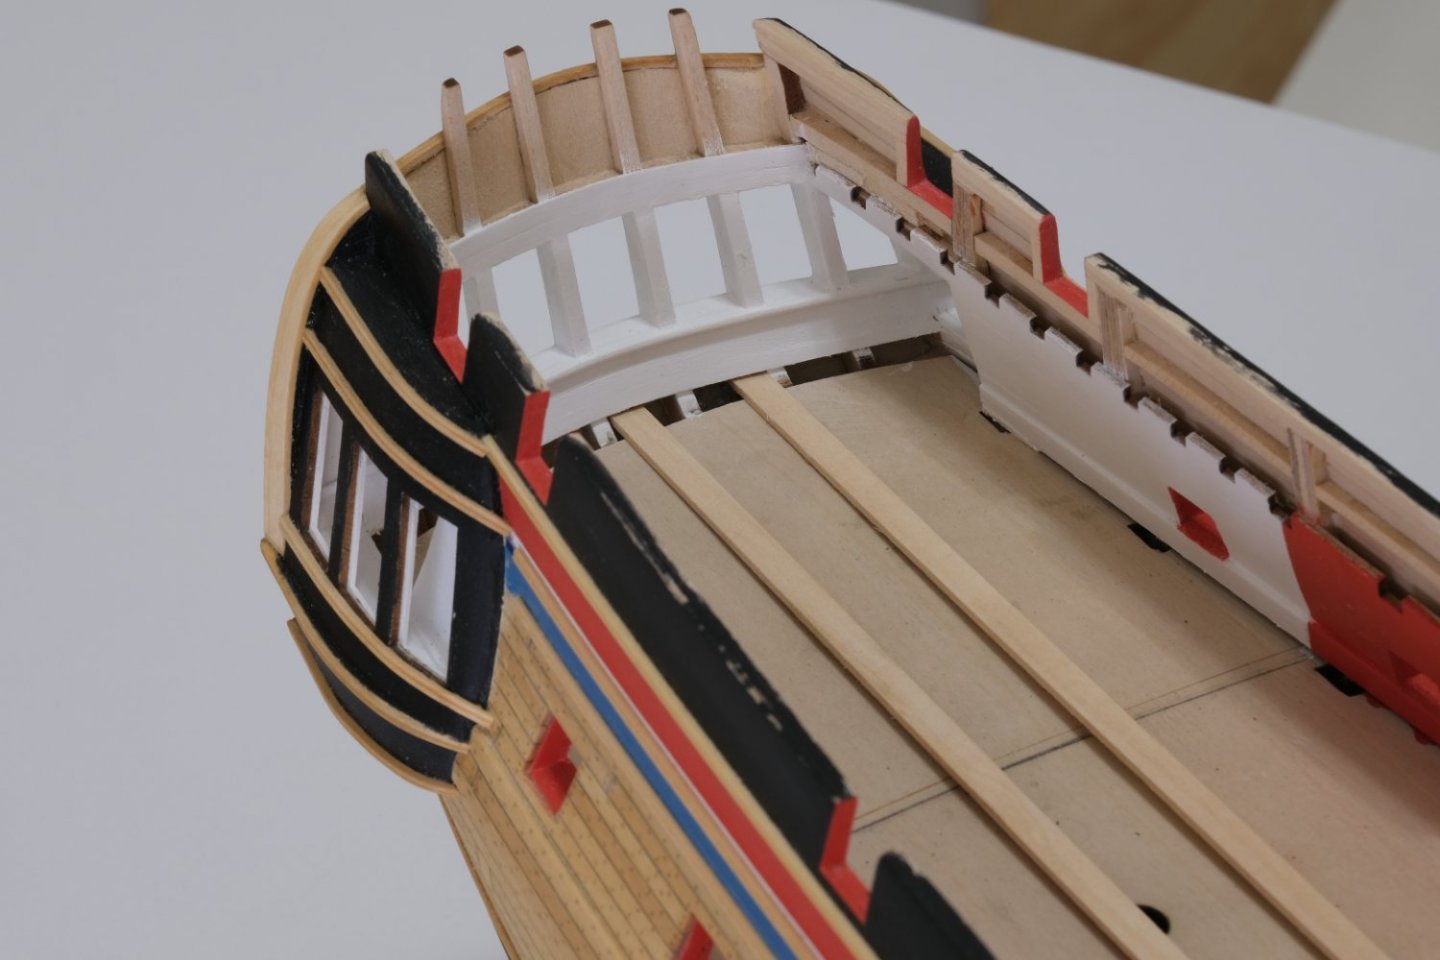
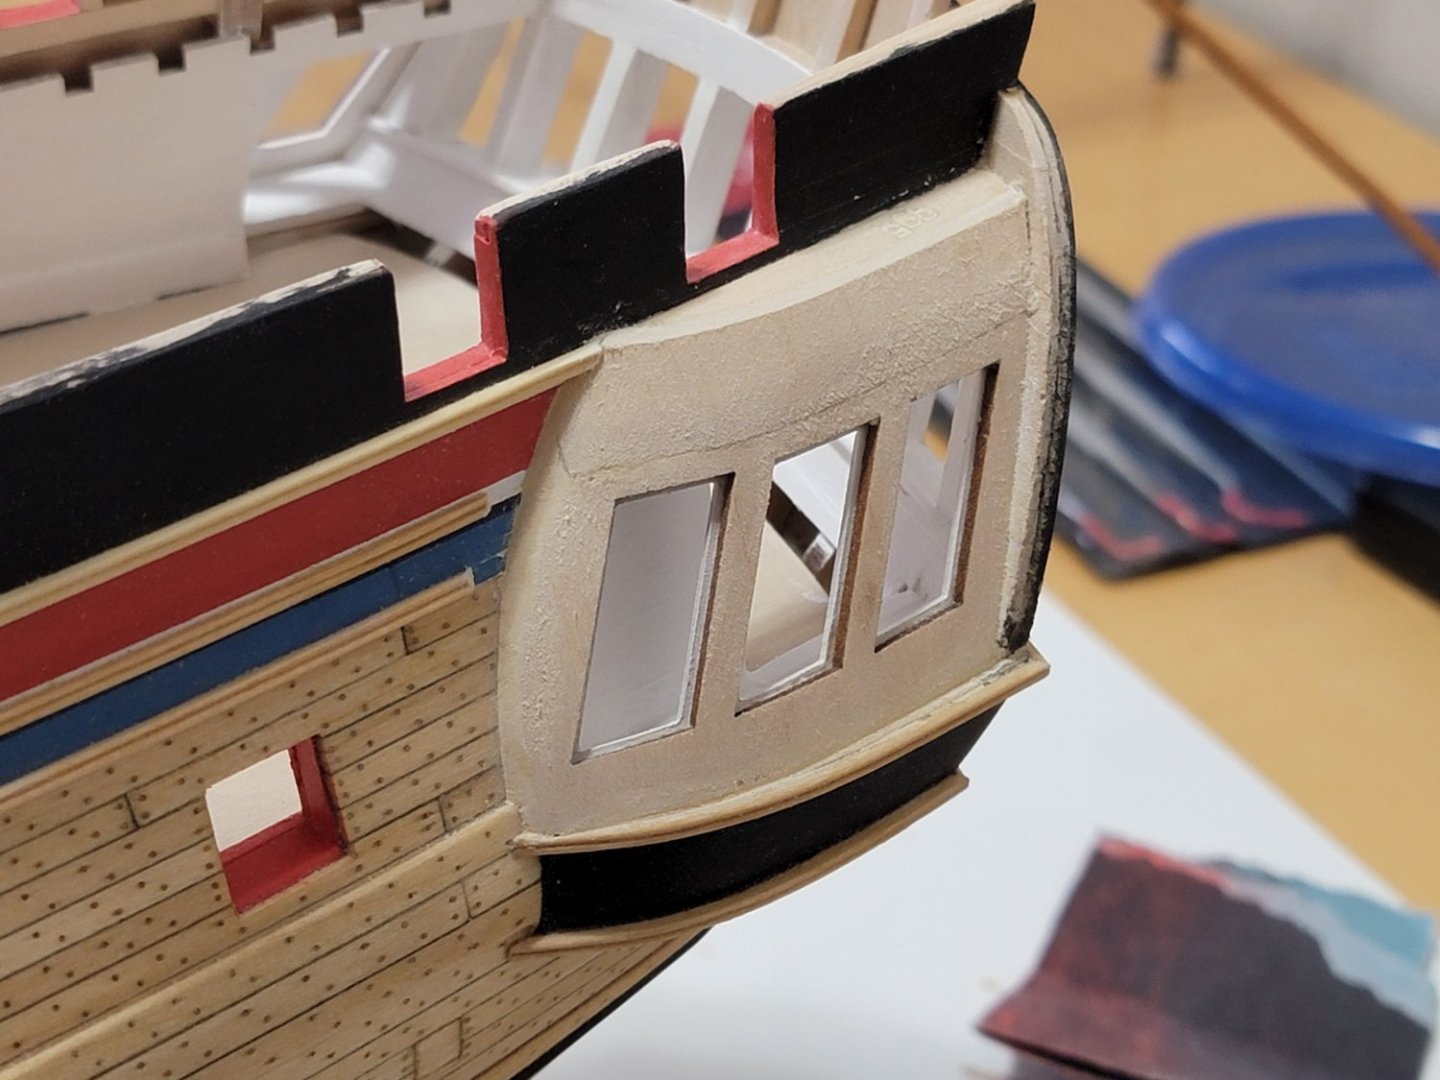
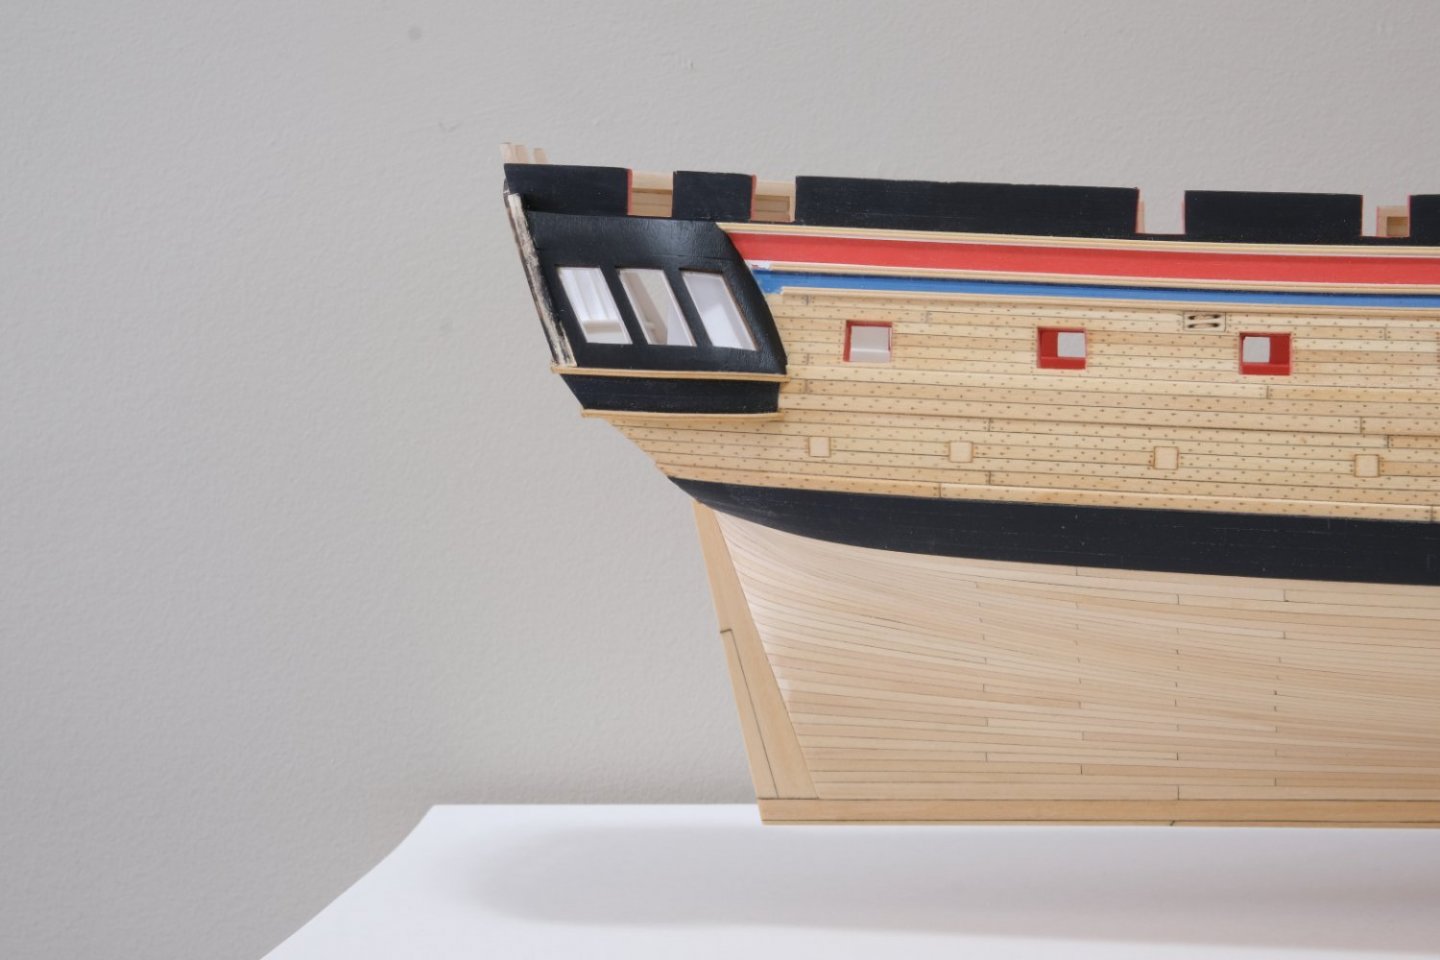
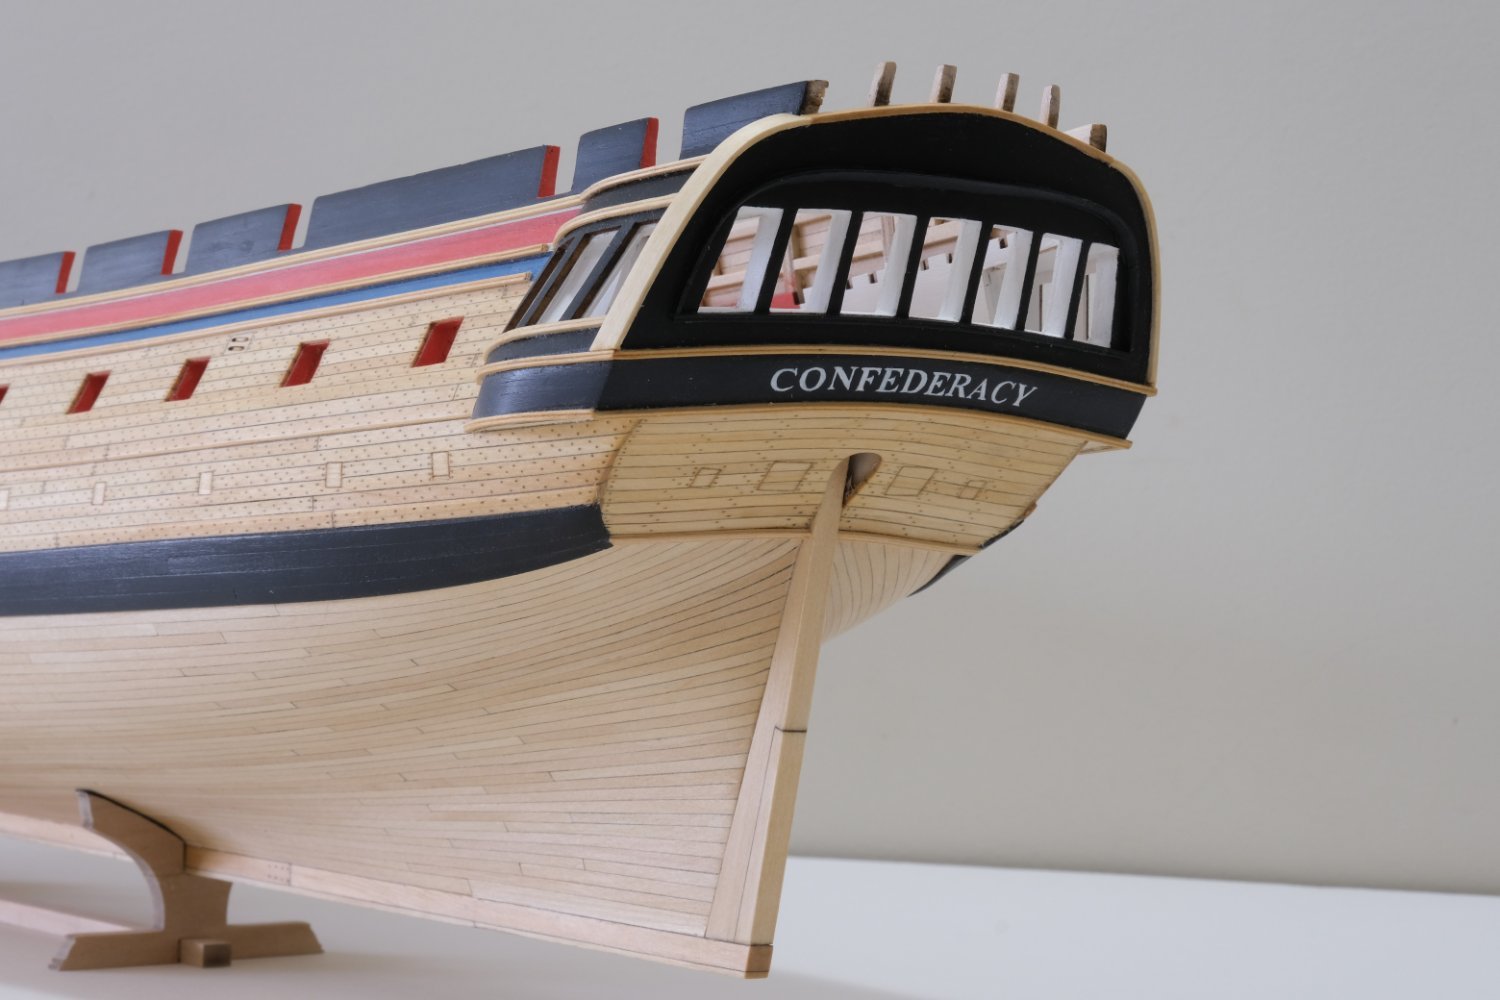
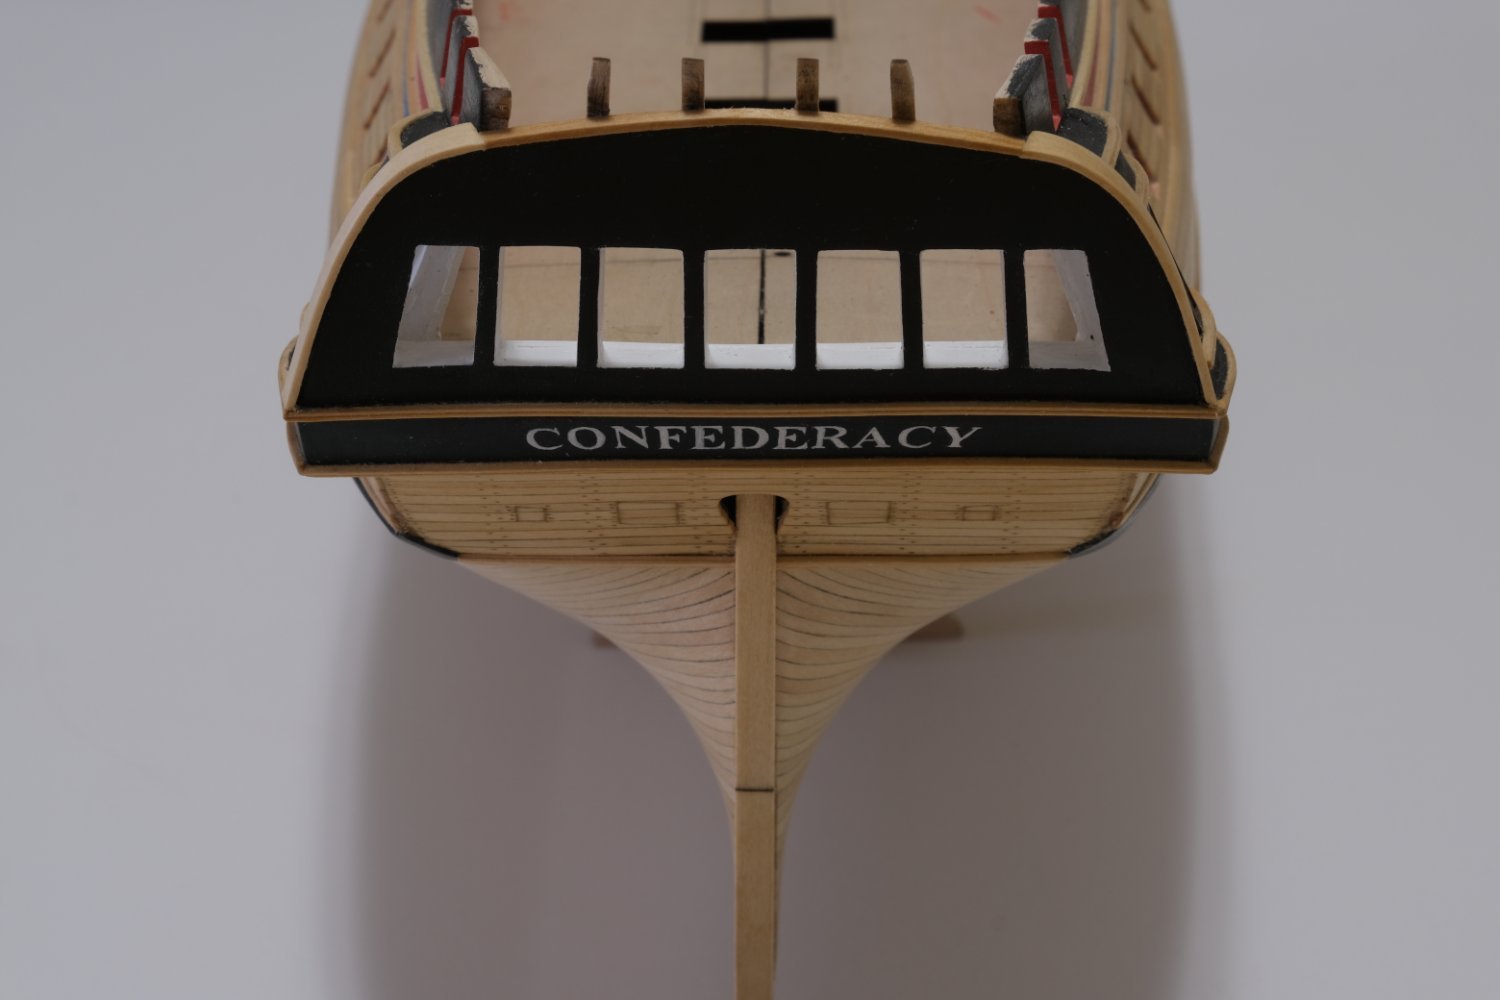
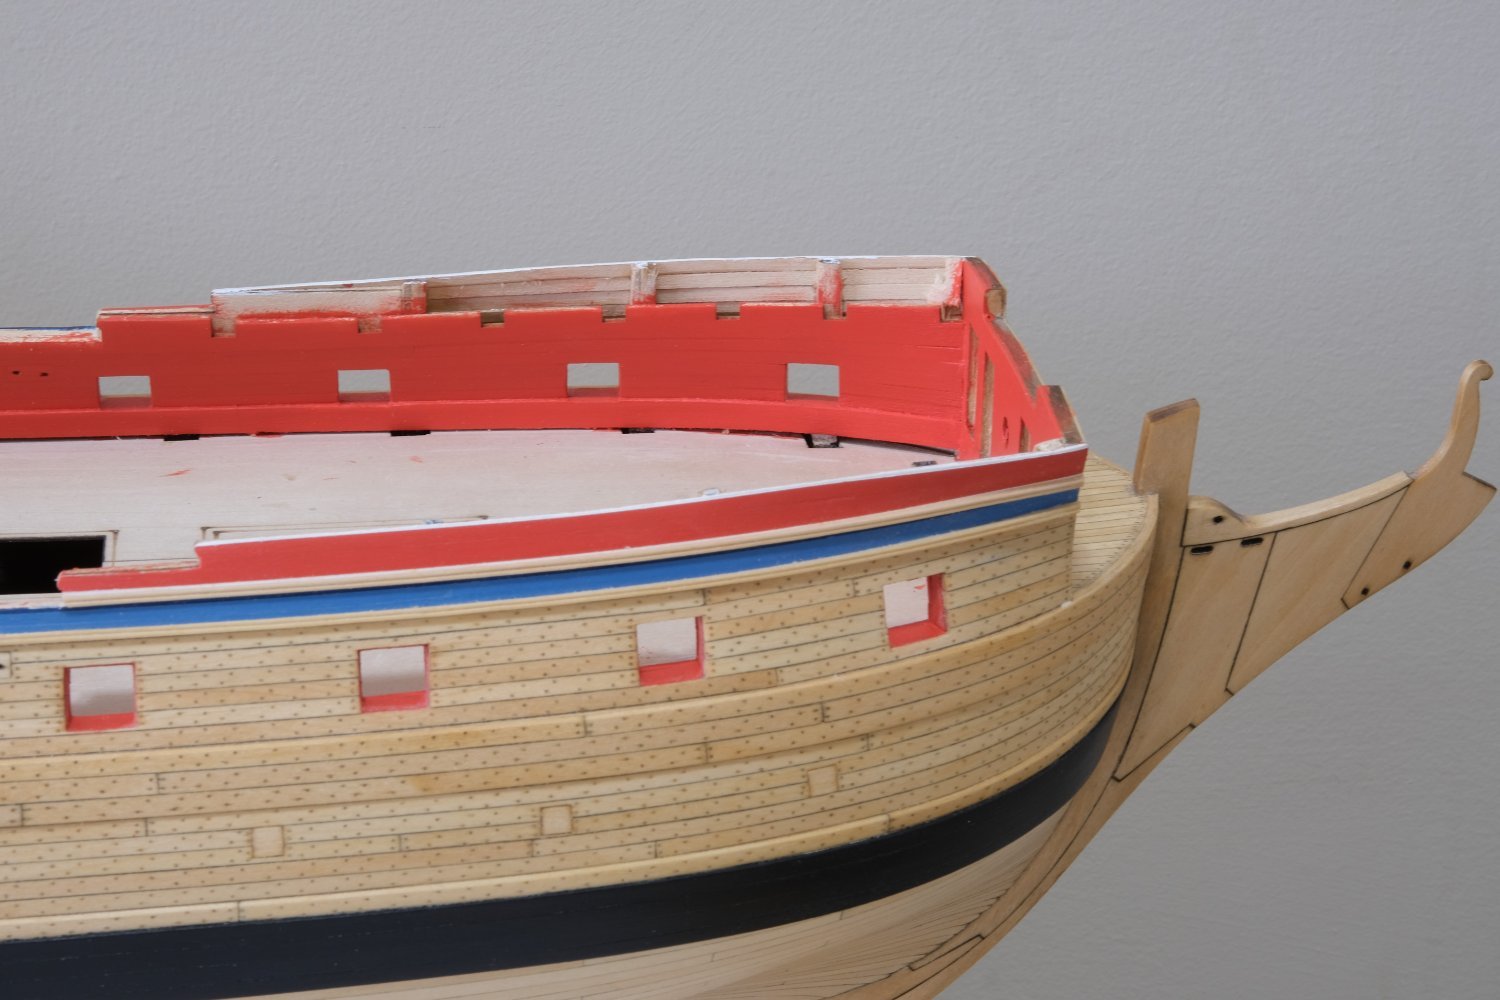
A small update before I commence on carvings. The cove and final moulding strip below the lights are installed. The cove was a very tricky and frustrating part to sand and shape. Just looking at it wrongly made the wood split, crack, and chip. I ended up using filler in the chipped parts and painted it black. Here are some photos:

-
On 4/11/2022 at 10:36 PM, desalgu said:
Beautiful work, as always! Strips of basswood will have some color variation in them when finished. On the hull planking, you've got similar color differences and it adds to the look. But I agree it would look better to get the side cap rails to match the top piece and the moldings. Perhaps when you make new ones, you can put finish on them before gluing them on to ensure you get a good match with the top piece.
I'm real curious how the carvings go. Based on what I've seen of your work, I bet they'll be awesome!
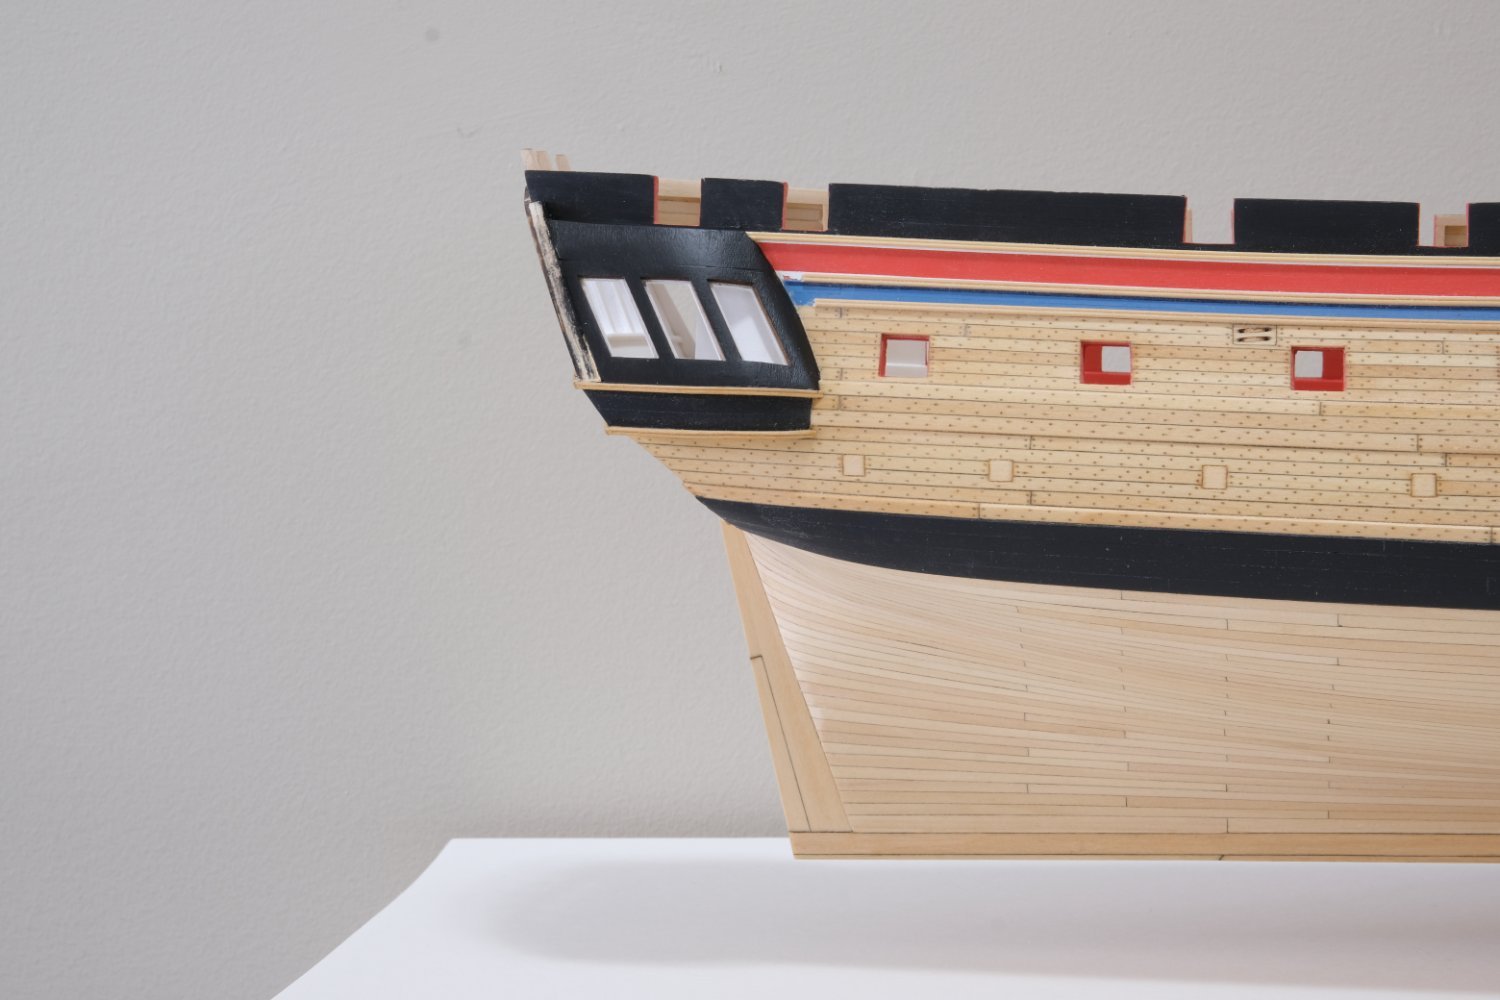
Thank you so much David! After some thought, I decided to leave the cap rail pieces as-is. Painting them black would make the quarter gallery too plain looking imo. I was afraid I will damage the thin delicate pieces if I try to replace them. And the added decorations would make the pieces harder to spot. I learnt for next time to apply the finish before hand to make sure the strips are of the same color (or use a better quality wood with less color variations per piece 😉).
-
Hi Werner, thank you for writing. And thanks all for the likes 🙂
6 hours ago, wernerweiss said:The different tone of color of the middle and side parts of the cap rail is the result of the different kinds of wood - the middle part from a stripe of basswood, the side parts from laser cut plywood. On my model, this did not occur because all wooden parts except the deck planks are painted with acrylic.
I used basswood strips for both the top and side pieces and did not see the color differences until I applied the tung oil finish. Funny enough, I did not use the laser cut cap rail pieces I was afraid of the color differences when I apply the finish (since the wood curves towards the end grain).
The color difference is bugging me more now, so I will see if I can replace the side ones to match the top. The color of the top one matches the mouldings so I think I'll leave that glued permanently.
Another option I am considering to paint the cap rail black as shown from the post below. Let's see...
-
Looks flawless, Michael.
- michael mott, mtaylor and Keith Black
-
2
-
 1
1
-
Gorgeous work, Werner. The details and the decking are very crisp and tidy. Can't wait to reach there myself 😄
-
Thank you for the kind words, Richard and Steven! 🙂
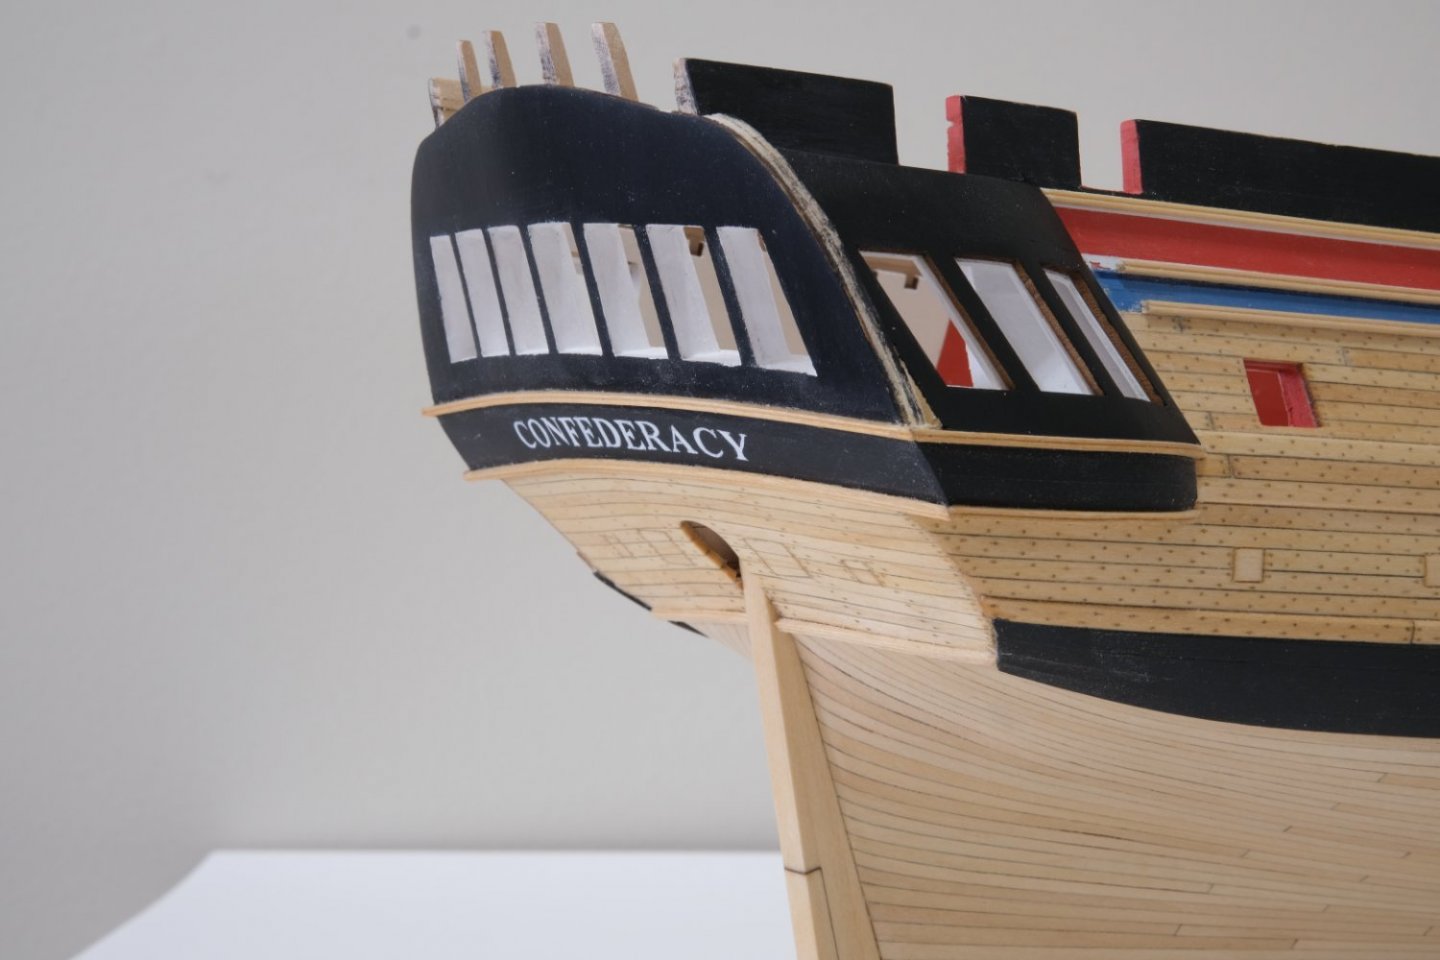
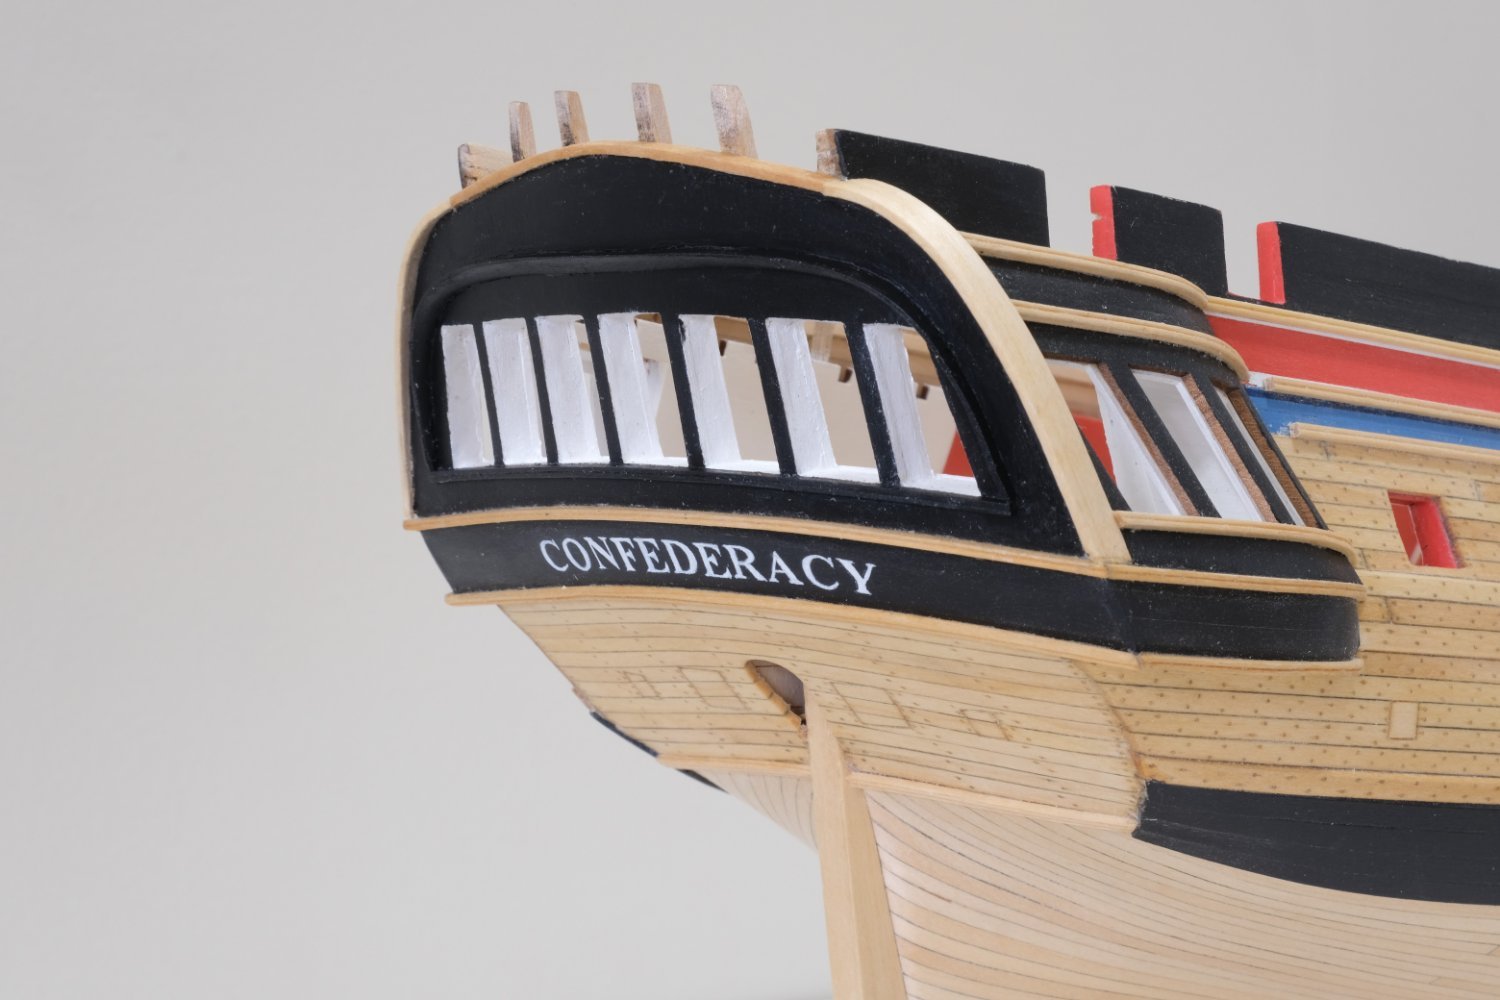
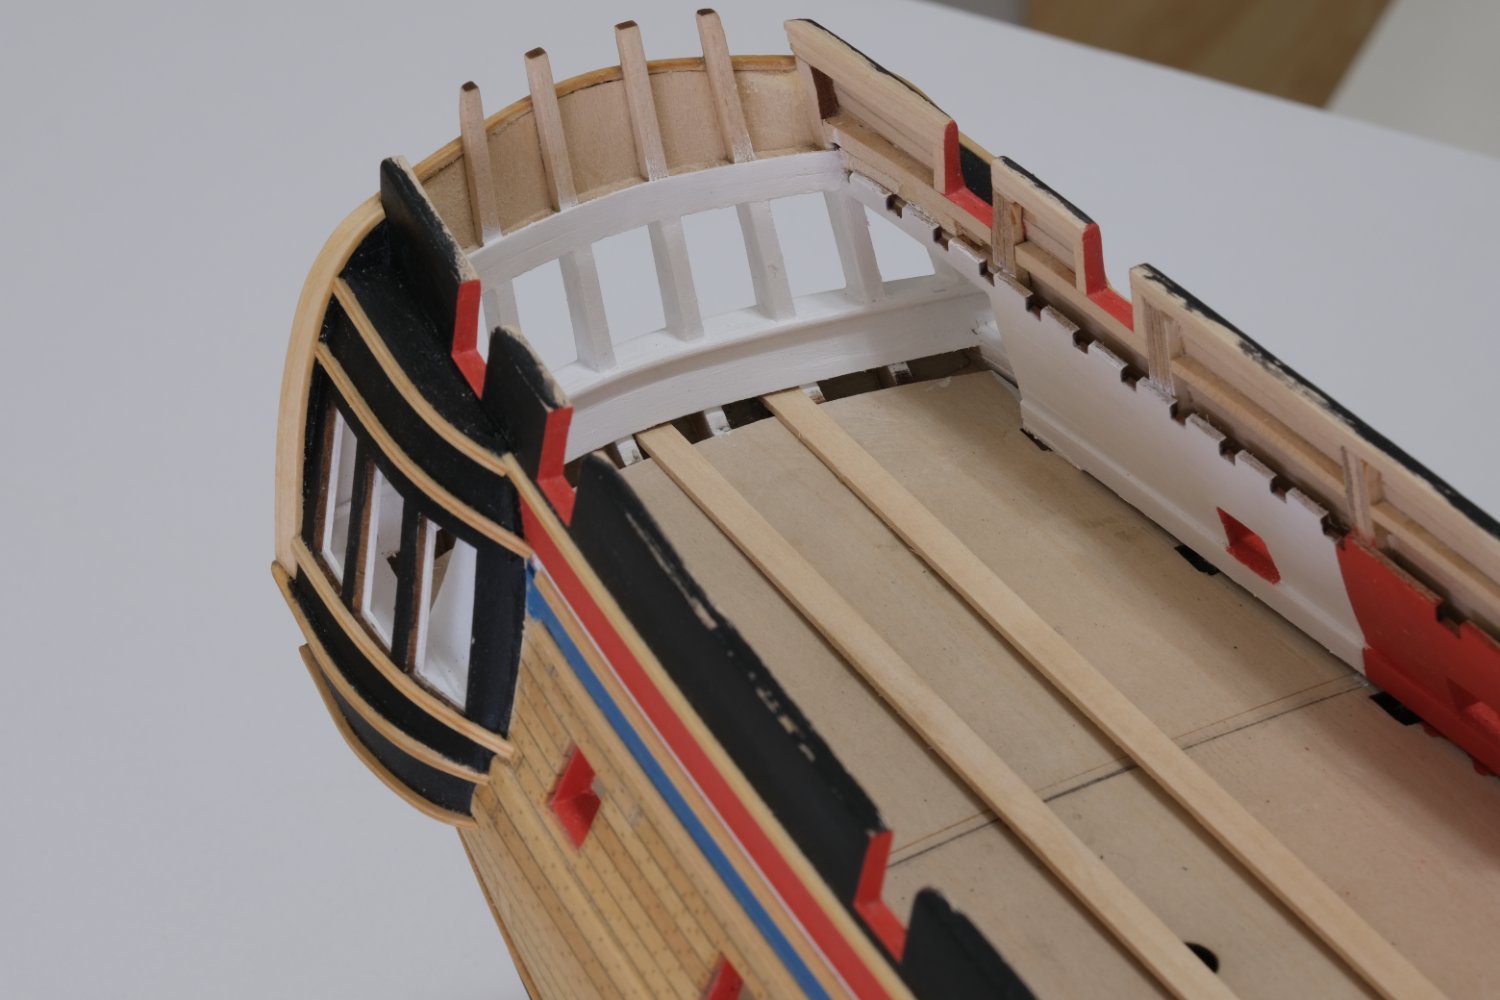
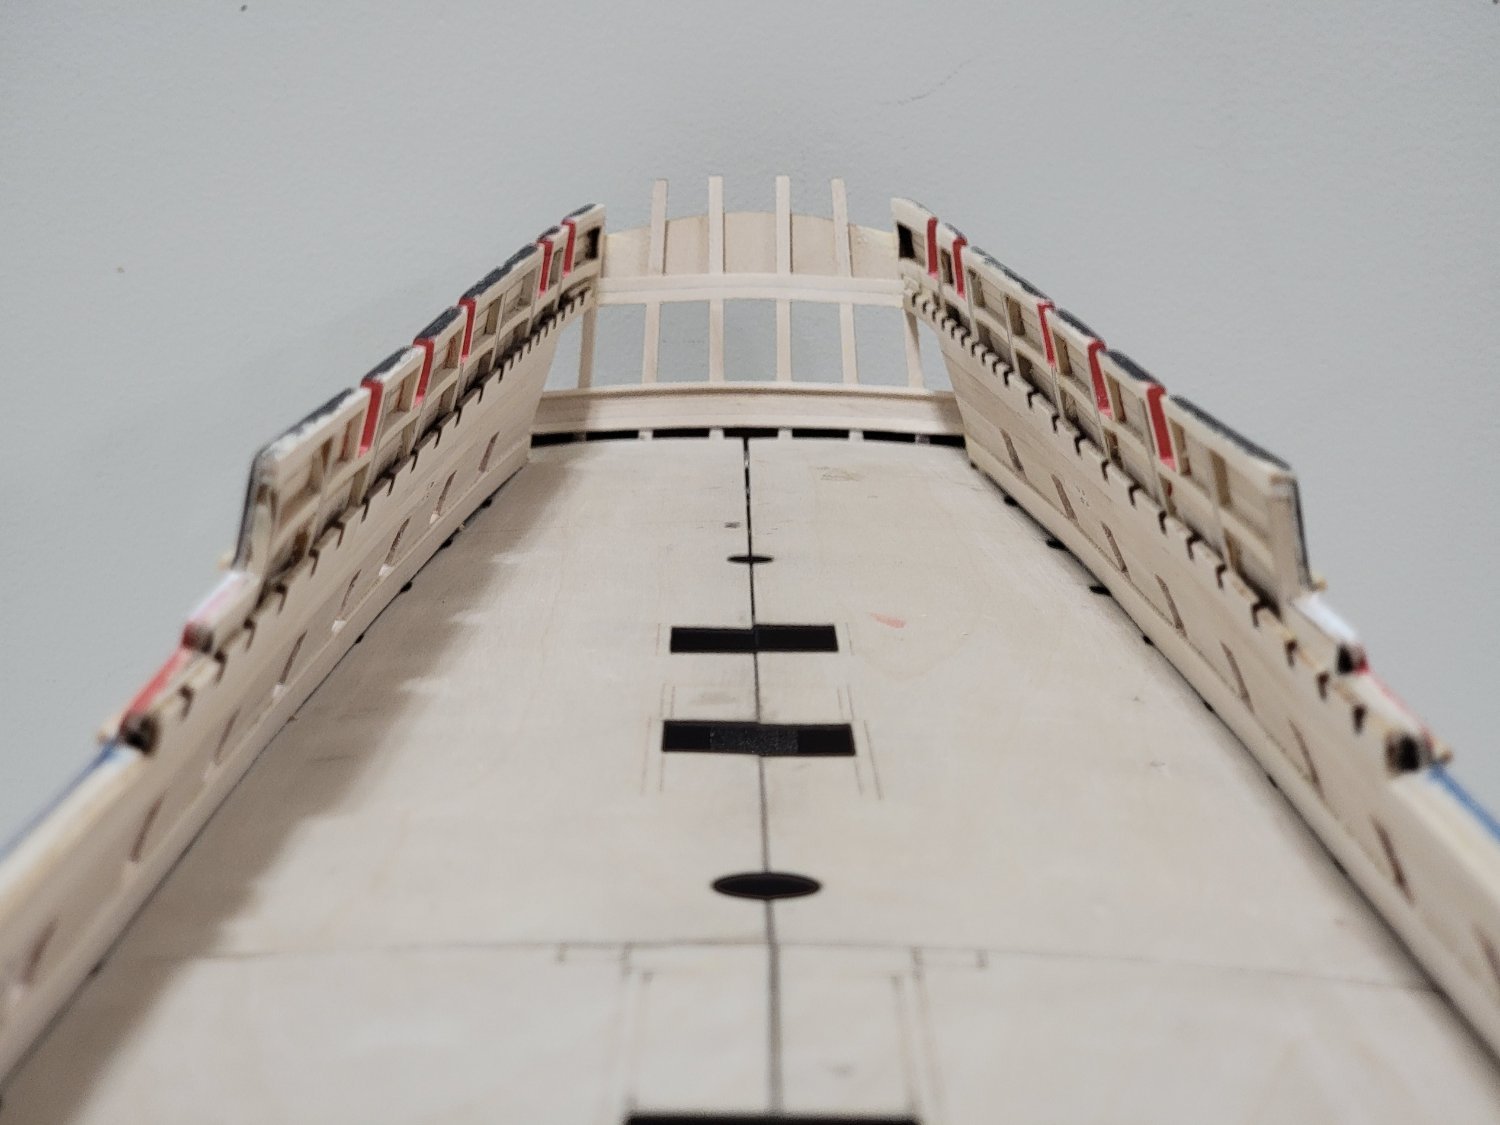
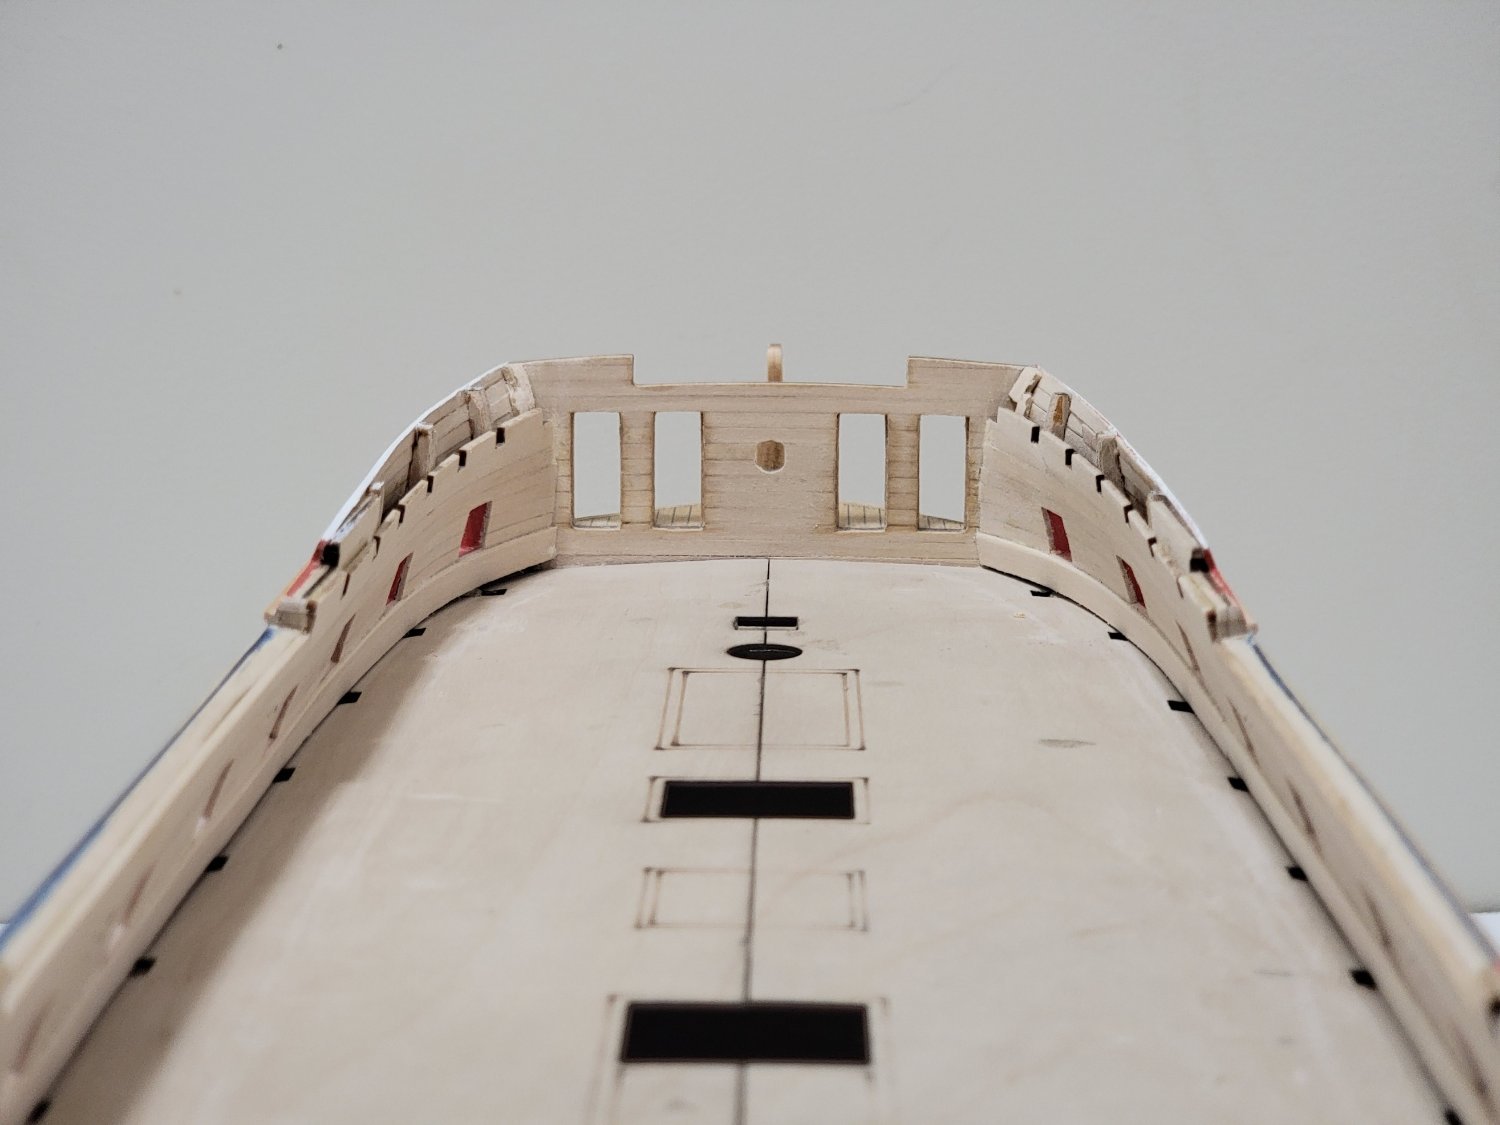
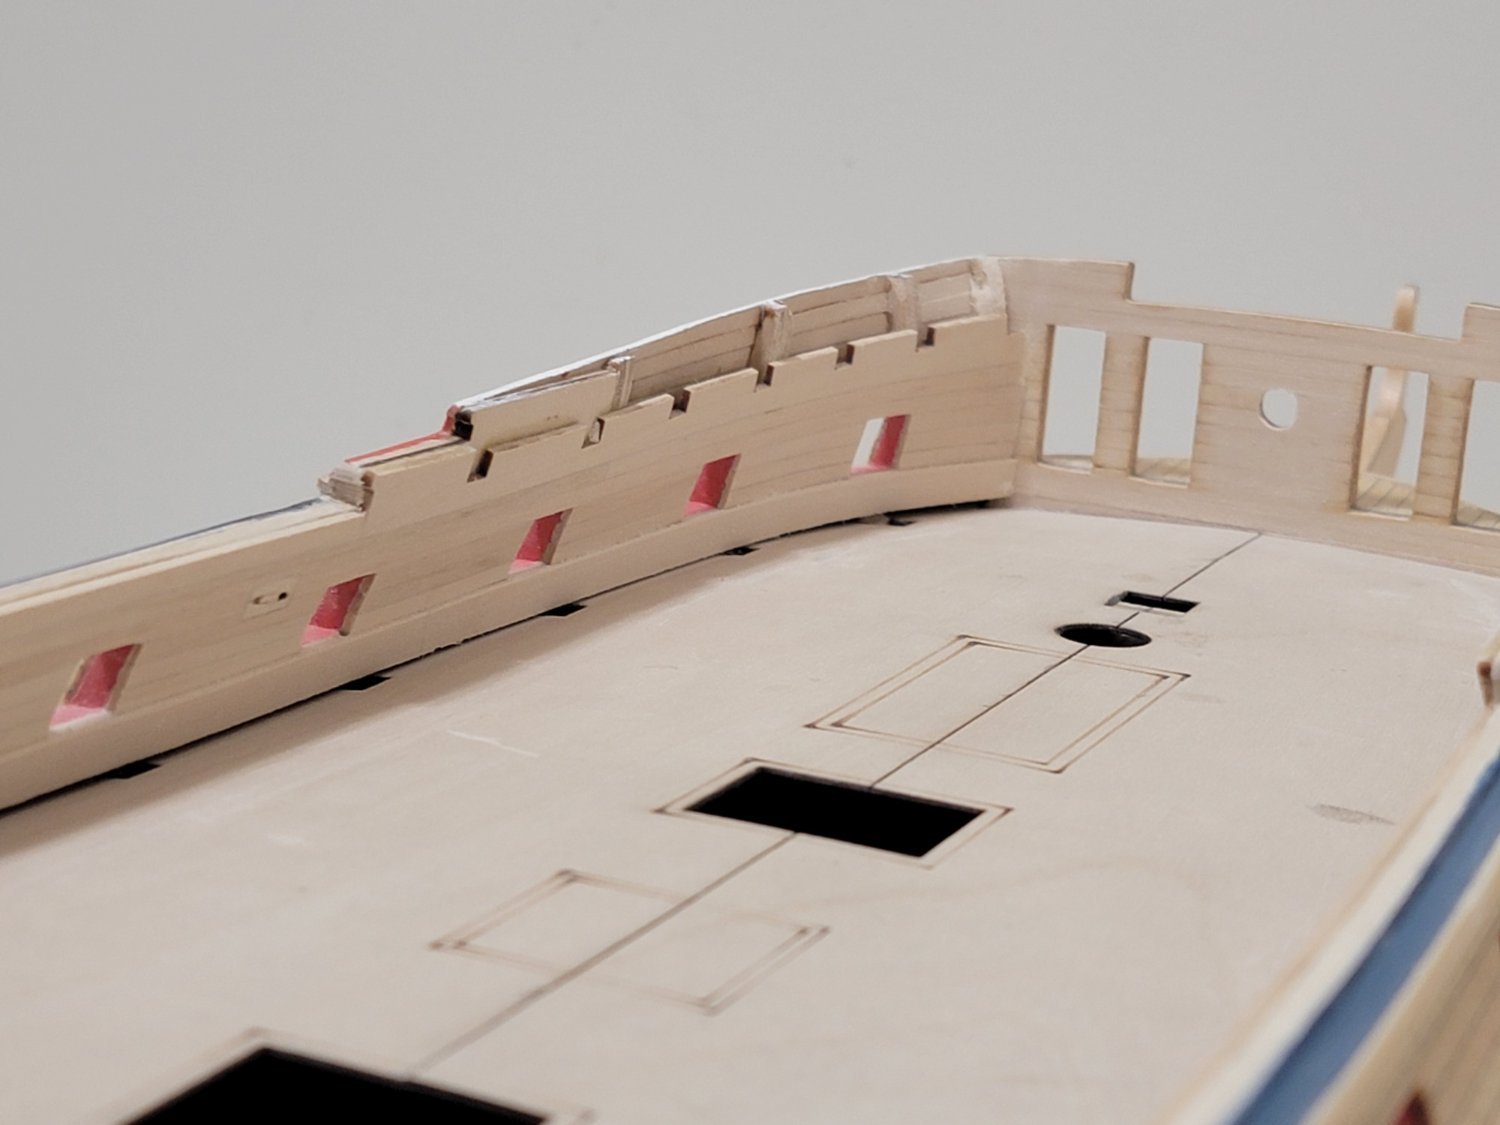
Continuing on with the quarter gallery construction with the mouldings and cap rail. I opted to go for two mouldings on the roof instead of the three as depicted in the plans and instructions. Reason being, the space between them was too narrow for the brass scrollwork, so I decided to omit the middle strip. I will try to carve out some larger scroll pieces that fit in the larger space.
After gluing the cap rail, I realized that the middle piece was a slightly different tone of color than the side pieces. I think it will be less noticeable when all the carvings are in place. So I decided to leave it as-is (and I was also afraid I may damage the other delicate areas surrounding the piece if I tried to remove it).
Below are some photos of where I have reached:

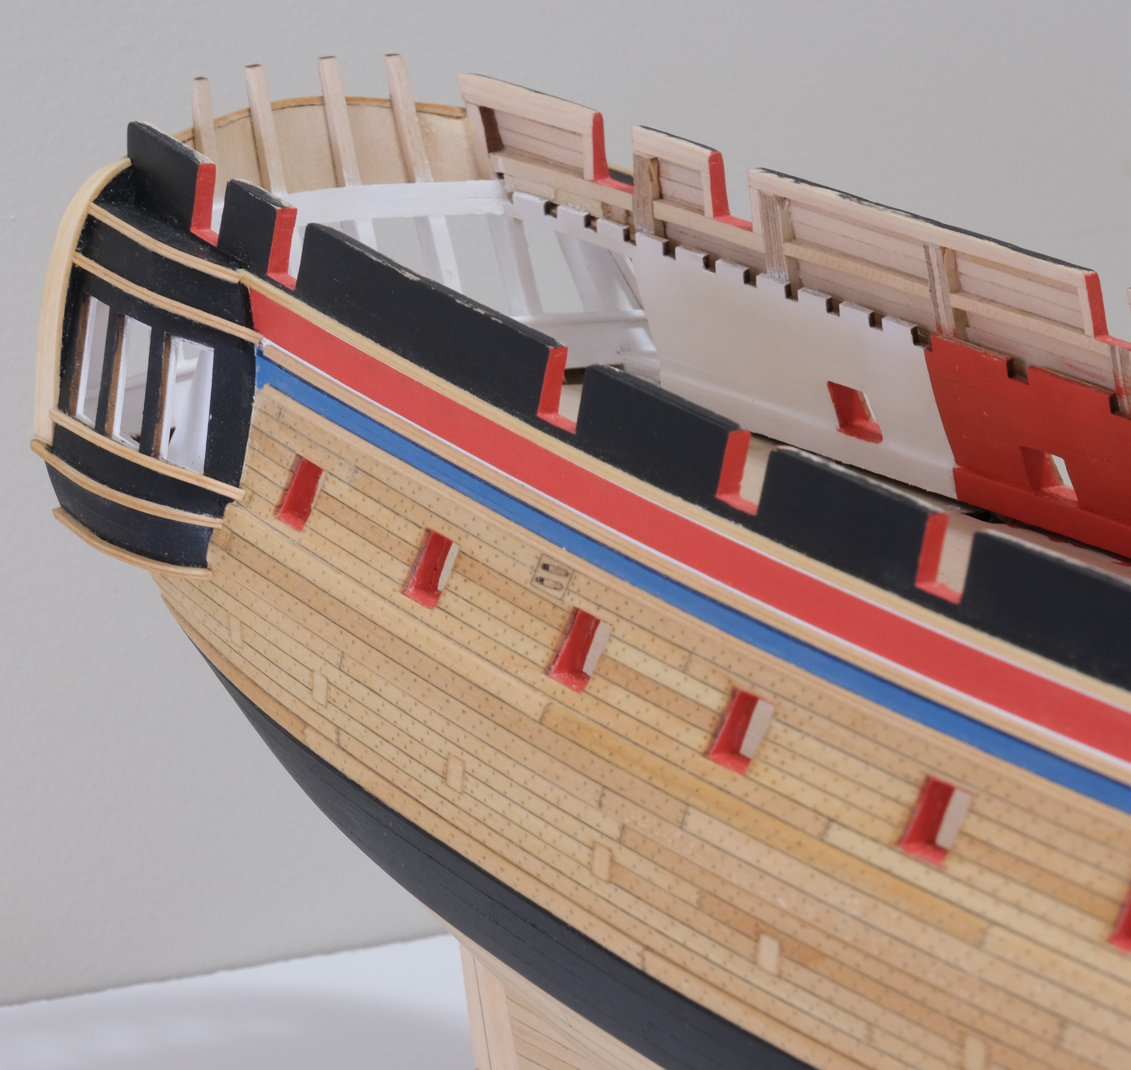
Lastly, I placed a 1/16in thick strip as a sample deck plank, and it seems like I do not need the extra plank below the bottom white plank. Any comments would be appreciated!
Now I am thinking to finally start working on the carvings. I have no idea how they will go as it is my first time trying it. If my attempts fail I will use the supplied pieces.
- realworkingsailor, Cathead, Dfell and 18 others
-
21
-
Thank you, Werner, Tom, Thomas, and Michael for the generous comments. And thanks all for the likes 🙂
Good catch, Werner. I'll make sure to fix the gap before working on the deck.
Harshil
-
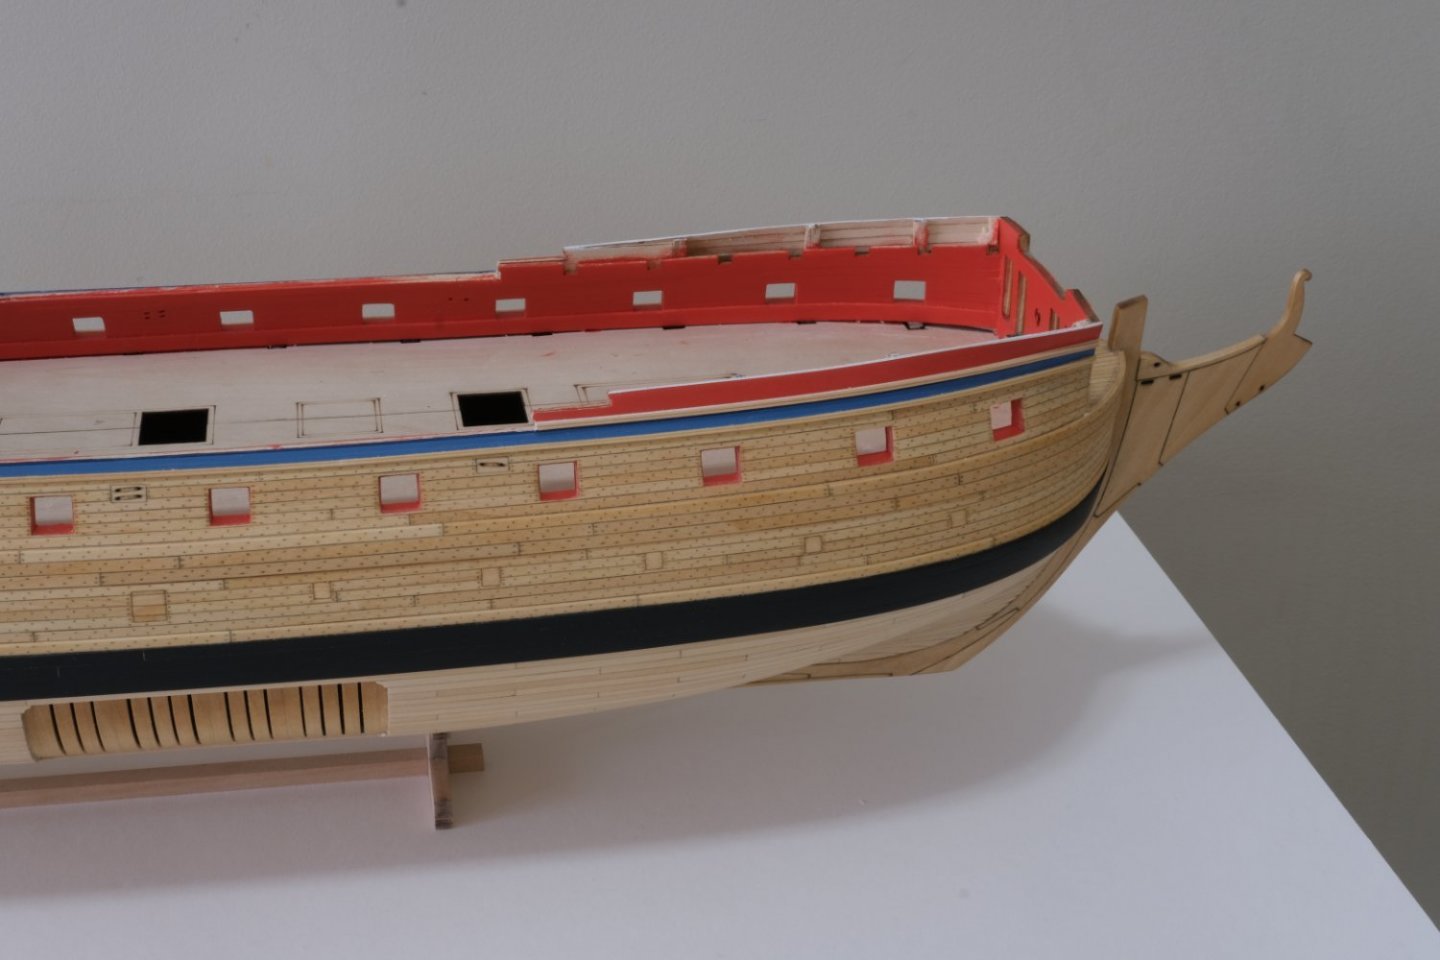
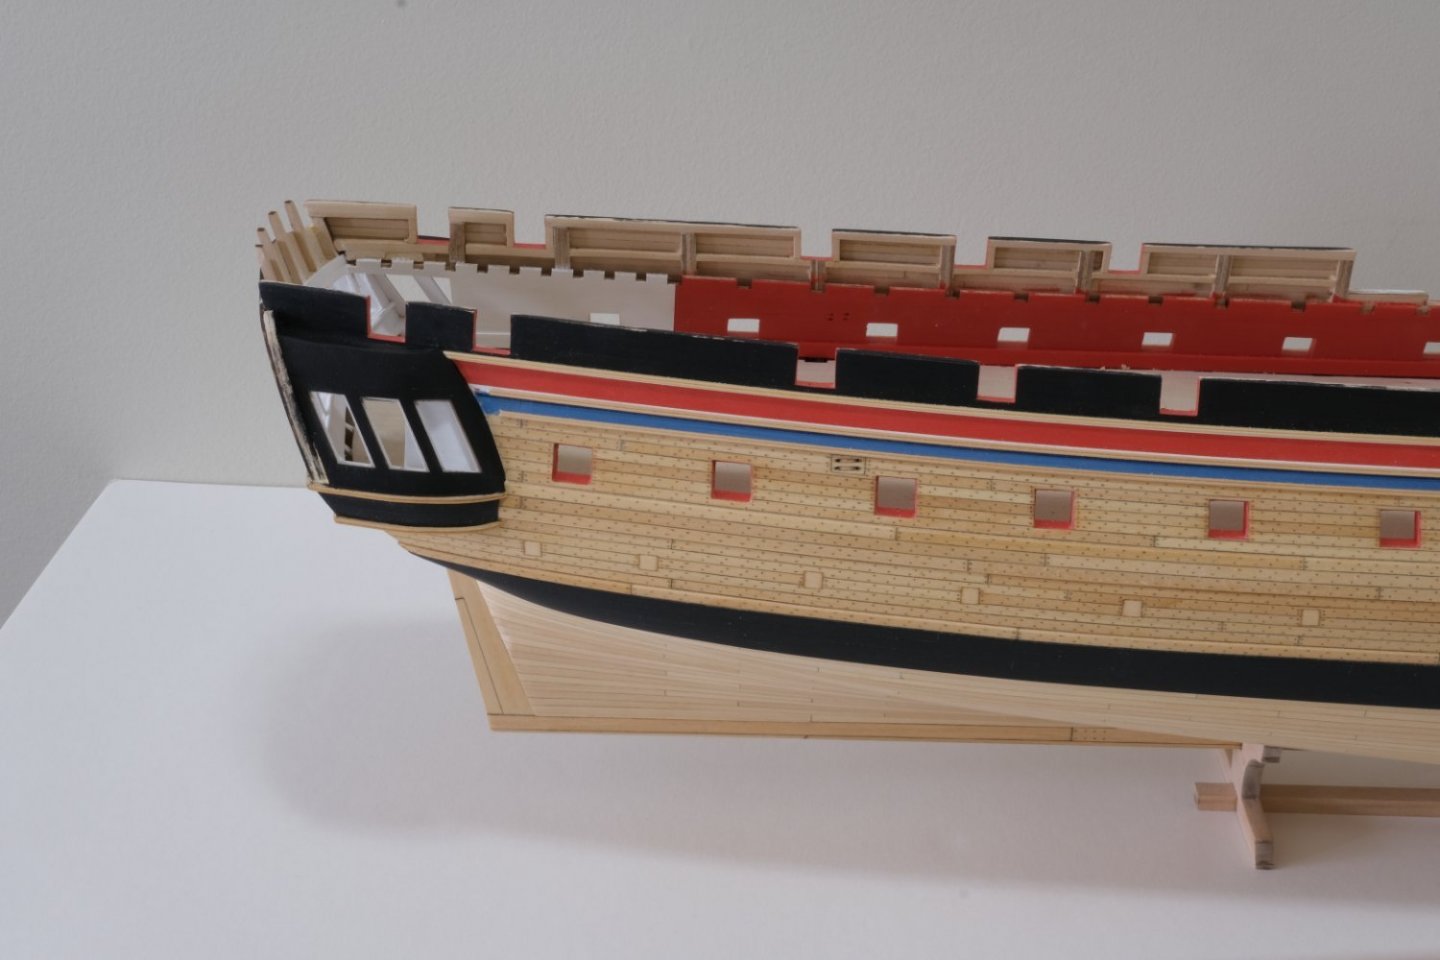
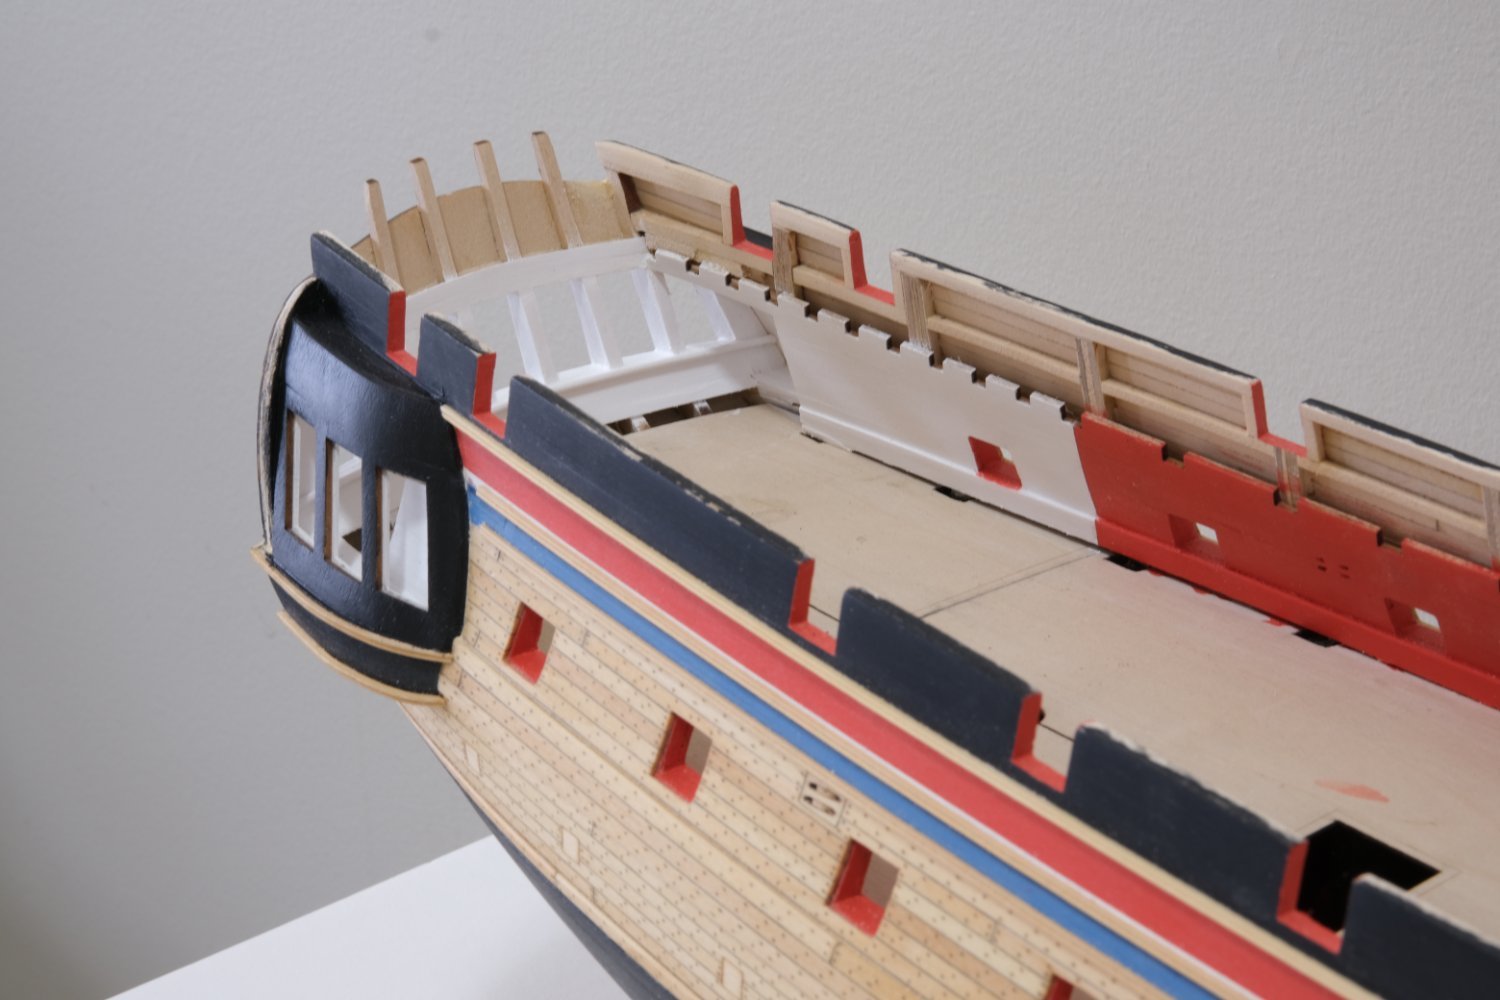
After some consideration, I decided to paint the bulwarks before drilling the holes. Reason being, the paint will clog up the holes, and I will need to pierce the holes again after painting. And I chose to paint the bulwarks in the great cabin white after seeing Werner's and Dirk's gorgeous builds.
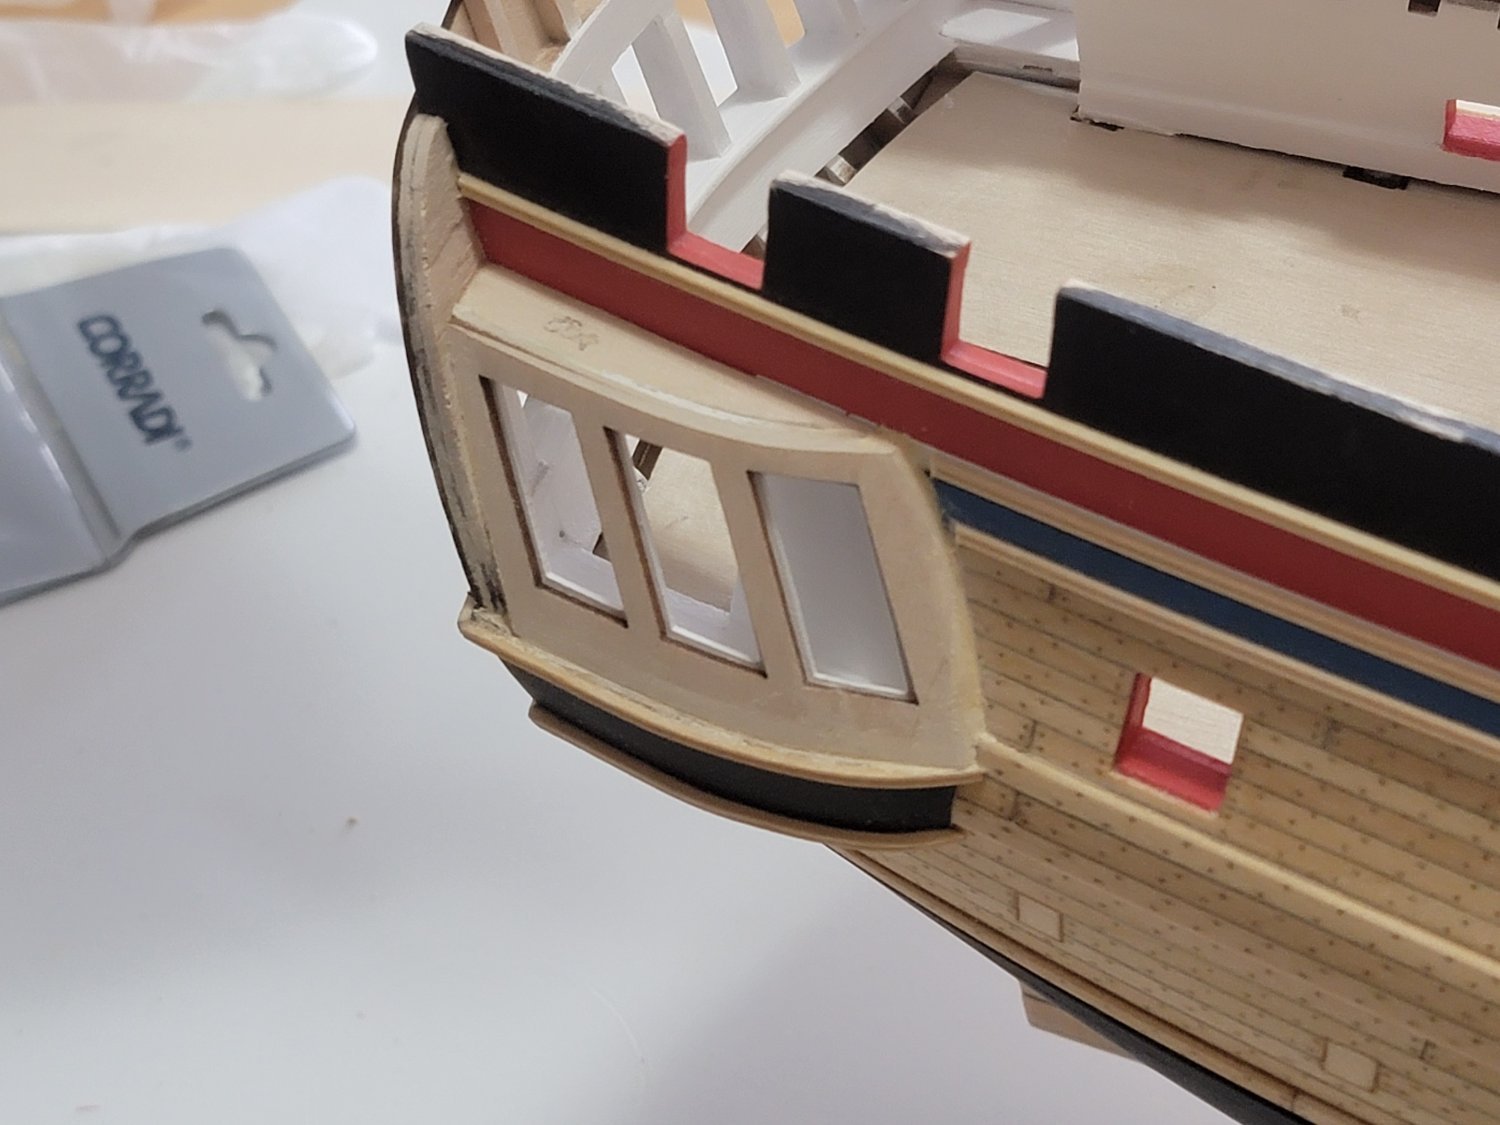
Also, I ended up using the kit's shell pieces for the sides of the quarter gallery instead of scratch building them. They needed a lot of tweaking for it to fit well, and not to mention a lot of filler as well 😁
Shaping and gluing these pieces is probably the trickiest part of the quarter gallery construction. There are a lot of angles to work with. It's not perfect, but I am happy with the outcome.

And here are some photos of the painted bulwarks:

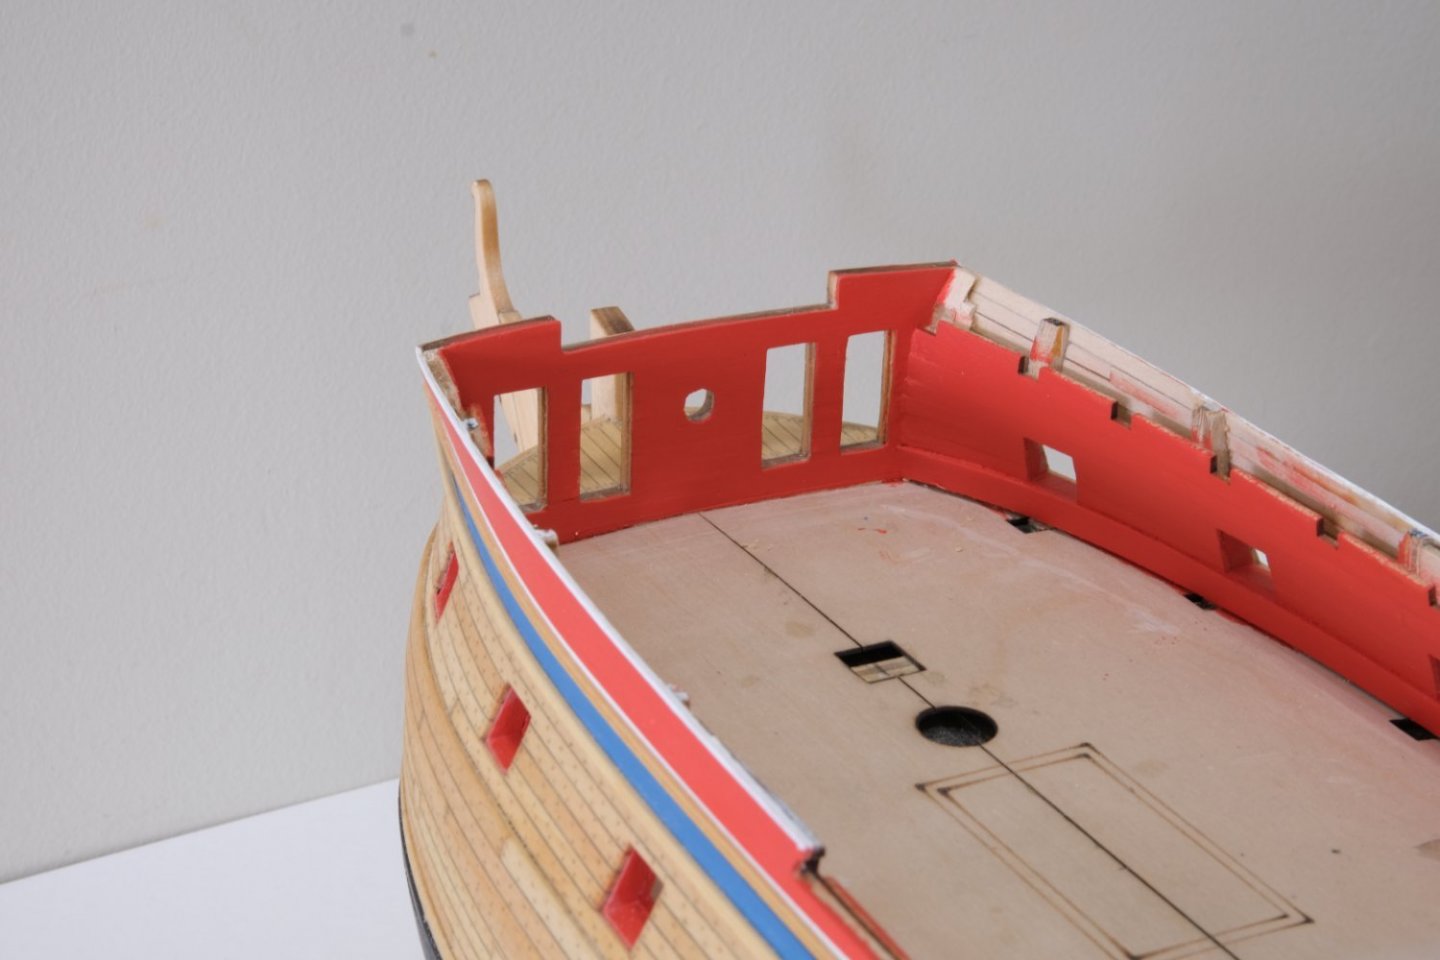


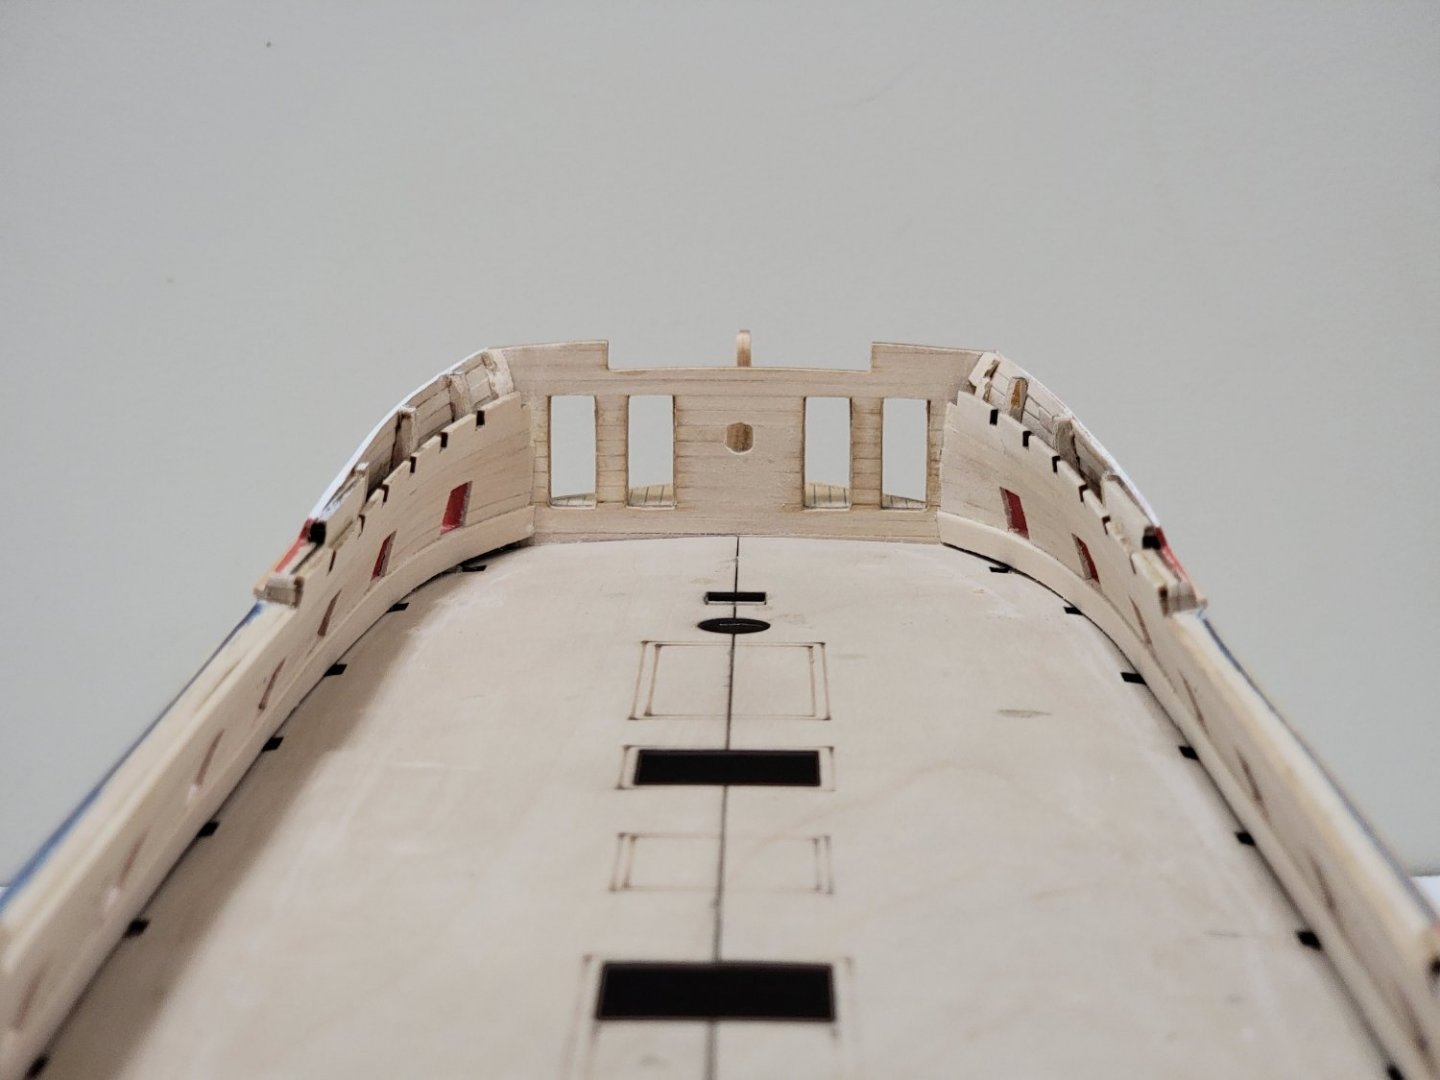
I will be gluing a thin veneer on the false deck at the portside of the bow since there is a large gap beneath the spirketting which is very noticeable. The starboard side has a more consistent gap throughout the entire hull. I was afraid to remove the false deck neatly, so that's why I am thinking of following this route instead.
-
On 3/18/2022 at 2:41 PM, wernerweiss said:
One question regarding the bow area: Did you glue a beam on the backside of the beakhead bulkhead as support for the fore edges of the false deck halves?
No, unfortunately I did not do this. Wish I thought of this earlier! I did check if the false deck is rigid near the beakhead bulkhead and it does not seem flimsy at all. I hope problems do not arise because of the lack of support underneath the sheet.
Thank you for forwarding the image of the template, it will be very handy in the coming week.. Much appreciated! 🙂
-
3 hours ago, Moonbug said:
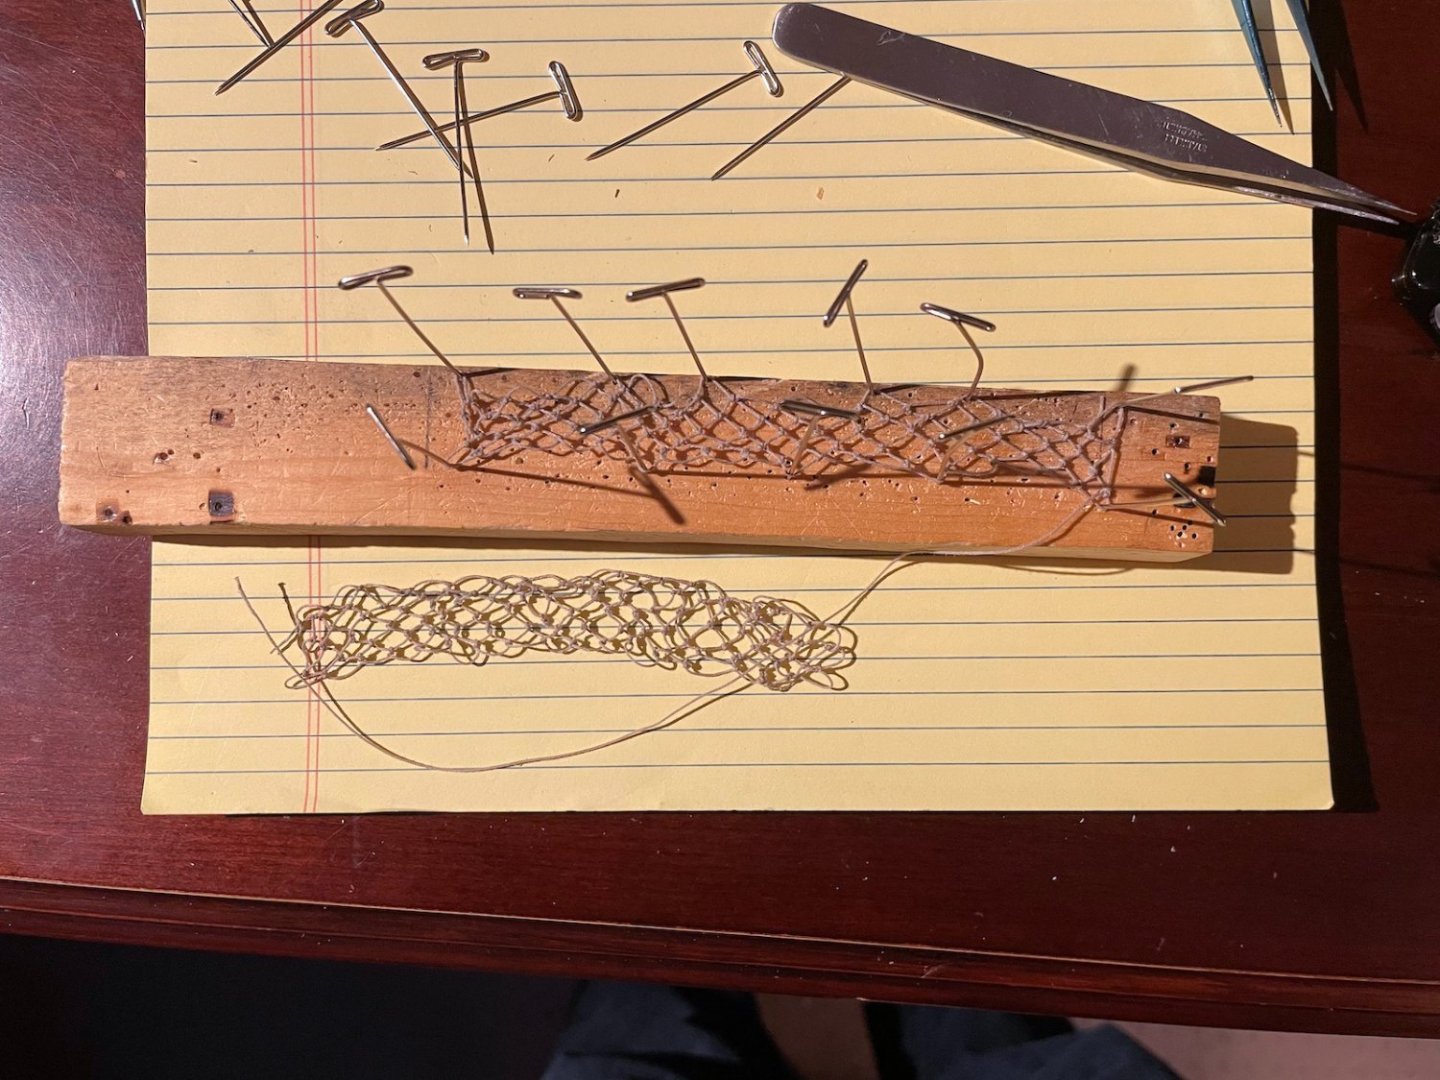
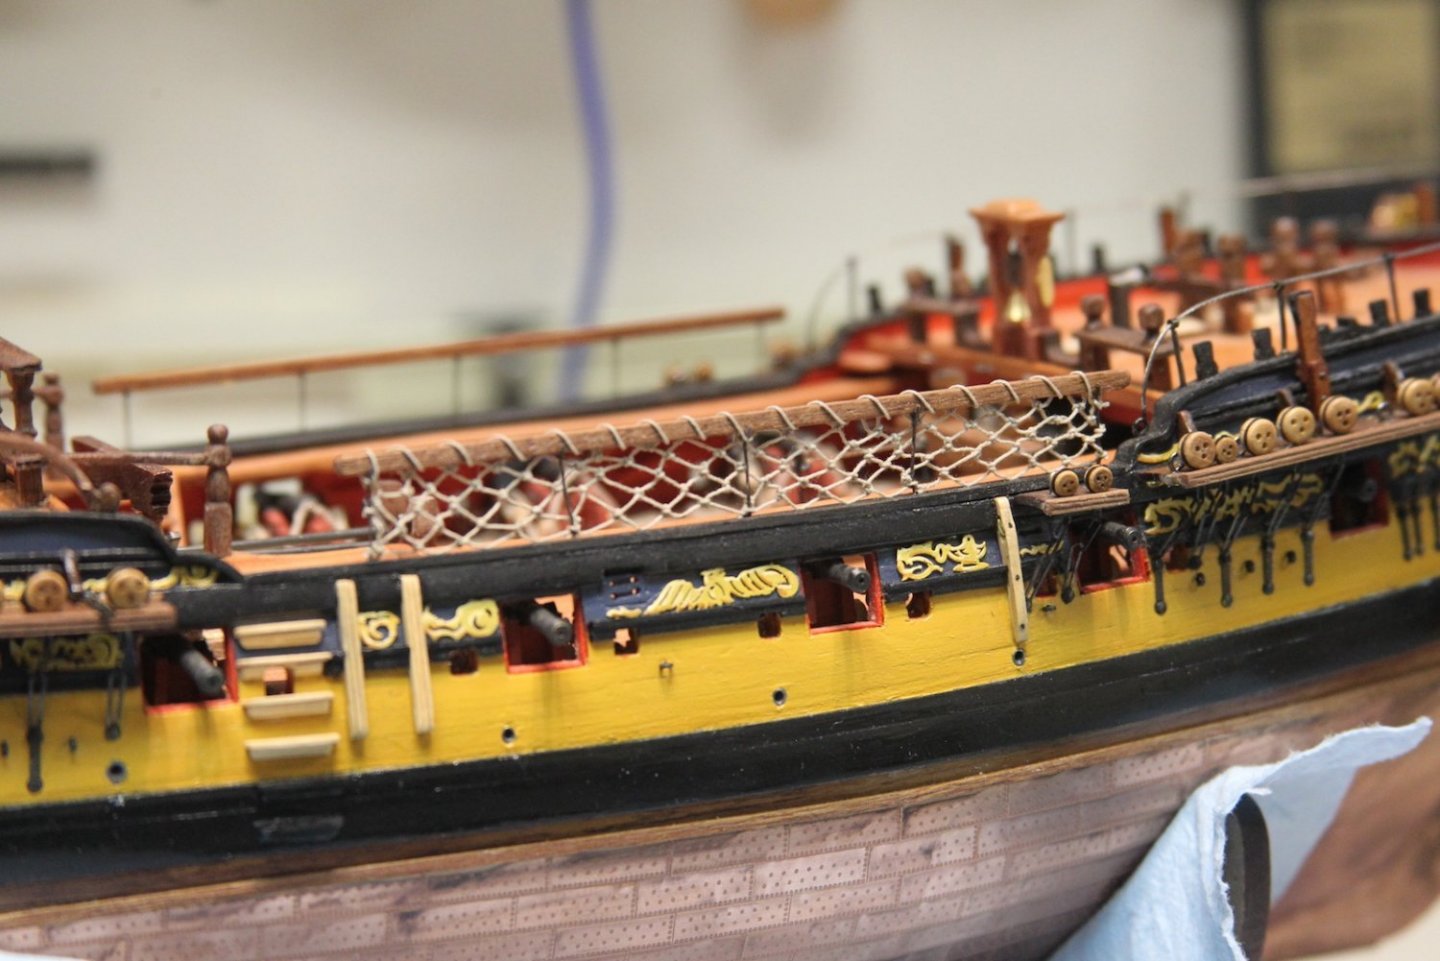
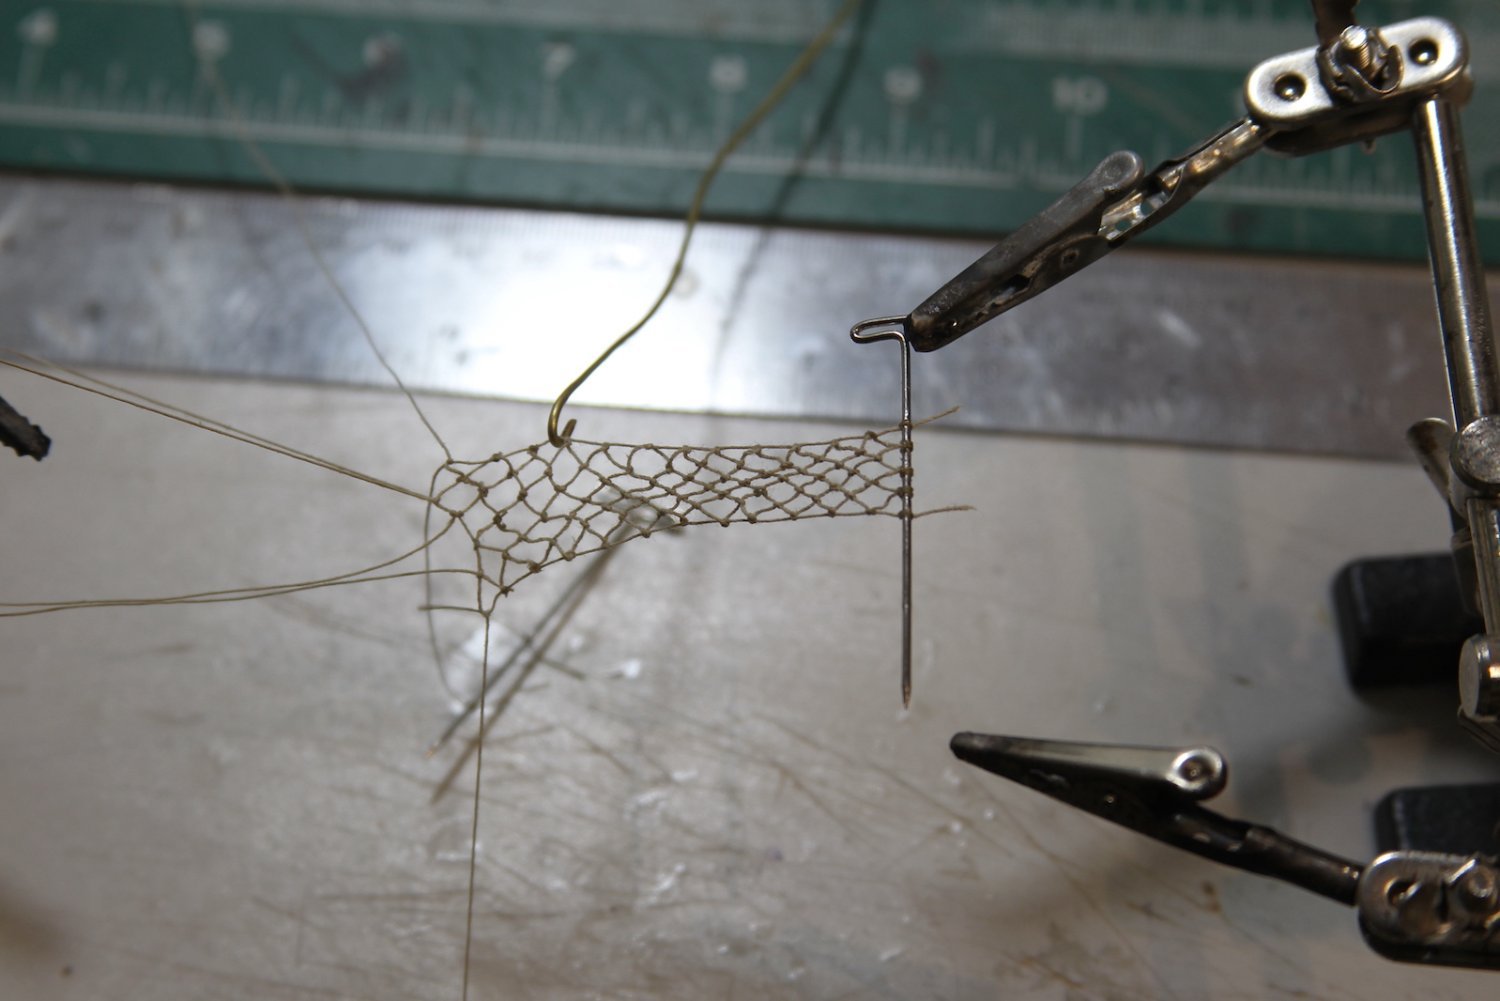
This is one of those short updates that represents a bunch of work. I've been noodling through how to make the netting along the waist rail. I spent quite a wile looking for a good "fishnet" representation - even going so far as to ask the admiral if she had any 'delicates' lying about that were no longer in use 😉. I found a couple of 'acceptable' options at a fabric store, but nothing that I was really happy with. None of them looked like "rope" but rather just laced thread.
First, I tried weaving together my own netting using Dan Vadas' example from his Jib Net here. Here's my attempt:

This is after something like 6 hours mind you, makes tying off ratlines feel like a breeze. After all that, I still wasn't digging it. I think it looks fine - and I may well still use it for a Jib Net, but I didn't like it for the waist. So, after more research I found this guy on youtube.
He over explains a bit - which is better than under-explaining I suppose - but more importantly, his method was transferrable to a much smaller scale and I was able to replicate it using .20mm rope. Here's a shot of my first attempt (bottom) which was pretty sketchy, but a good practice to get the hang of it and improve my method. In the top one, I used more pins to hold my tiny work in place and thus create more even loops. I didn't use any sort of net needle, I just used rope with the end stiffened with CA glue.
Still took 6 or 7 hours each to complete the netting which ended up being about 113mm long by 11mm wide. I then mounted it to my waist rail by first using a tiny dot of CA glue to attach the loops to the rail and stanchions, then tying off the loops to the stanchions, and finally looping and tying off another length of rope around the rail itself. I've seen other example of this looping on rails in this time frame - usually metal ones to create a better grip on the rail when wet. So I figure it too much of a stretch to have seen it on a waist rail.
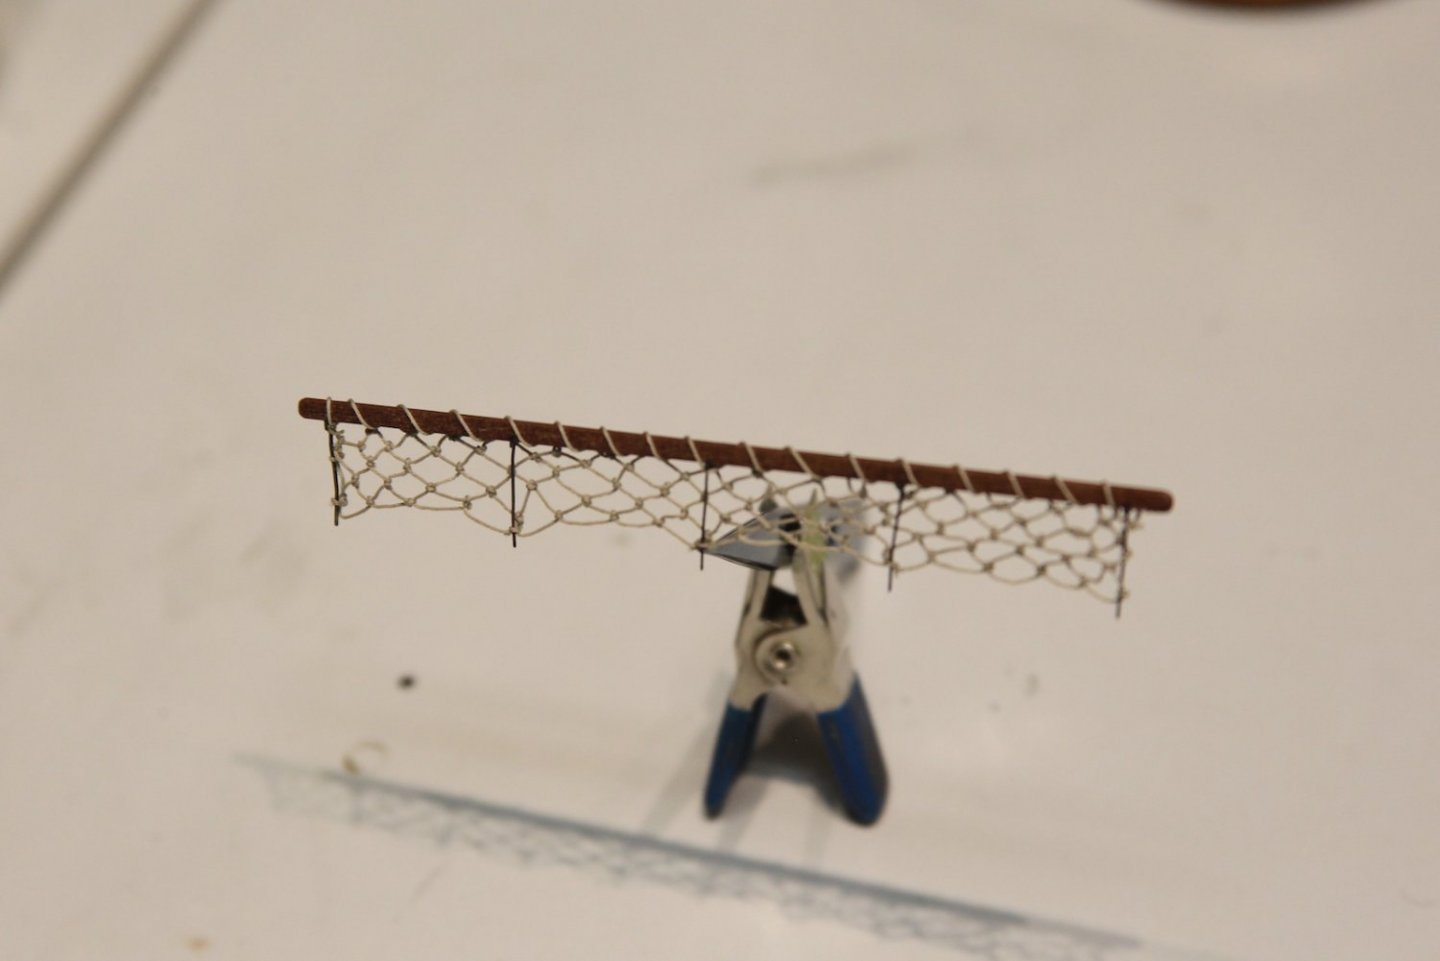
Finally, it's mounted on the waist. Last touches were to add another tiny drop of CA to hold the bottom loops even with the ship's rail. Overall, this was a boatload of work (no pun intended) for a relatively small area and detail; and I still have the port side to do. I think it's still a touch out of scale (especially the knots), but it's about as small a rope as I could go and still successfully work with. But I'm much more pleased with this than I think I would be with a more modern alternative to netting.
This is amazing!!! Nicely done 😀
-
8 hours ago, wernerweiss said:
Hello Harshil,
You make good progress with your model, and I would like to make some remarks regarding your pictures.
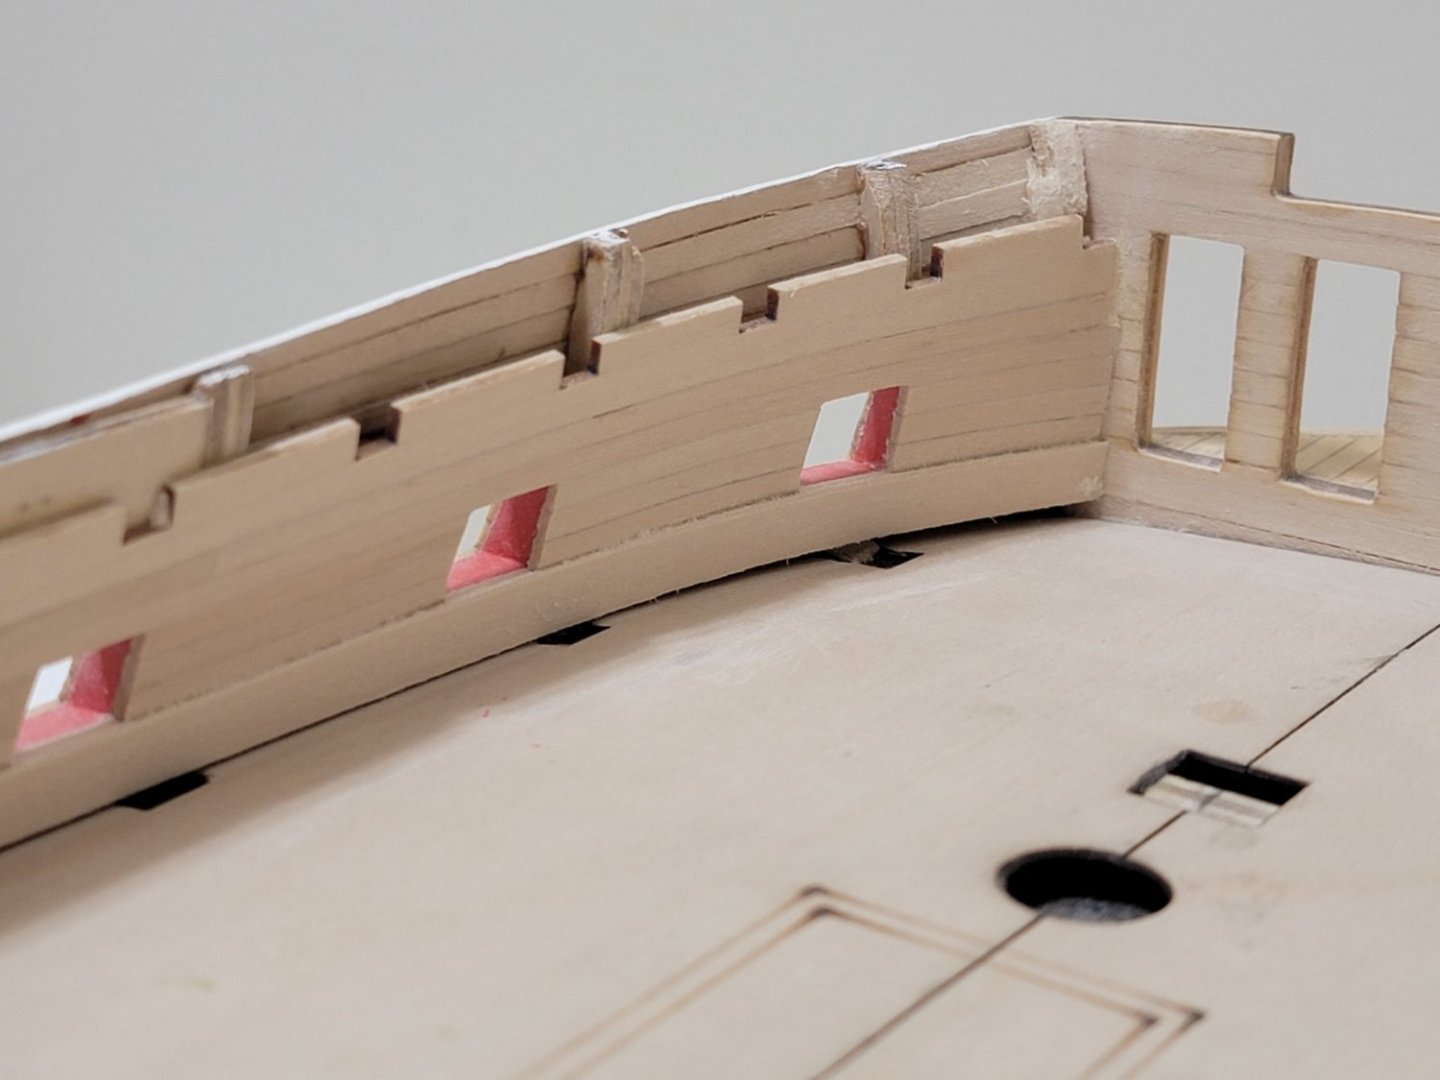
1. A good run of the spirketting shows the ups and downs in the run of the false deck especially at the edges. This was also the case with my model, and I adjusted the "waves" using appropiately downsanded 1,5 mm veneer as a second layer on the according areas of original false deck. (This is time consuming but worth the while because the waves will not disappear with the deck planking).
2. Before you paint the bulwarks I recommend that you drill the holes for the eyebolts for the gun riggings, that means 4 holes on each gun port. A selfmade drill template is very helpful.
3. I also used the provided shells, it works with a little trimming (but not on the aft edge because the space is needed for the decorative etch strip)
Regards
Werner
Hi Werner,
Thank you for these tips! I especially found the drill template idea very interesting. It will save a lot of time trying to find the correct location for each hole.
Do you have photos of your model with 2nd layer of the veneer sheet on the deck? I'm wondering if you only glued this sheet on areas of the wavy "dip". Did you glue the sheet before sanding the area flat?
Thanks again! And thank you all for the likes 🙂
Harshil
-
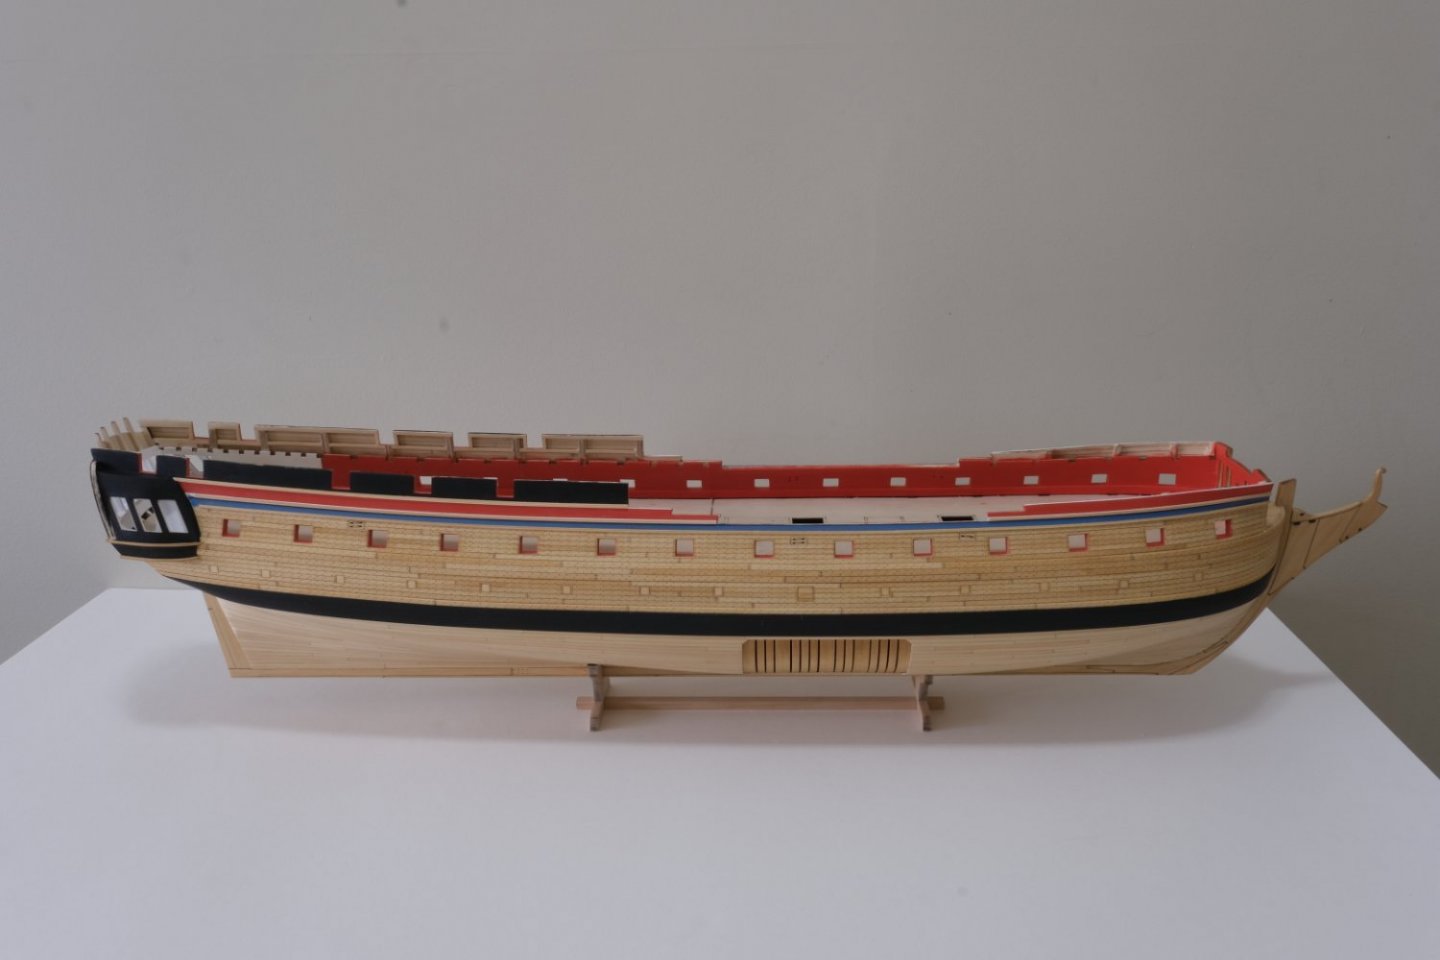
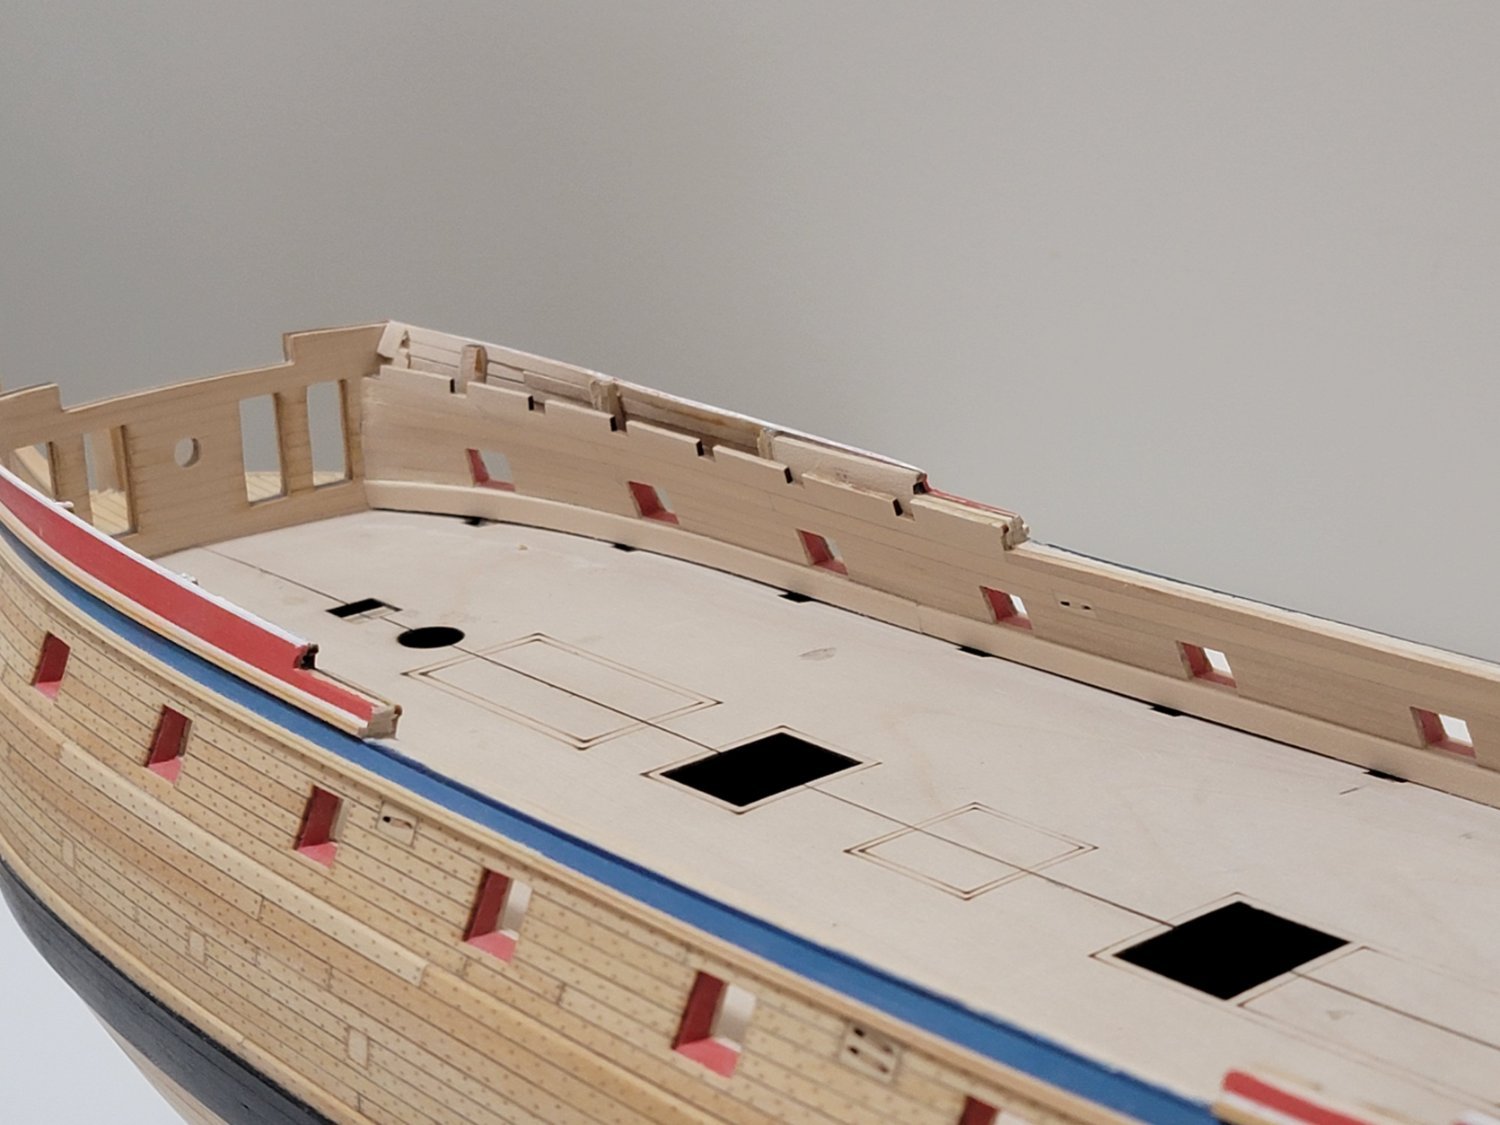
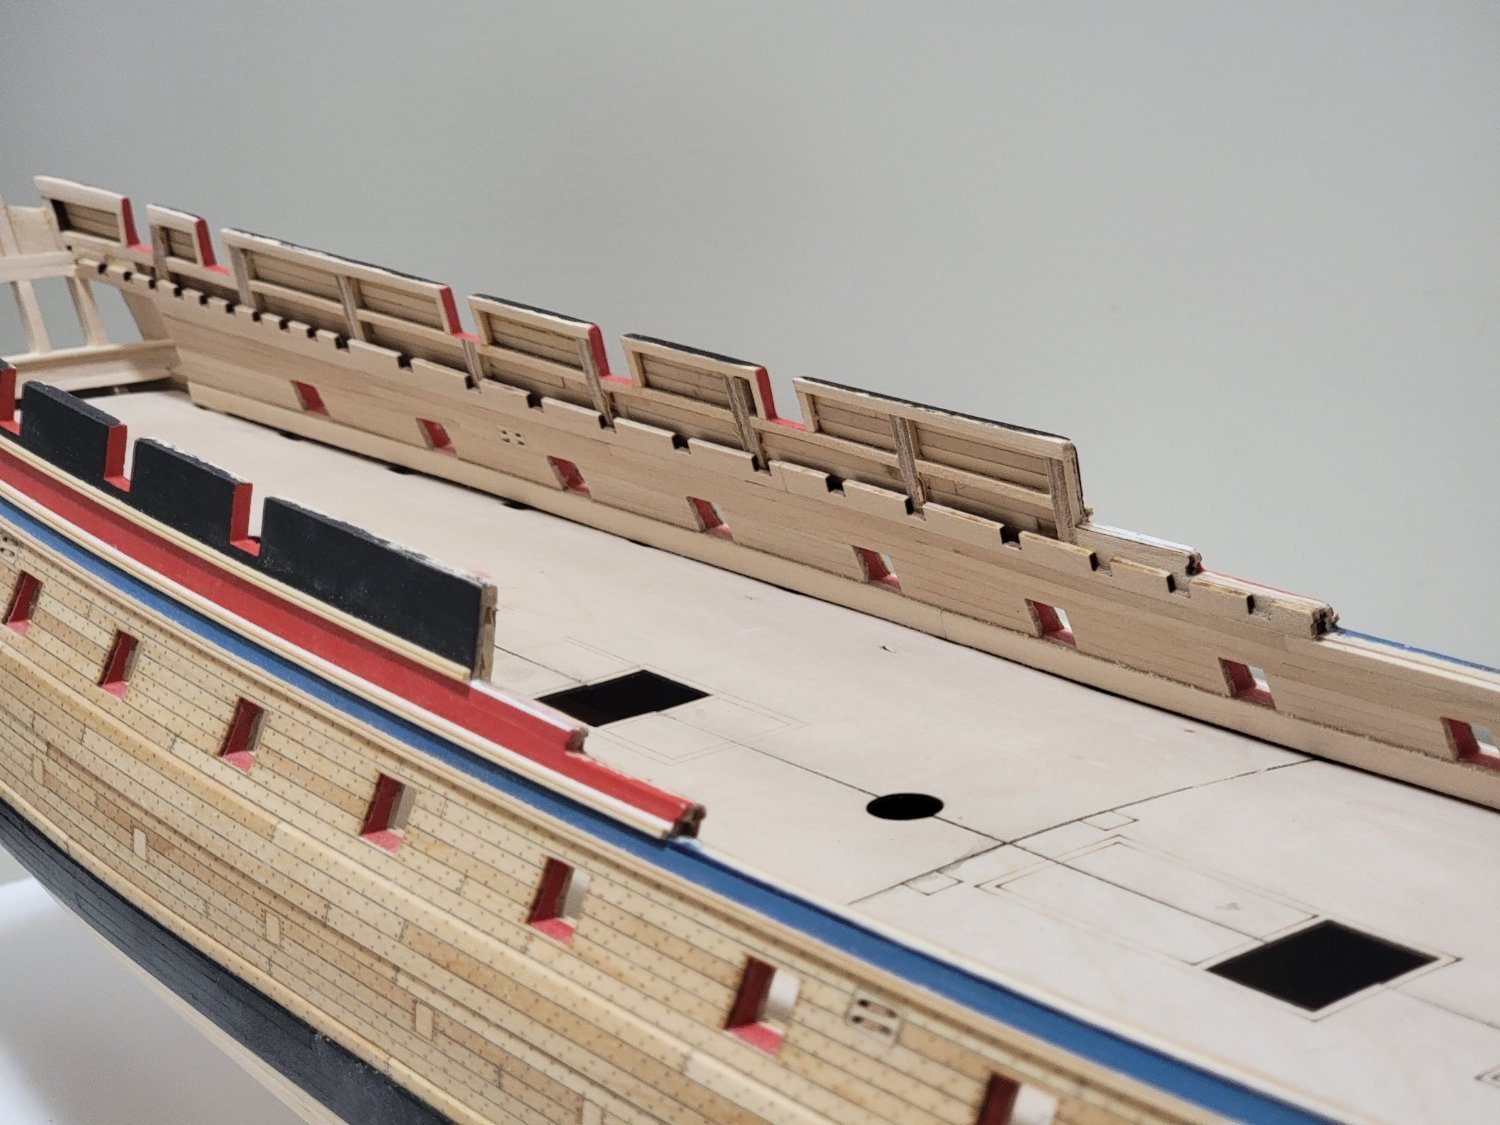
The interior of the bulwarks are now planked. The foreword piece with the notches was around 1-2mm short, so I had to trim the exterior planking slightly. I found the spirketting the most challenging part of this chapter, especially at the bow. I needed to use slivers of wood beneath the plank while the glue set so that the plank was oriented with the top of the port sills correctly. Here are some photos before I start painting:


- BobG, Edwardkenway, Gahm and 12 others
-
15
-
On 3/9/2022 at 11:22 AM, wernerweiss said:
Hello Harshil,
Excellent work so far, and I look forward to the pictures of the finished model!
With the "shells" do you mean the "drops" below the quarter galleries? On my model, these parts also did not fit at all....the angle of the topside to be glued under the bottom of the galleries is wrong. However, I used these parts after correcting the wrong angle with putty.
Regards
Werner
Hi Werner,
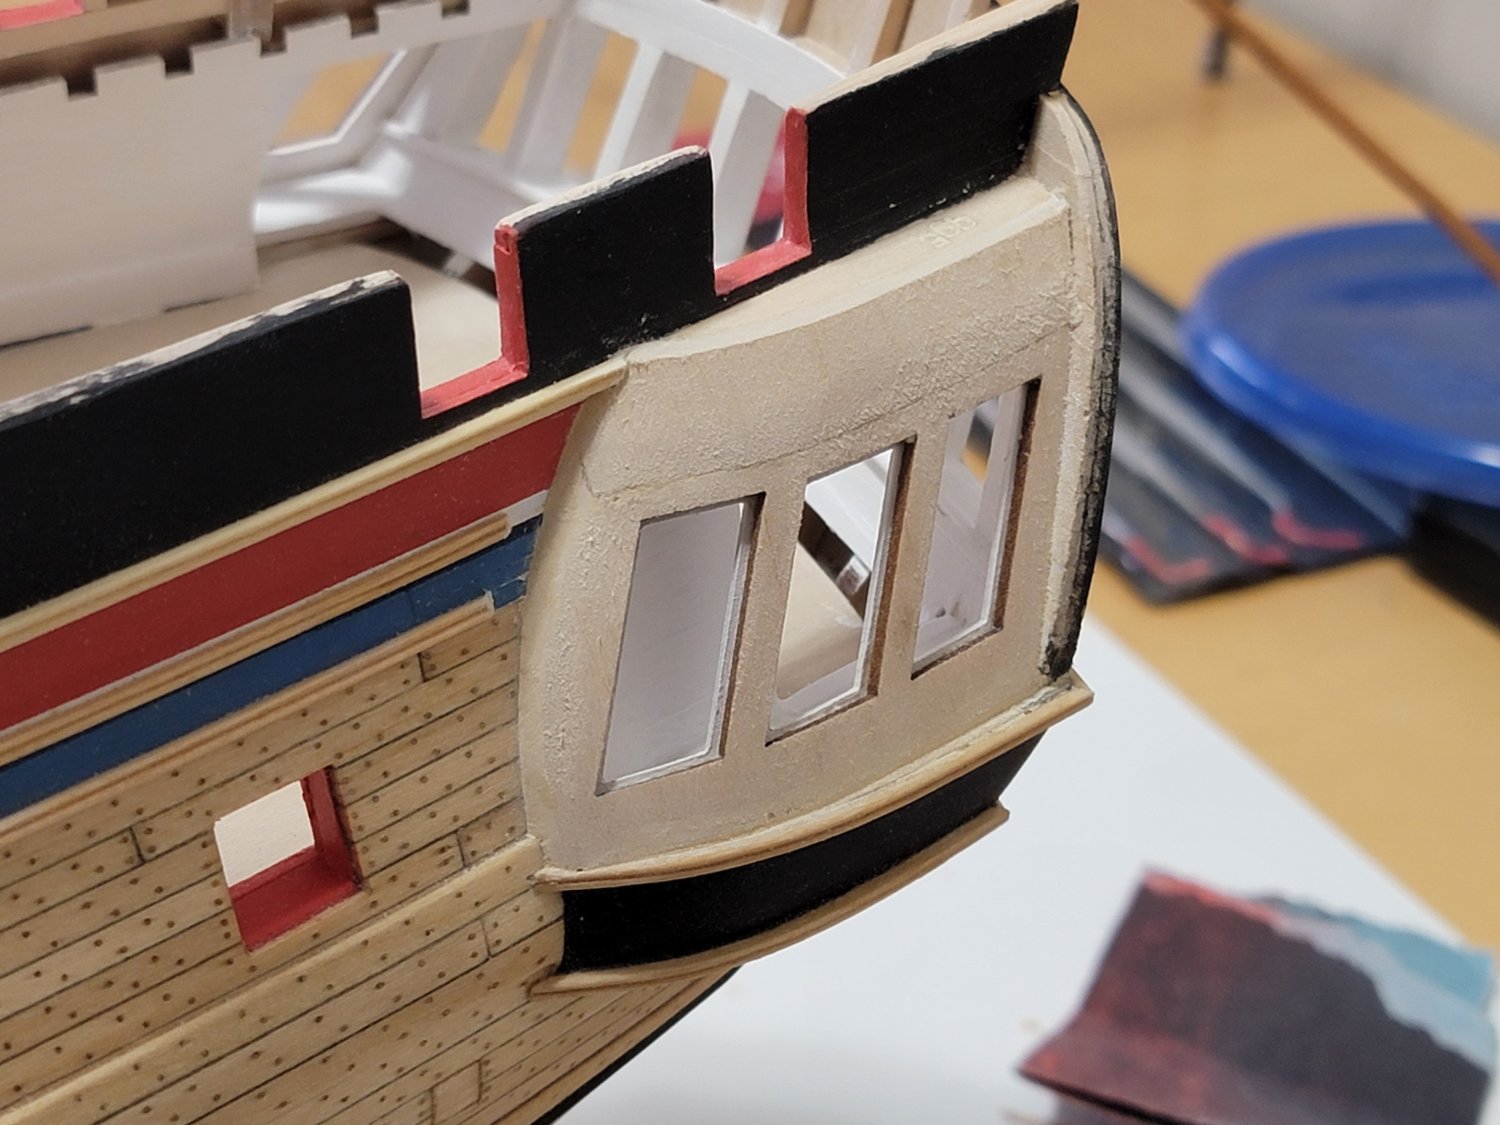
Thank you for your kind words! By shells I mean the parts that contour around the sides of the quarter gallery that holds the lights in place (see the image below of these parts). No matter the orientation I try, they don't fit nicely so I'll need to make my own parts. I plan to carve out the drops with boxwood (it will be my first time ever trying miniature carvings like this). If my trials don't turn out nicely I'll be using the supplied castings since they will also look good once painted.
Harshil

-
Richard, it's very nice to see your update photos. Beautiful as usual! 🙂
- md1400cs, FriedClams and Retired guy
-
2
-
1
-
Nice work! Fits like a glove 🙂
-
Hi Andy, thank you for pointing out these discrepancies. I'll have to check if I face the same issues with my build. I faced a lot of discrepancies with the quarter gallery construction since few of the supplied parts actually fit my model. I will also have to scratch build the shell on the sides of the QG.
The 3/16" strip is a good solution and it will be very hard to notice a wider strip when its all painted and the added details.
As for the fo'c'sle clamp, have you thought about the option to glue in an extra scrap piece of wood fore of the clamp so that the aft end matches? Filler could be used to hide the seams between the extra wood and the supplied cutout. I'm eager to hear what others also think about how to solve this.
- JohnB40, realworkingsailor, CiscoH and 1 other
-
4


USF Confederacy 1778 by WalrusGuy - Model Shipways - 1:64
in - Kit build logs for subjects built from 1751 - 1800
Posted
Hi Steven. Yes I took a break from modeling as life got a bit busy. I hope to resume the build in a few months. Thanks for stopping by!😁