
Bruma
-
Posts
175 -
Joined
-
Last visited
2 Followers

-
 kirill4 reacted to a post in a topic:
Cutty Sark by Bruma - Revell - 1:96 - PLASTIC
kirill4 reacted to a post in a topic:
Cutty Sark by Bruma - Revell - 1:96 - PLASTIC
-
Scottish Guy reacted to a post in a topic:
Cutty Sark by Bruma - Revell - 1:96 - PLASTIC
-
Scottish Guy reacted to a post in a topic:
Cutty Sark by Bruma - Revell - 1:96 - PLASTIC
-
Scottish Guy reacted to a post in a topic:
Cutty Sark by Bruma - Revell - 1:96 - PLASTIC
-
 Scottish Guy reacted to a post in a topic:
Cutty Sark by Bruma - Revell - 1:96 - PLASTIC
Scottish Guy reacted to a post in a topic:
Cutty Sark by Bruma - Revell - 1:96 - PLASTIC
-
Scottish Guy reacted to a post in a topic:
Cutty Sark by Bruma - Revell - 1:96 - PLASTIC
-
Scottish Guy reacted to a post in a topic:
Cutty Sark by Bruma - Revell - 1:96 - PLASTIC
-
Scottish Guy reacted to a post in a topic:
Cutty Sark by Bruma - Revell - 1:96 - PLASTIC
-
Scottish Guy reacted to a post in a topic:
Cutty Sark by Bruma - Revell - 1:96 - PLASTIC
-
Scottish Guy reacted to a post in a topic:
Cutty Sark by Bruma - Revell - 1:96 - PLASTIC
-
 Bruma reacted to a post in a topic:
Cutty Sark by Bruma - Revell - 1:96 - PLASTIC
Bruma reacted to a post in a topic:
Cutty Sark by Bruma - Revell - 1:96 - PLASTIC
-
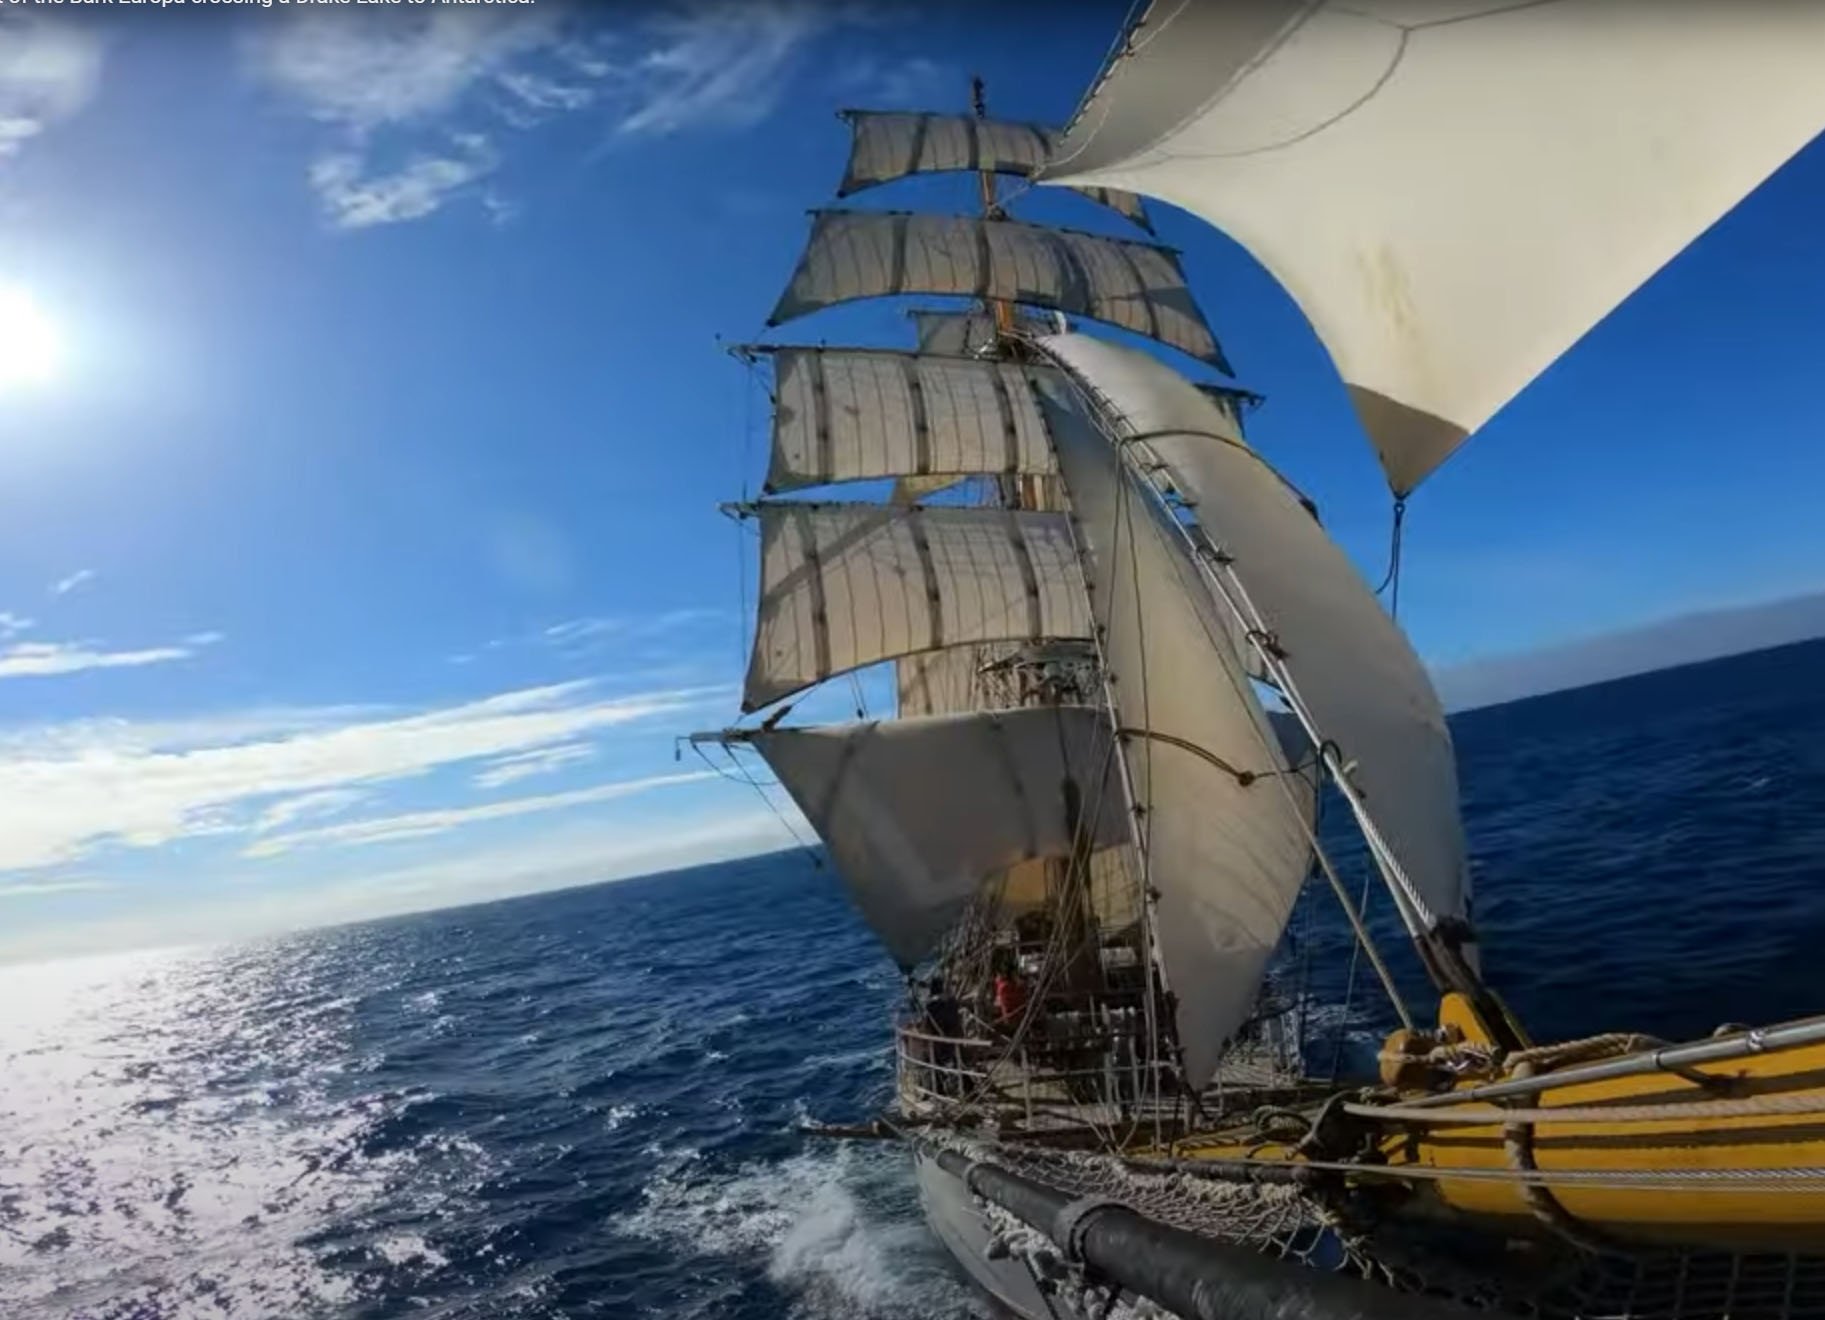
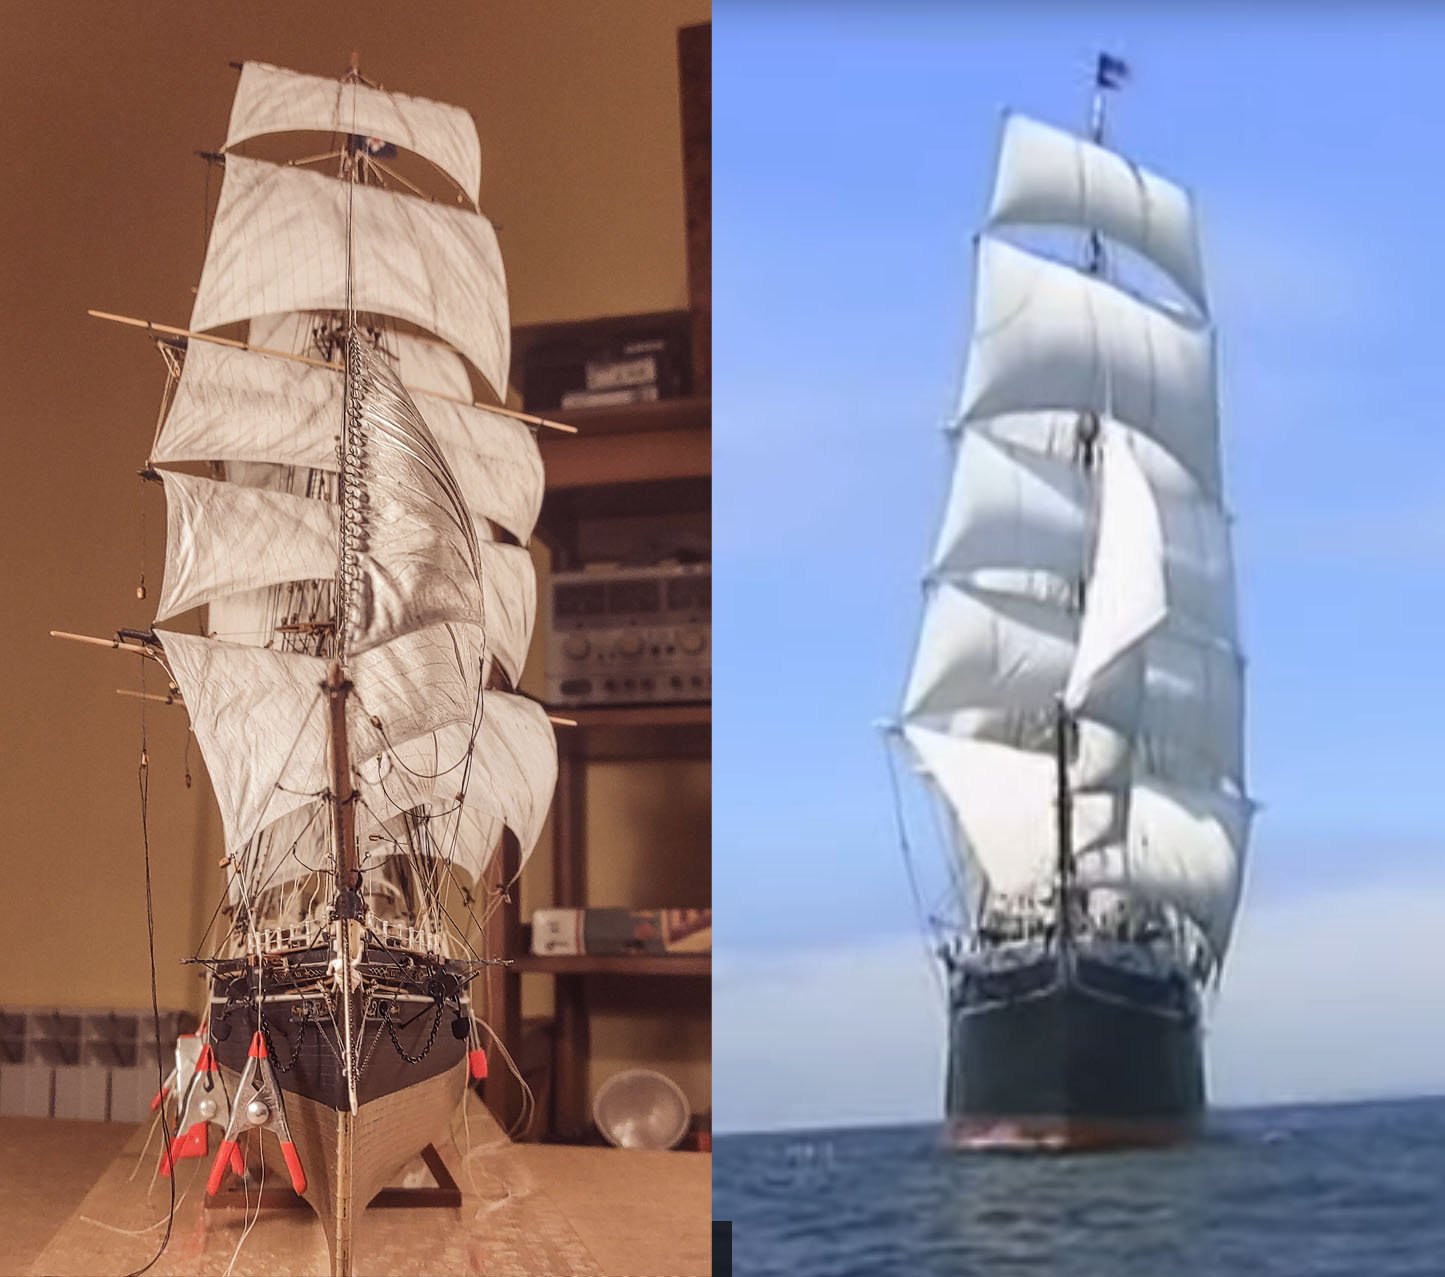
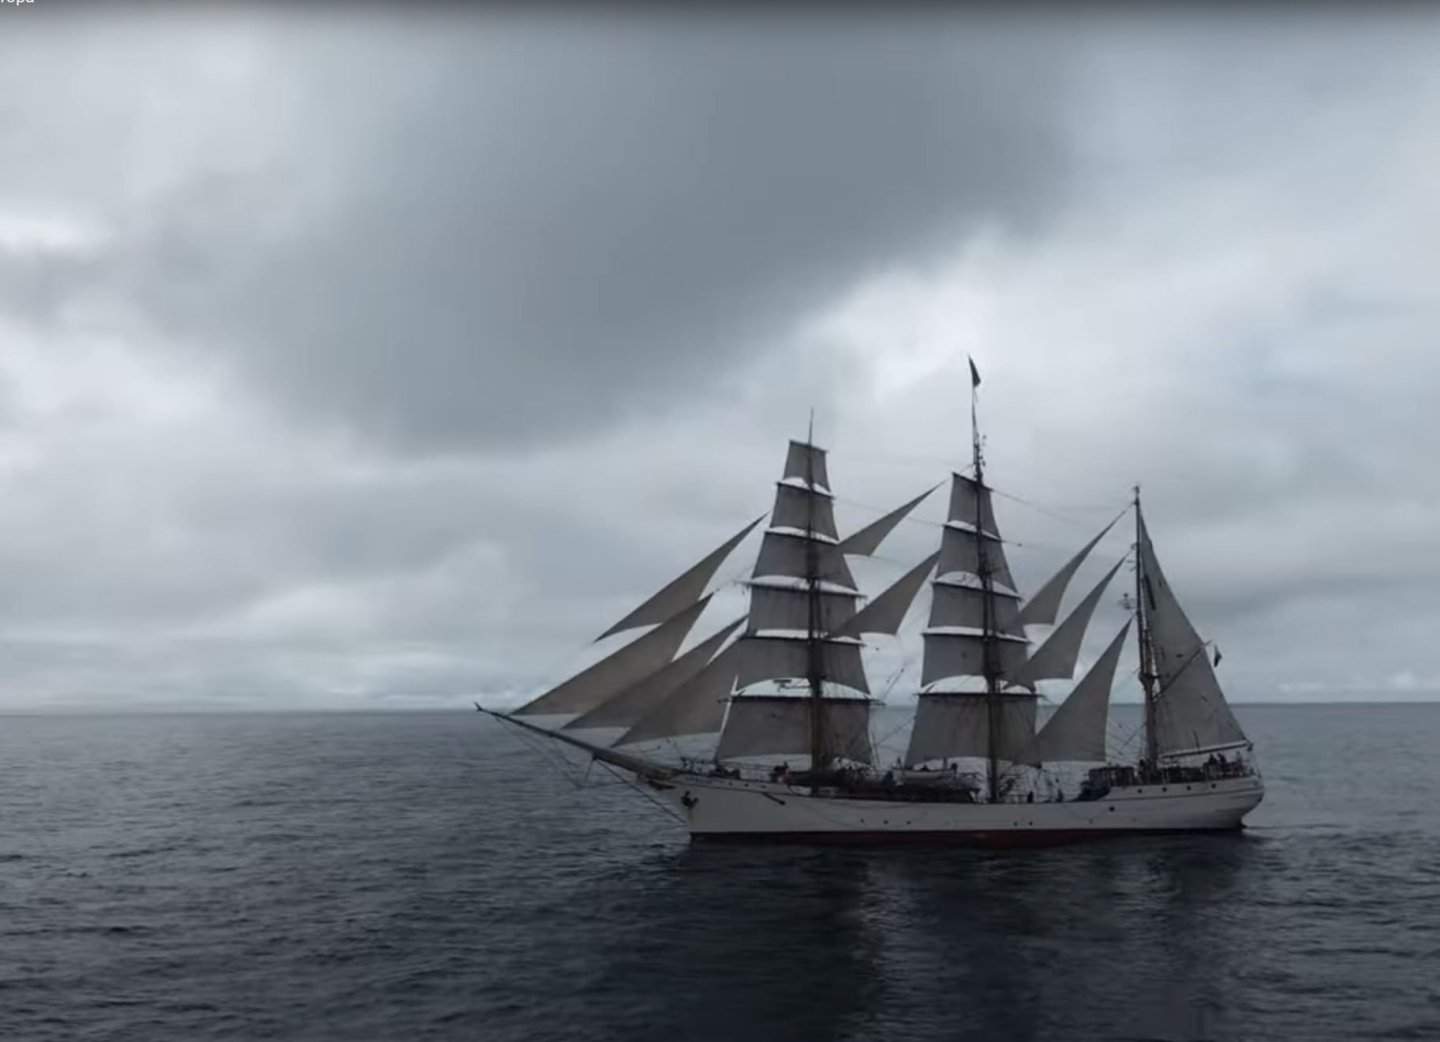
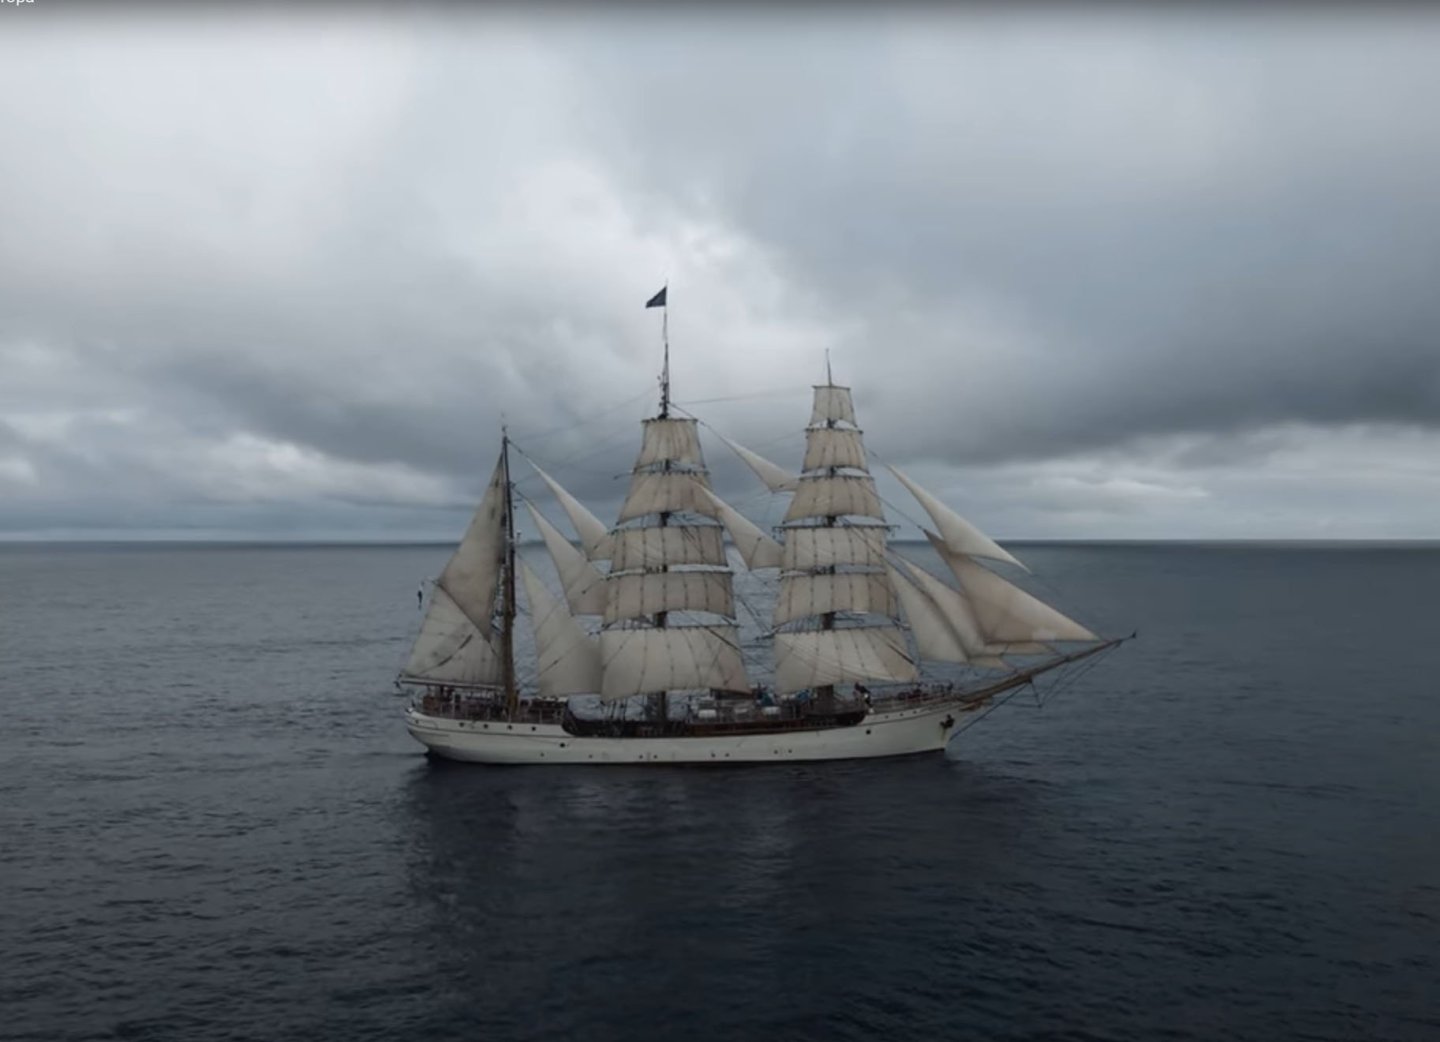
 Thank you again Kirill, and sorry for the delay in answering. I tend not to use models or painting as reference, so I have looked for more picture of real ships in the same condition. Here is a collection of James Craig, Europa and Star of india: As you can see, they all seem to match my model and I’m more and more convinced to present the cutty sark with the thack on the windward. I will further shape the sails, but this configuration appears to be vastly more frequent than the original one. Thank you for helping me to change my mind about it! Lastly a comparison between my Cutty Sark and the Star of India: Not too bad in my opinion, surely better than the previous one!


- 397 replies
-
- 5
-
-
- cutty sark
- revell
- (and 2 more)
-
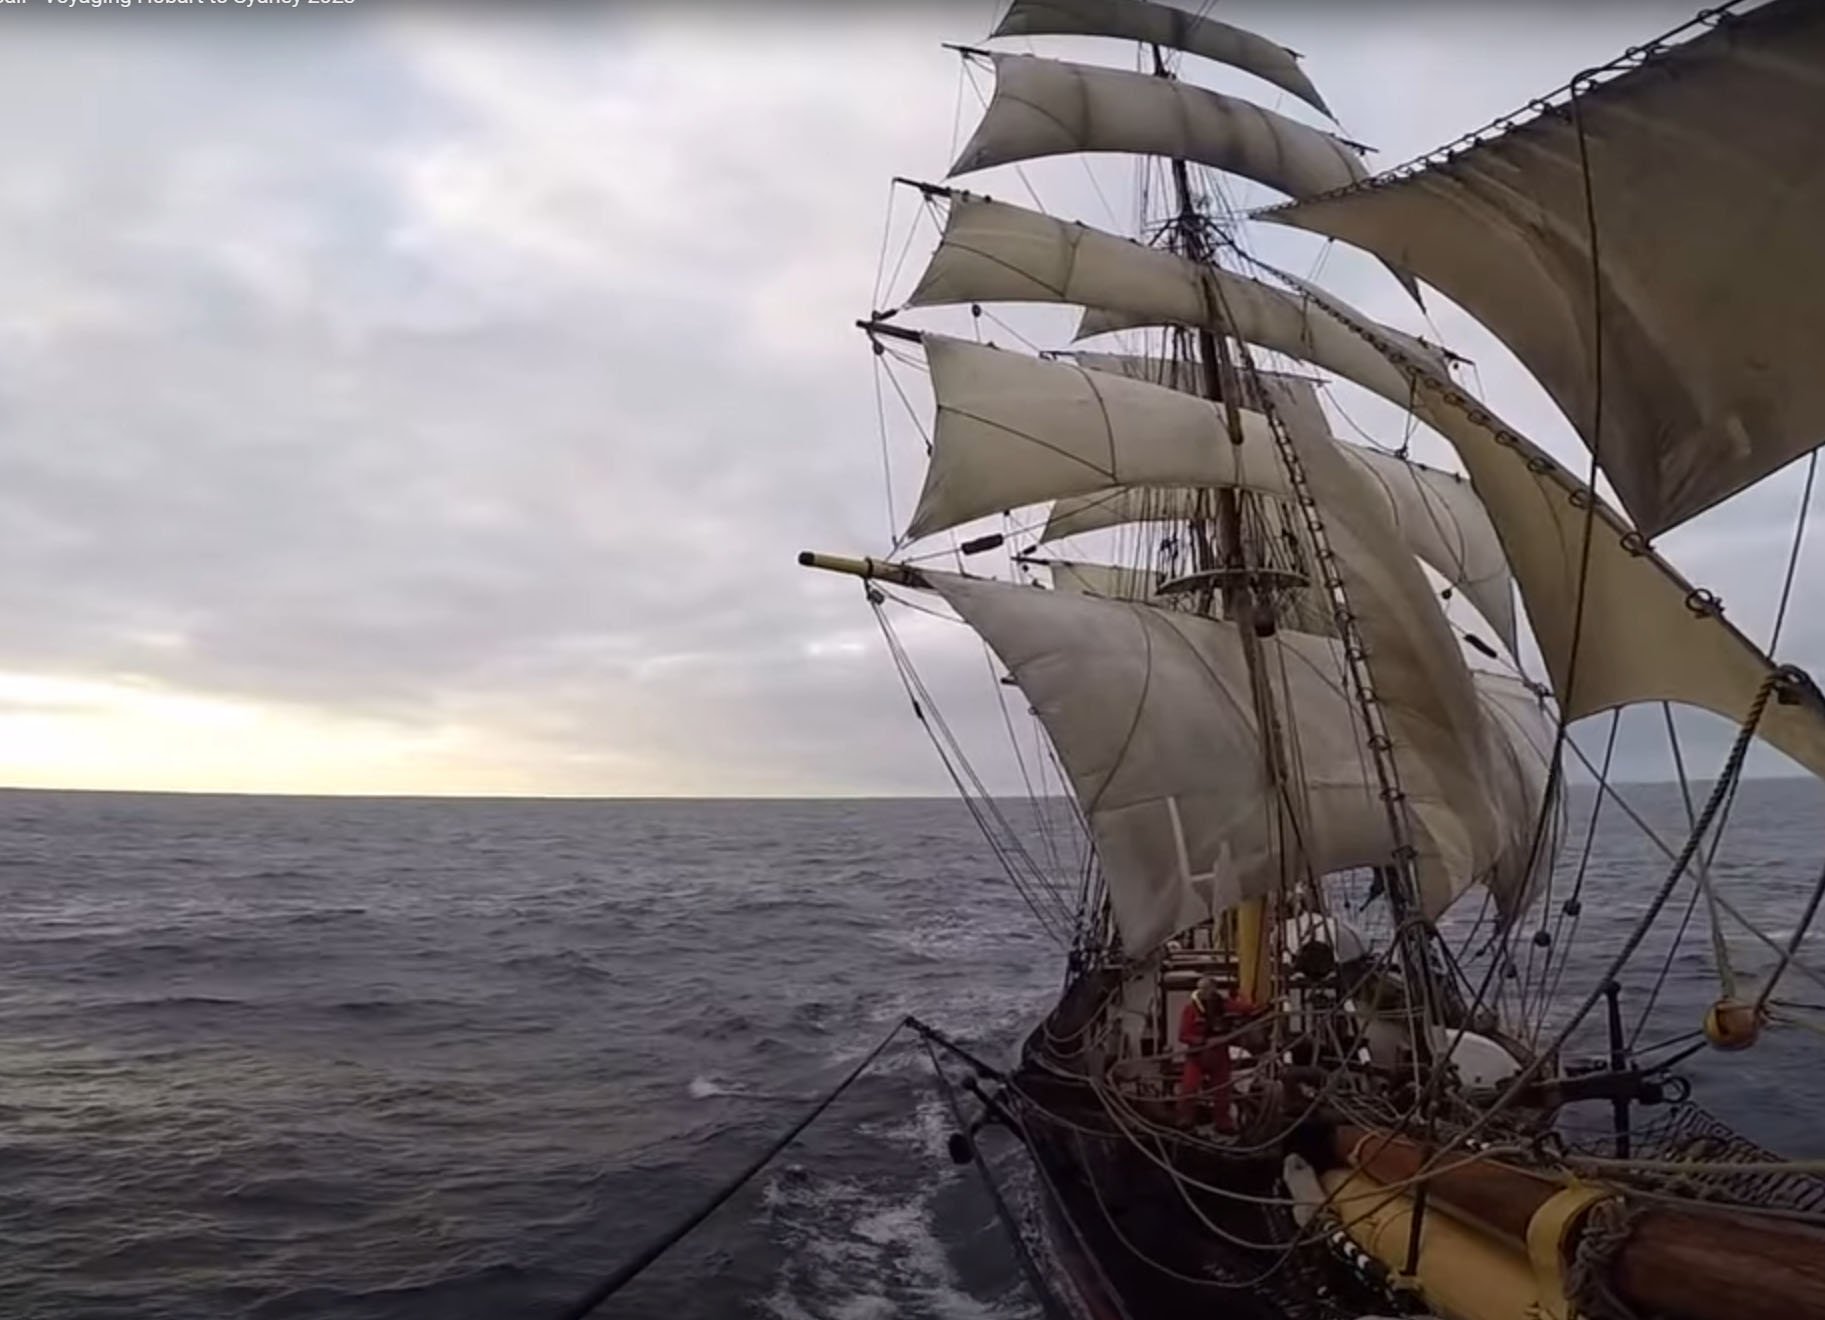
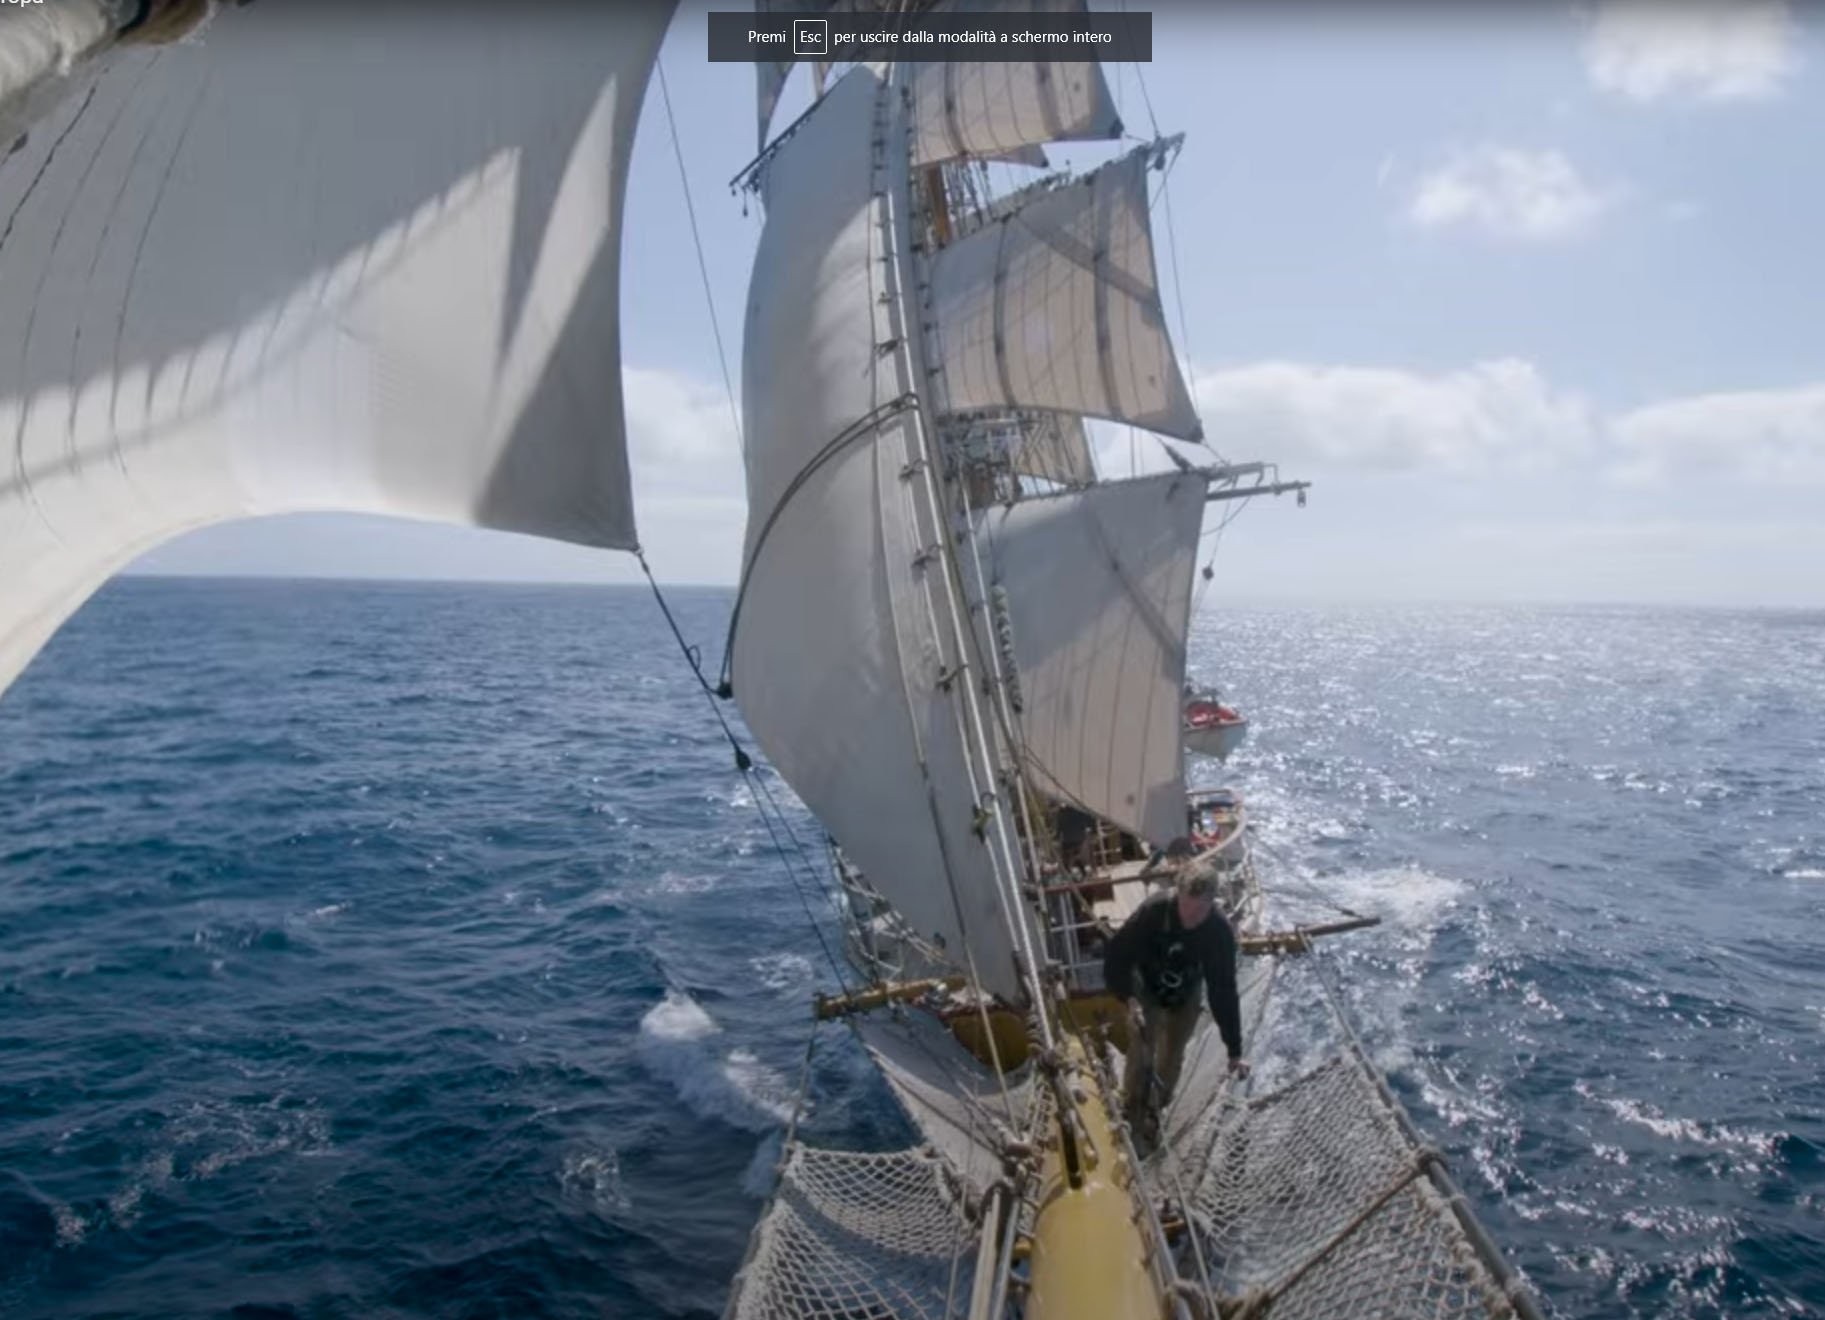
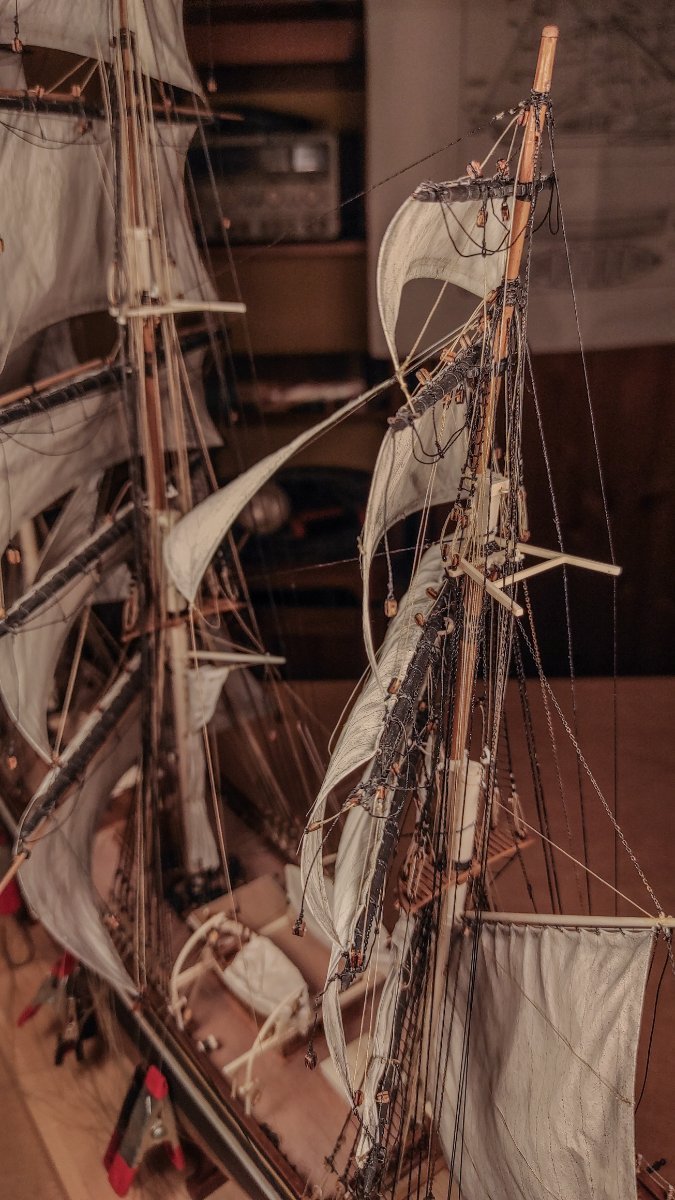
Thank you, that is good advice, I’ll try it out for sure! No apologies needed, Kirill! It is quite the opposite! Thank you for bringing this point to my attention. I'm still in doubt about what to do... And I'll be glad to read about this topic from others. I'm still not sure about my explanation, and I see many examples on real ship where it seems that you are right. Here is an example from Bark Europa: At 14:19 or at 14:59 she seems to be setted as you suggested, but looking at the flag on the main mast, she seems to be at “C” configuration, with the wind ahead. Here is another video: And at 7:17 it seems to be as I depicted them. But at 34:24, with almost no wind, the tack is clearly being used… I have also made a quick test on my model. The tack for the fore course is on the cathead, but it is really far ahead! It seems weird to me… I’m I missing something? This is the result of a firs quick test: I really need some help to be sure to make the right choice! If anyone knows the answer, please let me know!

- 397 replies
-
- 2
-
-
- cutty sark
- revell
- (and 2 more)
-
Bruma reacted to a post in a topic:
Cutty Sark by Bruma - Revell - 1:96 - PLASTIC
-
Bruma reacted to a post in a topic:
Cutty Sark by Bruma - Revell - 1:96 - PLASTIC
-
Bruma reacted to a post in a topic:
USS Kearsarge by gak1965 - BlueJacket Shipcrafters - 1:96
-
Bruma reacted to a post in a topic:
Cutty Sark by Bruma - Revell - 1:96 - PLASTIC
-
Bruma reacted to a post in a topic:
Cutty Sark by Bruma - Revell - 1:96 - PLASTIC
-
Bruma reacted to a post in a topic:
Cutty Sark by Bruma - Revell - 1:96 - PLASTIC
-
Bruma reacted to a post in a topic:
Cutty Sark by Bruma - Revell - 1:96 - PLASTIC
-
Bruma reacted to a post in a topic:
Cutty Sark by Bruma - Revell - 1:96 - PLASTIC
-
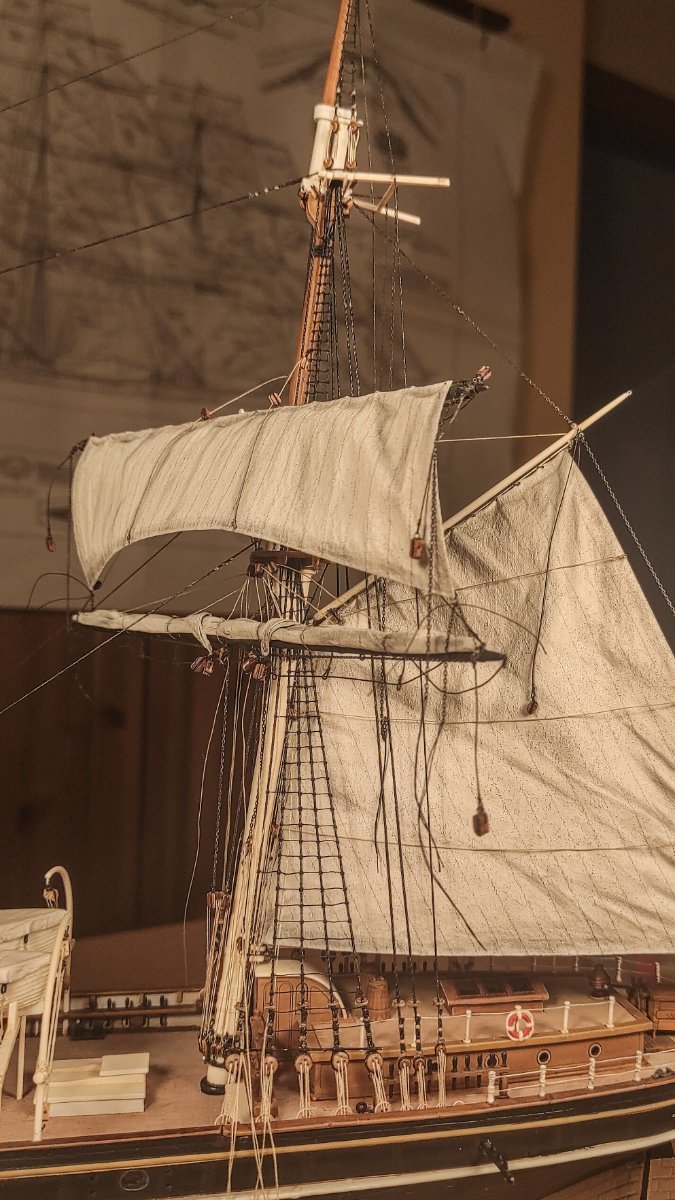
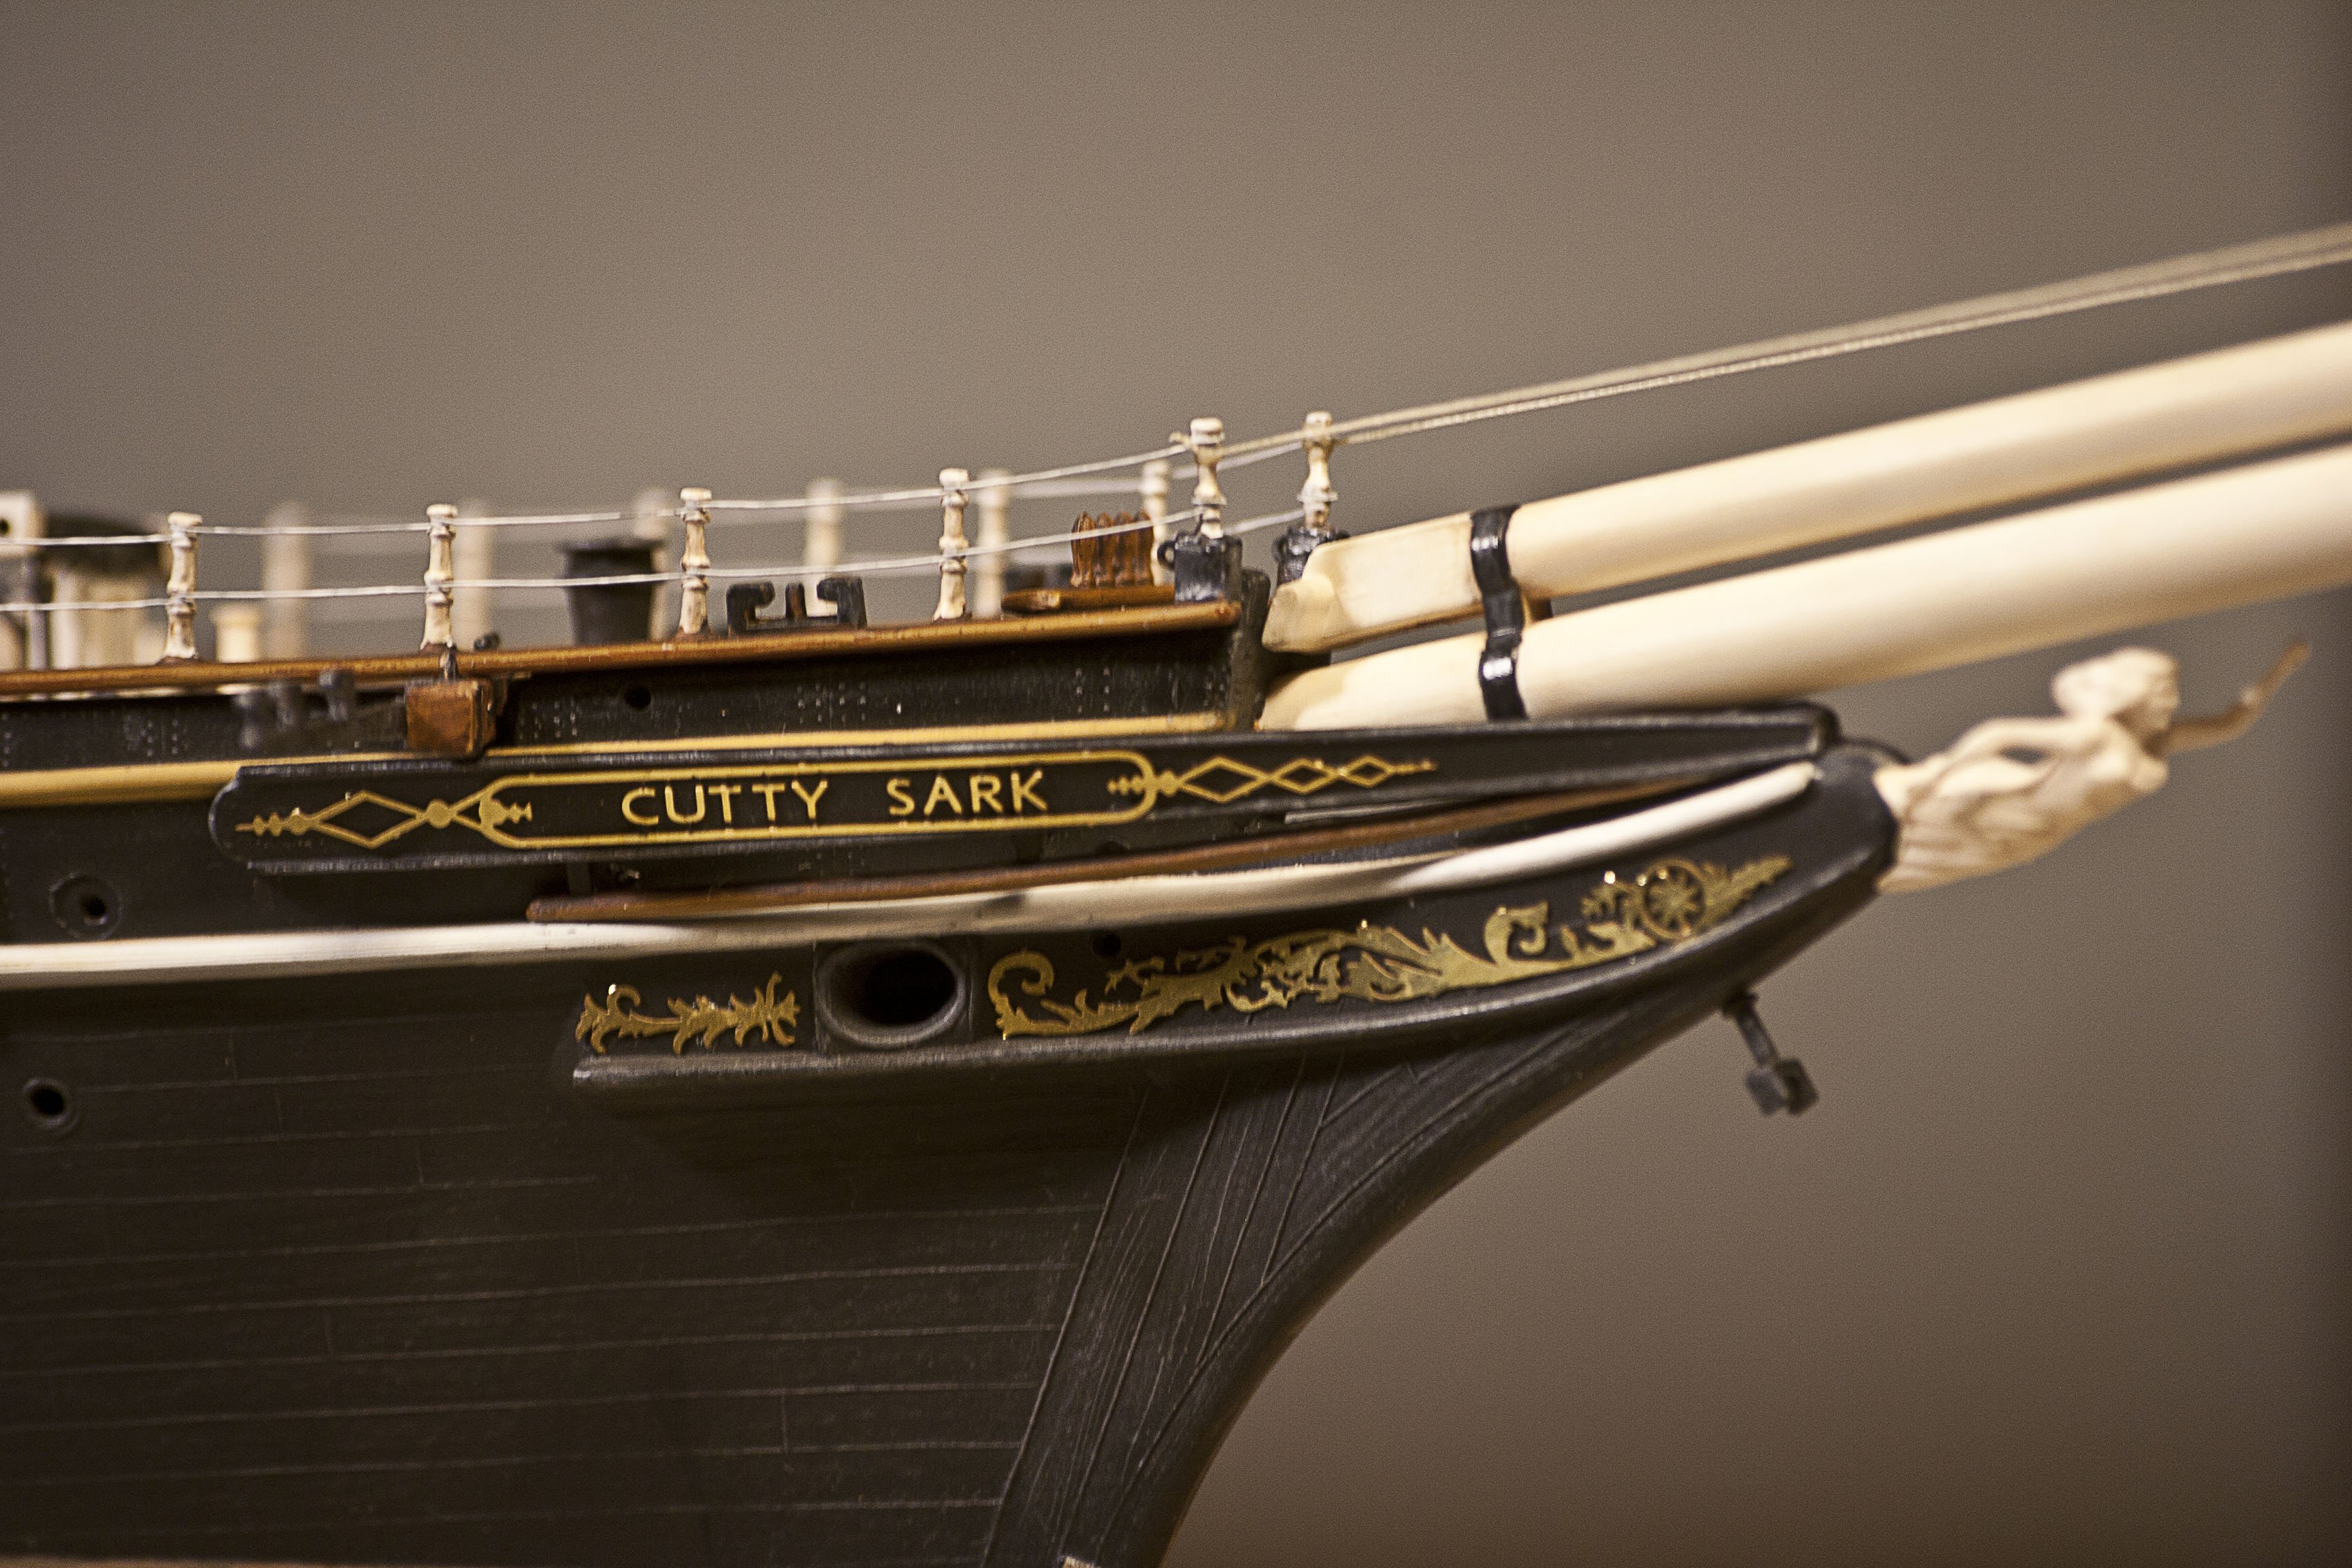
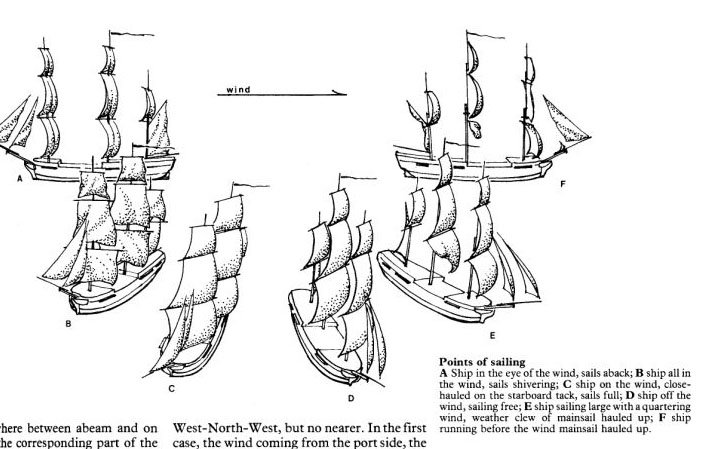
Hello everyone! First, sorry for not answering your post for so long, and thank you everyone for the comments and likes. I really appreciate all of them. I’m really happy you find it useful! Thank you! I have been away because I’m again in love with a side project related to steam locomotives…. This time, I tried to make my 3d printed locomotive move! Here is the result: Still a lot to do, but promising I guess! It is at 1:87 scale. But now, let’s get back to the Cutty Sark. I will post updates in the next few days, I need some free time to take some decent pictures. Meanwhile, I would like to address Kirill’s question about the courses. First, thank you, Kirill for pointing it out. I really appreciate this kind of constructive criticism; it makes me think and raises questions, which is part of the never-ending learning process. I have had the same doubt. In order to better understand my point of view, let my use this picture from “Seamanship in the age of sails”: To me, if you are sailing from F to D, the courses need to be set as I depicted them. The wind is still pushing “from behind”. As soon as you move to position C, you have a wind component “pushing against you”, and you must use the tacks to catch the wind (together with braced yardharms). Since with my Cutty Sark I’m trying to represent the point of sail indicated with the letter “D”, I think I get it right, but I would be glad to read opinions from others, more experienced, sails masters. The good news is that, if needed, I can remedy and shape the course with the tack tightened. I just want to be 100% sure about what to do! Thank you all!
- 397 replies
-
- 2
-
-
- cutty sark
- revell
- (and 2 more)
-
Thank you Vladimir!
-
Bruma reacted to a post in a topic:
Cutty Sark by Bruma - Revell - 1:96 - PLASTIC
-
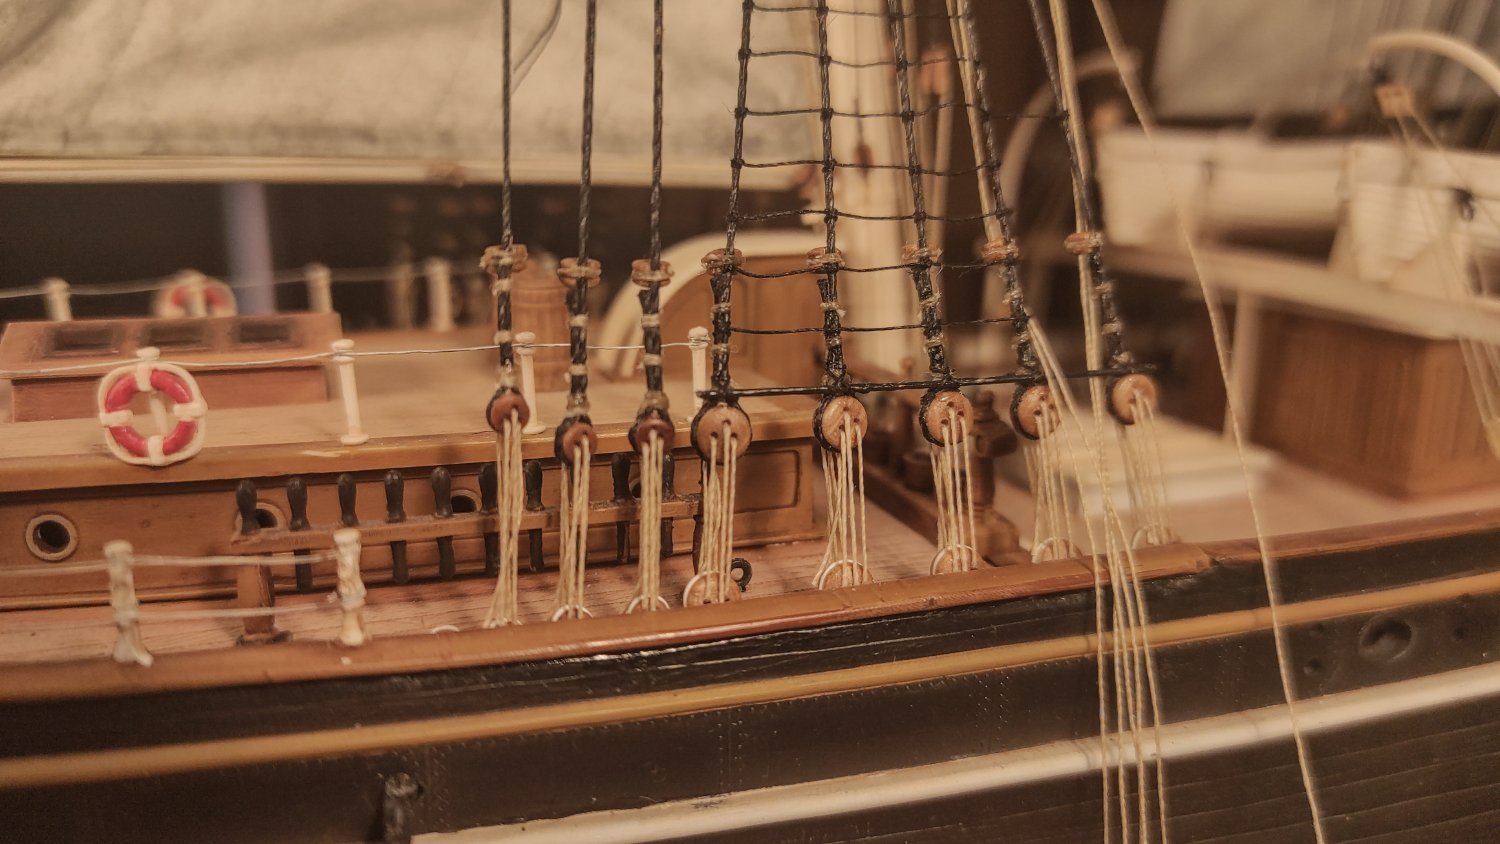
Thank you all for your comments and likes! I really appreciate all of them. And please, if you see something wrong, strange or missing, do not hesitate to point it out! Thank you, John, for helping me again, just to be clear: do you mean the pin on the main rail, port and starboard, or the fife rail at the mast foot? I'm tempted for the first answer, but the fife rail seems better for avoiding interference on the walkways... Thank you again!
- 397 replies
-
- 2
-
-
- cutty sark
- revell
- (and 2 more)
-
George, I have somehow missed the finish of your wonderful model. Congratulations on this great achievement! She is really a beauty! How do you feel now after working for so long on her? I've been working on my cutty sark for so many years that she is now part of my weekly routine...
-
Dear Johann, I've been following this masterpiece in religious silence for a long time, but now, for what is worth from a novice like me, I feel the need to compliments with you on this marvelous work of art. It's really a joy to watch and a great inspiration. Thank you for sharing your journey with us.
-
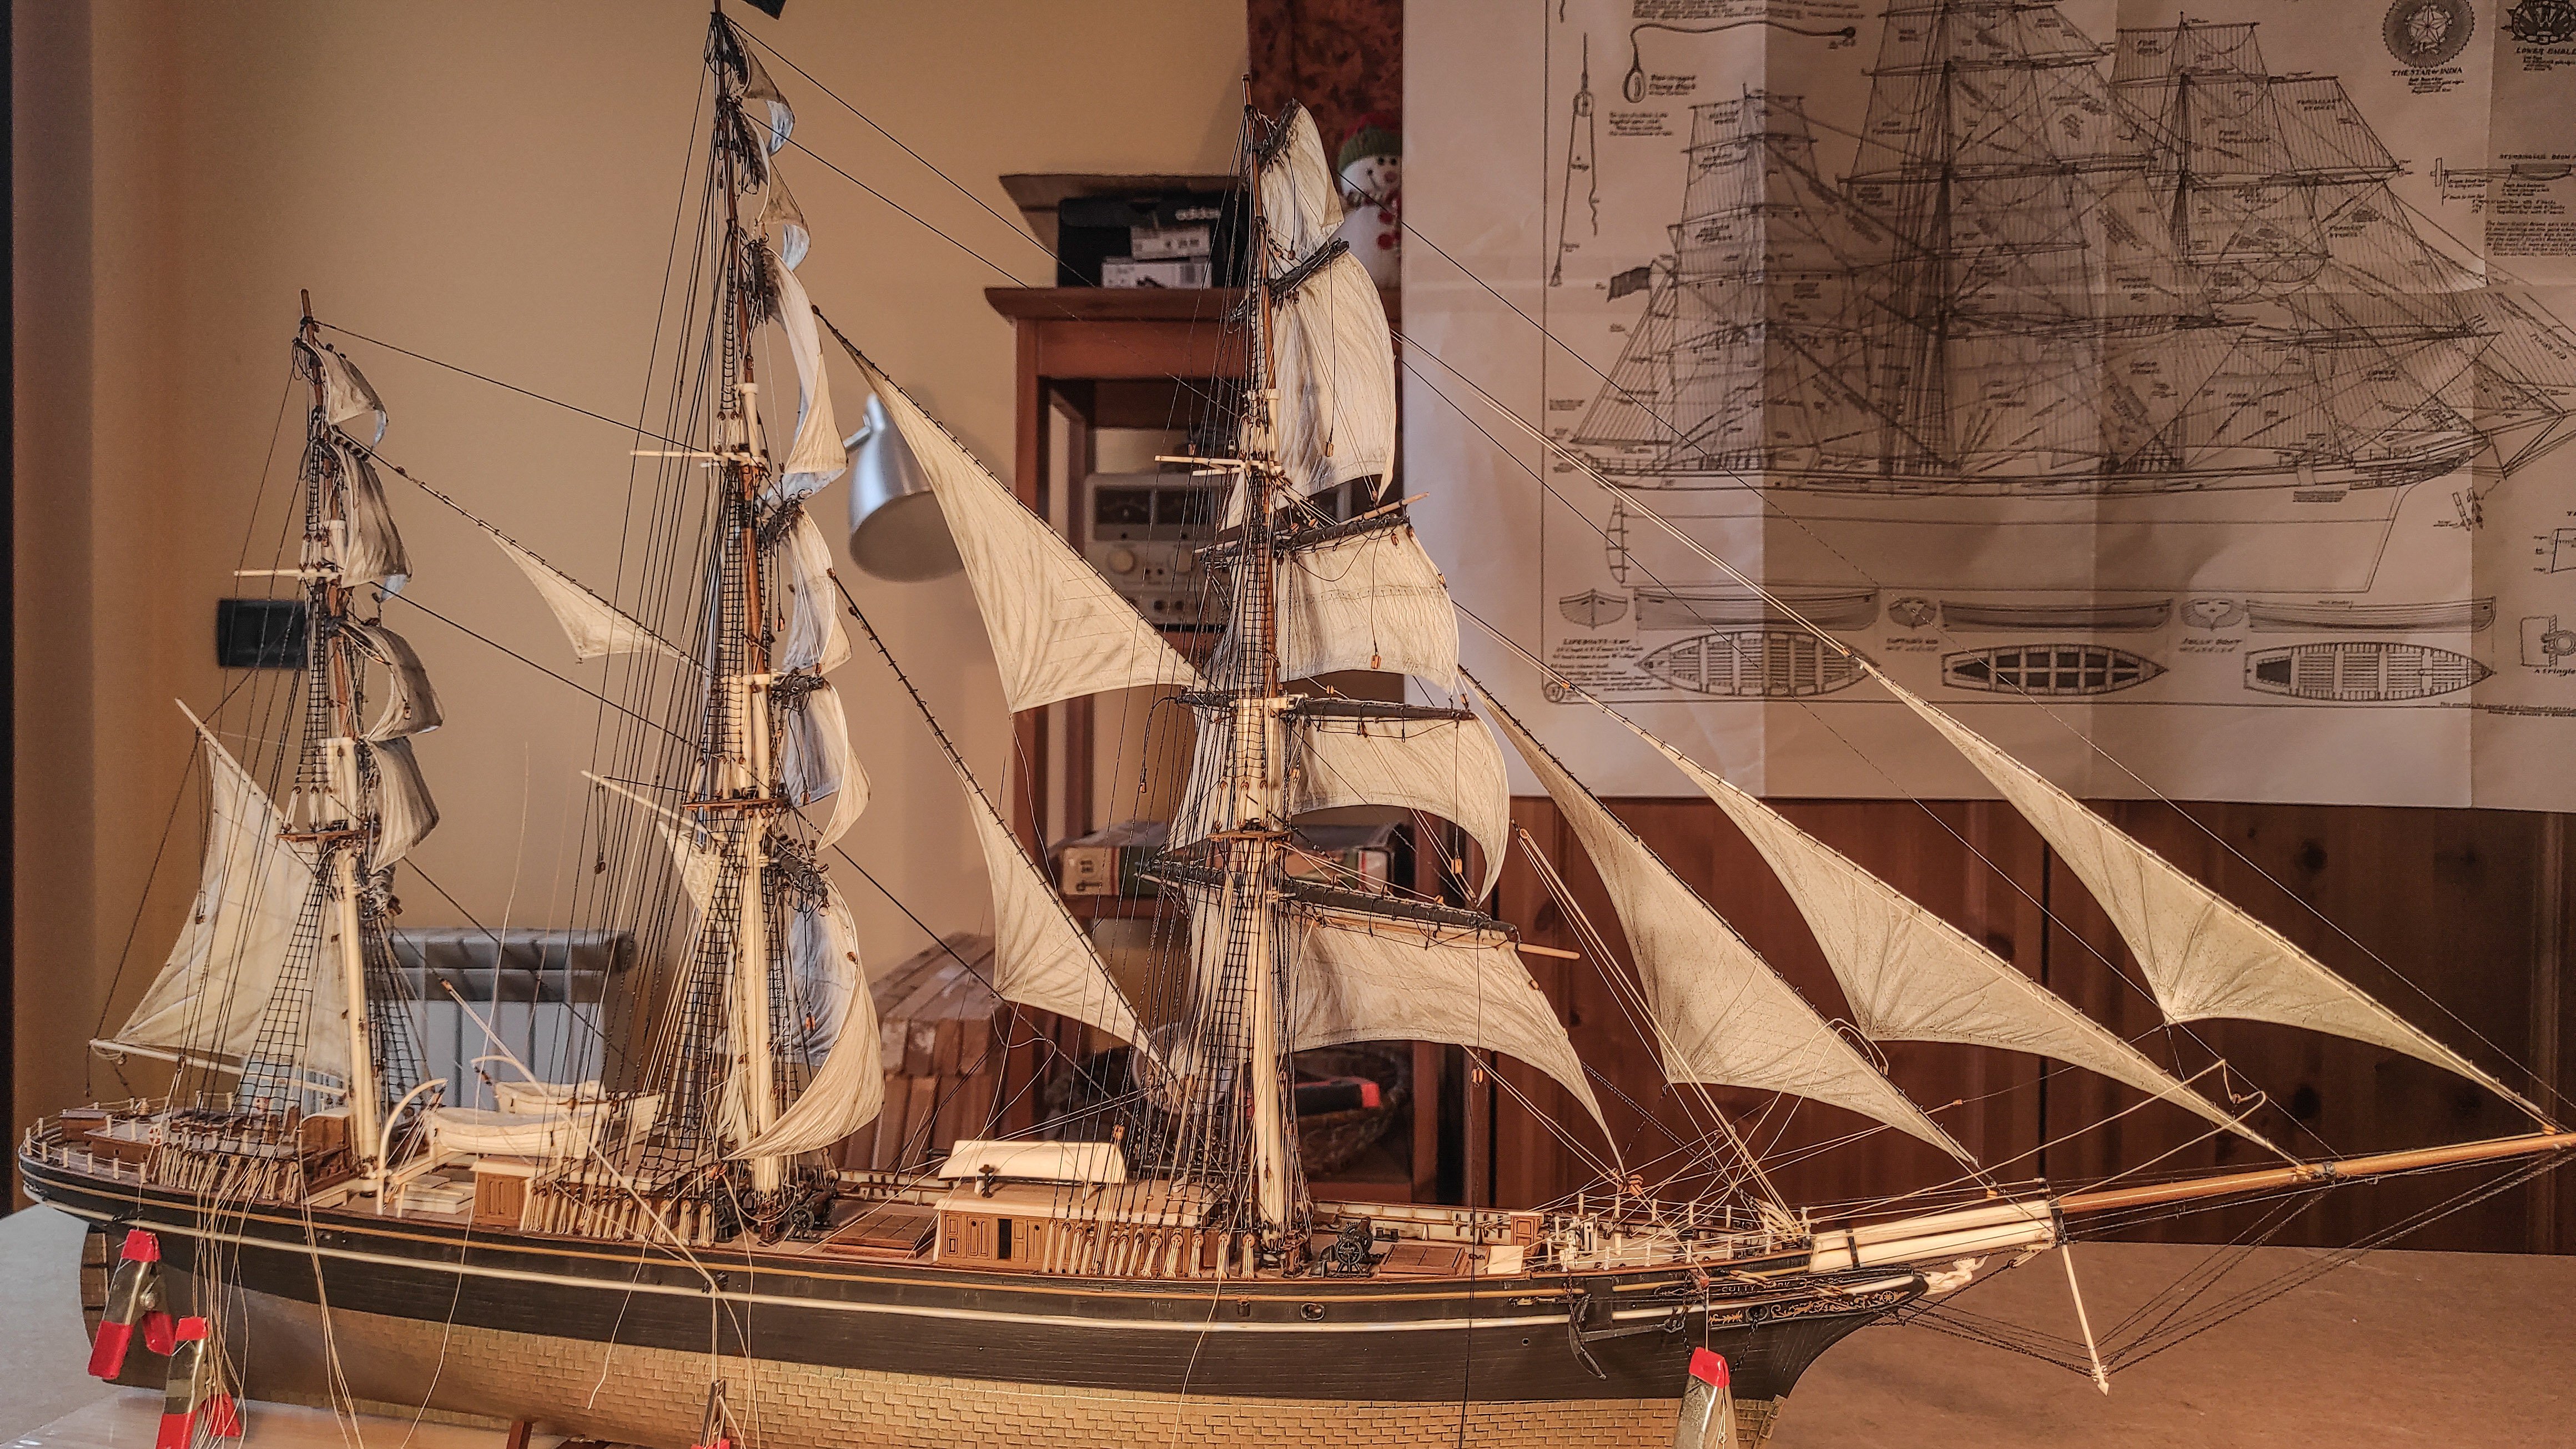
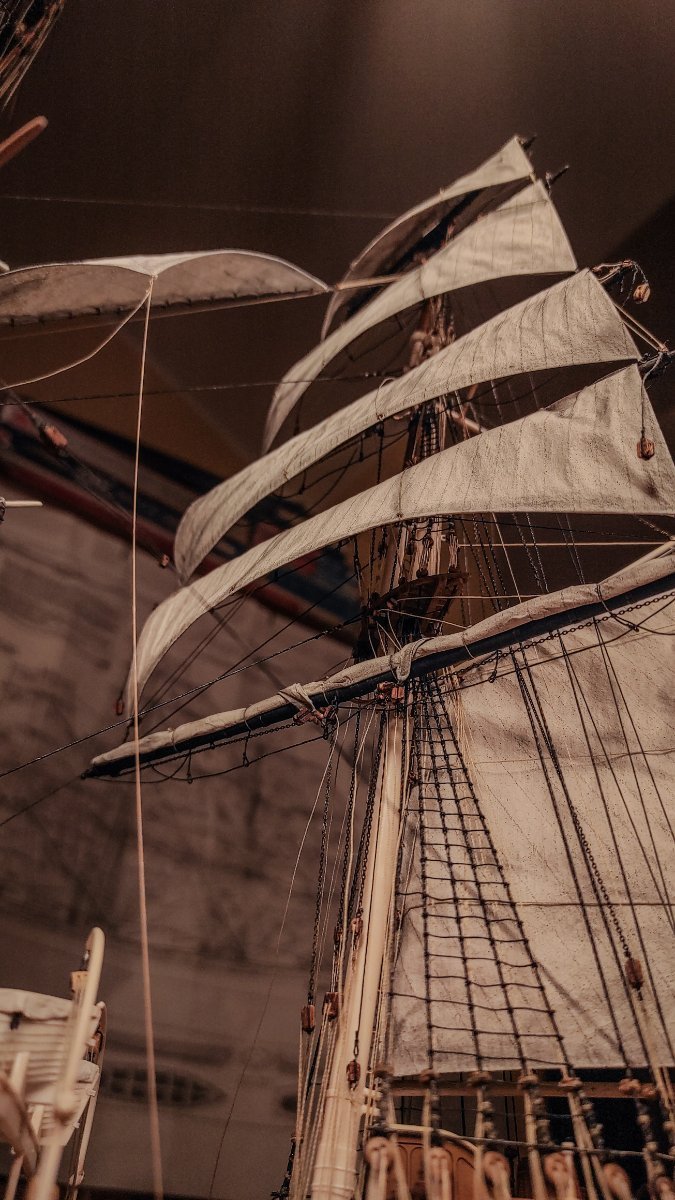
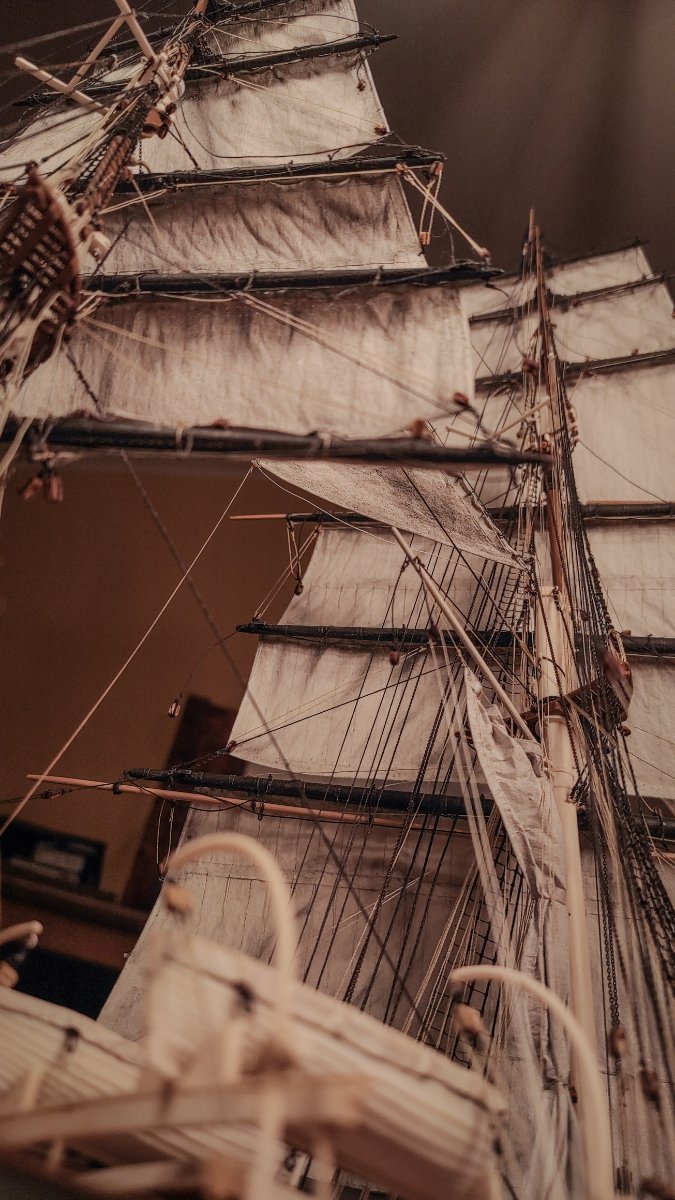
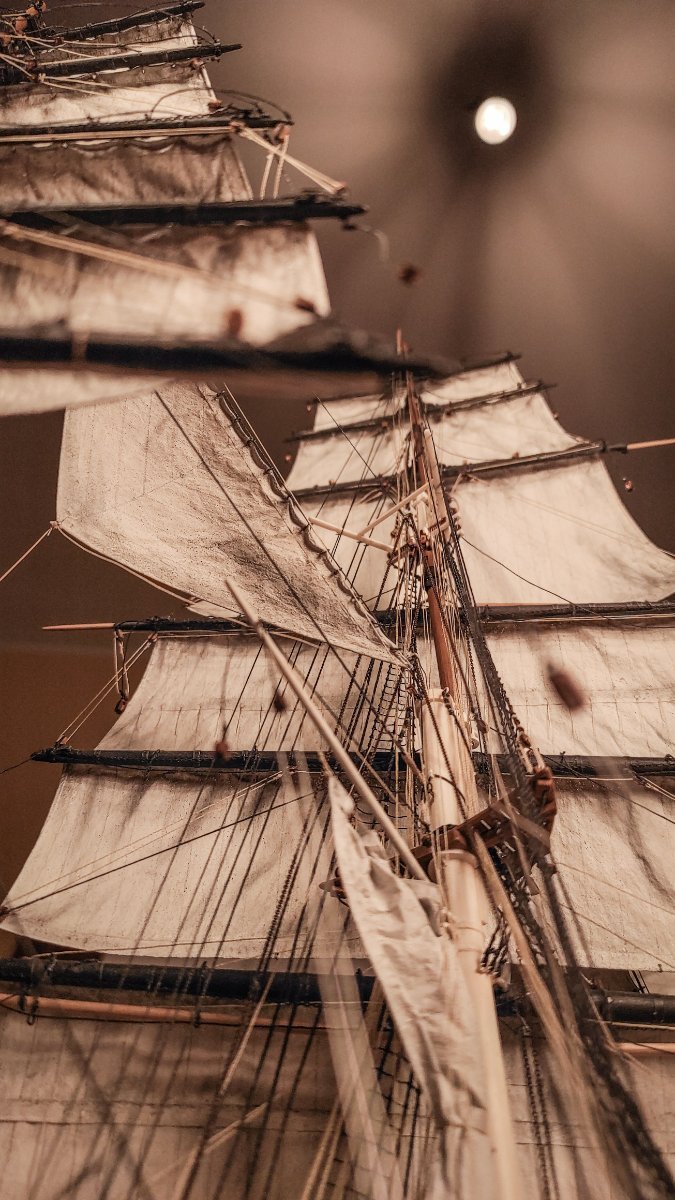
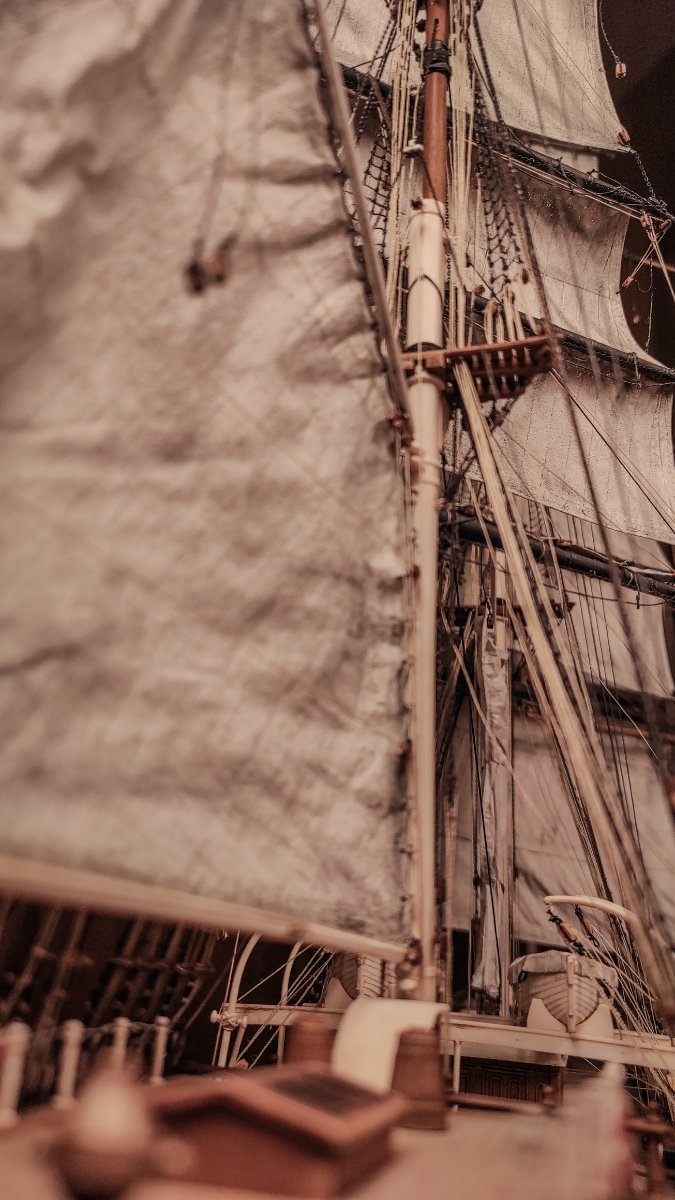
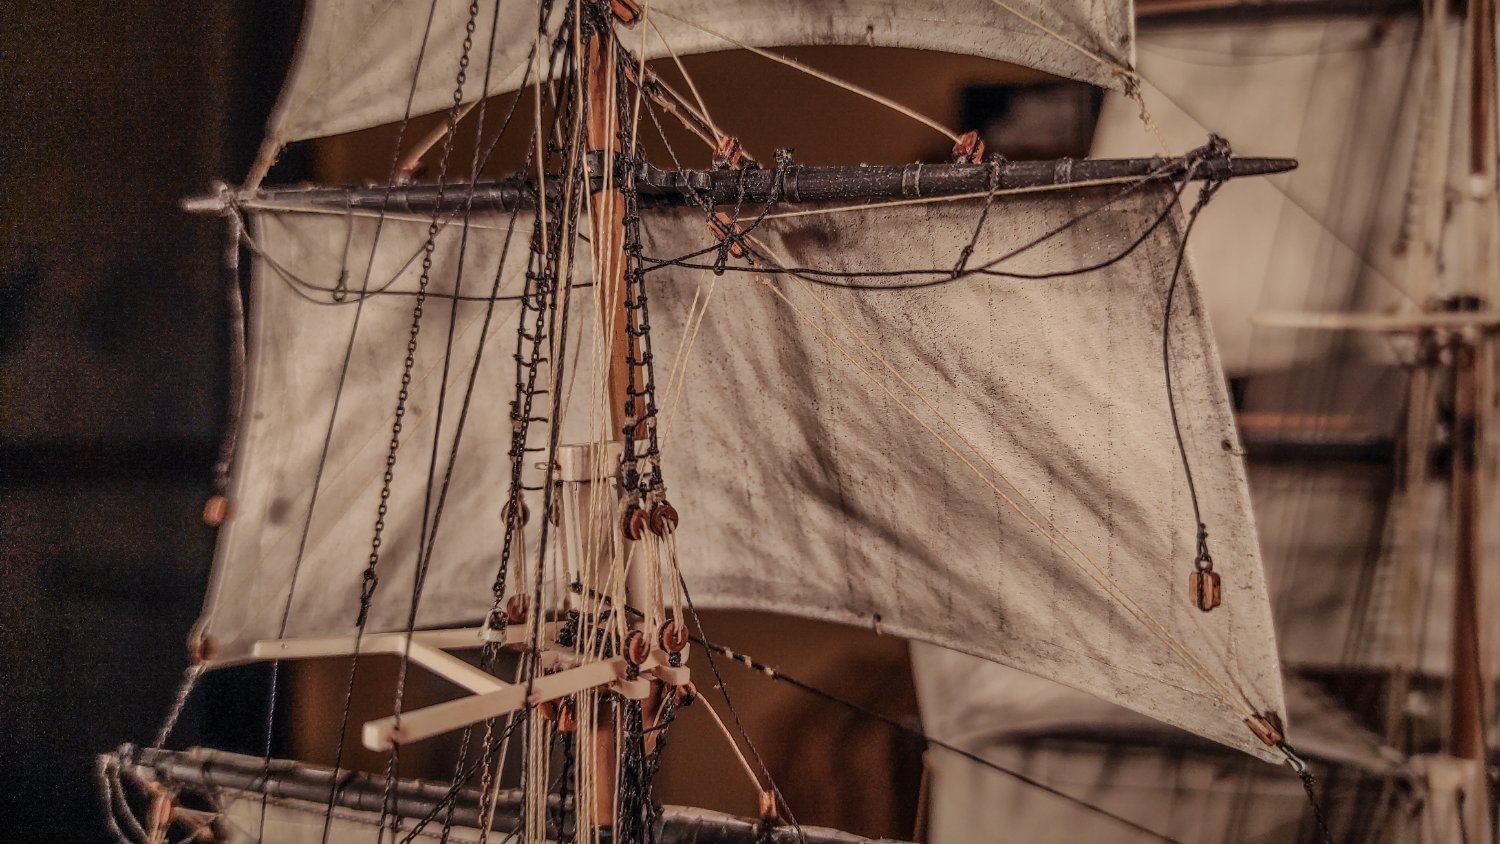
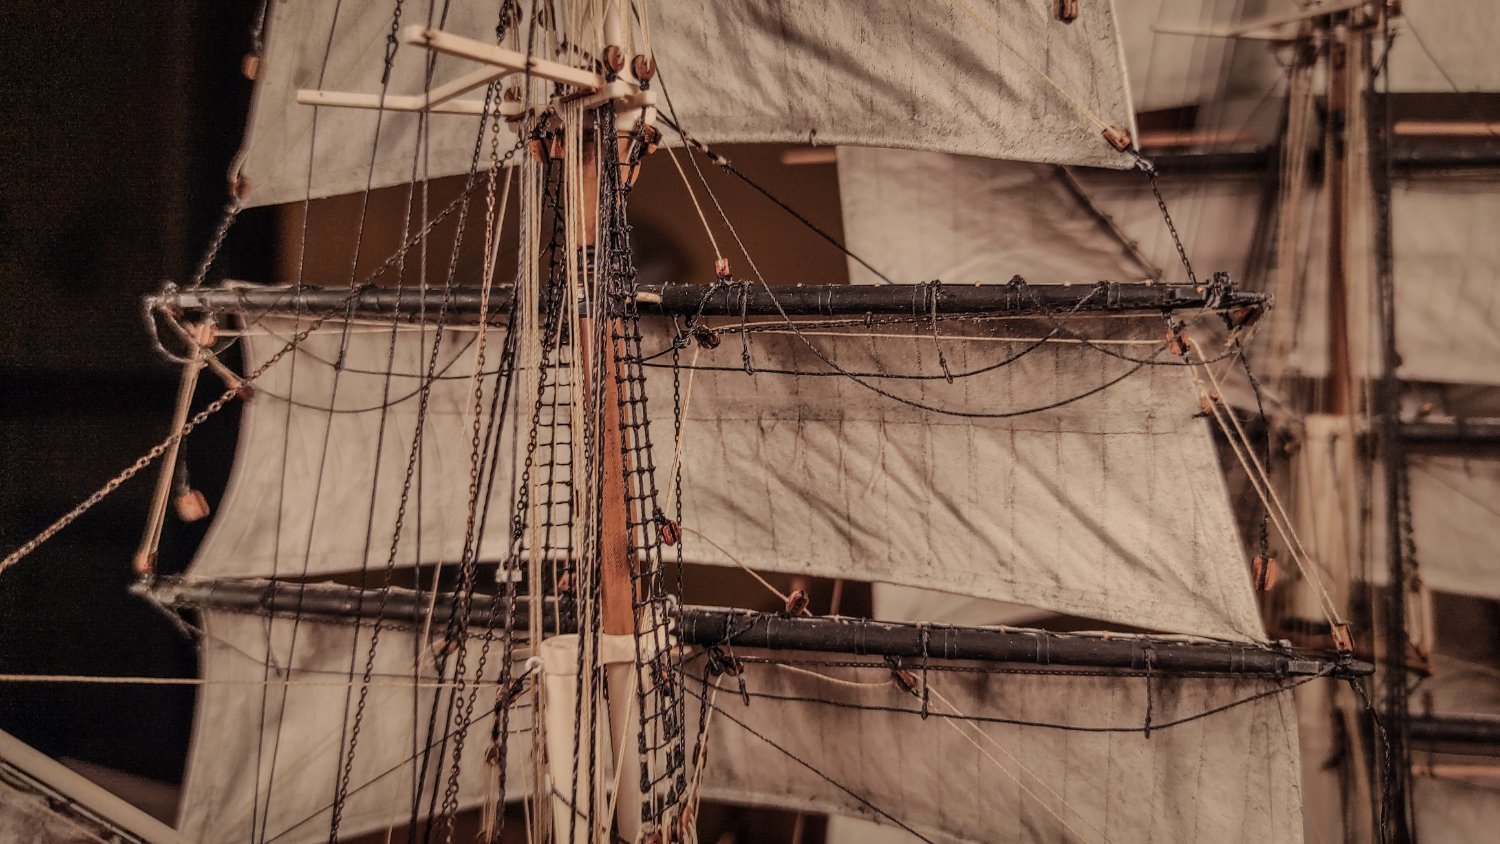
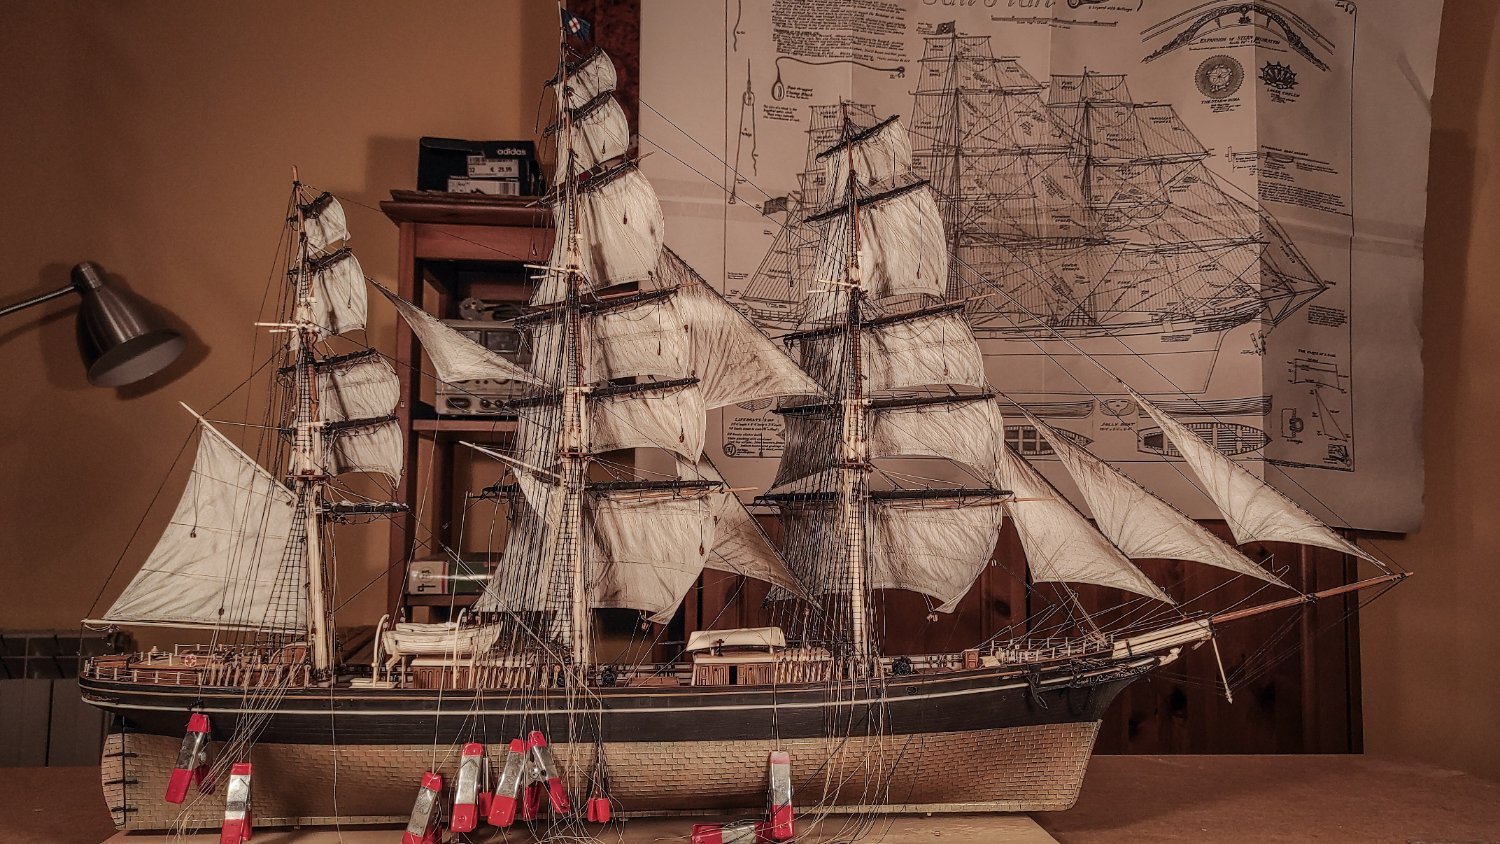
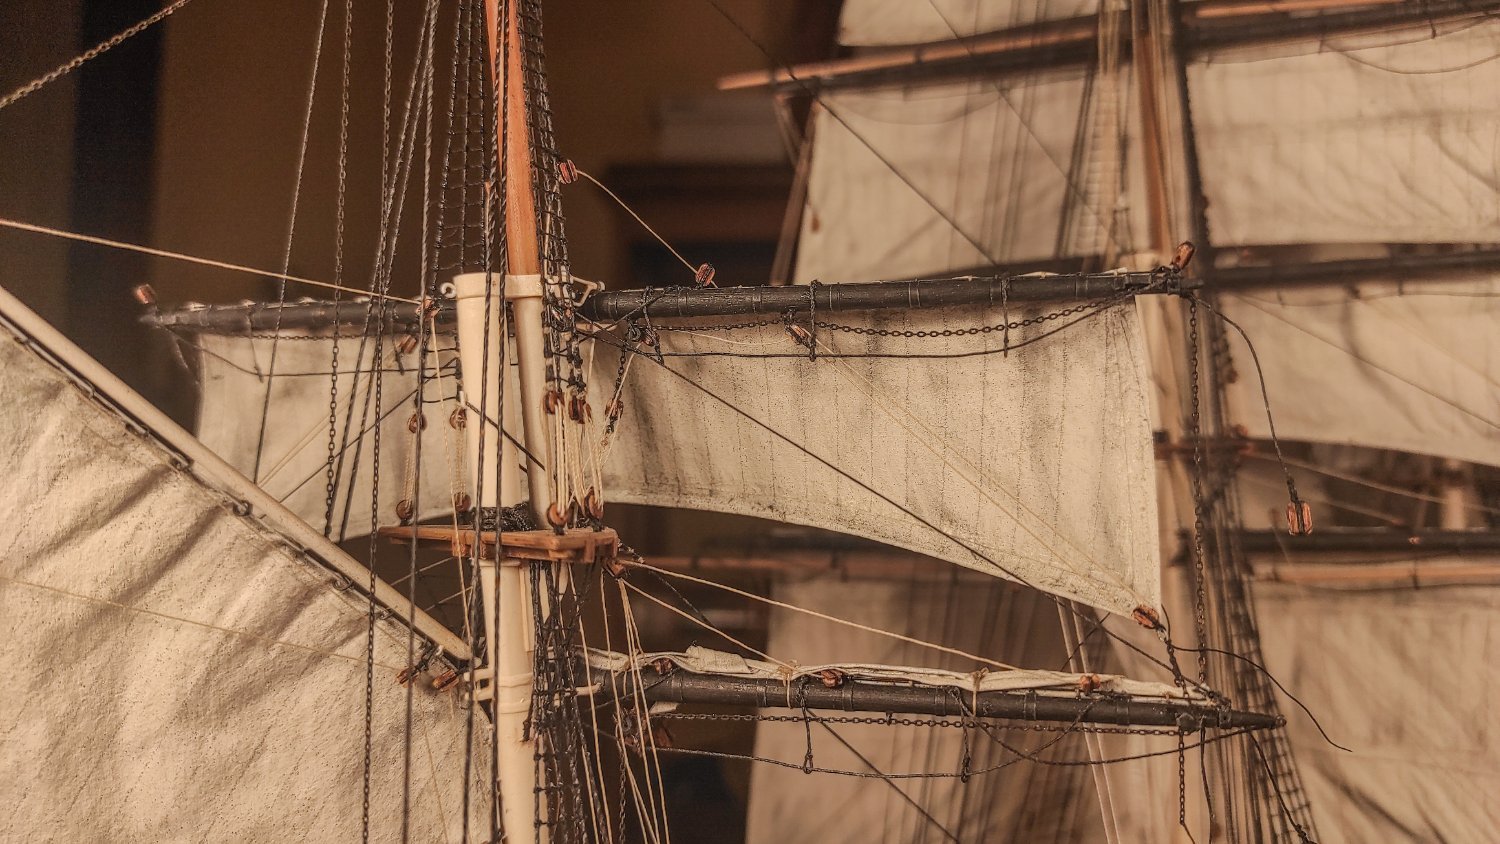
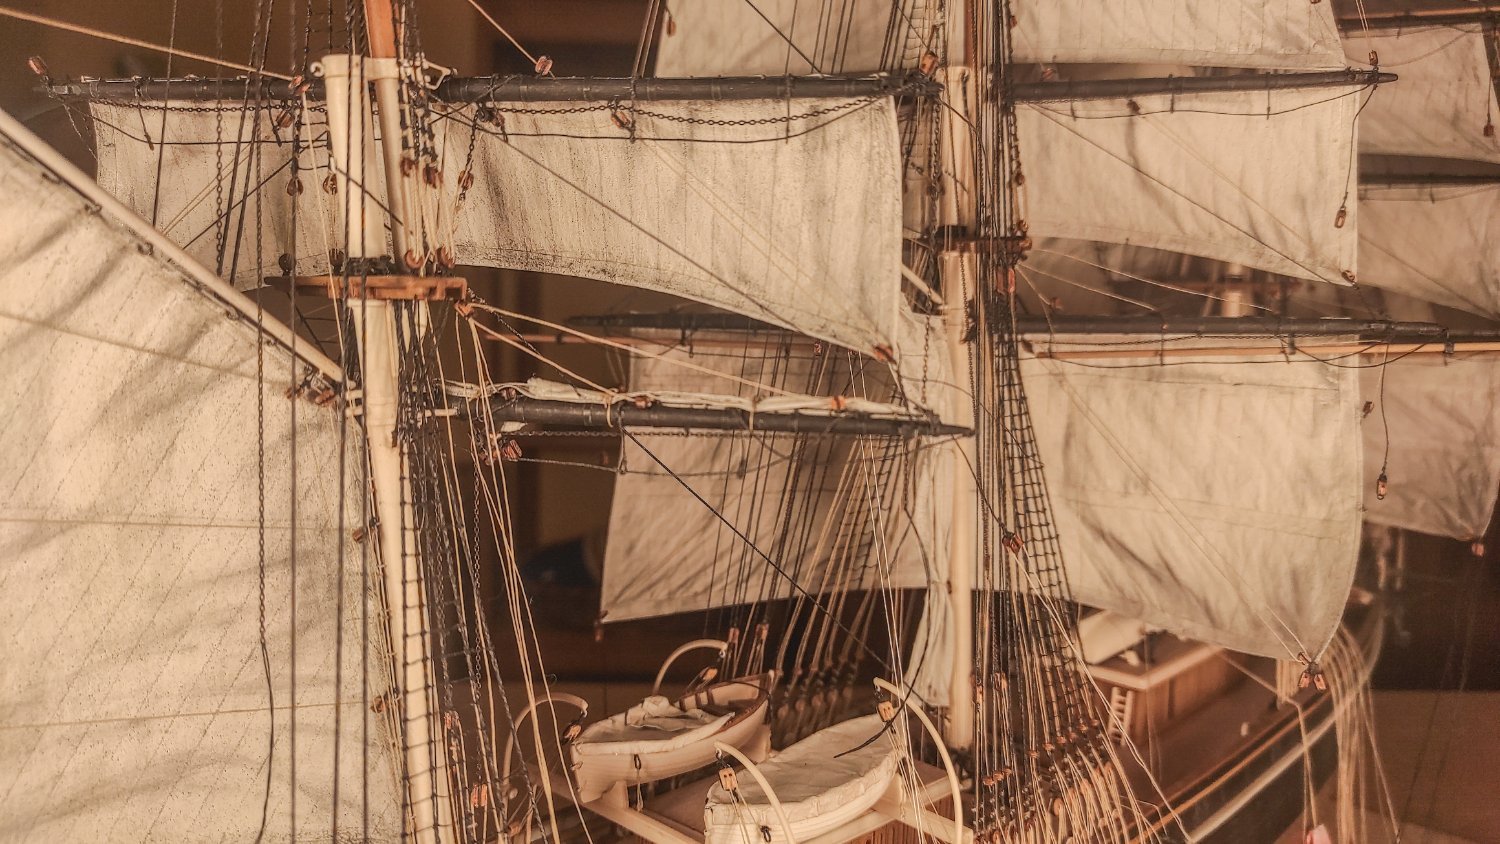
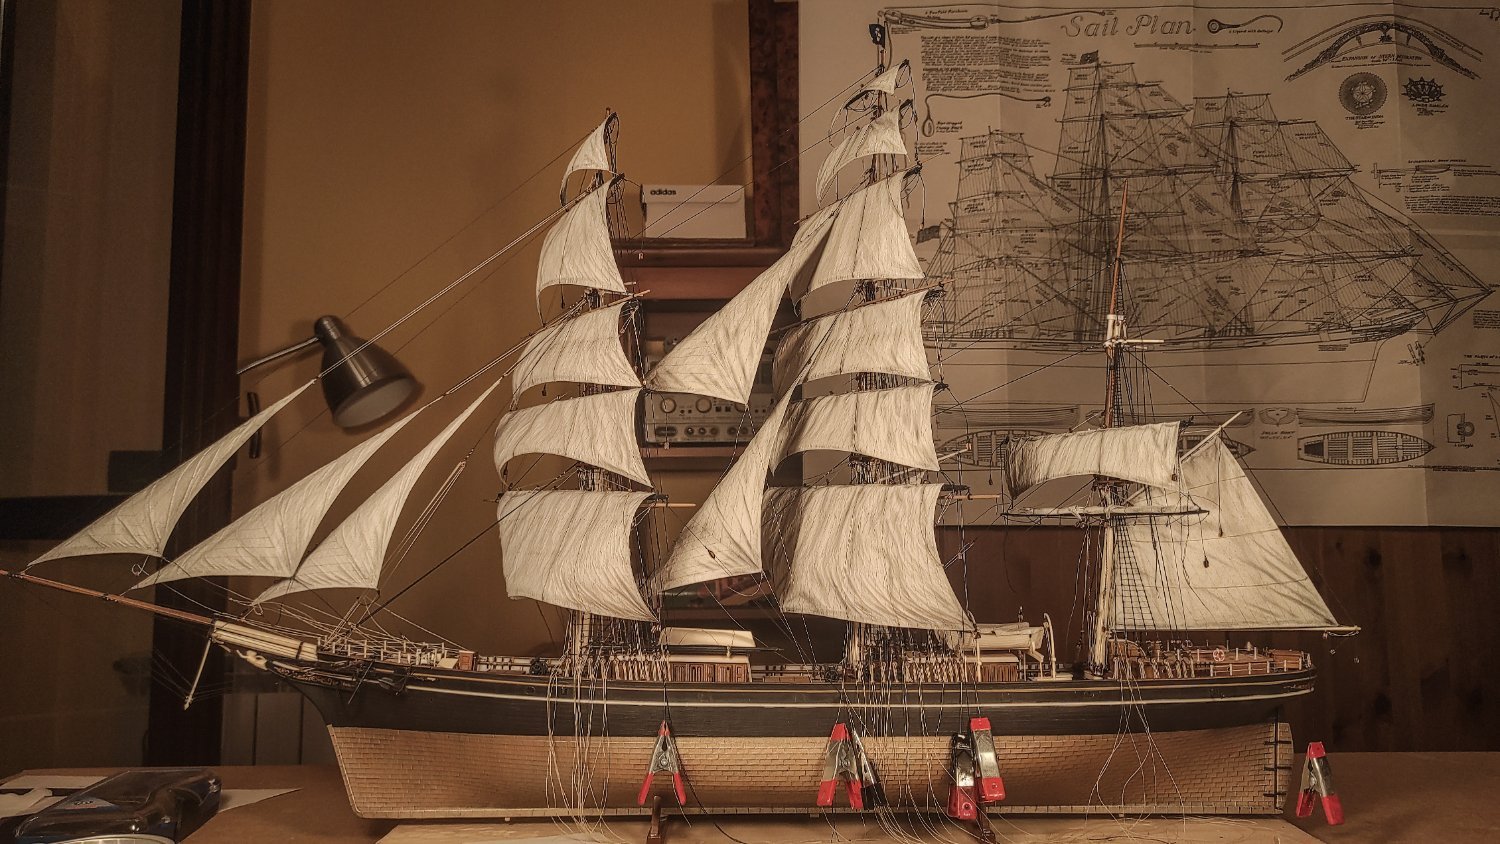
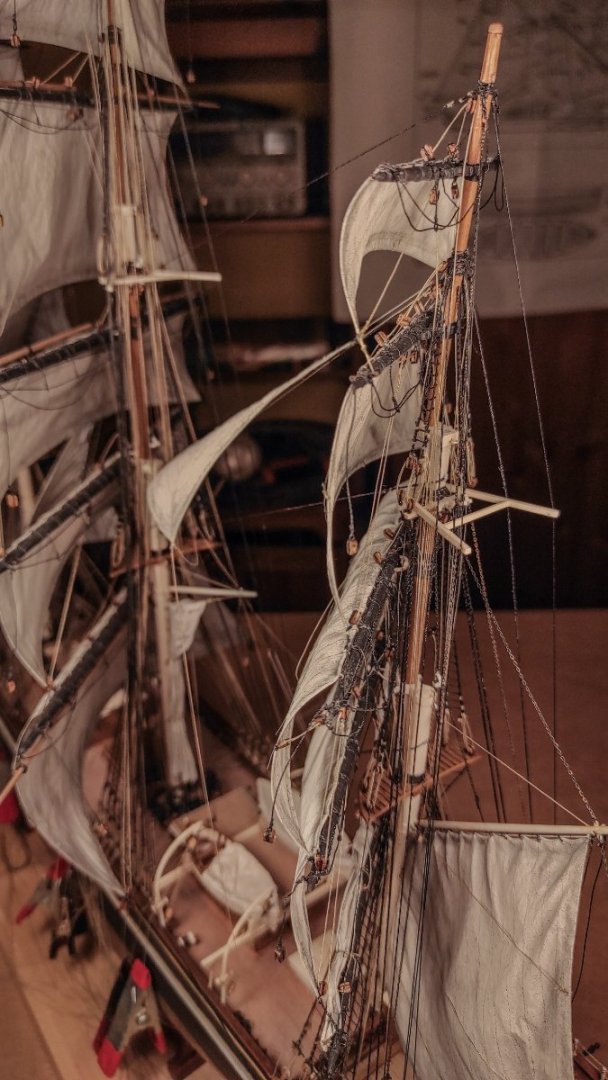
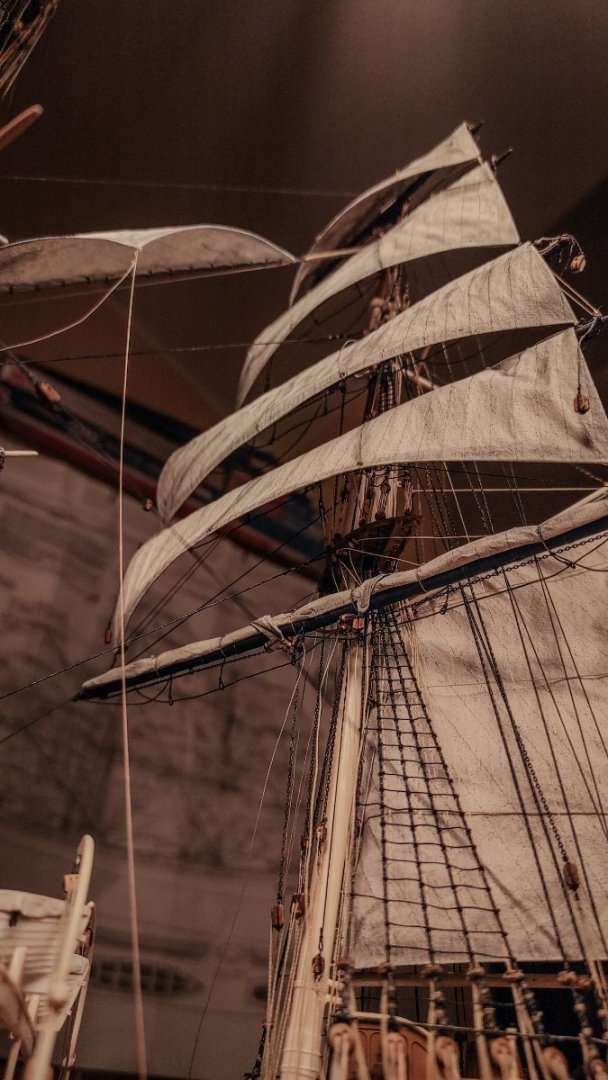
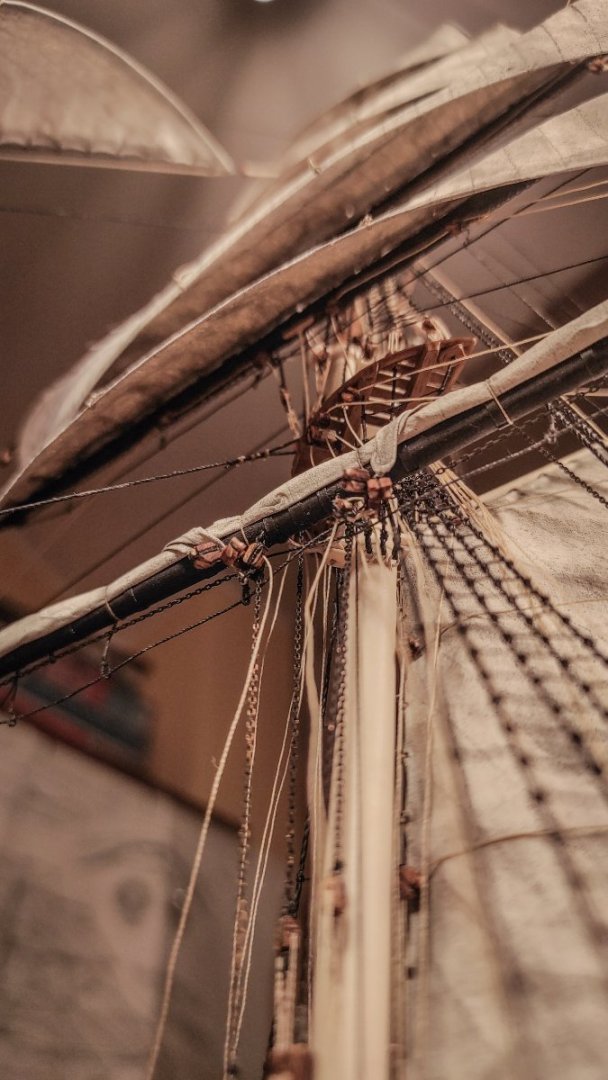
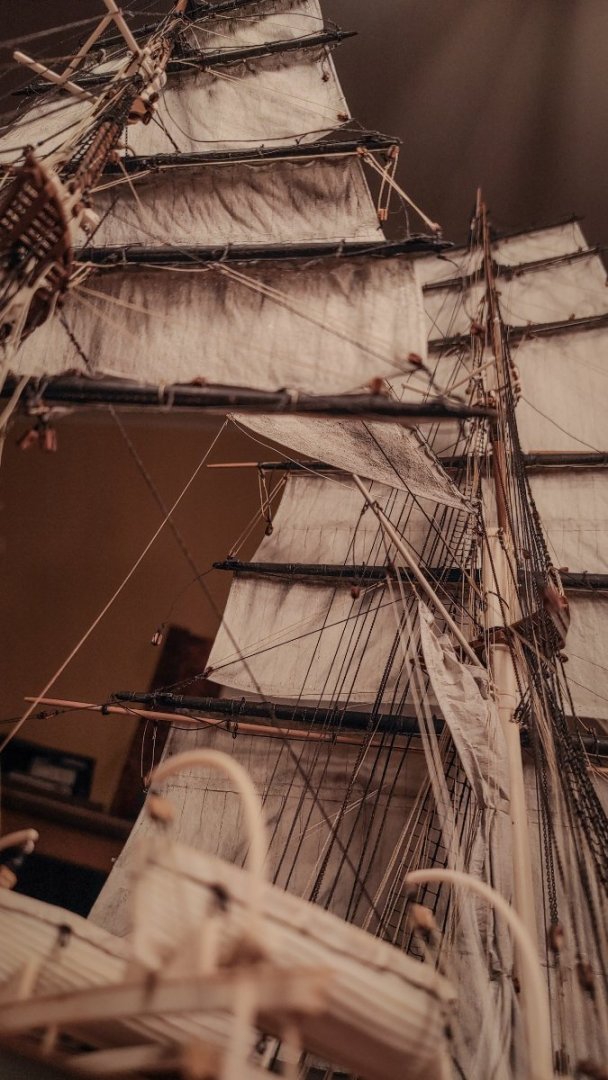
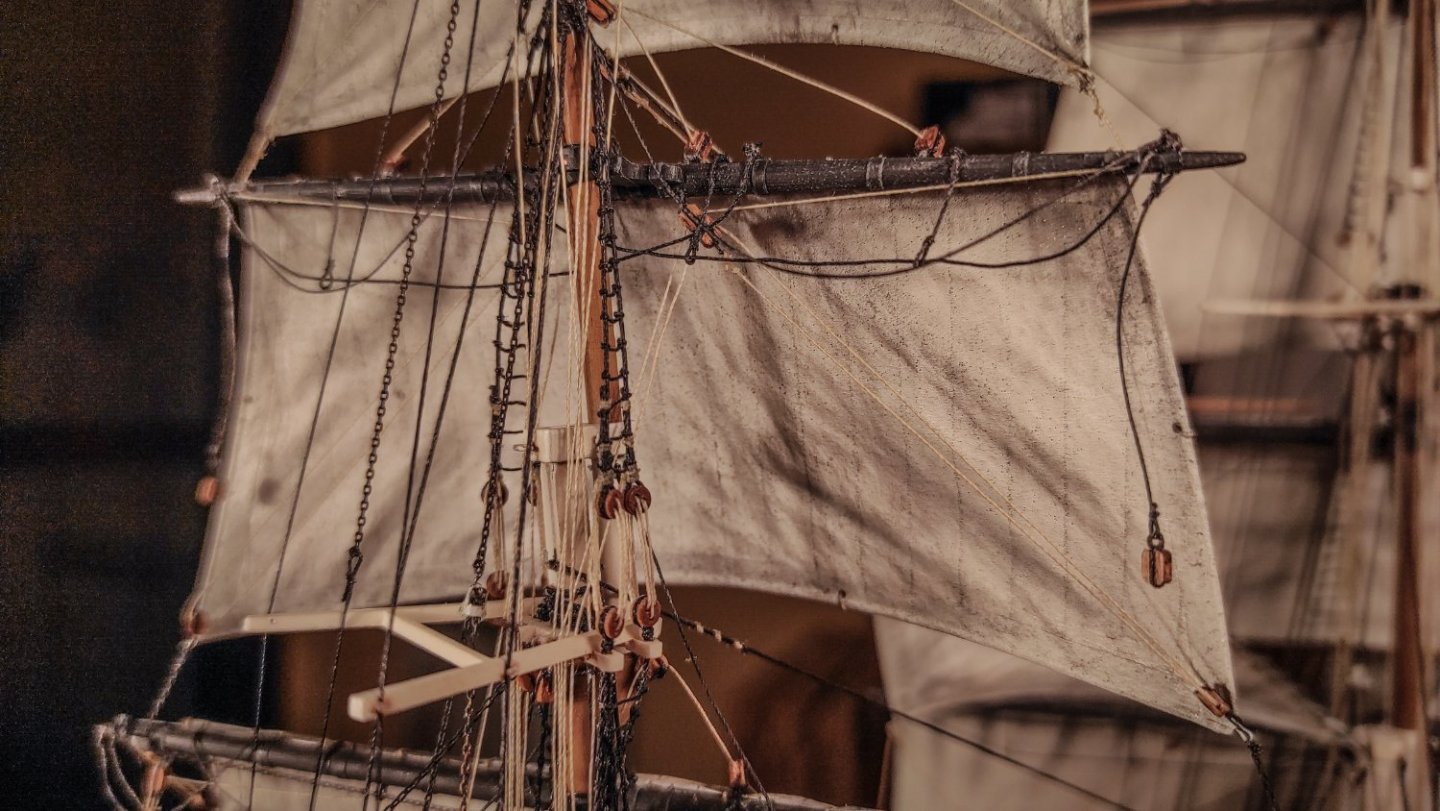
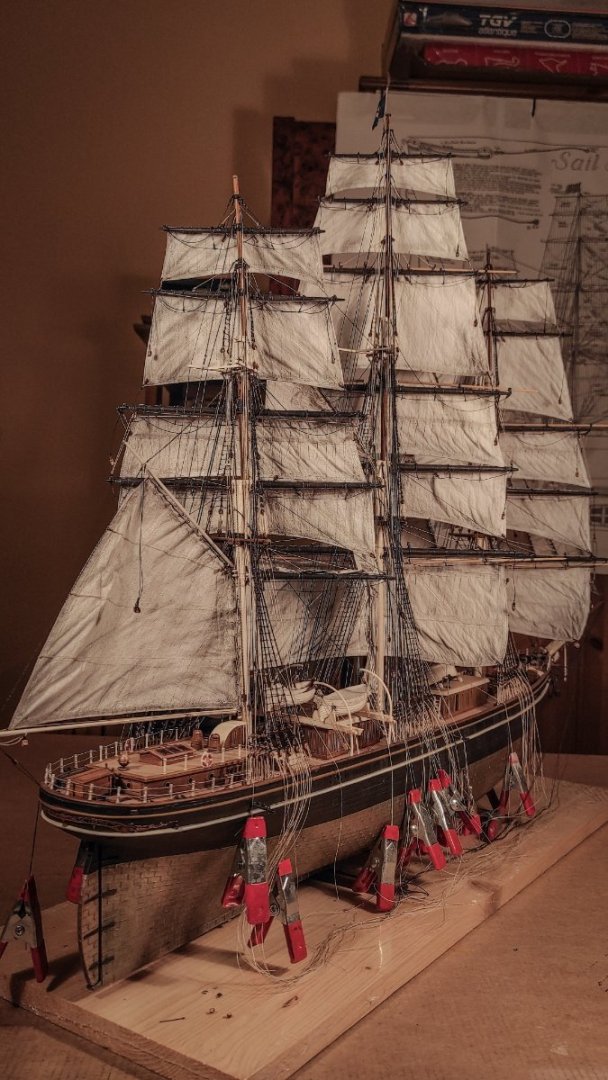
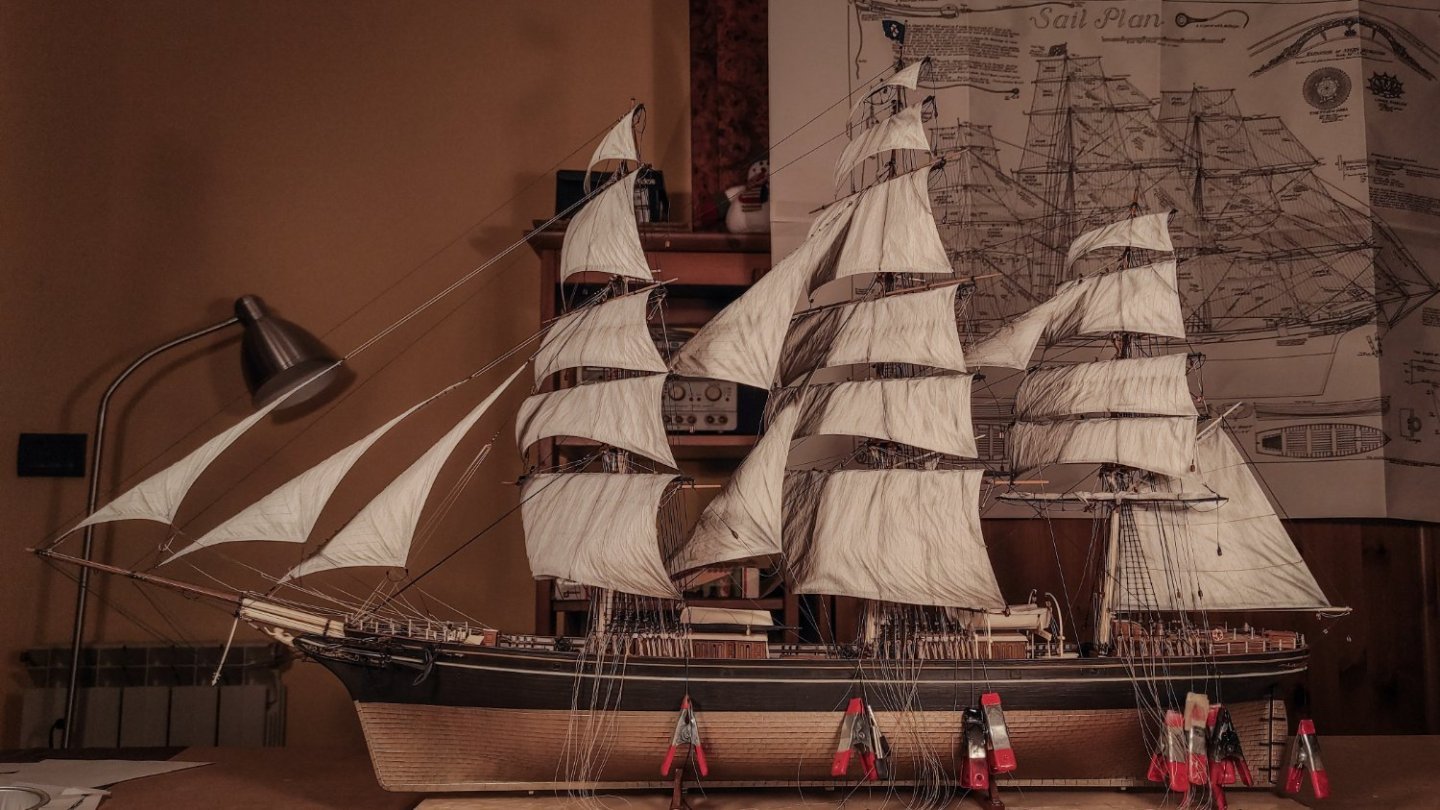
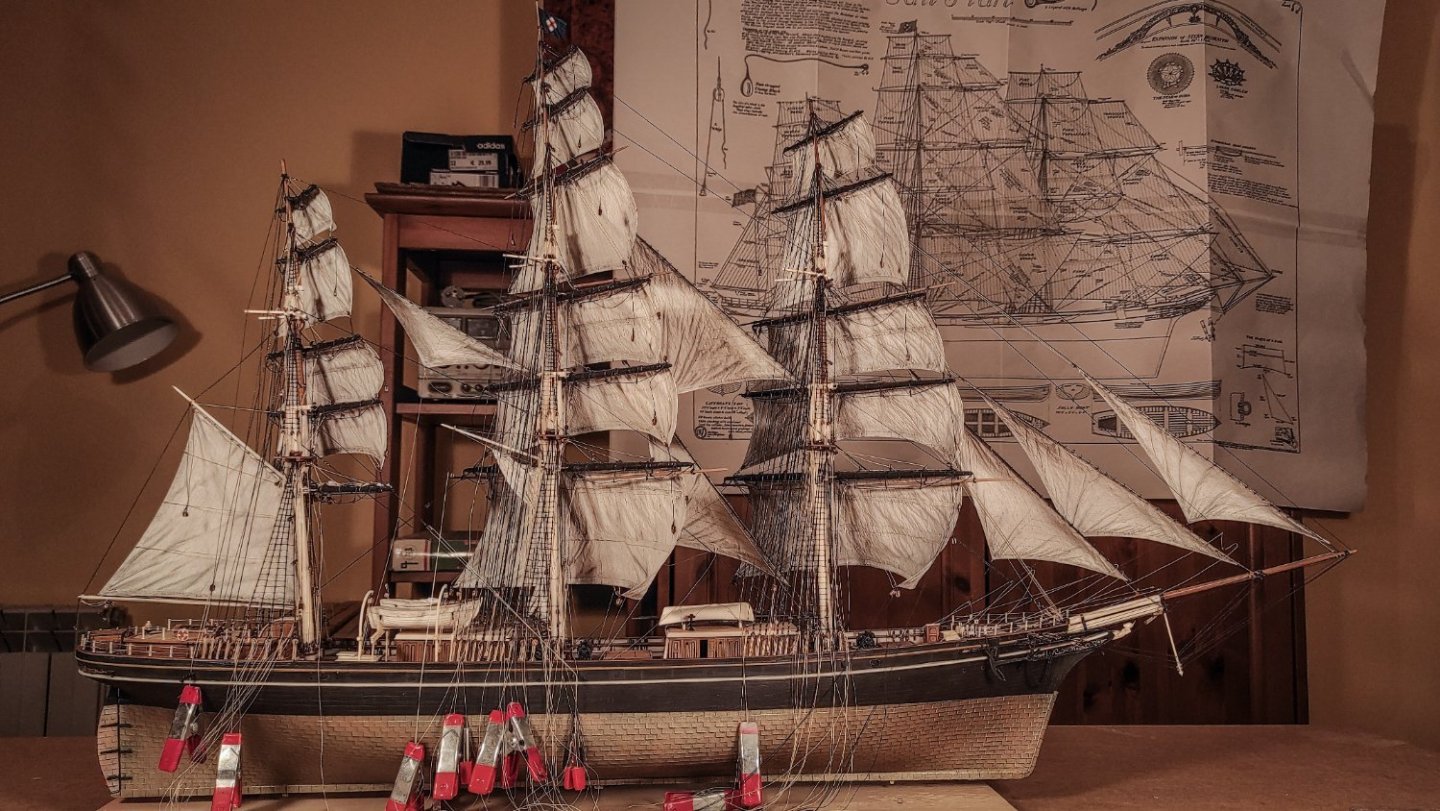
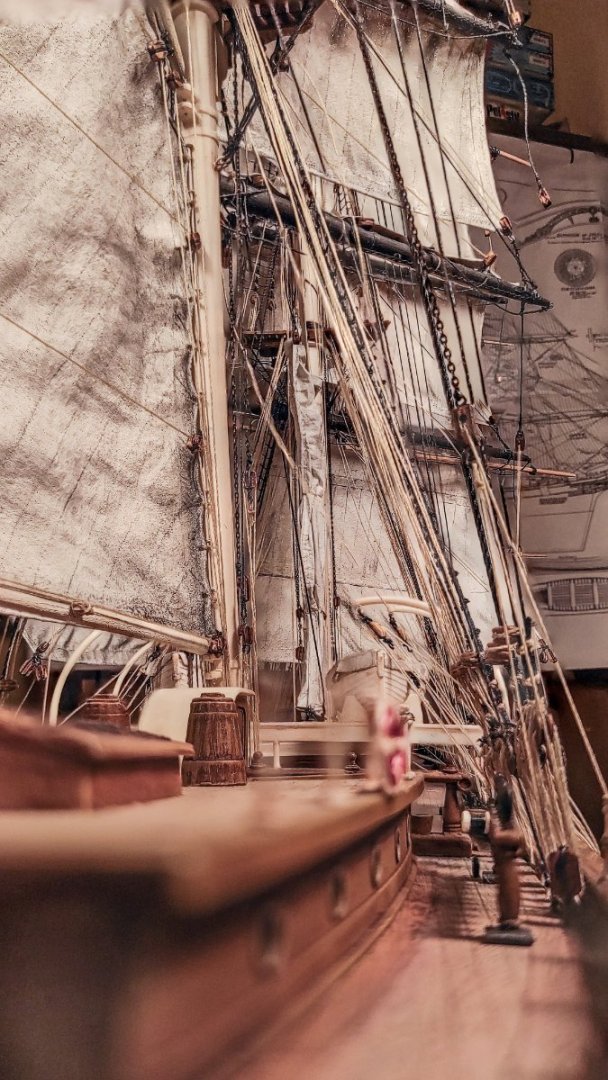
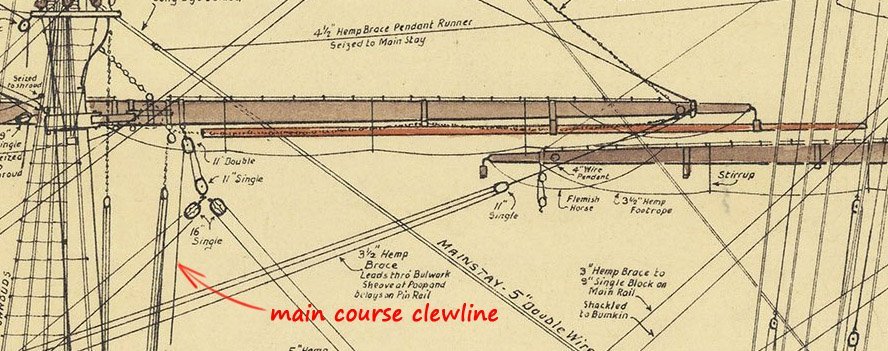
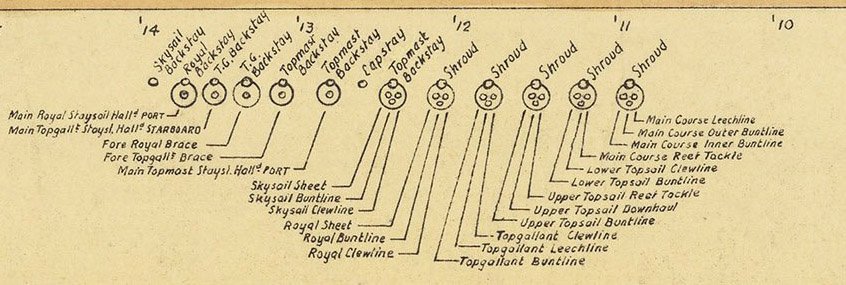
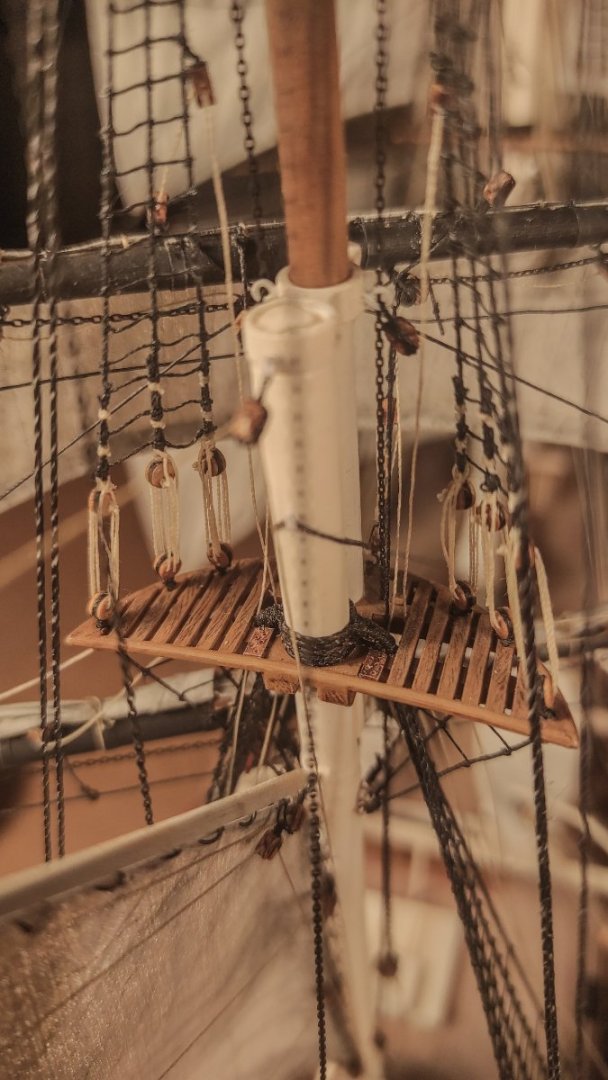
Hello everyone! I'm sorry for the long absence, but finally I have some updates to share: Mizzen mast completed and all sails completed! Yes, finally, even the last mast is completed! There is not so much left to say; the mizzen is similar to the main and foremast... The only thing worth mentioning is that I decided not to mount the Mizzen Staysail and the Main Royal Staysail. The Mizzen Staysail has been sacrificed in order to see the deck better. Without the Mizzen Staysail, it seemed to me a good idea not to mount the Main Royal Staysail too, in order to better balance the appearance of the ship. As for all the other masts, also the mizzen has been trimmed a bit, about 1 centimeter on top. Here are some pictures of mizzen completed: Some details: And here the ship as she is now: And here is a quick test of focus stacking, hoping to get you on board! That’s it for now, still many things to be done, but I finally see the end. Oh, a question for all of you rigging masters: what is the path followed by the course's clewlines? As you can see here they are visible here but the line is interrupted: But they are not present in the main fairleads diagram: Am I supposed to belay them directly to the pin rail port and starboard without passing through the fairlead or should I belay them elsewhere? If so, where? Thank you!


- 397 replies
-
- 13
-
-
-
-
- cutty sark
- revell
- (and 2 more)
-
You are doing a wonderful job! A real joy to watch, keep going!
-
Thank you all for the likes, and thank you to Keith and Kevin for the comments. That sounds strange to me, my experience is really different. Once wet, the material behaves like cloth, and it can be shaped at will. Once it's dried it retain the shapes usually. Two things come to mind: Did you use thin metal wire all around the sail like I do? I think it is quite important for the final result, it gives some fixed reference. Did you paint the material before shaping it? The color might help keeping the shape once dried. If I can help, please write me, modelspan is really a great resource! Once again, if I can help, please write me. It is really a huge task...
- 397 replies
-
- 1
-
-
- cutty sark
- revell
- (and 2 more)
-
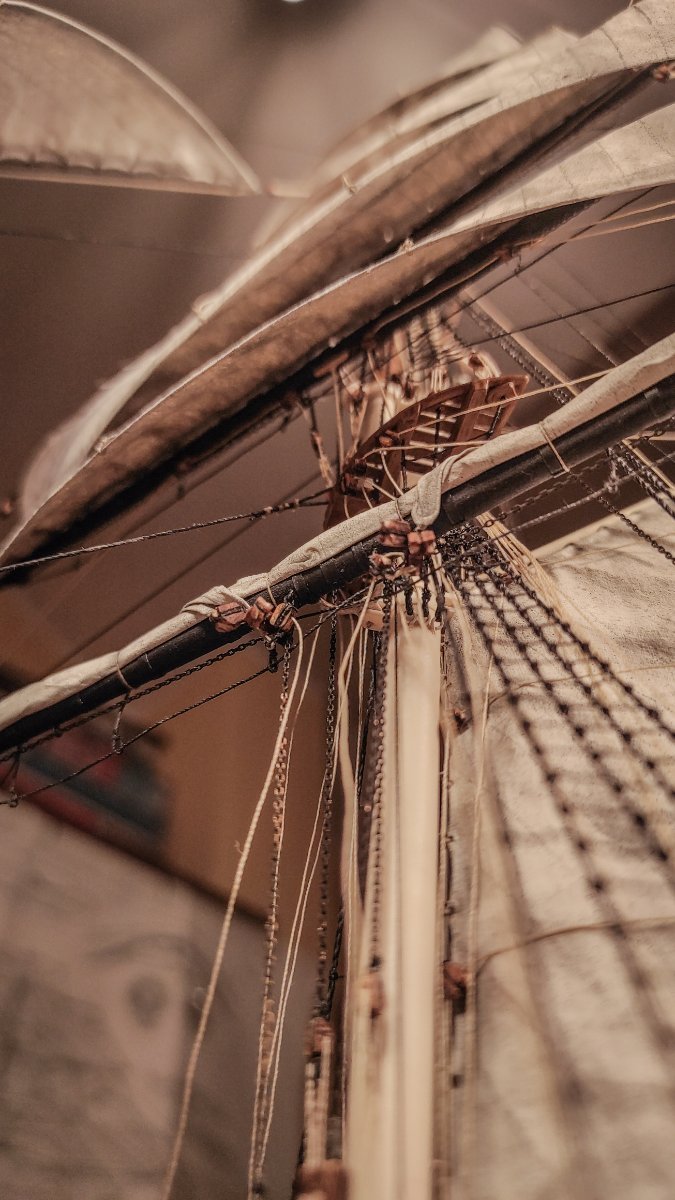
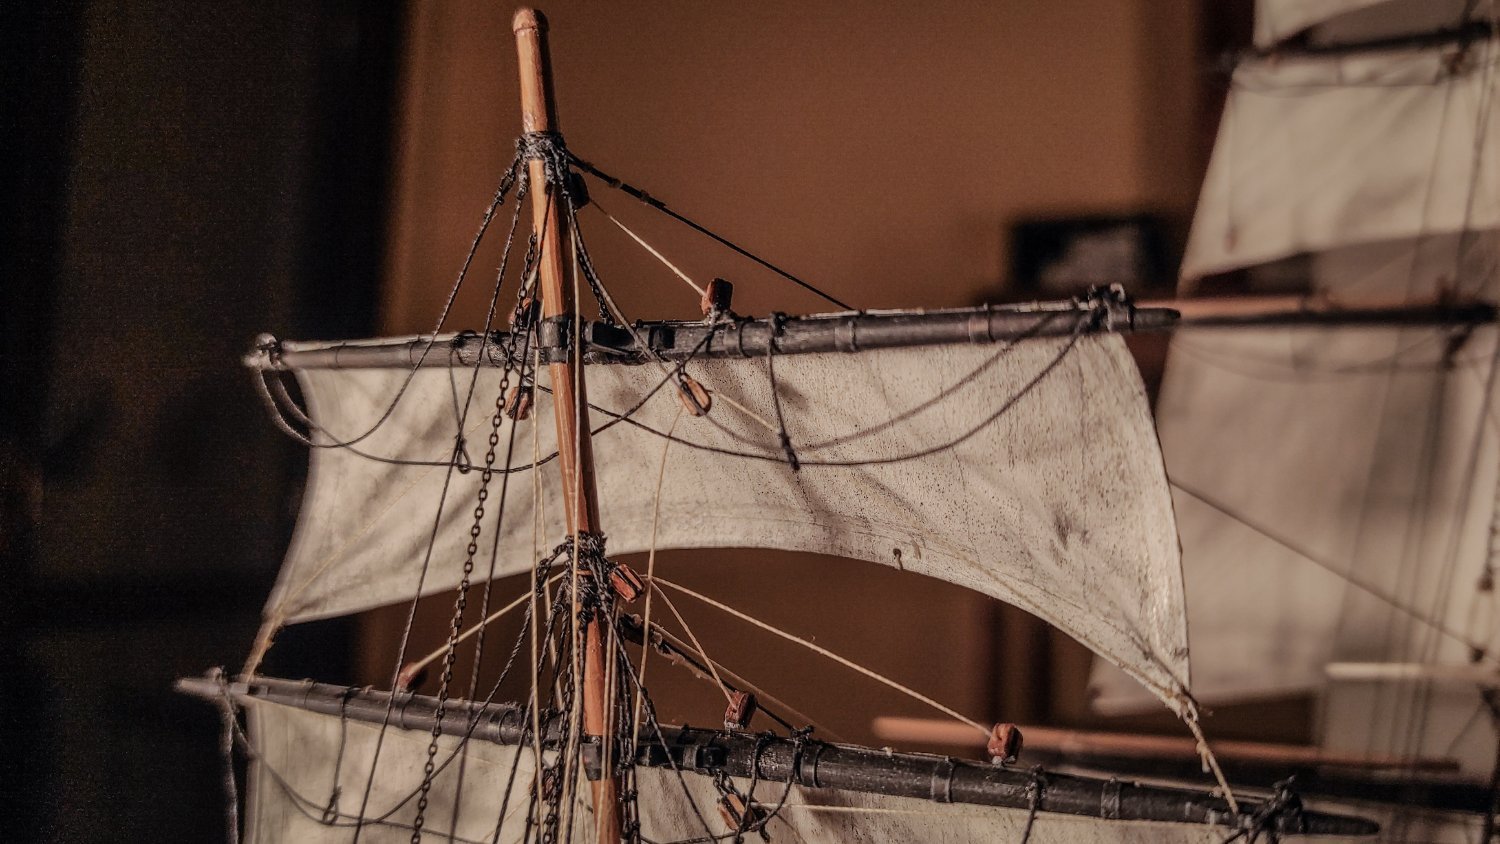
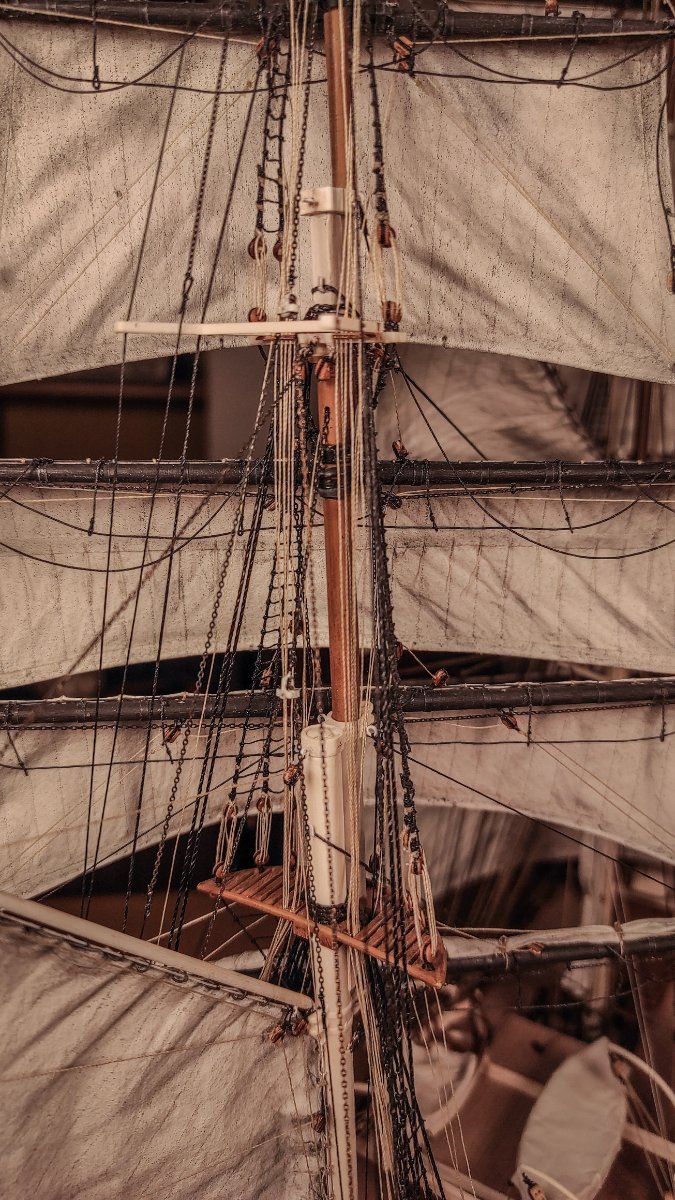
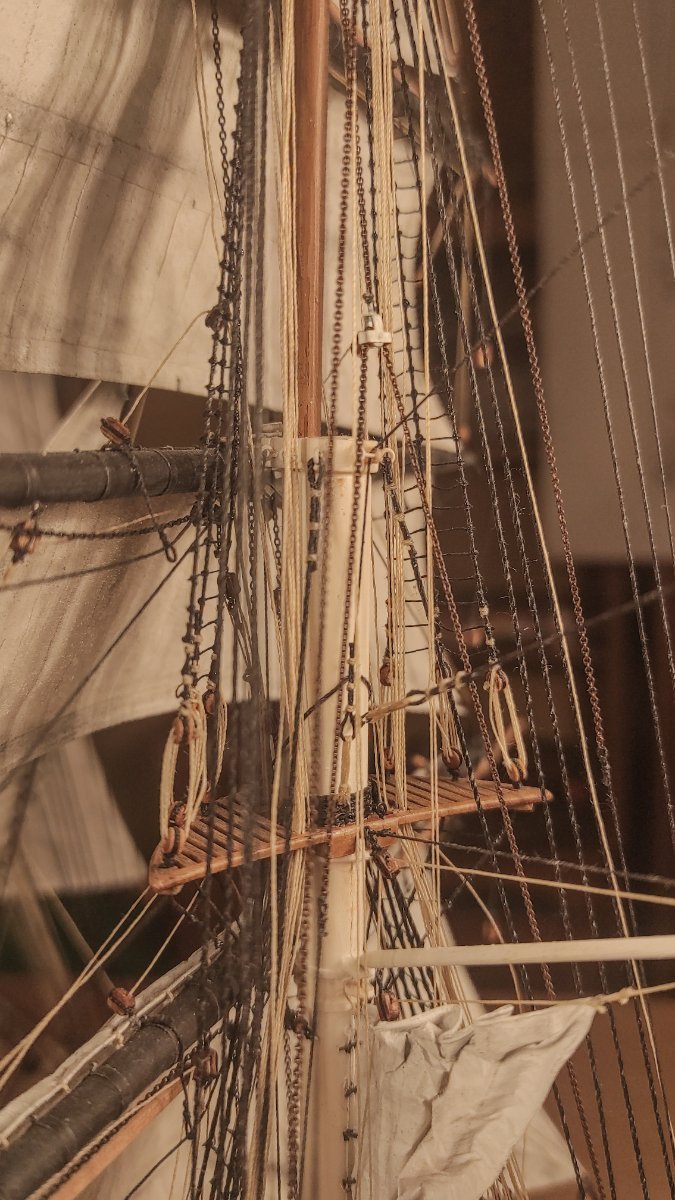
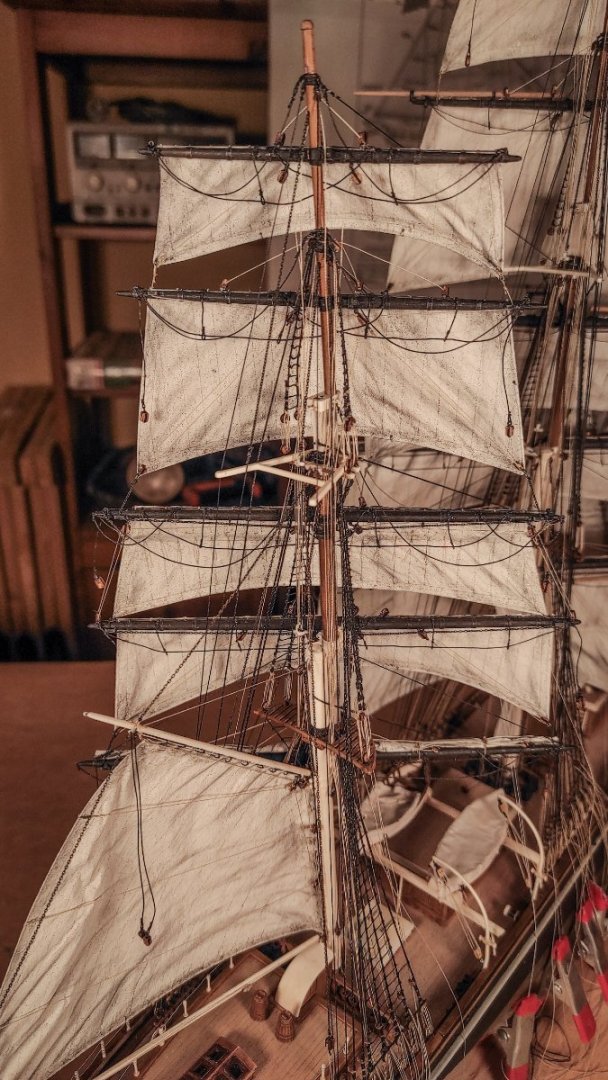
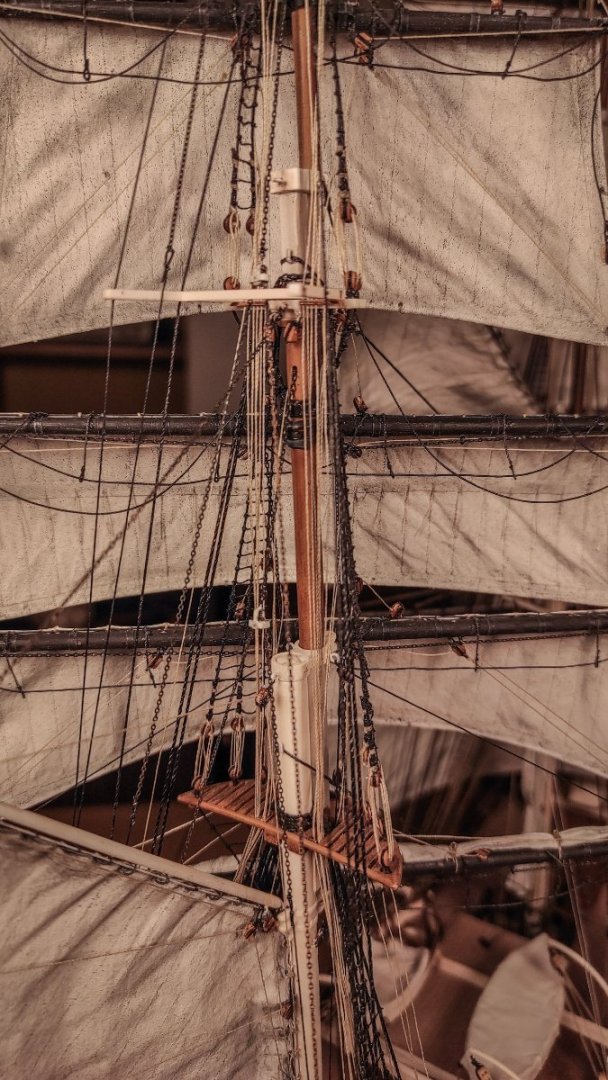
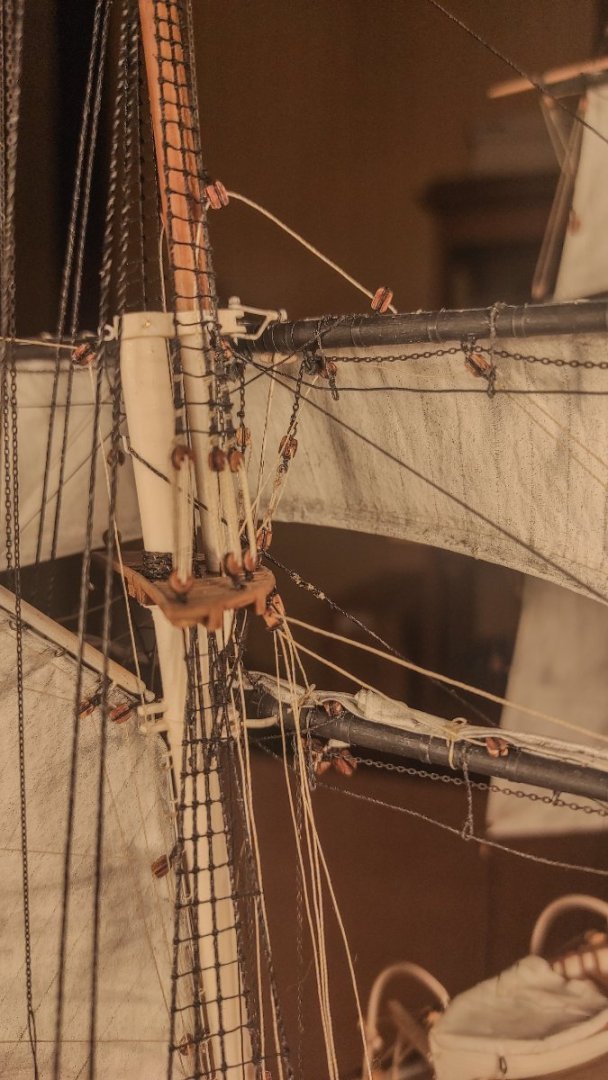
Hello! Here I am again with some updates: Mizzen mast has been stepped up, crojack and mizzen lower topsail in place. Stepping the mizzen is the same business as the main and fore mast. The only thing I changed is that the mizzen is not glued, but held in place just by the shrouds. No real reasons for this; I just wanted to try something slightly different. In the end, the glue is not needed, and I’m happy with this choice. Shrouds in place, ratlines, fairleads, all as usual. Here is a close up of the fairleads: Since these are the last ratlines on my Cutty Sark, I took the opportunity to make a small video of the process. No audio, slow and not so steady hands due to the uncomfortable position, with the smartphone in the middle, but just to share a long and repetitive process that I ended up liking. If you struggle to get a sleep, here it is: Once the mast was stepped, I installed and rigged the crojack and the lower topsail. Once again, the process is similar to the other sails and other masts. Sails are prepared before installation, and rigged as much as possible before being installed on the mast. Here are some images: A small mention for the stays: It would have been better to pre-install them starting from the main mast. I thought I was smart pre-installing them on the mizzen mast before stepping it, but it is better to do the opposite in my opinion. I ended up removing them from the mizzen and starting all over again to be fitted on the main mast. Here is a close-up of the topmast and topgallant stay on the aft of the main mast: As you can see it’s quite crowded, not an ideal place to work with knots and tweezers. And, at last, the Cutty as she is now: Thank you all for passing by!


- 397 replies
-
- 17
-
-
-
- cutty sark
- revell
- (and 2 more)
-
Welcome to the Cutty Sark "plastic" family! You seem to have two hulls: one glued and the other still divided in half! Let us know your progress, it's always nice to see a beautiful clipper growing.
-
Wonderful job, Kevin! I really like the tops. How do you print the masts? Are they fdm or resin? I really like the sheaves on the topmast. I completely missed them at the beginning of my build, I was too inexperienced, and now I regret not having them. A side note for the crane of the lower topsail and the forked truss for the lower yard: they are nice, but are you sure they will be strong enough? Resin tends to be brittle, and it might become worse with time.