

bolin
-
Posts
477 -
Joined
-
Last visited
Content Type
Profiles
Forums
Gallery
Events
Posts posted by bolin
-
-
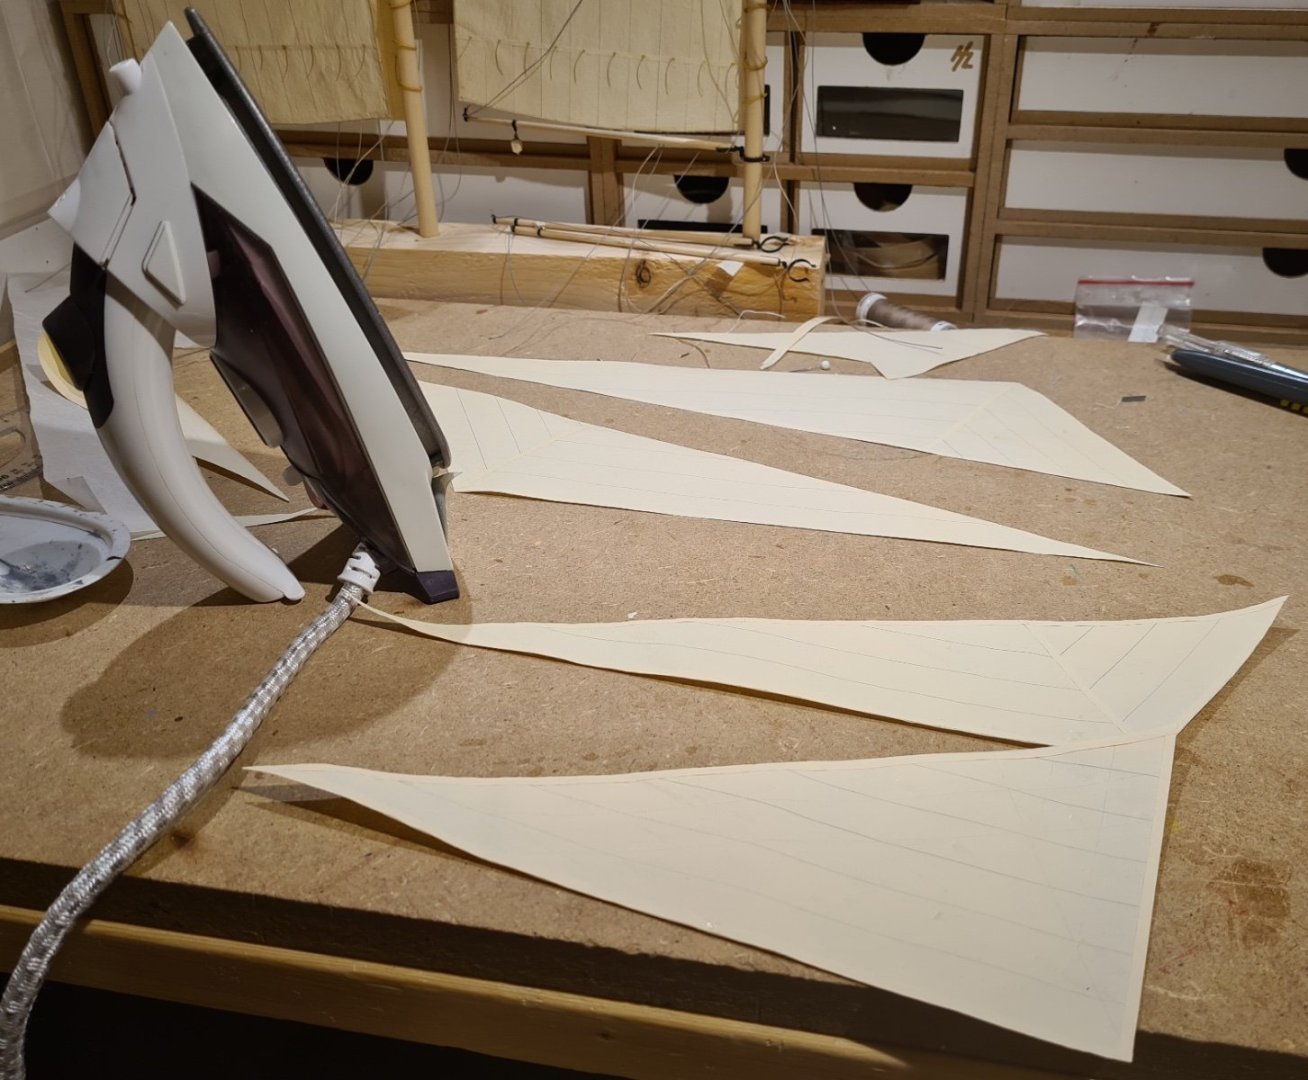
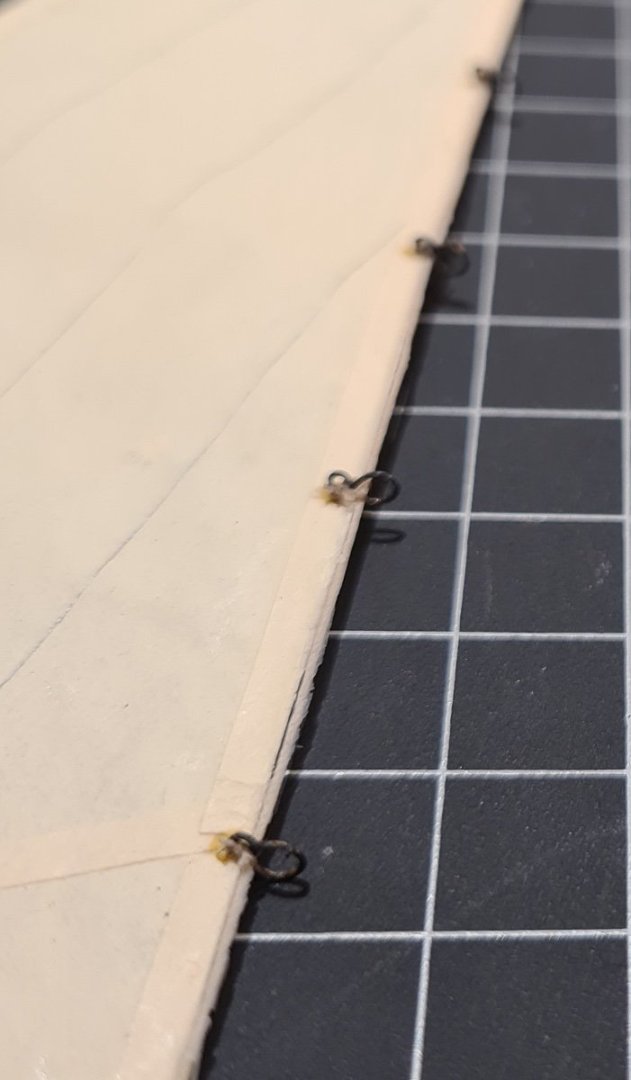
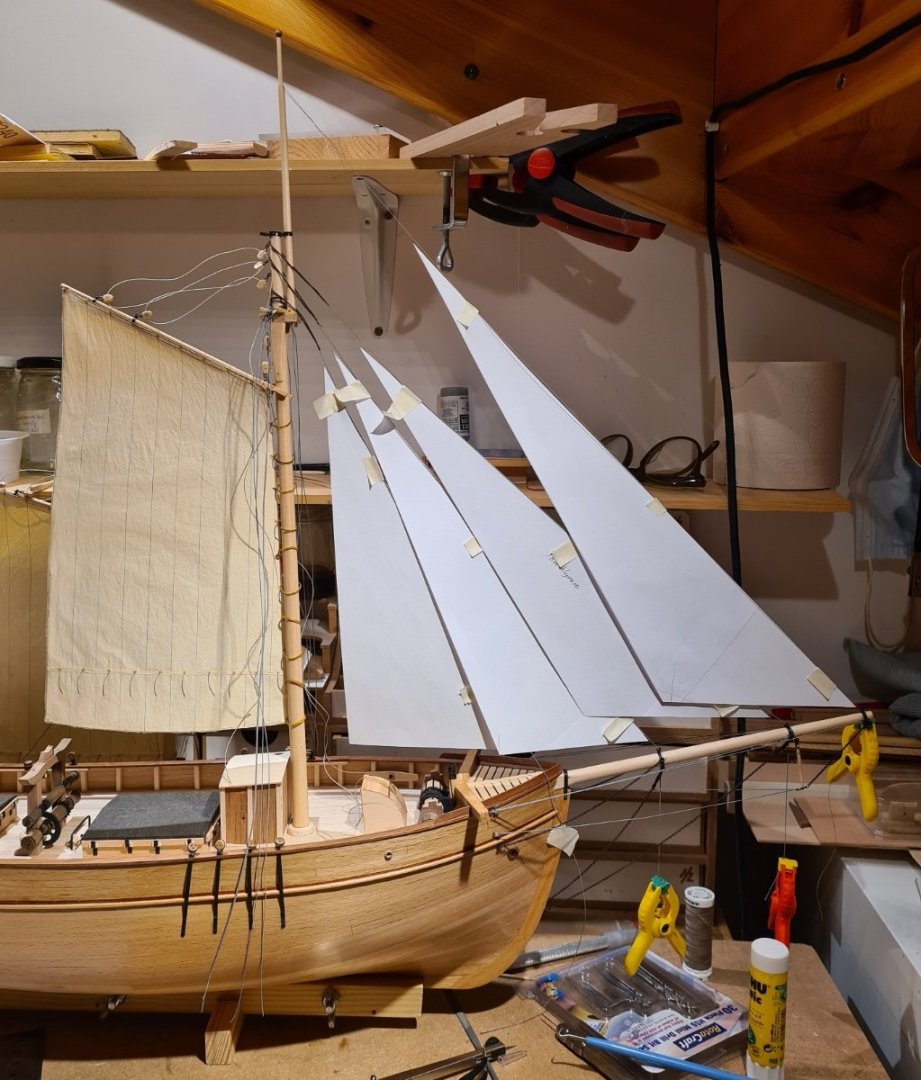
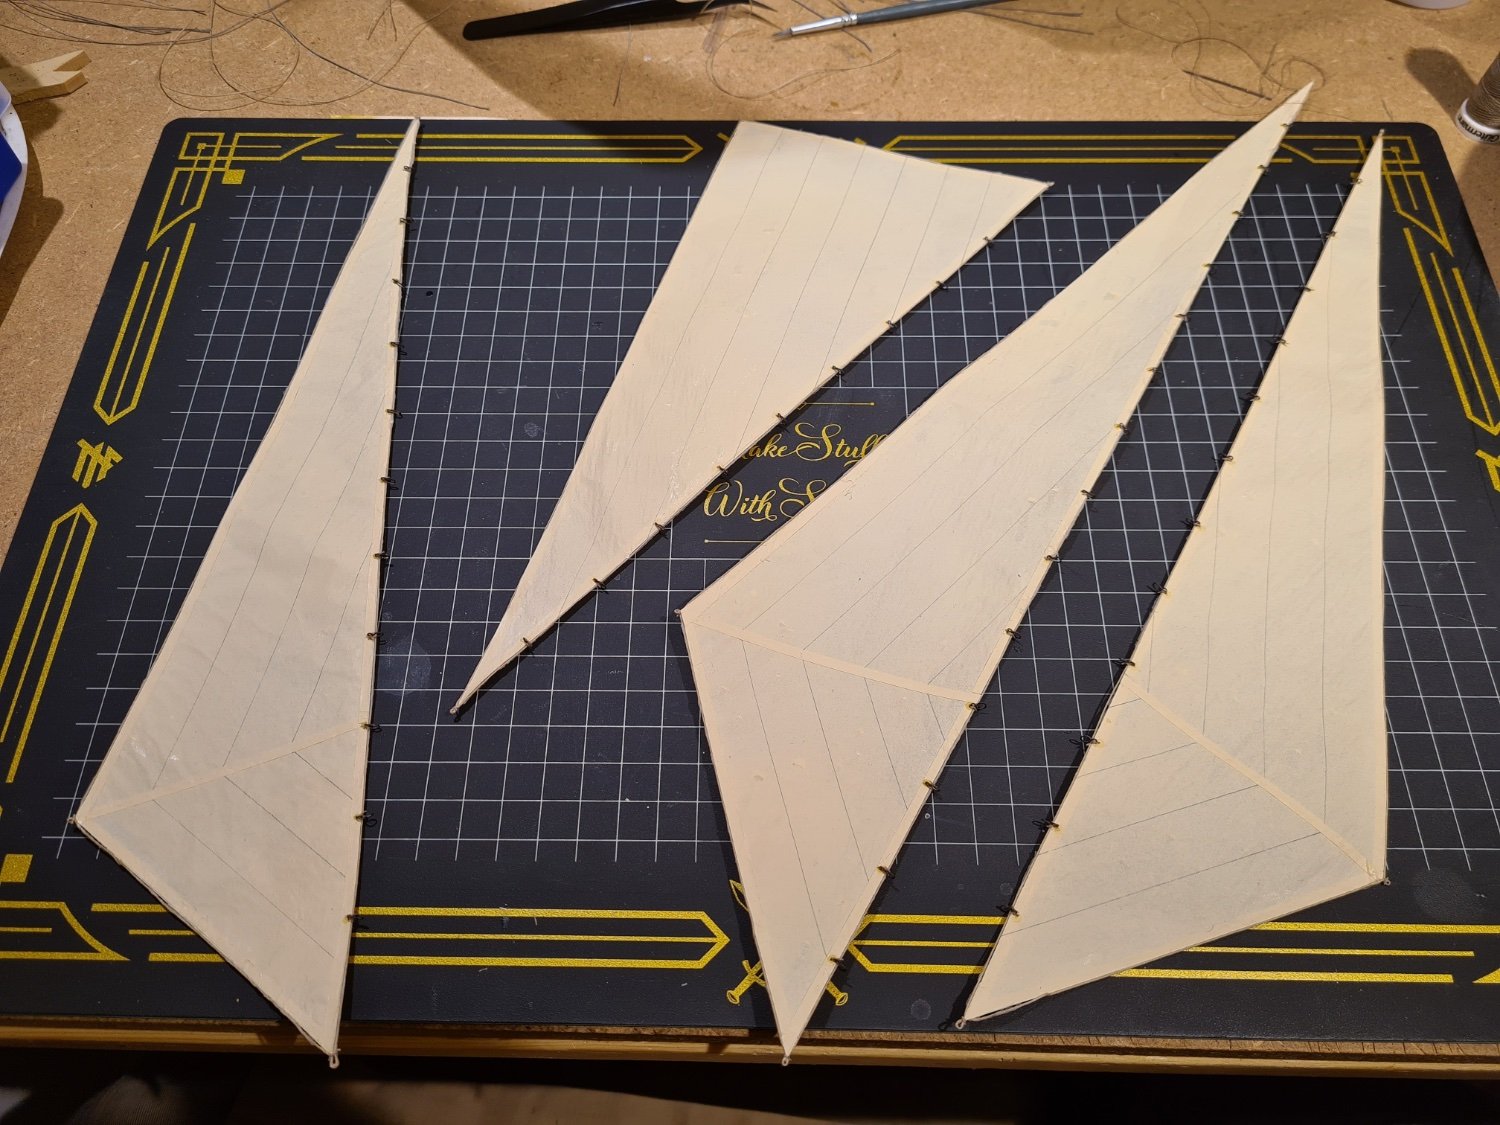
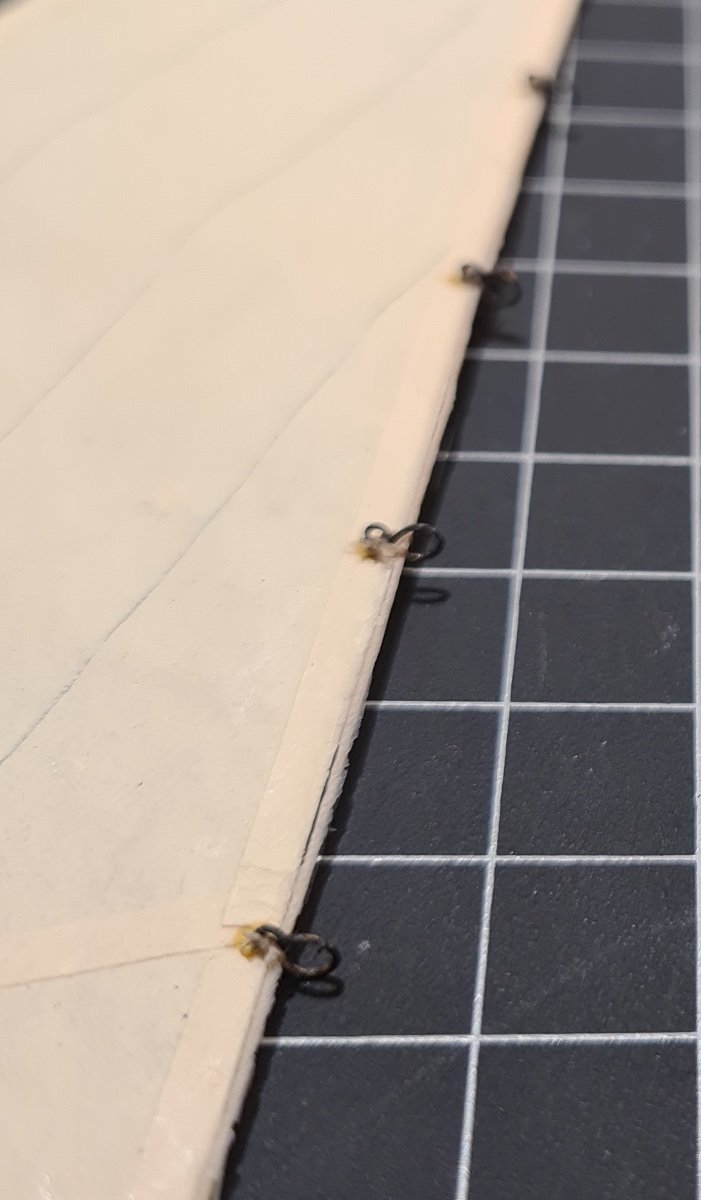
The stay sails ar now ready. They are painted, glued, ironed and then equipped with bolt ropes and hanks.


- Nirvana, Keith Black, clearway and 1 other
-
 4
4
-
Thanks.
I built a boat for my Will Everard from a kit by Mater Korabel. That was in 1:72 scale, so I'm thinking: How hard can it be to do it in 1:40? One reason I haven't started the boat is that I have used all of the 0.5 mm maple sheet I bought for that purpose for the deck and other details.
I will provide more detailed pictures later.
One thing I discovered when I made the templates for the sails was that I haven't prepared anywhere for the fore stay to attach! So I started to dig through my photos and books and discovered that the fore stay should be a double wire. I think I will run it through the grating and under the bow spit. Pictures will come later when I get around to it.
- Wintergreen, Keith Black and Nirvana
-
3
-
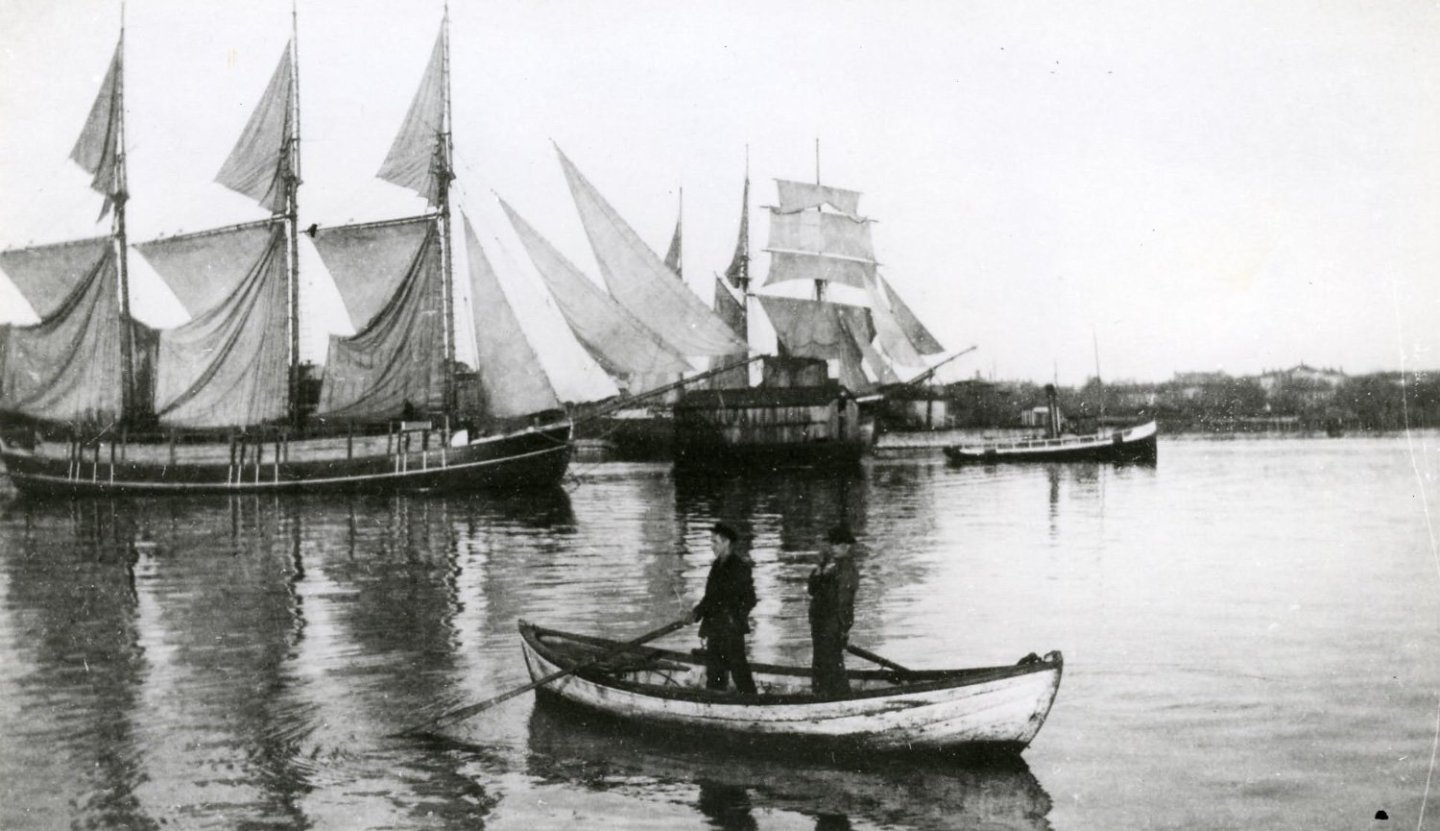
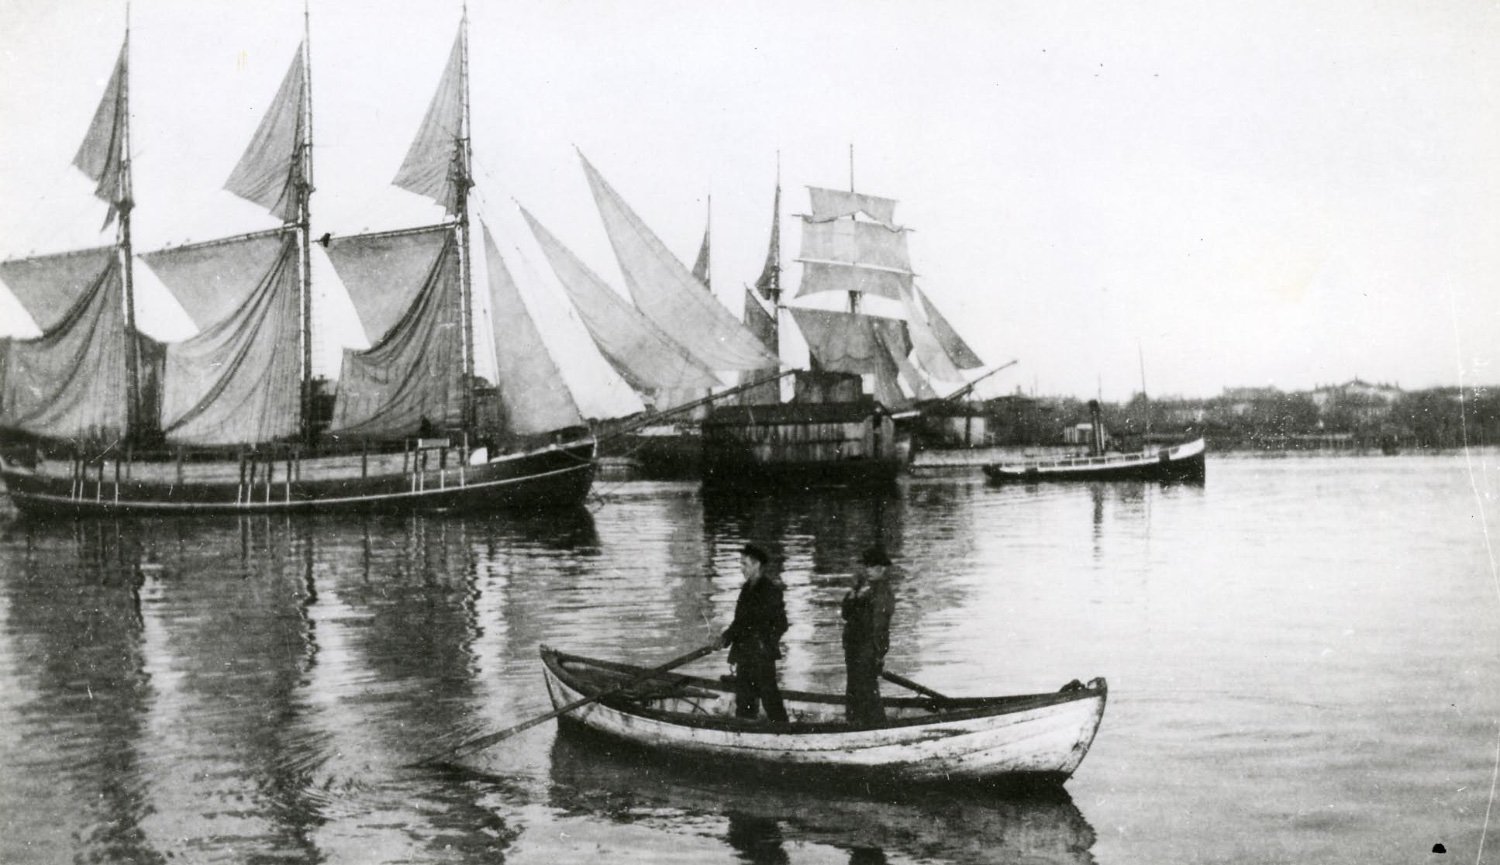
Since I only have photos of the original Metas rig I have not been able to determine the size of the fore staysail and jibs until now when I can step the mast and measure in place. None of the photos of Meta show here with the sails set. However the following photo seems to be close what it would have looked like.
Here I'm part way through fitting templates for the sails. The inner and flying jibs still look a bit oversized, so I have later reduced them a bit.
- Keith Black, DanB and clearway
-
3
-
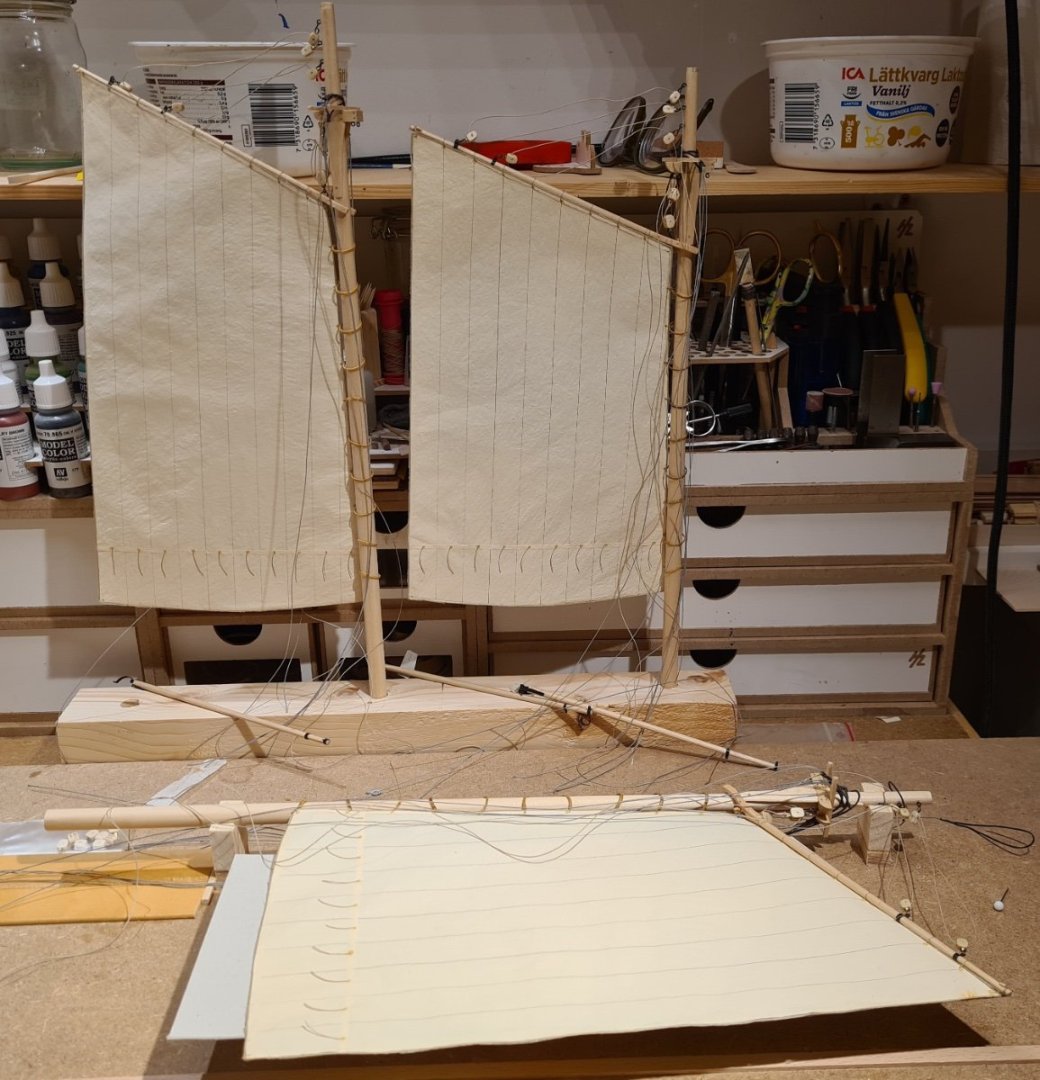
With the sails done I have all the parts to start rigging the masts.
I will try do as much as possible off the ship. It should make it easier. I have made a simple jigg so that I can work on the masts when they lie flat rather than being horizontal.
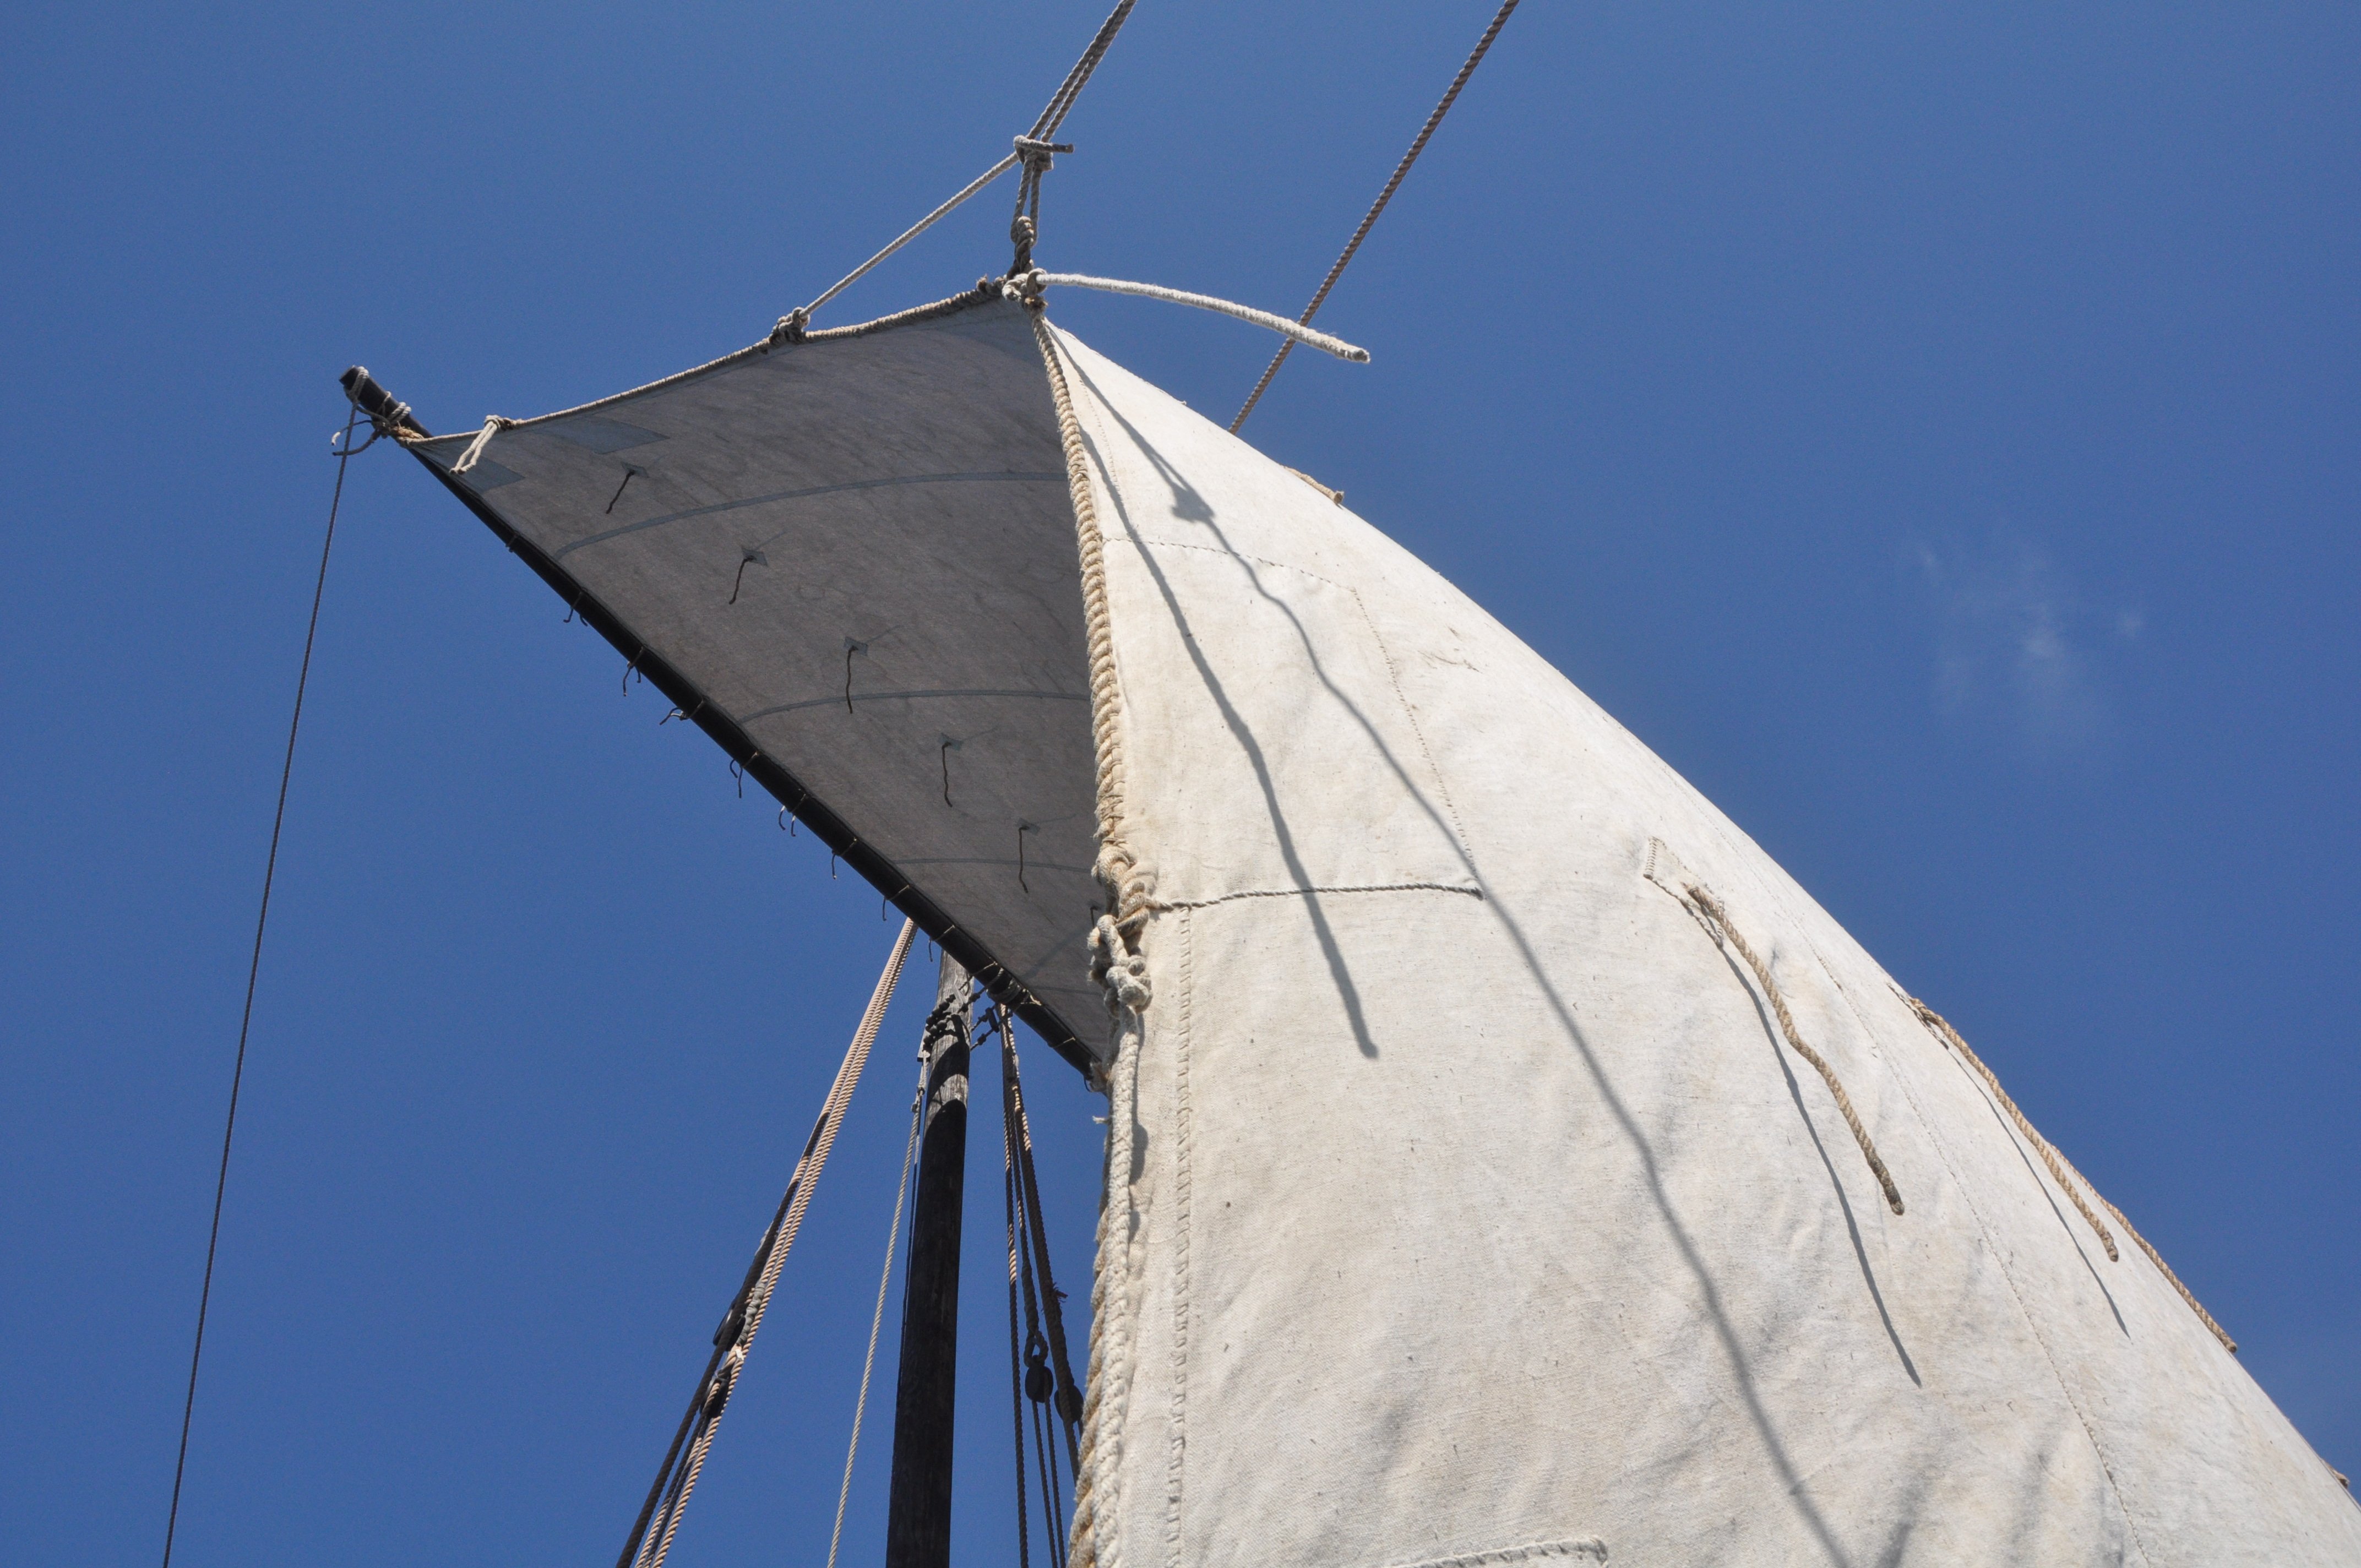
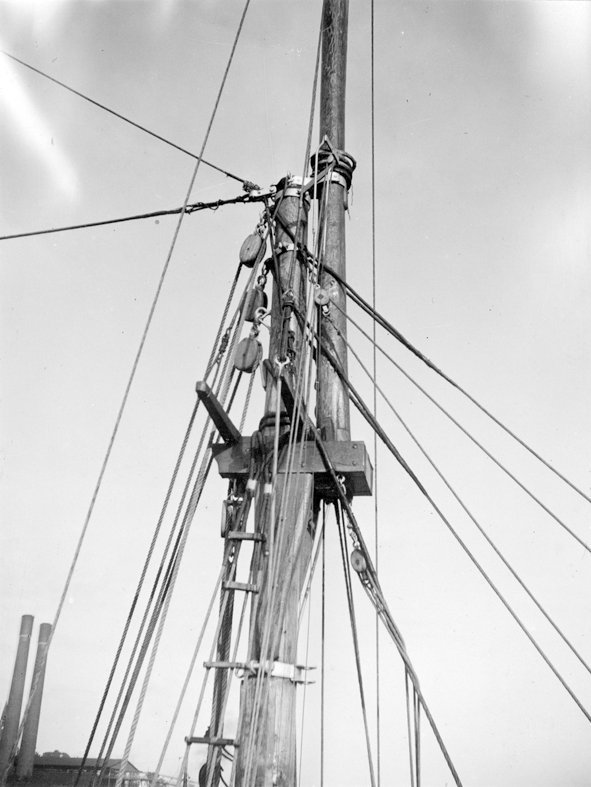
Most of the standing rigging would have been steel wire. I have chosen to use the rigging thread that I already have and paint it grey using acrylic paint, rather than using real wire. I think that will be a good enough approximation of the colors in the following picture. The wire lines have also been served as in the picture.
Painting the lines also makes them stiffer, which I think is good.
- Keith Black, Wintergreen and clearway
-
3
-
Some slow progress was made during the autumn. The gaff sails and the top sails are now done and are ready to be rigged on the masts.
- Keith Black, Nirvana and clearway
-
3
-
Long time since I posted an update.
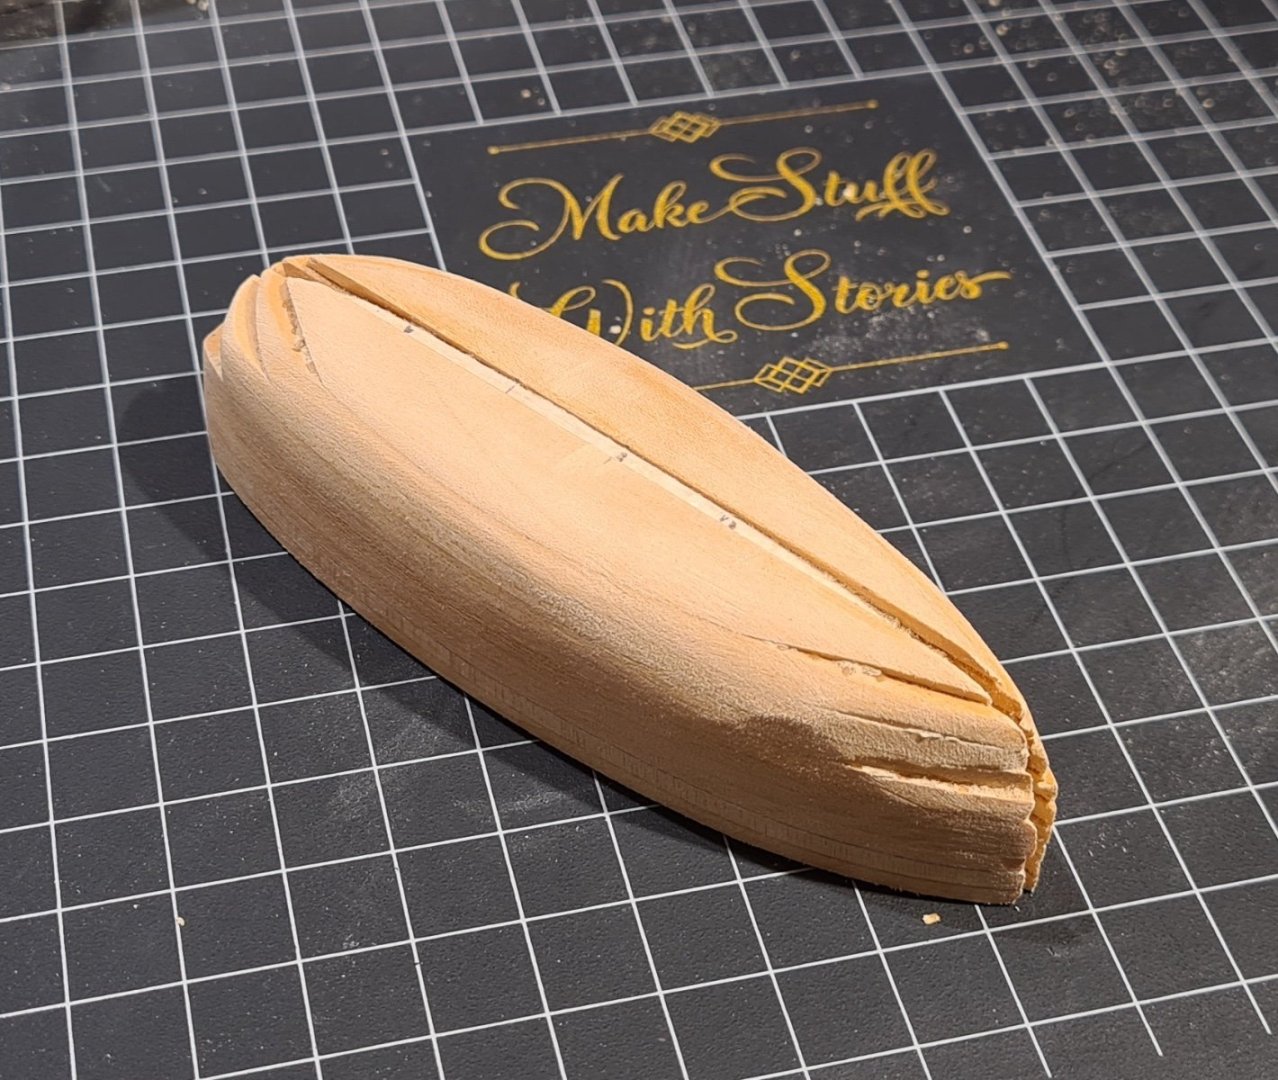
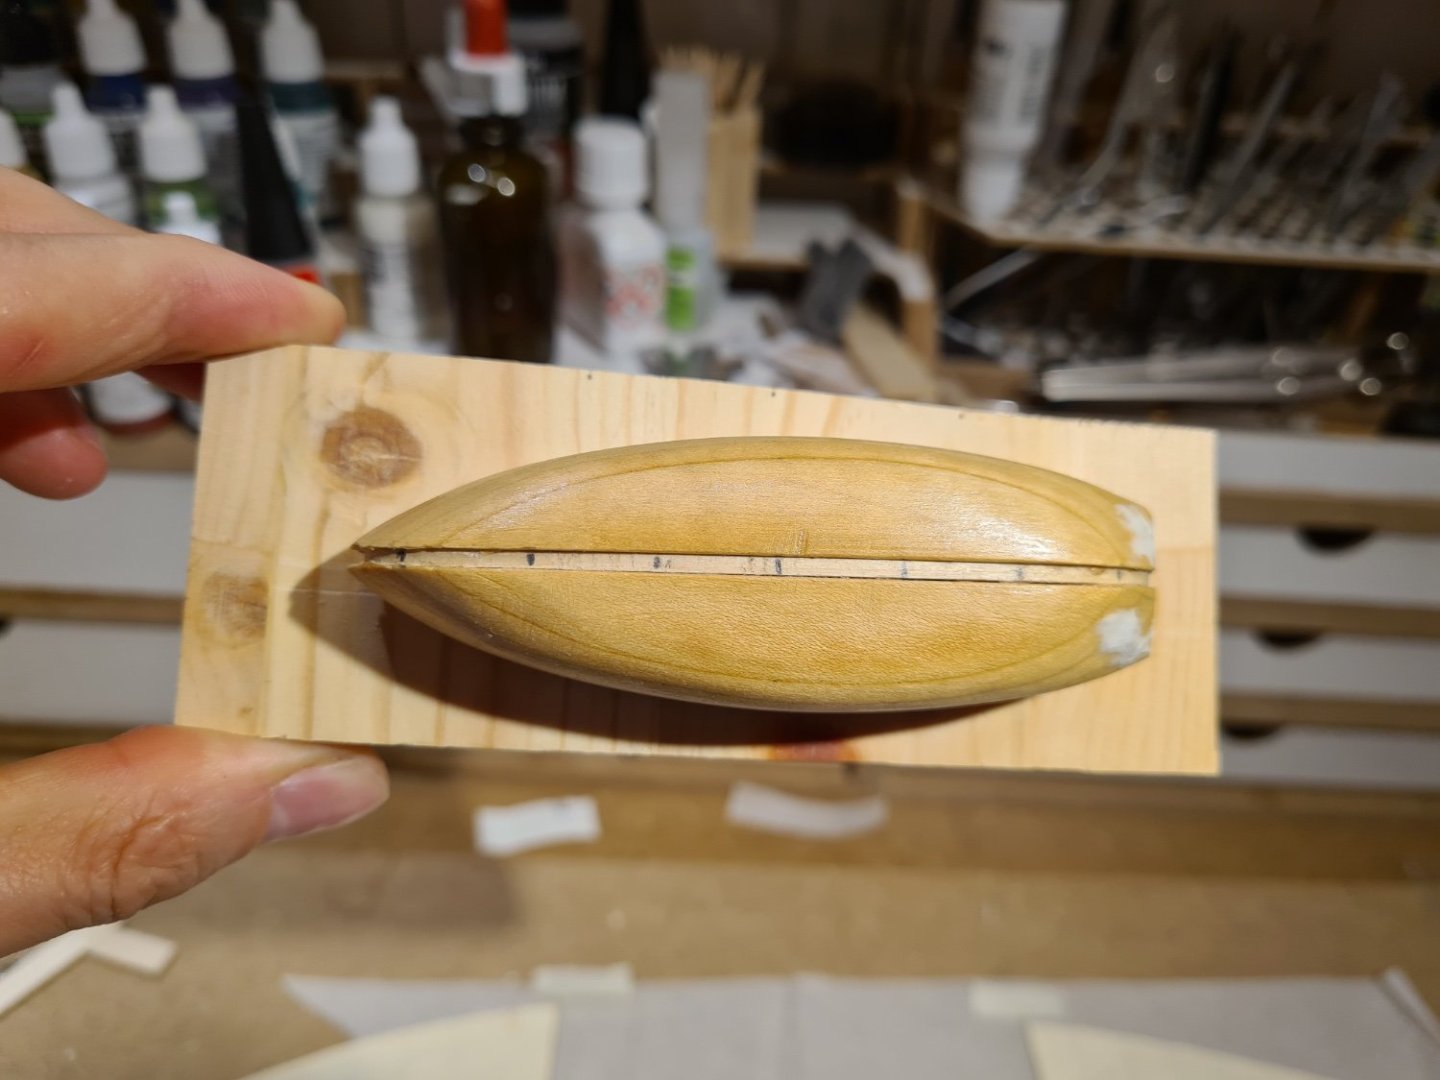
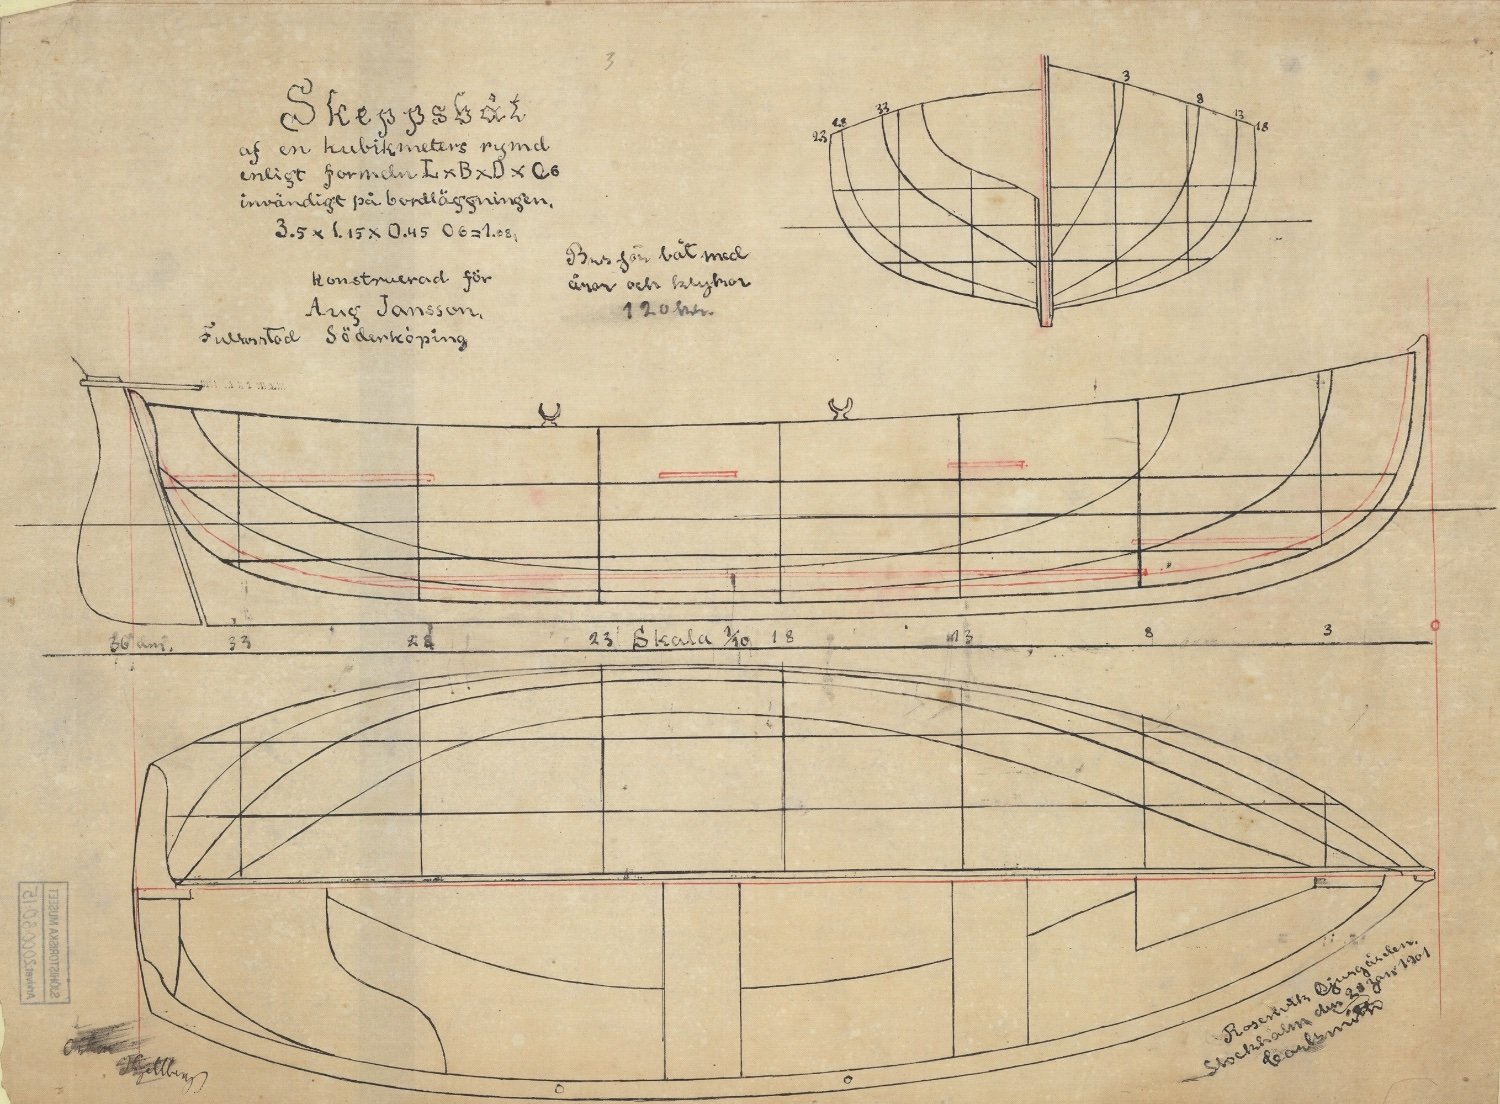
I have some progress to share with you all. A mold for the ships boat. It is based on a plan that I found at DigitaltMuseum. It's laminated from thinner strips and formed using files and sand paper. The final mold is treated with shellac, and I plan to wax it so that glue won't stick to it.

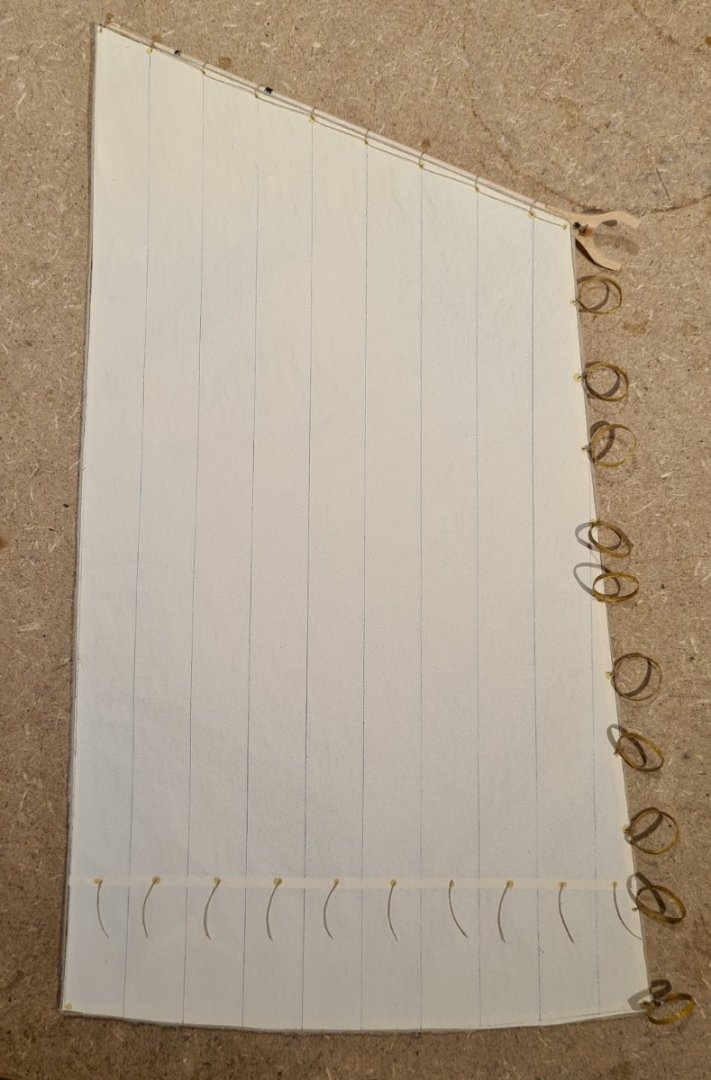
I have also started with the sails. The are made in thin paper. The paper is nothing fancy like silk span. Just something a shirt I bought was wrapped in. The paper is spray painted in parchment color. The seams are marked with a hard pencil. In the picture below I'm gluing the edge rope (bolt rope?) to the top sails.
.thumb.jpeg.a68f221cc834d26d0d25a6f7ebf5a5f2.jpeg)
-
Thank you Per for your interest in my build 🙂 . I will answer your post in English, but also send you a private message on this site in Swedish.
It is fascinating to hear from someone that has actually sailed on Meta. I would be delighted if you could share some of your pictures. It's quite easy to share them in this thread if you want. When you answer a message, click on "choose files..."

I don't know if there are model builders that would take on a commission to build a Meta model. I would assume so, but I don't know of any one.
Cheers
-
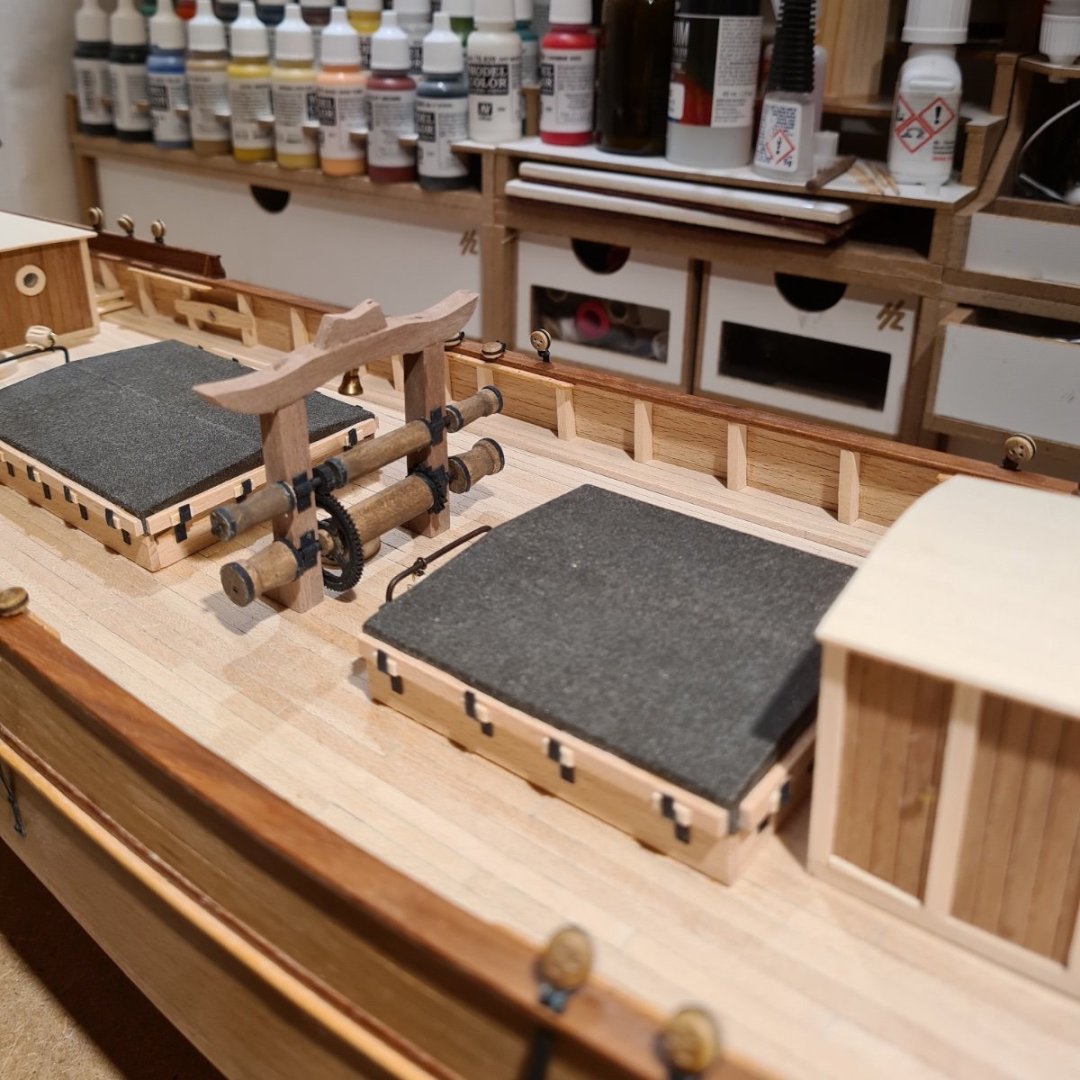
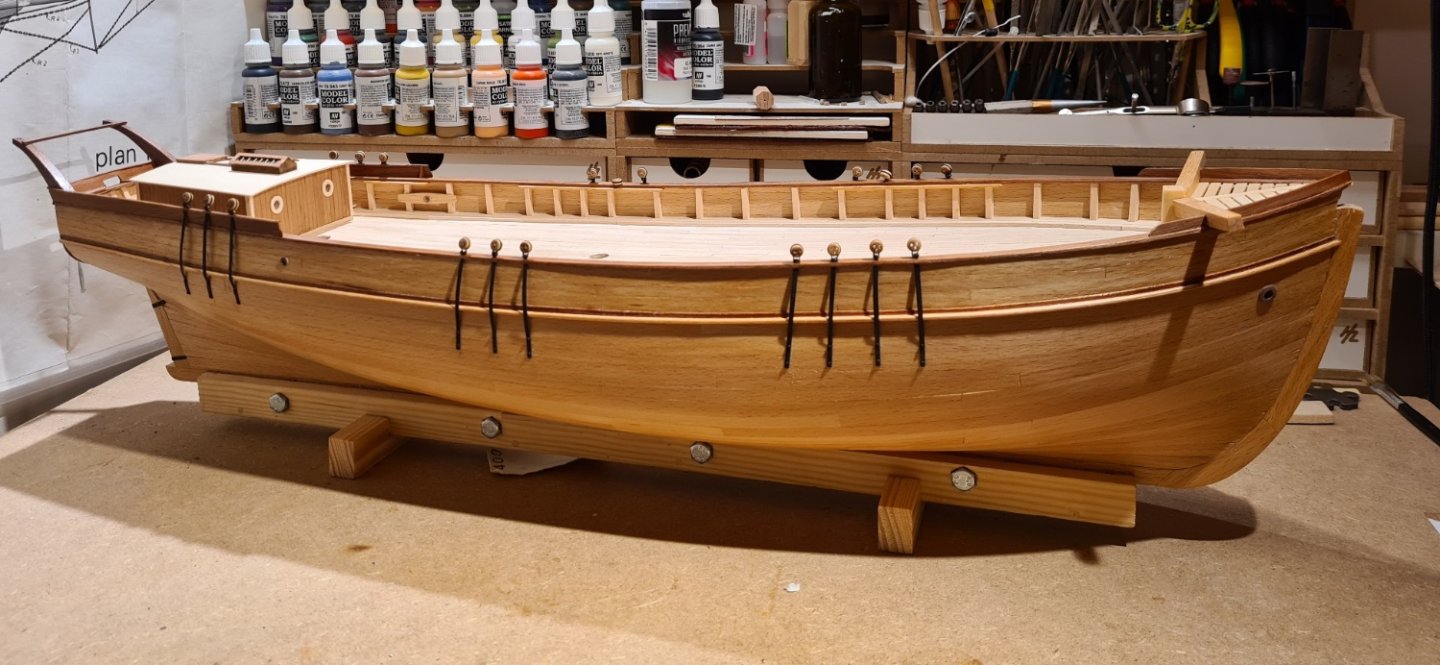
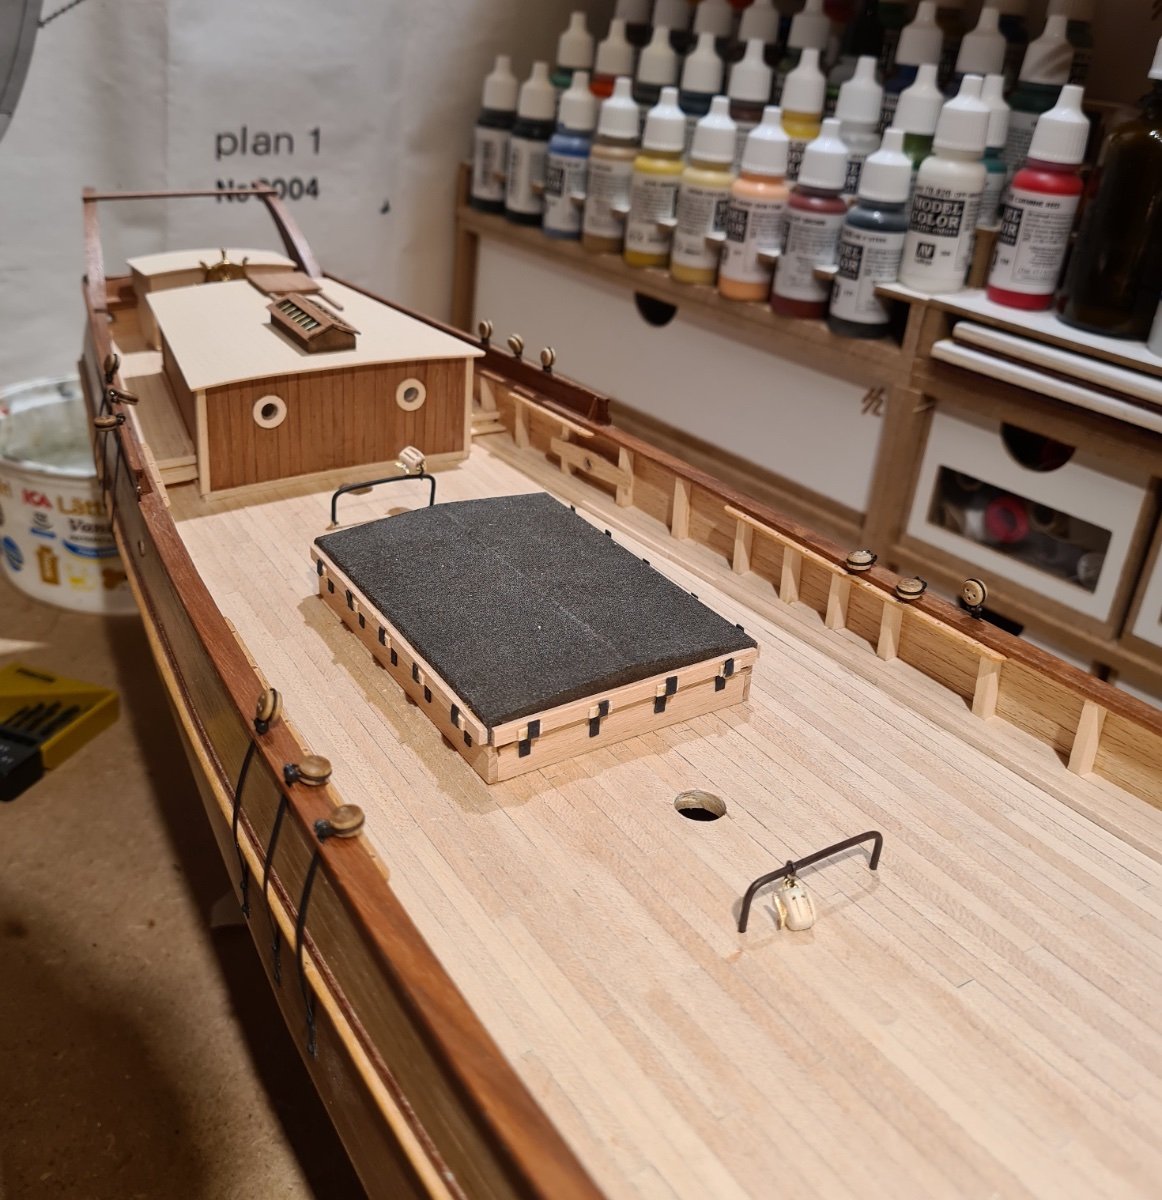
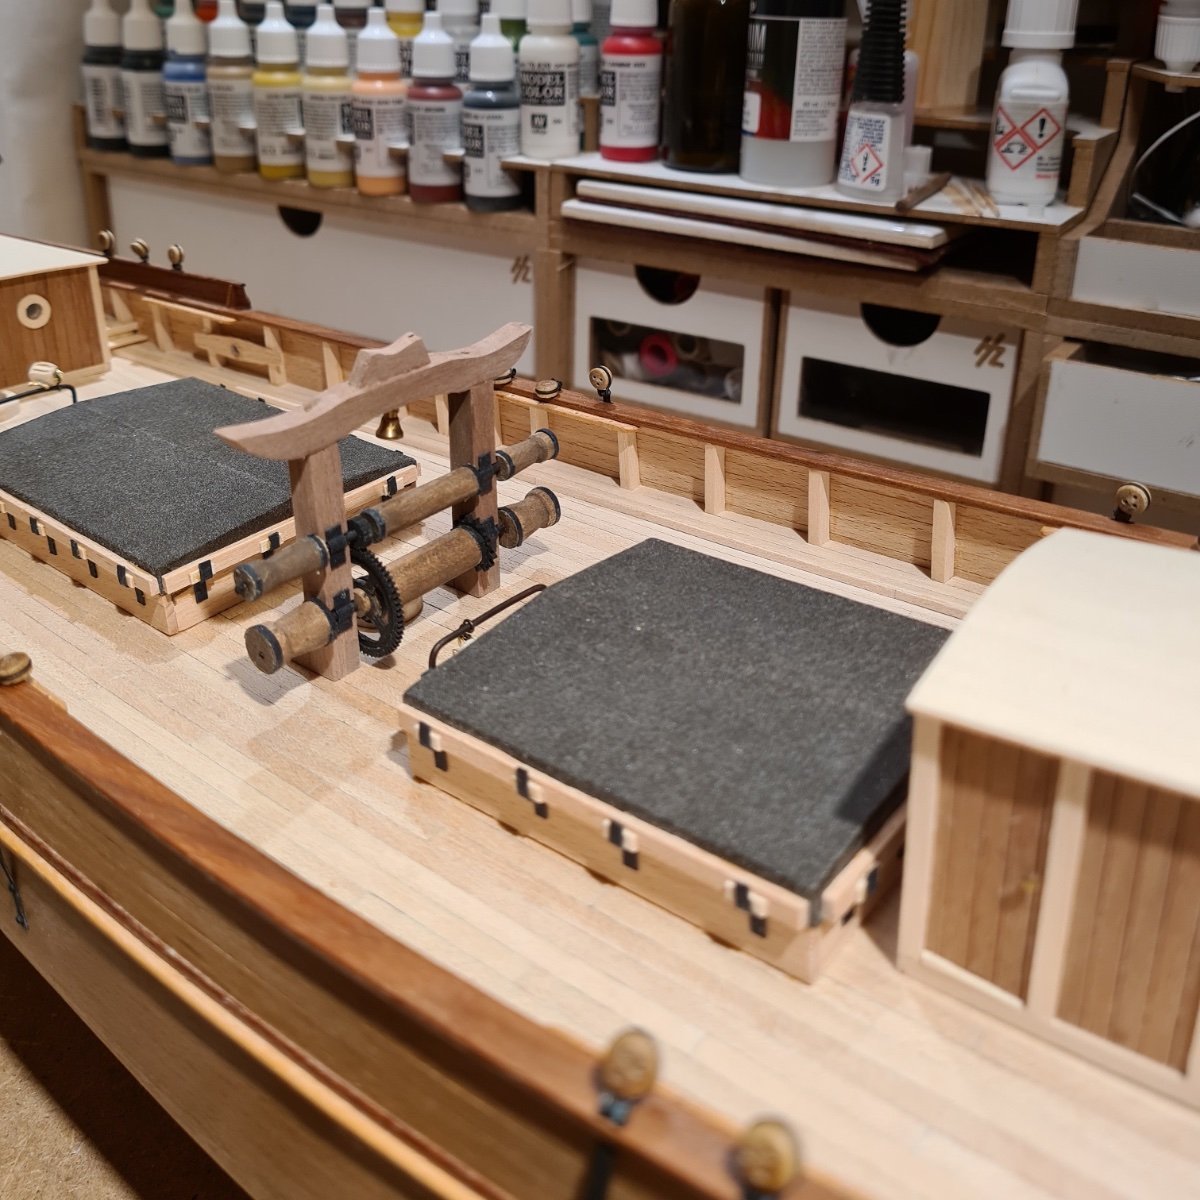
Today I installed the windlass. The handles are detachable, and I'm unsure where to put them. They where probably stoved when not used.

- Keith Black, Paul Le Wol, Wintergreen and 4 others
-
6
-
 1
1
-
During easter we visited our vacation home again (where I build this model). I only had time for a brief building session, so not to much progress.
I have started assembling the two halves of the hull. It is done by gluing pre-cut pieces on to each other in a sandwich fashion. The only potential tricky thing is the alignment of the pieces.
The instructions, at least in the English translation, uses a lot of words to say that the second layer shall protrude 13 mm in the fore beyond the first layer, the second layer 11 mm etc. It's hard to write good instructions. In this case, and at least for me, fewer words and more diagrams would probably have made them easier to follow.
- mtaylor, GrandpaPhil and Ghost029
-
3
-
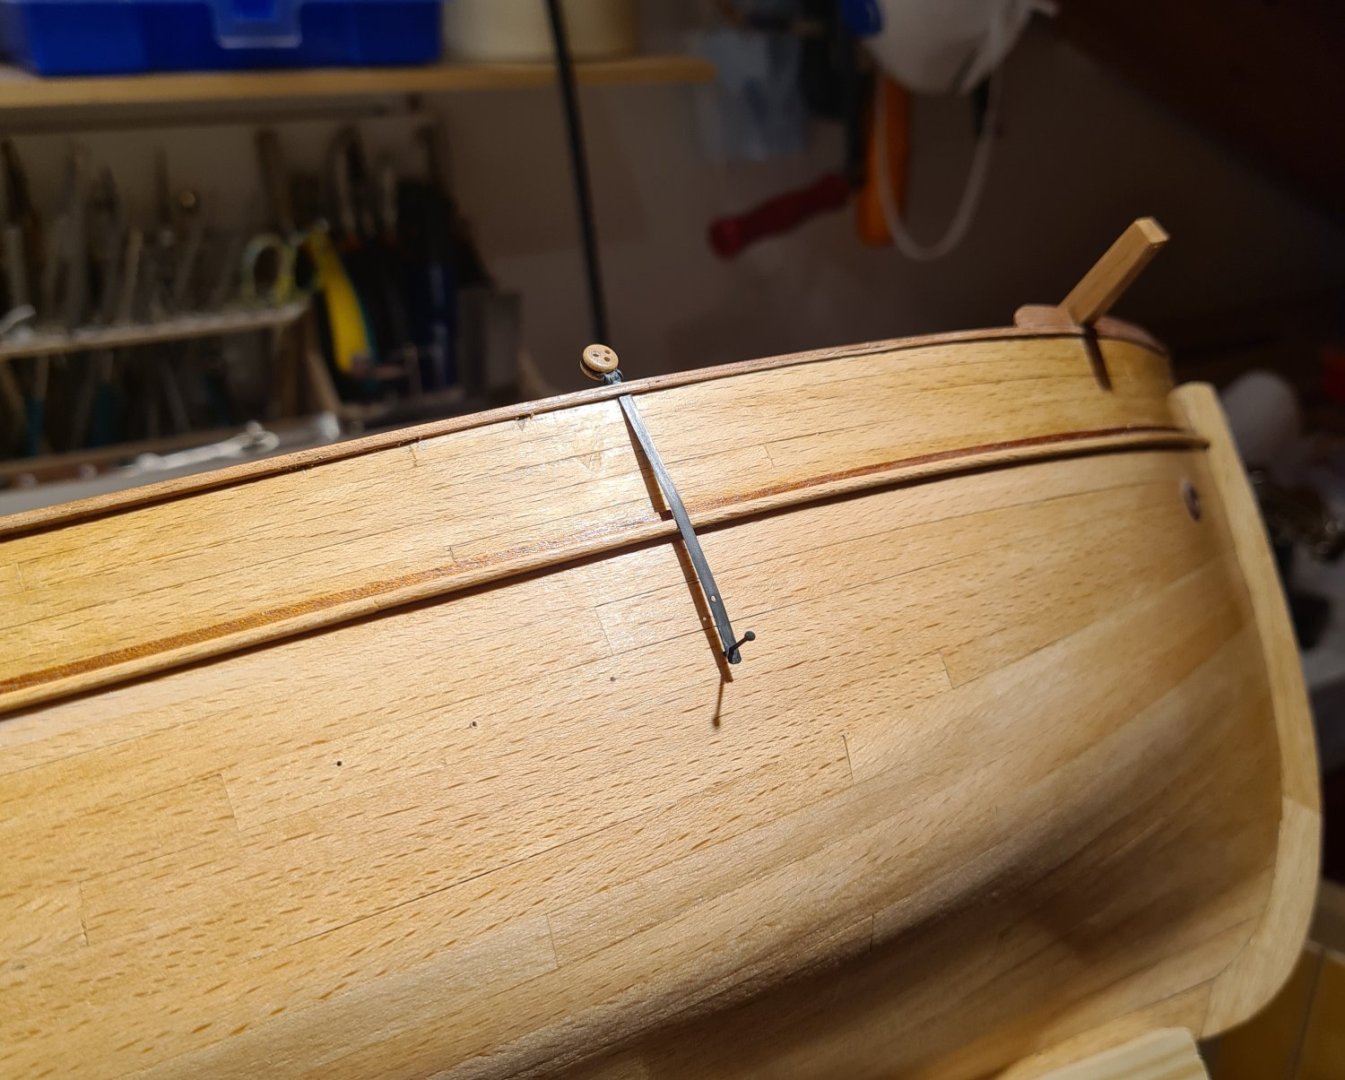
I'm a bit late with this update. The photos are from last weekend, when I started to install the deck fittings. Most of that I have already shown in earlier and where ready for installation.
First I installed the riders for the booms with the large double sheave blocks. Each of these blocks has a cleat on them.

Then followed the winch, the mast partners (almost not shown) and the forward hatch.
-
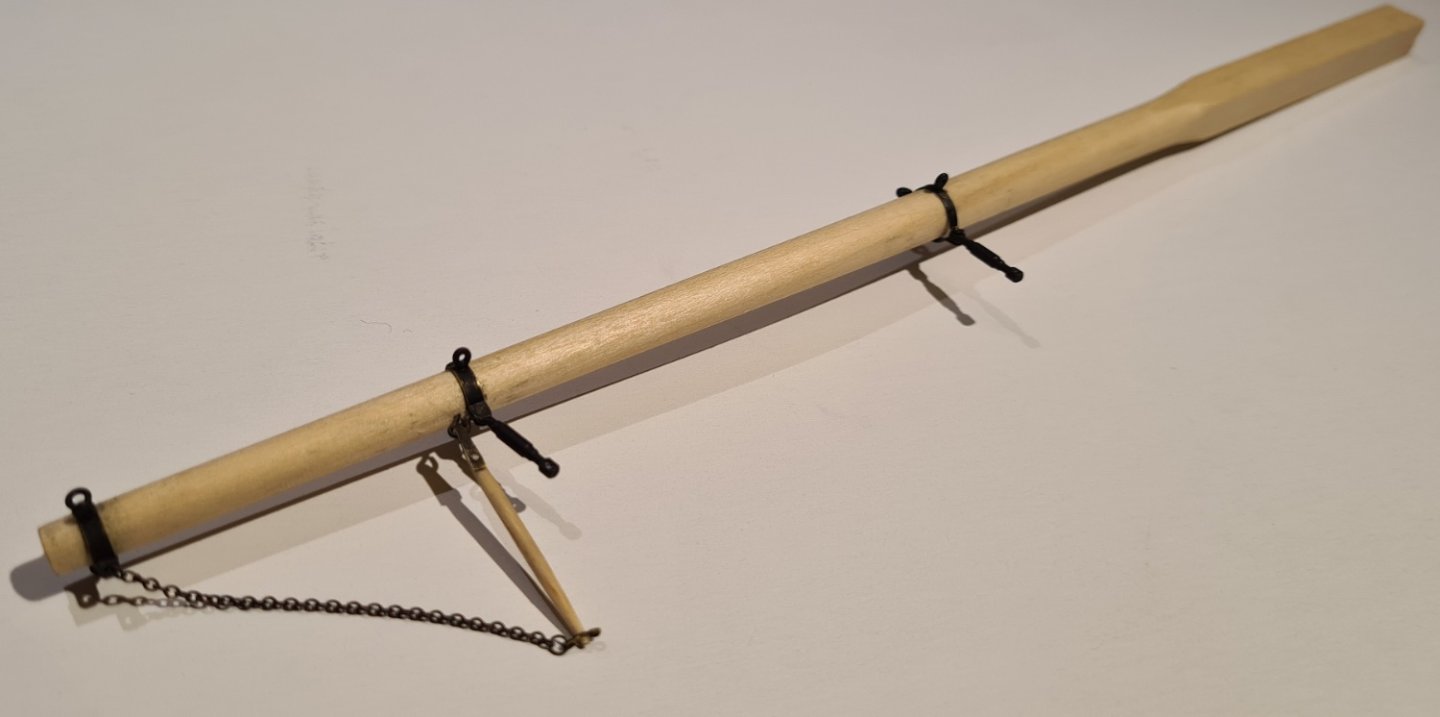
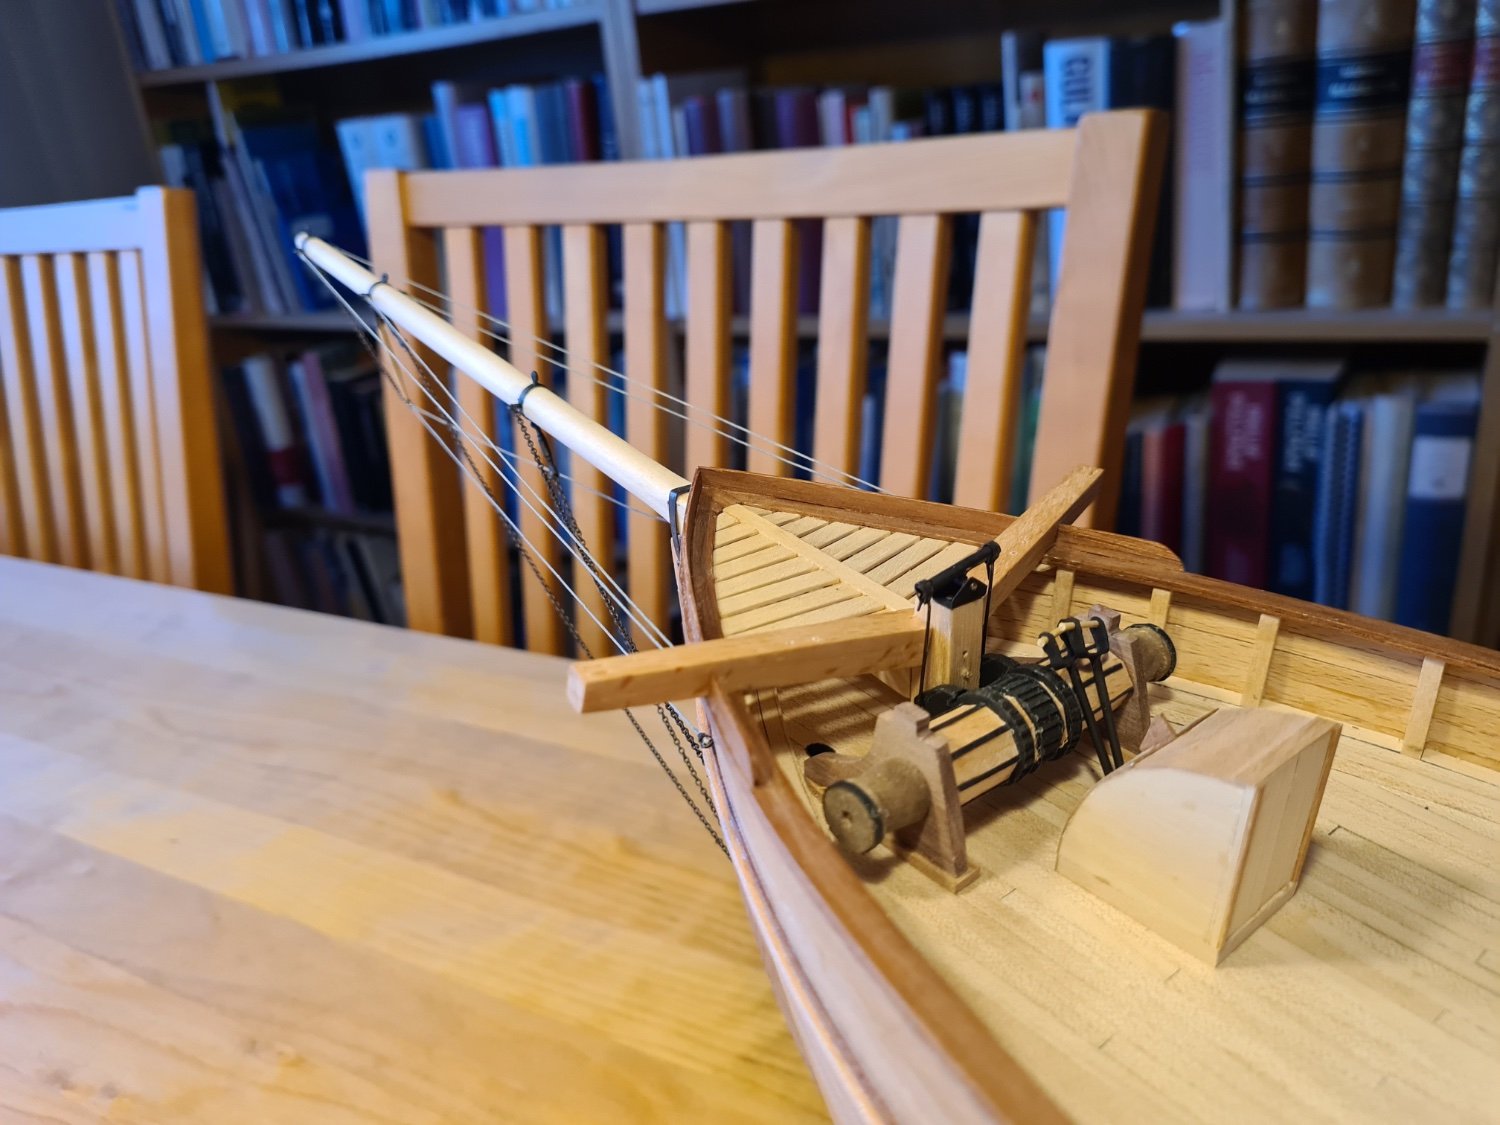
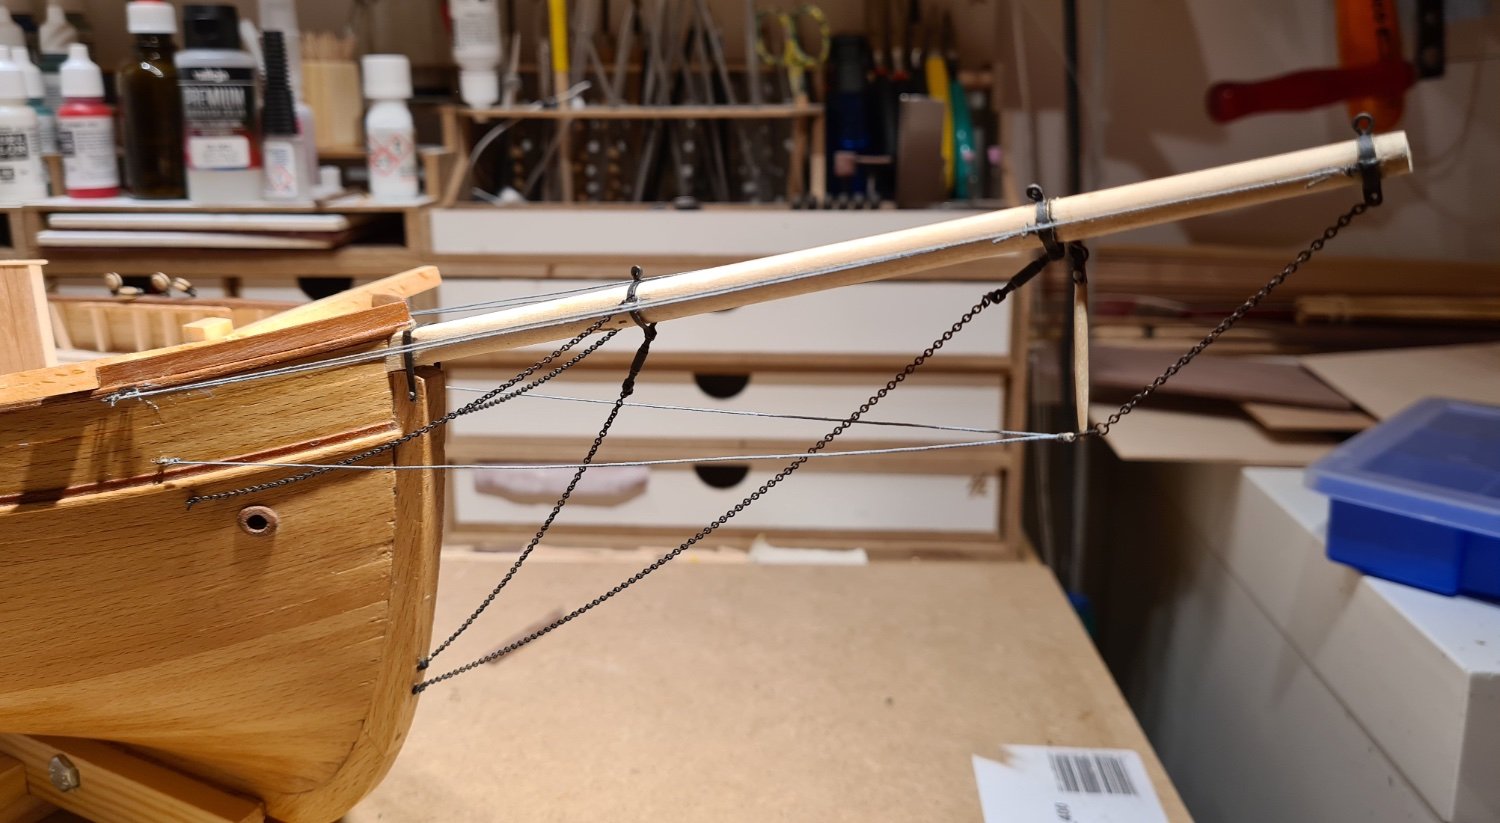
Now I can continue with assembling the parts I have made previously. First is the bow sprit.
Meta originally had a single spar bowsprit, a spike boom. In Billings kit she is, as I have mentioned before, represented with the later rigging. Later, when she was used in films, she was rigged with a jib-boom.
The details of the rigging is mostly taken from this photo of a similar ship. The photos of Meta I'm using seems to show a very similar rigging, but are taken from another angle so the details are not as clear.
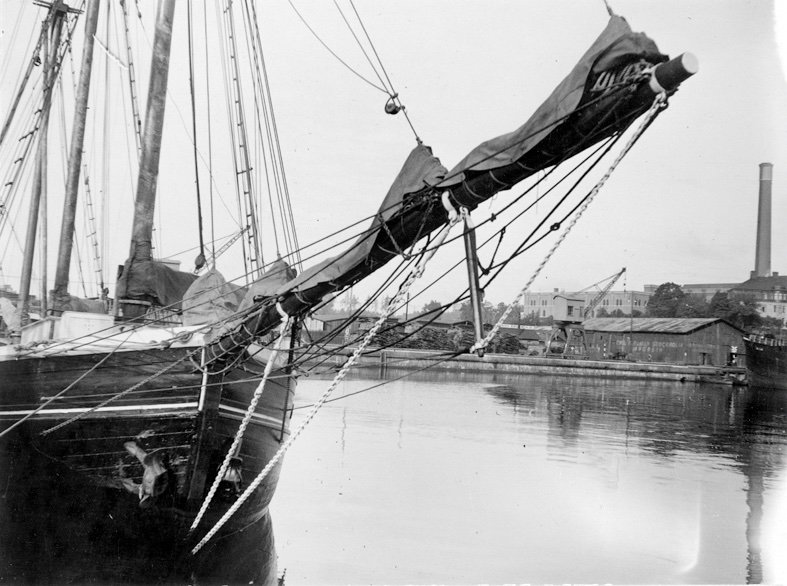

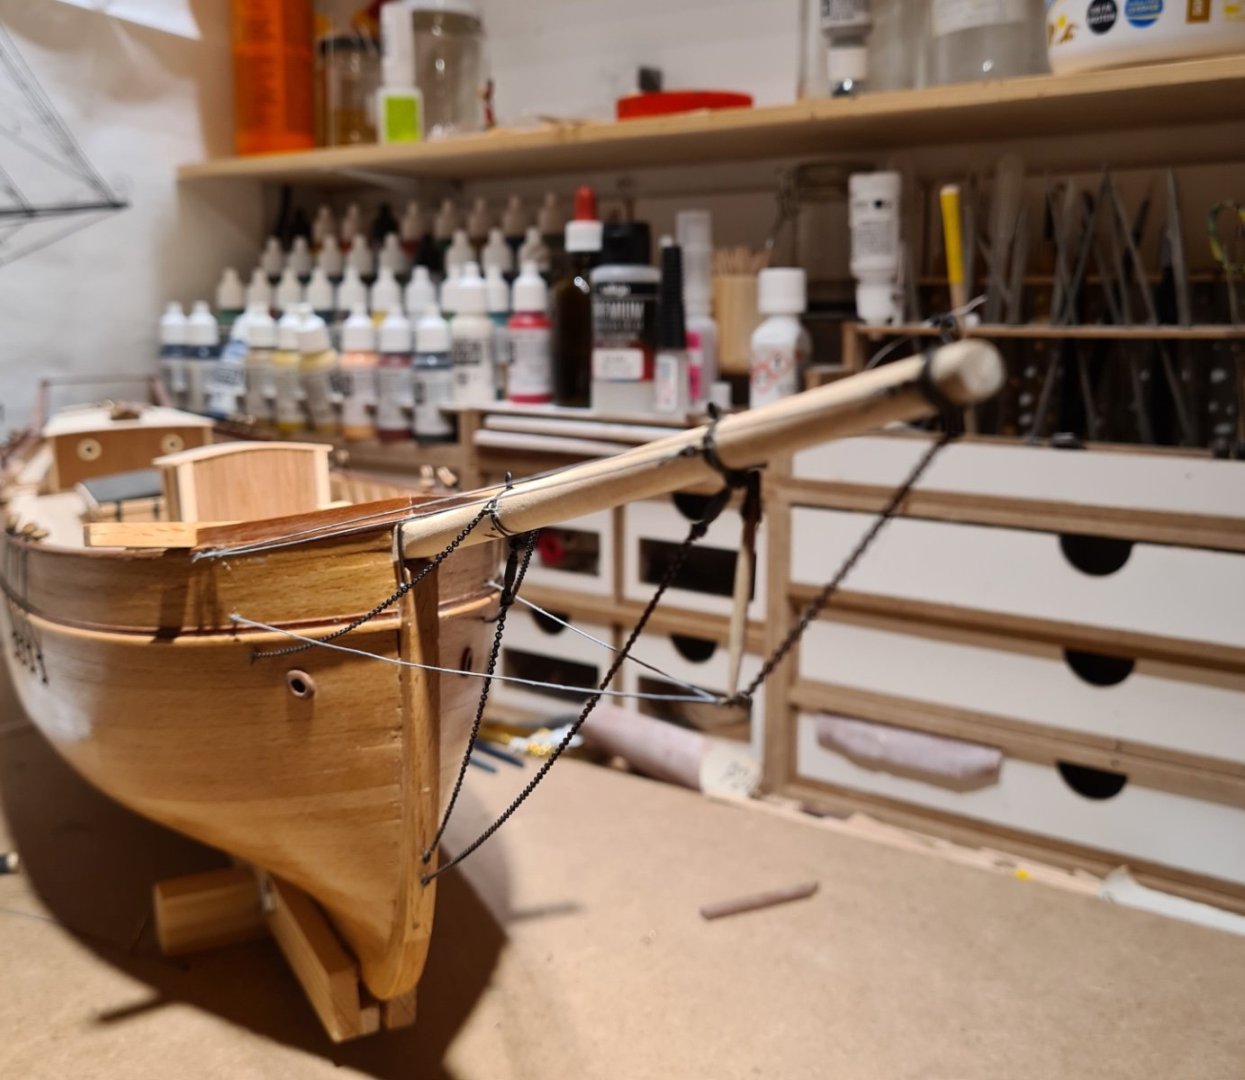
The chains are actually provided in the kit material, and is one of few parts that I will use.
-
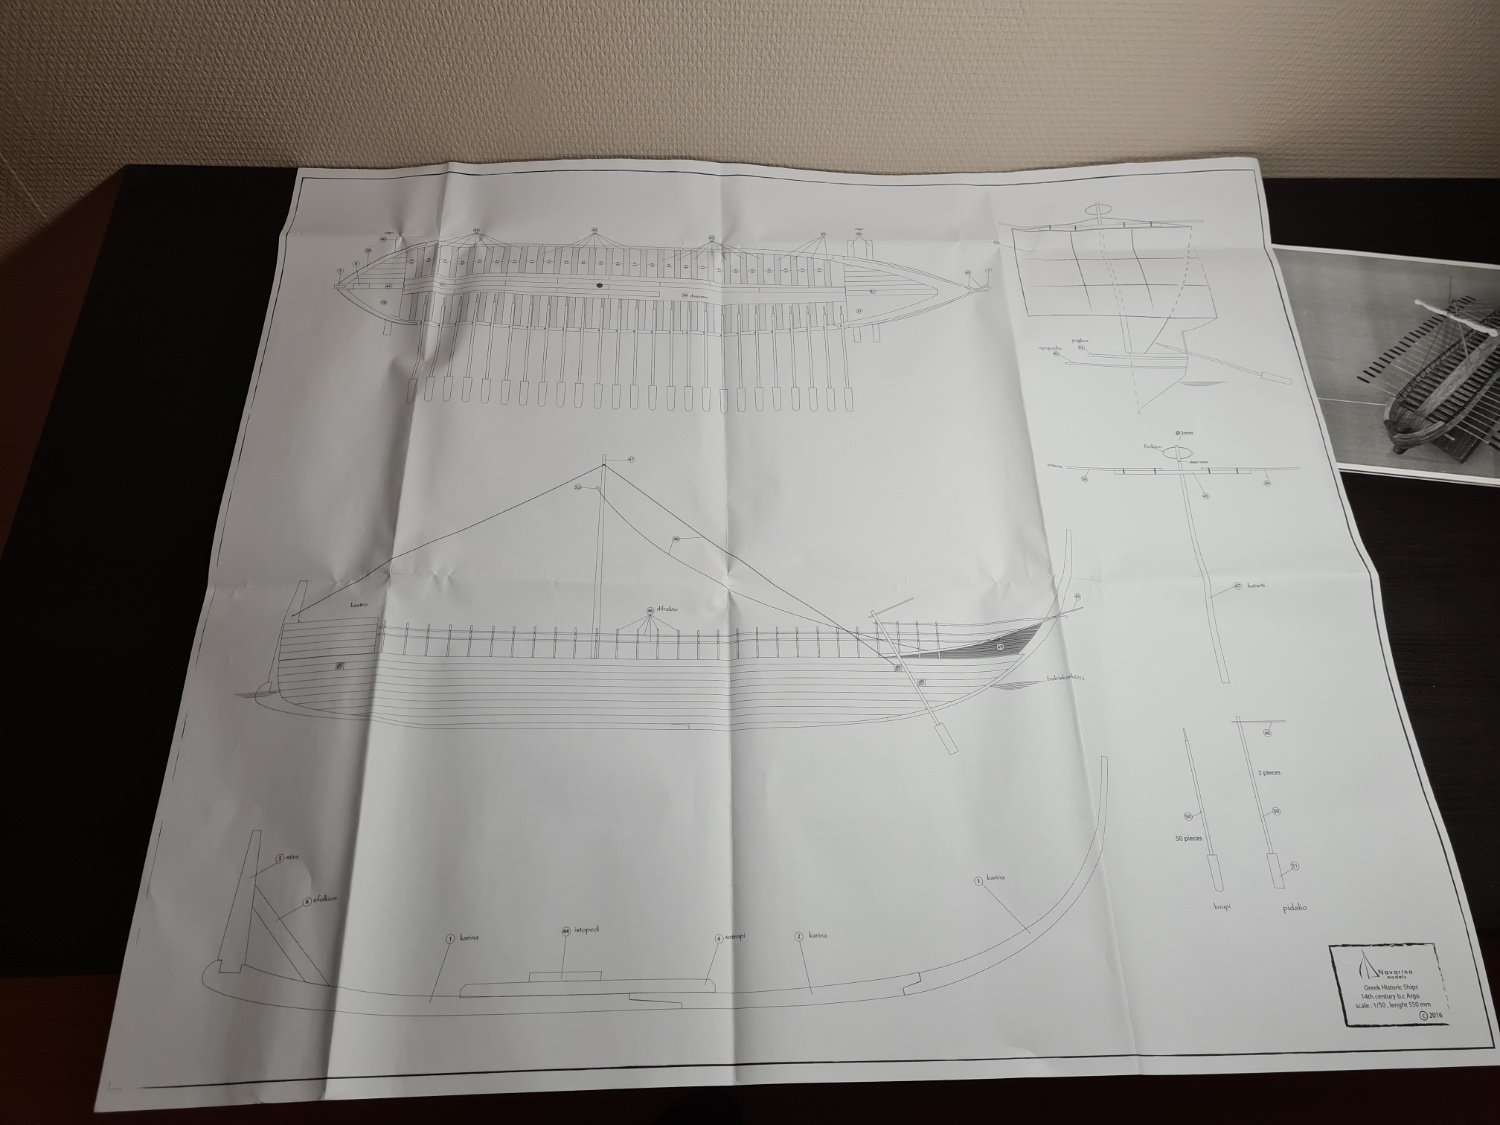
The first step of the build, according to the instructions, is the keel assembly.
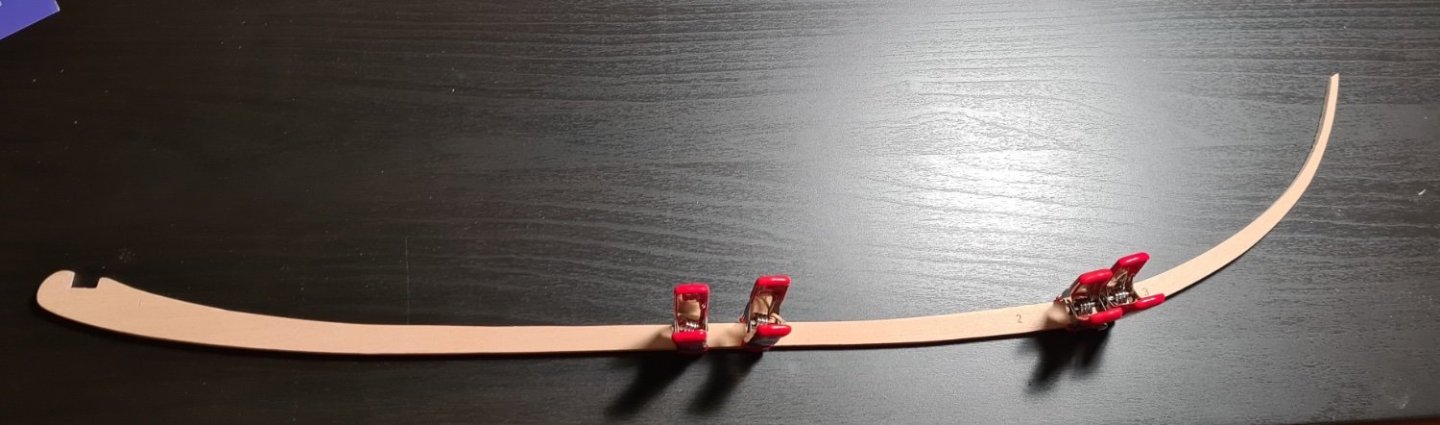
The pieces for the keel are packaged in a separate bag, so they are easy to find, and are stamped with numbers, so they are easy to identify. A slight problem though, all pieces does not match the plans. When I checked the assembled keel against the plan it did not match.
I was missled by that everything was so well prepared. But in fact the middle piece of the keel is too long, and the scarf joints are cut in slightly wrong angle. Or are they? Is it the pieces that are correct and plans that are wrong?
I decided to not continue with the keel but build the two sides first and then check how to best make the keel fit later.
Now there will be a couple of weeks until I can continue.
- ubjs, GrandpaPhil, Harvey Golden and 2 others
-
5
-
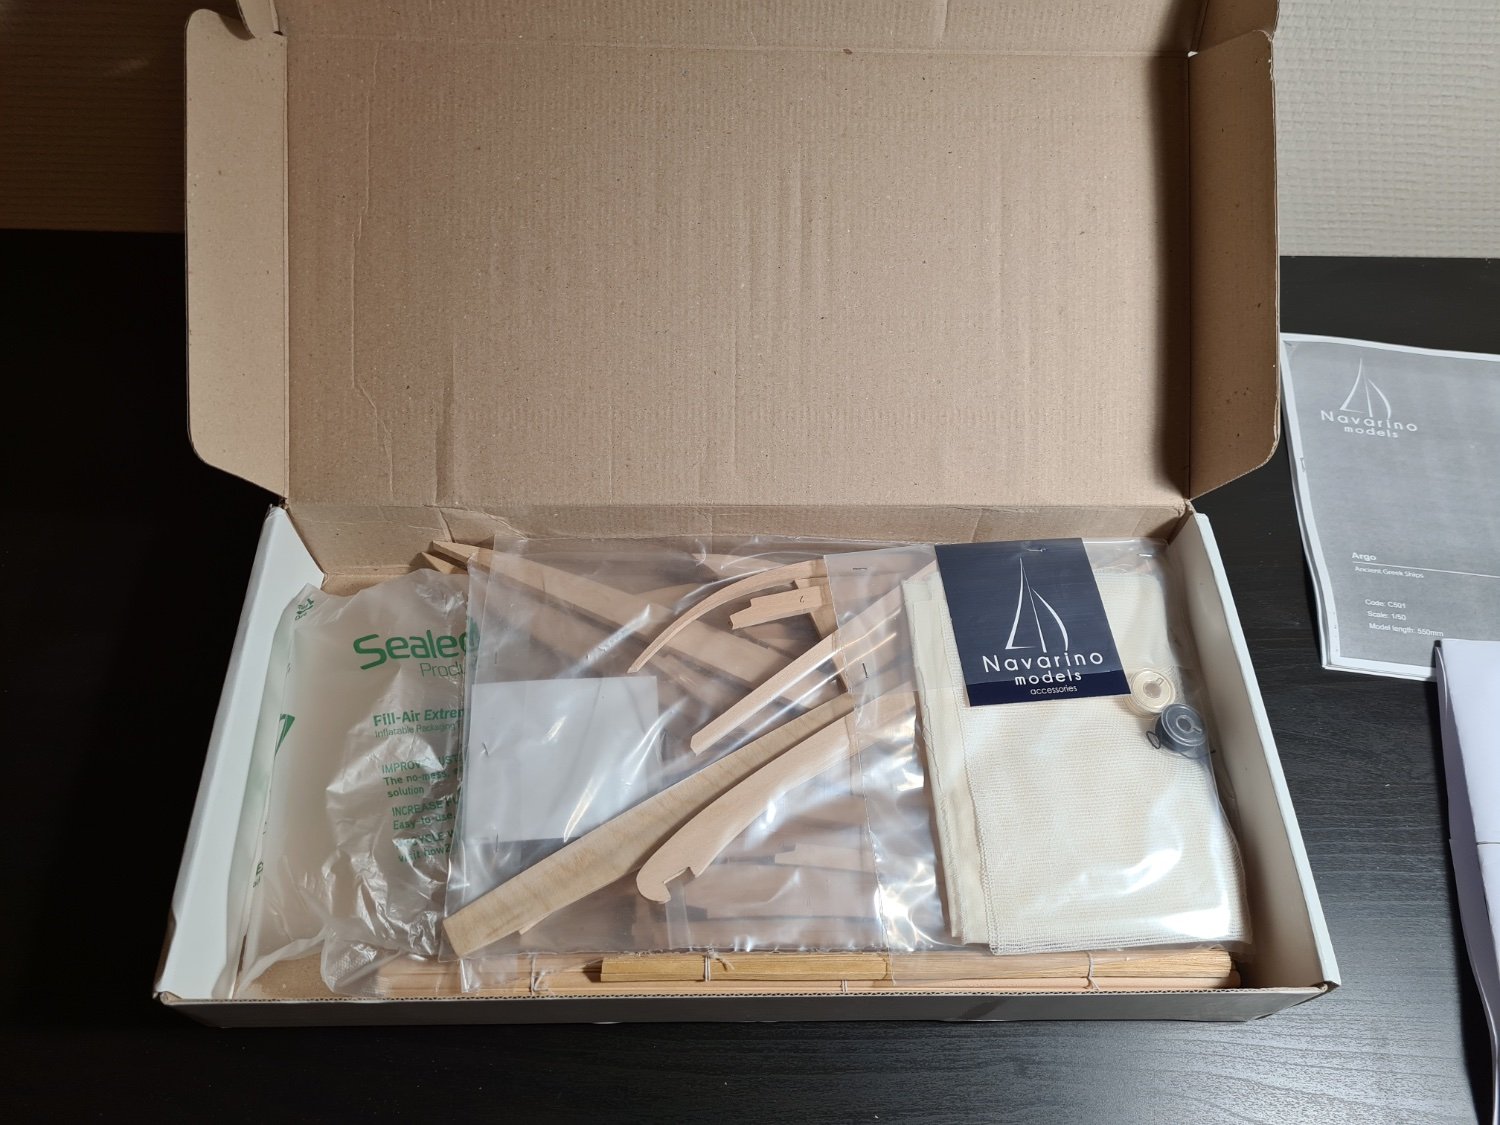
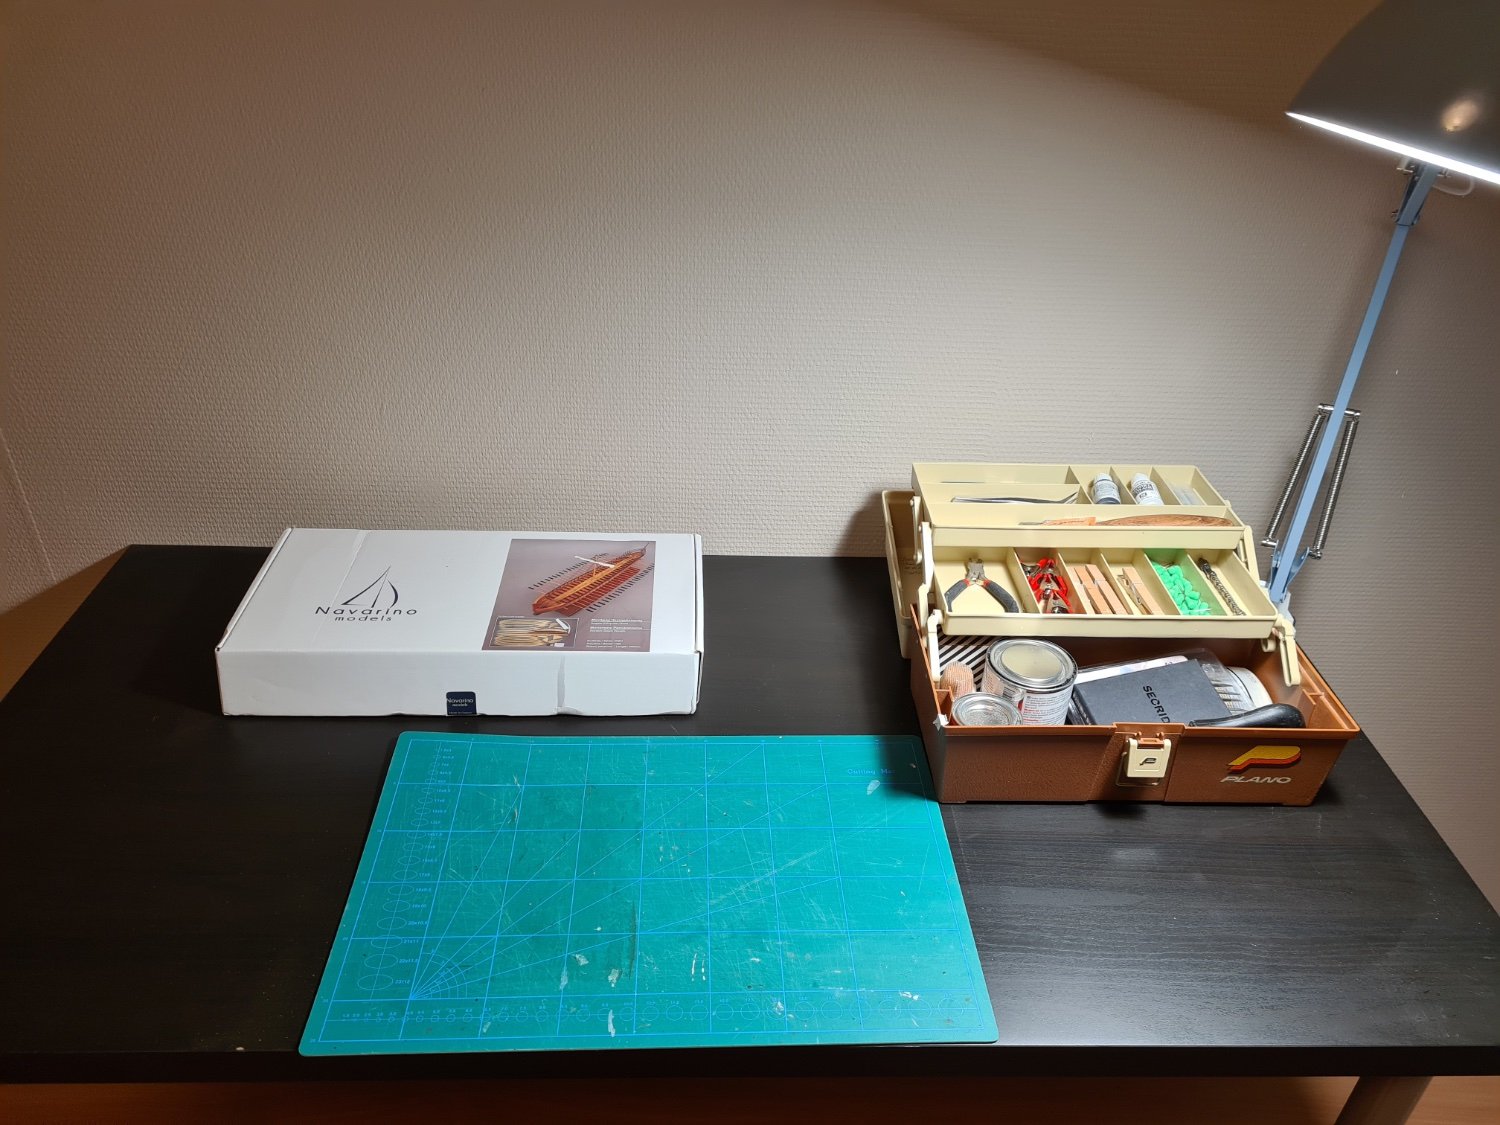
I have not seen any build logs of this kit, so I thought I should start by a brief review of the content of the box.
The box is not big and not even completely full. A part of it is filled with an inflated plastic bag to stop the rest from rattling around. This is not a complex model with many parts...

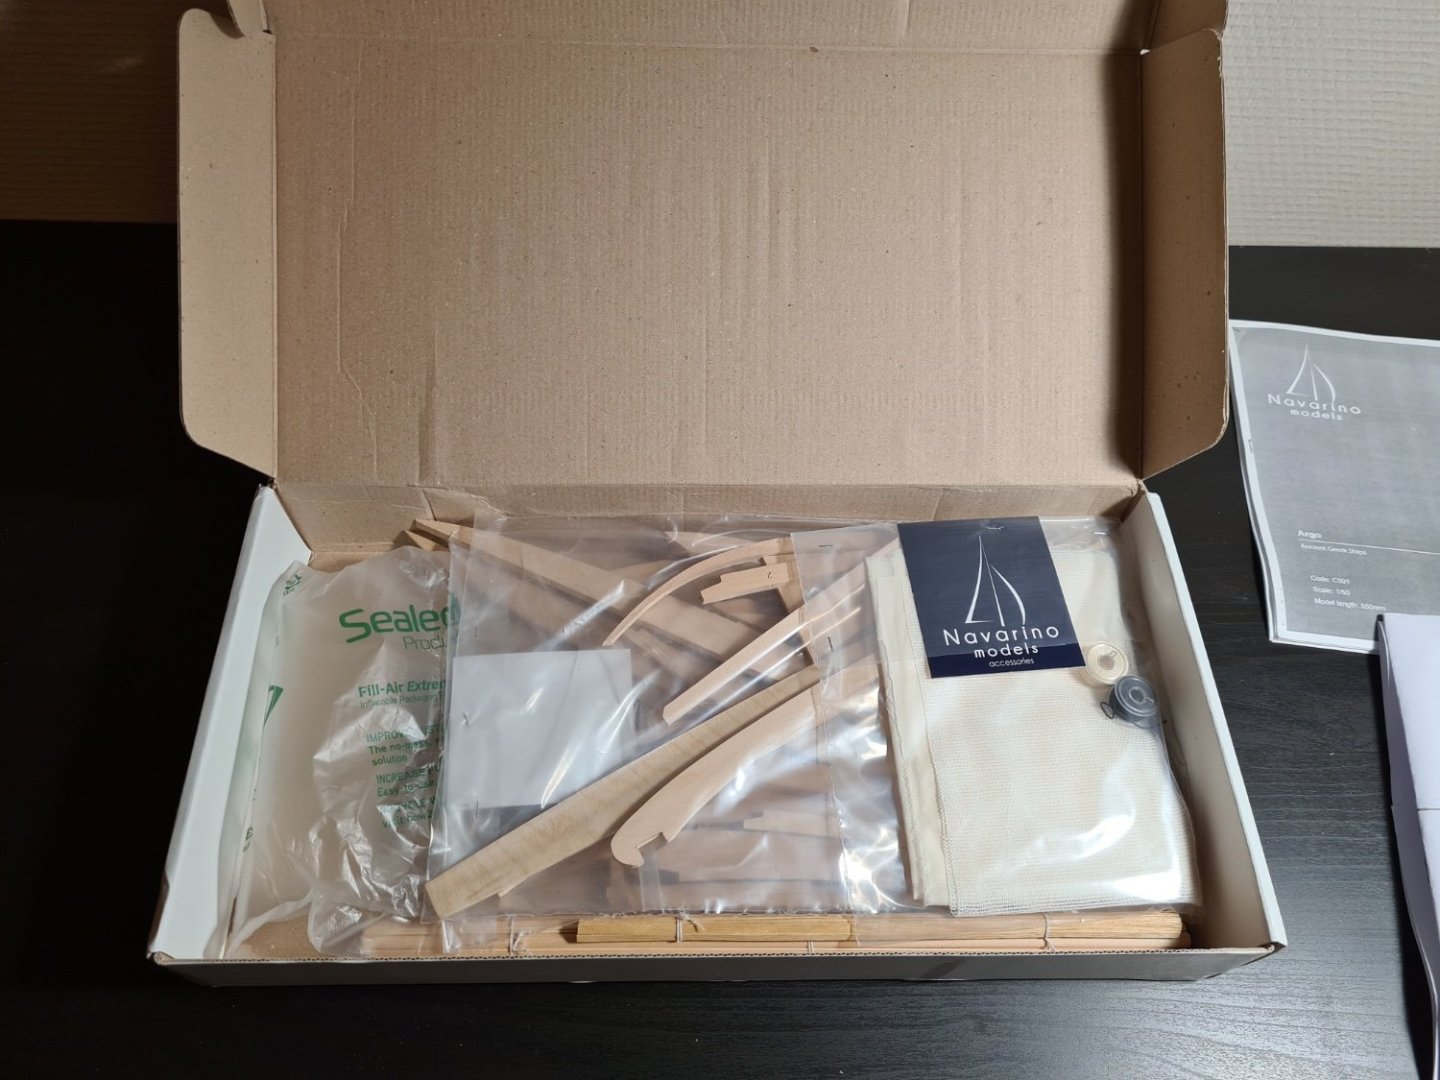
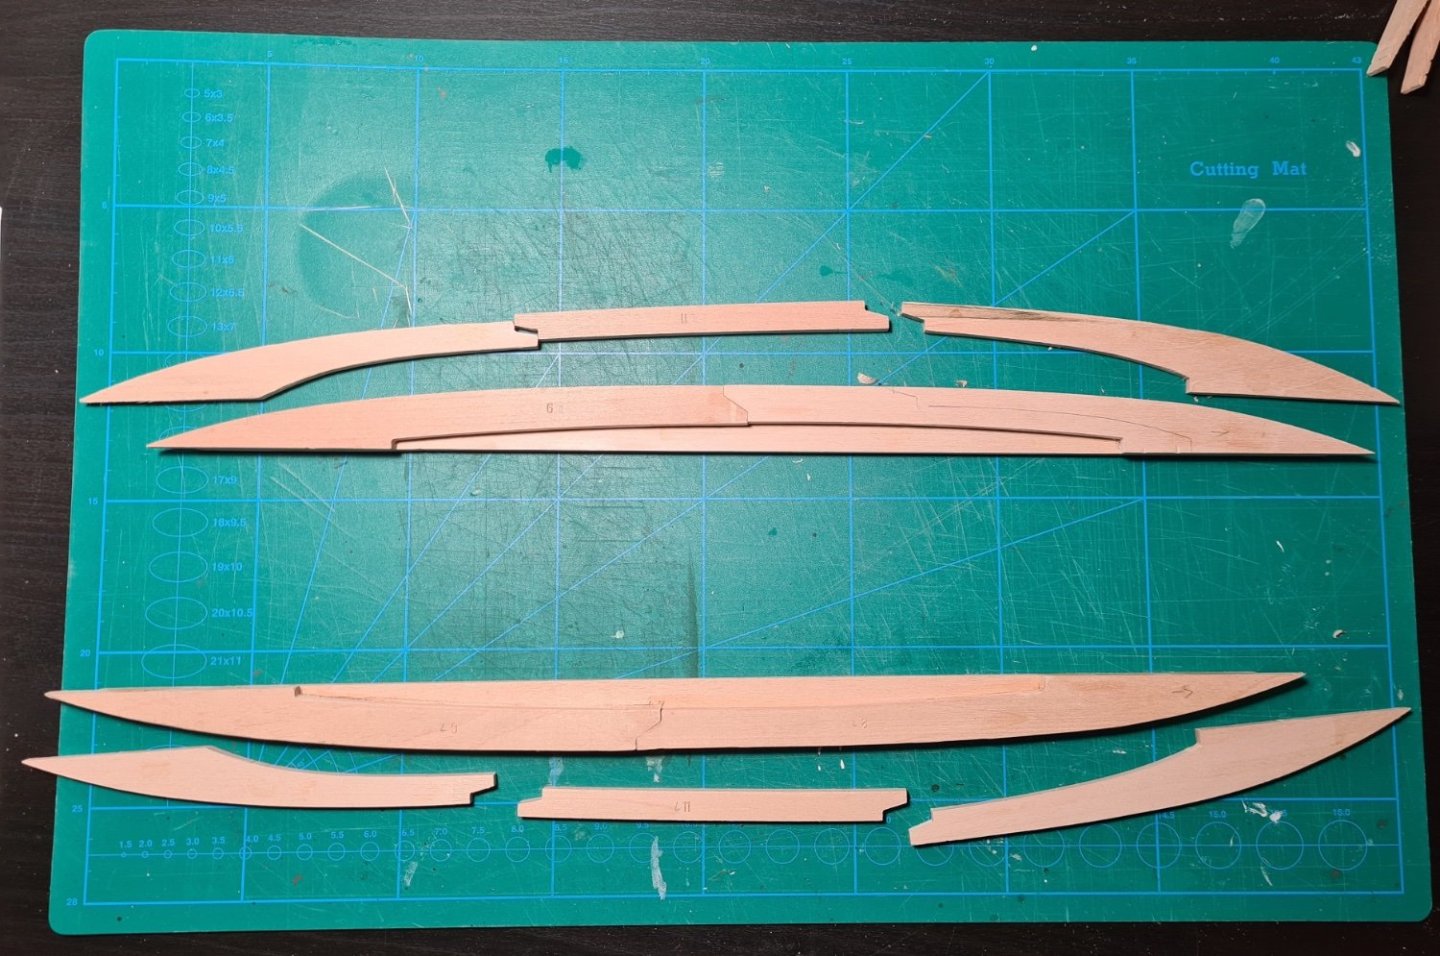
The kit mostly consists of pre-sawn pieces that will be laminated in a sandwich fashion to form two hull halves. In between them there is the keel assembly. Each is packaged in separate plastic bags. The material is described as either basswood or lime wood. I think that it is lime wood in my kit. I guess it might differ depending on availability.
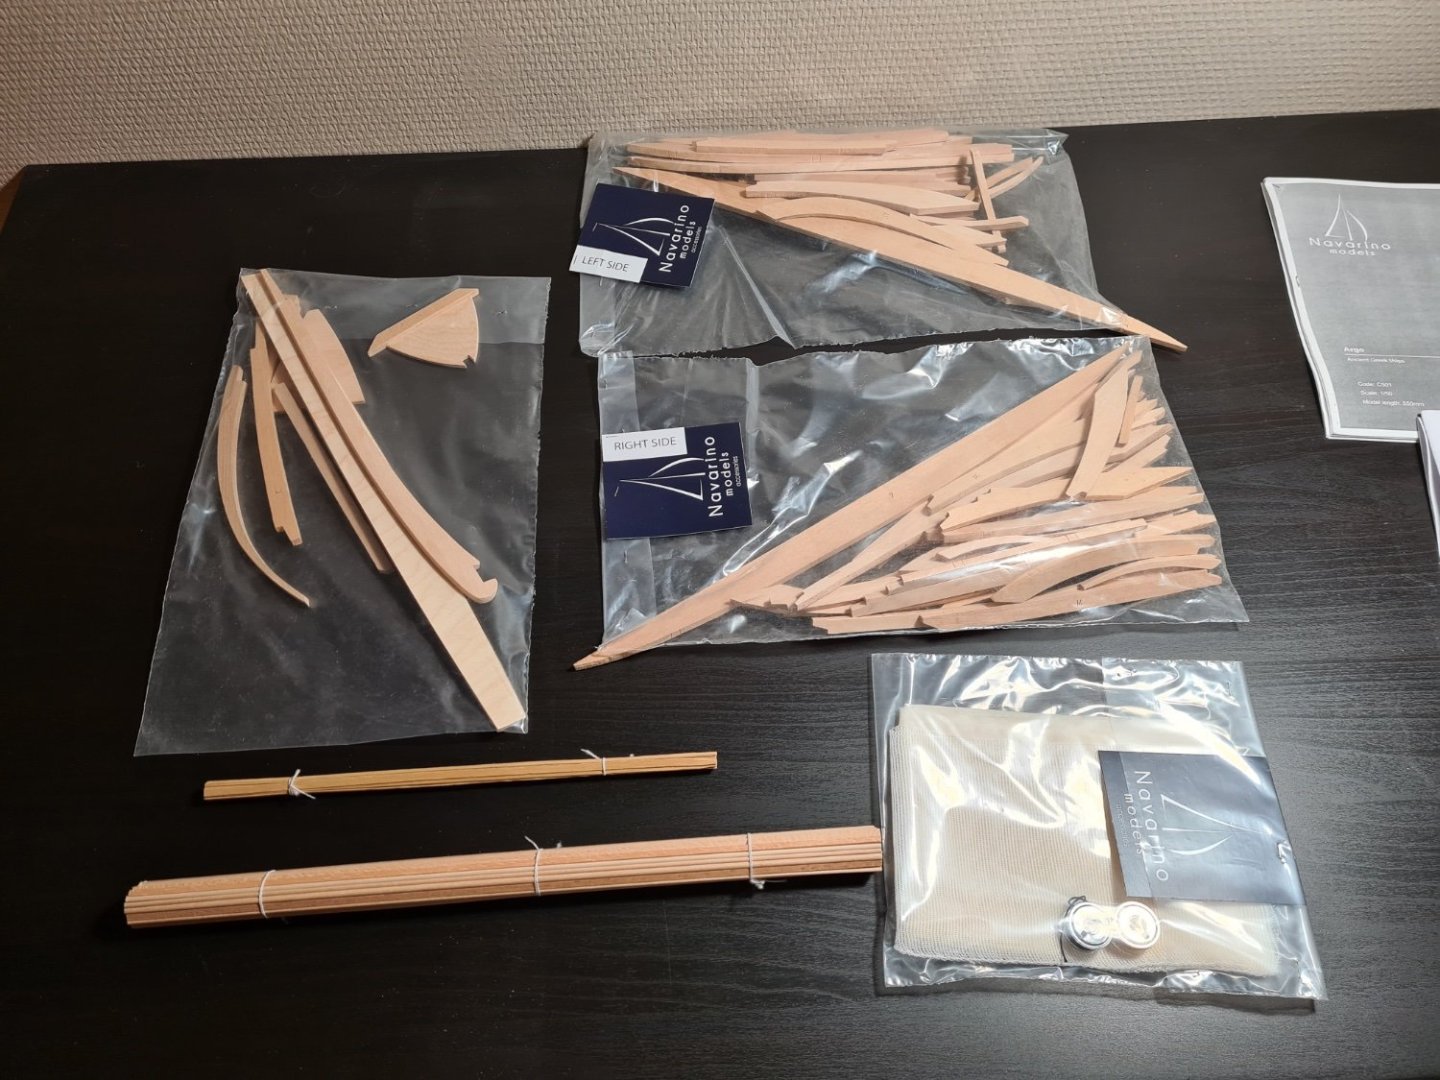 The kit contains full sized plans of the modell, and also of all the parts for the hull (not shown).
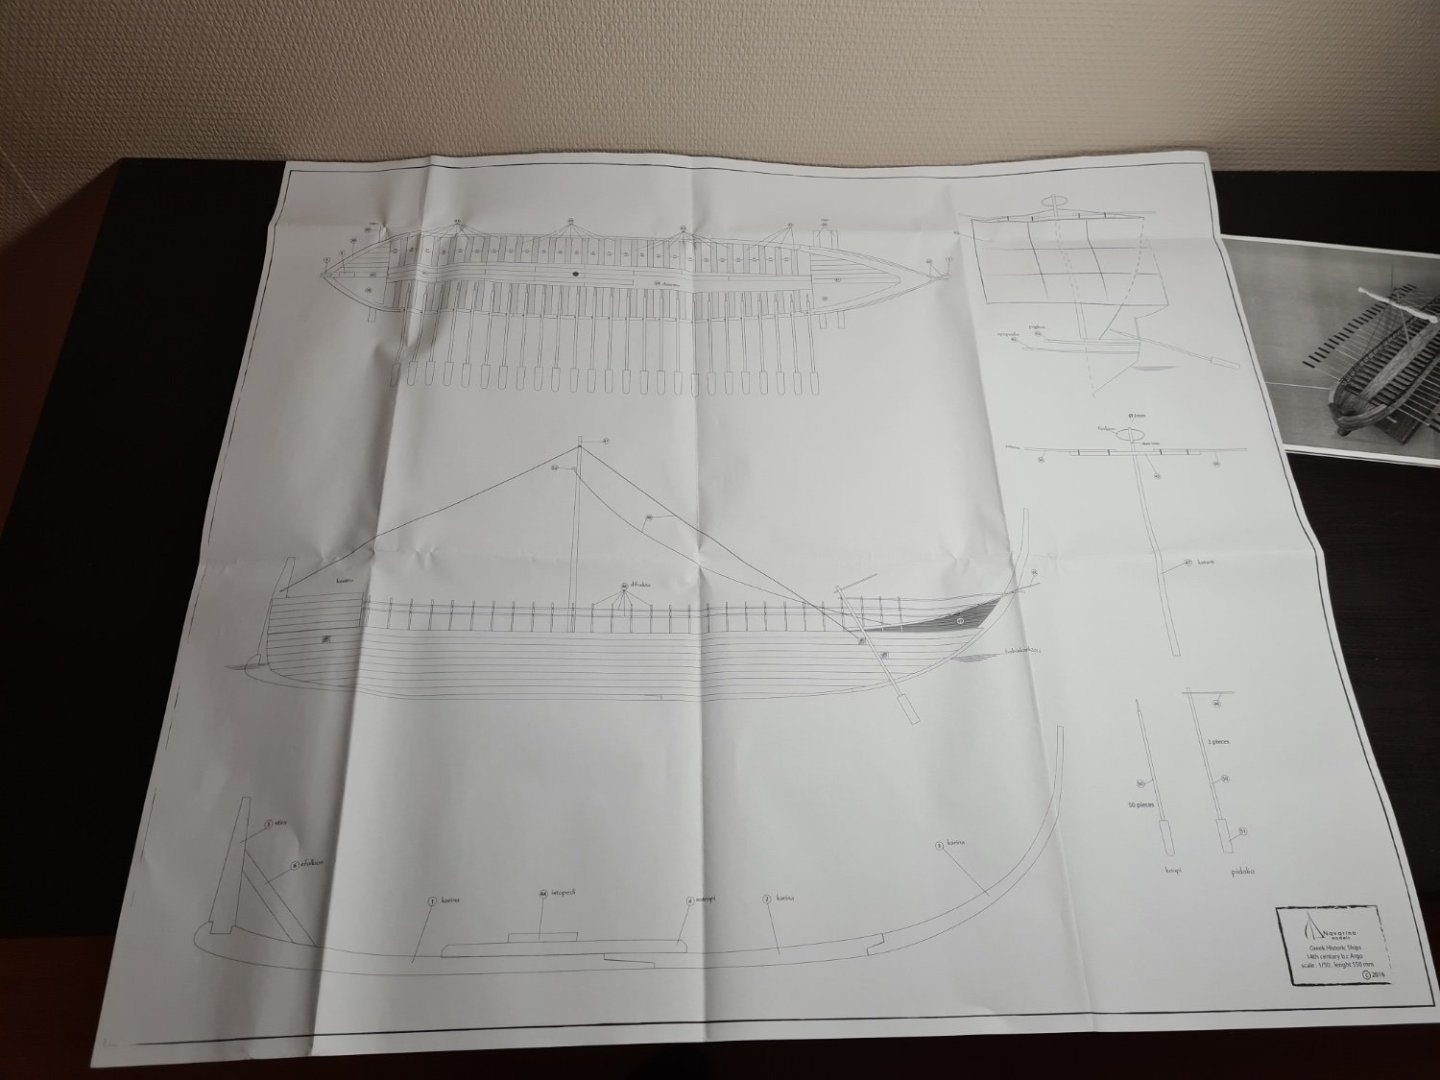
The kit comes with a relatively detailed instruction for such a simple model. Unfortunately the translation of the instruction to English is not perfect. This leaves the builder with a bit of interpretation to do.
- GrandpaPhil, ccoyle, ubjs and 3 others
-
6
-
Some years ago I finally read the Iliad and the Odyssey. It was about the same time as I started building ship models. I got inspired and wanted to build a ship like those that the greeks sailed to Troy in. As this was at the start of my career as a ship modeller I did not think I would be able to build one from scratch, so I looked for a kit. I found one from Navarino models of a Pentikontoros, that is one for fifty rowers.
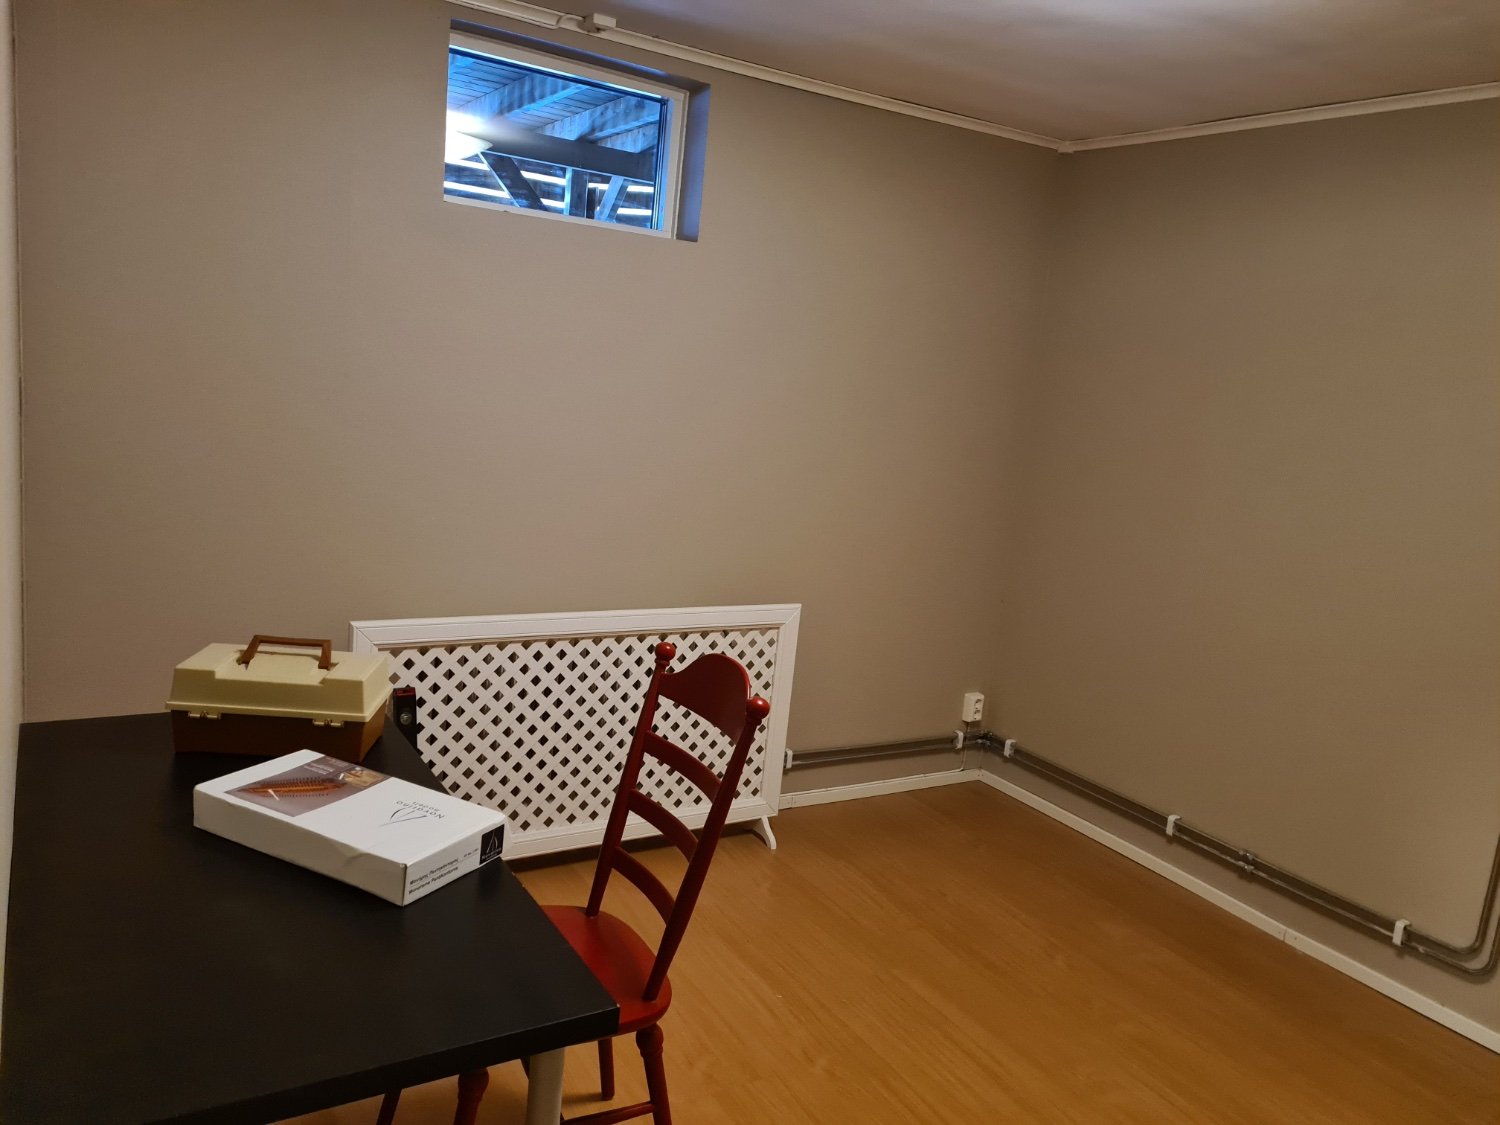
As my shipyard was busy at the time, and have been since, the kit was put in the stash. Now I have just got access to another place to build models at, our new vacation home. In the basement there I plan to outfit a model workshop.
Since it currently lack most of any kind of equipment a simple kit could be a good place to start.

-
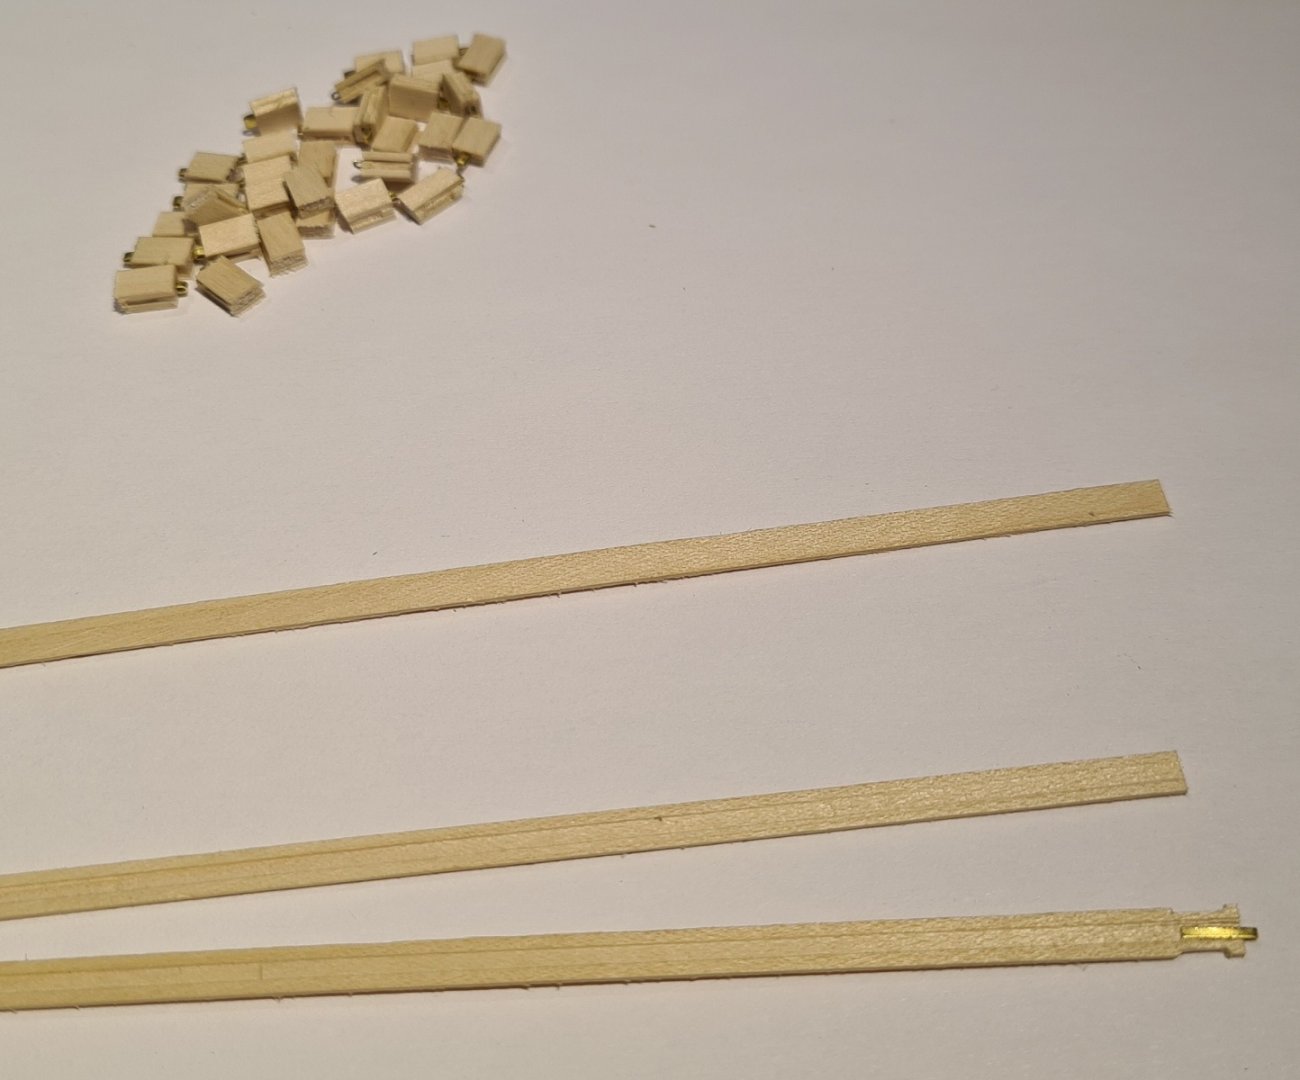
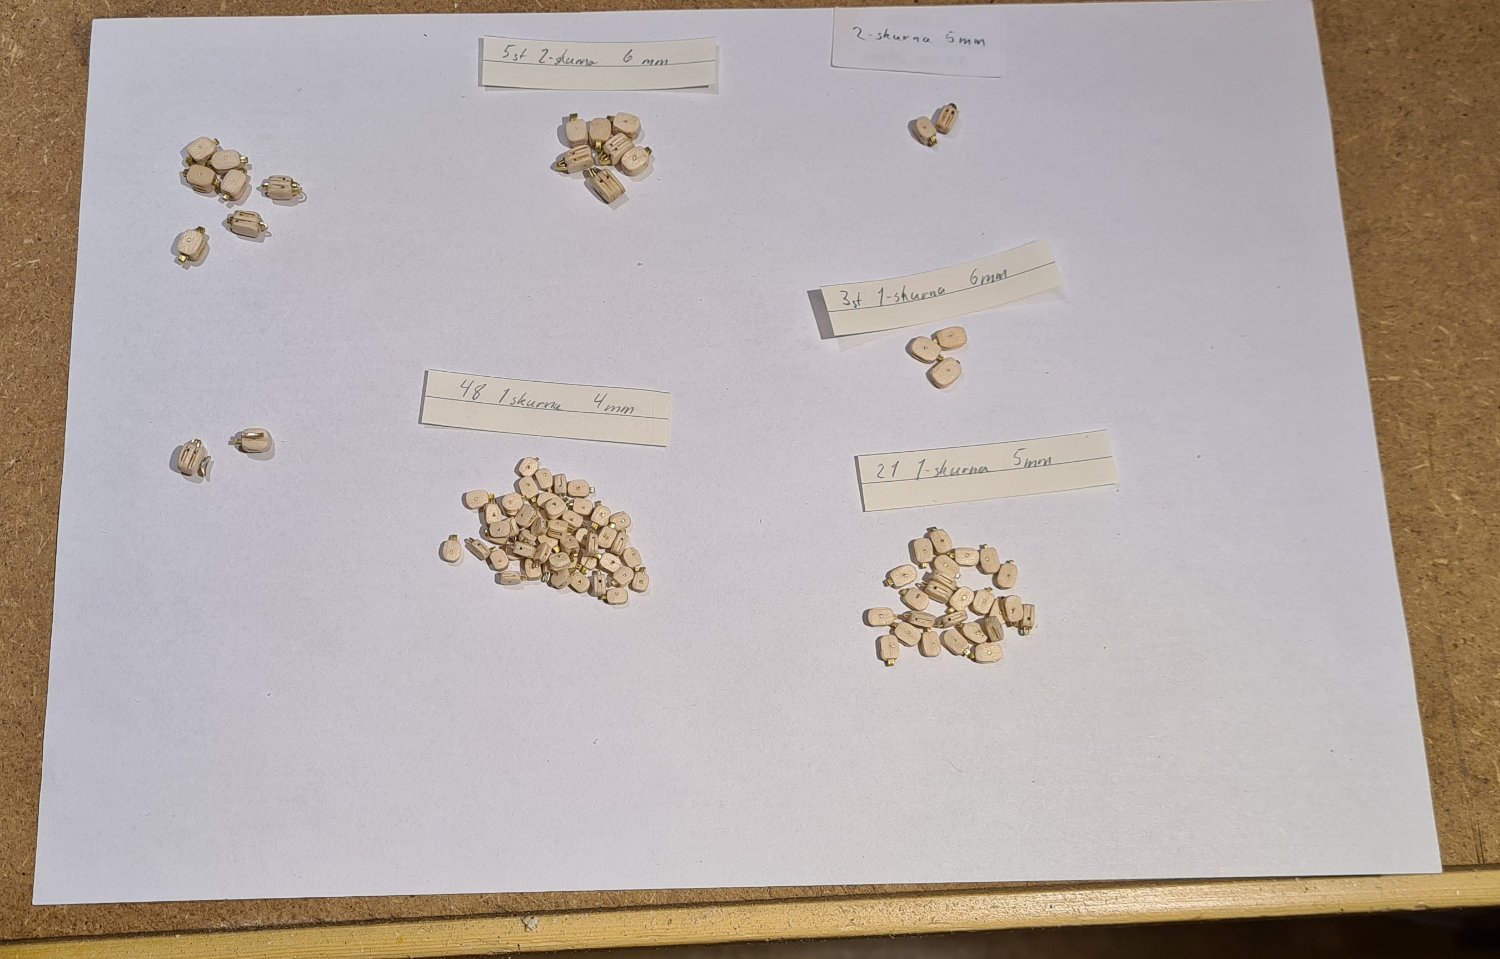
Finally something to share in this build. Every piece is a model in its own right...

So some 70 models later, all the blocks are done.
Now I can start with the rigging. But first I will build the stand.
- Keith Black, baskerbosse, Montaigne and 4 others
-
6
-
1
-
About one and a half years ago it was reported that the replica was being sold back to Sweden. I don’t know how it has turned out, but she was reported to be in bad shape and in need of repair.
- Montaigne and Keith Black
-
2
-
Thanks for sharing your memories of building this model, and your encouragement. I indeed have a copy of the book you mentioned. I have had some thoughts about building a model of the brig Gerda av Gefle sometime in the future. But I have ideas for many other models as well, so we will see…
- Montaigne, Keith Black and clearway
-
3
-
I got the idea for my method mostly from the kits of internally strapped blocks that Syren sells. Mine does not look as nice, at least not yet. But I can say that I built them myself 😁
I have not seen KeithAugs method, but I will check it out.
- Wintergreen and Keith Black
-
2
-
The progress I still rather slow. I have started to build the blocks. The rig will need about 90 blocks of various sizes. From 4 mm to about 6 mm.
At the time when Meta was built blocks were internally strapped. I build them from a laminate of wood with a brass strip folded between. They are held together with CA glue and a brass rivet.
In the top middle there are a few finished ones that I built first to test out my method. I hope that the rest will look better as I get more practice.
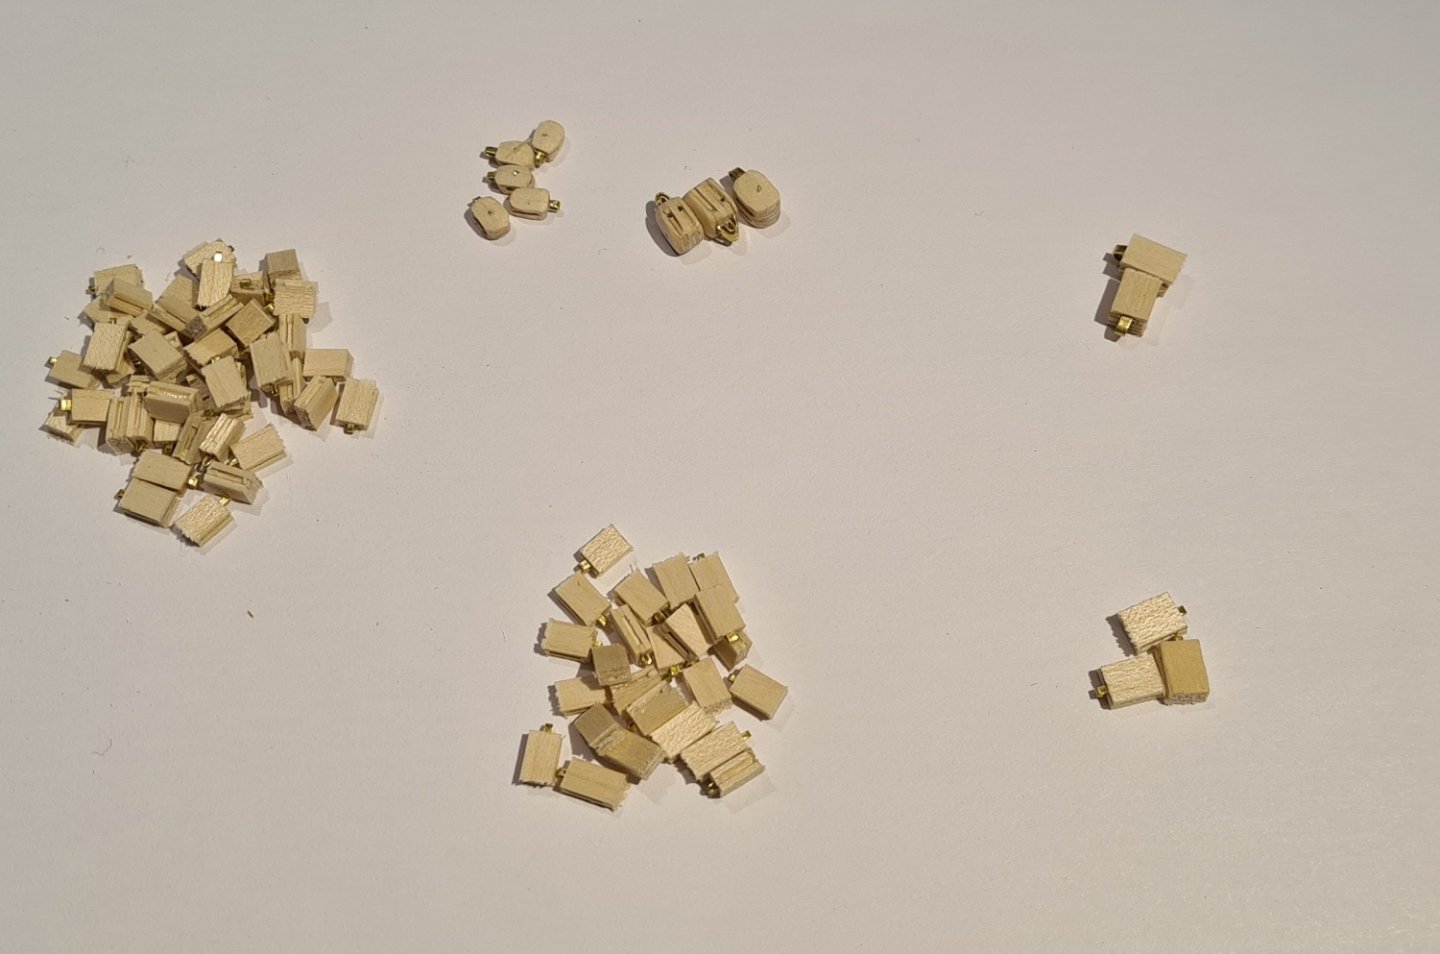
Cheers
- clearway, Wintergreen, Prowler901 and 1 other
-
3
-
1
-
Welcome to MSW! I wish you luck in your build of this model. When you get started I suggest that you start a build log here at the site. Then you can get help and encouragement from fellow modellers.
For my Meta I did not just buy the same dimensions as in the kit. Instead I made som research for more scale accurate alternatives.
The beech strips I bought for the hull were 7x2 mm. I had a photo where I could count the number of planks from the deck level to the water line. From that I could estimate the real plank width. The thickness of the strips was determined by availability. I would have preferred 1.5 mm, but could only get 2mm.
For the deck I replaced the subdeck from the kit with 1 mm lime sheets that I already had. For the planking on top of that I got a 0.5 mm maple sheet, from which I cut the strips myself. The width I estimated from photos of the decks of similar ships.
I also got a 0.8 mm maple sheet for other details and for the life boat. I have a scanned copy of the plans for a life boat from the same period as Meta. I got the thickness from that.
For the keel I got a 7mm thick sheet. I estimated the width of the keel from plans of similar ships.
Cheers
-
Thanks form the kind words Håkan. Slow and methodical was my method. I basically followed Chucks method of blank bending. I think you will do fine, your framing on the Atlantica looks excellent.
- Nirvana, Wintergreen and Keith Black
-
3
-
Lilla Dan is a nice little ship. I look forward to your build log of it. In general I like the subjects that Billing produces, but few of their fittings.
- clearway, Nirvana and Keith Black
-
3
-
Finally I'm back again. A 50th year anniversary and a lengthy business trip later I'm now back with a small update. This time it's the bowsprit.
With that I can start assembling the deck equipment and the rest of the individual parts. I hope that it won't take as long with that...
-
Back to the workbench again. It has been some weeks of very little building. Mostly because we got access to our new vacation home in the beginning of August.
Now I have managed to finish the chain plates.
- Paul Le Wol, Keith Black, Peanut6 and 3 others
-
6


.jpeg.b6c8cfb1c8e6766cd98237afa9671b39.jpeg)


Meta by bolin - Billing Boats - 1:40 - original fore-and-aft schooner rig
in - Kit build logs for subjects built from 1901 - Present Day
Posted · Edited by bolin
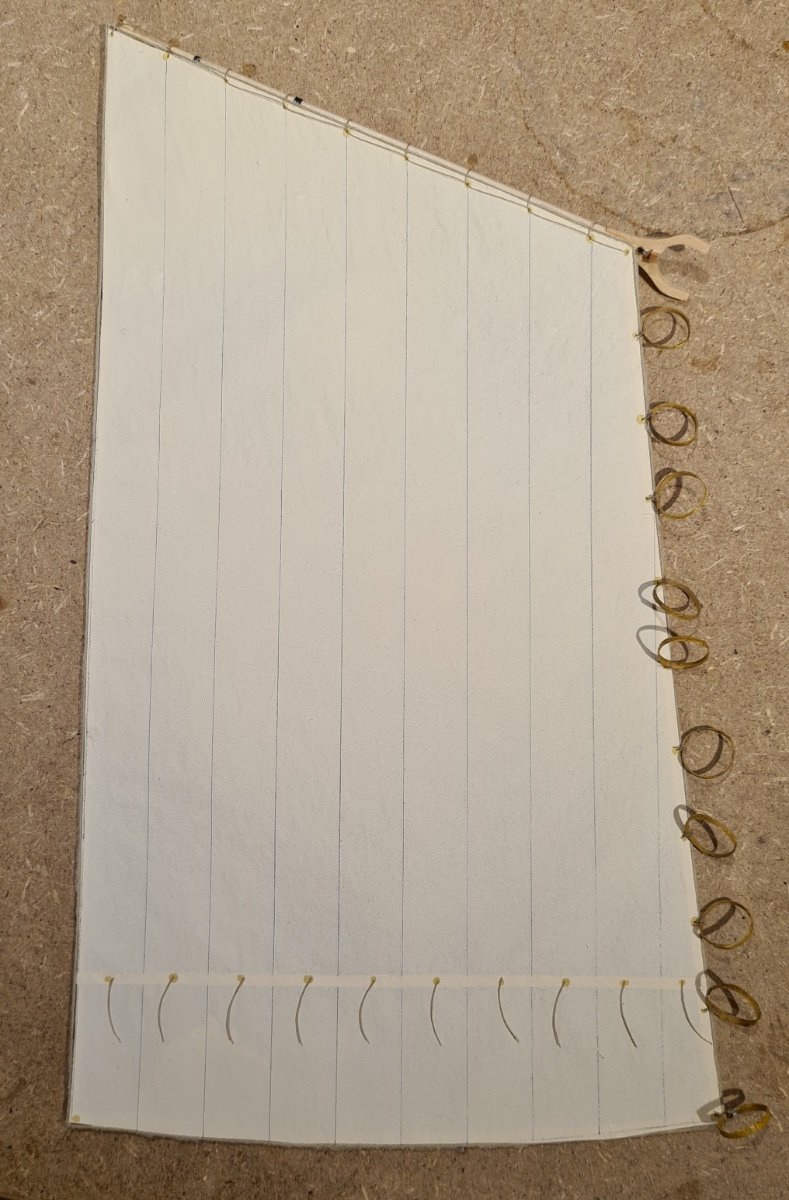
Yes, the bolt ropes are “edge glued” with diluted PVA glue. As you can see, I have not perfected the method. I will need to repair the glue bond in some places before I mount the sails.