HakeZou
-
Posts
318 -
Joined
-
Last visited
2 Followers

-
 HakeZou reacted to a post in a topic:
HMS Erebus by clearway - OcCre - 1/75 scale - bashed
HakeZou reacted to a post in a topic:
HMS Erebus by clearway - OcCre - 1/75 scale - bashed
-
HakeZou reacted to a post in a topic:
Endurance by theoracle09 - OcCre - 1:70
-
Geowolf reacted to a post in a topic:
HMS Terror by HakeZou - OcCre - 1:75
-
Geowolf reacted to a post in a topic:
HMS Terror by HakeZou - OcCre - 1:75
-
HakeZou reacted to a post in a topic:
Endurance by theoracle09 - OcCre - 1:70
-
Mike Shea reacted to a post in a topic:
Endurance by HakeZou - FINISHED - OcCre - 1:70
-
HakeZou reacted to a post in a topic:
HMS Erebus by clearway - OcCre - 1/75 scale - bashed
-
BobG reacted to a post in a topic:
HMS Terror by HakeZou - OcCre - 1:75
-
clearway reacted to a post in a topic:
HMS Terror by HakeZou - OcCre - 1:75
-
theoracle09 reacted to a post in a topic:
HMS Terror by HakeZou - OcCre - 1:75
-
JacquesCousteau reacted to a post in a topic:
HMS Terror by HakeZou - OcCre - 1:75
-
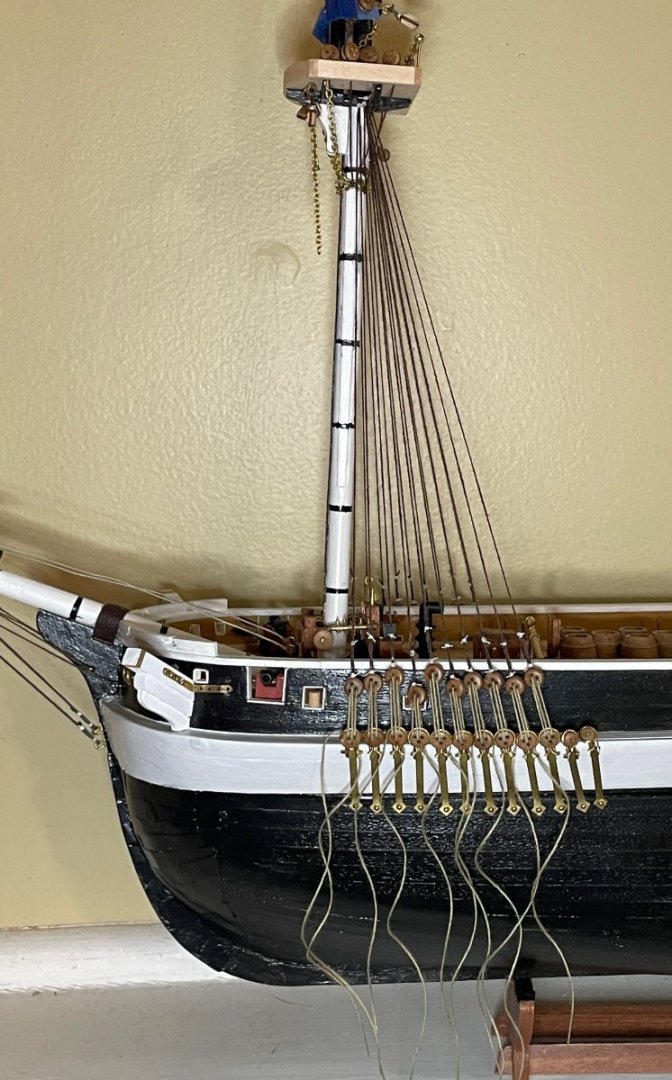
I spent more time in the shipyard this week than I should have...but I have no regrets! I've rigged all of the shrouds on the foremast! The lanyards are still temporary installations. I'll rig the ratlines next, then remove the lanyards so I can more easily access the running rigging. The deadeyes aren't lined up quite as evenly as I thought they would be, but they're close enough to be reasonable. Next steps: install foremast ratlines, install mainmast shrouds, install mizzenmast shrouds.

-
clearway reacted to a post in a topic:
HMS Terror by HakeZou - OcCre - 1:75
-
ccoyle reacted to a post in a topic:
HMS Terror by HakeZou - OcCre - 1:75
-
theoracle09 reacted to a post in a topic:
HMS Terror by HakeZou - OcCre - 1:75
-
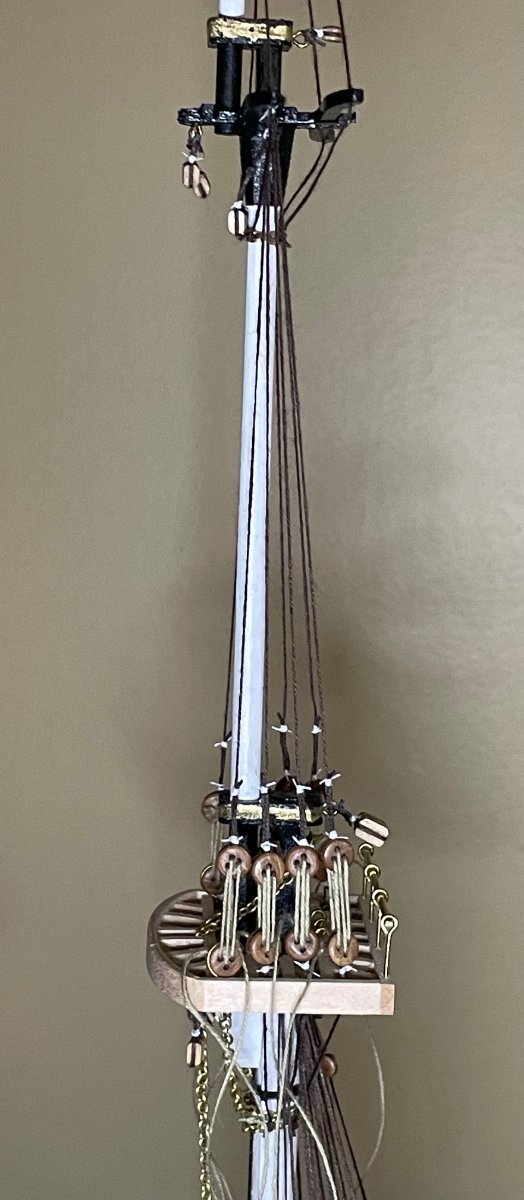
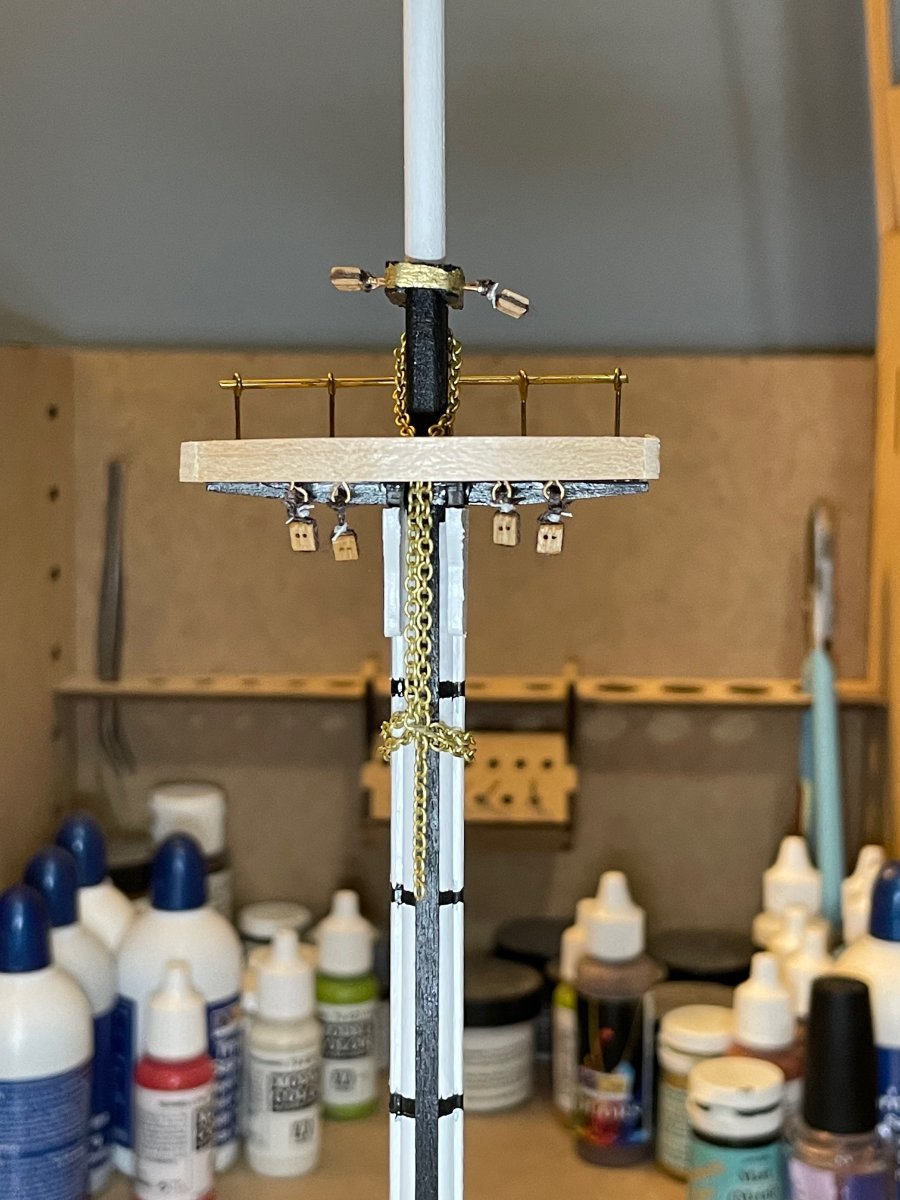
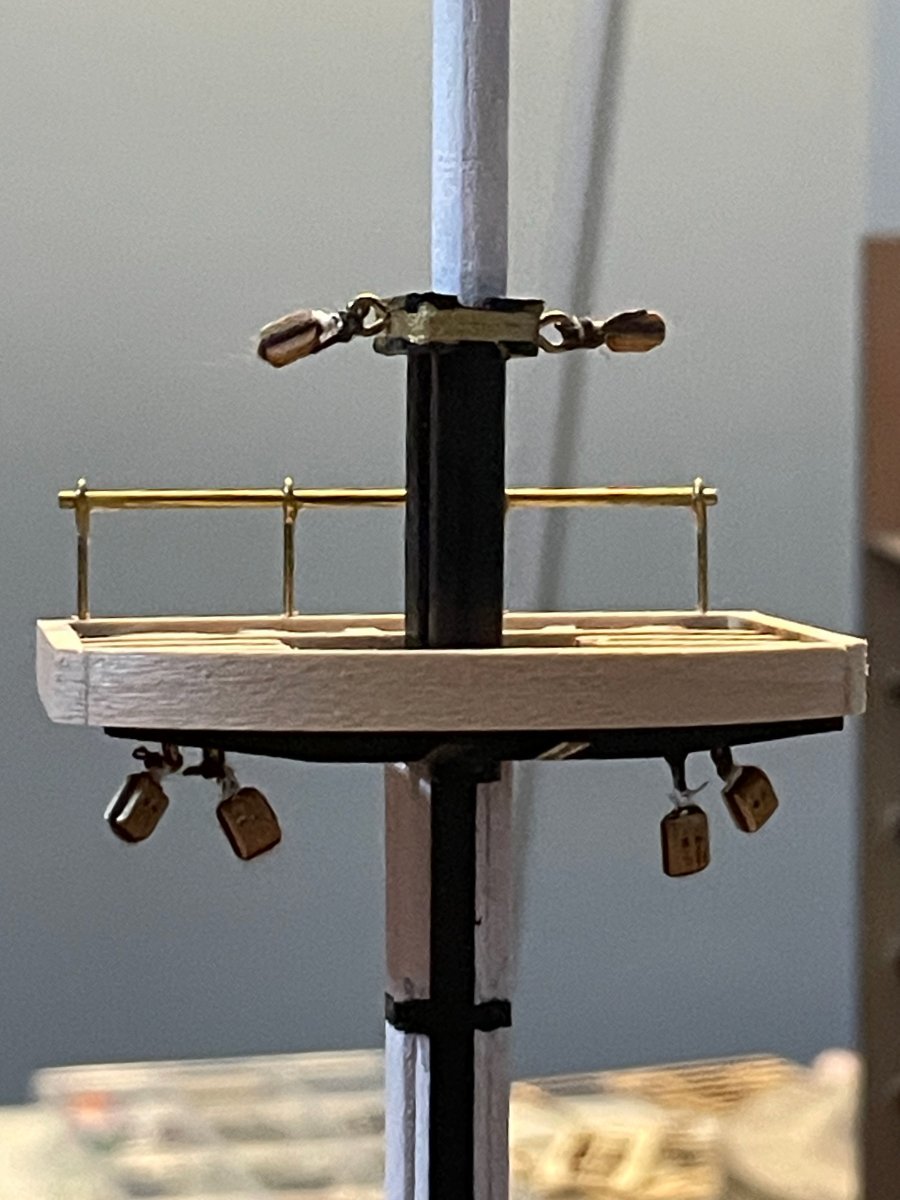
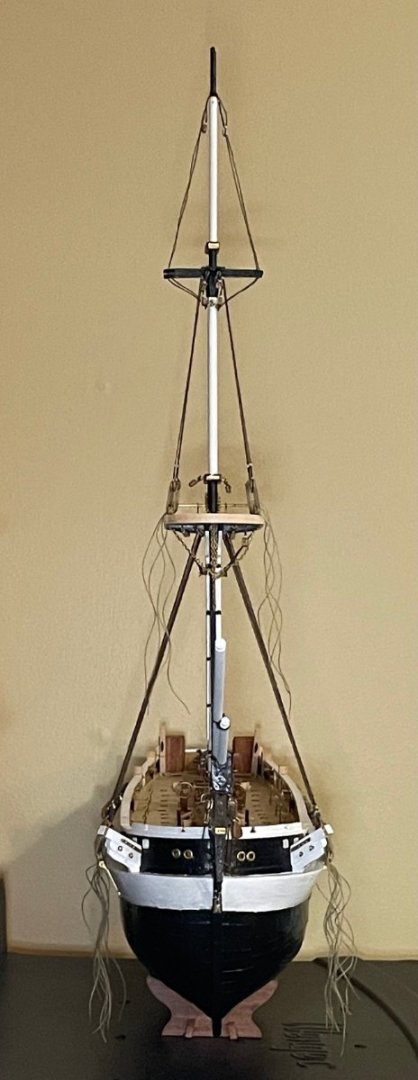
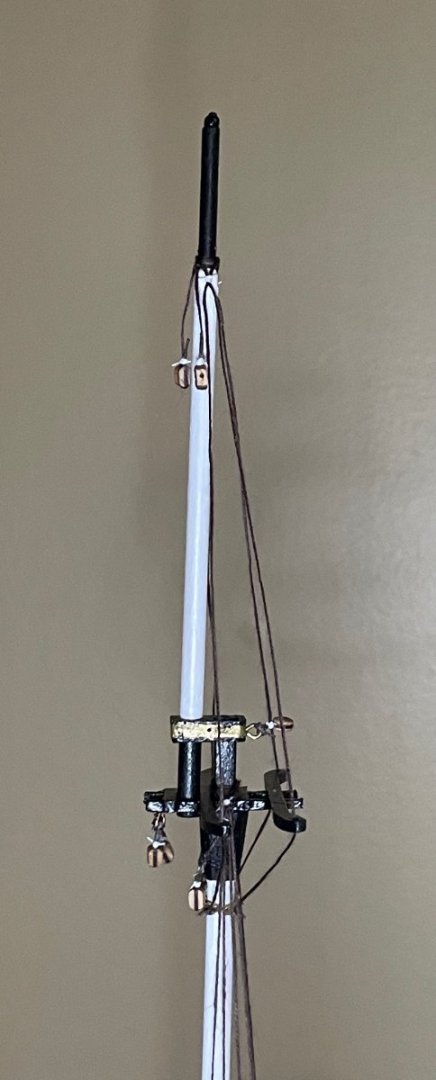
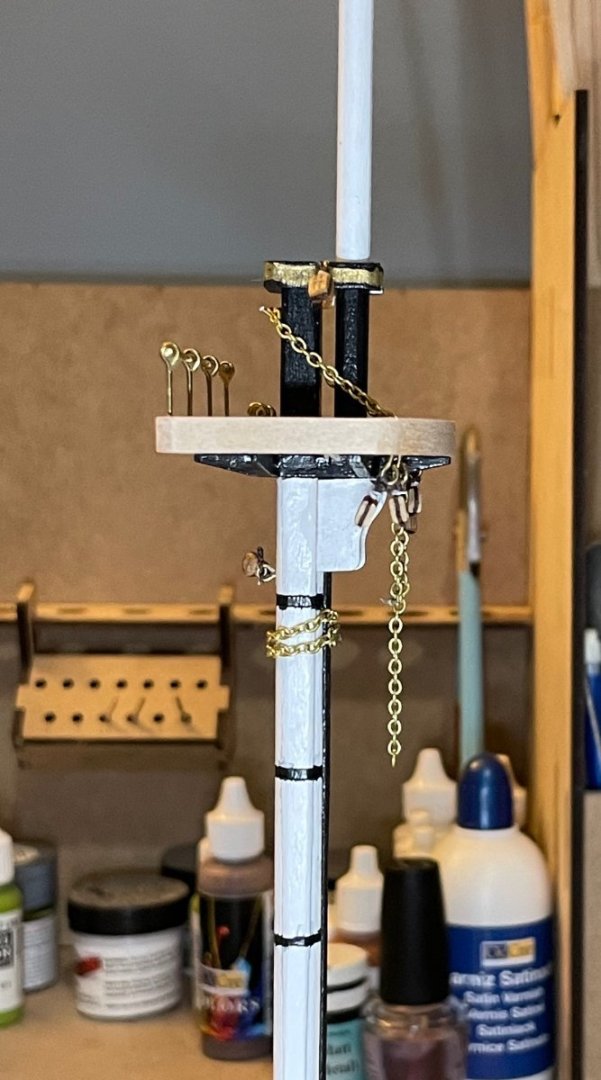
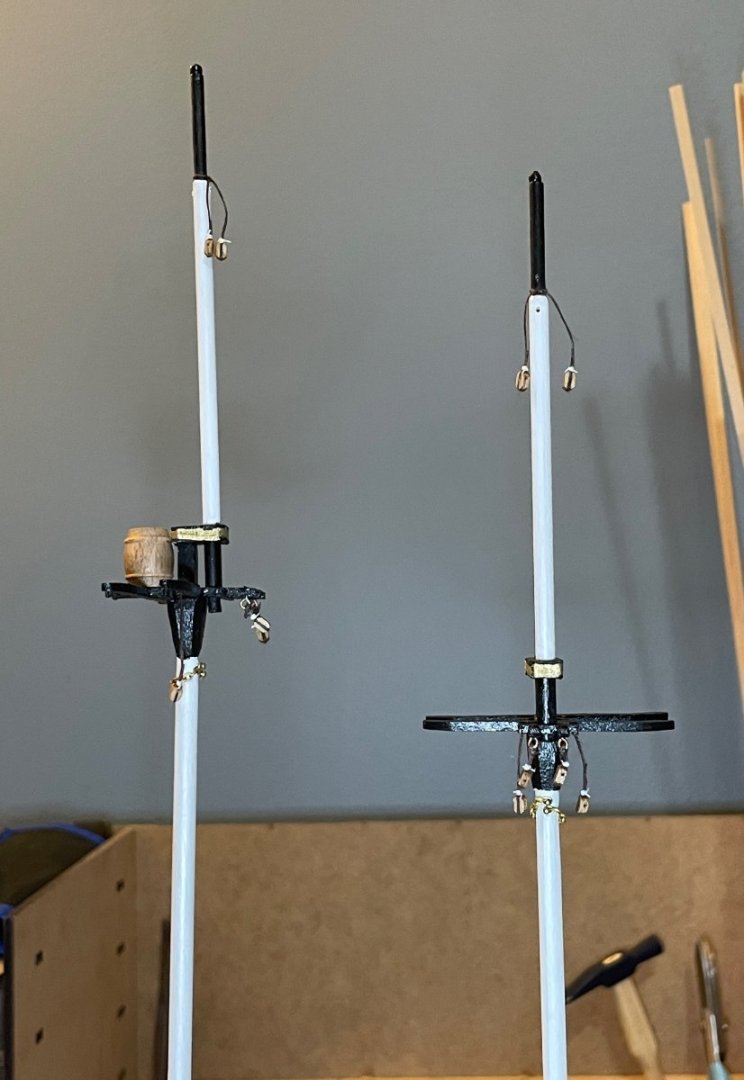
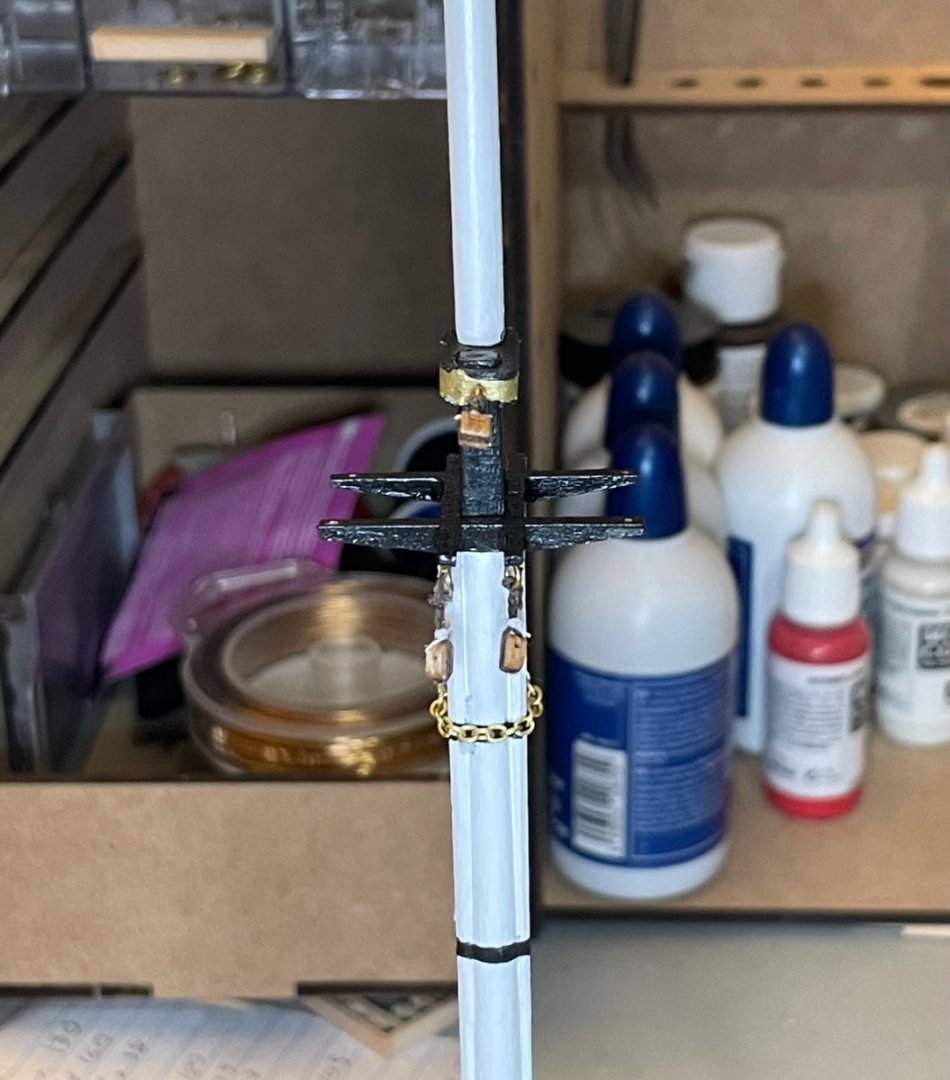
Thanks for looking in, everybody! Spring Break officially ends for me tonight, so I'll be back to slower progress soon. But I'm pleased with where I'm at, since I've just finished installing the various chains, blocks, and thimbles on the masts. Adding detailed notes here in part for myself, since I've already had to go back to earlier notes to remind myself what some of the stray parts and ropes were! First, a couple shots of the main and fore mast tops (viewed from forward and port, respectively). The chains that are visible are necklaces for securing the topmast shrouds and the slings for the yards. There's a row of eyebolts just aft of the fore mast head; these are for securing the main top mast, top gallant, and royal stays. There is now also a triple chunk block installed off the back of the mast cap, which will help in aligning these ropes. The main top mast preventer stay runs to the thimble below the fore top. The other blocks are lift blocks (on the caps) and reef and buntline blocks (under the top). Moving upward on the main and fore masts (viewed from port and forward, respectively): The chains (barely visible in this photo!) are necklaces for the top gallant shrouds. The blocks installed in the trees are lift blocks for the top mast yards. The various pendant blocks are lift blocks for the top mast and top gallant yards. The barrel is there as a crow's nest; for now, just sitting on the trees, but I think I like it enough to install later. Finally, the mizzen mast (viewed from aft). Not as much to show here! A necklace for the top mast shrouds, two blocks under the trees for the boom lift, and a double block for the gaff halliard. A lingering question: I'm not entirely clear on what I'll need to rig the topsail. I think it's just a halliard running through a sheave in the top mast and seized to the yard, plus tack and clew lines on the sail. Next steps: I see three separate next steps. Given the tedium of #1, I'll probably take breaks by working on #2 and 3, too. #1: Prepare the lower shrouds for all masts. #2: Prepare the sails by installing bolt ropes. #3: Prepare the yards for rigging. My plan with the lower shrouds is to install them with temporary lanyards, install all ratlines, and then remove the temporary lanyards so that I can work around the shrouds more easily.

-
HakeZou reacted to a post in a topic:
HMS Erebus by clearway - OcCre - 1/75 scale - bashed
-
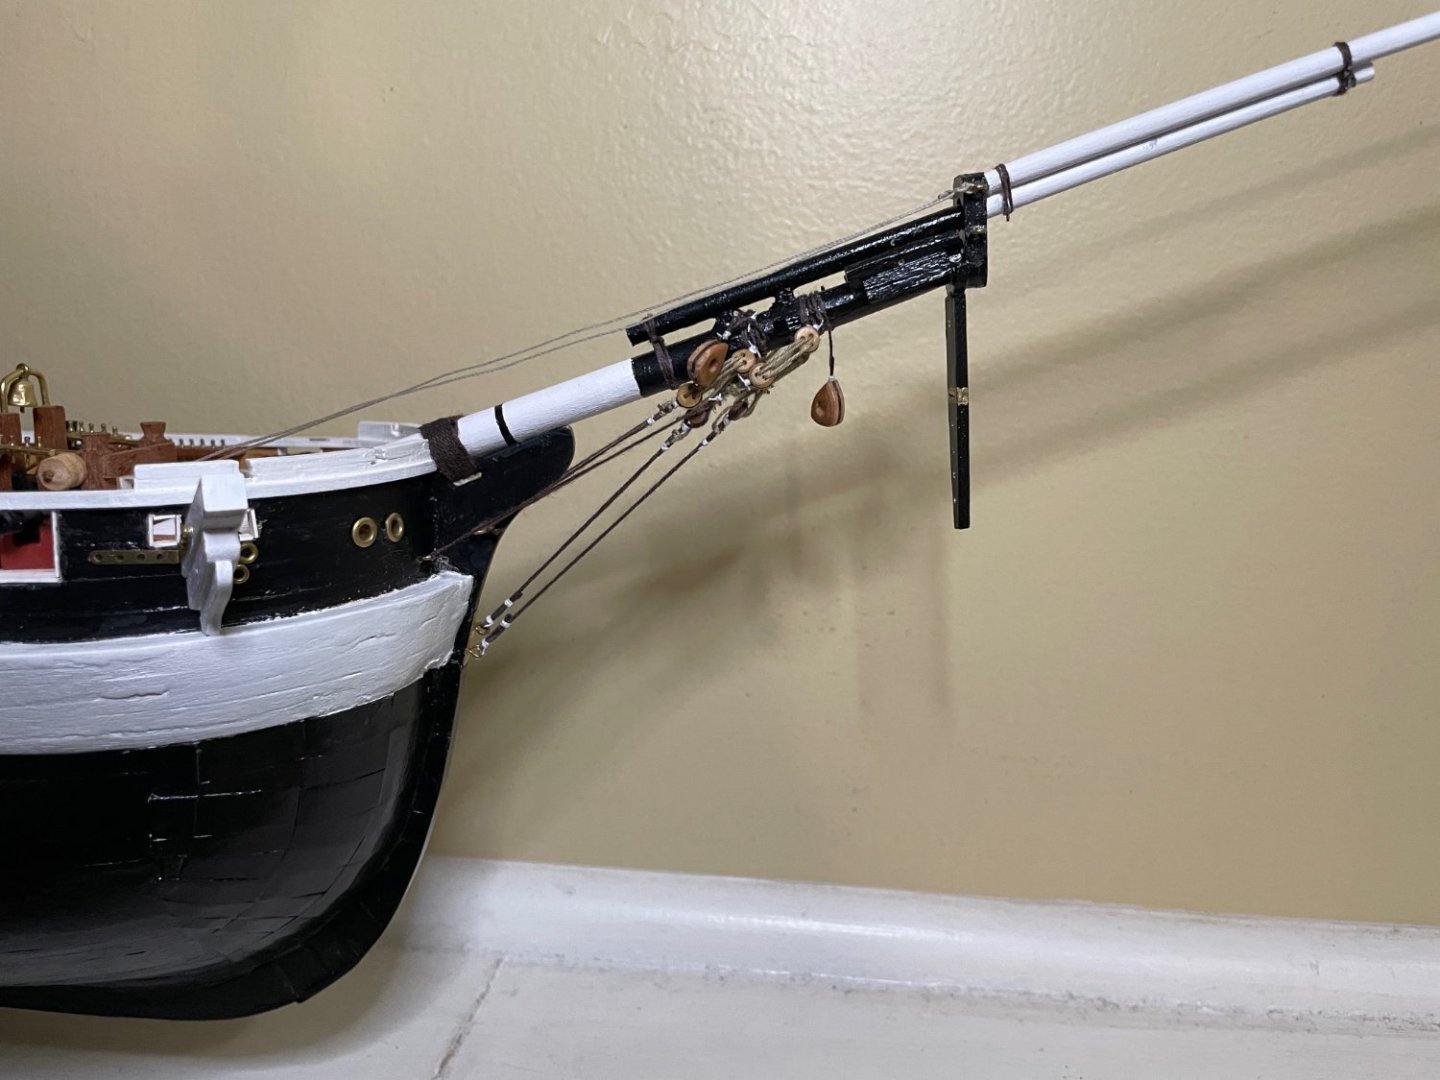
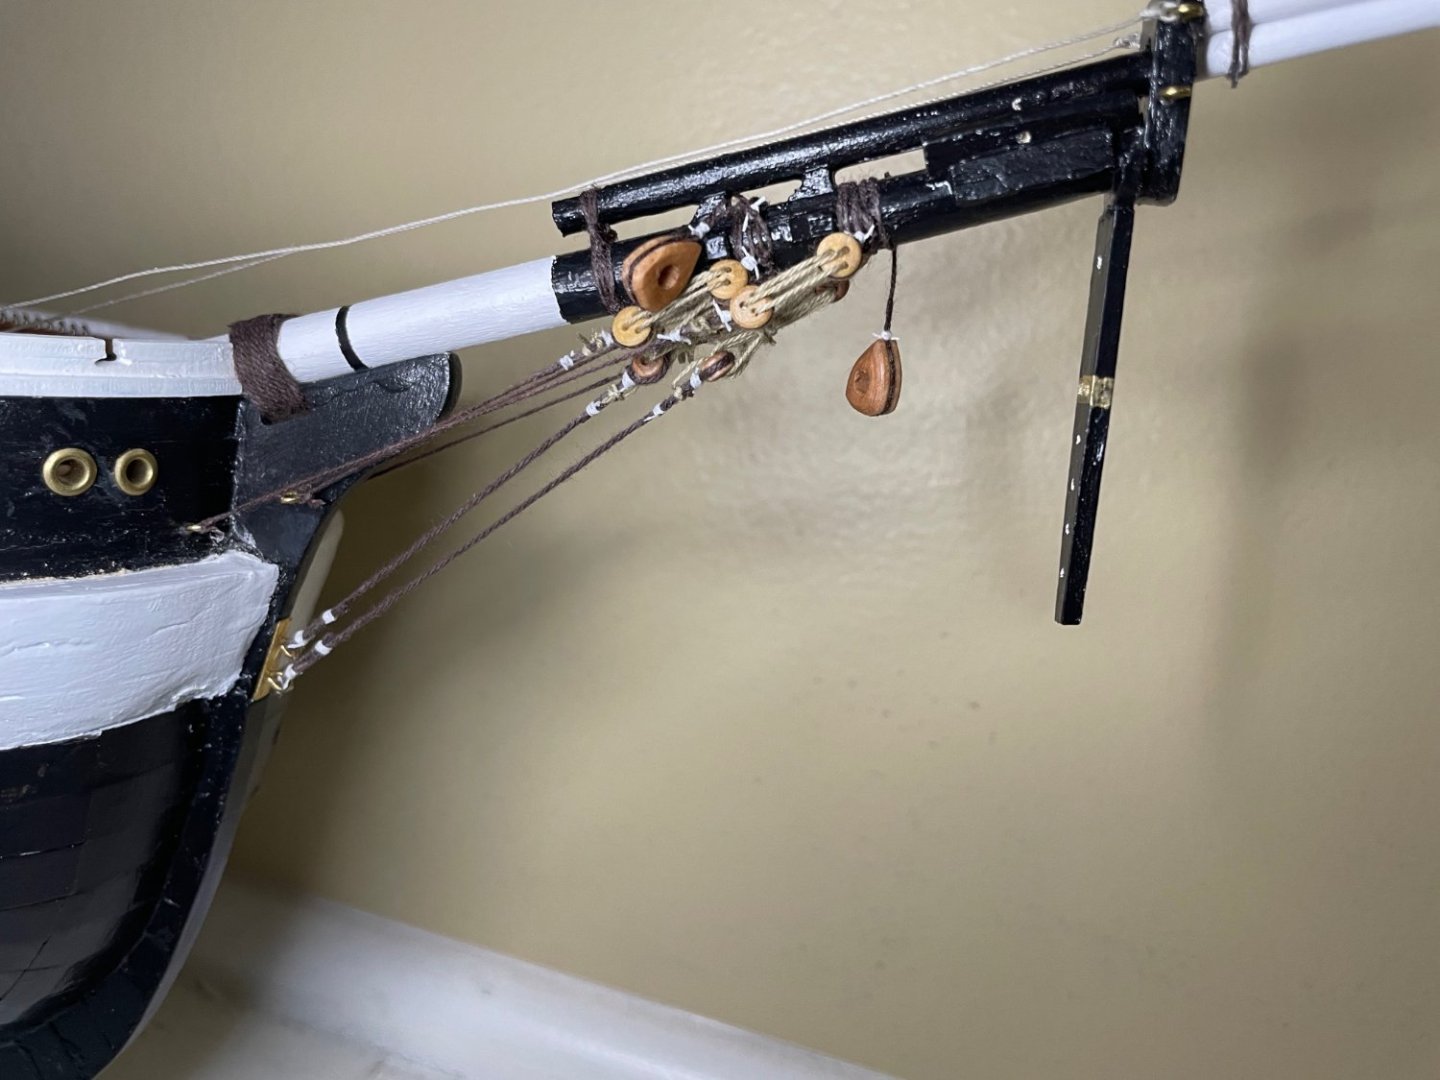
Thanks for checking in! Two posts in two days, but I'm feeling excited to have installed the first ropes! I decided to start by focusing on the bowsprit, since those ropes are pretty well out of the way of other things. So, the bowsprit is now officially installed! I've also installed the catheads and assembled the masts. (Note: The limp hearts are for the fore stay and fore preventer stay.) I struggled for a bit with the gammoning, but once I remembered how to tie a round lashing, that went quickly. There are ten loops laying nicely side-by-side. After that, it was on to the bobstays and shrouds. Unfortunately, I didn't plan this out well enough—I did the shrouds first. I needed some patience due to the tight spaces, but those went easily enough. However, once I turned my attention to the bobstays, I realized my folly! Now the tight spaces were even tighter, since I was stringing lanyards to thimbles that were in between the port and starboard deadeyes! I ended up setting the ship on top of a box, with a ring light shining up from below. That extra foot and the light made all the difference, since I could work from underneath the bowsprit. Finally, I went ahead and installed the horses. I don't think that they'll be too much of a nuisance, but we'll see if I end up regretting that decision. Next steps: Start working out the rigging for the lower fore mast.
-
HakeZou reacted to a post in a topic:
HMS Erebus by clearway - OcCre - 1/75 scale - bashed
-
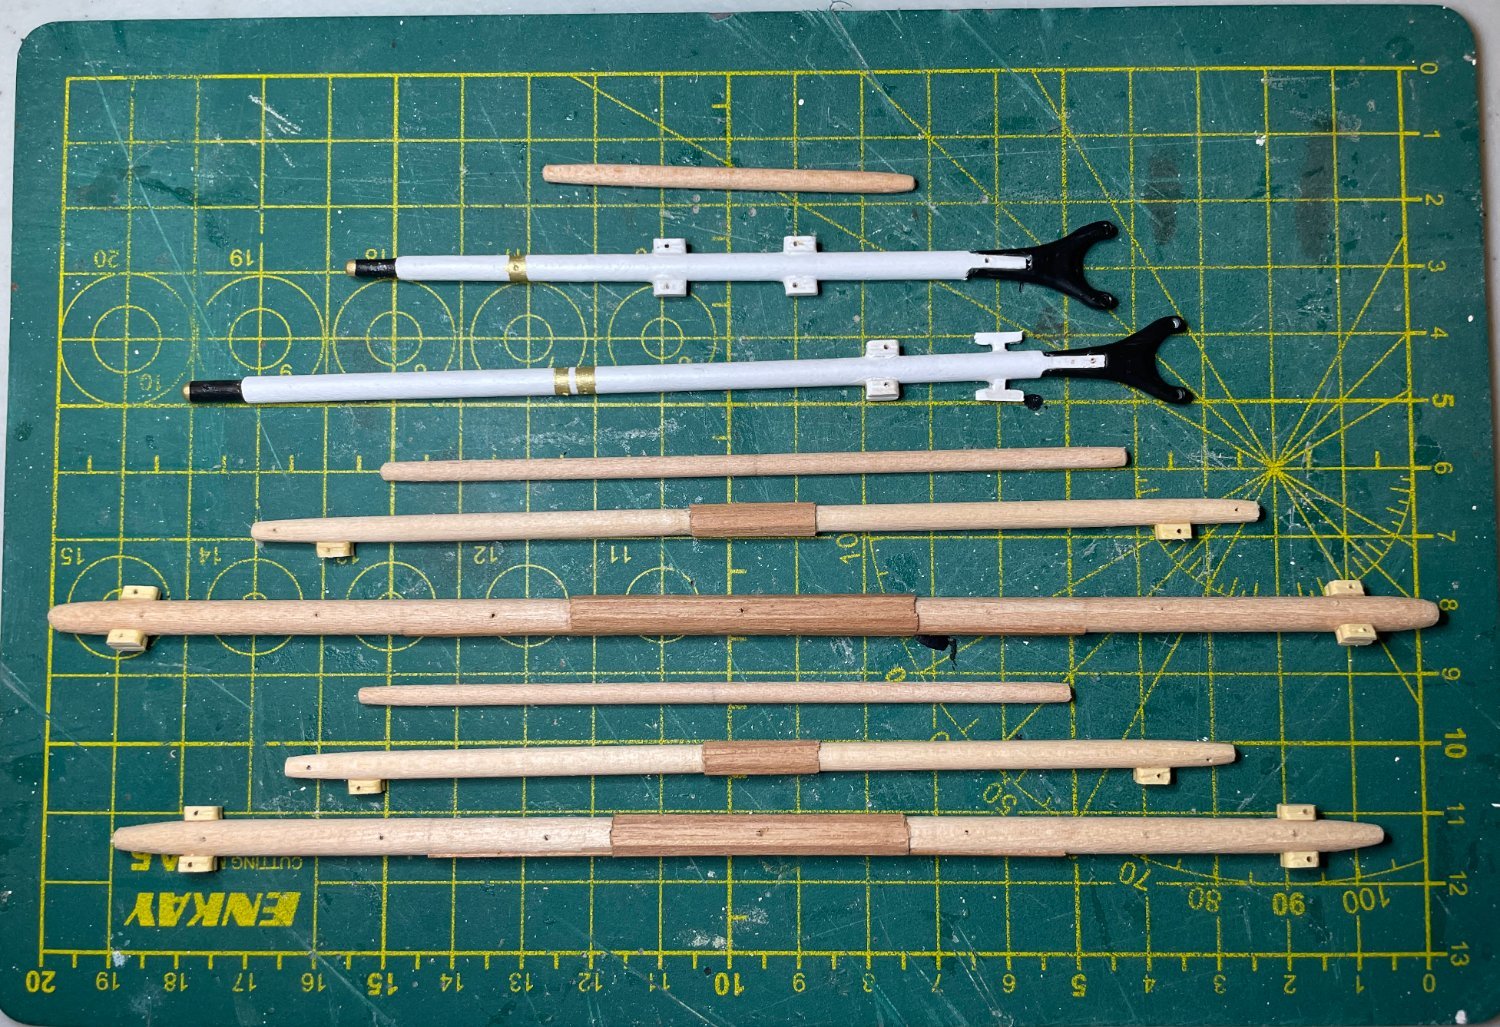
Thanks for looking in everybody! It's been nice to have some more consistent time in the shipyard, which means that the baby steps have continued this week! I've almost finished preparing the masts for rigging and I've also mostly finished the spars! The photo was taken before the last few blocks were attached to the main mast, but it gives a good sense of where things are at. As I've moved toward the final assembly work, I drilled out some holes in a spare block of wood, so that I could have a separate stand for working on the masts. Next up, I need to do some chainwork and then begin assembling the masts (which are still just dry-fit). The spars are mostly ready to go. I need to add jackstays on a few of them, footropes, and some other bits of hardware. I've started to run out of a few pieces of hardware, too. Making my own eyebolts hasn't been a big deal. However, I was hoping to order some more of the cleats that I've used elsewhere on the ship; they're beautiful and just the right size, but they come from Falconet and I can't find them available right now. The homemade cleats on the spanker boom (3rd from the top)...well, we'll see how they look once they have ropes belayed to them. It's probably an unusual choice to paint only the gaff and boom. But my thoughts were: 1) In some of the paintings, the gaff and boom seem to be a different color than the other spars; 2) Lees describes the spanker as a more permanent evolution of the driver, brailed to the mizzen mast rather than reefed to the boom, so these two spars would probably have been worked less frequently than the others (apart from the jaws rotating around the mast). I'm not sure whether my logic is completely sound, but I don't think it will have too much of a difference once all of the sails are hung. At this point, I'm at the point where I'm strategizing about how I'll run the rigging. I expect to bounce back and forth a bit between the bowsprit, masts, spars, and sails as I work forward.

-
HakeZou reacted to a post in a topic:
Endurance by theoracle09 - OcCre - 1:70
-
HakeZou reacted to a post in a topic:
Endurance by theoracle09 - OcCre - 1:70
-
@Snug Harbor Johnny offered me some fantastic advice that led me to attach all of the ropes belayed at the bases of the masts as early as possible in the build, before everything got crowded. Once it was time to hang the sails, I just ran those ropes in reverse, which made the process a lot easier. A bit late now for this project, but hopefully that'll be helpful in one of your future projects! In the meantime, everything's coming along really well and looking great! Good luck hanging the fore gaff sail—that looks like a challenge with a bit of extra fun thrown in!
-
HakeZou reacted to a post in a topic:
Endurance by theoracle09 - OcCre - 1:70
-
HakeZou reacted to a post in a topic:
Endurance by theoracle09 - OcCre - 1:70
-
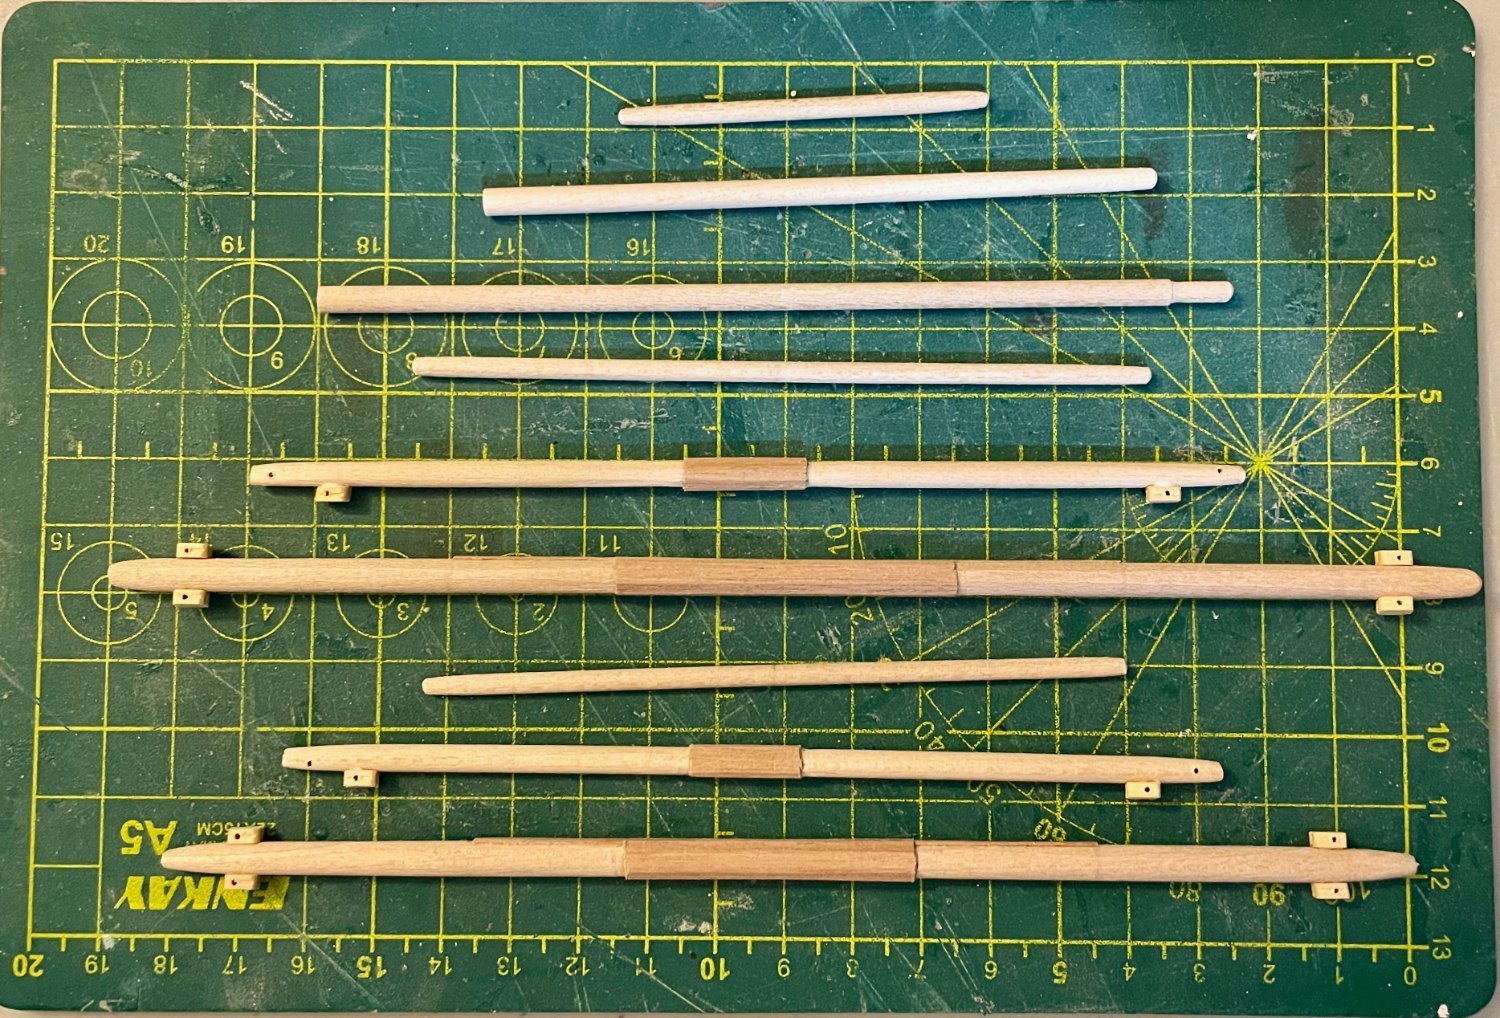
Some more slow and steady progress to report. Spring Break is here, so I'm hoping to make some more time for the Terror over the next week. I'm continuing to work on the spars. I've now shaped all of them, from bottom to top in the photo: foremast yard, topsail yard, and topgallant yard; mainmast yard, topsail yard, and topgallant yard; and mizzen spanker boom, gaff, and topsail yard. The fore and main yards and topsail yards have all been sanded to octagonal in the center, with obeche strips laid on those flat sides. In addition, following Lees, I installed blocks on the yard arms. Next steps: Finish preparing the remaining five spars. Then begin installing hardware on all spars (cleats, eyebolts, etc.).

-
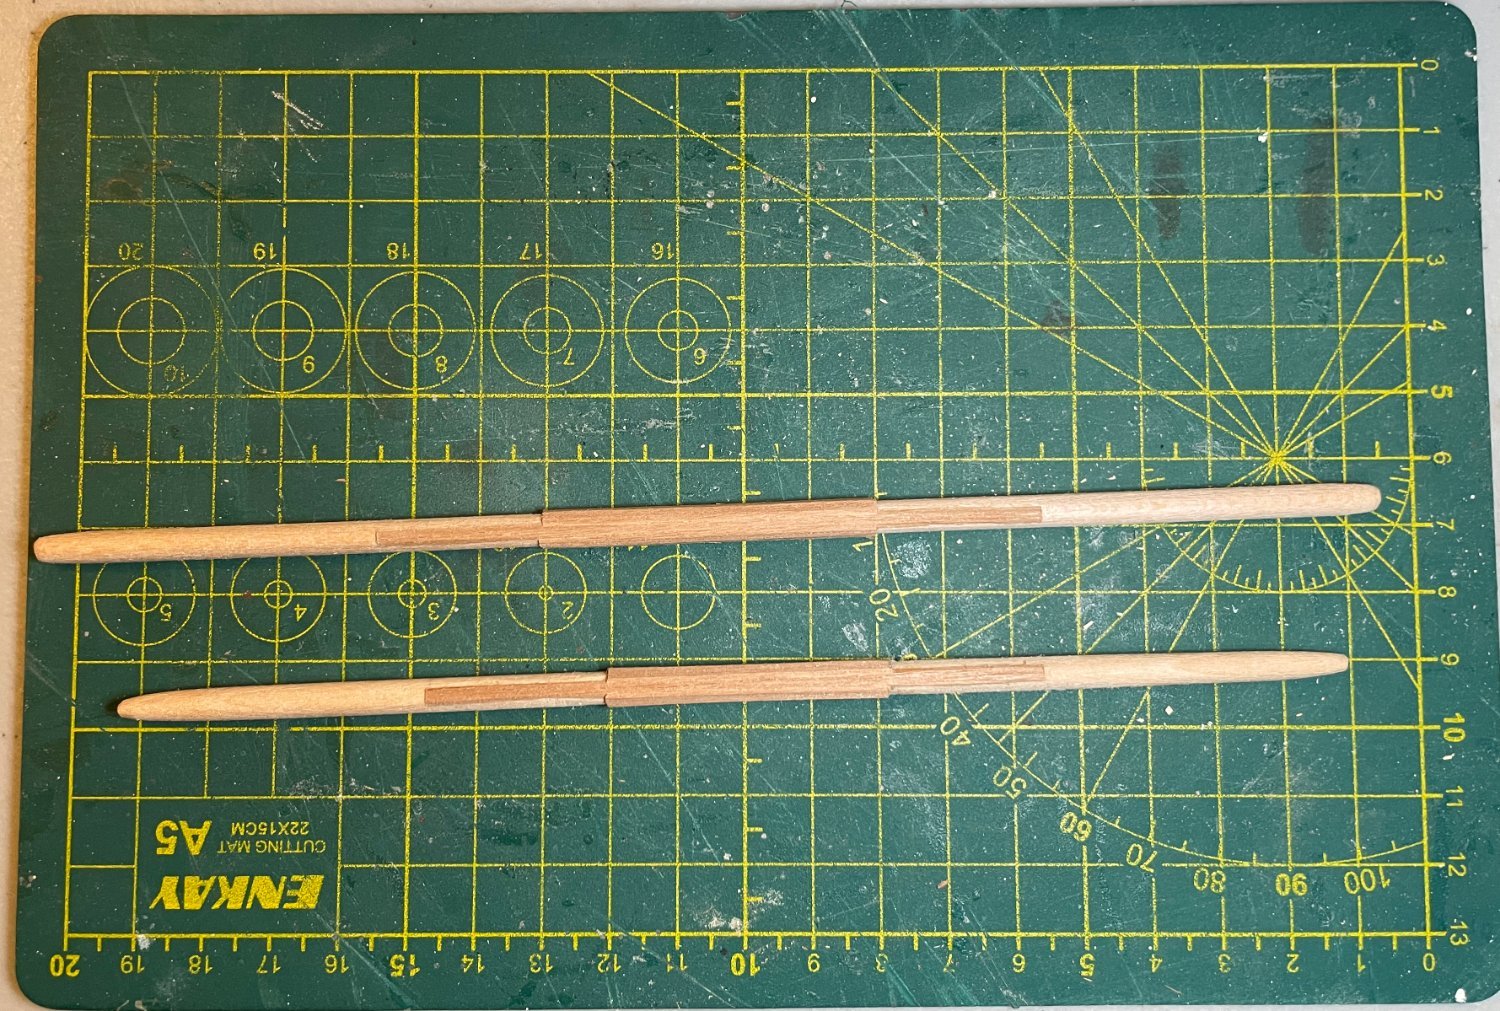
It's been a busy few weeks here, so I have hardly gotten into the shipyard. Stress levels have been high and I started this hobby as stress relief, so I definitely need to find a way to make more time for my Terror. I'm continuing to work on preparations for rigging. I made a checklist for myself from the Lees book, so have been slowly working through things. I haven't advanced much since the last post, because I found myself needing to have the fore and main yards in hand in order to better understand how everything is going to connect. So far, I've shaped both of those yards and have added some planks to shape and reinforce the centers of both. Following Lees, the center quarter-length of each is octagonal, with the aft side extended for a half-length. Not quite sure what kind of wood I used, just something that was in my stockpile and that was the right size—maybe some obeche leftover from my Martegaou? Next steps: finish preparing the fore and main yards; begin shaping the other yards.
-
Glad you're feeling better, Keith!
-
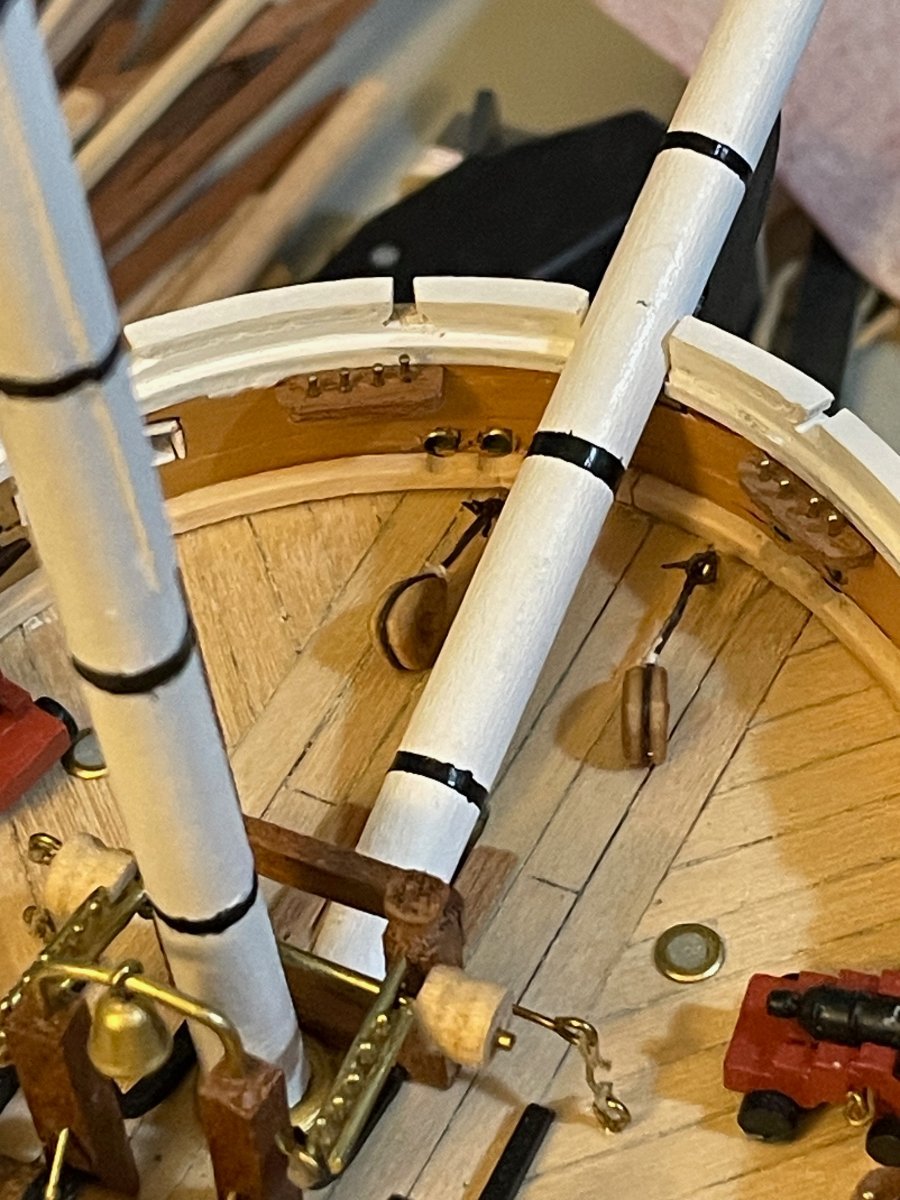
It's been a couple weeks since my last post, but I haven't forgotten about my Terror! I sat down to do an inventory of the rigging, which raised a number of questions, which led to re-reading and taking extensive notes on the Lees and Biddlecombe books. Armed with this studying, I've been continuing my preparation of the rigging. Lots of tedious work seizing blocks, deadeyes, and so on! At this point, the bowsprit is mostly ready to install and start rigging. The masts are mostly ready to install and start rigging. But I'm still working through everything I need in order to rig the yards and sails. (The final model will have sails—I prefer the look of my models with sails and one of my goals with this model is to learn about squaresail rigging.) In my preparations since the last post, I've made progress in a few areas: 1) the hearts for the main stay and main preventer stay have been installed in the forecastle. 2) the blocks for the fore course lifts, leech lines, and bunt lines have been installed to the mast cap and mast top; I've also added a sheave to the fore topmast crosstree for the main top-gallant stay. I still need to strop on blocks for the main topmast stay and preventer stay, but will do that once I get closer to assembly; for now, all pieces of the masts are still dry-fit. 3) I've prepared various ropes for the bowsprit. I'm still working out the positions of the various eyebolts "in the bows," so none of these are installed yet. The inner and outer bowsprit shrouds are toward the upper left. The bowsprit horses are to the upper right. In the lower left are the catheads, boomkins, and stern davits/quarter boomkins. I'm gradually getting the hardware installed on these. Slow and steady progress, but everything's starting to make sense—except for one thing. So a question for all those who are more experienced than I am: When a rope "runs down to the mast top" or "runs down and secures to the mast top with lanyard and thimbles," where do these ropes attach? If they are running rigging, should their be a pinrail somewhere on the mast top? If they are standing rigging, should I just find a convenient place for an eyebolt? Thanks in advance for any help!


-
Thanks, Keith! That's very close to what I was picturing in my head! Always nice to get confirmation on one's gut instincts.
-
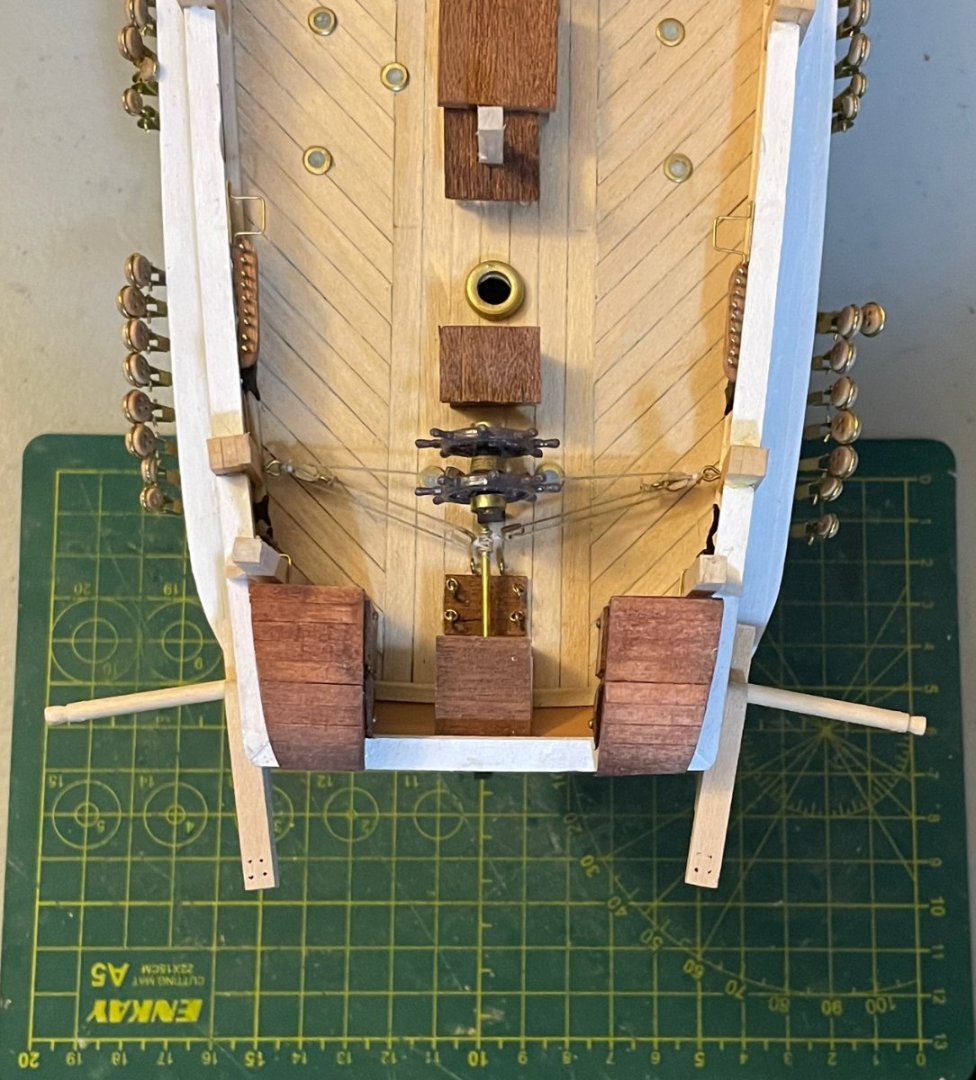
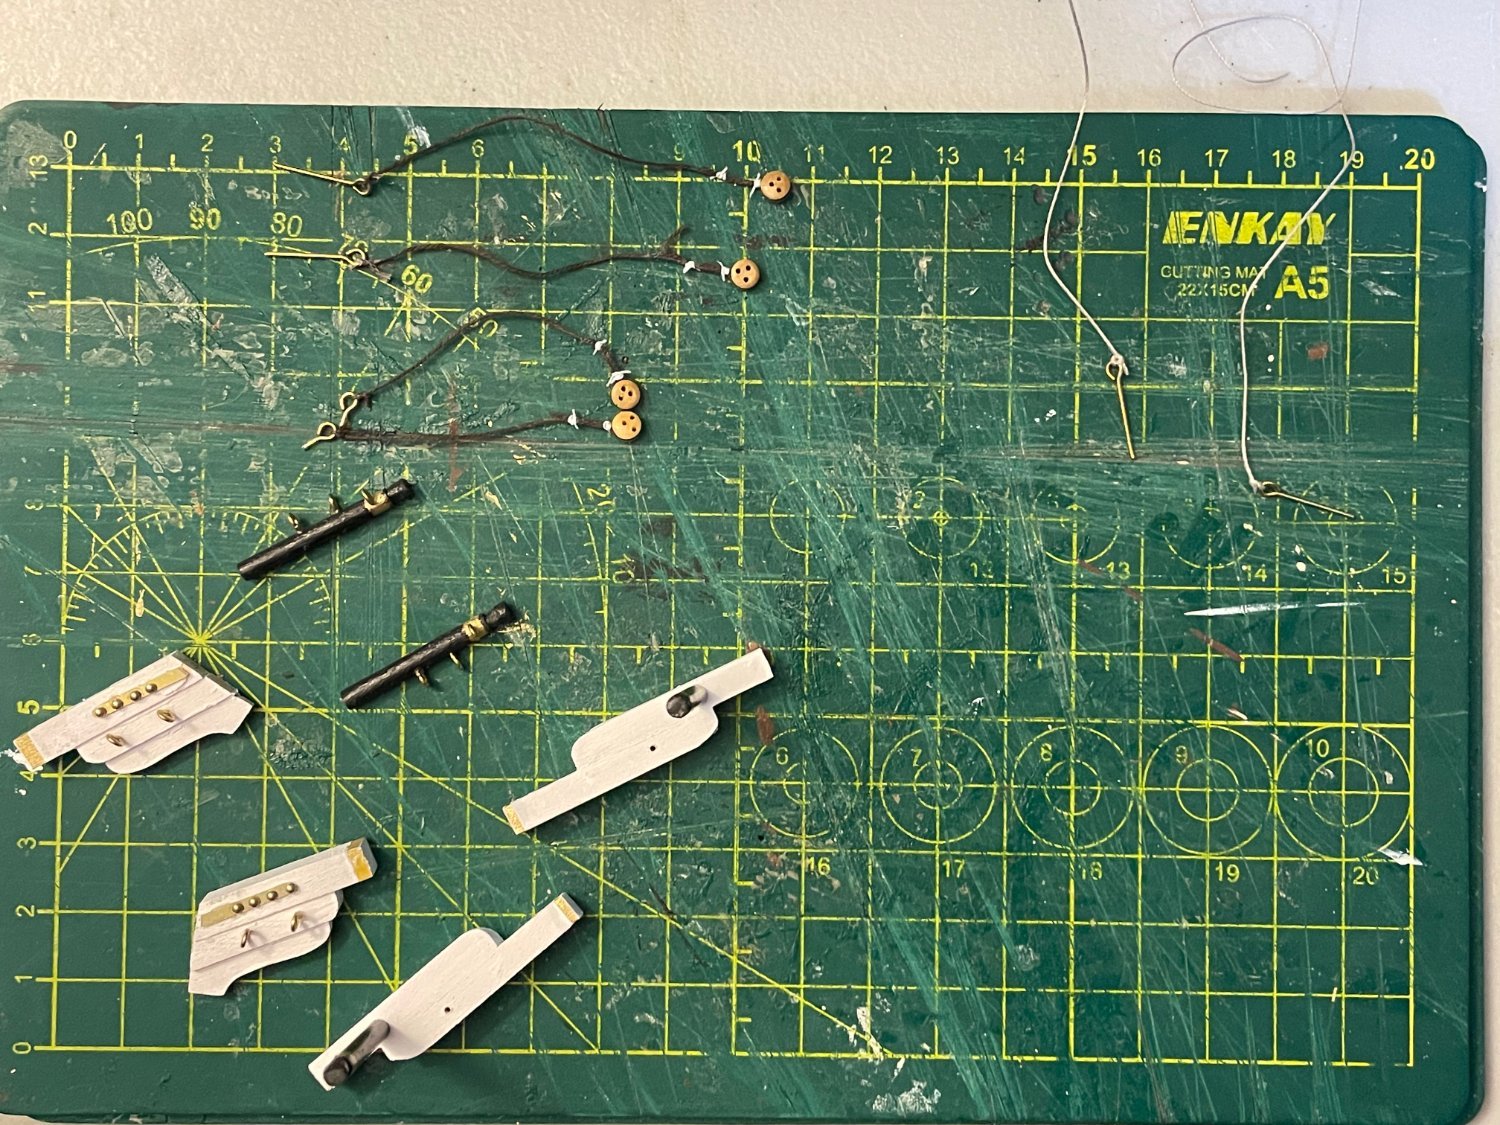
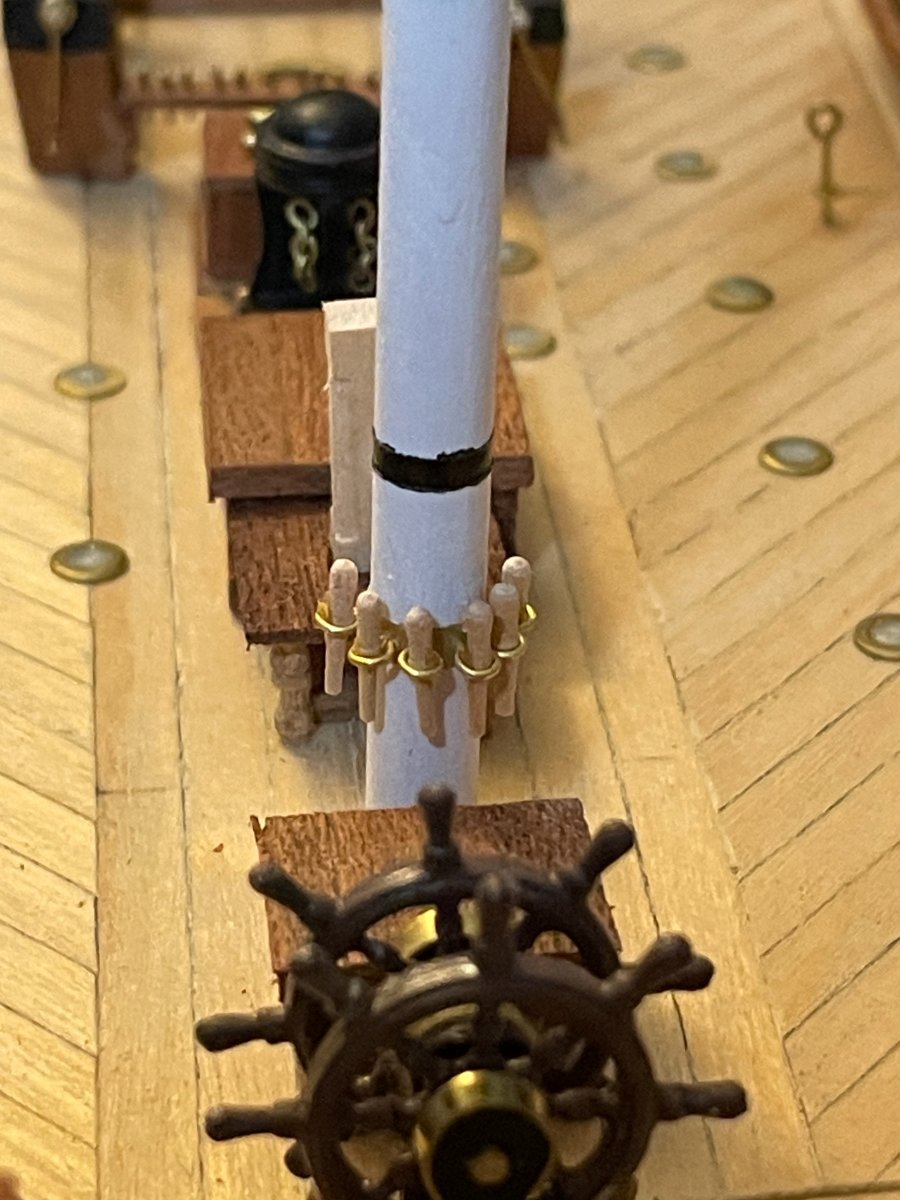
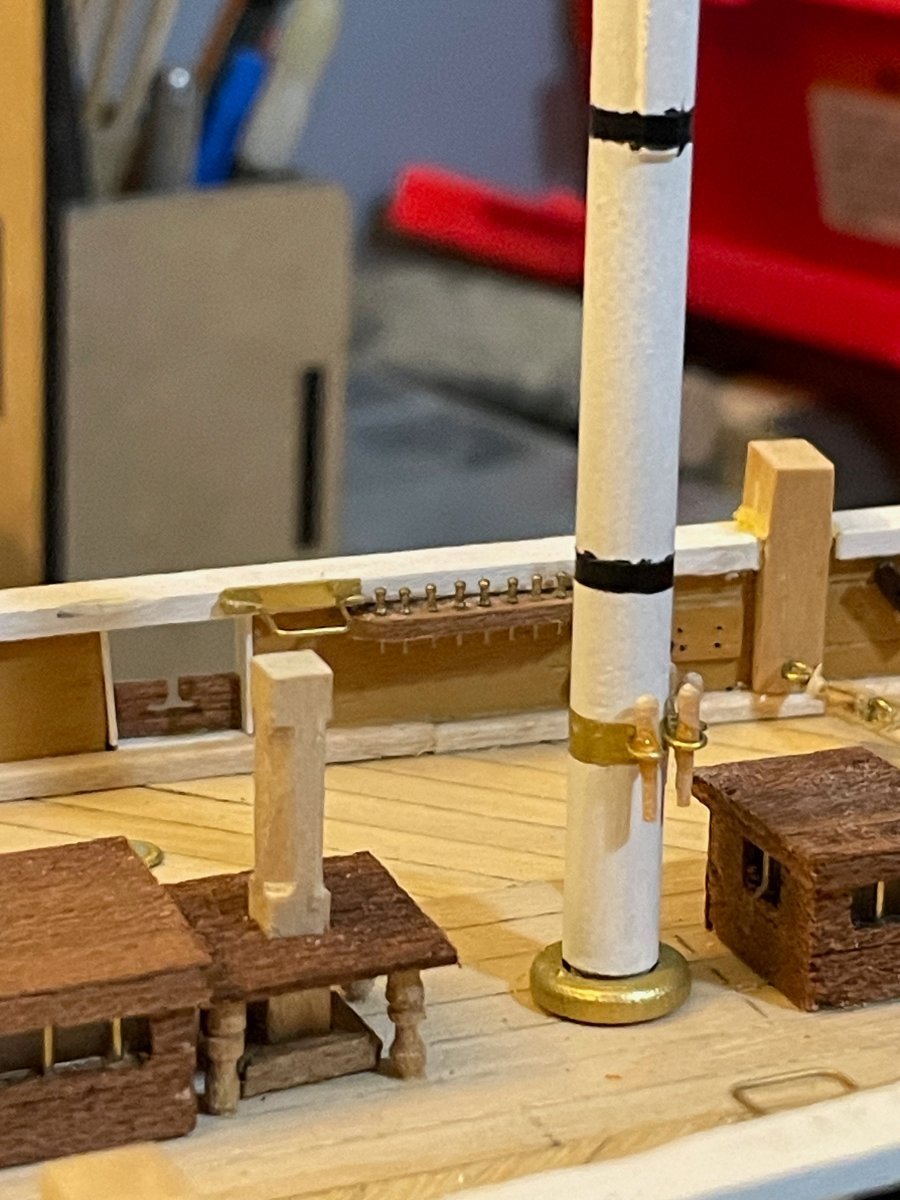
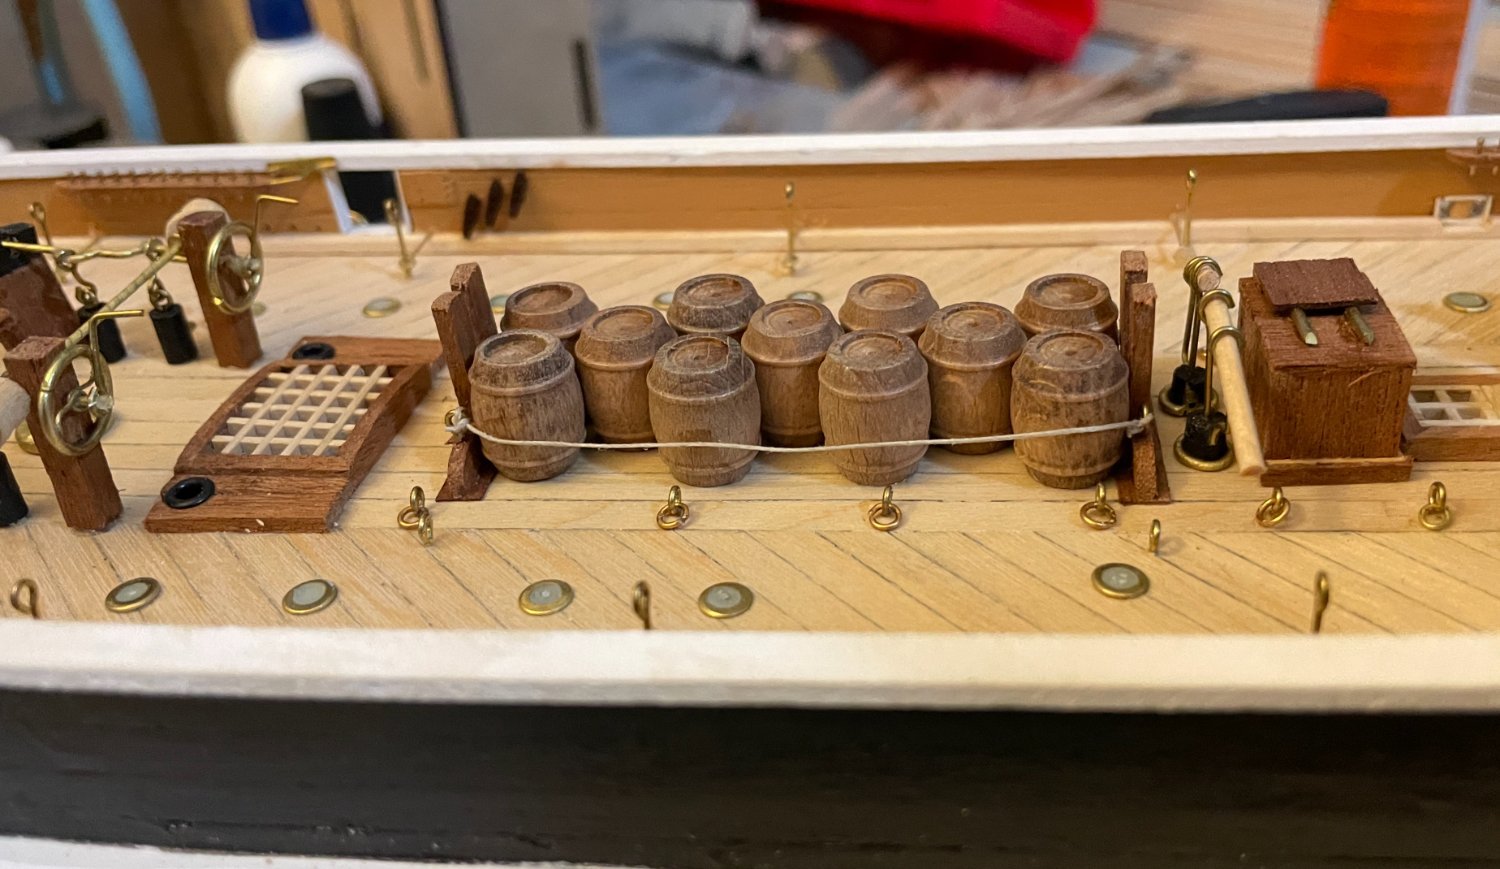
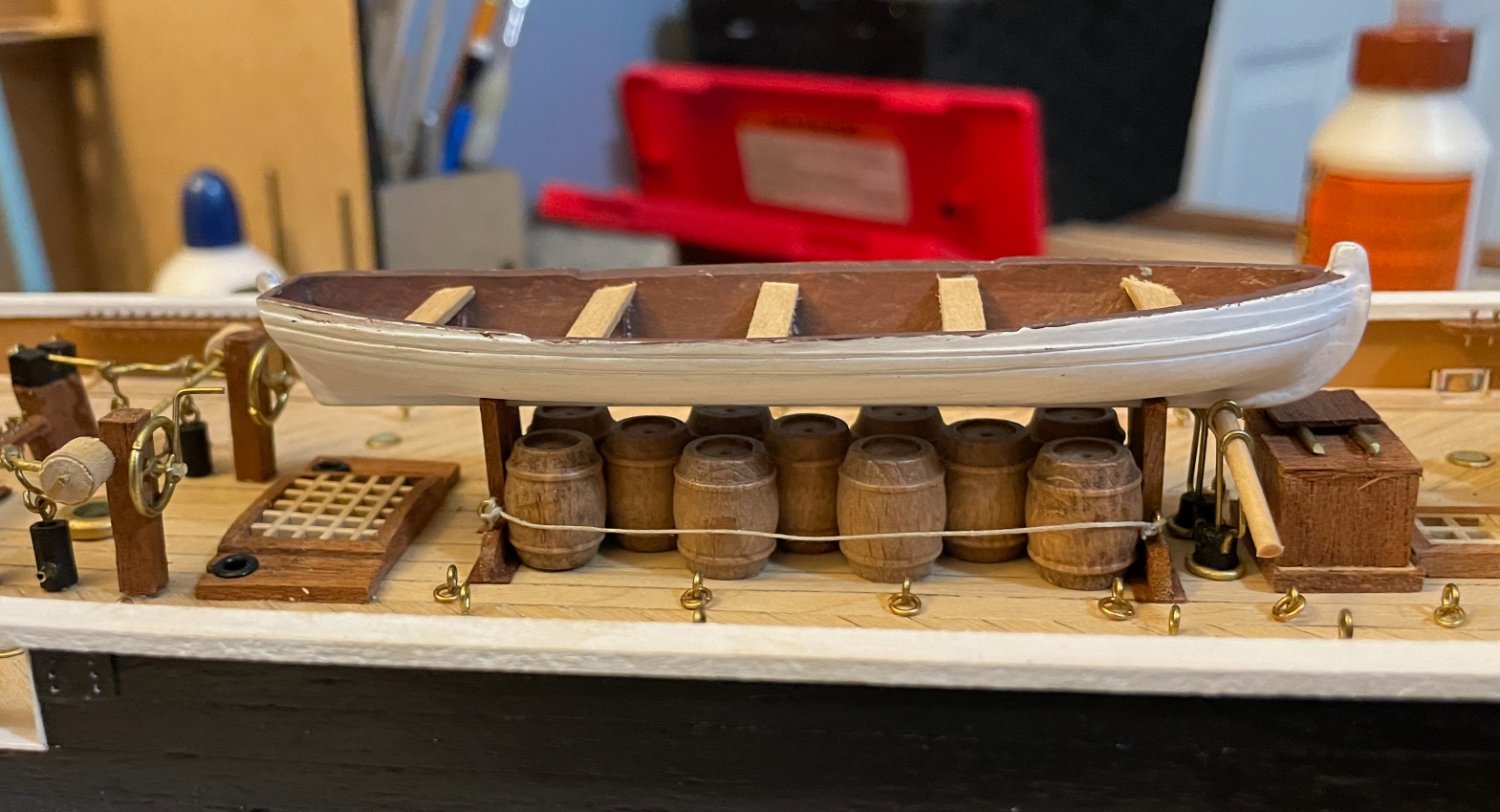
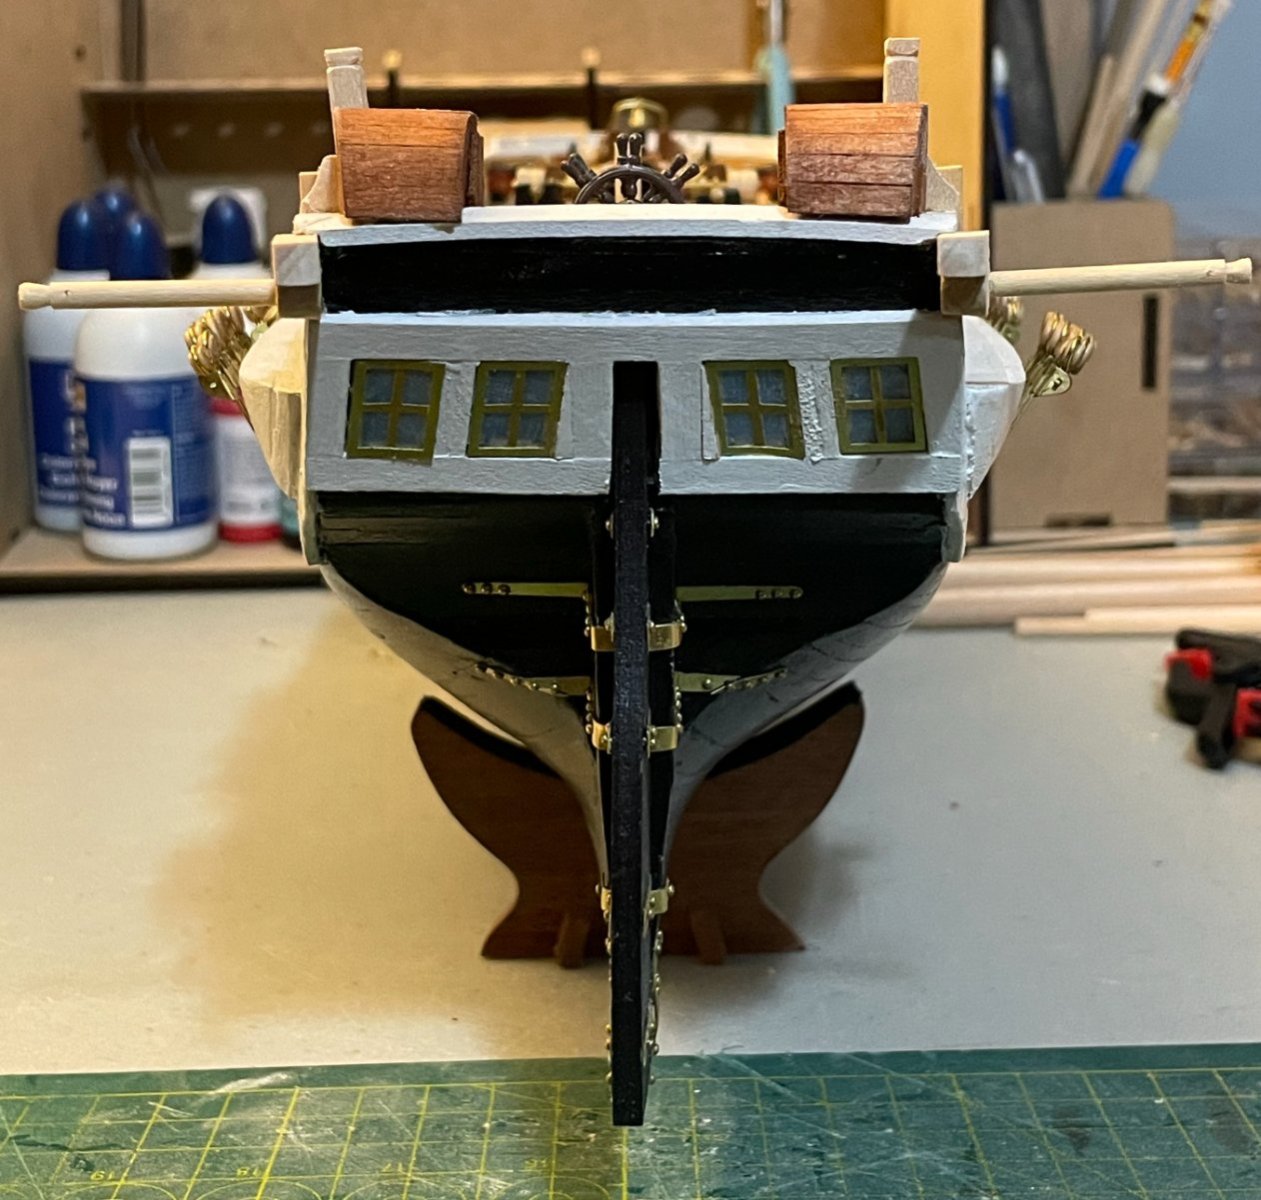
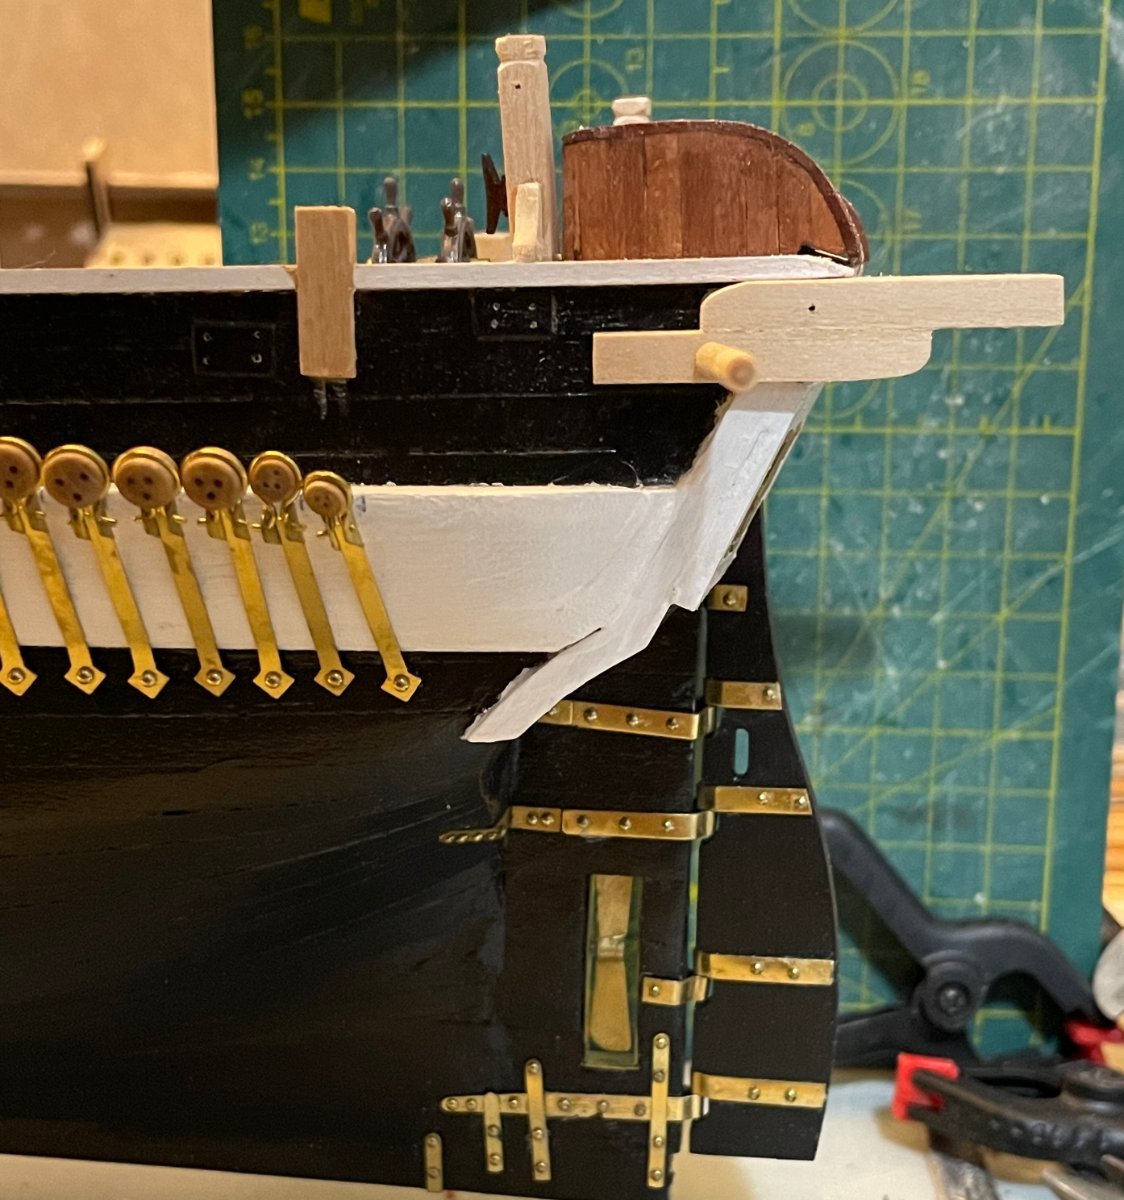
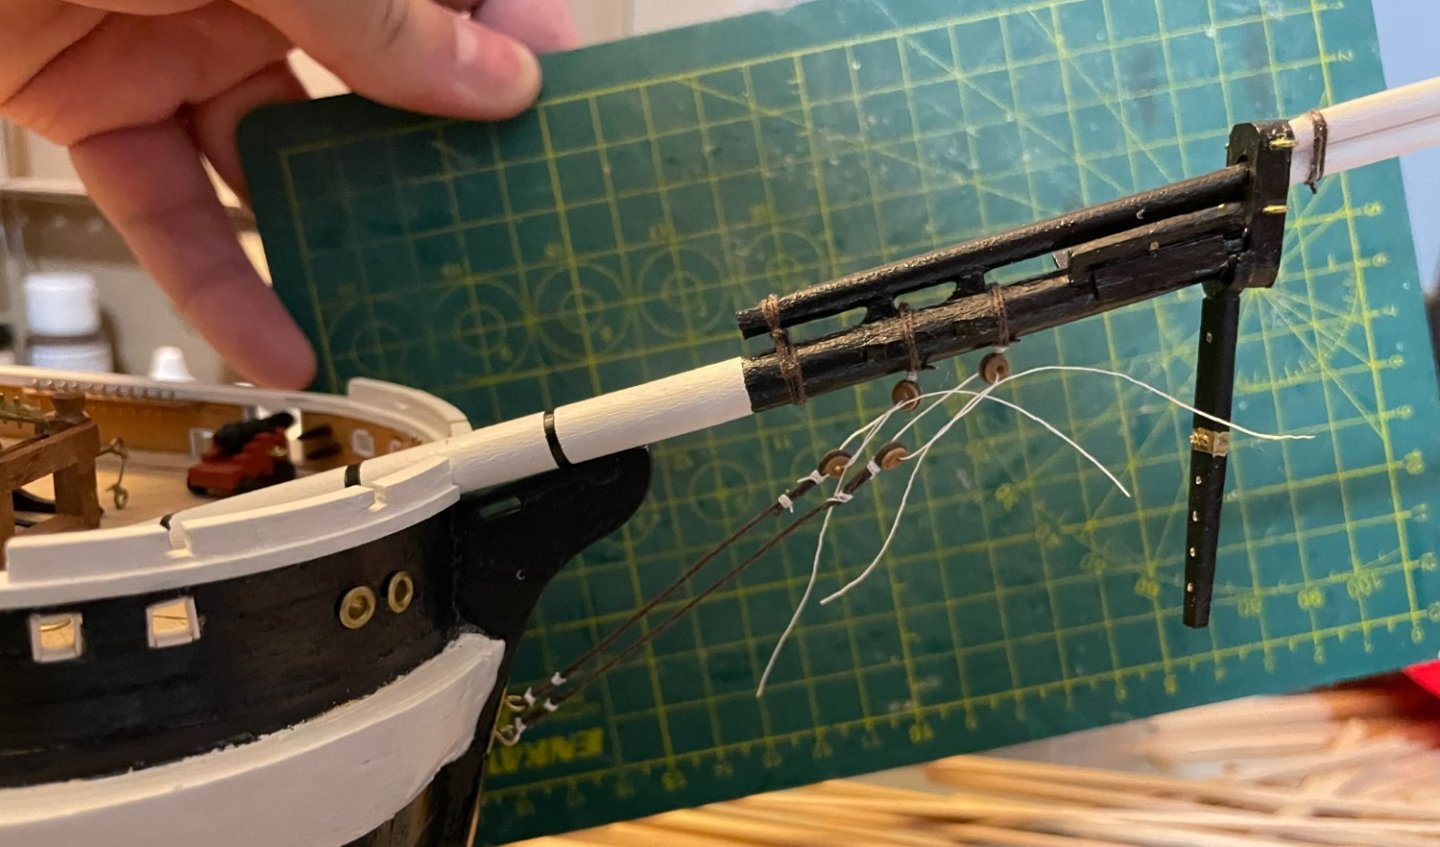
Catching up with a few things that have been going on in my shipyard. I'm almost done preparing the cathead davits, boomkins, stern davits, and quarter boomkins. This means, it's almost time to start the rigging! First, a quick shot of the davits and boomkins as the paint dries. The photo isn't great, but it'll do for now. Tomorrow, I'll get the last coats of paint on these. One other quick project dealt with the midships boat rack. Similar to what OcCre calls for, I built mine elevated, since the 30' galley that I'm planning to put there is too long given the deck fittings in that part of the ship. (Yes, I'm having some second thoughts about putting that boat there, but I committed to the elevated rack long ago.) By elevating the boat, I left some empty space underneath. Since we know that the ship was packed to the gills, I just couldn't leave it empty. So, I installed a few eyebolts, laid in some barrels, and secured them with ropes. I went ahead and did this now, since they shouldn't be in the way of anything that's yet to come and since this job will get much harder once the rigging is started. One photo with the 30' galley sitting in place and one without. Next up, adding a spider band to the mizzen mast, in preparation for rigging. I feel like I took a bit of a cheater's way out here, but given my very novice metalworking skills, I think that I achieved the best look that I could have. I painted the metal band, installed eyebolts, then fitted belaying pins into the eyes. All six are positioned between the 3 o'clock and 9 o'clock positions, since the conning plank/boat rack will make space so tight on the front side of the mizzen mast. I'm using metal pins elsewhere, but they're too small for the eyebolts. So instead, I'm using some leftover pins from another kit that are significantly smaller than the ones provided by OcCre. Finally, I started preparing the bowsprit for rigging. All I managed to accomplish tonight was to install the bobstay collars and to fit the bobstays. The eyebolts holding the bobstays in place on the stem are not glued in yet, nor is the bowsprit itself. Obviously, the current lanyards are just temporary ones. I'm planning to follow the order for rigging in the Biddlescombe book, so these will be among the first ropes to be installed, but there's more to do before the bowsprit is ready for all of that. Next steps: Finish the davits and boomkins. Continue preparing the bowsprit for rigging.


-
2000+ miles later, I'm back. I enjoyed spending my holidays with family and friends, but there's no place like no home. Hope everybody else has had a lovely holiday season, too! Before diving back into the office tomorrow, I spent as much time in the shipyard as I could today. I fixed the eyebolt-tiedowns for the boat rack, then cleaned up and finished the boat rack and the inboard supports for the boat davits. Everything is still sitting off to the side in pieces; I'll actually install those later. The main new progress involved the stern davits. Assembly is mostly finished and they're ready for painting. After studying various sources, I opted to prepare the boomkins at this point, too, following the diagrams in the Lees book. They're a bit generous in diameter, but should be reasonably accurate in terms of length. At this point, everything is just dry-fit in place. Once they're painted, I'll install the missing eyebolts and the boomkins; I'll wait to install the whole assembly until I've finished up all of the other projections from the hull and started rigging. Next steps: move to the bow to work on davits, boomkins, etc.