whadozer
-
Posts
4 -
Joined
-
Last visited
-
 Jonny 007 reacted to a post in a topic:
HM Cutter Lady Nelson by whadozer - Amati/Victory Models - Scale 1:64
Jonny 007 reacted to a post in a topic:
HM Cutter Lady Nelson by whadozer - Amati/Victory Models - Scale 1:64
-
Jonny 007 reacted to a post in a topic:
HM Cutter Lady Nelson by whadozer - Amati/Victory Models - Scale 1:64
-
JpR62 reacted to a post in a topic:
HM Cutter Lady Nelson by whadozer - Amati/Victory Models - Scale 1:64
-
GrandpaPhil reacted to a post in a topic:
HM Cutter Lady Nelson by whadozer - Amati/Victory Models - Scale 1:64
-
GrandpaPhil reacted to a post in a topic:
HM Cutter Lady Nelson by whadozer - Amati/Victory Models - Scale 1:64
-
VTHokiEE reacted to a post in a topic:
HM Cutter Lady Nelson by whadozer - Amati/Victory Models - Scale 1:64
-
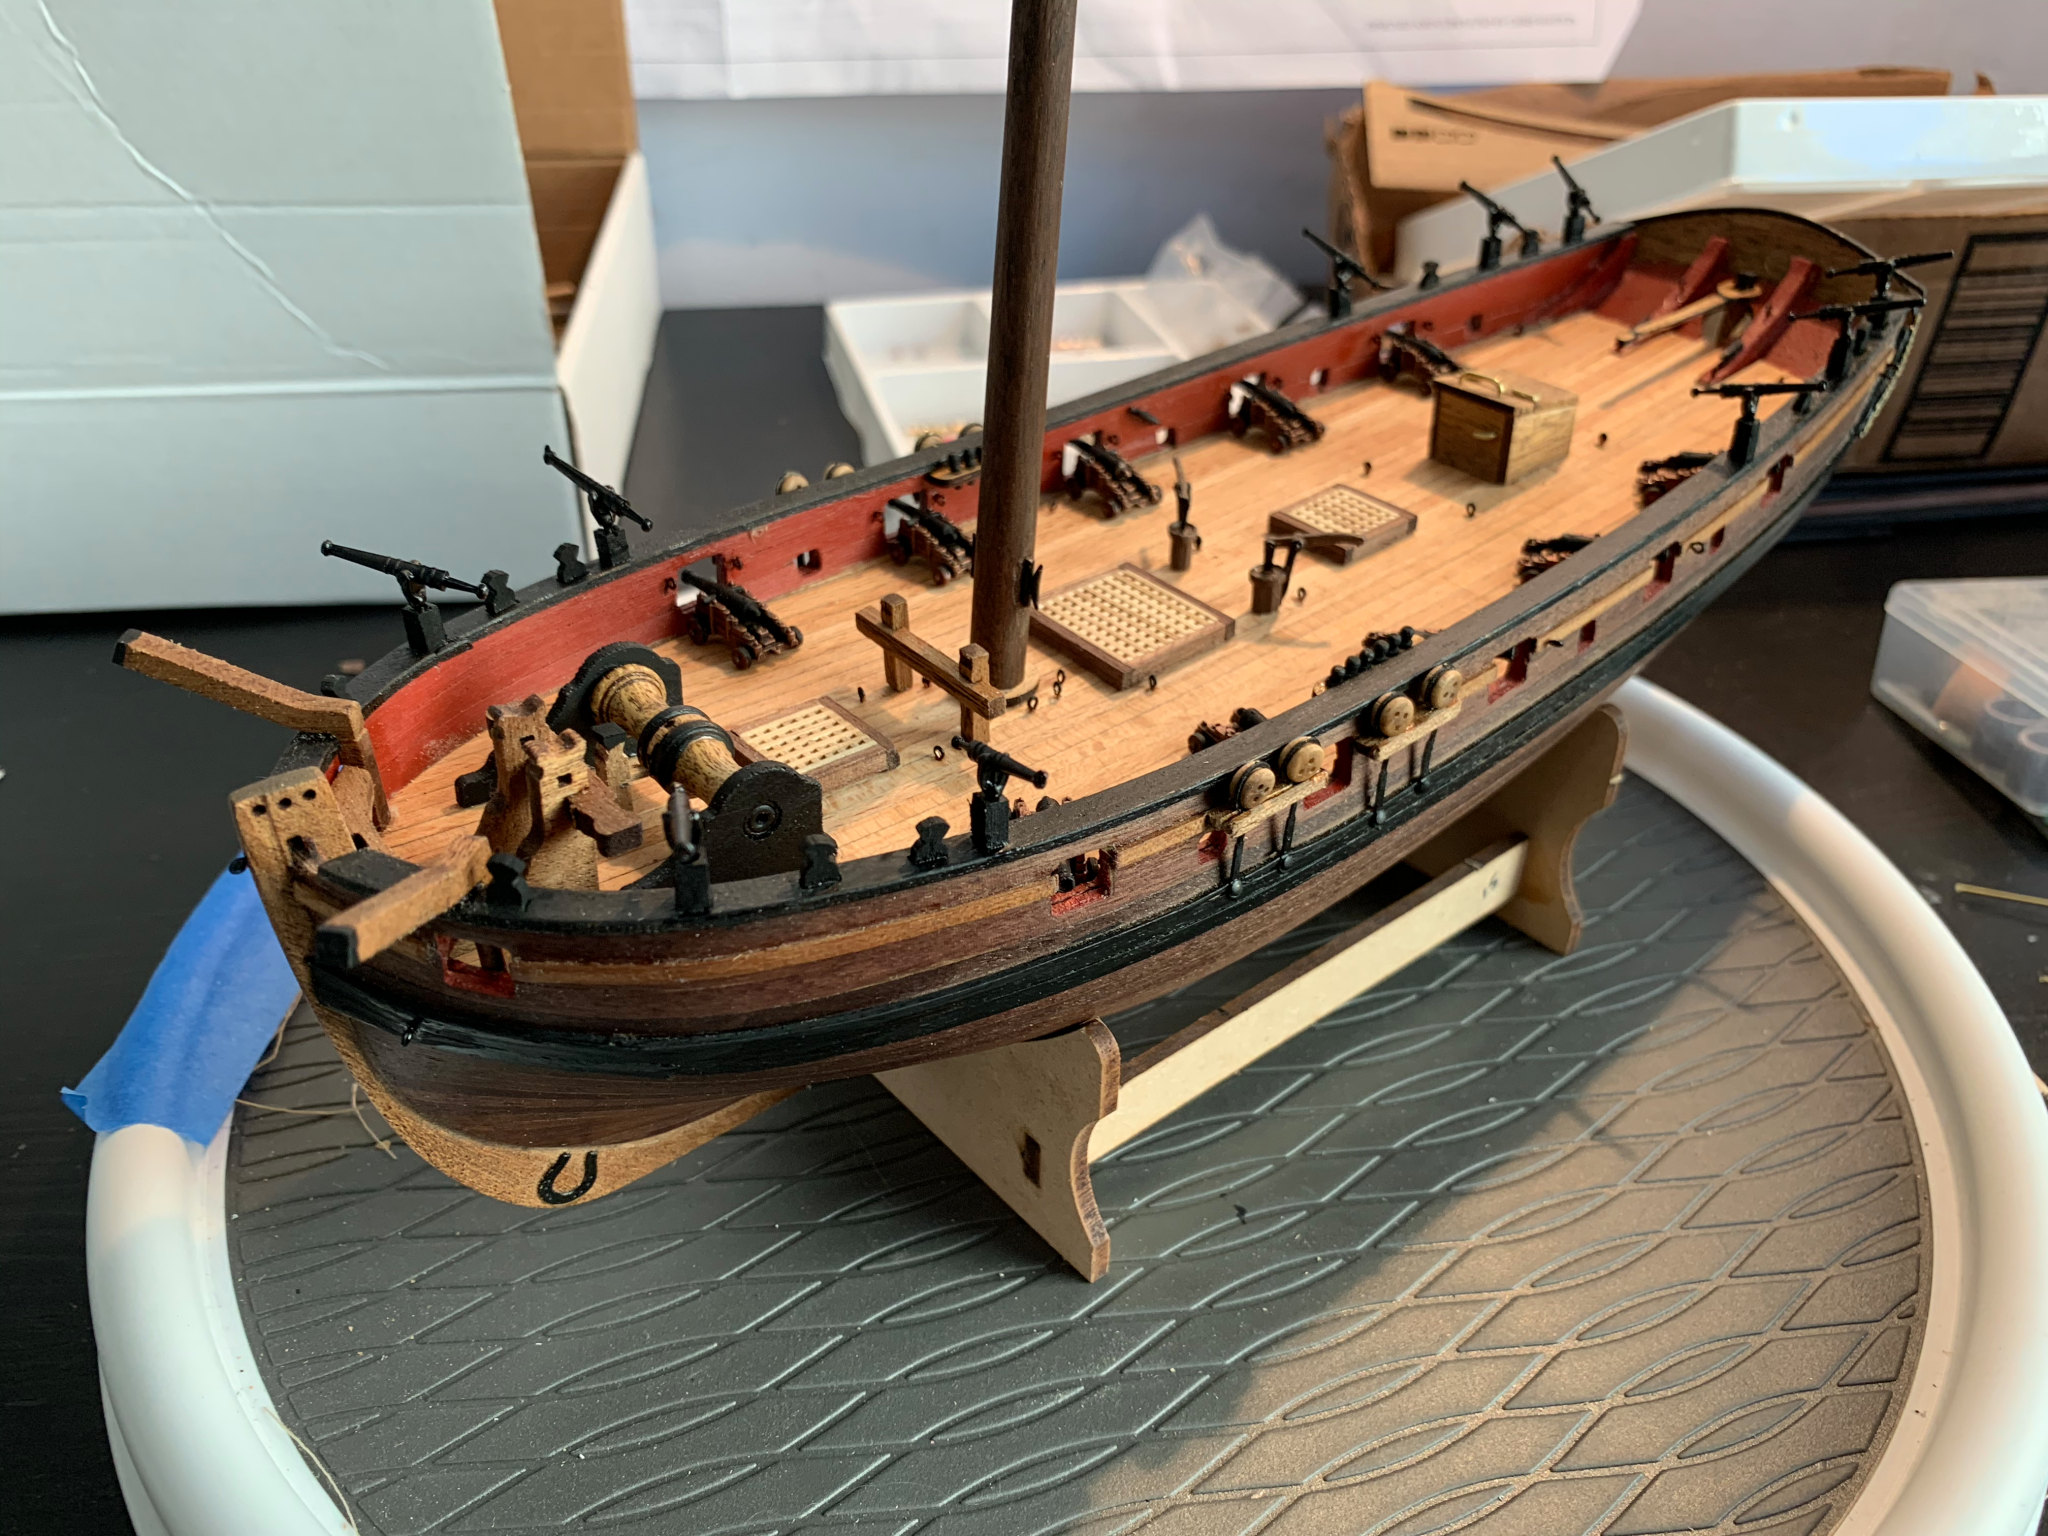
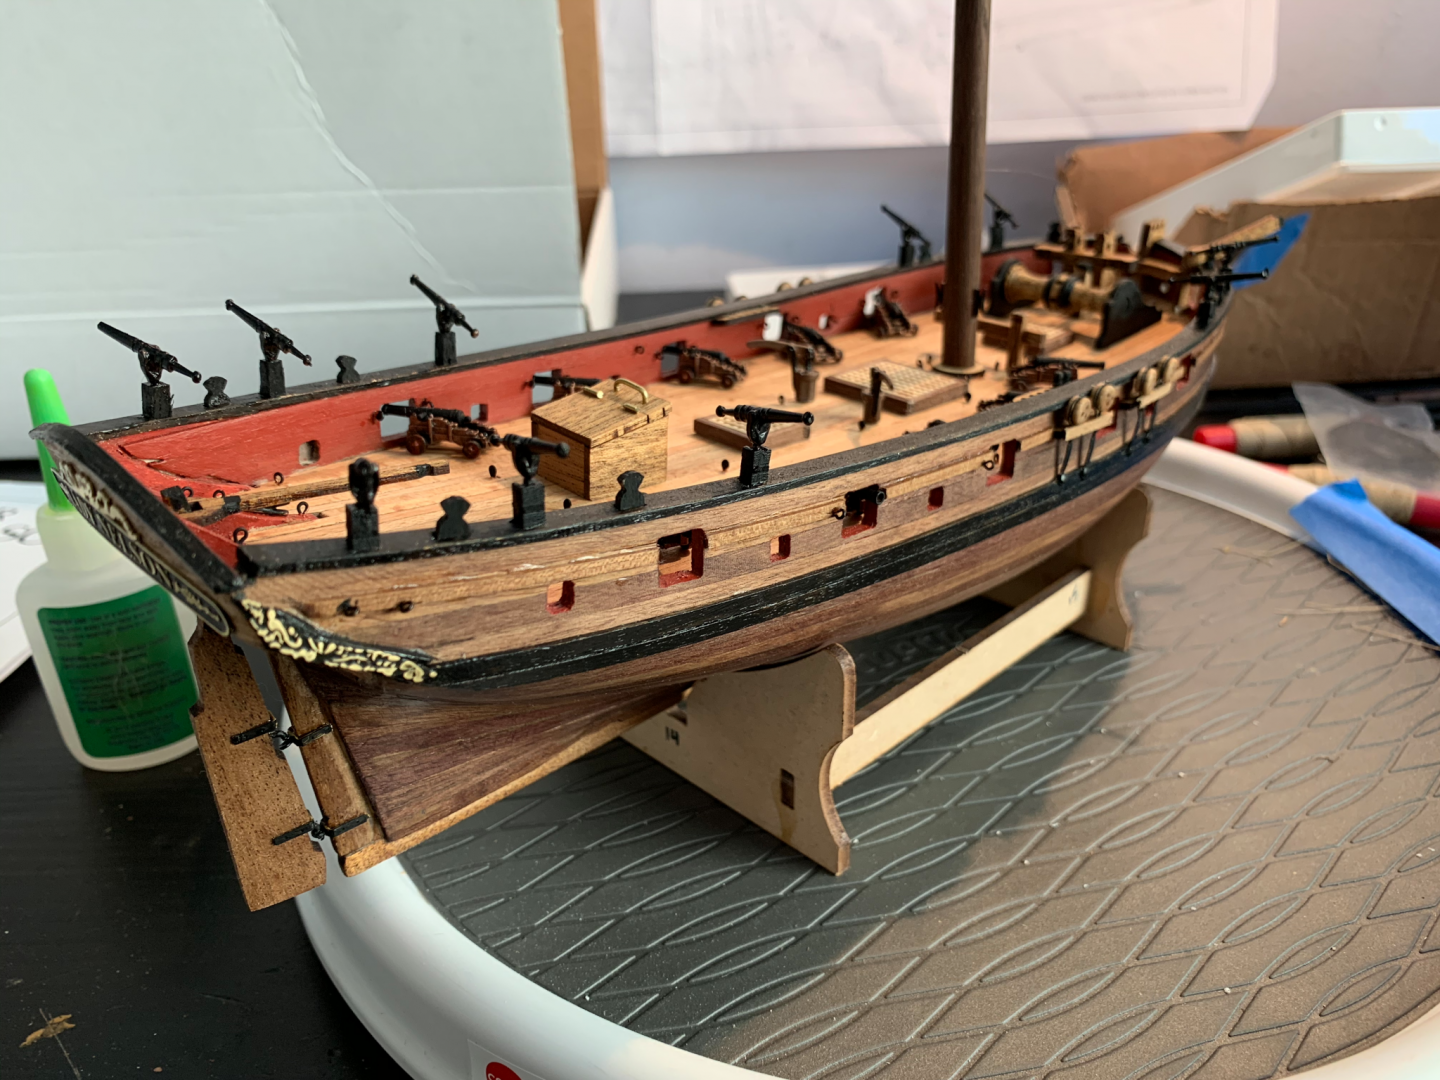
Thanks for pointing me to those awesome builds - inspiring me to scratchbuild a few things. For the most part, I'm just trying to stay on the kit instructions and do things as cleanly as I can. Since my last post, I've been working maybe 9-10 hours a day on this... as my normal gigs have been cancelled due to the pandemic, I have nothing but time. I find it tremendously enjoyable and have a hard time focusing on anything else. I've been working on the deck furniture and guns. Will start the gun rigging this evening. (The guns in the second photo are not in final position, they just slid around on the deck) I think most things are going well. I'm unhappy with how the channel assembly came out. The PE chainplates were not long enough (the wales were too far apart, my fault), so I had to nail into the very top edge of the lower wale. That caused a little splintering and by the time I got the pesky nails in, I had lost the alignment I had so carefully lined out with the mast and some string. The placement also means the deadeyes are below the bulwark and therefore are going to be a challenge to rig. The instructions aren't super clear on how things are supposed to be painted/stained, so I just kind of added some black in a few areas to indicate ironwork or whatever. Honestly, sometimes I just get lost in the enjoyment of the process and make decisions on what is aesthetically pleasing rather than historically accurate. I can only spend so much time on the internet researching! That said, let me know if there are glaring things I should correct Some questions: What are good ways to remove CA glue overflow? What is the best glue to seal rigging knots? How does one get the fabric flags to drape naturally/to scale?

- 11 replies
-
- 4
-
-
- lady nelson
- amati
- (and 1 more)
-
Edwardkenway reacted to a post in a topic:
HM Cutter Lady Nelson by whadozer - Amati/Victory Models - Scale 1:64
-
ccoyle reacted to a post in a topic:
HM Cutter Lady Nelson by whadozer - Amati/Victory Models - Scale 1:64
-
whadozer reacted to a post in a topic:
HM Cutter Lady Nelson by whadozer - Amati/Victory Models - Scale 1:64
-
JeffT reacted to a post in a topic:
HM Cutter Lady Nelson by whadozer - Amati/Victory Models - Scale 1:64
-
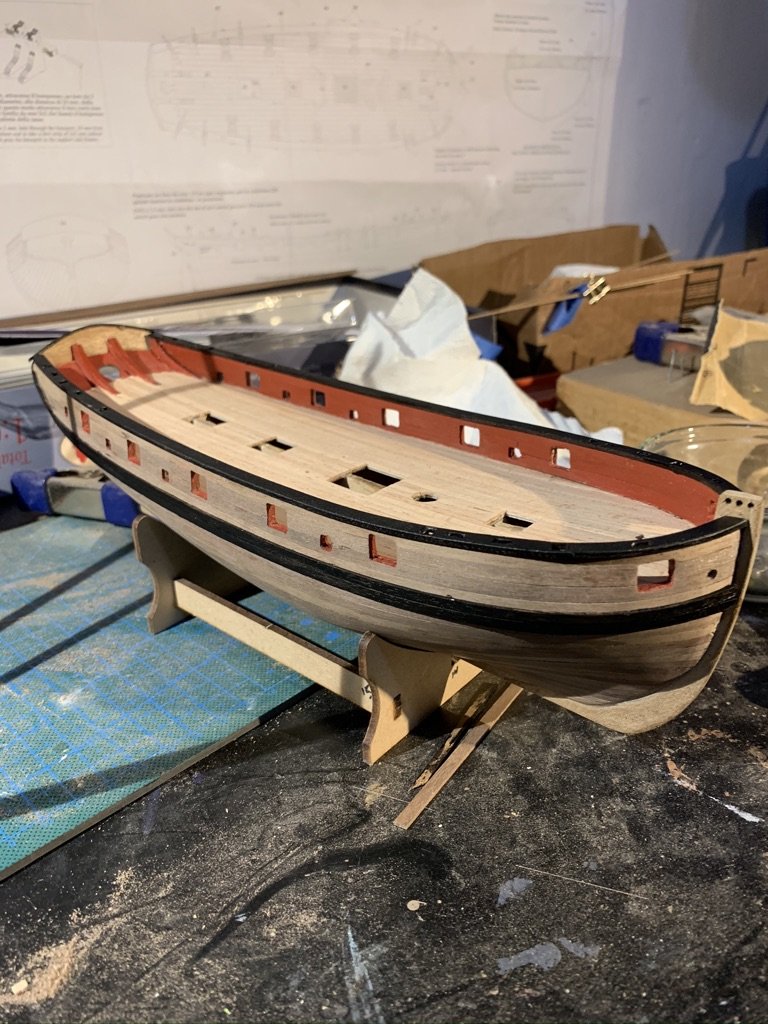
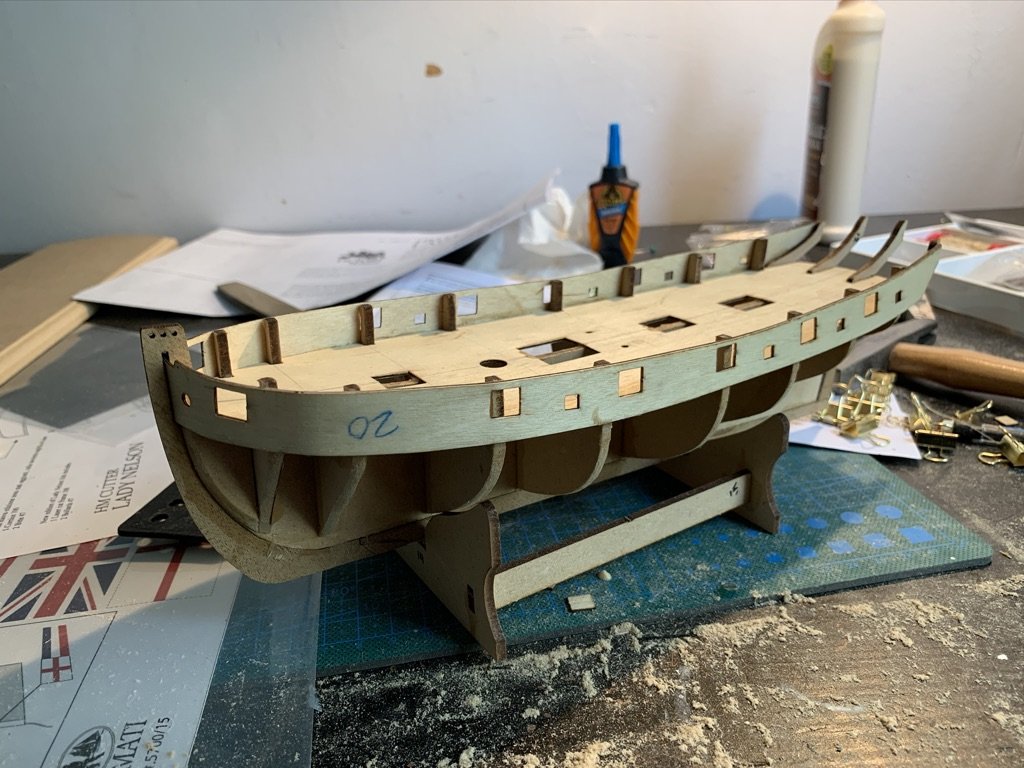
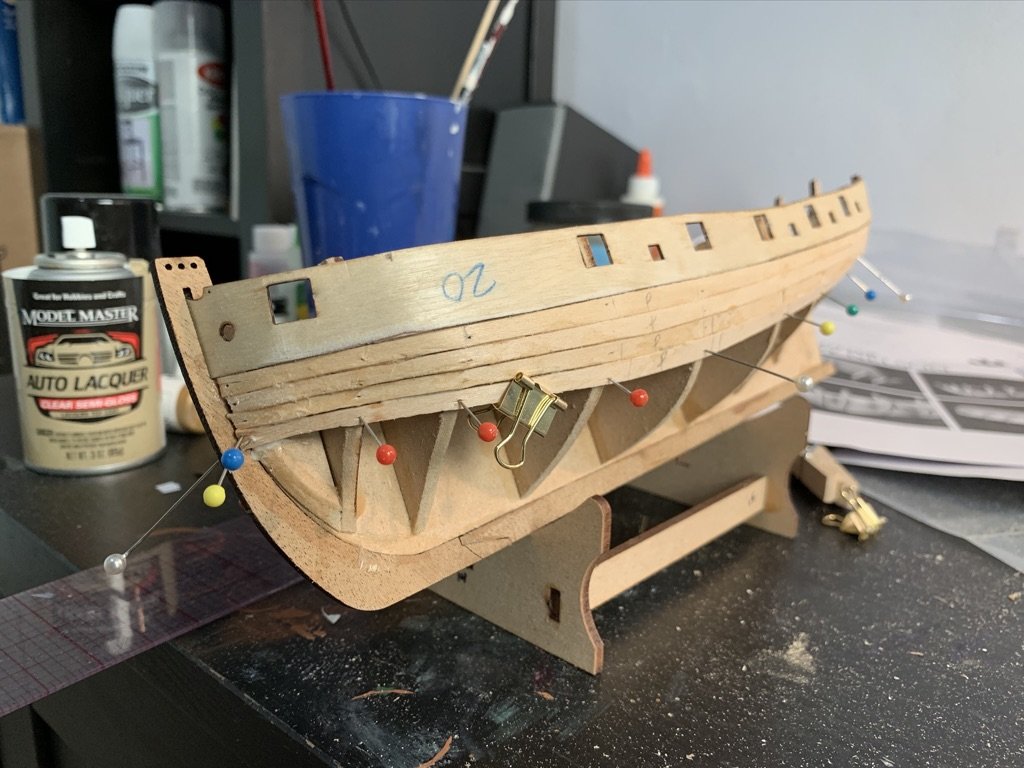
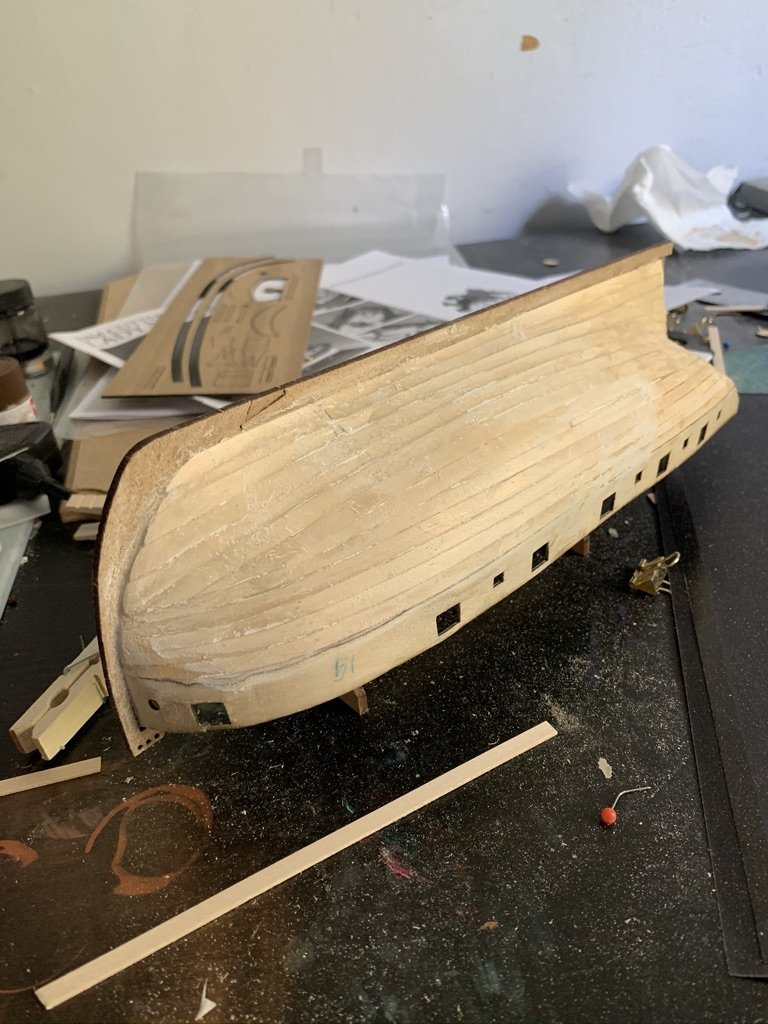
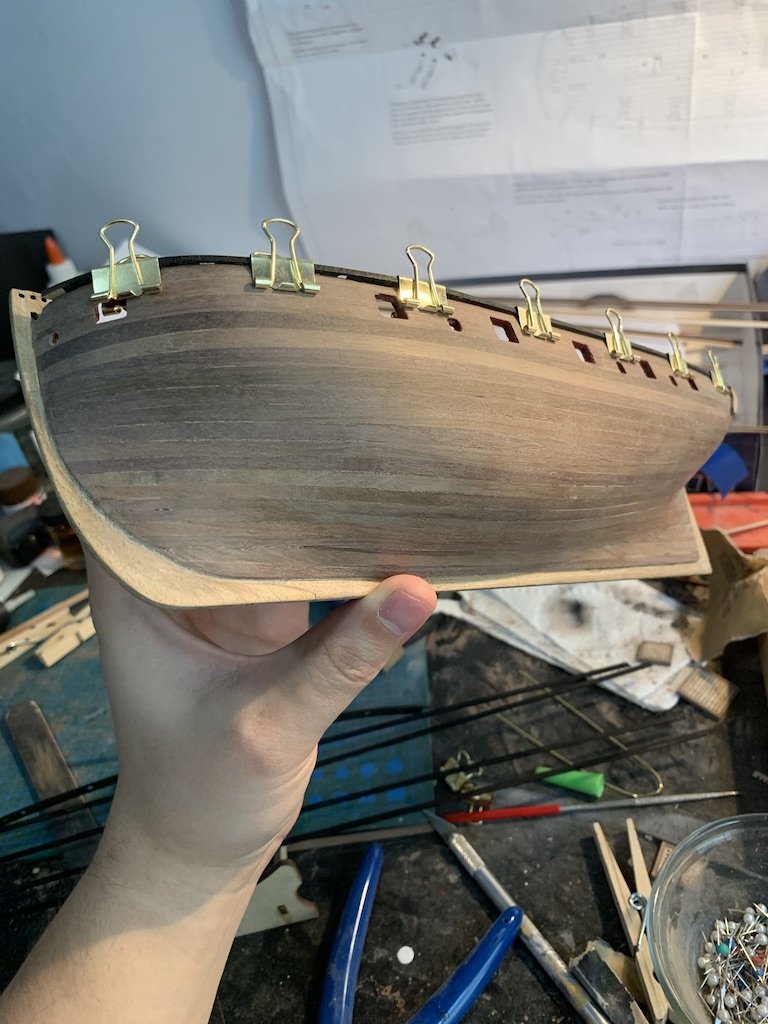
After completing some plastic model kits, I decided I needed to try a wooden model. Internet research pointed me to the Lady Nelson by Amati and I'm really happy with the quality of materials and clarity of instructions. Much better than the plastic model kits! This was a challenge for me also because I have no real woodworking experience at all, but I'm really loving it so far. I started this several weeks ago and only recently decided to join the forum, so most of the woodworking, finishing, and painting is out of the way, but to catch you up: I mostly followed the Modeler's Shipyard DVD that Amati has put online on their Facebook page. I found it to be a really helpful resource. I feel okay about the fairing job on the hull, but knowing now how planks lie I'm sure I'd take a bit more time and care with my next ship. One of the biggest mistakes I made was tapering the first layer planks from the wrong bulkheads, so there's a little bulge towards the bow. It didn't end up causing too much of a problem after sanding and filling. Not very proud of the first layer of planking, but it was sufficient in providing a solid smooth base for the second layer, which I took much more time and care with. The second layer went on like a dream. I was more careful with the tapering and also set up a rather crude jig to edge bend the planks with steam. I simply soaked the planks for a half hour and then used an electric iron as I bent them around the jig to steam the water out and lock the curve into place. I was a bit sloppy with the first two planks above the garboard plank (shoving splinters instead of spiling properly). I used wood glue/sawdust for filler, but WAY overfilled without removing excess and ended up sanding a layer of hard dried glue off the hull for a whole day. IMG_3090.HEIC I finished the hull with Tung oil, which was satisfying to say the least. IMG_3079.HEICIMG_3086.HEIC Here she is today, with most of the deck furnishings painted or stained and ready to be glued on. The masts and yards (which I had to taper and shape by hand) are finished and painted. What I want to do differently next time: 1. Find better ways to make sure the false deck lies at the proper curve against the bulkheads. I tried pins but they were extremely difficult to get through the deck, and many of them came out while the glue dried. So the deck is less curved than I'd like, and the gunports don't sit at an even distance from the deck. 2. Tapering the planks from the proper location on the first layer of planking 3. Not overdoing the filler that I used between the planks on the second layer of planking (or just making the planks fit tighter), so as not to leave glue on the surface of the hull. I sanded most of it off, but the tung oil revealed some missed spots. 3. I used CA glue with the second layer, which was fast and convenient as I didn't have to do as much shaping of the planks. It was an okay situation, but next time I'll try using wood glue and pins, which will help me get a tighter fit between planks. 4. Break up the deck planking into realistic lengths instead of having them run the full length of the ship. There's a lot more to add to this list, but those are the main issues I've run into so far. That, and just not having money or a car to go out and buy the tools that make things easier! Any constructive criticism or advice moving forward is more than welcome. Thanks for reading!

- 11 replies
-
- 5
-
-
- lady nelson
- amati
- (and 1 more)
-
mtaylor reacted to a post in a topic:
New Member in Connecticut
-
Thanks for the encouragement and welcome, all! Bill, I'm in New Haven.
-
whadozer reacted to a post in a topic:
New Member in Connecticut
-
whadozer reacted to a post in a topic:
New Member in Connecticut
-
whadozer reacted to a post in a topic:
New Member in Connecticut
-
whadozer reacted to a post in a topic:
New Member in Connecticut
-
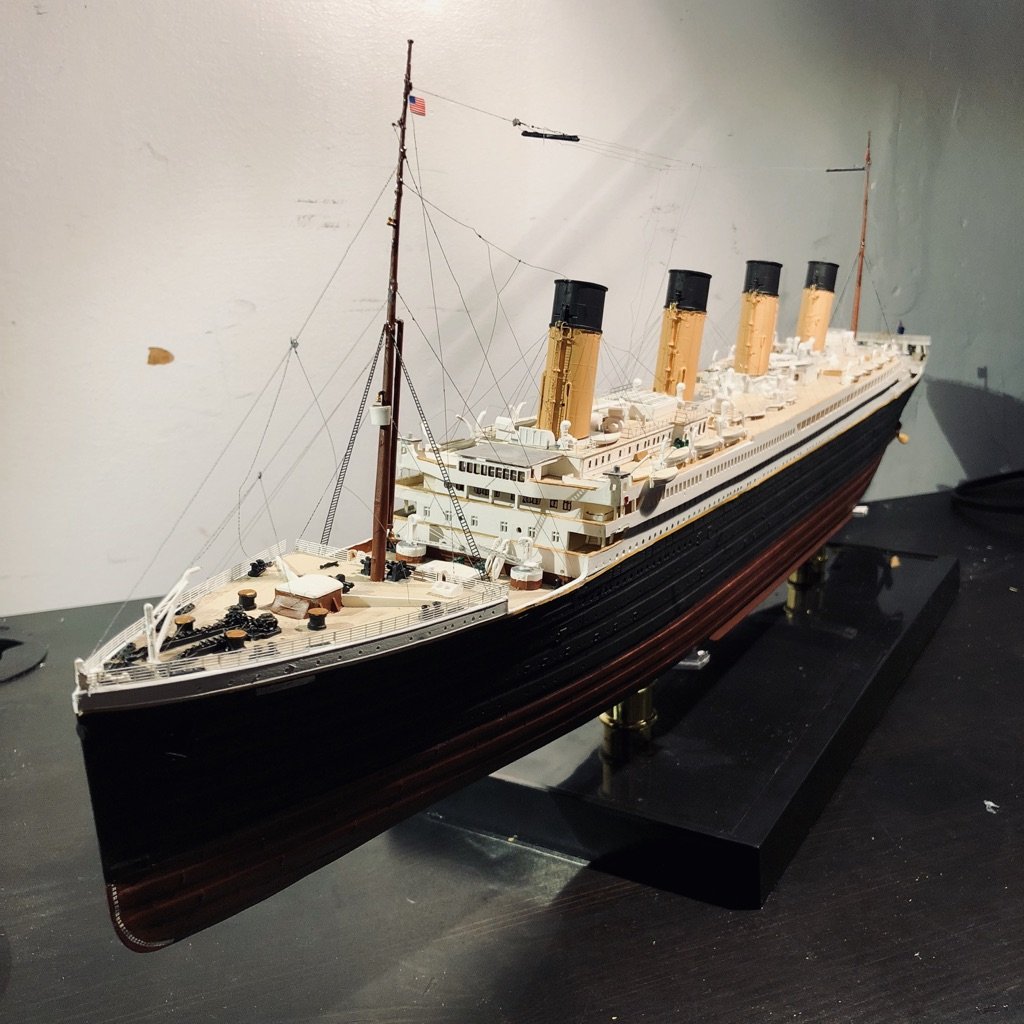
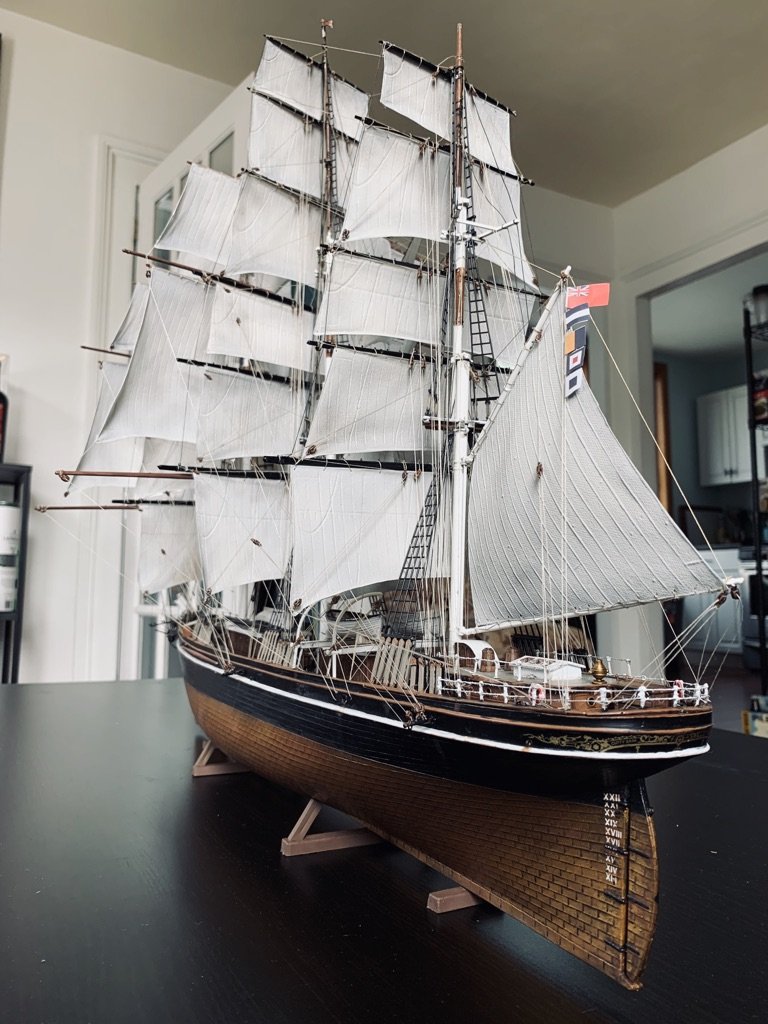
Greetings! I'm a freelancing classical musician living in Connecticut. I finished my second Masters at Yale in 2018 and am a singer specializing in early music and historical performance practice (although I sing a variety of different classical genres). I have a lot of artistic interests, including calligraphy, illumination, drawing, and painting. My journey into model shipbuilding began with the Minicraft Titanic 1:400 in October 2018. I recently completed the Revell Cutty Sark 1:96 (thanks to covid-19), and am currently working on my first wood model, the Amati Lady Nelson. I originally did this in the spirit of challenging myself to be a more patient, precise, and focused artist. I honestly have a hard time looking at those first two models because of how much I have learned since, but I'm sure many of you feel that way about your first models. I feel very vulnerable and self-conscious sharing photos of these crude builds to a community of literal experts, but I've attached just a few wide shots so you can't be too scrutinizing ☺️. I will be putting up a build log for the Lady Nelson soon. I feel really good about how she's coming along, and have decided to really explore working with wood in future models, which I have no experience with (beyond a crude Pinewood derby car I build when I was 10). I absolutely love working with it on the Lady Nelson, though. It's resilient, sculptable, and full of character and life. I don't think I'll ever go back to a plastic model again. As a young freelancing performer, I am rather limited on the space and funds I need to develop this hobby. I have a decent selection of hand tools but no power tools. Not even a drill. I work in a small carpeted office that also is a room I practice in. But I'm embracing having to do things by hand and having to be more creative with my processes. This community has already provided me with so much knowledge and experience and I hope I can continue learning with constructive criticism and more active participation in the forums. I am already (ambitiously) dreaming of which kit I will build next. Thanks for reading! Will