LucienL
-
Posts
102 -
Joined
-
Last visited
Recent Profile Visitors
969 profile views


.thumb.jpeg.ffac2f8a24d212961a83eab4efb06a6c.jpeg)
-
 Keith Black reacted to a post in a topic:
Odd number of rowers on whaleboat
Keith Black reacted to a post in a topic:
Odd number of rowers on whaleboat
-
DonSangria reacted to a post in a topic:
Odd number of rowers on whaleboat
-
 I see, that would make sense, although this part is much higher up than the thwarts. I wonder why they haven't drawn that on the plans though. I'm not a fan of the asymmetry so I think I will add an extra thole for the last thwart. Thank you. Progress has been a bit inconsistent on the beagle, but the boats are coming along pretty well. I've been meaning to post an update for a while and probably will soon now.
 -
Keith Black reacted to a post in a topic:
Odd number of rowers on whaleboat
-
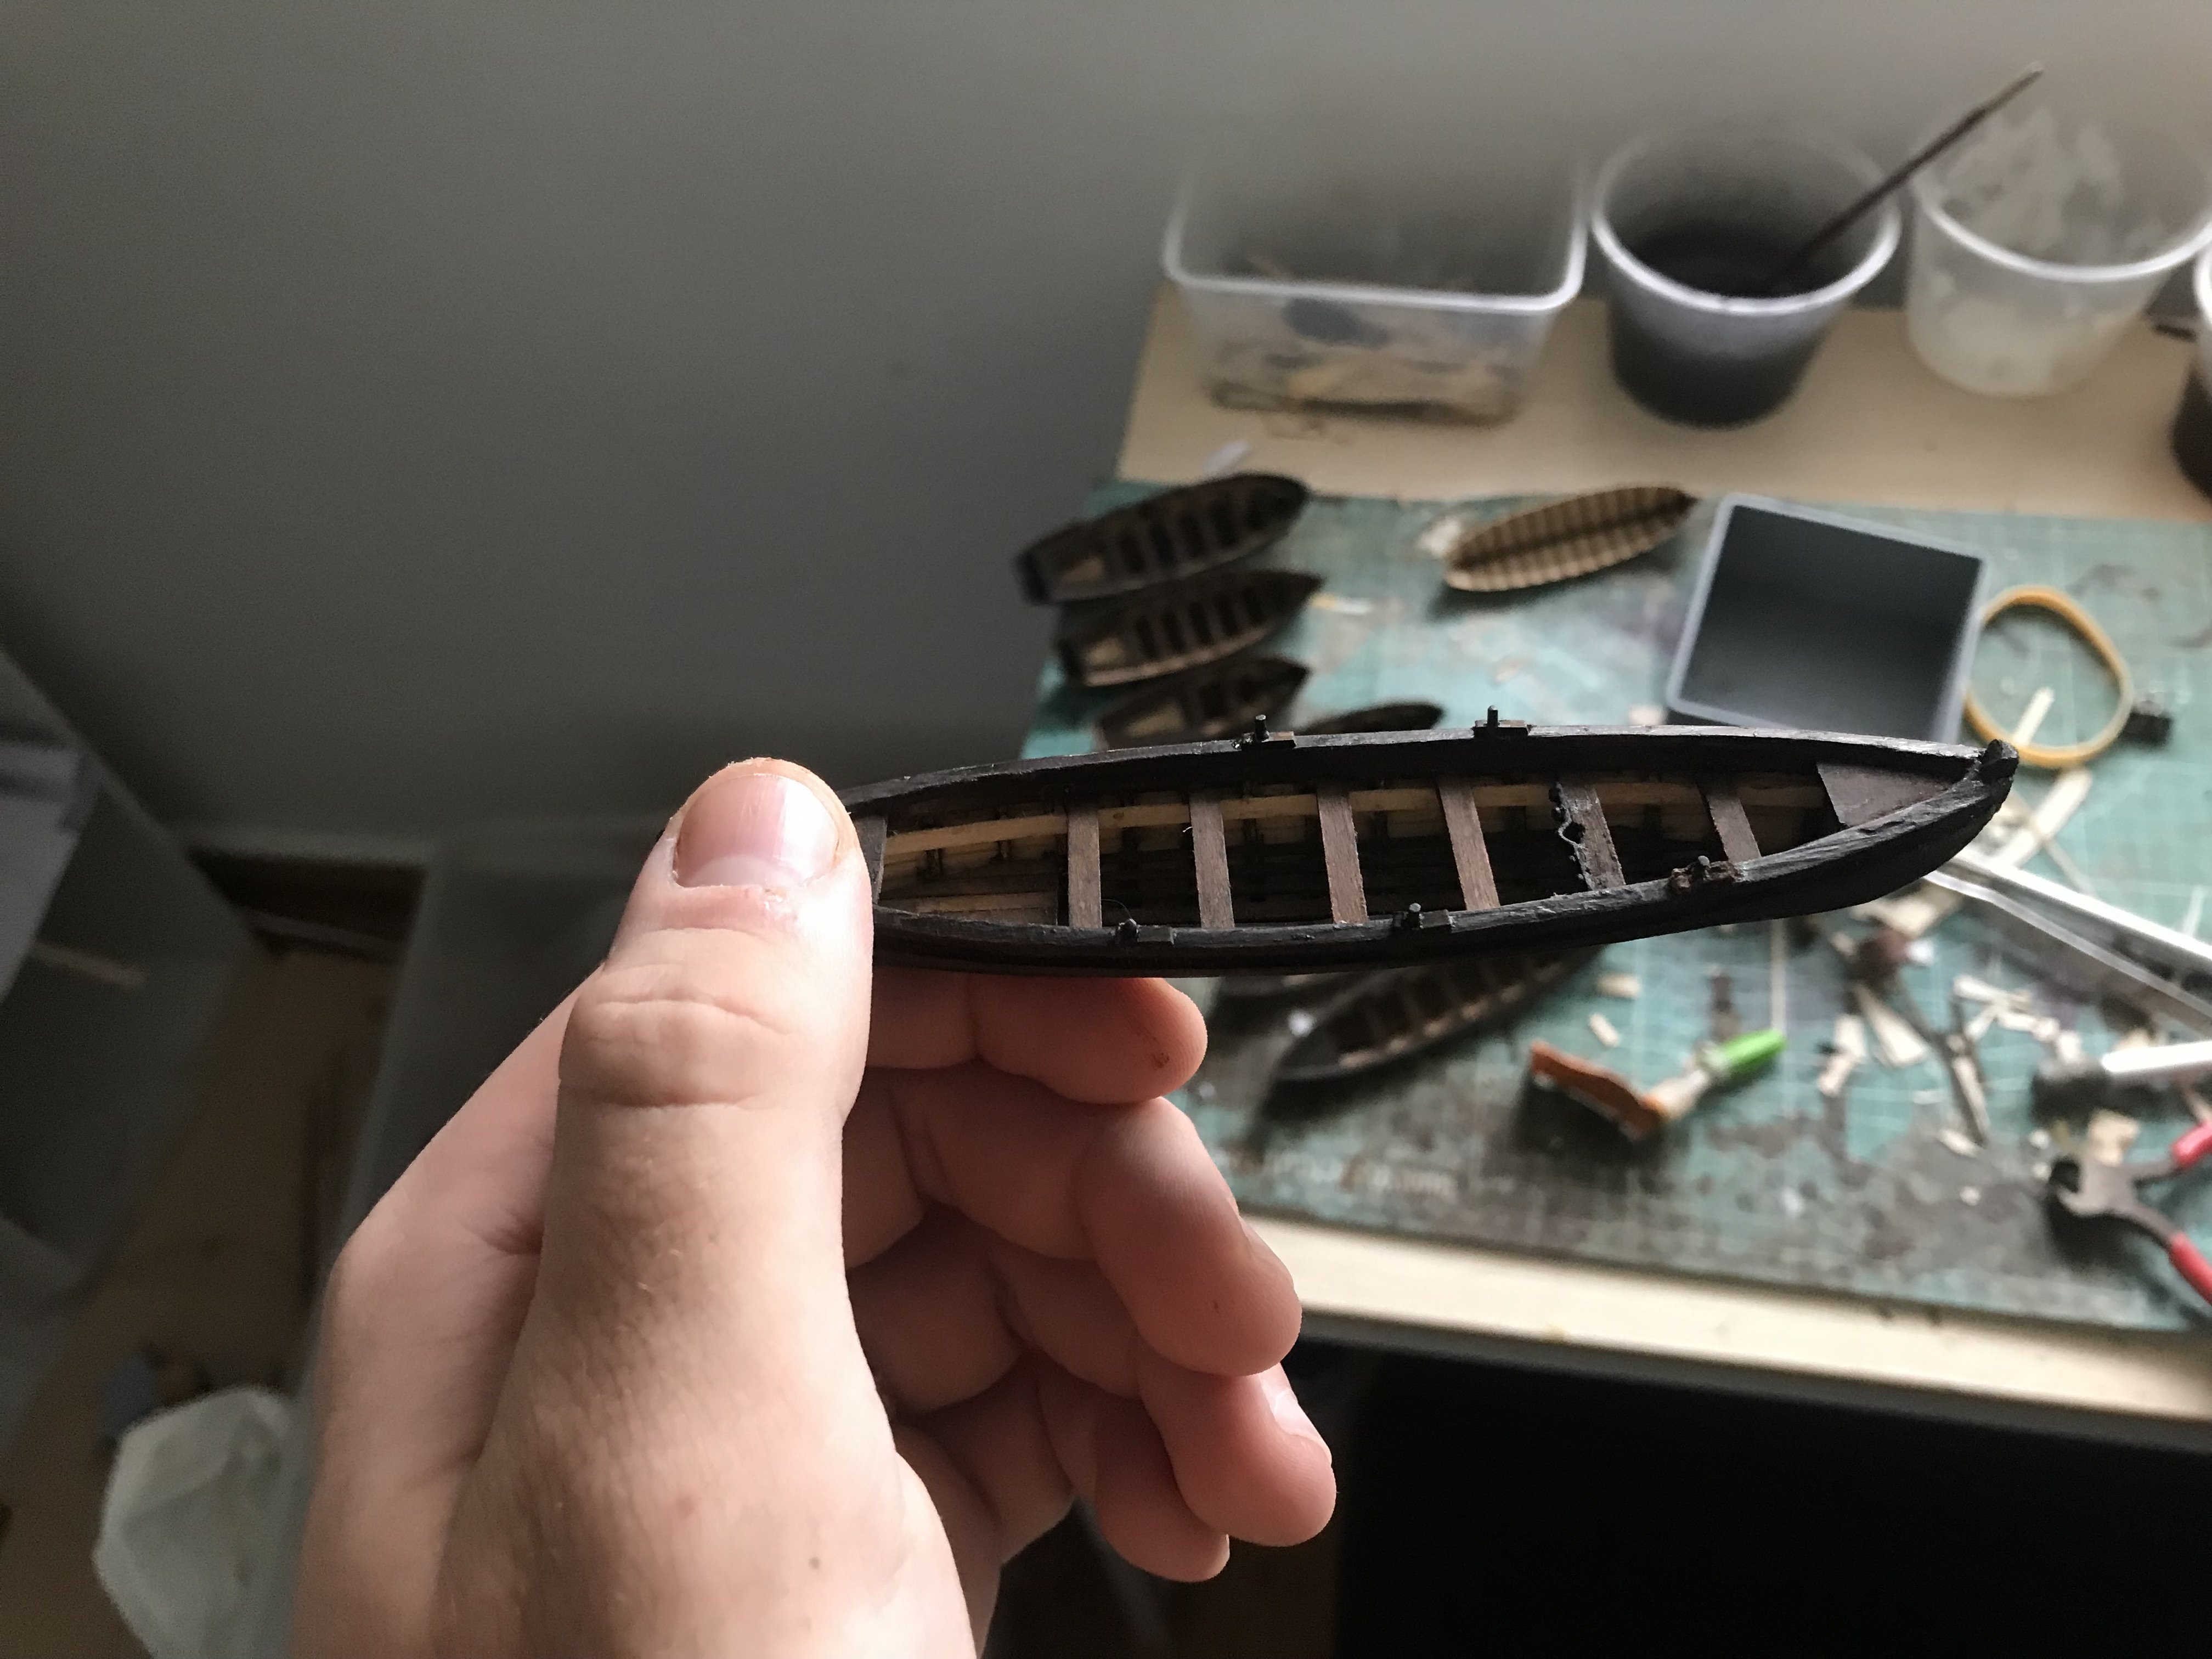
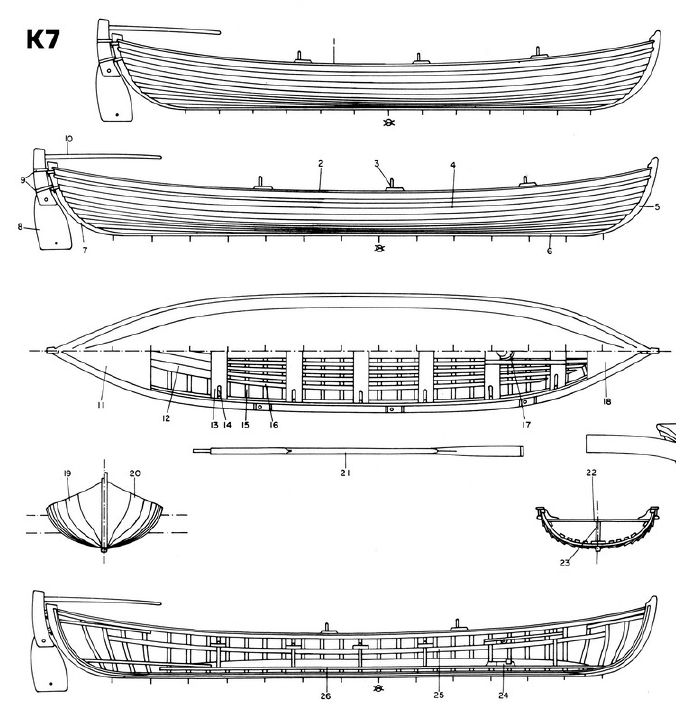
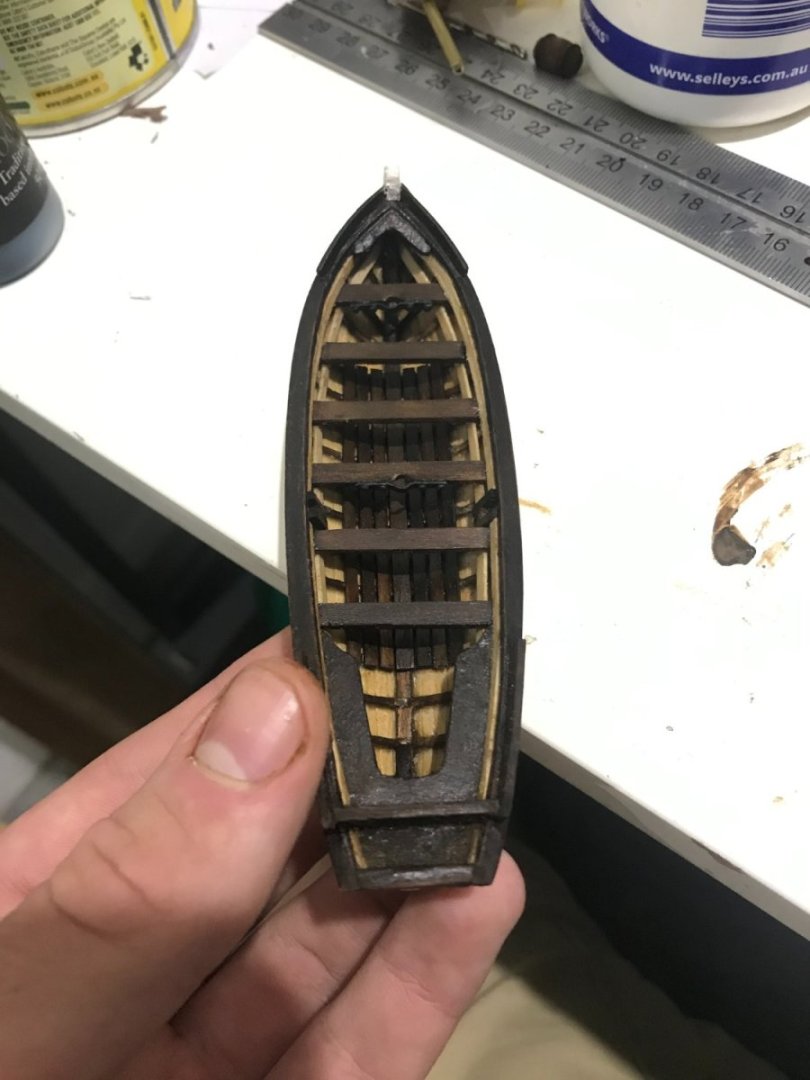
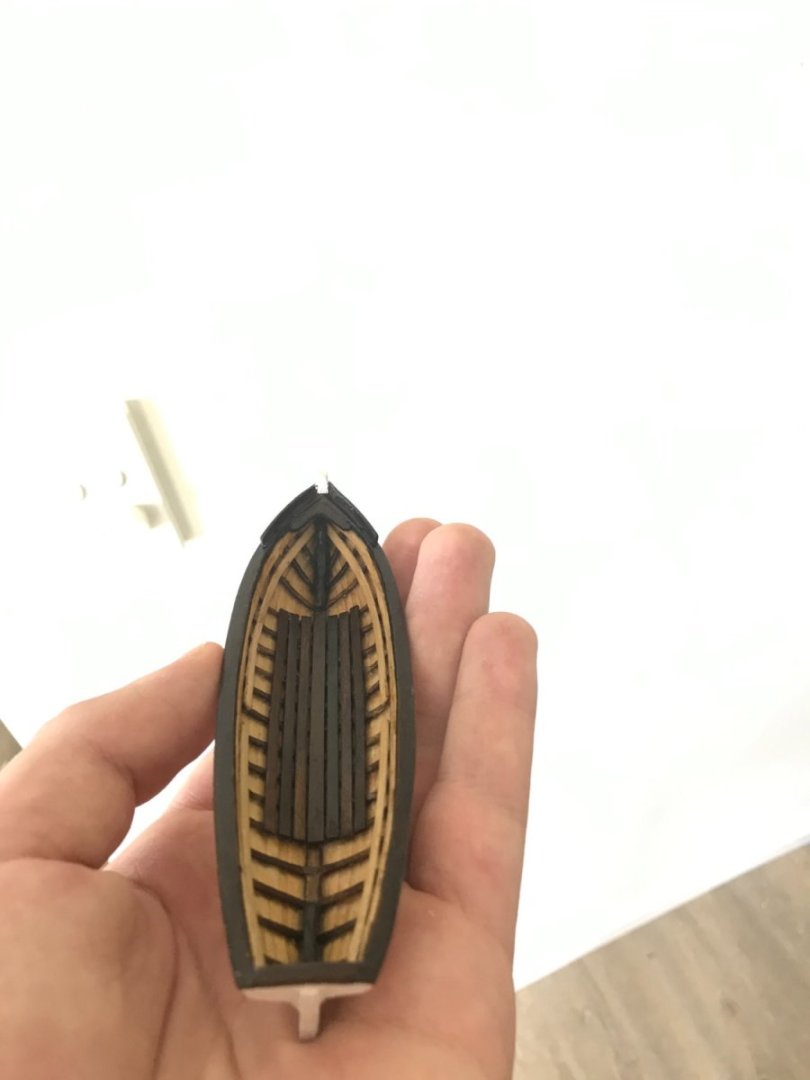
Hi there. I am currently building the boats for the HMS Beagle and have been following the anatomy of the ship as a guide. This is the whaleboat There are six thwarts total and 5 tholes, presumably the aft-most thwart was for someone to control the rudder. As far as I can tell, this is what the plans suggest I'm just not sure if this is right as this would result in an odd number of rowers that would make the boat difficult to keep straight. If anyone knows whether this is something that may have been done, please let me know.

-
Patrick B reacted to a post in a topic:
HMS Beagle by Capella - OcCre - 2nd build
-
Mr Whippy reacted to a post in a topic:
HMS Beagle by Capella - OcCre - 2nd build
-
Hi Capella. On the point you raise about the metal parts G11 and G12, these are false quarter galleys, and are just decoration. I don't think they would have actually been glass, but I might be wrong on that. I chose to go with what the replica had done and paint them white.
-
Penfold reacted to a post in a topic:
HMS Beagle by Capella - OcCre - 2nd build
-
Prowler901 reacted to a post in a topic:
HMS Beagle by LucienL - OcCre - 1:60
-
Prowler901 reacted to a post in a topic:
HMS Beagle by LucienL - OcCre - 1:60
-
Cathead reacted to a post in a topic:
HMS Beagle by LucienL - OcCre - 1:60
-
Capella reacted to a post in a topic:
HMS Beagle by LucienL - OcCre - 1:60
-
Thank you for the kind words everyone. @allanyed I think the trouble came when I tried to glue the spacer pieces that sit between the frames. I think some of the glue stuck to the jig, which meant that it would be impossible to remove in one piece. I think that next time I will wrap the jig in some cling wrap and that should allow the boat to lift off the jig easily if I do it the same way. Thank you for the link, I actually did come across your log towards the end of this process. The Bounty's launch from the Model Shipways kit was my first build, so I'm interested to see you tackle it. @Capella The darker bits were stained using an oak stain. This is much darker than other oak stains I have seen and I think that this stain is meant to be diluted before use with a colour reducer that is sold separately. I liked the colour that came from the undiluted stain, so that's what I have been working with. I also rub in a small amount of walnut filler into the grain before staining to give a more even colour and hide some of the grain. I have used some paulownia wood for some pieces, which doesn't stain the same way as the limewood and has a very large grain. Adding the filling putty is necessary to get all the bits the same colour. The pale bits are just the raw limewood sealed with a matt varnish.
-
 LucienL reacted to a post in a topic:
HMS Beagle by LucienL - OcCre - 1:60
LucienL reacted to a post in a topic:
HMS Beagle by LucienL - OcCre - 1:60
-
LucienL reacted to a post in a topic:
HMS Beagle by LucienL - OcCre - 1:60
-
LucienL reacted to a post in a topic:
HMS Beagle by LucienL - OcCre - 1:60
-
Ah, that is annoying. I would also think cutting a new one would be a good idea. You could even bend some of the 2 x 2 mm sticks to fit it. Did this piece fit well with the false keel?
-
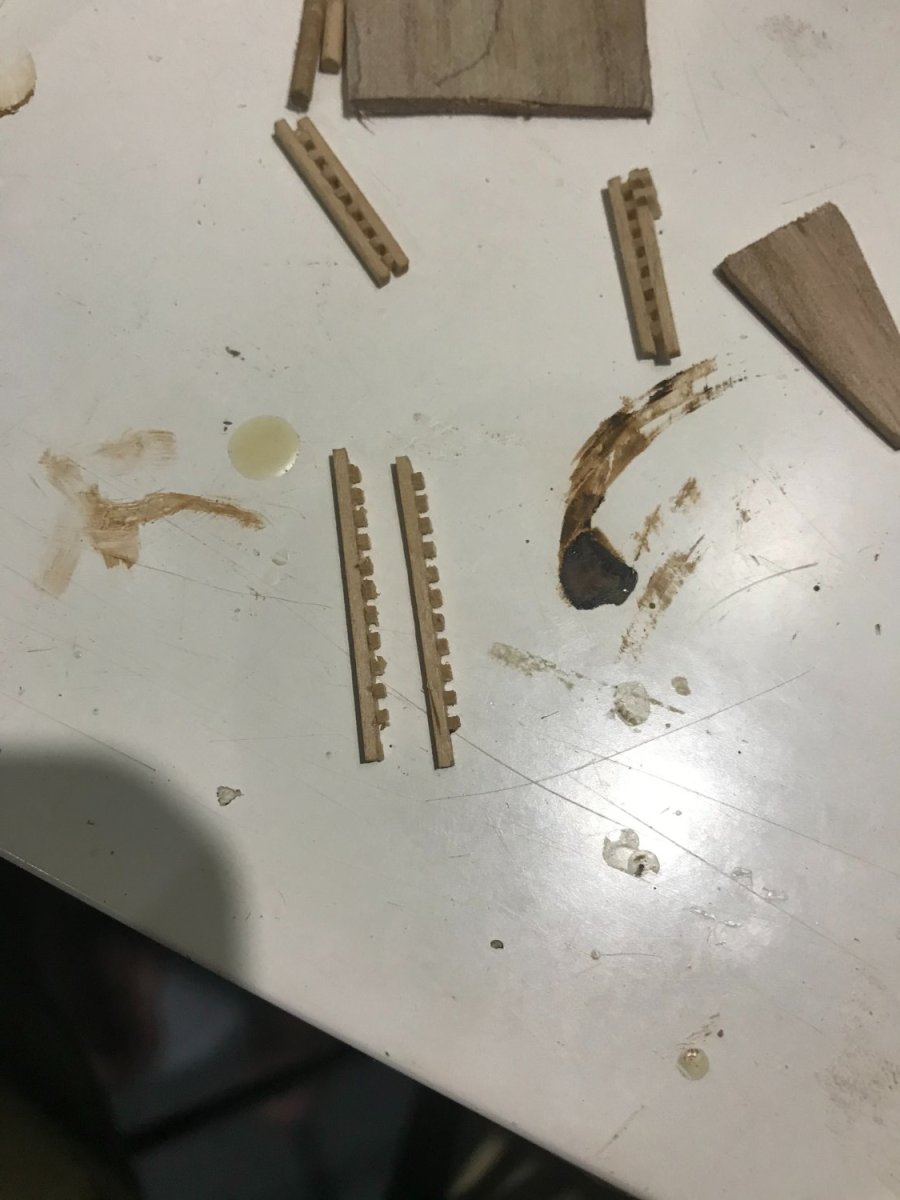
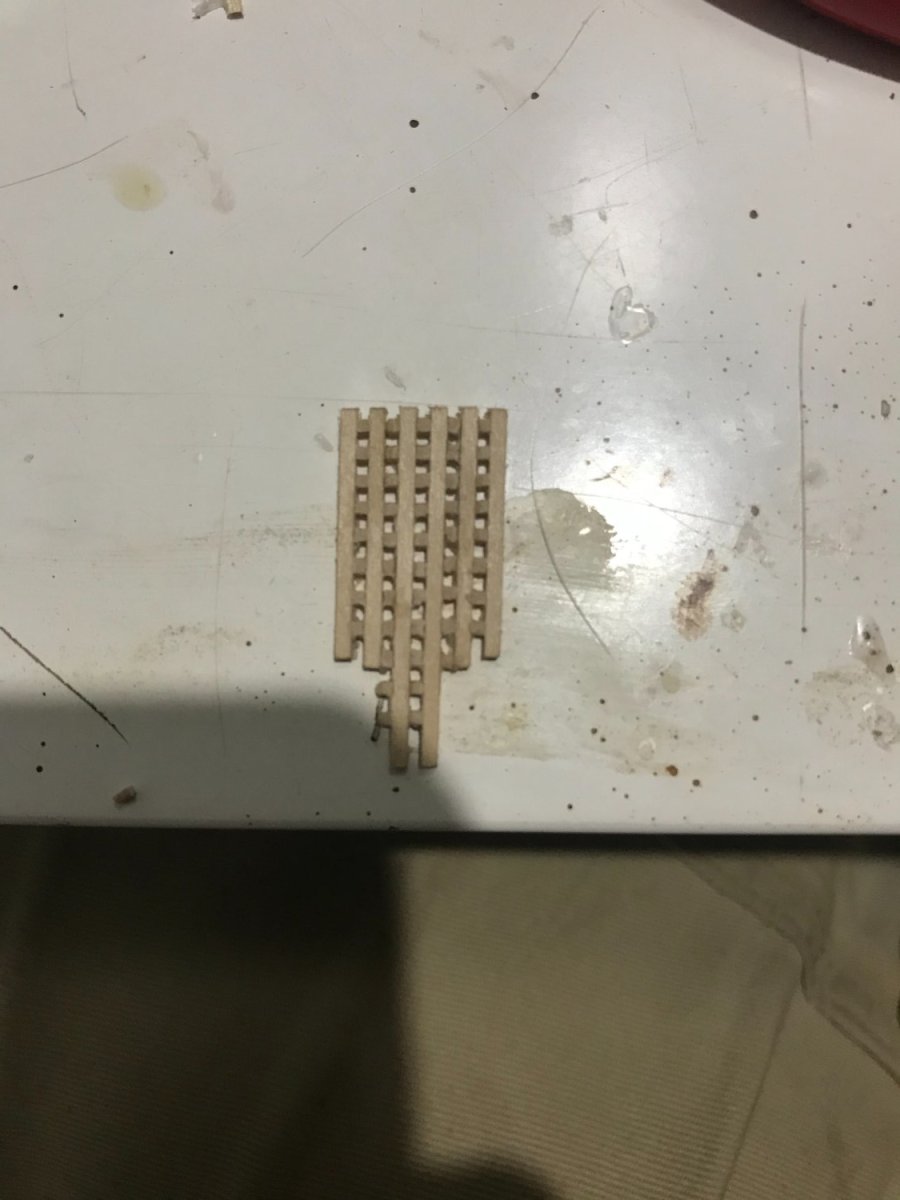
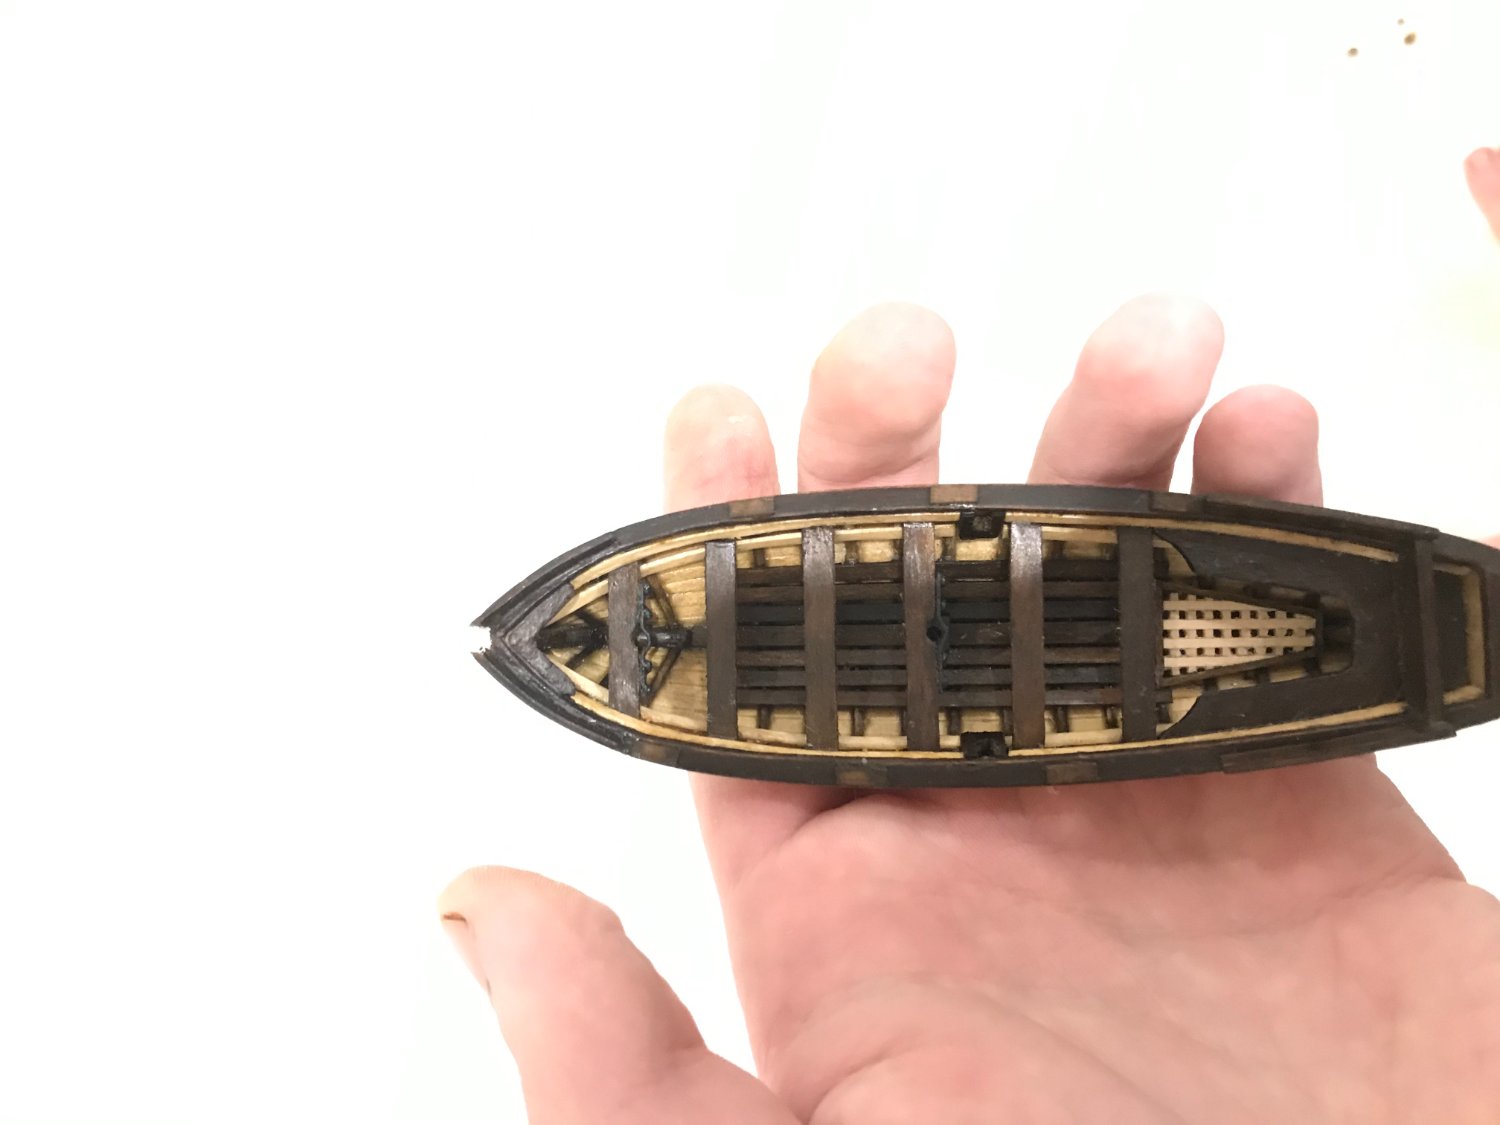
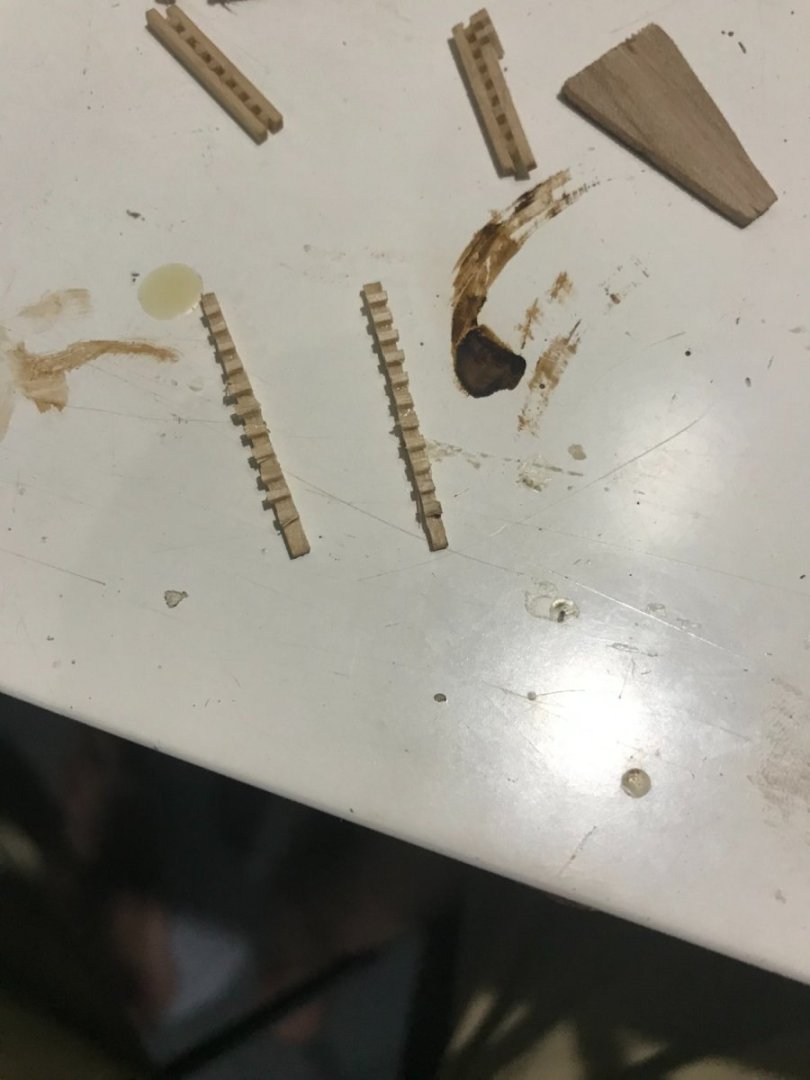
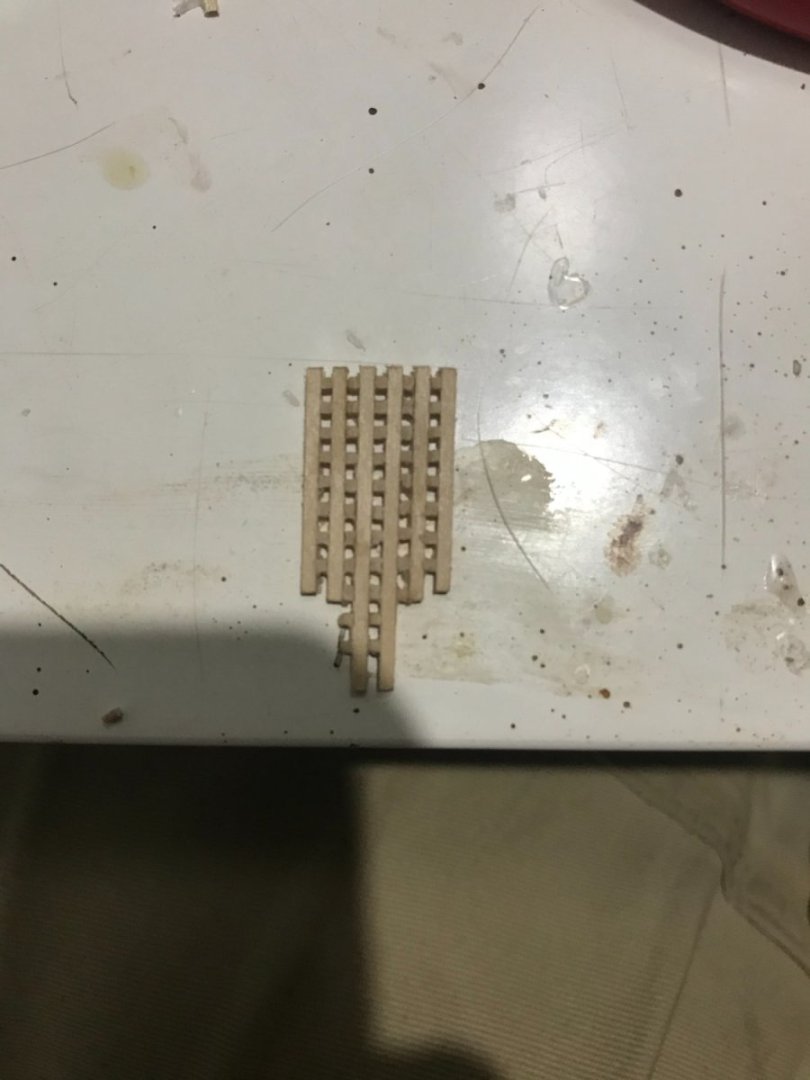
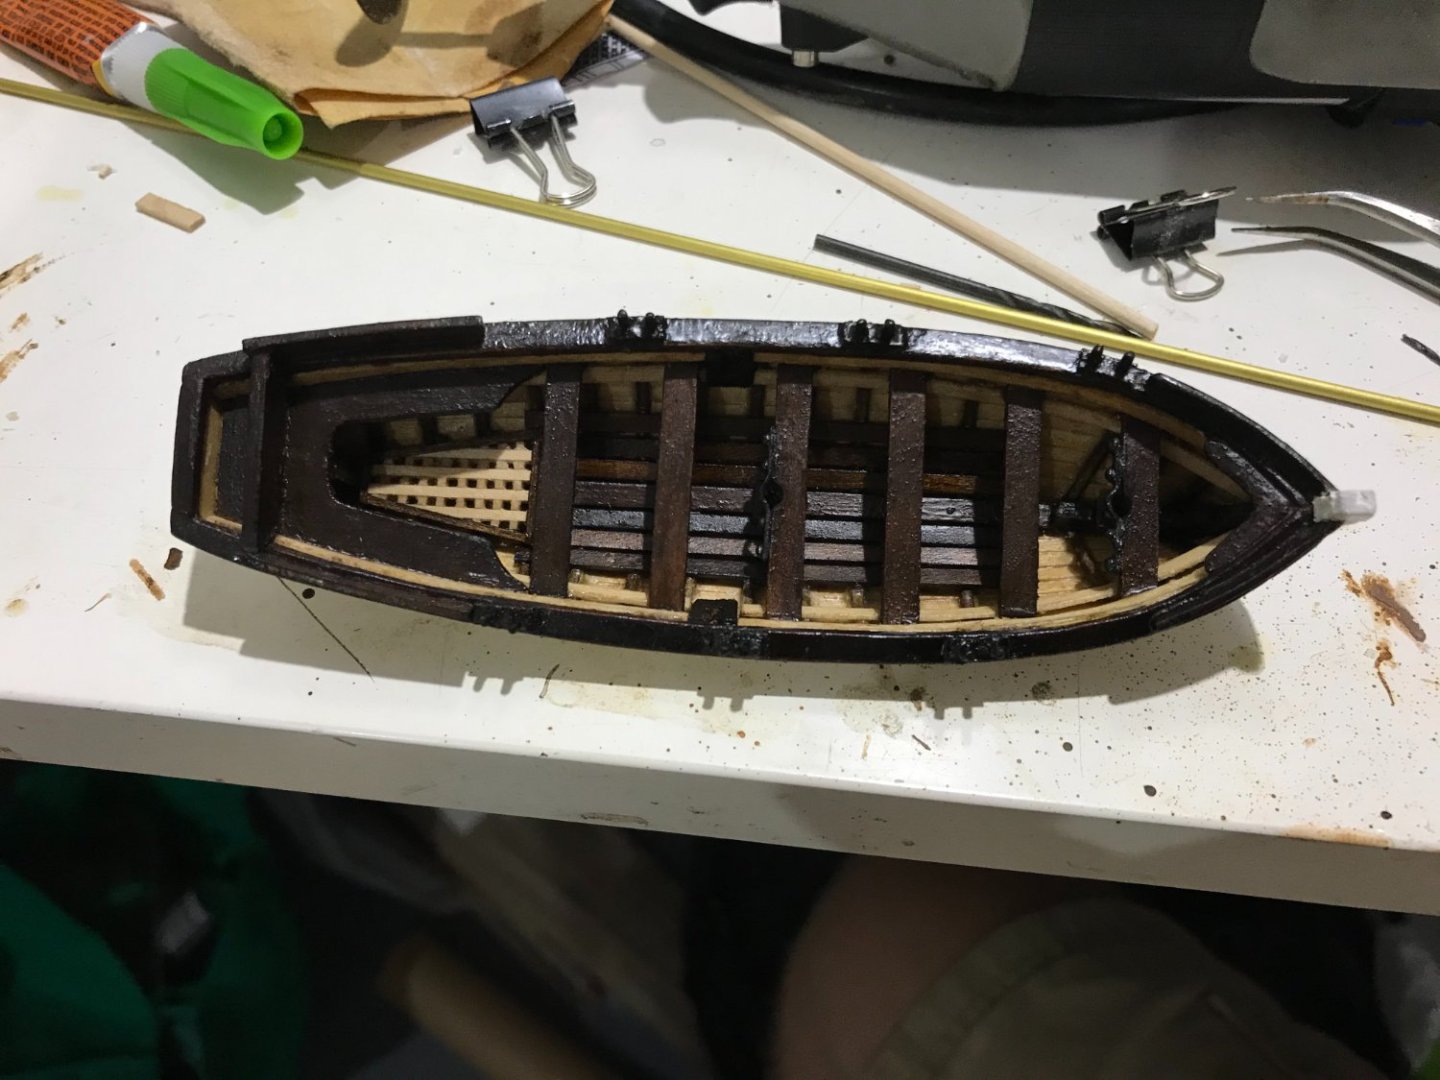
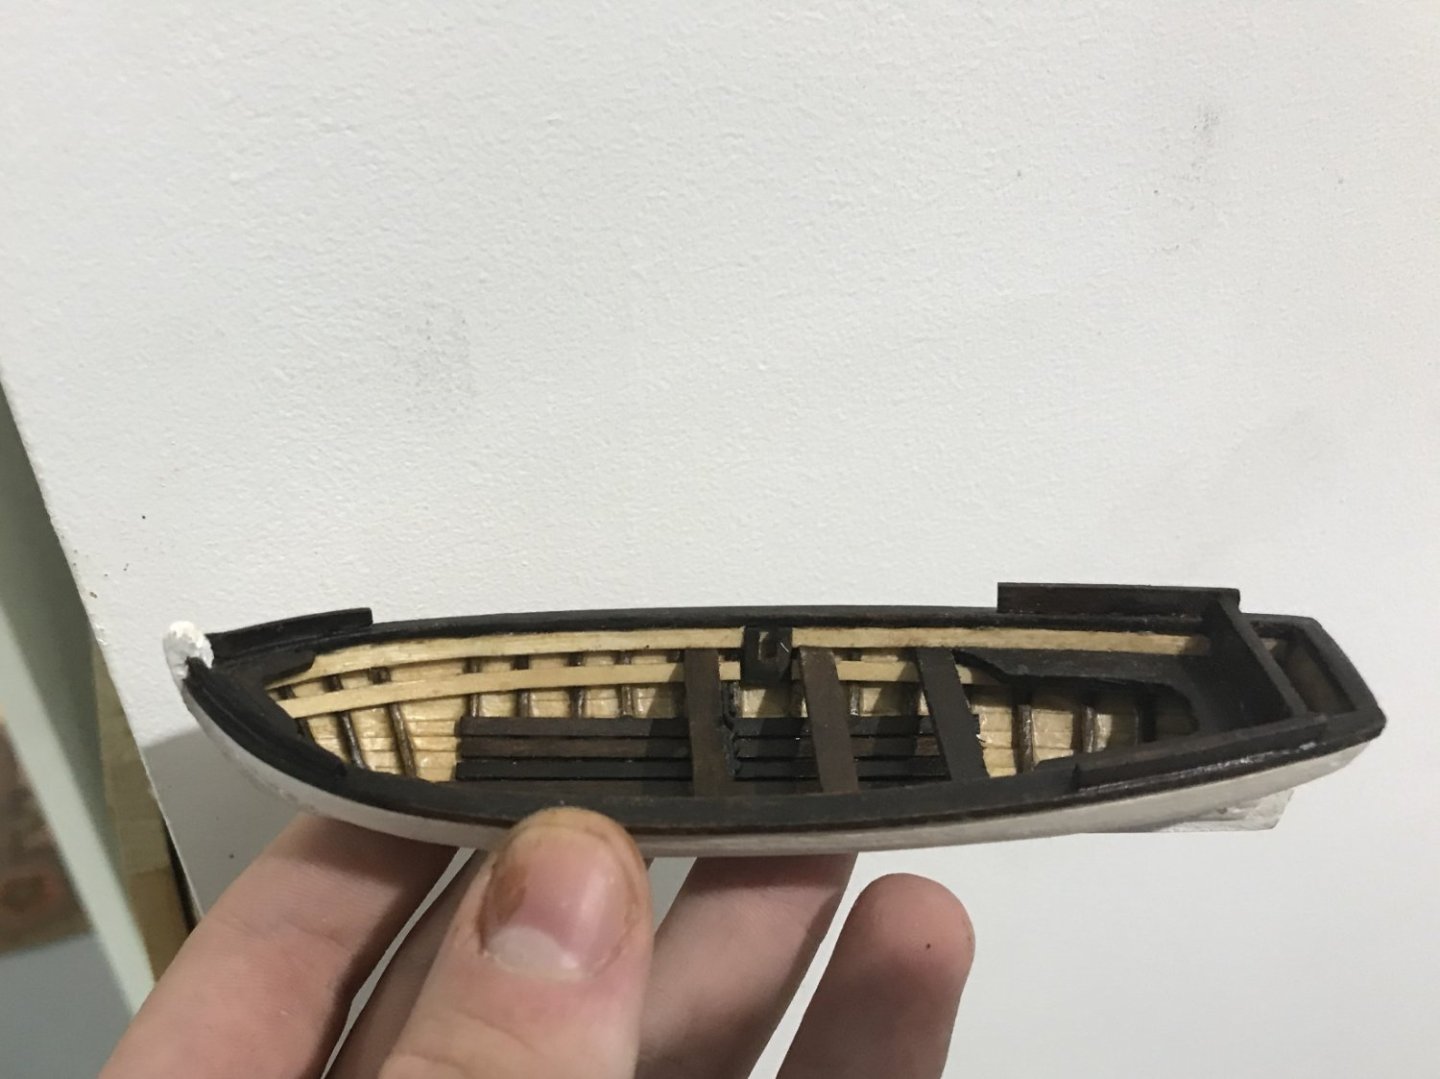
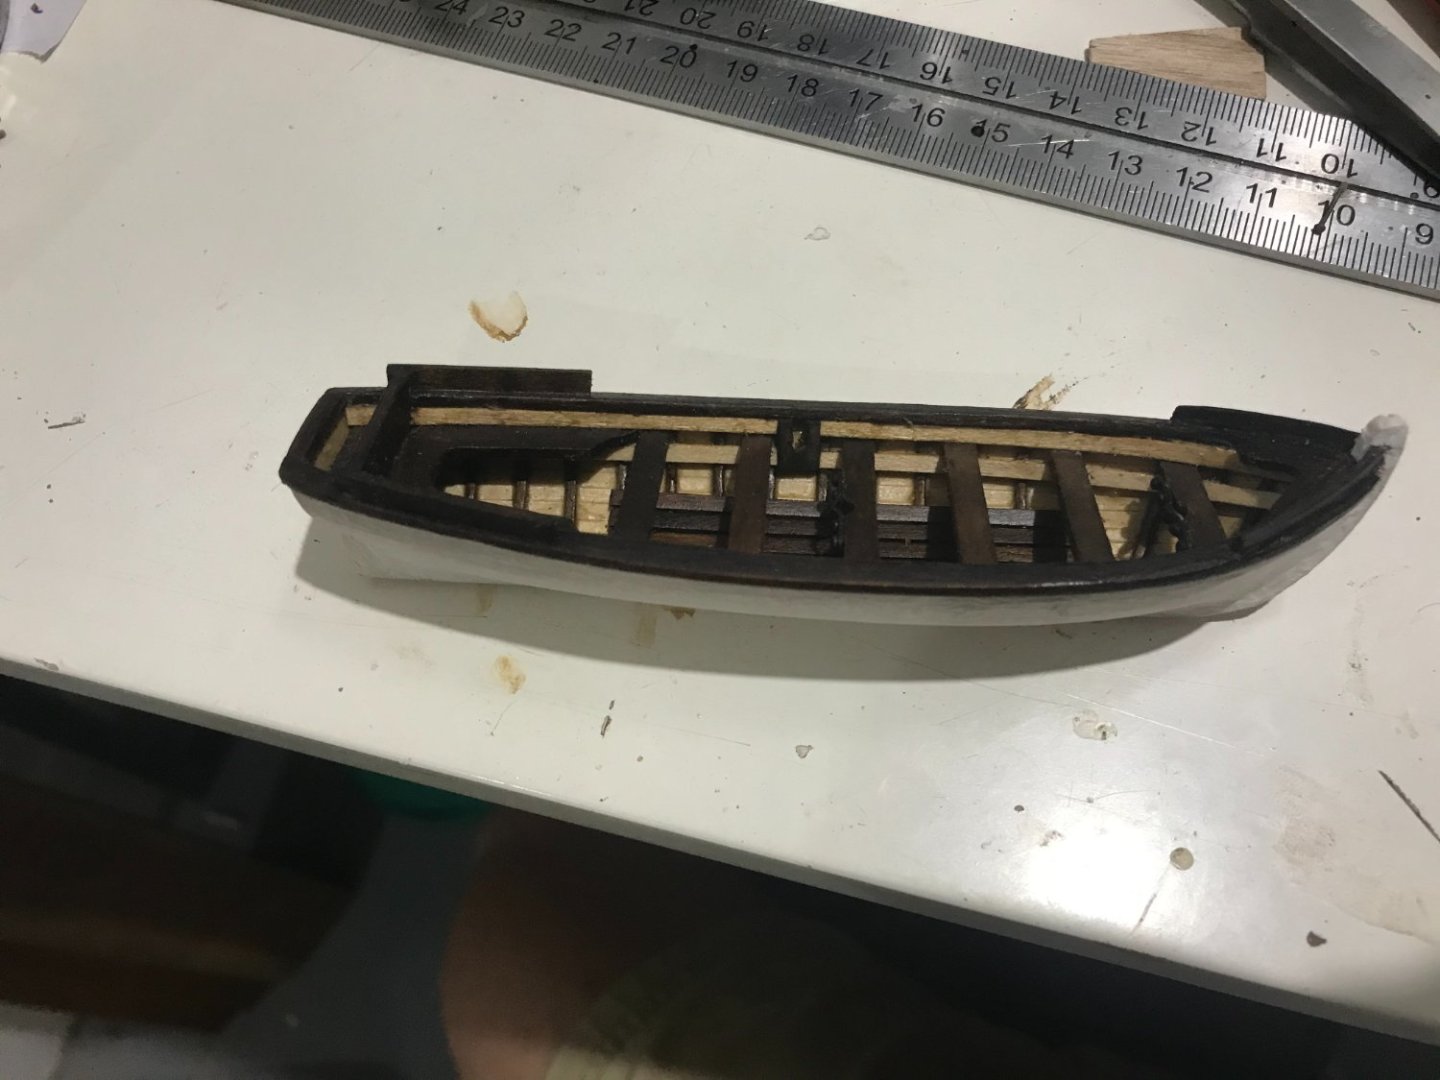
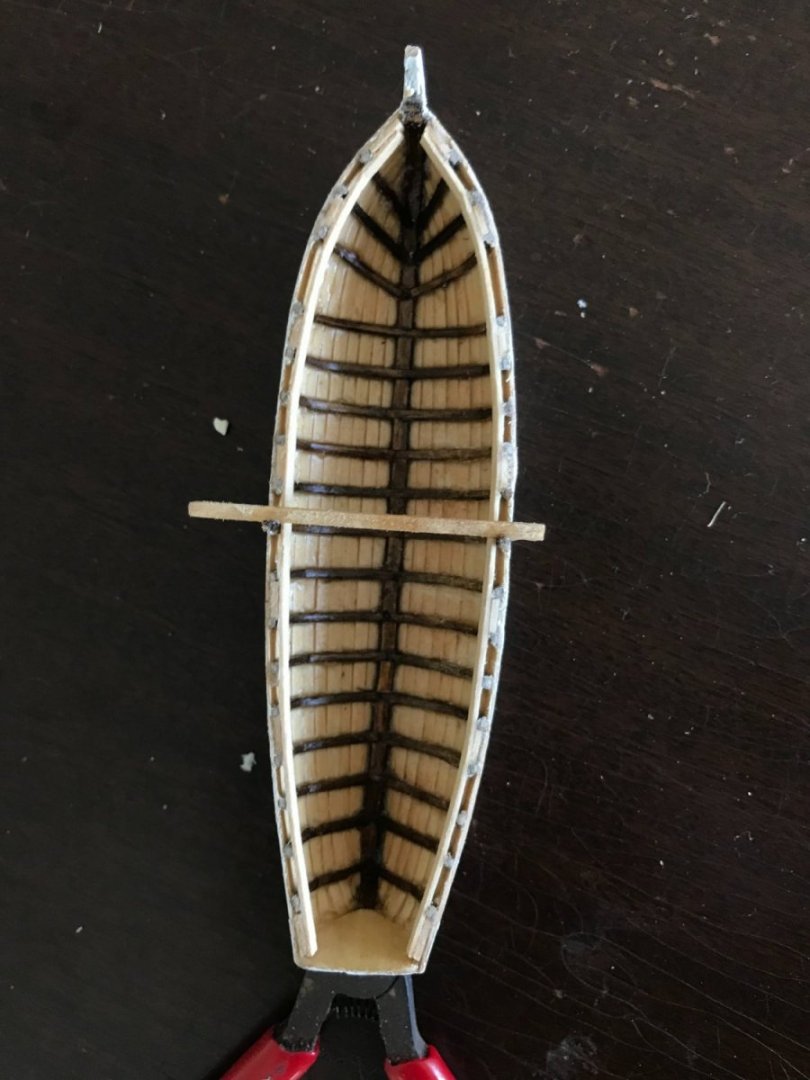
Been finishing up some of the last details on the yawl. The big one was the grating that makes up the quarter deck. I glued some 1 x 1 mm sticks to a 3 x 1 mm stick using some 1 mm spacers. Then I cut them in half to double the amount of grating made, which could then be glued together. In only had a small amount to make, so this relatively inefficient process was still effective. I’ve also done the thwart stanchions, mast steps and the tholes, which means that this one is basically done aside from boat gear, which I might combine with some of the other boats a bit later.


-
Hi Roger, thank you, that makes much more sense
-
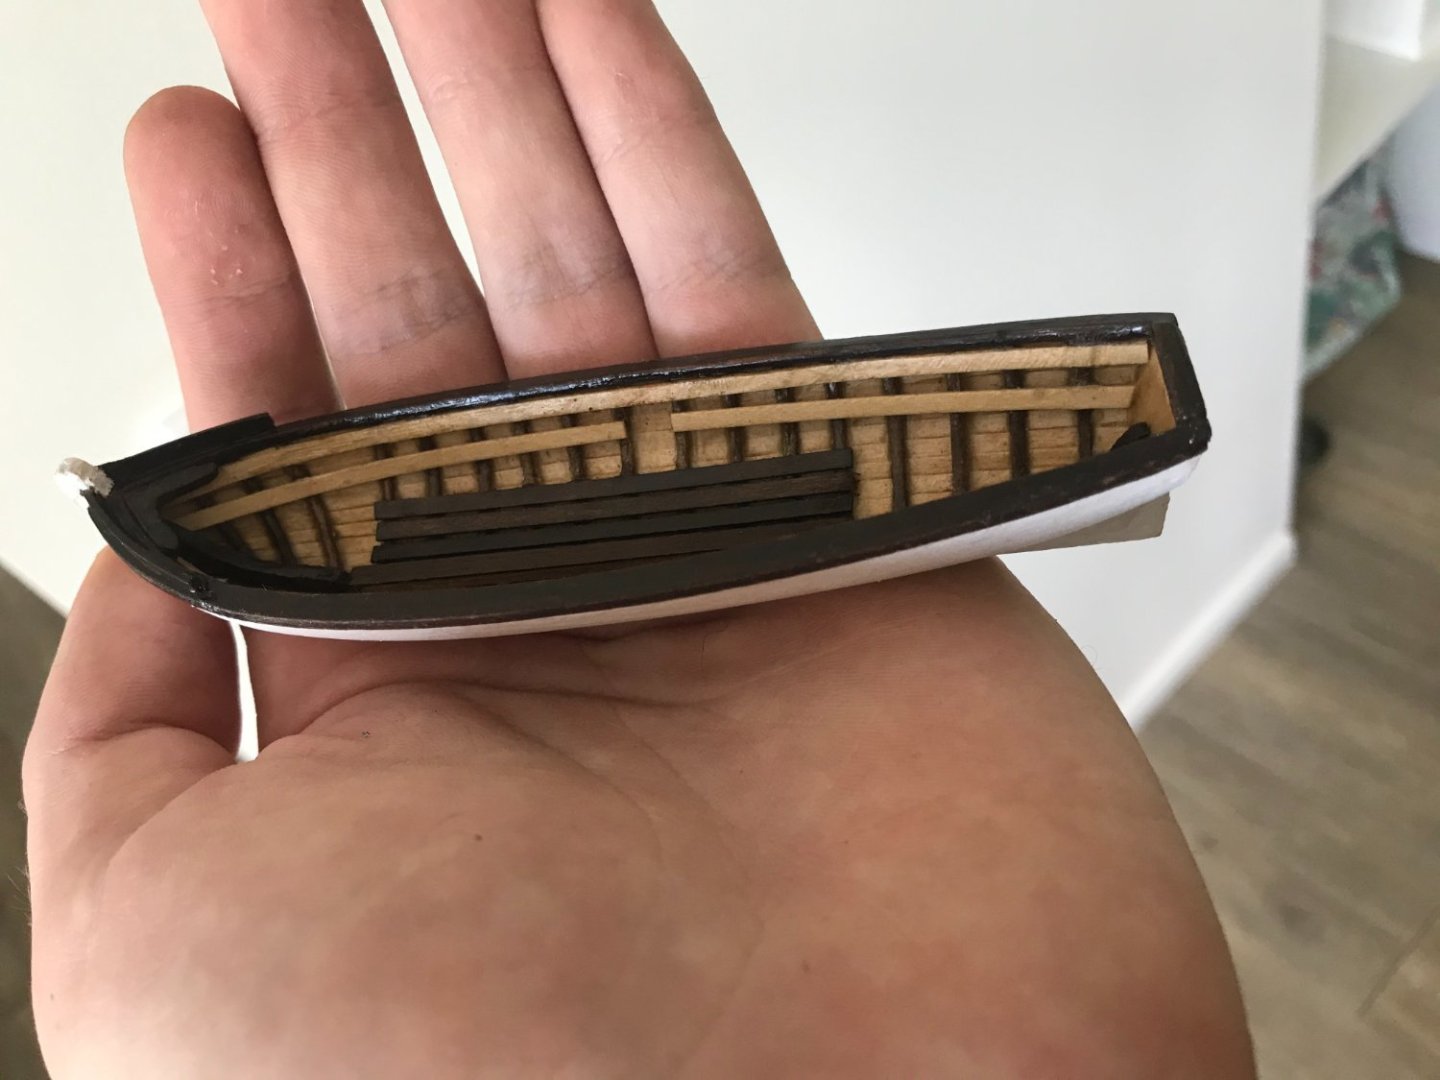
I'm currently working on building the Beagle's boats, starting with the 26 ft yawl. I'm drawing from the anatomy of the ship, which outlines the plans here. My question is regarding the aftmost tholes, i.e. the ones that appear to be positioned for a rower seated on the stern-sheet bench. This seems as though it would present a very awkward rowing position and this individual would be forced to place their back to the thole and move the oar to their side. Is this something that is seen on other boats? How realistic is it that a rower would be able to use an oar positioned as such?
-
LucienL reacted to a post in a topic:
HMS Beagle by RobTBay - OcCre - 1:60
-
Hey capella, this is probably too late, but I found that shading the edges of the planks before fitting them helped. Alternatively, you could go as you have and outline the planks. Then run over it with a razor blade (or even a broken piece of glass) to clean the planks and hopefully keep the grooves
-
 LucienL reacted to a post in a topic:
HMS Beagle by LucienL - OcCre - 1:60
LucienL reacted to a post in a topic:
HMS Beagle by LucienL - OcCre - 1:60
-
In the wise words of Samwise Gamgee "It's the job that's never started as takes longest to finish". I'm sure your boats will look great! I was also dreading this a bit and it did turn out to be much easier than I expected.
-
LucienL reacted to a post in a topic:
HMS Beagle by RobTBay - OcCre - 1:60
-
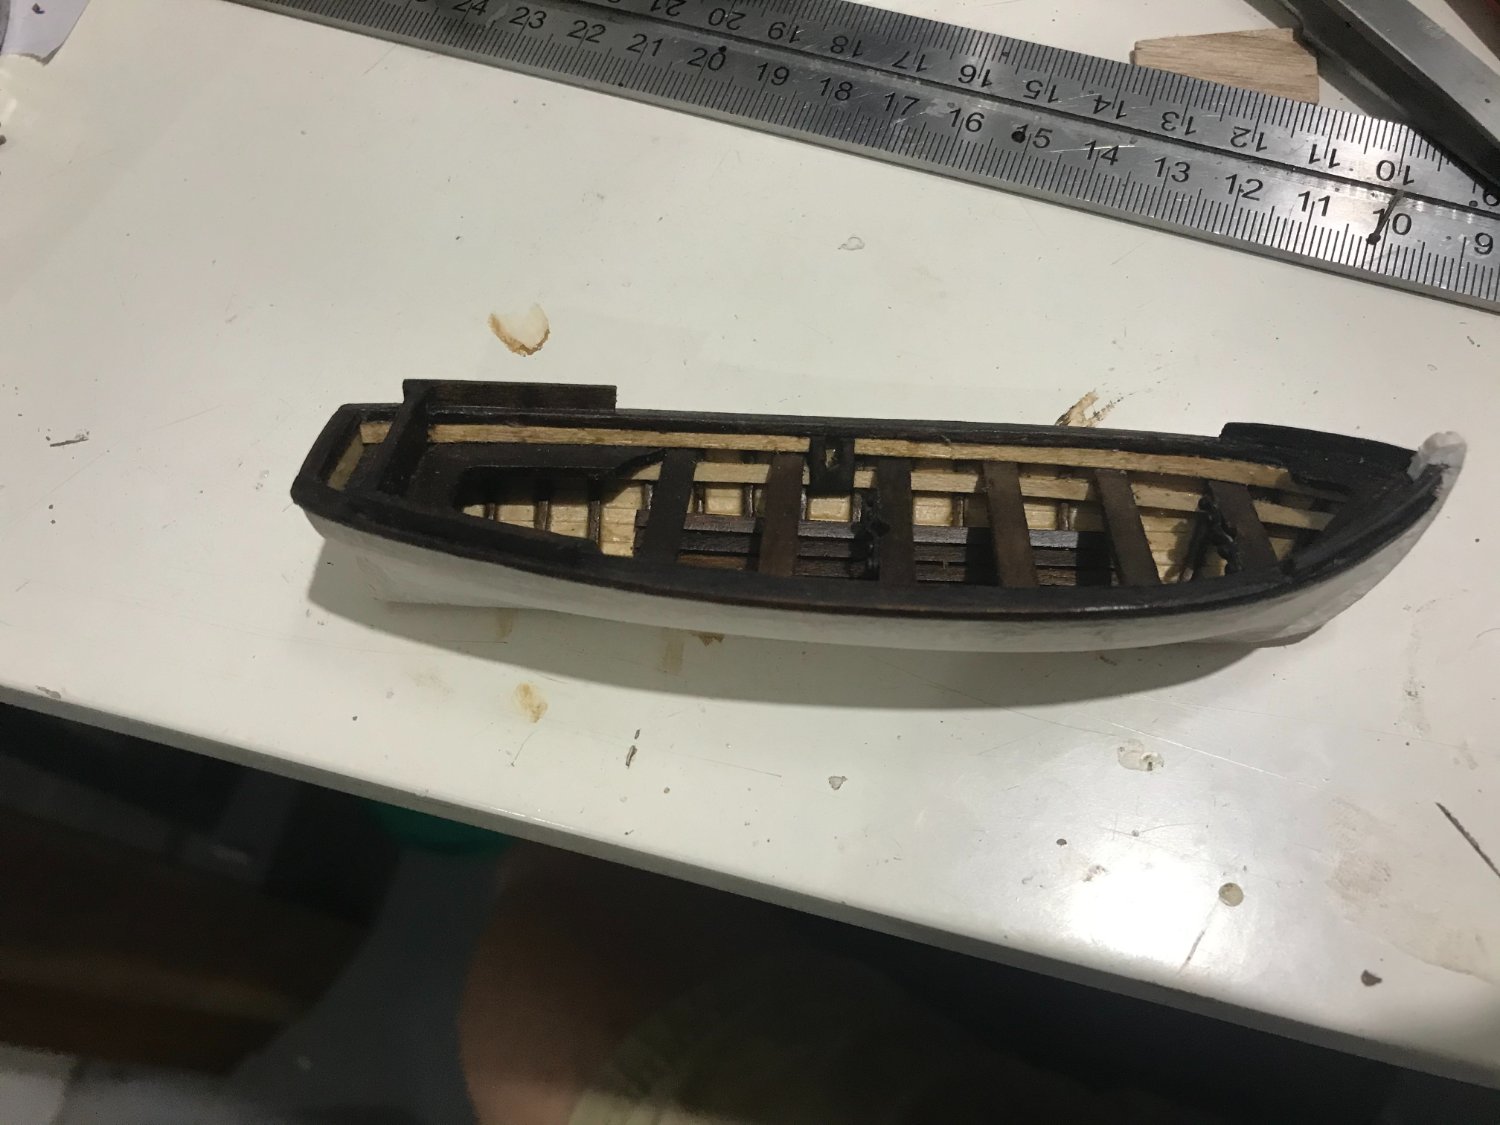
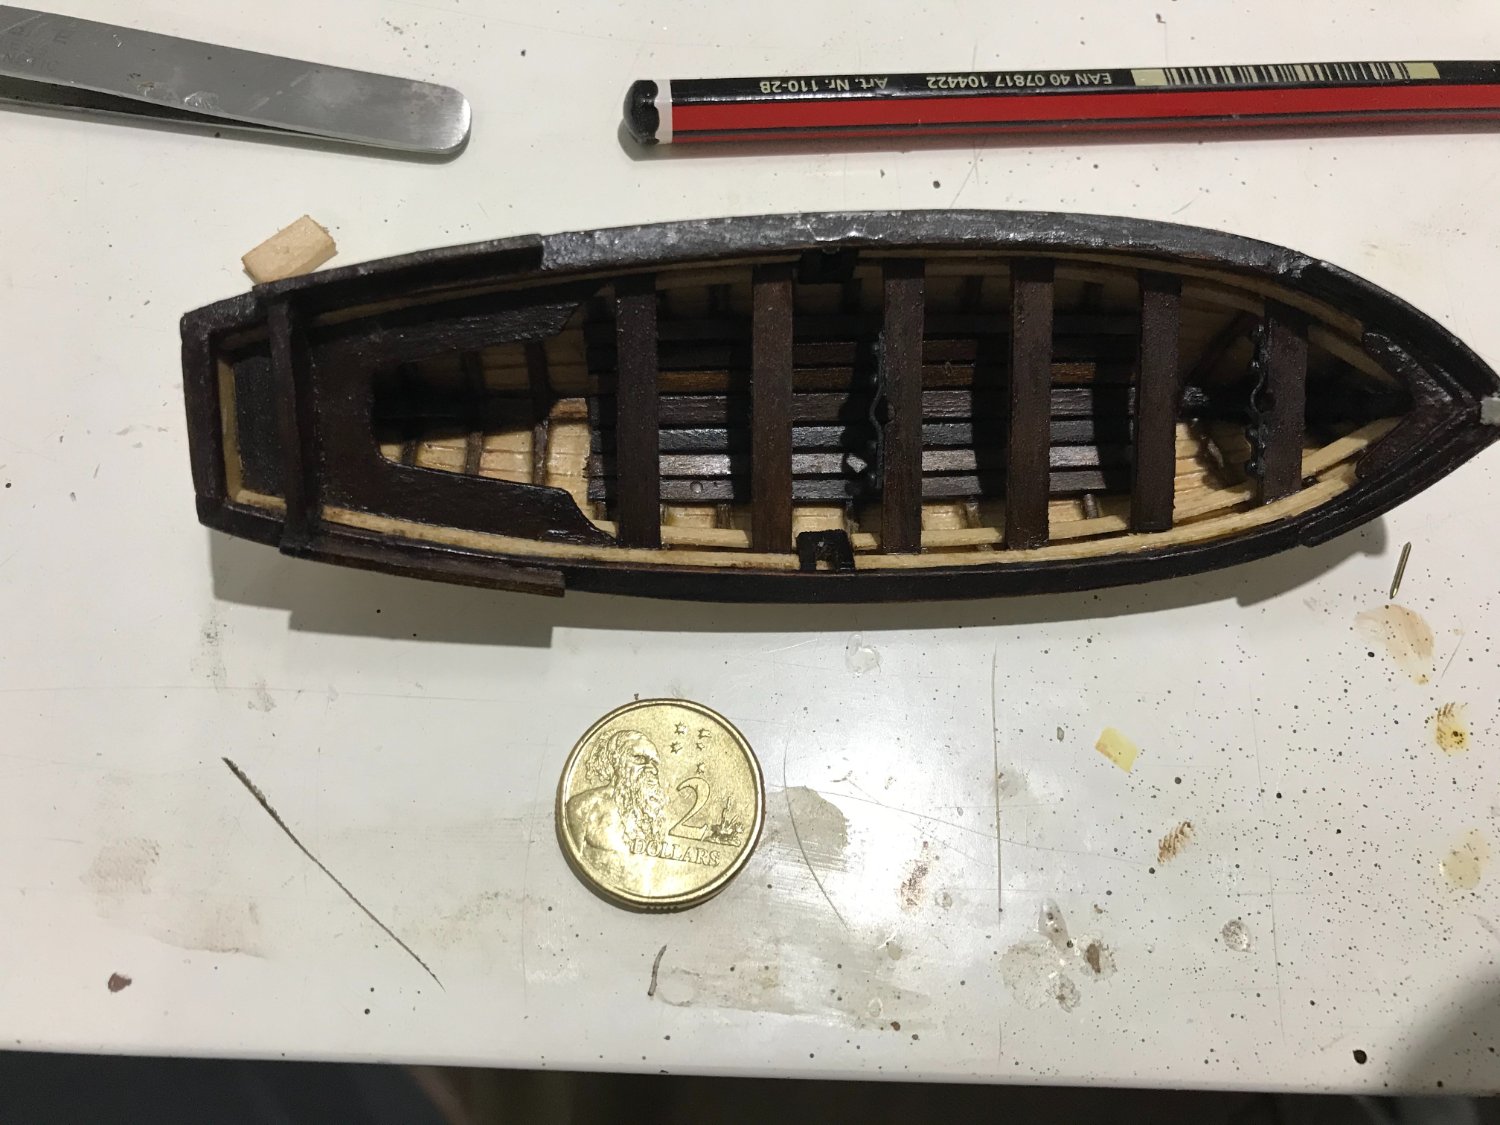
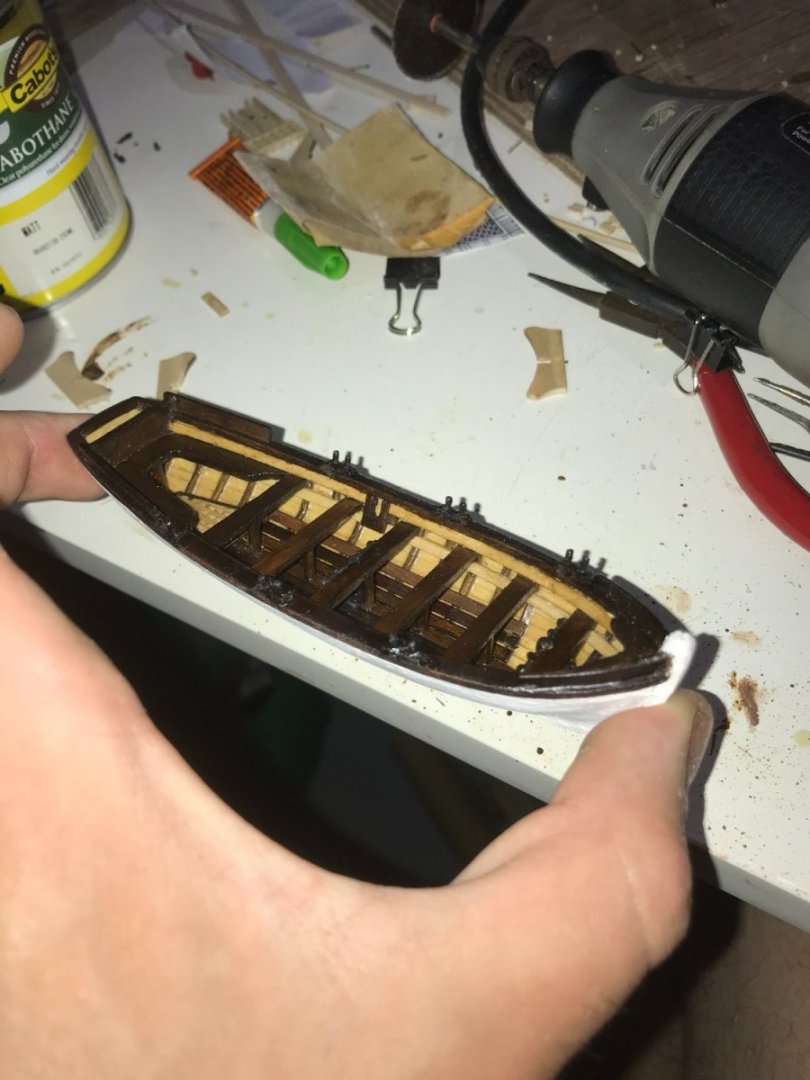
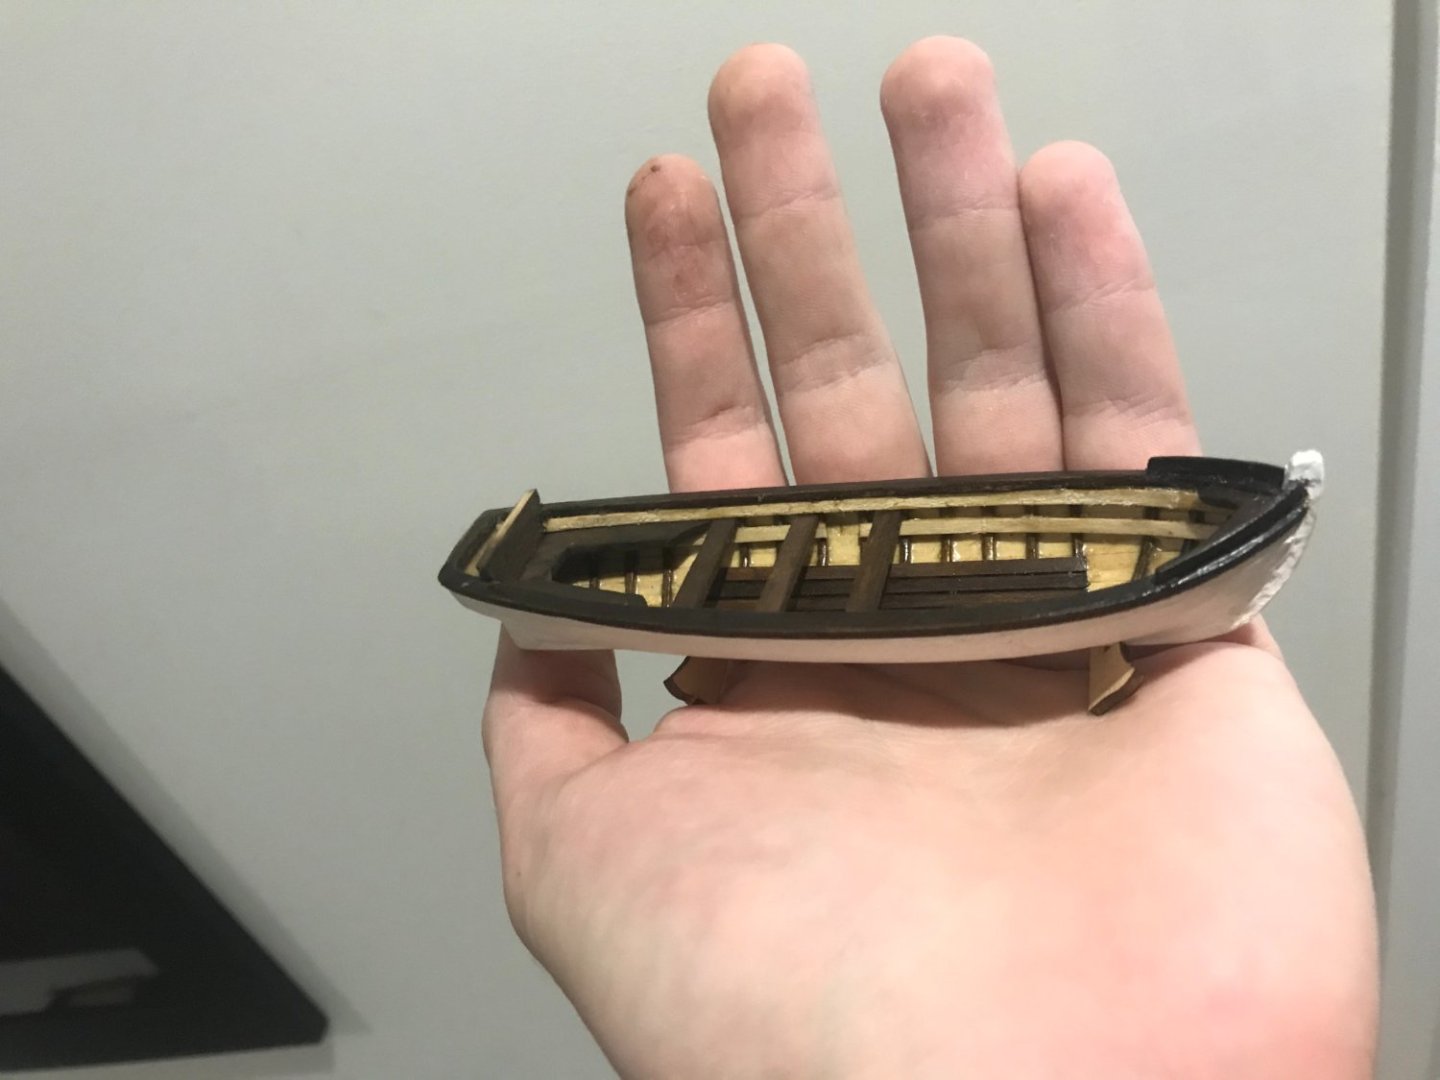
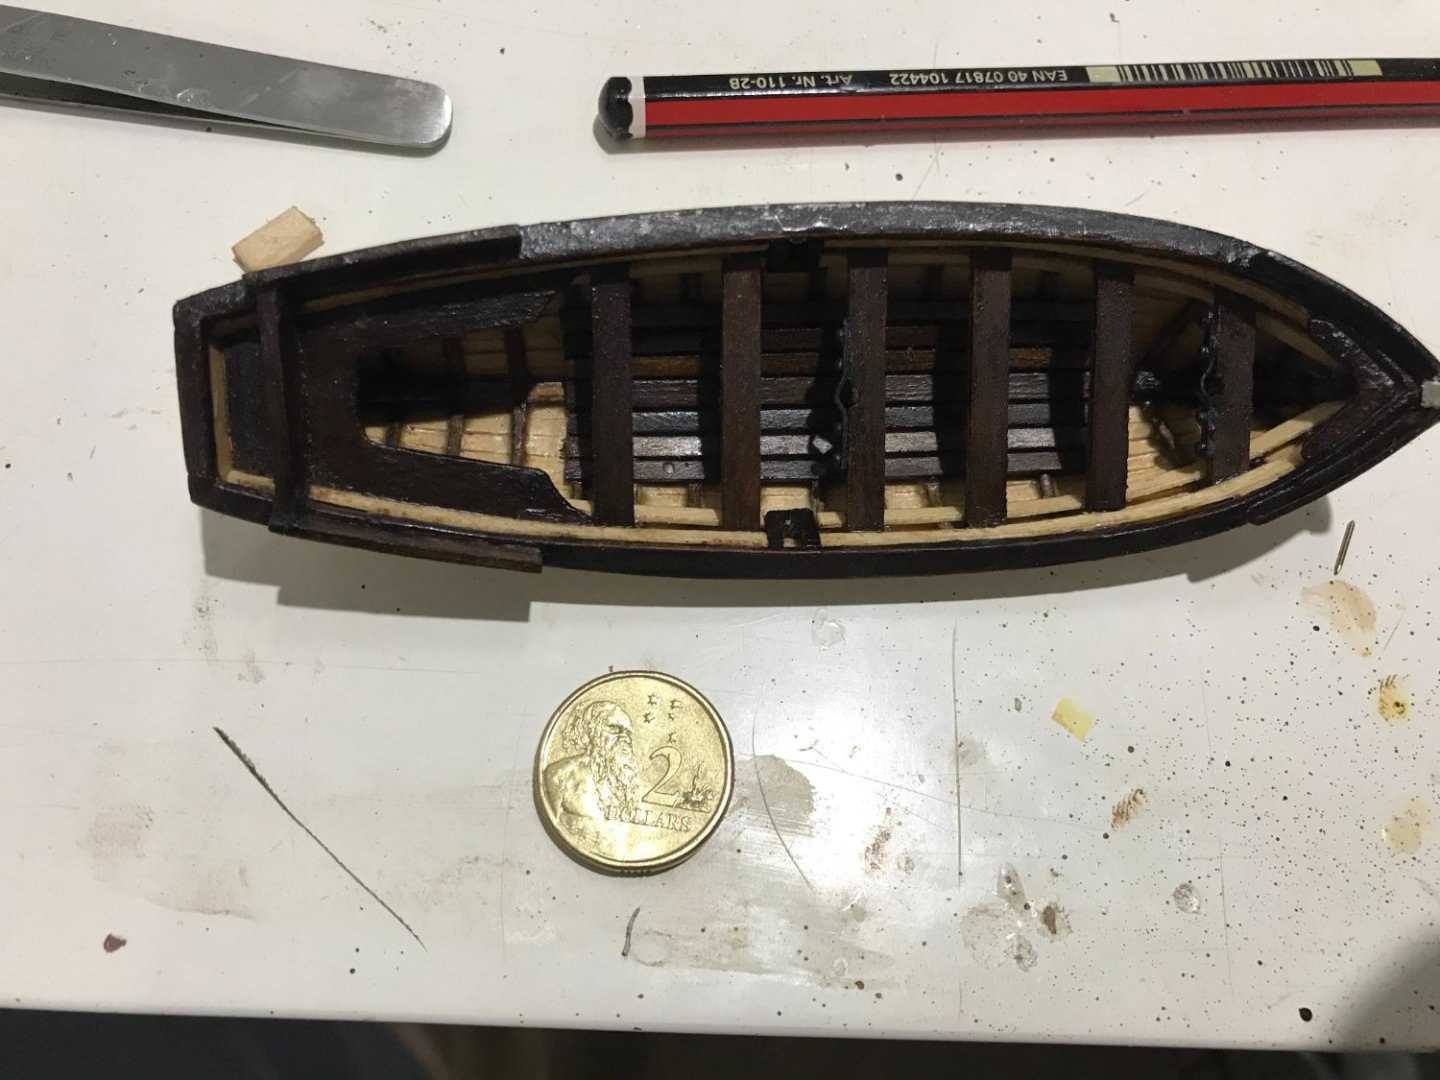
Another smallish update but has taken some time. I fitted the stern-sheet bench and back, which took ages to make from scratch and sand to fit properly. I also added a few thwarts, the third one is the mast thwart and is only dry fit. The mast helpers are made from 1 mm wide brass strips and painted back. I’ve used the kit nails to fit them in, they’re probably a bit too big but add some nice detail. Also made the windlass holders. I think I will make up a full windlass and strap that to the deck as part of the boat kit. I’ll probably also make up some oars, a grapnel, the rudder, masts and sails and chuck in a barrel. I’m drawing a lot from my experience on my first build: The Bounty’s Launch to make these little boats. I think my sheer clamp and thwart raisers are too wide, but I can live with them. And finally, with all the thwarts in. No pennies in Australia, but our 2-dollar coin is around the same size (I think) Next steps are to make the grating for the quarter deck, do the mast steps, tholes and the thwart stanchions. Then I should be able to move on to fitting it into the main boat and building the 23 ft cutter. Feeling motivated and keen at the moment, so should be able to keep making progress (unless the gratings kill me).
-
Hi Capella, great build so far, looking forward to seeing your progress. The planks you describe definitely seem like the ones that should be A20 (even just going by quantity) it's interesting that the dimensions are off though. Although, the 5 mm planks are probably too wide for scale so that might actually be a bonus (or they've improved the kit).
-
Hey Rob That's an impressive list of stuff you're thinking about! You've definitely found a lot of limitations with this kit. I will follow along with interest. One of my biggest frustrations is also the cannons and boats (as well as the belaying pins). I've also been working on this kit and trying to incorporate as many improvements from AOTS as I can. My biggest bottlenecks so far in terms of motivation, time and learning have been coppering the hull, making cloth hammocks and scratch-building the small boats (I also probably want to make my own sails).
-
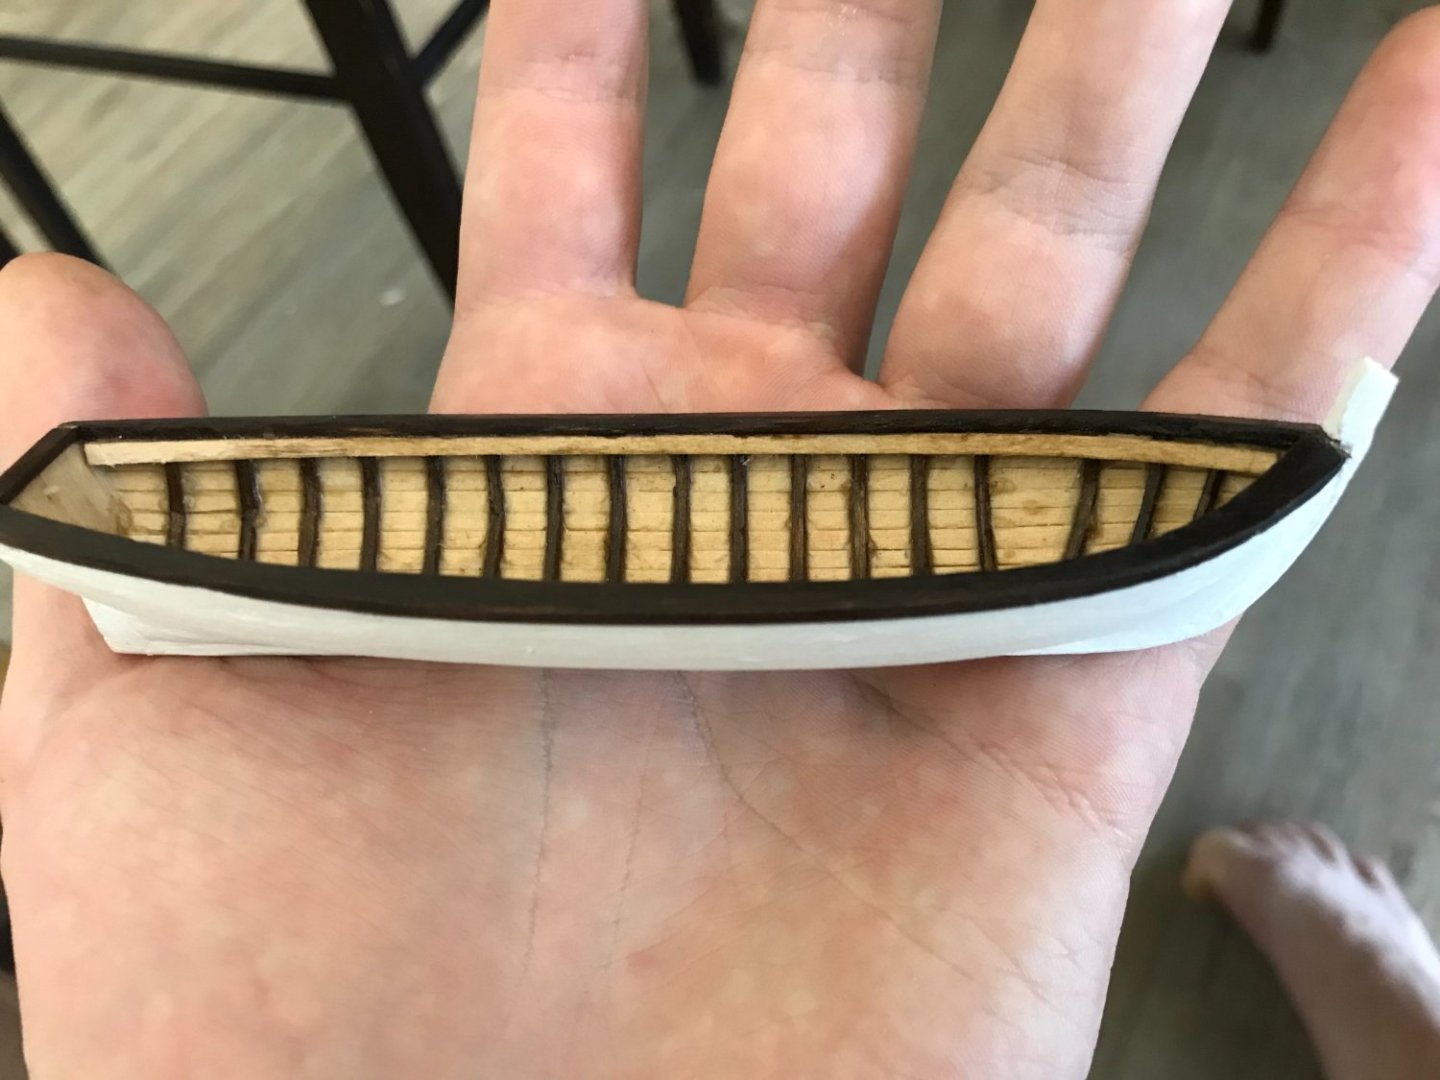
Hey everyone, I’ve been working on fitting out the hull of the yawl and making it look nice. I painted it and fit the sheer clamps to give it some more rigidity. I was a bit worried about it spilling out at the sides, as this happened on my first build the Bounty’s launch After fitting the gunwales it was much more sturdy. I cut these from a piece of ply after tracing the outline from the remnants of the jig. I cut them wider than they should be to start (around 4-5 mm width), and then sanded them down to fit the hull as best as possible to around 2-3 mm. They should be mirror images, but I did have to bend them a bit while gluing. Then some other bits and the deck planks (varnish is not quite dry yet. It was a bit fiddly to get the bow looking right I think the sheer clamp got a bit grubby by this stage, will try to clean it a bit. Really enjoying making this little guy and getting into it. I think I’ve gotten over the main barriers which were bending frames, planking and fitting the gunwales. Should be much easier to do boat number 2 (and 3-7) now.

-
Hi Rob, yeah it was definitely close! I’m not sure if this is the best way to go about it, I’ve seen other people use laser cut frames which might be a bit easier. This works for me though, even if it is pretty time consuming.