Jeff preisler
-
Posts
81 -
Joined
-
Last visited
1 Follower

About Jeff preisler

- Birthday 06/02/1965
Recent Profile Visitors
366 profile views


.thumb.jpeg.fc5d633a7b34428fcf19419a73d56d55.jpeg)
-
 Mirabell61 reacted to a post in a topic:
Lightship #112 NANTUCKET 1936 by Jeff Preisler - FINISHED - BlueJacket Shipcrafters - Scale 1/8" = 1'
Mirabell61 reacted to a post in a topic:
Lightship #112 NANTUCKET 1936 by Jeff Preisler - FINISHED - BlueJacket Shipcrafters - Scale 1/8" = 1'
-
Mirabell61 reacted to a post in a topic:
Lightship #112 NANTUCKET 1936 by Jeff Preisler - FINISHED - BlueJacket Shipcrafters - Scale 1/8" = 1'
-
Canute reacted to a post in a topic:
Lightship #112 NANTUCKET 1936 by Jeff Preisler - FINISHED - BlueJacket Shipcrafters - Scale 1/8" = 1'
-
Canute reacted to a post in a topic:
Lightship #112 NANTUCKET 1936 by Jeff Preisler - FINISHED - BlueJacket Shipcrafters - Scale 1/8" = 1'
-
Canute reacted to a post in a topic:
Lightship #112 NANTUCKET 1936 by Jeff Preisler - FINISHED - BlueJacket Shipcrafters - Scale 1/8" = 1'
-
 Jeff preisler reacted to a post in a topic:
Lightship #112 NANTUCKET 1936 by Jeff Preisler - FINISHED - BlueJacket Shipcrafters - Scale 1/8" = 1'
Jeff preisler reacted to a post in a topic:
Lightship #112 NANTUCKET 1936 by Jeff Preisler - FINISHED - BlueJacket Shipcrafters - Scale 1/8" = 1'
-
Thank you for your nice compliment and interest in my build.
- 29 replies
-
- 1
-
-
- Nantucket Lightship
- BlueJacket Shipcrafters
- (and 1 more)
-
Thanks, Nic for your nice compliment and the 10% discount.
- 29 replies
-
- 2
-
-
- Nantucket Lightship
- BlueJacket Shipcrafters
- (and 1 more)
-
Thank you for your interest in my build and the nice compliment! I'm by no means a photographer, but it was the evening, and I took the photos with the dining room lights off using just my camera flash.
- 29 replies
-
- 2
-
-
- Nantucket Lightship
- BlueJacket Shipcrafters
- (and 1 more)
-
Jeff preisler reacted to a post in a topic:
Lightship #112 NANTUCKET 1936 by Jeff Preisler - FINISHED - BlueJacket Shipcrafters - Scale 1/8" = 1'
-
Jeff preisler reacted to a post in a topic:
Lightship #112 NANTUCKET 1936 by Jeff Preisler - FINISHED - BlueJacket Shipcrafters - Scale 1/8" = 1'
-
Jeff preisler reacted to a post in a topic:
Lightship #112 NANTUCKET 1936 by Jeff Preisler - FINISHED - BlueJacket Shipcrafters - Scale 1/8" = 1'
-
 yvesvidal reacted to a post in a topic:
Lightship #112 NANTUCKET 1936 by Jeff Preisler - FINISHED - BlueJacket Shipcrafters - Scale 1/8" = 1'
yvesvidal reacted to a post in a topic:
Lightship #112 NANTUCKET 1936 by Jeff Preisler - FINISHED - BlueJacket Shipcrafters - Scale 1/8" = 1'
-
ccoyle reacted to a post in a topic:
Lightship #112 NANTUCKET 1936 by Jeff Preisler - FINISHED - BlueJacket Shipcrafters - Scale 1/8" = 1'
-
Mirabell61 reacted to a post in a topic:
Lightship #112 NANTUCKET 1936 by Jeff Preisler - FINISHED - BlueJacket Shipcrafters - Scale 1/8" = 1'
-
Landlubber Mike reacted to a post in a topic:
Lightship #112 NANTUCKET 1936 by Jeff Preisler - FINISHED - BlueJacket Shipcrafters - Scale 1/8" = 1'
-
GrandpaPhil reacted to a post in a topic:
Lightship #112 NANTUCKET 1936 by Jeff Preisler - FINISHED - BlueJacket Shipcrafters - Scale 1/8" = 1'
-
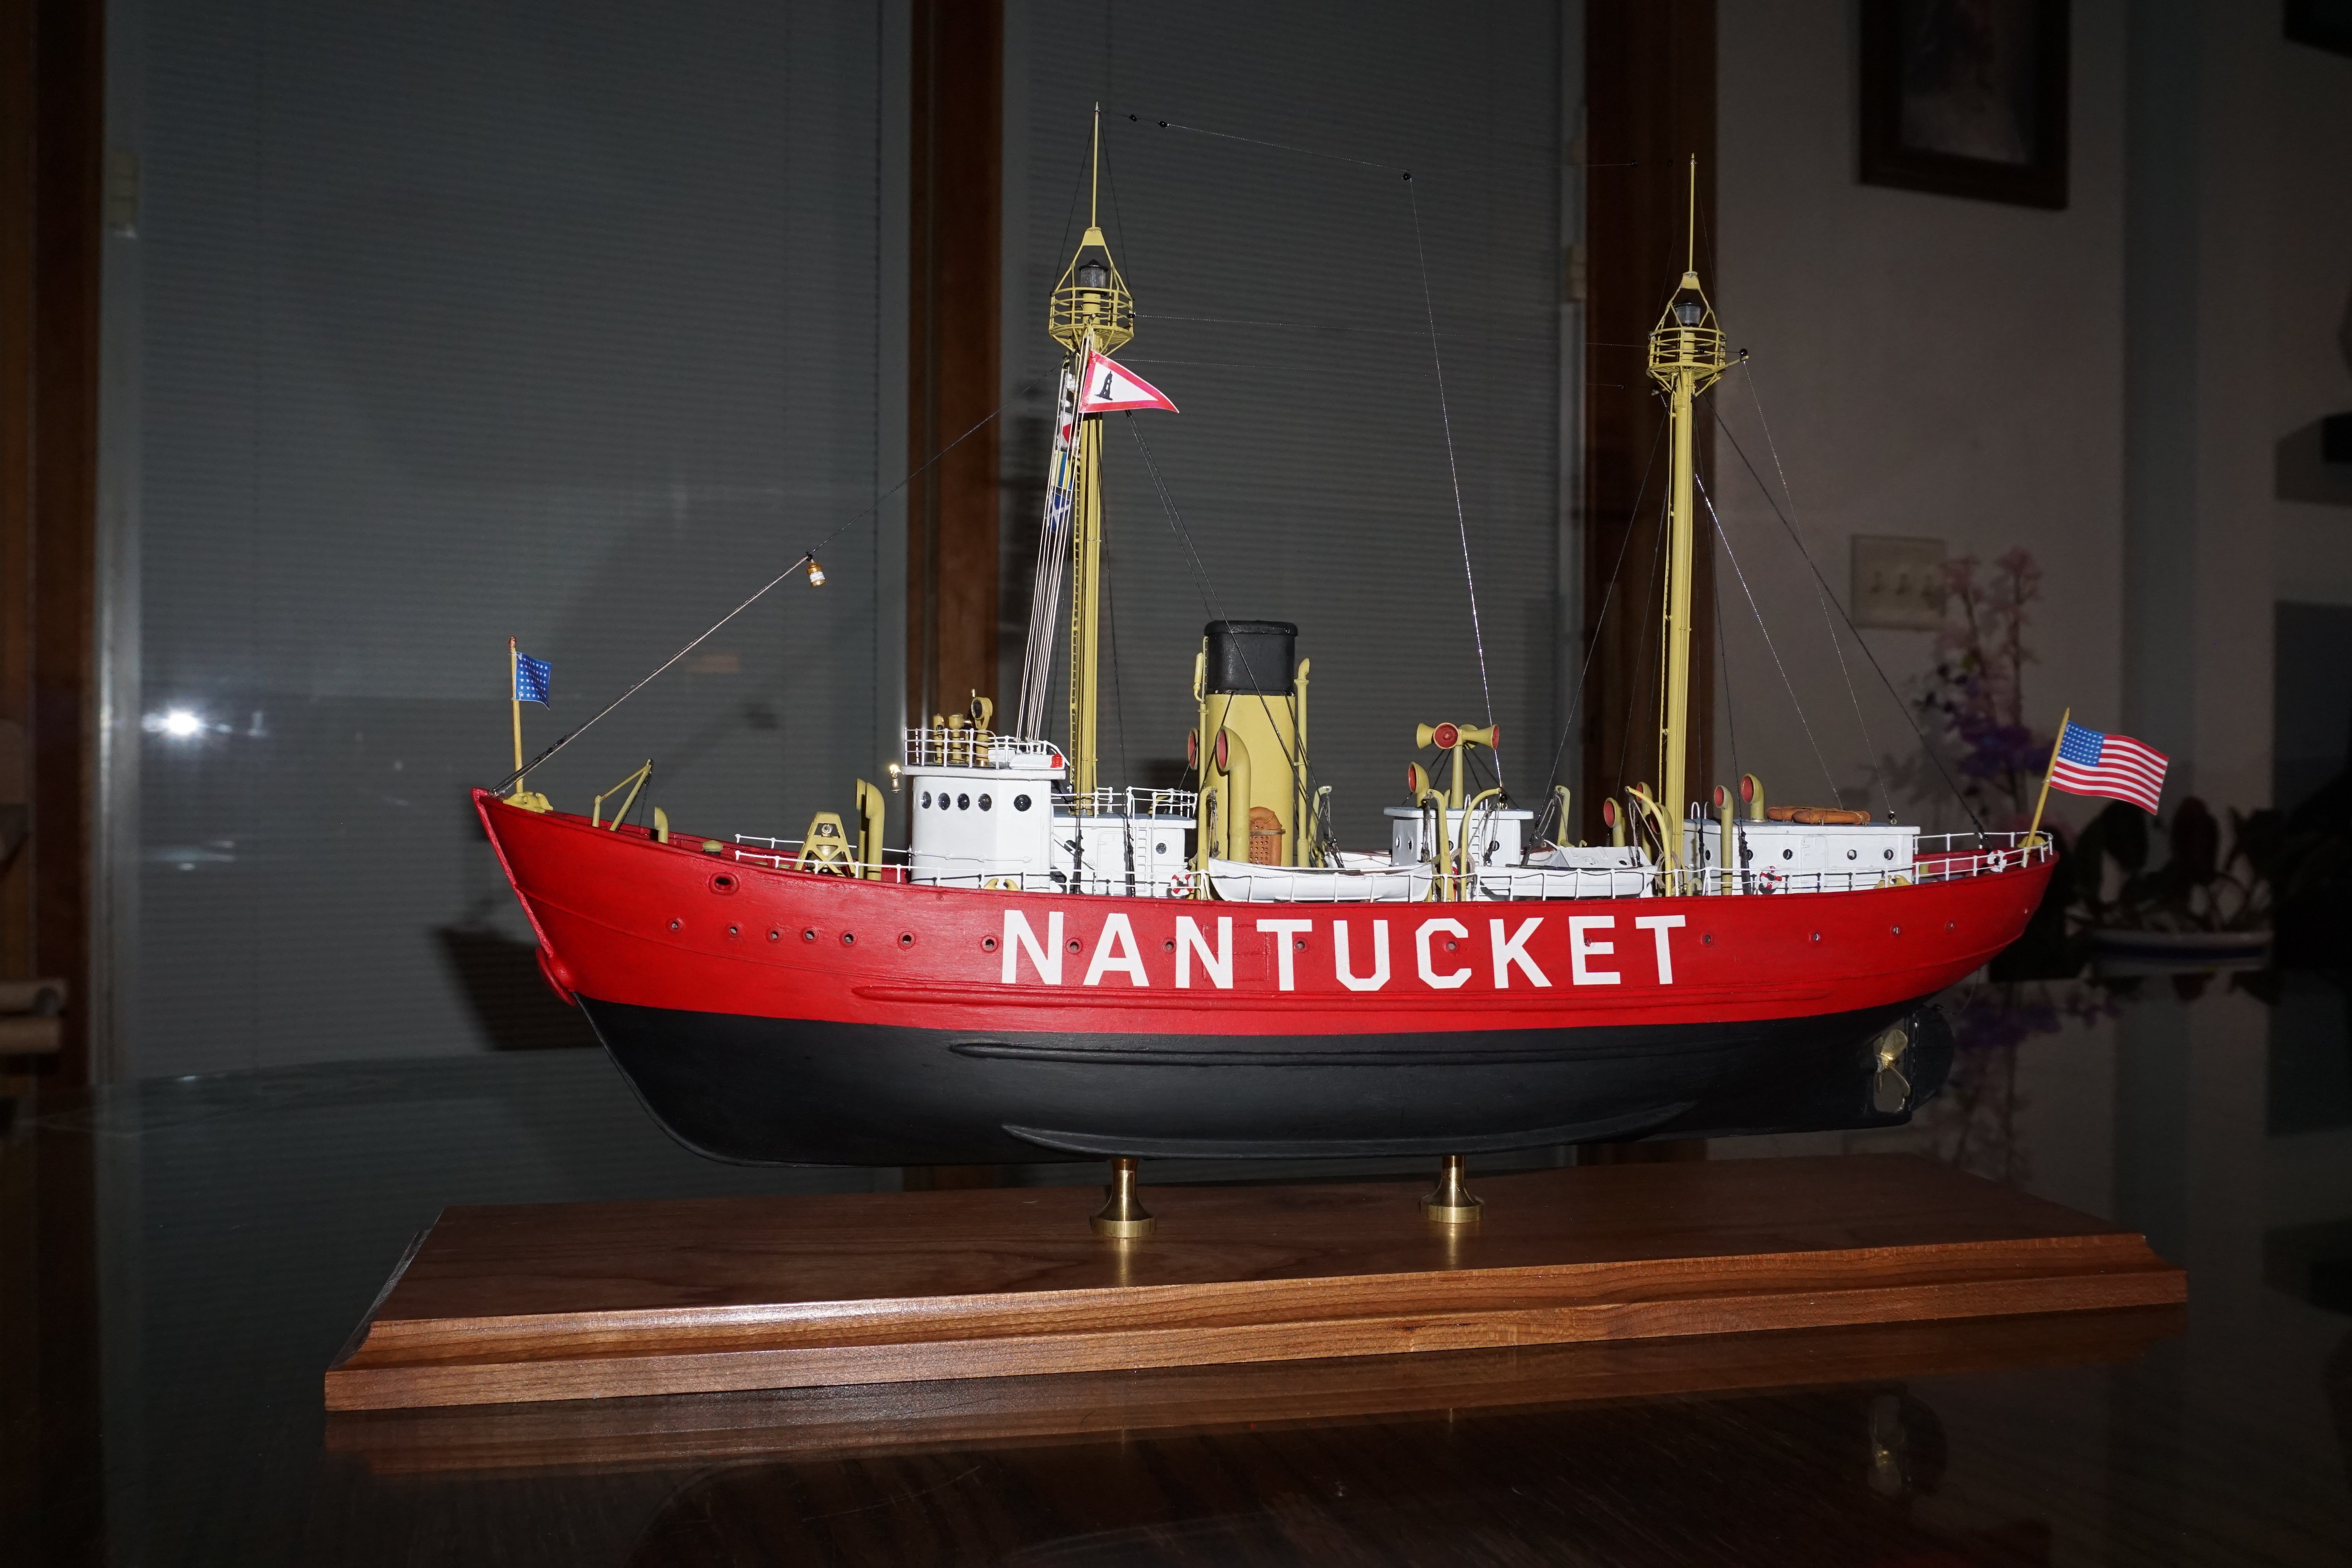
The kit is supplied with adhesive backed lettering. Very easy to work with and after applying pressure around any raised or recessed detail it will conform nicely. Thank you for the nice compliment on my build and glad you like.
- 29 replies
-
- 2
-
-
- Nantucket Lightship
- BlueJacket Shipcrafters
- (and 1 more)
-
Jeff preisler reacted to a post in a topic:
Lightship #112 NANTUCKET 1936 by Jeff Preisler - FINISHED - BlueJacket Shipcrafters - Scale 1/8" = 1'
-
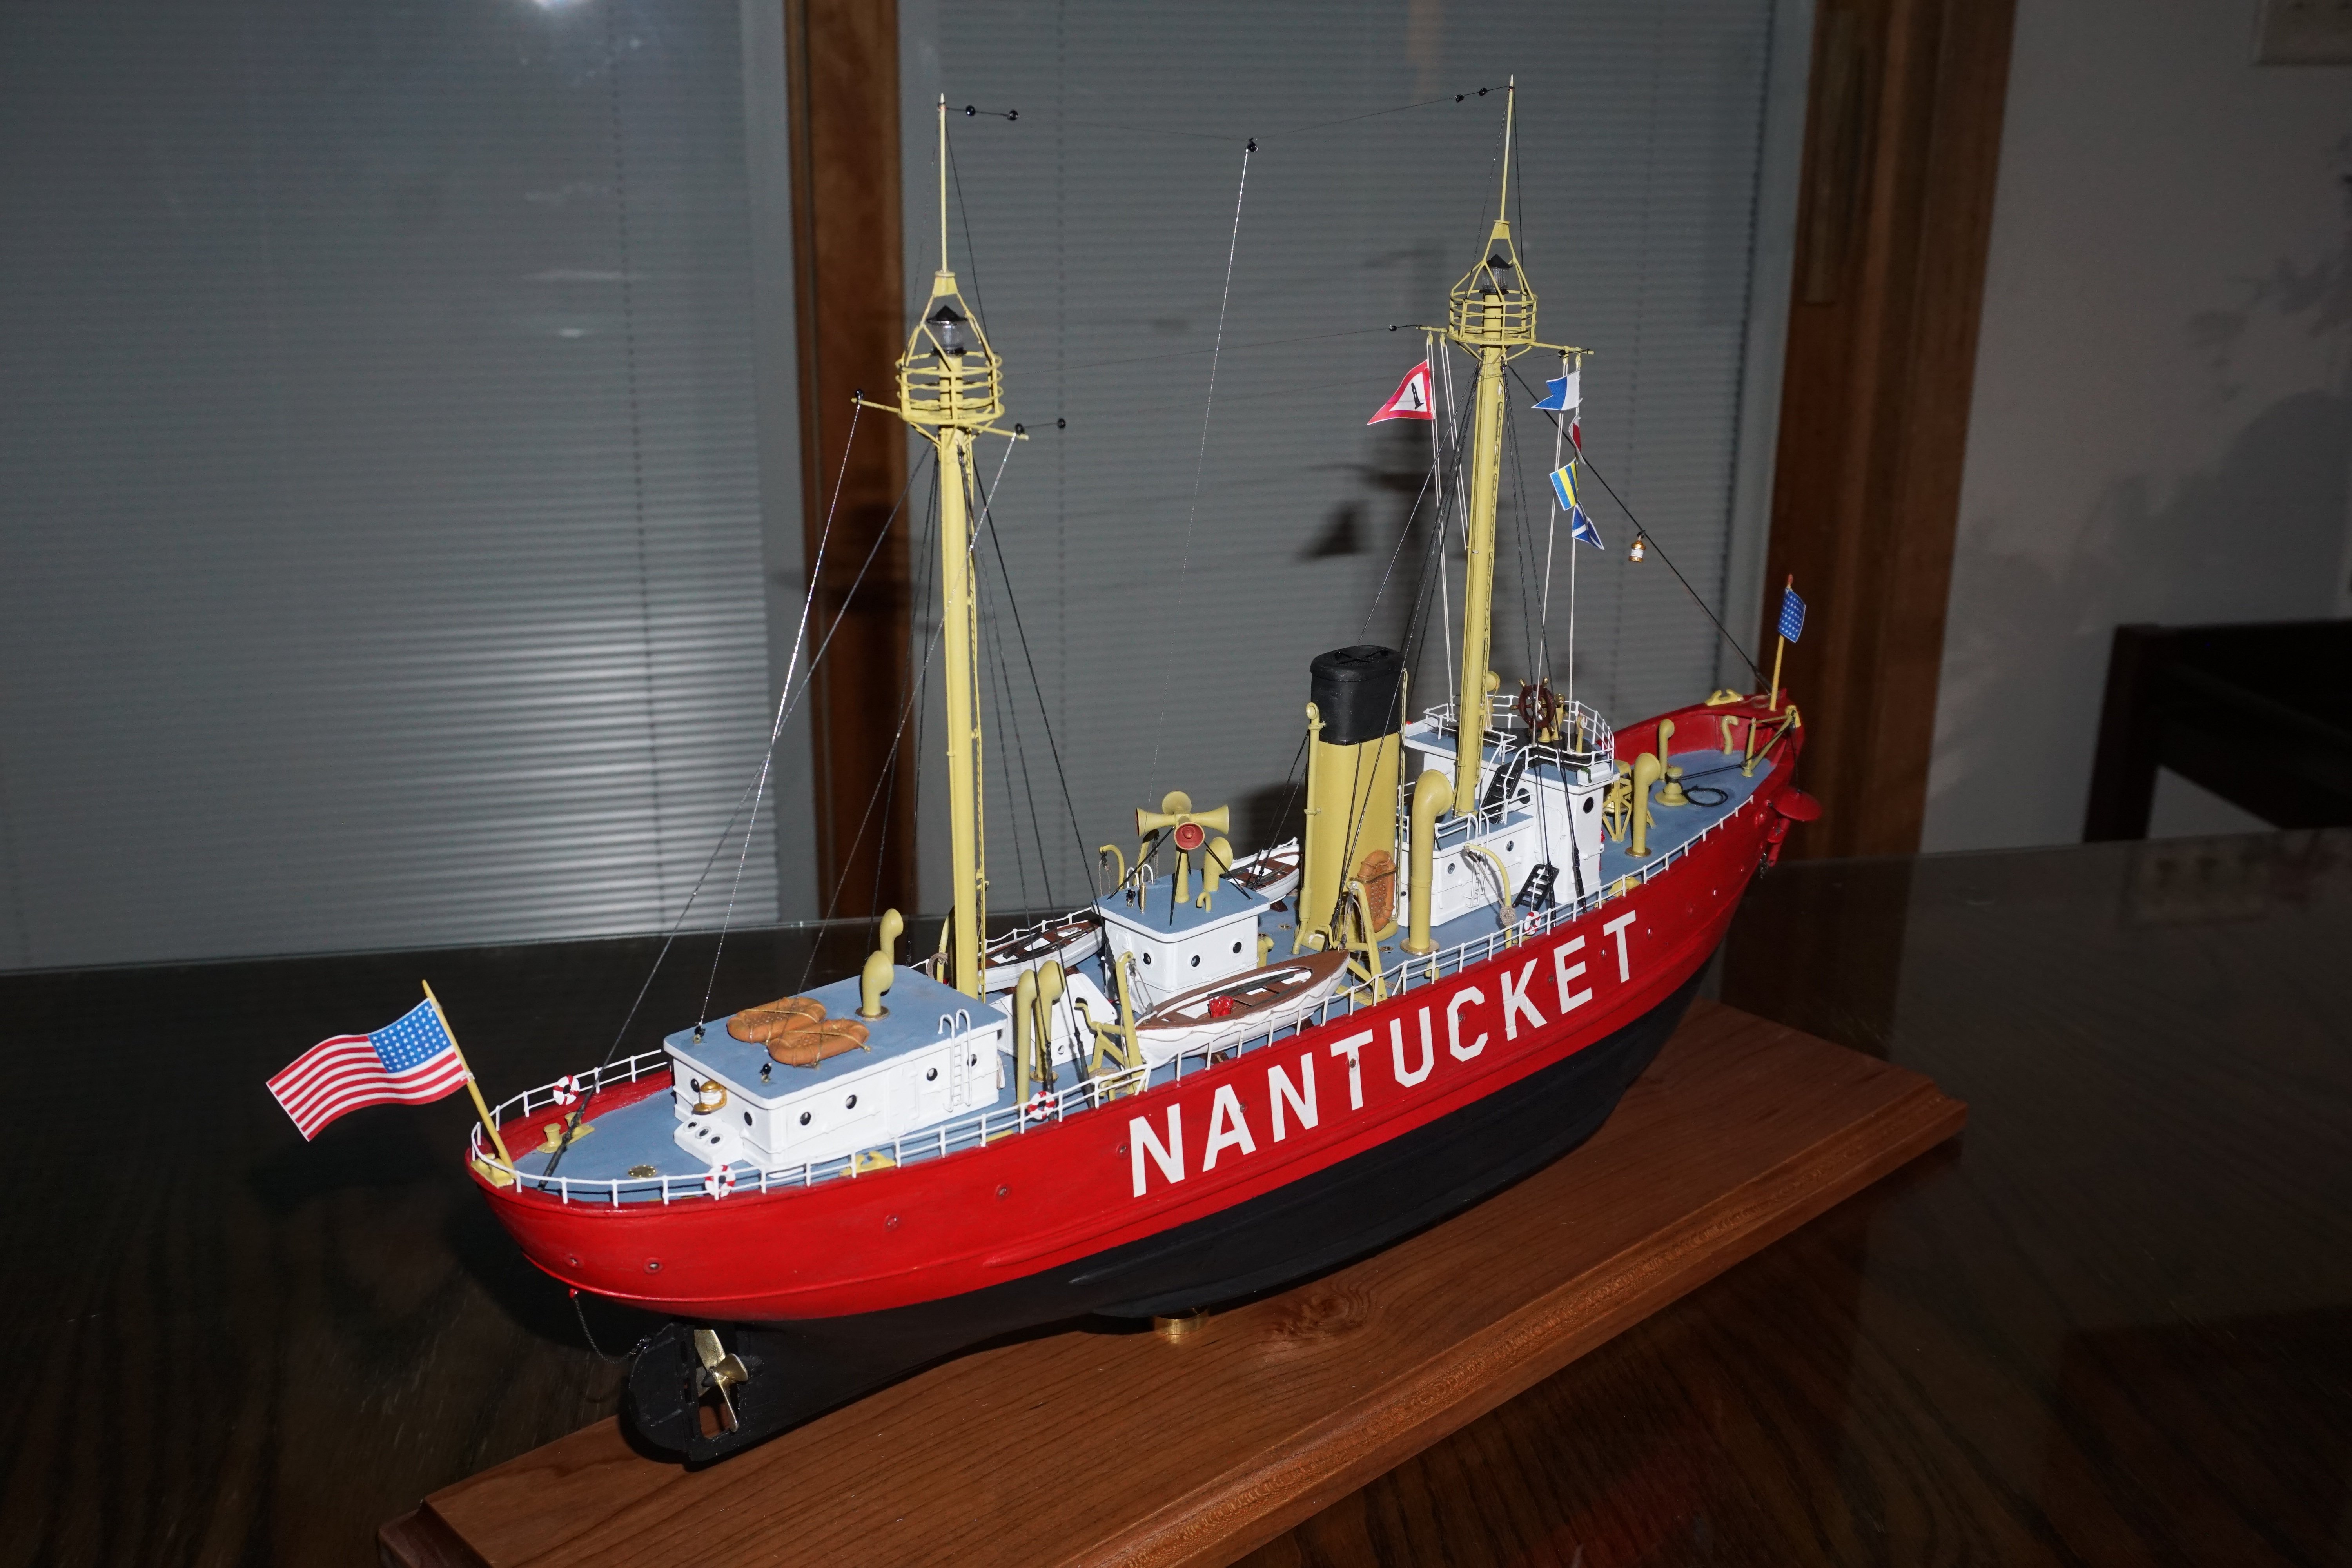
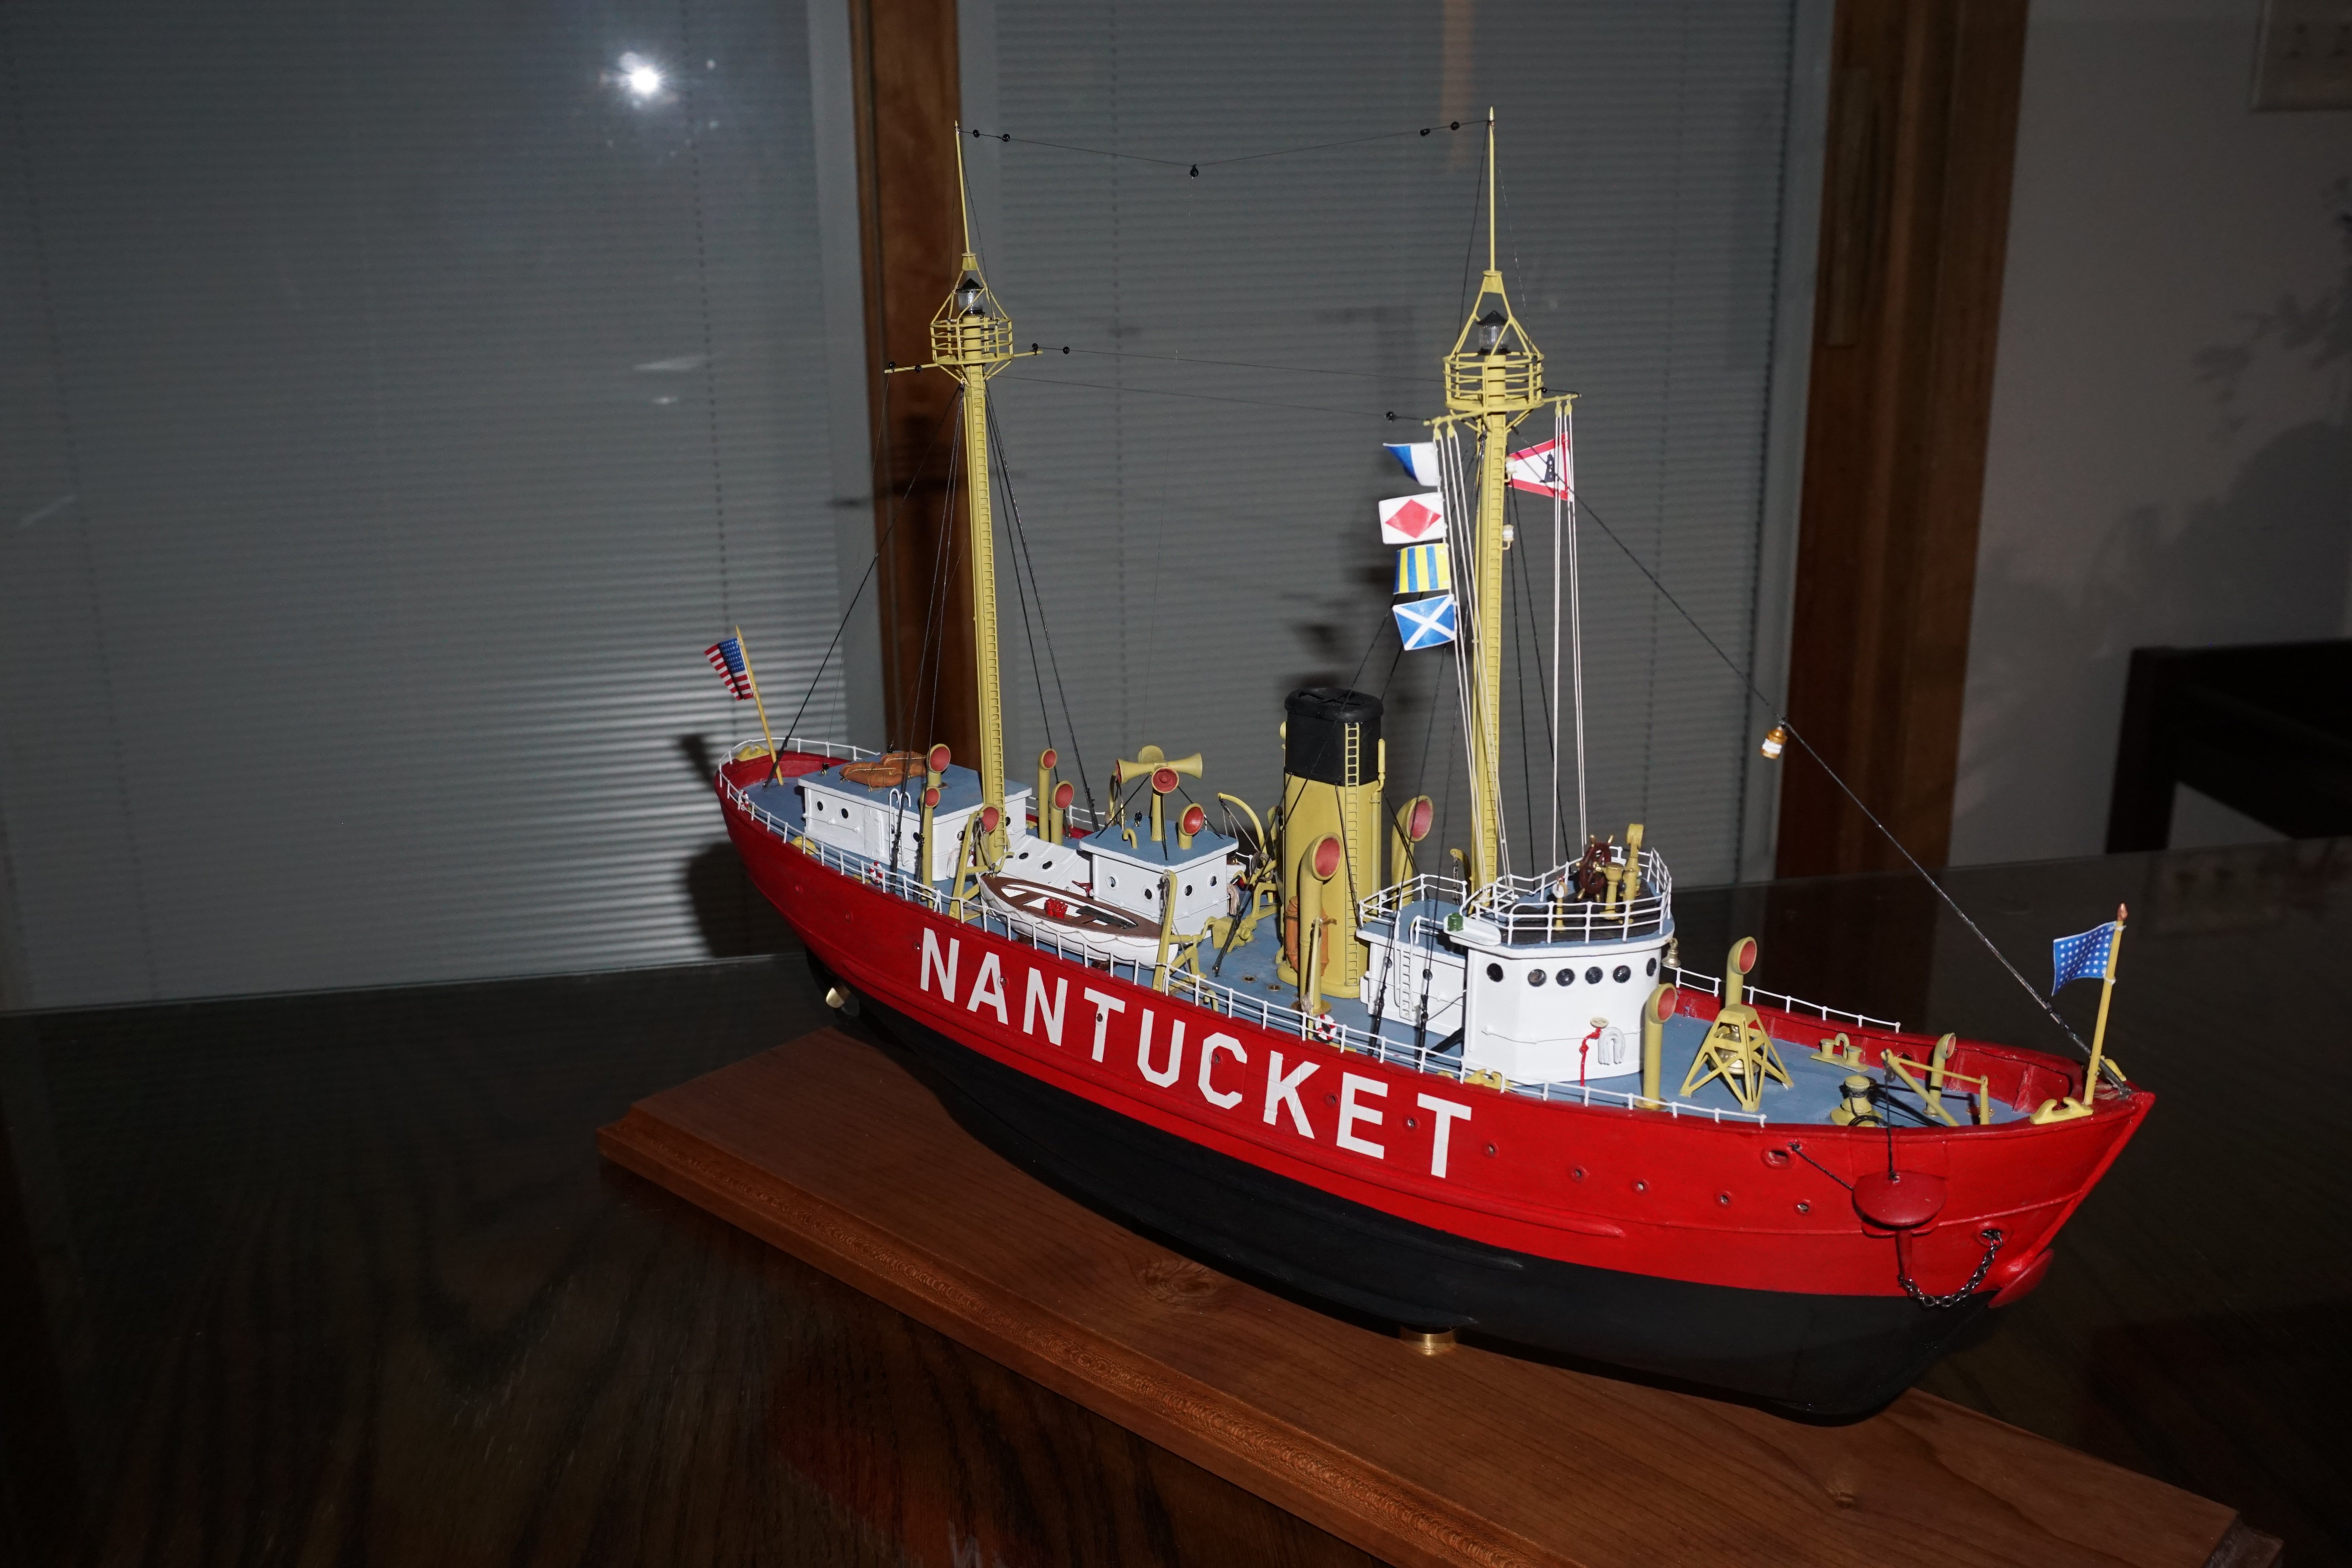
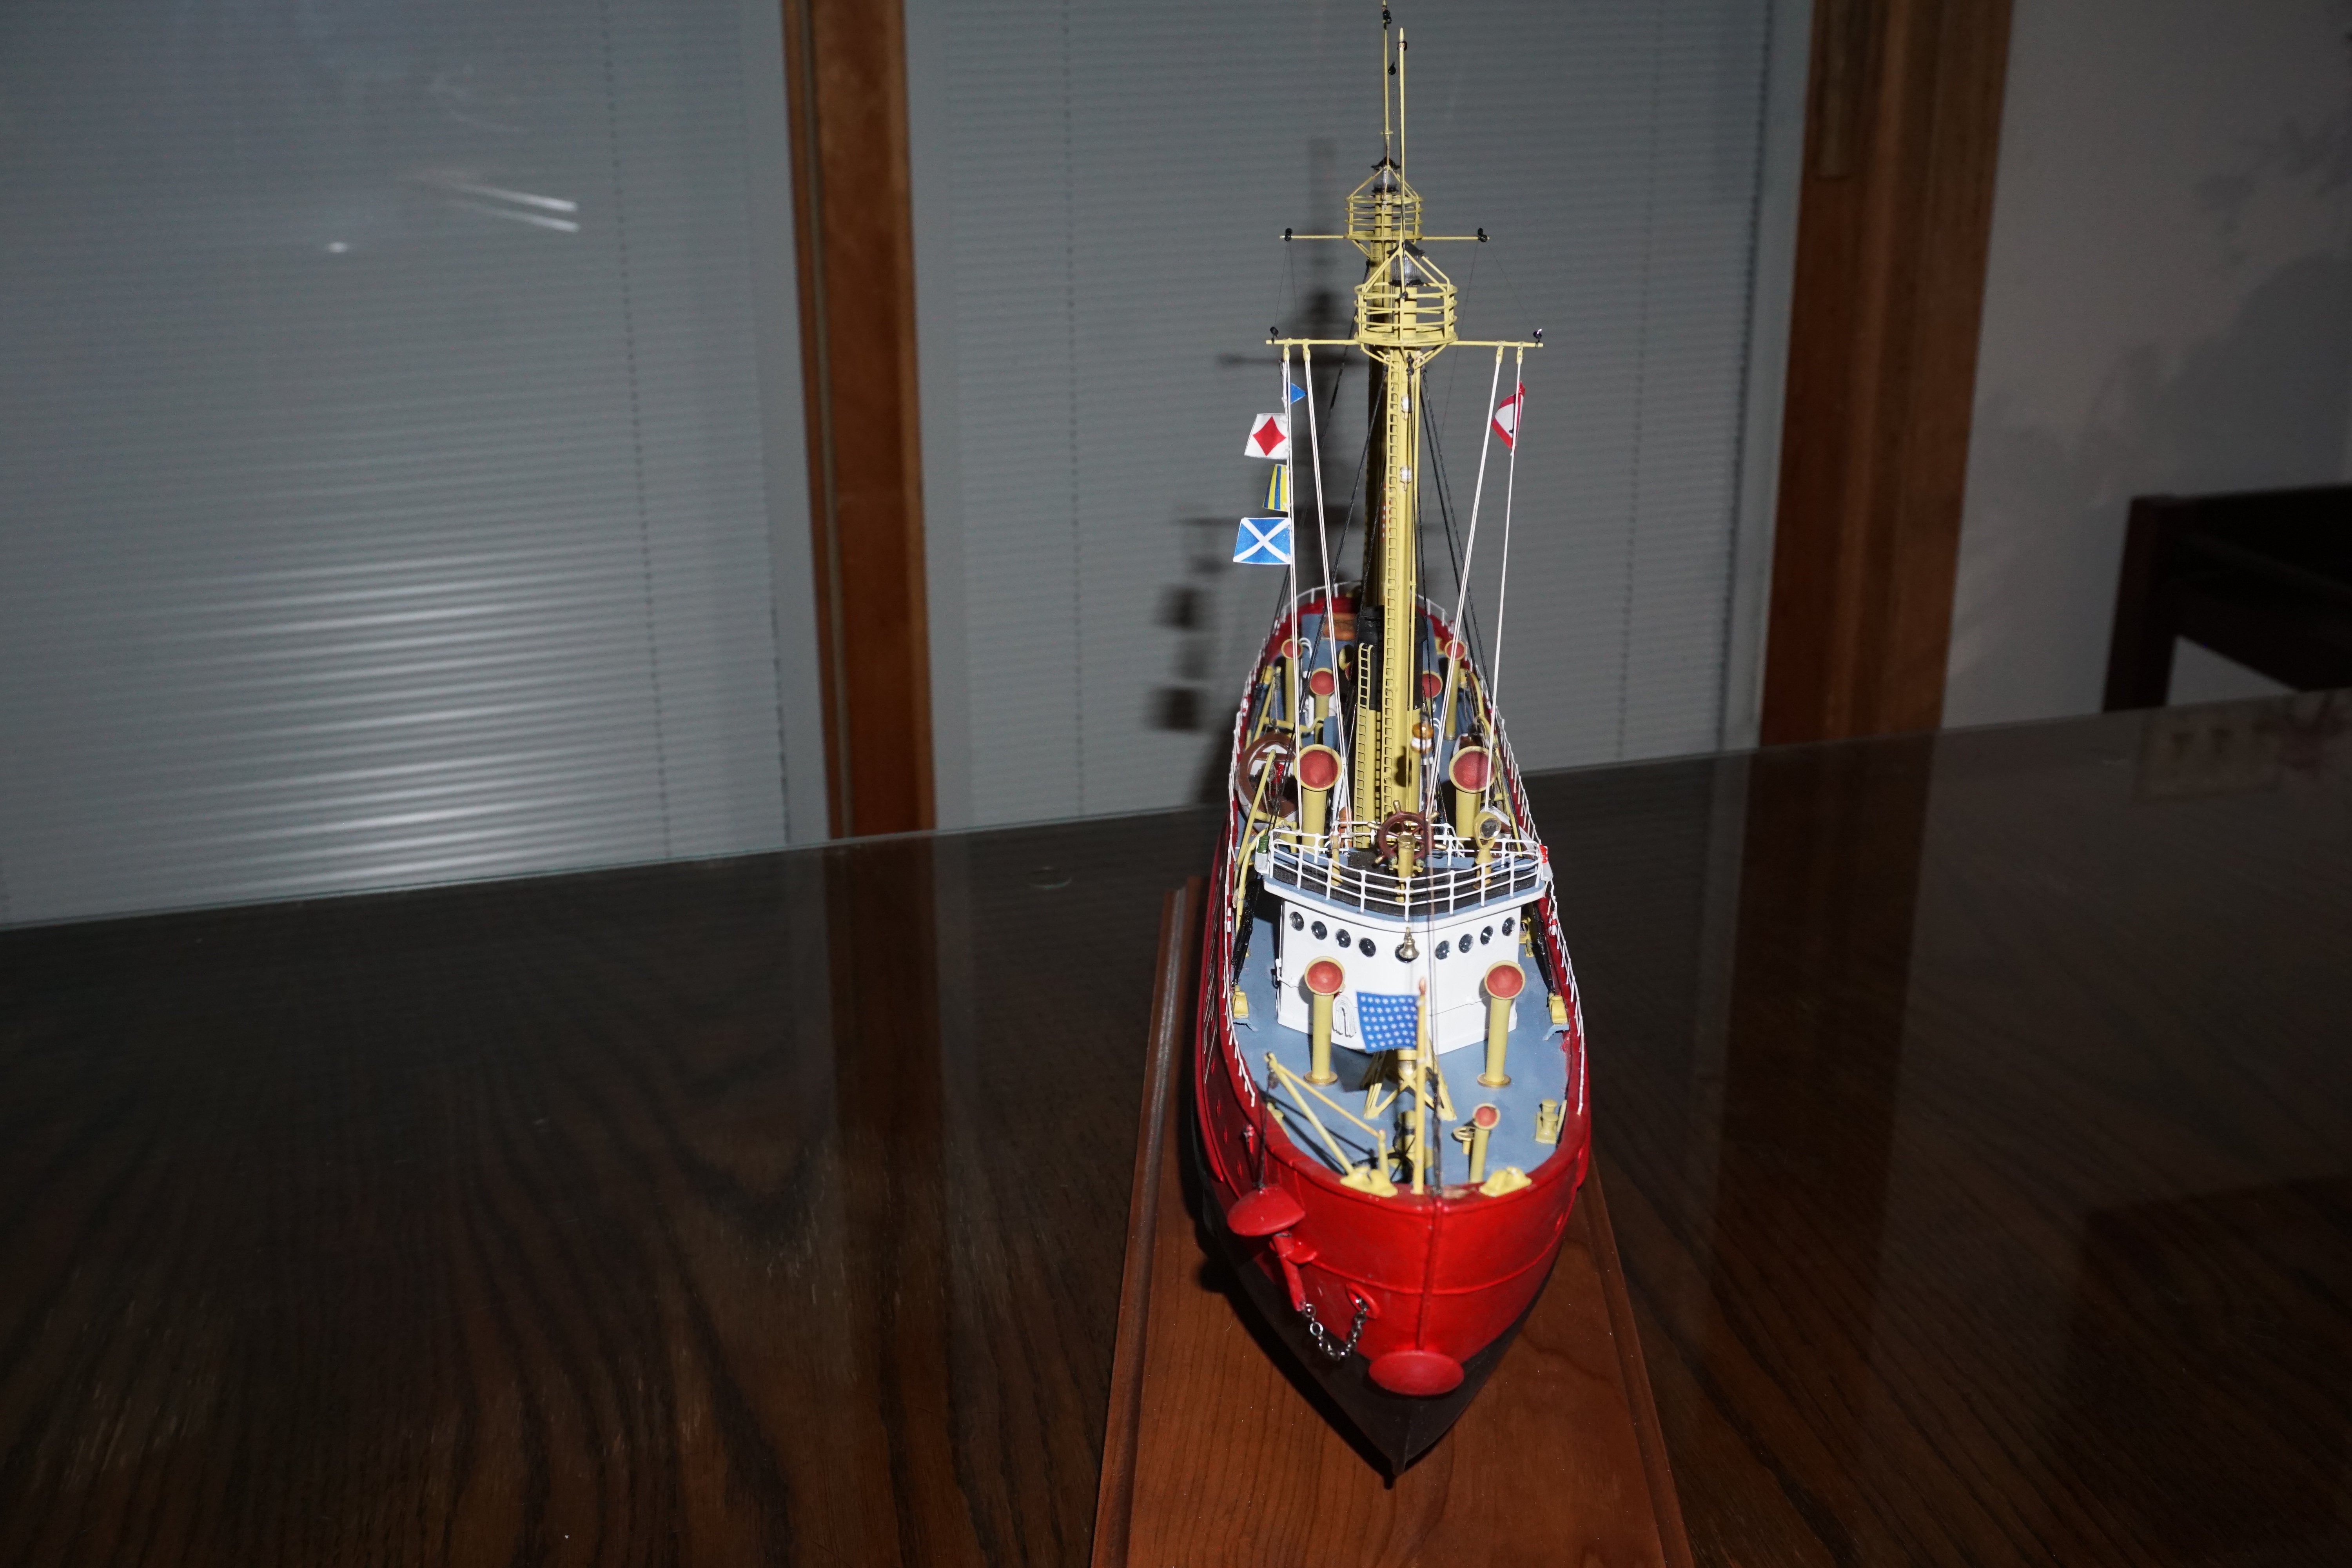
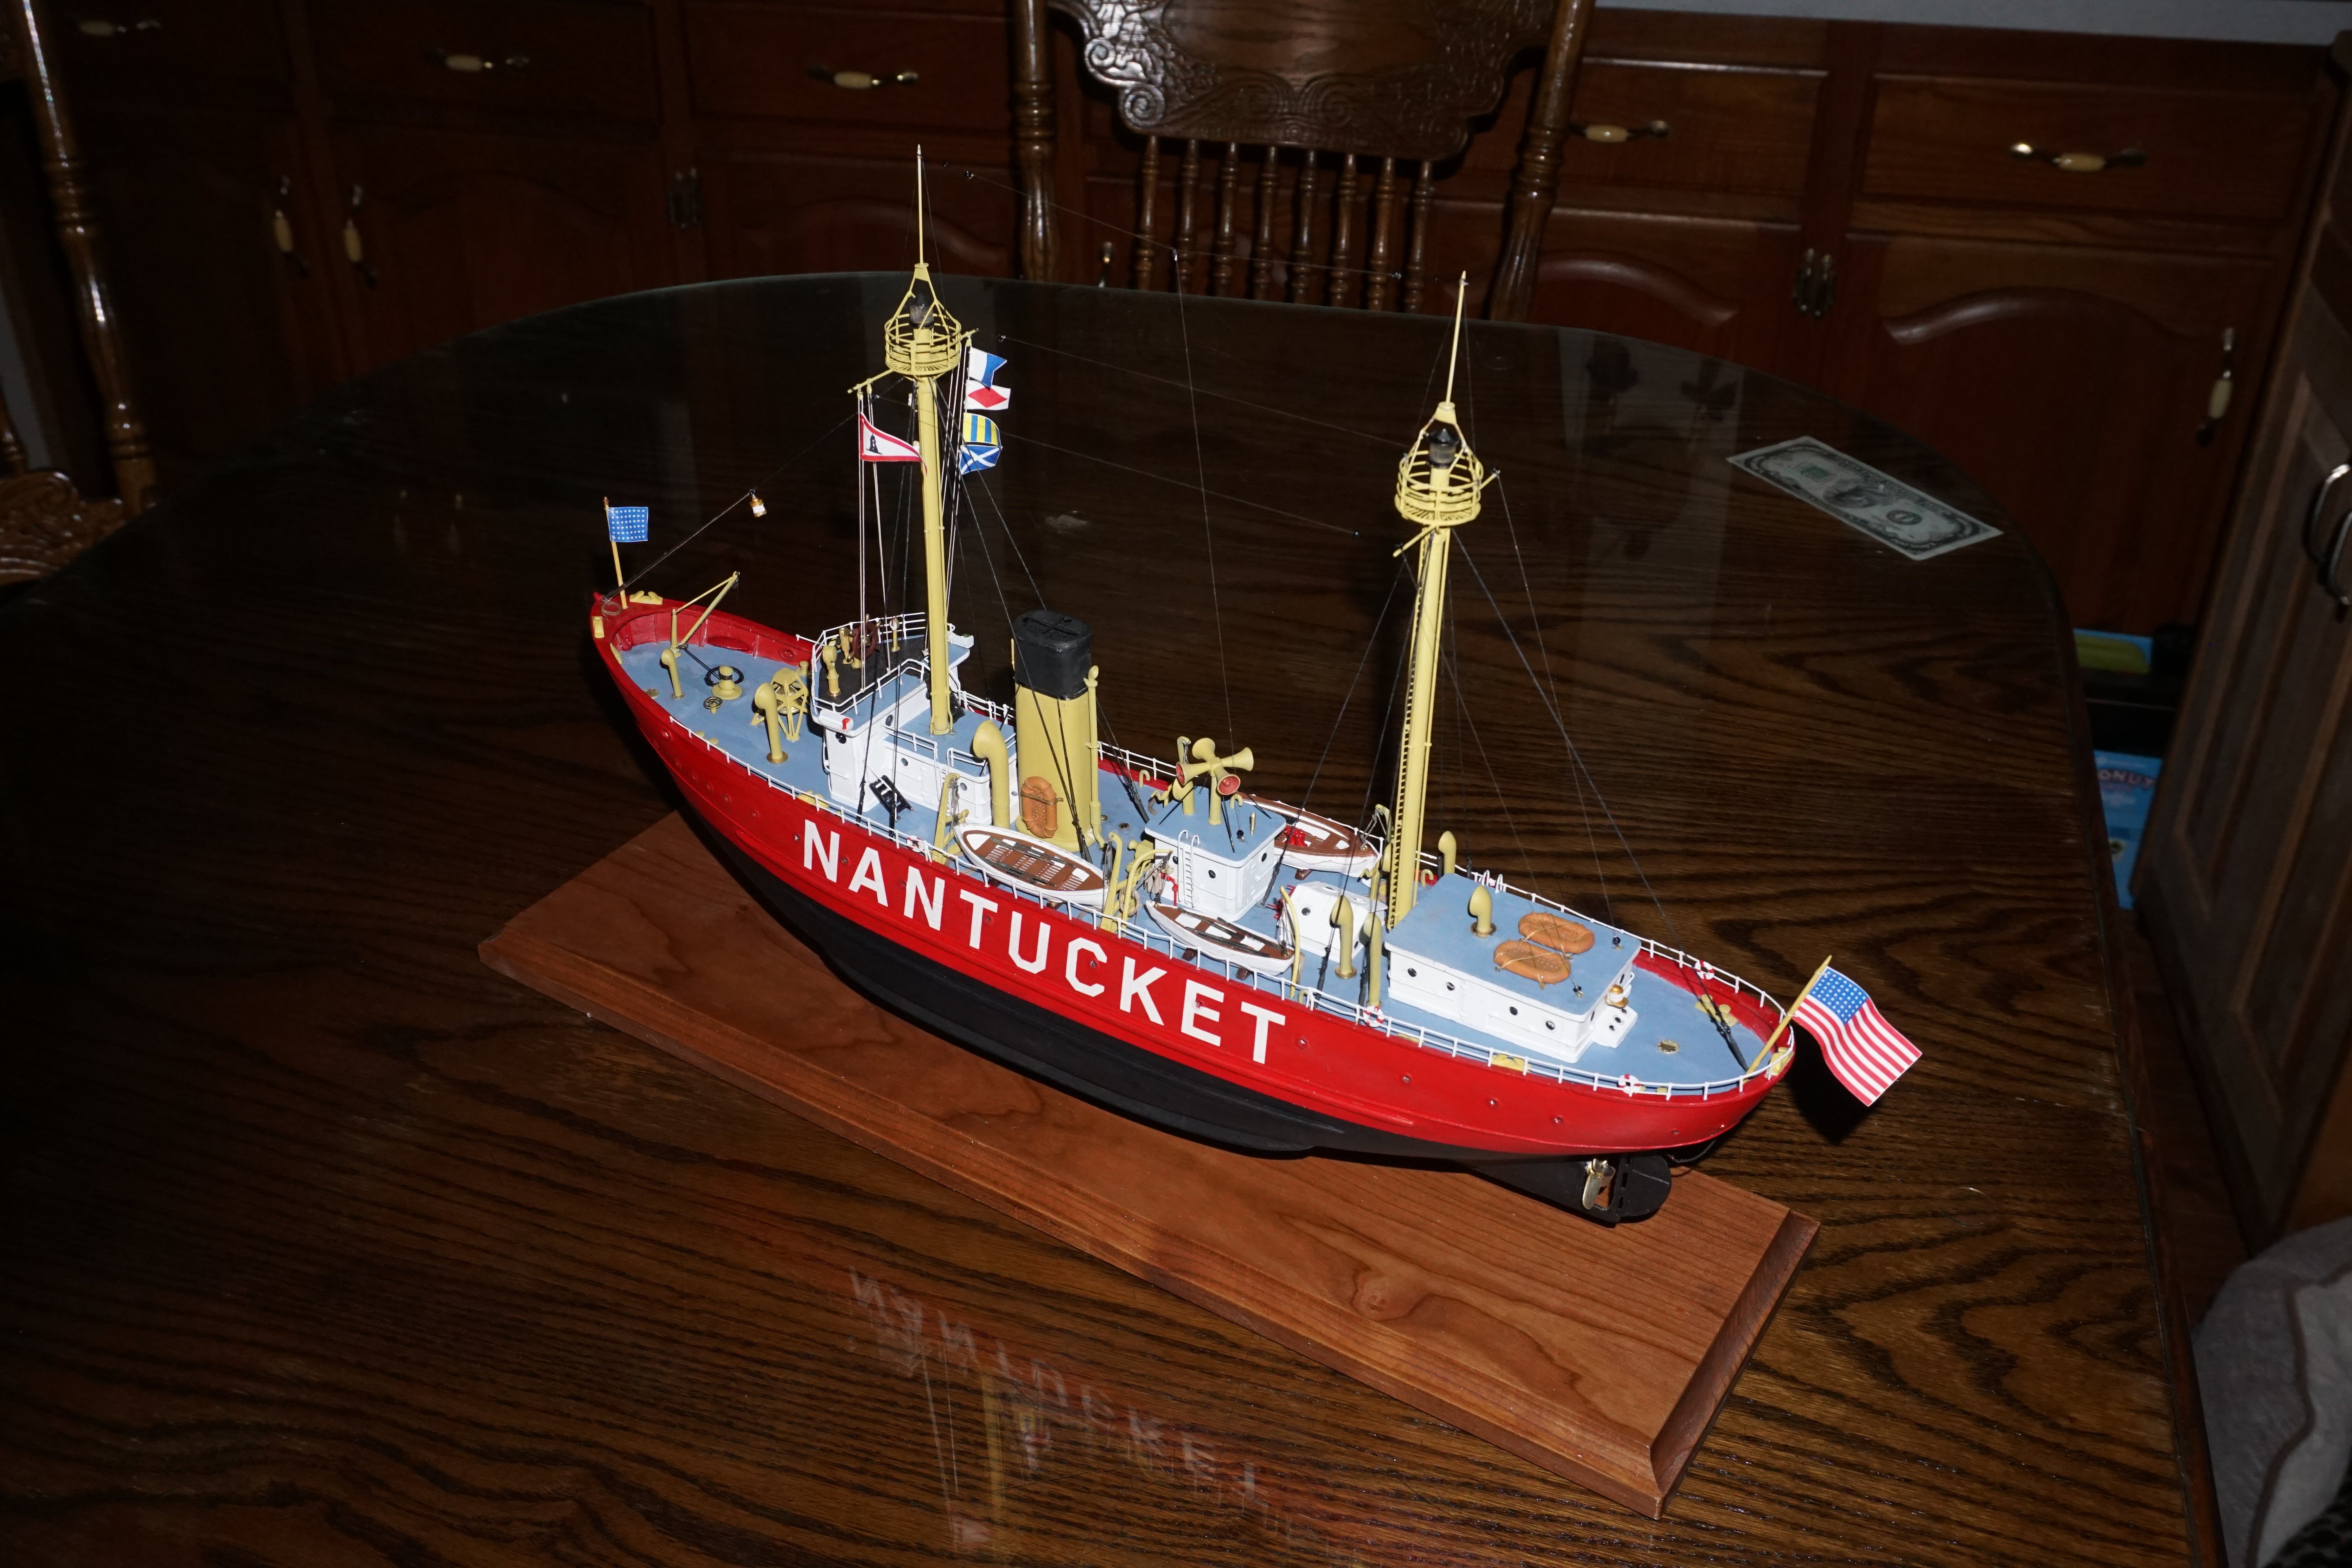
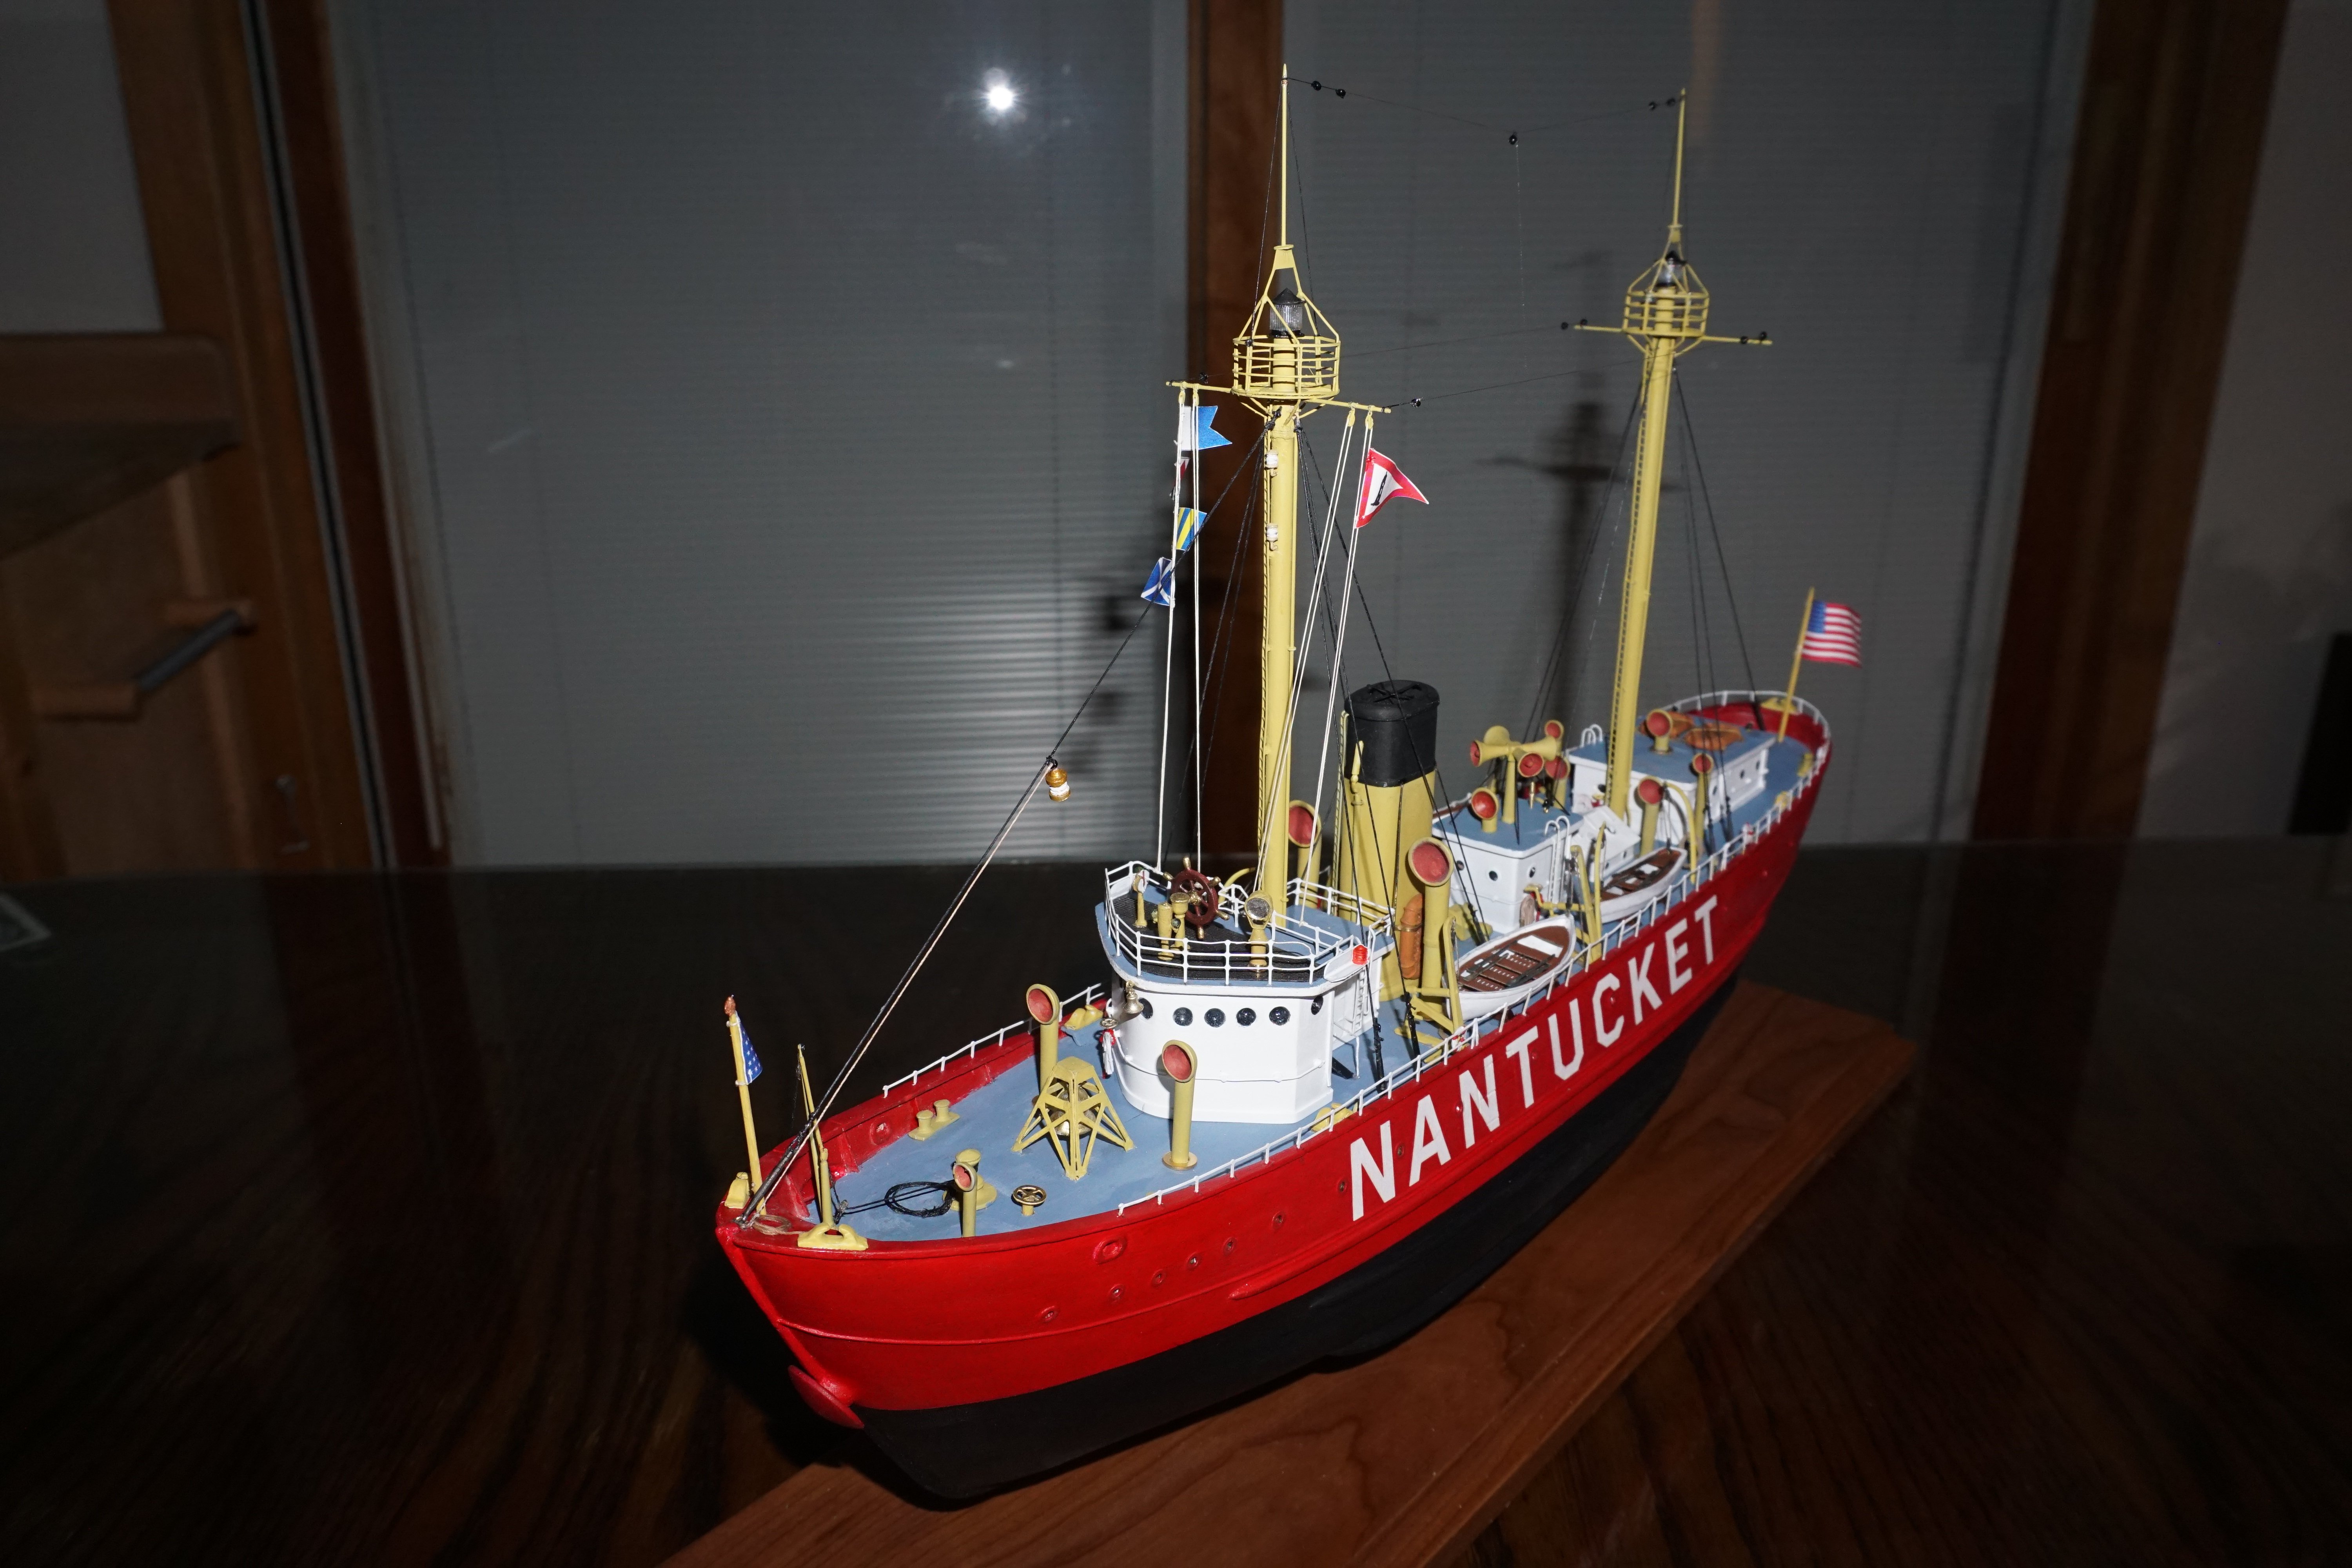
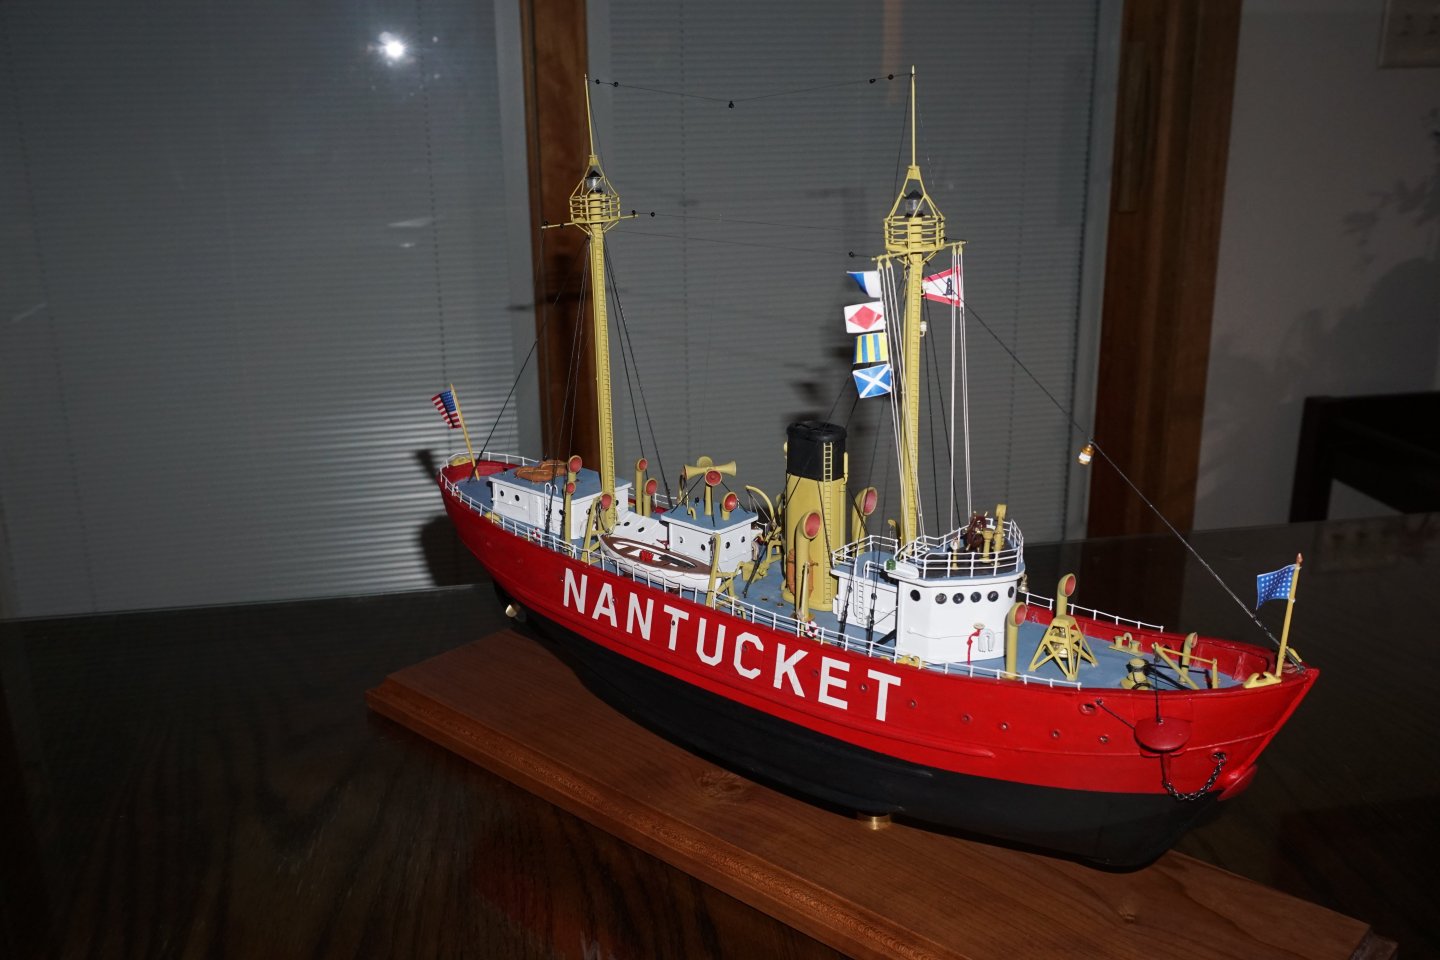
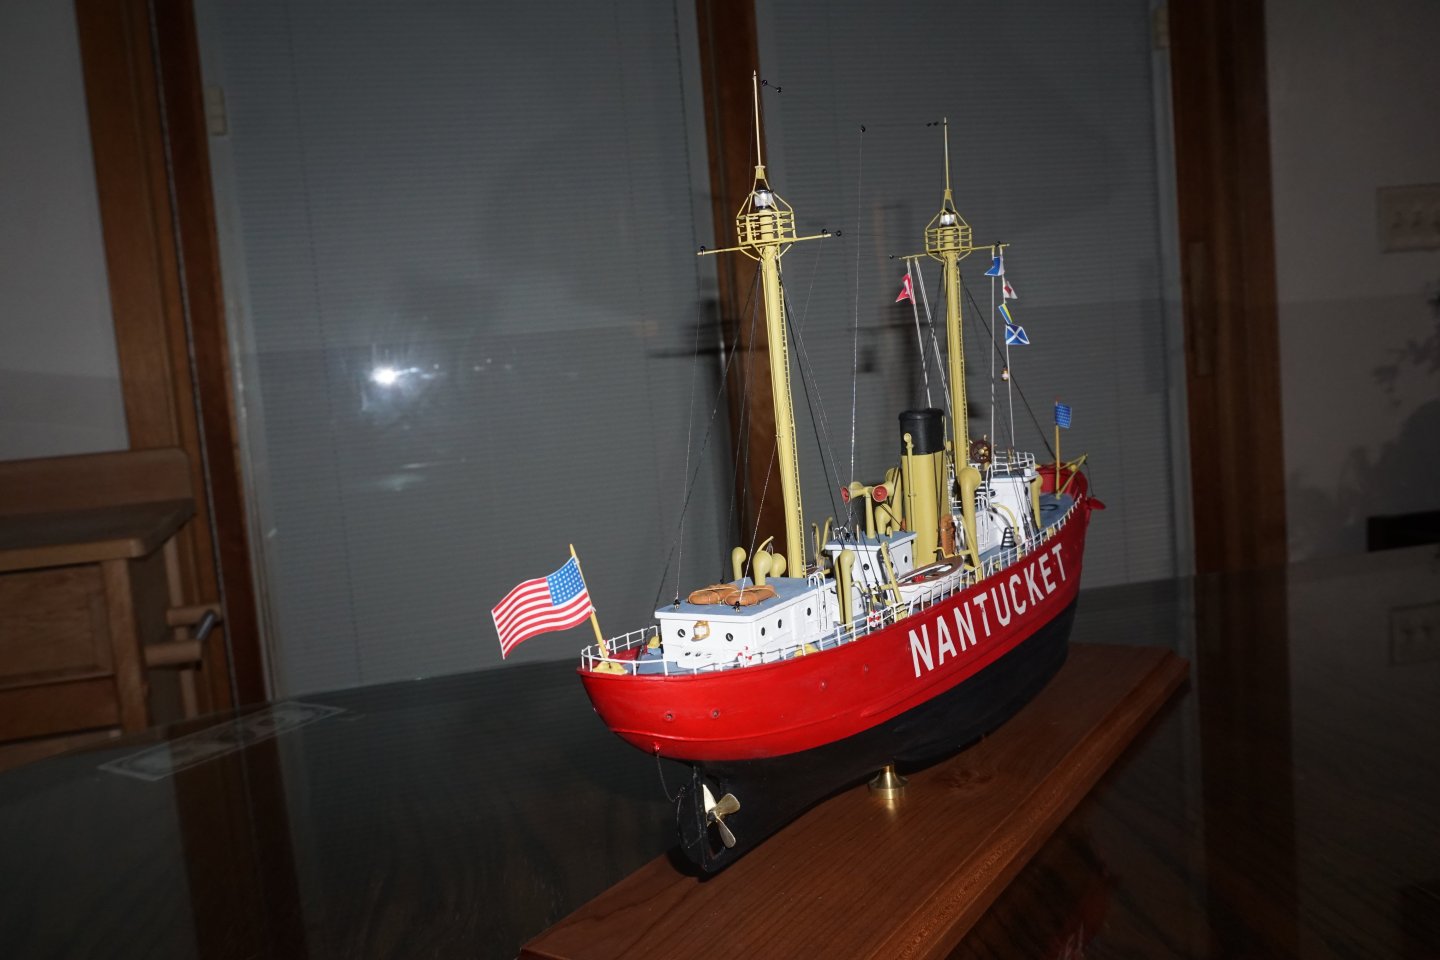
Ok. here is my completed Lightship. It took me nearly 4 months to get this done and I'm very satisfied with the end result. Not much more to say about this build except that it was a pure joy and kept me entertained for most of the winter.


- 29 replies
-
- 9
-
-
-
- Nantucket Lightship
- BlueJacket Shipcrafters
- (and 1 more)
-
Jeff preisler reacted to a post in a topic:
Lightship #112 NANTUCKET 1936 by Jeff Preisler - FINISHED - BlueJacket Shipcrafters - Scale 1/8" = 1'
-
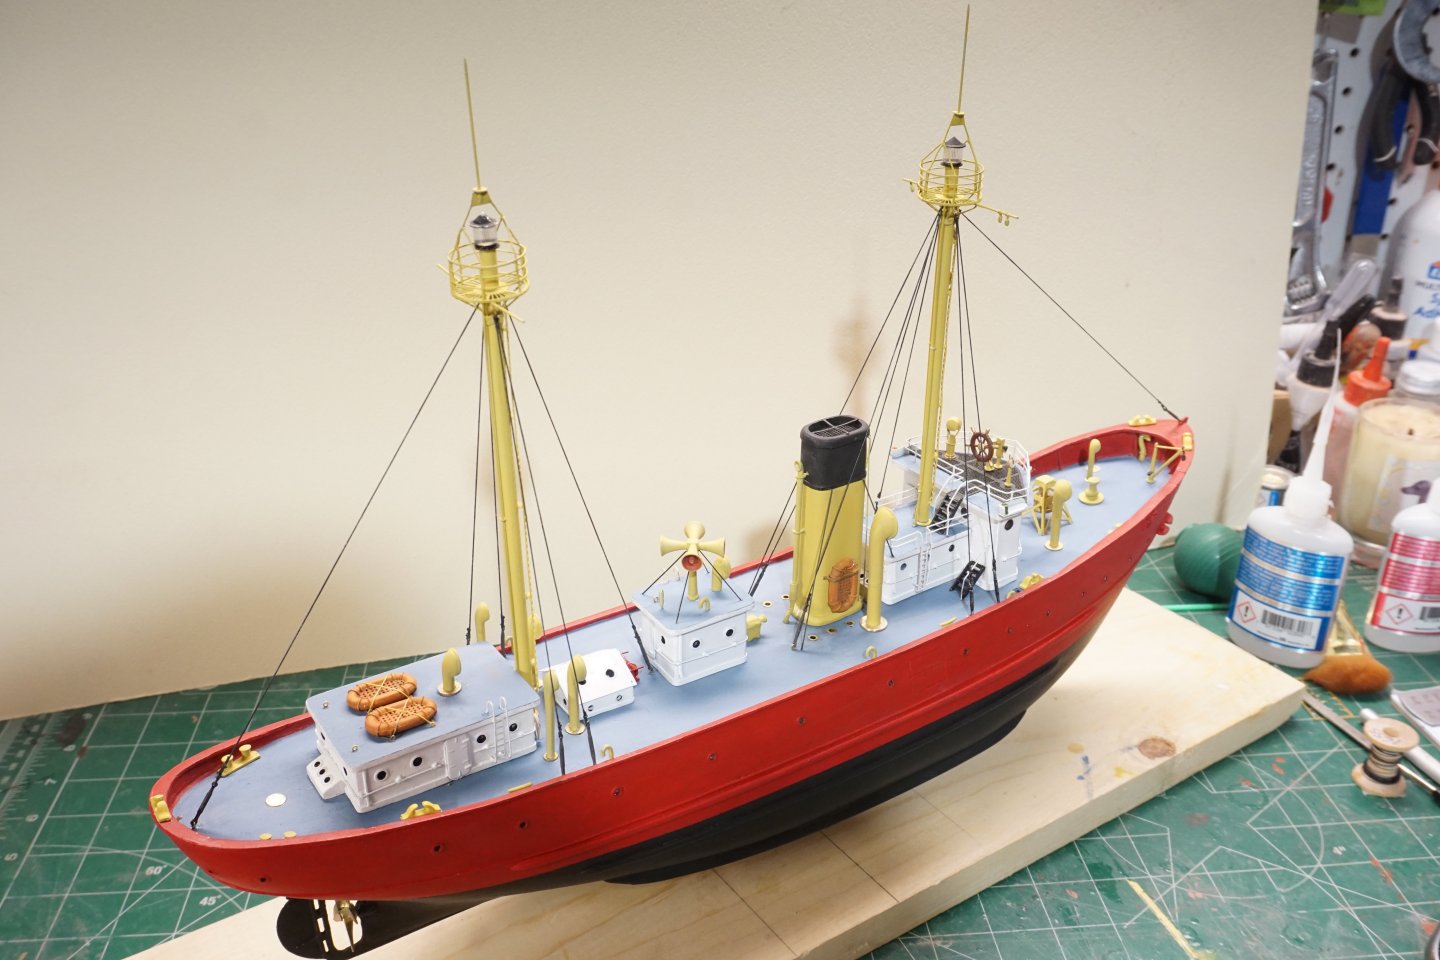
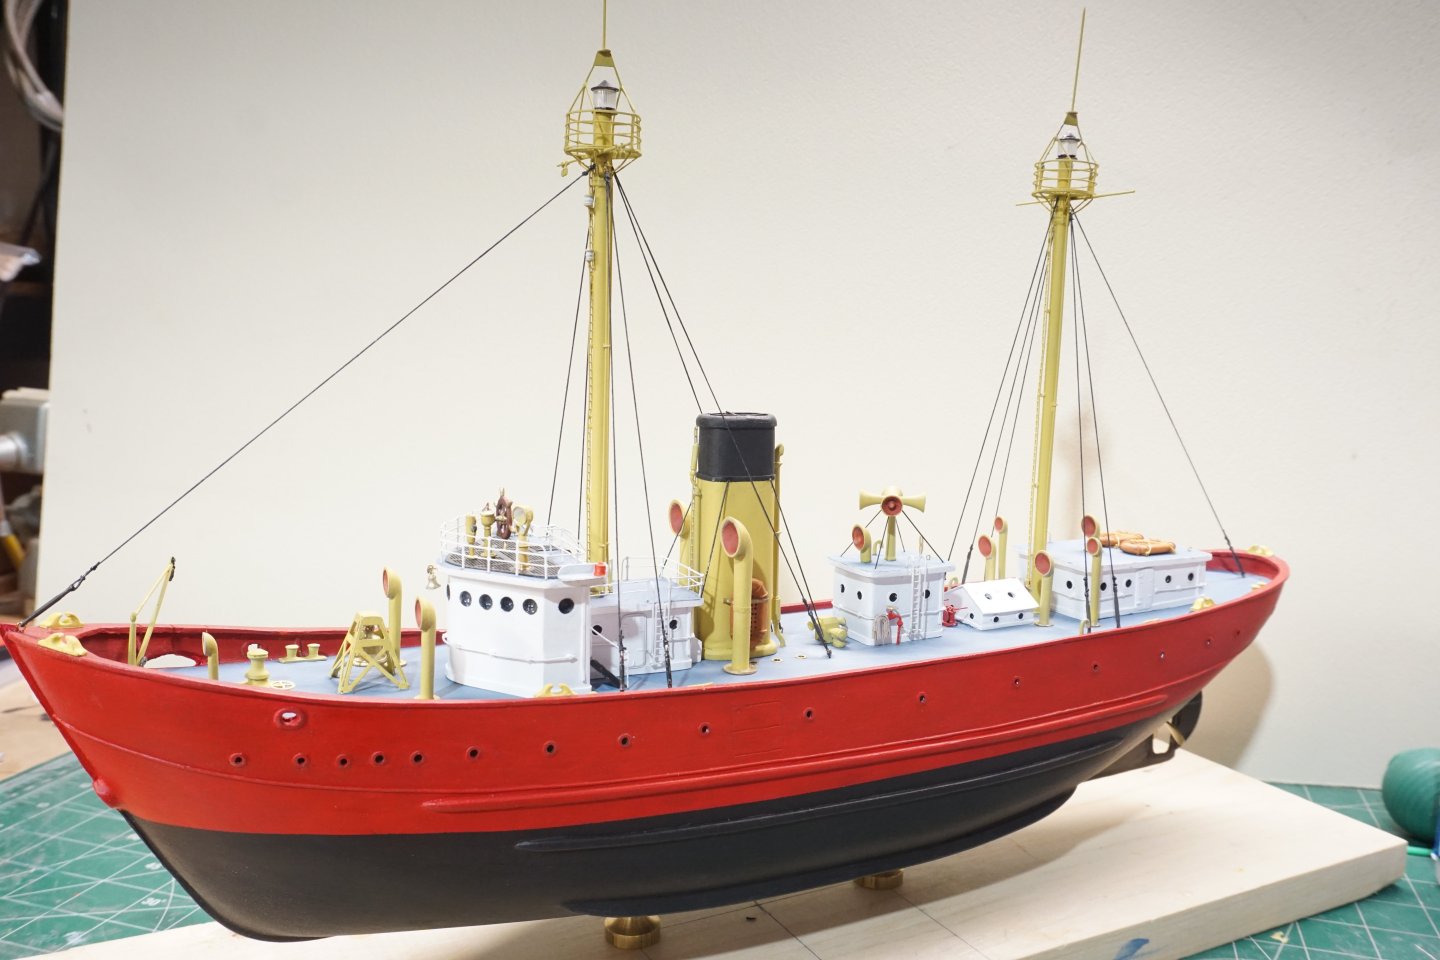
The mast construction went fairly smooth, for added strength, I decided to solder the photo etch lantern frames and baskets together. Humbrol enamel matt 81 (pale yellow) was the color I used for airbrushing the masts, stack, vent funnels and davits. At this point everything is glued down and I got a good start on the rigging, completing the stays and shrouds. I should have this completed in the next few days.
- 29 replies
-
- 8
-
-
- Nantucket Lightship
- BlueJacket Shipcrafters
- (and 1 more)
-
Jeff preisler reacted to a post in a topic:
Skiff by Legodude with ESF - BlueJacket Shipcrafters - 1:12 - first build
-
Jeff preisler reacted to a post in a topic:
Skiff by Legodude with ESF - BlueJacket Shipcrafters - 1:12 - first build
-
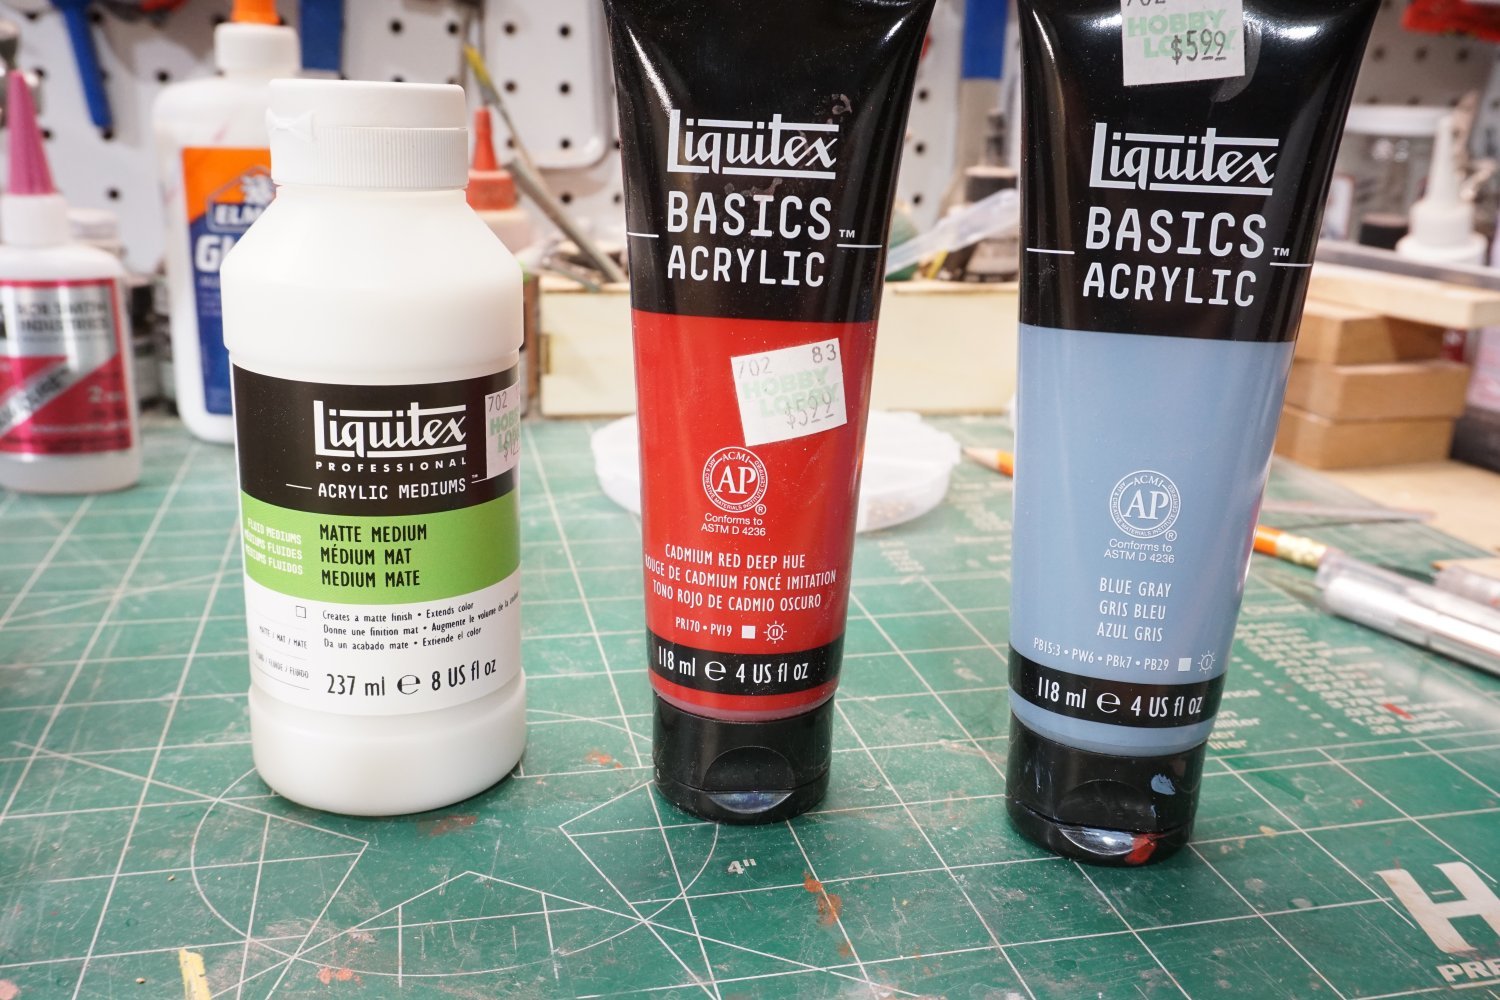
Thank you for your information. I will have to look into it, I saw a product called flow medium (Masters Touch) at my local Hobby Lobby which is supposed to thin but give I glossy finish per label. I actually used Liquitex matte medium to lower viscosity, but it wasn't like using paint thinner, so I did not experiment and after brushing on some scrap wood I decided to brush paint as my impatience with trying something new got the best of me. After reading your reply and doing some research, I found Liquitex does make an actual airbrushing thinner which my local hobby lobby did not have, I will order some and try it out. Thank you so much for your input and I will definitely try experimenting with my airbrush in the future.
- 29 replies
-
- 1
-
-
- Nantucket Lightship
- BlueJacket Shipcrafters
- (and 1 more)
-
Jeff preisler reacted to a post in a topic:
Lightship #112 NANTUCKET 1936 by Jeff Preisler - FINISHED - BlueJacket Shipcrafters - Scale 1/8" = 1'
-
Jeff preisler reacted to a post in a topic:
Lightship #112 NANTUCKET 1936 by Jeff Preisler - FINISHED - BlueJacket Shipcrafters - Scale 1/8" = 1'
-
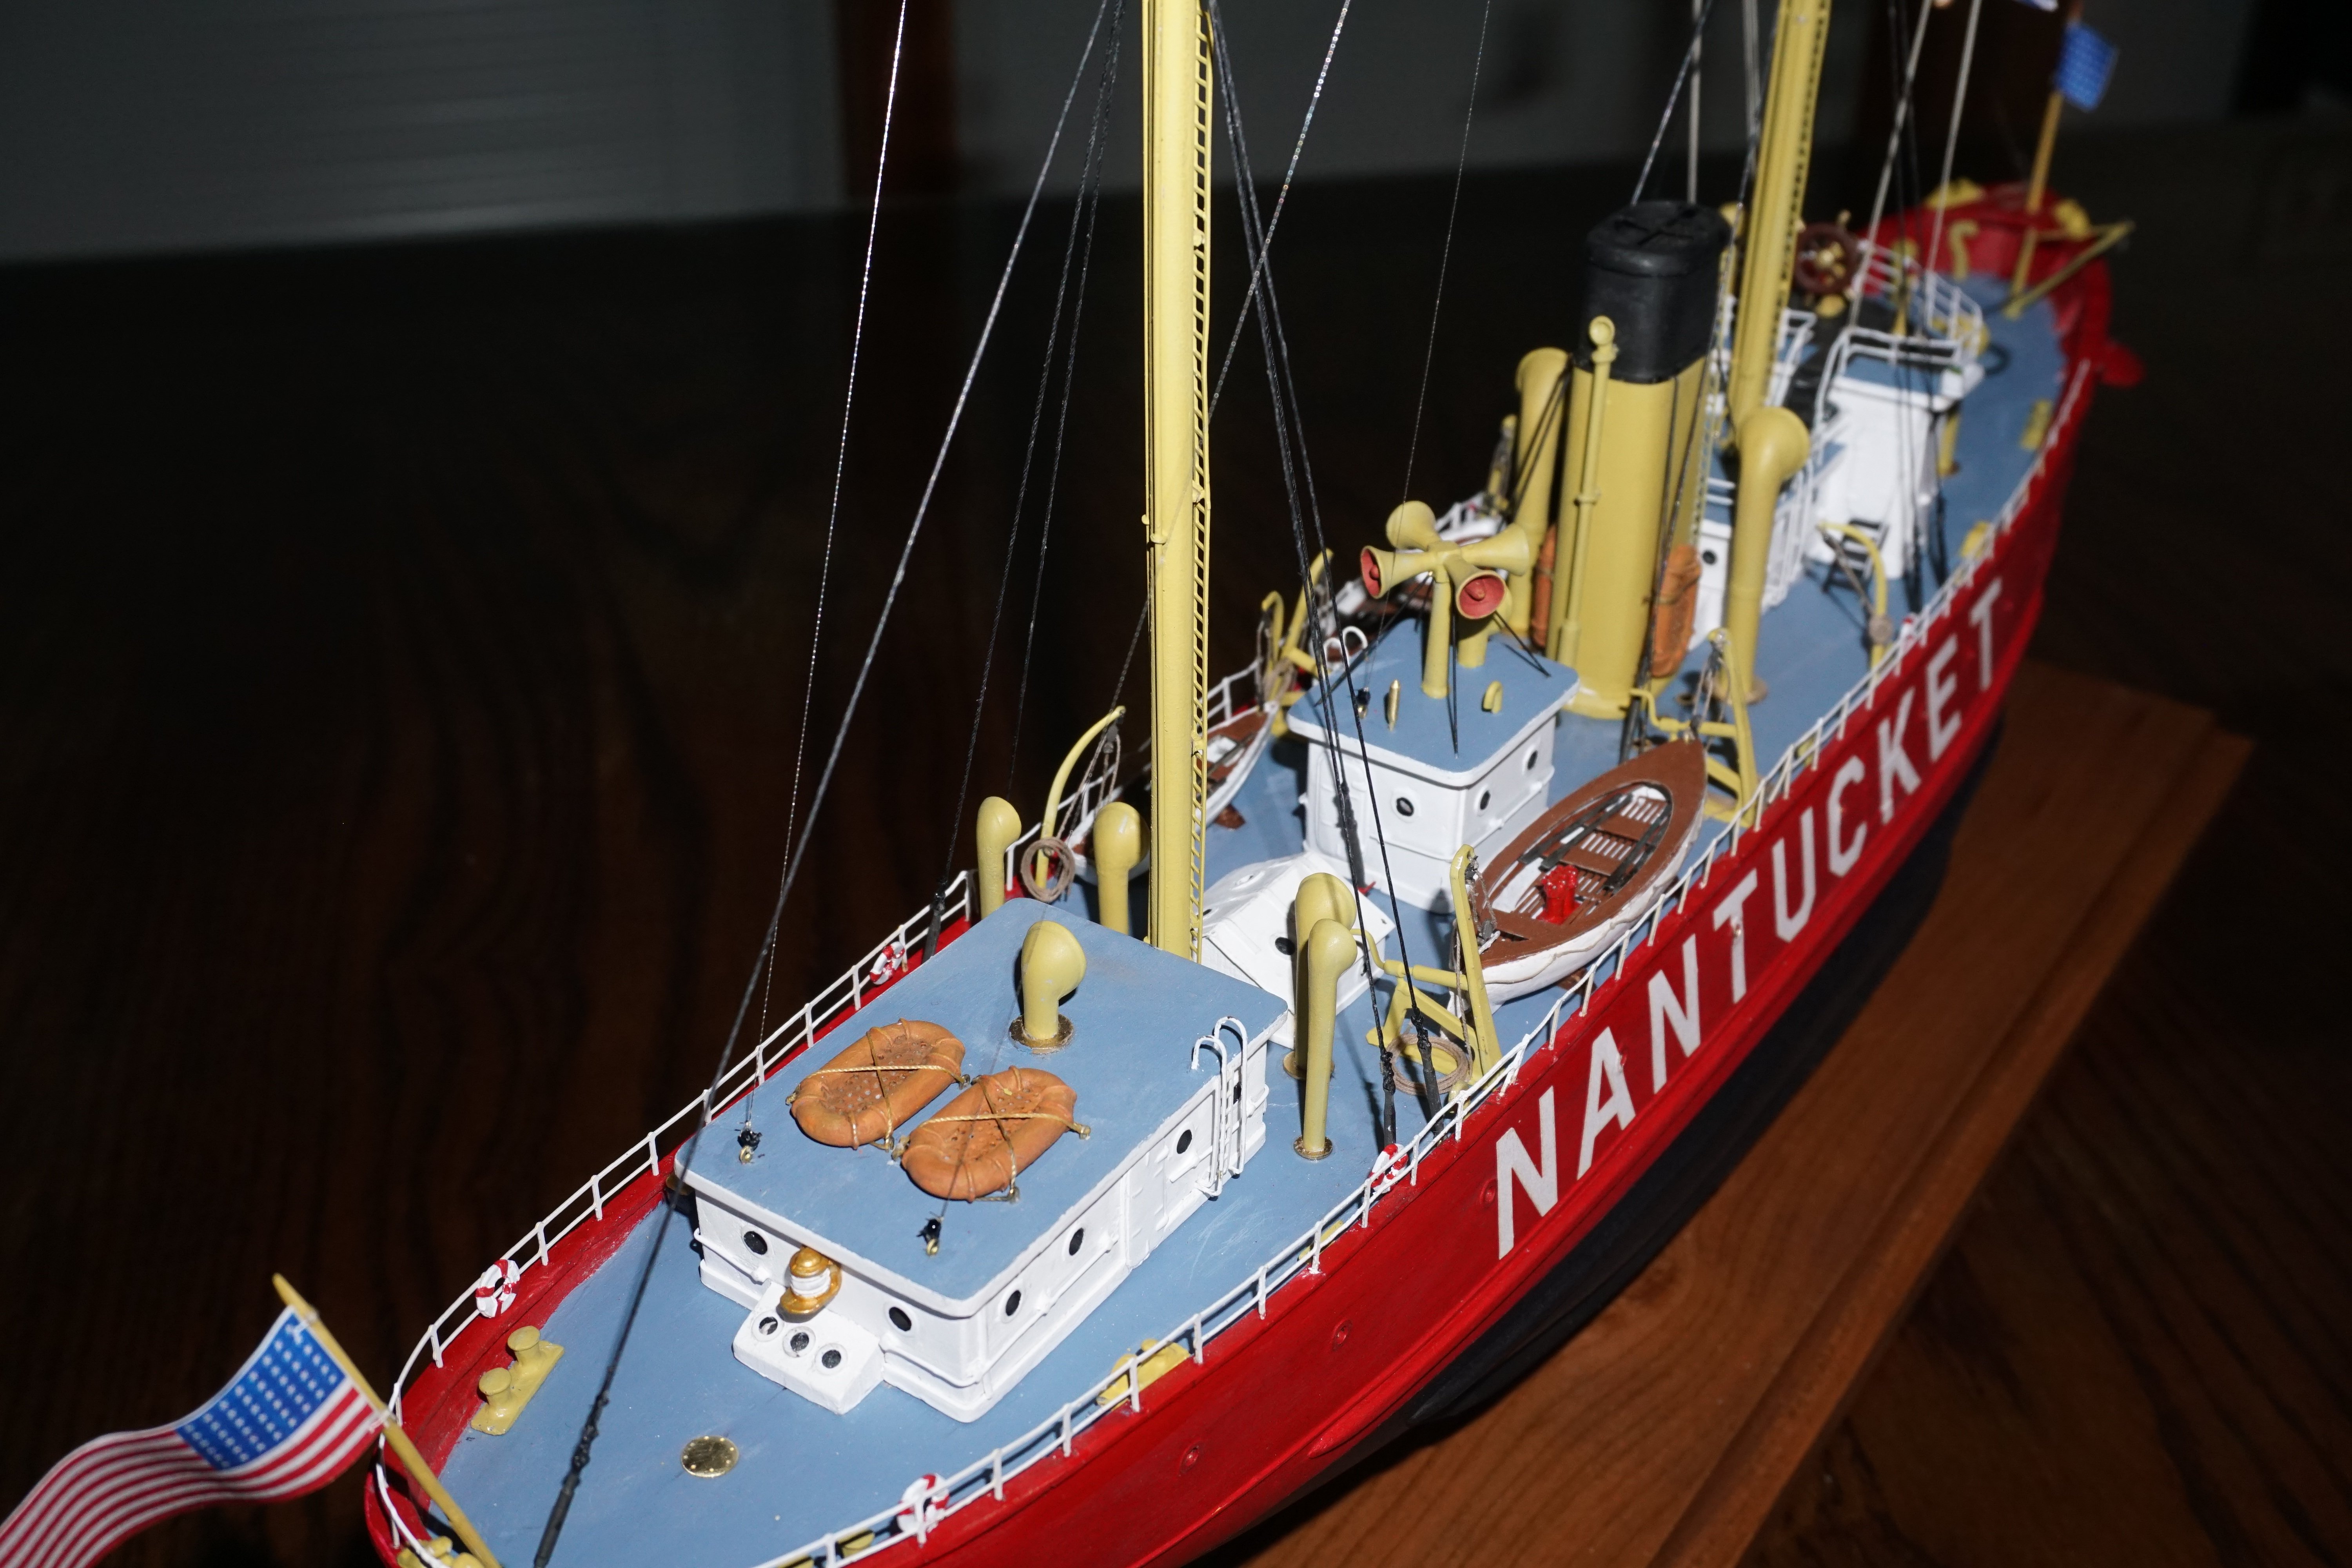
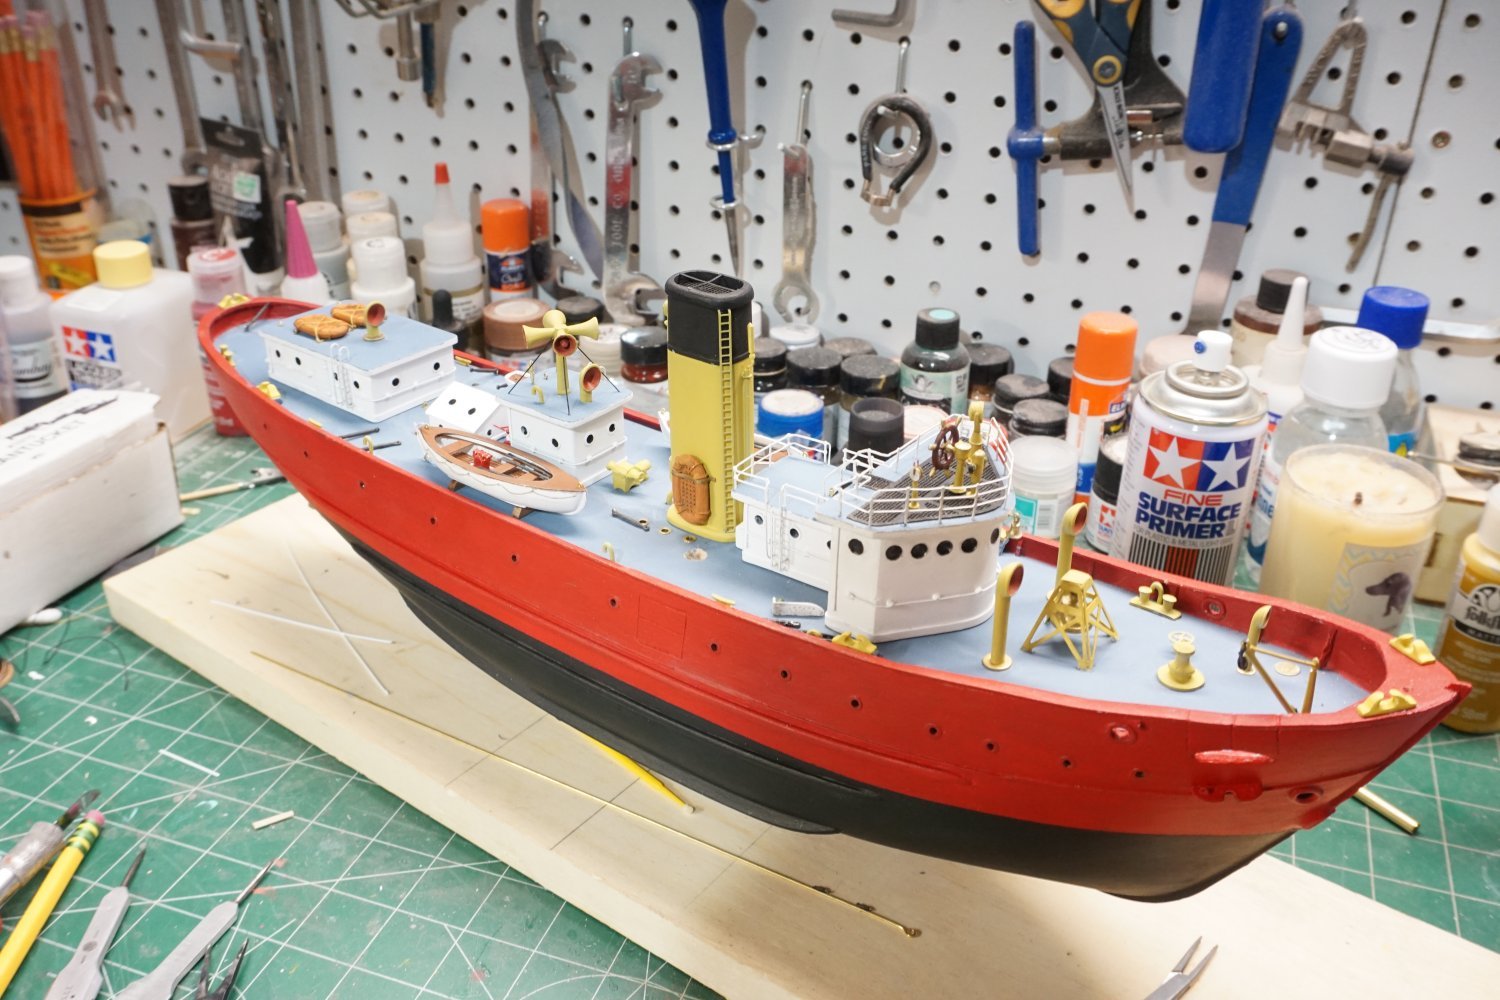
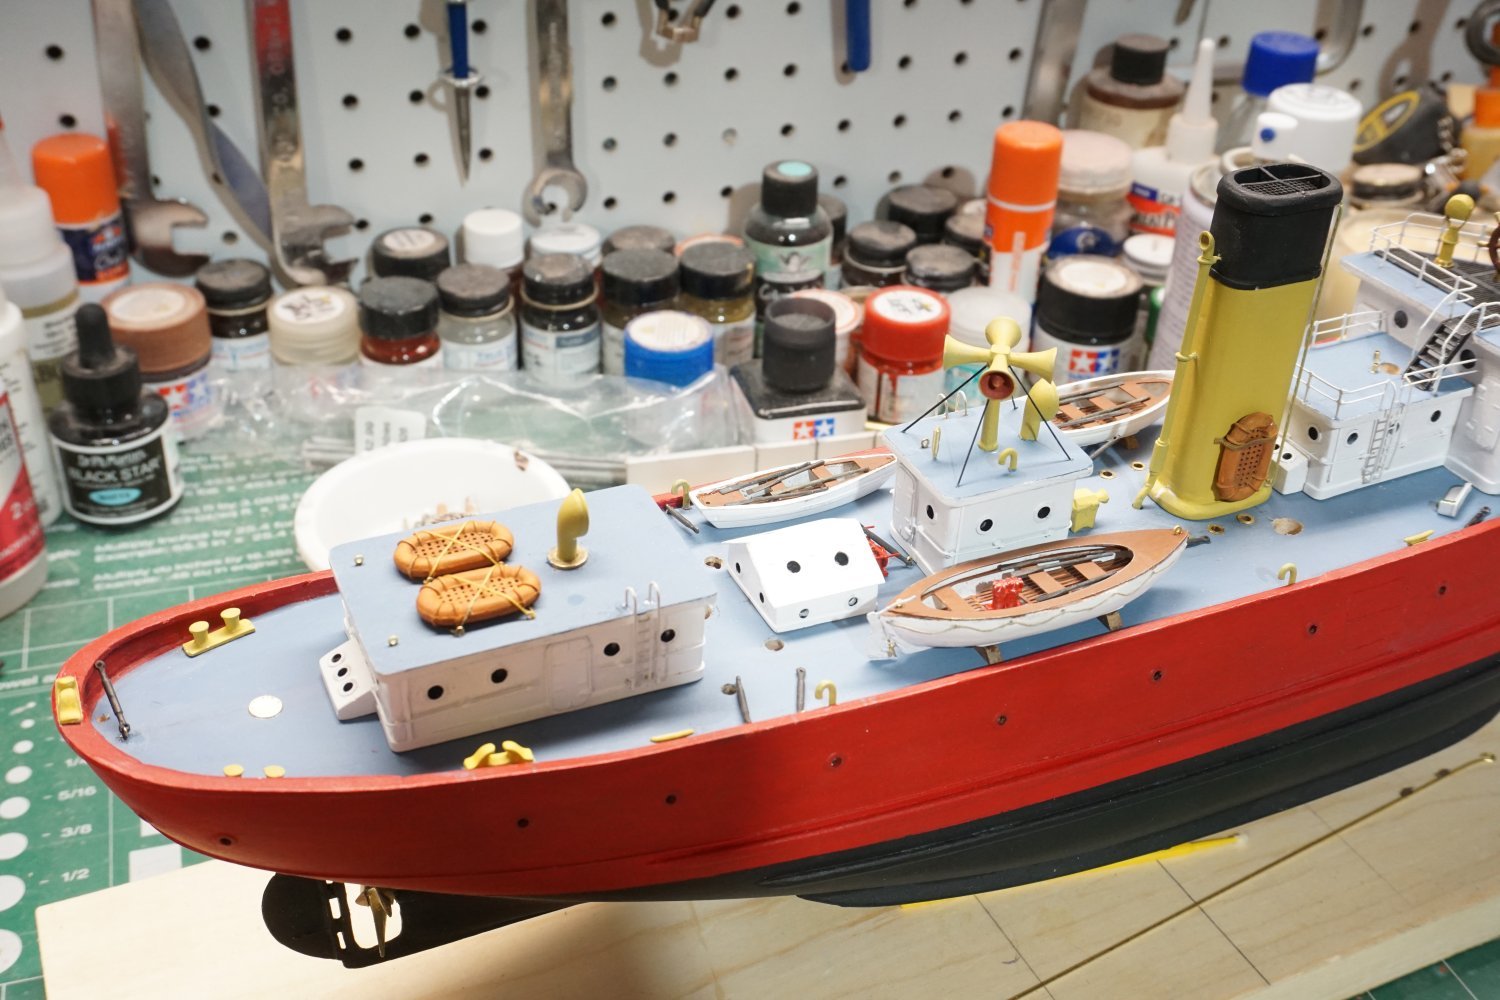
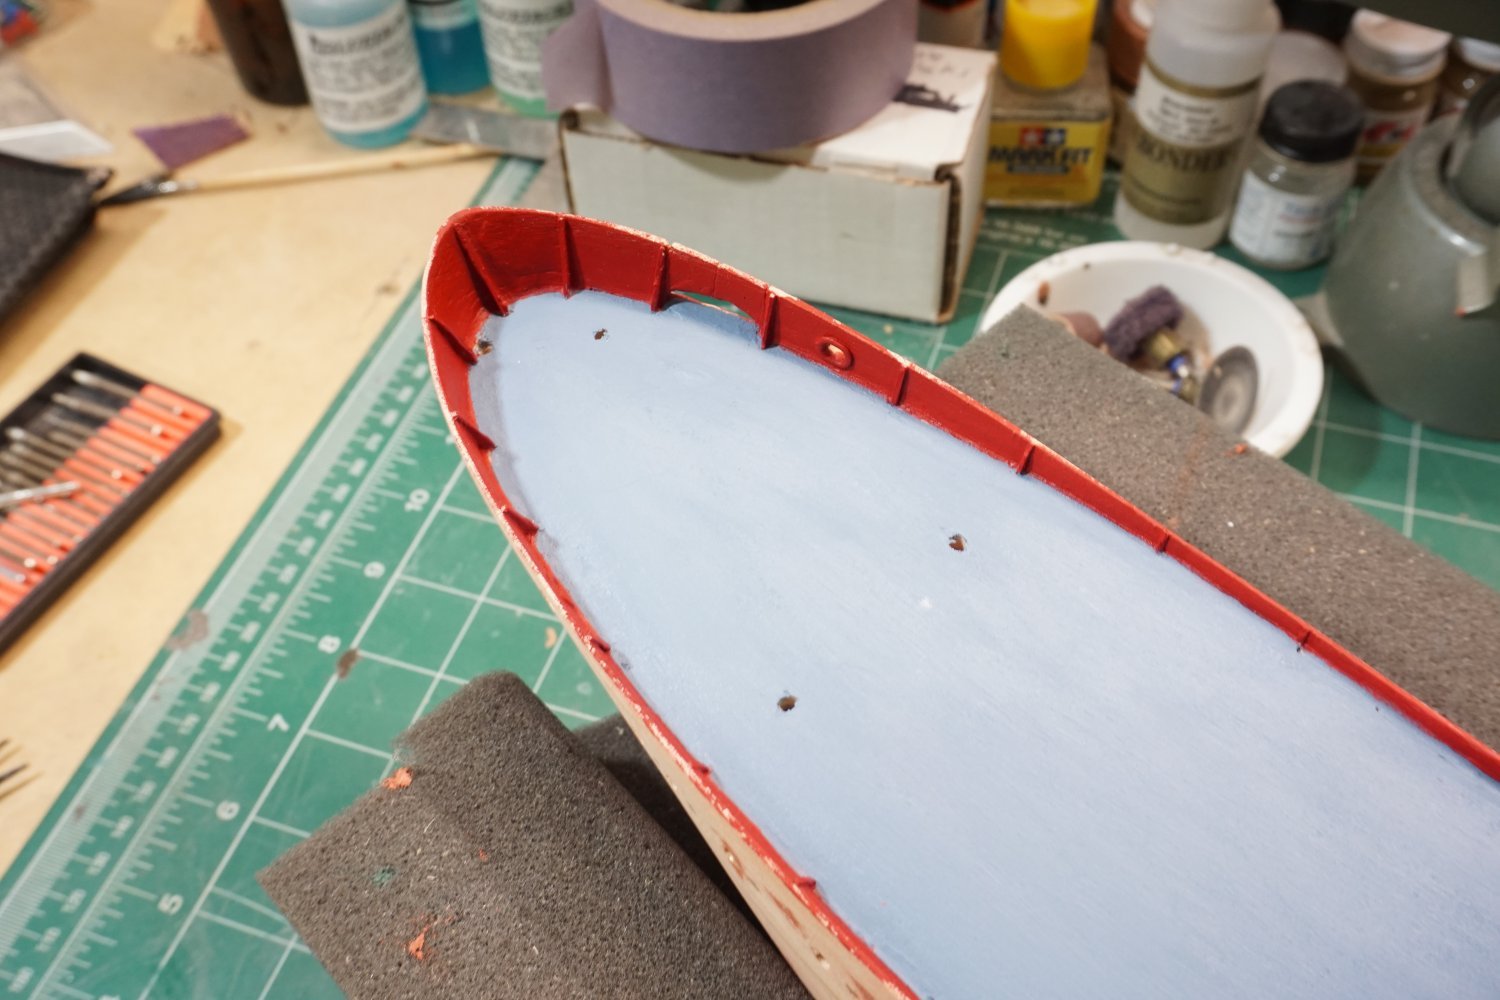
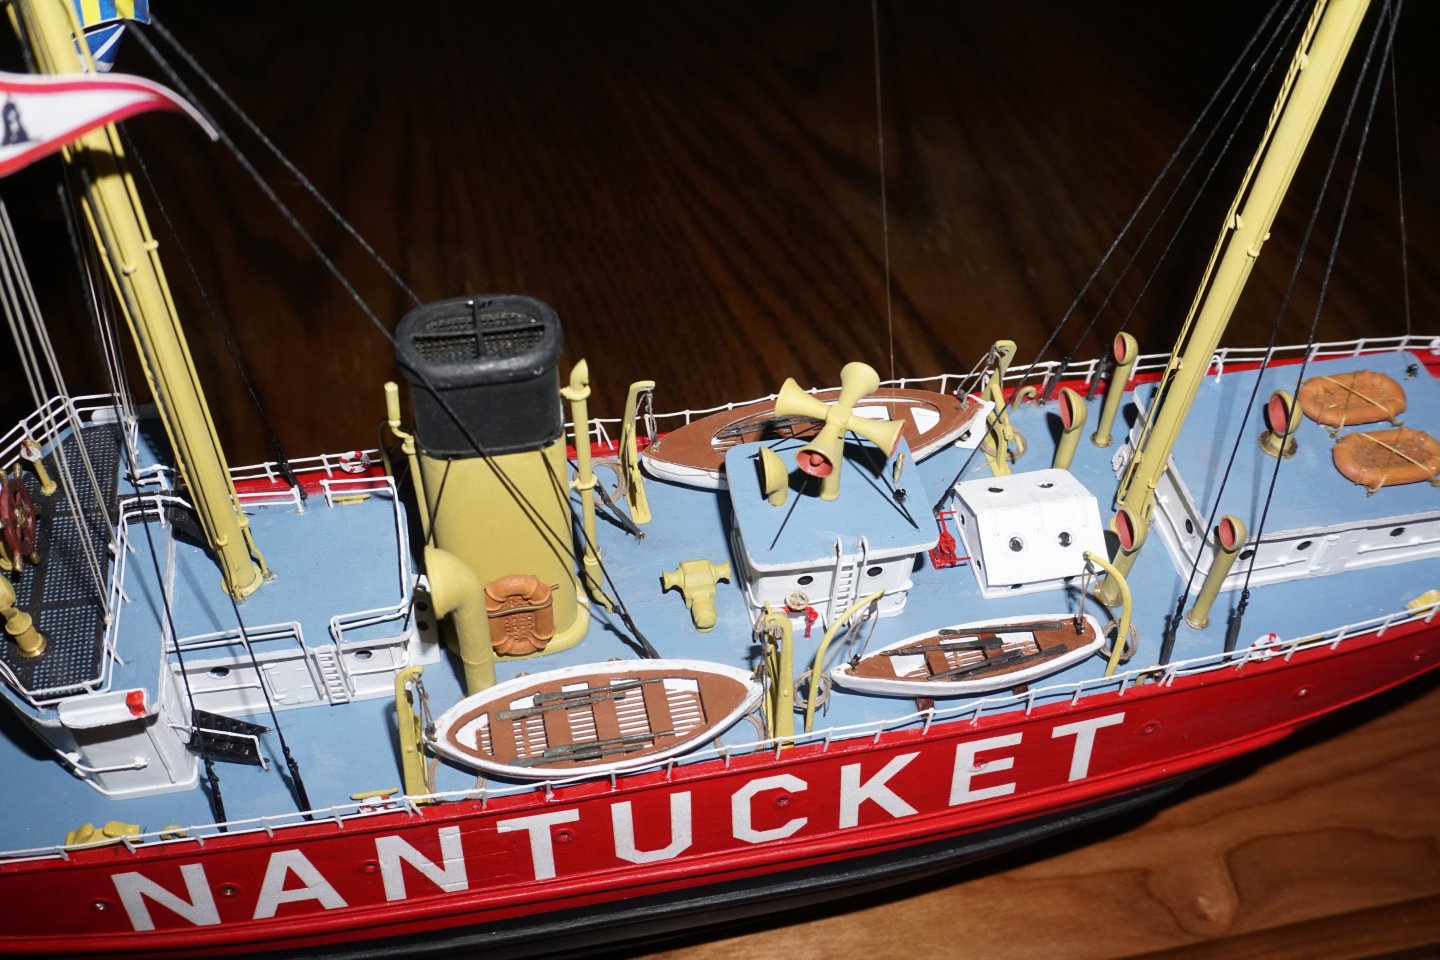
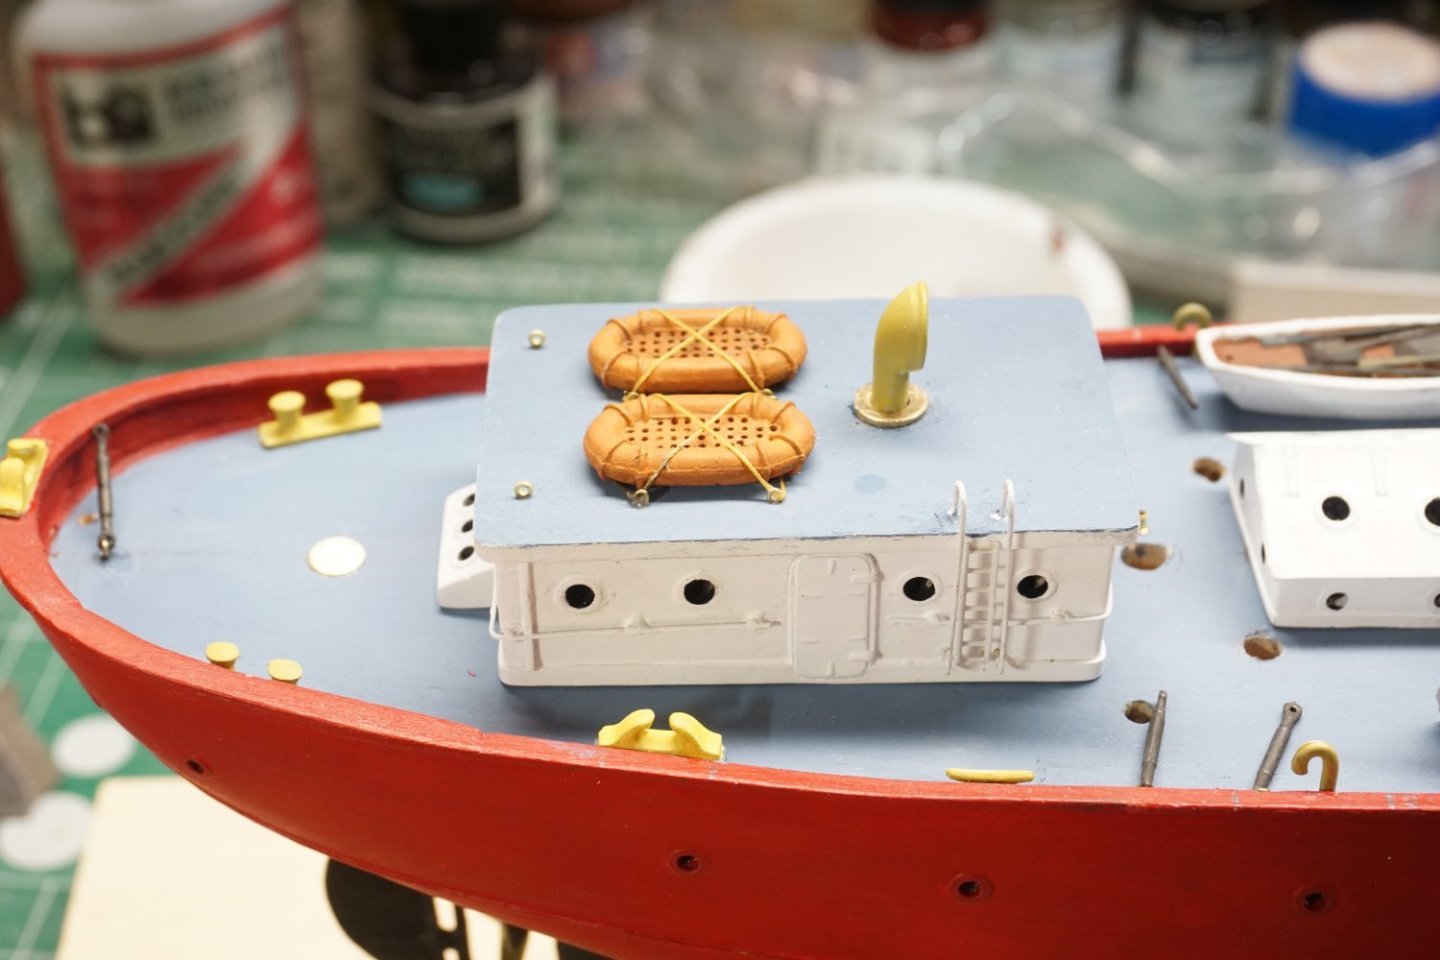
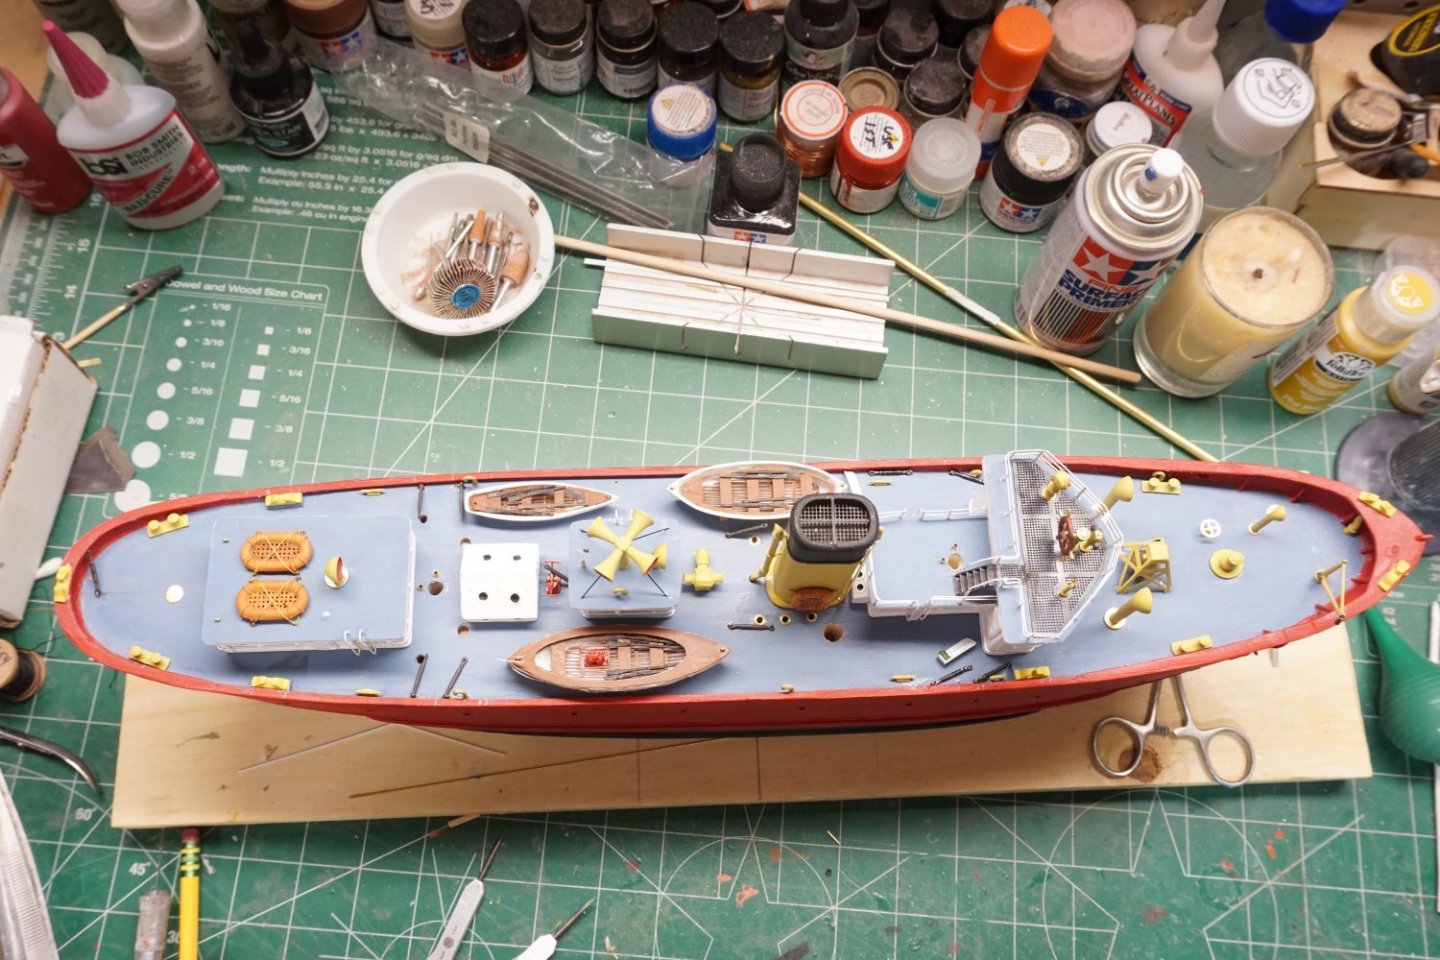
More progress on the Nantucket. Completed all deck structures. Instead of just glueing the life rafts to the radio house roof, I decided to add tie downs for more detail. I also did the extra work and made a propeller and shaft out of scrap brass for the large whale boat, made some mounting cradles out of hardwood as well. I'm probably wrong on my color choice for the boats flooring and benches as it was supposed to be the deck grey, but I went with red brown instead as I like the look. At this point in my build the only deck structure that is glued down is the small engine room skylight, everything else is just positioned in its location. Currently working on the boats davits then it will be on to the masts and rigging. I'm really enjoying this build but looking forward to the finished product.


- 29 replies
-
- 9
-
-
- Nantucket Lightship
- BlueJacket Shipcrafters
- (and 1 more)
-
Very Nice!! Congratulations!!
-
Thank you and glad you like it so far. The kit that I have is supplied with .020' x .020" styrene plastic for the drainpipe and .020" x .10" styrene plastic for the baseboards.
- 29 replies
-
- 2
-
-
- Nantucket Lightship
- BlueJacket Shipcrafters
- (and 1 more)
-
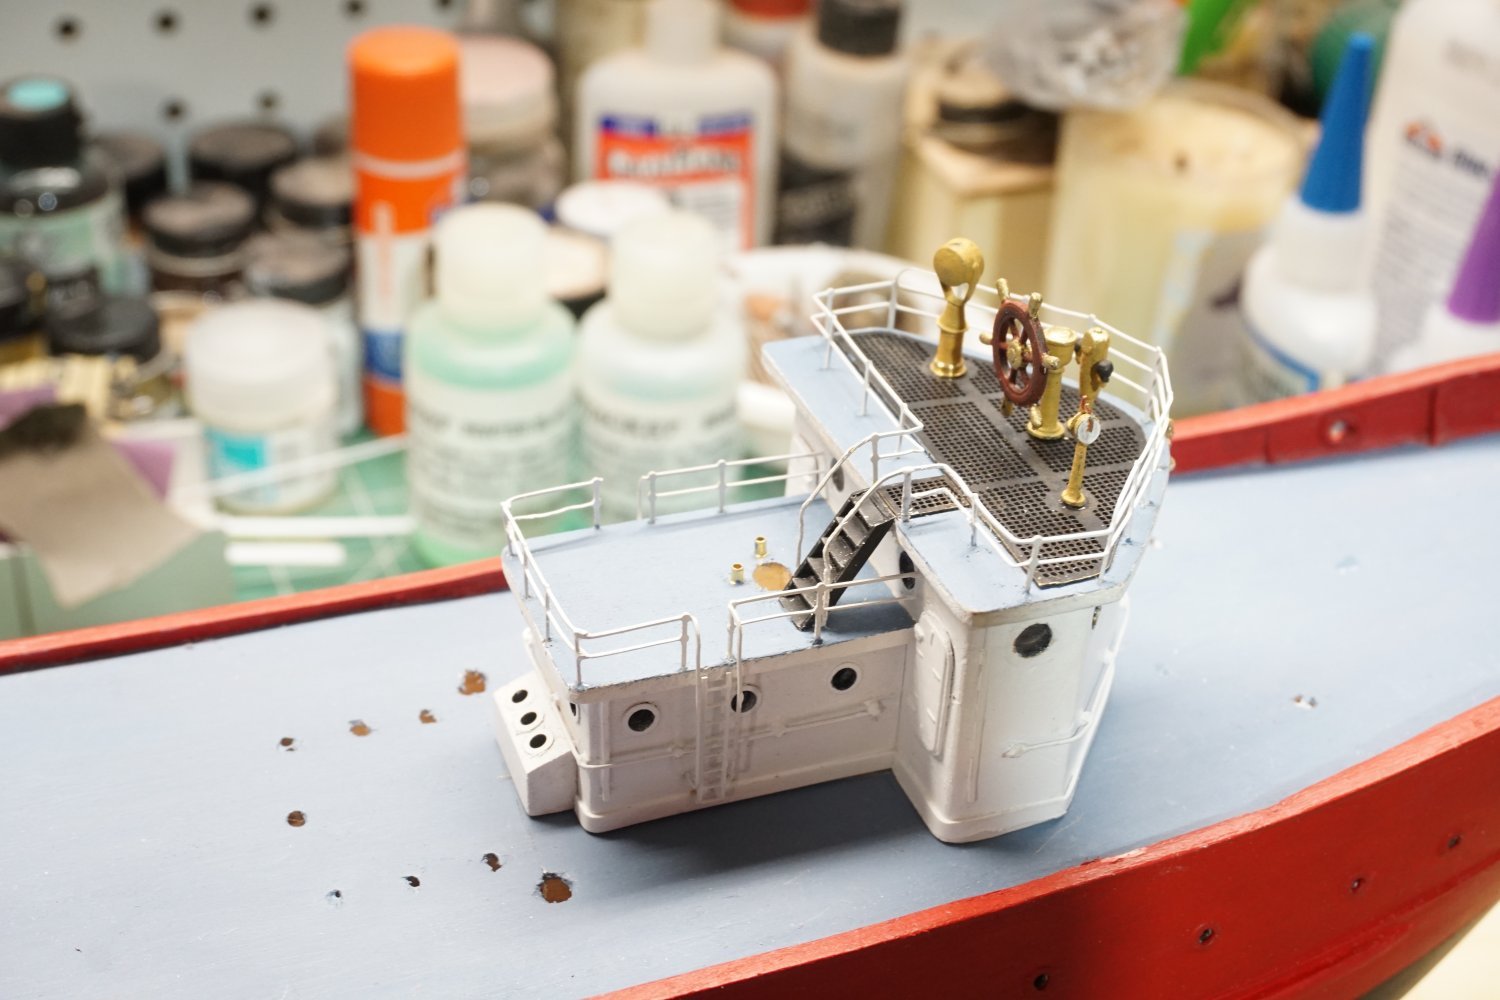
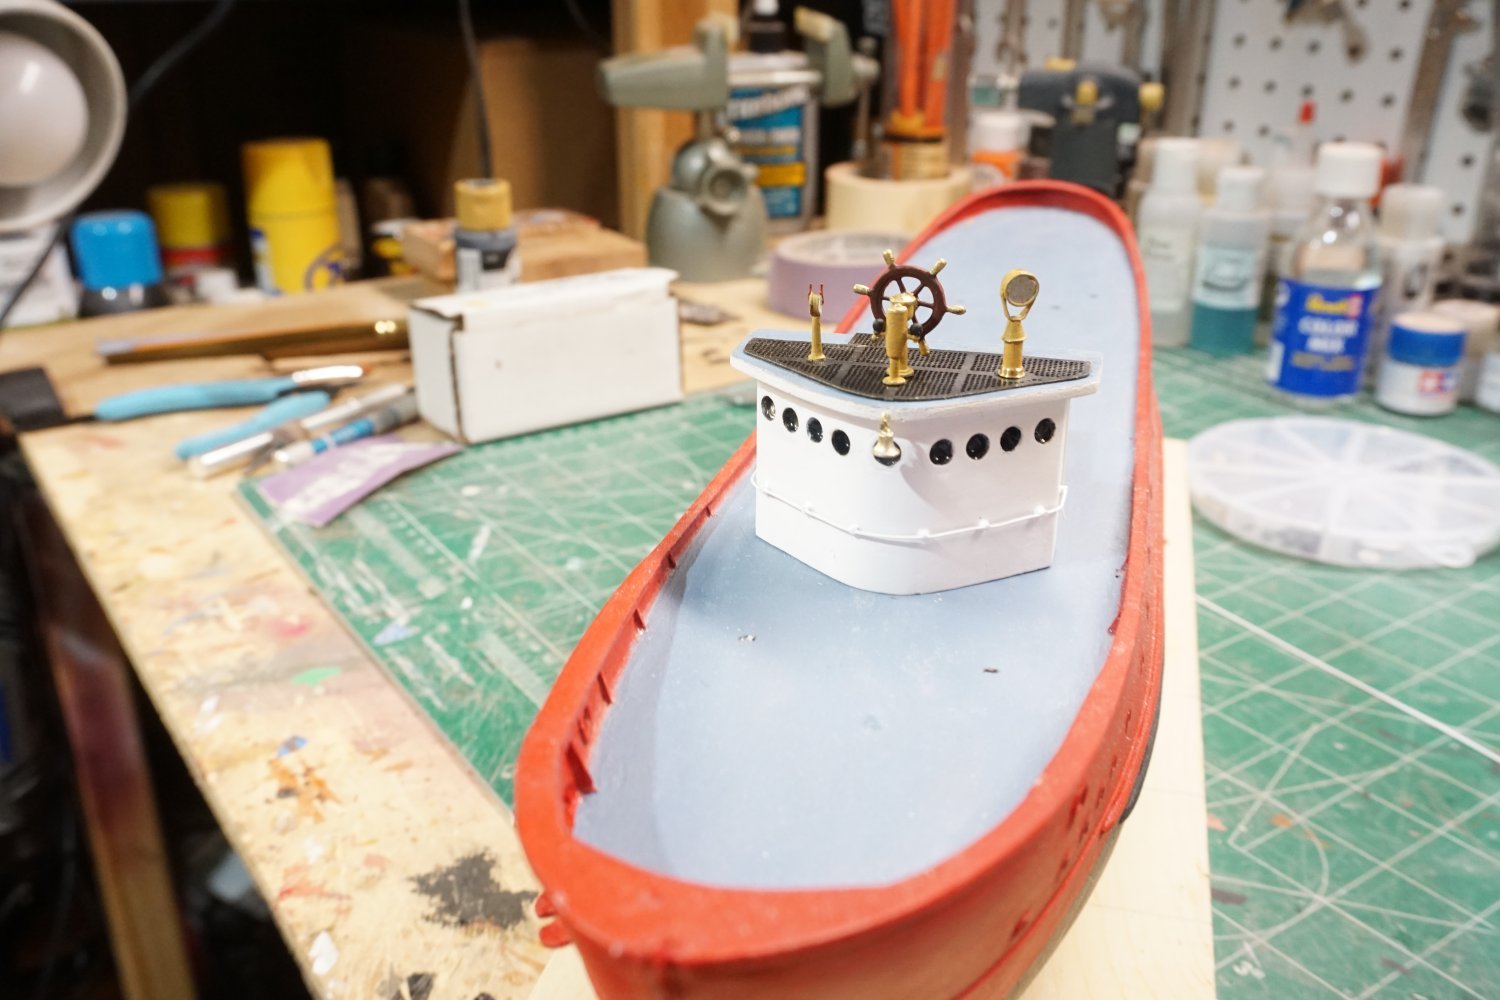
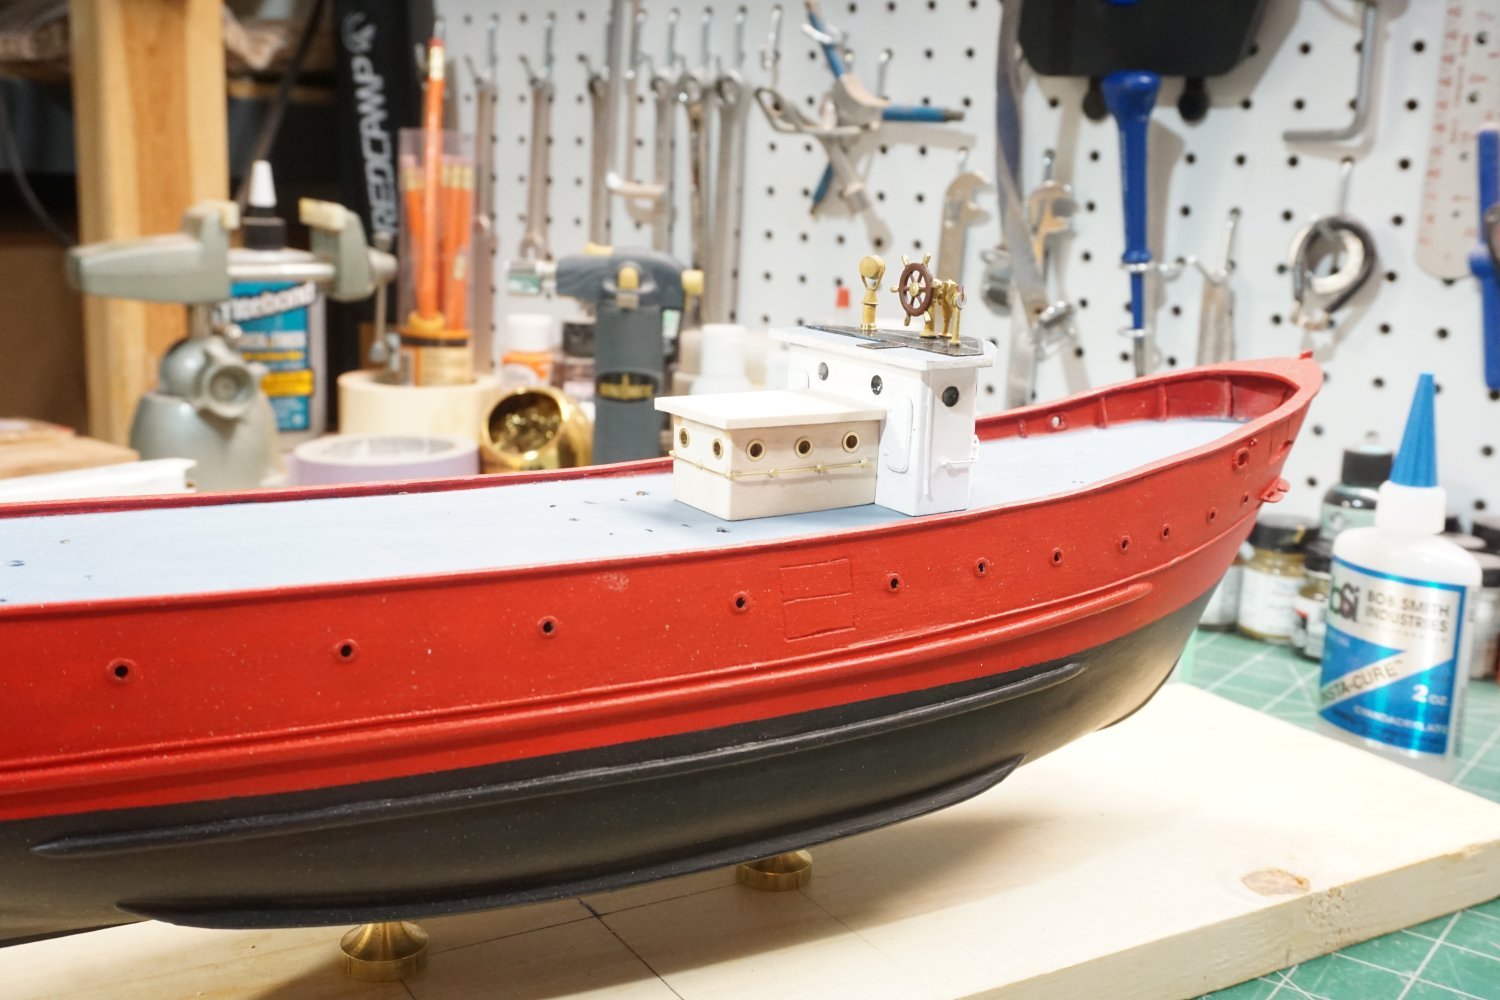
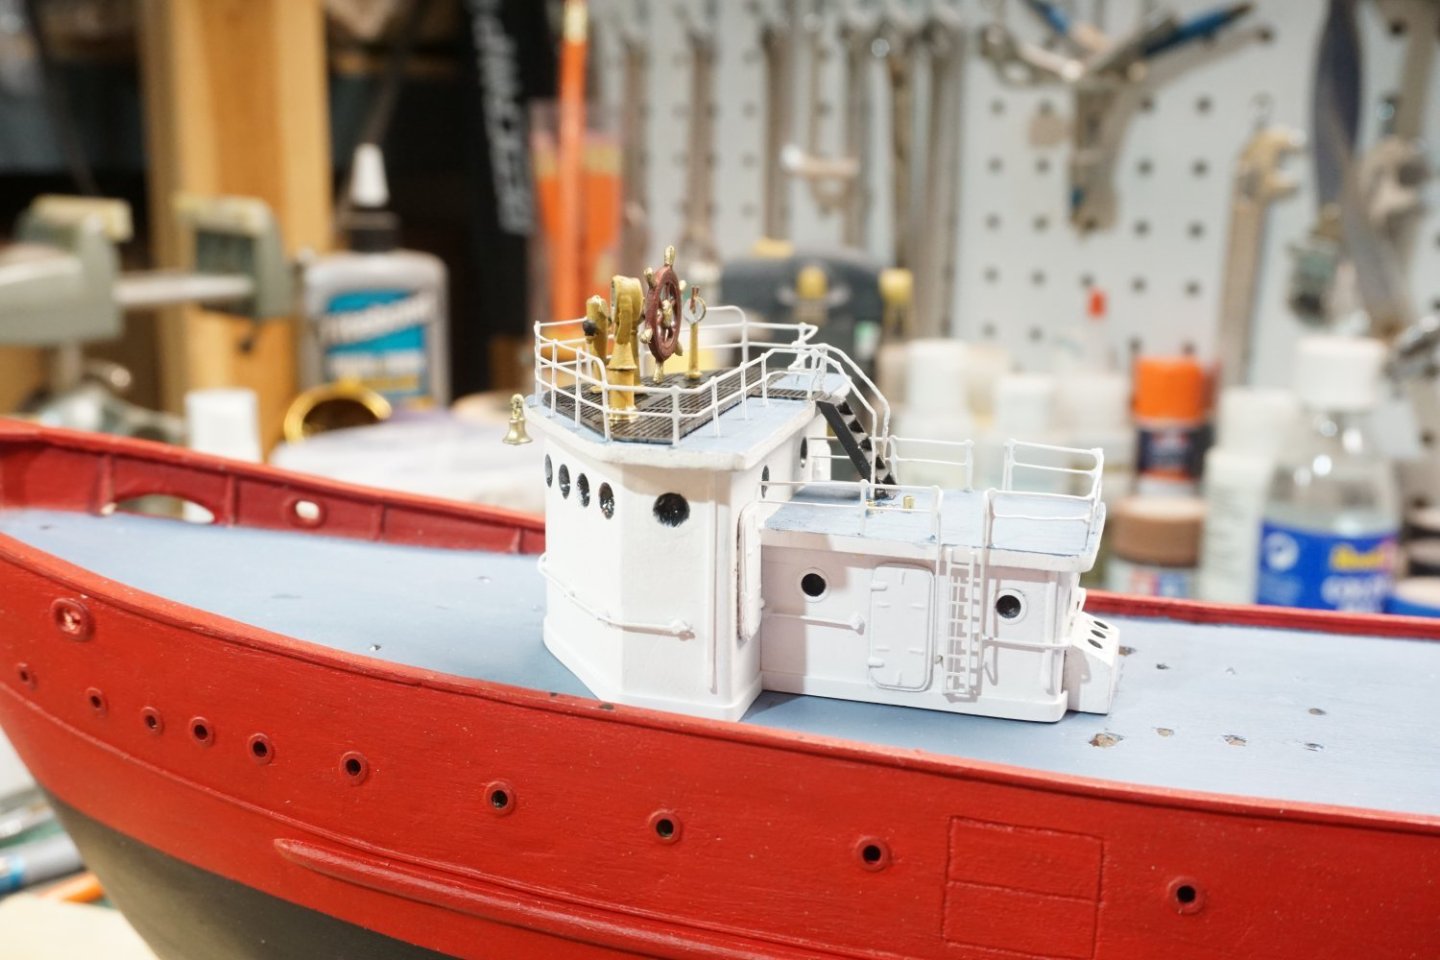
I spent several hours yesterday and today finishing up the pilot house and forward deck house. After bending the brass railings to fit, (which took a lot of persuading), I sprayed them with Tamiya flat white primer and set aside to dry. Installing the railings were a little tricky but came out Ok. The port and starboard lights is the only thing left and I will install these later. The photos show I need a little touching up to do around the pilot house side portholes which I will take care of as well. Now it is on to fabricating the stack.

- 29 replies
-
- 8
-
-
-
- Nantucket Lightship
- BlueJacket Shipcrafters
- (and 1 more)
-
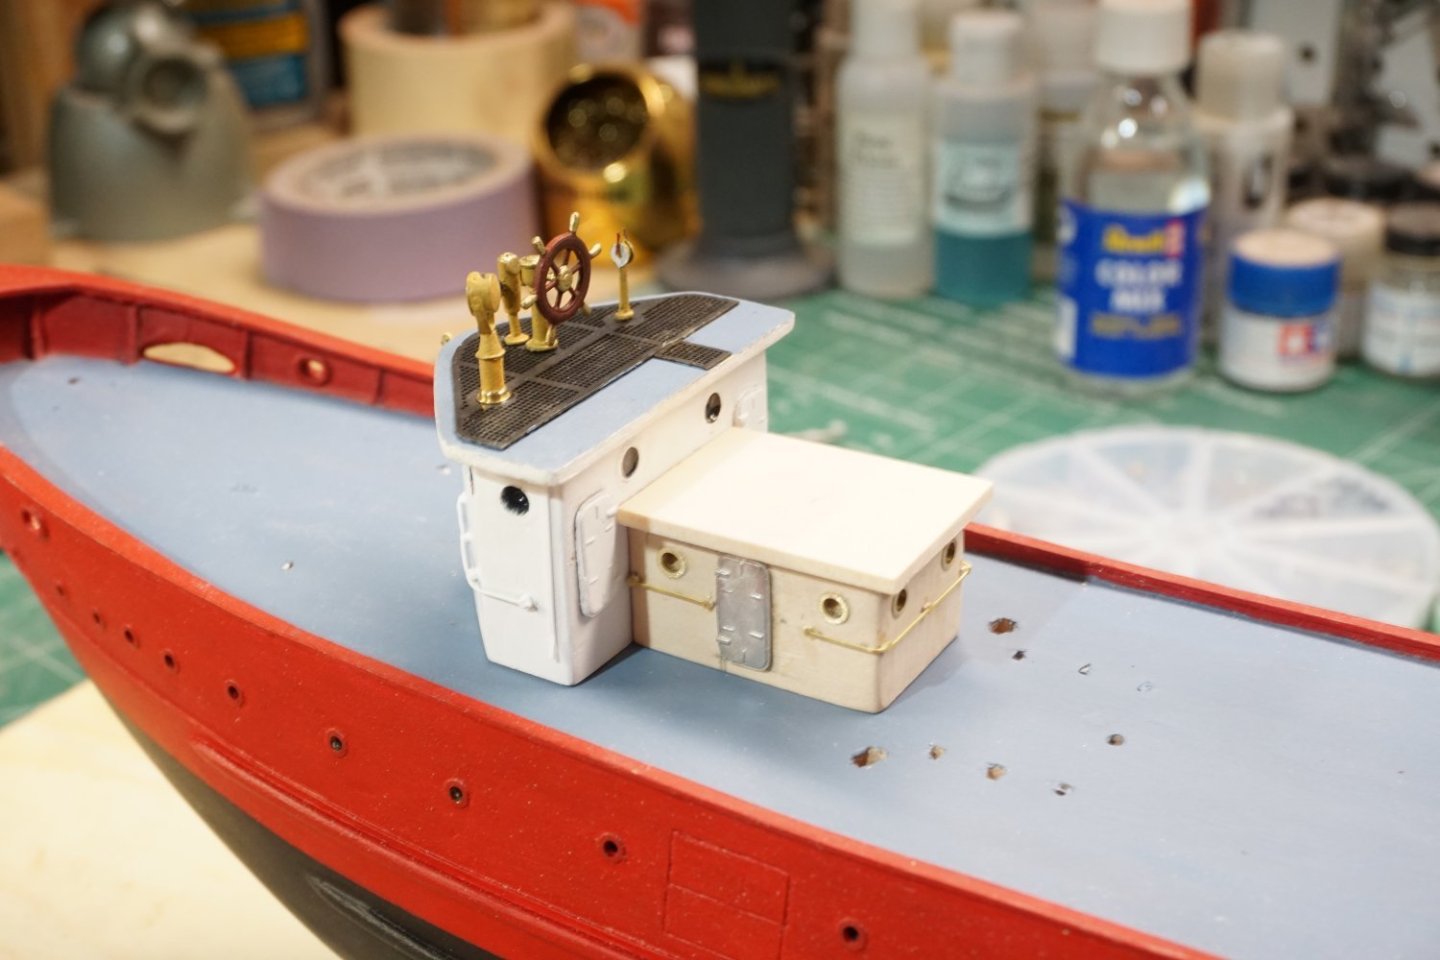
Made some progress on the deck structures. The Pilot house was a challenge with all the portholes so close together, I had to be careful here using my Dremel tool. For the railings, I used a tiny piece of plastic strip behind the photo-etched railing to keep it away from the sides of the structures. to simulate the porthole glass, I used Microscale Kristal Klear. Not in the photos are the completed steps going into the pilot house and up to the bridge deck which I will add later in the build. The structures are not glued down yet just checking the alignment and taking measurements as I still have to spray paint the forward deck house.


- 29 replies
-
- 8
-
-
- Nantucket Lightship
- BlueJacket Shipcrafters
- (and 1 more)
-
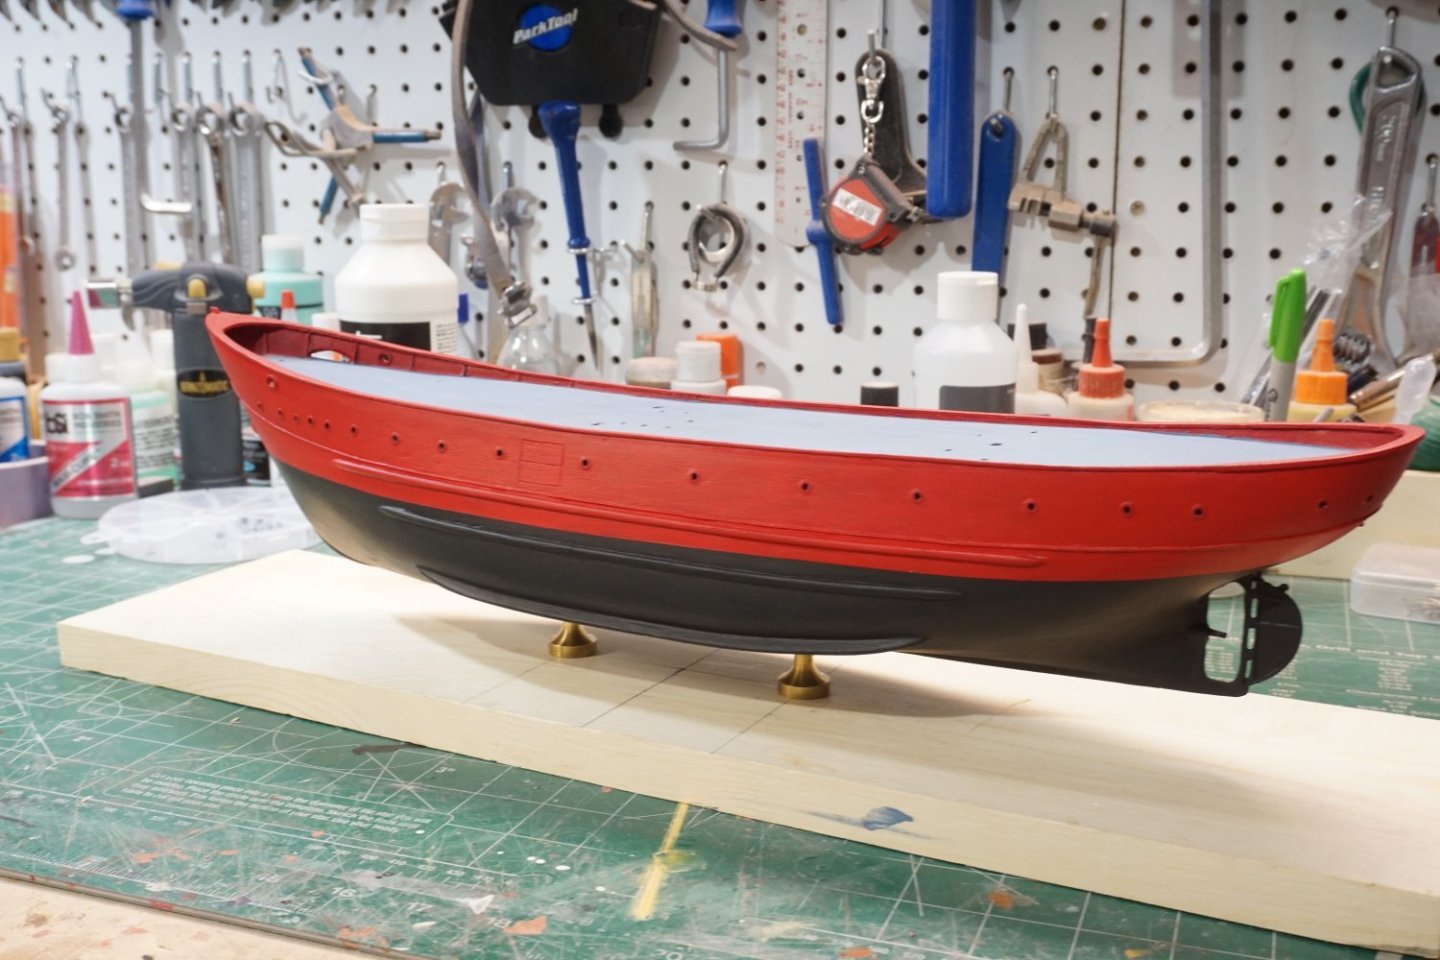
Installed rubbing strakes and bilge keels and then cut out the starboard slot for the spare anchor. After lots of sanding and some filling I brush painted 2 coats of Liquitex white gesso as a primer. Did some light sanding with 400 grit after gesso was dry, then I brush painted 3 coats of Liquitex red and black thinning with Liquitex matte medium to improve the flow. I normally use an airbrush, but this time I thought I would brush this as I was curious about the end result using the Liquitex acrylics. Brush strokes are minimal, and I am pleased with the end result. After dry I mounted the hull to its temporary base.

- 29 replies
-
- 7
-
-
- Nantucket Lightship
- BlueJacket Shipcrafters
- (and 1 more)
-
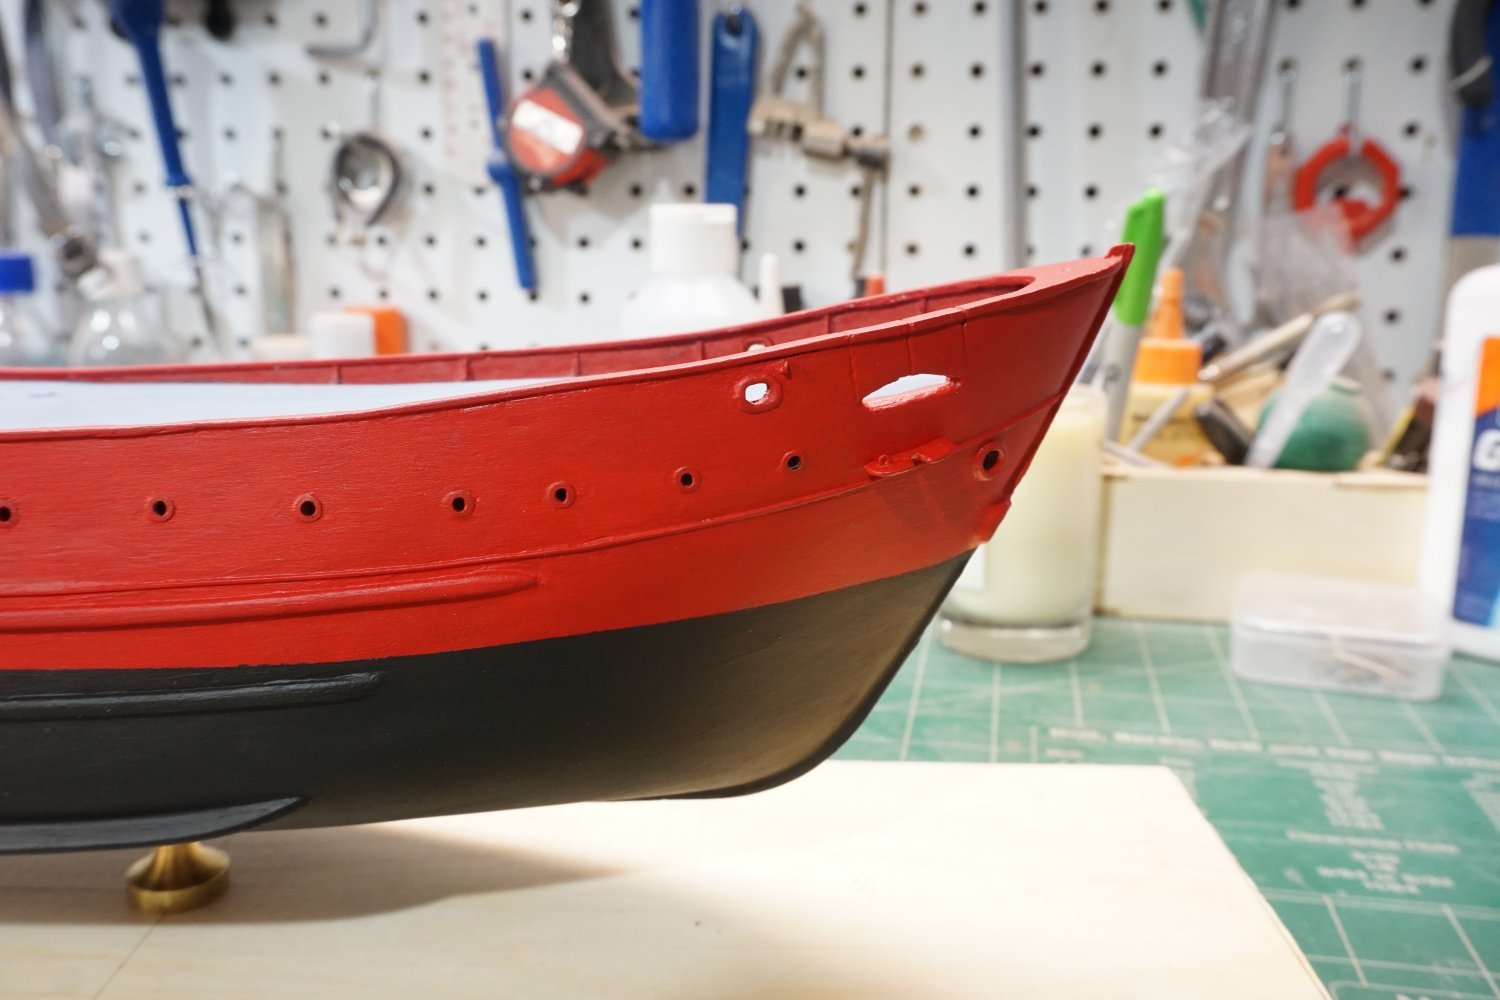
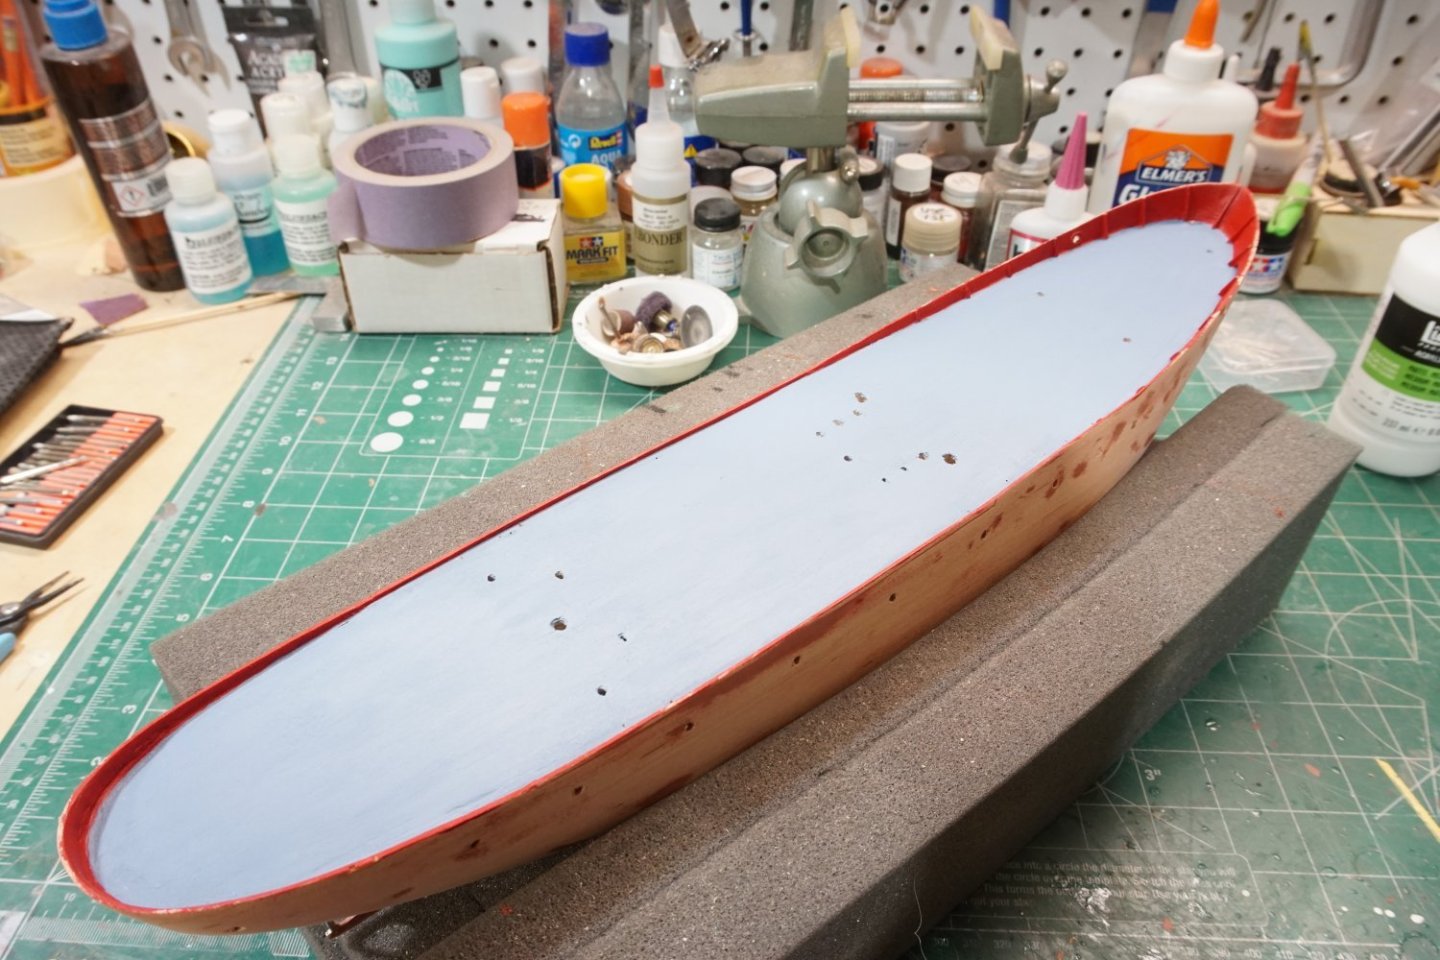
I decided to brush paint the model using Liquitex cadmium red for the bulwarks and blue gray for the deck. I did brush sanding sealer on entire hull before this step, but I did not use any primer. I thinned down the paint with Liquitex fluid matte medium and paint brushed on rather nicely. I will use the same red color for the hull, but I will see if I can thin this for airbrush use, if not brushing this will be ok. I also plan on priming the hull with the Liquitex white gesso first.


- 29 replies
-
- 5
-
-
- Nantucket Lightship
- BlueJacket Shipcrafters
- (and 1 more)