Meriadoc Brandybuck
-
Posts
195 -
Joined
-
Last visited
-
 Meriadoc Brandybuck reacted to a post in a topic:
HMS Revenge 1577 by GrandpaPhil - 1/64 - CARD - from Victory Models Plans
Meriadoc Brandybuck reacted to a post in a topic:
HMS Revenge 1577 by GrandpaPhil - 1/64 - CARD - from Victory Models Plans
-
Canute reacted to a post in a topic:
HMS Revenge 1577 by GrandpaPhil - 1/64 - CARD - from Victory Models Plans
-
Glen McGuire reacted to a post in a topic:
HMS Revenge 1577 by GrandpaPhil - 1/64 - CARD - from Victory Models Plans
-
mtaylor reacted to a post in a topic:
HMS Revenge 1577 by GrandpaPhil - 1/64 - CARD - from Victory Models Plans
-
GrandpaPhil reacted to a post in a topic:
HMS Revenge 1577 by GrandpaPhil - 1/64 - CARD - from Victory Models Plans
-
I’m interested to hear how that goes. I’ve some very small and thin stunsail booms and yards to manufacture at 1:100. I’ve been sanding down bamboo dowels to the right diameter, and am also considering brass wire for the tiny yards. Meriadoc
-
Meriadoc Brandybuck reacted to a post in a topic:
HMS Revenge 1577 by GrandpaPhil - 1/64 - CARD - from Victory Models Plans
-
GrandpaPhil reacted to a post in a topic:
HMS Badger by Meriadoc Brandybuck - WAK - 1:100 - CARD - serenely taking in sails
-
Meriadoc Brandybuck reacted to a post in a topic:
HMS Tiger 1747 by Siggi52 - 1:48 - 60 gun ship from NMM plans
-
Meriadoc Brandybuck reacted to a post in a topic:
HMS Tiger 1747 by Siggi52 - 1:48 - 60 gun ship from NMM plans
-
tkay11 reacted to a post in a topic:
HMS Badger by Meriadoc Brandybuck - WAK - 1:100 - CARD - serenely taking in sails
-
ccoyle reacted to a post in a topic:
HMS Badger by Meriadoc Brandybuck - WAK - 1:100 - CARD - serenely taking in sails
-
Rudolf reacted to a post in a topic:
HMS Badger by Meriadoc Brandybuck - WAK - 1:100 - CARD - serenely taking in sails
-
Rudolf reacted to a post in a topic:
HMS Badger by Meriadoc Brandybuck - WAK - 1:100 - CARD - serenely taking in sails
-
Rudolf reacted to a post in a topic:
HMS Badger by Meriadoc Brandybuck - WAK - 1:100 - CARD - serenely taking in sails
-
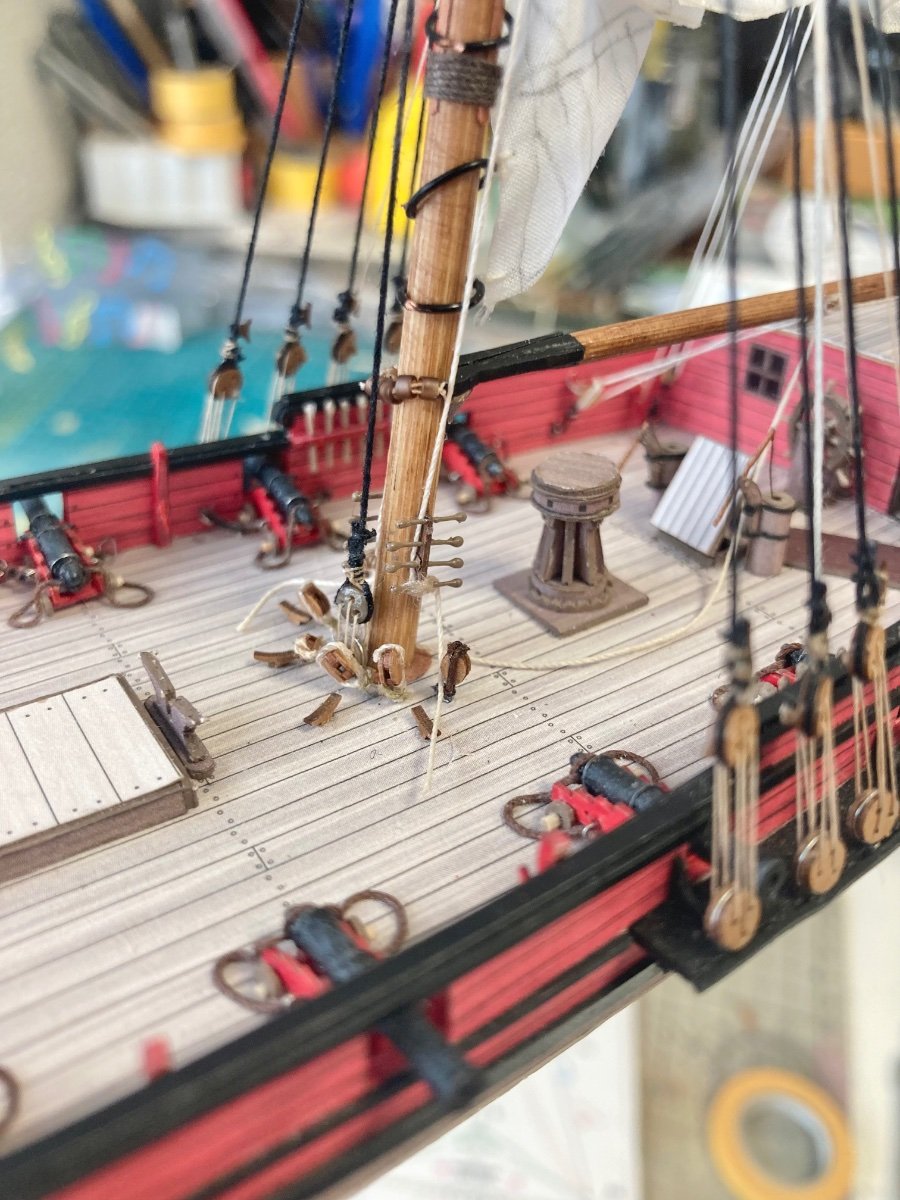
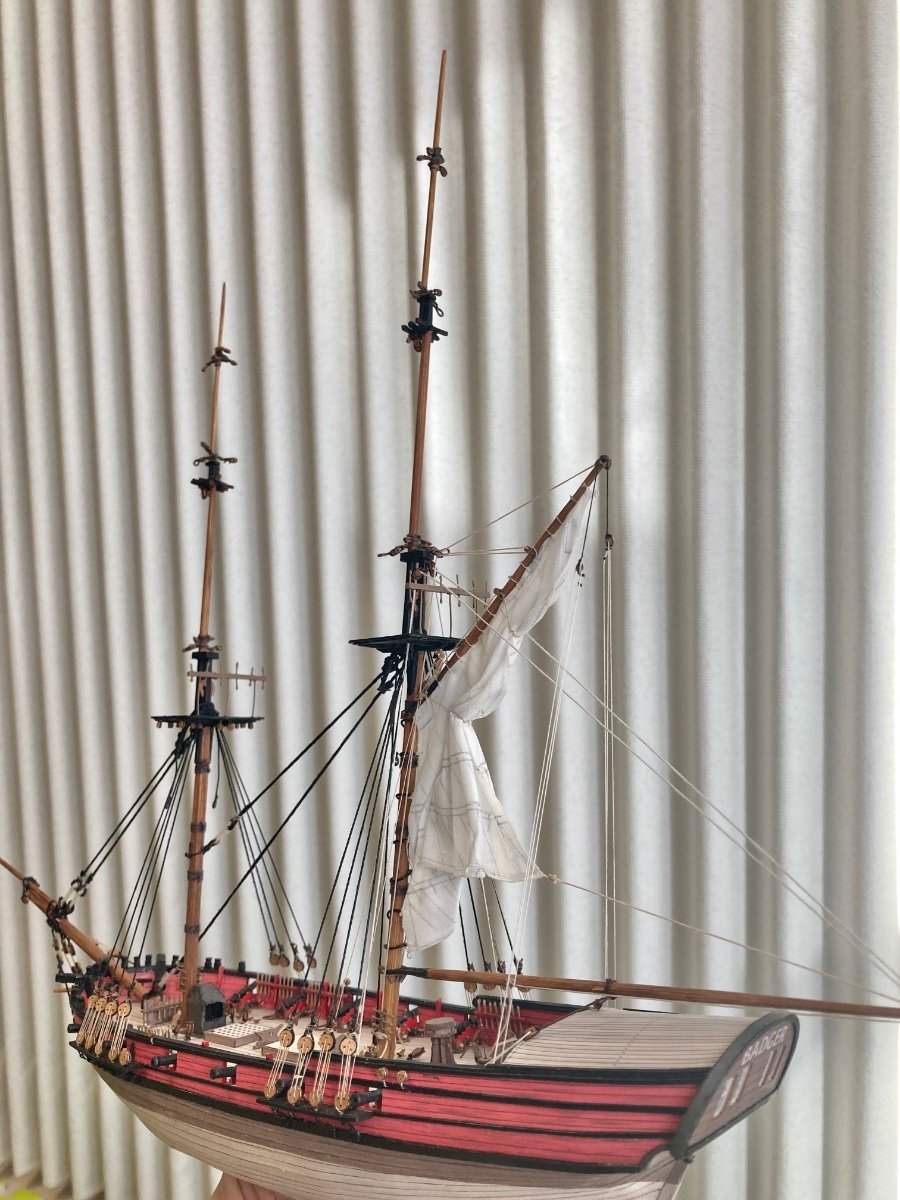
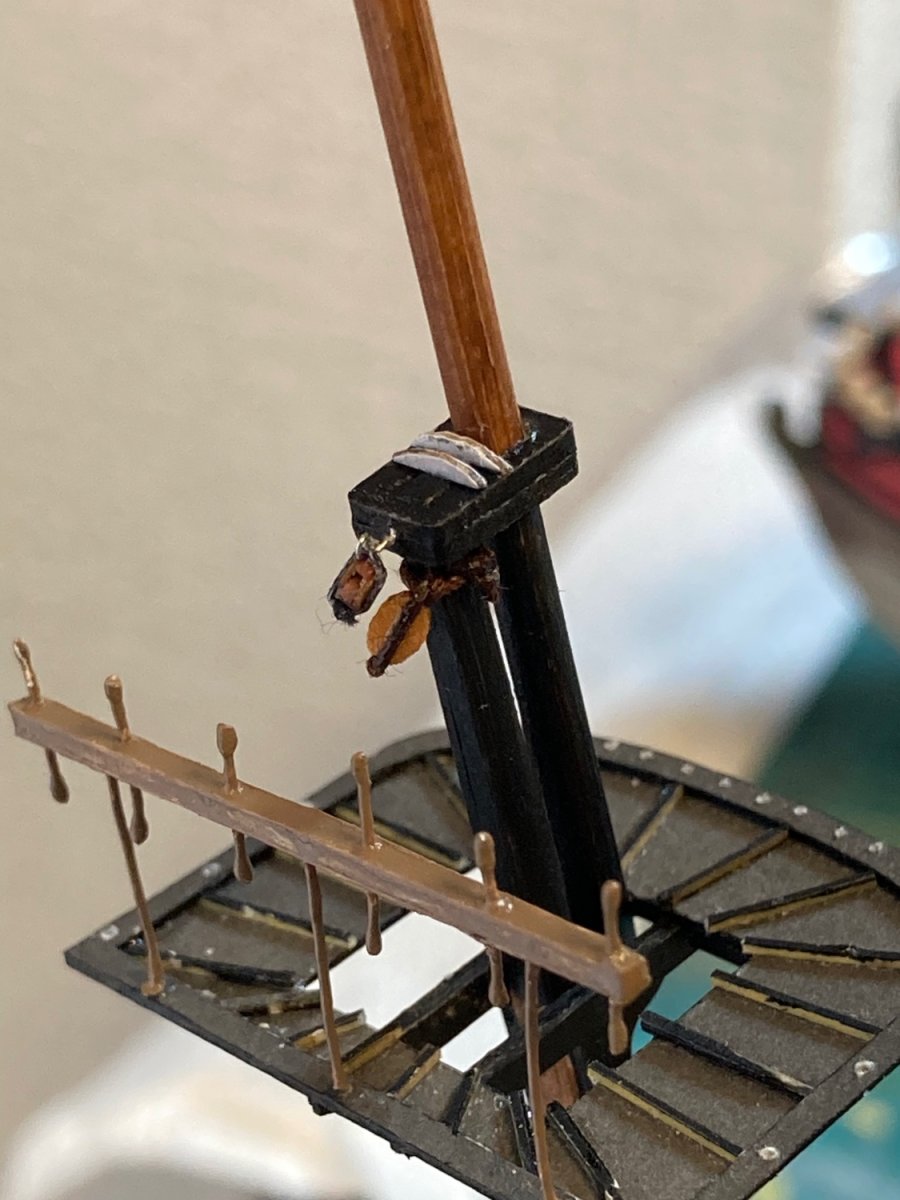
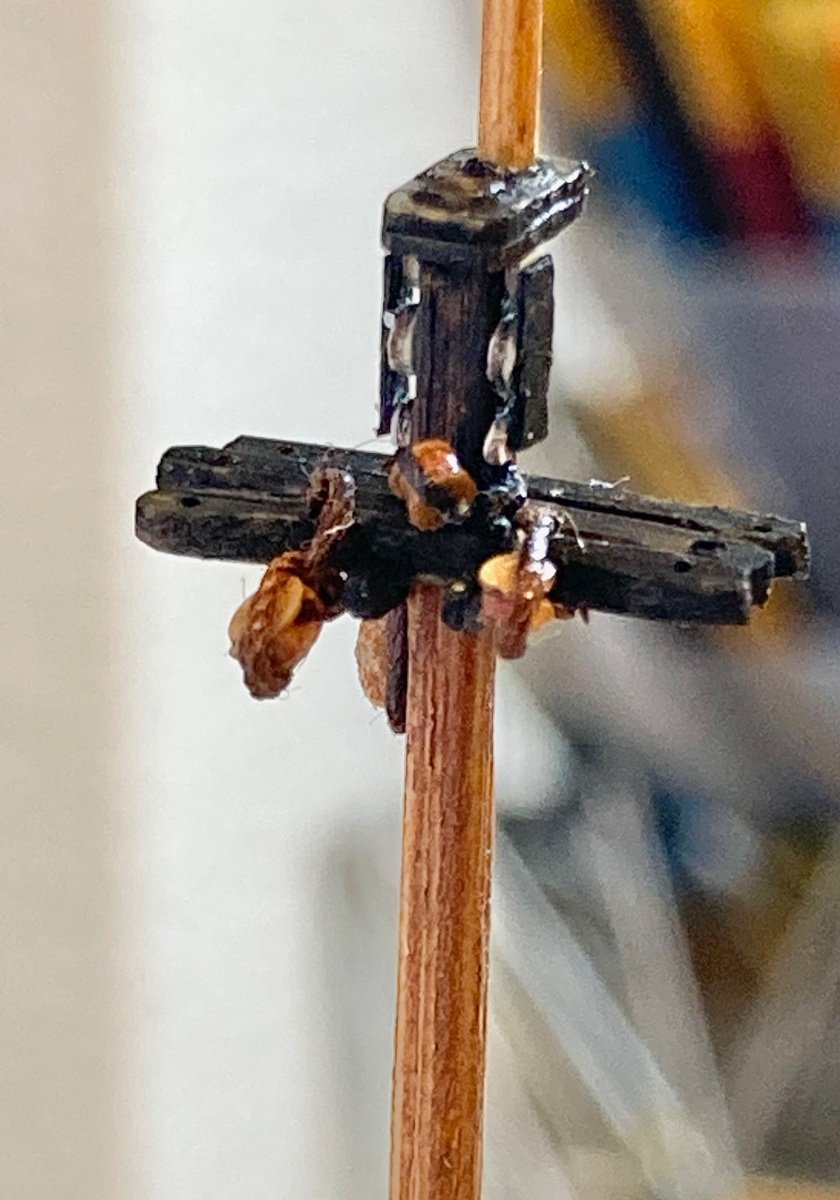
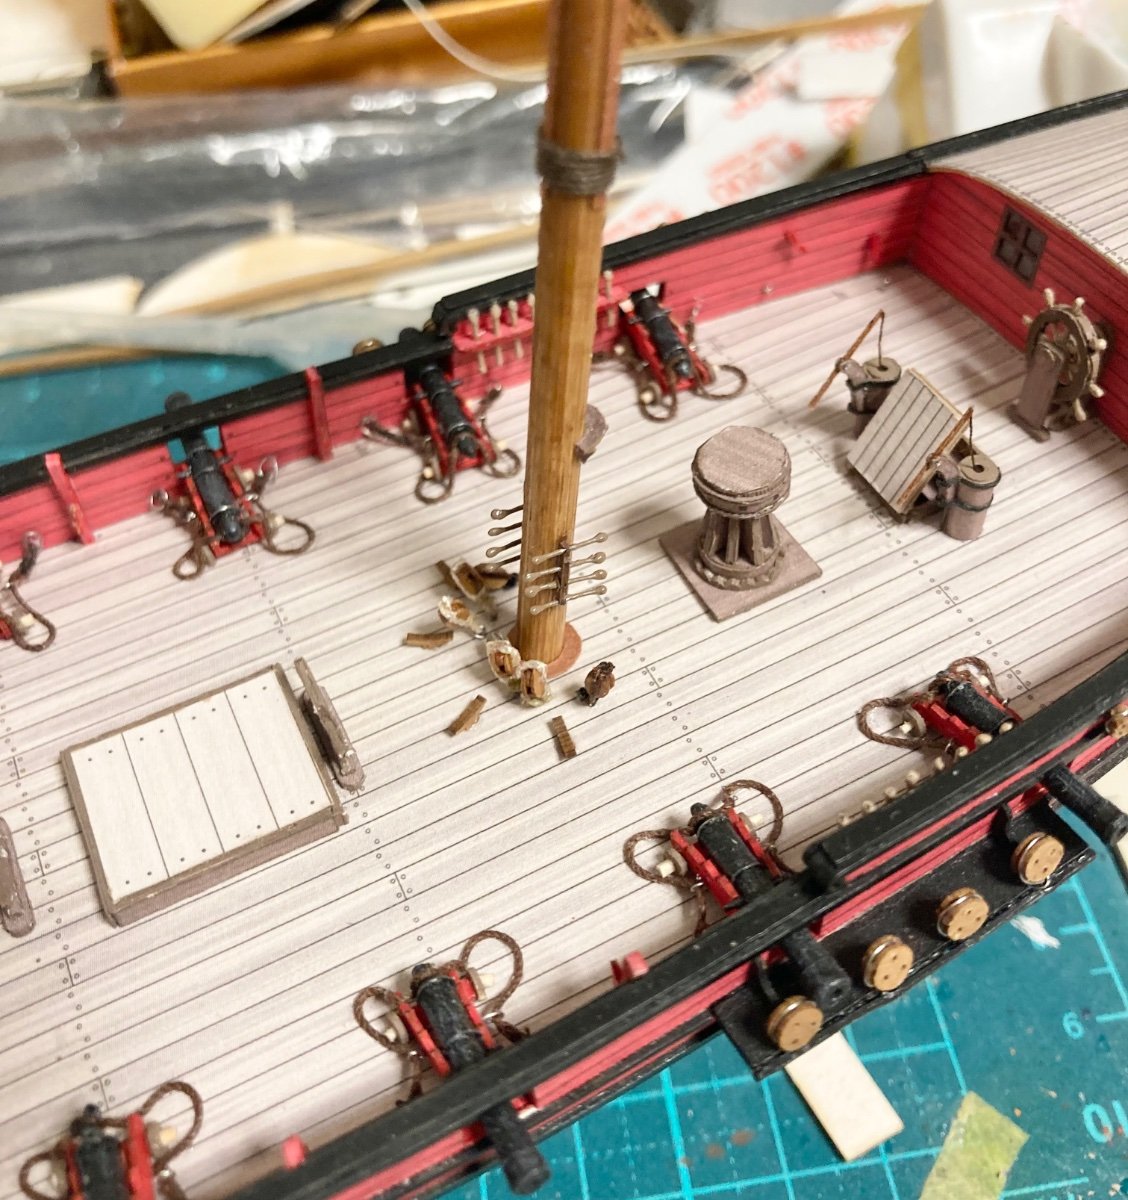
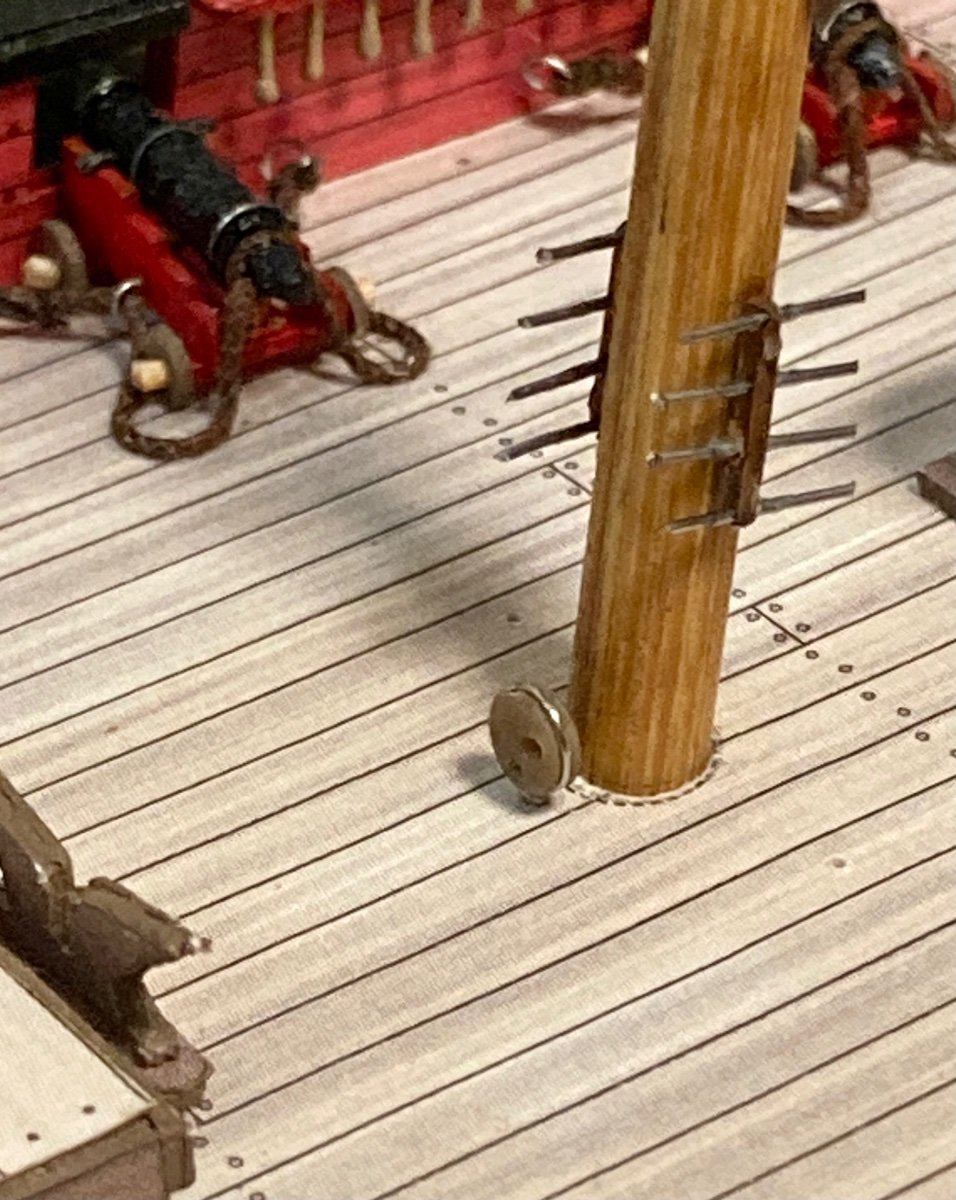
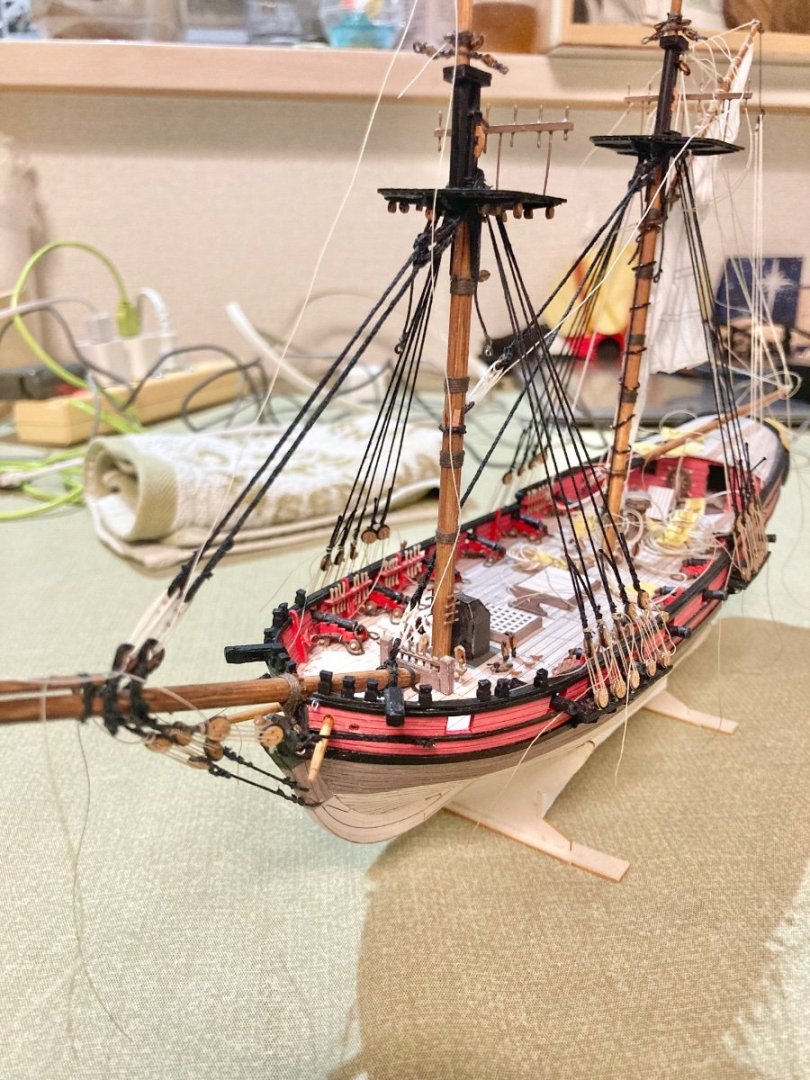
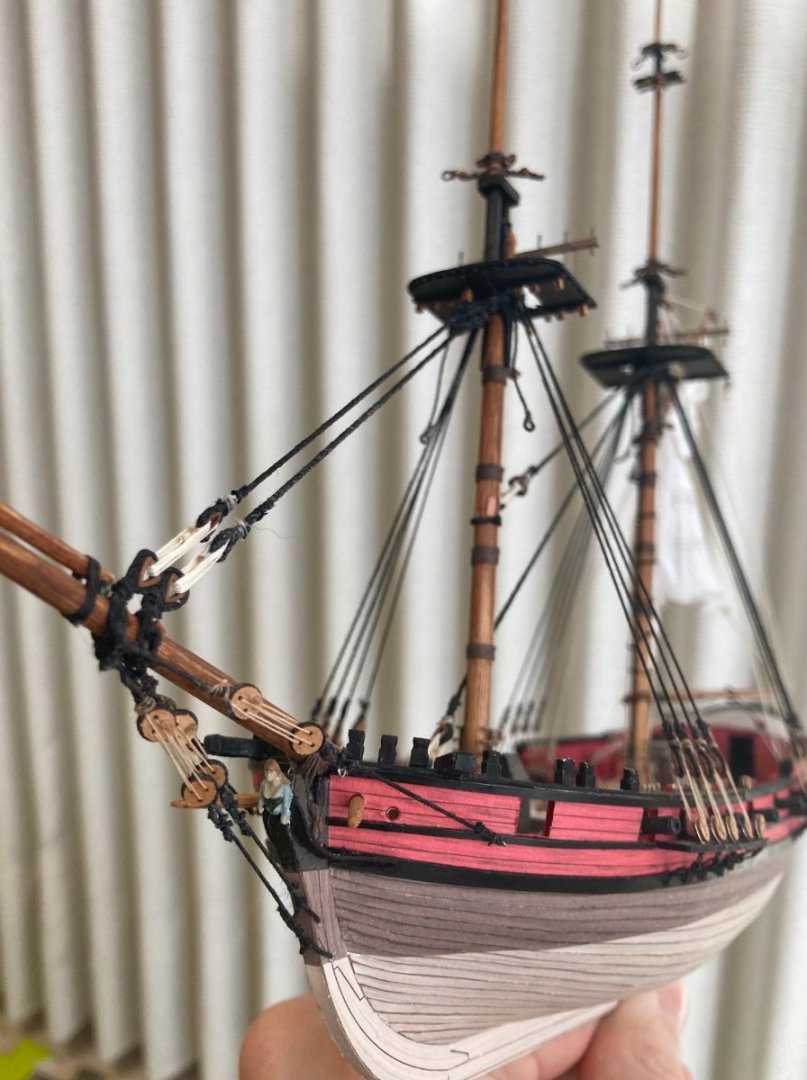
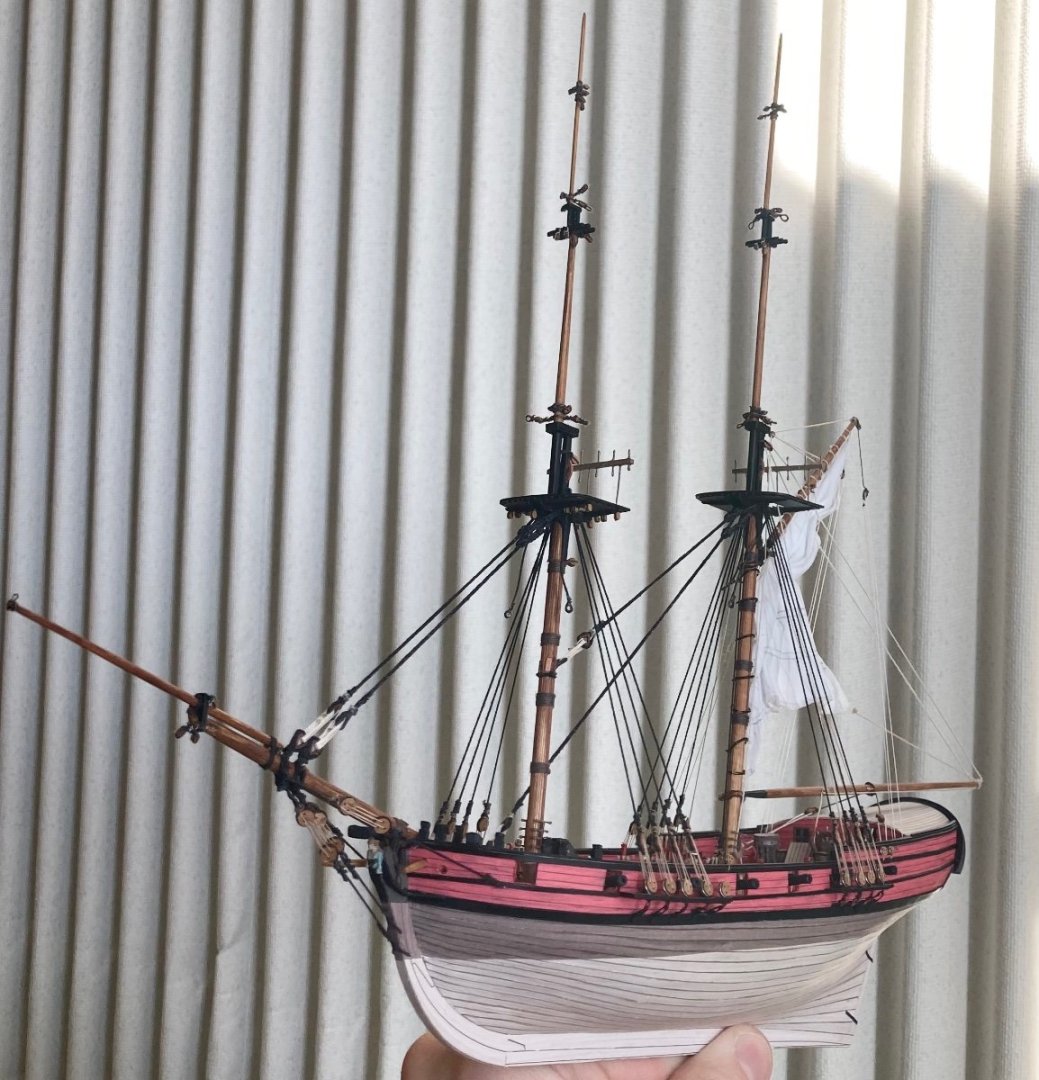
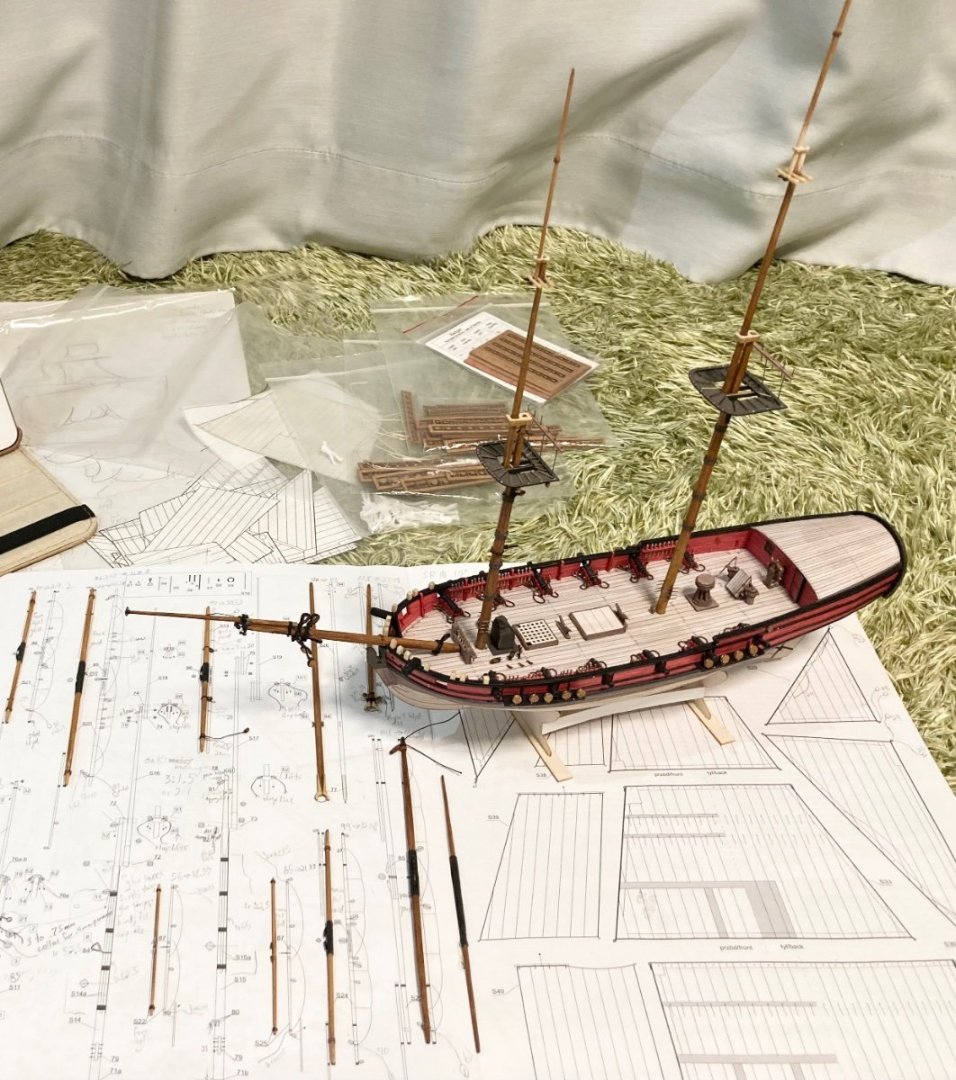
Hello, An update on standing rigging. The first tier of shrouds and stays has been finalized (ratlines going on currently behind the scenes). Photos below showing the progress as well as the completed mainsail miniproject. Below: the messy state of affairs before balancing and finalizing tension, with lanyard excess hanging everywhere. Below: the mainmast, rope horse, and the snipped ends of all the falls of rope. Coils will be made and stuck onto the pins and cleats later. Below: all the excess falls have been labeled to get the right diameter and length into the final coils. Below: the brailed-up mainsail, with all its rigging finalized. Below: views of the head and bowsprit with the bobstays, martingale stays, and gammoning. Below: overall views of the rigging progress. That’s about as far as I’ve gotten; today I got on the futtock staves and a decent number of the ratlines. Maybe another month and I’ll have the standing rigging completed at this rate? -slow but sure Meriadoc


-
Meriadoc Brandybuck reacted to a post in a topic:
HMS Tiger 1747 by Siggi52 - 1:48 - 60 gun ship from NMM plans
-
Meriadoc Brandybuck reacted to a post in a topic:
HMS Badger by Meriadoc Brandybuck - WAK - 1:100 - CARD - serenely taking in sails
-
Thanks; though I think in this case the hard part will be getting the stuns’ls to hang just right. When we get there. Better do some experiments. Meriadoc
-
Meriadoc Brandybuck reacted to a post in a topic:
HMS Badger by Meriadoc Brandybuck - WAK - 1:100 - CARD - serenely taking in sails
-
Meriadoc Brandybuck reacted to a post in a topic:
HMS Badger by Meriadoc Brandybuck - WAK - 1:100 - CARD - serenely taking in sails
-
Interesting choice. I can’t wait to see it take shape. I have the book; it’s one of my most prized possessions with all its magnificent plans. Given enough time I’d like to build everything in it and make my own variations like Ab does. For now I’ve started preparing to build a little kaag and pink sometime this year or so. Perfect little finishable projects, unlike my Badger. Meriadoc
-
Meriadoc Brandybuck reacted to a post in a topic:
HMS Revenge 1577 by GrandpaPhil - 1/64 - CARD - from Victory Models Plans
-
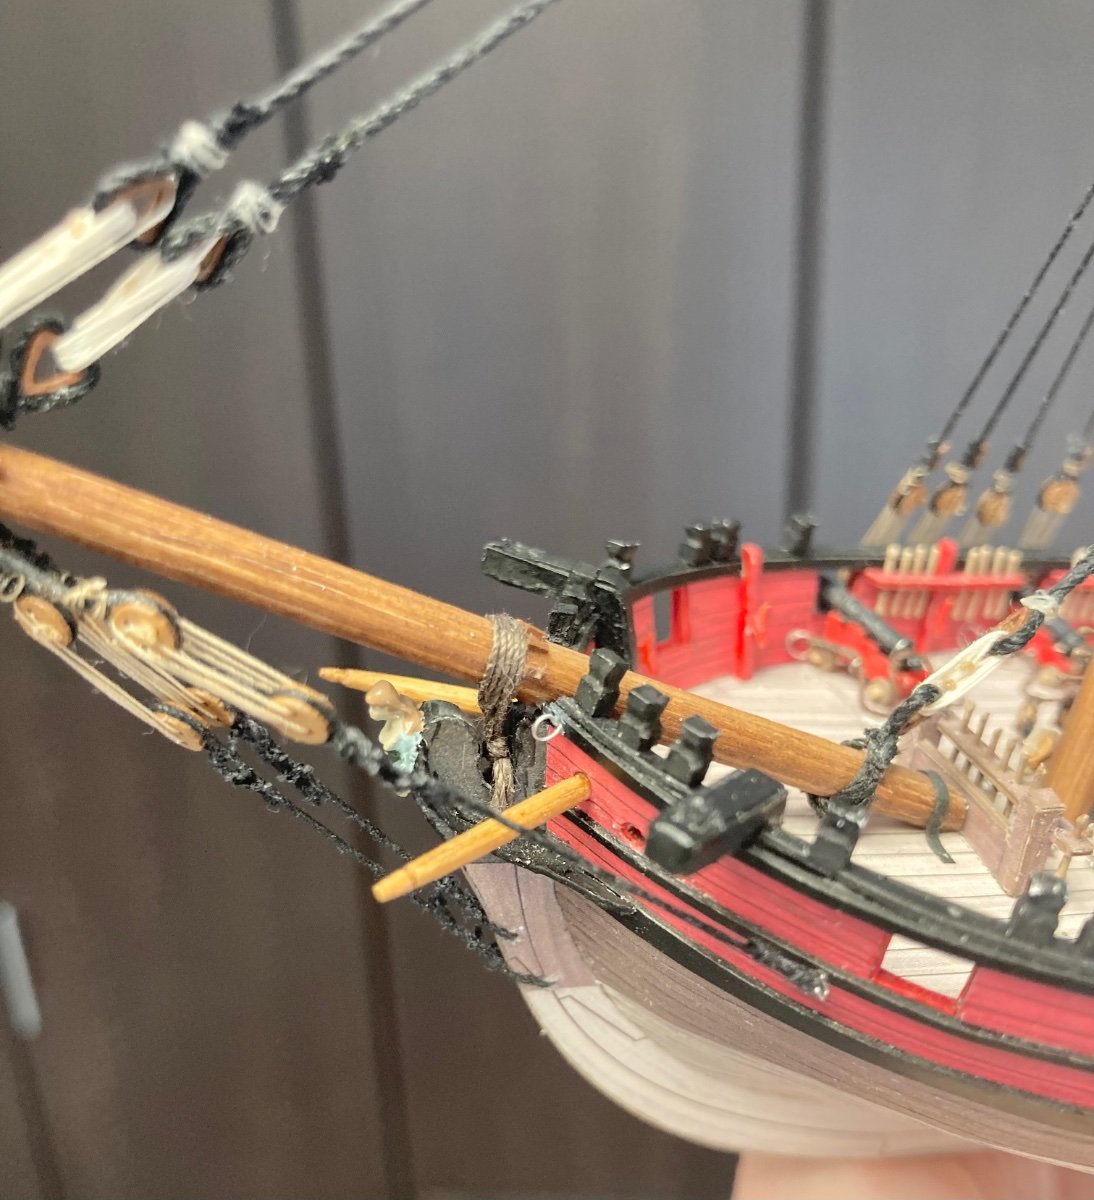
A little update. I managed to get all the rigging for the gaff and boom set. I wanted to get this out of the way before main shrouds got in the way. I don’t think the net tension of the standing rigging will affect these lines much. You can see the vangs, topping lifts, sheets, halyards, and even an inhaul-which I’m wondering is even necessary. All lines except brails are belayed and fastened permanently; later I will snip off the excess and turn it into hanks. Not sure how the halyard falls should look. That’s a lot of rope. The mainsail brails are still tied off at the foretop as they will eventually terminate at main shrouds cleats. The first set of main shrouds is going on now. I made a twisted wire guide to hold the deadeye at the right height, but it always wiggles loose somehow. I have better luck just judging the length by hand and using my four hands and mouth to try to seize the shroud around the deadeye while holding it all in place somehow. I don’t even know how I do it but I have gotten better at it. I cannot wait to get the standing rigging on her and start sculpting the rest of my sails. Anyone think I’ve made a horrible mistake by finalizing the mainsail rigging before the standing rigging? Meriadoc
-
I’m very curious about what you’re going to build from Hoving’s book. -Nosy Meriadoc
-
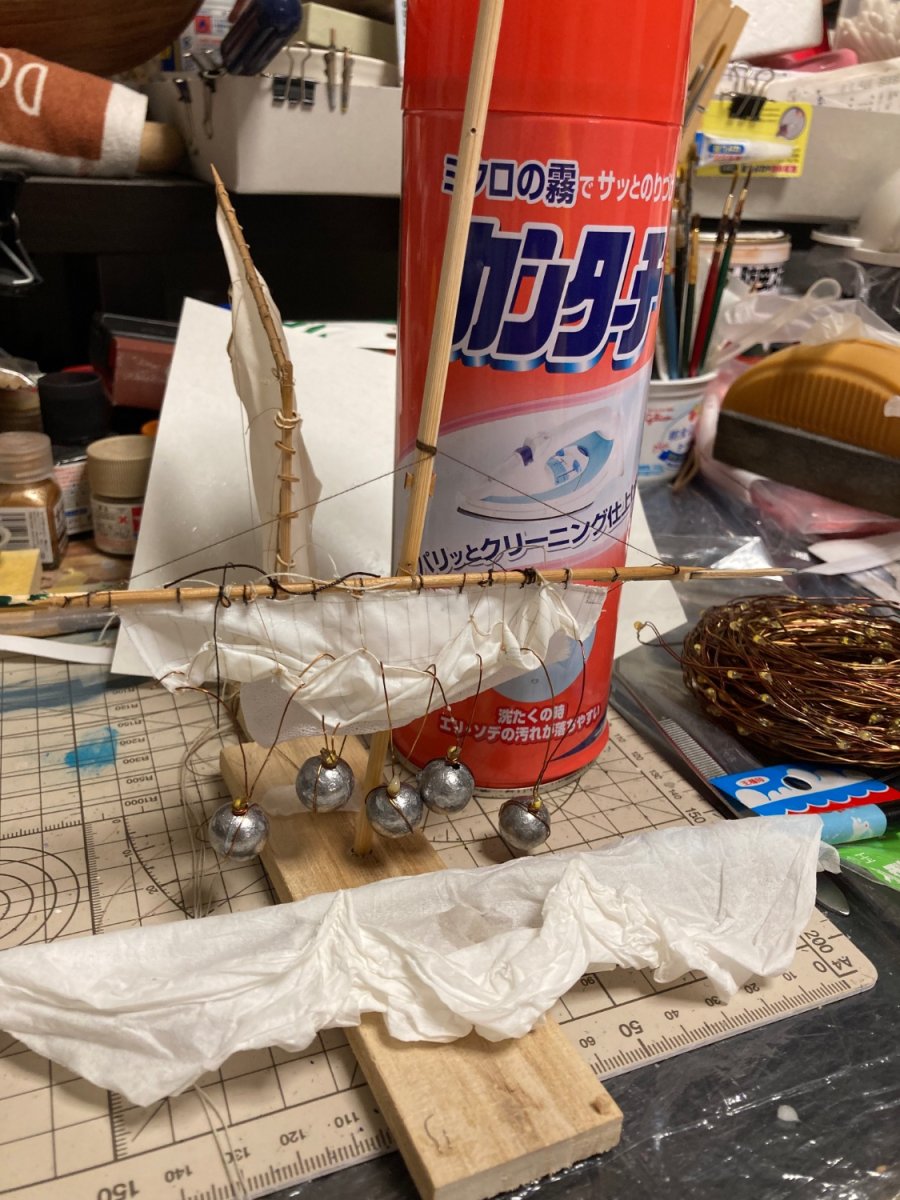
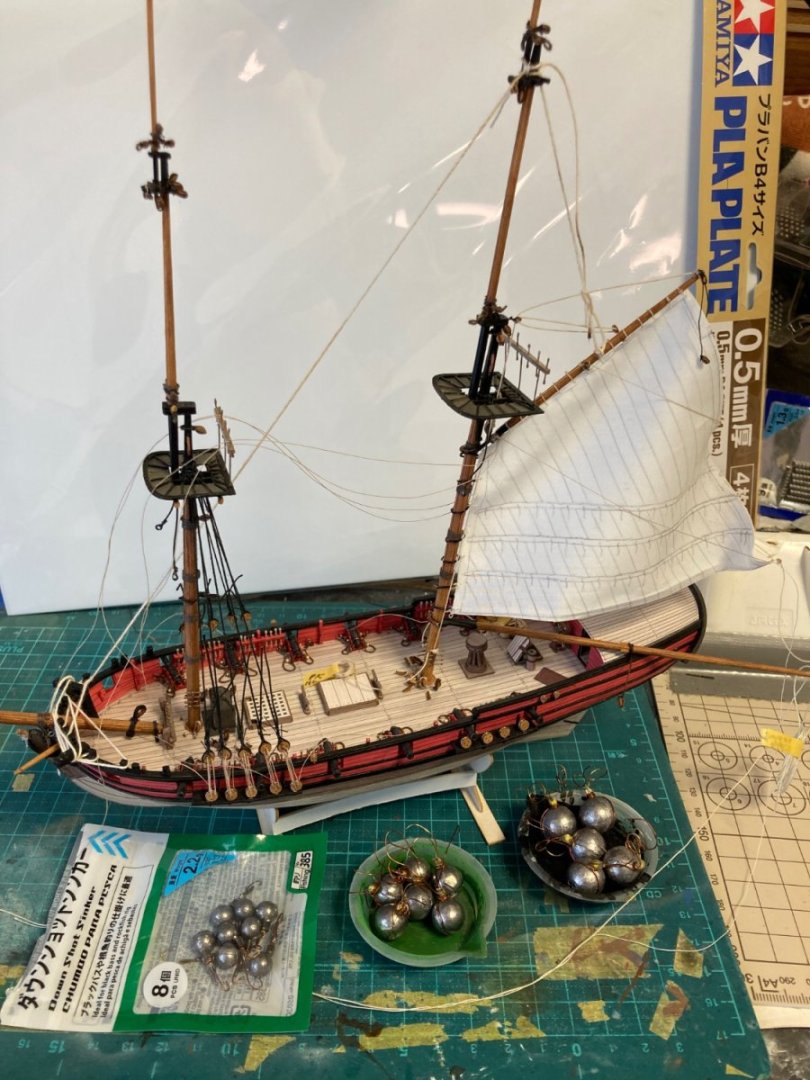
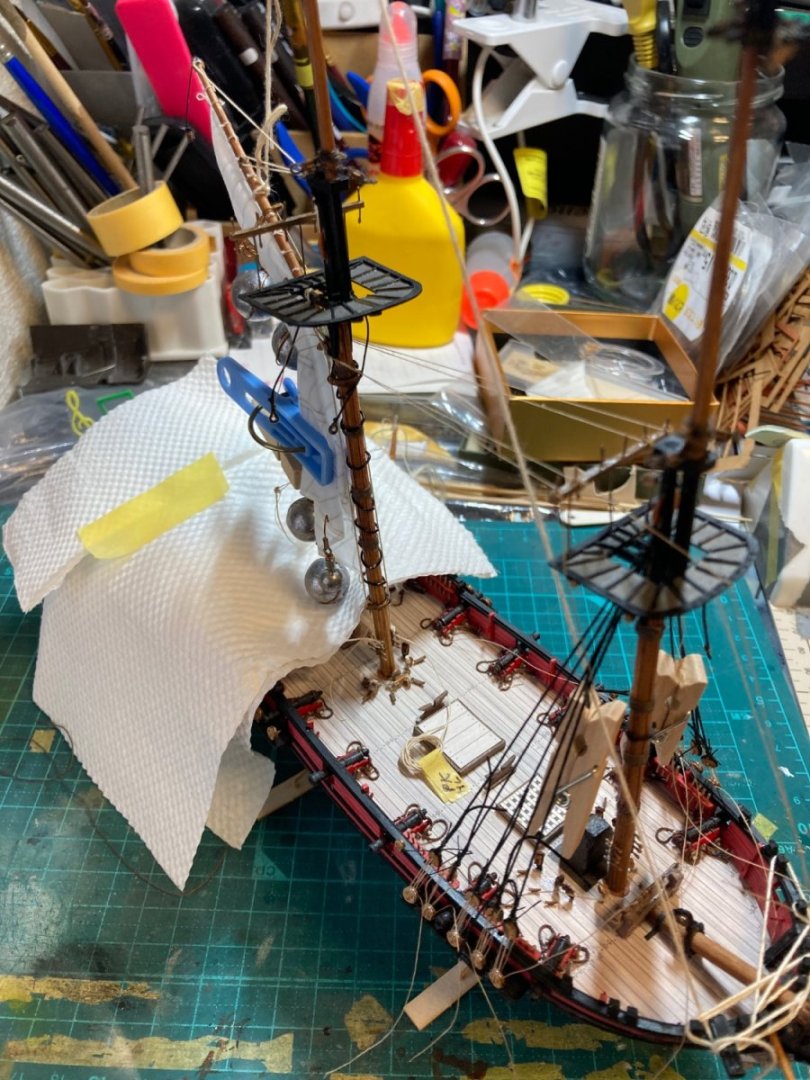
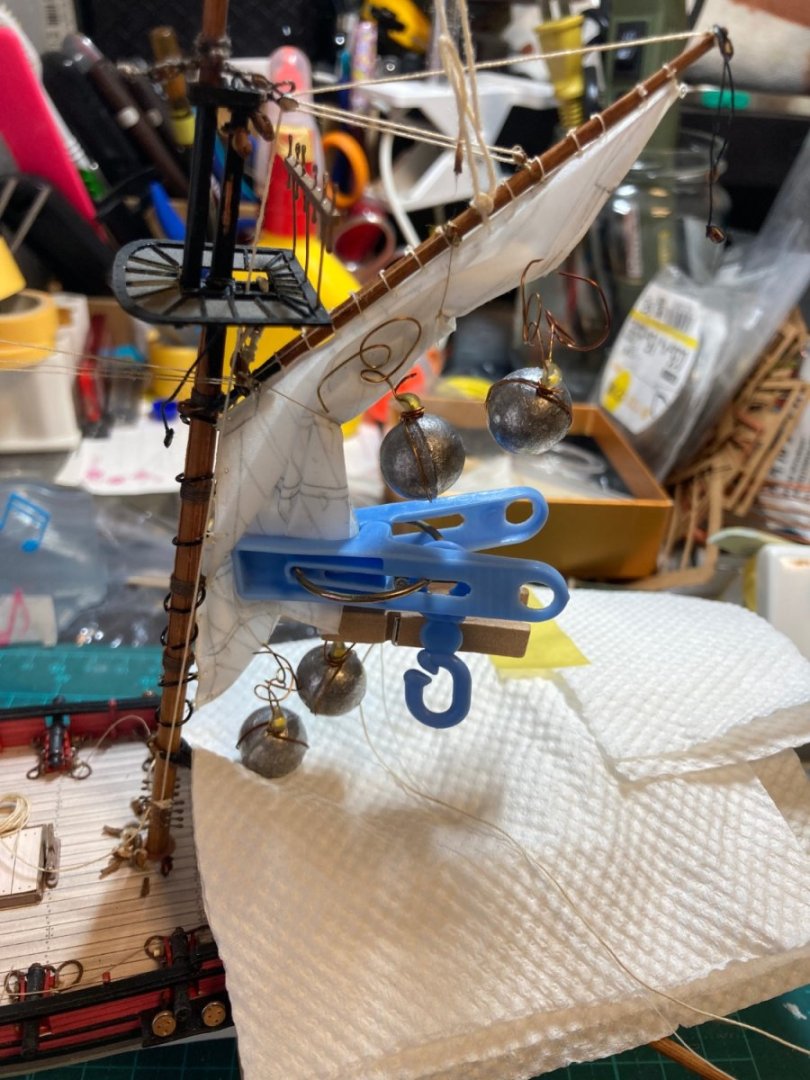
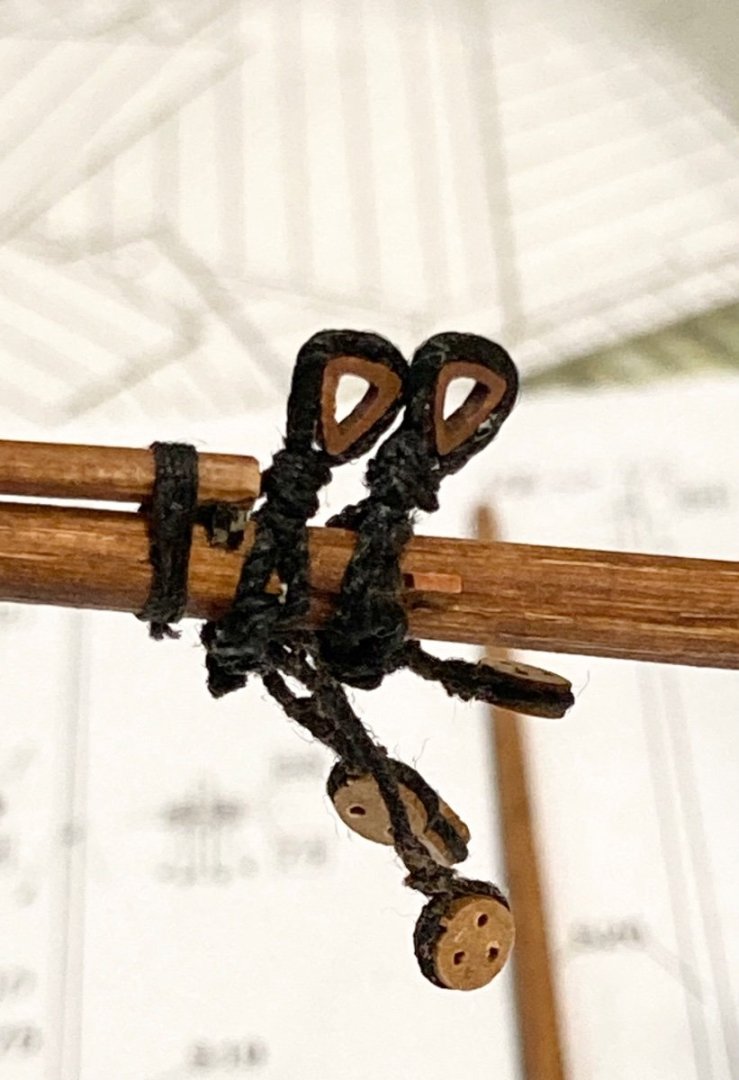
Well back to business. I started doing shrouds on the foremast, but decided to get the gaff sail all set up before putting the main shrouds in my way. The boom, gaff, and sail went on in about a day’s work. I discovered that I forgot to prepare the boom sheets and peak halyard so there was some catching up to do. Also had to get all the lines on the sail- brails, sheet, and inhaul. Bending it to the gaff and mast rings (which were prepared with wire) took a while because all the little ropes get in each other’s way. Then illness struck and things took a long pause while I recovered. Today, I prepared everything for the final gaff sail sculpting: a jury lift and stay to stabilize the gaff and mainmast because of all the fishing weights to be strung from the sail, and several more weights had to be set up with wire hooks: See the operation below. In the end the heavier weights are more useful (about 10 grams each or so): Brail lines are temporarily made fast to the foretop pins for convenience. The sail is wet by fingers (using a dripper just runs water down the sail) with paper towels below for safety. Weights tend to fall off and threaten to break the tiny pump handles on the quarterdeck. I got lucky. When the sail dries, I can blast it with starch a few times to get it to retain the shape. With the sheet line pulled a bit, it should look much like the paintings. With that done I can proceed with the main shrouds and complete the standing rigging, and on from there. I’m happy with the look so far. Hopefully the rest of the sails go well too. That’s all for now! Stay healthy! -Meriadoc
-
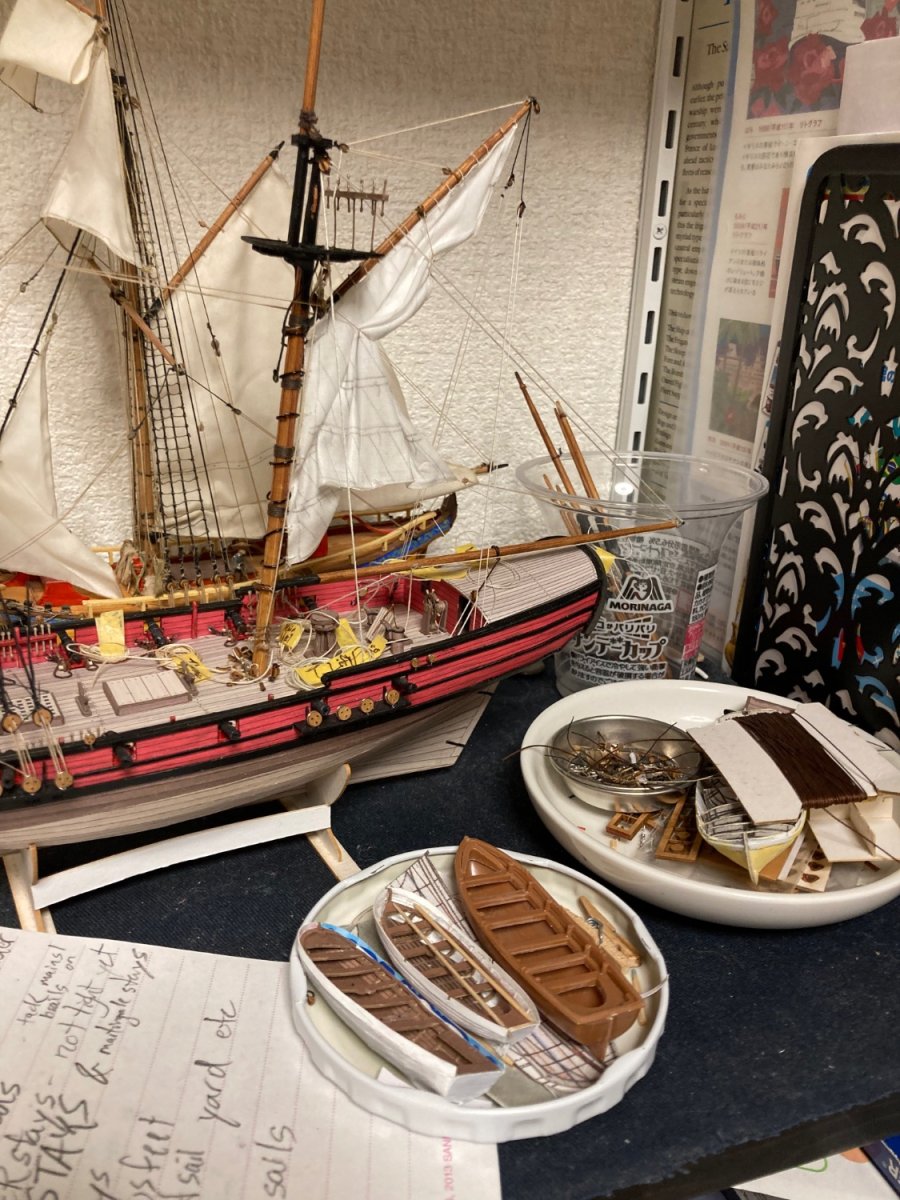
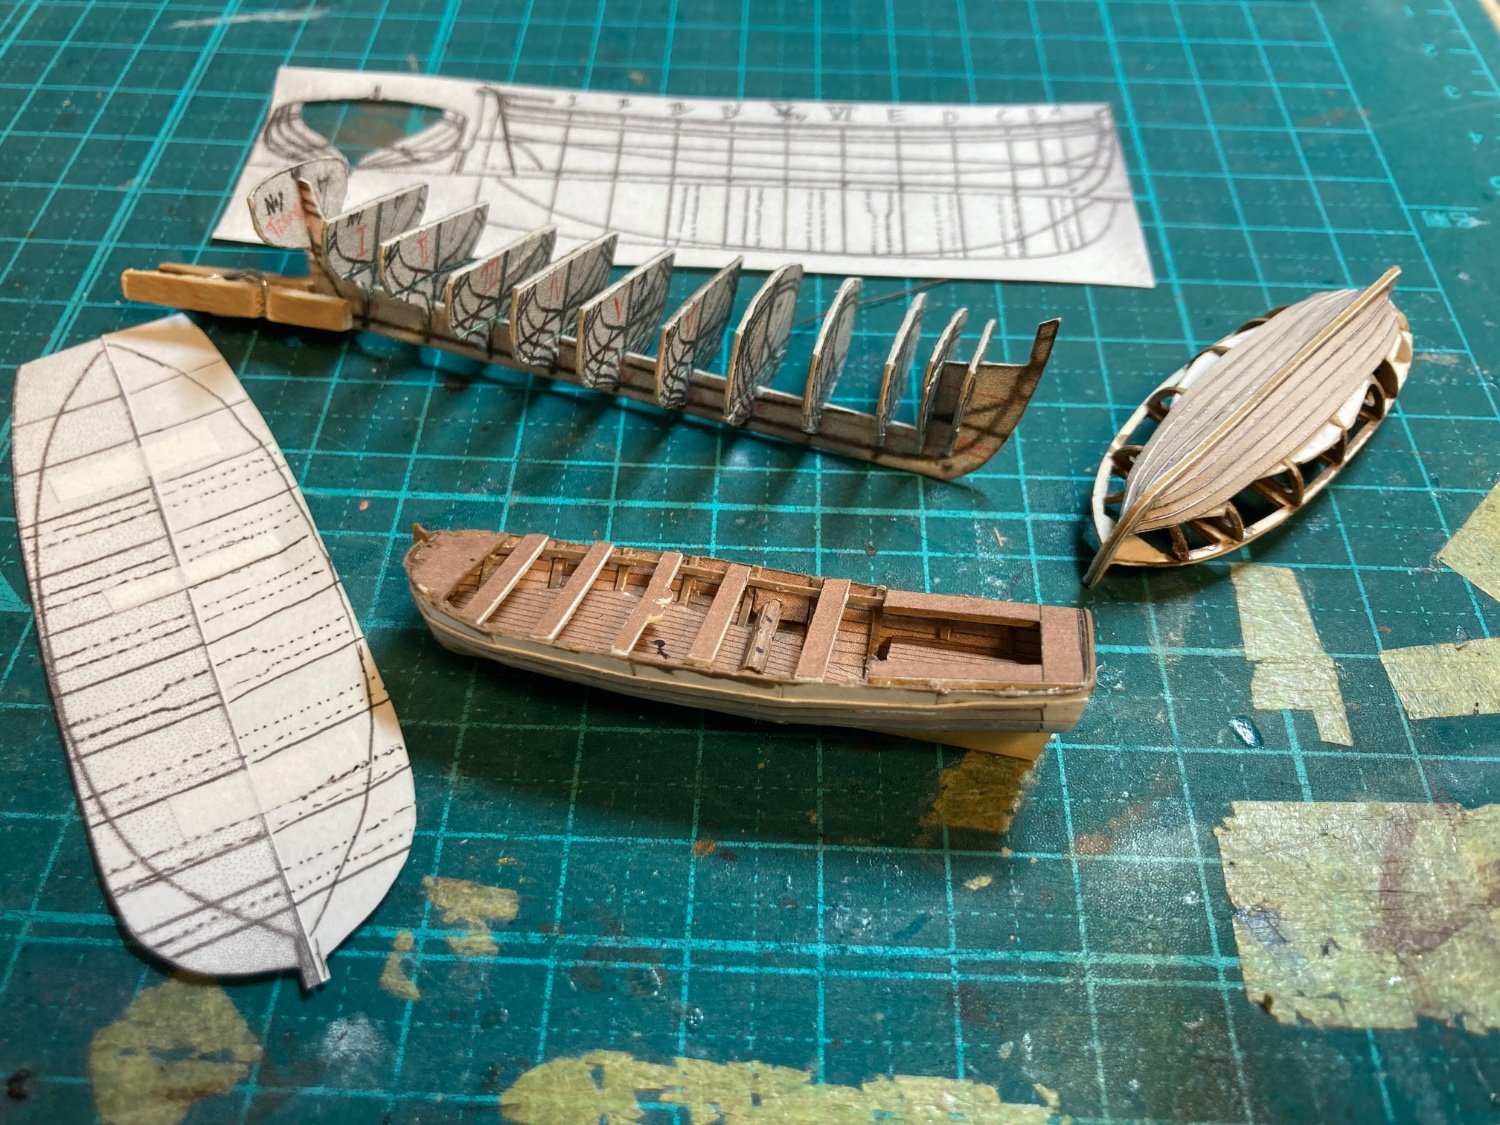
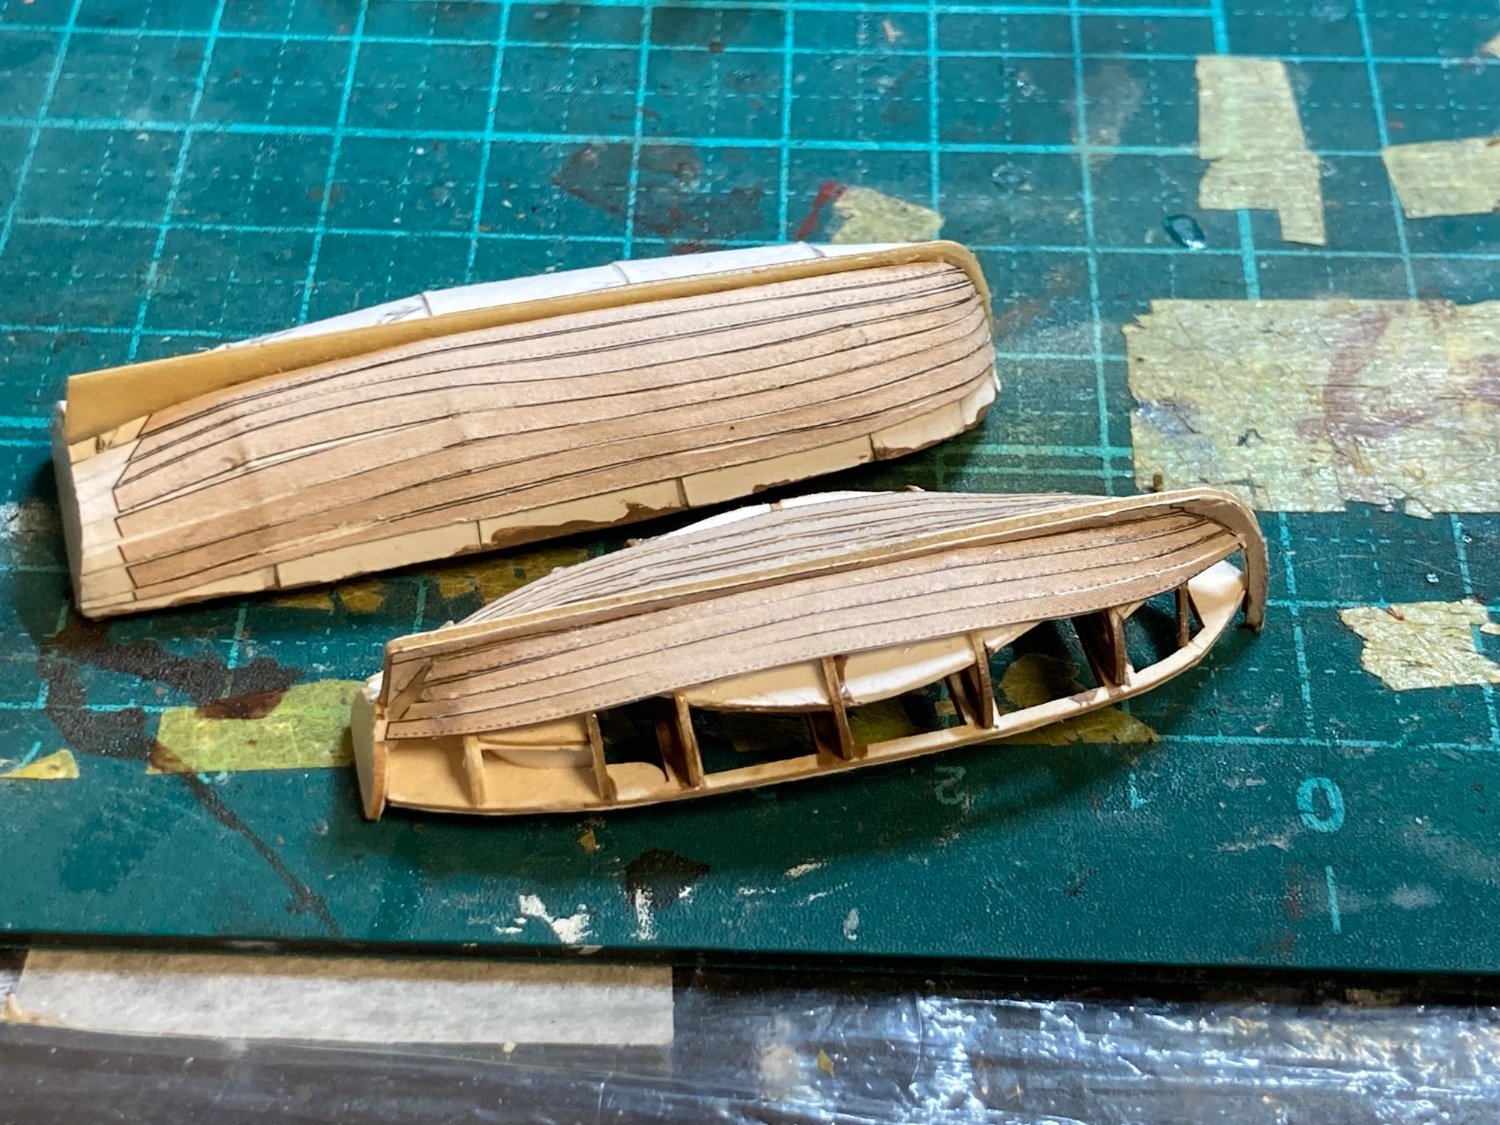
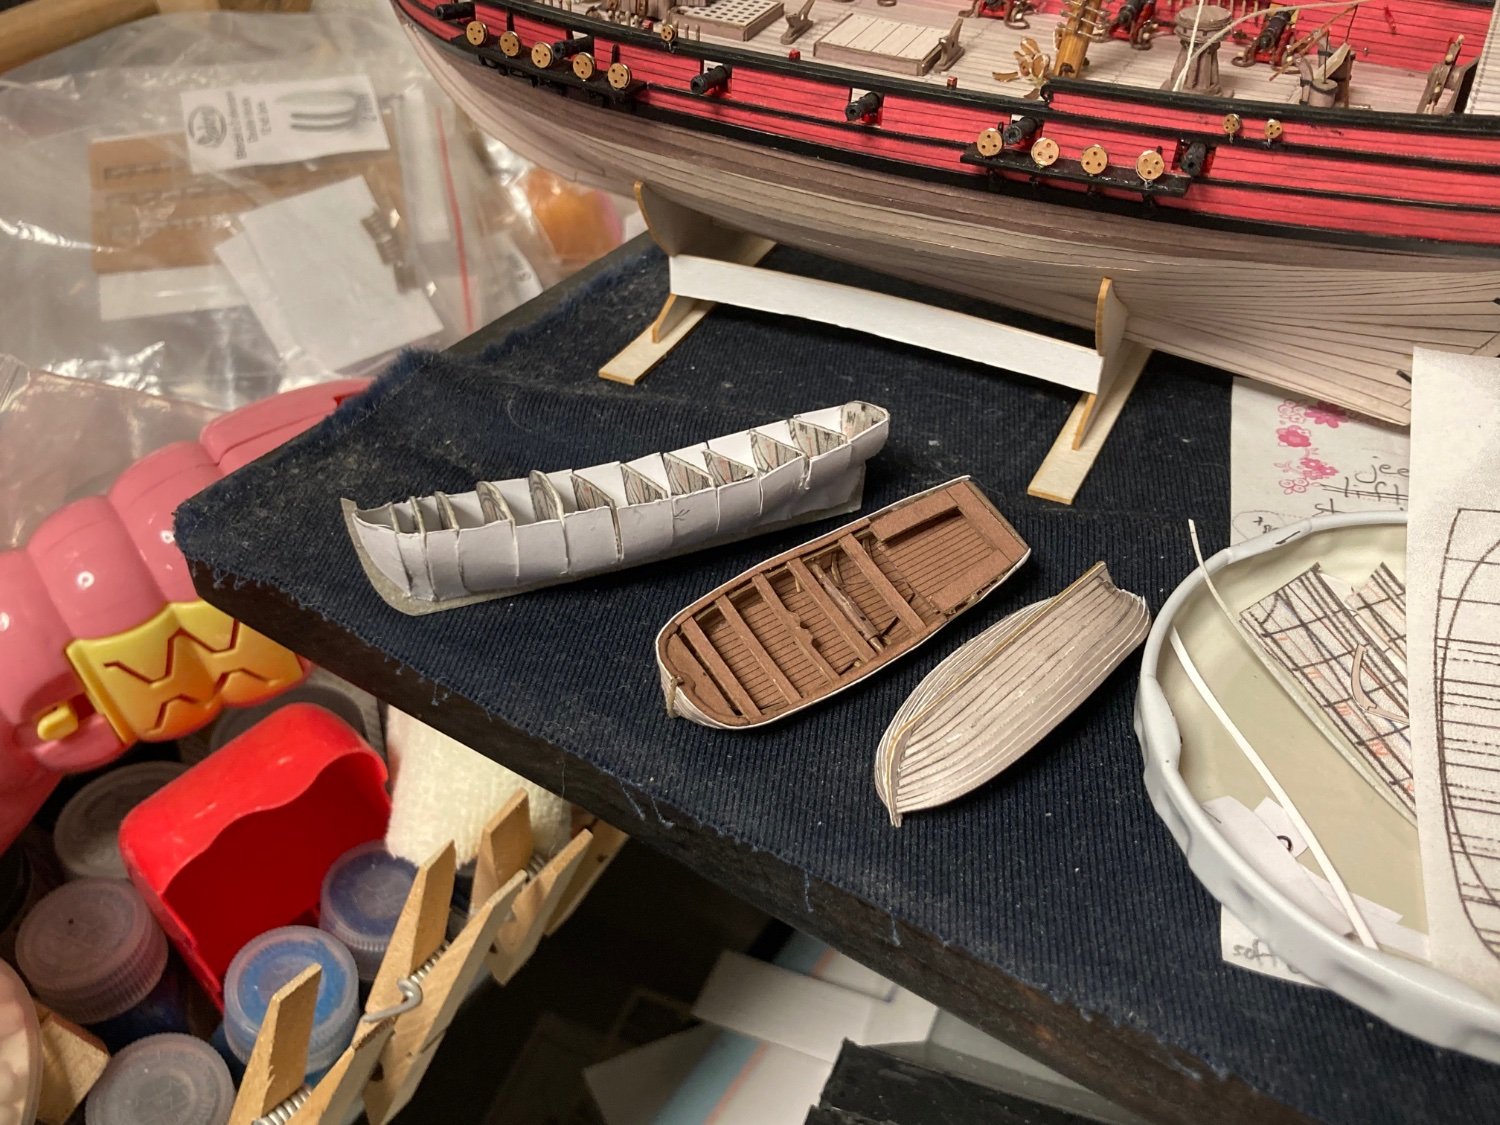
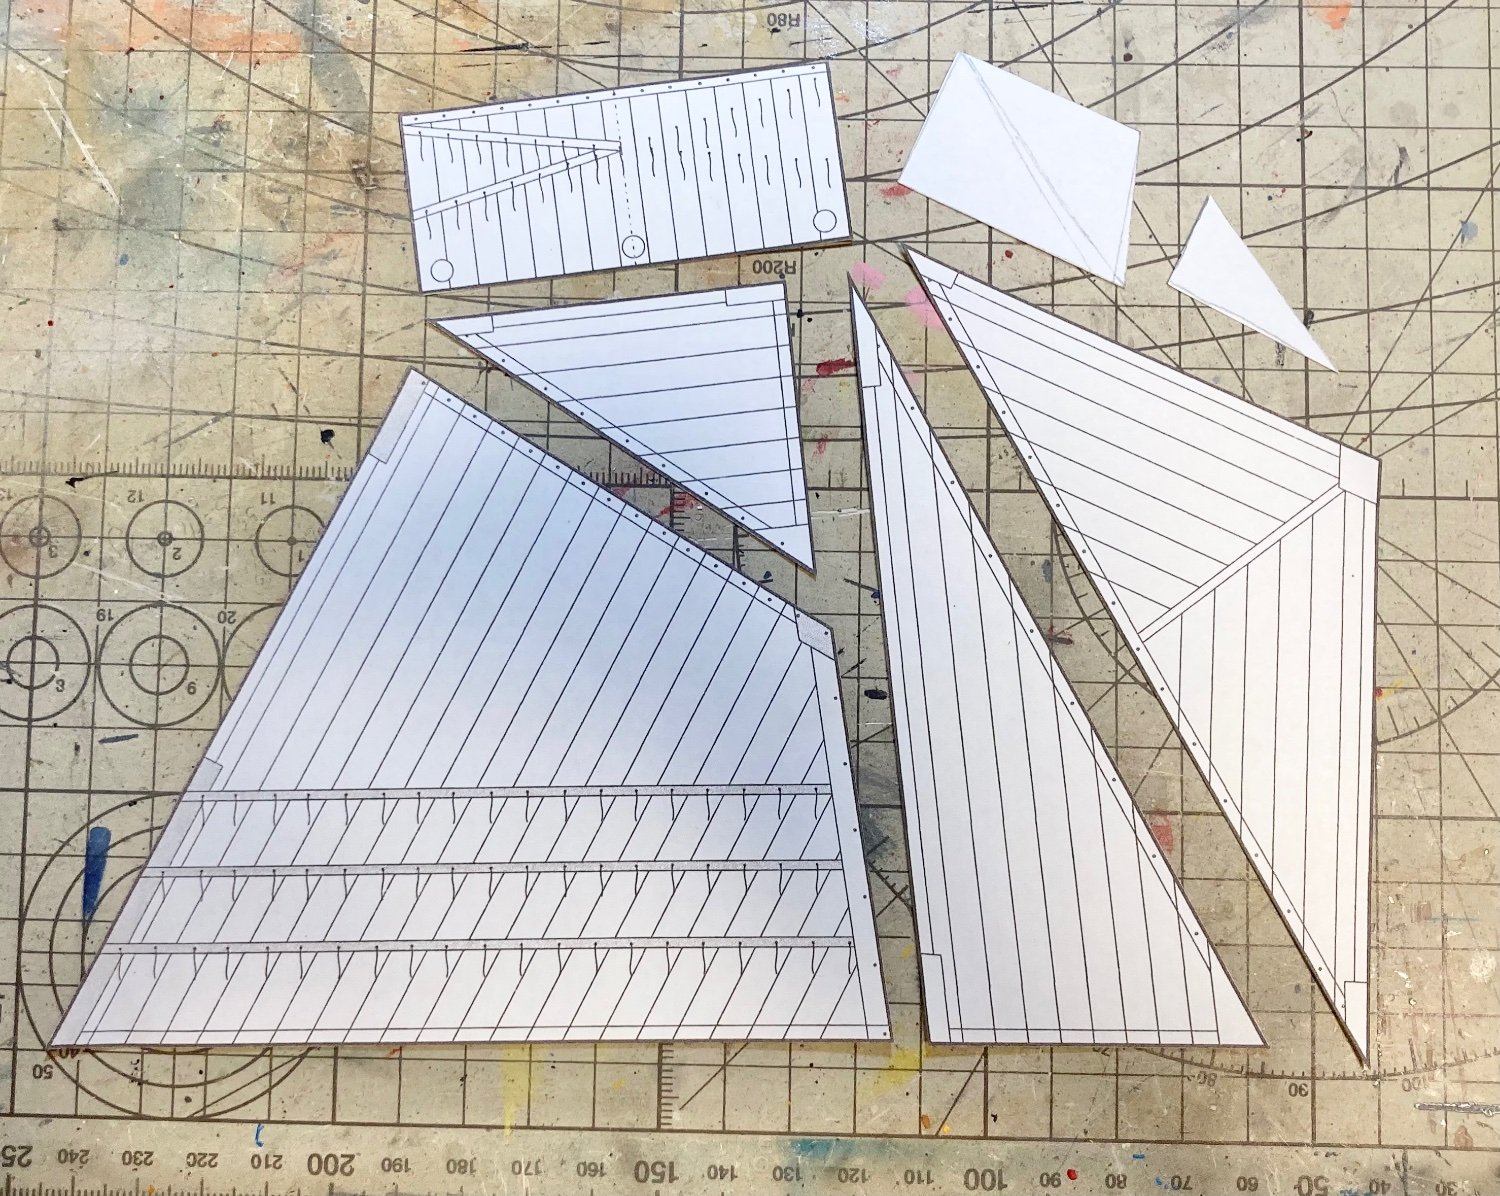
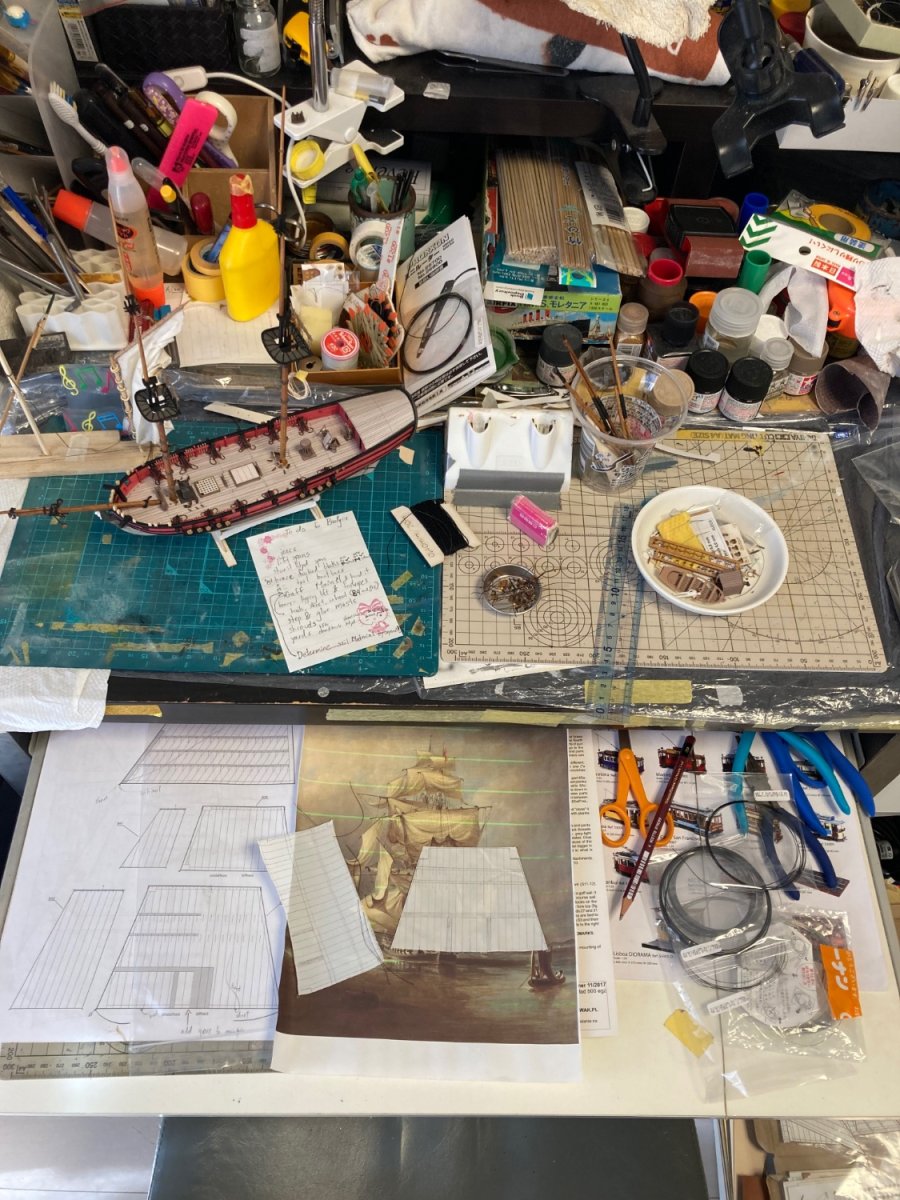
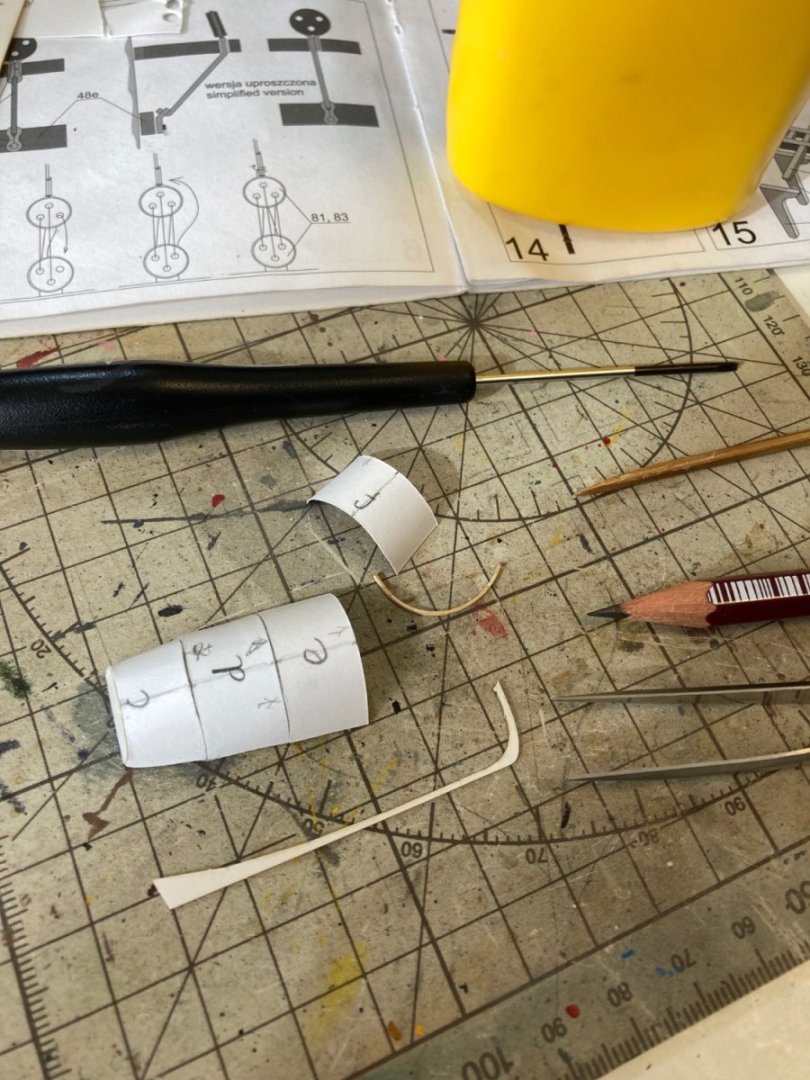
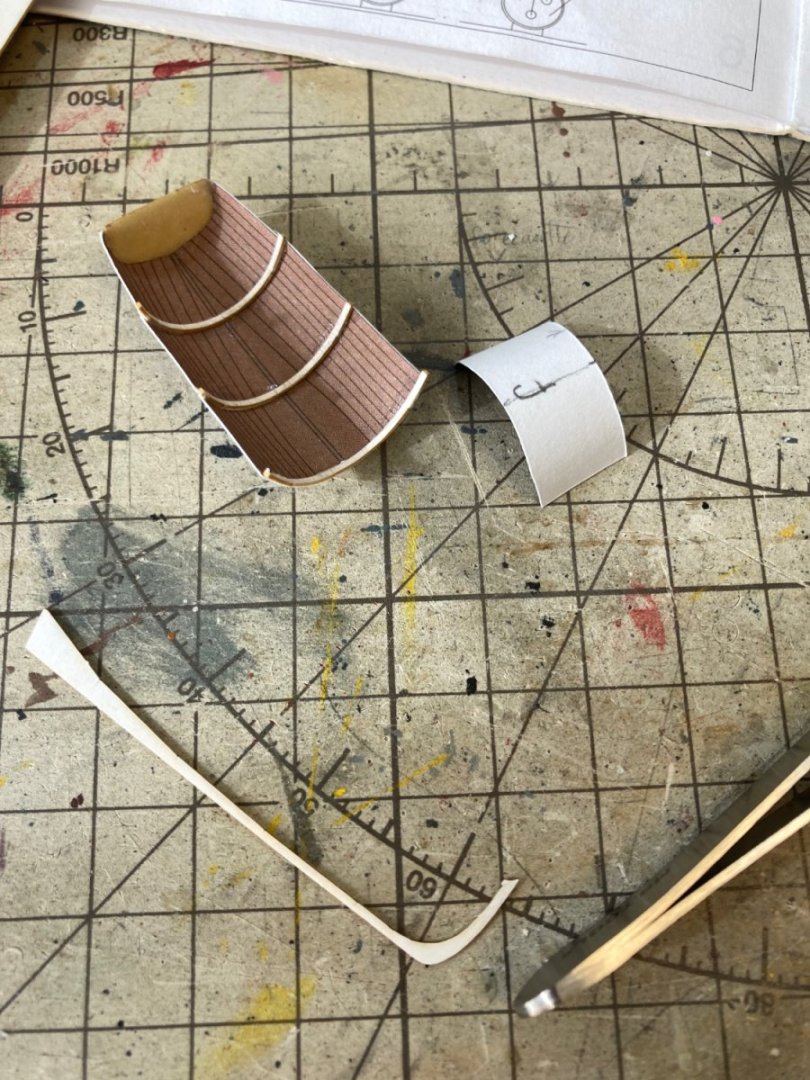
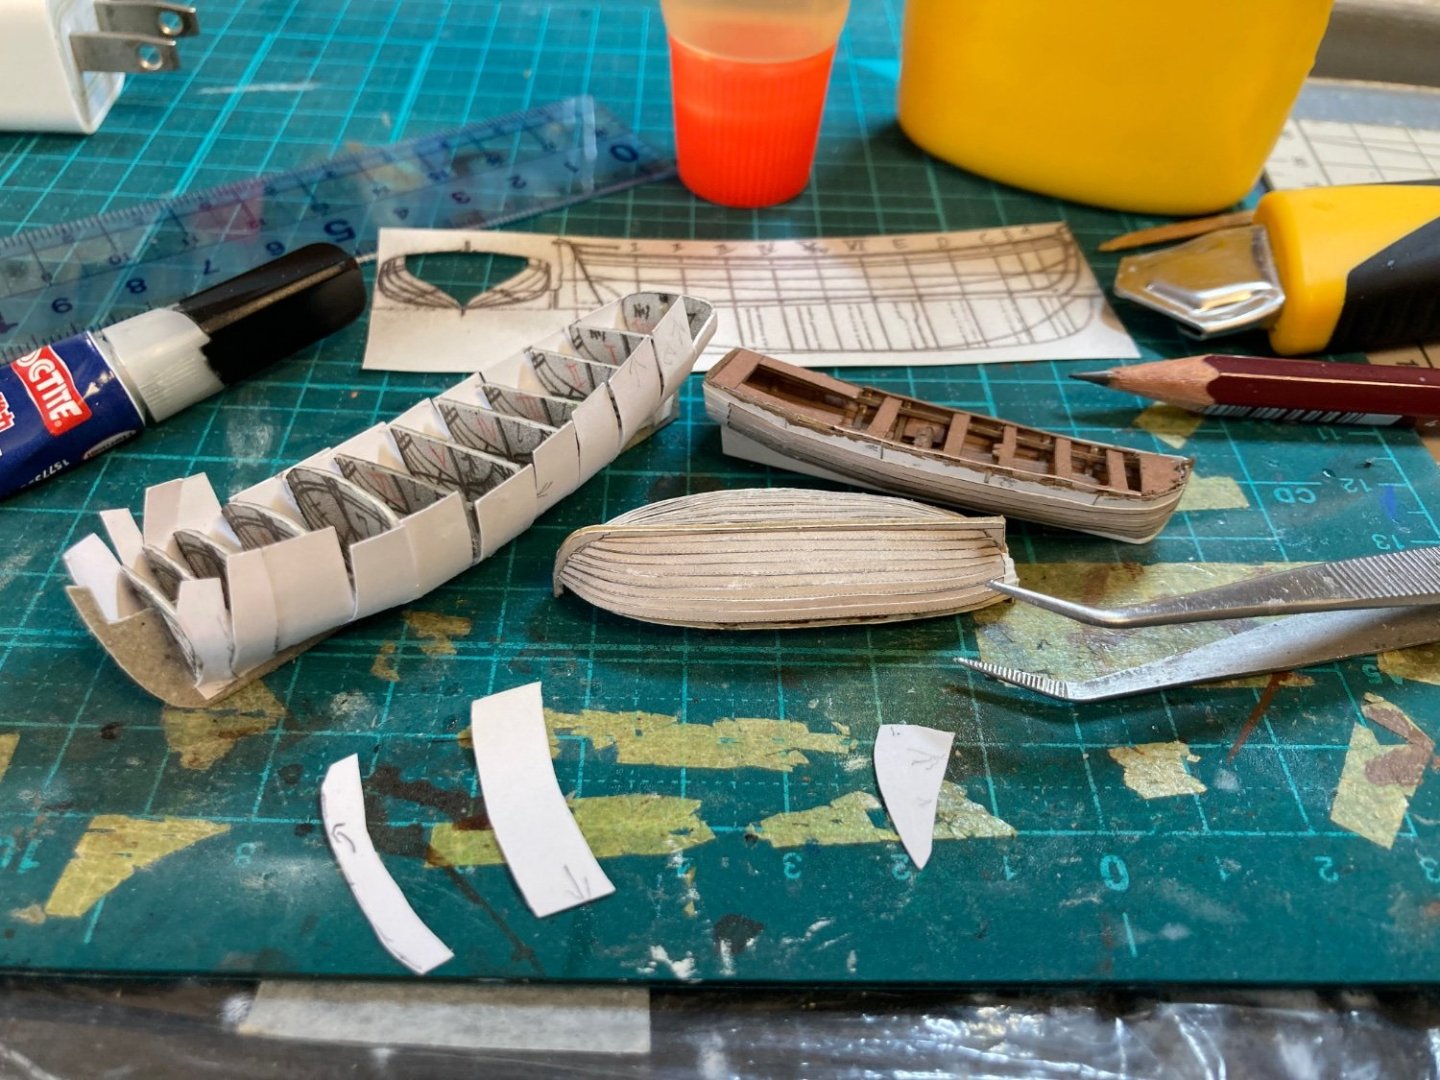
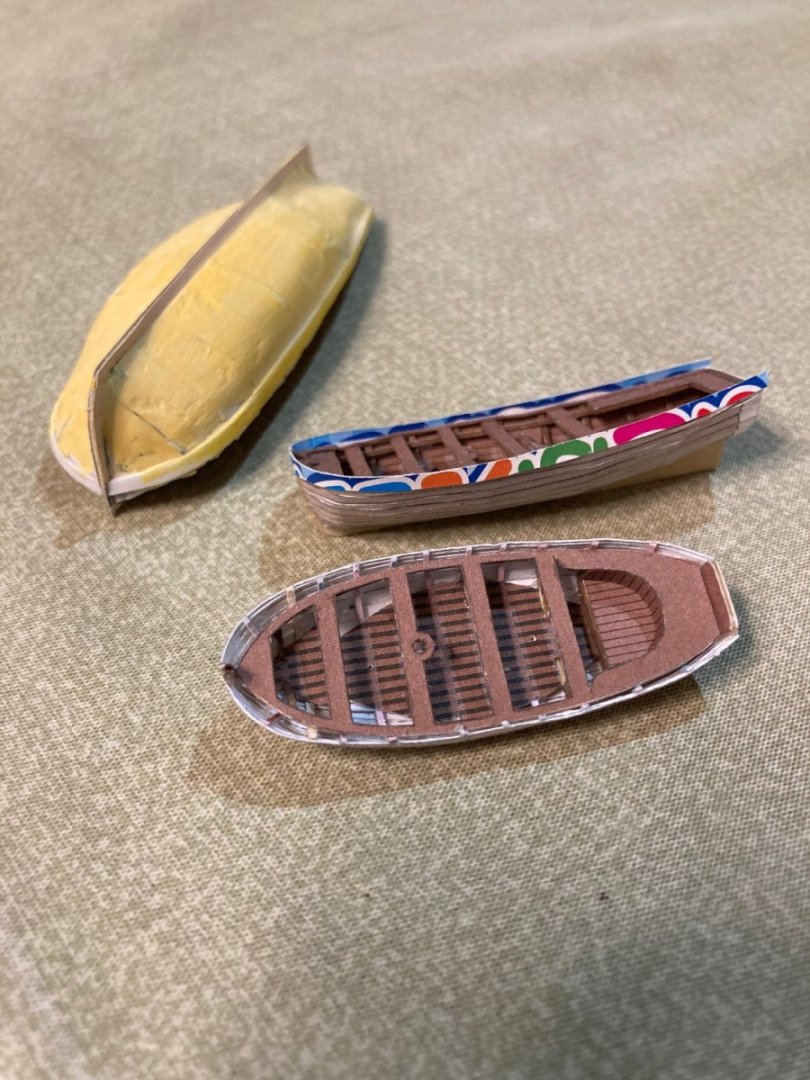
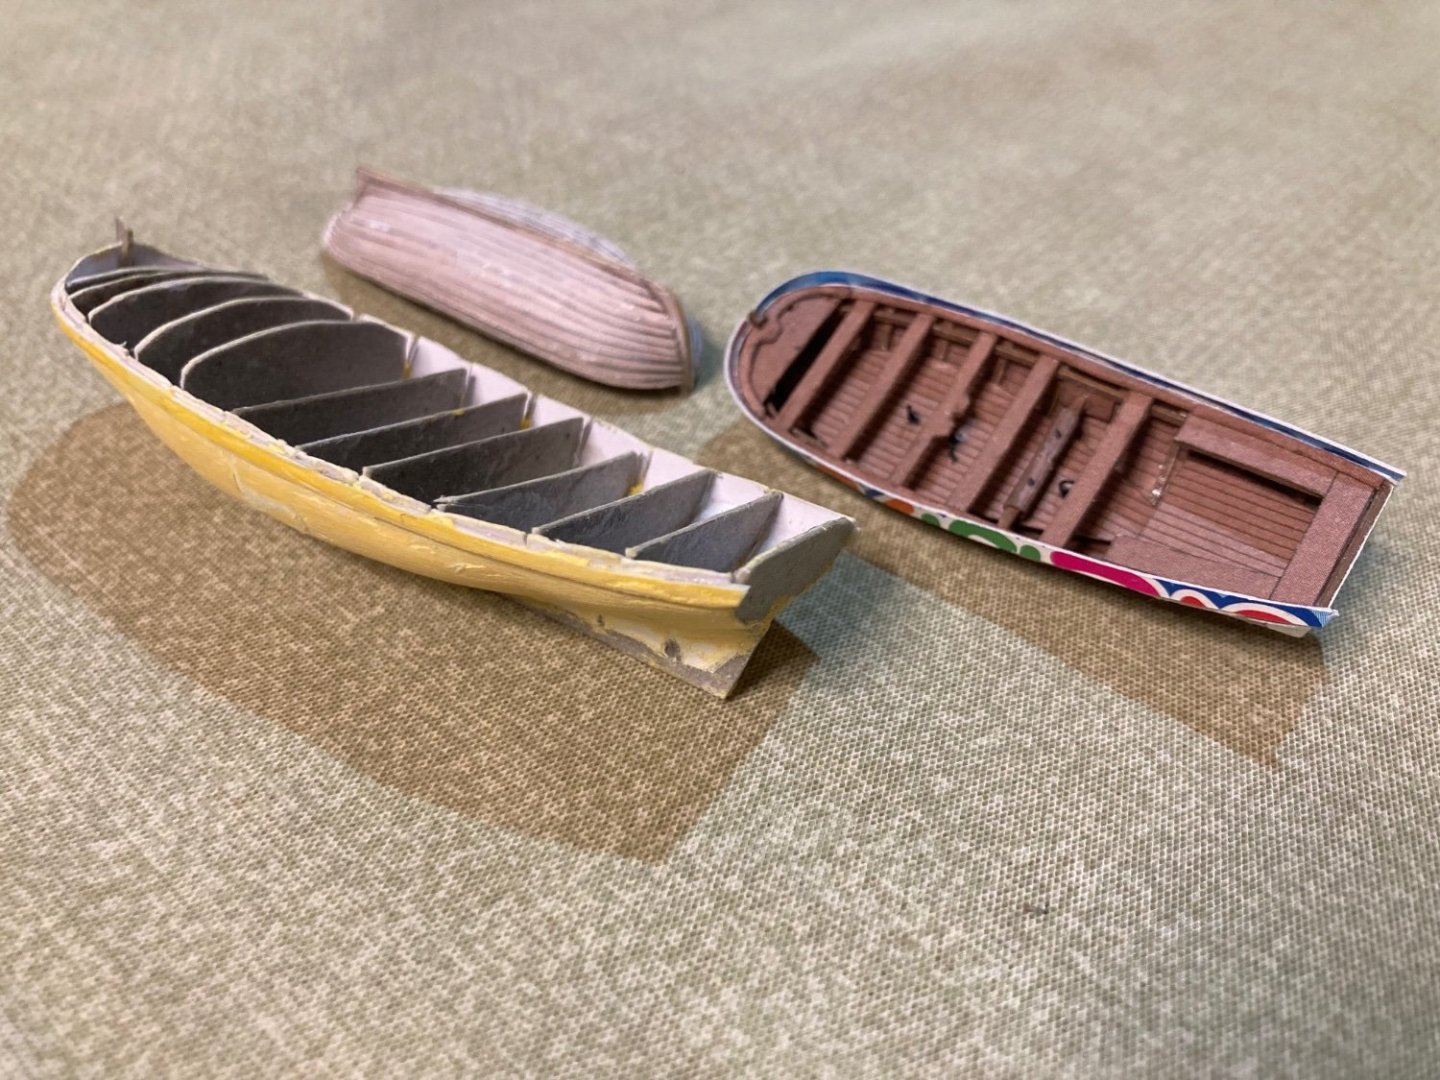
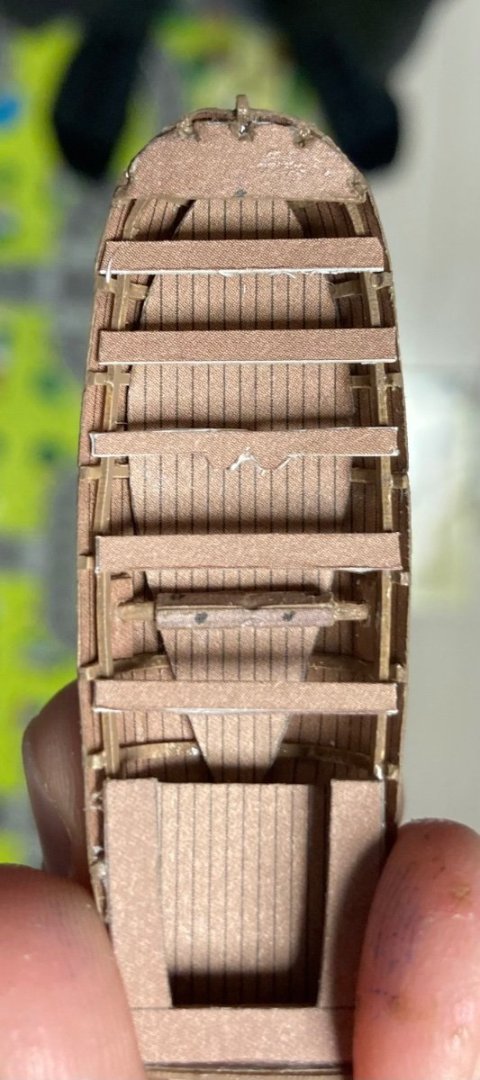
Well, I hope everyone is doing well. I haven’t been; in keeping with the recent theme of nothing going to plan, I ended up sick with pneumonia for about three weeks, stayed a spell in the hospital and finally got out alive. It’s good to be healthy again. Really good. I have lots of unreported progress. So I guess I’ll get to it. Boats. The kit includes two boats, a 16’ cutter and an 18’ launch, though the instructions are a bit unclear or mistaken about how they are to be planked. In any case I proceeded to assemble them, along with a scratch built 25’ longboat for fun since I’ve wanted to try building one for some time. Above: test fitting my thwarts in the launch. I added thwarts along with a hastily scratch built windlass. The kit wants you to leave the thwarts out and stack the cutter inside, but that was not the usual British practice. Also I have other plans for the boats. Above: cutter taking shape on the right with its clinker planking and my longboat (from Chapman) with its frames finally glued together. Above: planking on the launch displaying the hungry horse effect. I found this difficult to avoid with the soft paper employed: in retrospect it would have been best to find more rigid planking even if it was a bit too thick. I can try to stick this side out of sight in the finished model; the other side isn’t as bad. Above: added my own washstrakes. Longboat coming along with filler. Needs another go. Above: final verdict for the kit boats- I find the launch far too blunt-bowed for 1776. It seems a bit more 19th century. In any case it manages to fit in the narrow space available aboard the little brig. I plan on having it suspended from the main & fore tackles and yard tackles, being swayed out. Though that might prove too ambitious and incompatible with the sailing activities going on. It would be a fun visual effect though. The cutter ended up a bit too big as the clinker planking had trouble meeting the frames. It looks alright though and will go in the water with a spritsail and jib. You can see the templates I made for those sails below, along with a first batch of sails to make for the ship. For some reason sailmaking is enjoyable, even though it shouldn’t be. It takes too long. But I got the first batch ready. Next post, we will talk about the status of the ship itself. -Happy to be functional again Meriadoc


-
Meriadoc Brandybuck reacted to a post in a topic:
HMS Revenge 1577 by GrandpaPhil - 1/64 - CARD - from Victory Models Plans
-
You work too fast. Looks great, but I can’t keep up. Meriadoc
-
Merry Christmas, happy New Year, and congratulations on finishing your lovely 74 before the year ended! This was quite the project. Can’t wait to see the victory album! Meriadoc
- 364 replies
-
- 2
-
-
- bellerophon
- victory models
- (and 2 more)
-
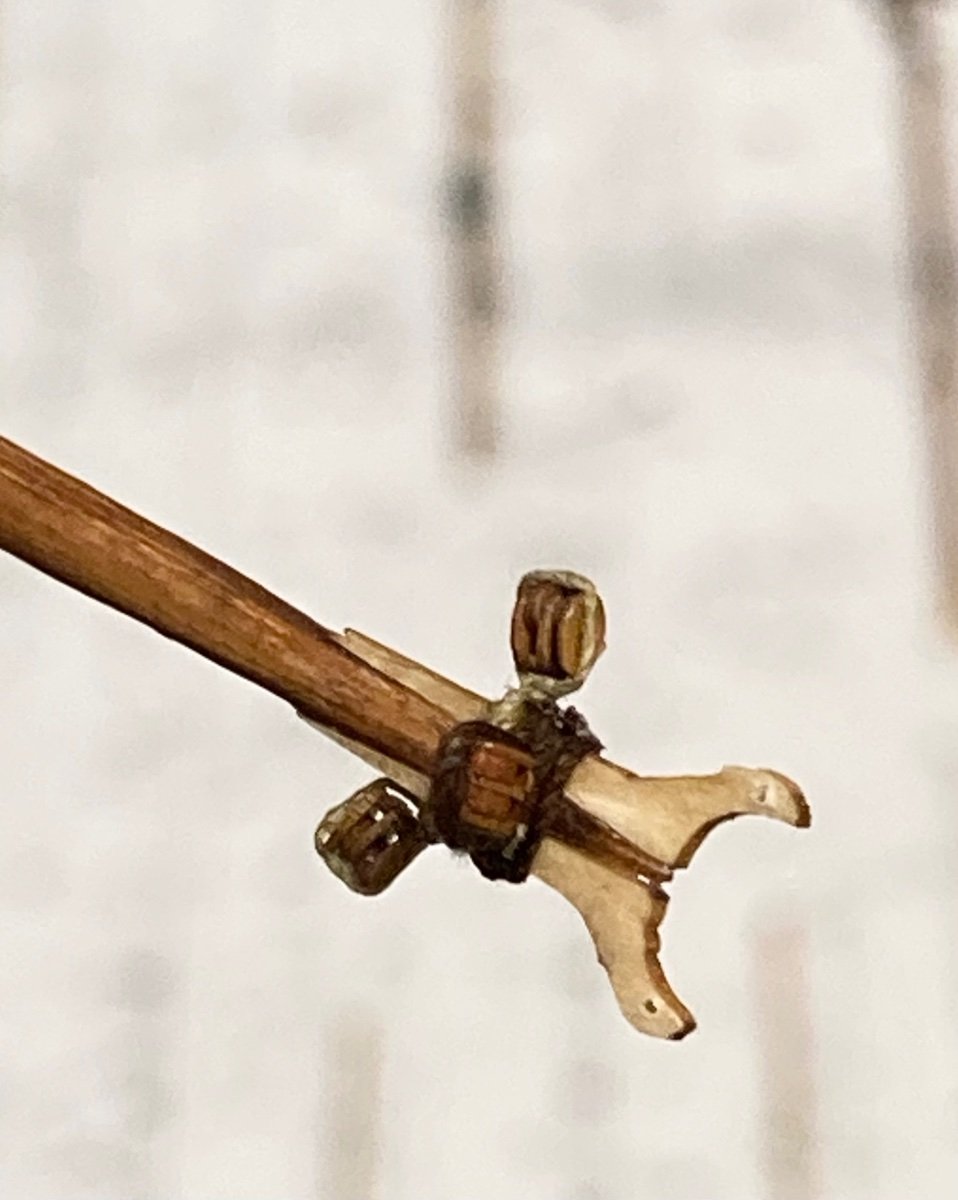
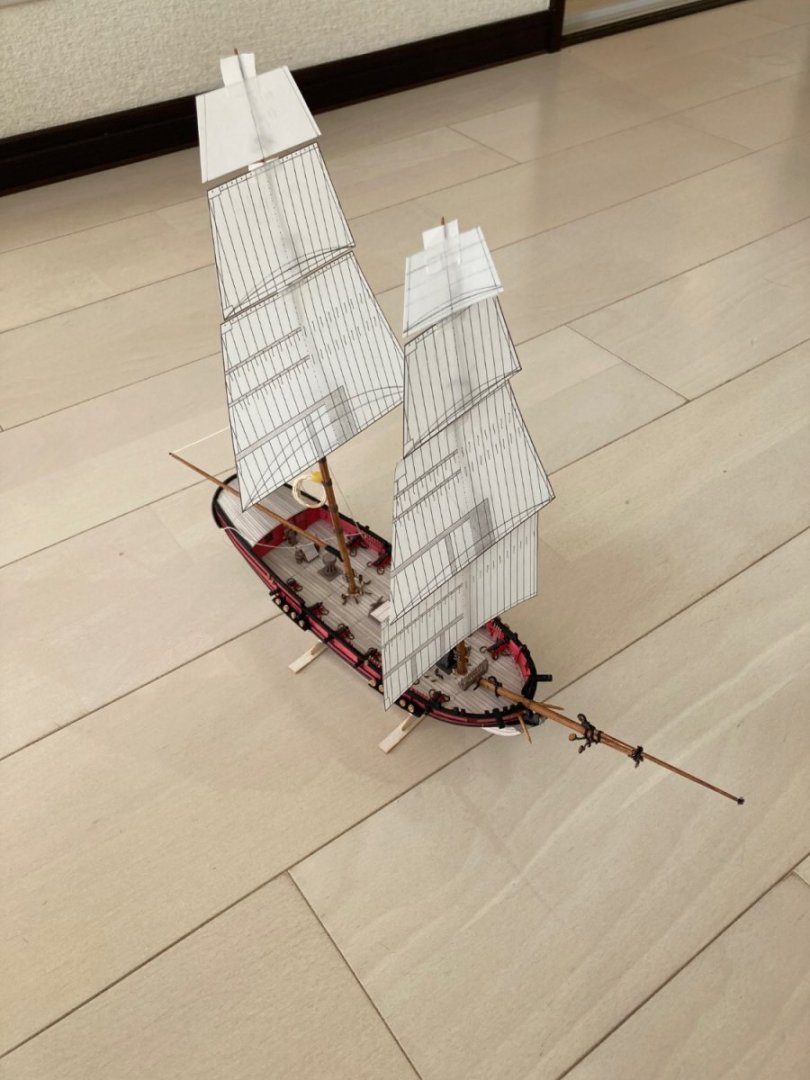
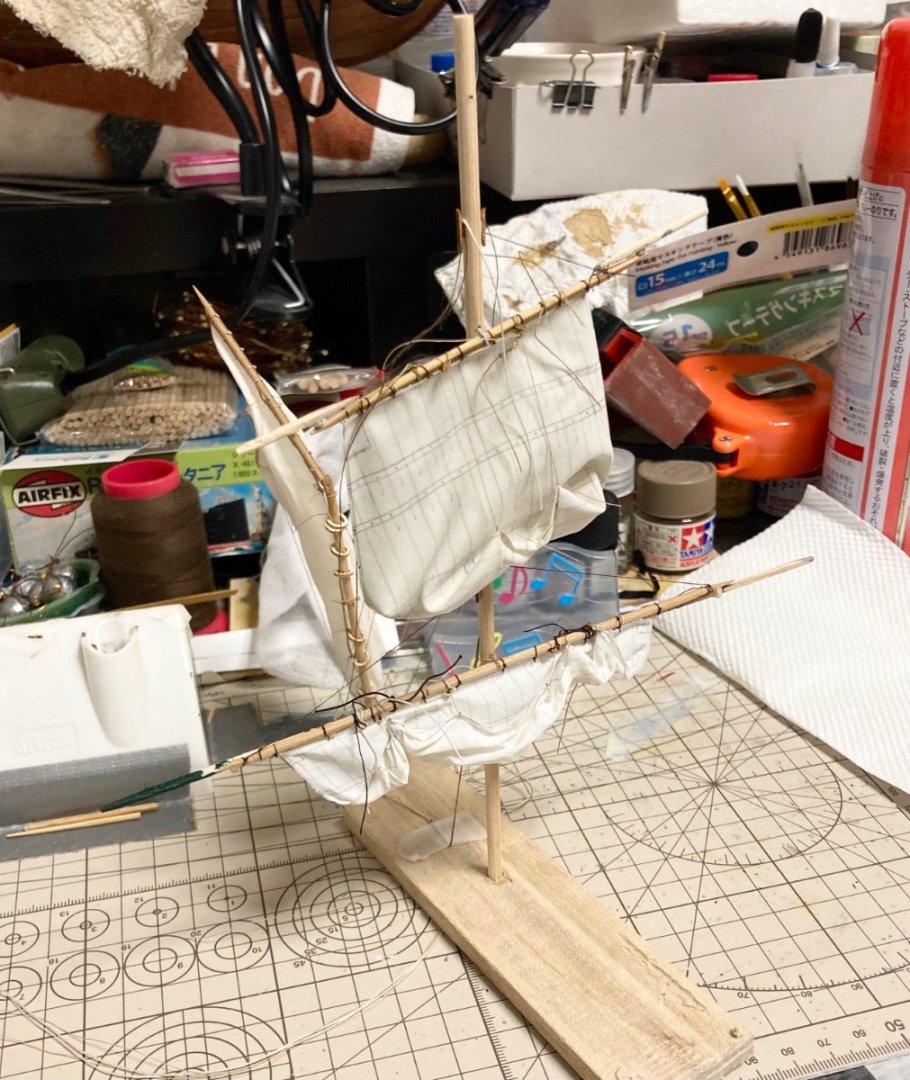
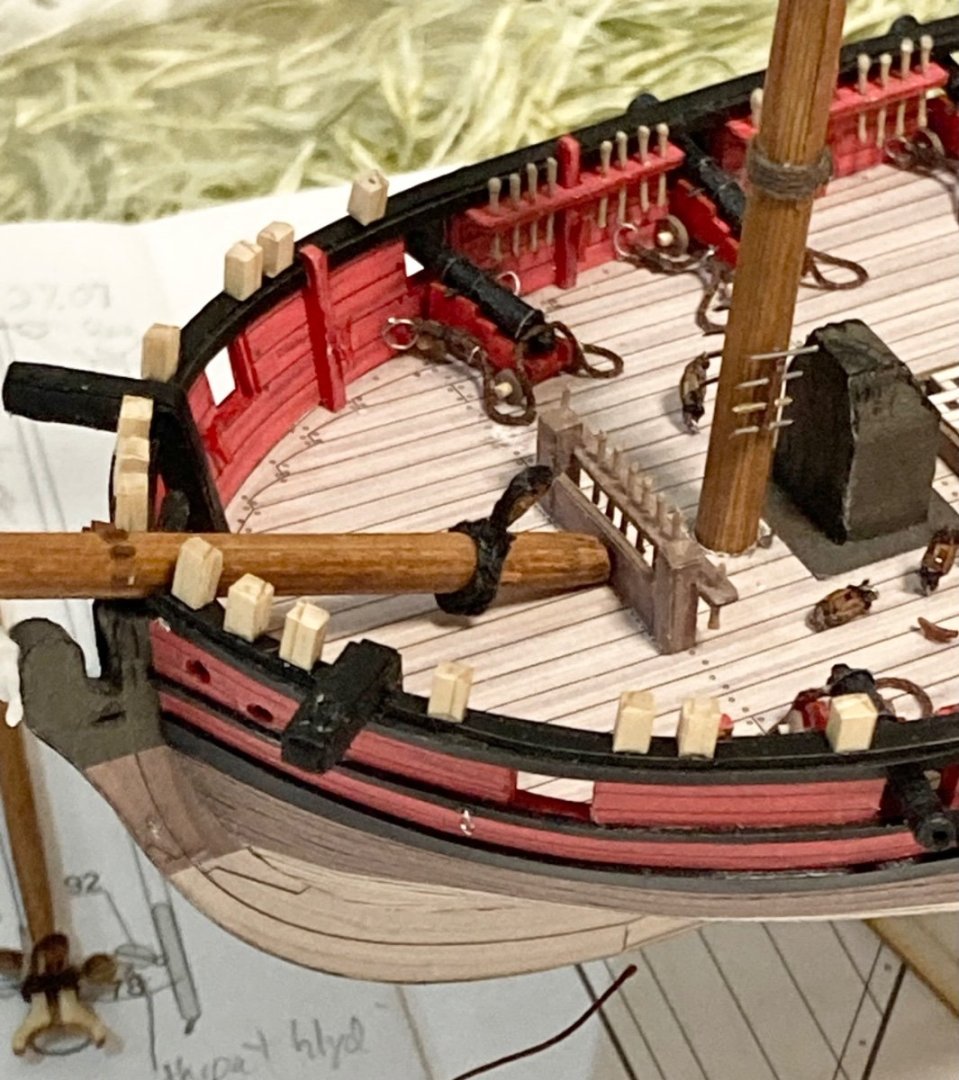
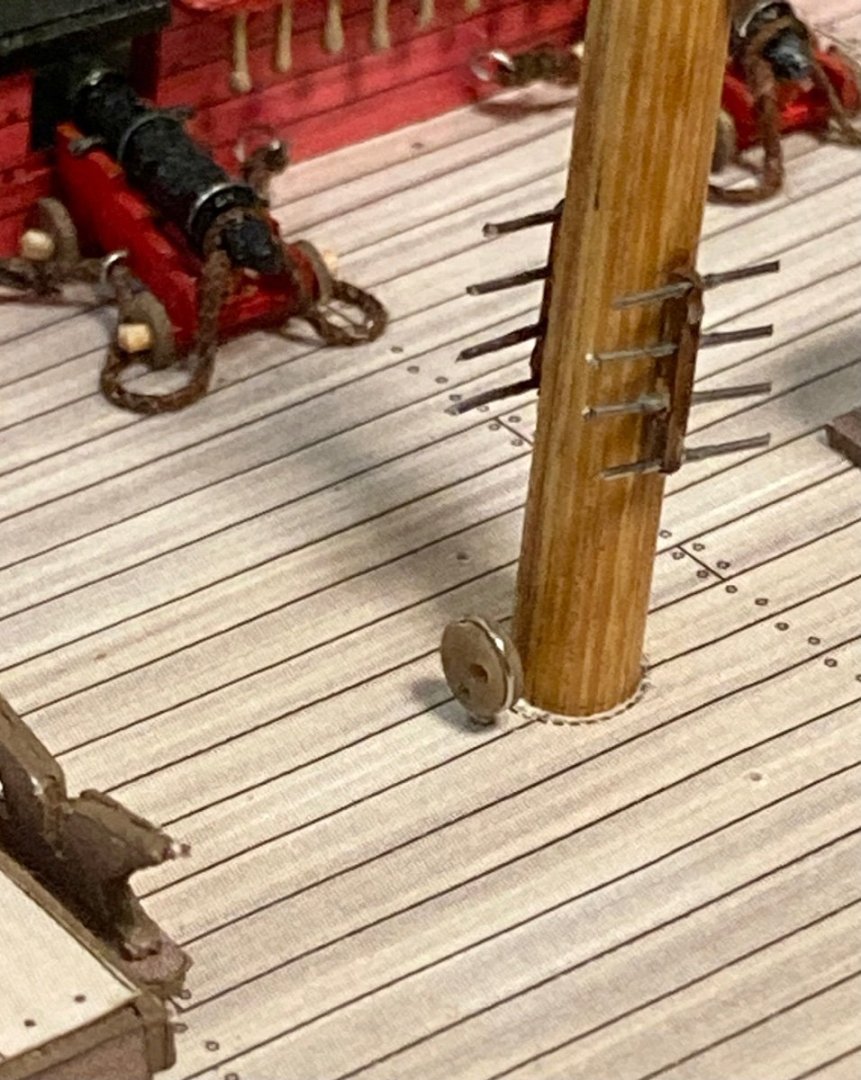
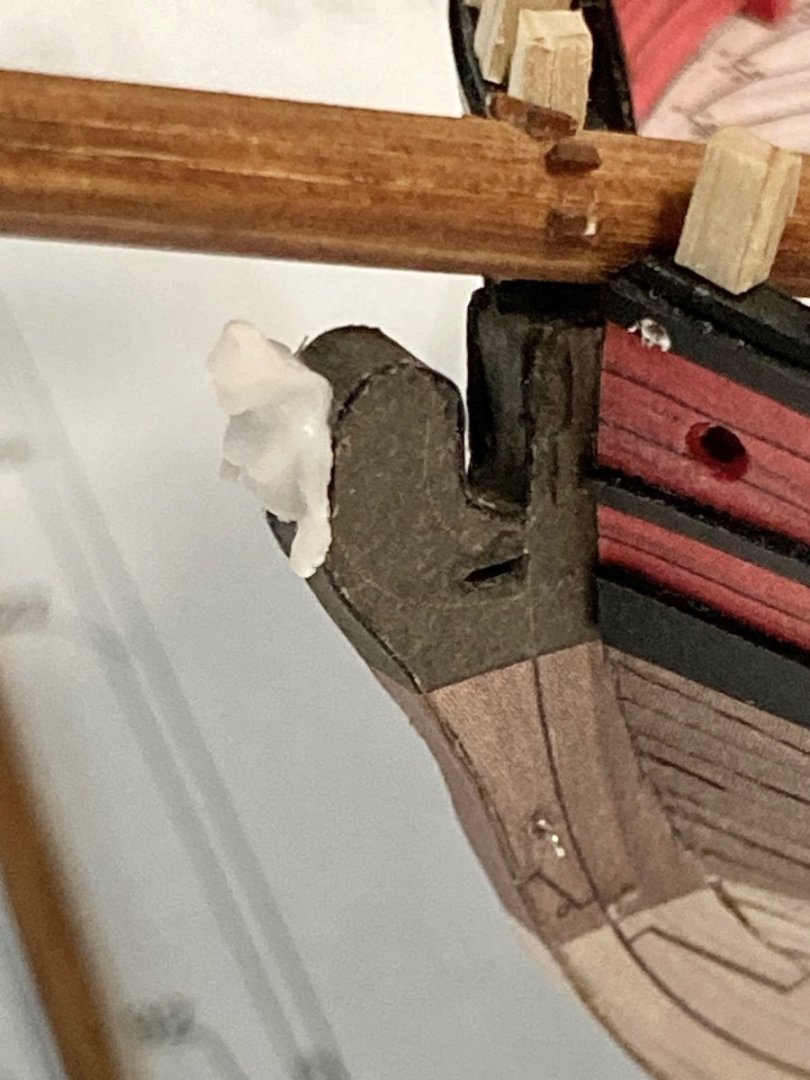
Well, I have much to report. I ran out of things to do that aren’t rigging-related. Rigging is my favorite part, but I wanted to make sure everything was ready to go so it will go as smoothly as possibly. Masts have been finished with all blocks and fittings (except jeers yet) and when all was finished on the hull, they were finally glued in place and await shrouds. I also experimented with sail manipulation and achieved decent results. Please see below. Above- lots of subassemblies and two sails I prepared for practice and experimentation. Above- masthead sheave blocks (going to check that terminology when my dog gets off my lap) for the running lines of the headsails. Above- no way to reasonably hang these blocks from the tiny paper-construct fore top, so they are simply attached with a drop of CA. Above- I decided I needed a saddle for the halyard of the flying main course crojack yard. The regular jeers will hoist the full-diameter main topsail spread yard. Above- speaking of so many yards on the mainmast, I installed extra cleats and blocks to handle them. The kit doesn’t include jeers or even halyards for the main yard but I decided to use jeers for ease of hoisting. Slings were not quite yet in use at this time, so something robust would be desirable to hold the weight of the yard. Above- a couple experiments. The cloth course was rigged to a jury setup with all its clews, bunts, and leech lines and hauled up. This looked completely unconvincing but I remembered to try fishing weights, so after wetting the sail I used weights to give the sail scale gravity effects. When it dried I used laundry starch in a spray can a few times to stiffen it before removing the weights. There is also a brailed gaff sail and a tissue that I tried “clewed up” around a chopstick. Not bad if I knew what to coat it with for stiffening and longevity. Above- the result of my sail experiments. I also did a topsail, less tightly hauled up. It was made of a nylon blend fabric that feels nice but isn’t as workable. For one it’s nearly waterproof and thus difficult to soften. I used weights to obtain the curves, and lots of starch to hold it but it’s still pretty pliable since the starch can’t soak in. Acceptable result though for loosely hanging sails. Based on these results, I will use the cloth from the lower sail (a fine lawn if I recall) and a diversity of fishing weights to sculpt each sail on yard with my jury rig mast before final installation on the model. Above- my little figurehead painted with little head knees installed on each side. Also boomkins to handle the foresail tacks and timber heads made of Proxxonned 2x2mm stock. Also I went ahead and stuck in the boom topping lift so the ship looks that much more believable. Now for standing rigging and methodical spar work and sail sculpting. Happy Thanksgiving! Meriadoc


-
I honestly am not much of a builder. My love for sailing ships and need to see them in 3D causes me to tangle with skills that by no means come natural. I wish I was more of a craftsman- and I wish I had more space and time for it too! Hope you’re enjoying those dollhouses! Not a bad distraction. Meriadoc
-
Ocean Liner kits?
Meriadoc Brandybuck replied to Meriadoc Brandybuck's topic in Card and Paper Models
Hello, your United States is looking good. I did discover the JSC kits. I understand they are all waterline kits. Do they include plans or parts for below the waterline as well? -
Well, summer has folded into the unreachable regions of spacetime known as the past, and I spent way too much time enjoying a borrowed copy of the new Zelda game- but the Badger has not been forgotten. I have completed assembly of the masts and principal spars, almost got the hull completely fitted out, and have been prepping all sorts of blocks and started getting the yards fitted while I dread the chain plate fiddling. Really, I had hoped to be doing clove hitches by now, but alas, time does not slow. Photos: Above- I had to fashion the trestle trees from bamboo dowels that I planed down; the paper was too flimsy even soaked in CA. Bamboo is a good material for this sort of thing, whereas I am no master craftsman. They look best from a safe distance. Above- forecastle timber heads made out of square dowel sanded to rough dimensions, to be proxxoned into their final shape- after I practice a little with the new Proxxon router. Above- the deadeye for the rope horse upon which will ride the main topsail spread yard. And ugly pins which will be covered in rope someday hopefully soon. Above- stay collars look simple enough but take a lot of time and knots to prepare. Glad to have them ready along with the associated martingale and bobstay deadeyes Above- gaff throat halyard block with brail fairlead blocks. I don’t know if that term is correct. Above- gammoning cleats and my makeshift figurehead. I will have to sit down with some putty and sculpt some sort of scrollwork to make it a bit more convincing. Self-respecting ships of this period almost always had a figurehead, and I thought a little bit of effort would go a long way here. Well, don’t be shy. Let me know what you think. I am hoping to get into running rigging by the end of the year, but I’m wondering about the build order with studding sails and so much scale gravity to work into the sails. I guess I’ll do fore and aft sails first and then work the foremast course>tpsl>tglnt>ryl and then the mainmast. But do I do stunsails last, or as I go? I also have to make the boats, and for fun they’ll be in the water setting sail, or something visually interesting. -Meriadoc

-
My guess on the strange otherworldly jib in the Bellona AotS drawing is that it’s an old, strictly light airs maneuvering sail that never featured in many paintings. I don’t recall seeing anything like it anywhere. Meriadoc
- 364 replies
-
- 1
-
-
- bellerophon
- victory models
- (and 2 more)