Maddog Shipyards
-
Posts
8 -
Joined
-
Last visited
-
 mtaylor reacted to a post in a topic:
HMS Pandora - 24 Gun Frigate in 3D| Blender
mtaylor reacted to a post in a topic:
HMS Pandora - 24 Gun Frigate in 3D| Blender
-
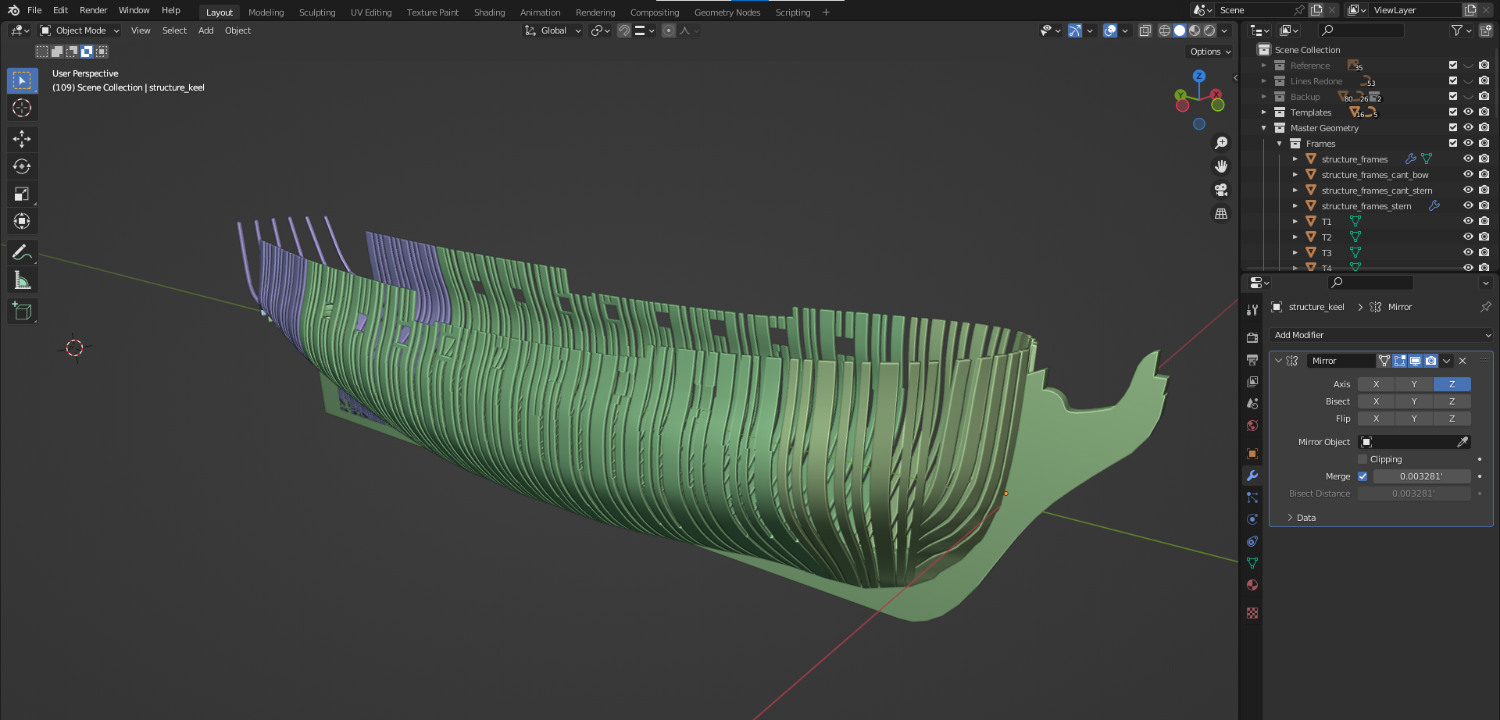
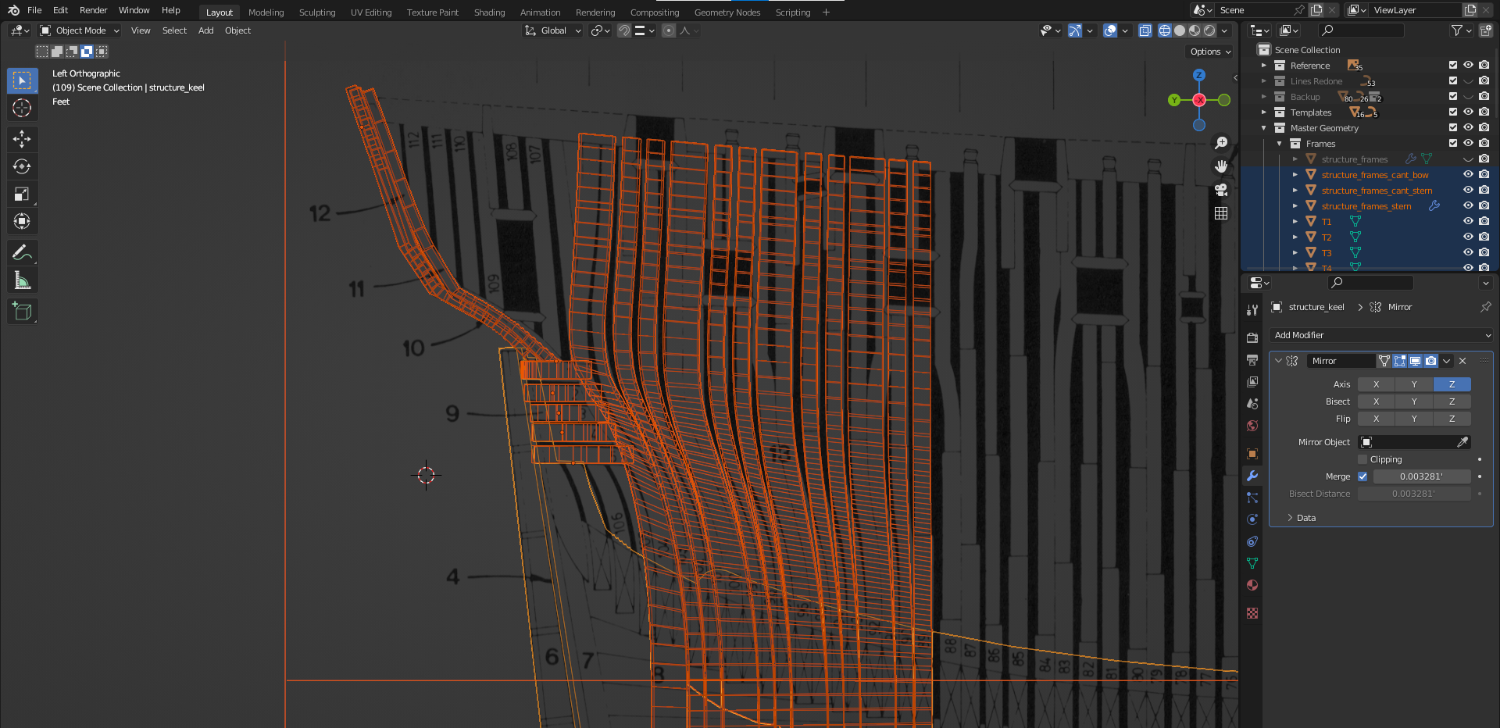
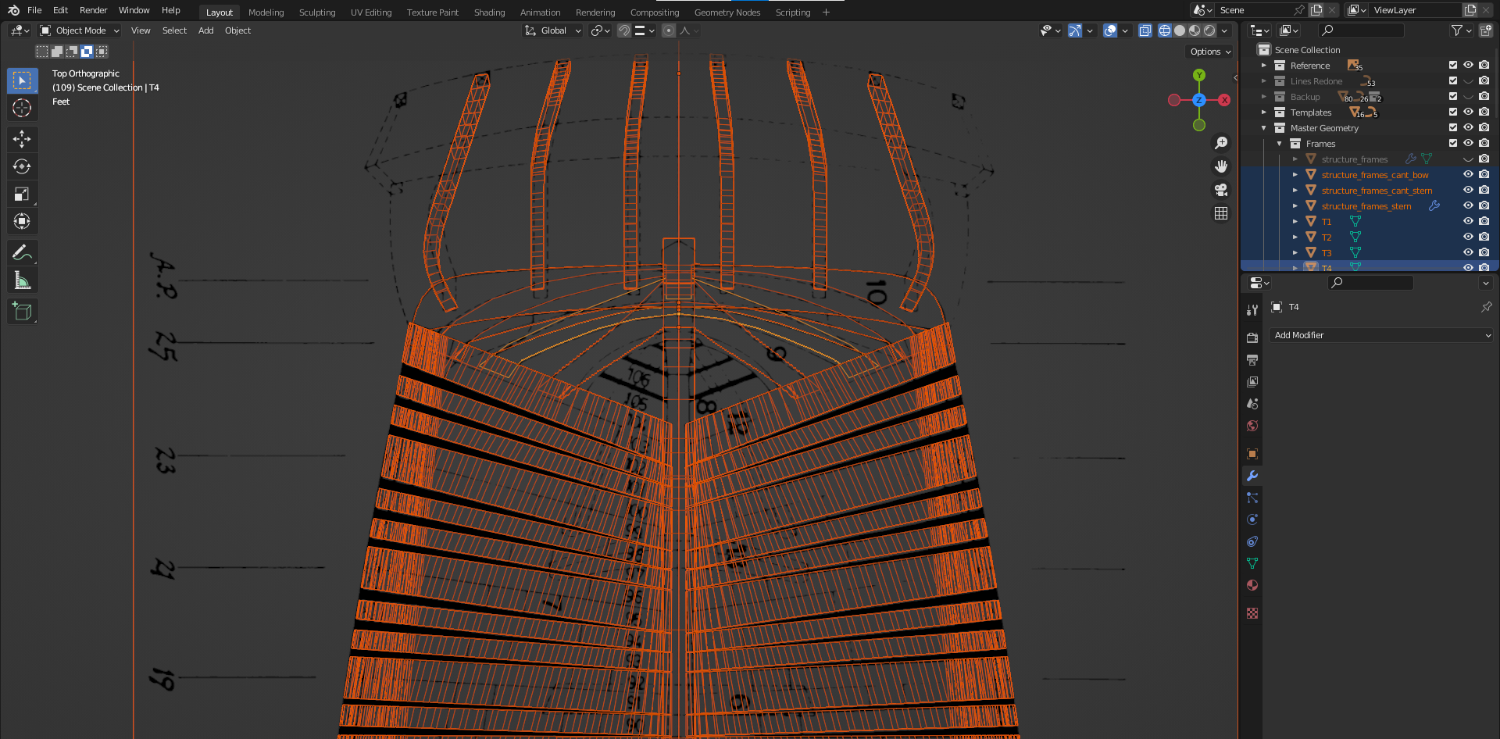
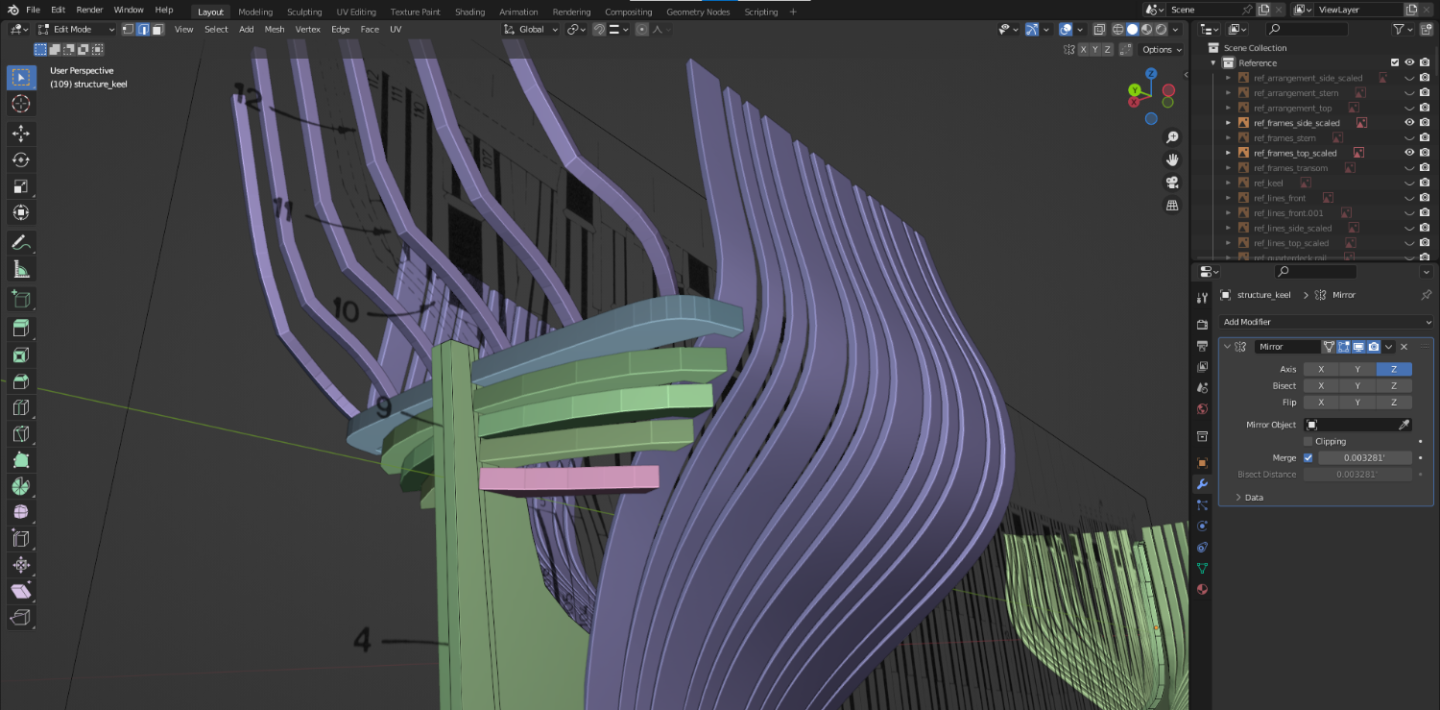
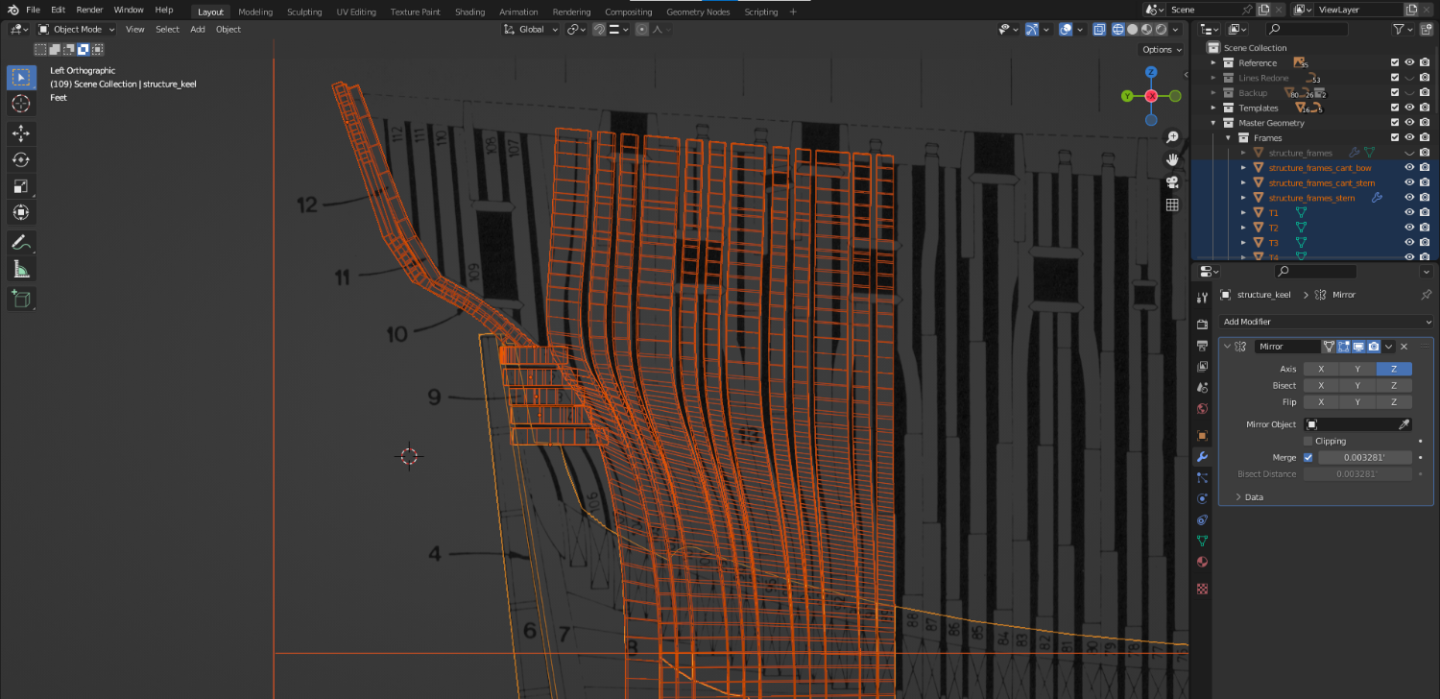
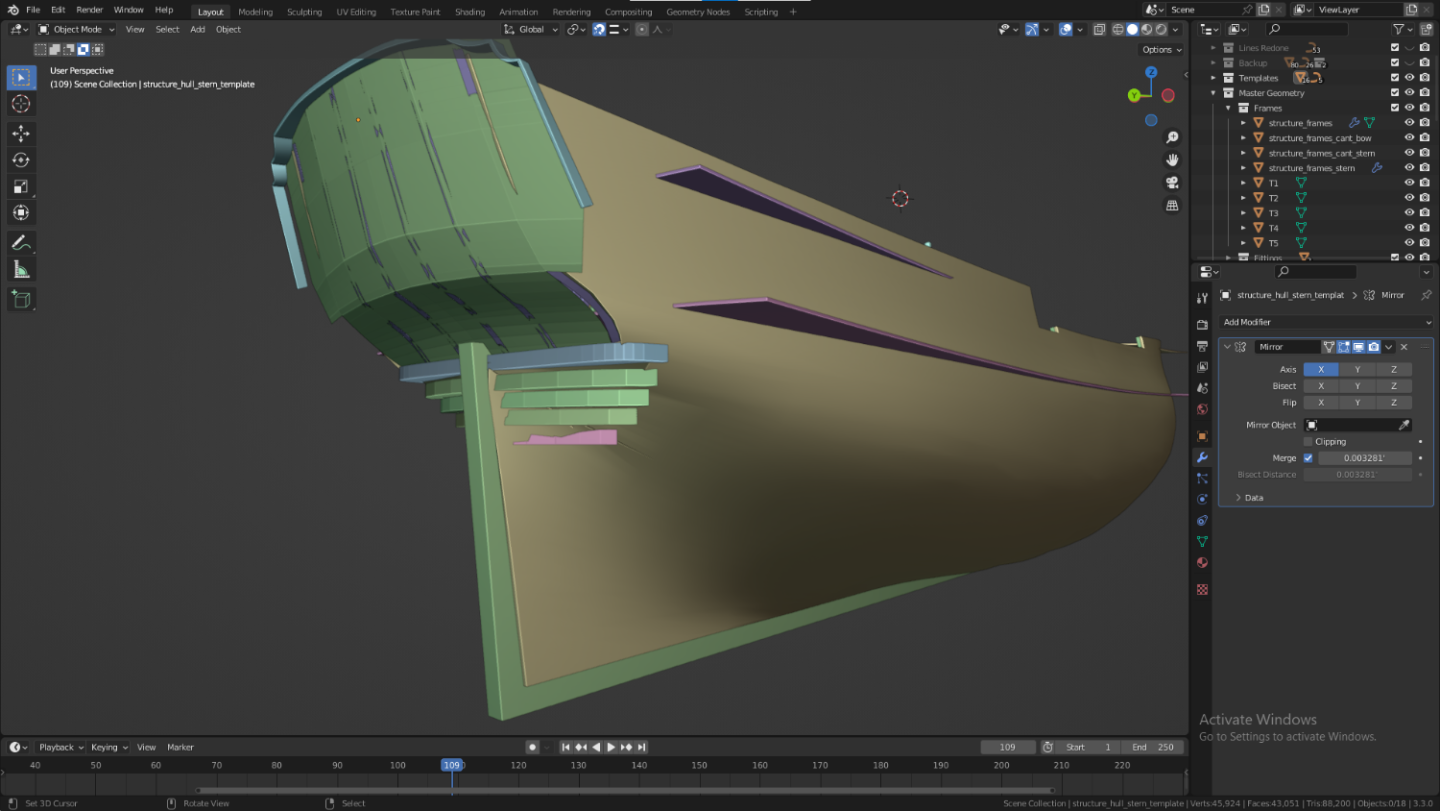
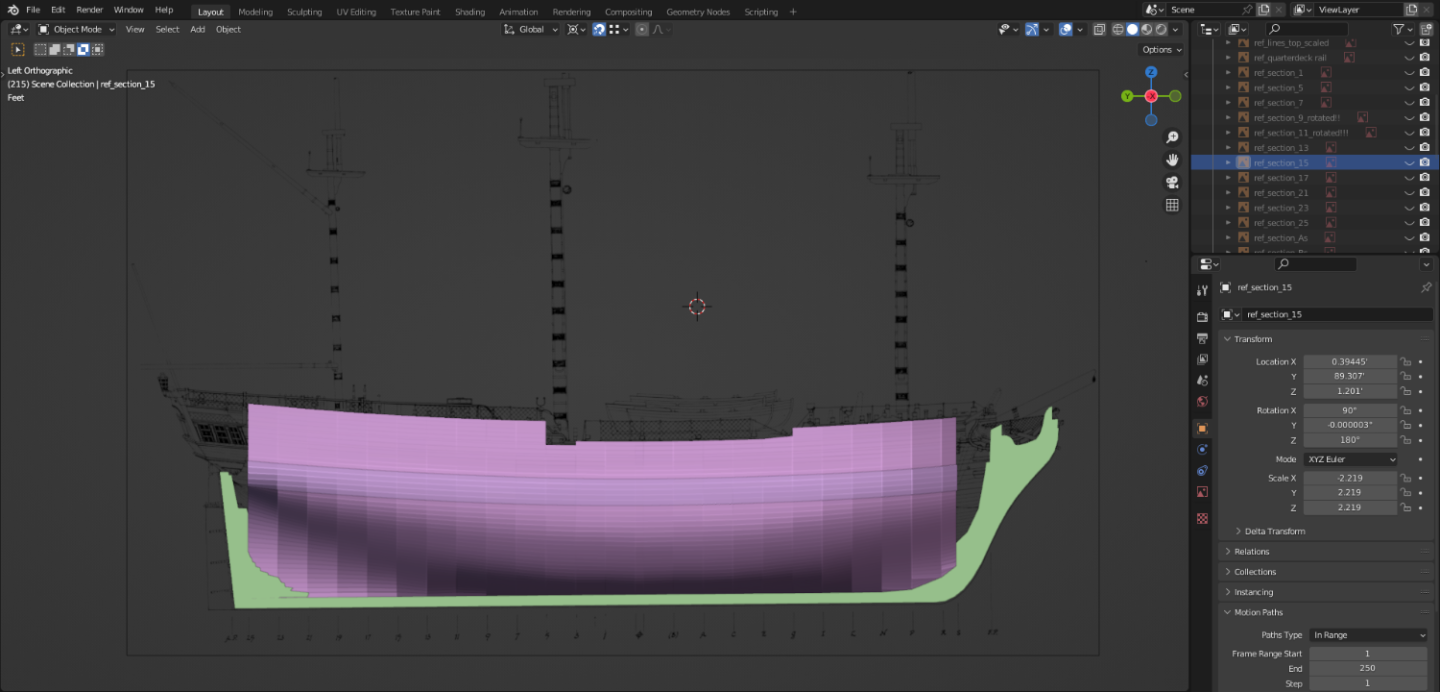
 Tackled the cant frames and started work on the stern. The stern framing is definitely more challenging than the rest of the frames, as there is a lot of small details that the plans don't show too well. One issue i'm having is with the transom frames. I've modeled them exactly off the plans and they fit well in the arrangement however they seem completely out of place when compared with the planking/hull shape surface. I know I will have to do a bevel cut on them to shape them to the planks but even so they seem to stick out quite far. The lines for station 25 are correct per the plan so I don't know what's going on here, will take more investigation! More to come shortly
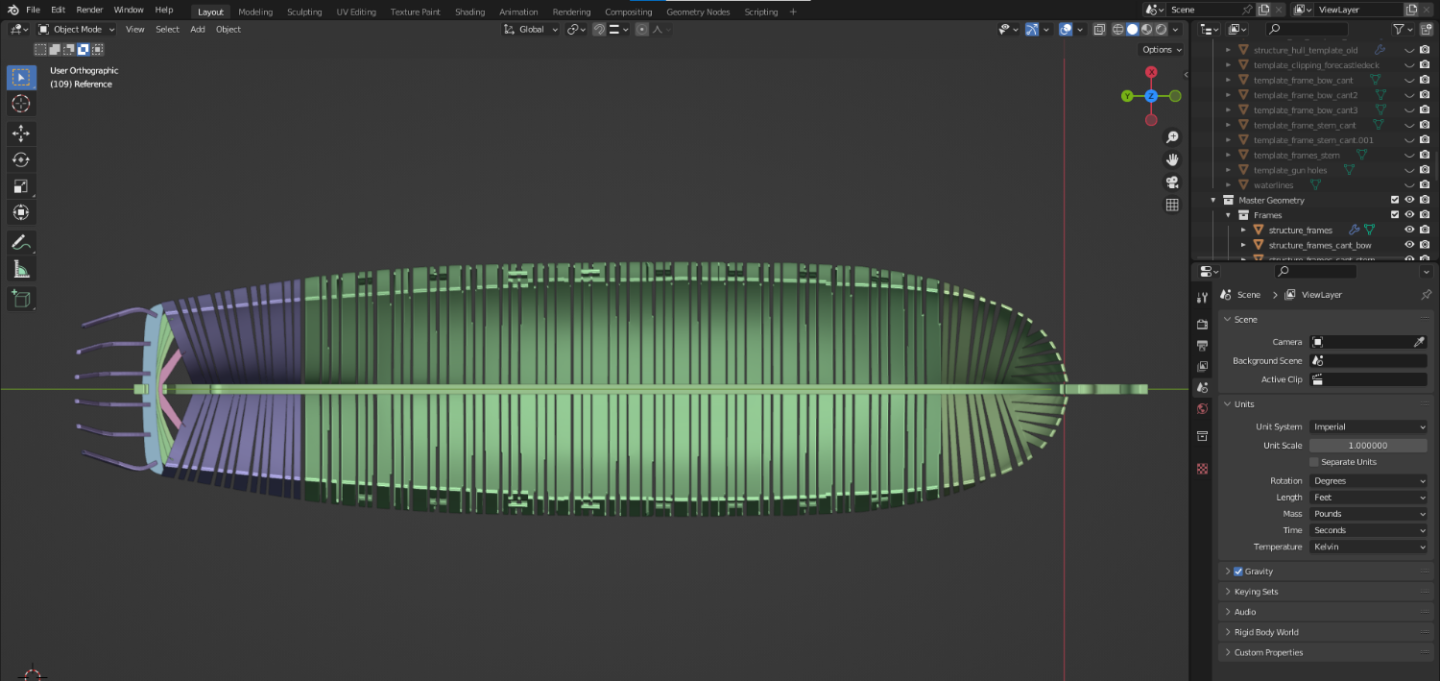


-
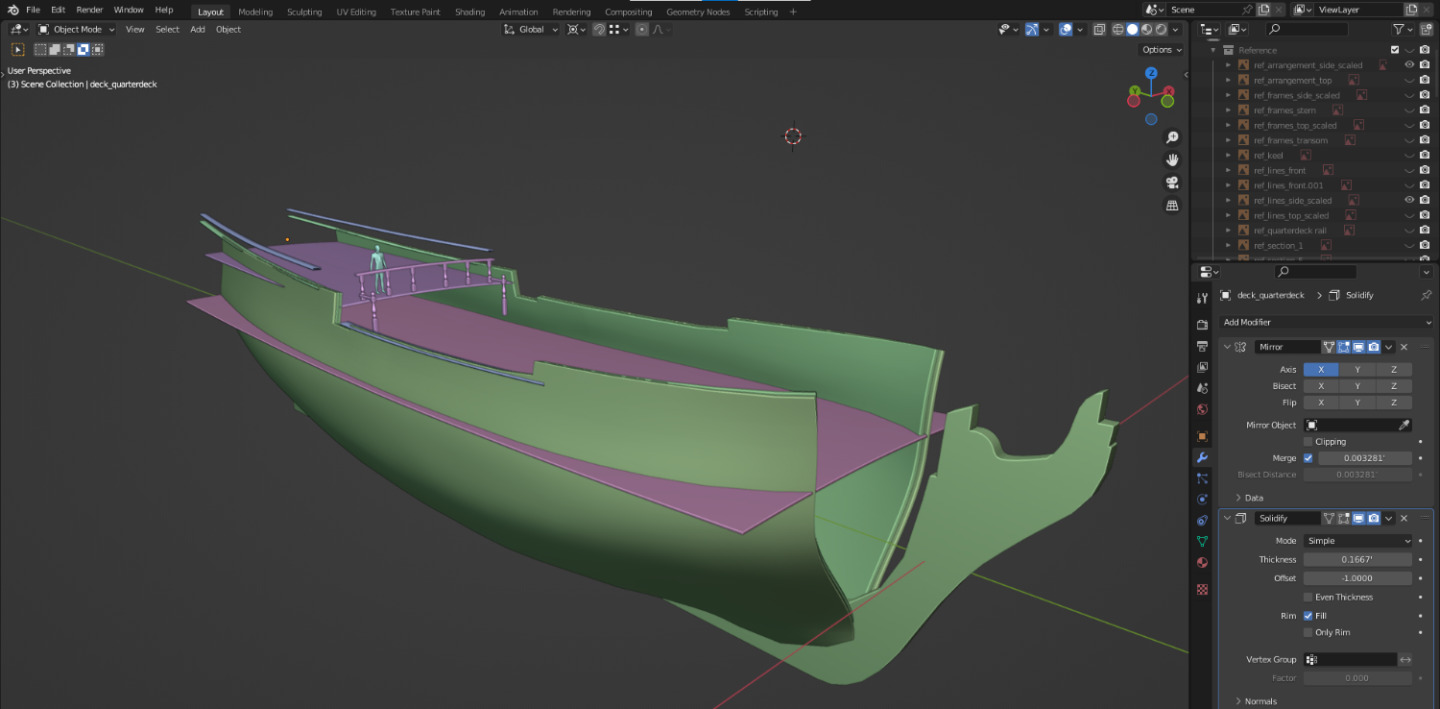
Thank you for the additional resources! I'll see if I can incorporate them to check my current lines. Straight frames are getting closer to completion, still have to finish the gun ports and the bitts and stanchions. Cutting out all of the futtocks was EXTREMELY tedious, and they won't even be visible in the model normally. Just wanted to give it a try. Due to limitations with the solidify modifiers I had to pick a "mean" thickness to the frames, but it would be significantly more work if I was to bevel them by hand. Deck profiles for main and quarterdeck complete, working on the rails as well As you can see i've been putting off doing the cant frames and transom, but I'll have to clench my teeth and tackle it soon!


-
mtaylor reacted to a post in a topic:
HMS Pandora - 24 Gun Frigate in 3D| Blender
-
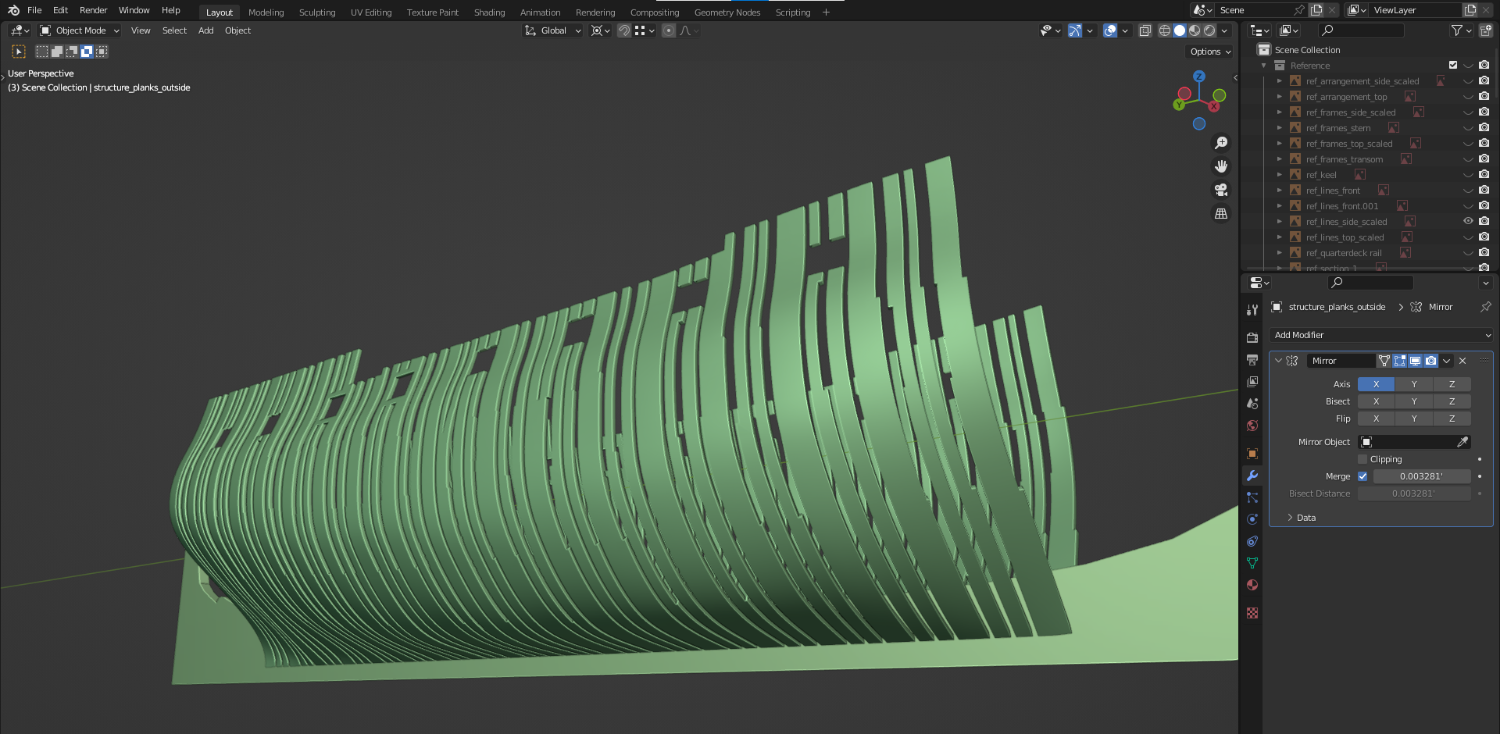
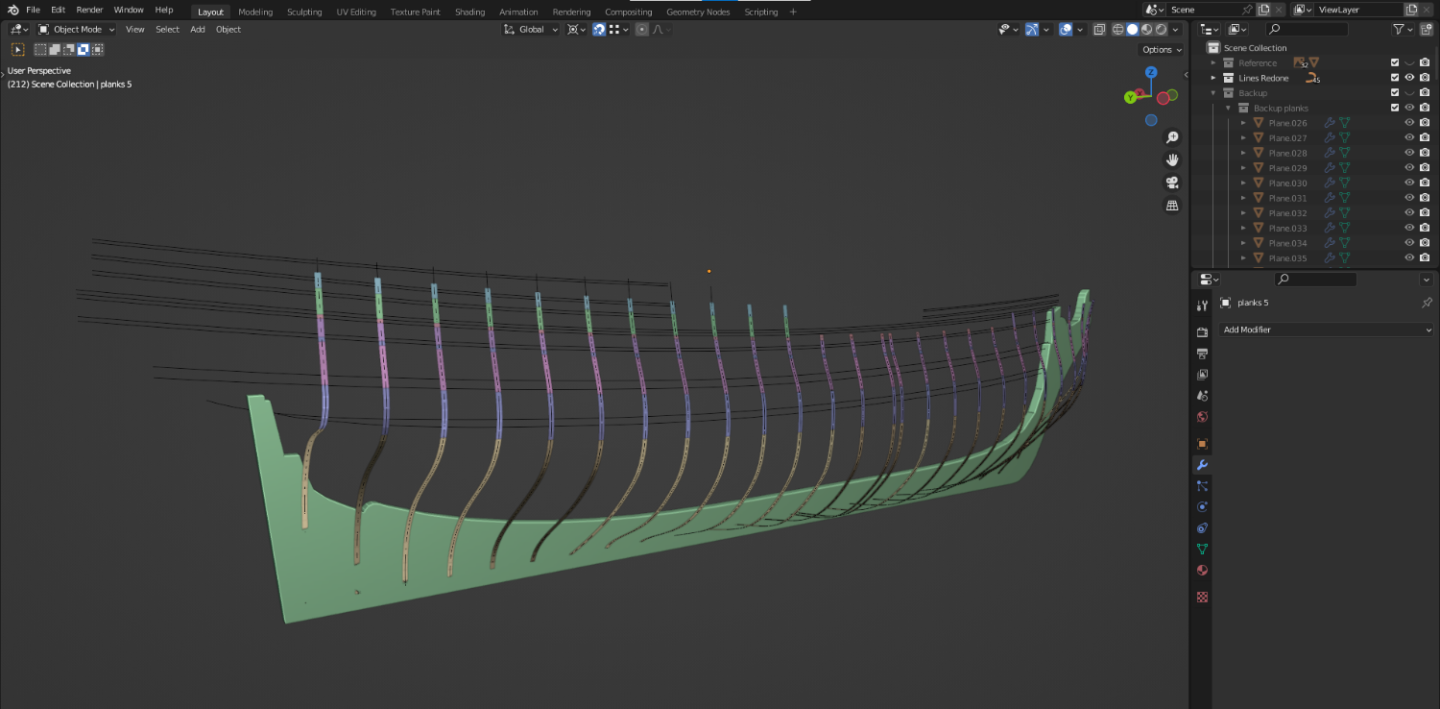
Hello everyone! I am back with a new project, the HMS Pandora, in which I hope to make significantly more progress on due to the readily available plans. As this model will be intended for use in a real-time application, I will be attempting to strike a balance between polycount and fidelity. To start, I began with scanning the plans from the AOTS book. This was a challenge in itself as I did not de-bind the pages as I don't wish to destroy the book. As a result there is some distortion in the plans requiring touch ups in photoshop, and of course stitching the scans together and straightening them out. I highly recommend anyone attempting this method to take their time in this step as small errors magnify greatly as you go forth. Would be a lot easier if you could get PDFs from the author 😜 I drew the lines as NURBs paths, then used the method demonstrated by @3DShipWright to "plank" the frames out. This is my second attempt at the hull, and I found this method gives significantly better results. A few tips for those attempting the same method: Make sure your 6x6 "plank" origin, generally the midpoint of the bottom edge, is the same as your body line, which should be sitting on the rabbet. I had to twist all the paths by 90 degrees to get the correct orientation, and I used the "Switch Direction" command to make sure it went the right way. In order to use the top two vertices to stretch to your wales/rails, make sure you enable "Display Modifier in Edit Mode" I am very happy with the result! It was very time consuming to individually stretch each frame to the next line, but this way a lot of the future topology issues should be resolved and the hull will look much more cohesive. Next I will fill in the geometry outside of the station lines, and attempt to get the transom correct, which I find is the hardest part of these ship models!! As I am a rookie to ship modelling and learning many of the specific construction details, I've ran into some challenges. One thing that threw me off at the beginning was that the body plan is drawn with a flat keel, while the ship has a raked keel. Therefore the waterlines on the body plan are actually CURVED, and I had to start all over to make sure I offset the frames from the rabbet after drawing them on the plan. Also the frames towards midships are so close together that they are almost impossible to distinguish, and require some manual "fairing" after the fact to get right. Another thing I am struggling with is how to accurately shape the keel with all of the tapers. I've simplified it to a constant width so as to not waste time with it in frustration but for whatever reason my mind cannot accurately visualize how to shape the bits especially towards the stem. I may try it at some point with some knife projections.


-
mtaylor reacted to a post in a topic:
3D Brig 'Rose' in Blender 3.3x
-
jmiba reacted to a post in a topic:
3D Brig 'Rose' in Blender 3.3x
-
Very impressive, I’ve started a new model using some of your techniques! I am going to try to keep the polycount down for real time application. Did you unwrap and texture the model as you went or after the fact? That’s one thing I am terrible at especially considering the types of geometry and just how much there is 😅
-
mtaylor reacted to a post in a topic:
3D Brig 'Rose' in Blender 3.3x
-
 3DShipWright reacted to a post in a topic:
3D Brig 'Rose' in Blender 3.3x
3DShipWright reacted to a post in a topic:
3D Brig 'Rose' in Blender 3.3x
-
CDR_Ret reacted to a post in a topic:
3D Brig 'Rose' in Blender 3.3x
-
Good lord the level of detail here is unbelievable. Out of curiosity what is your poly count? You are incredibly talented with blender!
-
BenD reacted to a post in a topic:
HMS Surprise/Rose by Maddog Shipyards - 1:1 3D Model
-
jchbeiner reacted to a post in a topic:
HMS Surprise/Rose by Maddog Shipyards - 1:1 3D Model
-
jchbeiner reacted to a post in a topic:
HMS Surprise/Rose by Maddog Shipyards - 1:1 3D Model
-
I am building the ship used for the movie, the 1970 replica, for reasons I listed in my Introduction/Project motivation post! The actual Surprise is indeed significantly different, I may take a whack at it afterwards for comparison
-
Update 1: Lines and Offsets Today we are lofting the table of offsets and starting to create the hull of the ship. Feedback on the site design is appreciate, as its my first time doing something like this! !
-
Maddog Shipyards changed their profile photo
-
Welcome to my project to digitally recreate the HMS Surprise, as seen in the movie Master and Commander. This vessel was converted from the HMS Rose, a replica frigate drawn from original admiralty plans. I will be hosting the progress updates on my personal site, however all updates and discussion will be posted on this site. Apologies if this is posted in the wrong forum, as I believe this project is unique from other logs here! Introduction and Project Motivation