javajohn
-
Posts
207 -
Joined
-
Last visited
Content Type
Profiles
Forums
Gallery
Events
Everything posted by javajohn
-
@Dave_E I certainly will!
-
@allanyed Thanks Allan! For the hull I mixed Liquitex Unbleached Titanium with a bit of Model Expo White. Washington is indeed beautiful. We can't wait to experience the seasons. Phoenix has two seasons: Hot and Not Hot 🙂 We are moving to the northwest corner of the state in Anacortes. We still need to find a permanent home but will be renting for a while we look. We've spent several weeks in both winter and summer to make sure we were good with both extremes. Our son and daughter-in-law live on a boat in the marina and love the lifestyle.
-
A quick update - or lack thereof - of progress. I've put all of the modeling tools away since we are getting ready for our move to Washington end of January. I don't expect to start again until mid-February. Our house is on the market and we have to keep things pristine for showing which means the model area has to be kept clean and sharp tools and nasty chemicals put safely away. I figured it was easiest just to pack everything up. We are really excited to start a new adventure in the pacific northwest and be near our kids. My wife has lived in Phoenix her entire life, so it will be a big change for her! I hope everyone has a happy new year!
-
100% agreement with @Javelin! That's a truly impressive - and inspiring - repair; It shows me that with perseverance and determination we can all fix those seemingly impossible-to-fix problems.
-
Great tip for a ladder jig! I'm going to steal your idea! Have a Happy Thanksgiving!
-
Ditto! It's nice to see another Rattlesnake build!
-
Thanks for the kind words, @Dave_E! I am getting inspiration from others; I think of it as a team effort!
-
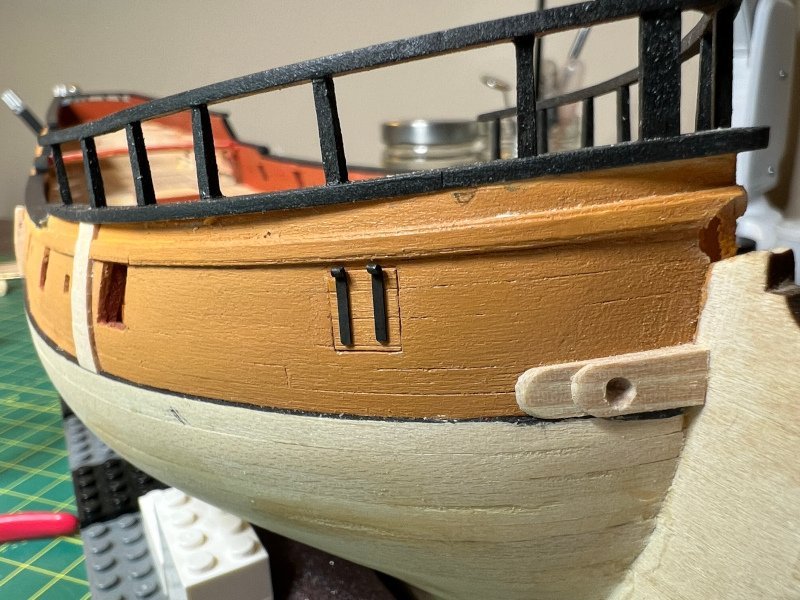
Thanks everyone for the likes. I decided to paint the boarding ladders, crosstrees and anchor pads black to give a little contrast against the yellow ochre. I think it turned out pretty good.
-
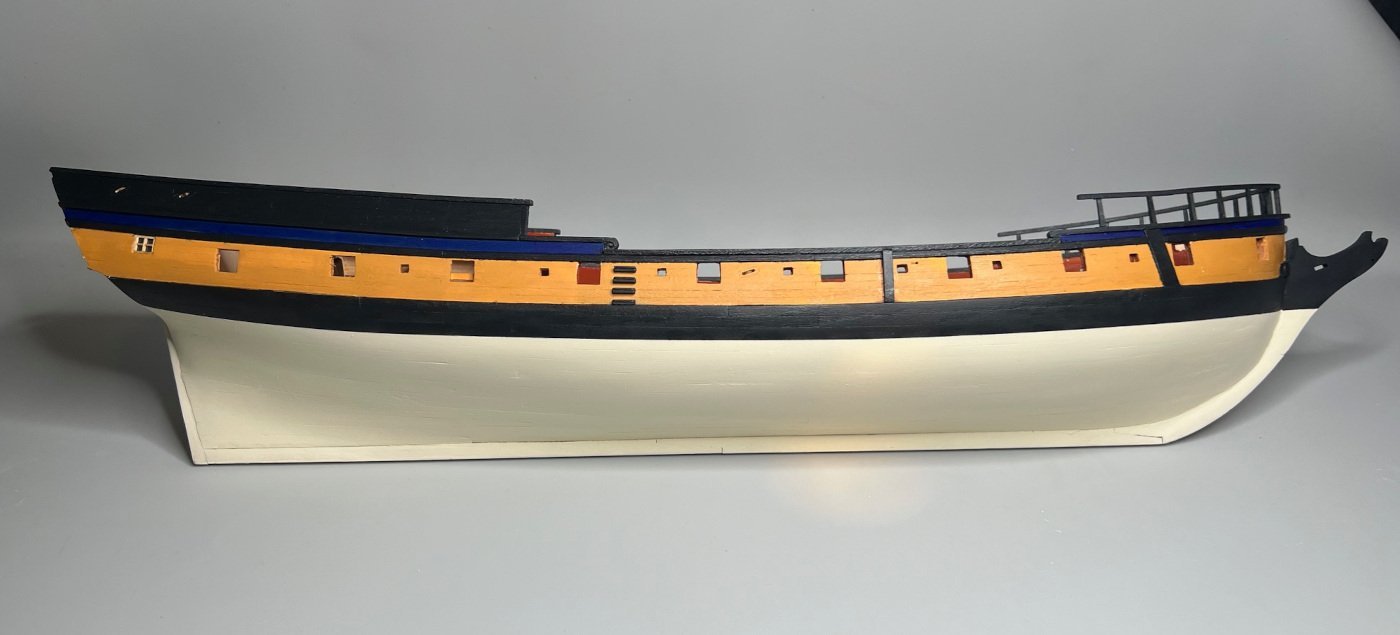
Quick update - I finished painting the hull. I used unwaxed shellac as a sealer. You can see some places where I didn't quite put on enough - lots of deep lines where the planks meet. The paint bonded well to the shellac. The blue was a bit disappointing - a bit too dark. I used Liquitex ultramarine blue, but it dried much darker than I expected. Most of their paints don't shift colors appreciably when they dry, but this one does. I should have tested first, but I didn't want to add yet a third coat onto the model, so I'm leaving it. It still looks fine in bright light. For the hull color, I used equal mixes of Model-expo's white and Liquitex unbleached titanium. I wanted to see how well the Liquitex works compared to the MSW by itself and it worked very well At the line where the hull tallow color meets the black, I used 1/8"Tamiya masking tape. Over that I used a Scotch brand masking tape for automobile detailing. The Tamiya tape is wonderful - it easily peeled off. The Scotch tape was far too sticky and ended up pulling the paint off the model where I didn't seal it very well. A bit of touch up work fixed the issue. I forgot to paint the window frames, but I'll do that later. Now it's on to finishing the gunports and start working deck details.
-
@Gustav Ykema Yes, just email them and explain. My kit was missing the filler blocks for the aft and stern. Model-expo replaced them promptly. While I'm writing I should give an update - things are extremely slow and will be for the foreseeable future. There are too many other things going on in our lives that are taking me away from modeling. So, I'm down to maybe a few hours each month. I do spend a few minutes each morning with my coffee on the forum, though. I did start re-painting the hull and will hopefully have it done this weekend and show some pictures. I put my thumb again where it doesn't belong and broke the large grating. Ugh. So, more repairs! I think @Dave_E made a comment on his build log that he tossed the Model-Expo paints. I'm about to do the same! They dry much too quickly which results in blobs of partially set paint on the model and brush. I constantly have to dip the brush in water to keep it from drying out. That's even after thinning. I'm sure the lack of humidity in Phoenix also plays a role!
-
Nice work, Ed! Your Rattlesnake is really looking good.
-
Very nice work, Ed! How much work did it take to prepare them for painting? I left them off my model mainly due to the poor quality. I'm not sure I'd be able to make them look good.
-
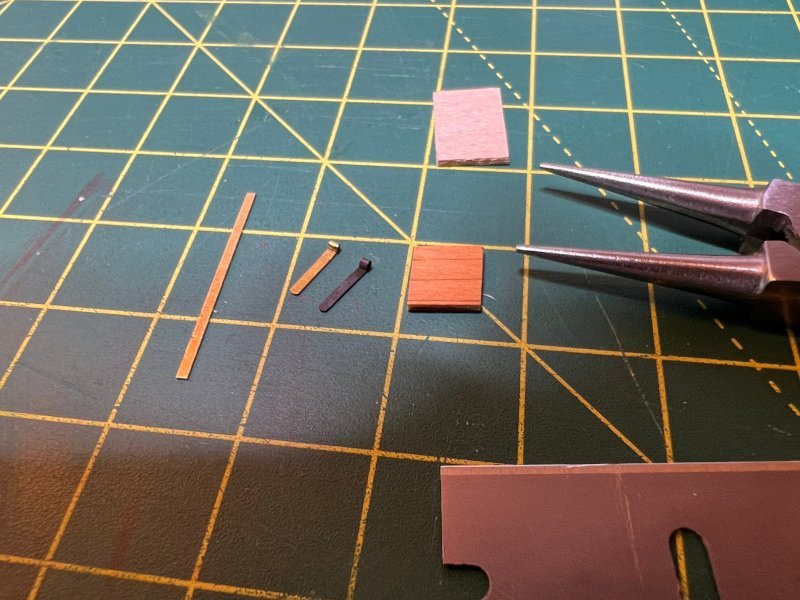
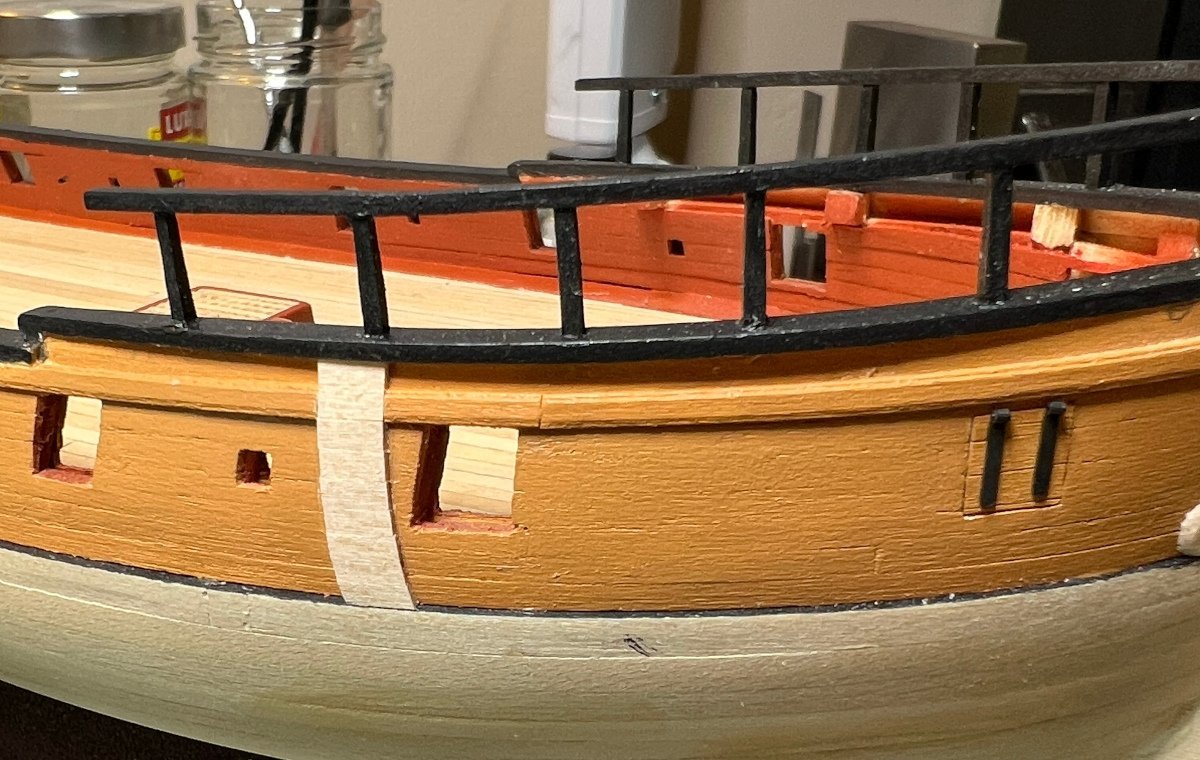
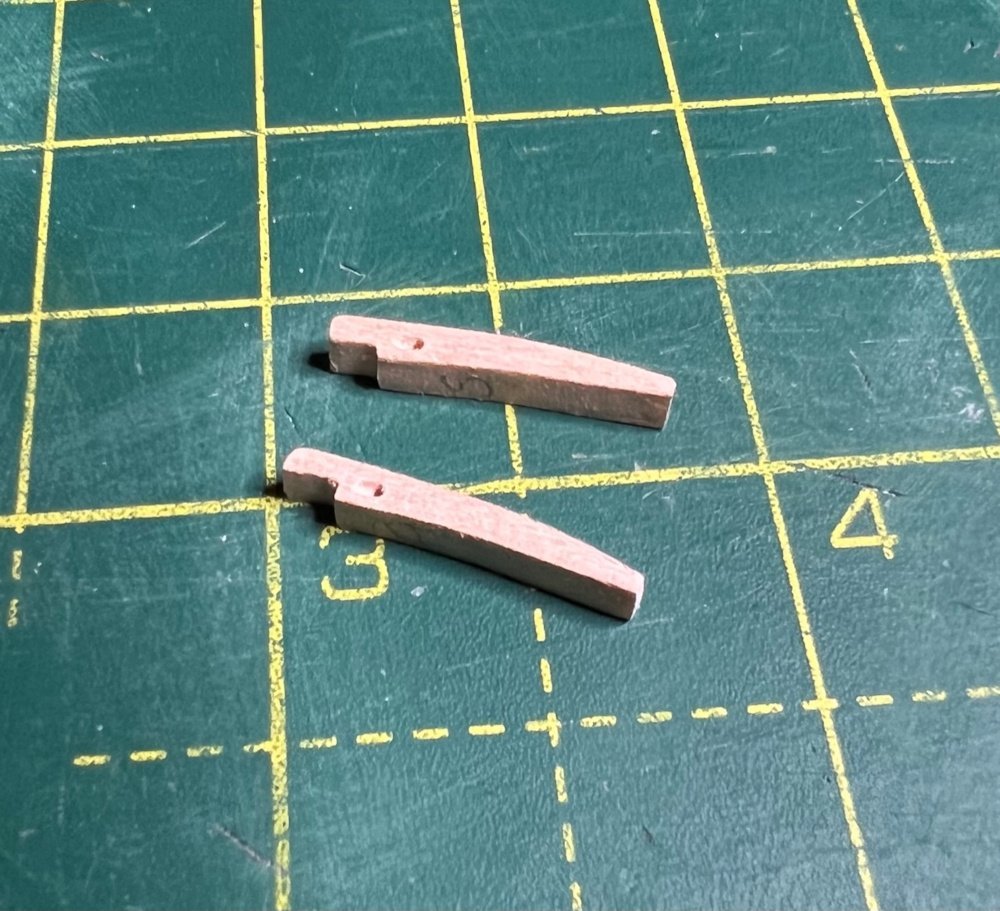
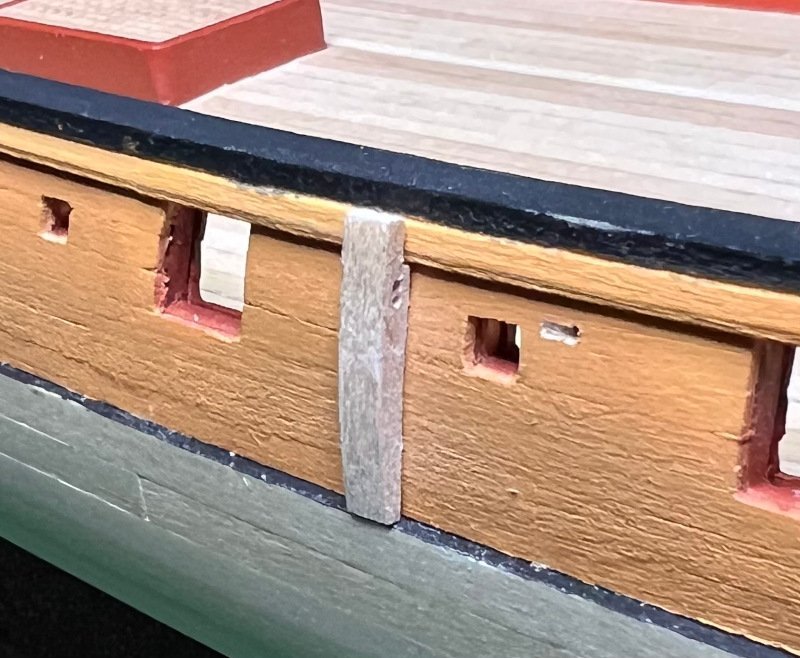
We took a few weeks off to go visit our son and daughter-in-law in Anacortes, Washington. It was nice getting out the 110+ degree temperatures of Phoenix! We are planning to move up there next year as I get closer to retirement. I work remotely and my employer is fine with me moving to Washington, so the preparations are beginning! Anyway, I'm now back to modeling a few hours on the weekends. I finished the anchor pads.They are constructed from 1/32"x 3/32" planks. I then got an itch to try creating a gunport lid. Because I plan on having the lids closed, I will have to make each one individually; I didn't make the gunports the same size. I cut the lid from the 3/64" x 1" basswood strip. I covered the gunport with cellophane tape to mark the port corners and used that to transfer the wood strip and cut it out. Once I was satisfied with the fit, I painted the lid. I used a razor blade to score the plank edges by pushing down slightly and then rocking the razor blade back and forth a few times. I cut some 0.3mm thick brass into 1.1mm strips and used some Jewler's pliers to bend a small curl at the end to suggest a hinge and used a dremel to clean it up a bit. I used Brass Black to blacken the hinge. I think for this model, the results will be good enough even though the hinge isn't really "complete". It's a bit beyond my skill to attempt a full hinge, but I'm quite satisfied with the result! I've ordered some maritime blue paint from Liquitex because I really like @Ed Ku20's color scheme on his Rattlesnake. Before I complete the gunport lids, I'll install the ladder steps and finish painting the hull. Creating the gunport lids: The lid test-fitted: The anchor pad:
-
Wow, Ed, she looks great! I've been considering precisely the same colors for my Rattlesnake! I saw an image of another Rattlesnake build with this color scheme and really liked it, but it is really uncommon. Also, all of the Winchelsea builds on the forum have me thinking this way. The blue (I assume Prussian Blue?) really makes it pop. How did you come to decide on the colors?
-
2023 Donations drive
javajohn replied to James H's topic in How to use the MSW forum - **NO MODELING CONTENT**
I just sent in my donation. I've benefited so much from the work that the team at MSW has done, and all of the help of the members. It is truly a remarkable resource. -
Ed, Your moldings look fantastic!
-
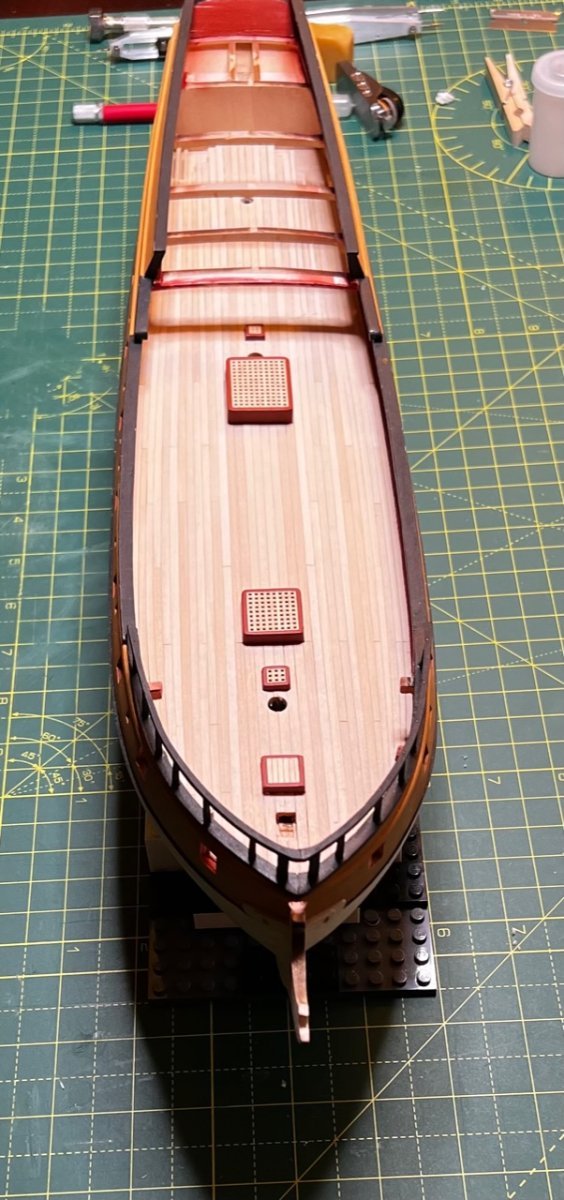
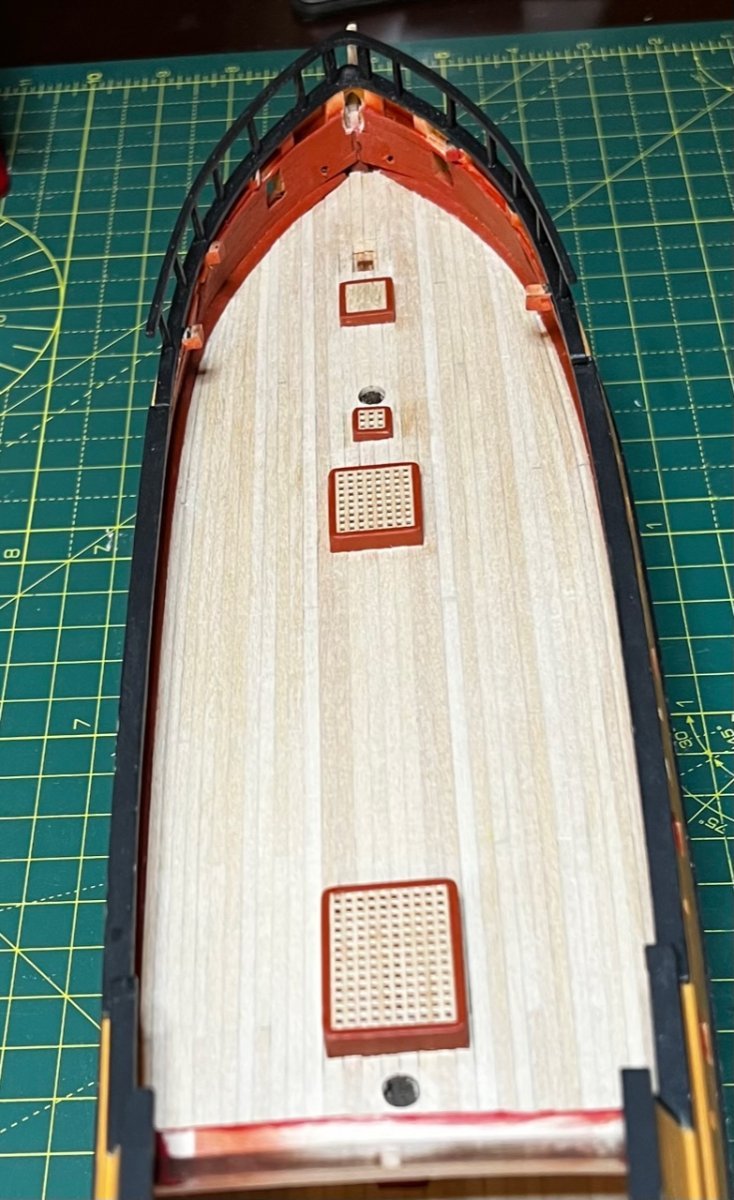
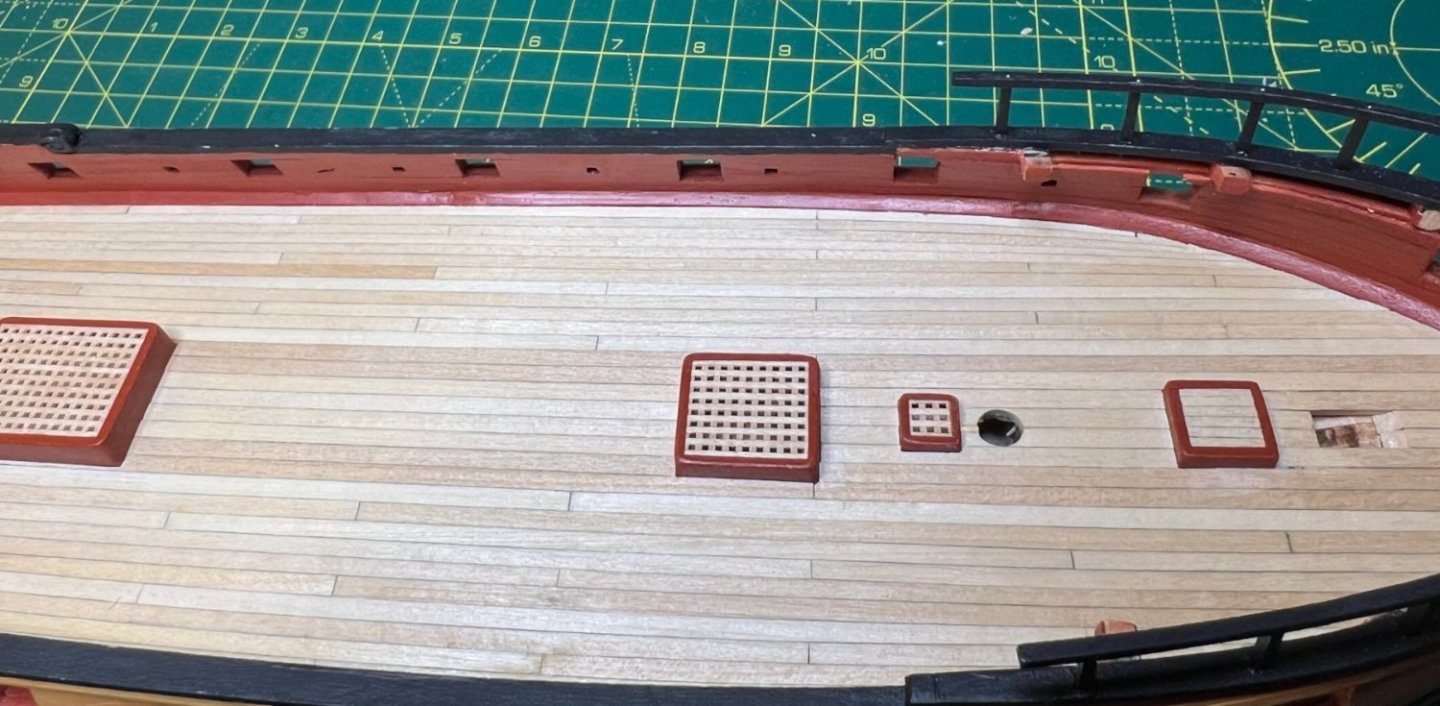
Thanks @Ed Ku20! Yes, we have to pick our battles 🙂 For some reason, there are mistakes that will bug me to no end and I hvae to fix them even though I will be the only one that notices. My Wife's #1 comment on my models when I show her what I'm doing is "No one will ever see that!" Two more updates: I put some WOP on the deck and now the caulk lines really stand out much better. I'm quite pleased with the result. I completed the chesstrees and test fitted them. I wasn't sure about the shape, but this is what I came up with. I'm debating how to paint them - black or yellow ochre. I've seen some models where the anchor pads, chesstrees and ladder steps were black, others yellow. The navy museum model has them the same color as the bulwarks (yellow ochre).
-
I discovered I made a bonehead mistake with the steam grate while studying the plans to see what to do next. I completely missed the fact that it is offset to the port side, not centered. The repair would require reinstalling 5 planks. Leaving it as-is won't make much difference to the finished model since the grate will be largely obscured by the ship's boat. I'm leaning toward not fixing it. I'm not building for complete accuracy anyway. When you guys make such mistakes do you let it slide, or try to fix it?
-
My Mother once told me she used to rub whiskey on my gums when I was teething to numb the pain. It's probably why I like a good single malt scotch.
- 227 replies
-
- 10
-

-

-
I finally finished planking the gun deck. It turned out better than I expected, so I'm pretty happy with how it turned out. Basswood is soft and the edges of the planks could "dent" if I wasn't careful; just a slight bend the wrong way or applying too much pressure with a pair of tweezers while placing the plank could ruin it! That happened to me more than once. I used the pencil lead method to mimic the caulking between the planks. It turned out to be a bit inconsistent and a bit light, but I think once I apply a finish it will look good. The planking under the forecastle deck would have been more of a challenge had I not removed the beams. I didn't bother fixing the area around the bowsprit because it really won't be visible. I also didn't bother too much with the planking under the quarter deck because it will only be visible from the ladderway. The photos show it unfinished. I think I will coat it with wipe-on poly to protect it and bring out the seams. Next up: chesstrees, anchor pads, hull painting, then I think I'll work on the screen bulkhead which should be a fun project.


-
Really great advice here. @jpalmer1970 mentioned rubber bands. I have rubber bands that I cut into strips. I use hemostats to clamp the ends of the bands once I've positioned them. @Bob Cleek mentioned get the best tools you can afford. Take this advice to heart! I kick myself every time I try to save money and go with a cheap tool. I bought a box of cheap plastic clamps that I ended up throwing away because they were more frustrating than useful. I use single-edge razor blades quite a bit. I use them for trimming and to score planks to simulate where the ends meet.
-
Byrnes Table Saw Configeration
javajohn replied to Guyuti's topic in Modeling tools and Workshop Equipment
I used the sliding table with a jig for making gratings the first time and it really helped to prevent wandering or yawing of the piece as I cut grooves. It was easier and much faster than using the micrometer stop which resulted in a less than stellar attempt. I talk about my grating journey in my Rattlesnake build. @Roger Pellett - good advice on painting the miter pin! I agree with others the extended fence and miter bar are essential. I have not had an opportunity to use the rip taper gauge and didn't purchase the tilting table. That 90T 0.03 blade is definitely the workhorse. -
Ed, After seeing your chesstree, I took another look at the plans. There is a sheave in the bulwark just forward of the chesstree. I missed it and will have to add it to my build. The line goes through the chesstree sheave, then passes through the bulwark via another sheave and is belayed to a cleat on the inner bulwark. What I don't understand is why that sheave is so much smaller than the others.
-
Ed, Thanks for the very informative explanation of your process for making the chesstrees! Your covering boards look great! I think it is natural for us as modelers to obsess over details . Choose your battles based on skill and don't fret over things beyond them! It's all about learning and improving. I get much satisfaction over accomplishing something I've never done before, even though my work won't make it into the ship model hall of fame 🙂