
Mark m
-
Posts
47 -
Joined
-
Last visited
Content Type
Profiles
Forums
Gallery
Events
Everything posted by Mark m
-
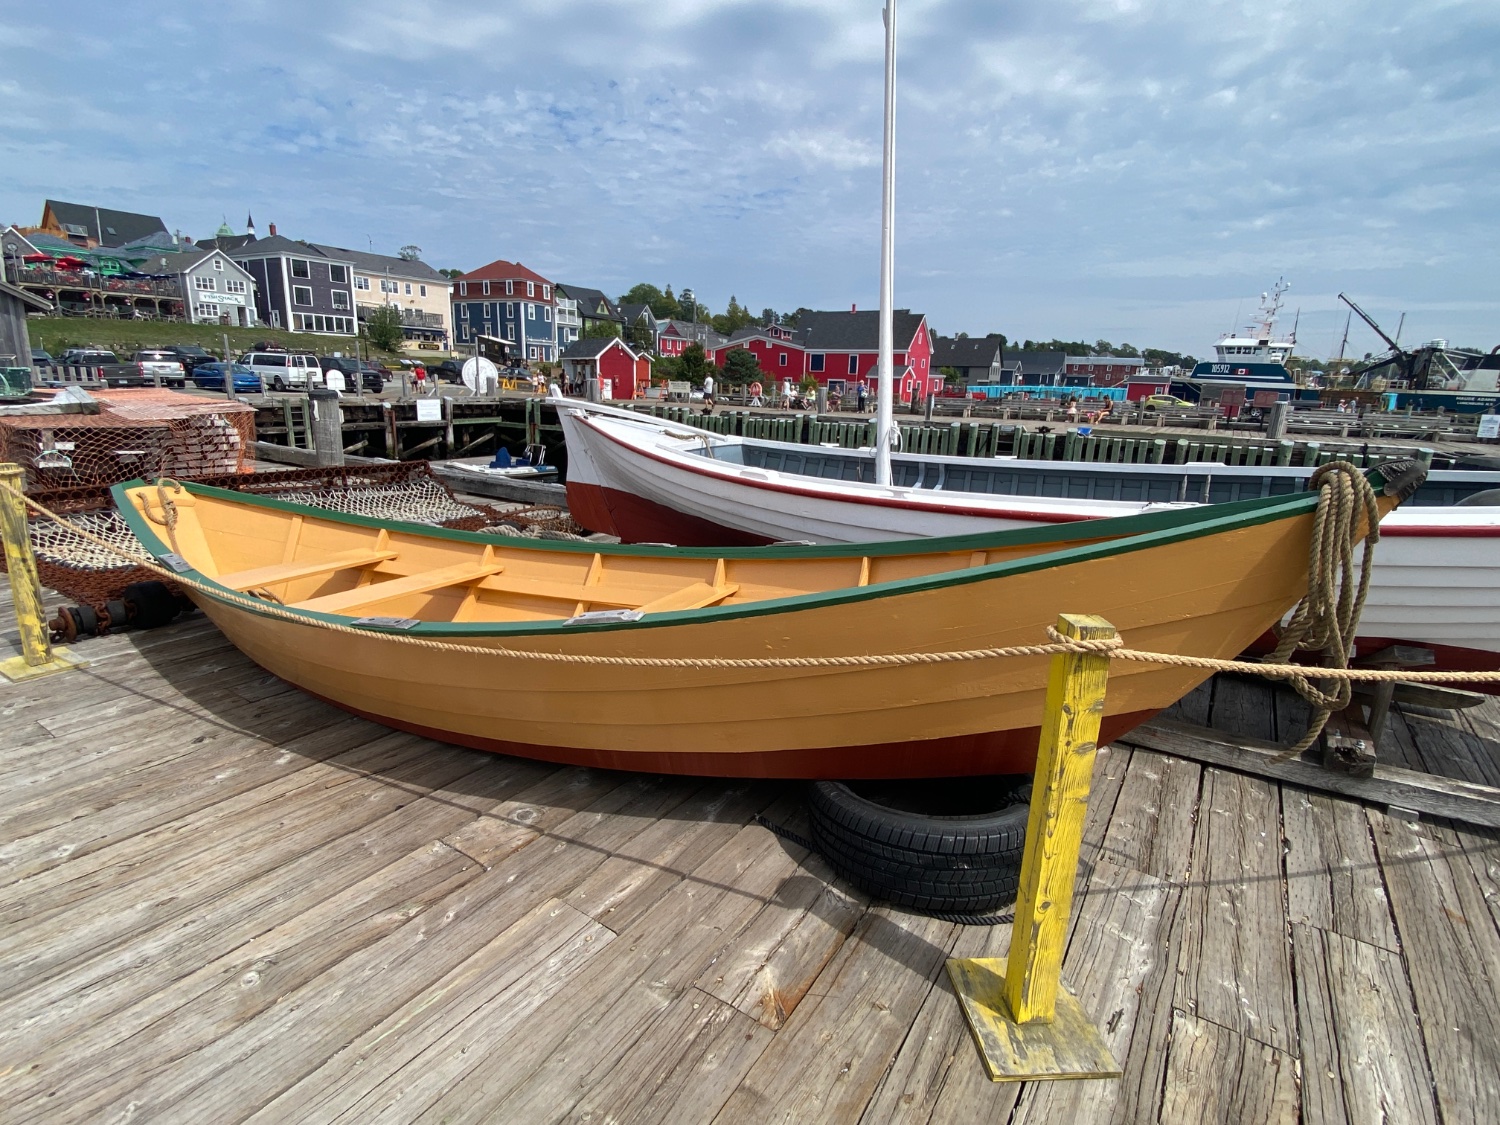
I’ve been in Nova Scotia for a couple of weeks. Dories are popular here. Museums, Dory Shop, etc. Nice to see the real thing!

- 15 replies
-
- 2
-

-
- Model Shipways
- Shipwright Series
- (and 2 more)
-
I travel around the US and Canada. Often nowhere near a good hobby shop, but I prefer in-store when I can.
-
I bought a set of small drill bits on Amazon. I measured the bits, and found that the sizes were mostly incorrect, and that 2 or 3 supposedly different sizes were actually identical. In searching the MSW forums, I saw similar complaints about other vendors. Now I’m looking for better quality bits. Is there a good brand or supplier I should look to?
-
Finding miniature bolts
Mark m replied to Mark m's topic in Metal Work, Soldering and Metal Fittings
I’ll try that. The pictures in the kit instructions show a round head, so a carriage bolt is more appropriate. Thanks! -
Finding miniature bolts
Mark m replied to Mark m's topic in Metal Work, Soldering and Metal Fittings
I’ll look into that. Thanks! -
Model Shipways paint
Mark m replied to Mark m's topic in Painting, finishing and weathering products and techniques
Yeah. Paint stirrers for hand drills recommend 600 rpm, and my Dremel slowest is 5000. Thinking of using mixing balls. -
Model Shipways paint
Mark m replied to Mark m's topic in Painting, finishing and weathering products and techniques
I wonder if anyone has a Dremel attachment for this. -
I am paint my second kit (MS Norwegian Pram) with the MS paints it came with. Purchased in April. Paint seems thick and not well mixed even after a good shake. I have read threads here about acrylics I general, and a little about Model Shipways specifically. What is the best way to mix and thin this paint? Is water good, or should I use something else? I’ve noticed other brands have brand-specific thinners.
-
@ccoyle I am trying to make a good looking bolt head. Can you provide a link or other source for bolt heads?
- 84 replies
-
- 1
-
-
- Statenjacht
- Kolderstok
- (and 1 more)
-
Finding miniature bolts
Mark m replied to Mark m's topic in Metal Work, Soldering and Metal Fittings
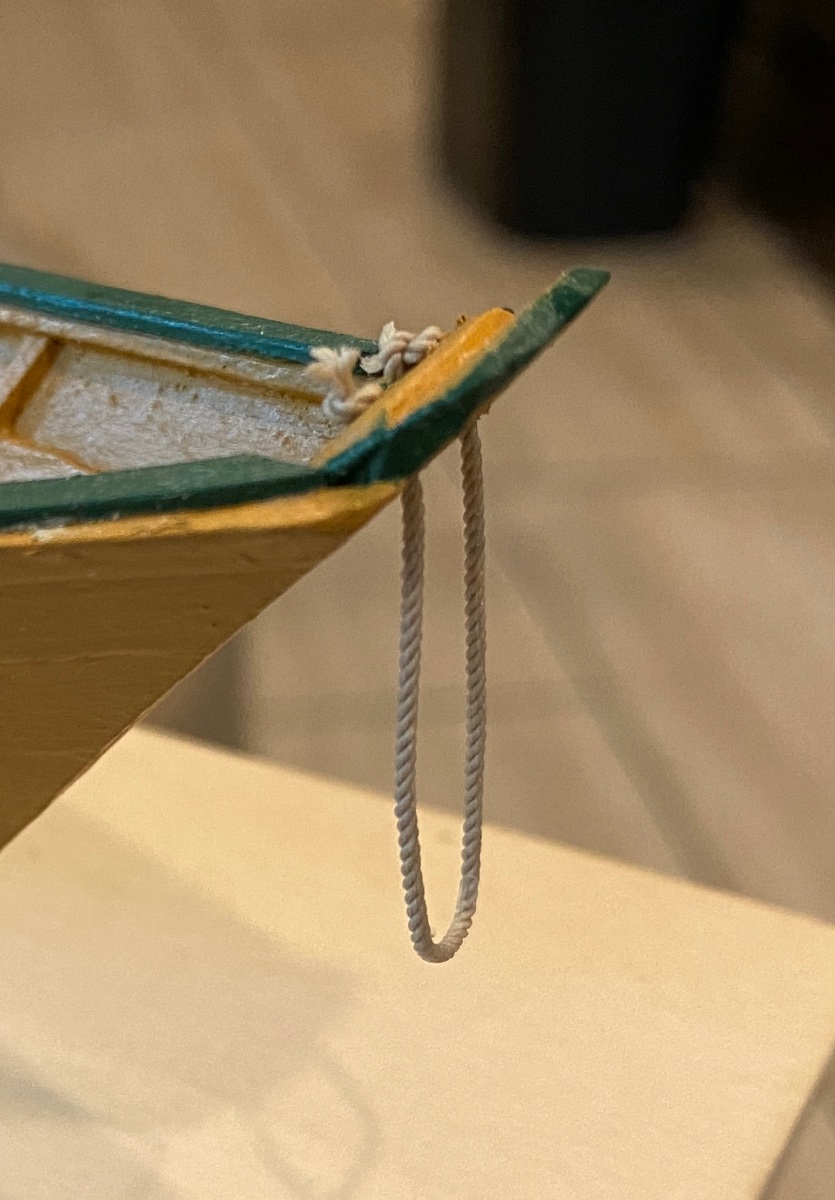
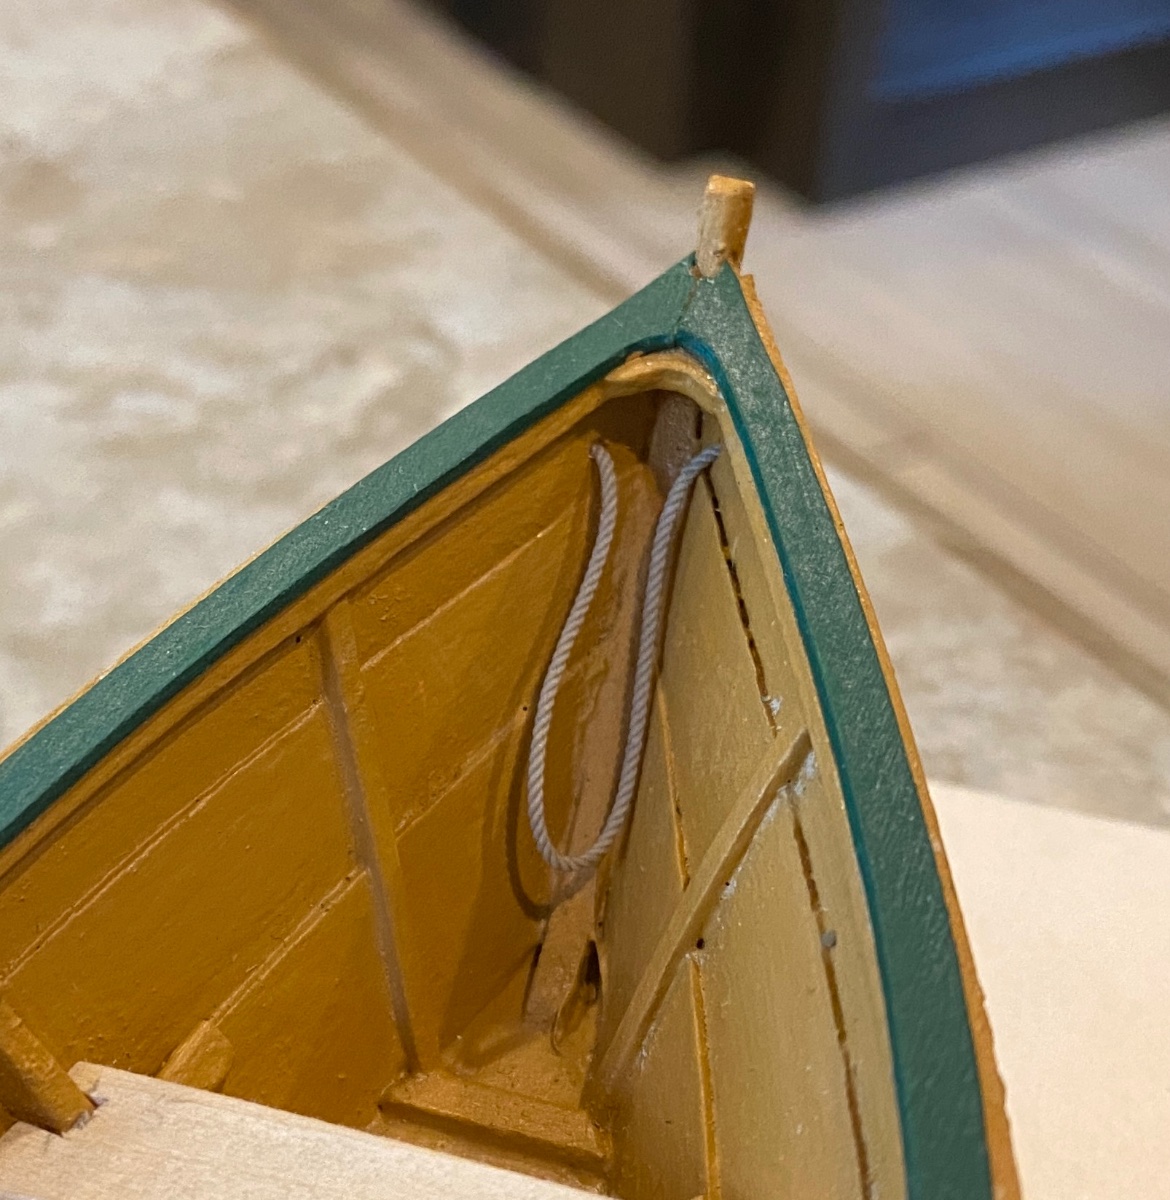
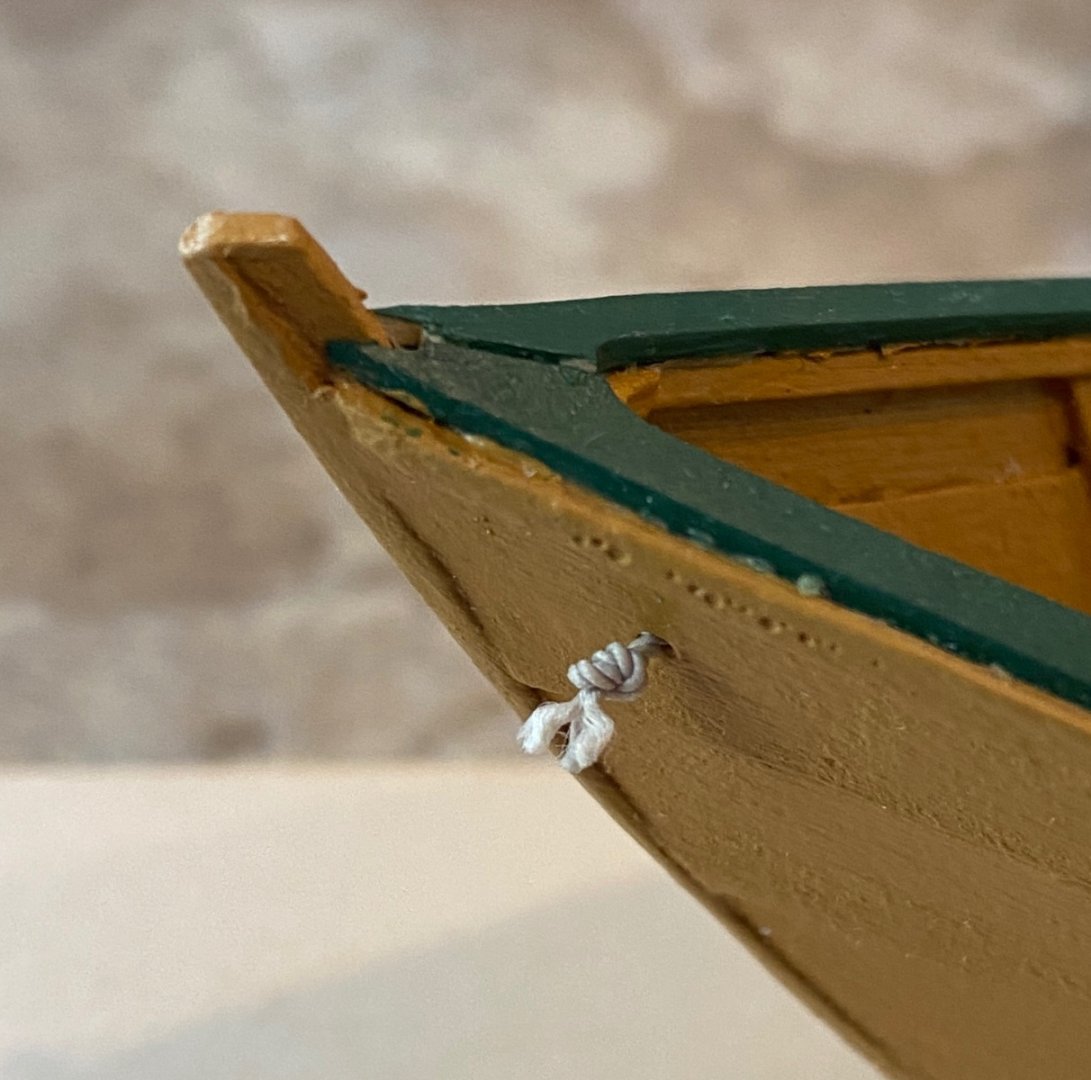
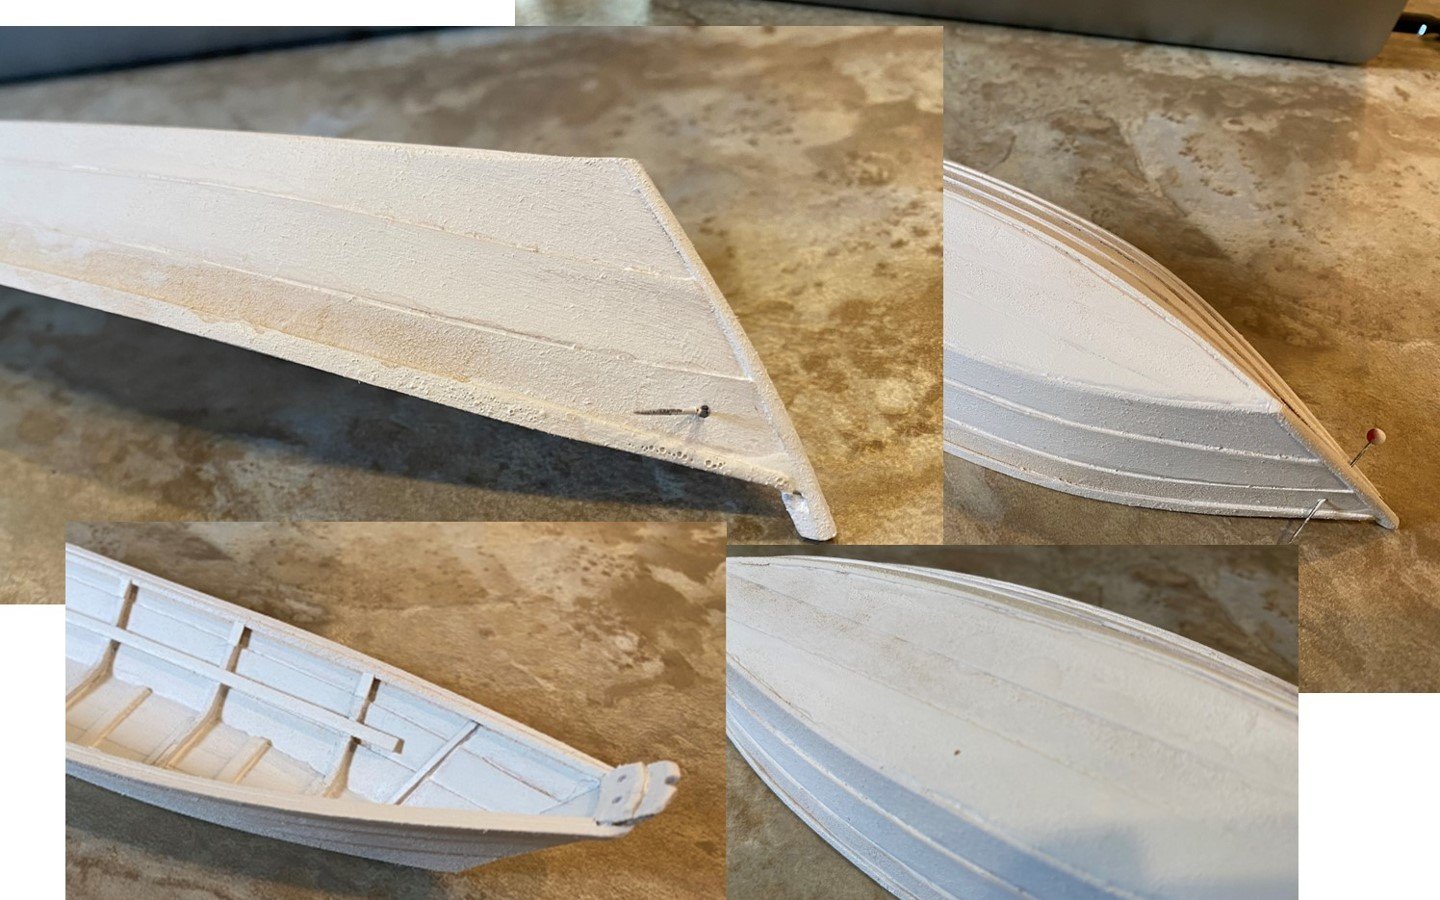
Picture shows nail which is supposed to fit into small holes in adjacent brass fittings.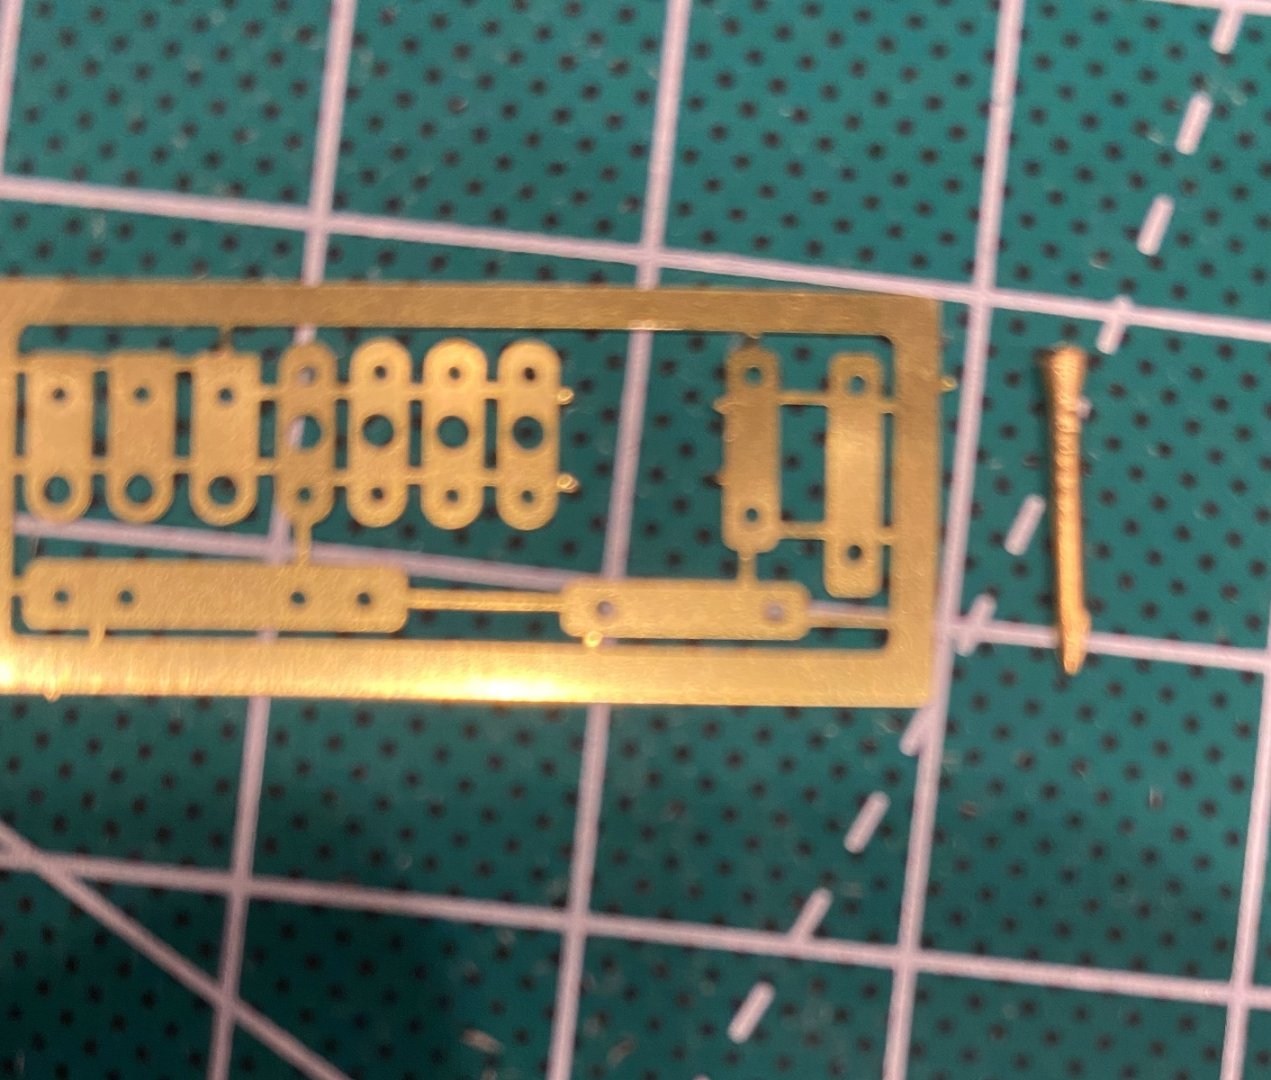
-
I am working on the Norwegian Pram from Model Shipways. The kit includes 16 brass nails. However, the instructions call for bolts. I know nails can represent bolts, but there are 2 issues. 1. The pictures show very attractive round heads, whereas the nails are flat. 2. More importantly, the nails are very wide just below the heads and even the diameter of the rest of the shaft is too large for the brass fittings in the kit. Where can I buy better-looking “bolts”? Thanks!
-
I’ve been on both sides of this issue. As a seller, shipping is very expensive for small sellers, even with the EBay discount rates. As a buyer, I think it’s best to consider the total cost (item price plus S&H). $20 with free shipping is not as good as $1 with $16 shipping. As an aside, the “developing countries” subsidy can lead to ridiculous situations. I needed one or two needle threaders, but it was cheaper to buy 50 from China than 1 from the US!
-
Still on my simple Model Shipways Norwegian Pram. But looking ahead to future builds.
-
I’ve read the excellent thread here on MSW discussing the Model Expo ratliner and some related pros and cons of rigging on ship vs off. In Ship Modeling Simplified, Mastini recommends putting the mast into a hole drilled into a 2x4 and building the rigging off ship before moving everything onboard. What are peoples thoughts on his recommendation?
-
Finally got around to adding the rope from Ropes of Scale. Looks much better than the kit rope would have. What, if anything, should I have done about the fraying ends? Real rope frays, but this looks excessive.


-
I am a fairly new ship builder, having completed the Model Shipways Dory and working on the Norwegian Pram. Next up is the Muscongus Bay Lobster Smack. I have recently acquired a number of kits in a package deal, and am trying to decide the order in which to build them. Any opinions on the relative difficulty of these kits: Occre Essex Model Shipways Armed Virginia Sloop Model Shipways Glad Tidings Model Shipways Flying Fish Model Shipways Ben Latham Model Shipways Emma Berry Model Shipways Bedford Whaleboat Model Shipways Fair American Model Shipways Niagara Model Shipways Sultana (old, solid hull)
-
What's a good kit for learning rigging?
Mark m replied to Mark m's topic in Masting, rigging and sails
I’m reading this one. More detailed than I need, and wrong era for you. Perhaps start a separate topic in the forum and others may comment.
-
Storage and transportation
Mark m replied to Mark m's topic in Modeling tools and Workshop Equipment
Thanks for the detailed explanation! -
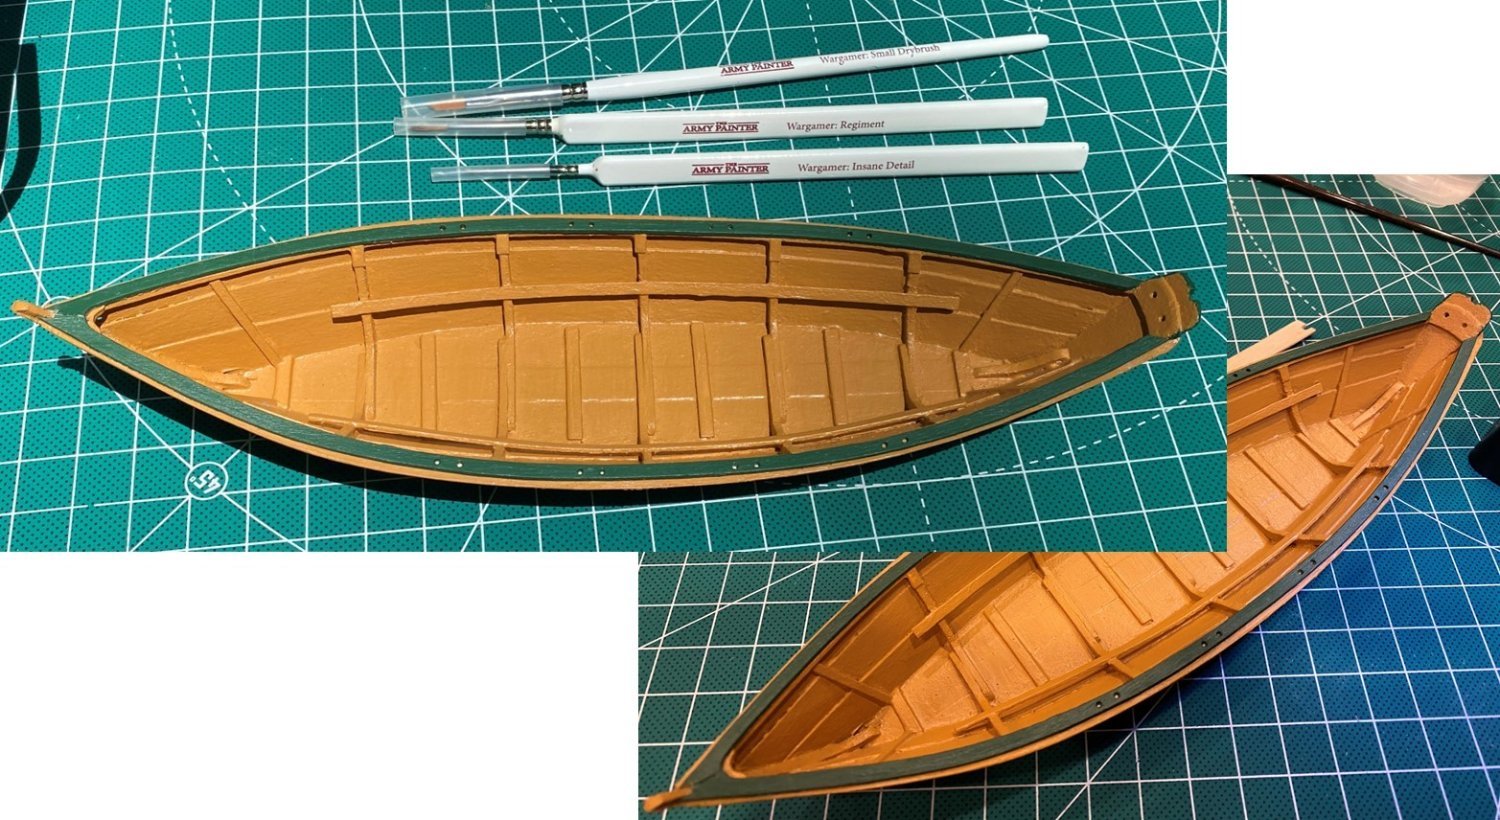
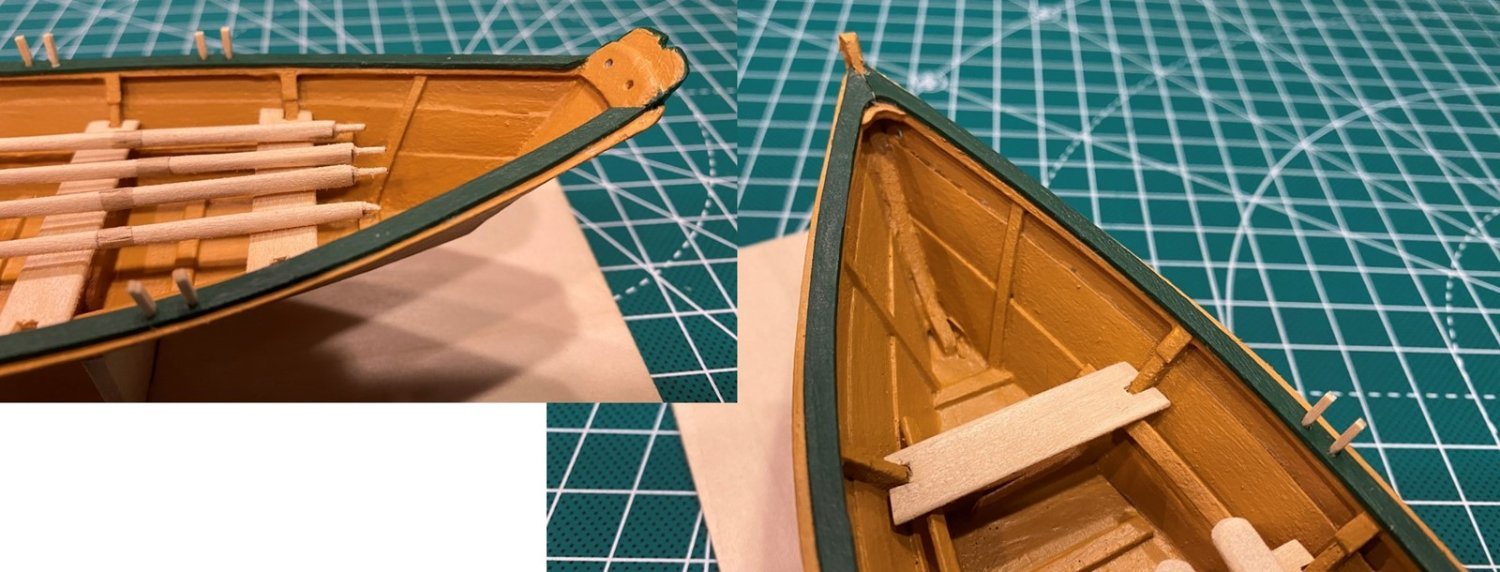
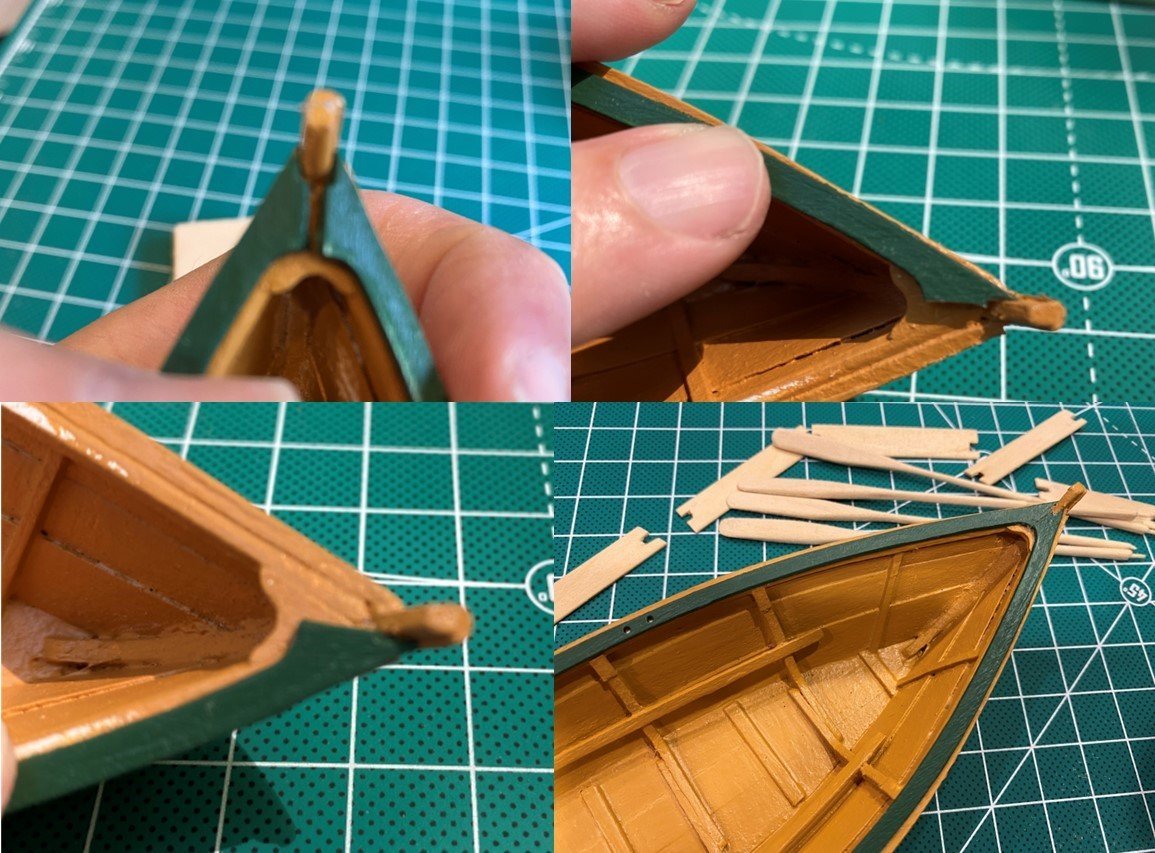
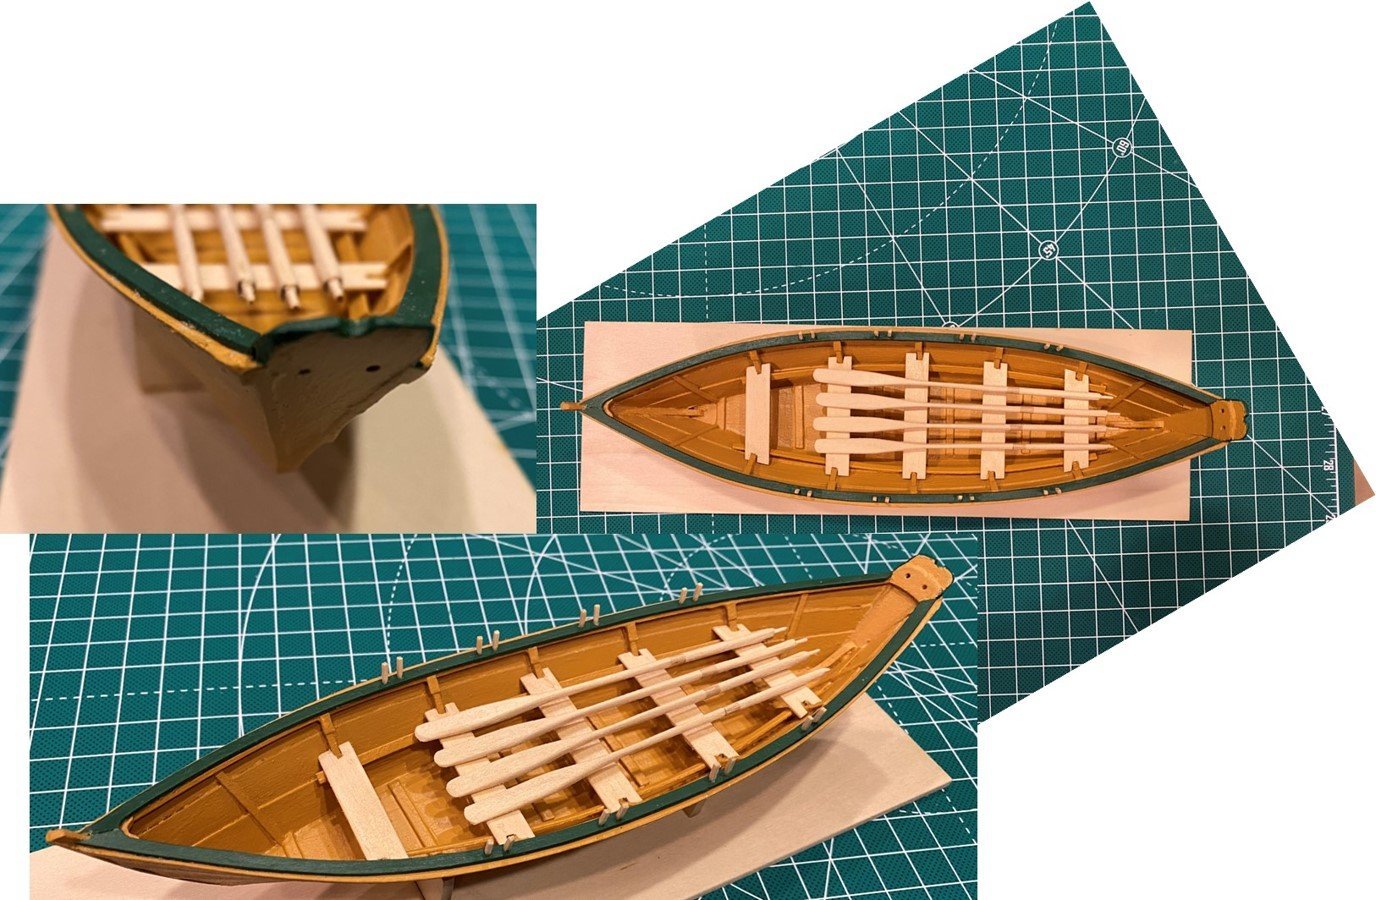
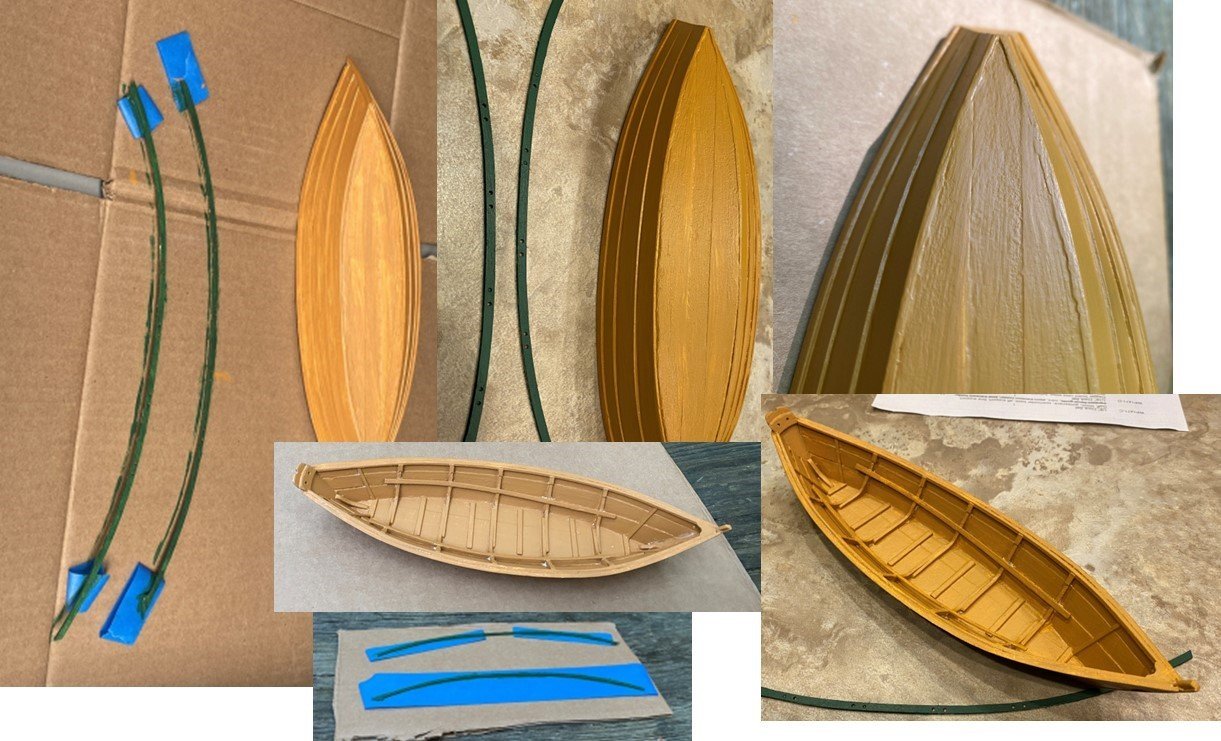
Part 7 Final Touches and model complete Both Part 6 and Part 7 were written when I had no internet on my laptop. So’s here's Part 7 just a few hours after Part 6. After the main painting work, it’s time for some final touches and the boat will be finished! The cap rail was to be glued on the boat. Although I had trimmed them to fit pretty well prior to painting, the paint added a little thickness to both the false stem and the cap rails. I did a little trimming to make a better fit, and carefully glued them on. The glue wouldn’t stick painted parts together, so I sanded the bottom of the rail and the area it was to be glued to. One area near the stern wouldn’t stick so I used a drop of superglue for that spot. One of the more challenging parts was to position the rail flush with the inside edge of the boat. Gluing a little at a time seemed to work. I then did a little touch-up painting. The brushes provided with the kit had been good for everything up to this point, but there were some small corners and areas behind other parts that really required more detailed brushes. I purchased a set of three Army Painter Wargamer brushes, and ended up using all 3. $20 well spent in my opinion. The next step was the beckets – rope handles for the boat. The provided 2 mm rope seemed awfully thick, at about 2 scale inches and just didn’t look right to me. I posted for advice elsewhere in the MSW forums. General agreement was that 0.8-1 mm would be better, so I ordered some from Ropes of Scale and postponed that step until it arrives. The thwarts were another slight misfit. I had prepped them prior to painting, but they didn’t sit flush on the seat risers after painting. Another minor trimming and sanding and they looked good. Gluing the thwarts and oars in was pretty simple. The next step was to make and install the thole pins. This was a test of hand-eye coordination, requiring magnification, good light and tweezers. The instructions refer to a 3/64” dowel, but the kit included a 3/64” x 3/64” strip. The infamous square peg in a round hole! I carefully cut off the corners of the thole pins, until they fit firmly in the holes. One sentence to write, but there are 16 of them and it took some time. I will add the beckets when I have the rope in hand, but I am declaring the build log complete and my first wooden ship model done!


- 15 replies
-
- 8
-
-
- Model Shipways
- Shipwright Series
- (and 2 more)
-
You know the saying “a bad workman always blames his tools”. I’ll blame the wood. But seriously, thank you for the comment.
- 15 replies
-
- 2
-
-
- Model Shipways
- Shipwright Series
- (and 2 more)
-
Dory Build Log Part 6 Painting Although this only takes a few paragraphs to write, painting dragged out over a couple of weeks. I tried to be patient, do many thin coats instead of dolloping it on, and wait between coats. You can judge the outcome! The first step in the instructions is to spray with a grey universal primer to prevent the grain raising as it absorbs water. I was in a small town and could only find white primer, which I used. That shows through more, but I think I would have needed just as many coats whether I had used grey or white. The outcome of spraying the boat with primer was a bit disappointing. It was difficult to get an even coat and seemed to bubble and leave granules. Probably my technique. I also learned that you can’t rely on paint to cover up other issues. Glue stains, gaps between boards and uneven high spots. I sanded down, resprayed, sanded again and added a few coats of paint, and things seemed to improve. I also decided to do the cap rails with no primer, sanding sealer or anything else – just paint on bare wood. That actually seemed to go better initially, but the end result with primer and umpteen coats of paint looks slightly better. At this point, I still had a few bare spots. I touched those up but don’t have any good pictures. Also – I view my pictures mostly on my phone. I have been cluttering up the view of my build log on computers with too many large pictures. I’ve tried to condense and make a couple of montages in this update. Writing the log is a learning experience, just like building the ship!
- 15 replies
-
- 4
-
-
- Model Shipways
- Shipwright Series
- (and 2 more)
-
New to modeling - wish I found this site earlier
Mark m replied to flutlo6180's topic in New member Introductions
Welcome! And I second the previously mentioned Model Shipways series - but only if you get frustrated with this one. If this one works out for you, then that series may be too simple. -
Storage and transportation
Mark m replied to Mark m's topic in Modeling tools and Workshop Equipment
I live in a motorhome and relocate every 10-14 days, so my biggest issues are space and weight. For model transport, I need to pack up and stash it securely every time. Not a problem with a hull, but tricky with a mast. -
Ok. I’ll contact you via your website and email to get details and order. BTW - Syren store is currently down for maintenance, but thank you for offering that link as well. Thank you!
-
Aha! A rope expert. What is the difference between cable-laid rope and polyester? Im in the US, but will be in Canada near Toronto in about a month. Do you have a physical store, or online only?