


DocRob
-
Posts
669 -
Joined
-
Last visited


-
 mtaylor reacted to a post in a topic:
AEG G.IV - Creature of the Night by DocRob - Wingnut Wings - 1/32
mtaylor reacted to a post in a topic:
AEG G.IV - Creature of the Night by DocRob - Wingnut Wings - 1/32
-
Old Collingwood reacted to a post in a topic:
AEG G.IV - Creature of the Night by DocRob - Wingnut Wings - 1/32
-
DocRob reacted to a post in a topic:
AEG G.IV - Creature of the Night by DocRob - Wingnut Wings - 1/32
-
GrandpaPhil reacted to a post in a topic:
AEG G.IV - Creature of the Night by DocRob - Wingnut Wings - 1/32
-
GrandpaPhil reacted to a post in a topic:
AEG G.IV - Creature of the Night by DocRob - Wingnut Wings - 1/32
-
king derelict reacted to a post in a topic:
AEG G.IV - Creature of the Night by DocRob - Wingnut Wings - 1/32
-
Jack12477 reacted to a post in a topic:
AEG G.IV - Creature of the Night by DocRob - Wingnut Wings - 1/32
-
 cotrecerf reacted to a post in a topic:
AEG G.IV - Creature of the Night by DocRob - Wingnut Wings - 1/32
cotrecerf reacted to a post in a topic:
AEG G.IV - Creature of the Night by DocRob - Wingnut Wings - 1/32
-
cotrecerf reacted to a post in a topic:
AEG G.IV - Creature of the Night by DocRob - Wingnut Wings - 1/32
-
cotrecerf reacted to a post in a topic:
AEG G.IV - Creature of the Night by DocRob - Wingnut Wings - 1/32
-
 Thank you Gentlemen, the AEG has the widest wingspan I built until now. I am not so much interested in four engine planes so much, as I don´t enjoy repetitive work so much. I always had a soft spot for Lozenge camo, with the colorful fighters it adds a beautiful contrast. With the big bat not so much, but somehow it looks special. Photographing is another hobby of mine, but I still find it difficult to take proper modeling photos. My lightbox helps a lot and I normally use my 45 mm macro lens, which equals to 90 mm with a full format sensor camera. This allows distortion free pictures, which I take free hand, because I´m too lazy to use a tripod. Light metering and white balance is done before capturing and that´s it. I don´t like post processing and try to do as little as possible, mostly none. Sometimes, I make some experiments with different lighting or focus stacking, because I feel, I could do better. Cheers Rob
 -
 DocRob reacted to a post in a topic:
AEG G.IV - Creature of the Night by DocRob - Wingnut Wings - 1/32
DocRob reacted to a post in a topic:
AEG G.IV - Creature of the Night by DocRob - Wingnut Wings - 1/32
-
DocRob reacted to a post in a topic:
AEG G.IV - Creature of the Night by DocRob - Wingnut Wings - 1/32
-
DocRob reacted to a post in a topic:
AEG G.IV - Creature of the Night by DocRob - Wingnut Wings - 1/32
-
The big bat flexes it´s wings. Today, I finished rigging the wings and I´m happy to have that behind me. It was not overly difficult on the outer wings, but fiddly with lots of scissors and tweezers involved, always adjusting the light and try not to knock off or scratch parts. I loosely attached the rudder, but not the elevators. The tail will be last, as until now, it´s easy to set the plane onto some foam, bottom up. With about 60 cm of wingspan the bat starts to handle a bit awkward and it´s relatively heave, luckily quite robust. It´s hard to see on the pics, but the white rudder has spar markings visible. I used 1mm masking tape over the spars, when I sprayed the tinted varnished over the whole airframe. Cheers Rob
- 138 replies
-
- 16
-
-
-
 DocRob reacted to a post in a topic:
Ferrari 288 GTO Yellow by CDW - Fujimi Enthusiast Series - 1:24 Scale
DocRob reacted to a post in a topic:
Ferrari 288 GTO Yellow by CDW - Fujimi Enthusiast Series - 1:24 Scale
-
DocRob reacted to a post in a topic:
AMC DH9 by davec - Wingnut Wings - 1/32
-
DocRob reacted to a post in a topic:
AMC DH9 by davec - Wingnut Wings - 1/32
-
AMC DH9 by davec - Wingnut Wings - 1/32
DocRob replied to davec's topic in Non-ship/categorised builds
The lobster is coming together nicely, Dave. I like the vivid scheme and good to see, that the decals worked well. With persistent decals, you can use a hairdryer as well as the usual softening solutions. You asked about masking in an older post. It can be a real pain, specially with these WWI planes. I use whatever comes to mind, mostly Kabuki tape, but I like liquid mask for the strut connectors. You don´t want to have any color there. for the strut holes in the wings and fuselage, I use parts of toothpicks or styrene rod, glued in temporally with a tiny bit of diluted white glue. Damp kitchen paper is heavily underrated, as it can be pushed in tiny crevices and around complicated contours, like engines and it stays in place. Cheers Rob -
De nada, Dave. The 0,5 mm drill bit does not only take care of the burr, it leaves a little bit conical opening of the tubes hole, which helps, fiddling the fishing line in. I try to prepare everything as good as possible for rigging, which relates to the hardware, like the right line, de burred tubes, good CA, ... and also the sequence to do the job as easy as possible. Rigging is complicated enough, get stuck somewhere due to poor preparation is a nightmare. Cheers Rob
-
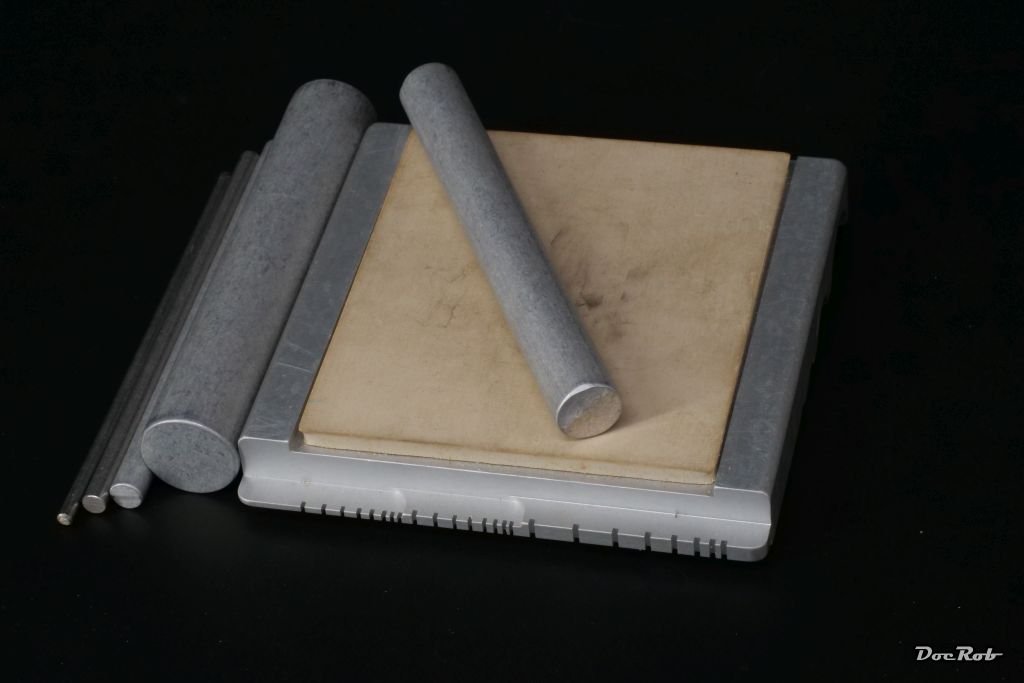
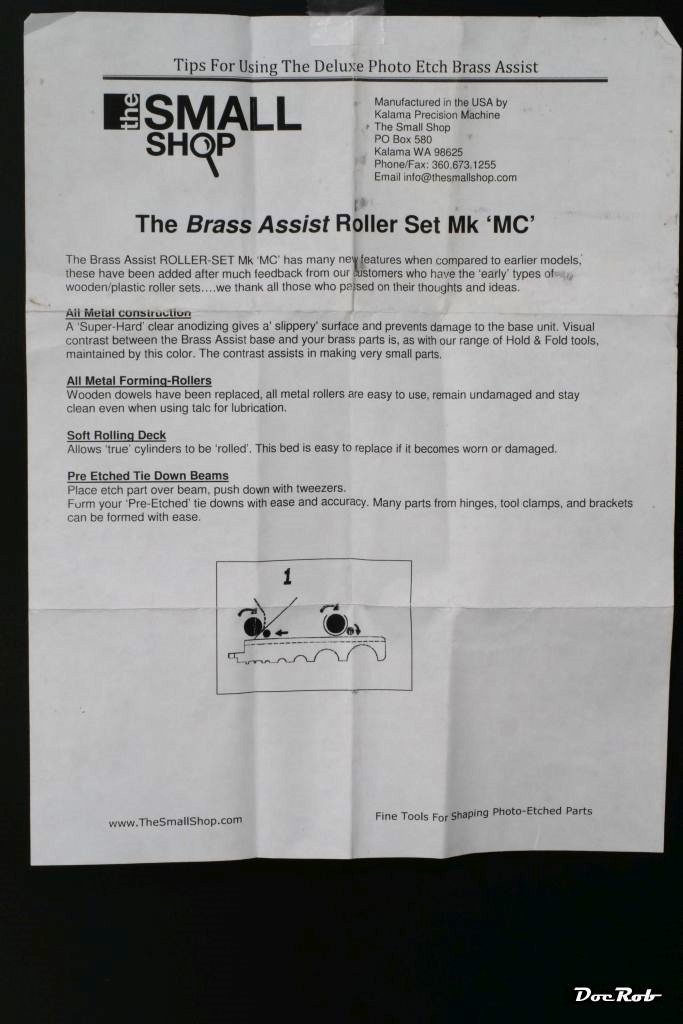
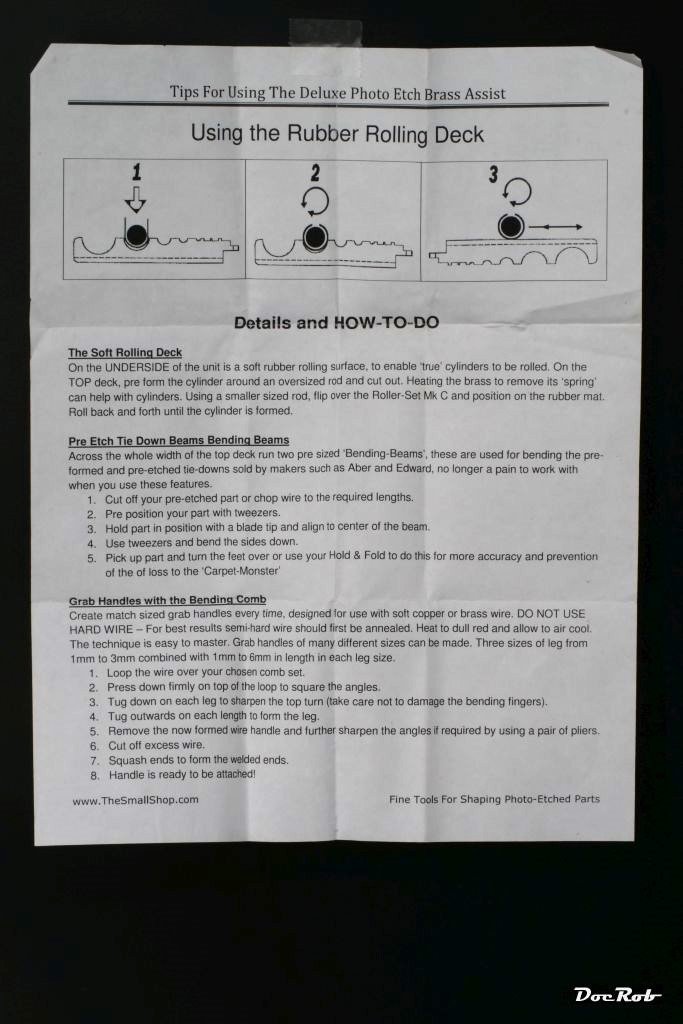
The small copper sheets for coppering a hull don´t need to be bent into two dimensions, I guess. for one dimensional bending, I use the following tool, which is made for photo etch parts and can simply be self fabricated, at least the here important rubber side. Cheers Rob

-
One side done . I finished the rigging with pulling all lines taught and add a drop of CA to the anchor points to secure everything. This part of rigging was much easier, than the nacelles and inner rigging. I had to fabricate new turnbuckle tubes, which is not the most exciting work, but now, I have enough for side number two. Cheers Rob
- 138 replies
-
- 14
-
-
-
-
Today, I pre rigged one wing in about four hours, not too bad. First, I fitted all the lines to the eyelets, like shown above for the entire lower wing. Then I added the struts, where the inner ones had eyelets in their connecting stubs, which were also pre fitted with fishing line. With a pulling test, I made sure, all connections were ok. This is a step, where you want to make proper preparations, as mounting on the second side, the upper wing is more difficult, due to space limitations. I also made sure, that all the struts fit completely into the wing holes. In the next step, I pushed the lower wing onto it´s connecting tab, but still without glue and carefully slid the upper wing onto it´s tab, without breaking the struts. When everything aligned correctly, I glued the wings and upper strut connections in place. Luckily the fit is very good. Then I turned the AEG onto it´s upper wing and made the same loop and tubes like before with the upper wing eyelets. This is, where I am now. The fishing line isn´t pulled taut and CA secured for now, as this will be done in one flush, to maintain taut lines in the correct positions throughout. Cheers Rob
- 138 replies
-
- 14
-
-
-
Ok, there was a lot of talk about tubes, loops, eyelets, ... through the last steps of the build, so I thought, it might be helpful to explain my rigging process. I cut my ´turnbuckles´ from aluminum tube with the inner diameter of 0,3 mm, the outer 0,5 mm with a length of about 3mm. I roll a fresh blade over the tube until it splits. You don´t want to run into trouble with burr, later when you try to loop the fishing line through in the middle of a fragile spider web, so I use a 0,5 mm drill bit to remove the burr, holding the tube with a reverse action tweezer. I glued the eyelets into pre drilled holes into the wing, like here around one strut and for the ailerons with CA. I use Gaspatch eyelets for the structural rigging and Bob´s buckles eyelets, which are finer for steering lines. I orientate the eyelets for the easiest possible rigging. Maxima Chameleon fishing line is the weapon of choice, the brownish color looks ok to me and it´s monofilament. Now it gets serious, using one piece of tube onto the line and pass it through the eyelet. With tweezers, I pick up the end of the thread and bend it back to the tube and fiddle it through the tube for a second pass. Finally, I apply a drop of CA to near to the eyelet and push the tube onto it, holding the fishing line into it´s designated direction and cut the protruding rest with a scissor. Cheers Rob
- 138 replies
-
- 13
-
-
Yes, it´s monofilament. With the braided line, it might be more difficult to pass it through the ´turnbuckle´ tubes, especially the second pass after looping through the eyelet. Cheers Rob
-
Got the center section rigging done. It was not easy to fiddle everything in place with different tweezers, using magnifiers, backlight and a lot of care not to break anything. Now I have to stretch my back and help myself to a nice stiff cocktail. After testing the stability of the center section, I decided, I could take a peek with the outer wings inserted. She´s a big bat. Somehow the wings disturb the view onto the more interesting middle section, but I will build her with complete wings anyway. Cut away outer wings is scheduled for my Felixstowe maintenance build. Cheers Rob
- 138 replies
-
- 12
-
-
-
A little late, but nonetheless, happy birthday Craig, the cake looks fantastic, as does your Ferrari. The body finish seems to be very smooth and the seats are fitting, correct or not. Cheers Rob
-
That sounds interesting, especially the steel grey ones. The Maxima line is dark brown, which looks ok scale wise, but steel grey would be better. I´m not sure about the braided structure though. I have to do some research, how these threads look. Cheers Rob
-
For the wings, I will use Maxima Chameleon fishing line with a diameter of 0,12mm. This is perfect for my ´buckles´ made from brass or aluminum tube with an inner diameter of 0,3 mm and an outer diameter of 0,5 mm. The fishing line is threaded through the tiny tube, then through the eyelet, glued to the plane, and finally looped through the tube again. The second pass can be fiddly and you need to be sure, there is no burr in the tubes hole. The good thing, it´s almost self securing after pulled taut. I add a tiny dot of CA to be sure and cut off the rest of the fishing line. I used to buy the tubes ready cut from Bob´s Buckles, but make them myself now, rolling the tube material on a rubber mat under a sharp blade and nott too much force. Cuts the tube without burr. Cheers Rob
-
German WWI biplane rigging is relatively straight forward, even these twin engine bombers, compared to RAF planes with flat rigging and mostly a lot more rigging lines. I have a WNW FE.2b in stash as well as a Copper State Model Caudron G.3. These giving me the creeps with their spider web rigging. With the AEG, it´s all about planning the sequence, when it comes to when to add the eyelets, struts and actual rigging. Cheers Rob
-
Believe me, it isn´t wefalck. I build the Duchess of Kingston as my first serious attempt in wooden ship modelling and tackled the build in three month, including hull, detailing, mast and yards. Well, what´s amiss, right - rigging. I got nightmares doing it halfway right only for the bowsprit and postponed the build for now. I think, rigging the mid part of the plane with the nacelles with elastic thread was a good decision. The thread is easier to handle and is easy to tauten. For the outer wings, I will use fishing line, which gives some strength to the construction. Cheers Rob