Esap
-
Posts
18 -
Joined
-
Last visited
Content Type
Profiles
Forums
Gallery
Events
Everything posted by Esap
-
 Hi all, I am having trouble finding many examples of the HMS Vanguard kit in a natural wood finish. I love the look of the kit, but am not keen at all to paint it and was hoping for more inspirational images of it in a natural finish. The build logs I find on modelshipworld all seem to have gone the fully painted route. Perhaps my search skills are simply not up to par. Best I have found so far is http://modelshipbuilder.la.coocan.jp/elephant.htm, although the photos are not big the model clearly looks fantastic done this way, and I would love to see more examples, or of a very similar nature even if not the same kit - I heard a rumour of a Bellona prototype from Chris done with Tanganyika but can't seem to find any serious photos there either. Thanks for your help, Esap
 -
The weathering is fascinating in that it almost works too well, making it look at a glance like less effort was put in than a 'normal' model, where as instead it actually takes additional effort. I am not sure I would personally take such a total-weathered approach over something more subtle, but it is very interesting to follow.
-
Its definitely your build and your decision, but I think the natural finish sounds great. You have mentioned a few times how it is a big improvement against prior builds, and that is worth proudly showing if you ask me. Good luck with the sanding!
-
> I have never planked a bow area this well before This is what it is all about man! Congratulations! A little bit better every model
-
Well done! You have definitely added a lot of detail to this kit and I think it has come out looking great so far. I have considered buying this kit on and off for a while. Was an 'off' month so far but you might be turning it around again
-
Frigate Diana by RossR - OcCre - 1:85
Esap replied to RossR's topic in - Kit build logs for subjects built from 1751 - 1800
On a double-planked hull it is probably less important to do it 'correctly' on the first planking layer, other than as a learning experience. I have seen many others go with the easiest way they can find to get the first planking sorted and then try get all planks starting at the rabbet (or where a rabbet would be...) on the 2nd planking instead. I am just a newbie finishing off the Occre Albatros as my very first build. Like you I tried to do it the 'right' way on the first planking and only partially succeeded, but for the 2nd planking layer tried hard to follow the edge-bending method to get the right look. I made a post on the forum about it actually as I initially struggled to find a way to edge bend such ultra-thin Sapeli strips, but eventually realised you can just press an Iron onto them to force them down and it does the job. Perhaps you should still experiment with this approach when you do your 2nd planking layer rather than wait solely for the half hull project. I found it perhaps medium difficulty with the thin strips as an absolute beginner, but with the Iron it worked out well. You can see my topic on it here: Overall I have found that I am enjoying the build experience but am constantly looking ahead, dreaming of bigger and more impressive ships. I am just uncertain whether I really should make a huge jump from the little Albatros to something sizeable or whether I should take a few intermediate steps along the way. For that reason I am particularly interested in experiences like what you are running into here, seeing how difficulty scales with ship size. -
Frigate Diana by RossR - OcCre - 1:85
Esap replied to RossR's topic in - Kit build logs for subjects built from 1751 - 1800
Hi RossR, how is that first planking coming along? With respect to your comment that it isn't going quite as you originally hoped, as a beginner I am quite interested in hearing more regarding the challenges you ran into. I hope you will be able to share some of the lessons you have learned. Is it significantly different to how things were with the Beagle? -
Your wooden kit progression - go big, or keep learning/practicing?
Esap replied to Esap's topic in Wood ship model kits
Very much appreciate the responses so far, it is certainly a nuanced topic, but don't forget, if you can, to also note which things you felt you learned early on that really made a big difference when you came to the more complex projects. > We really can't answer to everyone's needs and levels as we don't know them I completely agree and that isn't really the point of this thread, to be clear - I hope to have people share their own experiences, and hopefully some key things they learned along the way, so that newer modellers can help understand their own journey, and perhaps gain more confidence about the level they are operating at. It is definitely about the journey, not just the end product, but I think it is quite common for new modellers to have some goal in mind. Hopefully this thread can help them understand what it takes and what key experience really does help most in getting there. Thanks all! -
It is a common line of advice here to be careful when starting the hobby, especially when working with wood for example if you haven't before. Don't just jump into building the Victory, Agamemnon, or upcoming Indefatigable. Start small. This is good advice - it helps you know that you will enjoy the hobby, can stick with it and persevere through the tough parts to finish a kit, and make your mistakes and do your learning on a cheaper kit so that when you do splash out, you can do the expensive "dream kit" justice. The difficulty, I find, is that it isn't clear how much learning/practice is "enough", and this can be demoralising if a very particular kit has taken somebody's fancy. Some kits are harder than others of course and some particularly hard or even flawed, but often, advice is to have completed "many" other projects first before starting Grand Kit X. If your dream build is kit X, how long do you really have to practice/wait before being able to start it with a reasonable chance of a good outcome? If we are too conservative, and suggest to new entrants to the hobby that it will be many projects and likely 4+ years before they should think about starting their dream kit, that will demotivate people, and drive them away, many who may well have been able to succeed in spite of the challenge. There is something to be said in the realms of motivation, perseverance, and satisfaction regarding building a kit you particularly wanted to build, vs building something because you felt you had to in order to "level up". Of course, many in this situation may indeed NOT be able to overcome the challenge if they move too fast, and therein lies the problem. How to know? To help in understanding for relatively new modellers, so they can better judge if the time is right to take the next step after completing their first, second, or third projects, I would like to try get at what specifics you found you learned along the way on your journey to more complex, grander kits - experience that really made a difference. Vanguard models have descriptions on their kits regarding the level of experience required, which are great to have there, but I find these are not specific enough and think more detail on your personal experiences would be helpful to new modellers asking themselves these questions. What did you notice, with your 2nd and 3rd kits perhaps, that made huge impacts to your skill level on later builds? Also, for those that perhaps shortcut the process and jumped from their first kit straight into a huge complex one, what aspects did you find hardest? Which particular skills were most essential but not necessarily fully developed? Finally, for the most experienced among us, who perhaps notice time and again the same mistakes playing out on build logs, what do you see as the most essential skills being developed in this journey that can be missing after only a single small project?
-
Frigate Diana by RossR - OcCre - 1:85
Esap replied to RossR's topic in - Kit build logs for subjects built from 1751 - 1800
You can sometimes get better results bending the middle of a strip of wood rather than out near the edge as your picture appears to show. You then need to trim it of course so can be more wasteful, but might help if you need a particularly bendy bit if you are not already doing this. -
Glad to see work continues Daveruss! How are you finding this kit compared to your prior caldercraft kits?
-
Frigate Diana by RossR - OcCre - 1:85
Esap replied to RossR's topic in - Kit build logs for subjects built from 1751 - 1800
I am a newbie so take what I say with a grain of salt. Chuck's method with the hold-down works well for edge-bending planks, but the same 'apply heat' concept works well for bends in the natural direction too, including the sharper bends at the stern, with some effort. I have seen people use a specialist plank bending tool that is kind of like a modified soldering iron, but i've got away with just using a normal soldering iron for the heat - I do soak first but not for hours. I then just rub it across the soldering iron repeatedly in the target area while applying gentle pressure. Repeatedly re-wetting the strip is important if you don't want to burn it given the high heat involved. I believe a crimping tool is another option for those sharp bends but haven't seen much about that. For twists I have personally found just short-term soaking and then manually twisting and holding the wood with my hands for a short while is often enough to get it to stay permanently twisted, but does depend on the wood and how big of a twist you need. I assume heat treatment would help here too, but haven't done that yet. -
Occre Diana (Spanish frigate 1792), low quarter gallery windows?
Esap replied to Esap's topic in Wood ship model kits
Thanks mtaylor, things like the gallery being lower than the main deck is the type of thing I am uncertain about but would potential explain this if true. I have no idea if that was ever done? I have discovered that the Diana was a 'Mahonesa' class frigate. I haven't found much regarding the Diana itself, but the Mahonesa does appear to show the gallery more as I would expect it. Based on the links below I am growing more confident that this is a small mistake in the model from Occre, and that indeed the windows should be higher up. Combining this with the apparent difficulty in getting this aspect of the model correct anyway (seems a high number of build logs have the gallery windows even lower), and I am starting to think I should be picking a different kit. This is the type of subtle issue that if not consciously noticed would presumably never be an issue, but if you are unlucky enough to spot it... https://www.art.com/products/p53659600004-sa-i6752955/thomas-whitcombe-capture-of-the-mahonesa-october-13th-1796-engraved-by-thomas-sutherland.htm -
Hi all, I am relatively new to the hobby and have a question related to this kit, the Occre Spanish frigate Diana, which I was eyeing up to build next after I finish my learning experience with the Occre Albatros, as it seemed like a good stepping stone, is relatively inexpensive, and I like the idea of building a bigger ship like a frigate next. Unfortunately, something has struck my eye that just seems slightly off, and now that I see it I cannot unsee it - the quarter gallery windows just seem too low-set. My eye follows the line of the gun ports and imagines where the deck would therefore be, and the window seems to be down right on that line, as though the windows were positioned on the lower 2/3rds of the wall from the floor up, which I feel would be odd/unusual. This particular picture from the official product page showcases what I mean, the windows just seem slightly too low? To make matters worse, it seems the kit is not easy to make in this area and many build logs show the windows placed even lower than that official image, but... assuming I can match the official image, my question is: is this actually somewhat historically accurate? Perhaps I am simply wrong in my feeling as to where it should sit? I certainly am ignorant on the subject. I know this isn't intended to be a perfect historical representation, and I think I am fine with that in general at this stage of my modelling career, I just have unfortunately noticed this particular oddity already and am seeking reassurance... or confirmation.
-
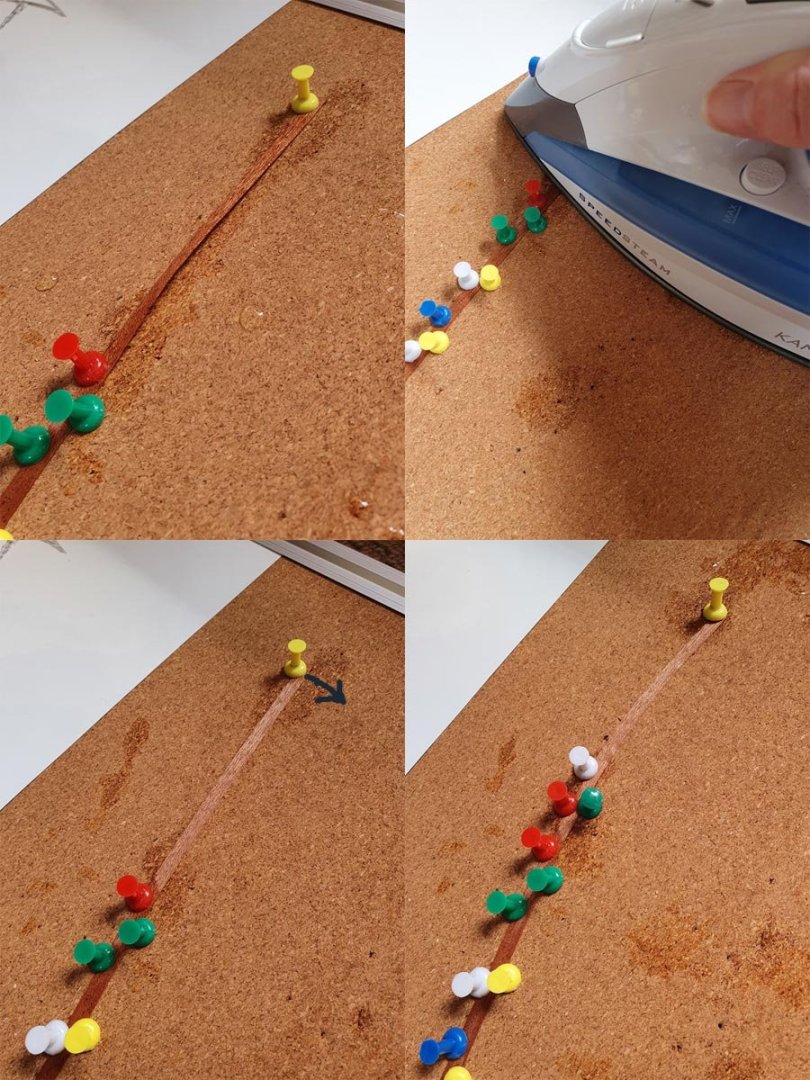
allanyed sorry I wasn't more clear there, I did have a hold down in the middle but it would just warp to either side of it, my photo above was to the left of the hold down, I should have showcased the whole thing but was trying to get a close up of the twist/warped bit. I think with strips this thin a single hold-down just doesn't cut it. Thanks everybody for your advice and feedback. You have inspired me to keep trying with this method and with heat, and I have found a way to follow the method while keeping the wood pinned down. I am using drawing pins on a pinboard, and progressively add more as I work my way along the strip with the iron. I wet the strip, move the far right pin down a bit until there is some warp in the middle, but not too much, and then just plonk the iron down on it anyway and flatten it out with heat. I then add additional pins to hold that area secure, and repeat. It seems to be working - the pins are helpful but really the trick was just having the confidence to plonk the iron onto the wood even when it wasn't very flat. When it is this thin the iron seems to just flatten it anyway without damaging it as long as the deformation isn't too large.
-
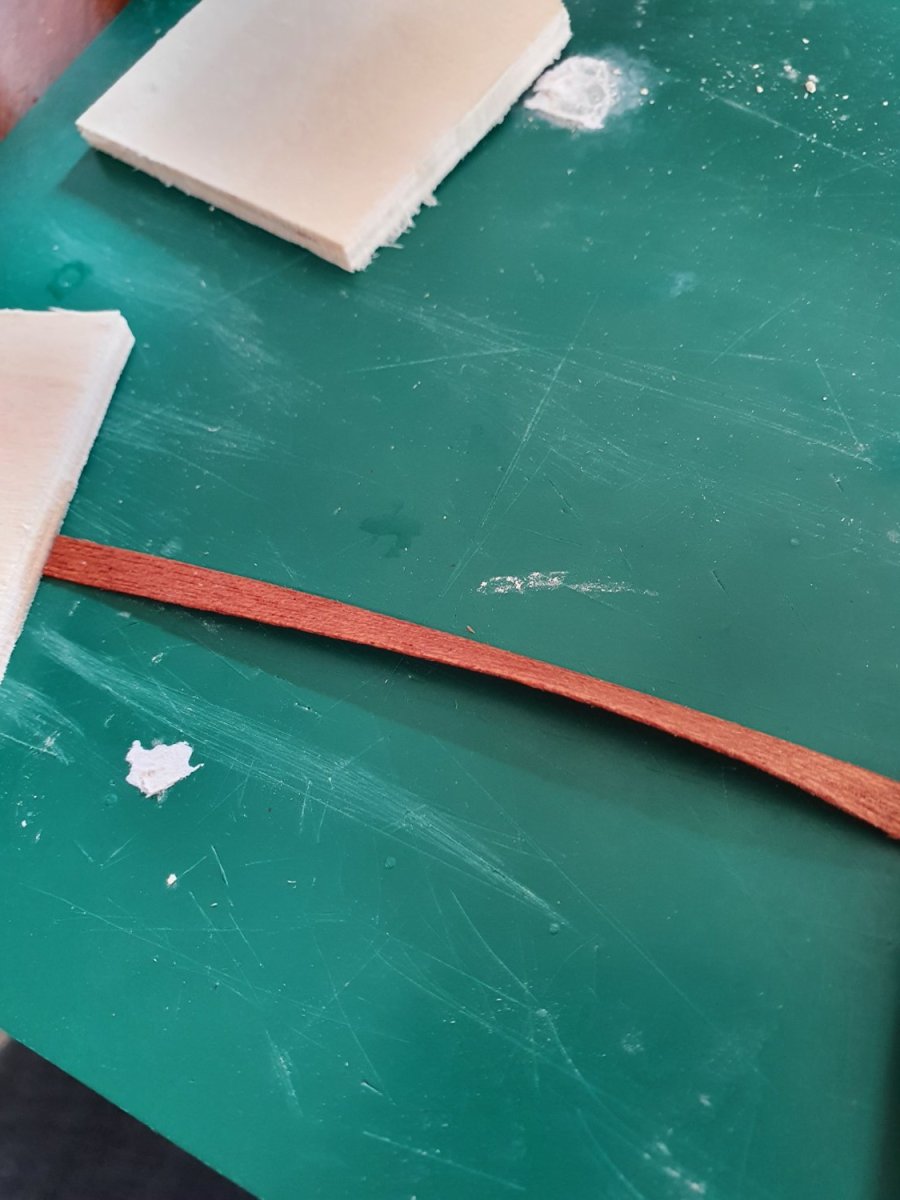
Hi Chris. Thanks for your fast response! I was planning to taper out of necessity as the bow of the ship has less space available than the middle, but wasn't aware that tapering would be sufficient to get it to lie flat against the hull? I figured I was going to run into the issue of the strip being unwilling to bend in the 3-dimensions necessary to lie properly on the hull unless I did manage to edge-bend it somewhat. With thicker strips you run into a clinker looking effect if you don't edge bend as it doesn't sit smoothly against the bulkhead. But with these ultra thin strips its not really a clinker effect, it just doesn't lie flat properly without that slight edge-curve... or so I thought. Have I misunderstood what Chuck's video series was demonstrating? This one talks of the specific issue I was trying to solve: It did work great with my thicker strips, I just can't seem to do it with these ultra thin ones. My attempt at a bending station can't get it to bend.
-
Hi all, I am on my first build, trying to do the right things for planking, and have read the tutorials and in particular watched Chuck Passaro's planking videos. The bending station idea and edge-bending technique to get a great flat-on-bulkhead fit makes total sense, especially with kits like the one I have where the plank wood supplied is not wide enough for spiling. I found success on the first layer of planking, as the thicker strips were more manageable, and I believe the strip in Chuck's video is very similar. However, attempting the same on the second planking material is proving difficult to say the least. The material is 0.6x5mm sapelli, and being extremely thin I just can't get it to edge bend, even after extended soaking in hot water. It has a very strong tendency to curl/rise up as my image hopefully shows. Having the hold-down in the middle to attempt to hold it flat worked great for thicker strips, but hasn't worked well for strips this thin, as it just curls, quite significantly, to the sides of that instead. I have found posts that do talk about it being harder with certain types of wood when it is this thin, but haven't found any detail on how to truly manage it, other than that it seems people have succeeded, somehow. Would anybody be kind enough to help shed some light on how beginners should be approaching this? Should I just plonk the iron down anyway to flatten it despite not really having achieved a nice curve? I want to do planking the best way possible, but I can see why so many beginners fall back to less 'proper' methods!