VitusBering
-
Posts
296 -
Joined
-
Last visited
Content Type
Profiles
Forums
Gallery
Events
Everything posted by VitusBering
-
 Time flies... my poor vessel has been in dry dock for too long. So have I. I do intend to start shipbuilding again soon. I don't know what soon means, though. I hope only a couple of weeks at most.
 -
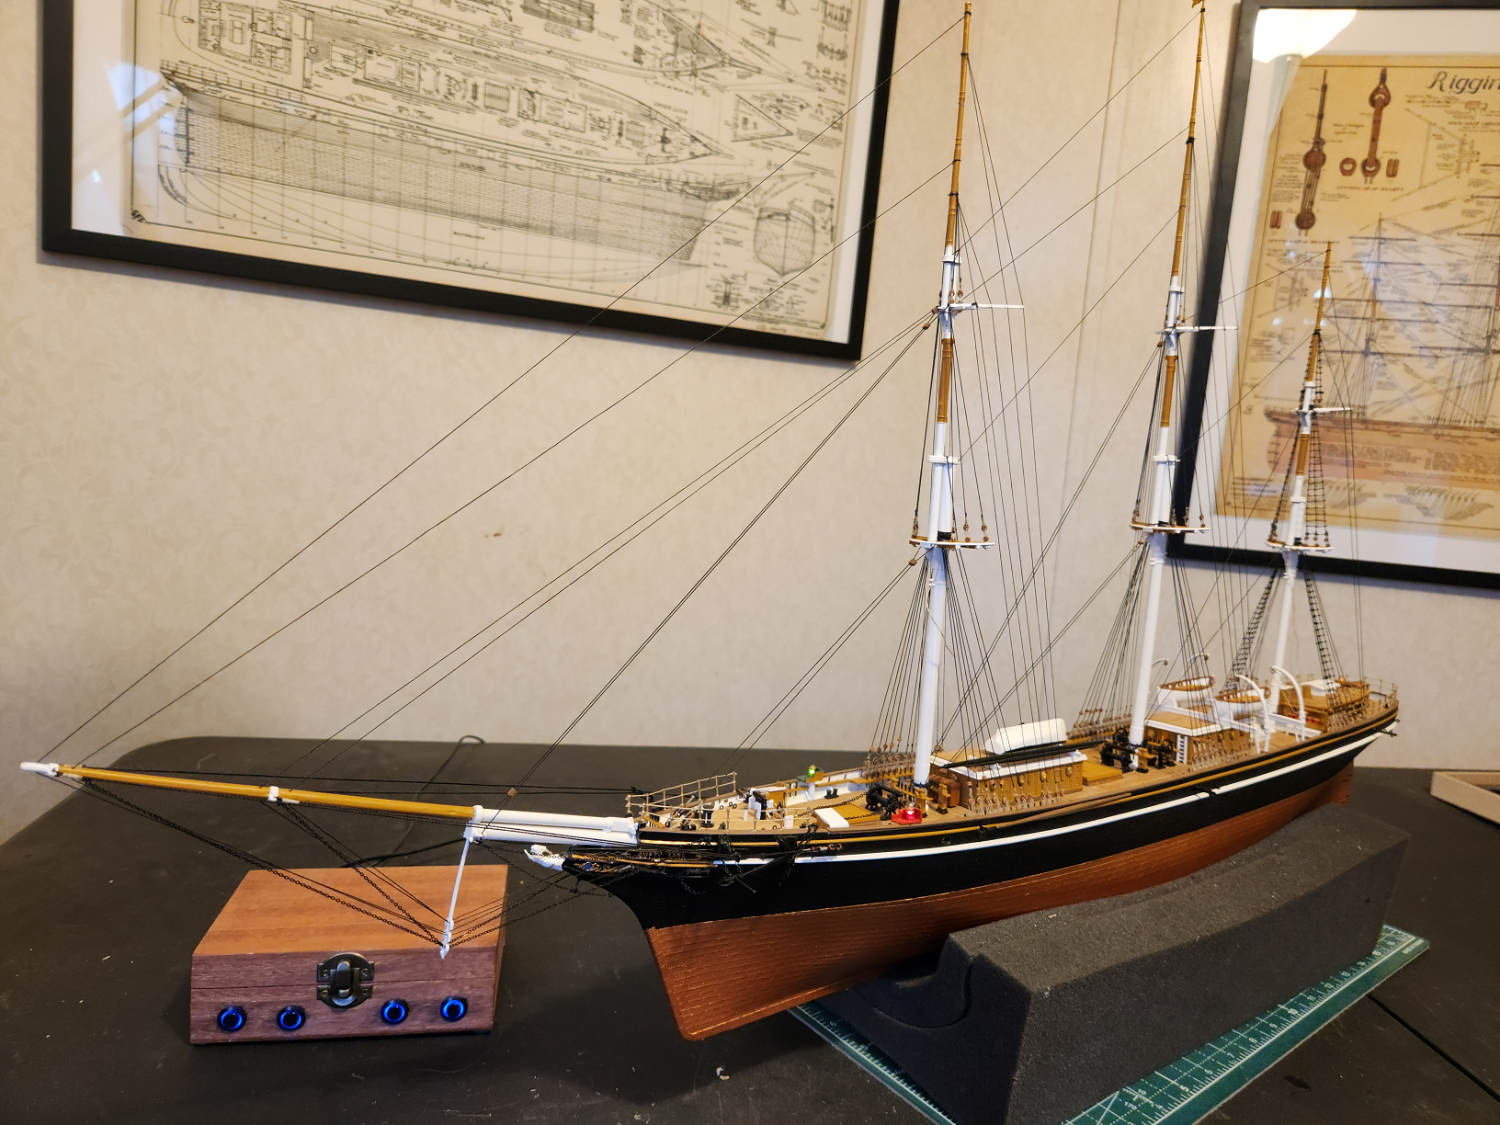
I have been MIA for a couple of months due to a health crisis. I am back in the wheelhouse part time and feeling pretty good. Before the unfortunate events I made some progress but not enough to post pics quite yet so you all will have to take my word that I've got most of the foremast yards rigged up with Flemish horses, footropes, jackstays, pulleys, and blocks. All but the top two spars are done and ready to hang but they will have to wait until all of the mast's yards are ready. The other two mast's yards don't have jackstays yet and are not yet painted. I have a lot of work to do before I can post pics but now that I am ambulatory again I think I can make tangible progress in a relatively short time.
- 85 replies
-
- 4
-

-
- Cutty Sark
- Revell
- (and 2 more)
-
USS Constitution vs Cutty Sark - which to build first?
VitusBering replied to Frank Burroughs's topic in Plastic model kits
I hear you loud and clear. I know I'll have to make hard choices with my Cutty Sark. I've said all along I don't intend to build a museum piece or even a generally historically correct model. I want to find a balance of customization that goes well beyond the simplistic original kit but doesn't end up as a messy spider web. Even then, it will be an interesting endeavor because the kit, of course, has no provision for pretty much of anything in the way of running rigging. -
USS Constitution vs Cutty Sark - which to build first?
VitusBering replied to Frank Burroughs's topic in Plastic model kits
You may well be right, I'm just now starting the running rigging and do plan to add much more detail than is listed in the instructions for either kit. It does promise to be a daunting task. And, as I said, my words were based on a shallow knowledge of the Connie kit. -
USS Constitution vs Cutty Sark - which to build first?
VitusBering replied to Frank Burroughs's topic in Plastic model kits
I haven't built the Constitution so I can't really advise - only guess that it is more complex than the Cutty Sark based on build logs here. I'm building a hybrid H-399 (1974) and 05422 (2017) Cutty Sark. I completely agree with Snug Harbor Johnny that the later kit does have more flash and a softer plastic composition. If (eh, when) I build this kit again it will be after I acquire a 3D printer to make my own more robust versions of some of the more fragile components. I had to undo and redo the mizzen backstays and rig the forestays first to prevent the mast from bending horribly. Lesson learned. -
I'm not sure of the source for these - and I apologize to the guy who linked them for me originally because I can't find that original post yet. It is quite likely in my old build log but I haven't seen it. cutty sark drawings.zip This set is from Radimir Beseda at hismodel.com. They have icons denoting which blocks are installed on various lines. They're most useful if you have Radimir's accessory set but they may come in handy otherwise as well. hismodel drawings.zip
-
Thank you for your kind words Noel. Yes, those plans are the Campbell drawings. This particular set is from the Royal Museums Greenwich. They're pleasant to have as wall art, and a handy reference (though the electronic zoomable versions are more convenient).
-
If you mean styrene sheets then yes, of course. Evergreen makes sheets as thin as .005 in. (0.13mm). On cutting styrene, for a straight cut, score it first with a sharp knife. The styrene will break cleanly on the scored line. For curves, I use scissors but cut wide of the line and sand the sheet to the final shape.
-
These are the 1974 Revell (kit number H-399) instructions. Running rigging starts on page 18 and is probably the most relevant to your question - there are instructions for the sheets and clew lines and a map of belaying pin locations. Cutty Sark 1-96 Revell 1974-1.pdf These are the 2017 Revell (kit number 05422) instructions. Running rigging starts on page 34. Same deal including belaying pin layouts. Cutty Sark 1-96 Revell 2017-1.PDF There are minor differences for tie points between these versions, you choose. I'm building the 05422 kit now and am starting the running rigging so I'm also struggling with these same issues. I haven't hung the yards yet, I'm just finishing adding backstays, Flemish horses, footropes, blocks, and pulleys. One of the questions I have yet to figure out is how the sheets and downhauls get routed through fairleads on the mast tops and crosstrees to the pin rails. It is quite a puzzle. I certainly agree with NoelSmith that the Longridge and Hackney books are invaluable resources.
-
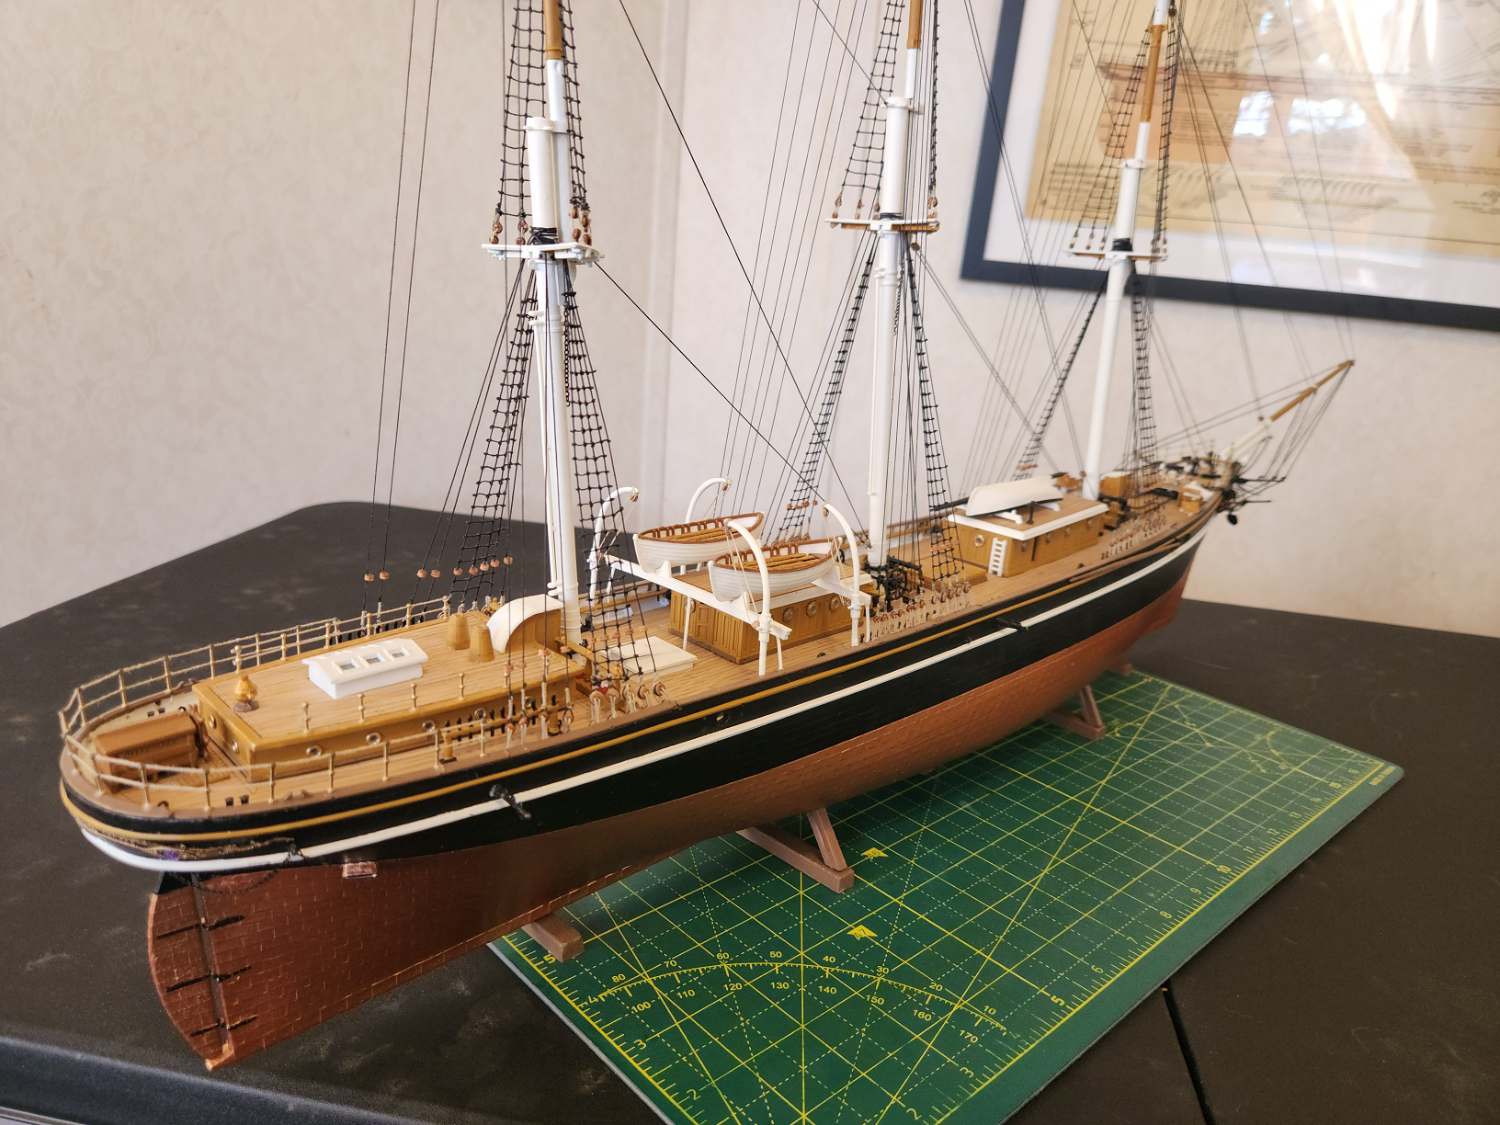
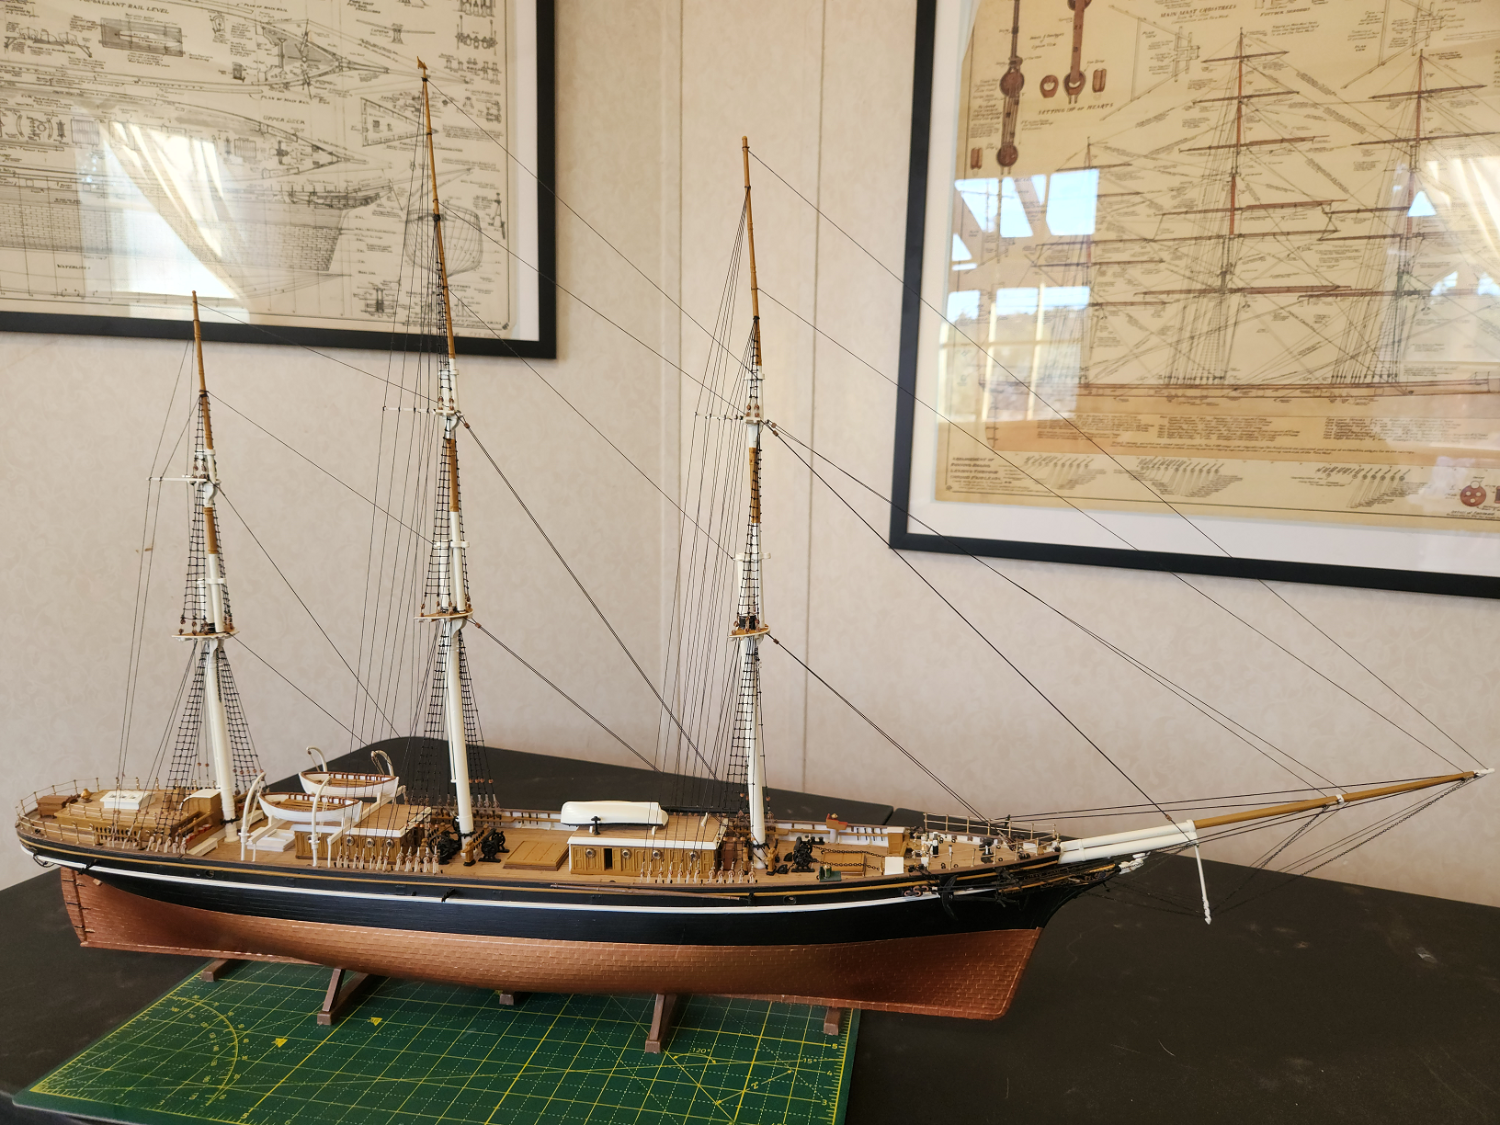
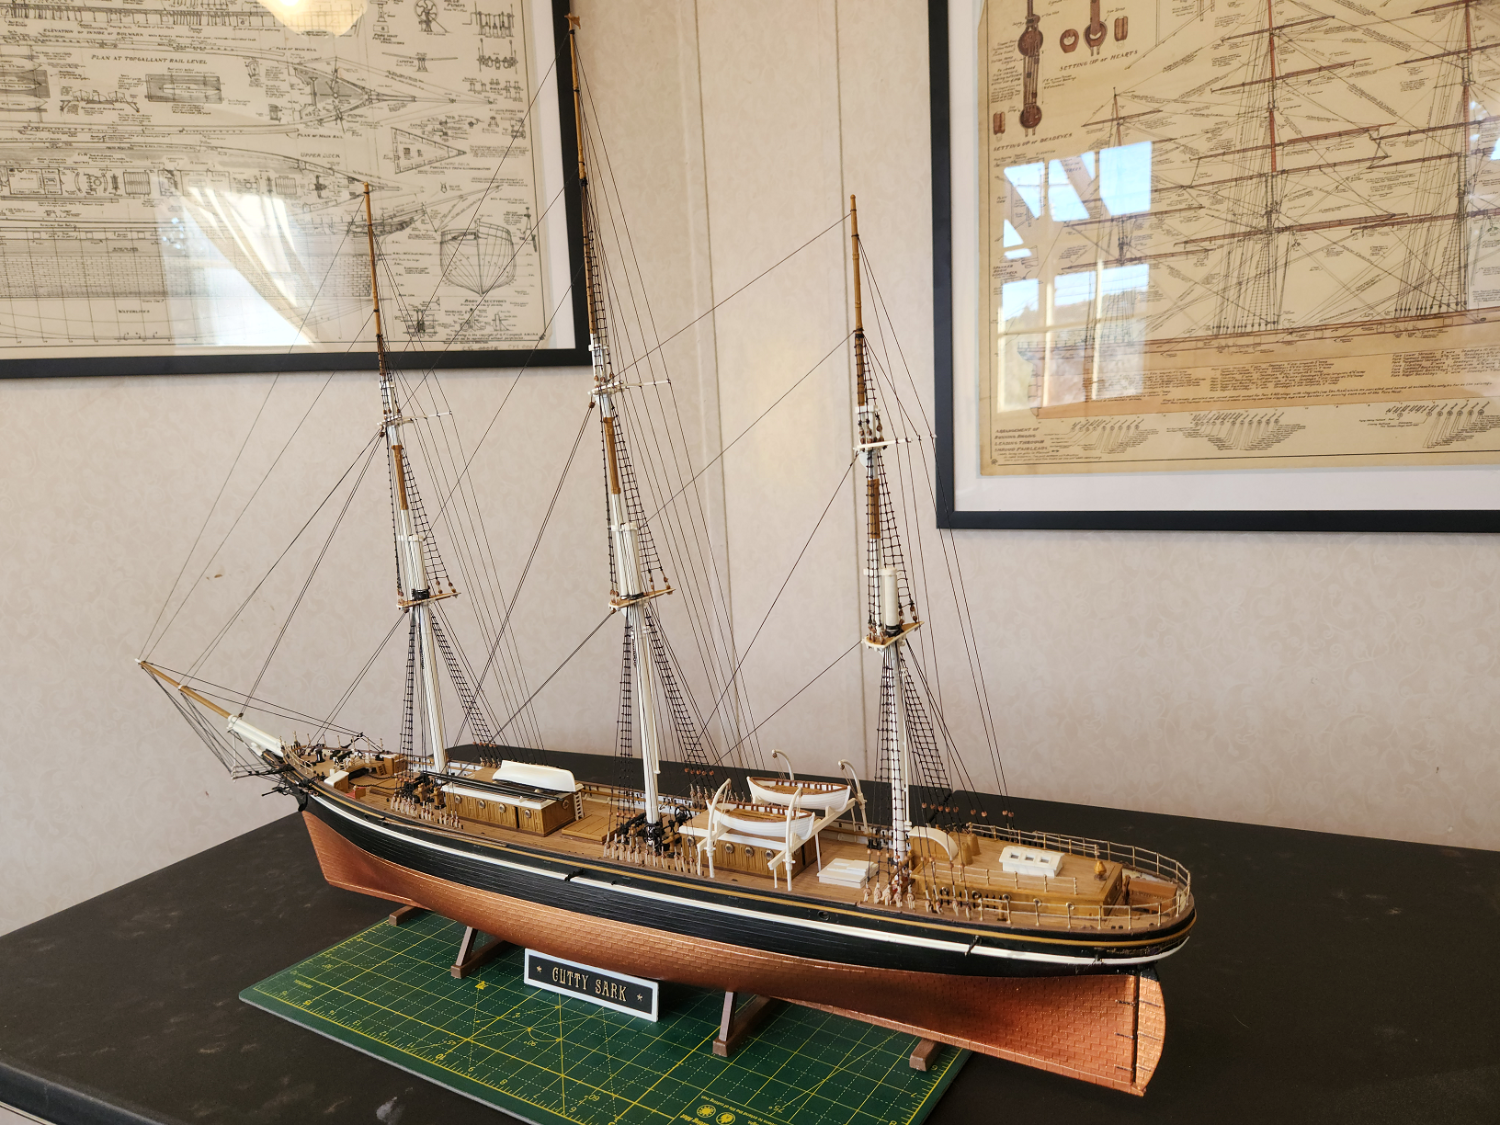
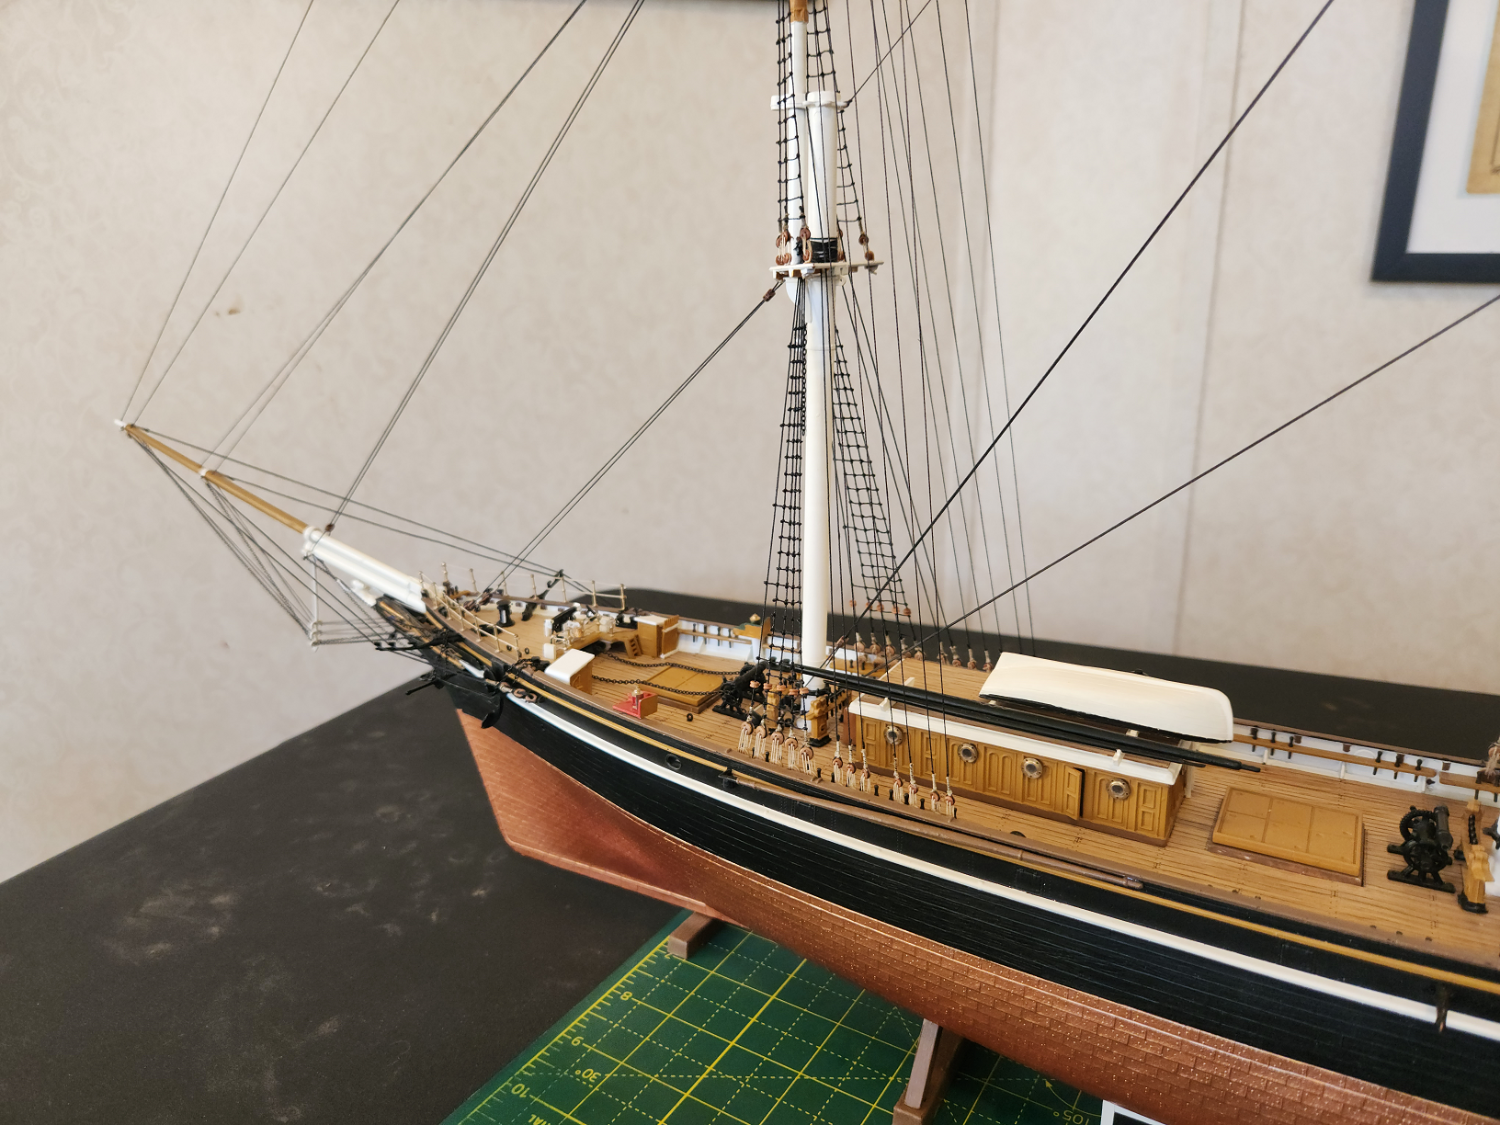
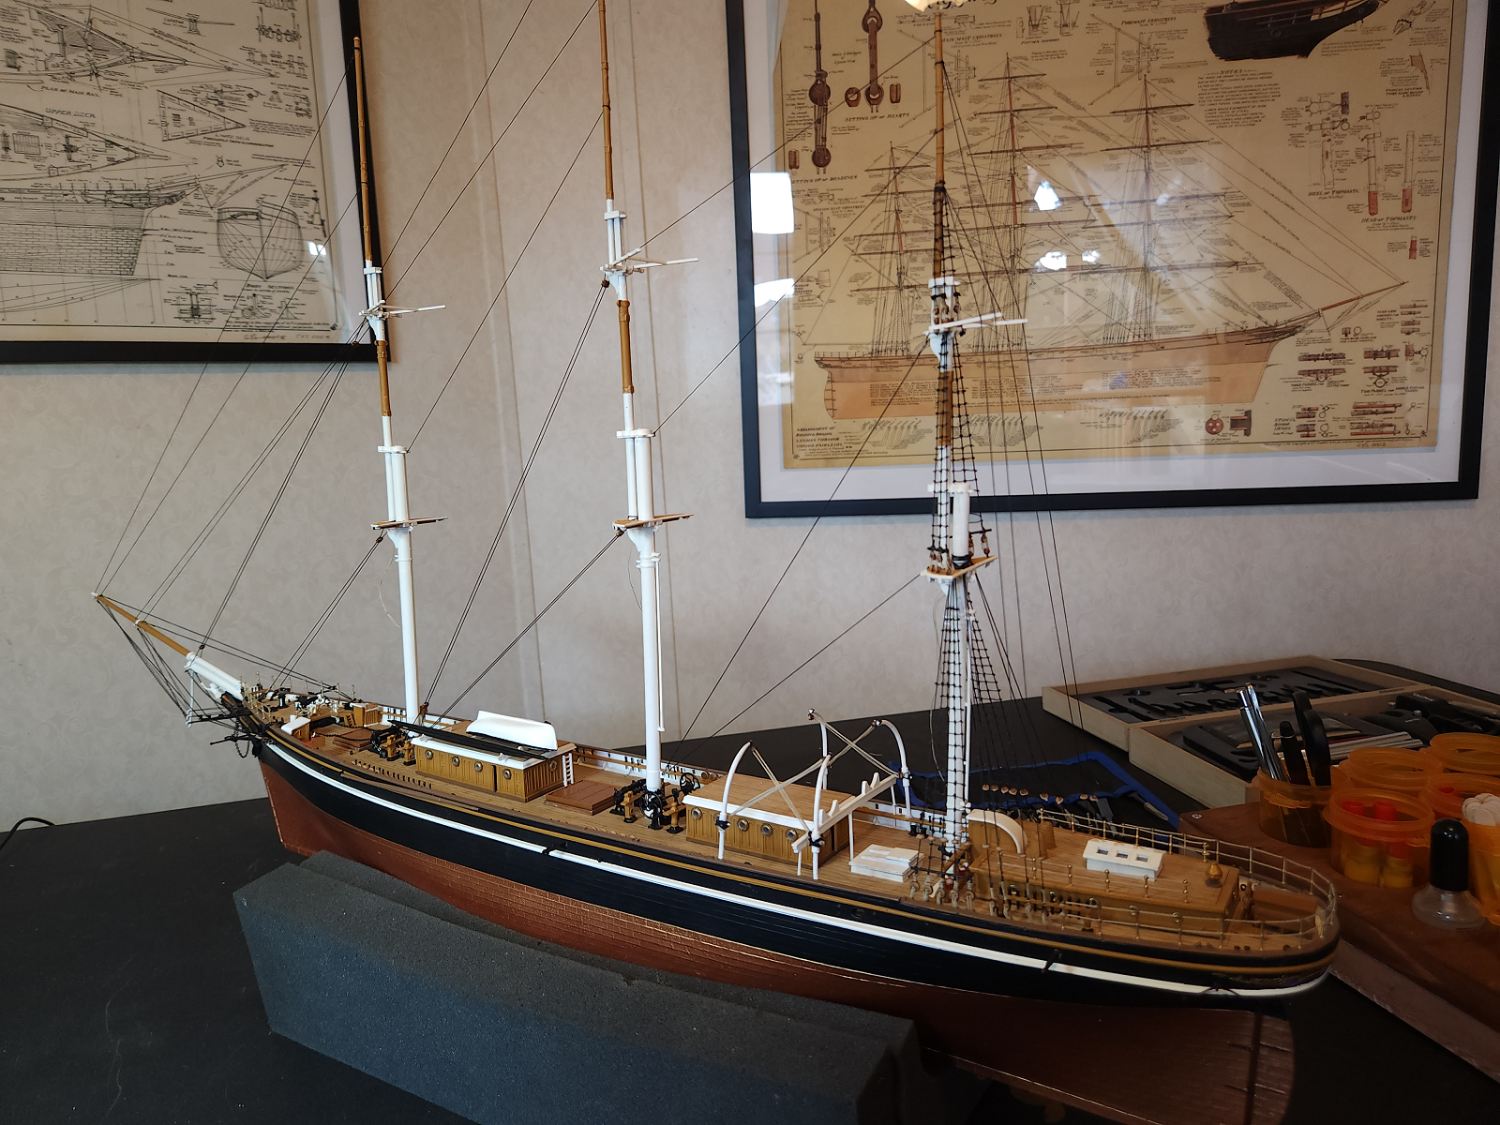
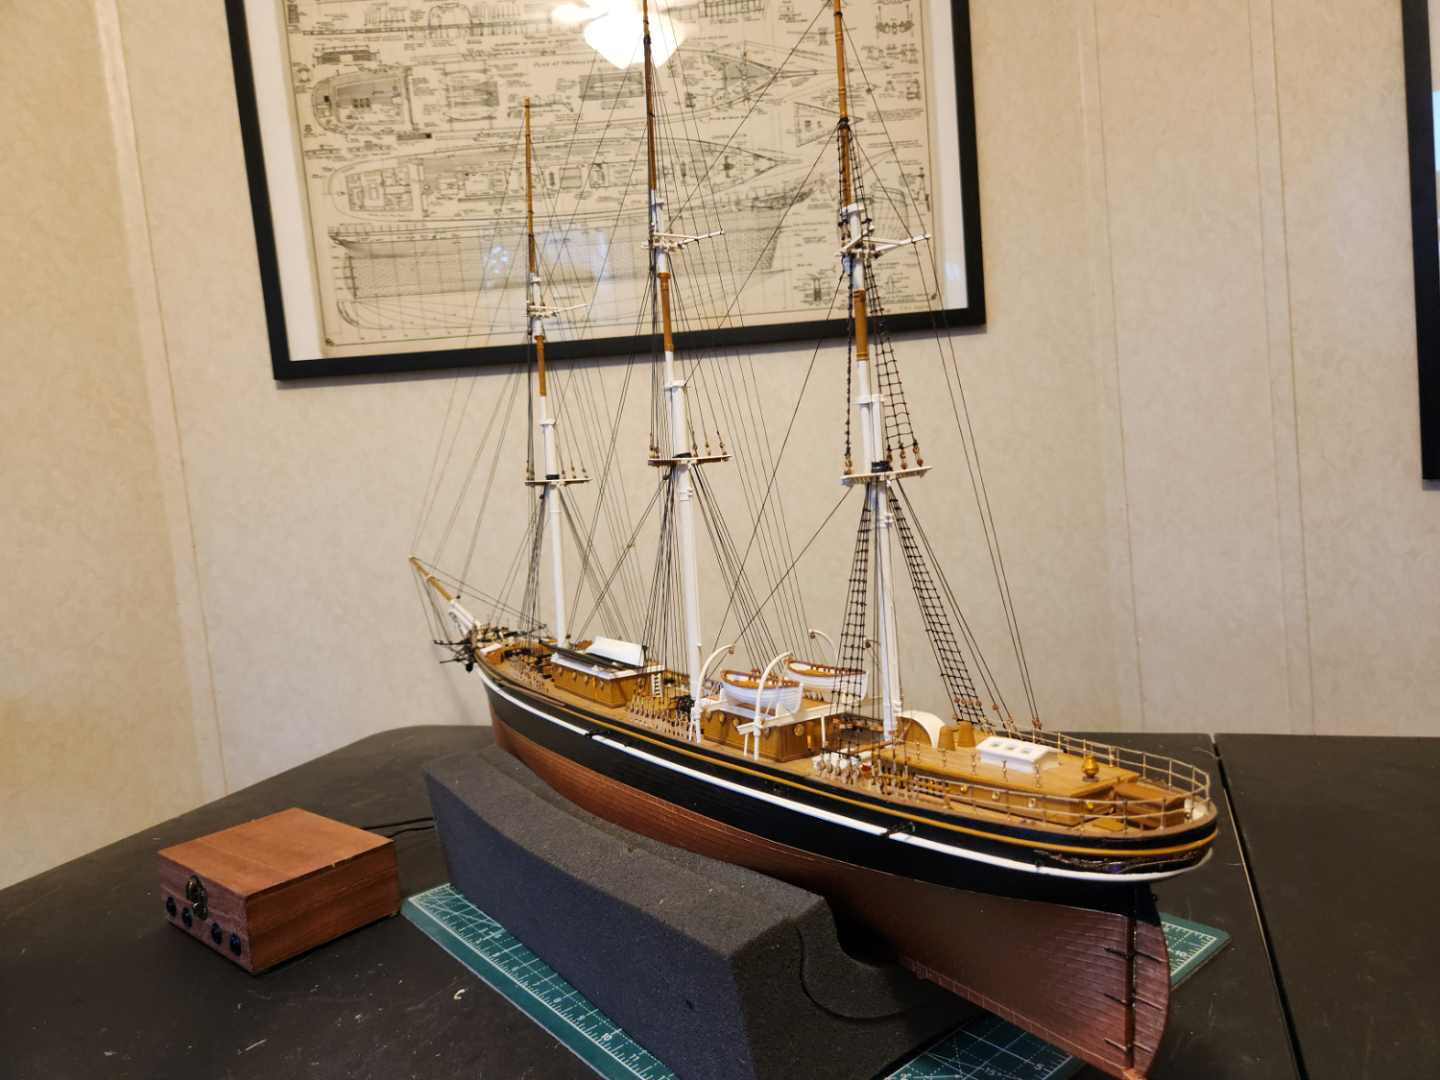
The standing rigging is as done as it can get for now. The ship is balanced on the stands, they're not glued to the hull nor are standoffs permanently attached, this is just a test to see if I like the color. Yard sling chains are installed, will be trimmed to length when the yards are attached. Now I'll start work on the yards. They need lots of stuff like jackstays, Flemish horses, footropes, a variety of blocks and pulleys, etc.


- 85 replies
-
- 7
-

-
-
- Cutty Sark
- Revell
- (and 2 more)
-
Just a short update note - I did recover from the glue spill, the shrouds are replaced and look good as new. I only have the starboard bottom tier ratline rungs on the main and fore masts left to tie, all the rest are done. When those are tied (only a few days from now, I'm guessing) I plan to do the touchup painting. There's not much to do there but it is something I have on my to-do list. Once that is done she'll go into dry dock for a time because the standing rigging will be as complete as I can get it before the yards are hung. I'll post pics at that point. Thank you all for your continued interest and patience 😉
- 85 replies
-
- 5
-
-
- Cutty Sark
- Revell
- (and 2 more)
-
I'm jealous. I've been looking for one of those early Revell Thermopylae kits. I think I've found one, we'll see when it arrives. As with yourself, there's no telling when I'll get around to building it... my Cutty Sark will be a year or better before it is done and then I'll probably start another. Scott, I'll be following your restoration with great interest. Best of luck!
- 38 replies
-
- 2
-
-
- Thermopylae
- Revell
- (and 3 more)
-
Yikes. Now I don't feel quite as badly. Oof, I'm sorry that happened to you.
- 85 replies
-
- 1
-
-
- Cutty Sark
- Revell
- (and 2 more)
-
Minor disaster... the knots for the starboard foremast shrouds were not set and the shrouds were a bit loose so I tightened them and intended to put a drop of CA at the upper wrap point. Instead of a drop a gush happened and the glue ran down the shrouds. I've had to cut them loose. The upper wraps are fairly cemented in place so I will try to wrap over that with the new shrouds. It isn't a fatal mistake but a very disheartening one but I'll recover as best as I am able. No pics, yet, it is too embarrassing but I'll let you folks tell me if it is too noticeable when I get the ratlines tied.
- 85 replies
-
- 3
-
-

-
- Cutty Sark
- Revell
- (and 2 more)
-
Beautiful! One of my flying buddies built a 1/4 scale Wildcat and the gear retraction was a pure joy to behold. Unfortunately the plane survived two flights. That gear, combined with a heavier than recommended radial motor, made for a craft with a CG way too far forward so it was a beast to fly and impossible to land gently. The second flight landing didn't seem all that rough but it wiped the undercarriage clean. It is a gorgeous craft though and your model is fantastic.
- 150 replies
-
- 10
-
-
Please bear in mind I have no idea what I'm talking about - but looking at the Facebook pic made me think of plugs used to conceal screw holes. This company makes them in lots of sizes and different woods. Stringing them to simulate the net floats seems doable.
-
2023 Donations drive
VitusBering replied to James H's topic in How to use the MSW forum - **NO MODELING CONTENT**
Did my part, too, quite gladly. -
Before I posted, the voice in my head was telling me that, as an inexperienced rank amateur, I had no business responding to this topic. I should have listened to that voice, and I'll try to do better in the future.
-
That's a good idea.
-
You will undoubtedly hear more experienced and expert advice than I can offer, but here is what I have learned and done on my Revell Cutty Sark... The ratline shrouds are actually a part of the standing rigging. Their main function is to act as additional backstays for the masts. I tie the ratline rungs after all of the rest of the standing rigging is done. (I didn't do this on my first pass at the mizzen mast and it didn't turn out as well as I had hoped - I had to redo the shrouds and rungs). I think all masts should be stepped because I've discovered a critical part of the standing rigging is the forestays. They all work in concert on all the masts and need to be tensioned carefully. The forestays should be installed before the shrouds or backstays. It is a bit like tuning an old piano. Tighten this wire here, and you need to go back and adjust five others. It is a tedious process but I don't find it tiresome, it is a fun thing to do. I think inboard or outboard first is a matter of choice and convenience. In my opinion it is more important to rig the forestays fore to aft first.
-
I use both - a weak detergent solution and full strength alcohol. Sometimes on the same parts, mostly not. It sounds confusing but here's the deal. I use soap and water on the sprues. I put a sprue in a baking sheet and use a very soft bristled paint brush dipped in the soap solution to clean the parts then rinse them really well. I use a baking sheet to make sure any parts that may come loose from the sprue during cleaning don't go down the drain. I use soap, then alcohol on the larger pieces, like hulls and decks. That's mostly because they pick up oils after soap cleaning and because the alcohol will ensure a good surface for paint adhesion. I wipe them down with a lint-free cloth saturated with alcohol immediately before painting (I let the alcohol evaporate before painting, of course).
-
You're very kind to say so, Harry. Personally I consider my seizing skills to be a weak point. Try as I might I struggle with getting the wraps to be consistent.
- 85 replies
-
- 1
-
-
- Cutty Sark
- Revell
- (and 2 more)
-
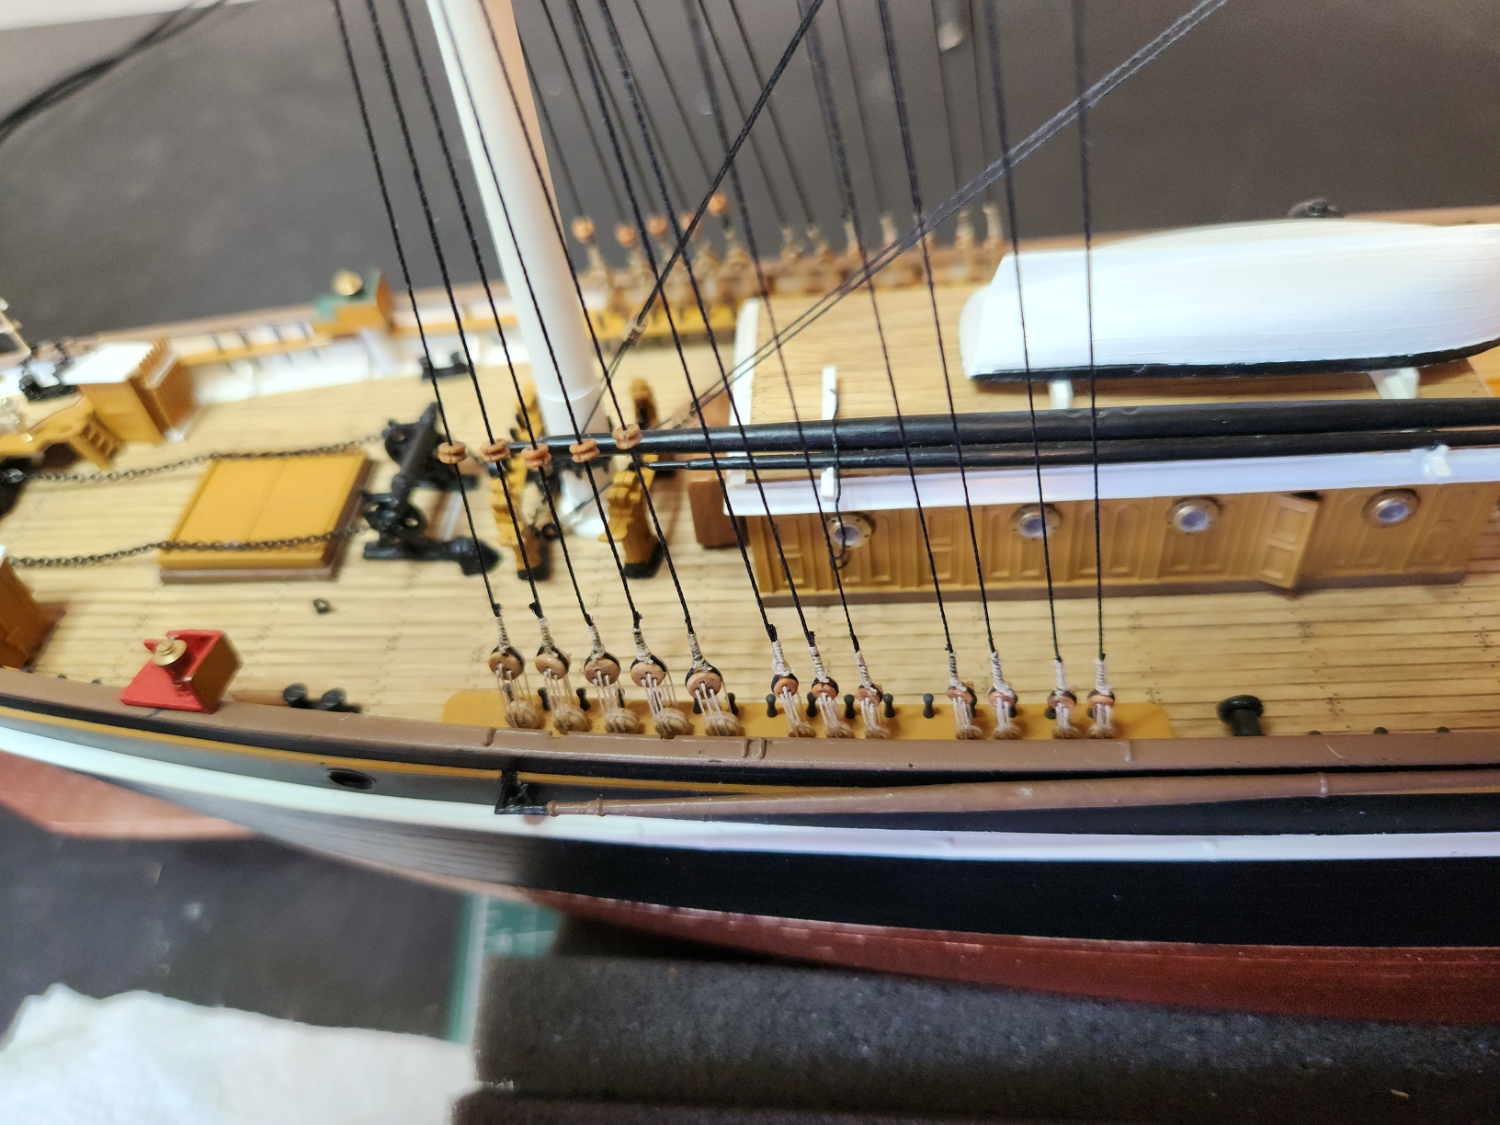
I briefly considered copper plating my model but sanity prevailed 😄 I am sure yours will look awesome. I was off by a few on the deadeye count. There are only 192 deadeyes in the standing rigging 🙃 Each ratline shroud has a pair and each backstay has a pair. There are 60 ratline shrouds and 36 backstays. [edit] ouch - the camera caught a stray piece of scrap thread laying on the spars. I usually catch those things myself or let the canned air dust them into the ether. The camera also catches all the places I need to touch up paint. I may take a boatload 😉of pictures to help me spot those when the ratlines are done.

- 85 replies
-
- 5
-
-
- Cutty Sark
- Revell
- (and 2 more)
-
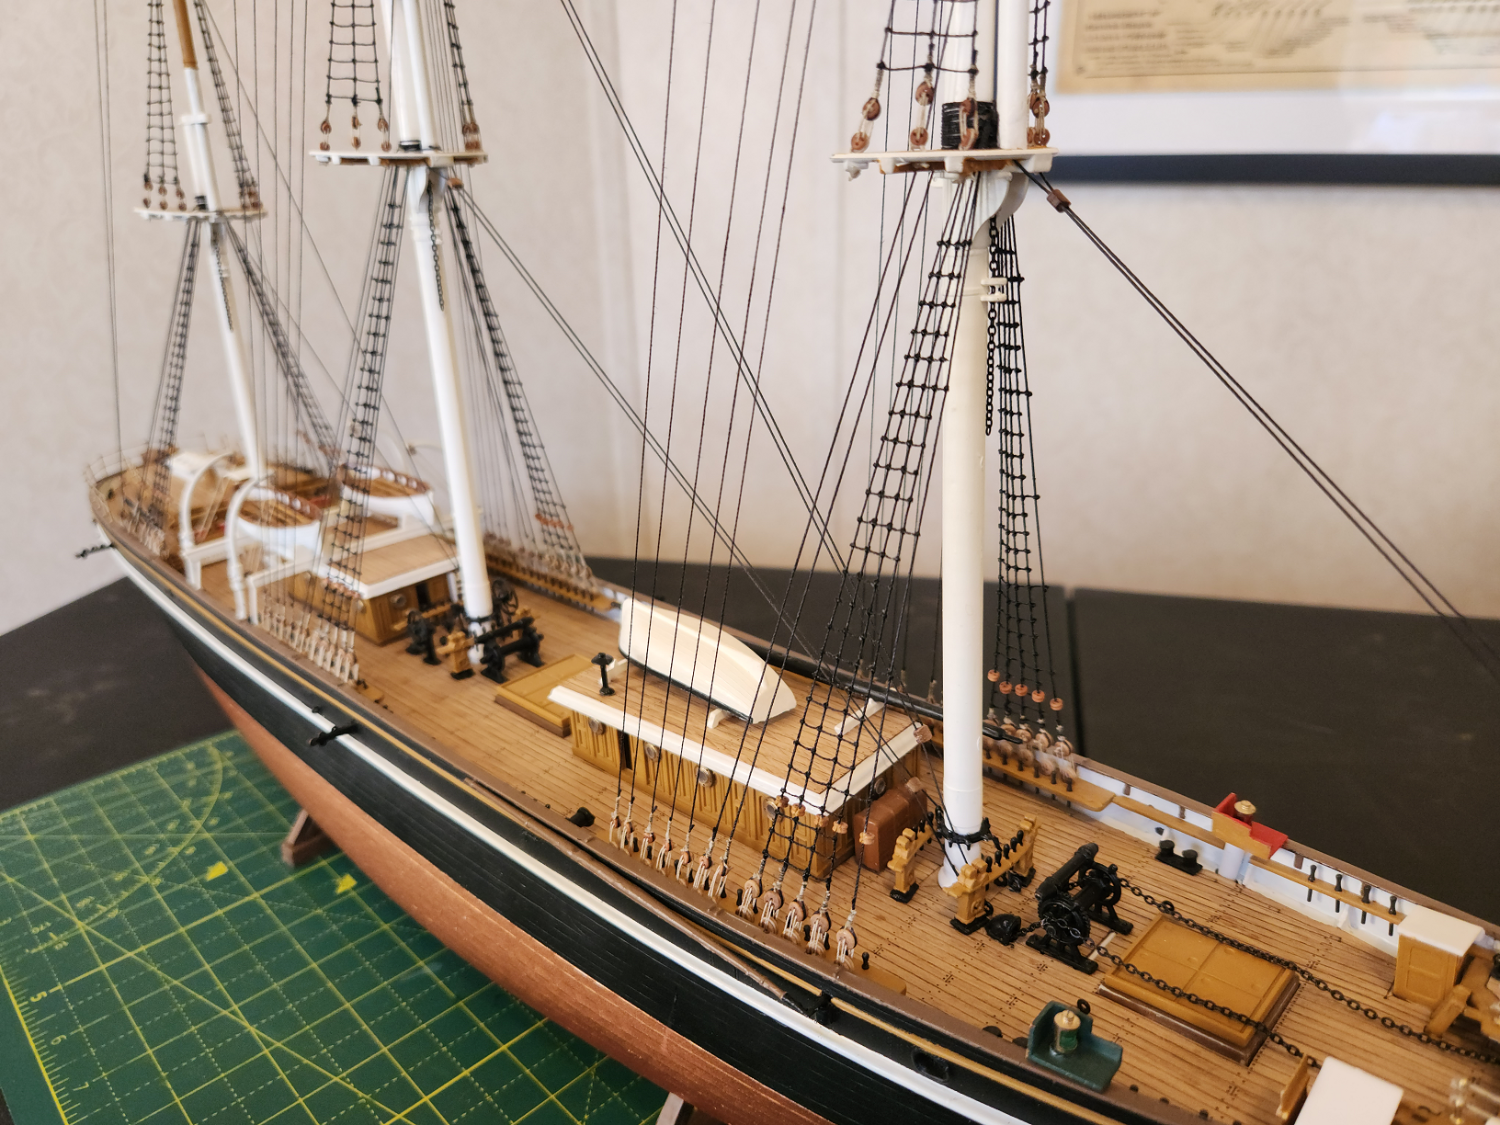
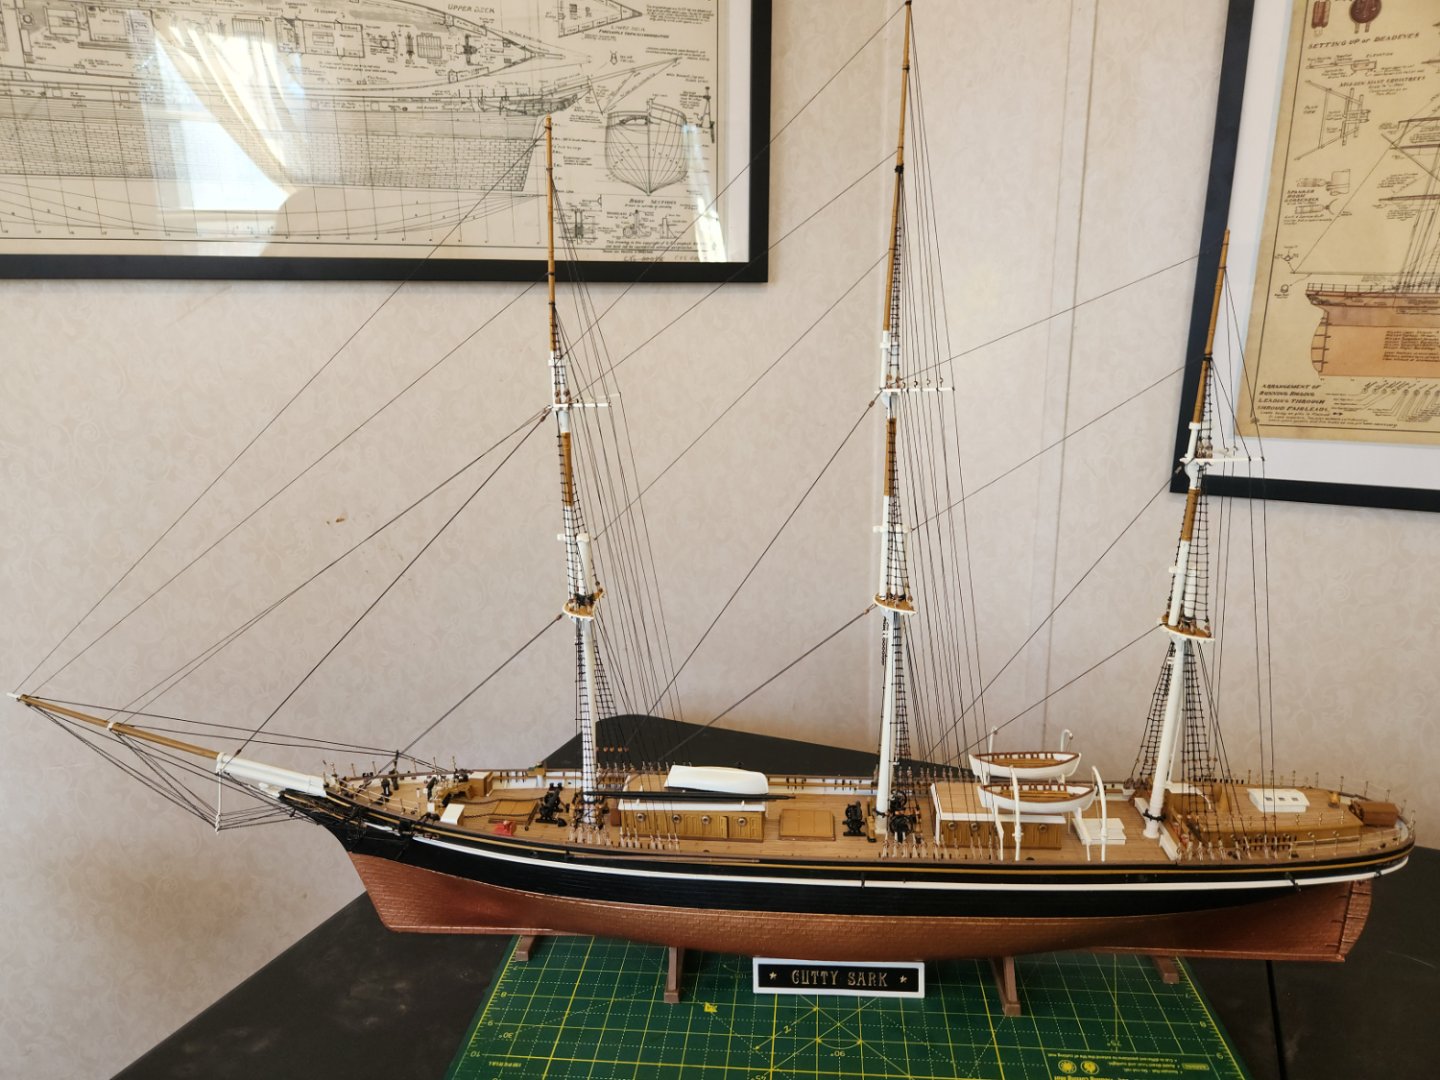
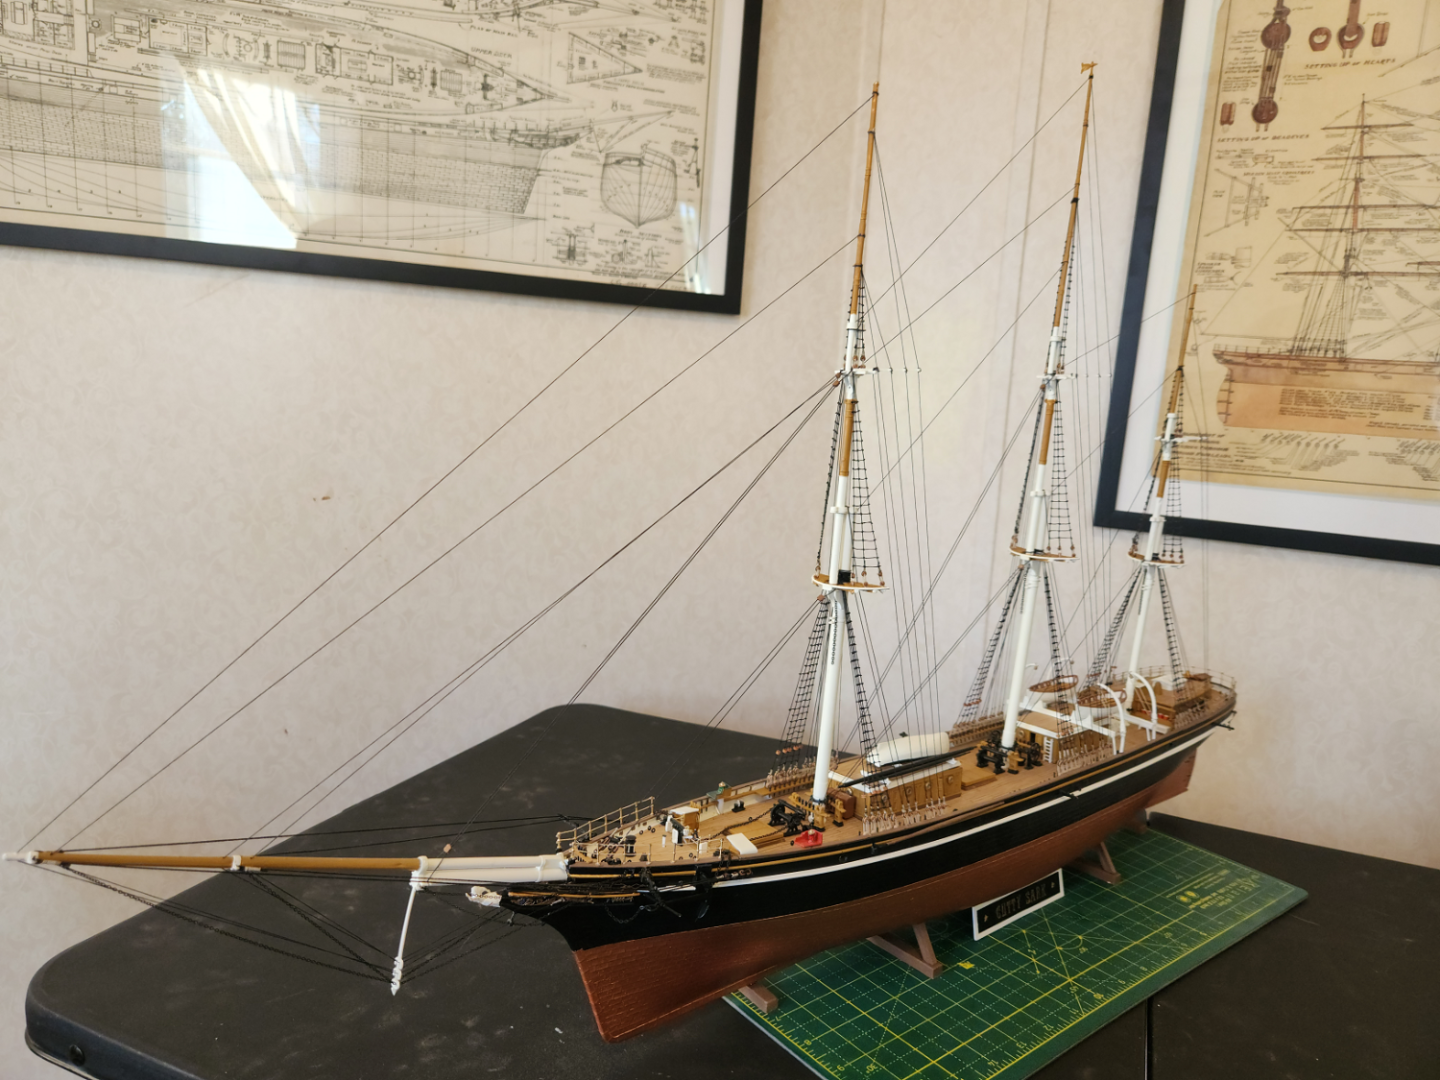
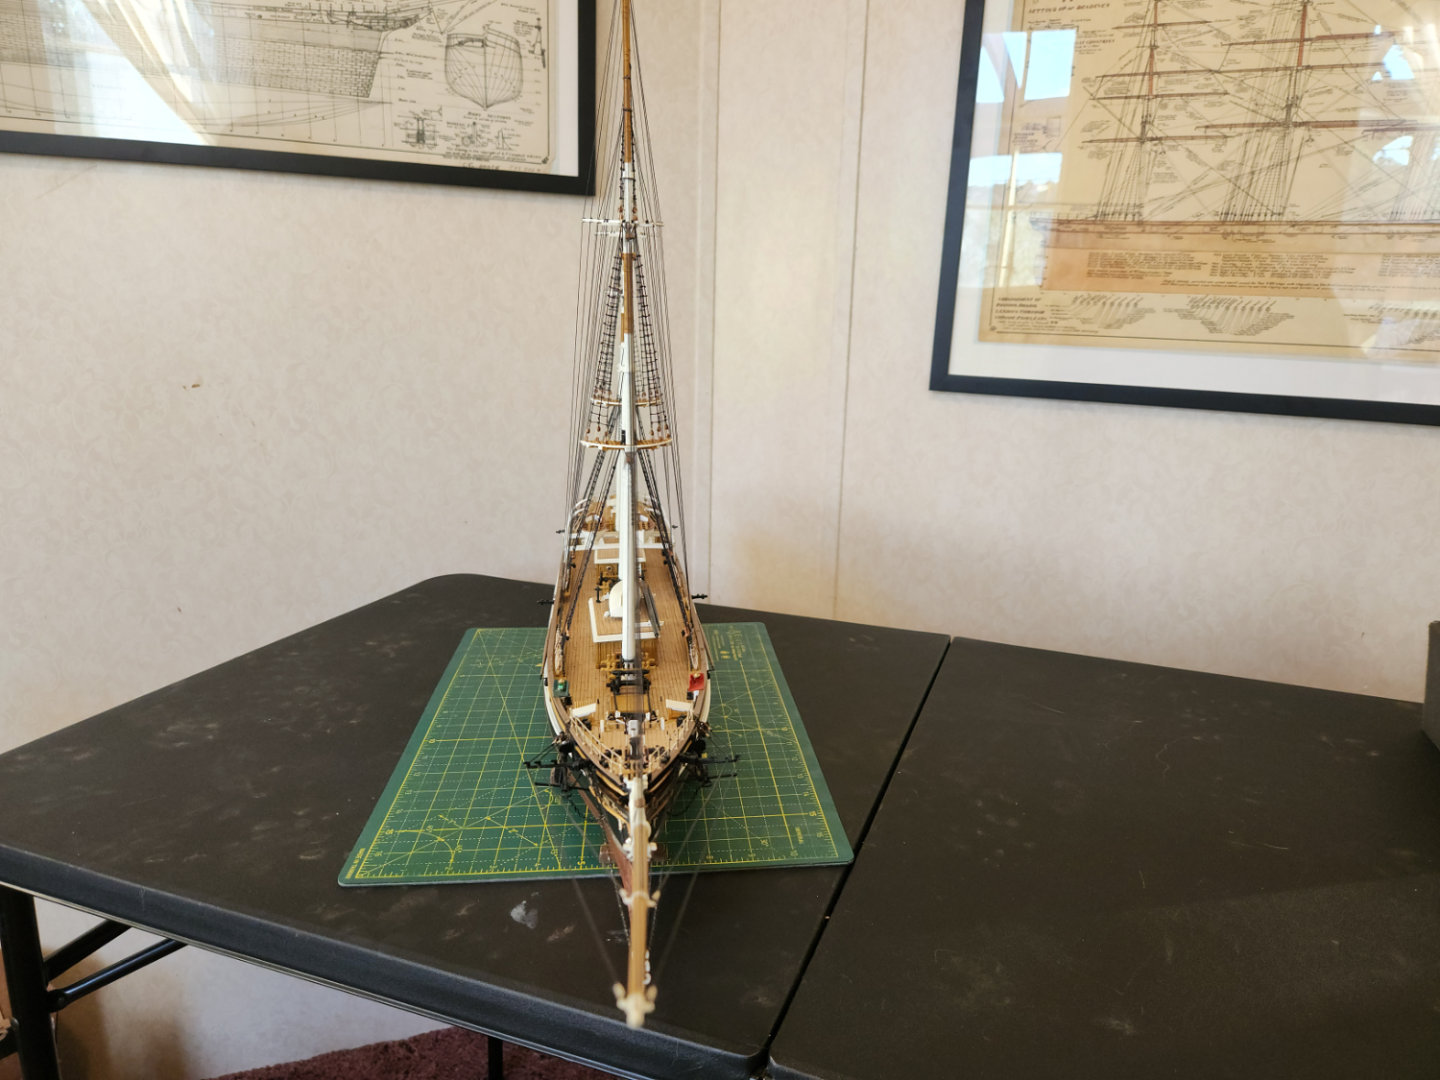
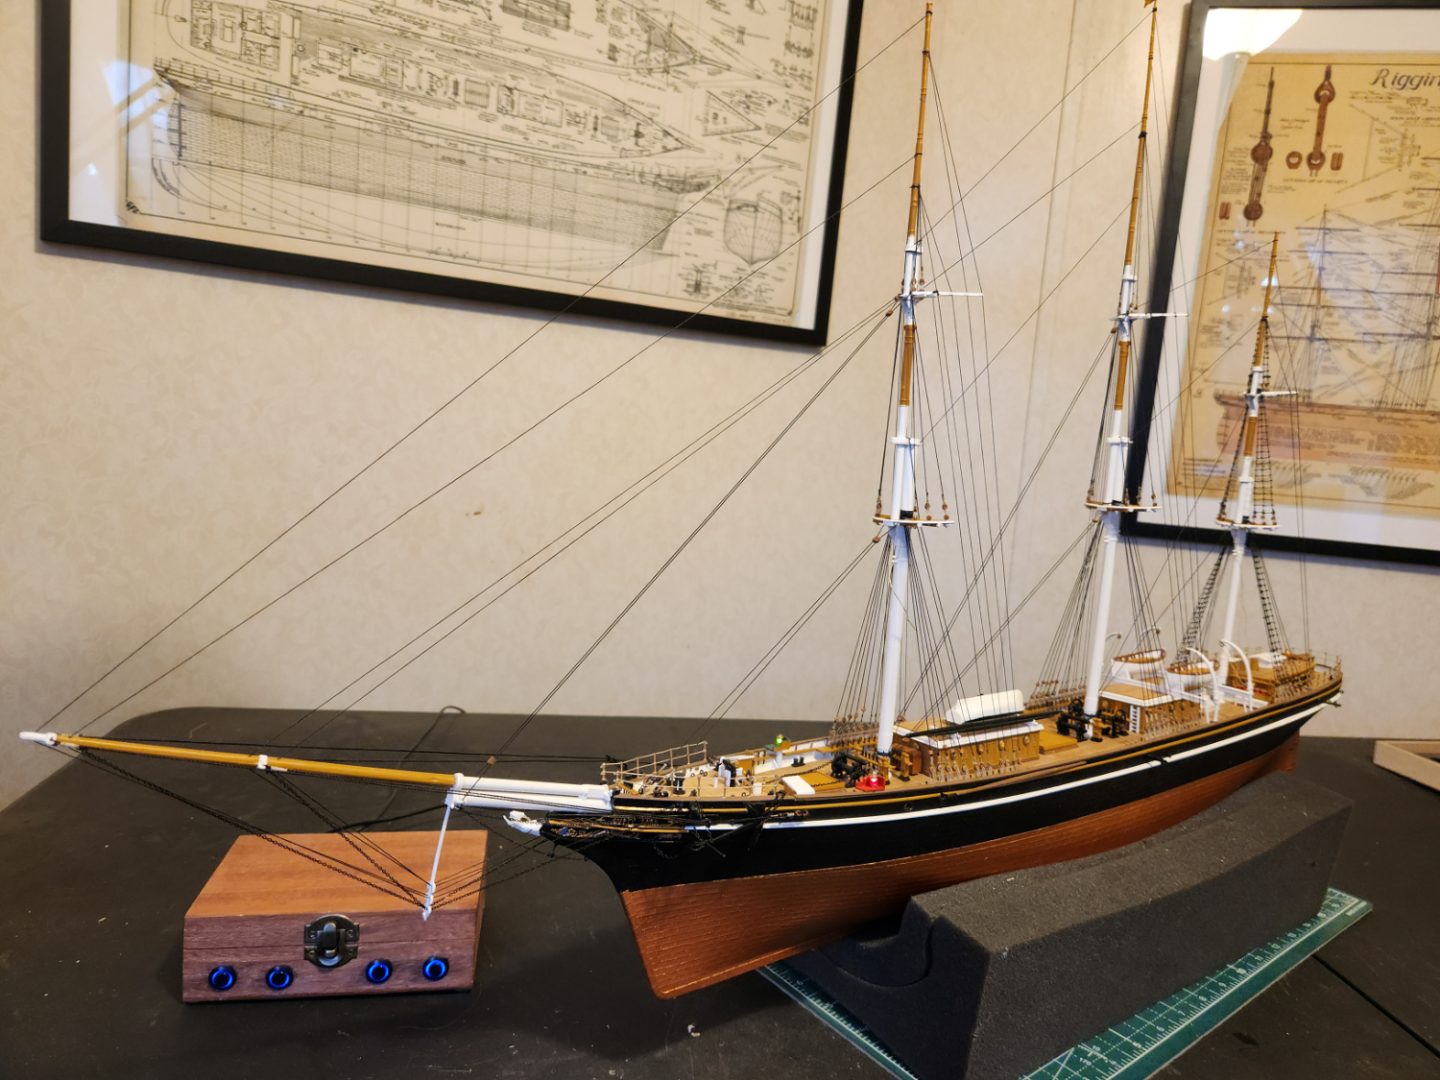
Standing rigging is virtually done. Though the main and fore ratline rungs are yet to be tied, I consider this a significant milestone because it means I'm finally done threading those accursed deadeyes. 196 of them on the main deck alone. There will likely be a small handful to be done in the running rigging but nothing on the scale of the standing rigging. I'll start on the ratlines tomorrow and when they're done, all that is left is a ton of detail touchup paint and I can put paid to the standing rigging. I've played fast and loose with tie points and methods partly out of n00bish ignorance, partly laziness, and mostly because of the indecipherable and bizarrely inappropriate instructions.
- 85 replies
-
- 7
-
-
- Cutty Sark
- Revell
- (and 2 more)
-
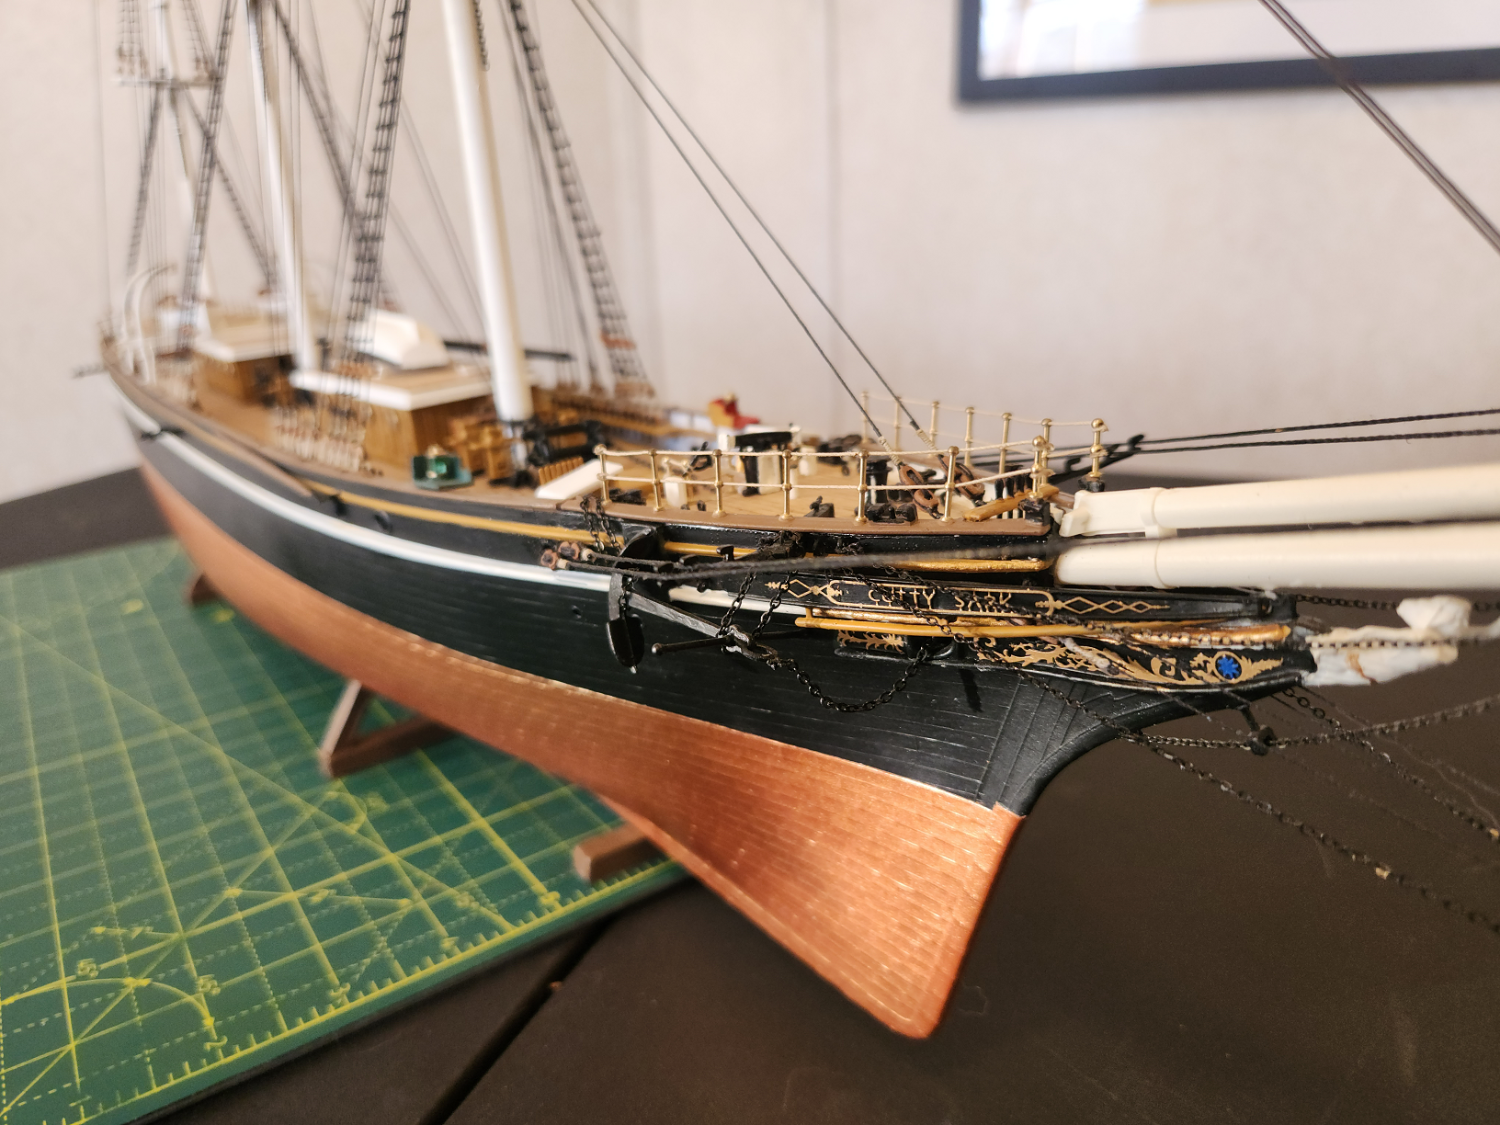
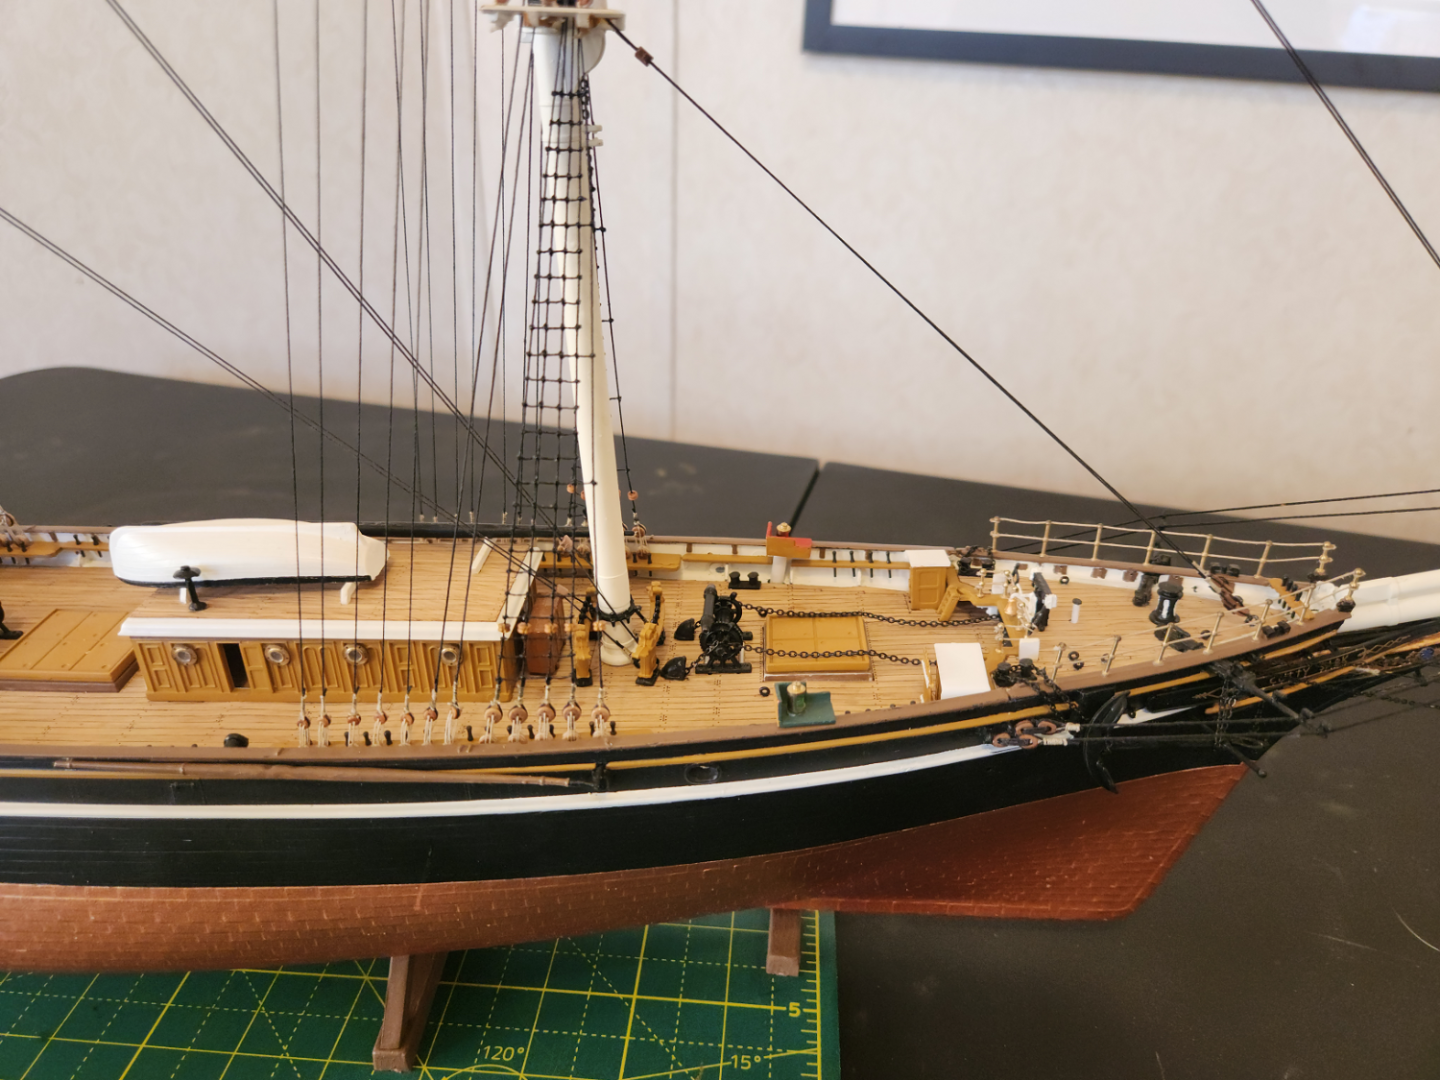
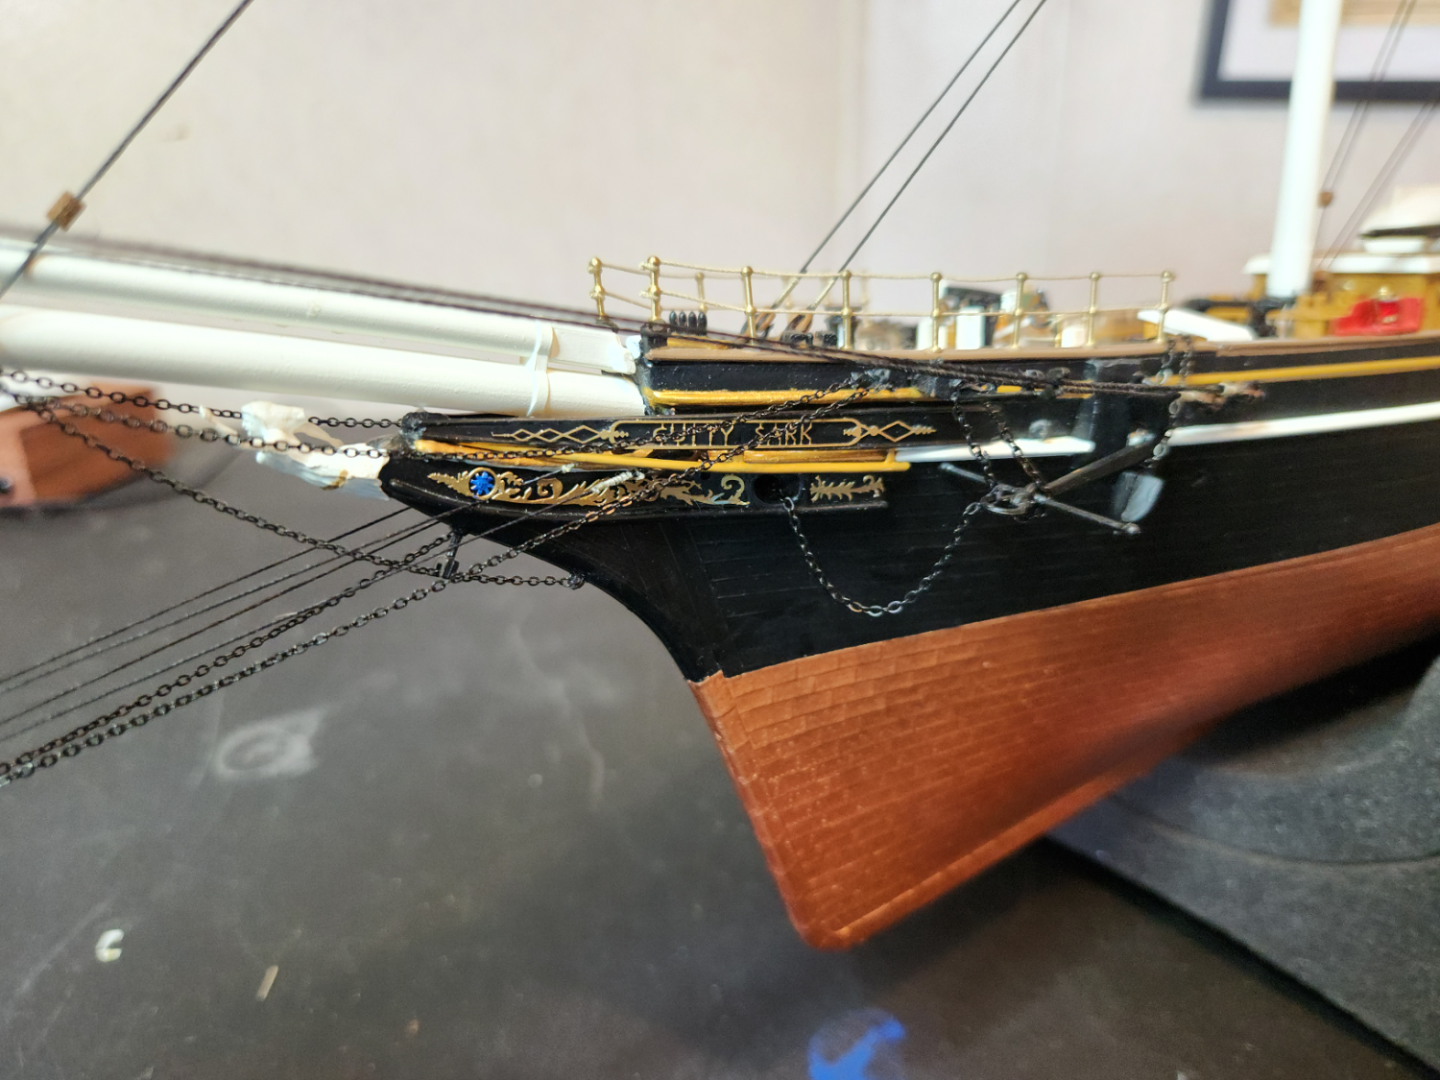
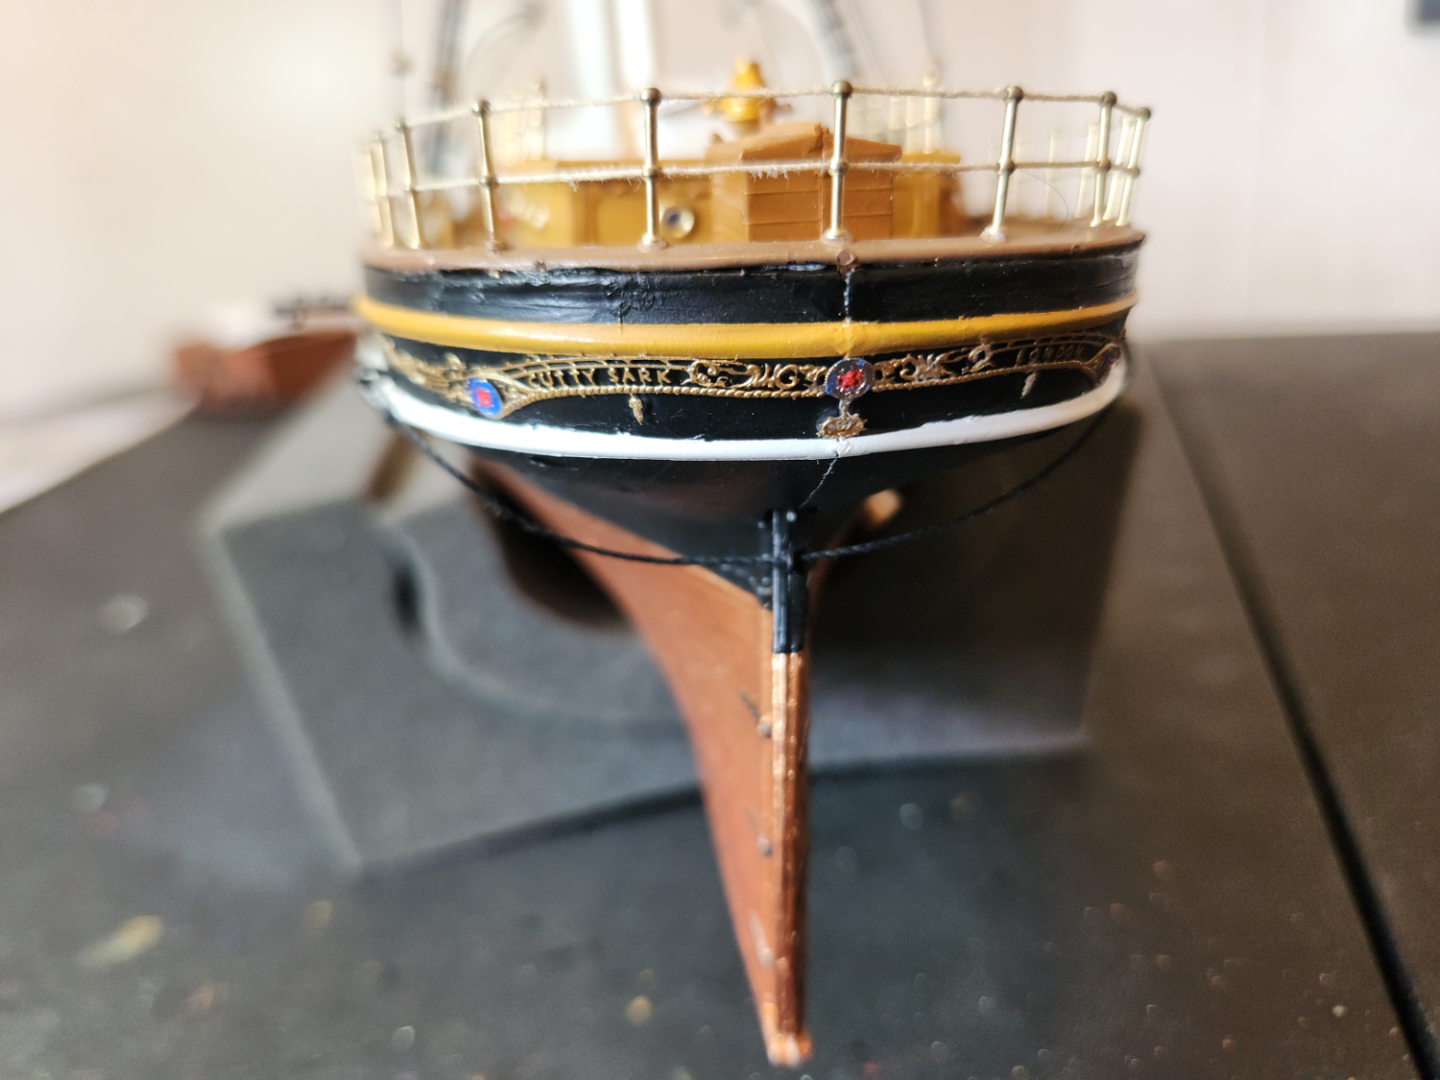
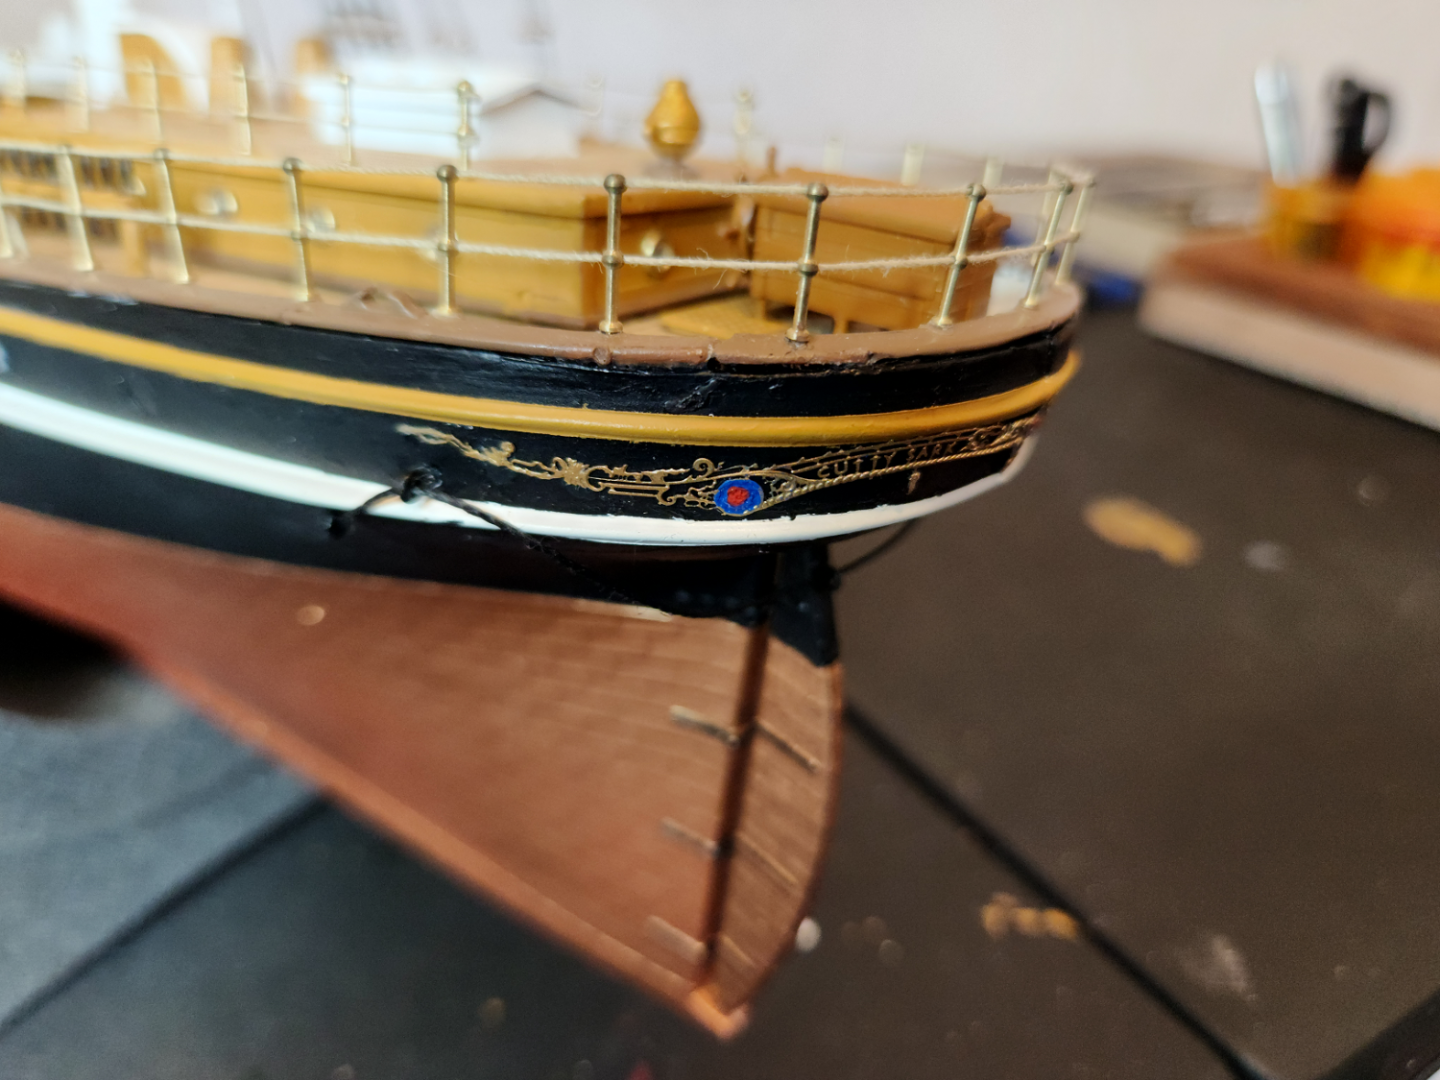
Trail boards and gingerbread installed. I haven't tackled the nameplate on the steering box yet - that PE is so fiddly it makes me nervous. I'll get to it when I'm in more of a Zen state of mind. [edit] what looks like gold or copper on those chains is just reflection. I did a double-take and had to check. The camera can be deceptive. Also reinstalled the mizzen backstays to much better effect this time around and didn't neglect their fairleads this time. Sharp eyes may notice I've removed the foremost boat mount (it was not glued in and may never be), and removed the mid section's belaying pins (like their full scale counterparts, they are not permanently set, either). That is all so I can get me some fightin' room to begin work on the main's shrouds and stays.

- 85 replies
-
- 6
-
-
-
- Cutty Sark
- Revell
- (and 2 more)