Lastcore
-
Posts
13 -
Joined
-
Last visited
-
 oren reacted to a post in a topic:
Vasa/Wasa by Lastcore - Billing Boats - 1:75
oren reacted to a post in a topic:
Vasa/Wasa by Lastcore - Billing Boats - 1:75
-
 GrandpaPhil reacted to a post in a topic:
Vasa/Wasa by Lastcore - Billing Boats - 1:75
GrandpaPhil reacted to a post in a topic:
Vasa/Wasa by Lastcore - Billing Boats - 1:75
-
Baker reacted to a post in a topic:
Vasa/Wasa by Lastcore - Billing Boats - 1:75
-
 ships carpenter reacted to a post in a topic:
Vasa/Wasa by Lastcore - Billing Boats - 1:75
ships carpenter reacted to a post in a topic:
Vasa/Wasa by Lastcore - Billing Boats - 1:75
-
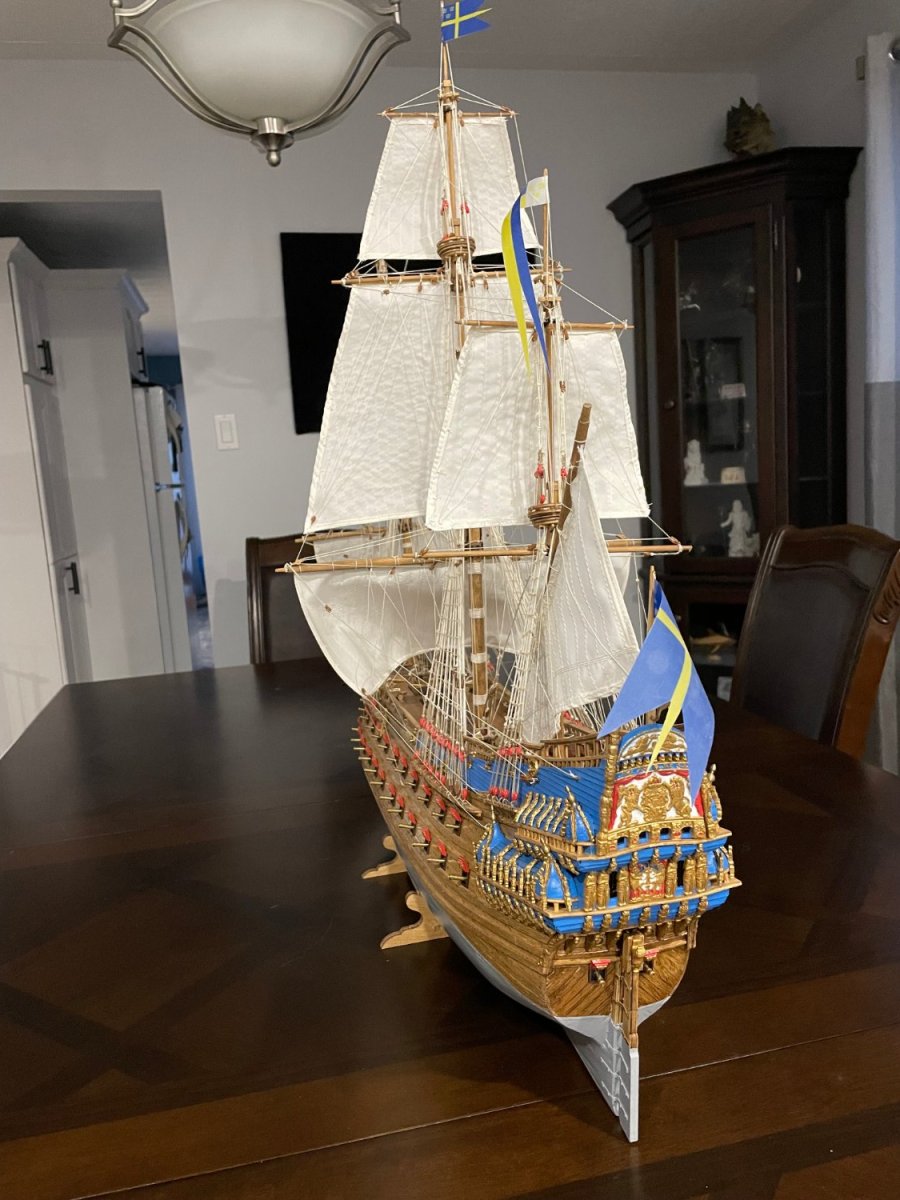
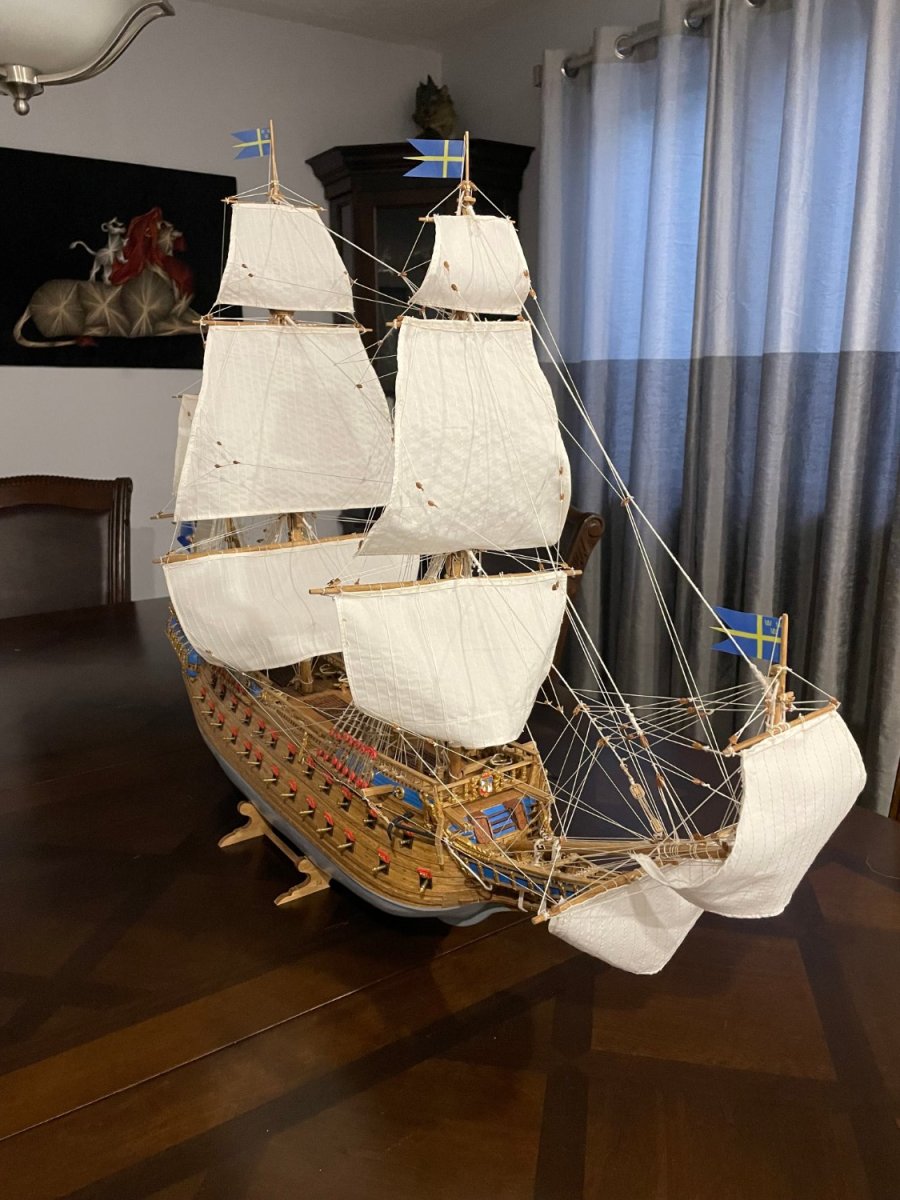
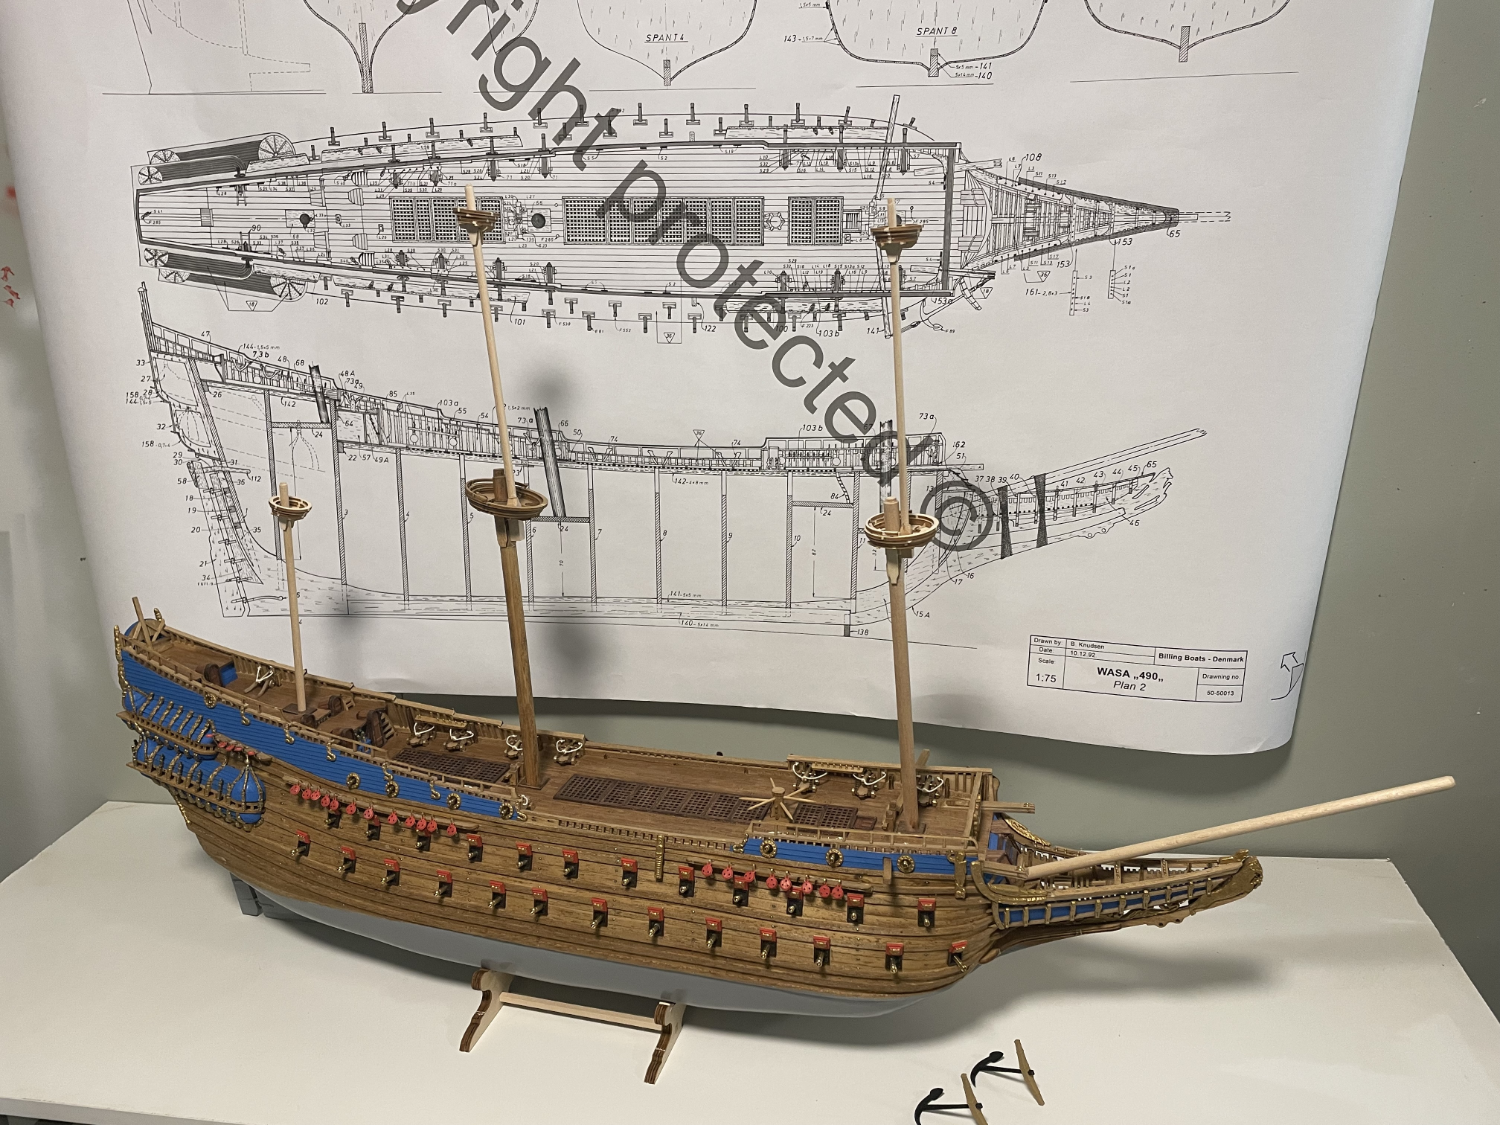
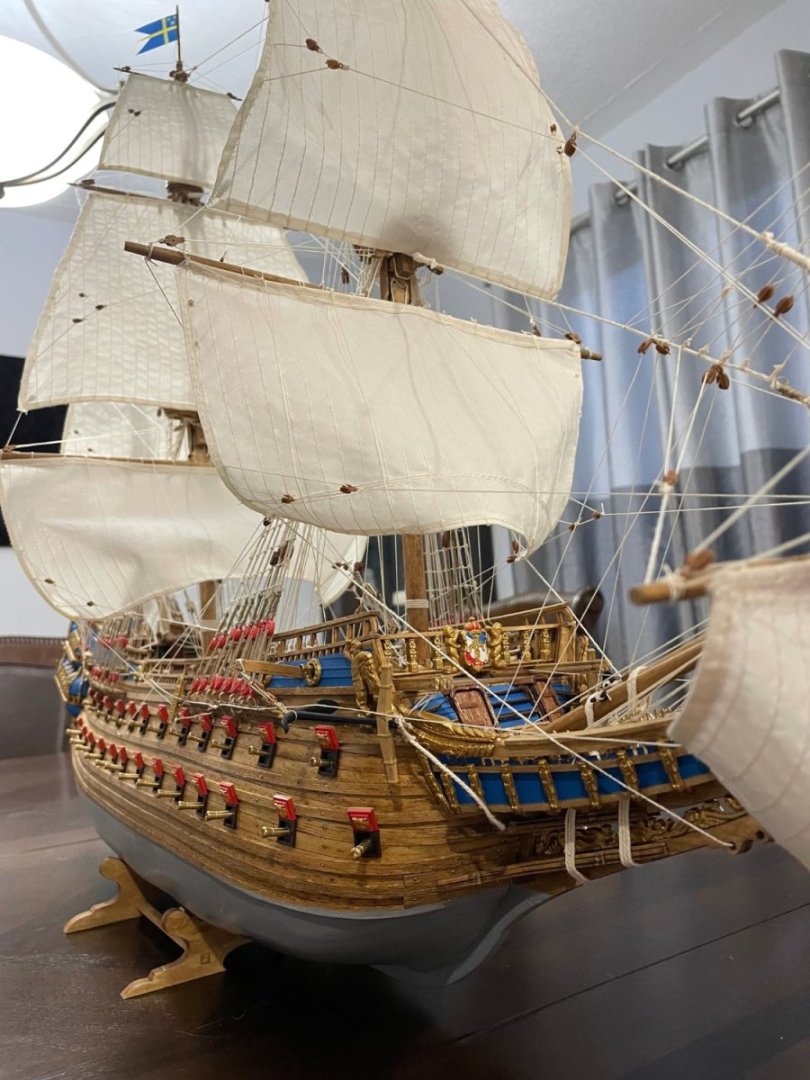
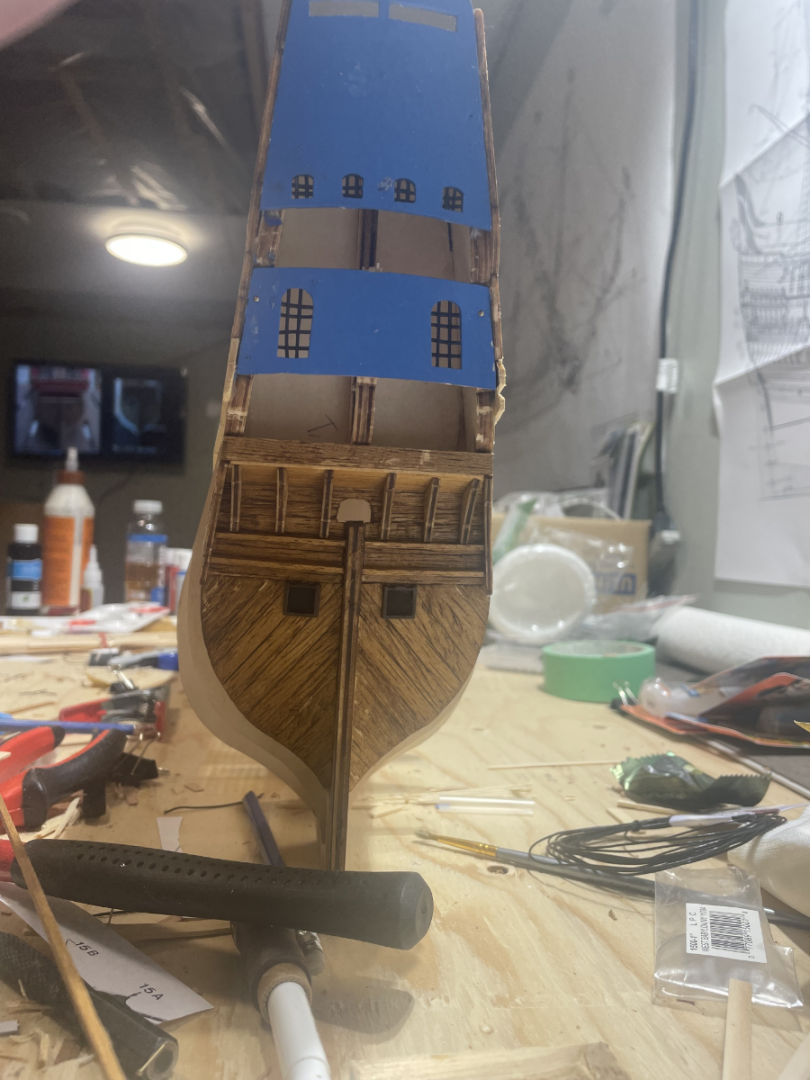
Hi @72Nova, The main hull is an golden oak stain. The kit called for mahogany, but the only mahogany stains I found were very dark. The water line I just kind of winged it based on some other builds online. I was trying to copy the build linked in the BB website. That is just a matte slate grey. And I agree. The blue looks better IMO vs the red. There isnt enough contrast with the red (again IMO). Though historically it was red, so I should have done that just for authenticity sake. Thanks! Charles
-
Jeff T reacted to a post in a topic:
Vasa/Wasa by Lastcore - Billing Boats - 1:75
-
Jeff T reacted to a post in a topic:
Vasa/Wasa by Lastcore - Billing Boats - 1:75
-
@Knocklouder I would love to.....But that is too expensive from what Ive seen. It boils down to what I want more. A case, or another boat kit! haha The Wasa is going to end up at my parents house on a high shelf. It will be dusted with some compressed air, and a lot of patience! If you have any suggestions for cheap cases, I am all ears. Thanks for the vote of confidence!
-
Knocklouder reacted to a post in a topic:
Vasa/Wasa by Lastcore - Billing Boats - 1:75
-
chris watton reacted to a post in a topic:
Vasa/Wasa by Lastcore - Billing Boats - 1:75
-
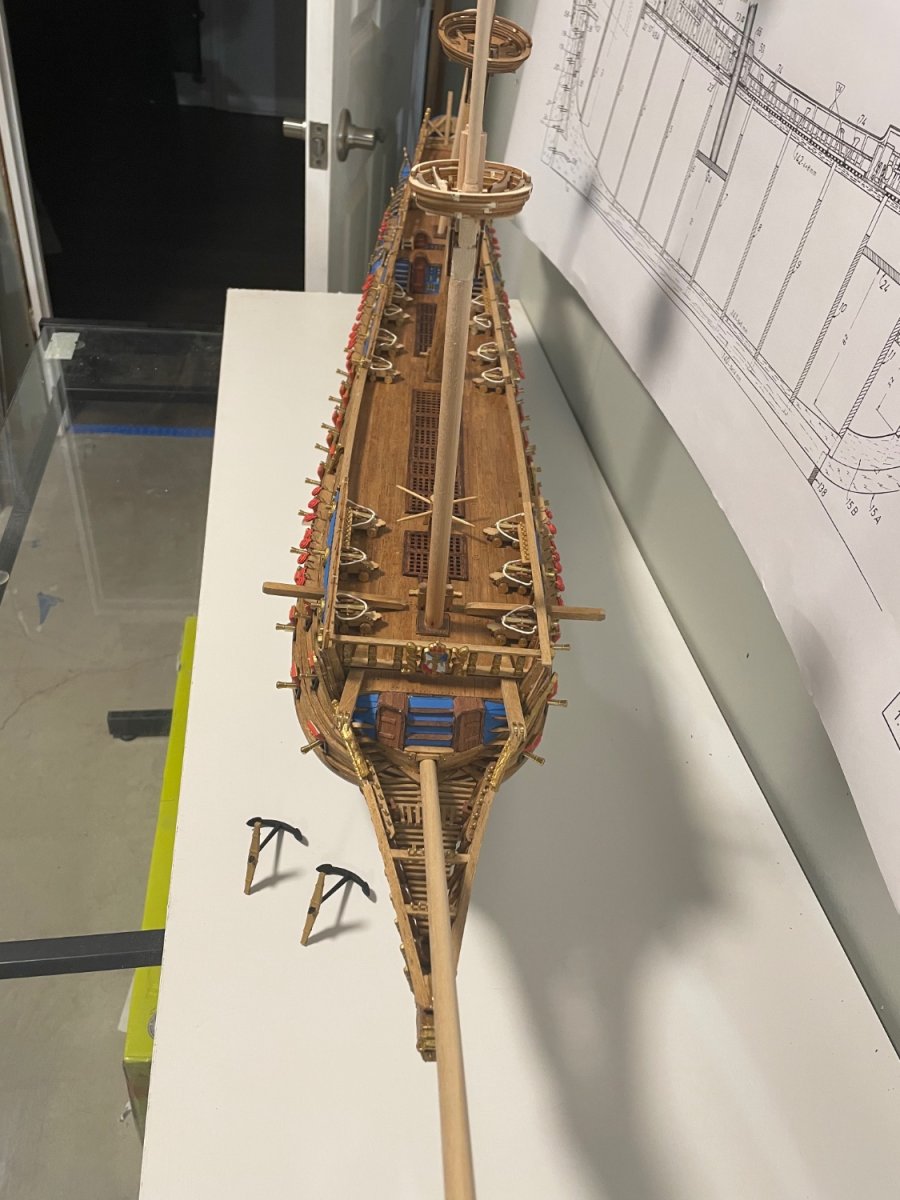
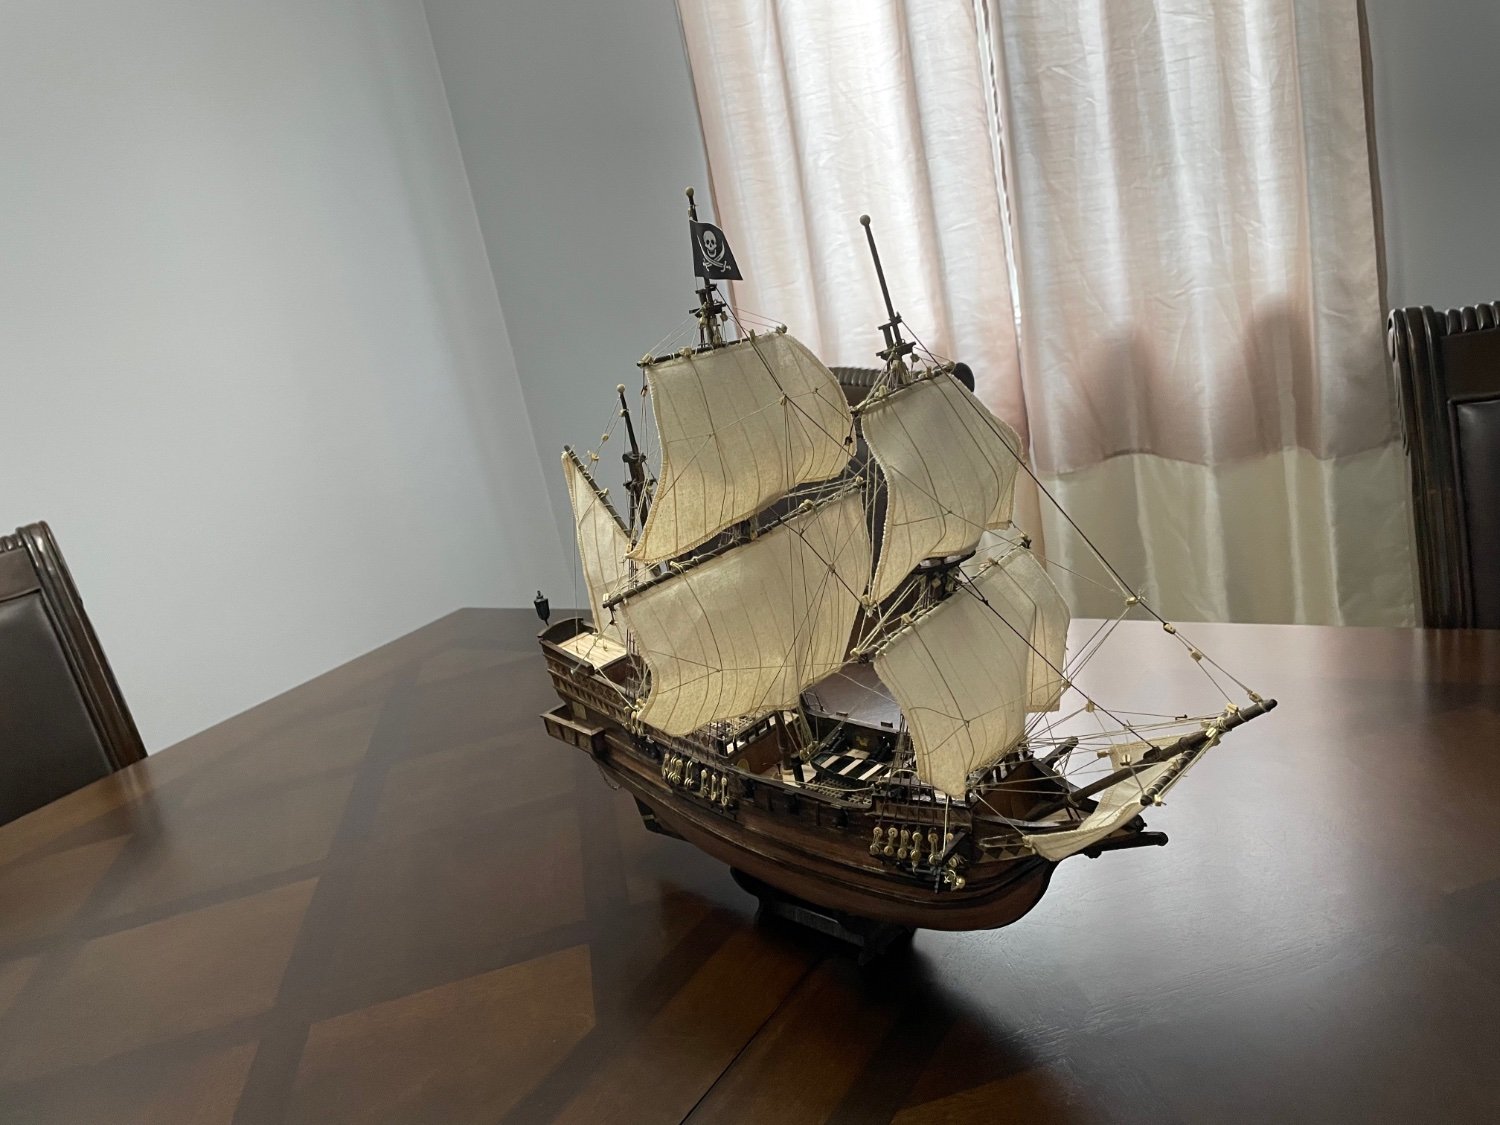
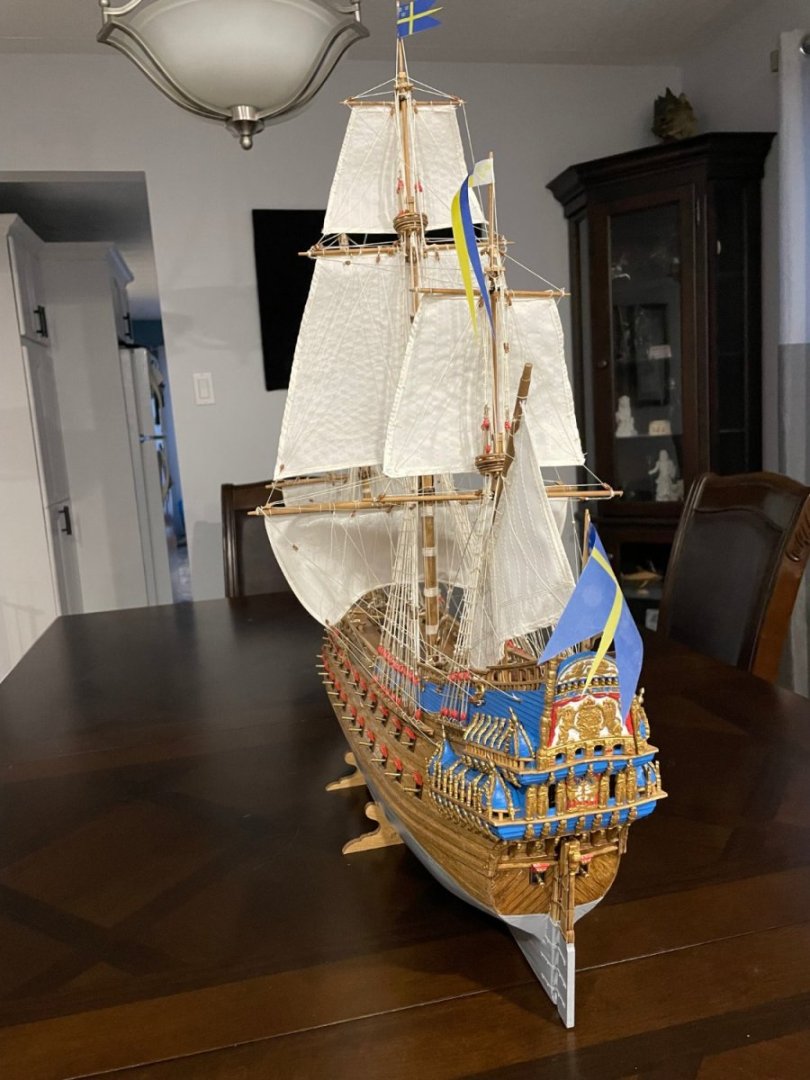
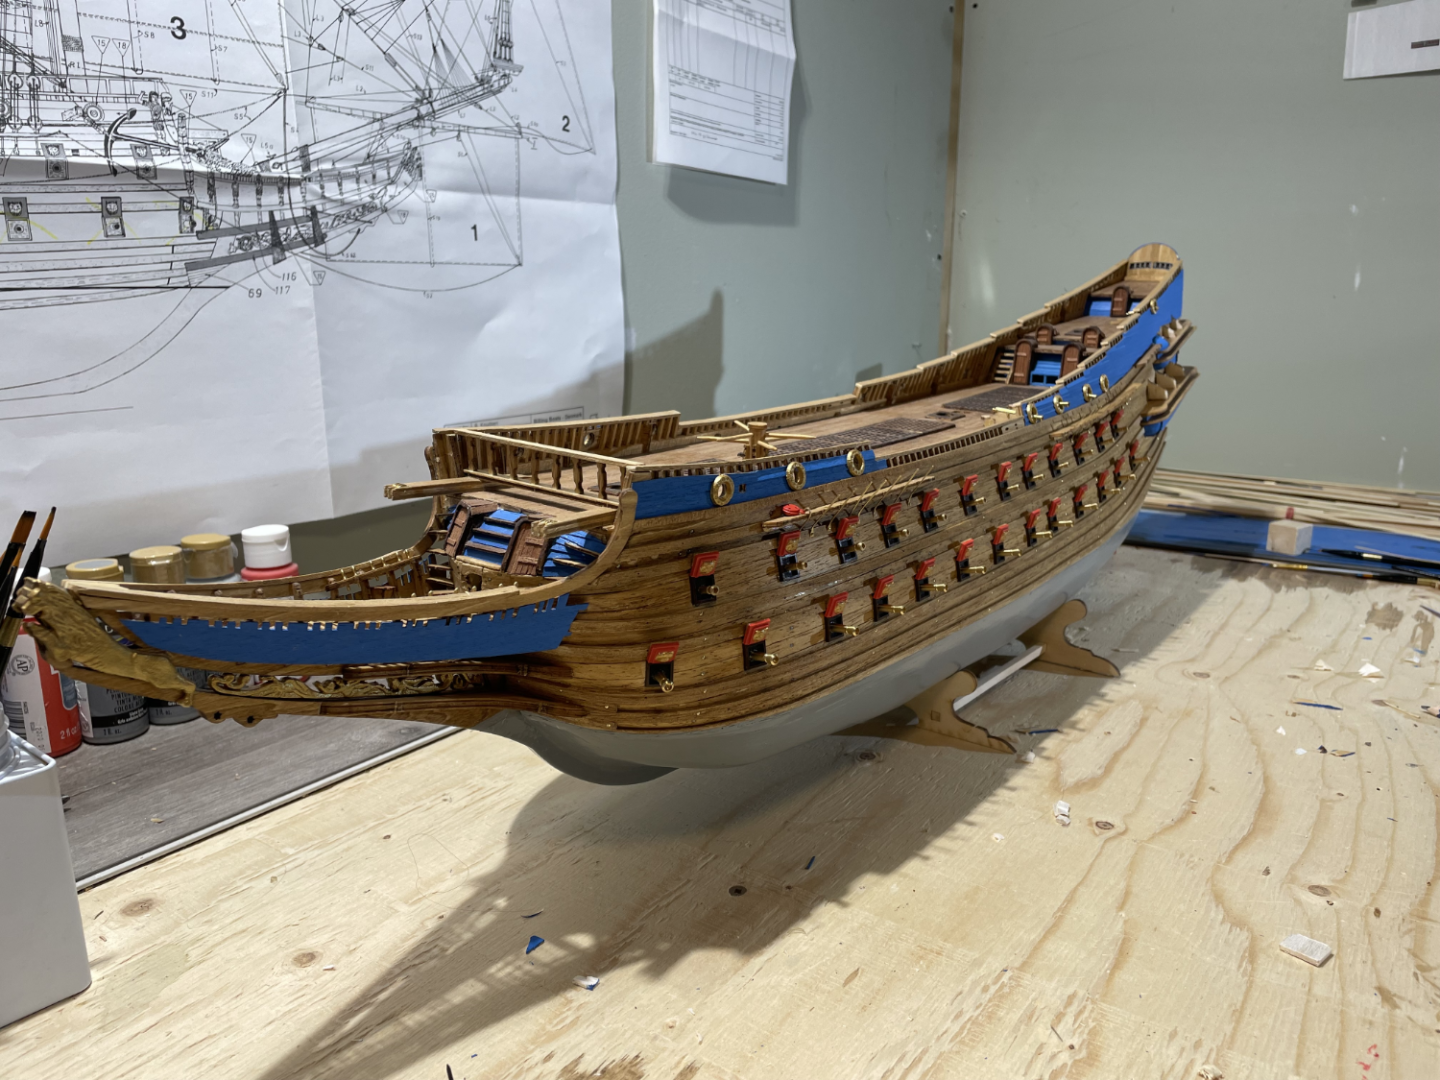
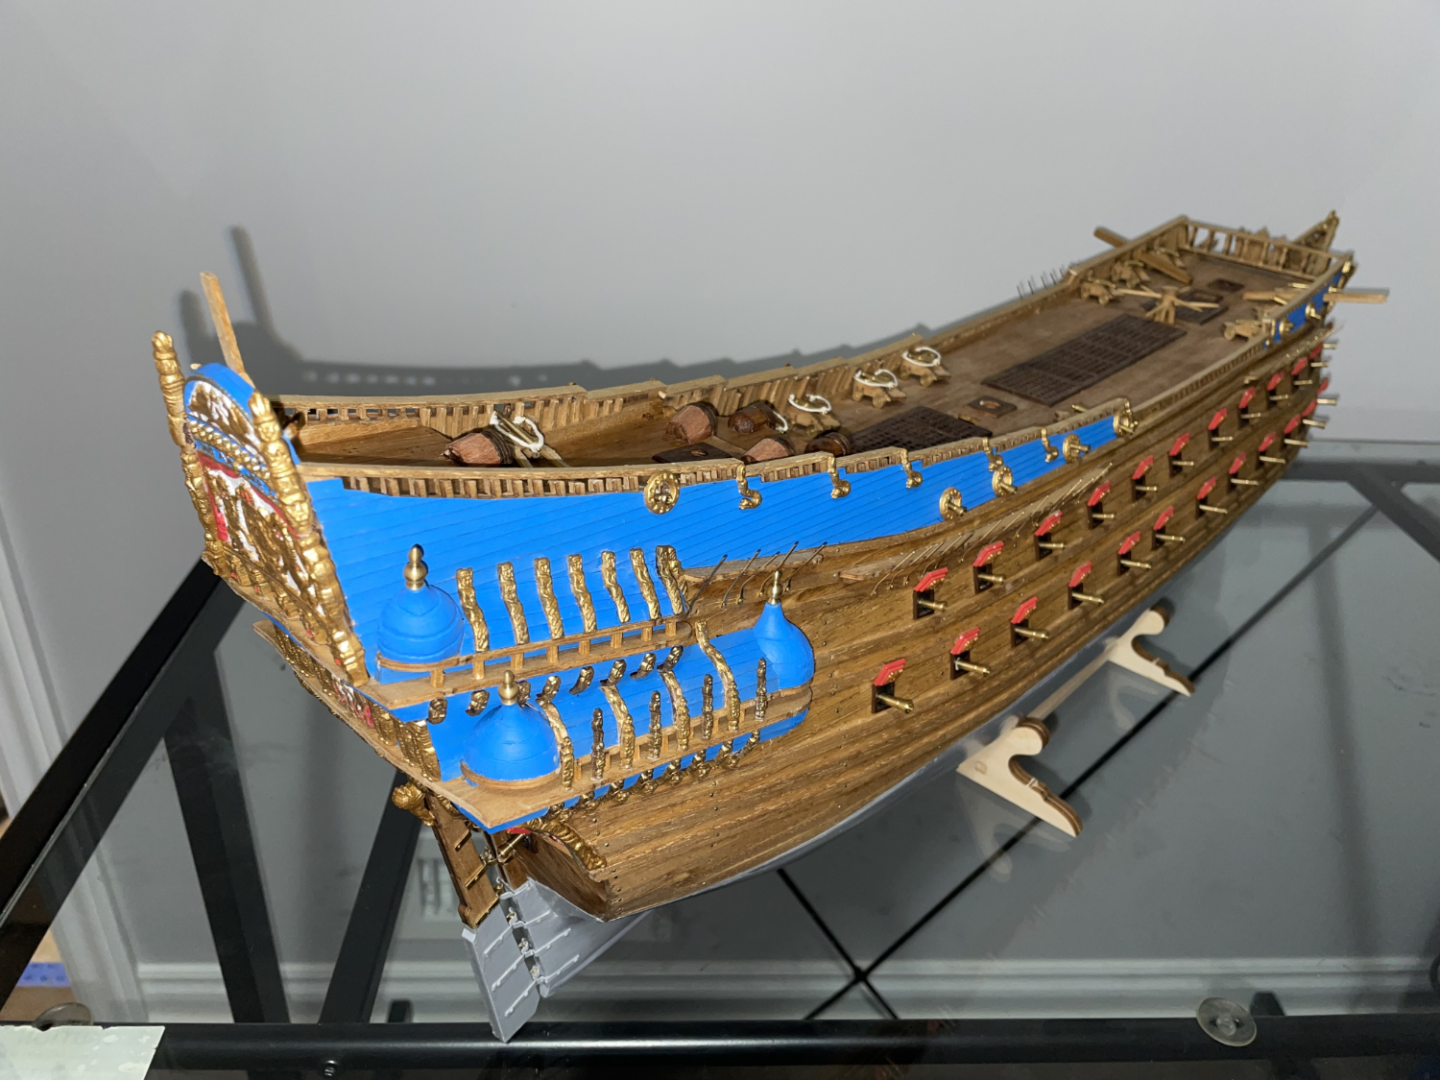
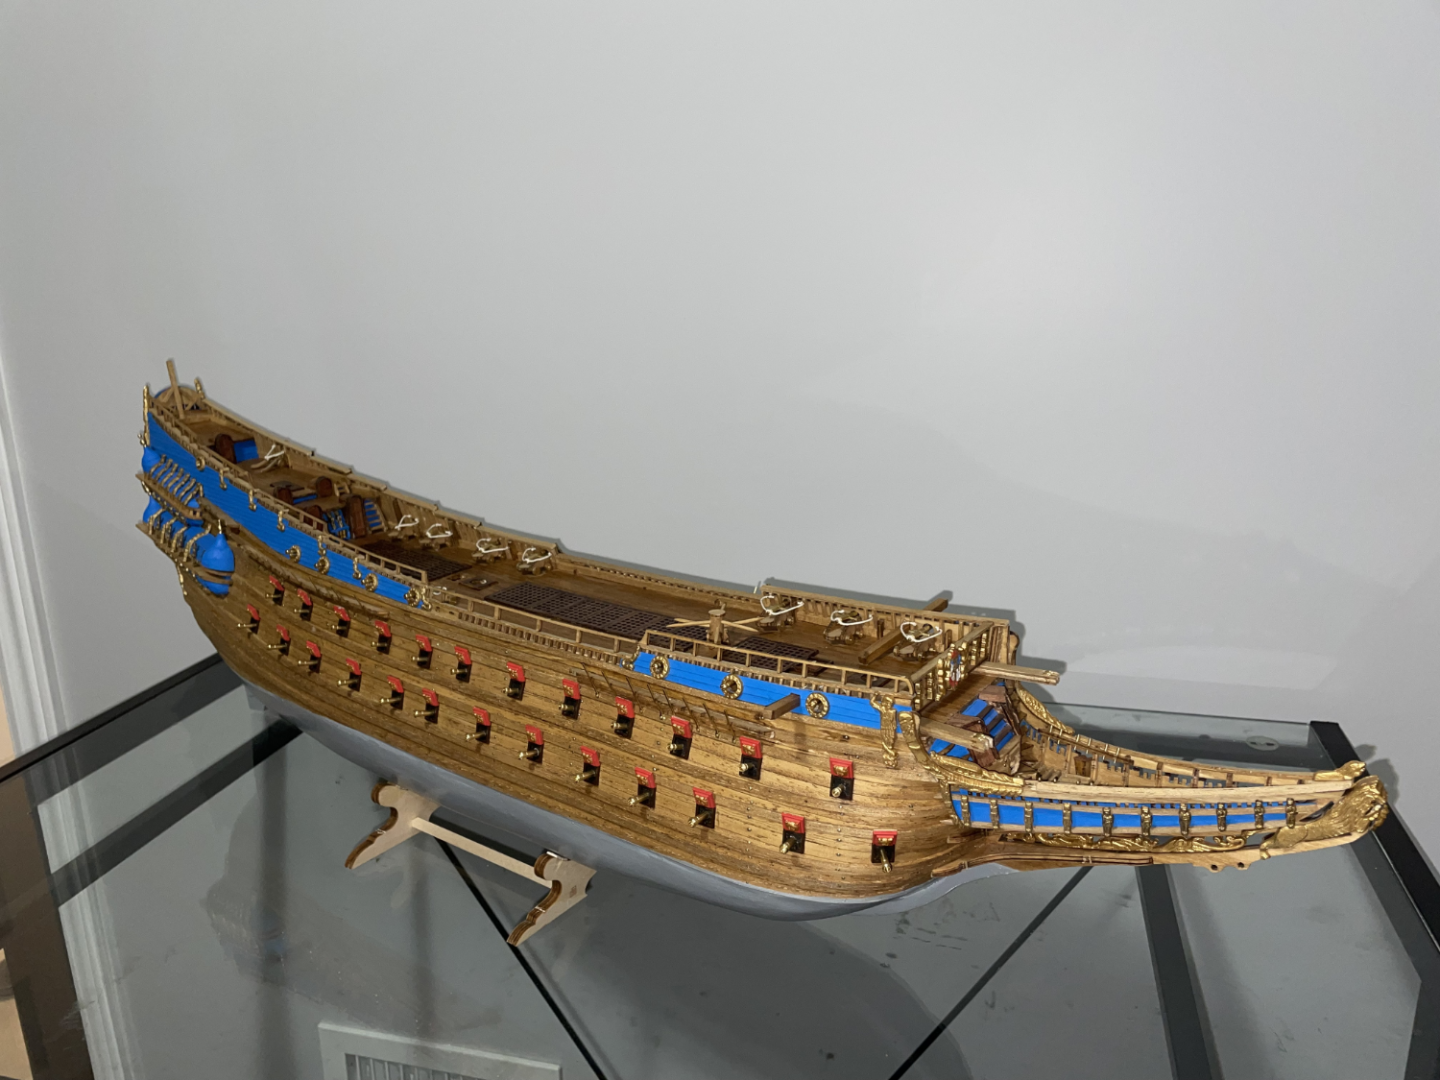
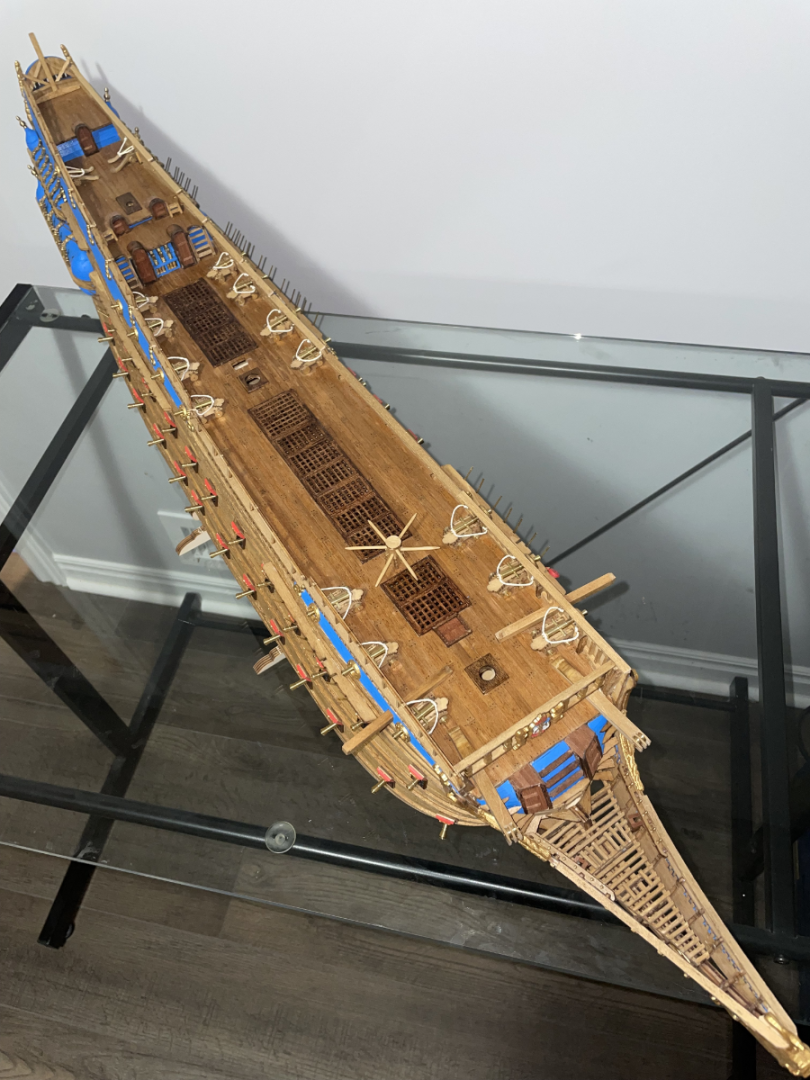
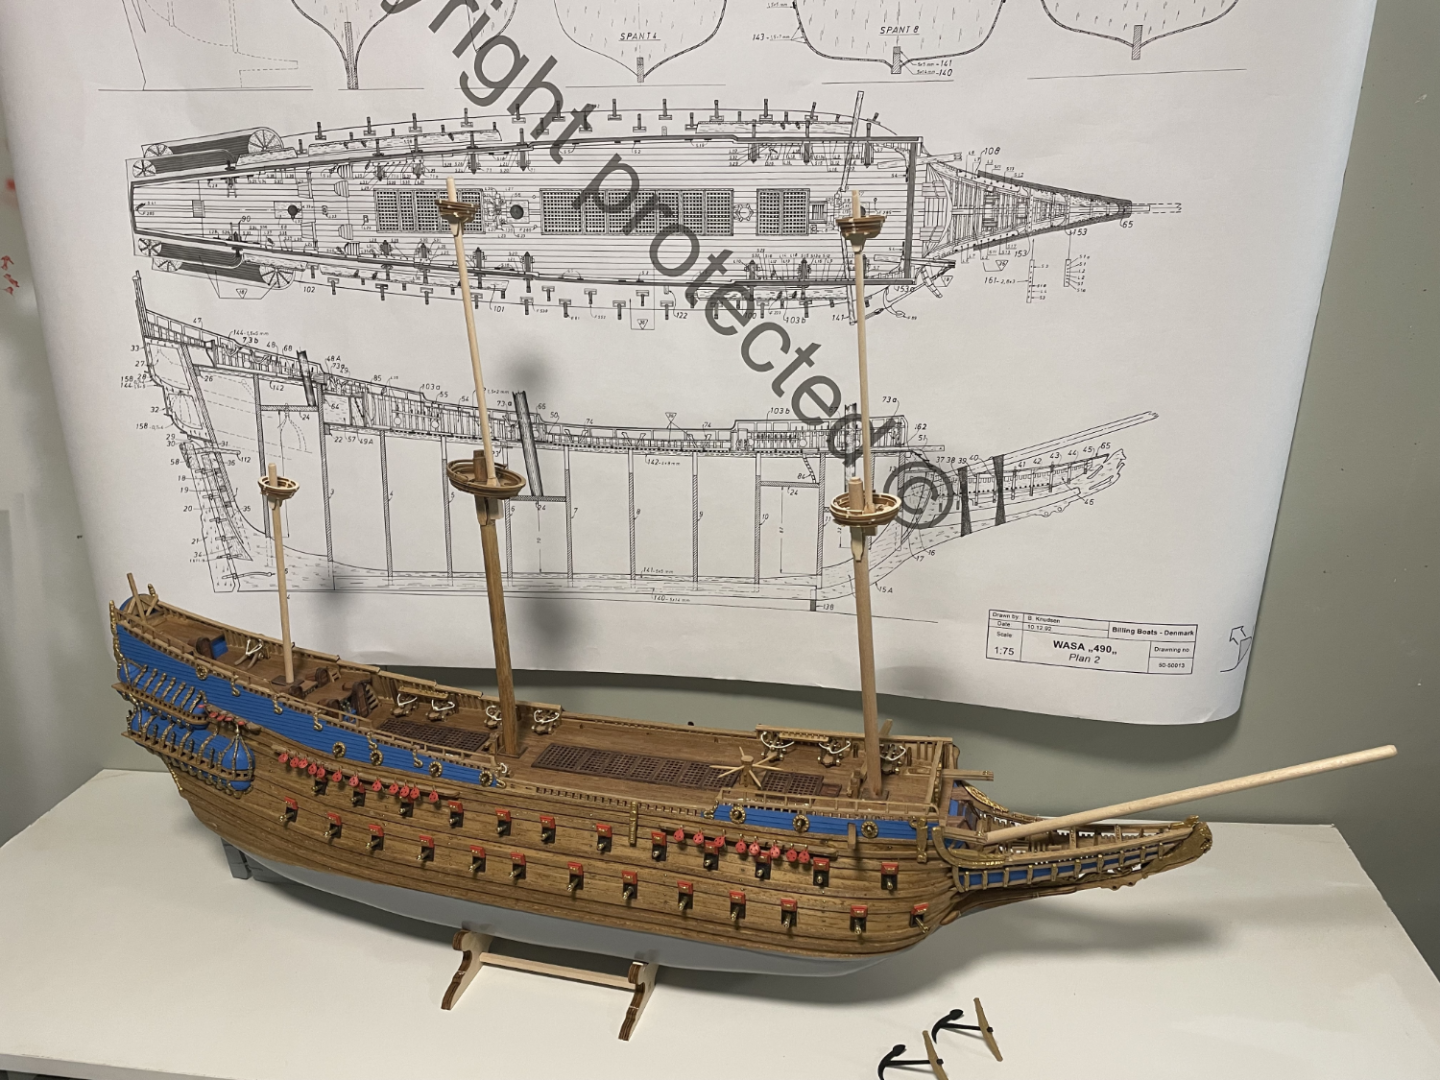
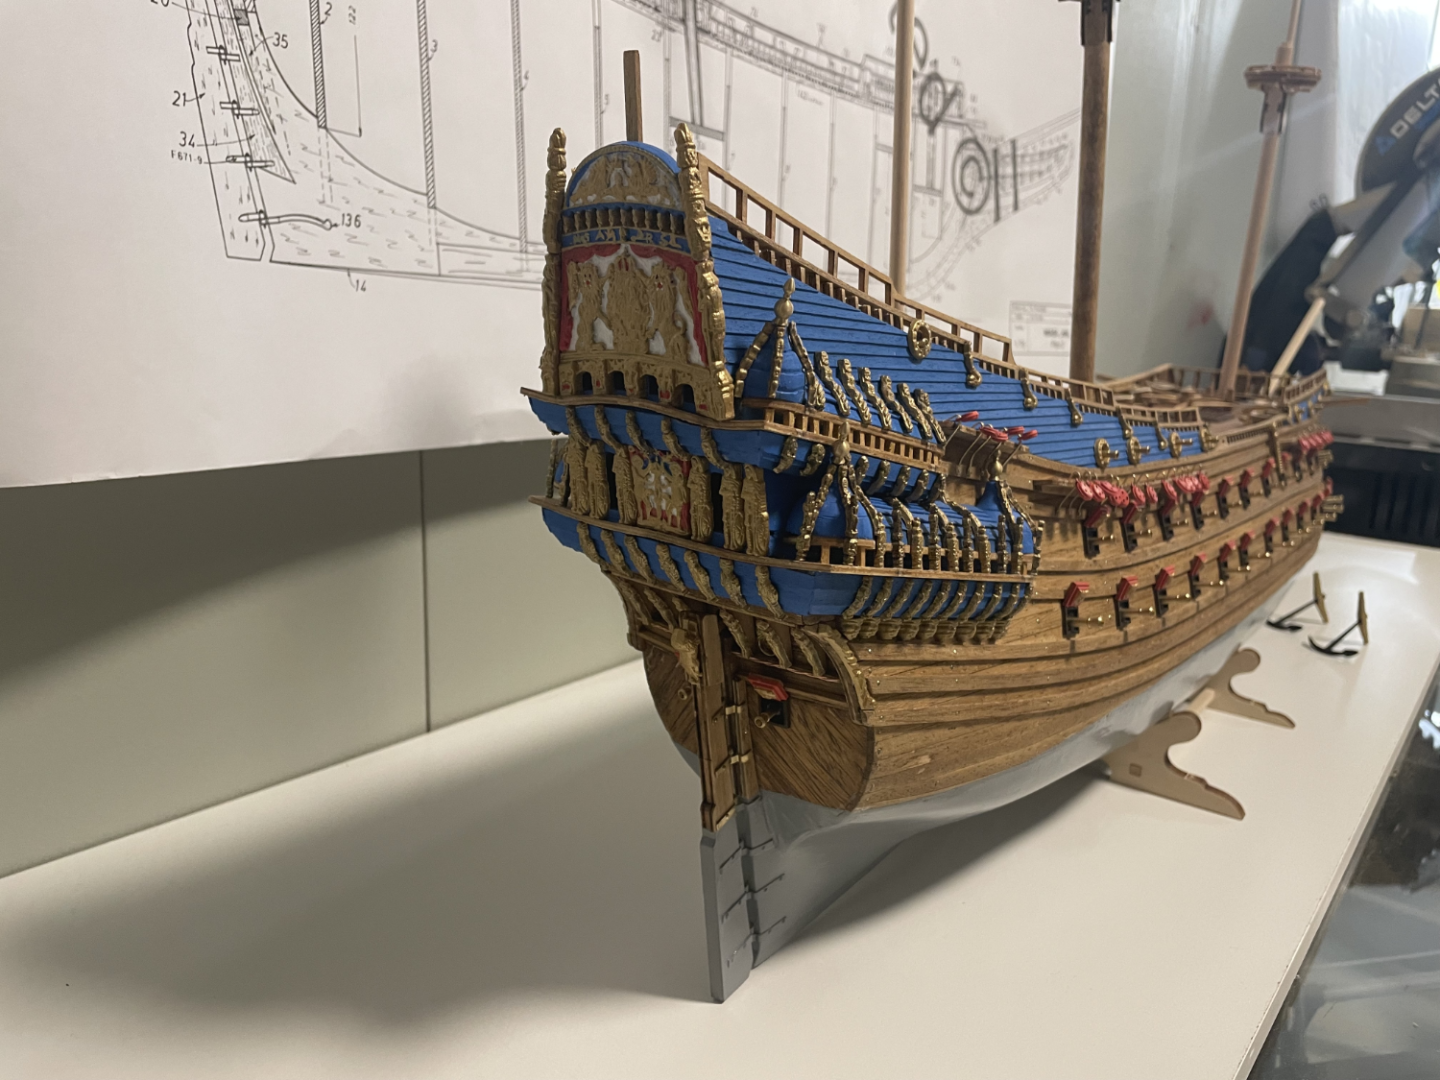
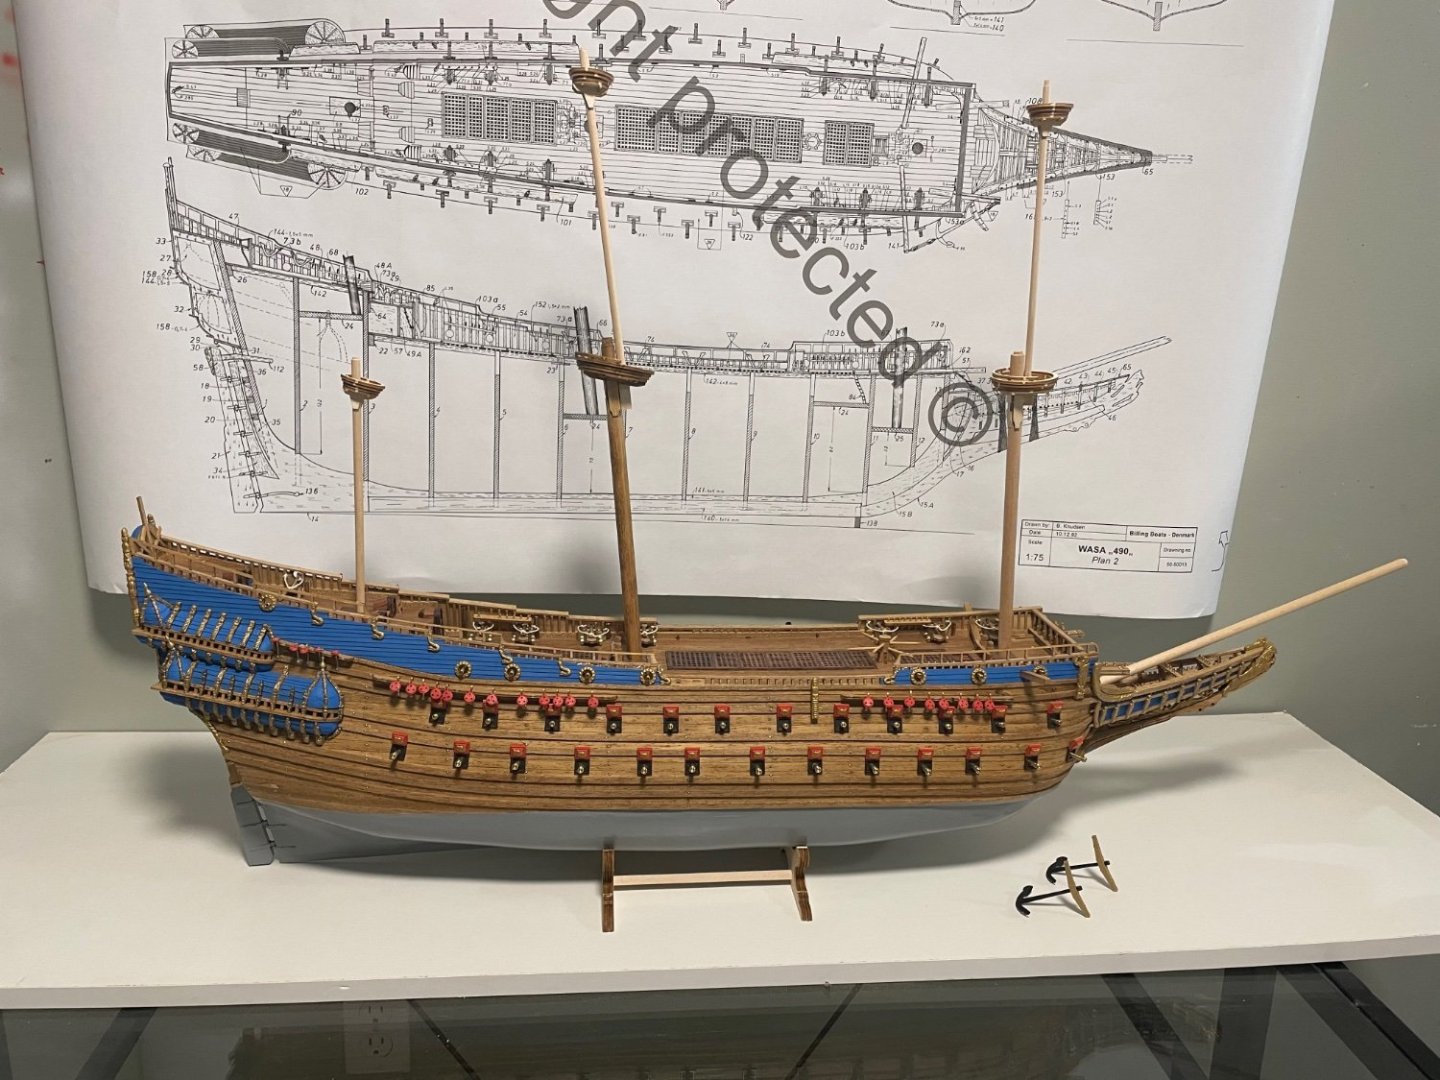
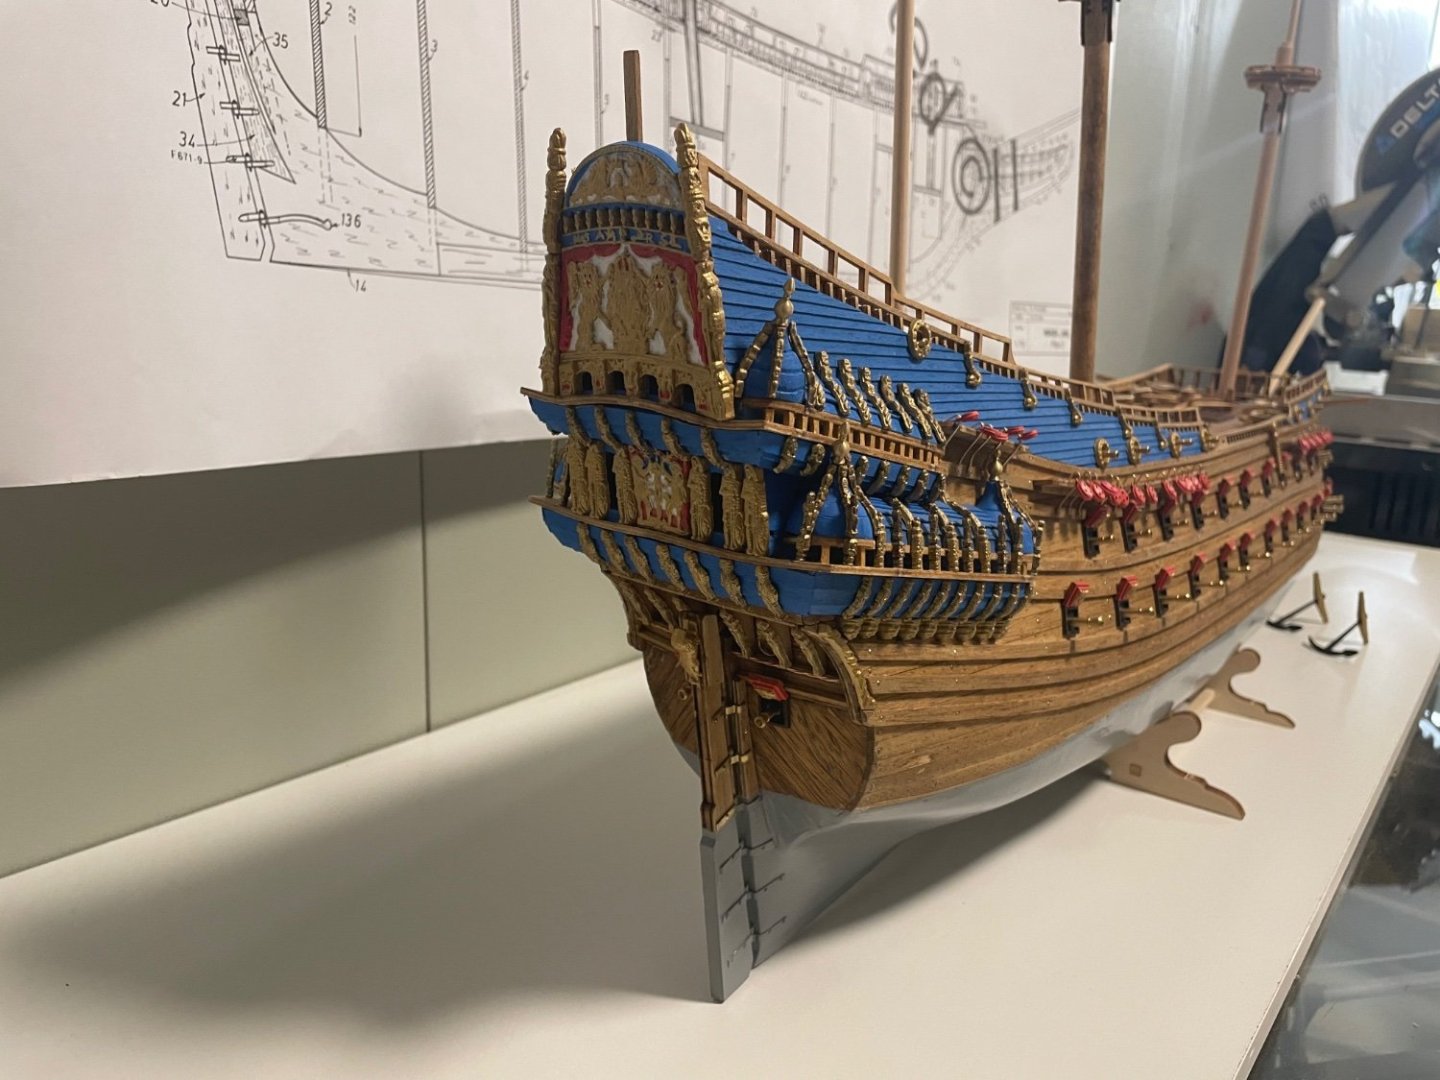
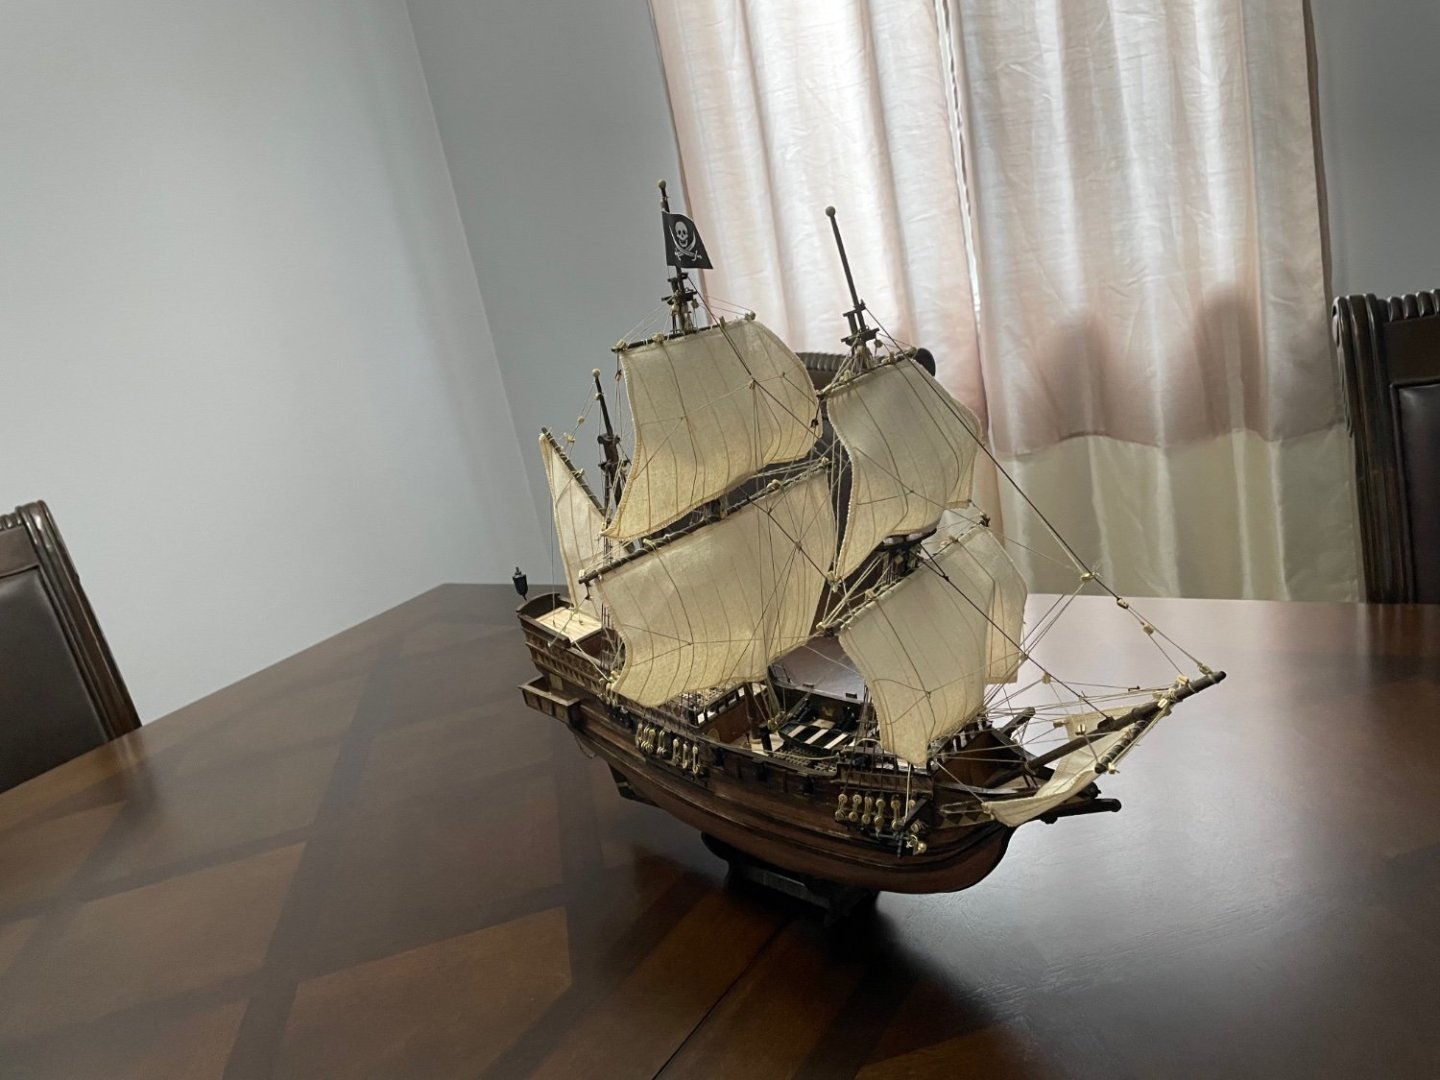
Hi Everyone, Sorry for the long wait (if anyone was actually waiting!). Here are a few pictures of my finished build. It isn't perfect, but I am still very proud of my 2nd boat kit, especially considering the quality of instructions by Billling Boats. The Artesania Latina rigging instructions helped a lot, however, I noticed that they didnt have all the rigging showed by the BB diagrams. I ended up using the AL instructions for the main rigging, then added the ones on the BB diagram after. Please feel free to ask any questions if anyone has any. I can provide more detail if it would help others! Thanks! Lastcore


-
oren reacted to a post in a topic:
Vasa/Wasa by Lastcore - Billing Boats - 1:75
-
BLACK VIKING reacted to a post in a topic:
Vasa/Wasa by Lastcore - Billing Boats - 1:75
-
Ubjs, Those are handy but not what I was hoping for. Tbh, I was kind of hoping for a "rule of thumb", aka shrouds are usually large, buntlines are all small...etc. Oren, the labels in there are for the statues. The deadeyes are fairly obvious in size, but the blocks themselves arent. Thanks guys!
-
Lastcore reacted to a post in a topic:
Vasa/Wasa by Lastcore - Billing Boats - 1:75
-
Hi Oren, Thanks for the suggestion! Those instructions are exactly what I have been referencing to do my rigging. Sadly, it doesnt appear to lineup well with what Billings boat supplied. As far as I can tell from the AL instructions, they have 3 single block sizes, 103 (small), 117 (medium), 115 (large). The 115's are used a fair amount, and I only have a handful of larger block supplied. Thanks for the suggestion though!
-
Hi Everyone, I have been working on the rigging and have been making good progress (Pictures to come). There is one thing I have been struggling with. Does anyone know a good way to identify the block sizes used for the rigging? BB supplies both a small single and double, and also a larger single and double. Hard part is the pictures aren't great, and the instructions don't seem to mention the block sizing at all. JW if anyone had any suggestions on how to approach this hurdle. Thanks! Lastcore
-
I am working on a Billings Boat Vasa as well, and I just dont have that piece at all. Maybe it is part of a slightly older kit? Sorry I can't be more help!
-
When I saw the first pictures I really wasn't sure if it was the Wasa. Goes to show how much the kits and overall information has changed over the years. You did an awesome job on updating this to match the more modern kits. Now It unquestionably looks like that Wasa. Your gallery spindles (not sure what they were called) make mine look horrible I can tell some effort was spent there.
-
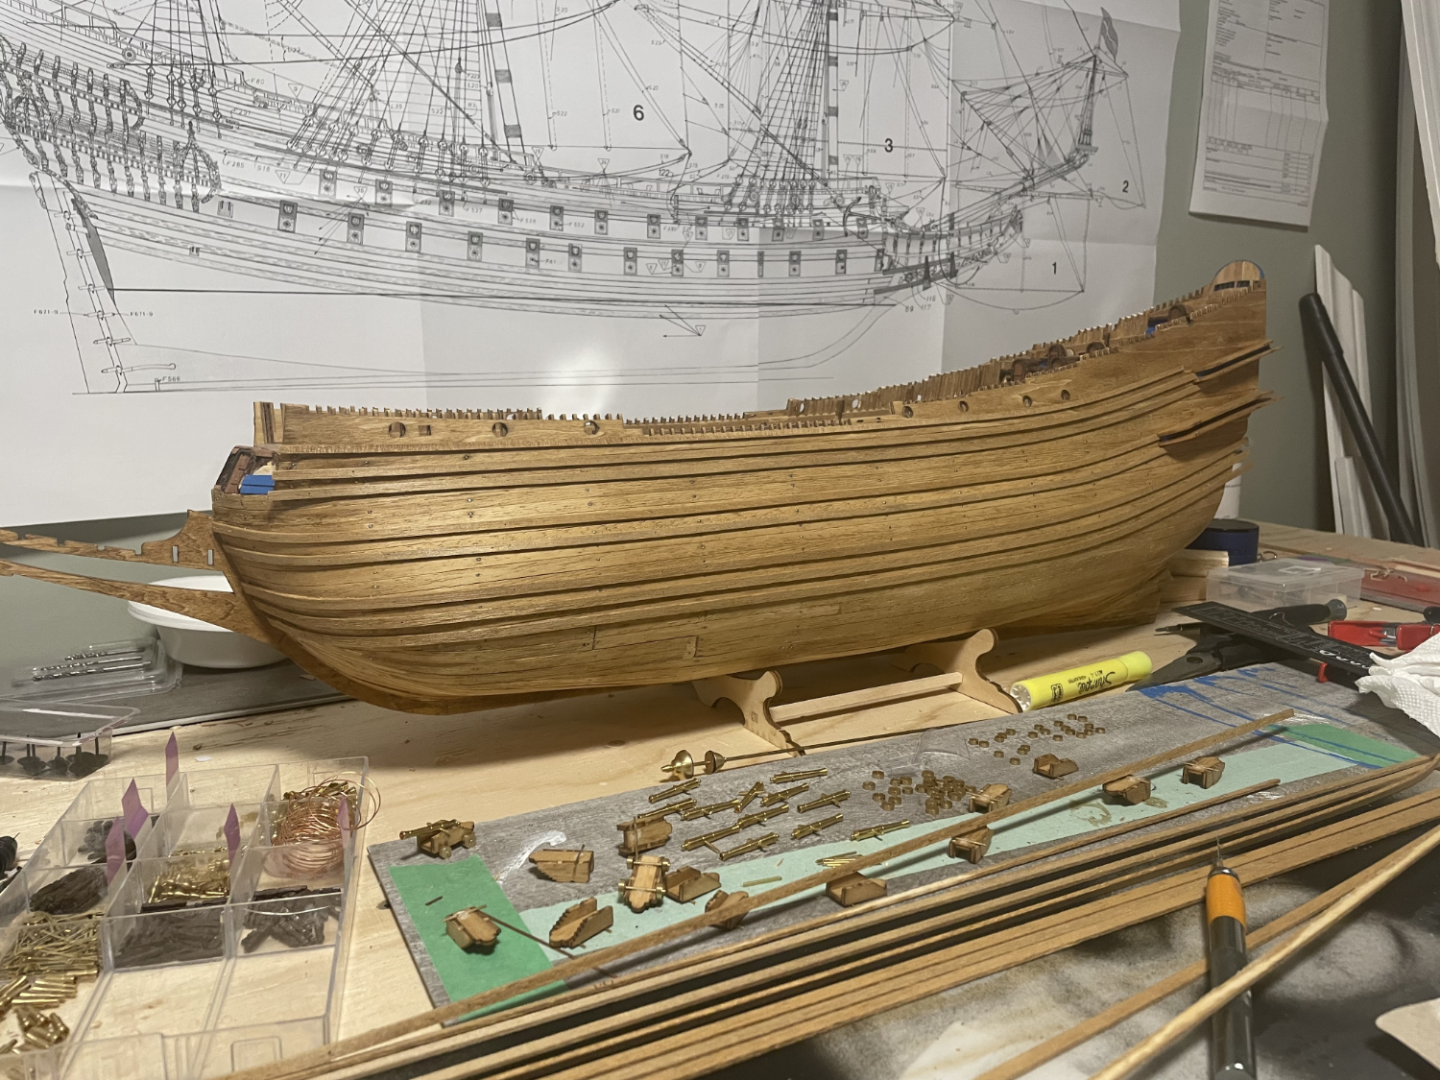
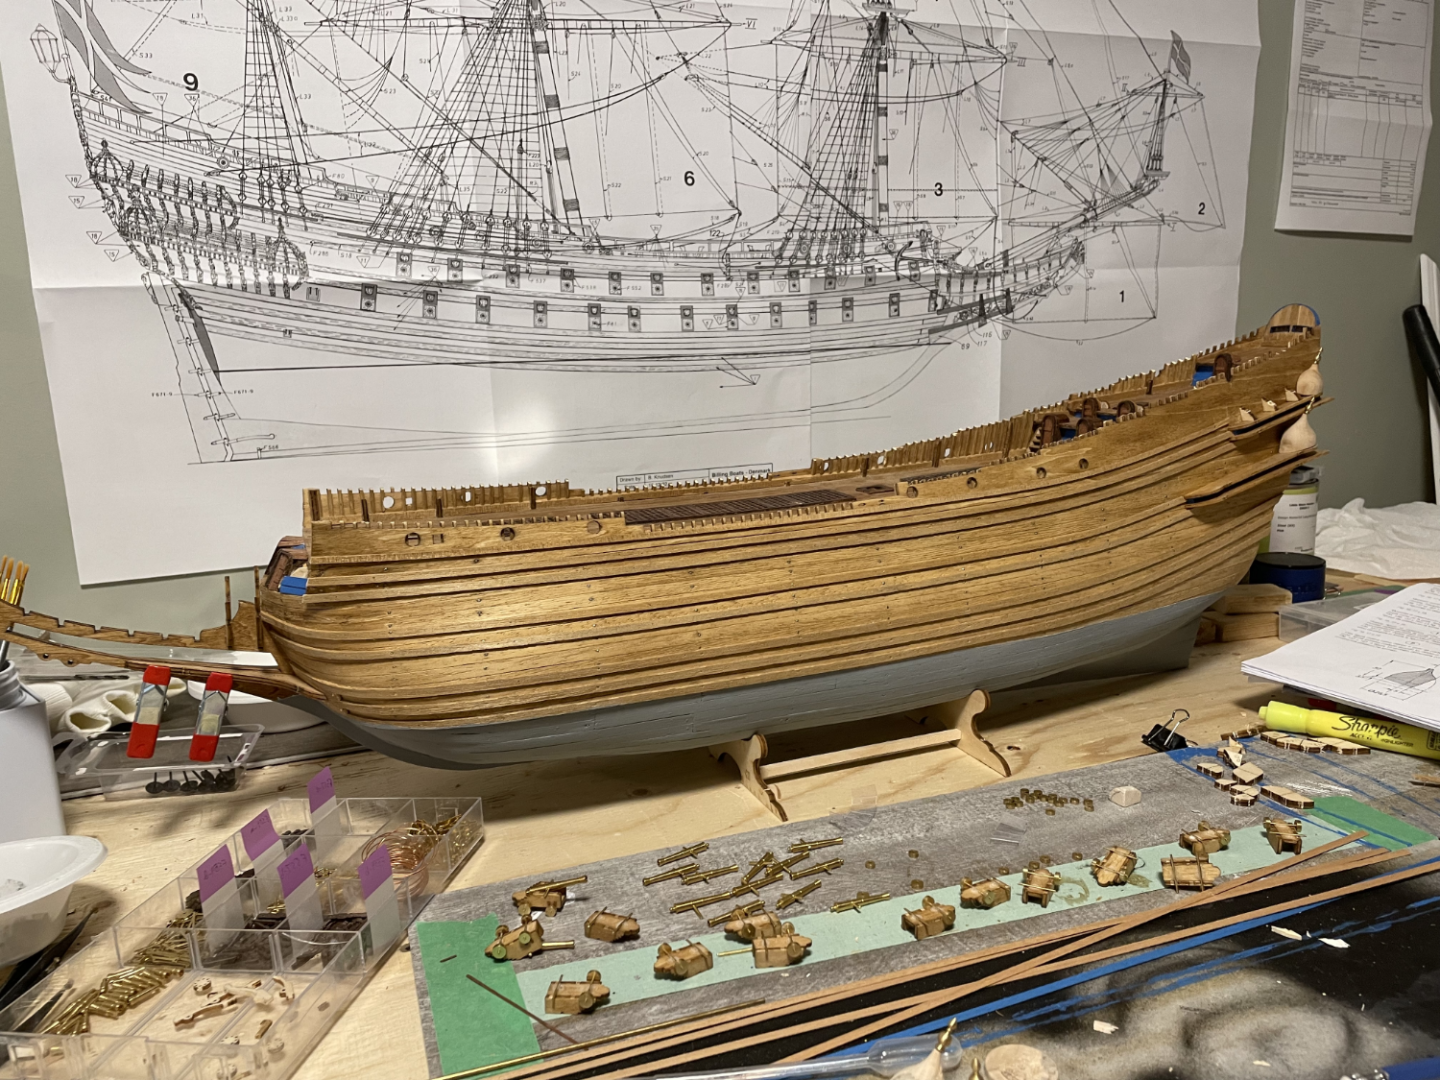
Thanks for confirming. This the boat that I am using as a reference. I understand the historical accuracy, but I personally like the contrast of the blue and red instead of just the red. Plus it is Swedish, so blue still feels fitting! https://photos.google.com/share/AF1QipPhydB-pHIxmto5pV8-r0zXM37Q38etO9so2OPhjg0BB0y1r8HXZPMZgrxKC_sIIw?key=T0tQYzFCUEJqaEZzSVBJWHZuc0RtclJ3MHVwRzVn It can also be found under "additional images" in the link below. https://www.billingboats.com/index.php/modelboats-footer/75/120/boats/the-expert/P-bb490-wasa Personally I think Billings boat is a decent company, however I do think some minor improvements could be made in some of the materials and instructions, which would improve the kit dramatically! I also hate the supplied anchors, they are plastic and look cheap considering how fancy this boat is. I have been working on getting it nicely smoothed out and primed to try to reduce the look of the plastic. Furthermore, the supplied dead eyes are all plastic, and a pain to paint. Plus they do reduce how accurate I can make the rigging, and they don't seem very solid, so I will have to be extra careful on adding the shrouds. If all fails on that front, I'll likely order some wood ones to replace them. Would likely look better anyways. Thanks! Lastcore
-
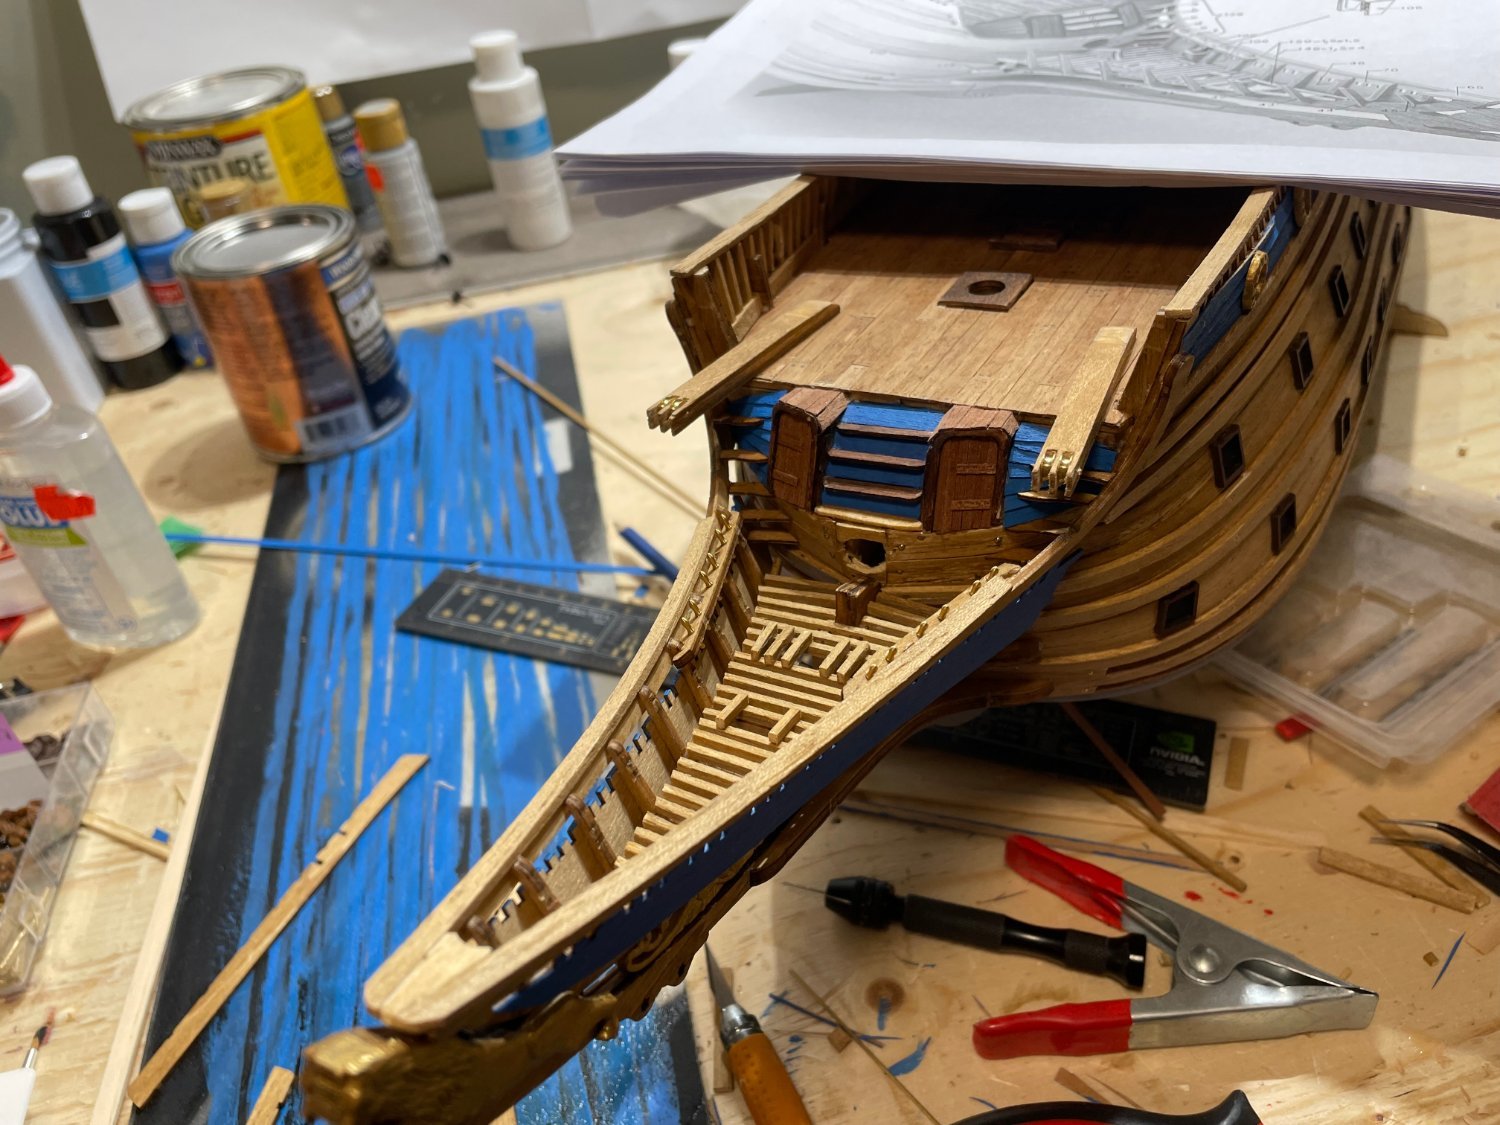
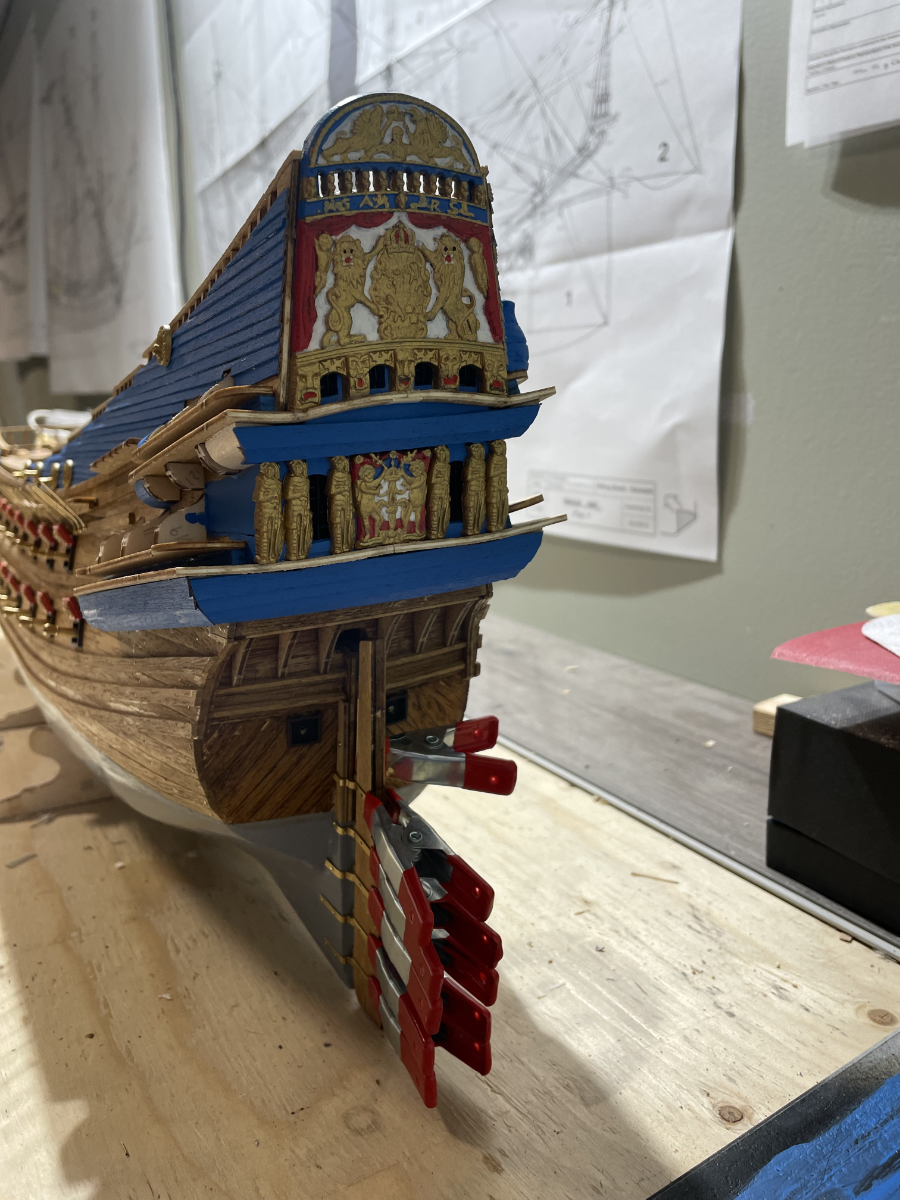
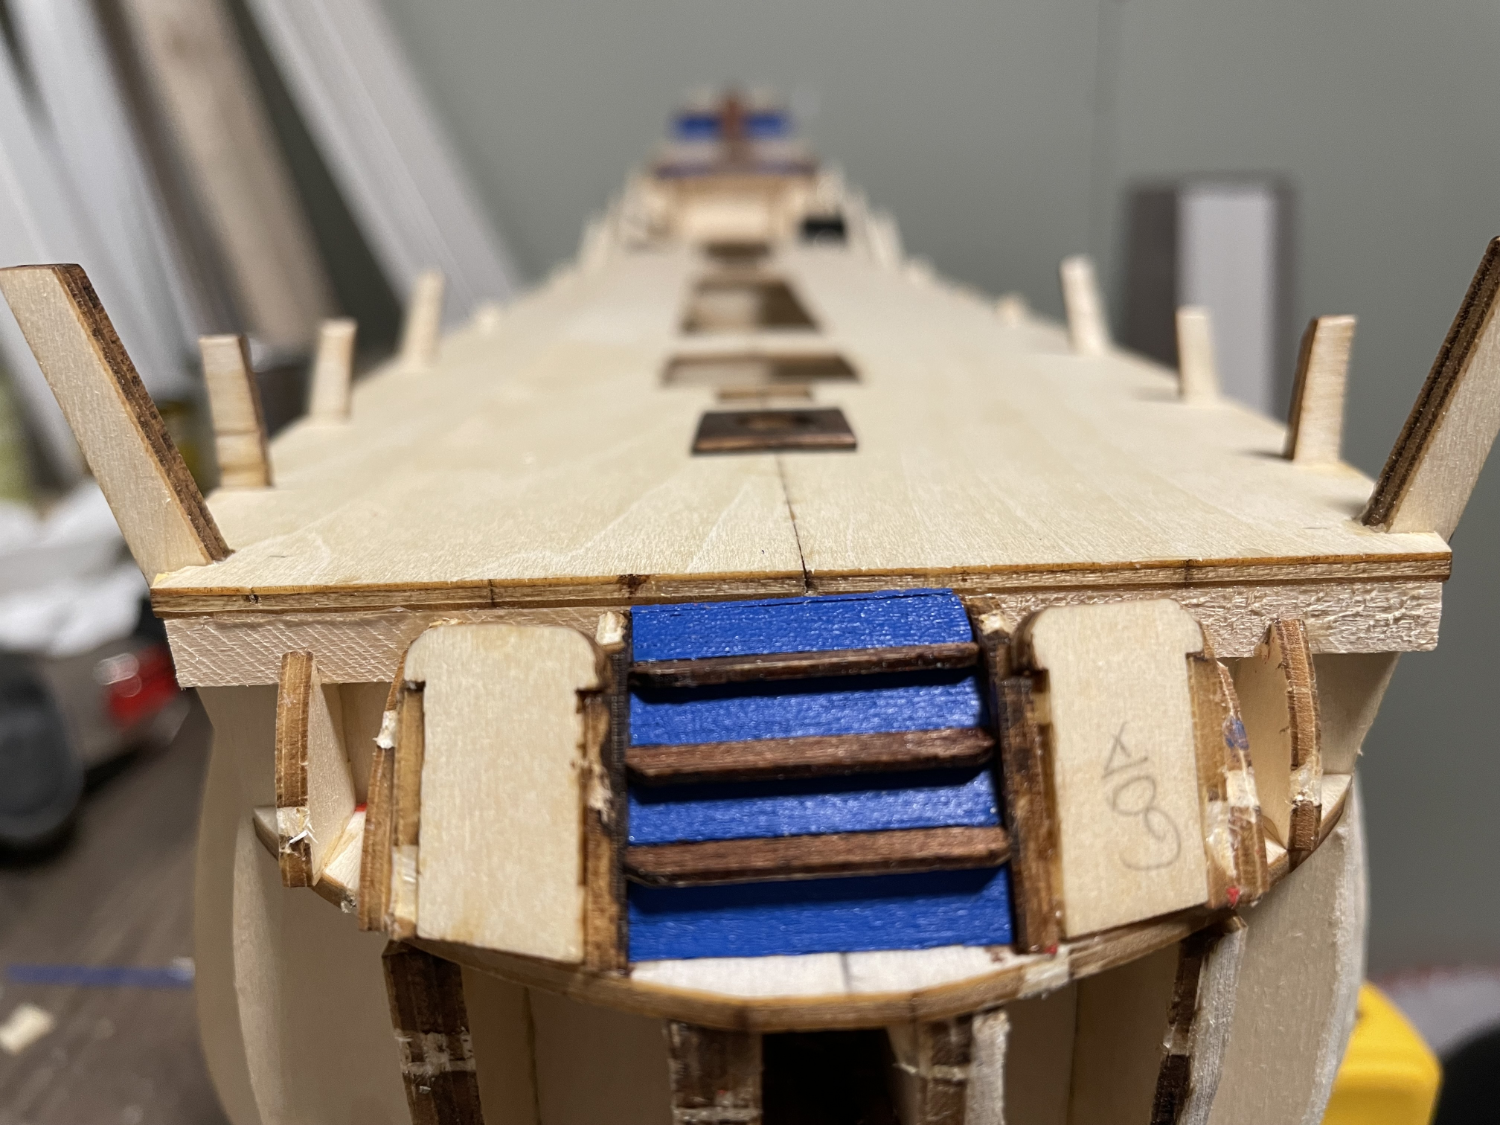
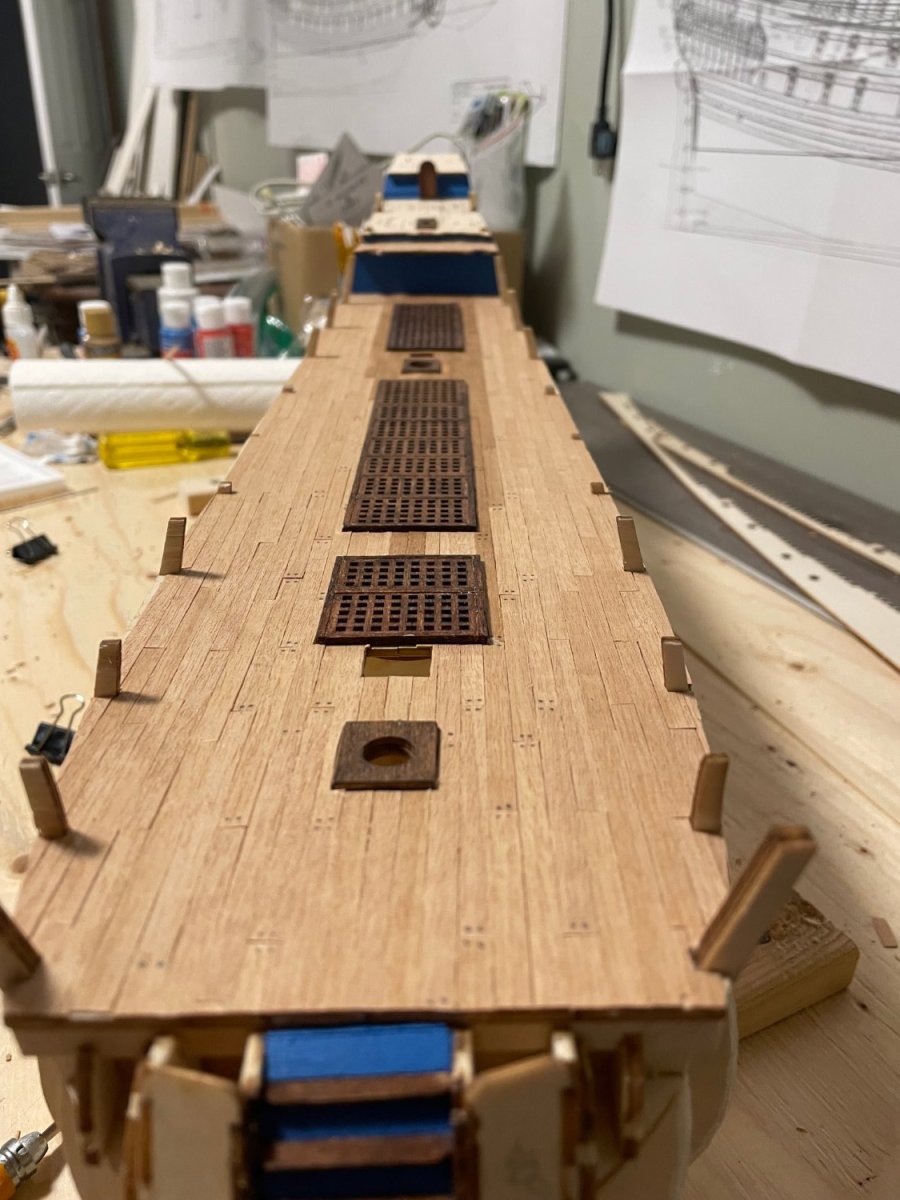
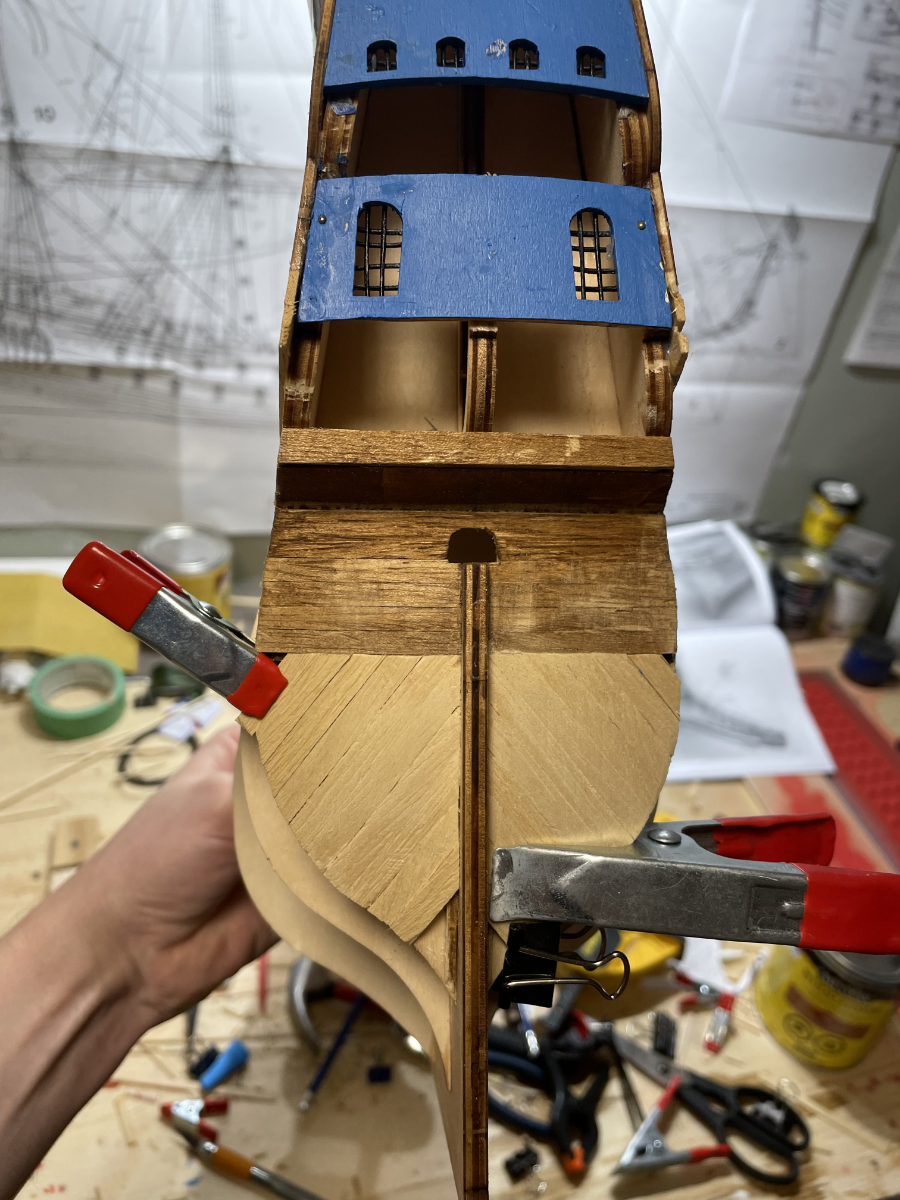
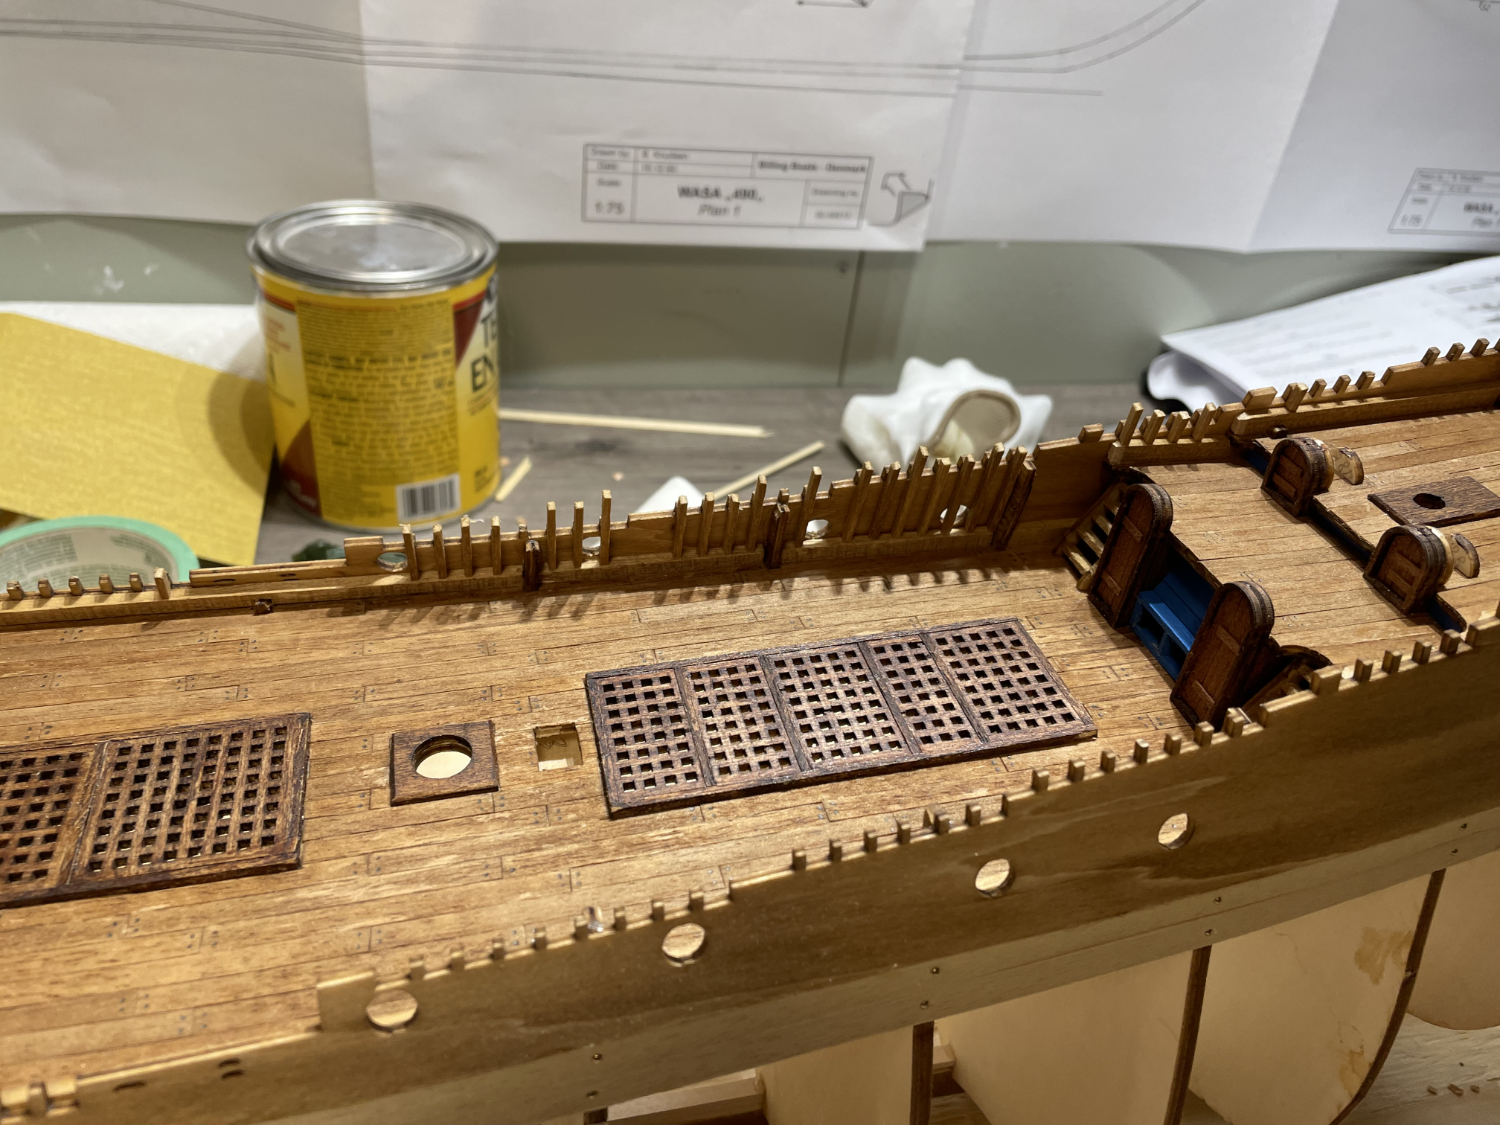
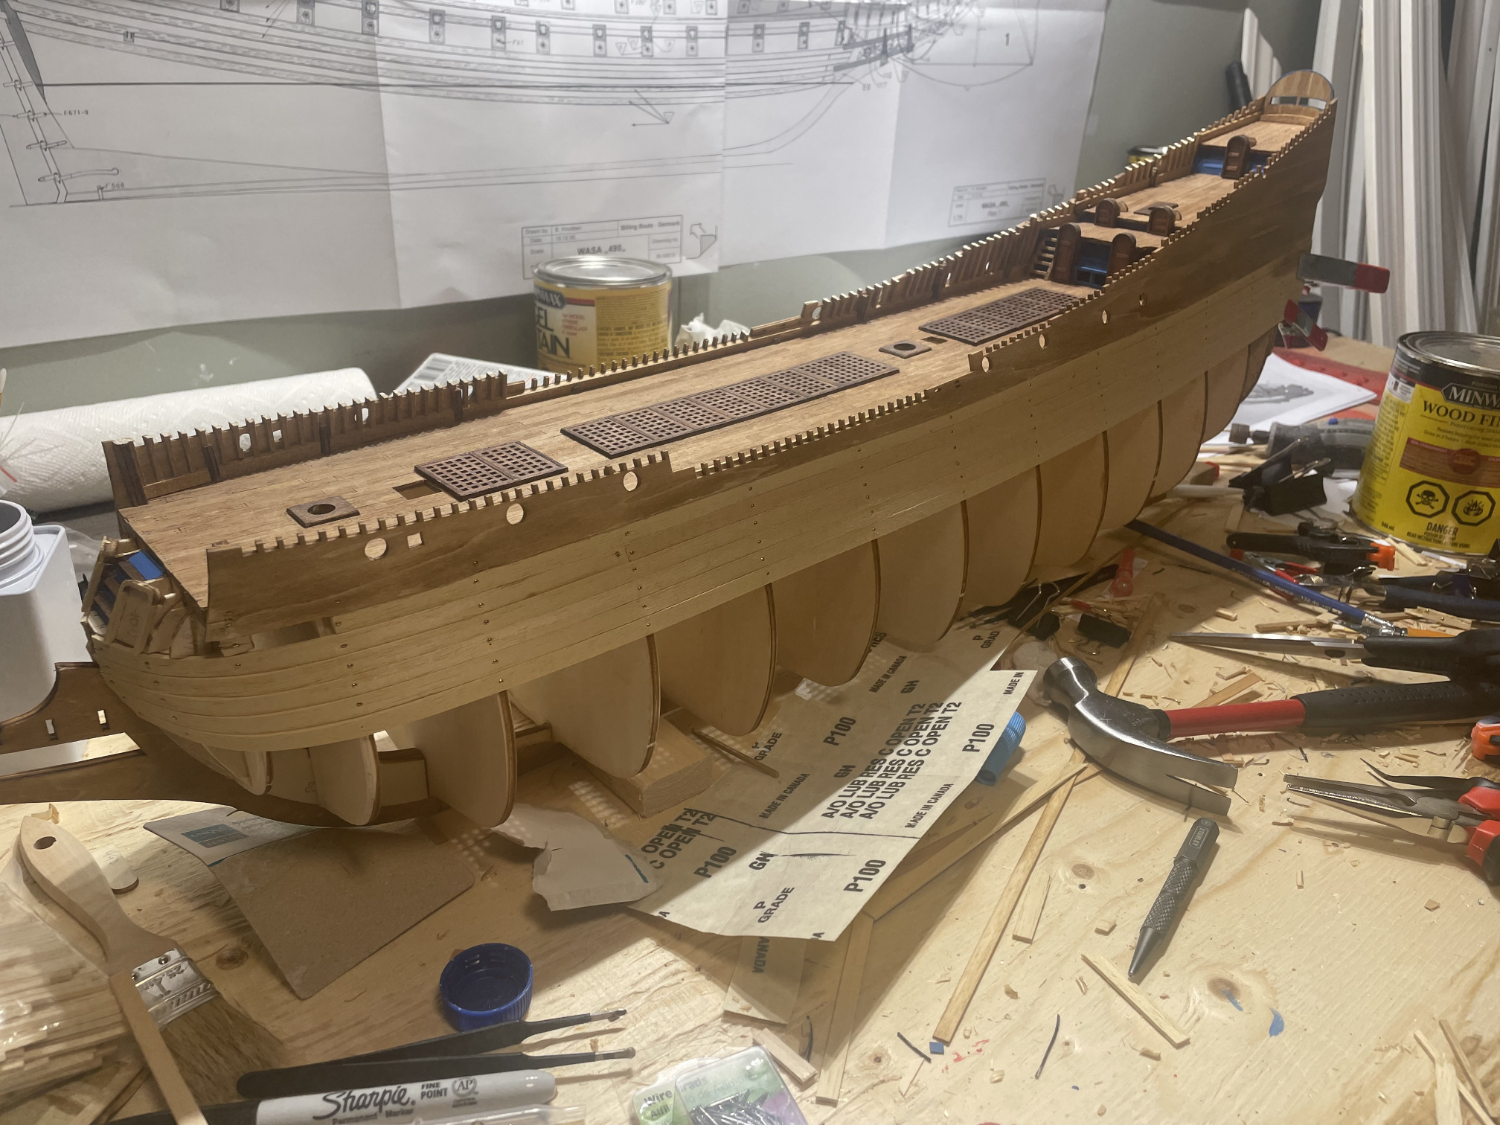
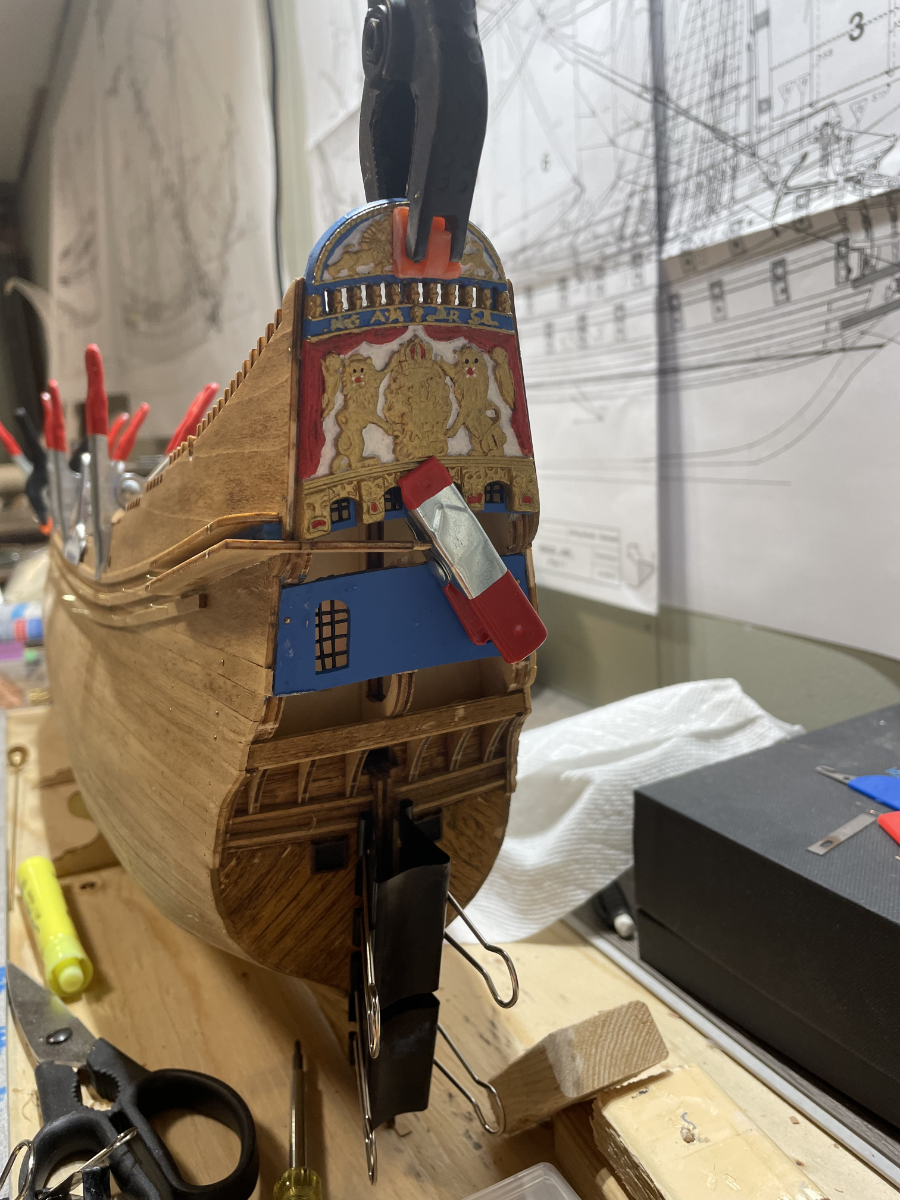
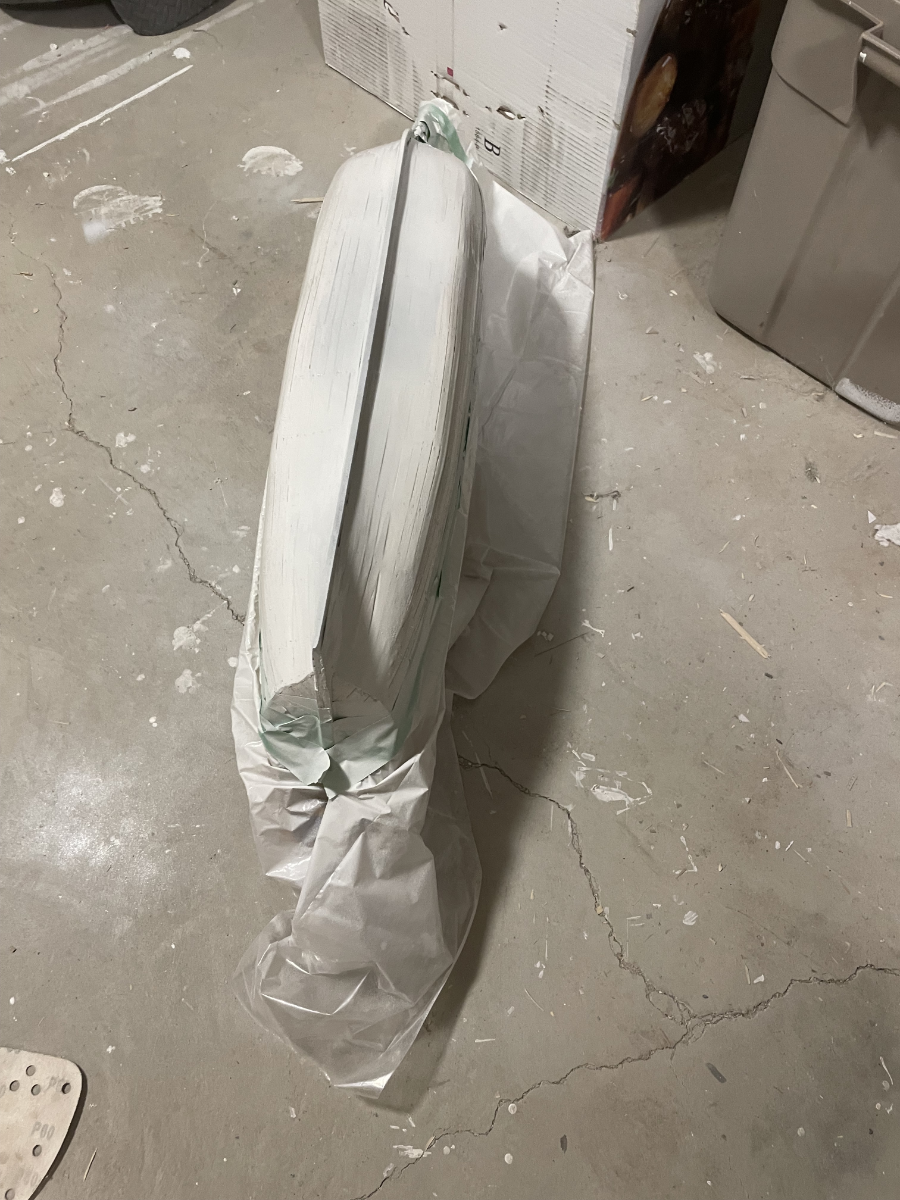
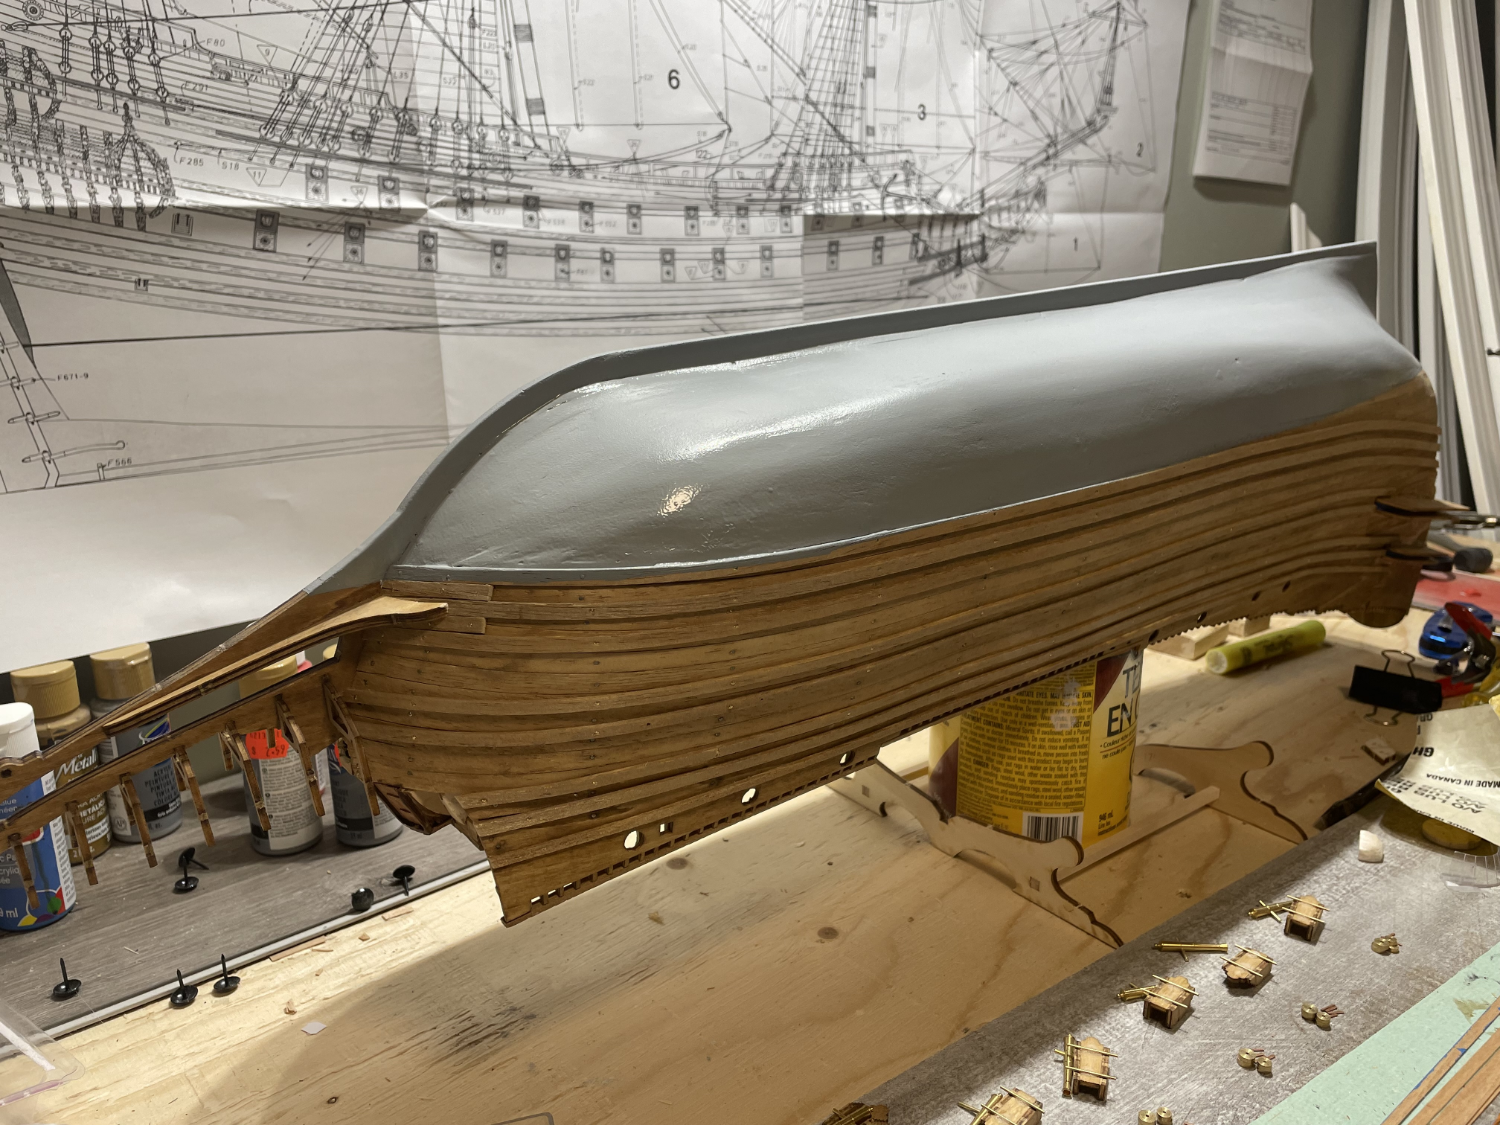
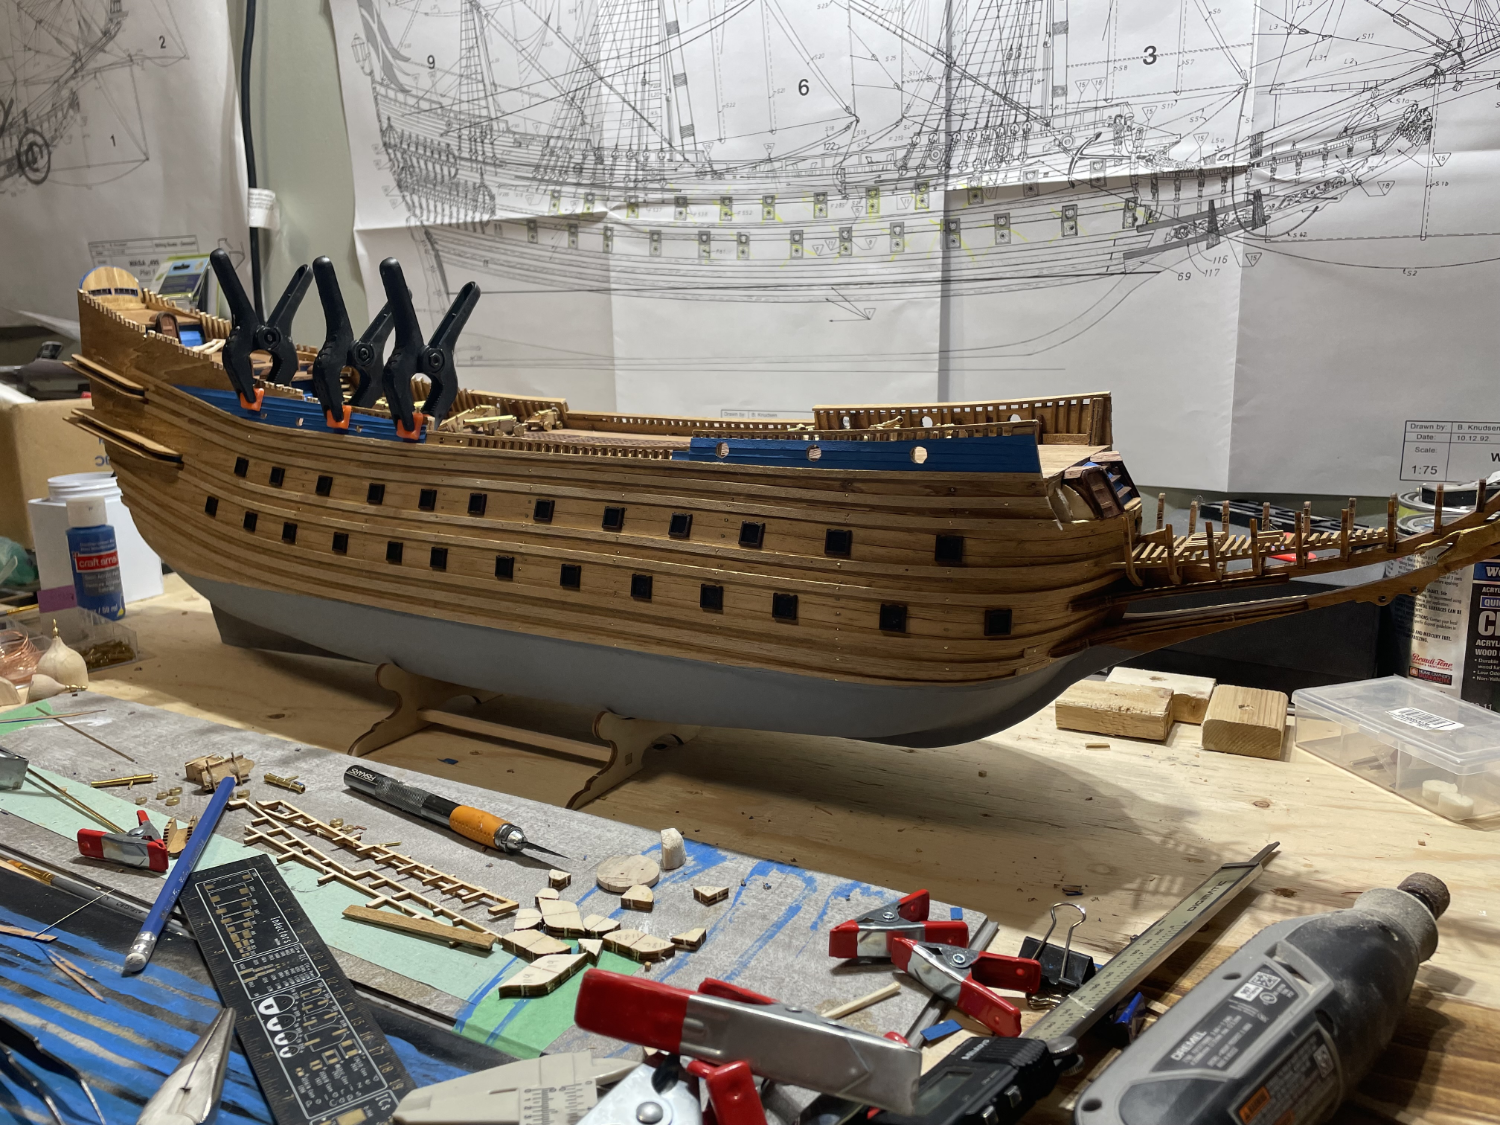
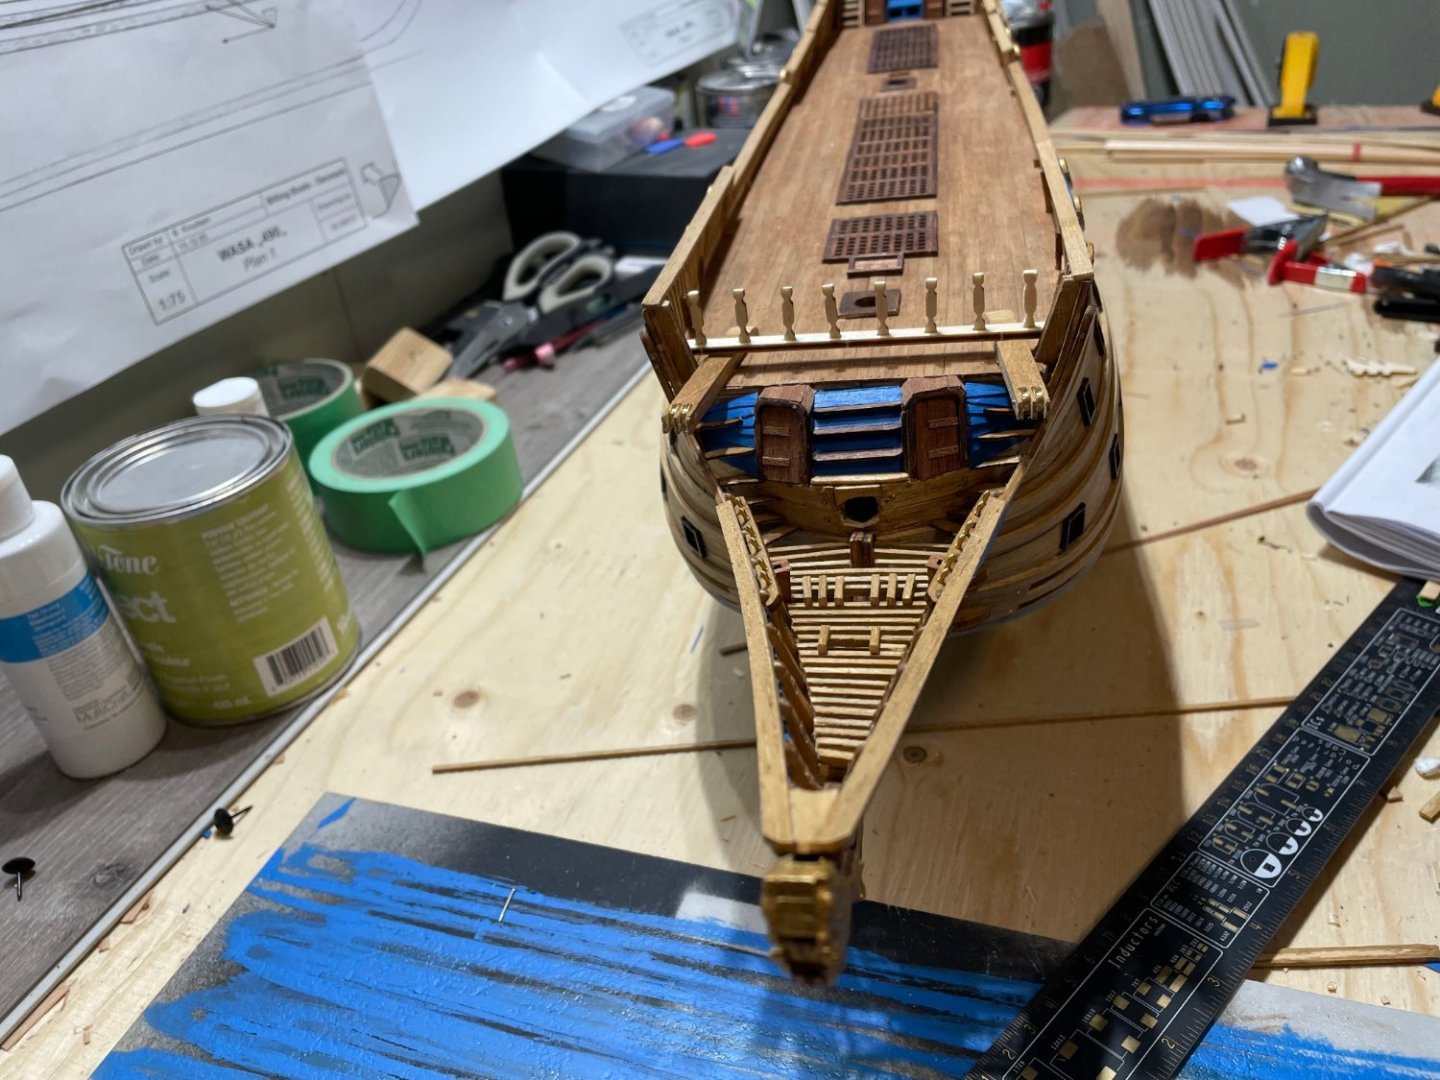
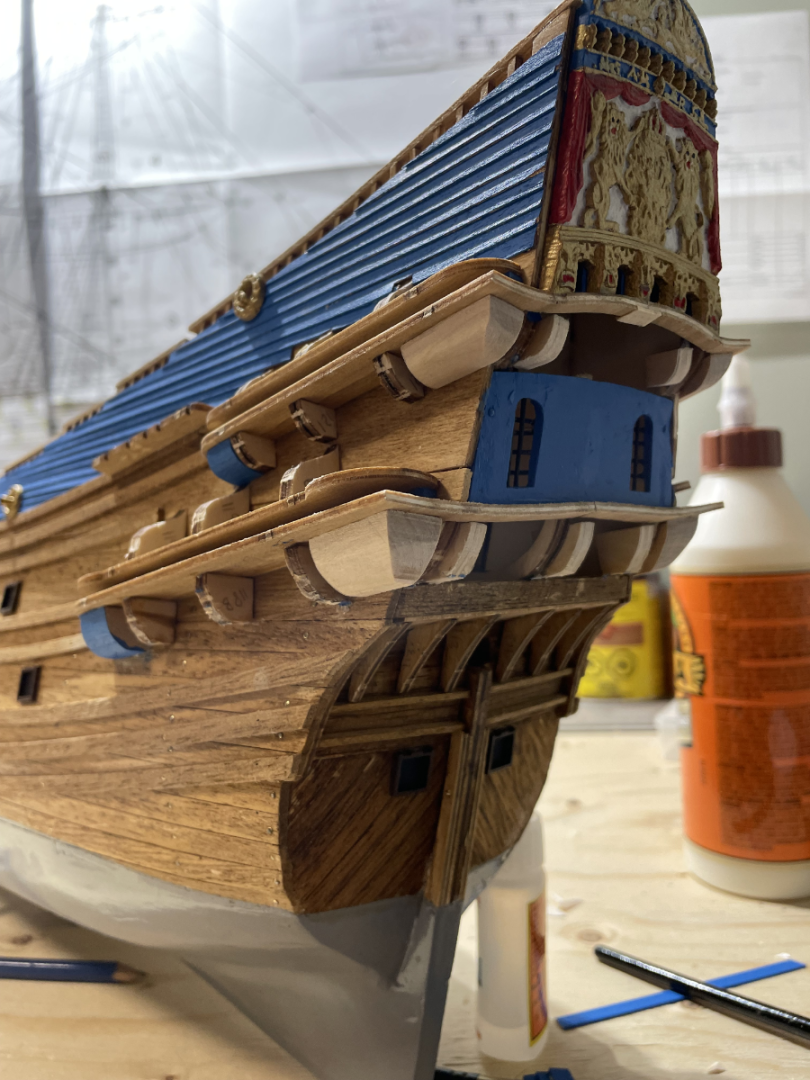
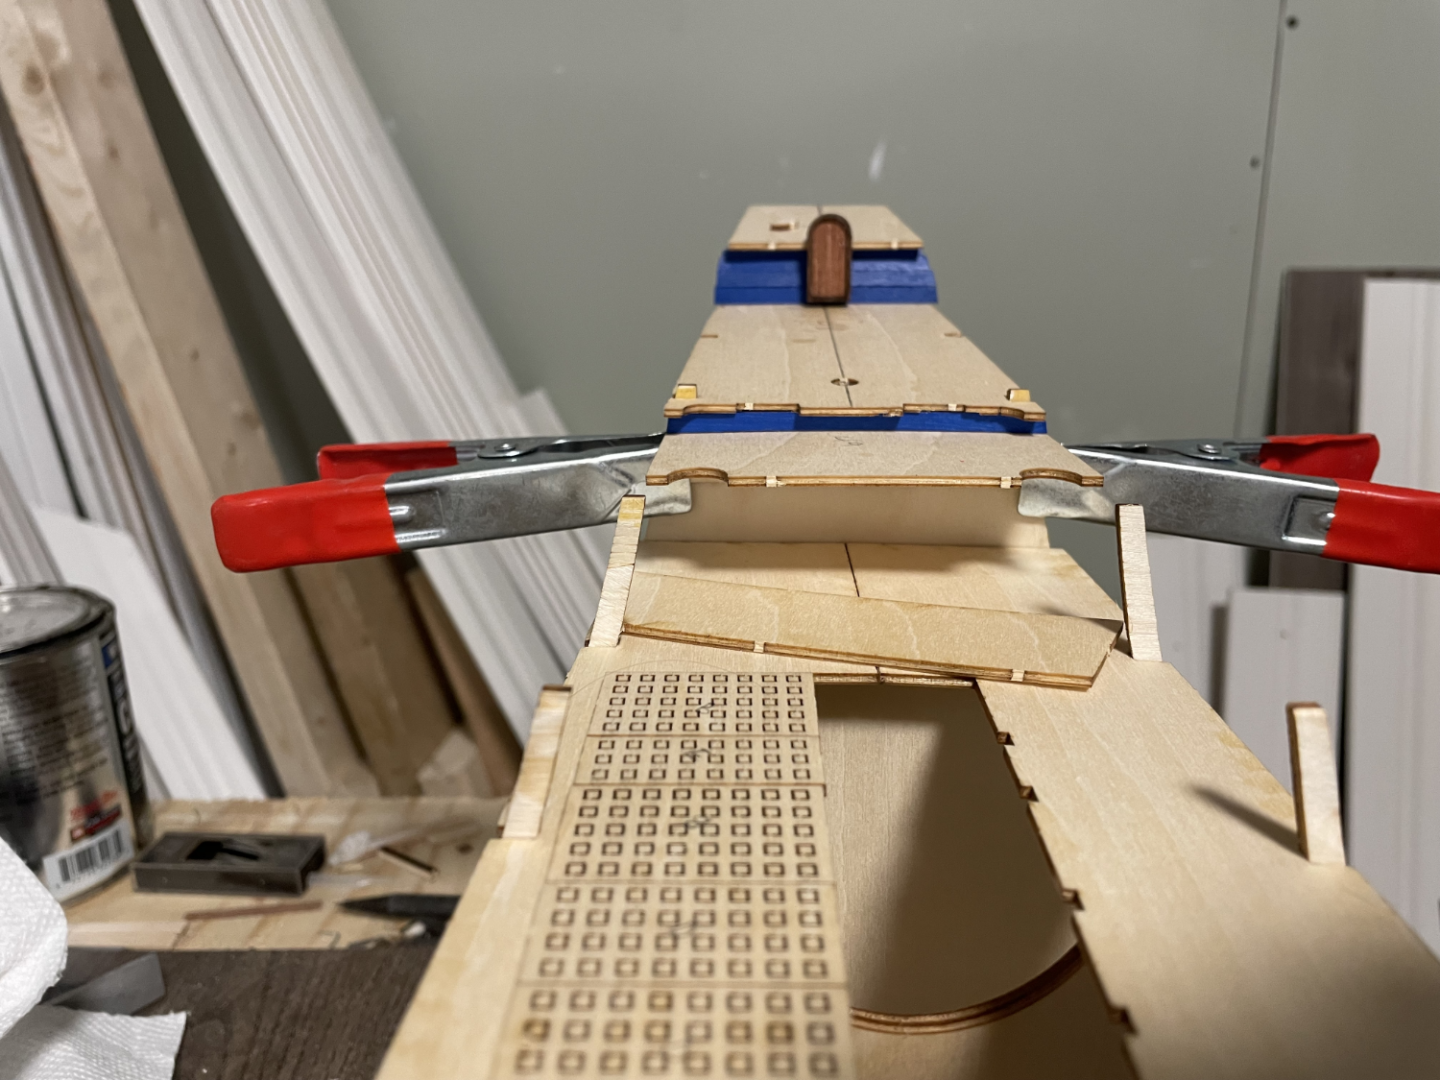
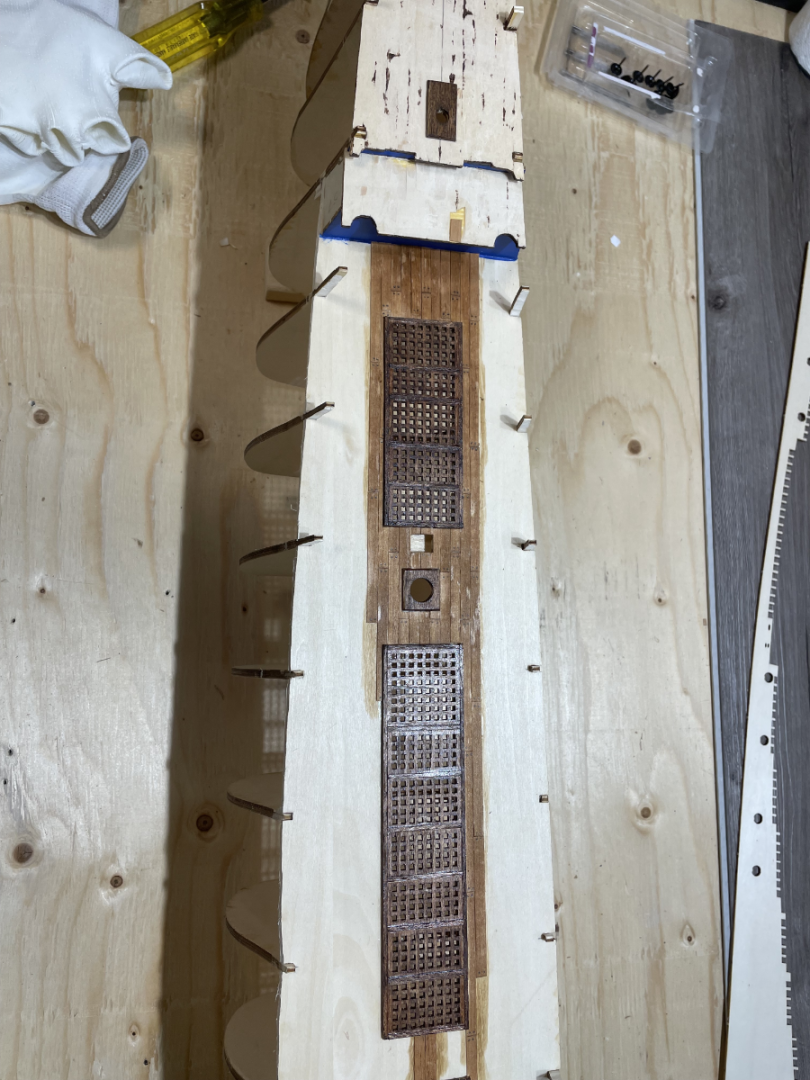
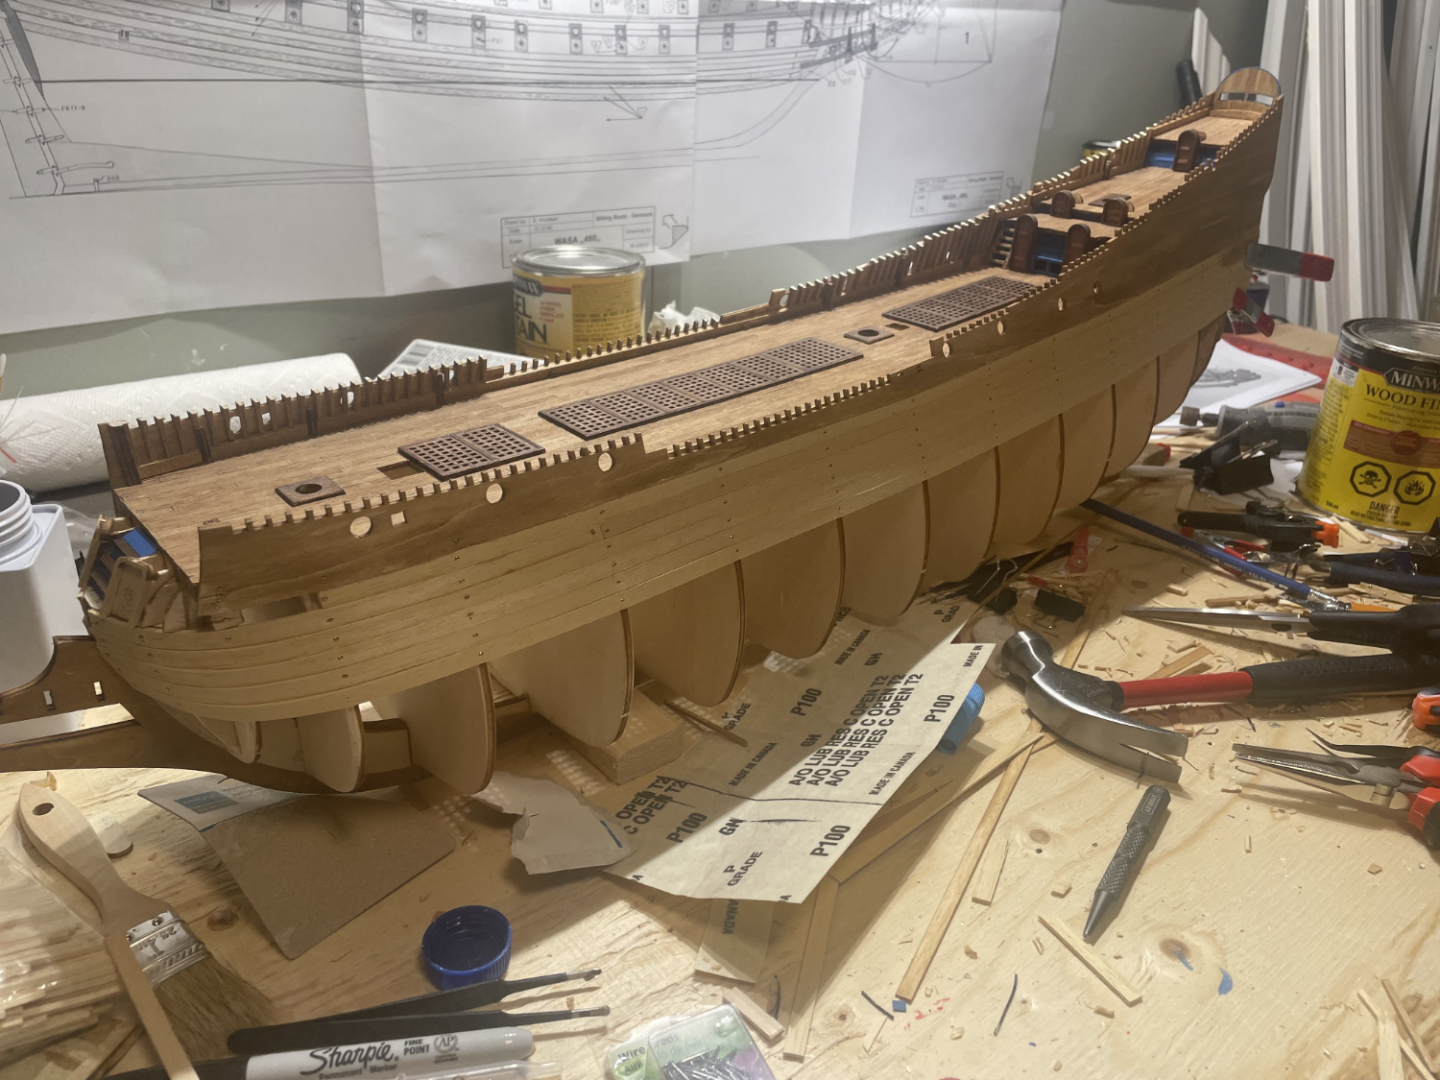
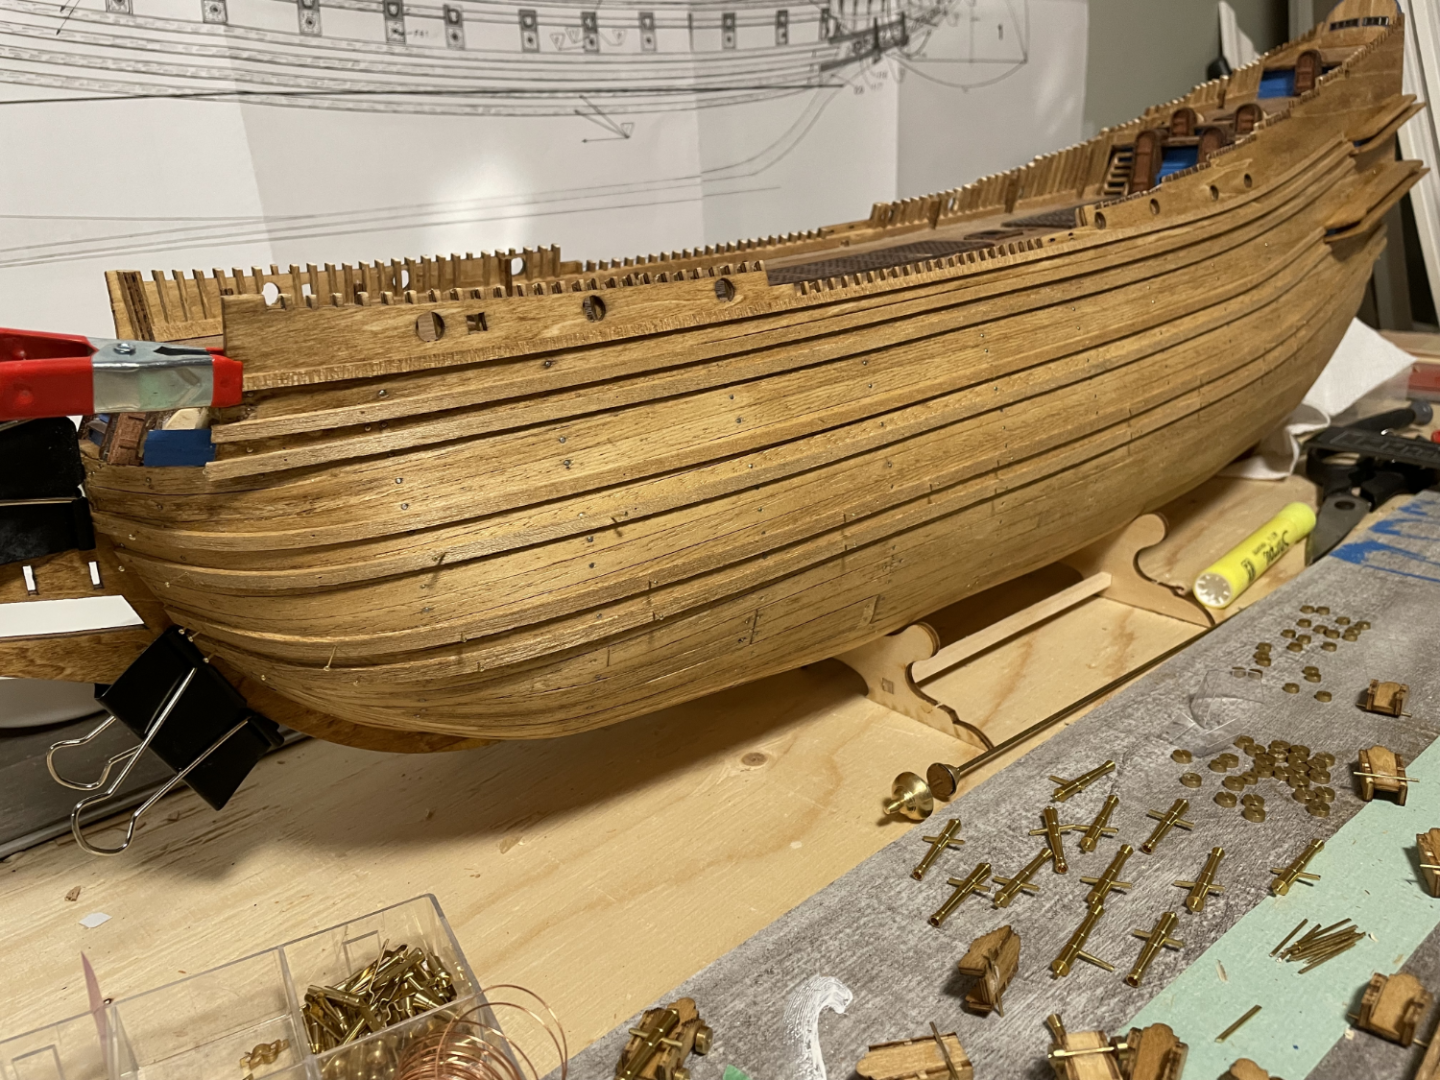
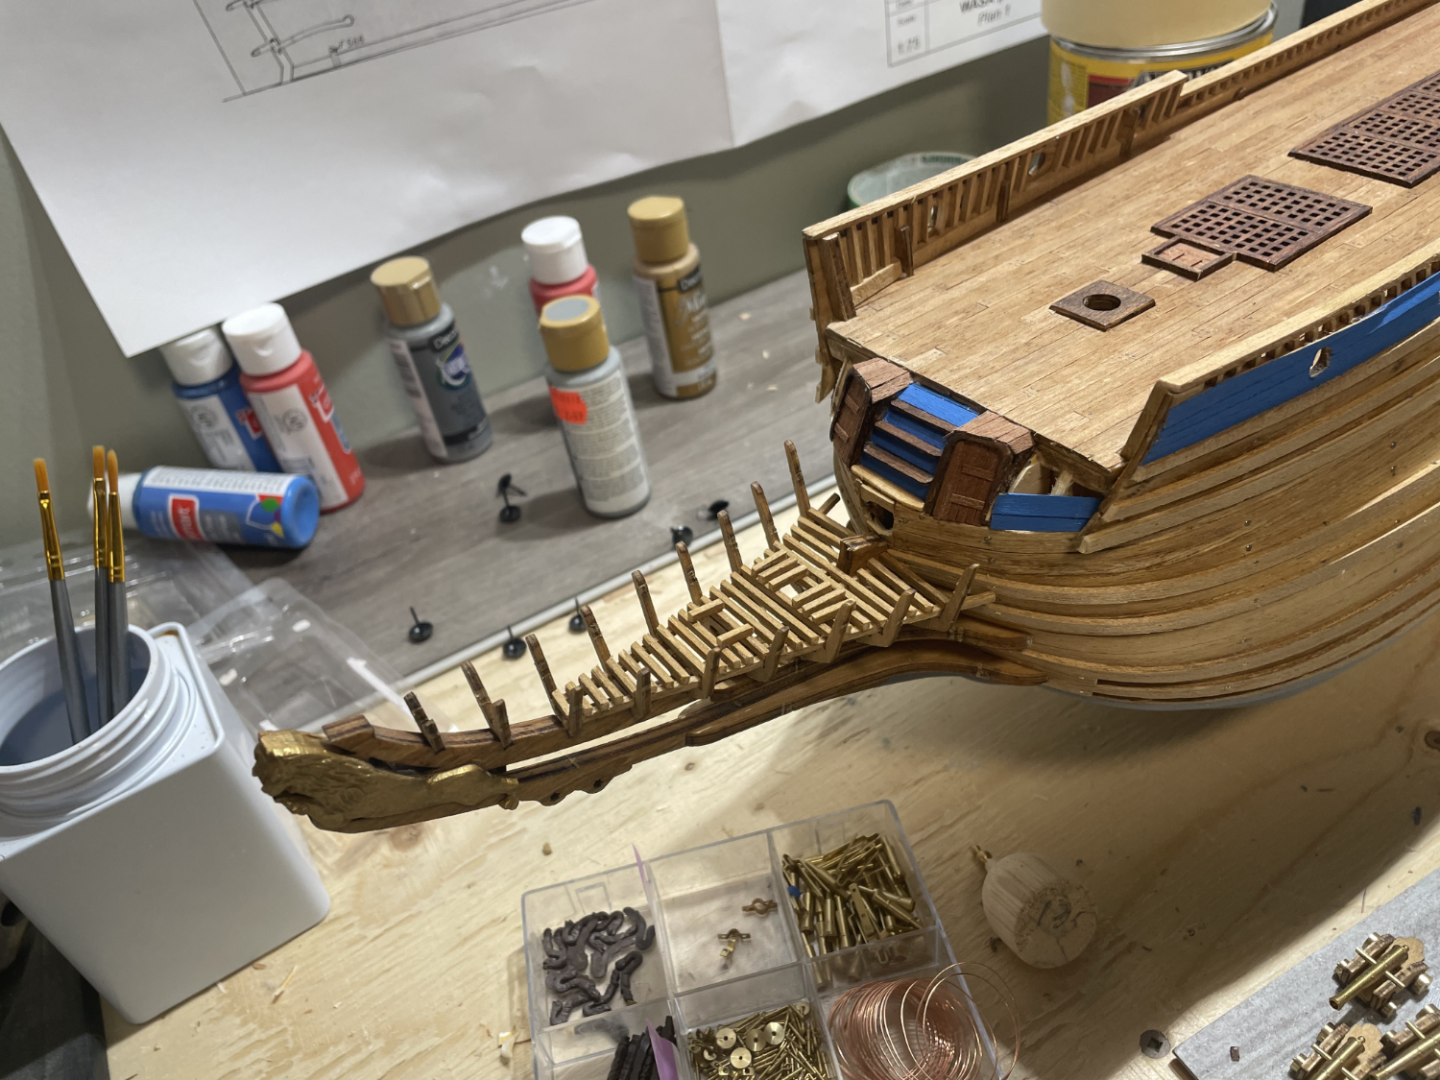
While doing all of this hull work, I also took some time to work on painting all the decorations including the Deadeyes and the gun ports. I had some issues trying to get good adhesion to the plastic, so I ended up using a spray paint primer, then using an airbrush to add the red. This was a pain as the small plastic piece would blow away from either. I ended up using tape (sticky side up) to keep these in place during the painting process. Then the lion heads were hand painted on each of the gun ports. Once they were painted, I did a rough fitting of them and didnt like how they were sitting. I ended up adding a small wood piece to the back of each one to get better glue surface area, and to make it look better from above. The cannon building process was pretty straightforward, so I won't go into much detail unless requested. The front cat heads were a little tricky, but nothing a scroll saw couldnt deal with to get those pulley in place. The stairs at the bow of the ship were also very hard to get into place nicely. This took a lot of time to line them up well, and to also get good surface contact to glue to. Tweezers in each hand for this part! The front railing was pretty easy to add, only because I didnt bend it as I have seen some people do. One of the next hard parts was working on the gallery. This was a struggle as BB wanted the corners to float, without any reinforcements. I tried doing this but it never turned out nicely, and felt very flimsy. I also noticed that the back didnt line up nicely (They were all too recessed), so I added extra pieces in order to have the back of the gallery look a little more even. After fighting with this piece I decided a different approach was better. I traced the supports on the side and back, then used a scroll saw to cut out the corners. I also ended up re carving the front bottom of each of the galleries as well. The wood supplied by BBs didnt have a nice finish. After that, I spent some more time on the deck detail, and the bow. I also added the mounts for the dead eyes, and the gun ports and the "cheater" cannons. After that, I added some of the planking to the back gallery, and also began working on the rudder. Sadly, I didnt get any pictures of the gallery before I began adding the statues. I did also run into an issue with running out of the wood for this section. Since I used too much on the siding, I was short for the gallery. I used some different spare wood, but it isnt as flat on the top as it should be (Wood was too wide). Which did mess with the statue placement along the top a bit. I also added the spindles. Those I regret not spending more time on as they would look a LOT better if more time was spent on them. I also added the deck cannons, and added the rigging for them, though it is very basic. This leads me to where I currently am in the project. I have some further detailing to add. Some small deck items, and also the railing. After that, I will be doing paint touch ups and then clear coating the entire boat. Then, comes the masts, yards and sails. Which I have only just started to work on. (They are only roughly in place, and not glued in yet) I still have a long way to go, and a lot more mistakes to make in the future. Though each mistake has made for a great learning experience, and I am overall fairly pleased with the hull and how it turned out. It isnt perfect, but I am still proud of what I was able to accomplish with basically no experience and research. I think anyone can do this as long as they spend enough time, and keep making small progress, even if they have to split off and work on different parts at the same time to feel like they are making progress. With that said, I do think doing a boat with better instructions would be WAY easier for a first timer. In that thought, I would recommend Occre as their instructions are very comprehensive in comparison. I am sure there are other manufacturers just as good, but none that I have done yet.


-
Hi Johnny, Thanks for the detail about the sails and the rigging. I am both looking forward and scared of what is to come. haha Personally, I am aiming to add all the sails, and the rigging as she would have been assuming she made it past 15 minutes afloat! I am aiming to re-create the build that is shown on the Billings Boat website, under the "more images" tab. Not sure if I am supposed to be attaching external URLs here! Thanks! Lastcore
-
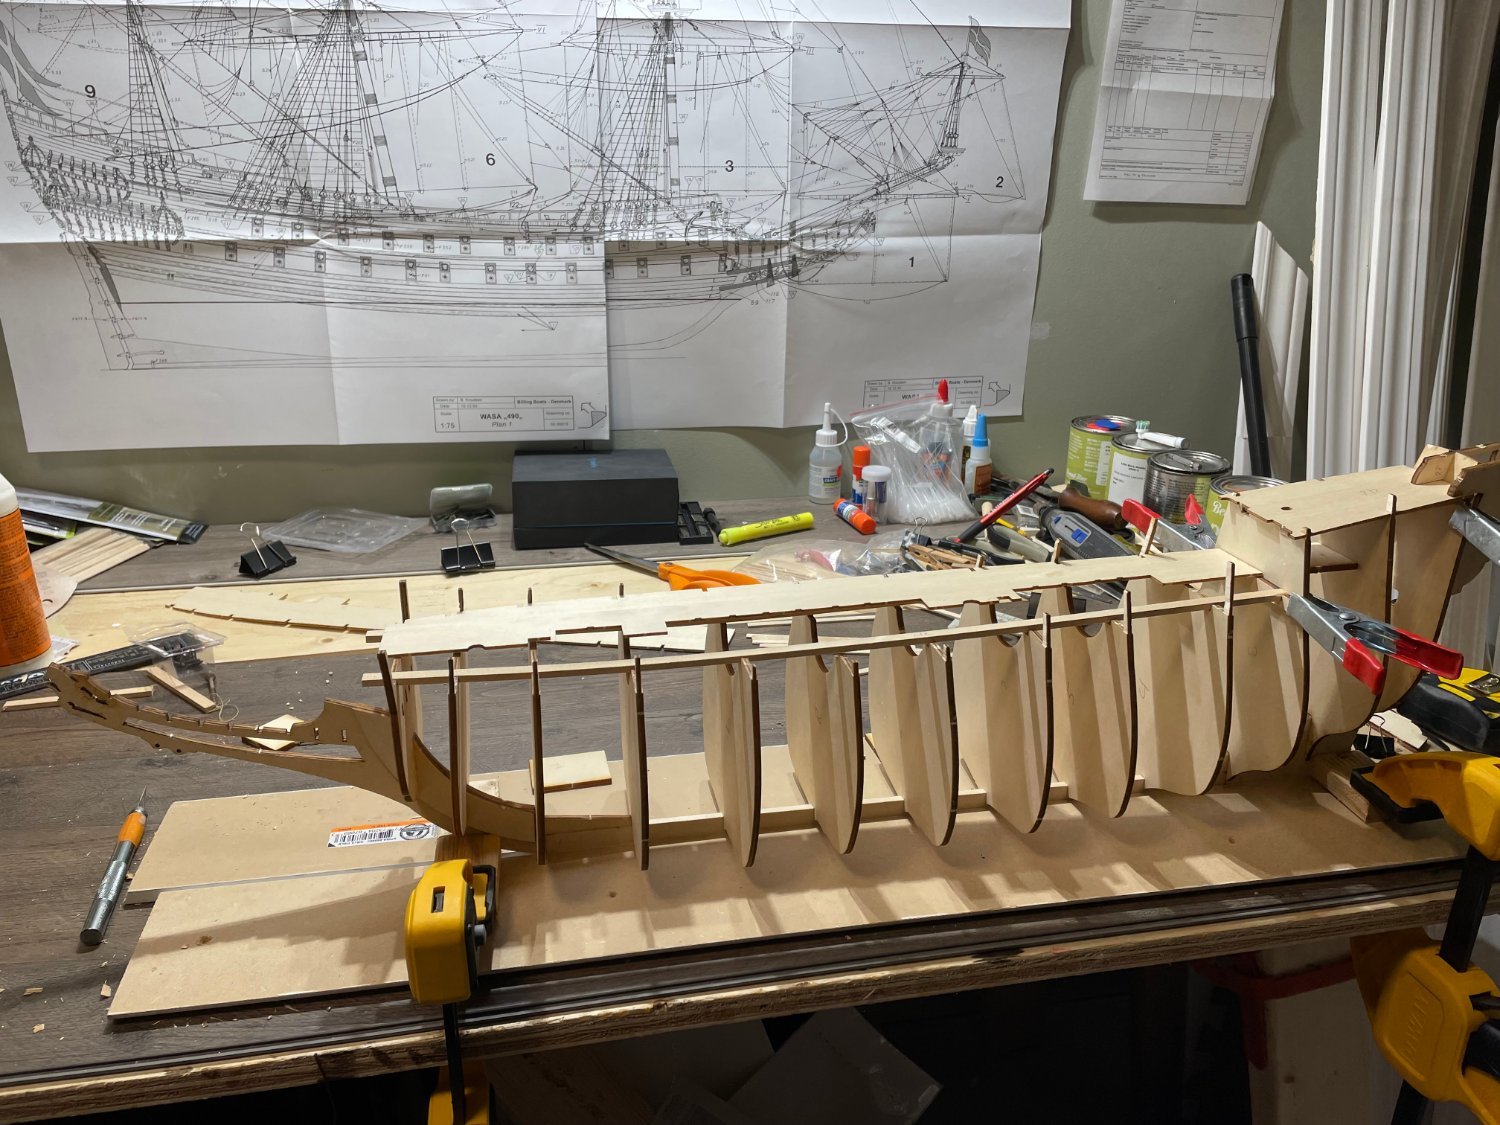
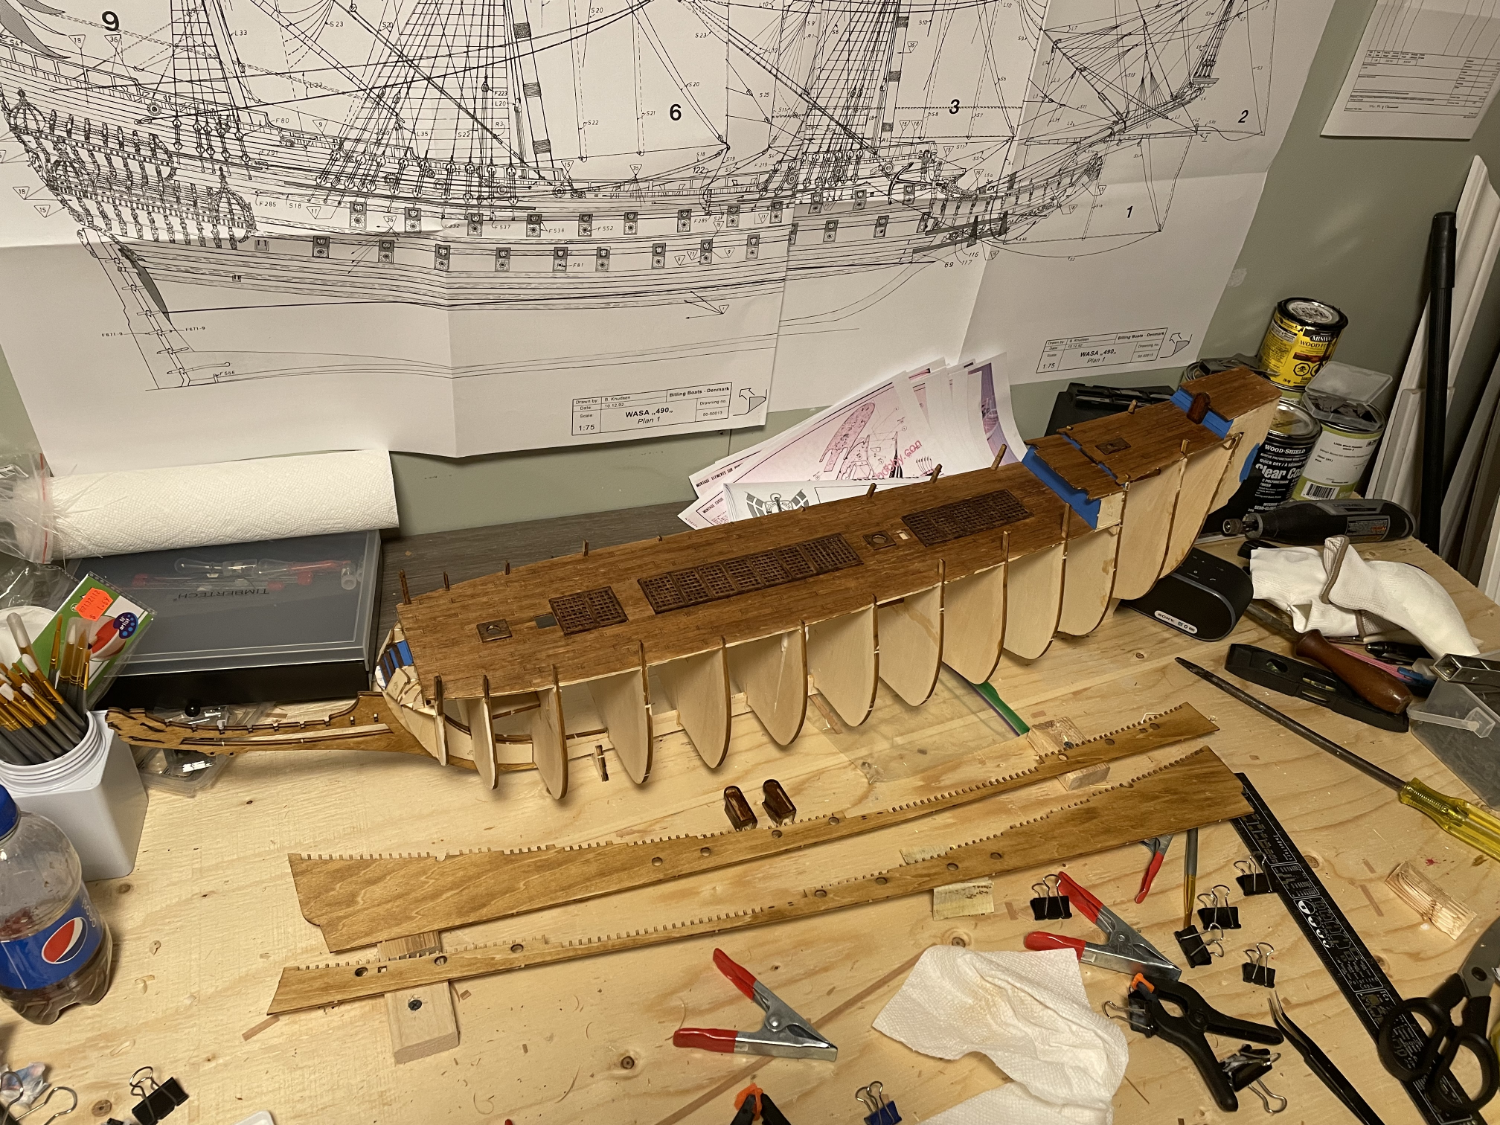
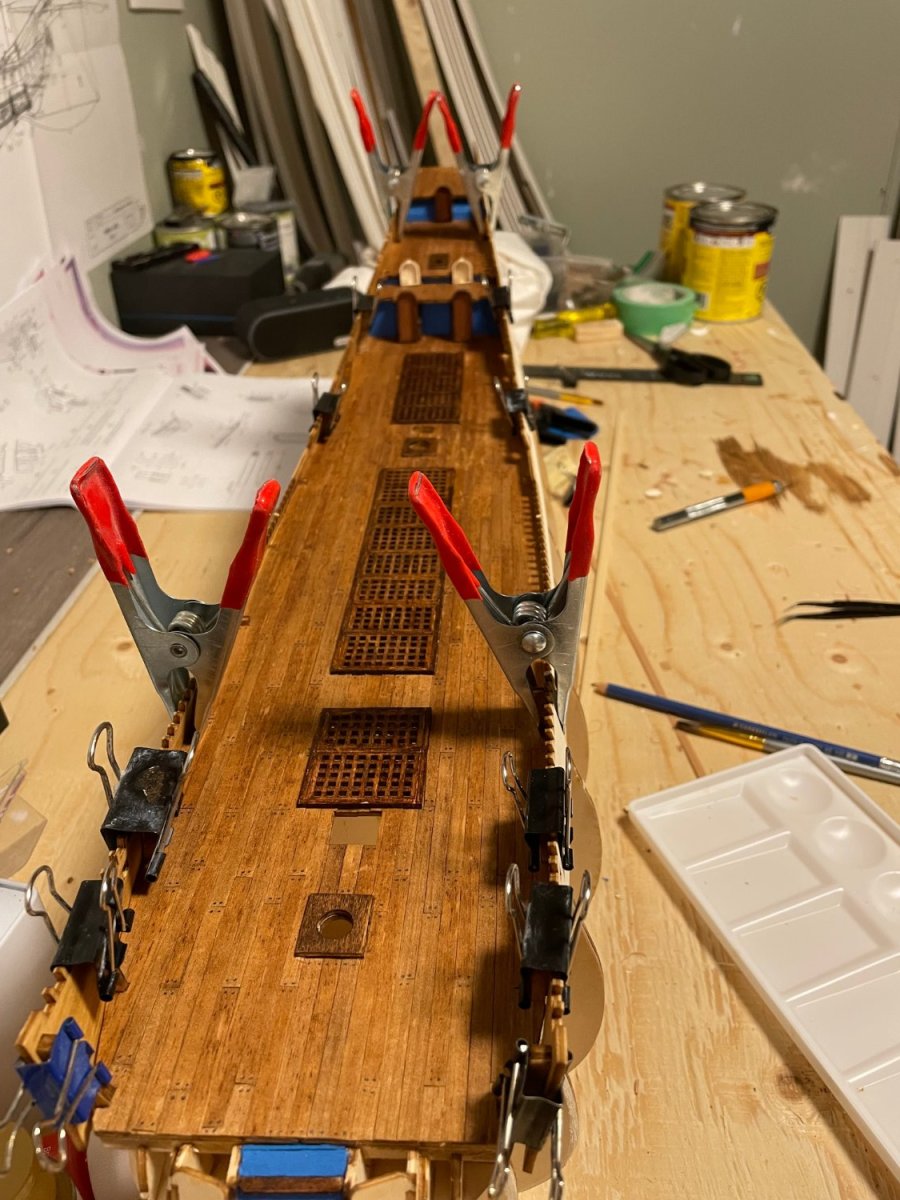
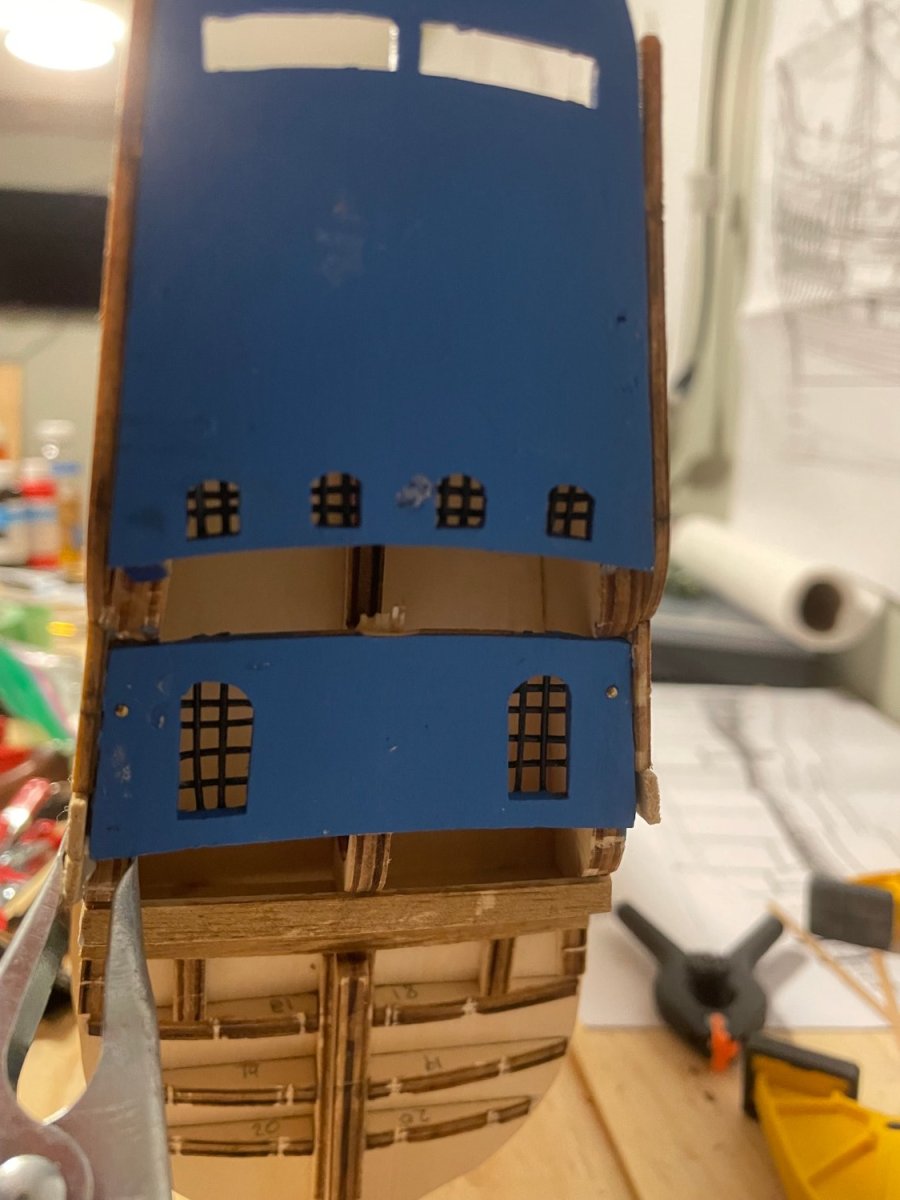
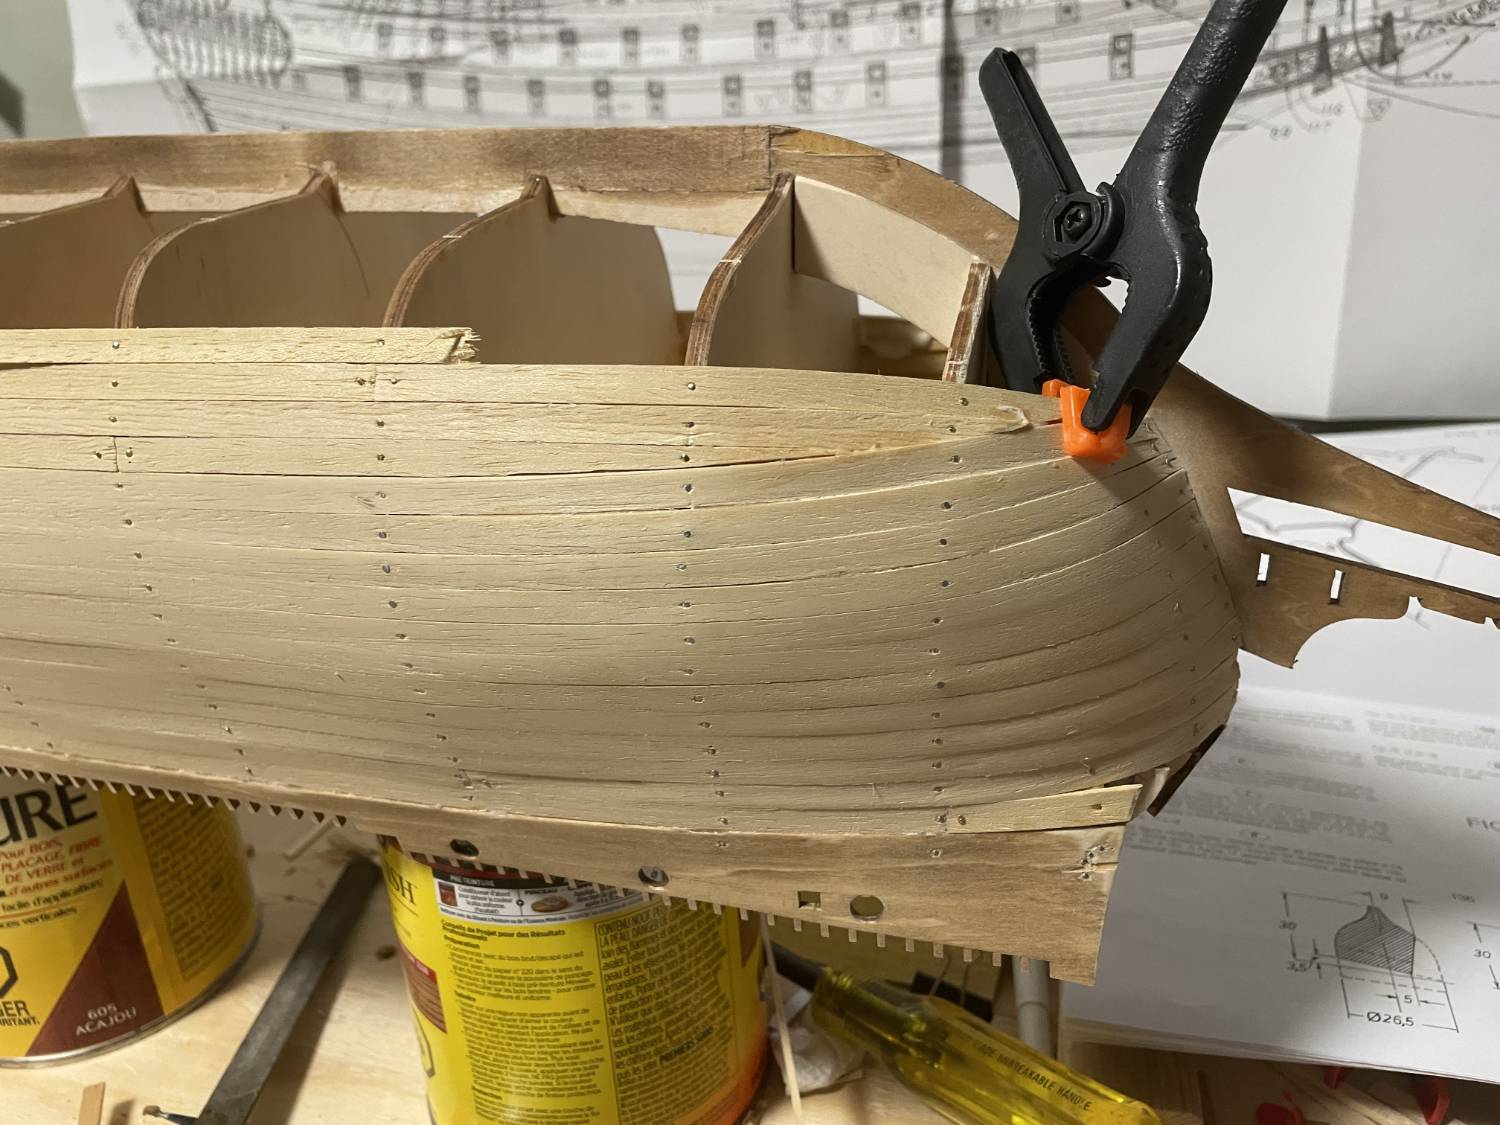
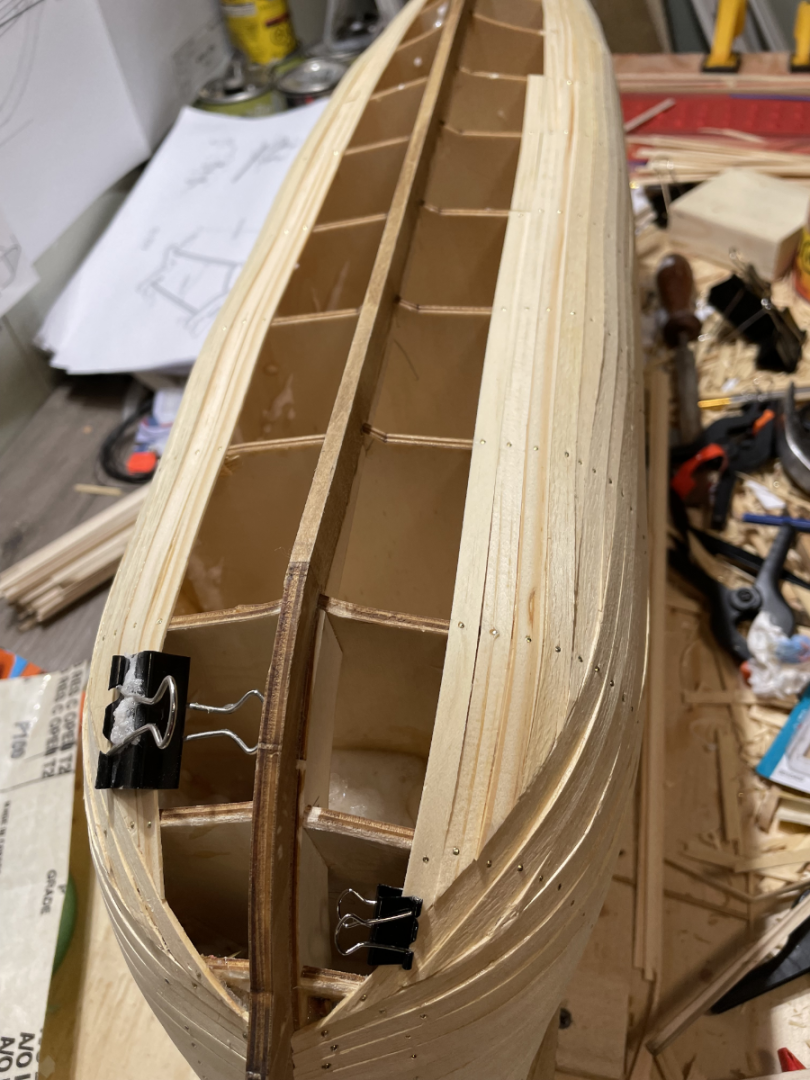
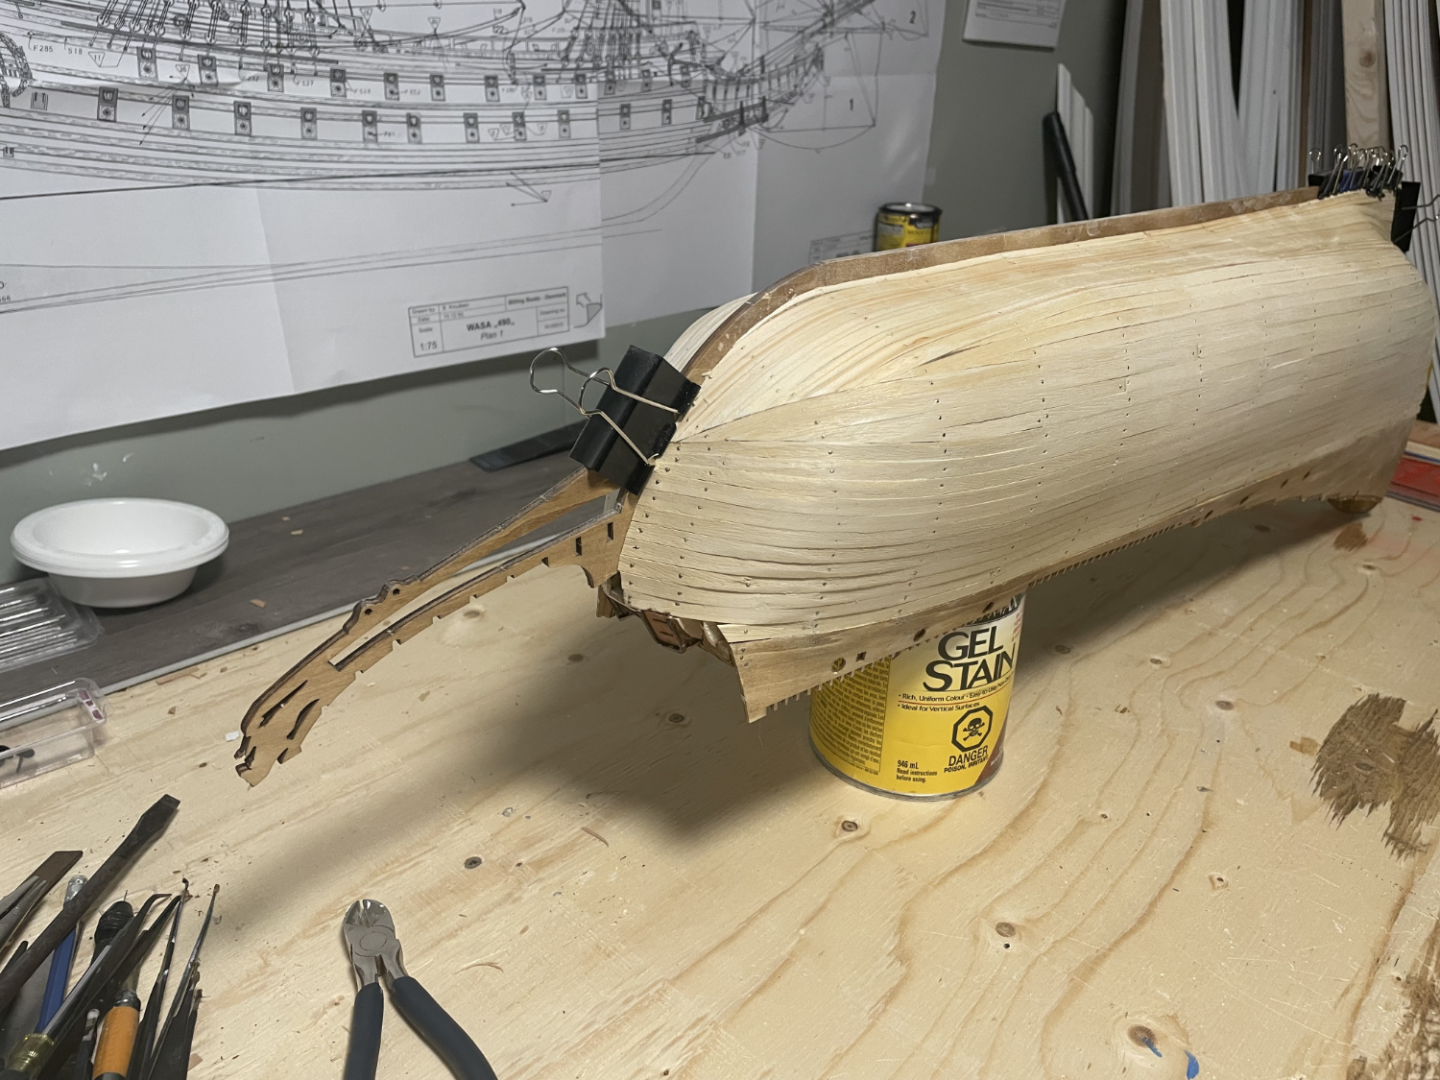
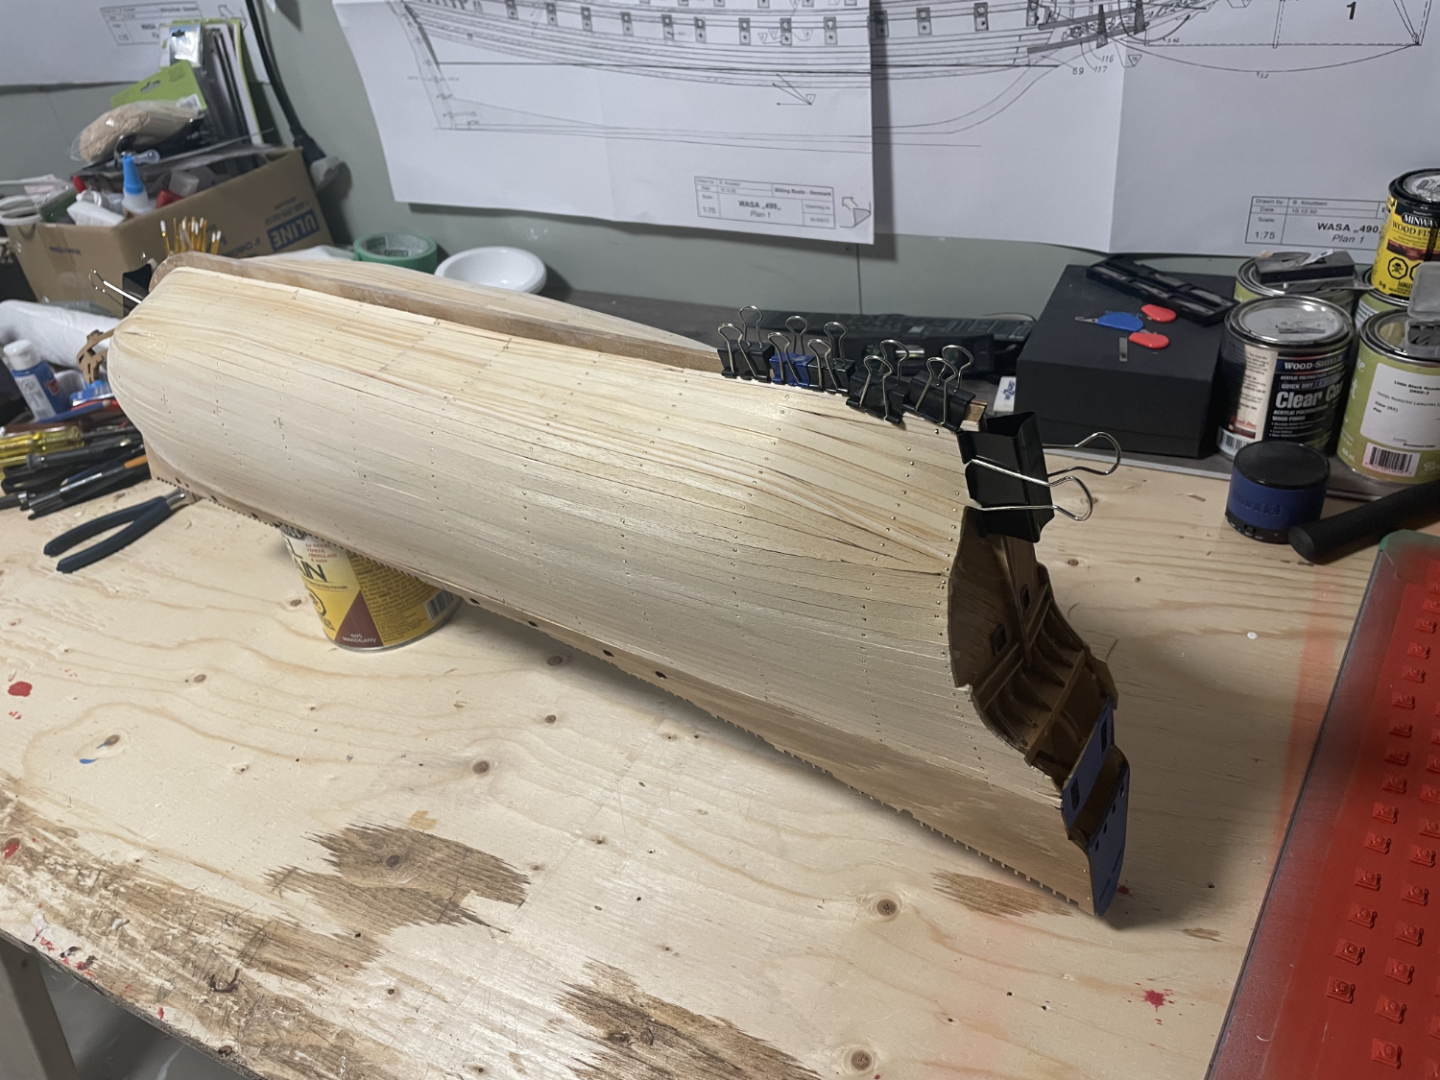
Hello Everyone. This is my second ship build (first build log), which I made the aggressive decision to build the Wasa by Billing Boats. This is unquestionably beyond my skill level, especially considering I did not to much in the way of research prior to beginning, and even during the majority of the building process. Personally, it is more fun for me to stumble through the project to learn vs doing a large amount of research before each step. This has made it more "fun", but also more difficult as I have made a LOT of mistakes throughout the build, which made it more difficult later in the build. Notes: I do know that this boat was red, however I fell in love with the blue on shown in the Billings Boat site (in the google link of more images). Also, I did not expect to share all of these build images so the background is usually very messy! Lastly, Since I did not expect to share the entire build log online, I completely understand every mistake I made, and will attempt to highlight everyone that I can think of. Starting the build: This build was a lot harder right from the start. The keel of the ship is 4 pieces, which 2 needs to be cut to length. What makes this difficult is the bulkheads don't have specific slots and each needs to be measured to fit correctly. What makes this even harder is that the bulkheads need to stand up 90 degrees from the keel being up ~20 degrees. I honestly feel like Billings Boat does this to try and get you to buy their specific tools. . I approached this by gluing the keel together, then measuring the bulkheads along the keel and marking each one. From there, I dry fitted everything together, and used the deck (which is notched) to make sure they all fit. Then I glued the bulkheads into place, then placed the deck back on to hold them into the correct positions. Sadly, I didn't realize that the bulkhead 10 (I believe) shifted at the keel, which later made the hull not uniform in the bend. This was the 4th bulkhead from the front. Once that was done. I proceeded to glue the deck into place, along with the stringers under the main deck. From there, I lined up the aft decks, and glued them into place as well. After that, I began working on a few different parts. Sometimes when I get annoyed with doing 1 part in particular I start another to keep myself interested, and keep up on the progress. Once I made enough progress on the deck, I decided (which was a very bad decision), to stain the upper deck with Mahogany, which was what the manual suggested. Sadly this turned out WAY darker than I wanted for the deck, so I immediately regretted my decision to not test it out before. This was just a stupid mistake on my part as I should have taken my time with it! This stain ended up setting me back a bit as I was very unhappy with just how dark the stain turned out. So I made the decision to remove all the upper decking, and start over on the upper deck. As you can see. I also started working on preparing for the bulwarks, however more sanding was still needed at this point to get the right curve. I also applied some stain to the deck to make sure I was happy with it this time (I did also test it before this time! ). The stain I ended up going with for the majority of the build is Golden Oak. From there, I finished the main decking. After that, I proceeded to plank the aft decks, then stain it all including the keel, and bulwarks. Once I had finished sanding down the sides, I proceeded to fit and glue the bulwarks into place. This is where I made another (of many!) mistake. I measured incorrectly, and ended up pushing the front of the bulwarks down ~1cm which caused issues for me later on (as always). I removed and re-added the stern piece (blue) probably 5 times as the process Billings wanted was to use clear plastic, with drawn lines on it. Sadly, this smudged off unless I used a marker, which looked bad. I ended up picking up some leather "string" for bracelet crafts, then gluing that into position, which turned out much better. After that, I began planking the stern, which again I made another mistake on. I only realized after I was almost completely done that I used a ~45 degree angle. This is something that made me regret not doing more checking before proceeding, but something that outside of this site, no one will notice. During this time, I also spent some time working on the bulwarks reinforcements, which just took forever! I then began to do some more work on the stern of the ship. I sadly noticed that the stain did not adhere as uniformly as I wanted, which is likely caused by some glue bleeding through and me not sanding it off enough. This is something I struggled with throughout the entire build. From there, I began planking the hull. I used multiple pictures of other people's BB Wasa hulls to get started with this. The start was easy, but it got VERY difficult as I reached the keel. Consider my process here a guide on how NOT to plank a boat. Don't do what I did here! haha As I approached the bottom of the keel, things got more and more frustrating! Lack of research really burned me here! I tried to keep the wood from twisting, which turned into multiple tapers for me to avoid twisting the wood. Also, BB did not supply enough wood for ANY mistakes in this process, so I quickly ran out of the Obechi wood supplied. This was honestly the hardest part of the building process, and I can understand people giving up here. This is where I most felt that I had bit off more than I can chew, and wasn't sure if I was going to be able to figure out how to get this done. More research would have helped for sure, but the lack of wood didn't allow me to start over without replacing all the Obechi. I ended up getting an uncle to cut small pine pieces which I used the complete the bottom section. I knew this would be okay to change the wood here as it was below the waterline, which I was planning on painting grey anyways. You can see here that the 4th bulkhead appears to flex inwards a bit as the bulkhead shifted a tiny bit when I glued it. It isnt something that I noticed until it was too late to fix, and It was something I was hoping would not be noticeable by anyone! At the time, I had no intention of sharing the build online where people would know better and spot this mistake. I finally completed the planking, which was a huge win considering how much I stumbled through the process! Then a lot of sanding was needed. Again early mistakes making it harder on me after! From here, I stained the entire hull and began painting and gluing on some of the stern decorations. I also began working on the wood pieces that line the outside of the hull. These I measured using a caliper from the bulwarks downwards. Which....ended up being a big mistake as I didnt realized until after these hull liners where glued into place that my bulwarks were about 1 CM to low on the front of the ship. If you look carefully, you will notice that the front of the ship is lower than it should be, which sadly ruins the curve on the side of the boat. Again this is something that I was too late to fix, and wasn't sure if anyone would actually notice this. This also removed enough space at the bottom to place my last wood liner. I wasn't able to glue it on without a significant twist to the wood as the front is too low for the 8th one down. After that, I then proceeded to prime and pain the waterline on the boat. This was a little tricky to get a fairly straight line. I ended up using a laser level and about 1 full roll of painters tape to get a line I was happy with. The primer looked way worse than the actual grey paint, but it was still something I was unhappy with as all I could see was the gaps between the hull planking. If I had done a better job on planking, this likely wouldn't have been a problem. After about a week or so of being unhappy with the finish, I got mad and proceeded to bondo the entire bottom of the waterline. once bondoed, I sanded it all back down then re-primed and painted it. This wasn't perfect, but it turned out WAY better and I was much happier with the results of the bondo. Once that part of the hull was done, I started making some good progress on the bow. This part was very fun as it was easy, and added a lot of detail to the boat. The next step I began to tackle was the upper sides of the hull. These went well however I did notice after that I didn't get the proper angle of this wood, and also made another mistake to cause problems later. (I didnt space out this wood enough, which means I ran out earlier than I was supposed to). As well as that, I also measured out all of the gun ports, glued the outside plastic squares (no idea what those would be called) on, and pained the inside of the ports black. This is again where the curve of the boat is obviously too low at the front. This is one of my biggest mistakes throughout the build, however I do take some comfort knowing that anyone so far who has seen it hasn't noticed (meanwhile it is all I see!). I will post further parts of my journey another day. I am not done, but I am a fair bit further than this post has got to.


-
Hi Everyone. I am new to this site, and to ship modelling in general. I have never built any models or anything like this, so it is quite the learning experience. My first ship was the buccaneer by Occre, which was a great learning experience. I completed this in about 6 months while juggling a pregnant wife. I made many mistakes, but those instructions were amazing for a first time. Now I am more than 50% done a Billings Boat Wasa. That was way more than I was prepared for, but I was able to make it through everything soo far. I’ve read a lot here about newbies starting boats that are way beyond their skills and this leading them to give up before making much progress. I am planning on creating a build log here with my Wasa, the pictures throughout the builds, and all of the mistakes I made and how I overcame each one. I am hoping that this will help inspire people to continue with their projects as mine is by no means perfect. I have spent almost 0 time watching videos on how to make these models, and spent almost 0 time reading the best processes. Part of the fun for me is stumbling through the instructions and the build to learn first hand the things I am doing well, and the many reasons to not make the many mistakes I have made. One day I hope to be as talented as some of the people on this site, but I am still in the learning process and fairly proud of my work so far. I also suspect I am an outlier in this demographic. 😛 I am only 30 and have a newborn to juggle so I can’t guarantee I will post fast. Thanks. Charles

- 15 replies
-
- 10
-