

42rocker
-
Posts
504 -
Joined
-
Last visited
Reputation Activity
-

 42rocker reacted to dewalt57 in H.M.S. Triton (Cross Section) 1:18 Scale, started by AL
Tim.... Thats Great!!! Glad you enjoyed my video's, Yes, been a long haul getting all this built but its been worth it to me. Hard to believe I started out with pushing a Dremel tool with 125oz. motors on a John K. home made gas pipe & skate bearings "Pipe Dream" machine many years ago to what I have built up now!! If there is any way you can, I'd say build that Cnc machine and don't look back!! I run mine at the cheap level, no fancy stuff like limit switches just basic cut & go!! All home made even down to the plywood E-chain!! I'm retired now and lots of time to play with my toys and still learning new things, it never ends or at least I hope not!... LOL Keep the faith buddy!!!
AL
-
42rocker reacted to Ulises Victoria in Vasa by Ulises Victoria - FINISHED - Corel - Scale 1: 75 - Royal Ship
MY VASA IS FINISHED!!!
I myself can't believe it but it's TRUE! It's finally done!!!
The feeling of proud and accomplishment one gets when finishing a 1200+ hour project is exhilarating.
Photo heavy thread. Sorry!
-
42rocker reacted to Paul Salomone in DKM Scharnhorst by Paul Salomone - 1:72nd Scale - German WW2 Battlecruiser
Hello all,
So let's start posting the original build pictures.
For those who did not see this build before, I would like to give a brief description of the model itself.
I have been into scale modelling since the age of six. At first, I assembled scale model kits, ranging from armour to ships to aircraft, but as time went by, I fell in love with ships - especially German, Italian, Japanese, Russian, Austrian, and French navies for periods 1850 to 1945. This was the true age of the battleships and their development.
I always had a soft spot for three gunned turreted ships, and I have to admit that one of the most beautiful ships ever built apart from the famous IJN Yamato, is the German heavy battlecruiser - the DKM Scharnhorst, as depicted in her last dazzle camouflage version in March/April of 1943.
The ship is in 1:72nd scale and measures some 3 mtrs 26cm ( 10 feet 9 1/2 inches). The hull together with the superstructure are entirely constructed from laminated 1mm thick cardboard, while the detailing is entirely scratch built using multi medium, like styrene, copper, brass, spring steel, PVC rods, timber, aluminium and resin.
I have started the model at the age of 20, but had to lay off a bit, as I had to build the house and construct the furniture - well it's duty before play. only recently I decided to scrap off the already built superstructure, to rebuild it again, and correct the errors found in the hull.
These pictures were taken quite a few years ago, but I managed to scan them.
A clear view of the method used to create the ship's frames, braces and stiffeners.
A front view, showing clearly the sleek bows of the ship.
A top view.
The ship's hull closed up with the first layer of cardboard. 4 to 6 more layers to go.
The bows of the ship ready, with some of the superstructure in place.
This picture clearly shows that at that time, I turned my mother's sitting and dining room into a dockyard.
Finishing in progress.
Finishing in gloss, before applying the satin finish.
A view of the detailing, when this ship was exhibited 20 years ago. Now all of the superstructure is scrapped away, and I have started all from the beginning. With the information I have today, The ship will have the correct detailing and finish, as you will see.
Will post more pictures later on today or tomorrow.
-
42rocker reacted to mtaylor in H.M.S. Triton (Cross Section) 1:18 Scale, started by AL
That surface looks just about right for a cast iron cannon, IMO. Nice work.
-
42rocker reacted to usedtosail in USS Constitution by usedtosail - FINISHED - Model Shipways - scale 1/76
I wanted to test fit the cannons I bought from Model Expo to make sure they fit in the gun ports, so I assembled one of them and did a quick test. These did not come with instructions, so I basically just fit a support piece between the two side pieces for this test cannon, but the real ones will have a small tapered piece and a front support piece instead. I also just used some 1/16" square wood for the axles, but will use wider pieces of wood in the final version. I made a jig to hold the side pieces up while I glued them to the axles. Here is the test cannon from the jig:
I rounded the axles to fit the wheels and just slid the wheels onto them for now:
When I put this cannon onto the gun deck I could see that it was about 1/8" too low. This made sense to me given that the bulkheads as supplied by ME are at the height of the gun deck after planking, but I had reduced the height of the bulkheads by 1/8" to account for the 1/16" of the gun deck support piece and the 1/16" deck planks. If I had just planked the deck without lowering the bulkheads, these cannons would fit fine or be close.
My first idea was to add more height to the axles, but that would only get me another 1/16" or so without looking awful. I then looked at the supplied gun carriage sides and realised that I could cut them in half without hitting any of the notches, then I could add a 1/18" by 1/16" piece to make up the height difference. I did this for two sides and after sanding them they looked fine.
I glued them up with the axles and support piece, added the wheels and this is how it came out:
And here it is in one of the gun ports. It fits nicely and more importantly, the barrel comes out straight so I can (hopefully) line them up with the dummy cannons that will be in the other gun ports.
Here is a comparison of the stock cannon (right) and the modified version (left):
I was lucky to have some extra cannons to experiment with. At some point I will make up the 16 cannons that will be rigged on the gun deck, but I have a lot more work to do to get to that point.
-
 42rocker got a reaction from flying_dutchman2 in 3D Printing - Not Just Yet!
A 3d 2,500 square foot house in 24 hours out of concrete. WOW. That would sure change a lot of things. Very interesting.
Later Tim
-
42rocker reacted to dewalt57 in H.M.S. Triton (Cross Section) 1:18 Scale, started by AL
Thanks Ray! This is using 25% step over with the 1/4" ball nose bit for roughing to within .001" of finial shape and a 5% step over for the 1/8" ball nose bit to do the finish cut. What that means is that when it makes one cut end to end, it steps over 5% of the cutter diameter and does the next cut. Takes 1 hour to complete the job. As you can see it's capable of very fine cutting down to the width of a human hair if need be!! The real limitation is the size of the cutter used, a 1/8" ball nose leaves a rounded edge where I'd like a sharp edge, I need a smaller ball nose bit to get more detail But the smaller the bit the more chance of bit breakage!!! The smoothness of the cut speaks well of the machine's stability and stiffness.
AL
Here it is next to a pen to see the size of it, brush painted with some gray primer and some gold leaf paint I'm been wanting to try out, very rough surface and gold leaf paint is way too thin for my liking. Rough surface is typical of MDF when not sanded smooth.
-
42rocker reacted to kruginmi in HMS Druid by Krug - FINISHED - 1:48 - Hahn
For a second go I used the shank of a drill bit to achieve around a 50% reduction in ring size for the eyebolts affixed to the hull. The hanging ring I kept at the 4P nail size.
This achieves the look I had in my mind. I now have to find my Zen, a comfortable spot and produce 90+ of the eyebolts. Then after cleaning and blackening I will put them aside until the gun deck is totally gel coated before gluing them in using CYA glue. I hope this ends up being this weekend!
Stay Building, My Friends,
Mark
-
42rocker reacted to chris watton in Newsworthy updates from Chris Watton
Thank you!
I only design them that way because I want an easy ride, too, when I have to build the prototypes!
-
 42rocker got a reaction from Bindy in H.M.S. Triton 1:48 scale cross section - FINISHED
Charge right in and go for it. Way to go! Buy a lathe and jump right in and make something that looks great!
Great Job.
Later Tim
-
 42rocker got a reaction from ziled68 in H.M.S. Triton 1:48 scale cross section - FINISHED
Your skill is great. Great job. I'm impressed.
Later Tim
-
42rocker reacted to voronDIV in Vorons Cross Section
Thank you for the congratulations.
I am still with You. I do everything manually. Therefore, the work is very slow.
All the dust lot of dust. Here are several stages of work.
-
-
42rocker reacted to mtaylor in Vorons Cross Section
Moderator's translation of the above post via Google: Thank you for your congratulations.
I am still with you. I have to do everything manually. Therefore, the Assembly is very slow.
Dust everywhere many pilot passed through several stages.
-
42rocker got a reaction from ziled68 in H.M.S. Triton 1:48 scale cross section - FINISHED
Charge right in and go for it. Way to go! Buy a lathe and jump right in and make something that looks great!
Great Job.
Later Tim
-
42rocker reacted to ziled68 in H.M.S. Triton 1:48 scale cross section - FINISHED
Hello Everyone,
Sorry for the delay since my last post. I didn’t have a lathe in order to turn my canons and was contemplating how to go about making them. Well I happened to go to the thrift store here on Fort Huachuca, AZ and was able to buy a lathe for $75.00. The only problem was that it did not have a faceplate but she still purred like a kitten and decided to buy it anyway. I was able to get a faceplate for it at Wood Craft for $30.00 and now I have a complete lathe capable of turning the canons. The next step was to learn how to use it since I’ve never owned one and all I had was a concept of how it must be used. Well I decided to turn a canon at twice the size the plans called for in order to get comfortable with it and I’m happy to report that I was able to make my first canon. I also made the carriage for the canon and added all the eyebolts and rings for it.
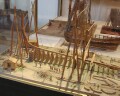
Since I was feeling comfortable, I decided to go ahead and make the three canons at the correct scale for my Triton. I also made the carriages for my canons with the exception of adding the eyebolts which I will try to do tomorrow. I went ahead and emulated my mentor by painting my carriages red but leaving the quoins natural in order to have color contrast. I also made the gun deck stanchions and added them into place. The following photos will show you what she is looking like along with my first try at the canon.
Cheers,
Raymond
-
 42rocker got a reaction from kruginmi in HMS Druid by Krug - FINISHED - 1:48 - Hahn
Outstanding work. Your attention to detail is great. Nice work. Thanks for sharing it.
Later Tim
-
42rocker reacted to kruginmi in HMS Druid by Krug - FINISHED - 1:48 - Hahn
Thanks for all the likes!
7 hours and 180 pieces of wood (and counting) the bulkheads are pretty close to done. Still need the hinges and door knobs to make the doors pop and the gel coating will help accentuate the paneling.
I also will add some pieces on the fore and aft panel between the beams to clean up the top edge and provide some added strength to keep it from shifting in the future. With the deck extension the British added these bulkheads are pretty far under the quarterdeck lip. I will keep a gap in the floor planking for some glimpses.
Now on to the mast partners.....
-mark
-
42rocker reacted to kruginmi in HMS Druid by Krug - FINISHED - 1:48 - Hahn
On to the bulkheads! The windows ended up being 66 different pieces of wood, it will be interesting to see how many pieces are used for these 3 panels.
The approach for the 3 panels (2 cross ship, one bow and aft connecting) was to use a 3 ply sandwich of 1/32" basswood, used on other builds in this forum. The middle piece is a solid piece of wood with the 2 other being trim pieces added to give the look of fancier paneling.
The initial form was defined through the use of cereal box cardboard. If any one needs that detail let me know, but needless to say it took around 3-4 iterations before I was satisfied (around a full size Cheerio box - hah, hah). Once I was satisfied with the fit I transferred to the basswood and cut out:
The panels were cut to fit under a defined deck beam, flush with the rear edge. You can see in the above photo the Legos used to help hold things up (another great idea from this forum). I then defined the doorway locations which required more effort than I thought. The original location looked great but upon trying the panel in location was obvious had an issue with the location of the stairs to the berth deck. I moved them farther out but then realized the door locations had to be equivalent on the aft bulkhead for the connecting partition to work and, of course, they were now too far out. So....third time the charm and I got to an acceptable location:
The connecting panel was added and the trim work to allow them to connect. I added some preliminary trim pieces to check out the pattern I sought after, but it is still incomplete. The doors will not have windows added to them.
A final check required before the push to complete the panels was to add the other quarterdeck beams. I love it when a plan comes together:
Tonight the plan is to complete the trim pieces on all three panels, add solid 3/32" pieces of wood between the beams on the fore and aft piece for strength and a more finished look. The metalwork for the hinges and door knobs will be this weekend. Then the pieces get stored away until the cannon carriage bolts are affixed.
Not too much work, but a tremendous change in visual appeal.
-mark
-
42rocker reacted to Jeronimo in LE BONHOMME RICHARD by Jeronimo - FINISHED
Hello, thanks to everyone for the kind comments.
Karl
Upper-Deck
prepared for the installation of the cannons.
T e i l 45
-
42rocker reacted to SawdustDave in A fully Rigged Model Shipways Confederacy.......
Mark....I will indeed. Figured I would get it past the "boiling water" stage before I begin posting the more interesting stuff. To me, this stage is much like watching grass grow. Just placed the last plank on the hull to complete my first planking.....ordered a beautiful piece of Mayan Walnut which I will be using for her skin. Can't wait to take it to my sawmill and begin creating her skin planks. Thanks
-
42rocker reacted to WackoWolf in A fully Rigged Model Shipways Confederacy.......
Mark,
Now that is the 64,000.00 question. Chuck knows Justin from my club in CT, he was the one who rig her in 91 but I do know he didn't do it all from those plans because of problems like Chuck had said. Also like I said they didn't match with what the NMM has either, and there is no framing plan anywhere either. I have been working on this ship in SoildWorks for well over a year and this is what I have done so far.
-
42rocker reacted to mtaylor in A fully Rigged Model Shipways Confederacy.......
The Navy was disbanded after the American Revolution as Congress didn't see a need to have one. Funny thing is, they left the charter for the Marines intact as they were to be stationed on certain merchant ships. (Trivia... the USMC is thus called the "Senior Service") A few years later, they realized their folly and chartered a Navy.
I think the designation for the Confederacy was just the Confederacy, though Hahn refers to it as "Continental Frigate Confederacy" in his book. At that point, there really may not have been a designation as Len and Andy have pointed out.
-
42rocker reacted to yvesvidal in A fully Rigged Model Shipways Confederacy.......
Folks,
While surfing the Web, I stumbled against a project which is dear to my heart: a fully rigged Confederacy!
Apparently, a very skilled modeler from North Carolina, Dave, has built the model as an Admiralty Model and added a full rigging with all masts and yards. I have looked at all the models built by Dave and am truly impressed and in awe with the quality of his models and the number of ships that he built.
I invite you to look at more of his work under http://www.davesconfederacy.blogspot.com/
A few full shots of the Confederacy in all its glory:
Fantastic work. Congratulations Dave.
Yves
PS: By the way, if anybody can give me more information about Dave and where he lives, I'd love to meet him. His Blog does not provide any clues.
-
42rocker reacted to dewalt57 in H.M.S. Triton (Cross Section) 1:18 Scale, started by AL
Got some more ship timber in and a 1" Poplar dowel to make cannons with! So we are back at it again making chips!!
Cut out a couple parts to check size and fit, for those who think CNC is flawless, think again.... LOL There is a slight mismatch in parts, several reasons for this, main one is..... its HARD wood with a GRAIN!!! The small 1/8" End Mill cutting bit will try to follow the path of least resistance in the grain of the wood, even a Carbide bit will flex a little while cutting, I even try to chuck the bit up close so it doesn't hang out too far from the router chuck, too long a bit will chatter, ( bending while cutting ), and make a wider cut path ( also known as Kerf ). Its just like a table saw, you only use as much blade as you need to cut the wood thickness!! So a CNC wood router is not perfect but its close enough for me to deal with. Another item of interest is that this router is a ( bought from Lowes ) Hitachi M12VC variable speed 8,000 RPM to 24,000 RPM, I never use this router on HIGH speed. The speed dial has a scale of 1 to 6, I never go above 3 which is maybe 12,000 RPM. Most of the guys that run full out and under a heavy load, end up replacing their router bearings after a year of hard pressed wood cutting, I've had mine running for over 5 years with no trouble. So bottom line is..... go easy on your tools and they will last a long time! Your mileage may very!!
AL
Notice the mismatch in cut between the next two pictures.
Top side perfect match.
Bottom side mismatch.