


glbarlow
-
Posts
3,807 -
Joined
-
Last visited
Content Type
Profiles
Forums
Gallery
Events
Posts posted by glbarlow
-
-
2 hours ago, CaptnBirdseye said:
but would rather ask
Nothing wrong with asking, that’s the beauty of the forum. Lots of reference guides.
-
You should eliminate the gap by sanding inside the curve of the stem as needed to create the fit. I had the same issue with mine. It’s important to get the right fit for planking the bow into the rabbet and the only way to do that is reduce inside of the stem. No way to force it.
You’ll want to taper the stem as well, I recall Chuck explains that in the monograph. And that is an extra part.
- CaptnBirdseye, allanyed, mtaylor and 2 others
-
 5
5
-
-
Fun stuff to see film making up close. Nice that ship modeling plays into the script.
- mtaylor, Ryland Craze and FrankWouts
-
3
-
Well done, quite the paint collection you have there.
- Glen McGuire, Thukydides and AJohnson
-
3
-
WOP has to be properly applied. Wipe on and then Wipe off immediately otherwise it’s just a shiny thick mess. My hulls have 3-4 coats done this way and I think they look pretty good. I don’t like varnish or “oils” but there is no end to the debate.
- CiscoH, Erik W, Ryland Craze and 1 other
-
4
-
-
4 hours ago, scrubbyj427 said:
Lovely work
Thank you, so many like you have shown me the way.
- Dave_E and FrankWouts
-
2
-
4 hours ago, Rustyj said:
And we will keep saying it!
Thank you Rusty!
- FrankWouts, Dave_E and Nunnehi (Don)
-
3
-
4 hours ago, Nunnehi (Don) said:
I know I’ve said it before,
Thank you for continuing to say it😁
- Nunnehi (Don), FrankWouts and Dave_E
-
3
-
Well done Fred, it's looking great.
-
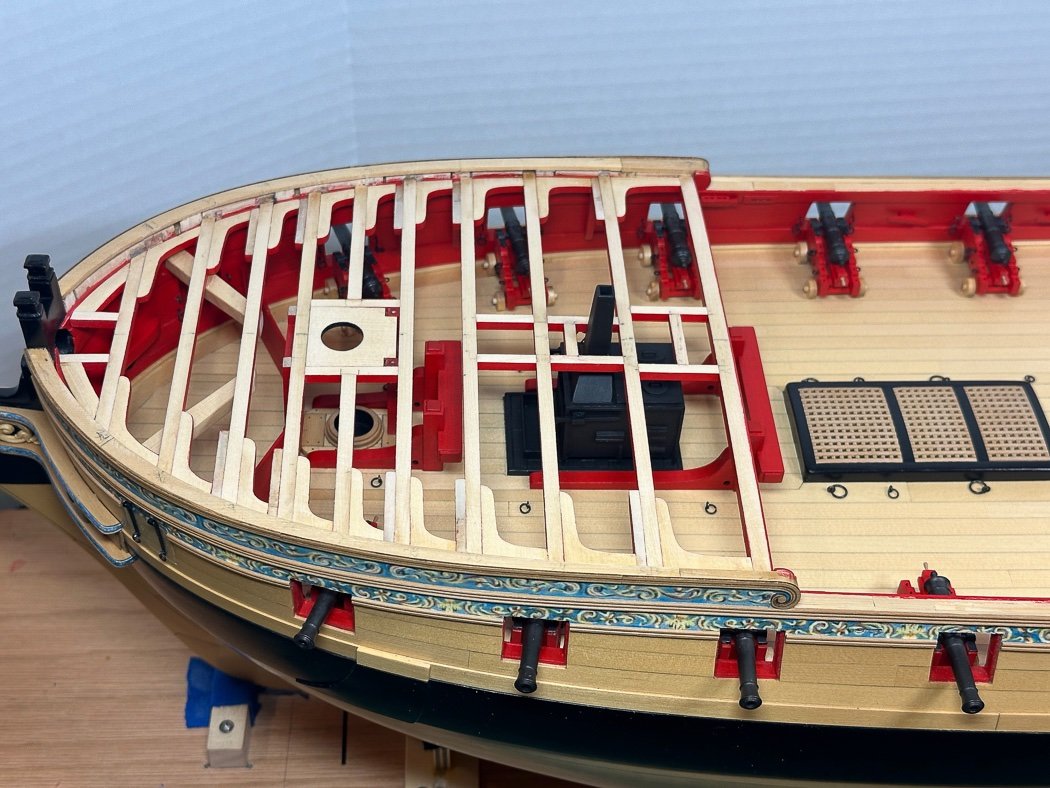
Chapter 8 Complete
It took me a lot less time to complete chapter 8 than it did chapter 7. It would have been done sooner except for two things: I split my available time between Winchelsea and creating a book from our Kenyan adventure, it’s now done and being printed. The second, for some now inexplicable reason we got a puppy - what were we thinking. It’s a nice Beagle but it takes a ton of time…anyway.
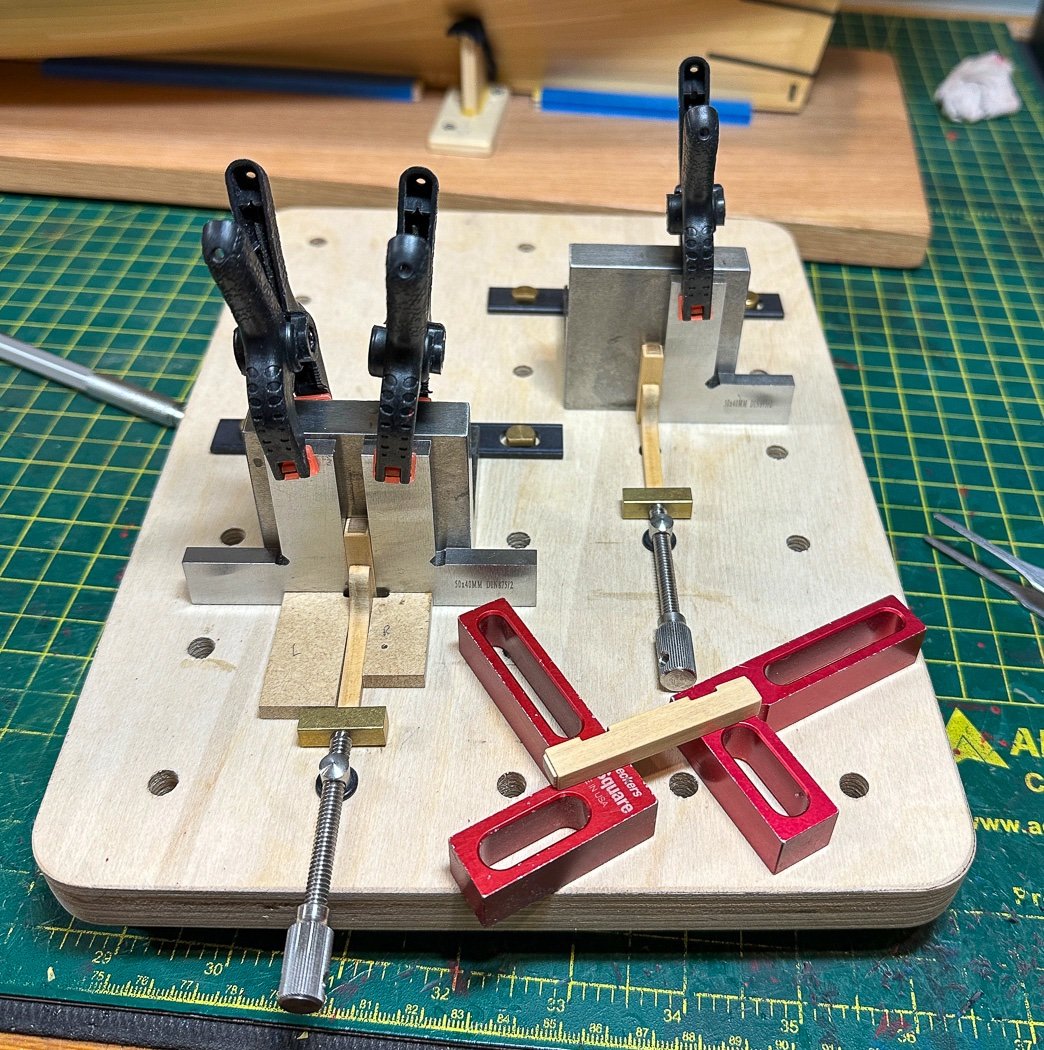
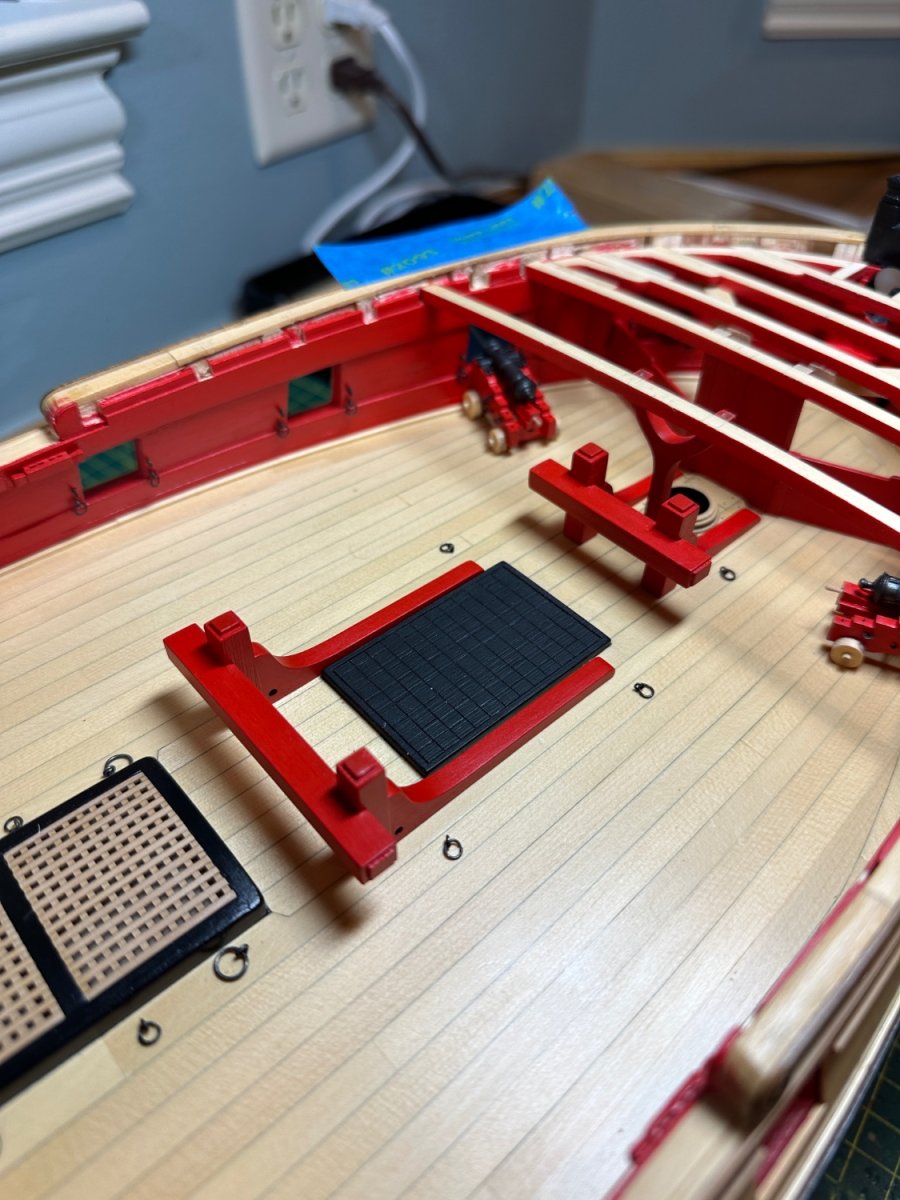
Picking up where I left off with the forecastle I created a few jigs to square up and assemble the two sets of bitts, the table with movable clamps comes in handy. The spacers were helpful in establishing proper distances as well as aligning both. I pinned as well as glued them to the deck after scratching through the coats of WOP on the deck beneath the runners.

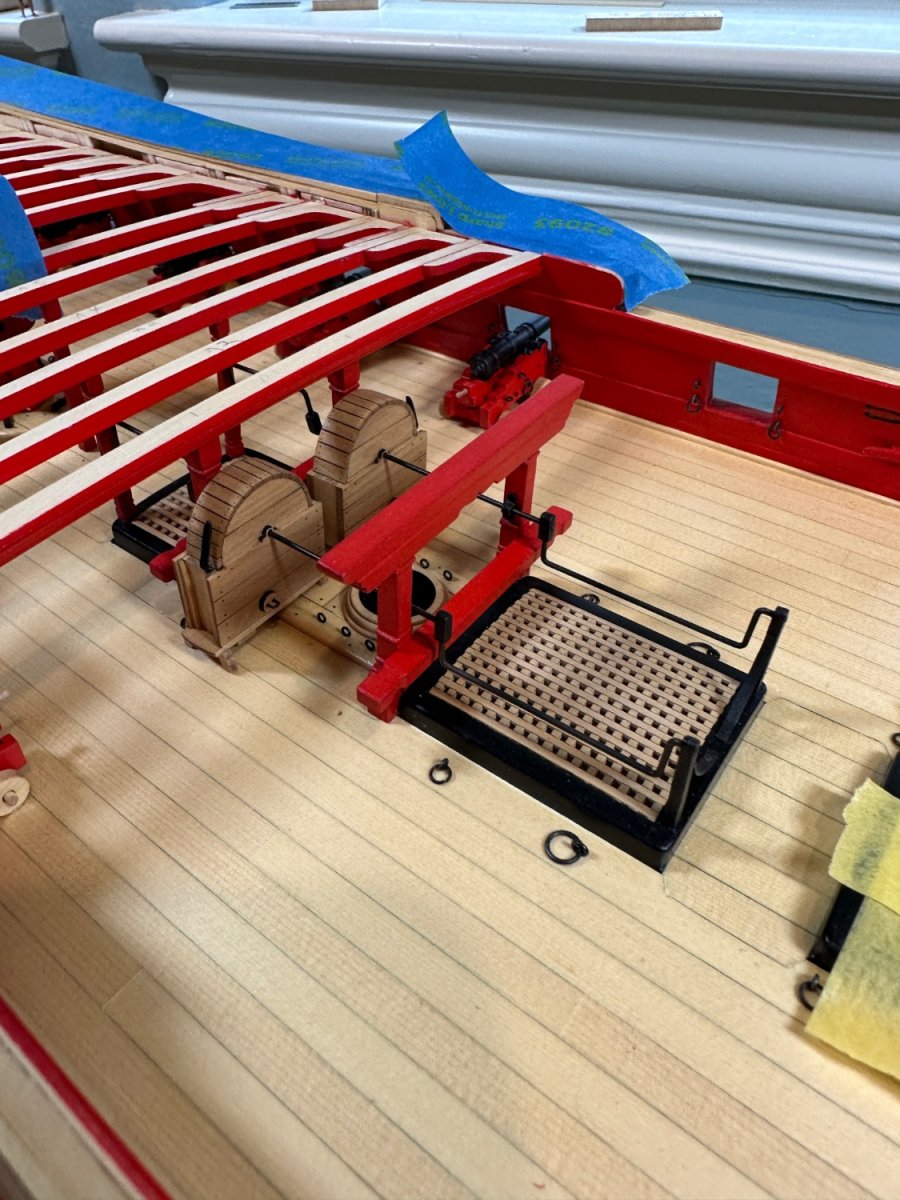
MDF left over from prior models repeatedly comes in handy for creating jigs. In this case I milled a carefully measured grove on the bottom of three pieces to square up the stove I’d made so very long ago. It has a small not visible rectangle of wood on the bottom planed the height of the stove legs so I didn’t have to depend on the thin legs. More importantly these spacers set the proper location of the chimney per the templates so it sits the proper distance from beams fore and aft of it. This is a bit tricking to establish so I spent a good amount of time dry-fitting and measuring, then first gluing in the drip tray followed by the stove.
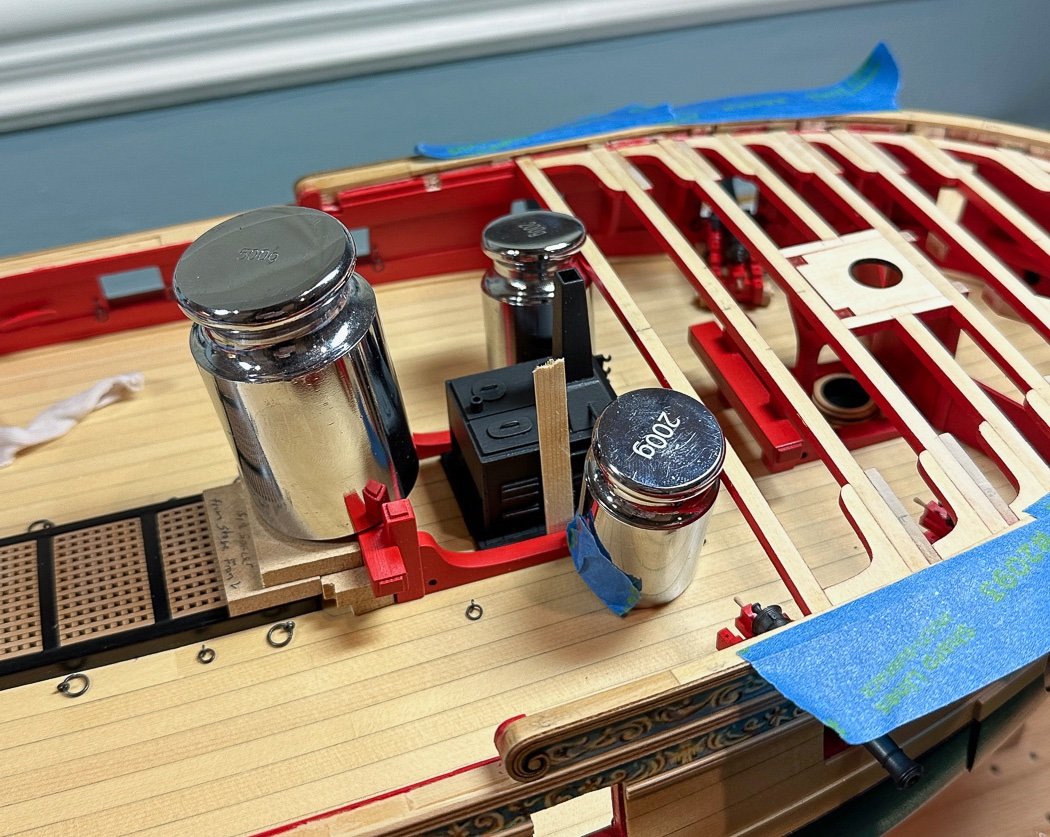
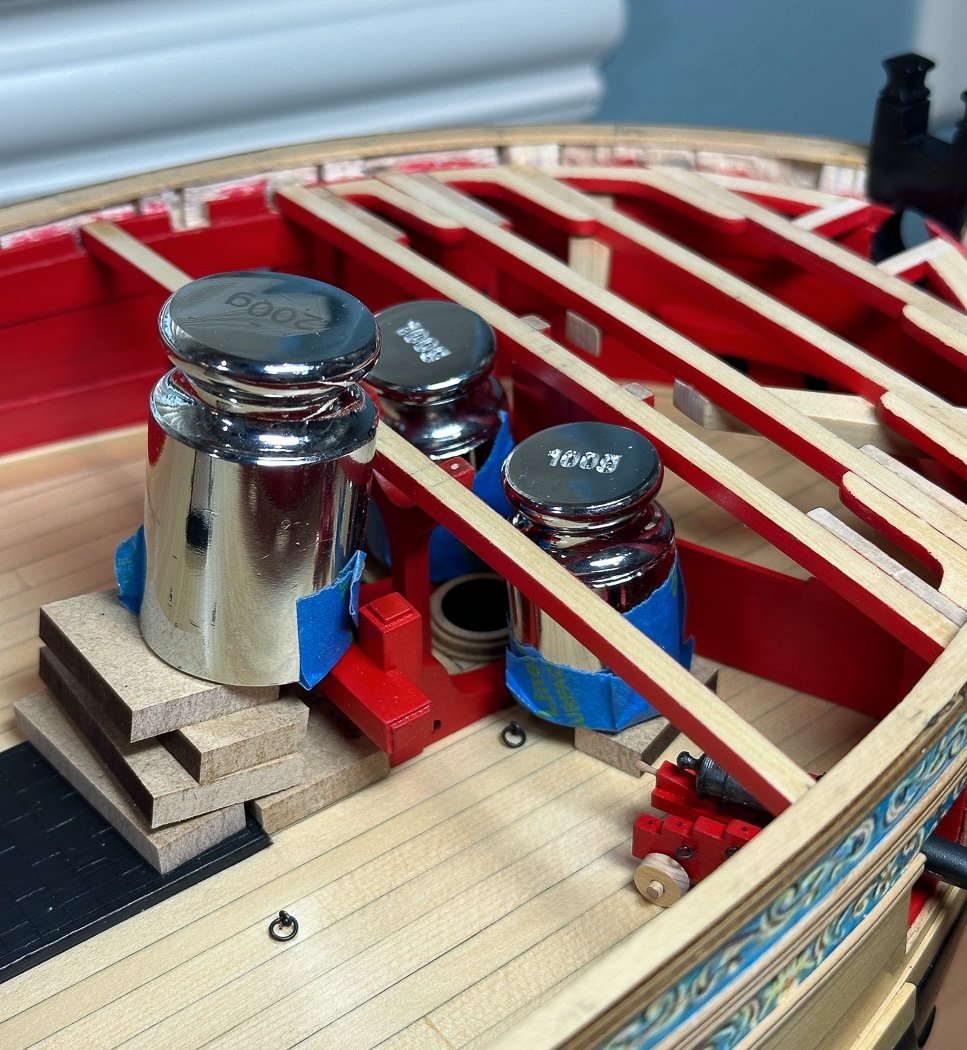
With that done I could then measure, place, pin, and glue the aft set of bitts. Again a MDF spacer between it and the cargo hatch was important. I had to interpret the plans a bit and judge the distance of the bitts from the aft most beam to properly place it. The MDF risers for the weight don’t sit on the cargo hatch, but instead a more narrow ones below it. The weights were needed as well as using a #11 blade to again scratch up the deck and its 3 coats of WOP below the runners.
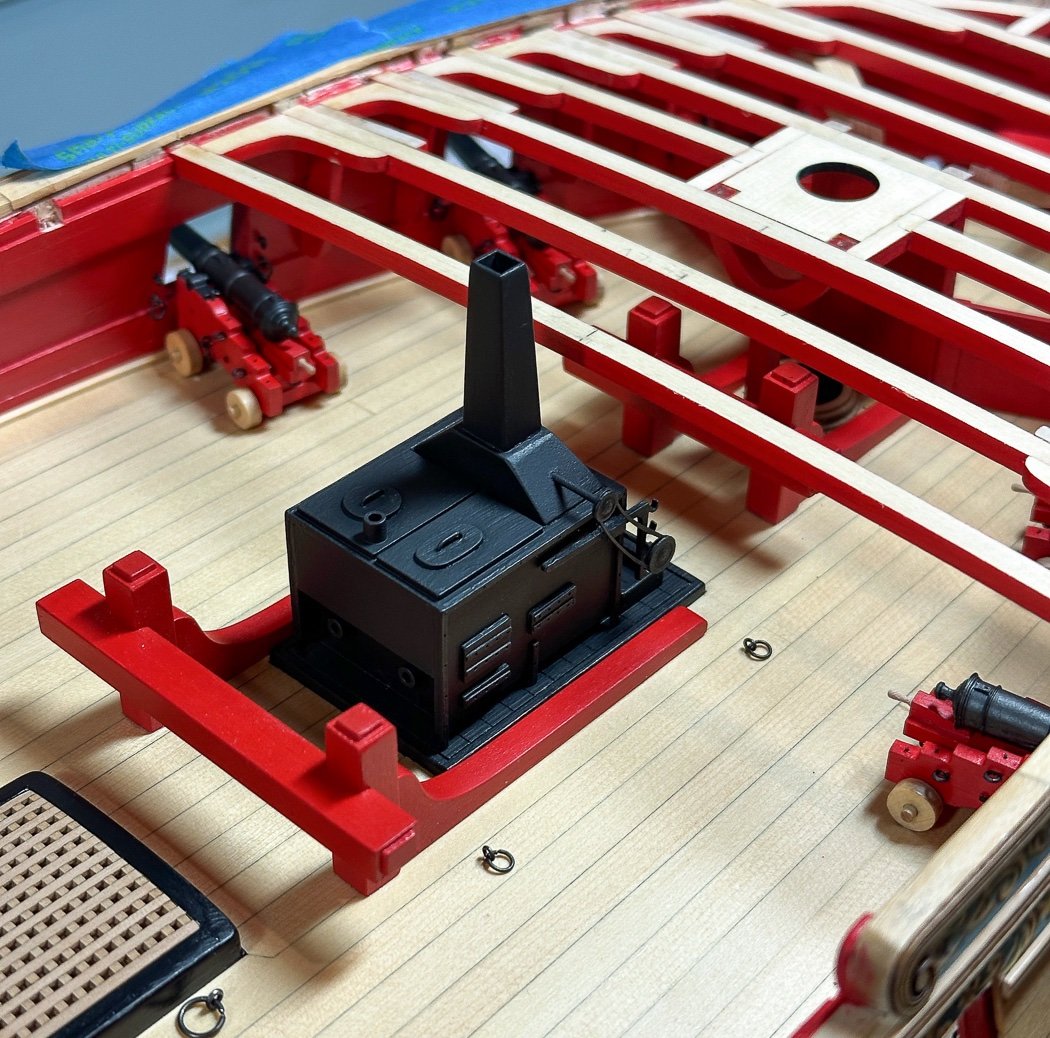
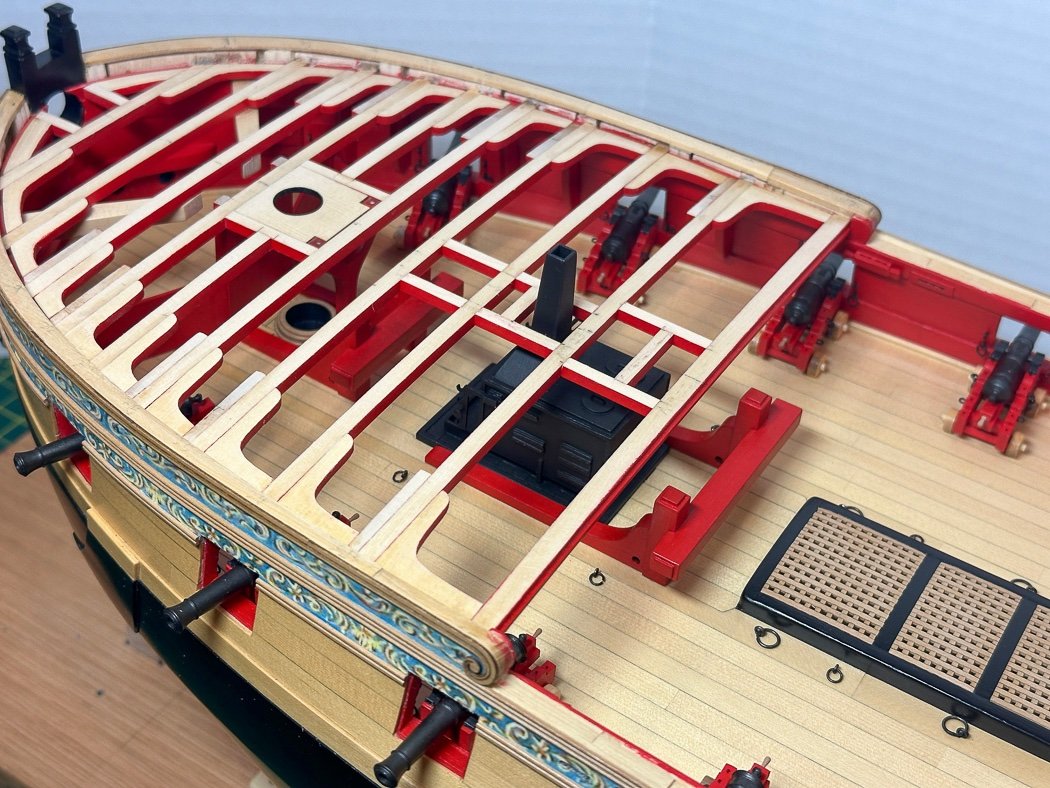
I mentioned this last time, it was very important to work slowly from bow to aft, it would have been near impossible to place the stove and the bits had I been premature in gluing beams, not to mention how the covered cannon would have been placed. Also had I mounted the cannon too early it would have complicated fitting and attaching the knees. Speaking of which, I’ve spent a long time on scraping, painting, and fitting all these knees. I will have to keep these photos for my memories as they’ll soon all be completely covered by decking. I’m sill considering alternative decking to keep some of them exposed. Anyway…
You’ll notice blue tape running down the sides of the hull. I call those my canaries(as in the coal mine). I hit the tape (I hope) before I hit a cannon barrel or port lid in my clumsy fashion of moving too fast from tool tray to deck. It’s dumb, but so far it seems to work. I could just slow down and not hit them...
With that the final two beams are glued in and the carlings added. The carlings too are a bit tricky. They will be covered by decking but are needed to support coaming. They have to fit snugly, neither too small or too tight and have the pairs be identical for that to happen. Measuring carefully of course is important, however my Byrnes disc sander makes fine tuning these possible. Thank you Jim Byrnes.
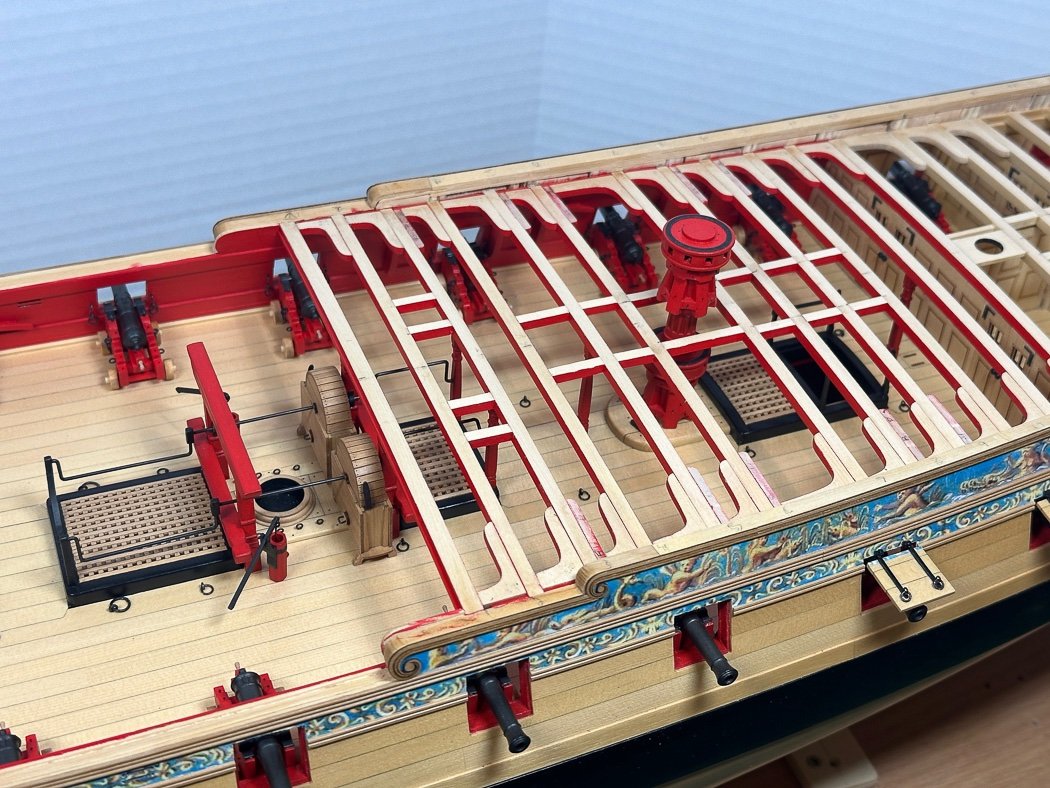
I also added carlings to the quarterdeck per the templates. I used a laser gauge to re-establish the center line then transferred measurements from the templates to the beams.
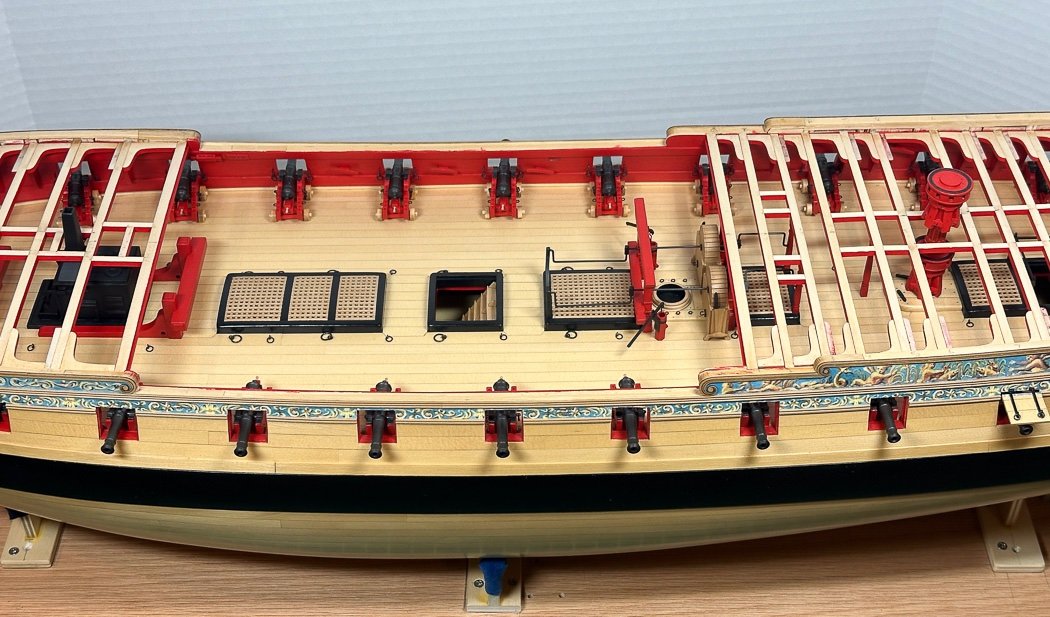
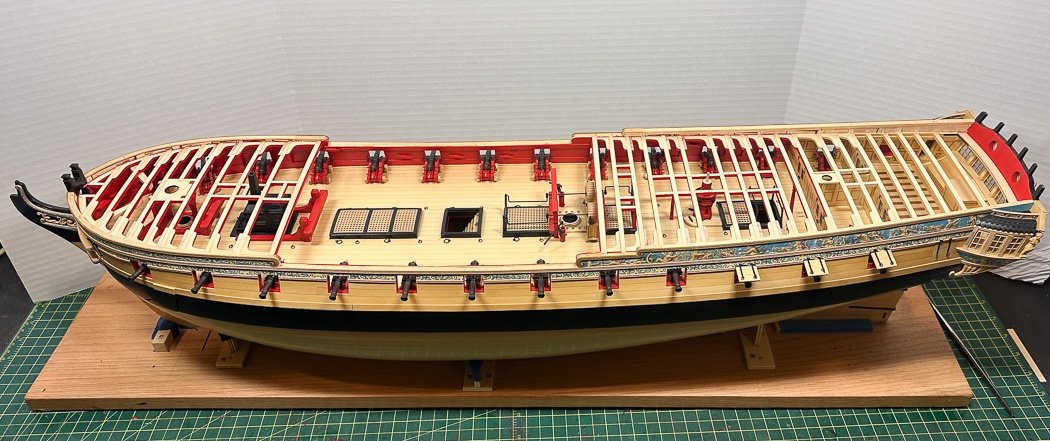
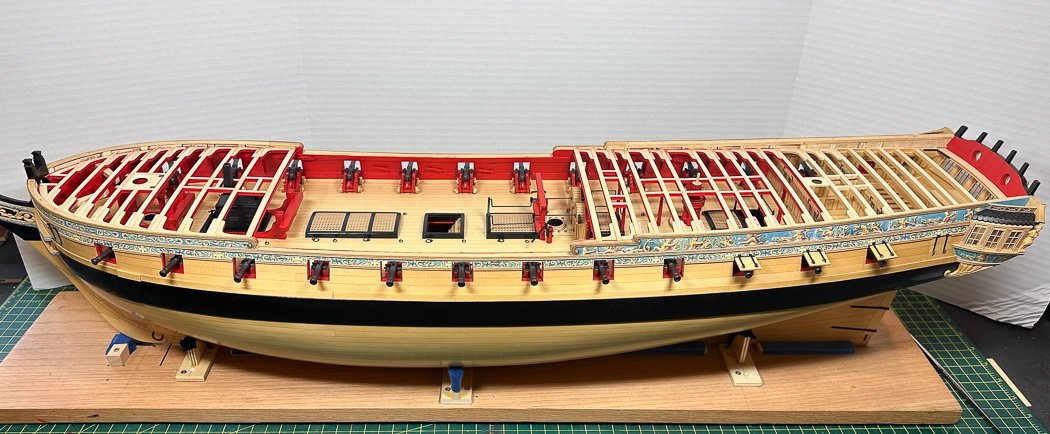
And with that Chapter 8 is complete (the waist cannons and elm tree pumps are just placed for the photos). Please excuse the low quality photos and pitiful backdrop. I need to create a separate photo studio someplace someday.
Thank you as always for stopping by, your likes and comments are appreciated. Now the puppy needs attention.
-
The entire exterior of both my Cheerful and Winchelsea including the black wales but excluding the friezes have multiple coats of WOP as does unpainted wood on the deck and deck furniture. I don’t include WOP over painted interior areas, the multiple coats of red paint are enough. Just how I do it.
- Erik W, Ryland Craze and Tigersteve
-
3
-
55 minutes ago, BrochBoating said:
Nope macro and stacking go hand in hand
Although my other hobby is photography GlennBarlow|Photography This is not a photography site so I’m going to bow out of this thread.
So, nope they are in fact different things. While macro photography includes stacking, stacking is not limited to macro photography. Focus stacking, such as a model or even a waterfall, does not include macro. Macro photography is all about showcasing a subject larger than it is in life. Focus stacking is about overcoming depth of field limitations of a single aperture for a deep composition.
With that I’ll leave everyone to their opinions and go back to modeling.
-
1 hour ago, Gregory said:
seems to be two sets of approach
I agree Gregory. My camera doesn’t stack them just takes as many as I want varying the focus point front to back, which I then have to stack in Photoshop (I used to use Helicon Focus but Photoshop has much improved this function).
As I noted in an earlier post I rarely stack focus anyway, way too much work for one photo f/11-f/16 does about as well for my purposes. Macro photography is a whole different thing, something I could never get excited about but I know produces some amazing images. Taking boat photos really isn’t macro photography.
A D850 by the way is ancient by camera technology definition. -
@ChuckMay I recommend this thread be forwarded to Donna and family when appropriate. When I lost my dad years ago I was touched by a stack of small hand written (pre-internet) notes by many that knew him. I’d think Donna and Jim’s family might appreciate how far and wide was Jim’s reach into our modeling world.
- Canute, Ryland Craze, Guyuti and 6 others
-
9
-
6 hours ago, BrochBoating said:
Newer ones do but older Pro cameras have no aids
Not sure what you’re defining as old. I first had this feature on a now 7 year old D850 and still have it on my current z7ii and two Z8s. Stacking with the camera in a fixed position modifying only the focus point is the best technique for stacking focus in my experience. Moving the camera changes the composition This is all just a matter of personal choice, whatever works for you. There is a difference between macro photography and focus stacked images, two different things.
-
Nikon pro level cameras have a much simpler focus stacking feature, a few settings from a fixed camera position and the camera does all the work with one click of the shutter. Of course the resulting images still have to be combined in post.
-
-
-
Those are tricky angles for sure
-
I’ve never visited this forum, sounds like I will continue not to 🤣
- mtaylor, scrubbyj427, Ryland Craze and 1 other
-
4
-
Glad it helped Frank. Your English is more than fine. Let me know if I can help further
I am scupper free so can’t help there.
- Dave_E and FrankWouts
-
1
-
 1
1
-
5 hours ago, hollowneck said:
showed your latest posts to a granddaughter
Thanks, I think 😊 that’s not a connection I’d make.
- Dave_E and FrankWouts
-
2

Cheerful build query
in Building, Framing, Planking and plating a ships hull and deck
Posted
The false keel is a long thin strip you’ll add only to the bottom of the keel