

Jeronimo
-
Posts
720 -
Joined
-
Last visited
Reputation Activity
-

 Jeronimo got a reaction from aviaamator in LE BONHOMME RICHARD by Jeronimo - FINISHED
Hi friends ,
Teil 2
Regards Karl
-
Jeronimo got a reaction from aviaamator in LE BONHOMME RICHARD by Jeronimo - FINISHED
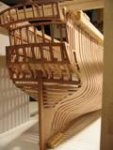
1st Construction stage - Stern part
posterior third of the ship with all the equipment and view of the interior the model
Karl
-
-
 Jeronimo got a reaction from Stoyne in LE BONHOMME RICHARD by Jeronimo - FINISHED
Hi friends ,
Teil 2
Regards Karl
-
 Jeronimo got a reaction from JerryGreening in LE BONHOMME RICHARD by Jeronimo - FINISHED
Hello friends,
mounting of the gun ports.
Karl
T e i l 22
-
Jeronimo got a reaction from JerryGreening in LE BONHOMME RICHARD by Jeronimo - FINISHED
Hello friends.
Design, construction and mounting of ancher.
Karl
T e i l 21
-
 Jeronimo got a reaction from archjofo in LE BONHOMME RICHARD by Jeronimo - FINISHED
Hello Ken, (BareHook)
answer the question.
Karl
-
 Jeronimo reacted to JerryGreening in Bonhomme Richard by JerryGreening - 1:48 scale
Moving on to the lower keel and towards the bow. I treenailed the keel pieces even though these will be covered over by frames later on. They are still visible from the bottom should I be crazy enough to turn the model over later on.
-
Jeronimo reacted to JerryGreening in Bonhomme Richard by JerryGreening - 1:48 scale
Starting at the stern. Here is the rudderpost and the deadwood above the keel. I had orginally planned to build this ship using oak for the frames. I had a lot of scrap oak at the time and it seemed like a good idea. I very quickly switched my choice of wood over to maple. For those of you new to this hobby Oak is awsome for full sized ships it is however a very lousy modeling wood, it is very grainy and very brittle. Don't use it - save it for the display board. You can see an oak version of the rudder post on the right side of the first two pictures
-
Jeronimo reacted to Alex M in HMS Sphynx 1775 by Alex M - Scale 1/48 - English 20-Gun Frigate
Hello,
Before I begin to install all guns, and work further with beams and knees for quarter deck, gun port lids must here. So the production of hinges, the lids itself are made earlier. I hope, the images are self explainable.
The installation of hinges and lid tackles.
After I have installed all lids, I have made blanks for channels, shaped them to right size and thickness, and installed them (only dry now).
To be continued
Alexander
-
Jeronimo reacted to Alex M in HMS Sphynx 1775 by Alex M - Scale 1/48 - English 20-Gun Frigate
Hello,
before I put the guns on their positions, I have decided to work around hull, especially the stern area und the bow. Here are few pictures of making the windows. The wood is Castello, the strips are 0,5x0,5mm and 0,5x0,8mm. For glazing I have used 0,3mm thick plastic from package, then glued framing with CA. The framing of stern windows was transfered to transparent paper, then the windows mullions are drafted on this transparent paper according to plan. Then I have glued white paper sheet to wood plate, and glued transparent paper over the first. So I have correct windows outline and right angles. Then placed clear plastic sheet over paper, and fixed them with tape.
Now the mullions. Horizontal mullions (0,5mm x 0,5 mm) are glued directly to plastic with CA glue. Then slots for vertical mullions are cut out with chisel, they are not halflapped, they go through horizontal down to plastic. This is showed in third picture. Then vertical mullions are glued on. then all was cut to right length according to drawing. Then outer frames (0,5mm x 0,8 mm) are glued, again directly to plastic. Then the windows are sand flush, the plastic was then cut out, and the window is ready.
The horizontal strips are glued first, then gaps for vertical strips are cut.
Vertical strips glued on, cut to right height, and outer framing gluing
overall view with outer frames. Also the sliding windows.
Close view after sanding
The frame for permanent window glued over additional sheet of plastic
Check how they fit. The windows need some cleaning, then coat of varnish will be added to simulate old glazing.
Preparing framing for galleries beginns
The shape of windows traced to transparent paper.
The windows for galleries are done in the same manner as before. The glazing is imitated by adding a coat of varnish, this give the irregular transparence like old glass. The battens between windows added separately. They will recieve mouldings later, and are hold at now by a little spot of glue.
All windows are dry fitted at now.
Here is how the wooden shindles are made, and ready cover for gallery
The planking of stern is completed. The arches are made from two strips of 0,6mm boxwood glued together.
Internal view with few beams of QD installed
To be continued
Alexander
-
 Jeronimo got a reaction from Wishmaster in LE BONHOMME RICHARD by Jeronimo - FINISHED
Hello friends,
mounting of the gun ports.
Karl
T e i l 22
-
 Jeronimo got a reaction from Luca in LE BONHOMME RICHARD by Jeronimo - FINISHED
Hello friends,
mounting of the gun ports.
Karl
T e i l 22
-
 Jeronimo got a reaction from druxey in LE BONHOMME RICHARD by Jeronimo - FINISHED
Hello friends,
mounting of the gun ports.
Karl
T e i l 22
-
Jeronimo got a reaction from Wishmaster in LE BONHOMME RICHARD by Jeronimo - FINISHED
Hello friends.
Design, construction and mounting of ancher.
Karl
T e i l 21
-
 Jeronimo got a reaction from Ferit in LE BONHOMME RICHARD by Jeronimo - FINISHED
Hello friends,
mounting of the gun ports.
Karl
T e i l 22
-
 Jeronimo got a reaction from CaptainSteve in LE BONHOMME RICHARD by Jeronimo - FINISHED
Hi friends,
I try all the Pictures of my model "LE BONHOMME RICHARD 1779" to restore.
Regards Karl
-
Jeronimo got a reaction from Luca in LE BONHOMME RICHARD by Jeronimo - FINISHED
Hello friends.
Design, construction and mounting of ancher.
Karl
T e i l 21
-
Jeronimo got a reaction from druxey in LE BONHOMME RICHARD by Jeronimo - FINISHED
Hello friends.
Design, construction and mounting of ancher.
Karl
T e i l 21
-
Jeronimo reacted to Dan Vadas in HMS Vulture 1776 by Dan Vadas - FINISHED - 1:48 scale - 16-gun Swan-class sloop from TFFM plans
Thanks for looking in Christian. BTW - there are four eyebolts immediately either side of the Main Mast and three on each side adjacent to it that should also be drilled and fitted before any work begins on the Pump Cranks. I'll drill these now and show you the updates later.
Hi all,
The final part of the Chain Pump setup - I've glued in the Pillars at the aft ends of the cranks. I was bumping and bending the aft ends of the cranks quite a bit, so I figured it was time to stabilize the whole structure. This meant fitting the 3rd Quarterdeck Beam as well :
My Aft Hatch is a little out of alignment - it's actually 2mm too short. I knew this a while ago - the problem is much further down. The Lower Well was slightly too far forward (2mm to be precise) and things further upwards had to be shifted to accommodate this. I'm not about to rip up two decks to fix an otherwise minor error properly .
Danny
-
Jeronimo reacted to Dan Vadas in HMS Vulture 1776 by Dan Vadas - FINISHED - 1:48 scale - 16-gun Swan-class sloop from TFFM plans
Yeah John, I'm pretty happy with the amount of work I did this weekend - especially with how detailed all this is .
Hi all,
The last couple of things for the Pumps - two Bungs, complete with handles, and the Latch that secures the Cistern Hood :
Danny
-
Jeronimo reacted to Dan Vadas in HMS Vulture 1776 by Dan Vadas - FINISHED - 1:48 scale - 16-gun Swan-class sloop from TFFM plans
Forward Stanchions, Cistern Hood and Pump Dale
Hi all,
The last few things for the Pump Assemblies (almost) - I've made the Forward support Stanchions, the port side Cistern Hood and the Pump Dale for the same side. None will be fitted to the starboard side.
The Stanchions support the forward ends of the Cranks :
The Cistern Hood is made from 1mm thick side pieces and 0.35mm boards over the top :
The Pump Dale is a removable item on the real ship - it would be a constant trip hazard otherwise. It is made from four pieces of 0.5mm thick timber, and attaches to the cistern via a board which can be lifted upwards :
Danny
-
Jeronimo reacted to Dan Vadas in HMS Vulture 1776 by Dan Vadas - FINISHED - 1:48 scale - 16-gun Swan-class sloop from TFFM plans
Thank you John and Grant - you ain't seen nuthin' yet .
Next trick was making the Chocks. The five lower Lower Capstan ones are 3 3/4" thick, the six lower Upper Capstan ones are 3 1/8" and both sets of upper chocks are 2" thick - keeping them separate was a trick .
The chocks taper inwards and are also bevelled for the scarphs. The upper capstan ones have a slightly different angle to the lower ones. I started by sanding one edge on the Byrnes disc sander using both the angle gauge and tilt table. Then I cut them all to width on the Byrnes saw using the angle gauge for the other edge, and freehand sanded the bevel into each one :
Then I glued the Whelps and Chocks to the Barrels :
I left all the chocks oversize on the outer edges at this stage. They will be turned down to size in the next stage :
Danny
-
Jeronimo reacted to Dan Vadas in HMS Vulture 1776 by Dan Vadas - FINISHED - 1:48 scale - 16-gun Swan-class sloop from TFFM plans
Capstans
The start of the Capstans. There are two of them - the Lower Capstan on the Upper Deck, and the Upper Capstan on the Quarterdeck above it. They are joined together between decks to work as one. I'm using English Box for all the components - some of them are quite small and require a very good timber.
The Lower Capstan Barrel has 10 flats milled into it to take 5 Whelps, and the Upper Capstan has 12 flats and 6 whelps. I decided to turn and mill both together for ease of setting up. They will be separated between decks for installation purposes.
I used the Dividing Attachment on my Sherline mill to cut the flats :
Then I turned down the centre portion :
I've also started making the Whelps. The ones for the Upper and Lower Capstans are of different sizes, there is also a corresponding difference in angles. I'm also using the Mill to cut the angles, with the aid of the Tilting Table :
Danny
-
Jeronimo reacted to Dan Vadas in HMS Vulture 1776 by Dan Vadas - FINISHED - 1:48 scale - 16-gun Swan-class sloop from TFFM plans
Thank you very much for the kind comments Eric and Frank .
Continuing on with the Capstan, the next job was to finish shaping the Whelps. Looking from above they form a wedge shape, with the outer edge 2" thicker than the inner. To cut these angles I made a wedge-shaped block of scrap timber which I lightly PVA'd to the underside of the piece that I'd Milled the faces to. I cut one edge on all 11 pieces, then I used Isopropyl to remove the wedge, let the alcohol evaporate thoroughly, and glued it back to the opposite side to cut the other angle :
After cutting them all to length I set the saw blade to protrude just 0.25mm above the bed. I carefully marked the positions of two of the Chock Scarphs in one each of the Upper and Lower Whelps (there is a slight difference in them), set the fence to the first cut and did all of them. Then I reset the fence for the other 3 measurements and cut all the remaining ones :
The two on the left in the pic above have only been cut on the saw. The two on the right have had the Mortices cut into them. I used a #11 Xacto to cut the angles - they were quite easy to do, owing to the saw cuts.
Another pic showing the wedge-shapes of the whelps :
Danny