Pasi Ahopelto
-
Posts
15 -
Joined
-
Last visited
-
 GrandpaPhil reacted to a post in a topic:
Rattlesnake by Pasi Ahopelto - Scale 1:48, U.S. privateer 1781 - Hahn's plans
GrandpaPhil reacted to a post in a topic:
Rattlesnake by Pasi Ahopelto - Scale 1:48, U.S. privateer 1781 - Hahn's plans
-
GrandpaPhil reacted to a post in a topic:
Rattlesnake by Pasi Ahopelto - Scale 1:48, U.S. privateer 1781 - Hahn's plans
-
KenW reacted to a post in a topic:
Rattlesnake by Pasi Ahopelto - Scale 1:48, U.S. privateer 1781 - Hahn's plans
-
KenW reacted to a post in a topic:
Rattlesnake by Pasi Ahopelto - Scale 1:48, U.S. privateer 1781 - Hahn's plans
-
Pasi Ahopelto reacted to a post in a topic:
THE 74-GUN SHIP by Jeronimo
-
tkay11 reacted to a post in a topic:
Rattlesnake by Pasi Ahopelto - Scale 1:48, U.S. privateer 1781 - Hahn's plans
-
src reacted to a post in a topic:
Rattlesnake by Pasi Ahopelto - Scale 1:48, U.S. privateer 1781 - Hahn's plans
-
mtaylor reacted to a post in a topic:
Rattlesnake by Pasi Ahopelto - Scale 1:48, U.S. privateer 1781 - Hahn's plans
-
Ryland Craze reacted to a post in a topic:
Rattlesnake by Pasi Ahopelto - Scale 1:48, U.S. privateer 1781 - Hahn's plans
-
Ryland Craze reacted to a post in a topic:
Rattlesnake by Pasi Ahopelto - Scale 1:48, U.S. privateer 1781 - Hahn's plans
-
CaptainSteve reacted to a post in a topic:
Rattlesnake by Pasi Ahopelto - Scale 1:48, U.S. privateer 1781 - Hahn's plans
-
Thanks Elia, I think I'll continue by making larger yards with octagonal center cross section. First one is fore yard. What's happened before this picture was sawing off a oversize piece from Sitka spruce billet and planing it square and to proper size. I have relatively simple jig for holding the part in place: there's a stopper piece at end, two triangular lengths side by side. What I'll do is take 2-3 shavings from one corner, rotate 90 degrees and repeat until each of the eight sides is roughly of equal width. There are some shavings on background: the thinner the better. Yard with octagonal cross section. Only center of the yard is will be octagonal, there's pencil marking near my left index finger telling where the cross section of opposite side becomes round. I'll do majority of shaping with plane, mainly because I like planes ( ), and they also give good control as long as direction of grain is suitable. I'm repeating myself, but what works is take a shaving, rotate and repeat. Final shaping with sanding paper and steel wool. Final step was making the cleats. The center ones turned out better than I expected, but I'm not entirely happy with the other four. Have to improve with forthcoming yards, maybe switching from basswood to something denser could help.
- 41 replies
-
- 5
-
-
- rattlesnake
- privateer
- (and 1 more)
-
Lower mizzen mast is similar to other lower masts, except smaller, so wont repeat myself with in-progress photos. Anyway what I have now mast and spar-wise: If you take a look at mast steps, then you'll see that they all are offset to left (if viewed from back). It tells that deck-keel alignment is off by few mm. I think it's visible only now, but becomes unnoticeable once the correction disappears under the deck. One benefit of making fully planked hull Let's see: mizzen top mast, main top and top gallant masts, fore top and top gallant masts, mizzen yard and mizzen top yard, main yard, main top yard, main top gallant yard, fore yard and top gallant yard are missing. Also trestle trees, details (nails), etc need to be made.
- 41 replies
-
- 4
-
-
- rattlesnake
- privateer
- (and 1 more)
-
Only two pictures this time, but finishing the cheecks is simple operation compared to hounds and what's below them. First upper parts of cheeks on sides of mast head (not sure of actual name). The width tapers slightly towards top, but thickness remains the same (a bit under 2 mm -- half of the hounds). Sides glued, leveled to mast head width. I shaped tenon for mast cap with a file and scalpel.
- 41 replies
-
- 8
-
-
- rattlesnake
- privateer
- (and 1 more)
-
Pasi Ahopelto reacted to a post in a topic:
La Salamandre by tadheus - 1:24
-
Pasi Ahopelto reacted to a post in a topic:
Three-mast schooner ATLANTIC by IgorSky - FINISHED - 1/600 Scale - BOTTLE
-
And next update: making cheeks. Started with a blank sawn off a cherry billet planed to 3.5 mm thickness. There's few mm extra length to allow cleaning away any rips from sawing. Started by tapering the edges. This follows shape of mast's flat sides (see previous posting). Tapered wide edges: thick (top) end remains at 3.5 mm, while bottom edge is half of that. Then used rasp to make area below hounds a bit thinner. And rounded edges with files. Completed cheecks by cutting scores for bibs. I was somewhat worried of splitting the wood, so made repeatedly shallow cuts from each of the four directions. I believe also wiggling the blade instead of just pressing it down helps (and it's easier to keep it in place compared to moving the blade). Finally some glue and clamps.
- 41 replies
-
- 4
-
-
- rattlesnake
- privateer
- (and 1 more)
-
Hi Sam, it's Veritas plane. If remember correctly, it's their "block plane". I'm quite fond of their plane designs, blade adjustments are easy, etc. Last week I had lower fore mast squared and tapered to dimensions, and will continue from there. Mast is upside down. Top section will remain square, and anything below will be round. First step was to cut small notches to prevent any wood splits taking part of the top square with it. I'd like to use plane, but there isn't room for it here, so starting with scalpel. Here I'm making lower part of mast roughly octagonal. And shaping it round with sanding block. Next step was to cut mast's sides to accomodate cheeks. The cheeks cover about two thirds of mast's length and thicken towards top of mast. Top side is ready, lower side shows what will be removed: the top's thickness will be reduced to about one third. This is where cheek's lower end will be. And checking that the surface runs true length-wise. This shows welll how thin the very top ended up. Cutting mortice at mast's bottom. There's mortice for mast inside hull, but I don't remember its dimensions so using modelling wax to check what's in there... And finally checking that the mast is at correct angle (took some tweaking with tenon, but looks OK to me now).
- 41 replies
-
- 11
-
-
- rattlesnake
- privateer
- (and 1 more)
-
Slow but steady progress continues... Lower main mast is quite complete. There are many details missing, but it's at stage where it can safely be left to wait for next phase. I don't have any photos how it was made, mainly because I wanted to first to try whether what I'm doing works, and only then post the in-progress photos while building front mast. It's basicly the same but is slightly smaller. Some detail shots of main mast follows. You may notice a hidden fix for a slight asymmetry flaw; either deck or keel isn't exactly on center, but the offset mast bottom makes the mast to stand at correct angle. Anyway I think one of the US Navy's first six frigates had bigger issues with hull symmetry... I've started to work on lower front mast. First step to was to plane a 8.5 mm square, and taper it to 5.6 mm at top and 7.3 mm at bottom. Thickest part is at forecastle deck level. I had the dimensions written down at various locations, but what I did was to measure at bottom. deck level and at top, take one shaving with plane, rotate 90 degrees and repeat until dimensions at the three locations were met.
- 41 replies
-
- 6
-
-
- rattlesnake
- privateer
- (and 1 more)
-
Continued by making spanker boom and fore topsail yard. The boom is basically larger gaff with slightly different cleat arrangement, and the yard is pretty much the same as spritsail or spritsail topsail yard except with octagonal center section, so I'll just add one picture showing them both: Pasi
- 41 replies
-
- 9
-
-
- rattlesnake
- privateer
- (and 1 more)
-
Thanks. I've adjusted plane to cut as thin shavings as possible, and then just start cutting On last week's yards I drew circles at the ends to indicate target diameter, but on this week's gaff I didn't do that. What I'll do is take one or two shavings and then visually check how it looks before continuing. But these yards are quite small (diameter 3-4 mm), I'm not sure if that would work with large yards, but I will give it a try in few weeks. This week I made gaff. I'll concentrate on gaff jaws. First roughly cutting outer side to shape: Then I cut a groove on backside, and rounded it with a file: More shaping to outside mainly with scalpel and flat and round files: One finished jaw half and one unstarted, and end of gaff cut to an angle: Gaff jaws glued: And finished the gaff with cleats (it's upside down on the picture): Metalwork and parrals are missing, as are from other masts and spars. I think I'll do those later once I have masts, etc otherwise ready.
- 41 replies
-
- 10
-
-
- rattlesnake
- privateer
- (and 1 more)
-
Thanks. Rhis week made two of the twelve yards. I intented to make spritsail and spritsail topsail yards, but accidentally picked spritsail and crossjack yards from plan Luckily no harm (doubles) done. I think last time I had one picture about shaping the yards, so I'll concentrate more on that. Before this picture was taken I had sawn off and planed two square strips, and planed them octagonal. These smaller yards will end up round, but the based on this exercise (and with bit more practise) the larger yards with octagonal centers should turn out ok. Here I have marked center, and I'm tapering the yard with a plane. Basicly I'm taking off a light shave, rotating the yard, and repeating until the shape is about right. Next, finishing the shape with sanding block (120 grit paper): I gave the surface finishing touch with 0000 steel wool. Here are the finished yards: I'm not entirely happy with the cleats; they are too irregular. Have to improve on that next.
- 41 replies
-
- 6
-
-
- rattlesnake
- privateer
- (and 1 more)
-
Thanks, it's good to continue building Rattlesnake and actually quite fun to do wood working. This week I completed jibboom. First ripping rough square from billet: It would be easier to make accurate cuts with tablesaw, but it doesn't take much effort to rip out two feet long strip of sitka spruce with quality hand saw. Then, making it to 4 mm by 4 mm with a plane: And tapered other end to about 3 mm by 3 mm: The jibboom is still slightly oversize, it should end up being be just under 4 x 4 and 3 x 3 mm. Made the boom first octagonal with plane and scalpel, and then finished to round section mainly with 120 grit sand paper glued on block of wood. Here I'm dry fitting the jibboom on bowsprit: The end (with step) was done with flat file. Then to details. I'm taking a shortcut here, mostly to avoid weakening the quite thin end of jibboom with (simulated) sheave; now it's just a hole which hopefully will be hidden by rigging: Other end has a hole for retaining pin: This area was quite unclear in the plans, what I did probably isn't exactly accurate... Experimenting with another fake sheave, this time coloured with a pencil: I think it's better than uncoloured, but not as good looking as working (brass) sheave would be. I believe 18th century ship's jibboom end should be octagonal. What's in the photo looks more round than it is in reality, but the shape isn't as well defined as liked it to be. Have to improve in future, because too round spar mid sections would stand out too much even to my liking.
- 41 replies
-
- 6
-
-
- rattlesnake
- privateer
- (and 1 more)
-
Since last posting I've ordered and received rigging line and blocks from Syren Shipmodel Company, and timber for masts and spars from The Lumberyard; I'm pleased with both. For masts and spars I'll use Sitka spruce. It has quite visible grain, but overall I like working with it and it should work fine. I'll take photos about spar and mast shaping in future, now I'll mostly concentrate on building the "small parts"; now the bowsprit just appears. First I cut bowsprit cap out of cherry billet and marked positions of hole for jibboom and mortise for tenon at bowsprit: Next, milled 3 mm holes and proper angles: Here's the milled cap with jibboom hole opened up to 4 mm with round file (I had 3 mm milling bit at hand): Later mortise was squared off with file, and the four small holes acted as guide holes. Gammonning cleats and tenon for securing bowsprit at deck. The latter will be hidden by forecastle, so it's quite rough and not "as in plans": Bee blocks: Block on left shows how the fake sheaves looks from under of bowsprit. Bees, bee blocks, bowsprit cap, and two more cleats are already glued. Here I'm gluing jibboom saddle with help of drill bit and elastic band: I'll probably start working on jib boom next.
- 41 replies
-
- 7
-
-
- rattlesnake
- privateer
- (and 1 more)
-
Thanks, and still one more posting without pictures... Finally finished counting blocks and measuring rigging. I think the earlier standing rigging measurement is about right, and running rigging (no sails) is about 60 metres (180 feet). I have now ordered wood for masts and spars, rigging line and blocks so it's now basicly waiting and making deadeyes, etc, in advance. The Rattlesnake's plan's have one sheet (side projection) of rigging, which is nice but leaves for example rigging line diameter's for builder to decide. Here Biddlecombes Art of Rigging proved to be valuable source, with some cross checking done against Steel. Also Petersson's Rigging Period Ship Models helped to understand rigging better.
- 41 replies
-
- 1
-
-
- rattlesnake
- privateer
- (and 1 more)
-
Thanks. No pictures today, but I have finished measuring from plans how much rope I would need for standing rigging. The diameters are still missing, and I think I can find those from books I have. But just to double-check: does total of 32 metres (or 100 feet) of scale standing rigging sound about right, or have I missed something? To me it sounds surprisingly low number. Note that running rigging isn't included, have to measure it next.
-
Thanks. It took bit longer to get back to actually building Rattlesnake. But anyway, in past three or so weeks I've completed rigging cannons, which also made hull complete except figurehead, and built anchors. I have photos of anchors only. First treenails for two anchor stocks by cutting beech wedges from 0.8 mm strip: Anchors stock halves were cut from walnut, glued, holes drilled for treenails and treenails tapped in: "Iron" bands for stocks were cut from watercolour paper dyed with india ink. The strips were soaked in thinned white glue (watercolour paper doesn't get fuzzy when wet) and held in place with locking tweezers: Anchor rings were cut from brass wire wound around x-acto blade handle: And finally tung oil (which made treenails almost invisible), anchor assembly and puddening: The pictures show only one anchor, but there are two identical ones as in plans. I think in reality there would be more, and more varied in size, but I'm building this one quite much "out-of-the-plans". Next: will calculate how much I need to order wood for masts and spars. I think I'll also order rigging line ready-made instead of building a ropewalk; calculating how much line I'll need will be a challenge.
- 41 replies
-
- 9
-
-
- rattlesnake
- privateer
- (and 1 more)
-
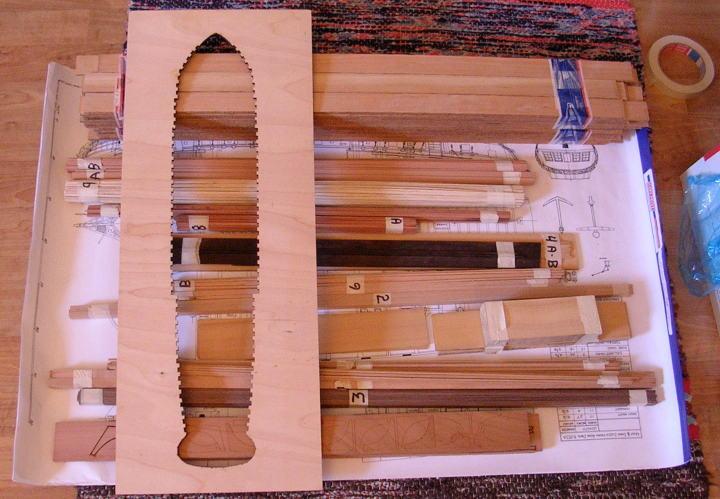
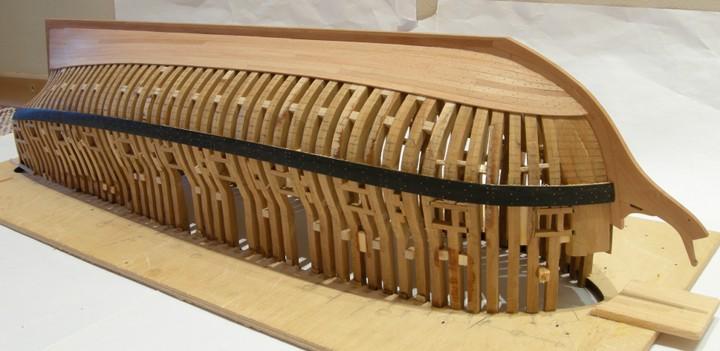
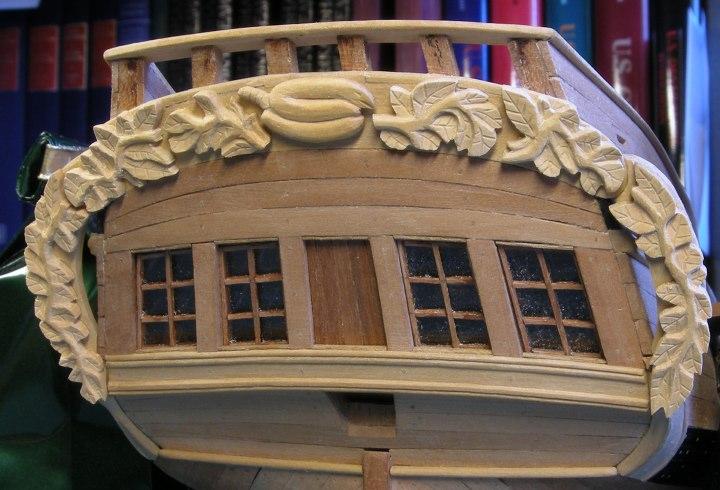
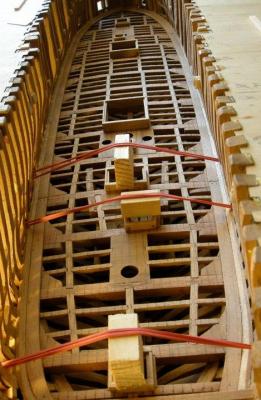
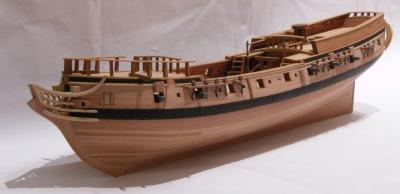
Hello, Fresh start is sometimes a good thing, the new forum looks much nicer and already while attaching "new" pictures it's evident that usability is improved. Anyway, I'll try to recapture my log so far with five pictures of reaching the main stages, which I consider to be checking what's inside of timbering set (the fun part), completing framing, planking, deck support structures, carvings and current situation. I must warn that there's slow phase in my build at the moment -- plastic models (not ships!) are taking more time than wooden ones, and I intend to build road bike wheel set before summer as well -- but I know myself and I'll return to this build eventually. I'm mainly posting this first post already now mainly to say I'm OK with the full reset. (My La Belle (1684) build is on hold, and I'll resume its log once I actually continue working on it.) Pasi


- 41 replies
-
- 11
-
-
- rattlesnake
- privateer
- (and 1 more)