


Aracnan
-
Posts
7 -
Joined
-
Last visited
Recent Profile Visitors
277 profile views

-
The instructions said to add the first lot of steps, note to self make sure to double check their positioning, I have had to remove them as the next deck has cut-outs for them and they wouldnt line up I am yet to start the hull planking so not sure of how much deck detail to add at this stage.
-
Well things are going a bit slow, just planking the decks (will post some pics in a bit). Just trying to work out when to fit some of the detail to the decks, I have yet to start planking the hull so need to be careful what I add to the decks at this stage.
-
Just wondering if anyone on here has done the Amati Titanic 1912 kit, I have hit bit of a small snag, nothing drastic just a bit confuzzled lol
-
Right this is my first time at doing a build log and hopefully all will go well I have decided to try my hand at making the Titanic as I have a very keen interest in the real Titanic and is a bit different to the Mississippi Paddle Steamer I have almost completed, this will be the third ship I have built so hopefully I will have enough skill to complete quite a complex model. The kit will be completed as per the instructions with no modifications on my part, having read a bit on models of the Titanic I believe the finished shape of the hull may be slightly out but I am not too bothered about this....it will be an achievement just to finish it lol I bought the kit from Cornwall Model Boats who have been fantastic and have a quick delivery time. Some pics of the open box....... The instructions and plan sheets take some going through and are quite thorough. Lets make a start, sorry but my descriptions may be a bit sparse with pictures telling the story, thats just me lol if anyone wants any further info just ask and I will do my best to answer. I have no special jigs etc I just constructed on the table using a square to make sure all the ribs were true. The insertion of the two wooden bars pulled the hull into a straighter shape thankfully! I found the fitting of decks etc before planking the hull a bit of getting used to and the planking of the decks takes some time the first walls have been built to give some shape and base for the other decks, I kept forgetting the brass parts on the walls which proved frustrating trying to glue in place once the walls were on the ship! Well thats progress so far, roughly three or four nights work so progress is slow but steady.
-
Sounds encouraging and very helpful think I will give it another go, made a start on it but its been put away before I got to the planking, thank you.
-
 Aracnan reacted to a post in a topic:
AL Titanic Lifeboat kit
Aracnan reacted to a post in a topic:
AL Titanic Lifeboat kit
-
many thanks I will look those up
-
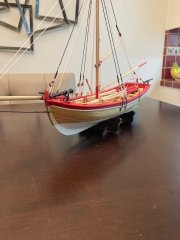
I have purchased this model without reading any reviews or build logs, this is the first time I have done this and to be honest having read some incomplete build logs and reviews I am wondering if the purchase was a wise one. This is not the first boat I have built but will be the first 'clinker' hull construction and I have read that this is the part that makes the boat so difficult and has left many a kit unfinished, does anyone have any simple hints to making this type of kit I really don't want this kit to be a waste of money or be a first unfinished model.