


Jack Panzeca
-
Posts
233 -
Joined
-
Last visited
Reputation Activity
-

 Jack Panzeca got a reaction from LFrankCPA in Bomb Vessel Granado 1742 by Jack Panzeca - 1:48 Scale - Cross-Section
Time for a small update. I have been working on a couple of sets of double frames as my initial frame tests. Both sets were D1 and D2 which are 2 of the outside frames.
The frame drawings were printed on letter size self adhesive labels and cut the futtocks out and stuck to the swiss pear. First I followed Grant's example and used 3M painter's masking tape which makes everything easier to remove from the wood. In this hemisphere it is blue rather than yellow. I have to mention how much nicer swiss pear is to work with than oak. Oseberg is almost completely oak and really hard to work in small scale. Swiss pear is much softer but still holds an edge. Sweet!
They were cut out loosely with a scroll saw and fine-tuned on a spindle sander and a disk sander. These where my first frames and they were a long way from satisfactory.
The joints were not precise and the chocks were still a mystery. I used only the 2 bolts shown on the drawings. They were made from .81mm copper wire.
The second set was a lot better, I guess that is the point of practice. I used mobbsie's flat vice method to file the scarph joints which helped a great deal. I also replaced my decades old, not intended for prime time, Delta disk sander with another dream machine Byrne's model and that worked wonders for making the ends square. (It is balanced so precisely that when I shut it off it continues to rotate for 30 seconds.)
Grant helped me with the layout of the additional bolts shown in AOTS. I laid them out on a drawing copy and than transferred them to a sticky label and added them to the glued up frames. I drilled them using a Vanda-Lay drill press with a Proxxon x-y table.
Here they are sort of finished but not glued together or faired.
They are much better but still not perfect. Third time is a charm (I hope). See you soon.
-
 Jack Panzeca got a reaction from Ryland Craze in Bomb Vessel Granado 1742 by Jack Panzeca - 1:48 Scale - Cross-Section
Time for a small update. I have been working on a couple of sets of double frames as my initial frame tests. Both sets were D1 and D2 which are 2 of the outside frames.
The frame drawings were printed on letter size self adhesive labels and cut the futtocks out and stuck to the swiss pear. First I followed Grant's example and used 3M painter's masking tape which makes everything easier to remove from the wood. In this hemisphere it is blue rather than yellow. I have to mention how much nicer swiss pear is to work with than oak. Oseberg is almost completely oak and really hard to work in small scale. Swiss pear is much softer but still holds an edge. Sweet!
They were cut out loosely with a scroll saw and fine-tuned on a spindle sander and a disk sander. These where my first frames and they were a long way from satisfactory.
The joints were not precise and the chocks were still a mystery. I used only the 2 bolts shown on the drawings. They were made from .81mm copper wire.
The second set was a lot better, I guess that is the point of practice. I used mobbsie's flat vice method to file the scarph joints which helped a great deal. I also replaced my decades old, not intended for prime time, Delta disk sander with another dream machine Byrne's model and that worked wonders for making the ends square. (It is balanced so precisely that when I shut it off it continues to rotate for 30 seconds.)
Grant helped me with the layout of the additional bolts shown in AOTS. I laid them out on a drawing copy and than transferred them to a sticky label and added them to the glued up frames. I drilled them using a Vanda-Lay drill press with a Proxxon x-y table.
Here they are sort of finished but not glued together or faired.
They are much better but still not perfect. Third time is a charm (I hope). See you soon.
-
 Jack Panzeca got a reaction from GTM in Bomb Vessel Granado 1742 by Jack Panzeca - 1:48 Scale - Cross-Section
Time for a small update. I have been working on a couple of sets of double frames as my initial frame tests. Both sets were D1 and D2 which are 2 of the outside frames.
The frame drawings were printed on letter size self adhesive labels and cut the futtocks out and stuck to the swiss pear. First I followed Grant's example and used 3M painter's masking tape which makes everything easier to remove from the wood. In this hemisphere it is blue rather than yellow. I have to mention how much nicer swiss pear is to work with than oak. Oseberg is almost completely oak and really hard to work in small scale. Swiss pear is much softer but still holds an edge. Sweet!
They were cut out loosely with a scroll saw and fine-tuned on a spindle sander and a disk sander. These where my first frames and they were a long way from satisfactory.
The joints were not precise and the chocks were still a mystery. I used only the 2 bolts shown on the drawings. They were made from .81mm copper wire.
The second set was a lot better, I guess that is the point of practice. I used mobbsie's flat vice method to file the scarph joints which helped a great deal. I also replaced my decades old, not intended for prime time, Delta disk sander with another dream machine Byrne's model and that worked wonders for making the ends square. (It is balanced so precisely that when I shut it off it continues to rotate for 30 seconds.)
Grant helped me with the layout of the additional bolts shown in AOTS. I laid them out on a drawing copy and than transferred them to a sticky label and added them to the glued up frames. I drilled them using a Vanda-Lay drill press with a Proxxon x-y table.
Here they are sort of finished but not glued together or faired.
They are much better but still not perfect. Third time is a charm (I hope). See you soon.
-
 Jack Panzeca got a reaction from mobbsie in Bomb Vessel Granado 1742 by Jack Panzeca - 1:48 Scale - Cross-Section
Time for a small update. I have been working on a couple of sets of double frames as my initial frame tests. Both sets were D1 and D2 which are 2 of the outside frames.
The frame drawings were printed on letter size self adhesive labels and cut the futtocks out and stuck to the swiss pear. First I followed Grant's example and used 3M painter's masking tape which makes everything easier to remove from the wood. In this hemisphere it is blue rather than yellow. I have to mention how much nicer swiss pear is to work with than oak. Oseberg is almost completely oak and really hard to work in small scale. Swiss pear is much softer but still holds an edge. Sweet!
They were cut out loosely with a scroll saw and fine-tuned on a spindle sander and a disk sander. These where my first frames and they were a long way from satisfactory.
The joints were not precise and the chocks were still a mystery. I used only the 2 bolts shown on the drawings. They were made from .81mm copper wire.
The second set was a lot better, I guess that is the point of practice. I used mobbsie's flat vice method to file the scarph joints which helped a great deal. I also replaced my decades old, not intended for prime time, Delta disk sander with another dream machine Byrne's model and that worked wonders for making the ends square. (It is balanced so precisely that when I shut it off it continues to rotate for 30 seconds.)
Grant helped me with the layout of the additional bolts shown in AOTS. I laid them out on a drawing copy and than transferred them to a sticky label and added them to the glued up frames. I drilled them using a Vanda-Lay drill press with a Proxxon x-y table.
Here they are sort of finished but not glued together or faired.
They are much better but still not perfect. Third time is a charm (I hope). See you soon.
-
 Jack Panzeca got a reaction from Rustyj in Bomb Vessel Granado 1742 by Jack Panzeca - 1:48 Scale - Cross-Section
Time for a small update. I have been working on a couple of sets of double frames as my initial frame tests. Both sets were D1 and D2 which are 2 of the outside frames.
The frame drawings were printed on letter size self adhesive labels and cut the futtocks out and stuck to the swiss pear. First I followed Grant's example and used 3M painter's masking tape which makes everything easier to remove from the wood. In this hemisphere it is blue rather than yellow. I have to mention how much nicer swiss pear is to work with than oak. Oseberg is almost completely oak and really hard to work in small scale. Swiss pear is much softer but still holds an edge. Sweet!
They were cut out loosely with a scroll saw and fine-tuned on a spindle sander and a disk sander. These where my first frames and they were a long way from satisfactory.
The joints were not precise and the chocks were still a mystery. I used only the 2 bolts shown on the drawings. They were made from .81mm copper wire.
The second set was a lot better, I guess that is the point of practice. I used mobbsie's flat vice method to file the scarph joints which helped a great deal. I also replaced my decades old, not intended for prime time, Delta disk sander with another dream machine Byrne's model and that worked wonders for making the ends square. (It is balanced so precisely that when I shut it off it continues to rotate for 30 seconds.)
Grant helped me with the layout of the additional bolts shown in AOTS. I laid them out on a drawing copy and than transferred them to a sticky label and added them to the glued up frames. I drilled them using a Vanda-Lay drill press with a Proxxon x-y table.
Here they are sort of finished but not glued together or faired.
They are much better but still not perfect. Third time is a charm (I hope). See you soon.
-
 Jack Panzeca got a reaction from scratch in Bomb Vessel Granado 1742 by Jack Panzeca - 1:48 Scale - Cross-Section
Time for a small update. I have been working on a couple of sets of double frames as my initial frame tests. Both sets were D1 and D2 which are 2 of the outside frames.
The frame drawings were printed on letter size self adhesive labels and cut the futtocks out and stuck to the swiss pear. First I followed Grant's example and used 3M painter's masking tape which makes everything easier to remove from the wood. In this hemisphere it is blue rather than yellow. I have to mention how much nicer swiss pear is to work with than oak. Oseberg is almost completely oak and really hard to work in small scale. Swiss pear is much softer but still holds an edge. Sweet!
They were cut out loosely with a scroll saw and fine-tuned on a spindle sander and a disk sander. These where my first frames and they were a long way from satisfactory.
The joints were not precise and the chocks were still a mystery. I used only the 2 bolts shown on the drawings. They were made from .81mm copper wire.
The second set was a lot better, I guess that is the point of practice. I used mobbsie's flat vice method to file the scarph joints which helped a great deal. I also replaced my decades old, not intended for prime time, Delta disk sander with another dream machine Byrne's model and that worked wonders for making the ends square. (It is balanced so precisely that when I shut it off it continues to rotate for 30 seconds.)
Grant helped me with the layout of the additional bolts shown in AOTS. I laid them out on a drawing copy and than transferred them to a sticky label and added them to the glued up frames. I drilled them using a Vanda-Lay drill press with a Proxxon x-y table.
Here they are sort of finished but not glued together or faired.
They are much better but still not perfect. Third time is a charm (I hope). See you soon.
-
 Jack Panzeca got a reaction from gjdale in Bomb Vessel Granado 1742 by Jack Panzeca - 1:48 Scale - Cross-Section
Time for a small update. I have been working on a couple of sets of double frames as my initial frame tests. Both sets were D1 and D2 which are 2 of the outside frames.
The frame drawings were printed on letter size self adhesive labels and cut the futtocks out and stuck to the swiss pear. First I followed Grant's example and used 3M painter's masking tape which makes everything easier to remove from the wood. In this hemisphere it is blue rather than yellow. I have to mention how much nicer swiss pear is to work with than oak. Oseberg is almost completely oak and really hard to work in small scale. Swiss pear is much softer but still holds an edge. Sweet!
They were cut out loosely with a scroll saw and fine-tuned on a spindle sander and a disk sander. These where my first frames and they were a long way from satisfactory.
The joints were not precise and the chocks were still a mystery. I used only the 2 bolts shown on the drawings. They were made from .81mm copper wire.
The second set was a lot better, I guess that is the point of practice. I used mobbsie's flat vice method to file the scarph joints which helped a great deal. I also replaced my decades old, not intended for prime time, Delta disk sander with another dream machine Byrne's model and that worked wonders for making the ends square. (It is balanced so precisely that when I shut it off it continues to rotate for 30 seconds.)
Grant helped me with the layout of the additional bolts shown in AOTS. I laid them out on a drawing copy and than transferred them to a sticky label and added them to the glued up frames. I drilled them using a Vanda-Lay drill press with a Proxxon x-y table.
Here they are sort of finished but not glued together or faired.
They are much better but still not perfect. Third time is a charm (I hope). See you soon.
-
 Jack Panzeca got a reaction from catopower in Bomb Vessel Granado 1742 by Jack Panzeca - 1:48 Scale - Cross-Section
Here comes the fun. I have been laying low for a couple of months due to some health problems. Yesterday was my first day back in the shipyard and today was the first with actual sawdust production. It is nice to be back.
This build will be part of the group build of the Bomb Vessel Granado, 1742, Cross Sectional Model drawn by Jeff Staudt. The plans at 1:48 scale fit on 8.5x11 or A4 which is very convenient.
I bound a couple of sets of drawings so that can spread them out wherever needed. I also scanned them so that I can print whatever I need on adhesive paper to stick to the wood for cutting.
I had been looking for a project to cross over to the dark side and when gjdale and mobbsie announced their group build I invited myself in and they graciously allowed me a space. Asat has joined in as well at 1:38 scale. The benefit of the group build is the multiple member PM system and the readily available logs. I scratched most of the Oseberg and by the time that I finished I wished that I had done it all.
The wood was purchased from Jeff Hayes from Grant's brilliant take off and material list. Jeff had stopped supplying ebony by the time I placed my order but I found some locally (Dallas/Fort Worth). If it is too difficult to work I can always use Swiss Pear and color it black.
This is a part of the wood supplied by Jeff, it is beautiful, we will miss him.
The layout for the building jig is part of the plans and and I built mine as Grant and mobbsie built theirs.
I am happy to be building again. I will finish up the jig and start the keel.
-
 Jack Panzeca got a reaction from Dee_Dee in Sloup by Dee_Dee - Corel - 1:25 Based on 'Bergere de Domremy / Shepherdess from Domremy
Hey Dee Dee,
I agree with Eamon's earlier post, "that dang thing looks real".
My mother taught me 2 things about hobbies: The first is to never keep track of the cost. If you do it ruins the fun. The second is never get in a hurry, if you do it quickly turns into work. For me ½ the fun is in figuring out how to do it. Your pace only needs to please you.
She looks great. I like seeing the wood grain as well, fine job.
-
 Jack Panzeca got a reaction from egkb in Sloup by Dee_Dee - Corel - 1:25 Based on 'Bergere de Domremy / Shepherdess from Domremy
Hey Dee Dee,
I agree with Eamon's earlier post, "that dang thing looks real".
My mother taught me 2 things about hobbies: The first is to never keep track of the cost. If you do it ruins the fun. The second is never get in a hurry, if you do it quickly turns into work. For me ½ the fun is in figuring out how to do it. Your pace only needs to please you.
She looks great. I like seeing the wood grain as well, fine job.
-
 Jack Panzeca got a reaction from JesseLee in Sloup by Dee_Dee - Corel - 1:25 Based on 'Bergere de Domremy / Shepherdess from Domremy
Hey Dee Dee,
I agree with Eamon's earlier post, "that dang thing looks real".
My mother taught me 2 things about hobbies: The first is to never keep track of the cost. If you do it ruins the fun. The second is never get in a hurry, if you do it quickly turns into work. For me ½ the fun is in figuring out how to do it. Your pace only needs to please you.
She looks great. I like seeing the wood grain as well, fine job.
-
 Jack Panzeca reacted to Dee_Dee in Sloup by Dee_Dee - Corel - 1:25 Based on 'Bergere de Domremy / Shepherdess from Domremy
Bob,
Thank you Bob. I spend a lot of time reading build logs, they contain a fountain of information. At times it's frustrating that I'm not progressing faster, but ah yes Grasshopper.............
Eamon,
I love your Ballahoo! So step away from the bin..........
These gudgeons and pintles were made different from the prints. The kit came with a sheet of photo etched parts. The sheet of brass is 0.32mm / 0.0130" thick.
This is how the prints wants the P& G's made - NOT! going to happen
I saw on another build log, where instead of making the 'loop' in the middle, the builder soldered on a piece of brass tubing. The key was to make sure the tubing was 90* to the strip, so I used a log piece of tubing and a lot of tape. This photo is a mock up (with oversized tubing / strip) on how I set up the soldering. The example I saw used silver / hard solder. I used an iron and put down a big GLOB of solder to make sure I had a good bond.
I used brass tubing with an OD of 1.57mm / 0.620". After soldering, I cleaned up the excess with files and they turned out like this. (The one on the right needs a bit more filing / cleaning up.)
EDIT: I did a bit more filing / clean up to the 3rd set of P & G's and I've added another photo to show how these cleaned up.
One of my favorite build logs to follow is Ed's / Edt's 'Young America' scratch build. Ed's work is stunning. The day after I posted this info, Ed posted a similar way to make the P & G's. Check out Ed's post here: http://modelshipworld.com/index.php/topic/3453-young-america-by-edt-extreme-clipper-1853/page-79#entry281895
Here is the original photo of the 3rd set of P & G's
Here are the P & G's after being cleaned up
For the 'pin' I used brass rod that measured 0.80mm / 0.320", it's a perfect fit with the tubing and I glued it in with thick CA glue.
The head on all of the nails I have are too big to use and look clunky. Instead, I use 'Silk pins', specialty pins made specifically for sewing with silk. The pin shaft and head are almost 20% smaller look much better.
Brass Kit nails head size 1.60mm
"Silk pins" head size 1.30mm
I glued the g's onto the rudder / stern post first and then I added the nails. Most of the nails were very short and I lost a lot of them!
Again, thanks for stopping by and the 'likes'.
Dee Dee
Edited 1/29/30 to change out and add photos, see info added in blue.
-
Jack Panzeca reacted to Dee_Dee in Sloup by Dee_Dee - Corel - 1:25 Based on 'Bergere de Domremy / Shepherdess from Domremy
My build is moving along at a glacial pace. Primarily because I take my time to think things through and figure out how it's all going to fit together. As I gain experience, maybe my pace will approach the speed of grass growing.
~~~~~~~~~~~
The hull is painted! I really don't like painting, but it's a skill I need to learn. Paint will either showcase your planking or hide your planking. I like the way my planking turned out, so I want to be able to see planking through the paint.
Back in post #52 I lopped off a bit of the hull / keel so I could add a stern post. It was a scary move, but I had thought it through and this is how it turned out! I like it.
Figuring out how to build the rudder / tiller and when to add the hardware took some time. The tiller is removable so the rudder can be installed.
Before I could add the bowsprit, I had to build up the bow stem. This is another item that should have been done on page one. I did my best and it's a bit off. But with the bowsprit, it's not as visible. I couldn't find the walnut square that I was planning to use for the bowsprit, so I glued up a blank from four pieces. The bowsprit is supposed to be unpainted, but decided to paint it to hide the glue seams. The aft most section is square and rests on the bow thwart between two stops. These two stops were a pain. The first wood I used didn't like to be glued and broke off AFTER I finished retouching the paint!
I keep on finding more and more little detailed parts that need to be added. My rolling TO DO list has 25 items and none are related to the rigging! The kit rigging is overly simplified using only single blocks. On the Shepherdess from Domremy, half of the blocks are double blocks and I think there's one or two triple blocks. So, I need to draw / diagram the actual rigging plan and determine how many blocks and how much line I'll need and order from Syren.
As always, thanks for stopping by.
Dee Dee
(Edited to fix photos)
-
Jack Panzeca got a reaction from mobbsie in Bomb Vessel Granado 1742 by mobbsie - FINISHED - 1/48 - cross-section
Hi mobbsie,
Your progress looks wonderful. The more I watch you guys move ahead the more I realize what a great choice this set of plans is for a first scratch build.
Keep on rolling buddy! Great Job.
-
Jack Panzeca reacted to gjdale in Bomb Vessel Granado 1742 by gjdale - FINISHED - 1/48 - Cross-Section
Thanks Augie, Jack, Mobbsie, David (Scratch) and Mike, and all of the "likes".
Well, the frames are finally complete. Here they are prior to having the WOP finish applied:
All of the gunport and sweep port sills have been pre-cut, again thanks to Mobbsie for showing me the method for this:
And here are all the frames test-fit in the jig:
All appears to be in order. I marked all the reference lines from the frame drawings on the individual frames, and they seem to be fairly well aligned and in roughly the right place, so I think I'm good to glue up. If anyone spots any glaring errors, please let me know before I break out the glue!!!
-
Jack Panzeca reacted to mobbsie in Bomb Vessel Granado 1742 by mobbsie - FINISHED - 1/48 - cross-section
Hi Guys,
I thought it was about time I put pen to paper and came up with an update, just to let you know I haven't fallen of the planet.
All the frames are now glued onto the keel and that showed my first problem, not all the frames fitted the jig fully, a few were as much as 2mm in from the outside of the jig, this presented a problem when it came down to sanding the inside of the frames, they need to be tight so there is no rocking when sanding.
The problem was solved by using Spanions method which is to place elastic bands around each frame and fix to a point of your choosing, this holds the frames tight to the jig edge. I chose to drill the jig from the top and place round head pins in, the bands were then pulled tight around the pins, great, until you don't pick the jig up by the sides, I now have nicely punctured finger tips.
I glued the first 8 frames and when the glued had dried they were sanded down, I have one frame which is a little out of line and it was a case of either cut the Futtock Rider to fit or make up a new frame, I tried adjusting the Rider which worked well so that worked out ok. Once the first 8 frames were sanded I then fitted the final 4 frames and fared them down. There is a small rise in frames 9 to12 and they have to be sanded at a slightly different angle.
With the inside completed I turned my attention to the outside, first job was to mark the height, frames D1 TO 4 ( 9 frames ) are level and flat, frames 5 to 12 are sloped with frame 12 being the highest. There is still a fair bit of movement in the frames which needs to be reduced to virtually nothing, this was achieved by placing 2.5mm blocks between each frame at a point above the water line where the hull planking will cover them up, the tops of the frames were also blocked at this time, this also served to strengthen some of the weaker frames.
Next up was the Gunport Sills, Sweep Sills and Filling Lintels, more problems, these were down to my c--p joinery skills and not the drawing's. If I put the sills in place without any work they would end up looking like a mountain range, so measurements and levels were taken and out came the sanding sticks and files which were applied to the Port side. The Sills were the first to receive the treatment with new levels being made, most of the notches which had been pre-cut were sanded back, so with all the mistakes removed the Sills and Linings were added to the Gunports and Sweep Sills, The Filling Lintels were next to be attacked, as it happens they turned out to be quite easy to make and so in they went. A little more sanding and an acceptable finish was reached bearing in mind that this work will all be covered with planking. The Portside took 3 days to repair so I have the same to look forward to on the Starboard side.
Whilst waiting for glue to dry and the need to change tasks I made the following, Keelson, Mortar Pit Deck Clamps ( Upper and Lower Strakes ) and the Upper Deck Clamps ( Upper and Lower Strakes ). I also cut out on the scroll saw the Futtock and Floor riders, these are not finished yet because they will require fitting individually.
At this point I want to thank Grant for keeping me on the right track regarding the timber, I got a little confused with what timber to use and so consulted my mentor, things were explained and backsides kicked, thanks mate. At this point mate I decided to keep you on.
I should imagine your about ready for some pics, if your not suicidal by now.
Portside clamped up waiting for the glue to dry on the blocks
Just a few more clamps on the Starboard side.
This is Spanions method of holding the frames.
Profile of the frames prior to sanding down.
You can see the nature of my problem.
The finished Portside, bearing in mind it is to be planked over.
So there we are guys, your right up to date. Next job is to finish the Starboard side, fit the Keelson and work on the Futtock and Floor riders.
Be Good
mobbsie
-
 Jack Panzeca got a reaction from trippwj in Bomb Vessel Granado 1742 by Jack Panzeca - 1:48 Scale - Cross-Section
I have been working on the keel. The lower false keel is ebony and the upper false keel, keel and hog are swiss pear.
The ebony piece was cut from a roughly 1" x 1" x 1' piece I found in a local Woodcraft store. Ebony sure makes a mess. I used an extractor on the saw and I am still cleaning up fine black dust a week later. It should be a real mess turning the mortar.
I used the Grant method of cutting the hog. ¼" end mill to cut the notches and level the tops. I used a ¼' x 1" piece of pear to give me something to grip with the vice and than cut it to size when it was finished. I started out to use this keel as a test but it turned out so well that decided to keep it.
I have been really worried about cutting the rabbet and once again went for the Grant method. It is essentially a 90 degree V groove placed in a mill. The rabbet runs straight about ⅔ of the way and turns up slightly. I can't imagine cutting this by hand. Great job on your end mobbsie.
After the rabbet the ends were cut to the proper length and a pass or 2 through the thickness sander and here we are.
Test frames coming up. Starting late on this group build has the advantage of me being able to have the benefit of all that previous experience. It sure does help. Thanks Grant, mobbsie and Lou.
-
Jack Panzeca reacted to Mike Y in Beavers Prize 1777 by Mike Y - 1:48 - POF - Hahn style
Replaced the table of my disk sander - stock one was nice but not flat - slightly rising right near the disk. It was a problem when shaping the keel parts - they are thin, and sanded on a wrong angle due to skewed table.
Did not bothered to contact proxxon for replacement, plus I wanted a smaller gap between the table and the disk.
Looks weird, but works pretty well - it is flat at least!
Disk sander made a big difference in the frame blank production speed. It takes like 30sec per blank to to set a straight edge with a proper angle. And allows to cut blanks on a bandsaw, freehand, with less accuracy and precision - it does not matter, sander will make it straight anyway. Amazing!
It took me just 4 hours to make the next batch of blanks, which would be used for the next 10 frames.
(Left side - for planked side, right side - for opened side, finely selected wood pieces)
-
Jack Panzeca reacted to gjdale in Bomb Vessel Granado 1742 by gjdale - FINISHED - 1/48 - Cross-Section
Thanks very much Bob, Mark, Sjors, Dave, Jeff and Aldo, and also to all of the "likes". It's been a while since my last post, but only because I was doing more testing, thinking, testing, thinking............
Completing the Double Frames
Okay, so I decided that I wasn’t entirely happy with my scarph joints, and also that I was over-thinking the Chocks. Time to revisit methodologies (again).
I decided to try Mobbsie’s method of creating the scarph joints, by using a file and the top edge of a vice as a reference plane/stop. Only problem was, I first had to go out and buy a new vice with a flat top surface on the jaws. The method is really simple. Having cut roughly to shape on the scroll saw, simply line up the template pattern line with the top of the vice jaws and and file until you feel metal instead of wood.
Some of the frames require cutouts for gunports/sweeps etc, and these are cut into the frames prior to assembly. To achieve this, I used a neat razor saw to make some initial cuts before removing the waste with a chisel, and then finishing using the file/vice method.
Time to re-think the Chocks, again……..
Here’s the latest method, and this really seems to work well. First up, getting a good, neat butt join between adjacent futtocks is essential, along with scarph joints that meet evenly at the butt join. This is achieved using the file/vice method and test fitting, filing, test fitting until satisfied. Once happy with the butt/scarph joints, I used double sided tape to hold the lower central futtock in place over the pattern, placed more double sided tape over the locations for the remaining futtocks, and then placed some glue on the mating face of the next futtock before placing it in position hard up against the first futtock, where it is held in place by the double sided tape until the glue dries. This process is repeated with the remaining futtocks until the frame (minus chocks) is complete.
The chocks were then made by cutting a piece of stock to roughly the width of the chock space and then finessing with the Disc Sander until a neat fit in to the chock opening was achieved. Note the “handles” on the inboard side of the chocks.
The chock ends were then shaped on the Disc Sander until a neat fit was obtained, at which point the chocks were glued in place. Because of the neat fit, and the frames being held in place on the tape, no clamps were required. This had been problematic previously as clamps tended to throw everything out of alignment as they were tightened. Once the glue had dried, the frames were removed from the templates, the chock “handles” trimmed close on the scroll saw, and then finished off on the spindle sander. Here’s what a completed frame looks like, with almost invisible joints….
Once the method was worked out, completing the remaining double frames went very smoothly. All five double frame pairs have now been completed. Here are a few progress shots:
That's it for now. Off to Sydney to visit family for a couple of days and then it's on with the single frames, which should be relatively easy (famous last words)......
-
Jack Panzeca got a reaction from gjdale in Bomb Vessel Granado 1742 by gjdale - FINISHED - 1/48 - Cross-Section
Hi Grant,
Your frames look great. So does that other object in the background. Just beautiful.
-
 Jack Panzeca got a reaction from Mike Y in Beavers Prize 1777 by Mike Y - 1:48 - POF - Hahn style
Hi Mike Y,
Your frames look great. They will soon begin to look like a ship. I have just started to work on my first practice frames.
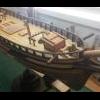
The images of the replica ship are wonderful. HUGE! I worked as a consultant in Russia 10 or 12 years ago so I understand what you mean about the rules not applying.
Keep up the good work.
-
Jack Panzeca got a reaction from Mike Y in Bomb Vessel Granado 1742 by Jack Panzeca - 1:48 Scale - Cross-Section
I have been working on the keel. The lower false keel is ebony and the upper false keel, keel and hog are swiss pear.
The ebony piece was cut from a roughly 1" x 1" x 1' piece I found in a local Woodcraft store. Ebony sure makes a mess. I used an extractor on the saw and I am still cleaning up fine black dust a week later. It should be a real mess turning the mortar.
I used the Grant method of cutting the hog. ¼" end mill to cut the notches and level the tops. I used a ¼' x 1" piece of pear to give me something to grip with the vice and than cut it to size when it was finished. I started out to use this keel as a test but it turned out so well that decided to keep it.
I have been really worried about cutting the rabbet and once again went for the Grant method. It is essentially a 90 degree V groove placed in a mill. The rabbet runs straight about ⅔ of the way and turns up slightly. I can't imagine cutting this by hand. Great job on your end mobbsie.
After the rabbet the ends were cut to the proper length and a pass or 2 through the thickness sander and here we are.
Test frames coming up. Starting late on this group build has the advantage of me being able to have the benefit of all that previous experience. It sure does help. Thanks Grant, mobbsie and Lou.
-
Jack Panzeca got a reaction from mobbsie in Bomb Vessel Granado 1742 by mobbsie - FINISHED - 1/48 - cross-section
Hey mobbsie,
Terrific progress. You are flying. My plan is to use poly as well.
Great work my friend.
-
Jack Panzeca reacted to gjdale in Bomb Vessel Granado 1742 by gjdale - FINISHED - 1/48 - Cross-Section
I thought it was about time I posted an update, just to show "proof of life" in the shipyard............
I thought it timely to do some testing of finishes to make sure I was happy with the result, as I will need to finish the fore and aft faces of the frames before permanently installing them. I plan on using Minwax Wipe-On Poly (WOP), in a satin finish, following the lead of some more experienced scratch builders here. I was very satisfied with the result (and ease of use). For the Australians on the forum, I did find Minwax in Bunnings here but they carry only a very limited range of products. I visited the new Masters home improvement centre recently and was delighted to see that they carry an extensive range of Minwax products.
Anyway, here's a shot of the test frame with two coats of WOP. An untreated test frame is in the top of the picture. Unfortunately, the photograph doesn't really do it justice, but to the naked eye, it is a very pleasing colour.
i have also rough cut all of the remaining single frames. I managed to cut all of these - 12 frames (60 component pieces) from a single 24" x 3" billet of Swiss Pear. That provided me with lots of tricky scroll saw practice but I managed it without any boo-boos along the way. In fact, I think it took me longer to lay out the pattern pieces to make them fit on the board, than it did to cut them out! Here they all are:
And I have managed to custom fit the chocks to the first three of these frames. Having finally settled on a reliable method for making these, they are really not difficult and don't take much time at all. Again, I have to pay tribute to my mate Mobbsie for putting me onto a great method for making the scarph joints - this is half the battle for getting a good mating joint with the chocks.
Oh, you may notice something in the background of this shot that might help to explain the apparent lack of progress lately!
-
Jack Panzeca reacted to Mike Y in Beavers Prize 1777 by Mike Y - 1:48 - POF - Hahn style
Minor status update. Not so much going on - building frames when I have a time. Just around half of the work is done for a mere 10 frames in that batch
The keel structure is roughly cut and shaped, but waiting for TFFM books to arrive before I will fine-fit and assemble it - want to make sure that it would be done correctly, at least on the parts that would be visible.